Что такое Ableton Push?
Данный параграф написан, основываясь на материалах ableton.com , в нём же присутствуют изображения с официального сайта.
Ableton Push — это инструмент для написания электронной музыки, который обеспечивает удобное и практичное управление мелодией и гармонией, ударными партиями, различными звуками, лупами, а также самой структурой вашей песни.
В домашней студии Push позволит вам на лету создавать клипы в Режиме Сессии (Session View), как будто вы работаете с каким-либо аппаратным оборудованием типа грувбоксов. Используя данный контроллер, вы, практически не обращаетесь к экрану компьютера, можете сосредоточиться на звуке и аранжировке композиции, при этом вся необходимая информация будет отображаться на встроенном дисплее данного контроллера.
На сцене и во время диджеинга Push может служить мощным и гибким контроллером для запуска клипов и наигрывания мелодических партий.
Интерфейс Ableton Push разделяется на несколько секций. Вы можете увидеть их все на схеме внизу:

Очень многое при работе с Push зависит от того, в каком он находится режиме, а также от типа выбранной дорожки. Подробности о типах дорожек вы можете прочесть в параграфе 4.1. «Клипы и дорожки».
В данном параграфе вы сможете узнать об основных фундаментальных принципах работы с Ableton Push. Эти знания помогут вам вникнуть в его работу. Затем, в последующих абзацах, мы рассмотрим остальные средства управления Ableton Push.
Установка Push
Поскольку Push создавался специально под программу Ableton Live, его установка происходит автоматически. Вам нужно только запустить Ableton Live, и как только вы соедините Push шнуром с USB-портом вашего компьютера, он автоматически распознается в программе. После этого Push можно сразу же использовать. Нет никакой необходимости устанавливать какие-либо драйверы.
Просмотр и загрузка звуков
Вы можете прослушивать и загружать звуки при помощи Push, без использования браузера в программе Ableton Live. Это возможно в самом Push режиме браузера (Browse). Он вызывается при помощи кнопки «Browse» в правом верхнем углу Push’а.
Кнопка включения режима браузера.
В режиме браузера дисплей начинает показывать вам все доступные звуки и эффекты, а также все доступные категории «Places», практически также как в самом браузере Ableton Live.
Обратите внимание, что дисплей контроллера разделён на столбцы. Крайний левый столбец показывает определённый тип просматриваемого устройства или же какой-либо раздел меню Places, в который вы можете войти. Каждый столбец правее него показывает следующую подпапку в браузере, например с Presets, т.е. папку с пресетами (если таковая существует).
Используйте кнопки In и Out, на которых изображены изогнутые стрелки, чтобы смещать колонки дисплея Push’а влево или вправо. Таким образом, дисплей позволит вам просматривать более глубокие уровни подпапок. Также при помощи этих кнопок можно увидеть гораздо большее количество пресетов на вашем дисплее.

Этими кнопками вы можете смещать влево и вправо показанные на дисплее уровни папок.
Итак, прежде чем мы двинемся дальше, давайте ещё раз вспомним, что визуально дисплей Push состоит из четырёх колонок, как бы разграниченных между собой небольшими промежутками. Запомним, что каждая такая колонка дисплея в режиме браузера может содержать папку, категорию, подкатегорию, названия пресетов или семплов.
Мы можем перемещаться вверх и вниз по определённой колонке дисплея, тем самым выбирая нужную нам категорию девайсов.
Посмотрите на скриншот ниже. Мы сейчас находимся в категории, которая содержит несколько версий синтезатора Absynth 5. Для того чтобы перемещаться в этой колонке вверх и вниз, нам нужно нажимать соответствующие направлению подсвеченные кнопки навигации внизу.

Итак, допустим, при помощи этих кнопок мы выбрали нужный синтезатор. Теперь вы можете посмотреть на колонку правее. Она моментально отображает доступные пресеты для выбранного синтезатора.
Чтобы загрузить пресет, нужно нажать на зелёную кнопку, которая загорелась чуть правее от кнопок навигации. Данная зелёная кнопка становится активной только тогда, когда в колонке есть что-либо, что можно загрузить. В нашем случае мы можем загрузить пресет «Abyssyn».

Давайте рассмотрим ещё одно состояние дисплея, чтобы избежать недопонимания. На сриншоте ниже мы видим что зелёная кнопка горит также и в колонке, в которой был выбран «Auto Filter», при этом правее выбран пресет «Cut-O-Movie», который тоже оснащён зелёной кнопкой. Что бы это могло значить? Почему зелёная кнопка загорелась и в первой колонке?
Это происходит тогда, когда у нашего устройства есть некий default preset, т.е. пресет, который был назначен для этого девайса по умолчанию. Нажав на кнопку в первой «категорийной» колонке, мы быстро загрузим пресет по умолчанию.

Этими кнопками вы выбираете пресеты для девайсов в режиме браузера.
Вы можете листать предоставленные строки в столбцах дисплея ещё быстрее, если нажмёте Shift и будете его удерживать при нажатии горящих кнопок навигации вверх и вниз. Так вы будете перемещаться по целым страницам.
Также вы можете быстро перемещаться по папкам и подпапкам при помощи энкодеров Push’а:

Уже после нажатия кнопки загрузки устройств или пресетов устройств, она станет янтарной. Это указывает на то, что в настоящее время выбираемая вами функция уже загружена. Если же Вы будете перелистывать на другой выбор, то кнопка позеленеет снова (этот момент виден на анимированном скриншоте выше).
Подсказка: нажатие кнопки, которая стала янтарной, позволяет вам моментально загрузить следующую строку в списке, позволяя Вам быстро перепробовать все пресеты или устройства.
То, что Вы видите в режиме просмотра браузера на Push, зависит от устройства, которое было выбрано вами последним. Если Вы работали с инструментом, Браузер покажет Вам инструменты. Если Вы работали с эффектом, то будете видеть эффекты.
Различные папки (в том числе с семплами) будут видны на дисплее Push только в том случае, если они содержат объекты, которые в настоящий момент можно загружать куда-либо. Поясню. Например, если вы перейдёте в браузере в Places, в подкатегорию Samples (также как и в любую другую вашу собственную папку, содержащую семплы), они не будут вам видны до тех пор, пока вы не выберете конкретный пэд в Drum Rack. Как только вы выберете пэд — то тут же увидите в браузере все семплы, готовые к загрузке. Подробнее об этом вы сможете прочесть ниже.
Программирование и воспроизведение барабанов
Для того чтобы начать создание барабанов при помощи Push, сначала удостоверьтесь, что включен режим Note Mode.

Затем используйте режим браузера (Browse Mode), чтобы загрузить один из пресетов Drum Rack из вашей библиотеки Live 9.
Когда вы работаете с MIDI-дорожкой, которая содержит Drum Rack, Push автоматически преобразует всю доступную сетку пэдов Push’а, показывая вам три различные секции, которые позволяют вам:
- Играть на Drum Rack вживую;
- Использовать пошаговый секвенсор;
- Изменять длину получающегося клипа.
Посмотрите на сриншот ниже, чтобы понять визуально, где находится каждая секция.

Итак, 16 пэдов Drum Rack в левом нижнем углу соответствуют пэдам Drum Rack. Это сетка 4X4, на которой можно играть в реальном времени.
Цвета пэдов в данном Drum Rack означают следующее:
- Ярко-жёлтый — этот пэд содержит звук.
- Светло жёлтый — этот пэд пустой.
- Зелёный — этот пэд играет в настоящее время.
- Тёмно-синий — этот пэд выбран.
- Голубой — этот пэд играет в режиме solo.
- Оранжевый — этот пэд замьютирован (заглушен).
Если вы работаете с Drum Rack’ом (в нижней секции), который содержит большое количество пэдов, не умещающихся в этой секции, то используйте ленточную сенсорную полосу (touch strip) или же кнопки Octave Up и Octave Down, чтобы передвигаться внутри Drum Rack’а вверх или вниз на каждые 16-ть пэдов. Зажимайте Shift во время использования сенсорной полосы или же кнопки Octave для того, чтобы передвигаться на один ряд вверх-вниз, а не на целую страницу.
Если у вас возникли затруднения с пониманием устройства самого Drum Rack, то рекомендую прочесть параграф «8.10. Drum Rack», который подробно объясняет его устройство.
Режим 64-х пэдов (задействуется вся сетка целиком)
В дополнение к обычному трёхсекционному виду, вы также можете включить целиковую 8×8 сетку для игры на барабанах Drum Rack’а в реальном времени. Это очень полезно, когда вы работаете с очень большими наборами ударных, например такими, которые были созданы при помощи автоматической нарезки семпла (slicing). Об этом механизме вы можете прочитать в главе 5.5. «Преобразуем Audio в Midi».
Для того чтобы включить режим 64-х пэдов, нажмите кнопку «Note Mode» дважды. Нажатие Note ещё раз снова включит стандартное трёхсекционное отображение, позволяя вам быстро перейти обратно в режим пошагового секвенсора.
Цвета пэдов в 64-х пэдовом режиме точно такие же как и в его трёхсекционном отображении.
Примечание: когда вы переключаетесь туда-сюда между двумя разными режимами отображения пэдов, 16-ть пэдов, доступных для пошагового секвенсора не будут меняться автоматически. По этой причине вам нужно будет использовать сенсорную ленту или кнопки Octave для того, чтобы назначить для пошагового секвенсора те 16-ть пэдов, которые вы желаете там видеть.
Загрузка индивидуальных ударных в Drum Rack
Режим браузера (Browse Mode) может быть использован для того, чтобы заменять определённые индивидуальные пэды в уже загруженном вами Drum Rack’е.
Чтобы переключаться между просмотром Drum Rack’ов и его конкретного пэда нажмите кнопку Device, которая применяется для того, чтобы показывать девайсы на дорожке.

По умолчанию Drum Rack загружается так, как показано на дисплее внизу. Название текущего пэда, который вы настраиваете, показывается стрелкой. Для того чтобы выбрать любой другой индивидуальный пэд в Drum Rack’е, нажмите кнопку выбора прямо под названием пэда (см. скриншот внизу).

Теперь, совершив вход в режим просмотра (Browse Mode), вы сможете загружать или заменять звук только выбранного пэда. Находясь в режиме просмотра Browse Mode, и нажимая другие пэды, вы можете тем самым выбирать их для просмотра, и это позволит вам быстро загрузить или заменить различные звуки в пределах загруженного вами Drum Rack’а.
Прежде чем читать дальше, хорошенько проработайте и освойте навигацию, а также выбор пэдов в Drum Rack’е. Не откладывайте в «долгий ящик» практическое применение данного материала!
Барабаны в режиме пошагового секвенсора
Нажатие на пэд в секции Drum Rack’а также автоматически выбирает его, позволяя добавлять выбранные ноты в пошаговый секвенсор.
Подсказка: чтобы выбрать пэд не проигрывая его, нажмите и удерживайте кнопку «Select», когда нажимаете на пэд. Очень полезно во время живого выступления!
Для того чтобы записать ноты в пошаговый секвенсор, просто нажимайте на пэды в его области. Она занимает весь верх 8X8 сетки Push’а.

Таким образом, вы проставляете ноты миди-клипа там, где это вам необходимо. Клип начнёт воспроизведение, как только вы введёте в секцию секвенсора какие-либо ноты. По умолчанию каждый пэд в режиме пошагового секвенсора соответствует 16-ой ноте, но вы можете изменить размер шага ноты с помощью кнопок секции Scene/Grid (Сцена/Сетка). Посмотрите на доступные варианты:

Когда клип играет в режиме пошагового секвенсора, проигрывающийся в данный момент шаг обозначен движущимся зелёным мерцающим пэдом (когда будет включена Запись, движущийся пэд станет красным).
Выбирая шаг, на котором уже была поставлена нота, вы тем самым удаляете её. Нажмите и удерживайте кнопку Mute в режиме пошагового секвенсора, чтобы просто деактивировать данный пэд, не удаляя. Нажимайте и удерживайте кнопки Mute или Solo, при нажатии на пэд, чтобы, соответственно, приглушить или ввести его в режим соло.

Вы можете также скорректировать скорость и тайминг нот (т.е. расположение их в клипе по времени), как описано в разделе про автоматизацию в режиме степ секвенсора (см. ниже).
Для того чтобы удалить все ноты, введённые для какого-либо конкретного пэда, нажмите и удерживайте Delete во время выбора пэда.
Примечание: это действие удалит ноты, над которыми вы работаете в данный момент, и которые находятся в пределах лупа.

Цвета пэдов в режиме степ секвенсора указывают на следующее:
- Неосвещённый — этот шаг не содержит ноту.
- Синий — этот шаг секвенсора содержит ноту. Более тёмный синий цвет указывает на то, что нота сыграна с более высоким параметром Velocity (сила нажатия).
- Светло-жёлтый цвет — этот шаг содержит ноту, но нота была заглушена при помощи Mute.
- Светло-красный — правые два столбца пэдов покраснеют, если будет выбран режим триолей (размер 3/4) в качестве размера шага. В этом случае покрасневшие пэды не будут являться активными; только первые шесть пэдов в каждой строке шага секвенсора смогут вами использоваться.

Когда выбраны триоли, эти шаги секвенсора будут неактивны.
Для получения дальнейшей информации о корректировке размера длины лупа пэдов, см. раздел «Корректировка Длины Лупа».
Запись в реальном времени
Паттерны ударных могут быть также записаны в реальном времени. Вы можете наигрывать свои партии на пэдах Drum Rack’а.
Следуйте следующим шагам, чтобы записать свой паттерн «налету».
- Если Вы хотите сделать запись синхронно со скоростью трека, то нажмите кнопку Metronome. Тем самым вы включите встроенный в Ableton Live метроном, который поможет вам забить партию, совпадающую с темпом проекта.

- Затем нажмите кнопку «Запись» для начала Записи.

Теперь любой пэд в Drum Rack, который вы нажимаете, будет записан в образующийся клип. Повторное нажатие кнопки «Запись» прекратит запись, но воспроизведение клипа продолжится. Нажатие кнопки «Запись» в третий раз включает режим overdub. Это подразумевает запись нот поверх уже существующих в клипе непосредственно во время воспроизведения. Последующие нажатия кнопки «Запись» продолжат переключение между воспроизведением и режимом overdub. Подробнее о режиме Overdub вы сможете прочитать в главе 4.3. Midi Overdub и Запись Автоматизации.
Нажатие кнопки «New» останавливает воспроизведение выбранного в настоящий момент клипа, и подготавливает Ableton для записи нового клипа на указанной вами дорожке. Это позволит вам попрактиковаться, а уже потом делать запись новых идей.
Как правило, нажатие кнопки «New» дублирует все клипы, которые играют на других дорожках, в совершенно новую сцену режима сессии, при этом их воспроизведение продолжится. Это поведение Push’а может быть изменено, если вы поменяете режим Workflow в настройках Push’а. Вы можете переместиться к параграфу, в котором это описано нажав сюда.

Запись клипов фиксированной длины
Нажмите кнопку «Fixed Length» (Фиксированная Длина), чтобы установить размер новых клипов на определённую длину.

Нажмите и удерживайте кнопку Fixed Length для выбора длины записываемого клипа.

Когда Fixed Length функция будет отключена, новые клипы будут записываться дальше, пока вы не нажмёте кнопки Record (Запись), New или Play/Stop.
Подсказка: включение Fixed Length во время записи выключит запись и закрепит луп длиной, указанной в настройках Fixed Length.
Дополнительные опции записи: запись с повторением
С включенной кнопкой Push’а Repeat вы можете удерживать пэд, чтобы сделать запись непрерывно повторяющегося потока ритмичных нот. Эдакий вариант простейшего арпеджиатора для ударных. Это полезно, например, для записи паттернов hi-hat’ов.
Кстати! Изменение давления пальца может регулировать Velocity повторяемых нот. Отличная функция, которая предаст вашим партиям незабываемую динамику!

Частота повторений устанавливается кнопками Scene/Grid.
Подсказка: если вы нажмёте и отпустите Repeat очень быстро, то кнопка останется включена. Если же вы нажмёте и будете её удерживать, то кнопка выключится сразу, как только вы её отпустите, позволяя вам контролировать длительность повторения нот.
Начинайте крутить кноб Swing, чтобы применить эффект свинга к повторяющимся нотам. Как только вы повернёте кноб, дисплей тут же покажет количество добавляемого swing-эффекта.

Дополнительные опции записи: квантизация
Нажатие кнопки Quantize на Push’е будет выравнивать ноты по сетке в выбранном вами клипе.

Нажмите и удерживайте кнопку Quantize для изменения опций квантизации.

Swing Amount определяет интенсивность вашего свинга, который будет применяться к отквантованным нотам. Отметьте, что количество Swing’а может быть скорректировано при помощи энкодера №1 или специально выделенным кнобом Swing.
Quantize To устанавливает ближайшие значения нот, которые должны быть отквантованы, а Quantize Amount определеяет величину сдвига нот, которые уходят со своей оригинальной позиции.
Включение функции Record Quantize автоматически подвергает квантизации записываемые ноты, и изменяет значение квантизации при записи с помощью энкодера №8. Отметьте, что эти средства управления соответствуют настройкам, которые были выбраны в пункте Record Quantization в контекстном меню Edit внутри Ableton Live, и данные корректировки могут быть внесены как из Ableton Live так и при помощи Push. Подробности о меню edit вы могли прочесть в главе 3.1. «Основы Основ интерфейса».
Подсказка: когда вы работаете с барабанами, нажмите и удерживайте Quantize, и нажмите нужный вам пэд в Drum Rack, таким образом, вы отквантуете ноты только данного барабана в текущем клипе.
Создание мелодий и гармонии
После работы над партией ударных вы наверняка захотите создать новую дорожку с басом или с аккордами, и тому подобное. Нажмите кнопку Add Track, чтобы добавить новую MIDI-дорожку в ваш Live Set.

Подсказка: нажмите и удерживайте кнопку Add Track, чтобы выбрать между добавлением Audio, MIDI и Return-дорожек.
Добавление какой-либо дорожки переключает Push в режим Браузера (Browse Mode), о котором мы говорили в самом начале текущего параграфа. Таким образом, вы можете немедленно загрузить какой-либо инструмент и пресет. После загрузки вашего инструмента убедитесь, что режим Note Mode включен.
Когда вы работаете с MIDI-дорожкой, которая содержит какой-либо инструмент, Push’s автоматически настраивает сетку из 8×8 пэдов, так, чтобы проигрывать ноты. По умолчанию каждая нота в этой сетке находится в тональности C Maj (До мажор). Нижний левый пэд играет ноту C1, т.е. До первой октавы (хотя вы с лёгкостью можете изменить октаву кнопками Octave Up и Down). Если перемещаться вверх, то каждый пэд на четверть полутонов выше. Если вы перемещаетесь вправо в этой сетке, то каждый пэд будет отвечать за следующую ноту в до-мажорной тональности.
Поиграйте мажорную гамму. Для этого нажмите подряд первые три пэда в первой строке, точно так же три пэда в следующей строке, и так далее, пока вы не достигнете следующей ноты C (до):

Цвета пэдов помогают ориентироваться в том, что вы играете:
- Синий: это нота — тоника тональности (C).
- Белый: эта нота находится в тональности, но не является тоникой.
- Зелёный: это нота, которая проигрывается в настоящее время (другие пэды также могут стать зелёными, если они будут играть ту же самую ноту).
- Красный: играющая в настоящее время нота записывается.
Чтобы играть аккорды-трезвучия, попробуйте нажимать по следующему шаблону в любом месте сетки:

Данный скриншот показывает аккорд C maj (До мажор).
Игра в других тональностях
Нажмите кнопку Scales, чтобы изменить выбранный ключ и/или тональность.

Используя дисплей и кнопки Selection и State Control, вы можете изменить тональность (или, если угодно «лад»), который будет проигрываться секцией пэдов. Выбранная в данный момент тональность отмечена стрелкой на дисплее:

По умолчанию пэды и возможность выбора лада указывают на мажорные тональности. Можно использовать множество других ладов, используя первый энкодер, или две кнопки под дисплеем слева. Выбранный тип лада также будет отмечаться стрелкой.
В дополнение к изменению тональности вы также можете изменять расположение сетки пэдов, используя две крайние кнопки справа. Они отвечают за две настраиваемые функции.
Fixed Y/N: Когда Fixed Mode включена, ноты в сетке пэдов остаются на тех же самых позициях, когда вы изменяете ключевую тональность. Самый нижний левый пэд будет всегда играть ноту C (До), кроме тех тональностей, которые не содержат C (До), в таком случае он будет играть самую близкую ноту в заданной тональности. Когда Fixed-режим выключен, ноты в секции пэдов сдвигаются таким образом, чтобы нижний левый пэд всегда играл тонику (главную ноту) выбранной вами тональности.
In Key/Chromatic: с выбранным режимом In Key (в тональности), сетка пэдов будет эффективно «свёрнута», таким образом, что будут доступны ноты только в пределах заданной тональности. А в хроматическом режиме (Chromatic Mode), сетка пэдов будет содержать все ноты. Ноты, которые соответствуют выбранной тональности — подсвечены, в то время как ноты, которые не соответствует ей — не горят.
Удерживая кнопку Shift и нажимая кнопку Scales, вы получаете доступ ко многим дополнительным настройкам размещения нот.

Опции “4th” и “3rd “ определяют интервалы нот, на которых будет основана сетка ваших пэдов, а символы ^ и > определяют поворот сетки. Например, по умолчанию стоит расположение “4th ^”, оно означает, что каждый ряд пэдов на 4 полутона выше, чем ряд который находится под ним. Опция “4th >” также построена на четвертях, но теперь она определяет интервалы столбцов слева направо. Т.е. каждый столбец на четверть выше, чем столбец слева. Настройка «Sequent» располагает все ноты по порядку. Эта настройка полезна, когда вам нужен очень большой диапазон нот, т.к. эта настройка избавляет нас от дублей нот в сетке. Для того чтобы настройка имела своё действие на сетку, её, естественно, надо выбрать при помощи пэдов под дисплеем.
Все настройки записи в реальном времени, которые доступны для барабанов, также доступны и для мелодий и гармоний, включая запись фиксированной длины клипа, запись с повторением, квантизацией, и т.д. Но для такого редактирования вам будет необходимо работать с секвенсором мелодий, который мы описываем в следующем разделе.
Подсказка: одна возможность редактирования сразу же доступна в Note Mode: чтобы быстро удалить все ноты той же высоты в пределах текущего лупа, нажмите и удерживайте кнопку Delete, а затем выберите соответствующий этой ноте пэд.
Пошаговый секвенсор мелодий и аккордов
В дополнение к проигрыванию и записи в реальном времени вы можете также пошагово программировать секвенции своих мелодий и аккордов. Для того чтобы включить пошаговый мелодический секвенсор, нажмите кнопку Note Mode дважды.
Это преобразит вашу сетку пэдов следующим образом:

Когда вы используете мелодический пошаговый секвенсор, пэды в верхнем ряду будут корректировать длину вашего лупа. Подробности будут описаны ниже. Основные семь строк пэдов позволят вам помещать ноты в ваш клип. Если вы выбрали определённую тональность, то каждая строка в пошаговом секвенсоре будет соответствовать одной из конкретных нот заданной тональности.
Когда вы выбрали Chromatic, ноты, которые располагаются в тональности будут легко подсвечены, в то время как ноты, которые находятся вне тональности, светиться не будут. Голубоватый подсвеченный ряд (который обычно является самым нижним рядом по умолчанию) указывает на тонику выбранной тональности. Каждый столбец пэдов представляет собой шаг в разрешении, которое мы поставили при помощи кнопок Scene/Grid.
По аналогии с навигацией пэдов в режиме игры, нажатие на кнопки Octave Up и Down сдвигает диапазон доступных нот. Вы можете также использовать сенсорную полоску (Touch Strip) для того, чтобы изменять диапазон нот. (Совет: зажмите Shift-кнопку во время работы с сенсорной полосой или при нажатии на кнопки Octave для того, чтобы более аккуратно настроить диапазон нот.) После корректировки диапазона высоты тона или после переключения между режимом игры в реальном времени и пошагового секвенсора, дисплей кратко продемонстрирует вам доступный в настоящий момент диапазон.
Дополнительно ярко освещённые огни сенсорной полосы указывают на доступный диапазон нот, в то время как слабо горящие сенсорные огни полосы подсказывают, что клип содержит ноты в пределах соответствующего диапазона.
Нажатие кнопки Note снова переключит вас назад к функционалу пэдов для игры в реальном времени.
Подсказка: в дополнение к добавлению и удалению нот, вы можете также скорректировать параметр Velocity и тайминг (микро сдвиги) нот. Об этом подробно говорится в разделе, который посвящён автоматизации пошагового секвенсора.
Корректировка длины лупа
Средства управления длиной лупа позволяют вам устанавливать необходимую длину лупа клипа и определять, какую часть данного лупа вы можете увидеть и редактировать в мелодическом и барабаном пошаговом секвенсоре. Секция находится справа внизу, в соседстве с пэдами Drum Rack — секции. Каждый пэд секции Loop Length соответствует одной «странице» шагов, а длина страницы зависит от того, какое разрешение шагов было нами выбрано (это называется Step Resolution). Когда мы работаем с барабанами с разрешением шага 16-е ноты, то две страницы шагов доступны в один момент времени для двух тактов. Для того чтобы изменить длину лупа, удерживайте один пэд, а затем нажмите другой соседний пэд. (Или, чтобы установить длину петли точно в одну страницу, просто два раза быстро нажмите соответствующий пэд.)

Страница, которую вы видите, не обязательно будет страницей, которую вы слышите. Когда вы установите длину лупа, страницы обновятся так, чтобы текущая позиция воспроизведения (обозначено бегающей зелёной подсветкой пэдов в шаговом секвенсоре, т.е. своеобразным «курсором»), была всегда видна. Но в некоторых случаях вы можете захотеть отключить эту функцию авто-отображения. Например, вы хотите отредактировать конкретную страницу более длинного лупа. При этом вам нужно, чтобы она была перед вашими глазами, независимо от того, где блуждает подсвечивающийся «курсор». Это можно сделать одним нажатием на пэд, который соответствует необходимой вам странице лупа. Это «закрепит» отображение нужной вам страницы, не изменяя длину петли. Чтобы включить авто-отображение и следование «курсору» снова, просто нажмите на «зафиксированный» ранее пэд, тем самым деактивировав закреплённую страницу.
Цвета пэдов в разделе длины лупа указывают на следующее:
- Несветящиеся лупы — эта страница находится за пределами установленной длины лупа.
- Белый — эта страница в пределах лупа, но не видна в настоящие время в разделе пошагового секвенсора.
- Светло-жёлтый цвет — эта страница видима в разделе пошагового секвенсора, но в настоящее время не играет.
- Зелёный — это страница воспроизводится в настоящее время.
Навигация в Note Mode
Теперь, когда создано несколько дорожек, вы можете продолжить добавлять следующие. Но вам, скорее всего, захочется перемещаться между уже существующими дорожками, чтобы продолжить работать над музыкальными идеями, используя другие инструменты и девайсы. Вот эти клавиши со стрелками позволят вам сделать это.

Стрелки лево/вправо перемещают вас между дорожками текущего сета. Отметьте, что выбор дорожки MIDI на Push автоматически «вооружает» её на запись (Arm Record), таким образом, что вы можете начать играть через неё немедленно. В Ableton кнопка «Arm Record» дорожки будет гореть розовым, показывая, что она была вооружена через Push этими стрелками.

Поведение стрелок Вверх/Вниз зависит от режима работы, который вы устанавливаете в User Preferences (Настройках Пользователя) Push’а (о них — ниже). В обоих режимах стрелки Вверх/Вниз передвигают наш фокус вверх и вниз по одной сцене. В режиме работы со сценами (Scene Workflow), сцена, которая была выбрана, запускается. В режиме работы с клипами (Clip Workflow) срабатывает только клип выбранной вами дорожки. Клипы на других дорожках не затрагиваются.
Навигация стрелками Вверх/Вниз в режиме ноты (Note Mode) всегда сразу же начинает воспроизведение, и вызванный вами клип продолжит играть с позиции клипа который проигрывался на этой позиции прежде. Отметьте, что это — практически та же самая фукция, которая устанавливается в свойствах клипа, и которая называется режимом Legato. (Прочитать подробнее о Legato можно здесь: 5.1. Общие секции Audio и MIDI Клипов.)
Управление инструментами и эффектами в Live
Нажатие кнопки Device переключает Push в режим Device Mode, который позволяет энкодерам Push’а управлять параметрами устройств Ableton Live.

В режиме Device Mode кнопки Selection Control (кнопки прямо под дисплеем) выбирают устройства находящиеся в настоящее время на выбранной вами дорожке, в то время как кнопки State Control (следующий ряд кнопок) включают выбранное устройство или отключают его. Девайс, выбранный в настоящий момент будет отмечен стрелкой на дисплее.

Кнопки In и Out позволяют вам перемещаться к дополнительным устройствам и параметрам, которые не могут быть доступны с первого же показа.

Используйте эти кнопки для доступа к:
- дополнительным банкам параметров (для эффектов, у которых есть больше чем один банк параметров).
- дополнительным цепочкам устройства (device chains) в пределах Rack’ов, которые содержат более одной цепочки.
Микширование с Push
Для управления громкостью (Volume), панорамой (Pan), посылами (Send) при помощи энкодеров на восьми дорожках одновременно, нажмите соответствующую кнопку на Push.

В Режиме громкости, энкодеры управляют громкостью дорожки (Volume).
Нажатие кнопки Pan & Send неоднократно будет циклически переключать вас между управлением баланса и многими посылами, доступными в вашем Live Set’е.
Нажмите кнопку Track, чтобы включить Режим Track Mode.

В Режиме Track Mode, энкодеры управляют громкостью дорожки (Volume), балансом панорамы (Pan) и первыми шестью посылами (Sends) выбранной дорожки. Нажмите кнопку Selection Control (ряд кнопок под дисплеем), чтобы выбрать, какой дорожкой будут управлять энкодеры в Режиме Track Mode.

Нажмите кнопку Master, чтобы выбрать Мастер-дорожку.
Подсказка: нажмите и удерживайте кнопку Group Track’s Selection Control, чтобы развернуть или свернуть дорожку.
Запись автоматизации
Изменения, которые вы производите в устройствах и параметрах микшера, могут быть записаны в ваши клипы в виде автоматизации, так, чтобы звук изменялся во время воспроизведения клипа. Чтобы сделать запись автоматизации, нажмите кнопку Automation.

Это действие переключает кнопку Session Automation Arm, позволяя вам сделать запись изменений, которые вы производите с помощью энкодеров Push’а в клипе. Когда вы сделали запись изменений параметров, нажмите кнопку Automation снова, чтобы выключить запись автоматизации. Чтобы удалить изменения, которые вы записали для какого-либо параметра, нажмите и удерживайте кнопку Delete и прикоснитесь к тому энкодеру, которым проводили изменения параметра клипа.
Автоматизированные параметры обозначены символом «■» рядом с названием параметра на дисплее. Параметры, которые вы переопределили (вручную корректируя параметр, не делая запись) покажут своё значение в скобках.

Чтобы перезаписать всю автоматизацию, которую вы сделали вручную, держите Shift а затем нажмите кнопку Automation.
Автоматизация в пошаговом секвенсоре
И в пошаговом секвенсоре ударных и в мелодическом пошаговом секвенсоре нажмите и удерживайте кнопку нужного вам шага, чтобы секвенсор получил доступ к определённым параметрам ноты (выбрать её можно нажав кнопку ниже “Notes”-надписью дисплея), или же можно применить пошаговую автоматизацию (выбрать можно, нажав кнопку выбора под “Automat”).

Специальные параметры ноты
Нажмите Notes, а затем начинайте корректировать энкодерами представленные ниже параметры нот:
- nudge — двигает ноты назад или вперёд по времени. Значение указывается в процентах смещения нот от предыдущей линии сетки. (Отрицательные величины указывают на то, что нота находится перед линией сетки.)
- length — изменение длины выбранных нот. Первый энкодер корректирует грубо длину, в то время как второй энкодер позволяет вам точно корректировать длину ноты.
- velocity — изменение силы нажатия выбранных нот.
Вы можете также скорректировать эти специальные параметры ноты для нескольких нот сразу. Для того чтобы сделать это, нажмите и удерживайте все пэды, которые вы хотели бы скорректировать, а затем поворачивайте энкодер. Дисплей покажет диапазон значений для выбранных изменений.

Если вы выбрали несколько источников, дисплей будет показывать диапазон значений для параметров.
Подсказка: вы можете также создать ноты с нужными вам параметрами Nudge, Length, и Velocity, просто нажав и удерживая пустой шаг в секвенсоре и поворачивая любой из этих энкодеров.
Работая с барабанами, вы можете скорректировать nudge, length, and velocity для каждой ноты, играемой любым пэдом, нажимая и удерживая кнопку Select, нажав пэд, а затем поворачивая энкодеры.

Зажмите Select, а затем жмите на пэд ударного в Drum Rack для того, чтобы изменять все ноты, которые использует данный пэд.
Пошаговая автоматизация
Нажмите “Automat” и удерживайте шаг секвенсора, чтобы создать и отредактировать устройство или автоматизацию микшера только для выбранного шага. Удерживая шаг и поворачивая энкодер, значение автоматизации соответствующего параметра будет скорректировано именно в течение звучания одного этого шага. Отметьте, что автоматизация шага может быть создана для любого шага, даже если этот шаг не содержит ноты.
Управление Режимом Сессии при помощи Push
Нажмите кнопку Session на Push’е, чтобы переключиться из Note Mode в режим сессии Session Mode. Нажмите и удерживайте кнопку Session, чтобы временно переключиться в Session Mode. Отпускание кнопки возвратит вас к Note Mode. Аналогично, нажимая и удерживая кнопку Note, находясь в режиме Session, вы временно переключитесь вас в Note Mode.

В Session Mode 8×8 сетка пэдов теперь будет управлять клипами сессии, а кнопки Scene/Grid начнут запускать сцены. Нажатие пэда вызывает клип в соответствующем местоположении Режима Сессии. Если дорожка выбрана, то нажатие кнопки начнёт запись нового клипа.
Пэды подсвечиваются различными цветами, поэтому вы всегда знаете, что происходит в данный момент:
- Цвет всех неиграющих клипов в вашем Live Set отражён на пэдах.
- Запущенные клипы пульсируют от зелёного к белому.
- Запись клипа пульсирует от красного к белому.
Вы можете остановить всю музыку на дорожке, включив Stop Mode (Стоп-режим) и нажав кнопки State Control на дорожке (второй ряд под дисплеем).

Остановка воспроизведения клипа.
Для того чтобы остановить все клипы, зажмите Shift а уже потом нажмите Stop.
Push показывает происходящее внутри программы, но при этом, что очень важно, программное обеспечение также отражает то, что происходит на наших аппаратных средствах, в нашем случае — на Push’е. Слоты клипа, в настоящее время управляемые сеткой пэдов в Push’е, показываются в Live цветной рамкой.
Стрелки-указатели и кнопка Shift увеличивают объём сетки до полноразмерной 8×8.
- Нажатие Up или Down кнопок продвигает вашу рамку в сессии вверх или вниз на одну сцену за одно нажатие. (Отображение на сетке пэдов тоже, соответственно, меняется.) Удерживайте кнопку Shift, и зажмите Up или Down, чтобы продвинуть рамку на восемь сцен вверх или вниз. (Подсказка: вы можете также использовать кнопки Octave Up и Down, чтобы переместиться на восемь сцен в одно нажатие.)
- Клавиши со стрелками Влево и Вправо перемещают вас в режиме сессии влево или вправо на одну дорожку. Удерживайте кнопку Shift, нажимая лево/право, чтобы перемещаться в одно касание сразу на восемь дорожек.
Обзор Режима Сессии
Session Overview (обзор режима сессии) в Push’е позволяет вам перемещаться через большие сеты быстро, даже не смотря на ваш монитор. Удерживайте кнопку Shift, и отображаемый масштаб сетки пэдов увеличится, чтобы показать краткий обзор Session View. В режиме отображения Session View каждый пэд представляет собой «восемь сцен на восьми дорожках» блоки клипов, тем самым показывая вам матрицу из 64-х сцен на 64-х дорожках. Ударьте по пэду, чтобы сосредоточиться на нужном вам блоке клипов в Session View. Например, удерживая кнопку Shift, а затем, нажав в ряде пэдов номер три, столбец покажет вам сцены 17-24 и дорожки 1-8. Кроме того, в то время, когда Shift зажат, каждая кнопка запуска сцены представляет собой блок из 64-х сцен (если подобные блоки существуют в вашем сете).
В режиме отображения сессии (Session Overview) цветовое обозначение немного отличается:
Янтарный: указывает на выбираемый в данный момент блок клипов, которые будут окружены цветной рамкой в программе.
Зелёный: есть клипы, играющие в этом блоке клипов.
Красный: нет никаких клипов, которые играют в этом диапазоне.
Нет цвета: в этом блоке нет никаких дорожек или сцен.
Пользовательские настройки
Нажмите и удерживайте кнопку User, чтобы скорректировать чувствительность силы нажатия, послекасания, и других настроек.

Кнопка User

Настройки пользователя (User Settings)
Параметр Pad Treshold (Порог срабатывания) определяет самую слабую силу нажатия, которая будет вызывать ноты. Потребуется прилагать больше усилий при более высоких настройках Treshold. При более низких настройках ноты могут вызываться случайно, и пэды могут случайно «западать».
Velocity Curve (огибающая велосити) определяет насколько чувствительны пэды в зависимости от силы нажатия — от линейного графика, который показывает взаимоотношение между силой и velocity один к одному, до различных логарифмических графиков. Более высокие логарифмические значения предоставляют больше динамического диапазона, когда вы играете на них мягко. Диаграмма ниже демонстрирует различные кривые взаимоотношений силы нажатия на горизонтальной оси и скорости воспроизведения ноты (Velocity) на вертикальной оси.

Далее в настройках пользователя есть опция Workflow.
Опция Workflow определяет, как Push будет вести себя, когда нажаты кнопки Duplicate, New, или стрелки Вверх/Вниз. Режим, который вы здесь выбираете, зависит от того, как вам захочется организовывать ваши музыкальные идеи. Во время работы со Scene Workflow (с рабочим процессом сцен, который по умолчанию) музыкальные идеи организованы в сценах, и навигация тоже происходит по ним. Но во время работы с Clip Workflow (с рабочим процессом клипа) вы будете работать только с выбранным в настоящий момент клипом.
В рабочем процессе сцены (Scene Workflow):
- Duplicate создаёт новую сцену, содержащую все в настоящее время проигрываемые клипы, и одновременно включает их проигрывание в новой созданной сцене. Это — то же самое, что и команда «Capture and Insert Scene» в меню Create в самом Ableton Live.
- New идентина Duplicate, за исключением того, что эта команда не дублирует выбранный в текущий момент клип. Вместо этого создаётся пустой слот клипа, который позволяет вам создать новую идею на текущей дорожке.
- Стрелки Вверх/Вниз продвигают вверх или вниз на одну сцену. Воспроизведение клипов в новой сцене начинается без перерыва.
В рабочем процессе клипа (Clip Workflow):
- Duplicate создаёт копию в настоящее время выбранного клипа в новой сцене, продолжая воспроизведение любых играющих в данный момент клипов на других дорожках. (Подсказка: удерживайте Shift, нажимая Duplicate, и это создаст новую сцену, включающую все в настоящее время играющие клипы.)
- New готовит пустой слот клипа на выбранной в данный момент дорожке. Клипы в других дорожках не затронуты.
- Стрелки Up/Down продвигают нас на один шаг вверх или вниз по сценам. Воспроизведение выбранного в текущий момент клипа на дорожке начинается без перерыва. Клипы на других дорожках не затронуты.
Функция Aftertouch Threshold (порог срабатывания послекасания) устанавливает самое низкое входящее значение послекасания (от 0 до 127), которые Push сможет зафиксировать. Входящие значения ниже данного уровня будут просто игнорироваться, в то время как значения, превышающие назначенный нами уровень, будут масштабированы согласно доступному диапазону послекасания. Например, если вы поставите значение Aftertouch Threshold на 120, и сыграете что-либо со значением послекасания 119, т.е. ниже этого значения, то ничего не произойдёт. Но входящие значения между 120-тью и 127-ми будут масштабированы так, как показано ниже:
Если сила послекасания 0, то это будет равно 121-му
Сила послекасания 18 = 122
Сила послекасания 36 = 123
Сила послекасания 54 = 124
Сила послекасания 72 = 125
Сила послекасания 90 = 126
Сила послекасания 108 = 127
Функции кнопок и различных секций контроллера Push
Функция каждого раздела управления объяснена ниже.
Раздел Focus/Navigation
Note Mode — когда выбрана, секция пэдов изменяет свою функциональность, основываясь на типе дорожки, которая в настоящее время выбрана:
- MIDI дорожка, содержащая инструмент — пэды играют ноты. Нажимая на Note, вы будете переключаться между игрой в реальном времени и мелодическим пошаговым секвенсором.
- MIDI дорожка, содержащая Drum Rack — секция пэдов, разделена; нижние левые 16 пэдов играют Drum Rack, нижние правые 16 пэдов корректируют длину петли клипа, а верхние четыре строки управляют степ секвенсором.
Session Mode (Режим Сессии) — когда выбран, Секция Пэдов меняется на запуск клипов в Session View (Режиме Сессии) программы.
Shift — нажмите и удерживайте Shift, нажимая другие кнопки, и вы получите доступ к дополнительной функциональности.
Клавиши со стрелками — позволяют перемещаться в Live Set’е (в Session Mode) и между дорожками или сценами/клипами (в Note Mode).
Select — в Session Mode, удерживайте Select и нажмите клип, чтобы выбрать клип, при этом, не запуская его. Это также покажет имя клипа в дисплее. В Note Mode удерживайте Select и нажмите пэд в Drum Rack, чтобы выбрать его ноты, не проигрывая сам пэд.
Добавление секции (Add Section)

Эти кнопки добавляют новые устройства или дорожки к вашему Live Set.
Add Effect — открывает Browse Mode, чтобы вы имели возможность добавить новое устройство справа от выбранного в настоящий момент девайса. Удерживайте Shift, нажимая Add Effect, и это позволит вам добавить новое устройство в левой стороне от устройства, выбираемого в данный момент. Подсказка: чтобы добавить MIDI Effect, сначала выберите инструмент в дорожке. Затем удерживайте Shift, нажимая Add Effect.
Add Track — создаёт новую MIDI-дорожку справа от выбираемой в настоящее время дорожки. Нажмите и удерживайте Add Track, и это позволит вам выбирать различные типы добавляемых дорожек (Аудио, MIDI, или Return).
Секция нот (Note Section)

Эти кнопки используются, когда включен режим игры нотами в Push.
Scales — Когда Note Mode включен и выбрана инструментальная дорожка, нажимая эту кнопку, вы сможете выбирать тональность, которую можно играть на пэдах. Однако эта кнопка не имеет никакого эффекта, когда выбрана дорожка Drum Rack или когда мы находимся в Session Mode.
- Fixed Y/N: Когда режим Fixed Mode включен, ноты по сетке пэдов остаются на тех же самых позициях, когда вы меняете тональности. Нижний левый пэд всегда будет играть C (до) (кроме тональностей, которые не содержат C, тогда нижний левый пэд будет играть самую близкую нижнюю ноту в данной тональности). Когда Fixed mode выключен, ноты по секции пэдов сдвигаются так, чтобы нижний левый пэд всегда играл тонику выбранной тональности.
- In Key/Chromatic: с выбранным режимом In Key (в тональности), сетка пэдов будет эффективно «свёрнута» таким образом, что будут доступны ноты только в пределах заданной тональности. А в хроматическом режиме (Chromatic Mode) сетка пэдов будет содержать все ноты. Ноты, которые соответствуют выбранной тональности — подсвечены, в то время как ноты, которые не соответствует ей — не горят.
- Scale selection (Выбор тональности): выберите основную тональность с помощью кнопок вверх/вниз в левой стороне.
User — весь встроенный в Push’s функционал может быть отключен при помощи так называемого пользовательского режима (User Mode). Это позволяет вашему Push’у быть повторно запрограммированным, чтобы управлять дополнительными функциями в Live или в любом другом программном обеспечении. Нажмите и удерживайте кнопку User, чтобы получить доступ ко многим параметрам такой конфигурации. (Подсказка: энкодеры Push’s работают лучше всего в режиме “Relative (2’s Comp.)”, для выбора этого режима, поверните энкодер медленно влево во время Маппинга.)
Repeat — когда Repeat включен, удержание какого-либо пэда будет повторно вызывать ноту. Работает наподобие примитивного арпеджиратора. Кнопки Scene/Grid изменяют частоту этого ритмичного повторения.
Accent — когда Accent включен, все поступающие ноты (содержащиеся в режиме степ секвенсора или же поступающие в режиме игры в реальном времени) проигрываются с полным значением велосити. Нажмите и удерживайте Accent, чтобы временно включить и оставить работать эту функцию.
Octave Up/Down (Октавы Вверх/Вниз) — если выбрана инструментальная дорожка, эти кнопки, смещают пэды нот на октаву вверх или вниз. Если выбран Drum Rack, то эти кнопки смещают проигрываемые пэды в Drum Rack вверх или вниз на 16 пэдов, затрагивая прочие доступные пэды в девайсе. В Session Mode (в Работе с сессией) они управляют сдвигом вверх или вниз на восемь сцен. Эти кнопки не будут подсвечиваться, если дополнительные октавы не будут доступны.
State Control Section (Контроль состояния трека)

Работая с треками, крайние левые восемь кнопок могут останавливать клипы, мьютировать, или засолировать соответствующий трек, в зависимости от того, какая из трёх самых правых кнопок в этом ряду нажимается, имеются в виду кнопки Stop, Mute, или Solo. Если вы работаете с устройствами (девайсами) вместо треков, то крайние левые восемь кнопок в этом ряду включают или выключают устройства. Помните, что у этих кнопок есть дополнительная функциональность в других режимах (выбор гаммы, и т.д. и т.п.).
Подсказка: чтобы остановить все клипы разом, нажмите и удерживайте Shift, а затем нажмите Stop.
Selection Control Section (Секция Контроля Выбора

Эти кнопки работают вместе с кнопками Display/Encoder Section и выбирают, какие параметры могут регулироваться энкодерами, и при этом отображаться на дисплее. Кнопки In и Out позволяют вам получить доступ к устройствам внутри Rack’ов (контейнеров) или к дополнительным банкам параметров устройств, если они содержат более восьми параметров. В Browse Mode (Режиме Браузера) кнопки In и Out смещают ваш дисплей вправо или влево, позволяя вам просмотреть более глубокие уровни подпапок или рассмотреть большее число пресетов девайсов на дисплее.
Секция Дисплея/Энкодеров (Display/Encoder Section)

Эти шесть кнопок справа от дисплея определяют режим редактирования энкодеров. Во всех этих режимах девятый энкодер всегда будет управлять уровнем Мастер-трека (или уровнем предпрослушки (Cue), если при вращении зажата кнопка Shift). Нажимая Shift во время вращения любого из первых восьми энкодеров можно тонко настраивать любой параметр, который в текущий момент контролируется данным энкодером. Помните, что вы можете временно переключиться к различным режимам редактирования, нажимая и удерживая соответствующую кнопку. Отпускание данной кнопки возвратит вас к предыдущему режиму.

В режиме Громкости (Volume Mode) энкодеры управляют уровнем громкости восьми выбранных треков.

В режиме Панорамы & Посылов (Pan &Sends), нажмите один раз для управления панорамой. Нажав на кнопку второй раз, активируется режим управления посылами (Sends), и т.д.

В режиме трека (Track Mode) энкодеры управляют выходным уровнем громкости Volume трека, панорамой Pan и шестью посылами Sends выбранного трека. Выберите трек, которым будете управлять, с помощью восьми кнопок Selection Control (Контроль выбора, 1 ряд кнопок под дисплеем). Нажмите кнопку Master, чтобы выбрать Мастер-трек.
В режиме клипов (Clip Mode) энкодеры управляют различными параметрами выбранного клипа. Параметры зависят от типа выбранного клипа:

Если вы выбираете MIDI клип, тогда энкодеры управляют следующими параметрами:
- Loop Start (начало петли), или же Clip Start, если Loop выключен.
- Position (позиция клипа)
- Loop Length (длина петли) (или Clip End, т.е. конец клипа, если функция зацикливания Loop выключена)
- Loop On/Off (Вкл\Выкл зацикливание Loop)

Если выбираете Аудио Клип, энкодеры управляют такими параметрами:
- Loop Start (начало петли), или же Clip Start, если Loop выключен.
- Position (позиция клипа)
- Loop Length (длина петли) (или Clip End, т.е. конец клипа, если функция зацикливания Loop выключена)
- Loop On/Off (Вкл\Выкл зацикливание Loop)
- Warp Mode (Режим Варпинга)
- Detune (Расстройка)
- Transpose (Транспонирование)
- Gain (Выходной уровень сигнала)

Выбран девайс, экнодеры контролируют параметры выбранного девайса.

Выбран режим Browse браузера, энкодеры скролят доступные девайсы и пресеты.
Секция управления темпом (Tempo Section)

Tap Tempo — как только вы ритмично потыкаете на эту кнопку (один раз на долю), темп вашего сета в Ableton тут же подстроится под него. Если переключатель «Start Playback with Tap Tempo» включен в меню Preferences во вкладке Record/Warp/Launch, то вы также можете использовать Tap-кнопку для предварительного счёта. Если вы работаете в обычной размерности 4/4, то вам достаточно четырёх нажатий, чтобы начать воспроизведение трека в заданном темпе.
Metronome — включает или выключает метроном.
Левый энкодер в секции корректирует темп проекта на 1 BPM. Если вы зажмете Shift, тогда вы будете более плавно регулировать темп в десятых долях темпа.
Правый энкодер определяет величину свинга, когда активен Quantizing (квантование) или Record Quantizing (квантование записи) или когда кнопка Repeat нажата.
Секция редактирования (Edit Section)

Undo — отменяет последнее действие. Нажимая и удерживая Shift, а затем, нажимая Undo, вы тем самым совершите команду «Redo», которая позволяет отменить ранее совершённое действие отмены. Отметьте, что кнопка Undo на Push полностью повторяет функциональность Undo-команды в Ableton, т.е. если вы сделаете в программе что-то даже без использования Push, то ваше действие может быть отменено при нажатии на эту кнопку на Push’е.
Delete — В Note Mode, эта кнопка удаляет выбранный клип. В Session Mode удерживайте Удаление, а затем нажмите клип, чтобы удалить этот клип. Удерживая Удаление и выбирая устройство или трек при помощи Кнопок управления Выбором Push, можно удалить устройство или трек. Удерживая кнопку Удаления и касаясь энкодера, можно удалить автоматизацию, которая привязана к этому энкодеру.
Quantize — нажмите и отпустите кнопку, чтобы применить квантование для выбранных нот (или для всех нот в клипе, если не было сделано выбора). Удерживайте Quantize и нажимайте на пэд в Drum Rack’е, чтобы отквантовать ноты именно для этого пэда. Для аудио клипов квантование будет применяться к транзиентам при включенных алгоритмах варпинга. Нажмите и держите кнопку Quantize, чтобы получить доступ к настройкам квантизации. После того как вы измените эти настройки, нажмите на кнопку один раз, чтобы выйти из них, а затем нажмите и отпустите кнопку, чтобы ваши изменения возымели действие.
Double — дублирует материал внутри лупа, а также саму длину лупа.
Транспортная панель (Transport Section)

Fixed Length — когда включена данная функция все новые клипы будут создаваться с фиксированным числом тактов. Когда она отключена, новые клипы будут продолжать записываться, пока вы не нажмёте кнопки Record, New или Play/Stop. Нажмите и удерживайте, а затем используйте кнопки под дисплеем, чтобы определить и выбрать фиксированную длину клипа для записи.
Совет: включение фиксированной длительности во время записи выключит запись и создаст петлю с последующими несколькими тактами клипа, в зависимости от значений Fixed Length.
Automation — управляет автоматизацией записи в Ableton. Когда она включена, все изменения параметров будут записаны в проигрывающиеся в данный момент в Режиме Сессии. Если вы будете удерживать Shift, и нажмёте кнопку Automation, то повторно включите ту автоматизацию, которую вы переписали. Зажмите Delete и нажмите на кнопку Automation, чтобы удалить всю автоматизацию в клипе.
Duplicate — во время отображения на дисплее установок сцен (Scene Workflow), Duplicate создаёт новую сцену, содержащую все в настоящее время проигрывающиеся клипы. Если же вы работаете с клипами, то Duplicate создаст копию выбранного в настоящий момент клипа в новой сцене, продолжая при этом проигрывание любых играющих клипов на других дорожках.
New — нажатие New остановит выбранный клип, и подготовит Live для записи нового материала. Это позволит вам попрактиковаться, прежде чем приступить к записи снова.
Record — нажмите кнопку Record чтобы начать записывать. Нажатие кнопки Record снова прекратит запись, но продолжит воспроизводить клип. Нажатие Record в третий раз включит режим overdub, в котором можно записать новые ноты поверх старых, в то время когда он производится.
Play/Stop — эта кнопка включает одноимённую кнопку в транспортной панели Ableton Live. Нажатие на неё включит воспроизведение, повторное нажатие — остановит. Зажмите Shift, а затем нажмите кнопку Play/Stop, чтобы вернуть курсор в позицию 1.1.1, не начиная при этом воспроизведение. Очень удобно, когда вы подготовили некий материал в режиме сессии, и желаете его записать с собственными манипуляциями в режим аранжировки!
Сенсорная полоса (Touch Strip)

Когда выбран инструментальный трек, сенсорная полоса Push’а (Touch Strip) корректирует высоту тона или же работает как колесо модуляции во время игры в реальном времени, либо действует на доступный диапазон нот во время работы пошагового секвенсора. Когда выбран Drum Rack, сенсорная полоса выбирает банк для Drum Rack’а.
Регулировка высоты тоны выбирается по умолчанию, как только активируется инструментальный трек. Для того чтобы изменить функциональность сенсорной полосы, зажмите Select и притроньтесь к ней. Так вы сможете переключать её функциональность между регулировкой Pitch Bend (высоты тона) и модуляцией. Дисплей будет показывать текущий режим каждый раз, когда вы будете его менять. Помните, что оба режима сенсорной полосы — Pitch Bend («Высота тона») и Modulation Wheel («колесо модуляции») доступны только тогда, когда вы играете на инструментах в реальном времени, а не при использовании мелодического пошагового секвенсора.
Секция пэдов

Функциональность секции пэдов (Pad Section) определяется кнопками Note и Session Mode. Когда включен режим Session Mode секция пэдов используется для запуска клипов в режиме сессии программы Ableton Live. Когда же включен режим Note Mode, секция пэдов меняет свою функциональность, основанную на типе трека, который в настоящее время был вами выбран:
Если MIDI трек, содержит инструмент: пэды воспроизводят ноты. Нажатие кнопки Note дополнительно, переключает между режимом игры в реальном времени и мелодическим пошаговым секвенсором.
MIDI трек, содержащий Драм Рэк — Секция пэдов начинает делиться на три секции: нижние левые 16 пэдов проигрывают Drum Rack, нижние правые 16 пэдов корректируют длину клипа, а верхние четыре строки управляют степ секвенсором. Нажмите Note снова, чтобы переключиться в 64-х пэдовый режим, чтобы проигрывать ваши ударные уже по всей 8X8 сетке.
Секция Scene/Grid

Эти кнопки также могут изменять свою функциональность в зависимости от режима который вы выбираете: Session Mode или Note Mode. Когда выбран Session Mode, эти кнопки запускают сцены Session View. (Подсказка: удерживайте кнопку Select, нажимая кнопку Scene, чтобы выбрать сцену, при этом, не запуская её.) Если же выбран режим Note Mode, то Секция Scene/Grid будет задавать ритмичное разрешение сетки вашего пошагового секвенсора и ритмичное разрешение повторяющихся нот (т.е. нот, которые записываются при включенном режиме Repeat).
Напольные MIDI-педали

Два порта на задней стенке Push’а позволяют вам подсоединять к нему напольные миди-педали. Footswitch 1 действует как педаль сустейна. А Footswitch 2 даёт вам hands-free контроль записью Push, что позволит вам освободить руки. Одно нажатие на педаль включит кнопку Record, таким образом можно переключаться между просто записью, записью с overdubbing (записью новых нот поверх существующих) и воспроизведением текущего клипа. Быстрое двойное нажатие на педаль будет иметь то же самое действие как и нажатие кнопки New.
Помните, что определённые ножные выключатели могут вести себя «наоборот». Например, ноты могут быть подвержены сустейну, только когда педаль НЕ придавлена. Как правило это связано с полярностью педали, и обычно может быть легко исправлено, если вы будете подсоединять свою педаль к порту в нажатом состоянии. Но мы рекомендуем лучше использовать ножные педали с физическим переключением полярности на их корпусе.
Ableton Push 2 is an instrument for song creation that provides hands-on control of melody and harmony, beats, samples, sounds, and song structure. In the studio, Push 2 allows you to quickly create clips that populate Live’s Session View as you work entirely from the hardware. On stage, Push 2 serves as a powerful instrument for real-time playing, step sequencing, and clip launching.
Much of Push 2’s behavior depends on which mode it is in, as well as on which type of track is selected. To help you learn how to work with Push 2, this chapter will walk you through some of the fundamental workflows, and then will provide a reference of all of Push 2’s controls.
There are also a number of videos that will help you get started with Push 2. These are available at https://www.ableton.com/learn-push/
After plugging in the included power supply and connecting the USB cable to your computer, turn Push 2 on via the power button in the back. From here, setting up the Push 2 hardware is mostly automatic. As long as Live is running, Push 2 will be automatically detected as soon as it is connected to a USB port on your computer. After connection, Push 2 can be used almost immediately. It is not necessary to install drivers and Push 2 does not need to be manually configured in Live’s Preferences.
From time to time, Ableton will release firmware updates for Push 2 that will be included in updates to Live. When using Push 2 for the first time after installing a new version of Live, you may be prompted to update the firmware. Push 2 will walk you through this process.
You can browse and load sounds directly from Push 2, without needing to use Live’s browser. This is done in Push 2’s Browse Mode.
Press Push 2’s Browse button:
The display is divided into columns. When you first enter Browse Mode, the far left column shows either the specific category of device being browsed or the Collections label (see ‘Collections’), which lets you access tagged browser items quickly. Each column to the right shows the next subfolder (if any exist) or the contents of the current folder. You can scroll through presets and folders using the eight encoders above the display, or navigate through them one at a time via the arrow buttons.
The display will expand automatically as you navigate. You can load Live’s “default” devices from the top level of the browser’s hierarchy, and can quickly move up or down in the hierarchy via the rightmost two upper display buttons.
By default, samples and presets from official Packs or Live’s core library will preview when selected in the browser. You can toggle preview on or off via the Preview button.
To adjust the previewing volume, hold the Shift button while turning the Master volume encoder.
To load the selected item, press the Load button.
What you see when in Browse Mode depends on the device that was last selected. If you were working with an instrument, Browse Mode will show you replacement instruments. If you were working with an effect, you will see effects. When starting with an empty MIDI track, the display shows all of your available sounds, instruments, drum kits, effects, and Max for Live devices (see ‘Max for Live’), as well as VST and Audio Unit instruments (see ‘Using Plug-Ins’).
To create beats using Push 2, first make sure Note Mode is enabled
Then use Browse Mode to navigate to the Drums section of the browser and load one of the Drum Rack presets from Live’s library.
When working with a MIDI track containing a Drum Rack, Push 2’s 8×8 pad grid can be configured in a few different ways, depending on the state of the Layout button. Pressing this button cycles between three different modes.
When the Loop Selector layout is enabled, the pads are divided into three sections, allowing you to simultaneously play, step sequence and adjust the length of your clip.
The 16 Drum Rack pads are laid out, like Live’s Drum Rack, in the classic 4×4 arrangement, allowing for real-time playing. Controls in the display and the pads in the Drum Rack match the color of the track, with subtle variations that help you understand what’s happening. The Drum Rack pad colors indicate the following:
When working with Drum Racks that contain a larger number of pads, use Push 2’s touch strip or the Octave Up and Octave Down buttons to move up/down by 16 pads. Hold Shift while using the touch strip or Octave buttons to move by single rows.
Holding the Layout button gives you momentary access to the 16 Velocities layout (see ‘16 Velocities Mode’). You can also lock the alternate layout in place by holding Shift and pressing the Layout button. To unlock the 16 Velocities layout, press the Layout button again.
Press the Layout button to switch to the 16 Velocities layout. In this mode, the bottom right 16 pads represent 16 different velocities for the selected Drum Rack pad. Tap one of the velocity pads to enter steps at that velocity.
Holding the Layout button gives you momentary access to the loop length controls (see ‘Adjusting the Loop Length’). You can also lock the loop length controls in place by holding Shift and pressing the Layout button. To unlock the loop length pads, press the Layout button again.
You can also use the entire 8×8 pad grid for real-time drum playing. This is useful when working with very large drum kits, such as those created by slicing (see ‘Slice to New MIDI Track’). To switch to 64-pad mode, press the Layout button again.
Note: when moving between 64-pad mode and the Loop Selector or 16 Velocities layouts, the 16 pads available for step sequencing will not change automatically. You may still need to use the touch strip or Octave keys in order to see the specific 16 pads you want.
Holding the Layout button gives you momentary access to the loop length controls (see ‘Adjusting the Loop Length’). You can also lock the loop length controls in place by holding Shift and pressing the Layout button. To unlock the loop length pads, press the Layout button again.
Browse Mode can also be used to load or replace individual pads within a loaded Drum Rack. To switch between browsing Drum Racks and single pads, make sure you’re in Device Mode by pressing the Device button. This will show the devices on the track.
By default, the Drum Rack is selected. To select an individual pad instead, tap that pad, then press the second upper display button. (The square icon next to the name represents a pad.)
Now, entering Browse Mode again will allow you to load or replace the sound of only the selected pad. (The selected pad will flash.) Once in Browse Mode, tapping other pads will select them for browsing, allowing you to quickly load or replace multiple sounds within the loaded Drum Rack.
After loading the selected item, the Load button’s name will change to Load Next. Pressing this button again will load the next entry in the list, allowing you to quickly try out presets or samples in the context of your song. You can also load the previous entry in the list via the Load Previous button.
Particularly in a performance situation, you may want to select a pad without triggering it. To do this, press and hold the Select button while tapping a drum pad or one of the 16 Velocity pads.
You can also select without triggering by pressing the lower display button for the Drum Rack’s track. This will expand the Drum Rack and allow the individual pads to be selected via the other lower display buttons. You can navigate to the previous or next pad via the left and right arrow keys.
To copy a pad to a different location in your Drum Rack, hold the Duplicate button and press the pad you’d like to copy.
While continuing to hold Duplicate, press the pad where you’d like to paste the copied pad. Note that this will replace the destination pad’s devices (and thus its sound) but will not replace any existing notes already recorded for that pad.
When a single pad is selected, you can adjust its choke group assignment (see ‘Input/Output Section’) via the first encoder or transpose the pad via the second encoder.
When working with drums, Push 2’s pads can be colored individually. To change a pad’s color, hold Shift and tap the pad. Then tap one of the pads on the outer ring to choose that color for the selected pad.
Note: your custom pad colors will be saved and reloaded with your Live Set, but will not be visible within Live. They only appear on Push 2.
Tapping a pad selects it and also enables it for step sequencing.
To record notes with the step sequencer, tap the pads in the step sequencer controls to place notes in the clip where you want them. The clip will begin playing as soon as you tap a step. By default, each step sequencer pad corresponds to a 16th note, but you can change the step size via the Scene/Grid buttons.
Adjust the tempo using the Tempo encoder. Each click of the encoder will adjust the tempo in increments of one BPM. Holding Shift while adjusting will set the tempo in increments of .1 BPM.
As the clip plays, the currently playing step is indicated by the moving green pad in the step sequencer section. (When Record is enabled, the moving pad will be red.) Tapping a step that already has a note will delete that note. Press and hold the Mute button while tapping a step to deactivate it without deleting it. Press and hold the Solo button while tapping a pad to solo that sound.
You can also adjust the velocity and micro-timing of individual notes, as described in the section on step sequencing automation (see ‘Step Sequencing Automation’).
To delete the entire pattern, press the Delete button. To delete all notes for a single pad, press and hold Delete while tapping that pad. (Holding Delete while pressing a pad that has no notes recorded in the current pattern deletes all of the devices from that pad.)
The pad colors in the step sequencer section indicate the following:
For detailed information about adjusting the loop length pads, see the section called Adjusting the Loop Length (see ‘Adjusting the Loop Length’).
Drum patterns can also be recorded in real-time by playing the Drum Rack pads. Follow these steps to record in real-time:
If you’ve enabled a recording count-in in Live (see ‘Recording with Count-in’), you’ll see a countdown bar move across the top of Push 2’s display and flash in tempo. This can serve as a helpful visual reference for when to begin playing.
Now any Drum Rack pads you play will be recorded to the clip. Pressing Record again will stop recording but will continue playing back the clip. Pressing Record a third time will enable overdub mode, allowing you to record into the clip while it plays back. Subsequent presses continue to toggle between playback and overdub. During playback, a small progress bar will appear in the display to show the playback position of each playing clip.
The pads are velocity sensitive, but if you want to temporarily override the velocity sensitivity, press the Accent button. When Accent is enabled, all played or step-sequenced notes will be at full velocity (127), regardless of how hard you actually tap the pads.
Tip: if you press and release Accent quickly, the button will stay on. If you press and hold, the button will turn off when released, allowing for momentary control of accented notes.
In 16 Velocities mode, you can tap one of the 16 velocity pads to record the selected sound at that velocity. Note that Accent overrides this behavior.
Pressing New stops playback of the currently selected clip and prepares Live to record a new clip on the currently selected track. This allows you to practice before recording a new idea. By default, pressing New also duplicates all clips that are playing on other tracks to a new scene and continues playing them back seamlessly. This behavior can be changed by changing the Workflow mode in Push 2’s Setup menu (see ‘Setup Menu’).
Press the Fixed Length button to set the size of new clips to a predetermined length.
Press and hold Fixed Length to set the recording length.
When Fixed Length is disabled, new clips will continue to record until you press the Record, New or Play/Stop buttons.
By default, starting a recording with Fixed Length enabled will create an empty clip of the selected length, and then begin recording from the beginning of the clip, in accordance with Live’s global launch quantization. If Phrase Sync is enabled, Push 2 treats the chosen length as a musical phrase, and will begin recording from the position in the clip that corresponds to that position within a phrase of that length. For example, with a fixed length of 4 bars and Phrase Sync on, starting a recording when Live’s global transport is at bar 7 will create an empty four bar clip and begin recording at the third bar of that clip.
Tip: enabling Fixed Length while recording will switch recording off and loop the last few bars of the clip, depending on the Fixed Length setting.
With Push 2’s Repeat button enabled, you can hold down a pad to play or record a stream of continuous, rhythmically-even notes. This is useful for recording steady hi-hat patterns, for example. Varying your finger pressure on the pad will change the volume of the repeated notes.
The repeat rate is set with the Scene/Grid buttons. Note that Push 2 “remembers” the Repeat button’s state and setting for each track. Tip: if you press and release Repeat quickly, the button will stay on. If you press and hold, the button will turn off when released, allowing for momentary control of repeated notes.
Turn up the Swing knob to apply swing to the repeated notes. When you touch the knob, the display will show the amount of swing.
Pressing Push 2’s Quantize button will snap notes to the grid in the selected clip.
Press and hold Quantize to change the quantization options:
Swing Amount determines the amount of swing that will be applied to the quantized notes. Note that the Swing amount can be adjusted from Encoder 1 or from the dedicated Swing knob.
Quantize To sets the nearest note value to which notes will be quantized, while Quantize Amount determines the amount that notes can be moved from their original positions.
Enable Record Quantize by pressing the corresponding upper display button to automatically quantize notes during recording. Adjust the record quantization value with Encoder 5. Note that if Record Quantize is enabled and Swing is turned up, the automatically quantized notes will not have swing applied.
When working with drums, press and hold Quantize and press a Drum Rack pad to quantize only that drum’s notes in the current clip.
When Live’s Arrangement View (see ‘Arrangement View’) is in focus in the software, pressing Record will toggle Arrangement Recording on and off. While Arrangement Recording is on, all of your actions on Push 2 are recorded into the Arrangement View.
You can also trigger Arrangement Recording while Live’s Session View is in focus by holding Shift and pressing Record. Note that this behavior is reversed when the Arrangement is in focus; holding Shift and pressing Record will then toggle Session recording.
After working on a beat, you’ll want to create other elements such as a bassline, harmony parts, etc. If you already have additional tracks in your Set, you can switch between them using the lower display buttons or the left and right arrow keys.
Or you can add a new track by pressing the Add Track button.
Adding a track puts Push 2 into Browse mode, allowing you to select which type of track you’d like to add (MIDI, Audio, or Return) and optionally load a device to the new track at the same time.
Note that when pressing the Add Track button while a track within a Group Track is selected, any new tracks will be inserted into that Group Track.
After creating a track, you can change its color. To do this, hold Shift and press the lower display button for the track. Then tap one of the pads on the outer ring to choose that color for the selected track.
When working with a MIDI track containing an instrument, Push 2’s 8×8 pad grid automatically configures itself to play notes. By default, every note on the grid is in the key of C major. The bottom left pad plays C1 (although you can change the octave with the Octave Up and Down buttons). Moving upward, each pad is a fourth higher. Moving to the right, each pad is the next note in the C major scale.
Play a major scale by playing the first three pads in the first row, then the first three pads in the next row upwards. Continue until you reach the next C:
The pad colors help you to stay oriented as you play:
To play triads, try out the following shape anywhere on the grid:
Holding the Layout button gives you momentary access to the loop length controls (see ‘Adjusting the Loop Length’). You can also lock the loop length controls in place by holding Shift and pressing the Layout button. To unlock the loop length pads, press the Layout button again.
Press Push 2’s Scale button to change the selected key and/or scale.
Using the upper and lower display buttons, you can change the key played by the pad grid. The currently selected key appears in white, while the other key options appear in gray:
By default, the pads and scale selection options indicate major scales. You can change to a variety of other scale types using encoders 2 through 7. The selected scale type is highlighted.
In addition to changing the key, you can also change the arrangement of the grid in a number of ways:
The Layout (Encoder 1) and Direction (Encoder
Changing the Direction control to “Horiz.” rotates the pad grid 90 degrees. For example, with a Layout of “4ths,” each pad is a 4th higher than the pad to its left.
Fixed Off/On: The lower right display button toggles Fixed on or off. When Fixed is on, the notes on the pad grid remain in the same positions when you change keys; the bottom-left pad will always play C (except in keys that don’t contain a C, in which case the bottom-left pad will play the nearest note in the key.) When Fixed is off, the notes on the pad grid shift so that the bottom-left pad always plays the root of the selected key.
In Key/Chromatic: The lower left display button toggles between In Key and Chromatic. With In Key selected, the pad grid is effectively “folded” so that only notes within the key are available. In Chromatic Mode, the pad grid contains all notes. Notes that are in the key are lit, while notes that are not in the key are unlit.
Scale options are saved with the Set, and Push 2 will return to these settings when the Set is loaded again. Tip: If you have particular key and scale settings that you like to use all the time, you can save them in your Default Set (see ‘Template Sets’). Any new Set created after this will have those settings in place when working with Push 2.
All of the real-time recording options available for drums (see ‘Real-time Recording’) are also available for melodies and harmonies, including the Accent button, fixed length recording (see ‘Fixed Length Recording’), recording with repeat (see ‘Recording with Repeat’), and quantizing (see ‘Quantizing’). But for detailed editing, you’ll work with the Melodic Sequencer described in the next section.
(Tip: one editing possibility is available in the real-time Note Mode: to quickly delete all notes of the same pitch within the current loop, press and hold Delete and then tap the respective pad.)
In addition to playing and recording in real time, you can also step sequence your melodies and harmonies. To toggle to the Melodic Sequencer, press the Layout button. This will set the 8×8 pad grid as follows:
When using the Melodic Sequencer, all eight rows of pads allow you to place notes in the clip. You can adjust the loop length and access additional step sequencing pages via the loop length pads (see ‘Adjusting the Loop Length’). The loop length pads can be momentarily accessed in the top row while holding the Layout button.
You can also lock the loop length pads in place. To do this, hold Shift and tap the Layout button. (Note that Push remembers this locked/unlocked state for each track.) To unlock the loop length pads, press the Layout button again.
With In Key selected, each row corresponds to one of the available pitches in the currently selected scale. With Chromatic selected, notes that are in the key are lit, while notes that are not in the key are unlit. The white row (which is the bottom row by default) indicates the root of the selected key. Each column of pads represents a step in the resolution set by the Scene/Grid buttons.
As with the real-time playing layout, pressing the Octave Up or Down button shifts the range of available notes. You can also use the touch strip to change the range. Hold the Shift key while adjusting the touch strip to shift the range by octaves. Hold the shift key while pressing the Octave buttons to shift by one note in the scale. The display will briefly show the available range as you adjust it.
Additionally, brightly-lit touch strip lights indicate the currently available note range, while dimly-lit touch strip lights indicate that the clip contains notes within the corresponding note range.
Pressing Layout again will toggle to the Melodic Sequencer + 32 Notes layout (see ‘Melodic Sequencer + 32 Notes’).
Tip: in addition to adding and removing notes, you can also adjust the velocity and micro-timing of the notes, as described in the section on step sequencing automation (see ‘Step Sequencing Automation’).
The loop length controls allow you to set the length of the clip’s loop and determine which part of it you can see and edit in the melodic and drum step sequencers. Each loop length pad corresponds to a page of steps, and the length of a page depends on the step resolution. When working with drums at the default 16th note resolution, two pages of steps are available at a time, for a total of two bars. In the Melodic Sequencer layout, one page of eight steps is available at a time, for a total of two beats. To change the loop length, hold one pad and then tap another pad (or, to set the loop length to exactly one page, quickly double-tap the corresponding pad.)
Note that the page you see is not necessarily the page you hear. When you set the loop length, the pages will update so that the current play position (as indicated by the moving green pad in the step sequencer section) always remains visible. But in some cases, you may want to disable this auto-follow behavior. For example, you may want to edit a single page of a longer loop, while still allowing the loop to play for the length you set. To do this, single-tap the pad that corresponds to that page. This will “lock” the view to that page without changing the loop length. You can also navigate to the previous or next page by pressing the Page Left/Right buttons.
To then turn auto-follow back on, simply reselect the current loop. (Note that single-tapping a page that is outside of the current loop will immediately set the loop to that page.) You can also turn auto-follow back on by holding either one of the Page Left/Right buttons.
The pad colors in the loop length section indicate the following:
If you need to access the loop length pads frequently, you can lock them in place. To do this, hold Shift and tap the Layout button. (Note that Push remembers this locked/unlocked state for each track.) To unlock the loop length pads, press the Layout button again. You can also navigate to the previous or next page by pressing the Page Left/Right buttons.
To duplicate the contents of a sequencer page, hold Duplicate, press the loop length pad for the page you want to duplicate, and then press the loop length pad for the destination page. Note that this will not remove existing notes in the destination page, but will add copied notes on top. To remove notes first, hold Delete and tap the loop length pad for that page.
The Melodic Sequencer + 32 Notes layout combines both step sequencing and real-time playing capabilities. Providing access to multiple octaves and steps on a single page, this layout is ideal for figuring out chords and harmonies to sequence. It is also well suited to longer phrases.
The bottom half of the pad grid lets you play notes in real-time, and select them for step sequencing. Each pad corresponds to one of the available pitches in the currently selected scale. Pressing a pad will select and play the note. Selected notes are represented by a lighter version of the track’s color.
Tip: to select a pad without triggering it, press and hold the Select button while tapping a pad.
The pad colors indicate the following:
Pressing the Octave Up or Down button shifts the range of available notes. Holding the Shift key while adjusting the touch strip shifts the range by octaves. You can hold the Shift key while pressing the Octave buttons to shift by one note in the scale. The display will briefly show the available range as you adjust it.
As with the 64 Notes layout, the notes in the bottom half of the pad grid can be adjusted via the Scale menu (see ‘Playing in Other Keys’).
Tapping a step in the top half of the pad grid adds all selected notes to that step. Steps containing notes are lit in the color of the clip.
Holding a step lets you view notes contained within the step, which are indicated in the bottom half of the pad grid by the lighter version of the track’s color. Tapping any of these selected notes will remove it from the step.
Holding multiple steps will add selected notes to all those steps. While holding Duplicate, you can press a step to copy the notes in that step and then press another step to paste them to a new location in the step sequencer.
The pad colors in the step sequencer indicate the following:
You can adjust the loop length and access additional step sequencing pages via the loop length pads (see ‘Adjusting the Loop Length’). The loop length pads can be momentarily accessed in the fifth row while holding the Layout button.
You can also lock the loop length pads in place. To do this, hold Shift and tap the Layout button. (Note that Push remembers this locked/unlocked state for each track.) To unlock the loop length pads, press the Layout button again. You can also navigate to the previous or next page by pressing the Page Left/Right buttons.
To duplicate the contents of a sequencer page, hold Duplicate, press the loop length pad for the page you want to duplicate, and then press the loop length pad for the destination page. Note that this will not remove existing notes in the destination page, but will add copied notes on top. To remove notes first, hold Delete and tap the loop length pad for that page.
Push 2 allows you to play samples from the pads in a variety of ways, with detailed but easy-to-use control over sample parameters directly from the encoders and display. The instrument that powers Push 2’s sample playback functionality is Simpler, and we recommend reading the detailed Simpler chapter (see ‘Simpler’) to learn more about its functionality.
To start working with a sample, you can either add a new MIDI track or press Browse to enter Browse Mode on an existing MIDI track. Although you can load an empty Simpler to a track, it isn’t playable until it contains a sample. Push 2’s display will inform you that your Simpler is empty and suggest browsing for a sample:
After loading a sample and switching to Device View, you will see the sample’s waveform in Push 2’s display, along with a number of parameters that allow you to quickly adjust how the sample plays back. This is the main bank of Simpler’s controls.
By default, Simpler will automatically set certain parameters based on the length of the loaded sample. For example, short samples will play once when triggered, while long samples will be set to loop and warp. Warped samples will play back at the tempo of your Set, regardless of which note you play. Bringing a warped clip into Simpler from an audio track, the browser, or your desktop preserves any warp settings and markers that were in the original clip. For more information about warping, see the Audio Clips, Tempo, and Warping chapter (see ‘Audio Clips, Tempo, and Warping’).
The most important parameter that determines how Simpler will treat samples is the Mode control, which is used to choose one of Simpler’s three playback modes.
In Classic Mode, the various sample position controls change which portion of the sample you play back. For example, if you load a drum break that contains silence at the beginning, you can start playback from after the silence. The Start control sets the absolute position in the sample from which playback could start, while the End control sets where playback could end; these parameters define the region of the sample that can be worked with. S Start and S Length are represented in percentages of the total sample length enabled by Start and End. For example, hitting a pad after setting an S Start value of 50% and S Length value of 25% will play back the third quarter (50-75%) of the region between the Start and End values. S Loop Length determines how much of the available sample (also determined by the Start and End values) will loop. Note that this parameter is only active if Loop is enabled.
Adjust the Zoom encoder to zoom into a portion of the waveform. The display shows a representation of the whole sample, as well as the currently active region. Turning the Zoom encoder clockwise zooms in. The specific portion of the sample that you zoom to is determined by the last-touched sample position control (Start, End, S Start, S Length, or S Loop Length.)
Pressing Simpler’s upper display button will enter Edit Mode. When in Edit Mode, the lower display buttons select additional pages of parameters and the upper display buttons toggle certain settings on or off. Pressing Simpler’s upper display button again will exit Edit Mode.
Pressing the Loop On/Off button determines whether or not the sample will loop when a pad is held down. The Warp as… button adjusts the warping of the sample between the Start and End values so that it will play back precisely within the specified number of bars. Live makes its best guess about what this value should be based on the length of the sample, but if it gets it wrong, you can use the ÷2 or ×2 buttons to double or halve the playback speed, respectively.
Crop removes the portions of the sample that are outside of the Start and End points, while Reverse plays the entire sample backwards. Note that both Crop and Reverse are non-destructive; they create a copy of the sample and apply the process to the copy, so your original sample is not changed.
In One-Shot Mode, the Zoom, Start, and End controls function the same as in Classic Mode, as do the Warp as…, ÷2, ×2, Crop, and Reverse buttons.
With Trigger enabled, the sample will continue playing even after the pad is released; the amount of time you hold the pad has no effect when Trigger is on. You can shape the volume of the sample using the Fade In and Fade Out encoders. Fade In determines how long it takes the sample to reach its maximum volume after a pad is hit, while Fade Out begins a fade out the specified amount of time before the end of the sample region. (Note: to stop a one-shot sample immediately, hold Shift while pressing the Play/Stop button.)
With Gate enabled, the sample will begin fading out as soon as you release the pad. The Fade Out time determines how long it will take to fade to silence after release.
The Transpose encoder allows you to transpose the sample up or down by up to 48 semitones (four octaves). Note that when transposing, the timbre of the sample may change dramatically depending on which warp mode you’ve selected. The Gain encoder sets the overall volume of the Simpler instrument.
Classic and One-Shot Modes provide a unique way of repitching a sample on the fly, without changing its playback position. (This is essentially a playable version of Legato Mode in clips (see ‘Legato Mode’).) To enable this functionality:
Now, as you play the pads legato, the sample will transpose without changing playback position. For best results, make sure Warp is on (in the Warp parameter bank). The Complex Pro warp mode tends to sound best when transposing, but experiment with the various warp modes to see which one works best for your particular sample.
In Slicing Mode, the Zoom, Start, and End controls function the same as in Classic and One-Shot Modes, as do the Warp as…, ÷2, ×2, and Reverse buttons.
The Slice By chooser determines the specific way in which slices will be created:
In all slicing modes, slices are laid out from left to right in groups of four starting from the bottom left pad. Each additional four slices is placed on the next four pads up. After the left half of the pad grid is used, slices are placed along the bottom row on the right side of the pad grid, again moving upwards in groups of four.
By default, the pad grid uses the 64-pad drum layout when in Slicing Mode. Pressing the Layout button cycles between 64-pad, Loop Selector, and 16 Velocities modes.
The Playback encoder determines how many slices can be triggered simultaneously. Mono is monophonic; only one pad can be played or sequenced at a time. When set to Poly, multiple pads can be triggered together. When set to Through, playback is monophonic, but triggering one slice will continue playback through the rest of the sample region.
The Trigger/Gate switch is the same concept as in One-Shot Playback Mode, but what you actually hear depends on which Playback mode is selected.
Nudge allows you to adjust the position of each slice marker. This is especially useful for fine-tuning slices that you’ve created in Manual mode. For greater nudging accuracy, tap the pad you’d like to adjust and use the Zoom encoder to get a closer look. Hold Shift while adjusting Nudge for extremely small adjustments.
Split Slice creates a new slice in the middle of the currently selected slice. This is also useful in Manual mode, in conjunction with Nudge, for fine-tuning slices created via Pad Slicing.
To delete a slice (either manually or automatically created), hold Delete and tap the corresponding pad.
Now that you’ve created a few tracks, you can continue to add more. But you may want to move between already-existing tracks to continue working on musical ideas using those instruments and devices. You can move directly to a new track using the lower display buttons or move sequentially to the previous or next track using the left and right arrow buttons.
Note that selecting a MIDI track on Push 2 automatically arms it, so it can be played immediately. In Live, track Arm buttons will appear pink to indicate that they have been armed via selection.
You can also manually arm any track by holding the lower display button for that track, or by holding the Record button and pressing the track’s lower display button.
This is useful if, for example, you want to use Push 2 to record audio clips. In Live, a manually armed track’s track Arm button will appear red. On Push 2’s display, manually armed tracks appear with a special icon.
The specific behavior of the Up/Down Arrows is determined by the Workflow mode, which is set in Push 2’s Setup menu (see ‘Setup Menu’). In both modes, the Up/Down Arrows move up or down by a single scene. In Scene Workflow, the selected scene is triggered. In Clip Workflow, only the selected track’s clip is triggered. Clips in other tracks are not affected.
Navigating with the Up/Down Arrows in Note Mode always begins playback immediately, and a triggered clip will take over the play position from whatever clip was played in that track before. Note that this is the same behavior as if the clips were set to Legato Mode in Live (see ‘Legato Mode’).
Pressing the Device button puts Push 2 in Device Mode, which allows you to use the encoders to control parameters in Live’s devices and third-party plug-ins.
In Device Mode, the upper display buttons select devices in the currently selected track, enabling their parameters for editing. The currently selected device is highlighted in the display.
Once a device is selected, pressing its upper display button again will enter Edit Mode. When in Edit Mode, the lower display buttons select additional pages of parameters for the selected device.
When in Edit Mode, pressing the leftmost upper display button will take you back up to the Device Mode’s top level.
Certain devices, such as Live’s Operator instrument (see ‘Operator’), have more than eight pages of parameters. When working with these devices in Edit Mode, the rightmost lower display button will show an arrow. Press this button to scroll to the additional pages (and then press the leftmost lower display button to get back.)
To load additional devices such as MIDI or audio effects to a track, press the Add Device button. This will open the Browser and display all device types that can be loaded to the current track.
(Note: you can also load an instrument via the Add Device button, but be aware that this works just like Browse Mode: You will replace the instrument that’s already on the track.)
As with Browse Mode, use the encoders or arrow keys to navigate between devices in the browser, and the Load button to load the selected device or preset. Devices will load to the right of the previously-selected device, although note that MIDI effects will always be placed before the instrument in the track and audio effects will always be placed after it.
To delete a device, hold the Delete button and press the upper display button that corresponds to the device.
To disable a device (without deleting it), hold the Mute button and press the upper display button that corresponds to the device. Disabled devices (and all of their parameters) appear gray in the display.
To reenable a disabled device, hold Mute and again press the upper display button that corresponds to the device.
Holding the Mute button for a few moments will lock it on. You can then release Mute and toggle devices on and off just by pressing the corresponding upper display button. Press Mute again to unlock it.
To move a MIDI or audio effect to a different position in the track’s chain of devices, press and hold the upper display button that corresponds to the effect. Then use any of the eight encoders to scroll the device to the new position and release the upper display button.
Instrument, Drum, and Effect Racks (see ‘Instrument, Drum and Effect Racks’) allow for multiple chains of devices to be contained within a single device. On Push 2’s display, Racks have special icons that distinguish them from regular devices.
To open a Rack, select it using the corresponding upper display button. Then press this button again. The Rack will unfold, revealing the devices in the currently selected chain. An unfolded Rack appears in the display with an underline that extends to the end of the enclosed devices. Each press of a selected Rack’s upper display button will toggle it open or closed. (Note that Drum Racks cannot be folded or unfolded directly from Push 2. They will appear in Push 2’s display as folded or unfolded depending on how they were set within Live.)
When the Rack itself is selected, the eight encoders control the Rack’s Macros (see ‘Using the Macro Controls’). Once a Rack is open, you can select one of its contained devices by pressing the relevant upper display button. After selecting a different device, the encoders will then control its parameters instead.
To access the devices on additional chains within a multi-chain Rack, press and hold the Rack’s upper display button. The Rack’s chains will be shown at the bottom of the display and can be selected via the corresponding lower display buttons.
To control volumes, pans, or sends with the encoders, press the Mix button.
Each press of the Mix button toggles between Track Mix Mode and Global Mix Mode. In Track Mix Mode, the first two upper display buttons select between mix parameters for the selected track and input and output routing options for that track. The lower display buttons are used to select the track. With Mix selected, the encoders adjust volume, pan, and send levels for the currently selected track.
(Tip: Hold Shift while adjusting the encoders for fine-tune control.)
If your Set contains more than six return tracks, the two rightmost upper display buttons will change to arrows, which allow you to shift the available parameters left or right.
With Input & Output selected, all of the track’s routing and monitoring options can be adjusted from the encoders.
In Global Mix Mode, the encoders adjust either volumes, pans, or send levels for the eight visible tracks. Select which parameter will be controlled via the upper display buttons.
If your Set contains more than six return tracks, the rightmost upper display button will change to an arrow, which allows you to shift the available sends to the right. Volumes and Pans will always remain visible.
If your Set contains more than eight tracks, the left and right arrow keys allow you to shift the visible tracks left or right.
Press the Master button to select the Master track. Press Master again to return to the previously selected track.
Note that when Split Stereo Pan Mode (see ‘The Live Mixer’) is active while in Global Mix Mode, the display will show the current pan value, but the pan dial will be disabled. In Track Mix Mode, the display will show either the pan control or stereo pan sliders, depending on the active pan mode.
On Push 2’s display, Group Tracks and tracks that contain Instrument or Drum Racks have special icons that distinguish them.
These types of tracks can be unfolded, allowing you to use the Mix Modes to control the tracks and chains within them. To unfold one of these tracks, select it using the corresponding lower display button. Then press this button again. The Group Track or Rack will unfold, revealing the enclosed tracks or chains. An unfolded track appears in the display with an underline that extends to the end of the enclosed tracks or chains. Each press of a selected track’s lower display button will toggle it open or closed.
Use the left and right arrow keys to access additional chains or tracks that may have been pushed off the display after unfolding. Tip: When working with an unfolded Drum Rack, hold Select and tap a pad to jump to that pad in the mixer. This can make it easier to mix with a large Drum Rack.
Changes that you make to device and mixer parameters can be recorded to your clips as automation, so that the sound will change over time as the clip plays. To record automation, press Push 2’s Automation button so that it turns red.
This toggles Live’s Session Automation Arm button, allowing you to record changes you make to Push 2’s encoders as part of the clip. When you’re done recording parameter changes, press the Automation button again to turn it off. To delete the changes you’ve recorded for a particular parameter, press and hold the Delete button and touch the corresponding encoder. If automation hasn’t been recorded for a parameter, holding Delete and touching an encoder will reset the corresponding parameter to its default value.
Automated parameters are shown with a white dot next to the parameter in the display. Parameters that you have overridden (by manually adjusting the parameter while not recording) will show a gray dot.
To reenable all automation that you have manually overridden press and hold Shift and press the Automation button.
In both the drum and melodic step sequencers, it’s possible to automate parameters for the selected step.
The parameters that are available will change depending on the display mode you are currently in.
When in Clip Mode, hold one or more steps to access note-specific parameters (see ‘Note-Specific Parameters’).
When in Device Mode or Mix Mode, hold one or more steps in order to create and edit device or mixer automation for only the selected step(s). While holding a step and tweaking an encoder, the corresponding parameter’s automation value will be adjusted specifically for the time represented by that step. Note that per-step automation can be created for any step, even if that step doesn’t contain notes.
Press the Clip button to enter Clip Mode, where you can adjust various parameters for the selected clip.
When working with an audio track, if no clip is selected, Push will prompt you to load a sample.
The display colors reflect the color of the clip, and the clip’s name is highlighted in the upper-left corner. Some of the adjustable parameters change depending on the type of clip selected.
In MIDI tracks containing Drum Racks, notes are displayed in their respective pad color. In all MIDI tracks, the velocity of each note is indicated by its opacity.
When a clip is playing on the selected track, the display follows the clip’s song position and scrolls automatically.
For both MIDI and audio clips, the second upper display button toggles Loop on or off. With Loop on, you can set the Loop Position, which is where within the clip the loop will begin. Loop Length sets how many bars and/or beats long the loop is, as measured from the loop position. Start Offset allows you to begin playback at a different point within the loop, rather than at the loop’s start position. If the Loop Position and Start Offset are at the same position, moving the Loop Position will result in the Start Offset moving along with it. With Loop off, you can control the Start and End position. This is the region that will play (once) when the clip is launched.
Hold Shift while adjusting any of these controls to adjust by 16th-note subdivisions.
You can Zoom in or out of the sample with the first encoder. The position you’ll zoom to is centered around the last position encoder you touched (Start, Length, Loop, etc.)
When working with an audio clip, you can also set the clip’s Warp Mode, gain, and transposition. Hold Shift while adjusting Transpose to adjust in cents rather than in whole semitones. (Note: This adjusts the Detune parameter in Live’s Clip View.)
When working with MIDI tracks in Clip Mode, you can view and refine played or sequenced MIDI from Push 2.
The display will change depending on the currently selected pad layout.
In addition to the Zoom, Start, End, and Loop controls available in Clip Mode (see ‘Clip Mode’), all pad layouts provide an additional Crop control, which lets you delete material that falls outside the selected loop.
When recording your real-time playing using the 64 Notes, 64 Pads or 64 Slices layouts, Clip Mode’s display lets you see the incoming MIDI notes, and the view adjusts so that all existing notes fit on the display at the same time (Note that this “folded” display is also shown in Session Mode (see ‘Controlling Live’s Session View’).)
In the melodic and drum step sequencer layouts, a semi-transparent white box on the display indicates the sequenceable area. This represents the area on the pads where you can add, delete or adjust notes.
Each sequenceable area corresponds to one page of steps. A box on the far left side of the display indicates which pitch range the sequenceable area is in.
As notes are added, lines will appear on the far left side of the display. These lines indicate which pitch ranges contain notes. You can use these indicator lines to find and edit notes quickly, without looking at your computer screen.
Pitch ranges with a higher density of notes are represented by thicker lines.
The Melodic Sequencer layout has a range of eight notes on each page. The sequenceable area can be moved horizontally via the loop length pads or Page Left/Right buttons, or vertically via the Octave Up/Down buttons or touch strip.
In this layout, the display will adjust to fit all notes in the clip. When a note(s) that exist in the clip is selected, their sequenceable area will be highlighted on the display. This makes it quicker to locate and edit steps containing the selected note(s). The sequenceable area can be moved horizontally via the Page Left/Right buttons or the loop length pads, which can be accessed momentarily in the fifth row by holding the Layout button.
Drums/Slicing Loop Selector and 16 Velocities
The Loop Selector and 16 Velocities layouts show the selected pad only. The sequenceable area can be moved horizontally via the loop length pads or Page Left/Right buttons, or vertically by selecting a different pad.
When working in any sequencing layout in Clip Mode, you can adjust note settings for each step. To access these settings, simply press and hold a step. The display will zoom to the page containing that step, and switch the controls to the step’s note settings. Notes contained within the selected step will be highlighted.
You can then adjust the corresponding encoders in order to:
You can also adjust these note-specific parameters for multiple steps at the same time. To do this, press and hold all of the pads you’d like to adjust, and then tweak the encoders. The display will show the range of values for the selected steps.
Tip: you can also create notes with your desired Nudge, Length, and Velocity values by holding an empty step and then tweaking any of these encoders.
When working with drums, you can adjust nudge, length, and velocity for every note played by a particular pad by pressing and holding the Select button, pressing the pad, and then adjusting the encoders.
Press Push 2’s Session button to switch from Note Mode to Session Mode. (Press and hold the Session button to temporarily toggle Session Mode. Releasing the button will then return to Note Mode. Likewise, pressing and holding Note while in Session Mode will temporarily toggle Note Mode.)
In Session Mode, the 8×8 pad grid will now launch clips and the Scene/Grid Buttons will launch scenes. Pressing a pad triggers the clip in the corresponding location in Live’s Session View. If the track is selected, pressing the button records a new clip.
The pads light up in different colors so you know what’s going on:
Clip colors can be changed when in Session Mode. To do this, hold Shift and press a pad that contains a clip. Then tap one of the pads on the outer ring to choose that color for the selected clip.
Pressing the Mute or Solo buttons will mute or solo the currently selected track, respectively. Hold Mute or Solo and press any track’s lower display button to mute or solo that track. Holding the Mute or Solo button for a few moments will lock it on. You can then release the button and toggle tracks on and off just by pressing the corresponding lower display buttons. Press Mute or Solo again to unlock it.
Pressing the Stop Clip button will stop the playing clip in the currently selected track. Hold Stop Clip and press any track’s lower display button to stop the playing clip in that track.
Holding the Stop Clip button for a few moments will lock it on. You can then release Stop Clip and stop clips just by pressing the lower display button for the track you would like to stop. While Stop Clip is locked on, the lower display buttons will pulse for any tracks that contain a currently playing clip. Press Stop Clip again to unlock it.
To stop all clips, press and hold Shift, and then press Stop Clip.
Push 2 tells you what’s going on in the software, but, importantly, the software also reflects what’s happening on the hardware. The clip slots currently being controlled by Push 2’s pad grid are shown in Live with a colored border.
Hold the Duplicate button and press a clip to copy it. Continue holding Duplicate and tap another clip slot to paste the clip there.
The arrows and Shift button increase the scope of the eight-by-eight grid.
While working in Session Mode when the focus is on Clip Mode, the display is “folded”, which means all notes within a clip will fit on the display at any given time. Being able to see all notes within a clip allows you to quickly identify it before launching it. (Note: to select a clip without launching it, press and hold the Select button while tapping the pad containing that clip.)
While recording MIDI from an external source (such as a MIDI sequencer or MIDI keyboard), the folded display lets you see all incoming notes.
When in Session Mode, holding the Layout button gives you momentary access to the Session Overview, which is explained in more detail below.
Push 2’s Session Overview lets you navigate through large Live Sets quickly without looking at your computer screen.
Holding the Layout button gives you momentary access to Session Overview, where the pad grid zooms out to reveal an overview of your Session View. You can also lock the Session Overview in place by holding Shift and pressing the Layout button. To unlock the Session Overview, press the Layout button again.
In the Session Overview, each pad represents an eight-scene-by-eight-track block of clips, giving you a matrix of 64 scenes by 64 tracks. Hit a pad to focus on that section of the Session View. For example, pressing the pad in row three, column one will put the focus on scenes 17-24 and tracks 1-8. Furthermore, each scene launch button represents a block of 64 scenes (if they are available in your Set.)
In the Session Overview, the color coding is a little different:
Press the Setup button to adjust brightness, the sensitivity of Push 2’s velocity response, and other settings.
When Pad Sensitivity is turned up, it takes less force to trigger a higher velocity. A Pad Sensitivity of 10 results in higher output levels at any given input velocity, while a setting of 0 results in lower output levels at the same velocity. The default (and recommended) setting is 5.
Pad Gain boosts or cuts the overall velocity curve. Higher values shift the curve towards the top of the velocity range, while lower values reduce it. This control has a stronger effect at medium velocities. The default (and recommended) setting is 5.
Pad Dynamics adjusts the spread of velocities across the output range. At a setting of 10, most velocities will result in high or low output, without much in the middle. At 0, most velocities will result in medium output levels (assuming Pad Gain is set to 5). The default (and recommended) setting is 5.
The easiest way to understand the relationship of the three velocity controls is by observing the changes in the graphical curve below them. The striking force (input) is shown on the horizontal axis, while the output level is shown on the vertical axis.
Tip: To use a linear velocity curve, set Pad Gain to 4 and Pad Dynamics to 7.
Display Light adjusts the brightness of Push 2’s display, while LED Brightness adjusts the brightness of the pads and buttons. At very low LED Brightness settings, pads may appear to be the wrong color. The default (and recommended) setting for both controls is 100%.
The Workflow option determines how Push 2 behaves when the Duplicate, New, or Up/Down arrow buttons are pressed. Which mode you choose depends on how you like to organize your musical ideas. In Scene Workflow (which is the default), musical ideas are organized and navigated in scenes. In Clip Workflow, you’re working with only the currently selected clip.
In Scene Workflow:
In Clip Workflow:
The function of each button and control is explained below.
Tap Tempo — As you press once every beat, the tempo of the Live Set will follow your tapping. If the “Start Playback with Tap Tempo” button is enabled in Live’s Record/Warp/Launch Preferences, you can also use tapping to count in: If you are working in a 4:4 signature, it takes four taps to start song playback at the tapped tempo. The encoder above the button adjusts Live’s tempo in increments of one BPM. Holding Shift while adjusting will set the tempo in increments of .1 BPM.
Metronome — Toggles Live’s metronome on or off. The right encoder sets the amount of swing applied when Quantizing, Record Quantizing or when Repeat is pressed.
Delete — In Note Mode, this button deletes the selected clip. When working with a Drum Rack, hold Delete and press a pad to delete that pad’s notes in the clip (or the pad itself if there are no recorded notes). In Session Mode, hold Delete and then press a clip to delete that clip. Hold Delete and select a device or track with the upper and lower display buttons to delete the device or track. Hold Delete and touch an encoder to delete automation controlled by that encoder. If automation has not been recorded for a particular parameter, holding Delete and touching the corresponding encoder will reset that parameter to its default value. In Simpler’s Slicing Mode, hold Delete and tap a pad to delete that slice. If the Arrangement View is in focus in Live, presing Delete will delete the currently selected clip in the Arrangement.
Undo — Undoes the last action. Press and hold Shift while pressing Undo to Redo. Note that Push 2’s Undo button applies Live’s Undo functionality, so it will undo actions in your Live Set even if they were done without using Push 2.
Mute — Mutes the currently selected track. Hold Mute while pressing another track’s lower display button to mute that track. Hold Mute while pressing a Drum Rack pad to mute the pad. Hold Mute while pressing a step sequencer step to deactivate the step. Hold Mute while pressing a device’s upper display button to deactivate the device. Holding the Mute button for a few moments will lock it on. You can then release Mute and toggle devices or tracks on and off just by pressing the corresponding upper or lower display buttons. Press Mute again to unlock it.
Solo — Solos the currently selected track. Hold Solo while pressing another track’s lower display button to solo that track. Hold Solo while pressing a Drum Rack pad to solo the pad. Holding the Solo button for a few moments will lock it on. You can then release Solo and toggle a track’s solo on and off just by pressing the corresponding lower display button. Press Solo again to unlock it.
Stop Clip — Stops the playing clip in the currently selected track. Hold Stop Clip and press any track’s lower display button to stop the playing clip in that track. While Stop Clip is held down, the lower display buttons will pulse for any tracks that contain a currently playing clip. Press Stop Clip again to unlock it. Hold Shift and press Stop Clip to stop all clips.
Convert — Converts the current instrument or clip into a different format. The details of the conversion depend on what is selected when you press Convert:
Double Loop — Doubles the material within the loop, as well as the length of the loop.
Quantize — Press and release to quantize the selected notes (or all notes in the clip if there is no selection). Hold Quantize and press a drum pad to quantize that pad’s notes. For audio clips, Quantize will affect transients. Press and hold Quantize to access quantization settings. After changing these settings, press once to exit and then press and release to apply your changes.
Duplicate — In Scene Workflow, Duplicate creates a new scene containing all of the currently playing clips. In Clip Workflow, Duplicate creates a copy of the currently selected clip in the next clip slot, while continuing playback of any currently playing clips in other tracks. Hold Duplicate while pressing a Drum Rack pad to copy the pad and paste it to a new location in the Drum Rack. Hold Duplicate while pressing a track selection button to duplicate that track. In Session Mode, hold Duplicate and press a clip to copy it. Continue holding Duplicate and tap another clip slot to paste the clip there.
New — Pressing New stops the selected clip and prepares Live to record new material. This allows you to practice before making a new recording.
Fixed Length — When enabled, all newly created clips will be a fixed number of bars. When disabled, new clips will continue to record until you press the Record, New or Play/Stop buttons. Press and hold, then use the lower display buttons to specify the fixed recording length. Tip: enabling Fixed Length while recording will switch recording off and loop the last few bars of the clip, depending on the Fixed Length setting.
Automate — Toggles Live’s Automation Record button. When on, your parameter changes will be recorded into playing Session View clips. Hold Shift and press Automate to reenable any automation that you have overridden. Hold Delete and press the Automation button to delete all automation in a clip.
Record — With the Session View focused in Live, press the Record button to begin recording a Session clip. Pressing Record again will stop recording but will continue playing back the clip. Pressing Record a third time will enable overdub mode, allowing you to record into the clip while it plays back. Hold Record and press the lower display button for a track to manually arm it. With the Arrangement View focused in Live, pressing Record will toggle Arrangement Recording on and off. You can also trigger Arrangement Recording while Live’s Session View is in focus by holding Shift and pressing Record. Note that this behavior is reversed when the Arrangement is in focus; holding Shift and pressing Record will then toggle Session recording.
Play/Stop — Toggles the play button in Live’s transport bar. While already stopped, hold Shift and press Play/Stop to return Live’s transport to 1.1.1 without starting playback.
Touch Strip — When an instrument track is selected, the touch strip adjusts pitch bend or modulation wheel amount when playing in real-time, or the available range of notes when step sequencing. Pitch bend is selected by default when an instrument track is selected. To change the functionality of the touch strip, hold Select and tap the strip. This toggles between pitch bend and mod wheel functionality each time you tap it. The display will briefly show the current mode each time you change it. Note that pitch bend and modulation wheel functionality is only available when playing instruments in real time, and not when using the Melodic Sequencer. When a Drum Rack track is selected, the touch strip selects the Drum Rack bank.
Encoders and display buttons — The encoders and the two banks of eight buttons above and below the display change function depending on a variety of factors, including the selected track type, the current mode, etc. In all modes, the far-right encoder controls the volume of the Master track (or the Pre-Cue volume if Shift is held.) Holding Shift while adjusting any of the encoders allows you to fine-tune whichever parameter is currently being controlled by that encoder.
Add Device — Opens Browse Mode to add a new device to the currently selected track. Devices will load to the right of the previously-selected device, although note that MIDI effects will always be placed before the instrument in the track and audio effects will always be placed after it.
Add Track — Puts Push 2 into Browse Mode, allowing you to select which type of track you’d like to add (MIDI, Audio, or Return) and optionally load a device to the new track at the same time. If the Add Track button is pressed while a track within a Group Track is selected, any new tracks will be inserted into that Group Track.
Master — Press the Master button to select the Master track. Press Master again to return to the previously selected track.
Scene/Grid buttons — These buttons change their functionality depending on whether Session Mode or Note Mode is selected. When Session Mode is selected, these buttons launch Session View scenes. (Tip: hold the Select button while pressing a Scene button to select the scene without launching it.) When Note Mode is selected, the Scene/Grid buttons determine the rhythmic resolution of the step sequencer grid and the rhythmic resolution of repeated notes (when Repeat is enabled.)
Setup — Press to adjust brightness, the sensitivity of Push 2’s velocity response, and other settings (see ‘Setup Menu’).
User — All of Push 2’s built-in functionality can be disabled via User Mode. This allows Push 2 to be reprogrammed to control alternate functions in Live or other software. (Tip: Push 2’s relative encoders work best in “Relative (2’s Comp.)” mode. To ensure this mode is selected, turn the encoder slowly to the left during mapping.)
Device — Press to enter Device Mode, which allows you to use the encoders and upper display buttons to control parameters in Live’s devices and third-party plug-ins (see ‘Working With Instruments and Effects’). While in another mode, press and hold to temporarily toggle to Device Mode. Releasing the button will then return to the previous mode.
Browse — Press to enter Browse Mode, where you can load instruments and effects to tracks. (see ‘Browsing and Loading Sounds’)
Mix — Each press of the Mix button toggles between Track Mix Mode and Global Mix Mode. In Track Mix Mode, the encoders adjust volume, pan, and send levels for the currently selected track. The lower display buttons are used to select the track (see ‘Track Control And Mixing’). While in another mode, press and hold to temporarily toggle to Mix Mode. Releasing the button will then return to the previous mode.
Clip — Press to enter Clip Mode, where you can adjust parameters for the selected clip (see ‘Clip Mode’). While in another mode, press and hold to temporarily toggle to Clip Mode. Releasing the button will then return to the previous mode.
Arrow Keys — Navigate through your Live Set (in Session Mode) and between tracks or scenes/clips (in Note Mode). In Browse Mode, use the arrows to move between columns of items in the browser.
Repeat — when Repeat is enabled, holding down a pad will retrigger the note. The Scene/Grid buttons change the rhythmic value of the repeated note. Press and hold Repeat to temporarily enable it.
Accent — when Accent is enabled, all incoming notes (whether step sequenced or played in real-time) are played at full velocity. Press and hold Accent to temporarily enable it.
Scale — When Note Mode is on and an instrument track is selected, pressing this button allows you to select which scale will be played on the pads. Note that this button has no effect when a Drum Rack track is selected or when in Session Mode.
Layout — Press to change the layout of the pad grid. When in Session Mode, Layout toggles the Session Overview on or off (see ‘Session Overview’). When in Note Mode, the layout options depend on the type of track that is currently selected and the current mode.
Note — Press to enter Note Mode. When enabled, the pads change functionality based on the type of track that is currently selected. While in Session Mode, press and hold Note to temporarily toggle to Note Mode. Releasing the button will then return to Session mode.
Session — Press to enter Session Mode. When enabled, the pad grid changes to launch clips in Live’s Session View. While in Note Mode, press and hold Session to temporarily toggle to Session Mode. Releasing the button will then return to Note Mode.
Octave Up/Down — If an instrument track is selected, these buttons shift the pads up or down by octave. If a Drum Rack is selected, these buttons shift the Drum Rack’s pad overview up or down by 16 pads. In Session Mode, these buttons shift control of the Session View up or down by eight scenes. These buttons will be unlit if no additional octaves are available.
Page Left/Right — When working with the drum or melodic step sequencers, these buttons navigate to the previous or next page of steps. In Session Mode, these buttons shift control of the Session View left or right by eight tracks.
Shift — Press and hold Shift while pressing other buttons to access additional functionality. Hold Shift while turning encoders for finer resolution.
Select — In Session Mode, hold Select and press a clip to select the clip without launching it. This will also display the clip name in the display. In Note Mode, hold Select and press a Drum Rack pad to select it without triggering the pad.
Two ports on the back of Push 2 allow you to connect momentary footswitches. Footswitch 1 acts as a sustain pedal. Footswitch 2 gives you hands-free control of Push 2’s recording functionality. A single tap of the footswitch will toggle the Record button, thus switching between recording/overdubbing and playback of the current clip. Quickly double-tapping the footswitch is the same as pressing the New button.
Note that certain footswitches may behave “backwards”; for example, notes may sustain only when the pedal is not depressed. Footswitch polarity can usually be corrected by connecting the footswitch to the port while depressing it, but we recommend using footswitches with a physical polarity switch.
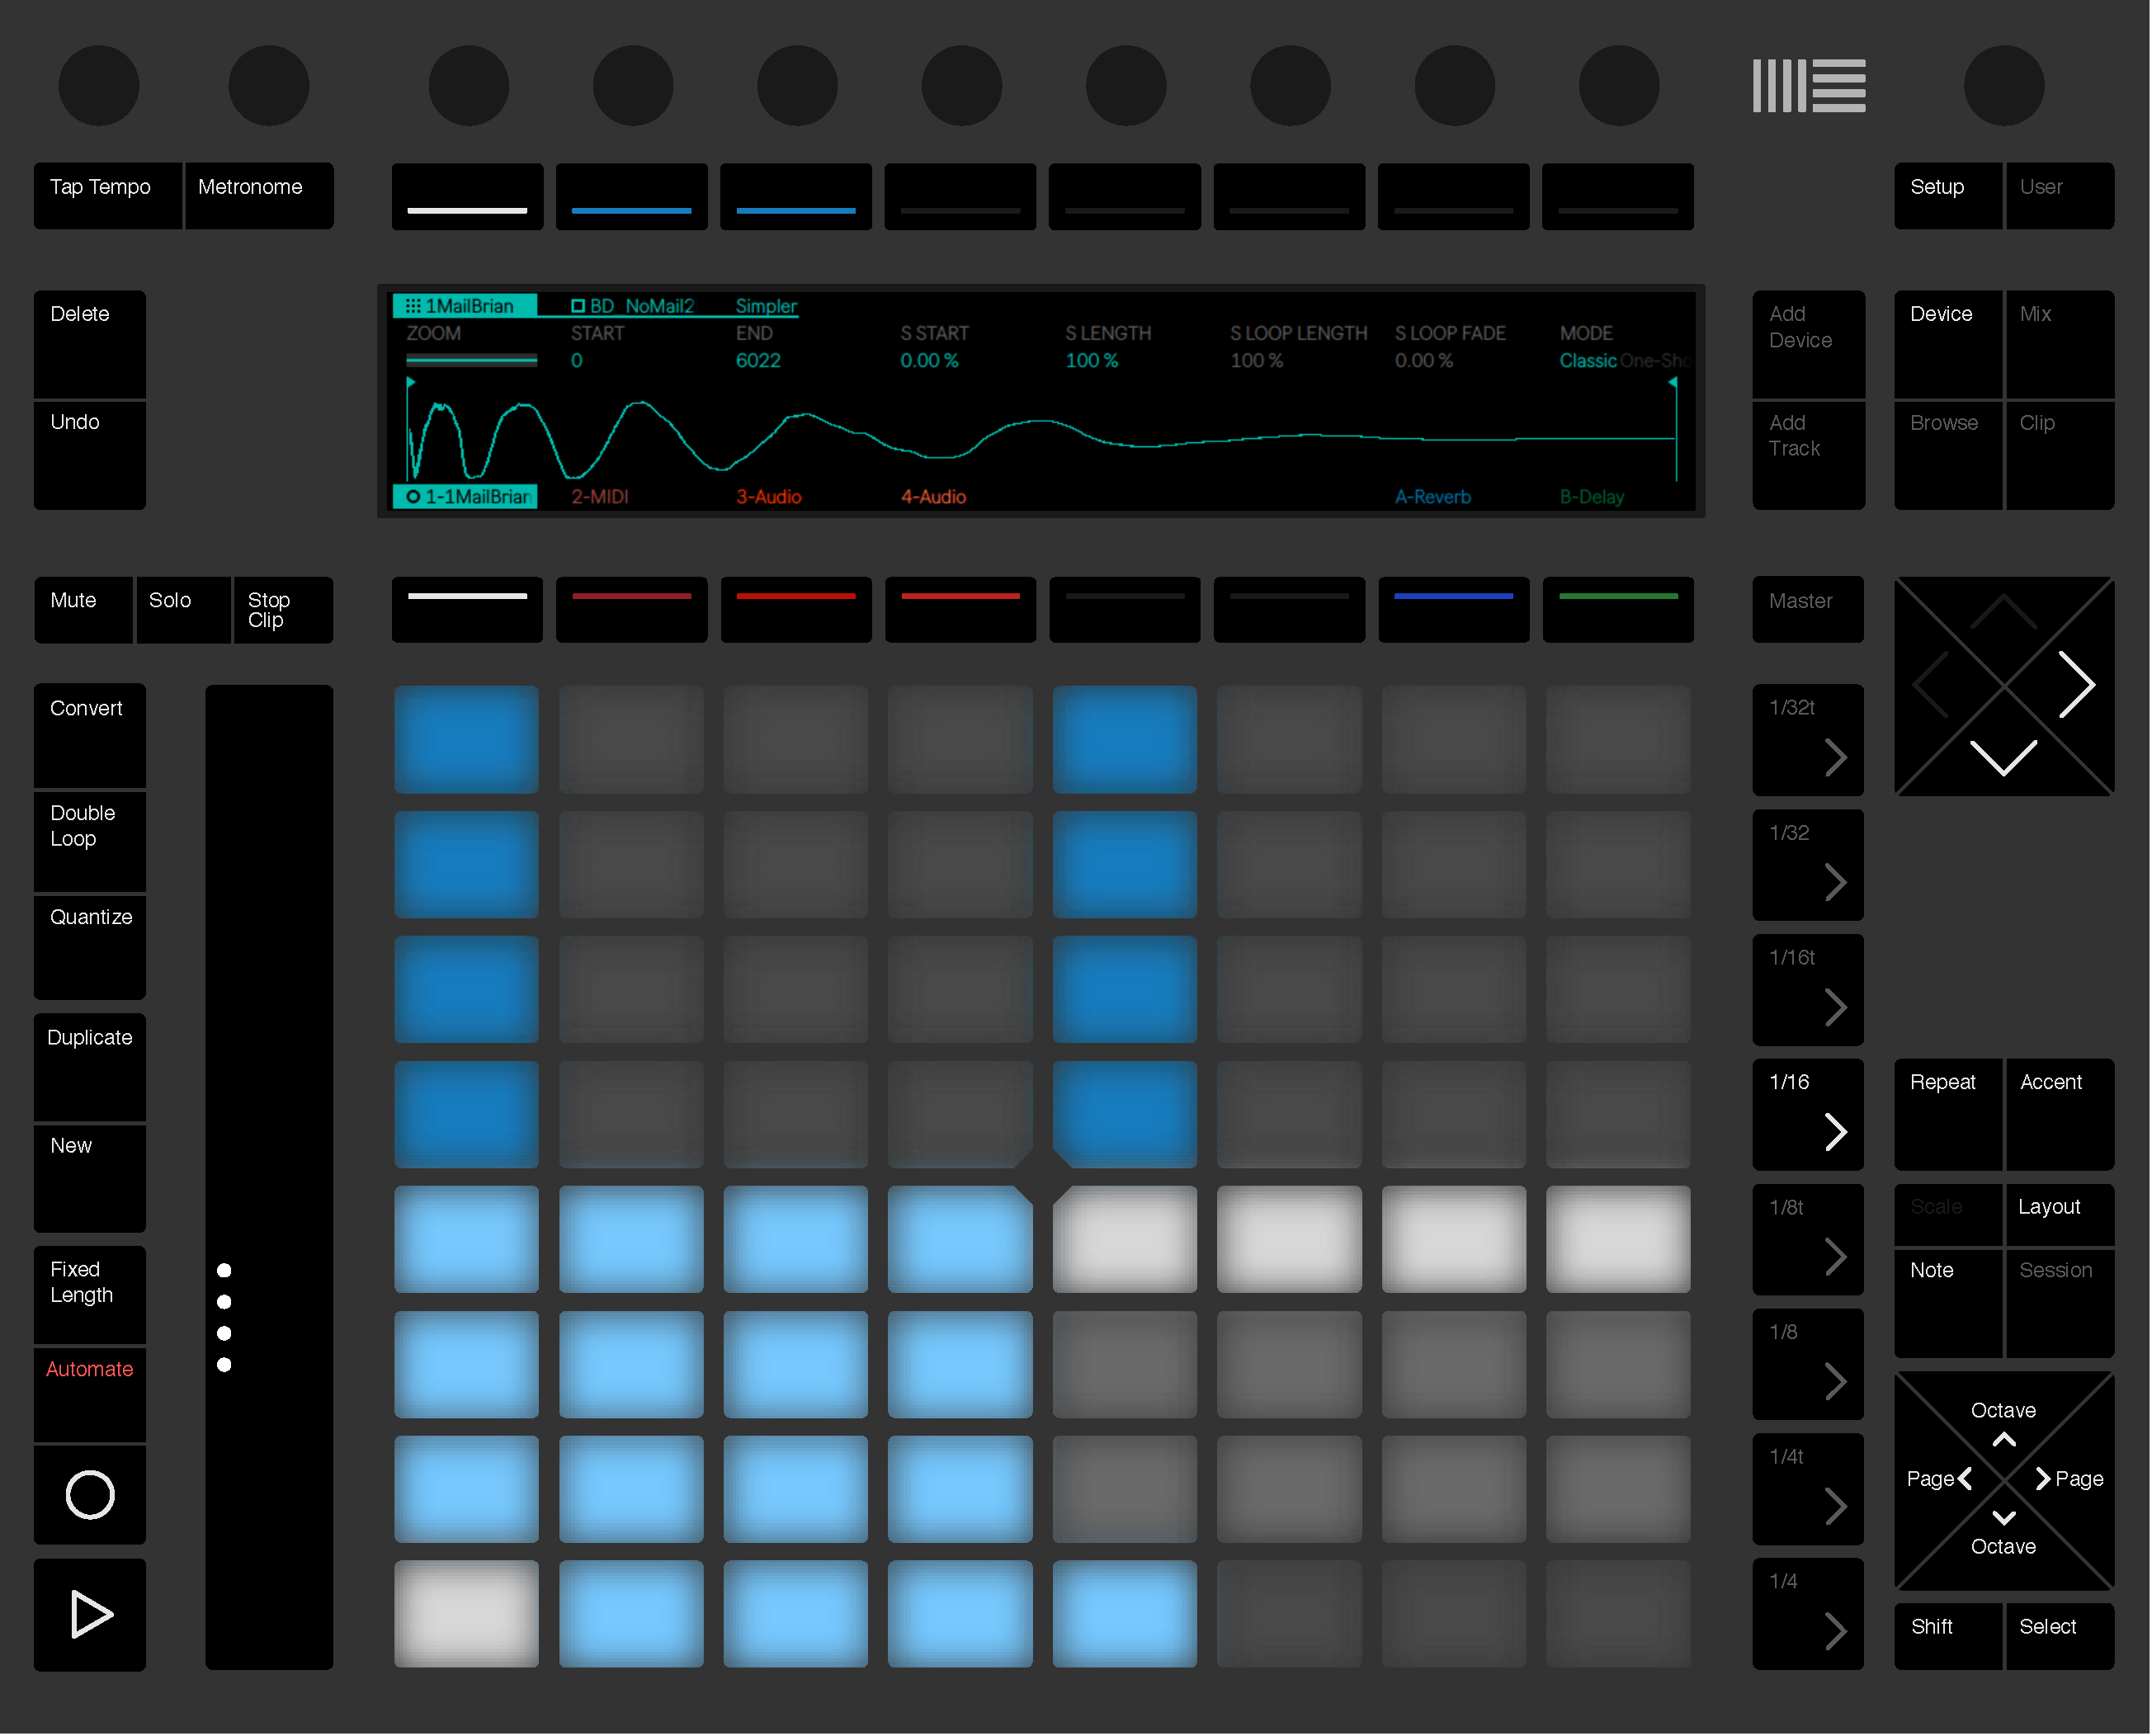
Setup
Browsing and Loading Sounds
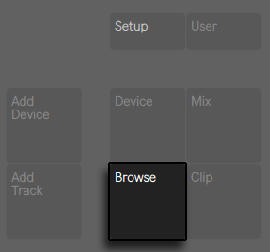


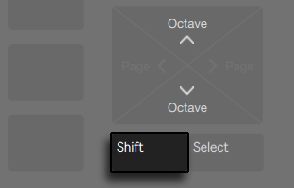

Playing and Programming Beats


Loop Selector
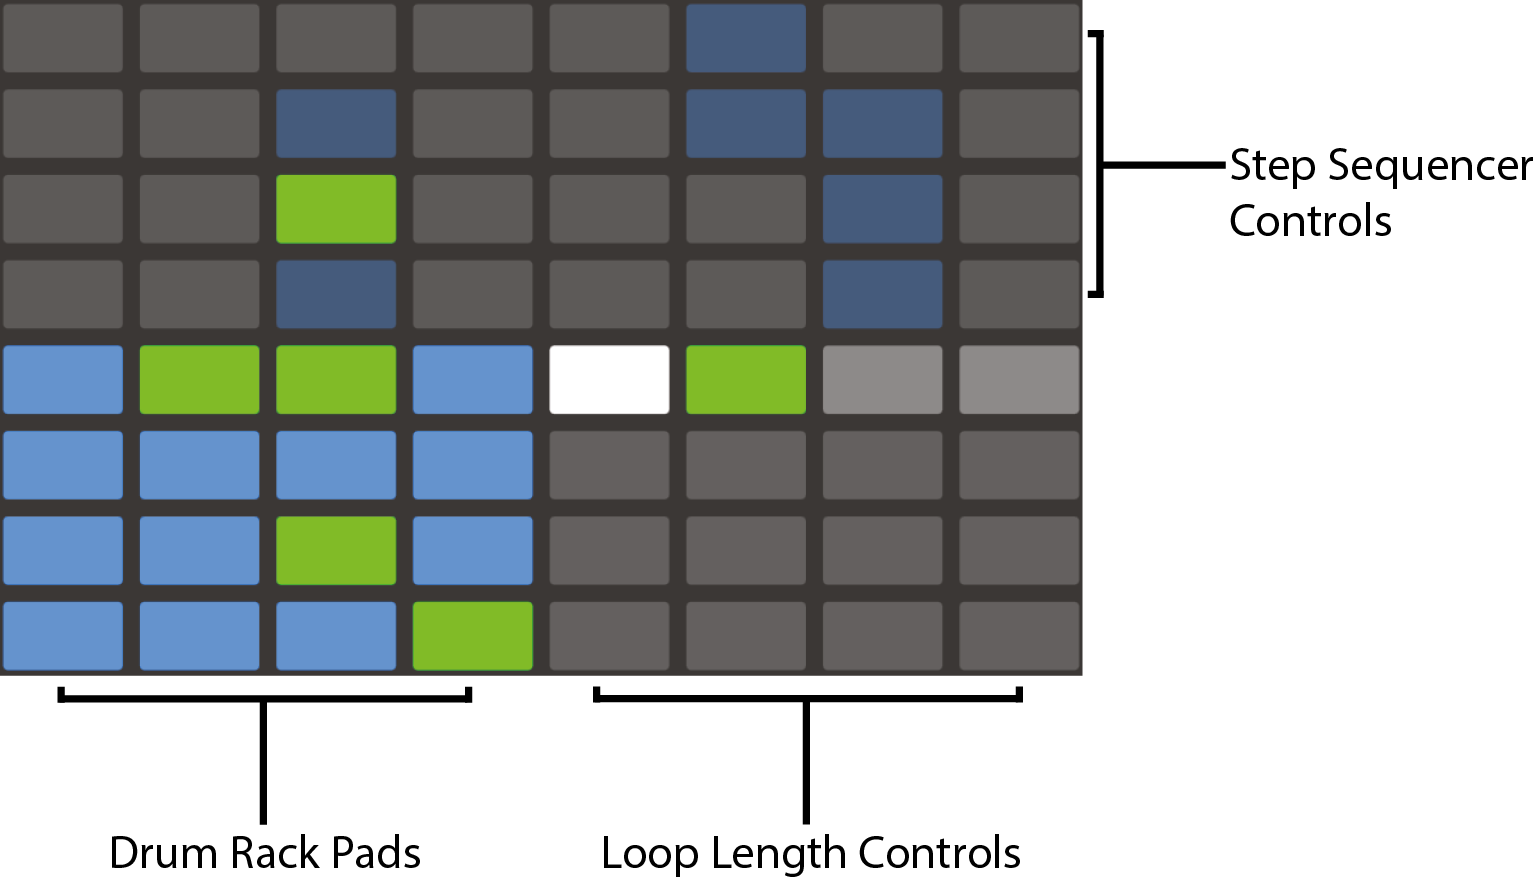

16 Velocities Mode
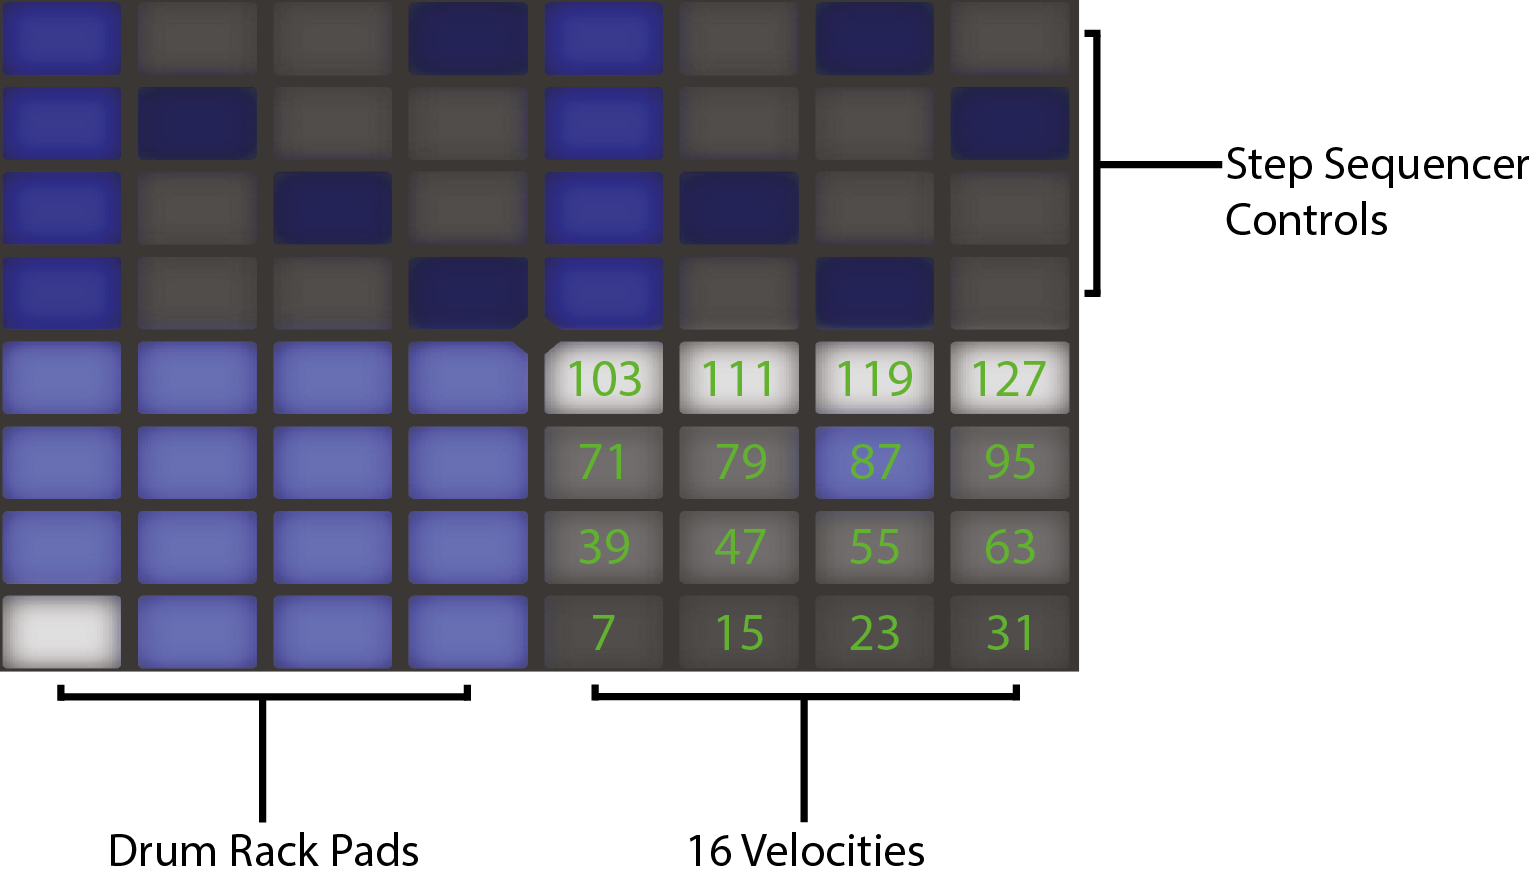
64-Pad Mode
Loading Individual Drums

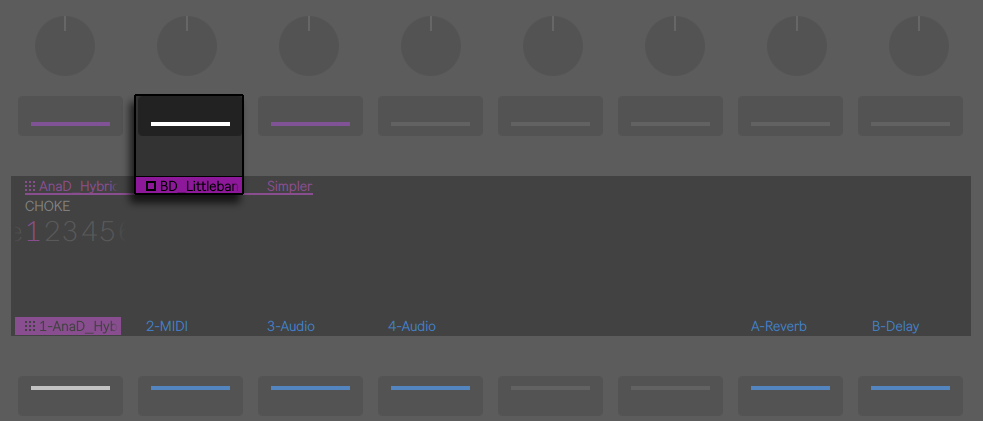


Additional Pad Options


Step Sequencing Beats


Real-time Recording


Fixed Length Recording


Additional Recording Options
Recording with Repeat


Quantizing


Arrangement Recording
Playing Melodies and Harmonies
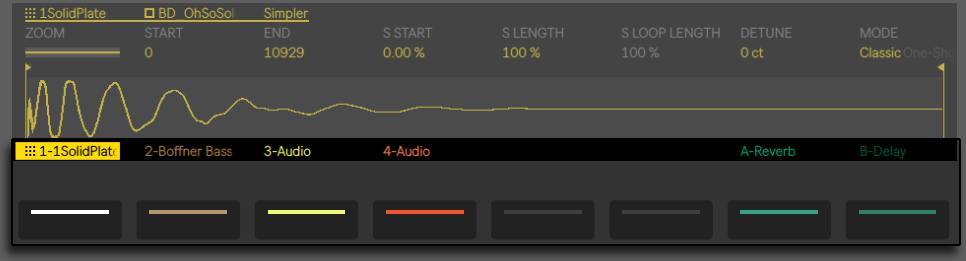


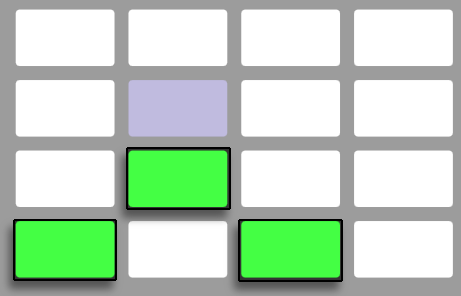
Playing in Other Keys

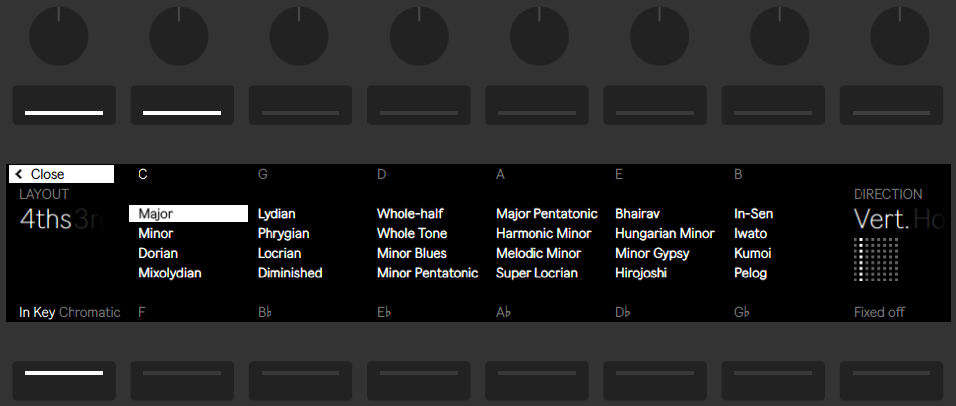
 controls work together to determine the orientation of the pad grid. The default settings are a Layout of “4ths” and a Direction of “Vert.” In this configuration, each pad is a 4th higher than the pad directly below it. Changing the Layout to “3rds“ means that each pad is now a 3rd higher than the pad directly below it. The “Sequent” layout puts all notes sequentially in order. This layout is useful if you need a very large range of notes available, because it has no duplicated notes.
Step Sequencing Melodies and Harmonies

Adjusting the Loop Length


Melodic Sequencer + 32 Notes

32 Notes
Sequencer

Working with Samples


Classic Playback Mode


One-Shot Mode

Legato Playback
Slicing Mode
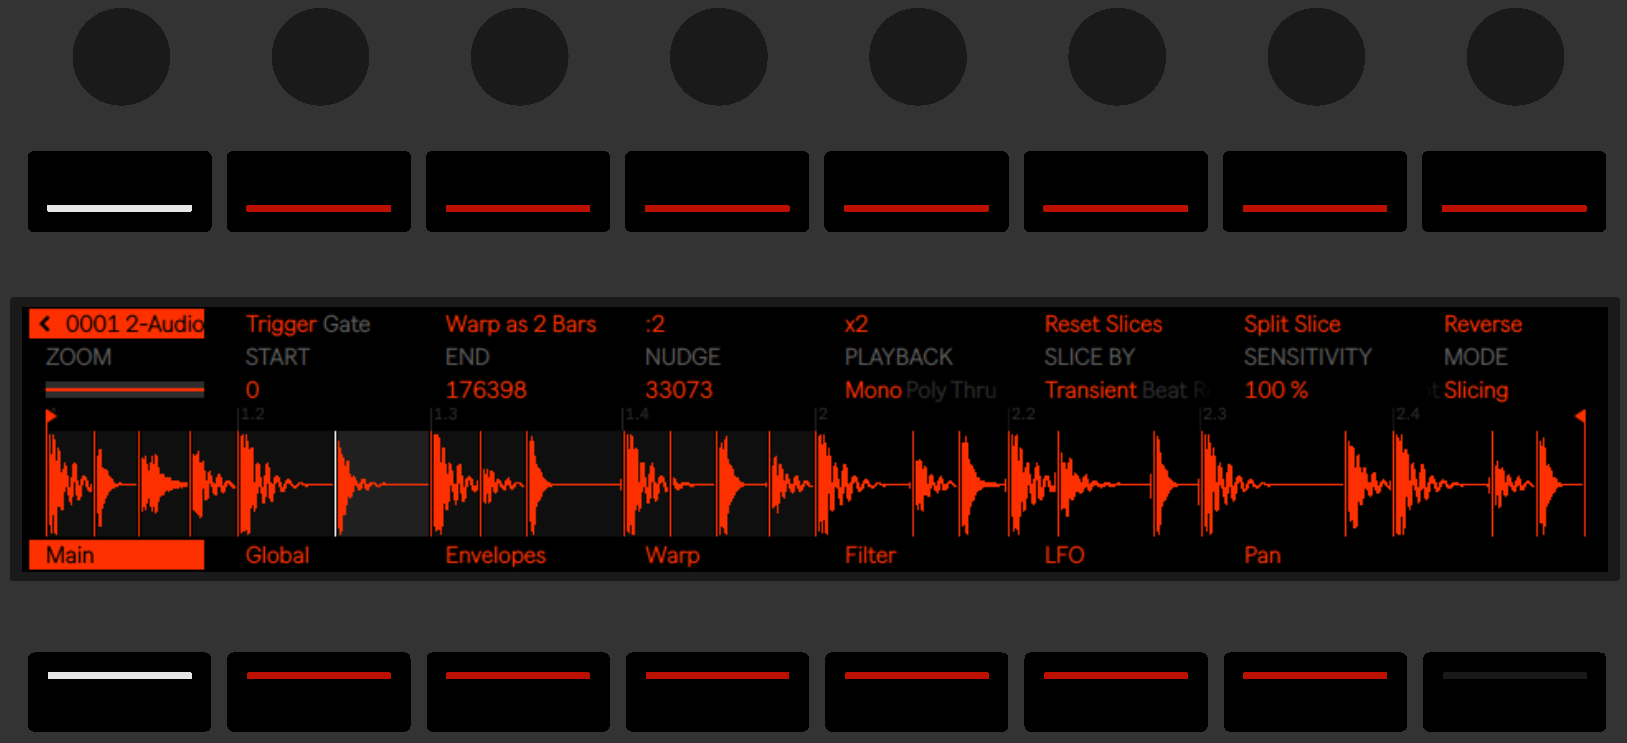
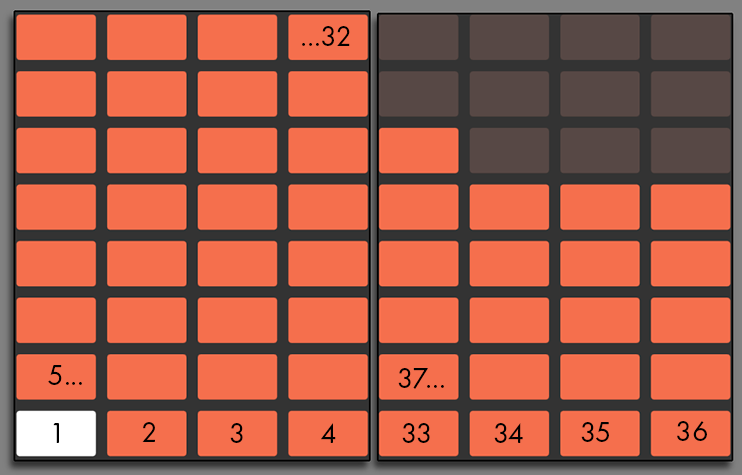
Navigating in Note Mode


Working With Instruments and Effects

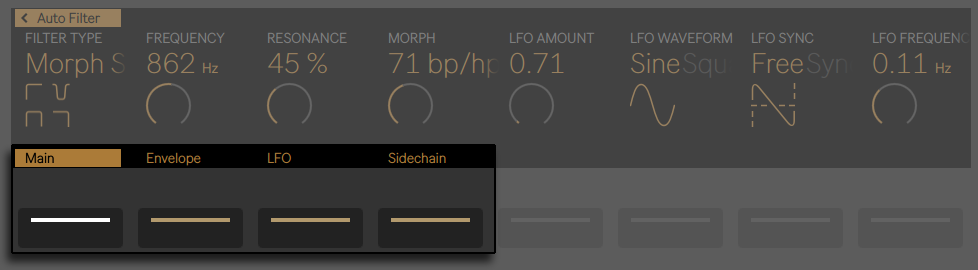


Adding, Deleting, and Reordering Devices


Working with Racks


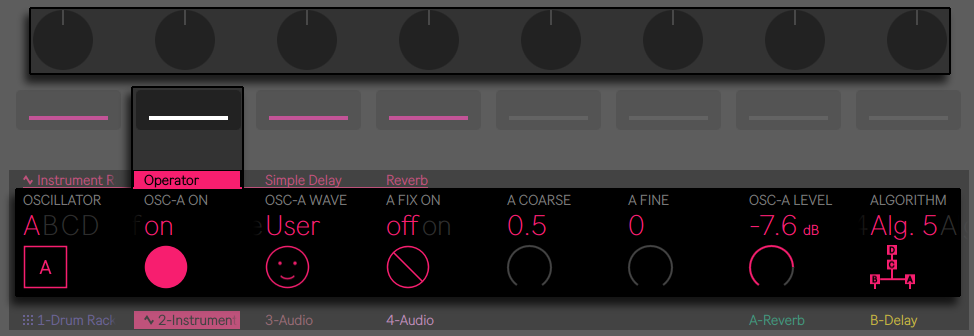

Track Control And Mixing


Rack and Group Track Mixing


Recording Automation


Step Sequencing Automation
Clip Mode


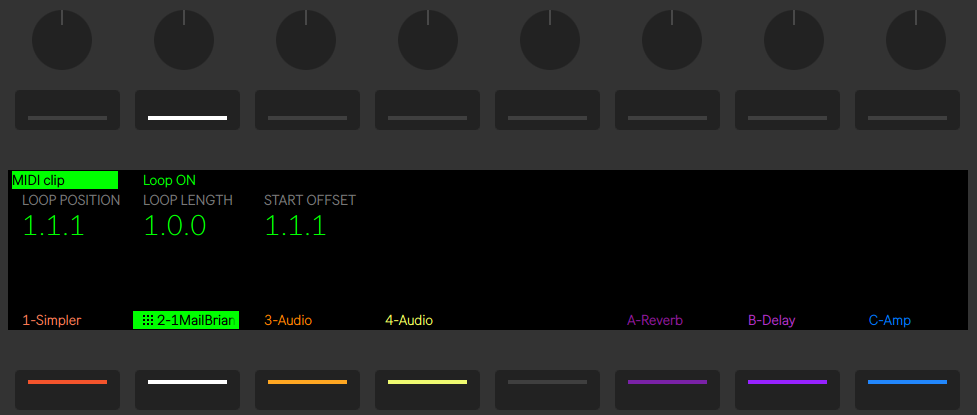

Using MIDI Tracks in Clip Mode
Real-Time Playing Layouts

Sequencing Layouts


Melodic Sequencer
Melodic Sequencer + 32 Notes
Note-Specific Parameters

Controlling Live’s Session View


Session Overview


Push 2 Control Reference
Footswitches
Что такое Ableton Push?
Данный параграф написан, основываясь на материалах ableton.com , в нём же присутствуют изображения с официального сайта.
Ableton Push — это инструмент для написания электронной музыки, который обеспечивает удобное и практичное управление мелодией и гармонией, ударными партиями, различными звуками, лупами, а также самой структурой вашей песни.
В домашней студии Push позволит вам на лету создавать клипы в Режиме Сессии (Session View), как будто вы работаете с каким-либо аппаратным оборудованием типа грувбоксов. Используя данный контроллер, вы, практически не обращаетесь к экрану компьютера, можете сосредоточиться на звуке и аранжировке композиции, при этом вся необходимая информация будет отображаться на встроенном дисплее данного контроллера.
На сцене и во время диджеинга Push может служить мощным и гибким контроллером для запуска клипов и наигрывания мелодических партий.
Интерфейс Ableton Push разделяется на несколько секций. Вы можете увидеть их все на схеме внизу:
Очень многое при работе с Push зависит от того, в каком он находится режиме, а также от типа выбранной дорожки. Подробности о типах дорожек вы можете прочесть в параграфе 4.1. «Клипы и дорожки».
В данном параграфе вы сможете узнать об основных фундаментальных принципах работы с Ableton Push. Эти знания помогут вам вникнуть в его работу. Затем, в последующих абзацах, мы рассмотрим остальные средства управления Ableton Push.
Установка Push
Поскольку Push создавался специально под программу Ableton Live, его установка происходит автоматически. Вам нужно только запустить Ableton Live, и как только вы соедините Push шнуром с USB-портом вашего компьютера, он автоматически распознается в программе. После этого Push можно сразу же использовать. Нет никакой необходимости устанавливать какие-либо драйверы.
Просмотр и загрузка звуков
Вы можете прослушивать и загружать звуки при помощи Push, без использования браузера в программе Ableton Live. Это возможно в самом Push режиме браузера (Browse). Он вызывается при помощи кнопки «Browse» в правом верхнем углу Push’а.
Кнопка включения режима браузера.
В режиме браузера дисплей начинает показывать вам все доступные звуки и эффекты, а также все доступные категории «Places», практически также как в самом браузере Ableton Live.
Обратите внимание, что дисплей контроллера разделён на столбцы. Крайний левый столбец показывает определённый тип просматриваемого устройства или же какой-либо раздел меню Places, в который вы можете войти. Каждый столбец правее него показывает следующую подпапку в браузере, например с Presets, т.е. папку с пресетами (если таковая существует).
Используйте кнопки In и Out, на которых изображены изогнутые стрелки, чтобы смещать колонки дисплея Push’а влево или вправо. Таким образом, дисплей позволит вам просматривать более глубокие уровни подпапок. Также при помощи этих кнопок можно увидеть гораздо большее количество пресетов на вашем дисплее.
Этими кнопками вы можете смещать влево и вправо показанные на дисплее уровни папок.
Итак, прежде чем мы двинемся дальше, давайте ещё раз вспомним, что визуально дисплей Push состоит из четырёх колонок, как бы разграниченных между собой небольшими промежутками. Запомним, что каждая такая колонка дисплея в режиме браузера может содержать папку, категорию, подкатегорию, названия пресетов или семплов.
Мы можем перемещаться вверх и вниз по определённой колонке дисплея, тем самым выбирая нужную нам категорию девайсов.
Посмотрите на скриншот ниже. Мы сейчас находимся в категории, которая содержит несколько версий синтезатора Absynth 5. Для того чтобы перемещаться в этой колонке вверх и вниз, нам нужно нажимать соответствующие направлению подсвеченные кнопки навигации внизу.
Итак, допустим, при помощи этих кнопок мы выбрали нужный синтезатор. Теперь вы можете посмотреть на колонку правее. Она моментально отображает доступные пресеты для выбранного синтезатора.
Чтобы загрузить пресет, нужно нажать на зелёную кнопку, которая загорелась чуть правее от кнопок навигации. Данная зелёная кнопка становится активной только тогда, когда в колонке есть что-либо, что можно загрузить. В нашем случае мы можем загрузить пресет «Abyssyn».
Давайте рассмотрим ещё одно состояние дисплея, чтобы избежать недопонимания. На сриншоте ниже мы видим что зелёная кнопка горит также и в колонке, в которой был выбран «Auto Filter», при этом правее выбран пресет «Cut-O-Movie», который тоже оснащён зелёной кнопкой. Что бы это могло значить? Почему зелёная кнопка загорелась и в первой колонке?
Это происходит тогда, когда у нашего устройства есть некий default preset, т.е. пресет, который был назначен для этого девайса по умолчанию. Нажав на кнопку в первой «категорийной» колонке, мы быстро загрузим пресет по умолчанию.
Этими кнопками вы выбираете пресеты для девайсов в режиме браузера.
Вы можете листать предоставленные строки в столбцах дисплея ещё быстрее, если нажмёте Shift и будете его удерживать при нажатии горящих кнопок навигации вверх и вниз. Так вы будете перемещаться по целым страницам.
Также вы можете быстро перемещаться по папкам и подпапкам при помощи энкодеров Push’а:
Уже после нажатия кнопки загрузки устройств или пресетов устройств, она станет янтарной. Это указывает на то, что в настоящее время выбираемая вами функция уже загружена. Если же Вы будете перелистывать на другой выбор, то кнопка позеленеет снова (этот момент виден на анимированном скриншоте выше).
Подсказка: нажатие кнопки, которая стала янтарной, позволяет вам моментально загрузить следующую строку в списке, позволяя Вам быстро перепробовать все пресеты или устройства.
То, что Вы видите в режиме просмотра браузера на Push, зависит от устройства, которое было выбрано вами последним. Если Вы работали с инструментом, Браузер покажет Вам инструменты. Если Вы работали с эффектом, то будете видеть эффекты.
Различные папки (в том числе с семплами) будут видны на дисплее Push только в том случае, если они содержат объекты, которые в настоящий момент можно загружать куда-либо. Поясню. Например, если вы перейдёте в браузере в Places, в подкатегорию Samples (также как и в любую другую вашу собственную папку, содержащую семплы), они не будут вам видны до тех пор, пока вы не выберете конкретный пэд в Drum Rack. Как только вы выберете пэд — то тут же увидите в браузере все семплы, готовые к загрузке. Подробнее об этом вы сможете прочесть ниже.
Программирование и воспроизведение барабанов
Для того чтобы начать создание барабанов при помощи Push, сначала удостоверьтесь, что включен режим Note Mode.
Затем используйте режим браузера (Browse Mode), чтобы загрузить один из пресетов Drum Rack из вашей библиотеки Live 9.
Когда вы работаете с MIDI-дорожкой, которая содержит Drum Rack, Push автоматически преобразует всю доступную сетку пэдов Push’а, показывая вам три различные секции, которые позволяют вам:
- Играть на Drum Rack вживую;
- Использовать пошаговый секвенсор;
- Изменять длину получающегося клипа.
Посмотрите на сриншот ниже, чтобы понять визуально, где находится каждая секция.
Итак, 16 пэдов Drum Rack в левом нижнем углу соответствуют пэдам Drum Rack. Это сетка 4X4, на которой можно играть в реальном времени.
Цвета пэдов в данном Drum Rack означают следующее:
- Ярко-жёлтый — этот пэд содержит звук.
- Светло жёлтый — этот пэд пустой.
- Зелёный — этот пэд играет в настоящее время.
- Тёмно-синий — этот пэд выбран.
- Голубой — этот пэд играет в режиме solo.
- Оранжевый — этот пэд замьютирован (заглушен).
Если вы работаете с Drum Rack’ом (в нижней секции), который содержит большое количество пэдов, не умещающихся в этой секции, то используйте ленточную сенсорную полосу (touch strip) или же кнопки Octave Up и Octave Down, чтобы передвигаться внутри Drum Rack’а вверх или вниз на каждые 16-ть пэдов. Зажимайте Shift во время использования сенсорной полосы или же кнопки Octave для того, чтобы передвигаться на один ряд вверх-вниз, а не на целую страницу.
Если у вас возникли затруднения с пониманием устройства самого Drum Rack, то рекомендую прочесть параграф «8.10. Drum Rack», который подробно объясняет его устройство.
Режим 64-х пэдов (задействуется вся сетка целиком)
В дополнение к обычному трёхсекционному виду, вы также можете включить целиковую 8×8 сетку для игры на барабанах Drum Rack’а в реальном времени. Это очень полезно, когда вы работаете с очень большими наборами ударных, например такими, которые были созданы при помощи автоматической нарезки семпла (slicing). Об этом механизме вы можете прочитать в главе 5.5. «Преобразуем Audio в Midi».
Для того чтобы включить режим 64-х пэдов, нажмите кнопку «Note Mode» дважды. Нажатие Note ещё раз снова включит стандартное трёхсекционное отображение, позволяя вам быстро перейти обратно в режим пошагового секвенсора.
Цвета пэдов в 64-х пэдовом режиме точно такие же как и в его трёхсекционном отображении.
Примечание: когда вы переключаетесь туда-сюда между двумя разными режимами отображения пэдов, 16-ть пэдов, доступных для пошагового секвенсора не будут меняться автоматически. По этой причине вам нужно будет использовать сенсорную ленту или кнопки Octave для того, чтобы назначить для пошагового секвенсора те 16-ть пэдов, которые вы желаете там видеть.
Загрузка индивидуальных ударных в Drum Rack
Режим браузера (Browse Mode) может быть использован для того, чтобы заменять определённые индивидуальные пэды в уже загруженном вами Drum Rack’е.
Чтобы переключаться между просмотром Drum Rack’ов и его конкретного пэда нажмите кнопку Device, которая применяется для того, чтобы показывать девайсы на дорожке.
По умолчанию Drum Rack загружается так, как показано на дисплее внизу. Название текущего пэда, который вы настраиваете, показывается стрелкой. Для того чтобы выбрать любой другой индивидуальный пэд в Drum Rack’е, нажмите кнопку выбора прямо под названием пэда (см. скриншот внизу).
Теперь, совершив вход в режим просмотра (Browse Mode), вы сможете загружать или заменять звук только выбранного пэда. Находясь в режиме просмотра Browse Mode, и нажимая другие пэды, вы можете тем самым выбирать их для просмотра, и это позволит вам быстро загрузить или заменить различные звуки в пределах загруженного вами Drum Rack’а.
Прежде чем читать дальше, хорошенько проработайте и освойте навигацию, а также выбор пэдов в Drum Rack’е. Не откладывайте в «долгий ящик» практическое применение данного материала!
Барабаны в режиме пошагового секвенсора
Нажатие на пэд в секции Drum Rack’а также автоматически выбирает его, позволяя добавлять выбранные ноты в пошаговый секвенсор.
Подсказка: чтобы выбрать пэд не проигрывая его, нажмите и удерживайте кнопку «Select», когда нажимаете на пэд. Очень полезно во время живого выступления!
Для того чтобы записать ноты в пошаговый секвенсор, просто нажимайте на пэды в его области. Она занимает весь верх 8X8 сетки Push’а.
Таким образом, вы проставляете ноты миди-клипа там, где это вам необходимо. Клип начнёт воспроизведение, как только вы введёте в секцию секвенсора какие-либо ноты. По умолчанию каждый пэд в режиме пошагового секвенсора соответствует 16-ой ноте, но вы можете изменить размер шага ноты с помощью кнопок секции Scene/Grid (Сцена/Сетка). Посмотрите на доступные варианты:
Когда клип играет в режиме пошагового секвенсора, проигрывающийся в данный момент шаг обозначен движущимся зелёным мерцающим пэдом (когда будет включена Запись, движущийся пэд станет красным).
Выбирая шаг, на котором уже была поставлена нота, вы тем самым удаляете её. Нажмите и удерживайте кнопку Mute в режиме пошагового секвенсора, чтобы просто деактивировать данный пэд, не удаляя. Нажимайте и удерживайте кнопки Mute или Solo, при нажатии на пэд, чтобы, соответственно, приглушить или ввести его в режим соло.
Вы можете также скорректировать скорость и тайминг нот (т.е. расположение их в клипе по времени), как описано в разделе про автоматизацию в режиме степ секвенсора (см. ниже).
Для того чтобы удалить все ноты, введённые для какого-либо конкретного пэда, нажмите и удерживайте Delete во время выбора пэда.
Примечание: это действие удалит ноты, над которыми вы работаете в данный момент, и которые находятся в пределах лупа.
Цвета пэдов в режиме степ секвенсора указывают на следующее:
- Неосвещённый — этот шаг не содержит ноту.
- Синий — этот шаг секвенсора содержит ноту. Более тёмный синий цвет указывает на то, что нота сыграна с более высоким параметром Velocity (сила нажатия).
- Светло-жёлтый цвет — этот шаг содержит ноту, но нота была заглушена при помощи Mute.
- Светло-красный — правые два столбца пэдов покраснеют, если будет выбран режим триолей (размер 3/4) в качестве размера шага. В этом случае покрасневшие пэды не будут являться активными; только первые шесть пэдов в каждой строке шага секвенсора смогут вами использоваться.
Когда выбраны триоли, эти шаги секвенсора будут неактивны.
Для получения дальнейшей информации о корректировке размера длины лупа пэдов, см. раздел «Корректировка Длины Лупа».
Запись в реальном времени
Паттерны ударных могут быть также записаны в реальном времени. Вы можете наигрывать свои партии на пэдах Drum Rack’а.
Следуйте следующим шагам, чтобы записать свой паттерн «налету».
- Если Вы хотите сделать запись синхронно со скоростью трека, то нажмите кнопку Metronome. Тем самым вы включите встроенный в Ableton Live метроном, который поможет вам забить партию, совпадающую с темпом проекта.
- Затем нажмите кнопку «Запись» для начала Записи.
Теперь любой пэд в Drum Rack, который вы нажимаете, будет записан в образующийся клип. Повторное нажатие кнопки «Запись» прекратит запись, но воспроизведение клипа продолжится. Нажатие кнопки «Запись» в третий раз включает режим overdub. Это подразумевает запись нот поверх уже существующих в клипе непосредственно во время воспроизведения. Последующие нажатия кнопки «Запись» продолжат переключение между воспроизведением и режимом overdub. Подробнее о режиме Overdub вы сможете прочитать в главе 4.3. Midi Overdub и Запись Автоматизации.
Нажатие кнопки «New» останавливает воспроизведение выбранного в настоящий момент клипа, и подготавливает Ableton для записи нового клипа на указанной вами дорожке. Это позволит вам попрактиковаться, а уже потом делать запись новых идей.
Как правило, нажатие кнопки «New» дублирует все клипы, которые играют на других дорожках, в совершенно новую сцену режима сессии, при этом их воспроизведение продолжится. Это поведение Push’а может быть изменено, если вы поменяете режим Workflow в настройках Push’а. Вы можете переместиться к параграфу, в котором это описано нажав сюда.
Запись клипов фиксированной длины
Нажмите кнопку «Fixed Length» (Фиксированная Длина), чтобы установить размер новых клипов на определённую длину.
Нажмите и удерживайте кнопку Fixed Length для выбора длины записываемого клипа.
Когда Fixed Length функция будет отключена, новые клипы будут записываться дальше, пока вы не нажмёте кнопки Record (Запись), New или Play/Stop.
Подсказка: включение Fixed Length во время записи выключит запись и закрепит луп длиной, указанной в настройках Fixed Length.
Дополнительные опции записи: запись с повторением
С включенной кнопкой Push’а Repeat вы можете удерживать пэд, чтобы сделать запись непрерывно повторяющегося потока ритмичных нот. Эдакий вариант простейшего арпеджиатора для ударных. Это полезно, например, для записи паттернов hi-hat’ов.
Кстати! Изменение давления пальца может регулировать Velocity повторяемых нот. Отличная функция, которая предаст вашим партиям незабываемую динамику!
Частота повторений устанавливается кнопками Scene/Grid.
Подсказка: если вы нажмёте и отпустите Repeat очень быстро, то кнопка останется включена. Если же вы нажмёте и будете её удерживать, то кнопка выключится сразу, как только вы её отпустите, позволяя вам контролировать длительность повторения нот.
Начинайте крутить кноб Swing, чтобы применить эффект свинга к повторяющимся нотам. Как только вы повернёте кноб, дисплей тут же покажет количество добавляемого swing-эффекта.
Дополнительные опции записи: квантизация
Нажатие кнопки Quantize на Push’е будет выравнивать ноты по сетке в выбранном вами клипе.
Нажмите и удерживайте кнопку Quantize для изменения опций квантизации.
Swing Amount определяет интенсивность вашего свинга, который будет применяться к отквантованным нотам. Отметьте, что количество Swing’а может быть скорректировано при помощи энкодера №1 или специально выделенным кнобом Swing.
Quantize To устанавливает ближайшие значения нот, которые должны быть отквантованы, а Quantize Amount определеяет величину сдвига нот, которые уходят со своей оригинальной позиции.
Включение функции Record Quantize автоматически подвергает квантизации записываемые ноты, и изменяет значение квантизации при записи с помощью энкодера №8. Отметьте, что эти средства управления соответствуют настройкам, которые были выбраны в пункте Record Quantization в контекстном меню Edit внутри Ableton Live, и данные корректировки могут быть внесены как из Ableton Live так и при помощи Push. Подробности о меню edit вы могли прочесть в главе 3.1. «Основы Основ интерфейса».
Подсказка: когда вы работаете с барабанами, нажмите и удерживайте Quantize, и нажмите нужный вам пэд в Drum Rack, таким образом, вы отквантуете ноты только данного барабана в текущем клипе.
Создание мелодий и гармонии
После работы над партией ударных вы наверняка захотите создать новую дорожку с басом или с аккордами, и тому подобное. Нажмите кнопку Add Track, чтобы добавить новую MIDI-дорожку в ваш Live Set.
Подсказка: нажмите и удерживайте кнопку Add Track, чтобы выбрать между добавлением Audio, MIDI и Return-дорожек.
Добавление какой-либо дорожки переключает Push в режим Браузера (Browse Mode), о котором мы говорили в самом начале текущего параграфа. Таким образом, вы можете немедленно загрузить какой-либо инструмент и пресет. После загрузки вашего инструмента убедитесь, что режим Note Mode включен.
Когда вы работаете с MIDI-дорожкой, которая содержит какой-либо инструмент, Push’s автоматически настраивает сетку из 8×8 пэдов, так, чтобы проигрывать ноты. По умолчанию каждая нота в этой сетке находится в тональности C Maj (До мажор). Нижний левый пэд играет ноту C1, т.е. До первой октавы (хотя вы с лёгкостью можете изменить октаву кнопками Octave Up и Down). Если перемещаться вверх, то каждый пэд на четверть полутонов выше. Если вы перемещаетесь вправо в этой сетке, то каждый пэд будет отвечать за следующую ноту в до-мажорной тональности.
Поиграйте мажорную гамму. Для этого нажмите подряд первые три пэда в первой строке, точно так же три пэда в следующей строке, и так далее, пока вы не достигнете следующей ноты C (до):
Цвета пэдов помогают ориентироваться в том, что вы играете:
- Синий: это нота — тоника тональности (C).
- Белый: эта нота находится в тональности, но не является тоникой.
- Зелёный: это нота, которая проигрывается в настоящее время (другие пэды также могут стать зелёными, если они будут играть ту же самую ноту).
- Красный: играющая в настоящее время нота записывается.
Чтобы играть аккорды-трезвучия, попробуйте нажимать по следующему шаблону в любом месте сетки:
Данный скриншот показывает аккорд C maj (До мажор).
Игра в других тональностях
Нажмите кнопку Scales, чтобы изменить выбранный ключ и/или тональность.
Используя дисплей и кнопки Selection и State Control, вы можете изменить тональность (или, если угодно «лад»), который будет проигрываться секцией пэдов. Выбранная в данный момент тональность отмечена стрелкой на дисплее:
По умолчанию пэды и возможность выбора лада указывают на мажорные тональности. Можно использовать множество других ладов, используя первый энкодер, или две кнопки под дисплеем слева. Выбранный тип лада также будет отмечаться стрелкой.
В дополнение к изменению тональности вы также можете изменять расположение сетки пэдов, используя две крайние кнопки справа. Они отвечают за две настраиваемые функции.
Fixed Y/N: Когда Fixed Mode включена, ноты в сетке пэдов остаются на тех же самых позициях, когда вы изменяете ключевую тональность. Самый нижний левый пэд будет всегда играть ноту C (До), кроме тех тональностей, которые не содержат C (До), в таком случае он будет играть самую близкую ноту в заданной тональности. Когда Fixed-режим выключен, ноты в секции пэдов сдвигаются таким образом, чтобы нижний левый пэд всегда играл тонику (главную ноту) выбранной вами тональности.
In Key/Chromatic: с выбранным режимом In Key (в тональности), сетка пэдов будет эффективно «свёрнута», таким образом, что будут доступны ноты только в пределах заданной тональности. А в хроматическом режиме (Chromatic Mode), сетка пэдов будет содержать все ноты. Ноты, которые соответствуют выбранной тональности — подсвечены, в то время как ноты, которые не соответствует ей — не горят.
Удерживая кнопку Shift и нажимая кнопку Scales, вы получаете доступ ко многим дополнительным настройкам размещения нот.
Опции “4th” и “3rd “ определяют интервалы нот, на которых будет основана сетка ваших пэдов, а символы ^ и > определяют поворот сетки. Например, по умолчанию стоит расположение “4th ^”, оно означает, что каждый ряд пэдов на 4 полутона выше, чем ряд который находится под ним. Опция “4th >” также построена на четвертях, но теперь она определяет интервалы столбцов слева направо. Т.е. каждый столбец на четверть выше, чем столбец слева. Настройка «Sequent» располагает все ноты по порядку. Эта настройка полезна, когда вам нужен очень большой диапазон нот, т.к. эта настройка избавляет нас от дублей нот в сетке. Для того чтобы настройка имела своё действие на сетку, её, естественно, надо выбрать при помощи пэдов под дисплеем.
Все настройки записи в реальном времени, которые доступны для барабанов, также доступны и для мелодий и гармоний, включая запись фиксированной длины клипа, запись с повторением, квантизацией, и т.д. Но для такого редактирования вам будет необходимо работать с секвенсором мелодий, который мы описываем в следующем разделе.
Подсказка: одна возможность редактирования сразу же доступна в Note Mode: чтобы быстро удалить все ноты той же высоты в пределах текущего лупа, нажмите и удерживайте кнопку Delete, а затем выберите соответствующий этой ноте пэд.
Пошаговый секвенсор мелодий и аккордов
В дополнение к проигрыванию и записи в реальном времени вы можете также пошагово программировать секвенции своих мелодий и аккордов. Для того чтобы включить пошаговый мелодический секвенсор, нажмите кнопку Note Mode дважды.
Это преобразит вашу сетку пэдов следующим образом:
Когда вы используете мелодический пошаговый секвенсор, пэды в верхнем ряду будут корректировать длину вашего лупа. Подробности будут описаны ниже. Основные семь строк пэдов позволят вам помещать ноты в ваш клип. Если вы выбрали определённую тональность, то каждая строка в пошаговом секвенсоре будет соответствовать одной из конкретных нот заданной тональности.
Когда вы выбрали Chromatic, ноты, которые располагаются в тональности будут легко подсвечены, в то время как ноты, которые находятся вне тональности, светиться не будут. Голубоватый подсвеченный ряд (который обычно является самым нижним рядом по умолчанию) указывает на тонику выбранной тональности. Каждый столбец пэдов представляет собой шаг в разрешении, которое мы поставили при помощи кнопок Scene/Grid.
По аналогии с навигацией пэдов в режиме игры, нажатие на кнопки Octave Up и Down сдвигает диапазон доступных нот. Вы можете также использовать сенсорную полоску (Touch Strip) для того, чтобы изменять диапазон нот. (Совет: зажмите Shift-кнопку во время работы с сенсорной полосой или при нажатии на кнопки Octave для того, чтобы более аккуратно настроить диапазон нот.) После корректировки диапазона высоты тона или после переключения между режимом игры в реальном времени и пошагового секвенсора, дисплей кратко продемонстрирует вам доступный в настоящий момент диапазон.
Дополнительно ярко освещённые огни сенсорной полосы указывают на доступный диапазон нот, в то время как слабо горящие сенсорные огни полосы подсказывают, что клип содержит ноты в пределах соответствующего диапазона.
Нажатие кнопки Note снова переключит вас назад к функционалу пэдов для игры в реальном времени.
Подсказка: в дополнение к добавлению и удалению нот, вы можете также скорректировать параметр Velocity и тайминг (микро сдвиги) нот. Об этом подробно говорится в разделе, который посвящён автоматизации пошагового секвенсора.
Корректировка длины лупа
Средства управления длиной лупа позволяют вам устанавливать необходимую длину лупа клипа и определять, какую часть данного лупа вы можете увидеть и редактировать в мелодическом и барабаном пошаговом секвенсоре. Секция находится справа внизу, в соседстве с пэдами Drum Rack — секции. Каждый пэд секции Loop Length соответствует одной «странице» шагов, а длина страницы зависит от того, какое разрешение шагов было нами выбрано (это называется Step Resolution). Когда мы работаем с барабанами с разрешением шага 16-е ноты, то две страницы шагов доступны в один момент времени для двух тактов. Для того чтобы изменить длину лупа, удерживайте один пэд, а затем нажмите другой соседний пэд. (Или, чтобы установить длину петли точно в одну страницу, просто два раза быстро нажмите соответствующий пэд.)
Страница, которую вы видите, не обязательно будет страницей, которую вы слышите. Когда вы установите длину лупа, страницы обновятся так, чтобы текущая позиция воспроизведения (обозначено бегающей зелёной подсветкой пэдов в шаговом секвенсоре, т.е. своеобразным «курсором»), была всегда видна. Но в некоторых случаях вы можете захотеть отключить эту функцию авто-отображения. Например, вы хотите отредактировать конкретную страницу более длинного лупа. При этом вам нужно, чтобы она была перед вашими глазами, независимо от того, где блуждает подсвечивающийся «курсор». Это можно сделать одним нажатием на пэд, который соответствует необходимой вам странице лупа. Это «закрепит» отображение нужной вам страницы, не изменяя длину петли. Чтобы включить авто-отображение и следование «курсору» снова, просто нажмите на «зафиксированный» ранее пэд, тем самым деактивировав закреплённую страницу.
Цвета пэдов в разделе длины лупа указывают на следующее:
- Несветящиеся лупы — эта страница находится за пределами установленной длины лупа.
- Белый — эта страница в пределах лупа, но не видна в настоящие время в разделе пошагового секвенсора.
- Светло-жёлтый цвет — эта страница видима в разделе пошагового секвенсора, но в настоящее время не играет.
- Зелёный — это страница воспроизводится в настоящее время.
Навигация в Note Mode
Теперь, когда создано несколько дорожек, вы можете продолжить добавлять следующие. Но вам, скорее всего, захочется перемещаться между уже существующими дорожками, чтобы продолжить работать над музыкальными идеями, используя другие инструменты и девайсы. Вот эти клавиши со стрелками позволят вам сделать это.
Стрелки лево/вправо перемещают вас между дорожками текущего сета. Отметьте, что выбор дорожки MIDI на Push автоматически «вооружает» её на запись (Arm Record), таким образом, что вы можете начать играть через неё немедленно. В Ableton кнопка «Arm Record» дорожки будет гореть розовым, показывая, что она была вооружена через Push этими стрелками.
Поведение стрелок Вверх/Вниз зависит от режима работы, который вы устанавливаете в User Preferences (Настройках Пользователя) Push’а (о них — ниже). В обоих режимах стрелки Вверх/Вниз передвигают наш фокус вверх и вниз по одной сцене. В режиме работы со сценами (Scene Workflow), сцена, которая была выбрана, запускается. В режиме работы с клипами (Clip Workflow) срабатывает только клип выбранной вами дорожки. Клипы на других дорожках не затрагиваются.
Навигация стрелками Вверх/Вниз в режиме ноты (Note Mode) всегда сразу же начинает воспроизведение, и вызванный вами клип продолжит играть с позиции клипа который проигрывался на этой позиции прежде. Отметьте, что это — практически та же самая фукция, которая устанавливается в свойствах клипа, и которая называется режимом Legato. (Прочитать подробнее о Legato можно здесь: 5.1. Общие секции Audio и MIDI Клипов.)
Управление инструментами и эффектами в Live
Нажатие кнопки Device переключает Push в режим Device Mode, который позволяет энкодерам Push’а управлять параметрами устройств Ableton Live.
В режиме Device Mode кнопки Selection Control (кнопки прямо под дисплеем) выбирают устройства находящиеся в настоящее время на выбранной вами дорожке, в то время как кнопки State Control (следующий ряд кнопок) включают выбранное устройство или отключают его. Девайс, выбранный в настоящий момент будет отмечен стрелкой на дисплее.
Кнопки In и Out позволяют вам перемещаться к дополнительным устройствам и параметрам, которые не могут быть доступны с первого же показа.
Используйте эти кнопки для доступа к:
- дополнительным банкам параметров (для эффектов, у которых есть больше чем один банк параметров).
- дополнительным цепочкам устройства (device chains) в пределах Rack’ов, которые содержат более одной цепочки.
Микширование с Push
Для управления громкостью (Volume), панорамой (Pan), посылами (Send) при помощи энкодеров на восьми дорожках одновременно, нажмите соответствующую кнопку на Push.
В Режиме громкости, энкодеры управляют громкостью дорожки (Volume).
Нажатие кнопки Pan & Send неоднократно будет циклически переключать вас между управлением баланса и многими посылами, доступными в вашем Live Set’е.
Нажмите кнопку Track, чтобы включить Режим Track Mode.
В Режиме Track Mode, энкодеры управляют громкостью дорожки (Volume), балансом панорамы (Pan) и первыми шестью посылами (Sends) выбранной дорожки. Нажмите кнопку Selection Control (ряд кнопок под дисплеем), чтобы выбрать, какой дорожкой будут управлять энкодеры в Режиме Track Mode.
Нажмите кнопку Master, чтобы выбрать Мастер-дорожку.
Подсказка: нажмите и удерживайте кнопку Group Track’s Selection Control, чтобы развернуть или свернуть дорожку.
Запись автоматизации
Изменения, которые вы производите в устройствах и параметрах микшера, могут быть записаны в ваши клипы в виде автоматизации, так, чтобы звук изменялся во время воспроизведения клипа. Чтобы сделать запись автоматизации, нажмите кнопку Automation.
Это действие переключает кнопку Session Automation Arm, позволяя вам сделать запись изменений, которые вы производите с помощью энкодеров Push’а в клипе. Когда вы сделали запись изменений параметров, нажмите кнопку Automation снова, чтобы выключить запись автоматизации. Чтобы удалить изменения, которые вы записали для какого-либо параметра, нажмите и удерживайте кнопку Delete и прикоснитесь к тому энкодеру, которым проводили изменения параметра клипа.
Автоматизированные параметры обозначены символом «■» рядом с названием параметра на дисплее. Параметры, которые вы переопределили (вручную корректируя параметр, не делая запись) покажут своё значение в скобках.
Чтобы перезаписать всю автоматизацию, которую вы сделали вручную, держите Shift а затем нажмите кнопку Automation.
Автоматизация в пошаговом секвенсоре
И в пошаговом секвенсоре ударных и в мелодическом пошаговом секвенсоре нажмите и удерживайте кнопку нужного вам шага, чтобы секвенсор получил доступ к определённым параметрам ноты (выбрать её можно нажав кнопку ниже “Notes”-надписью дисплея), или же можно применить пошаговую автоматизацию (выбрать можно, нажав кнопку выбора под “Automat”).
Специальные параметры ноты
Нажмите Notes, а затем начинайте корректировать энкодерами представленные ниже параметры нот:
- nudge — двигает ноты назад или вперёд по времени. Значение указывается в процентах смещения нот от предыдущей линии сетки. (Отрицательные величины указывают на то, что нота находится перед линией сетки.)
- length — изменение длины выбранных нот. Первый энкодер корректирует грубо длину, в то время как второй энкодер позволяет вам точно корректировать длину ноты.
- velocity — изменение силы нажатия выбранных нот.
Вы можете также скорректировать эти специальные параметры ноты для нескольких нот сразу. Для того чтобы сделать это, нажмите и удерживайте все пэды, которые вы хотели бы скорректировать, а затем поворачивайте энкодер. Дисплей покажет диапазон значений для выбранных изменений.
Если вы выбрали несколько источников, дисплей будет показывать диапазон значений для параметров.
Подсказка: вы можете также создать ноты с нужными вам параметрами Nudge, Length, и Velocity, просто нажав и удерживая пустой шаг в секвенсоре и поворачивая любой из этих энкодеров.
Работая с барабанами, вы можете скорректировать nudge, length, and velocity для каждой ноты, играемой любым пэдом, нажимая и удерживая кнопку Select, нажав пэд, а затем поворачивая энкодеры.
Зажмите Select, а затем жмите на пэд ударного в Drum Rack для того, чтобы изменять все ноты, которые использует данный пэд.
Пошаговая автоматизация
Нажмите “Automat” и удерживайте шаг секвенсора, чтобы создать и отредактировать устройство или автоматизацию микшера только для выбранного шага. Удерживая шаг и поворачивая энкодер, значение автоматизации соответствующего параметра будет скорректировано именно в течение звучания одного этого шага. Отметьте, что автоматизация шага может быть создана для любого шага, даже если этот шаг не содержит ноты.
Управление Режимом Сессии при помощи Push
Нажмите кнопку Session на Push’е, чтобы переключиться из Note Mode в режим сессии Session Mode. Нажмите и удерживайте кнопку Session, чтобы временно переключиться в Session Mode. Отпускание кнопки возвратит вас к Note Mode. Аналогично, нажимая и удерживая кнопку Note, находясь в режиме Session, вы временно переключитесь вас в Note Mode.
В Session Mode 8×8 сетка пэдов теперь будет управлять клипами сессии, а кнопки Scene/Grid начнут запускать сцены. Нажатие пэда вызывает клип в соответствующем местоположении Режима Сессии. Если дорожка выбрана, то нажатие кнопки начнёт запись нового клипа.
Пэды подсвечиваются различными цветами, поэтому вы всегда знаете, что происходит в данный момент:
- Цвет всех неиграющих клипов в вашем Live Set отражён на пэдах.
- Запущенные клипы пульсируют от зелёного к белому.
- Запись клипа пульсирует от красного к белому.
Вы можете остановить всю музыку на дорожке, включив Stop Mode (Стоп-режим) и нажав кнопки State Control на дорожке (второй ряд под дисплеем).
Остановка воспроизведения клипа.
Для того чтобы остановить все клипы, зажмите Shift а уже потом нажмите Stop.
Push показывает происходящее внутри программы, но при этом, что очень важно, программное обеспечение также отражает то, что происходит на наших аппаратных средствах, в нашем случае — на Push’е. Слоты клипа, в настоящее время управляемые сеткой пэдов в Push’е, показываются в Live цветной рамкой.
Стрелки-указатели и кнопка Shift увеличивают объём сетки до полноразмерной 8×8.
- Нажатие Up или Down кнопок продвигает вашу рамку в сессии вверх или вниз на одну сцену за одно нажатие. (Отображение на сетке пэдов тоже, соответственно, меняется.) Удерживайте кнопку Shift, и зажмите Up или Down, чтобы продвинуть рамку на восемь сцен вверх или вниз. (Подсказка: вы можете также использовать кнопки Octave Up и Down, чтобы переместиться на восемь сцен в одно нажатие.)
- Клавиши со стрелками Влево и Вправо перемещают вас в режиме сессии влево или вправо на одну дорожку. Удерживайте кнопку Shift, нажимая лево/право, чтобы перемещаться в одно касание сразу на восемь дорожек.
Обзор Режима Сессии
Session Overview (обзор режима сессии) в Push’е позволяет вам перемещаться через большие сеты быстро, даже не смотря на ваш монитор. Удерживайте кнопку Shift, и отображаемый масштаб сетки пэдов увеличится, чтобы показать краткий обзор Session View. В режиме отображения Session View каждый пэд представляет собой «восемь сцен на восьми дорожках» блоки клипов, тем самым показывая вам матрицу из 64-х сцен на 64-х дорожках. Ударьте по пэду, чтобы сосредоточиться на нужном вам блоке клипов в Session View. Например, удерживая кнопку Shift, а затем, нажав в ряде пэдов номер три, столбец покажет вам сцены 17-24 и дорожки 1-8. Кроме того, в то время, когда Shift зажат, каждая кнопка запуска сцены представляет собой блок из 64-х сцен (если подобные блоки существуют в вашем сете).
В режиме отображения сессии (Session Overview) цветовое обозначение немного отличается:
Янтарный: указывает на выбираемый в данный момент блок клипов, которые будут окружены цветной рамкой в программе.
Зелёный: есть клипы, играющие в этом блоке клипов.
Красный: нет никаких клипов, которые играют в этом диапазоне.
Нет цвета: в этом блоке нет никаких дорожек или сцен.
Пользовательские настройки
Нажмите и удерживайте кнопку User, чтобы скорректировать чувствительность силы нажатия, послекасания, и других настроек.
Кнопка User
Настройки пользователя (User Settings)
Параметр Pad Treshold (Порог срабатывания) определяет самую слабую силу нажатия, которая будет вызывать ноты. Потребуется прилагать больше усилий при более высоких настройках Treshold. При более низких настройках ноты могут вызываться случайно, и пэды могут случайно «западать».
Velocity Curve (огибающая велосити) определяет насколько чувствительны пэды в зависимости от силы нажатия — от линейного графика, который показывает взаимоотношение между силой и velocity один к одному, до различных логарифмических графиков. Более высокие логарифмические значения предоставляют больше динамического диапазона, когда вы играете на них мягко. Диаграмма ниже демонстрирует различные кривые взаимоотношений силы нажатия на горизонтальной оси и скорости воспроизведения ноты (Velocity) на вертикальной оси.
Далее в настройках пользователя есть опция Workflow.
Опция Workflow определяет, как Push будет вести себя, когда нажаты кнопки Duplicate, New, или стрелки Вверх/Вниз. Режим, который вы здесь выбираете, зависит от того, как вам захочется организовывать ваши музыкальные идеи. Во время работы со Scene Workflow (с рабочим процессом сцен, который по умолчанию) музыкальные идеи организованы в сценах, и навигация тоже происходит по ним. Но во время работы с Clip Workflow (с рабочим процессом клипа) вы будете работать только с выбранным в настоящий момент клипом.
В рабочем процессе сцены (Scene Workflow):
- Duplicate создаёт новую сцену, содержащую все в настоящее время проигрываемые клипы, и одновременно включает их проигрывание в новой созданной сцене. Это — то же самое, что и команда «Capture and Insert Scene» в меню Create в самом Ableton Live.
- New идентина Duplicate, за исключением того, что эта команда не дублирует выбранный в текущий момент клип. Вместо этого создаётся пустой слот клипа, который позволяет вам создать новую идею на текущей дорожке.
- Стрелки Вверх/Вниз продвигают вверх или вниз на одну сцену. Воспроизведение клипов в новой сцене начинается без перерыва.
В рабочем процессе клипа (Clip Workflow):
- Duplicate создаёт копию в настоящее время выбранного клипа в новой сцене, продолжая воспроизведение любых играющих в данный момент клипов на других дорожках. (Подсказка: удерживайте Shift, нажимая Duplicate, и это создаст новую сцену, включающую все в настоящее время играющие клипы.)
- New готовит пустой слот клипа на выбранной в данный момент дорожке. Клипы в других дорожках не затронуты.
- Стрелки Up/Down продвигают нас на один шаг вверх или вниз по сценам. Воспроизведение выбранного в текущий момент клипа на дорожке начинается без перерыва. Клипы на других дорожках не затронуты.
Функция Aftertouch Threshold (порог срабатывания послекасания) устанавливает самое низкое входящее значение послекасания (от 0 до 127), которые Push сможет зафиксировать. Входящие значения ниже данного уровня будут просто игнорироваться, в то время как значения, превышающие назначенный нами уровень, будут масштабированы согласно доступному диапазону послекасания. Например, если вы поставите значение Aftertouch Threshold на 120, и сыграете что-либо со значением послекасания 119, т.е. ниже этого значения, то ничего не произойдёт. Но входящие значения между 120-тью и 127-ми будут масштабированы так, как показано ниже:
Если сила послекасания 0, то это будет равно 121-му
Сила послекасания 18 = 122
Сила послекасания 36 = 123
Сила послекасания 54 = 124
Сила послекасания 72 = 125
Сила послекасания 90 = 126
Сила послекасания 108 = 127
Функции кнопок и различных секций контроллера Push
Функция каждого раздела управления объяснена ниже.
Раздел Focus/Navigation
Note Mode — когда выбрана, секция пэдов изменяет свою функциональность, основываясь на типе дорожки, которая в настоящее время выбрана:
- MIDI дорожка, содержащая инструмент — пэды играют ноты. Нажимая на Note, вы будете переключаться между игрой в реальном времени и мелодическим пошаговым секвенсором.
- MIDI дорожка, содержащая Drum Rack — секция пэдов, разделена; нижние левые 16 пэдов играют Drum Rack, нижние правые 16 пэдов корректируют длину петли клипа, а верхние четыре строки управляют степ секвенсором.
Session Mode (Режим Сессии) — когда выбран, Секция Пэдов меняется на запуск клипов в Session View (Режиме Сессии) программы.
Shift — нажмите и удерживайте Shift, нажимая другие кнопки, и вы получите доступ к дополнительной функциональности.
Клавиши со стрелками — позволяют перемещаться в Live Set’е (в Session Mode) и между дорожками или сценами/клипами (в Note Mode).
Select — в Session Mode, удерживайте Select и нажмите клип, чтобы выбрать клип, при этом, не запуская его. Это также покажет имя клипа в дисплее. В Note Mode удерживайте Select и нажмите пэд в Drum Rack, чтобы выбрать его ноты, не проигрывая сам пэд.
Добавление секции (Add Section)
Эти кнопки добавляют новые устройства или дорожки к вашему Live Set.
Add Effect — открывает Browse Mode, чтобы вы имели возможность добавить новое устройство справа от выбранного в настоящий момент девайса. Удерживайте Shift, нажимая Add Effect, и это позволит вам добавить новое устройство в левой стороне от устройства, выбираемого в данный момент. Подсказка: чтобы добавить MIDI Effect, сначала выберите инструмент в дорожке. Затем удерживайте Shift, нажимая Add Effect.
Add Track — создаёт новую MIDI-дорожку справа от выбираемой в настоящее время дорожки. Нажмите и удерживайте Add Track, и это позволит вам выбирать различные типы добавляемых дорожек (Аудио, MIDI, или Return).
Секция нот (Note Section)
Эти кнопки используются, когда включен режим игры нотами в Push.
Scales — Когда Note Mode включен и выбрана инструментальная дорожка, нажимая эту кнопку, вы сможете выбирать тональность, которую можно играть на пэдах. Однако эта кнопка не имеет никакого эффекта, когда выбрана дорожка Drum Rack или когда мы находимся в Session Mode.
- Fixed Y/N: Когда режим Fixed Mode включен, ноты по сетке пэдов остаются на тех же самых позициях, когда вы меняете тональности. Нижний левый пэд всегда будет играть C (до) (кроме тональностей, которые не содержат C, тогда нижний левый пэд будет играть самую близкую нижнюю ноту в данной тональности). Когда Fixed mode выключен, ноты по секции пэдов сдвигаются так, чтобы нижний левый пэд всегда играл тонику выбранной тональности.
- In Key/Chromatic: с выбранным режимом In Key (в тональности), сетка пэдов будет эффективно «свёрнута» таким образом, что будут доступны ноты только в пределах заданной тональности. А в хроматическом режиме (Chromatic Mode) сетка пэдов будет содержать все ноты. Ноты, которые соответствуют выбранной тональности — подсвечены, в то время как ноты, которые не соответствует ей — не горят.
- Scale selection (Выбор тональности): выберите основную тональность с помощью кнопок вверх/вниз в левой стороне.
User — весь встроенный в Push’s функционал может быть отключен при помощи так называемого пользовательского режима (User Mode). Это позволяет вашему Push’у быть повторно запрограммированным, чтобы управлять дополнительными функциями в Live или в любом другом программном обеспечении. Нажмите и удерживайте кнопку User, чтобы получить доступ ко многим параметрам такой конфигурации. (Подсказка: энкодеры Push’s работают лучше всего в режиме “Relative (2’s Comp.)”, для выбора этого режима, поверните энкодер медленно влево во время Маппинга.)
Repeat — когда Repeat включен, удержание какого-либо пэда будет повторно вызывать ноту. Работает наподобие примитивного арпеджиратора. Кнопки Scene/Grid изменяют частоту этого ритмичного повторения.
Accent — когда Accent включен, все поступающие ноты (содержащиеся в режиме степ секвенсора или же поступающие в режиме игры в реальном времени) проигрываются с полным значением велосити. Нажмите и удерживайте Accent, чтобы временно включить и оставить работать эту функцию.
Octave Up/Down (Октавы Вверх/Вниз) — если выбрана инструментальная дорожка, эти кнопки, смещают пэды нот на октаву вверх или вниз. Если выбран Drum Rack, то эти кнопки смещают проигрываемые пэды в Drum Rack вверх или вниз на 16 пэдов, затрагивая прочие доступные пэды в девайсе. В Session Mode (в Работе с сессией) они управляют сдвигом вверх или вниз на восемь сцен. Эти кнопки не будут подсвечиваться, если дополнительные октавы не будут доступны.
State Control Section (Контроль состояния трека)
Работая с треками, крайние левые восемь кнопок могут останавливать клипы, мьютировать, или засолировать соответствующий трек, в зависимости от того, какая из трёх самых правых кнопок в этом ряду нажимается, имеются в виду кнопки Stop, Mute, или Solo. Если вы работаете с устройствами (девайсами) вместо треков, то крайние левые восемь кнопок в этом ряду включают или выключают устройства. Помните, что у этих кнопок есть дополнительная функциональность в других режимах (выбор гаммы, и т.д. и т.п.).
Подсказка: чтобы остановить все клипы разом, нажмите и удерживайте Shift, а затем нажмите Stop.
Selection Control Section (Секция Контроля Выбора
Эти кнопки работают вместе с кнопками Display/Encoder Section и выбирают, какие параметры могут регулироваться энкодерами, и при этом отображаться на дисплее. Кнопки In и Out позволяют вам получить доступ к устройствам внутри Rack’ов (контейнеров) или к дополнительным банкам параметров устройств, если они содержат более восьми параметров. В Browse Mode (Режиме Браузера) кнопки In и Out смещают ваш дисплей вправо или влево, позволяя вам просмотреть более глубокие уровни подпапок или рассмотреть большее число пресетов девайсов на дисплее.
Секция Дисплея/Энкодеров (Display/Encoder Section)
Эти шесть кнопок справа от дисплея определяют режим редактирования энкодеров. Во всех этих режимах девятый энкодер всегда будет управлять уровнем Мастер-трека (или уровнем предпрослушки (Cue), если при вращении зажата кнопка Shift). Нажимая Shift во время вращения любого из первых восьми энкодеров можно тонко настраивать любой параметр, который в текущий момент контролируется данным энкодером. Помните, что вы можете временно переключиться к различным режимам редактирования, нажимая и удерживая соответствующую кнопку. Отпускание данной кнопки возвратит вас к предыдущему режиму.
В режиме Громкости (Volume Mode) энкодеры управляют уровнем громкости восьми выбранных треков.
В режиме Панорамы & Посылов (Pan &Sends), нажмите один раз для управления панорамой. Нажав на кнопку второй раз, активируется режим управления посылами (Sends), и т.д.
В режиме трека (Track Mode) энкодеры управляют выходным уровнем громкости Volume трека, панорамой Pan и шестью посылами Sends выбранного трека. Выберите трек, которым будете управлять, с помощью восьми кнопок Selection Control (Контроль выбора, 1 ряд кнопок под дисплеем). Нажмите кнопку Master, чтобы выбрать Мастер-трек.
В режиме клипов (Clip Mode) энкодеры управляют различными параметрами выбранного клипа. Параметры зависят от типа выбранного клипа:
Если вы выбираете MIDI клип, тогда энкодеры управляют следующими параметрами:
- Loop Start (начало петли), или же Clip Start, если Loop выключен.
- Position (позиция клипа)
- Loop Length (длина петли) (или Clip End, т.е. конец клипа, если функция зацикливания Loop выключена)
- Loop On/Off (ВклВыкл зацикливание Loop)
Если выбираете Аудио Клип, энкодеры управляют такими параметрами:
- Loop Start (начало петли), или же Clip Start, если Loop выключен.
- Position (позиция клипа)
- Loop Length (длина петли) (или Clip End, т.е. конец клипа, если функция зацикливания Loop выключена)
- Loop On/Off (ВклВыкл зацикливание Loop)
- Warp Mode (Режим Варпинга)
- Detune (Расстройка)
- Transpose (Транспонирование)
- Gain (Выходной уровень сигнала)
Выбран девайс, экнодеры контролируют параметры выбранного девайса.
Выбран режим Browse браузера, энкодеры скролят доступные девайсы и пресеты.
Секция управления темпом (Tempo Section)
Tap Tempo — как только вы ритмично потыкаете на эту кнопку (один раз на долю), темп вашего сета в Ableton тут же подстроится под него. Если переключатель «Start Playback with Tap Tempo» включен в меню Preferences во вкладке Record/Warp/Launch, то вы также можете использовать Tap-кнопку для предварительного счёта. Если вы работаете в обычной размерности 4/4, то вам достаточно четырёх нажатий, чтобы начать воспроизведение трека в заданном темпе.
Metronome — включает или выключает метроном.
Левый энкодер в секции корректирует темп проекта на 1 BPM. Если вы зажмете Shift, тогда вы будете более плавно регулировать темп в десятых долях темпа.
Правый энкодер определяет величину свинга, когда активен Quantizing (квантование) или Record Quantizing (квантование записи) или когда кнопка Repeat нажата.
Секция редактирования (Edit Section)
Undo — отменяет последнее действие. Нажимая и удерживая Shift, а затем, нажимая Undo, вы тем самым совершите команду «Redo», которая позволяет отменить ранее совершённое действие отмены. Отметьте, что кнопка Undo на Push полностью повторяет функциональность Undo-команды в Ableton, т.е. если вы сделаете в программе что-то даже без использования Push, то ваше действие может быть отменено при нажатии на эту кнопку на Push’е.
Delete — В Note Mode, эта кнопка удаляет выбранный клип. В Session Mode удерживайте Удаление, а затем нажмите клип, чтобы удалить этот клип. Удерживая Удаление и выбирая устройство или трек при помощи Кнопок управления Выбором Push, можно удалить устройство или трек. Удерживая кнопку Удаления и касаясь энкодера, можно удалить автоматизацию, которая привязана к этому энкодеру.
Quantize — нажмите и отпустите кнопку, чтобы применить квантование для выбранных нот (или для всех нот в клипе, если не было сделано выбора). Удерживайте Quantize и нажимайте на пэд в Drum Rack’е, чтобы отквантовать ноты именно для этого пэда. Для аудио клипов квантование будет применяться к транзиентам при включенных алгоритмах варпинга. Нажмите и держите кнопку Quantize, чтобы получить доступ к настройкам квантизации. После того как вы измените эти настройки, нажмите на кнопку один раз, чтобы выйти из них, а затем нажмите и отпустите кнопку, чтобы ваши изменения возымели действие.
Double — дублирует материал внутри лупа, а также саму длину лупа.
Транспортная панель (Transport Section)
Fixed Length — когда включена данная функция все новые клипы будут создаваться с фиксированным числом тактов. Когда она отключена, новые клипы будут продолжать записываться, пока вы не нажмёте кнопки Record, New или Play/Stop. Нажмите и удерживайте, а затем используйте кнопки под дисплеем, чтобы определить и выбрать фиксированную длину клипа для записи.
Совет: включение фиксированной длительности во время записи выключит запись и создаст петлю с последующими несколькими тактами клипа, в зависимости от значений Fixed Length.
Automation — управляет автоматизацией записи в Ableton. Когда она включена, все изменения параметров будут записаны в проигрывающиеся в данный момент в Режиме Сессии. Если вы будете удерживать Shift, и нажмёте кнопку Automation, то повторно включите ту автоматизацию, которую вы переписали. Зажмите Delete и нажмите на кнопку Automation, чтобы удалить всю автоматизацию в клипе.
Duplicate — во время отображения на дисплее установок сцен (Scene Workflow), Duplicate создаёт новую сцену, содержащую все в настоящее время проигрывающиеся клипы. Если же вы работаете с клипами, то Duplicate создаст копию выбранного в настоящий момент клипа в новой сцене, продолжая при этом проигрывание любых играющих клипов на других дорожках.
New — нажатие New остановит выбранный клип, и подготовит Live для записи нового материала. Это позволит вам попрактиковаться, прежде чем приступить к записи снова.
Record — нажмите кнопку Record чтобы начать записывать. Нажатие кнопки Record снова прекратит запись, но продолжит воспроизводить клип. Нажатие Record в третий раз включит режим overdub, в котором можно записать новые ноты поверх старых, в то время когда он производится.
Play/Stop — эта кнопка включает одноимённую кнопку в транспортной панели Ableton Live. Нажатие на неё включит воспроизведение, повторное нажатие — остановит. Зажмите Shift, а затем нажмите кнопку Play/Stop, чтобы вернуть курсор в позицию 1.1.1, не начиная при этом воспроизведение. Очень удобно, когда вы подготовили некий материал в режиме сессии, и желаете его записать с собственными манипуляциями в режим аранжировки!
Сенсорная полоса (Touch Strip)
Когда выбран инструментальный трек, сенсорная полоса Push’а (Touch Strip) корректирует высоту тона или же работает как колесо модуляции во время игры в реальном времени, либо действует на доступный диапазон нот во время работы пошагового секвенсора. Когда выбран Drum Rack, сенсорная полоса выбирает банк для Drum Rack’а.
Регулировка высоты тоны выбирается по умолчанию, как только активируется инструментальный трек. Для того чтобы изменить функциональность сенсорной полосы, зажмите Select и притроньтесь к ней. Так вы сможете переключать её функциональность между регулировкой Pitch Bend (высоты тона) и модуляцией. Дисплей будет показывать текущий режим каждый раз, когда вы будете его менять. Помните, что оба режима сенсорной полосы — Pitch Bend («Высота тона») и Modulation Wheel («колесо модуляции») доступны только тогда, когда вы играете на инструментах в реальном времени, а не при использовании мелодического пошагового секвенсора.
Секция пэдов
Функциональность секции пэдов (Pad Section) определяется кнопками Note и Session Mode. Когда включен режим Session Mode секция пэдов используется для запуска клипов в режиме сессии программы Ableton Live. Когда же включен режим Note Mode, секция пэдов меняет свою функциональность, основанную на типе трека, который в настоящее время был вами выбран:
Если MIDI трек, содержит инструмент: пэды воспроизводят ноты. Нажатие кнопки Note дополнительно, переключает между режимом игры в реальном времени и мелодическим пошаговым секвенсором.
MIDI трек, содержащий Драм Рэк — Секция пэдов начинает делиться на три секции: нижние левые 16 пэдов проигрывают Drum Rack, нижние правые 16 пэдов корректируют длину клипа, а верхние четыре строки управляют степ секвенсором. Нажмите Note снова, чтобы переключиться в 64-х пэдовый режим, чтобы проигрывать ваши ударные уже по всей 8X8 сетке.
Секция Scene/Grid
Эти кнопки также могут изменять свою функциональность в зависимости от режима который вы выбираете: Session Mode или Note Mode. Когда выбран Session Mode, эти кнопки запускают сцены Session View. (Подсказка: удерживайте кнопку Select, нажимая кнопку Scene, чтобы выбрать сцену, при этом, не запуская её.) Если же выбран режим Note Mode, то Секция Scene/Grid будет задавать ритмичное разрешение сетки вашего пошагового секвенсора и ритмичное разрешение повторяющихся нот (т.е. нот, которые записываются при включенном режиме Repeat).
Напольные MIDI-педали
Два порта на задней стенке Push’а позволяют вам подсоединять к нему напольные миди-педали. Footswitch 1 действует как педаль сустейна. А Footswitch 2 даёт вам hands-free контроль записью Push, что позволит вам освободить руки. Одно нажатие на педаль включит кнопку Record, таким образом можно переключаться между просто записью, записью с overdubbing (записью новых нот поверх существующих) и воспроизведением текущего клипа. Быстрое двойное нажатие на педаль будет иметь то же самое действие как и нажатие кнопки New.
Помните, что определённые ножные выключатели могут вести себя «наоборот». Например, ноты могут быть подвержены сустейну, только когда педаль НЕ придавлена. Как правило это связано с полярностью педали, и обычно может быть легко исправлено, если вы будете подсоединять свою педаль к порту в нажатом состоянии. Но мы рекомендуем лучше использовать ножные педали с физическим переключением полярности на их корпусе.
Ableton Push 2 is an instrument for song creation that provides hands-on control of melody and harmony, beats, samples, sounds, and song structure. In the studio, Push 2 allows you to quickly create clips that populate Live’s Session View as you work entirely from the hardware. On stage, Push 2 serves as a powerful instrument for real-time playing, step sequencing, and clip launching.
Much of Push 2’s behavior depends on which mode it is in, as well as on which type of track is selected. To help you learn how to work with Push 2, this chapter will walk you through some of the fundamental workflows, and then will provide a reference of all of Push 2’s controls.
There are also a number of videos that will help you get started with Push 2. These are available at https://www.ableton.com/learn-push/
Setup
After plugging in the included power supply and connecting the USB cable to your computer, turn Push 2 on via the power button in the back. From here, setting up the Push 2 hardware is mostly automatic. As long as Live is running, Push 2 will be automatically detected as soon as it is connected to a USB port on your computer. After connection, Push 2 can be used almost immediately. It is not necessary to install drivers and Push 2 does not need to be manually configured in Live’s Preferences.
From time to time, Ableton will release firmware updates for Push 2 that will be included in updates to Live. When using Push 2 for the first time after installing a new version of Live, you may be prompted to update the firmware. Push 2 will walk you through this process.
Browsing and Loading Sounds
You can browse and load sounds directly from Push 2, without needing to use Live’s browser. This is done in Push 2’s Browse Mode.
Press Push 2’s Browse button:
The display is divided into columns. When you first enter Browse Mode, the far left column shows either the specific category of device being browsed or the Collections label (see ‘Collections’), which lets you access tagged browser items quickly. Each column to the right shows the next subfolder (if any exist) or the contents of the current folder. You can scroll through presets and folders using the eight encoders above the display, or navigate through them one at a time via the arrow buttons.
The display will expand automatically as you navigate. You can load Live’s “default” devices from the top level of the browser’s hierarchy, and can quickly move up or down in the hierarchy via the rightmost two upper display buttons.
By default, samples and presets from official Packs or Live’s core library will preview when selected in the browser. You can toggle preview on or off via the Preview button.
To adjust the previewing volume, hold the Shift button while turning the Master volume encoder.
To load the selected item, press the Load button.
What you see when in Browse Mode depends on the device that was last selected. If you were working with an instrument, Browse Mode will show you replacement instruments. If you were working with an effect, you will see effects. When starting with an empty MIDI track, the display shows all of your available sounds, instruments, drum kits, effects, and Max for Live devices (see ‘Max for Live’), as well as VST and Audio Unit instruments (see ‘Using Plug-Ins’).
Playing and Programming Beats
To create beats using Push 2, first make sure Note Mode is enabled
Then use Browse Mode to navigate to the Drums section of the browser and load one of the Drum Rack presets from Live’s library.
When working with a MIDI track containing a Drum Rack, Push 2’s 8×8 pad grid can be configured in a few different ways, depending on the state of the Layout button. Pressing this button cycles between three different modes.
Loop Selector
When the Loop Selector layout is enabled, the pads are divided into three sections, allowing you to simultaneously play, step sequence and adjust the length of your clip.
The 16 Drum Rack pads are laid out, like Live’s Drum Rack, in the classic 4×4 arrangement, allowing for real-time playing. Controls in the display and the pads in the Drum Rack match the color of the track, with subtle variations that help you understand what’s happening. The Drum Rack pad colors indicate the following:
- the track’s color — this pad contains a sound.
- lighter version of the track’s color — this pad is empty.
- Green — this pad is currently-playing.
- White — this pad is selected.
- Dark blue — this pad is soloed.
- Gray— this pad is muted.
When working with Drum Racks that contain a larger number of pads, use Push 2’s touch strip or the Octave Up and Octave Down buttons to move up/down by 16 pads. Hold Shift while using the touch strip or Octave buttons to move by single rows.
Holding the Layout button gives you momentary access to the 16 Velocities layout (see ‘16 Velocities Mode’). You can also lock the alternate layout in place by holding Shift and pressing the Layout button. To unlock the 16 Velocities layout, press the Layout button again.
16 Velocities Mode
Press the Layout button to switch to the 16 Velocities layout. In this mode, the bottom right 16 pads represent 16 different velocities for the selected Drum Rack pad. Tap one of the velocity pads to enter steps at that velocity.
Holding the Layout button gives you momentary access to the loop length controls (see ‘Adjusting the Loop Length’). You can also lock the loop length controls in place by holding Shift and pressing the Layout button. To unlock the loop length pads, press the Layout button again.
64-Pad Mode
You can also use the entire 8×8 pad grid for real-time drum playing. This is useful when working with very large drum kits, such as those created by slicing (see ‘Slice to New MIDI Track’). To switch to 64-pad mode, press the Layout button again.
Note: when moving between 64-pad mode and the Loop Selector or 16 Velocities layouts, the 16 pads available for step sequencing will not change automatically. You may still need to use the touch strip or Octave keys in order to see the specific 16 pads you want.
Holding the Layout button gives you momentary access to the loop length controls (see ‘Adjusting the Loop Length’). You can also lock the loop length controls in place by holding Shift and pressing the Layout button. To unlock the loop length pads, press the Layout button again.
Loading Individual Drums
Browse Mode can also be used to load or replace individual pads within a loaded Drum Rack. To switch between browsing Drum Racks and single pads, make sure you’re in Device Mode by pressing the Device button. This will show the devices on the track.
By default, the Drum Rack is selected. To select an individual pad instead, tap that pad, then press the second upper display button. (The square icon next to the name represents a pad.)
Now, entering Browse Mode again will allow you to load or replace the sound of only the selected pad. (The selected pad will flash.) Once in Browse Mode, tapping other pads will select them for browsing, allowing you to quickly load or replace multiple sounds within the loaded Drum Rack.
After loading the selected item, the Load button’s name will change to Load Next. Pressing this button again will load the next entry in the list, allowing you to quickly try out presets or samples in the context of your song. You can also load the previous entry in the list via the Load Previous button.
Particularly in a performance situation, you may want to select a pad without triggering it. To do this, press and hold the Select button while tapping a drum pad or one of the 16 Velocity pads.
You can also select without triggering by pressing the lower display button for the Drum Rack’s track. This will expand the Drum Rack and allow the individual pads to be selected via the other lower display buttons. You can navigate to the previous or next pad via the left and right arrow keys.
Additional Pad Options
To copy a pad to a different location in your Drum Rack, hold the Duplicate button and press the pad you’d like to copy.
While continuing to hold Duplicate, press the pad where you’d like to paste the copied pad. Note that this will replace the destination pad’s devices (and thus its sound) but will not replace any existing notes already recorded for that pad.
When a single pad is selected, you can adjust its choke group assignment (see ‘Input/Output Section’) via the first encoder or transpose the pad via the second encoder.
When working with drums, Push 2’s pads can be colored individually. To change a pad’s color, hold Shift and tap the pad. Then tap one of the pads on the outer ring to choose that color for the selected pad.
Note: your custom pad colors will be saved and reloaded with your Live Set, but will not be visible within Live. They only appear on Push 2.
Step Sequencing Beats
Tapping a pad selects it and also enables it for step sequencing.
To record notes with the step sequencer, tap the pads in the step sequencer controls to place notes in the clip where you want them. The clip will begin playing as soon as you tap a step. By default, each step sequencer pad corresponds to a 16th note, but you can change the step size via the Scene/Grid buttons.
Adjust the tempo using the Tempo encoder. Each click of the encoder will adjust the tempo in increments of one BPM. Holding Shift while adjusting will set the tempo in increments of .1 BPM.
As the clip plays, the currently playing step is indicated by the moving green pad in the step sequencer section. (When Record is enabled, the moving pad will be red.) Tapping a step that already has a note will delete that note. Press and hold the Mute button while tapping a step to deactivate it without deleting it. Press and hold the Solo button while tapping a pad to solo that sound.
You can also adjust the velocity and micro-timing of individual notes, as described in the section on step sequencing automation (see ‘Step Sequencing Automation’).
To delete the entire pattern, press the Delete button. To delete all notes for a single pad, press and hold Delete while tapping that pad. (Holding Delete while pressing a pad that has no notes recorded in the current pattern deletes all of the devices from that pad.)
The pad colors in the step sequencer section indicate the following:
- Gray — this step doesn’t contain a note.
- the clip’s color — this step contains a note. Higher velocities are indicated by brighter pads.
- lighter version of the clip’s color — this step contains a note, but the note is muted.
- unlit — the right two columns of pads will be unlit if triplets are selected as the step size. In this case, these pads are not active; only the first six pads in each row of steps can be used.
For detailed information about adjusting the loop length pads, see the section called Adjusting the Loop Length (see ‘Adjusting the Loop Length’).
Real-time Recording
Drum patterns can also be recorded in real-time by playing the Drum Rack pads. Follow these steps to record in real-time:
- If you want to record with a click track, press the Metronome button to enable Live’s built-in click. You can adjust the metronome volume by holding the Shift button while adjusting the Master volume encoder. (Tip: As with all of the buttons on Push 2 that turn something on or off, when the metronome is on, its button light will pulse.)
- Then Press the Record button to begin recording
If you’ve enabled a recording count-in in Live (see ‘Recording with Count-in’), you’ll see a countdown bar move across the top of Push 2’s display and flash in tempo. This can serve as a helpful visual reference for when to begin playing.
Now any Drum Rack pads you play will be recorded to the clip. Pressing Record again will stop recording but will continue playing back the clip. Pressing Record a third time will enable overdub mode, allowing you to record into the clip while it plays back. Subsequent presses continue to toggle between playback and overdub. During playback, a small progress bar will appear in the display to show the playback position of each playing clip.
The pads are velocity sensitive, but if you want to temporarily override the velocity sensitivity, press the Accent button. When Accent is enabled, all played or step-sequenced notes will be at full velocity (127), regardless of how hard you actually tap the pads.
Tip: if you press and release Accent quickly, the button will stay on. If you press and hold, the button will turn off when released, allowing for momentary control of accented notes.
In 16 Velocities mode, you can tap one of the 16 velocity pads to record the selected sound at that velocity. Note that Accent overrides this behavior.
Pressing New stops playback of the currently selected clip and prepares Live to record a new clip on the currently selected track. This allows you to practice before recording a new idea. By default, pressing New also duplicates all clips that are playing on other tracks to a new scene and continues playing them back seamlessly. This behavior can be changed by changing the Workflow mode in Push 2’s Setup menu (see ‘Setup Menu’).
Fixed Length Recording
Press the Fixed Length button to set the size of new clips to a predetermined length.
Press and hold Fixed Length to set the recording length.
When Fixed Length is disabled, new clips will continue to record until you press the Record, New or Play/Stop buttons.
By default, starting a recording with Fixed Length enabled will create an empty clip of the selected length, and then begin recording from the beginning of the clip, in accordance with Live’s global launch quantization. If Phrase Sync is enabled, Push treats the chosen length as a musical phrase, and will begin recording from the position in the clip that corresponds to that position within a phrase of that length. For example, with a fixed length of 4 bars and Phrase Sync on, starting a recording when Live’s global transport is at bar 7 will create an empty four bar clip and begin recording at the third bar of that clip.
Tip: enabling Fixed Length while recording will switch recording off and loop the last few bars of the clip, depending on the Fixed Length setting.
Additional Recording Options
Recording with Repeat
With Push 2’s Repeat button enabled, you can hold down a pad to play or record a stream of continuous, rhythmically-even notes. This is useful for recording steady hi-hat patterns, for example. Varying your finger pressure on the pad will change the volume of the repeated notes.
The repeat rate is set with the Scene/Grid buttons. Note that Push “remembers” the Repeat button’s state and setting for each track. Tip: if you press and release Repeat quickly, the button will stay on. If you press and hold, the button will turn off when released, allowing for momentary control of repeated notes.
Turn up the Swing knob to apply swing to the repeated notes. When you touch the knob, the display will show the amount of swing.
Quantizing
Pressing Push 2’s Quantize button will snap notes to the grid in the selected clip.
Press and hold Quantize to change the quantization options:
Swing Amount determines the amount of swing that will be applied to the quantized notes. Note that the Swing amount can be adjusted from Encoder 1 or from the dedicated Swing knob.
Quantize To sets the nearest note value to which notes will be quantized, while Quantize Amount determines the amount that notes can be moved from their original positions.
Enable Record Quantize by pressing the corresponding upper display button to automatically quantize notes during recording. Adjust the record quantization value with Encoder 5. Note that if Record Quantize is enabled and Swing is turned up, the automatically quantized notes will not have swing applied.
When working with drums, press and hold Quantize and press a Drum Rack pad to quantize only that drum’s notes in the current clip.
Arrangement Recording
When Live’s Arrangement View (see ‘Arrangement View’) is in focus in the software, pressing Record will toggle Arrangement Recording on and off. While Arrangement Recording is on, all of your actions on Push 2 are recorded into the Arrangement View.
You can also trigger Arrangement Recording while Live’s Session View is in focus by holding Shift and pressing Record. Note that this behavior is reversed when the Arrangement is in focus; holding Shift and pressing Record will then toggle Session recording.
Playing Melodies and Harmonies
After working on a beat, you’ll want to create other elements such as a bassline, harmony parts, etc. If you already have additional tracks in your Set, you can switch between them using the lower display buttons or the left and right arrow keys.
Or you can add a new track by pressing the Add Track button.
Adding a track puts Push 2 into Browse mode, allowing you to select which type of track you’d like to add (MIDI, Audio, or Return) and optionally load a device to the new track at the same time.
Note that when pressing the Add Track button while a track within a Group Track is selected, any new tracks will be inserted into that Group Track.
After creating a track, you can change its color. To do this, hold Shift and press the lower display button for the track. Then tap one of the pads on the outer ring to choose that color for the selected track.
When working with a MIDI track containing an instrument, Push 2’s 8×8 pad grid automatically configures itself to play notes. By default, every note on the grid is in the key of C major. The bottom left pad plays C1 (although you can change the octave with the Octave Up and Down buttons). Moving upward, each pad is a fourth higher. Moving to the right, each pad is the next note in the C major scale.
Play a major scale by playing the first three pads in the first row, then the first three pads in the next row upwards. Continue until you reach the next C:
The pad colors help you to stay oriented as you play:
- the track’s color — this note is the root note of the key (C.)
- White — this note is in the scale, but is not the root.
- Green — the currently-playing note (other pads will also turn green if they play the same note.)
- Red — the currently-playing note when recording.
To play triads, try out the following shape anywhere on the grid:
Holding the Layout button gives you momentary access to the loop length controls (see ‘Adjusting the Loop Length’). You can also lock the loop length controls in place by holding Shift and pressing the Layout button. To unlock the loop length pads, press the Layout button again.
Playing in Other Keys
Press Push 2’s Scale button to change the selected key and/or scale.
Using the upper and lower display buttons, you can change the key played by the pad grid. The currently selected key appears in white, while the other key options appear in gray:
By default, the pads and scale selection options indicate major scales. You can change to a variety of other scale types using encoders 2 through 7. The selected scale type is highlighted.
In addition to changing the key, you can also change the arrangement of the grid in a number of ways:
The Layout (Encoder 1) and Direction (Encoder controls work together to determine the orientation of the pad grid. The default settings are a Layout of “4ths” and a Direction of “Vert.” In this configuration, each pad is a 4th higher than the pad directly below it. Changing the Layout to “3rds“ means that each pad is now a 3rd higher than the pad directly below it. The “Sequent” layout puts all notes sequentially in order. This layout is useful if you need a very large range of notes available, because it has no duplicated notes.
Changing the Direction control to “Horiz.” rotates the pad grid 90 degrees. For example, with a Layout of “4ths,” each pad is a 4th higher than the pad to its left.
Fixed Off/On: The lower right display button toggles Fixed on or off. When Fixed is on, the notes on the pad grid remain in the same positions when you change keys; the bottom-left pad will always play C (except in keys that don’t contain a C, in which case the bottom-left pad will play the nearest note in the key.) When Fixed is off, the notes on the pad grid shift so that the bottom-left pad always plays the root of the selected key.
In Key/Chromatic: The lower left display button toggles between In Key and Chromatic. With In Key selected, the pad grid is effectively “folded” so that only notes within the key are available. In Chromatic Mode, the pad grid contains all notes. Notes that are in the key are lit, while notes that are not in the key are unlit.
Scale options are saved with the Set, and Push 2 will return to these settings when the Set is loaded again. Tip: If you have particular key and scale settings that you like to use all the time, you can save them in your Default Set (see ‘Template Sets’). Any new Set created after this will have those settings in place when working with Push 2.
All of the real-time recording options available for drums (see ‘Real-time Recording’) are also available for melodies and harmonies, including the Accent button, fixed length recording (see ‘Fixed Length Recording’), recording with repeat (see ‘Recording with Repeat’), and quantizing (see ‘Quantizing’). But for detailed editing, you’ll work with the Melodic Sequencer described in the next section.
(Tip: one editing possibility is available in the real-time Note Mode: to quickly delete all notes of the same pitch within the current loop, press and hold Delete and then tap the respective pad.)
Step Sequencing Melodies and Harmonies
In addition to playing and recording in real time, you can also step sequence your melodies and harmonies. To toggle to the Melodic Sequencer, press the Layout button. This will set the 8×8 pad grid as follows:
When using the Melodic Sequencer, all eight rows of pads allow you to place notes in the clip. You can adjust the loop length and access additional step sequencing pages via the loop length pads (see ‘Adjusting the Loop Length’). The loop length pads can be momentarily accessed in the top row while holding the Layout button.
You can also lock the loop length pads in place. To do this, hold Shift and tap the Layout button. (Note that Push remembers this locked/unlocked state for each track.) To unlock the loop length pads, press the Layout button again.
With In Key selected, each row corresponds to one of the available pitches in the currently selected scale. With Chromatic selected, notes that are in the key are lit, while notes that are not in the key are unlit. The white row (which is the bottom row by default) indicates the root of the selected key. Each column of pads represents a step in the resolution set by the Scene/Grid buttons.
As with the real-time playing layout, pressing the Octave Up or Down button shifts the range of available notes. You can also use the touch strip to change the range. Hold the Shift key while adjusting the touch strip to shift the range by octaves. Hold the shift key while pressing the Octave buttons to shift by one note in the scale. The display will briefly show the available range as you adjust it.
Additionally, brightly-lit touch strip lights indicate the currently available note range, while dimly-lit touch strip lights indicate that the clip contains notes within the corresponding note range.
Pressing Layout again will toggle to the Melodic Sequencer + 32 Notes layout (see ‘Melodic Sequencer + 32 Notes’).
Tip: in addition to adding and removing notes, you can also adjust the velocity and micro-timing of the notes, as described in the section on step sequencing automation (see ‘Step Sequencing Automation’).
Adjusting the Loop Length
The loop length controls allow you to set the length of the clip’s loop and determine which part of it you can see and edit in the melodic and drum step sequencers. Each loop length pad corresponds to a page of steps, and the length of a page depends on the step resolution. When working with drums at the default 16th note resolution, two pages of steps are available at a time, for a total of two bars. In the Melodic Sequencer layout, one page of eight steps is available at a time, for a total of two beats. To change the loop length, hold one pad and then tap another pad (or, to set the loop length to exactly one page, quickly double-tap the corresponding pad.)
Note that the page you see is not necessarily the page you hear. When you set the loop length, the pages will update so that the current play position (as indicated by the moving green pad in the step sequencer section) always remains visible. But in some cases, you may want to disable this auto-follow behavior. For example, you may want to edit a single page of a longer loop, while still allowing the loop to play for the length you set. To do this, single-tap the pad that corresponds to that page. This will “lock” the view to that page without changing the loop length. You can also navigate to the previous or next page by pressing the Page Left/Right buttons.
To then turn auto-follow back on, simply reselect the current loop. (Note that single-tapping a page that is outside of the current loop will immediately set the loop to that page.) You can also turn auto-follow back on by holding either one of the Page Left/Right buttons.
The pad colors in the loop length section indicate the following:
- Unlit — this page is outside of the loop.
- Gray — this page is within the loop, but is not currently visible in the step sequencer section.
- White — this page is visible in the step sequencer section, but is not currently playing.
- Green — this is the currently playing page.
- Red — this is the currently recording page.
If you need to access the loop length pads frequently, you can lock them in place. To do this, hold Shift and tap the Layout button. (Note that Push remembers this locked/unlocked state for each track.) To unlock the loop length pads, press the Layout button again. You can also navigate to the previous or next page by pressing the Page Left/Right buttons.
To duplicate the contents of a sequencer page, hold Duplicate, press the loop length pad for the page you want to duplicate, and then press the loop length pad for the destination page. Note that this will not remove existing notes in the destination page, but will add copied notes on top. To remove notes first, hold Delete and tap the loop length pad for that page.
Melodic Sequencer + 32 Notes
The Melodic Sequencer + 32 Notes layout combines both step sequencing and real-time playing capabilities. Providing access to multiple octaves and steps on a single page, this layout is ideal for figuring out chords and harmonies to sequence. It is also well suited to longer phrases.
32 Notes
The bottom half of the pad grid lets you play notes in real-time, and select them for step sequencing. Each pad corresponds to one of the available pitches in the currently selected scale. Pressing a pad will select and play the note. Selected notes are represented by a lighter version of the track’s color.
Tip: to select a pad without triggering it, press and hold the Select button while tapping a pad.
The pad colors indicate the following:
- the track’s color — this note is the root note of the scale.
- lighter version of the track’s color — this pad is selected.
- Green — this pad is currently playing.
- White — this note is in the scale, but is not the root.
Pressing the Octave Up or Down button shifts the range of available notes. Holding the Shift key while adjusting the touch strip shifts the range by octaves. You can hold the Shift key while pressing the Octave buttons to shift by one note in the scale. The display will briefly show the available range as you adjust it.
As with the 64 Notes layout, the notes in the bottom half of the pad grid can be adjusted via the Scale menu (see ‘Playing in Other Keys’).
Sequencer
Tapping a step in the top half of the pad grid adds all selected notes to that step. Steps containing notes are lit in the color of the clip.
Holding a step lets you view notes contained within the step, which are indicated in the bottom half of the pad grid by the lighter version of the track’s color. Tapping any of these selected notes will remove it from the step.
Holding multiple steps will add selected notes to all those steps. While holding Duplicate, you can press a step to copy the notes in that step and then press another step to paste them to a new location in the step sequencer.
The pad colors in the step sequencer indicate the following:
- the clip’s color — this step contains a note.
- Green — this step is currently playing.
- White — this step is selected.
- Light gray — this step contains a note, but the note is muted.
- Gray — this pad is empty.
- Unlit — the right two columns of pads will be unlit if triplets are selected as the step size. In this case, these pads are not active; only the first six pads in each row of steps can be used.
You can adjust the loop length and access additional step sequencing pages via the loop length pads (see ‘Adjusting the Loop Length’). The loop length pads can be momentarily accessed in the fifth row while holding the Layout button.
You can also lock the loop length pads in place. To do this, hold Shift and tap the Layout button. (Note that Push remembers this locked/unlocked state for each track.) To unlock the loop length pads, press the Layout button again. You can also navigate to the previous or next page by pressing the Page Left/Right buttons.
To duplicate the contents of a sequencer page, hold Duplicate, press the loop length pad for the page you want to duplicate, and then press the loop length pad for the destination page. Note that this will not remove existing notes in the destination page, but will add copied notes on top. To remove notes first, hold Delete and tap the loop length pad for that page.
Working with Samples
Push 2 allows you to play samples from the pads in a variety of ways, with detailed but easy-to-use control over sample parameters directly from the encoders and display. The instrument that powers Push 2’s sample playback functionality is Simpler, and we recommend reading the detailed Simpler chapter (see ‘Simpler’) to learn more about its functionality.
To start working with a sample, you can either add a new MIDI track or press Browse to enter Browse Mode on an existing MIDI track. Although you can load an empty Simpler to a track, it isn’t playable until it contains a sample. Push 2’s display will inform you that your Simpler is empty and suggest browsing for a sample:
After loading a sample and switching to Device View, you will see the sample’s waveform in Push 2’s display, along with a number of parameters that allow you to quickly adjust how the sample plays back. This is the main bank of Simpler’s controls.
By default, Simpler will automatically set certain parameters based on the length of the loaded sample. For example, short samples will play once when triggered, while long samples will be set to loop and warp. Warped samples will play back at the tempo of your Set, regardless of which note you play. Bringing a warped clip into Simpler from an audio track, the browser, or your desktop preserves any warp settings and markers that were in the original clip. For more information about warping, see the Audio Clips, Tempo, and Warping chapter (see ‘Audio Clips, Tempo, and Warping’).
The most important parameter that determines how Simpler will treat samples is the Mode control, which is used to choose one of Simpler’s three playback modes.
- Classic Playback Mode is the default mode when using Simpler, and is optimized for creating “conventional” melodic and harmonic instruments using pitched samples. It features a complete ADSR envelope and supports looping, allowing for samples to sustain as long as a note is held down. Classic Mode is polyphonic by default, and the pad grid uses the same layout in this mode as is used when playing other pitched instruments.
- One-Shot Playback Mode is exclusively for monophonic playback, and is optimized for use with one-shot drum hits or short sampled phrases. This mode has simplified envelope controls and does not support looping. By default, the entire sample will play back when a note is triggered, regardless of how long the note is held. The pad grid in One-Shot Mode also uses the melodic layout.
- Slicing Playback Mode non-destructively slices the sample so that the individual slices can be played back from the pads. You can create and move slices manually, or choose from a number of different options for how Simpler will automatically create slices. This mode is ideal for working with rhythmic drum breaks.
Classic Playback Mode
In Classic Mode, the various sample position controls change which portion of the sample you play back. For example, if you load a drum break that contains silence at the beginning, you can start playback from after the silence. The Start control sets the absolute position in the sample from which playback could start, while the End control sets where playback could end; these parameters define the region of the sample that can be worked with. S Start and S Length are represented in percentages of the total sample length enabled by Start and End. For example, hitting a pad after setting an S Start value of 50% and S Length value of 25% will play back the third quarter (50-75%) of the region between the Start and End values. S Loop Length determines how much of the available sample (also determined by the Start and End values) will loop. Note that this parameter is only active if Loop is enabled.
Adjust the Zoom encoder to zoom into a portion of the waveform. The display shows a representation of the whole sample, as well as the currently active region. Turning the Zoom encoder clockwise zooms in. The specific portion of the sample that you zoom to is determined by the last-touched sample position control (Start, End, S Start, S Length, or S Loop Length.)
Pressing Simpler’s upper display button will enter Edit Mode. When in Edit Mode, the lower display buttons select additional pages of parameters and the upper display buttons toggle certain settings on or off. Pressing Simpler’s upper display button again will exit Edit Mode.
Pressing the Loop On/Off button determines whether or not the sample will loop when a pad is held down. The Warp as… button adjusts the warping of the sample between the Start and End values so that it will play back precisely within the specified number of bars. Live makes its best guess about what this value should be based on the length of the sample, but if it gets it wrong, you can use the ÷2 or ×2 buttons to double or halve the playback speed, respectively.
Crop removes the portions of the sample that are outside of the Start and End points, while Reverse plays the entire sample backwards. Note that both Crop and Reverse are non-destructive; they create a copy of the sample and apply the process to the copy, so your original sample is not changed.
One-Shot Mode
In One-Shot Mode, the Zoom, Start, and End controls function the same as in Classic Mode, as do the Warp as…, ÷2, ×2, Crop, and Reverse buttons.
With Trigger enabled, the sample will continue playing even after the pad is released; the amount of time you hold the pad has no effect when Trigger is on. You can shape the volume of the sample using the Fade In and Fade Out encoders. Fade In determines how long it takes the sample to reach its maximum volume after a pad is hit, while Fade Out begins a fade out the specified amount of time before the end of the sample region. (Note: to stop a one-shot sample immediately, hold Shift while pressing the Play/Stop button.)
With Gate enabled, the sample will begin fading out as soon as you release the pad. The Fade Out time determines how long it will take to fade to silence after release.
The Transpose encoder allows you to transpose the sample up or down by up to 48 semitones (four octaves). Note that when transposing, the timbre of the sample may change dramatically depending on which warp mode you’ve selected. The Gain encoder sets the overall volume of the Simpler instrument.
Legato Playback
Classic and One-Shot Modes provide a unique way of repitching a sample on the fly, without changing its playback position. (This is essentially a playable version of Legato Mode in clips (see ‘Legato Mode’).) To enable this functionality:
- In Edit Mode, press the second lower display button to view the Global parameter bank.
- Set the Glide Mode parameter to Glide.
- Set the Voices parameter to 1. (Note that this parameter is only available in Classic Mode. In One-Shot Mode, playback is always monophonic.)
Now, as you play the pads legato, the sample will transpose without changing playback position. For best results, make sure Warp is on (in the Warp parameter bank). The Complex Pro warp mode tends to sound best when transposing, but experiment with the various warp modes to see which one works best for your particular sample.
Slicing Mode
In Slicing Mode, the Zoom, Start, and End controls function the same as in Classic and One-Shot Modes, as do the Warp as…, ÷2, ×2, and Reverse buttons.
The Slice By chooser determines the specific way in which slices will be created:
- Transient — Slices are placed on the sample’s transients automatically. The Sensitivity encoder determines how sensitive Simpler is to transient levels within the sample, and thus how many slices will be automatically created. Higher numbers result in more slices, up to a maximum of 64 slices.
- Beat — Slices are placed at musical beat divisions. The Division encoder selects the beat division at which Simpler will slice the sample region.
- Region — Slices are placed at equal time divisions. The Regions encoder selects the number of evenly-spaced slices that will be created.
- Manual — When Manual is selected, no slices are placed automatically. Instead, slices are created manually by enabling Pad Slicing and tapping empty pads as the sample plays back. To create manual slices:
- Tap a pad that contains a slice to begin playback from that slice.
- When the sample reaches the point at which you would like to create an additional slice (a drum hit, for example), tap any empty pad.
- A slice will be placed at this point and it will be assigned to a pad. Any pads that were already assigned after this point will be shifted “upward” on the pad grid.
- Once the loop is sliced as you like it, turn Pad Slicing off.
In all slicing modes, slices are laid out from left to right in groups of four starting from the bottom left pad. Each additional four slices is placed on the next four pads up. After the left half of the pad grid is used, slices are placed along the bottom row on the right side of the pad grid, again moving upwards in groups of four.
By default, the pad grid uses the 64-pad drum layout when in Slicing Mode. Pressing the Layout button cycles between 64-pad, Loop Selector, and 16 Velocities modes.
The Playback encoder determines how many slices can be triggered simultaneously. Mono is monophonic; only one pad can be played or sequenced at a time. When set to Poly, multiple pads can be triggered together. When set to Through, playback is monophonic, but triggering one slice will continue playback through the rest of the sample region.
The Trigger/Gate switch is the same concept as in One-Shot Playback Mode, but what you actually hear depends on which Playback mode is selected.
Nudge allows you to adjust the position of each slice marker. This is especially useful for fine-tuning slices that you’ve created in Manual mode. For greater nudging accuracy, tap the pad you’d like to adjust and use the Zoom encoder to get a closer look. Hold Shift while adjusting Nudge for extremely small adjustments.
Split Slice creates a new slice in the middle of the currently selected slice. This is also useful in Manual mode, in conjunction with Nudge, for fine-tuning slices created via Pad Slicing.
To delete a slice (either manually or automatically created), hold Delete and tap the corresponding pad.
Navigating in Note Mode
Now that you’ve created a few tracks, you can continue to add more. But you may want to move between already-existing tracks to continue working on musical ideas using those instruments and devices. You can move directly to a new track using the lower display buttons or move sequentially to the previous or next track using the left and right arrow buttons.
Note that selecting a MIDI track on Push 2 automatically arms it, so it can be played immediately. In Live, track Arm buttons will appear pink to indicate that they have been armed via selection.
You can also manually arm any track by holding the lower display button for that track, or by holding the Record button and pressing the track’s lower display button.
This is useful if, for example, you want to use Push 2 to record audio clips. In Live, a manually armed track’s track Arm button will appear red. On Push 2’s display, manually armed tracks appear with a special icon.
The specific behavior of the Up/Down Arrows is determined by the Workflow mode, which is set in Push 2’s Setup menu (see ‘Setup Menu’). In both modes, the Up/Down Arrows move up or down by a single scene. In Scene Workflow, the selected scene is triggered. In Clip Workflow, only the selected track’s clip is triggered. Clips in other tracks are not affected.
Navigating with the Up/Down Arrows in Note Mode always begins playback immediately, and a triggered clip will take over the play position from whatever clip was played in that track before. Note that this is the same behavior as if the clips were set to Legato Mode in Live (see ‘Legato Mode’).
Working With Instruments and Effects
Pressing the Device button puts Push 2 in Device Mode, which allows you to use the encoders to control parameters in Live’s devices and third-party plug-ins.
In Device Mode, the upper display buttons select devices in the currently selected track, enabling their parameters for editing. The currently selected device is highlighted in the display.
Once a device is selected, pressing its upper display button again will enter Edit Mode. When in Edit Mode, the lower display buttons select additional pages of parameters for the selected device.
When in Edit Mode, pressing the leftmost upper display button will take you back up to the Device Mode’s top level.
Certain devices, such as Live’s Operator instrument (see ‘Operator’), have more than eight pages of parameters. When working with these devices in Edit Mode, the rightmost lower display button will show an arrow. Press this button to scroll to the additional pages (and then press the leftmost lower display button to get back.)
Adding, Deleting, and Reordering Devices
To load additional devices such as MIDI or audio effects to a track, press the Add Device button. This will open the Browser and display all device types that can be loaded to the current track.
(Note: you can also load an instrument via the Add Device button, but be aware that this works just like Browse Mode: You will replace the instrument that’s already on the track.)
As with Browse Mode, use the encoders or arrow keys to navigate between devices in the browser, and the Load button to load the selected device or preset. Devices will load to the right of the previously-selected device, although note that MIDI effects will always be placed before the instrument in the track and audio effects will always be placed after it.
To delete a device, hold the Delete button and press the upper display button that corresponds to the device.
To disable a device (without deleting it), hold the Mute button and press the upper display button that corresponds to the device. Disabled devices (and all of their parameters) appear gray in the display.
To reenable a disabled device, hold Mute and again press the upper display button that corresponds to the device.
Holding the Mute button for a few moments will lock it on. You can then release Mute and toggle devices on and off just by pressing the corresponding upper display button. Press Mute again to unlock it.
To move a MIDI or audio effect to a different position in the track’s chain of devices, press and hold the upper display button that corresponds to the effect. Then use any of the eight encoders to scroll the device to the new position and release the upper display button.
Working with Racks
Instrument, Drum, and Effect Racks (see ‘Instrument, Drum and Effect Racks’) allow for multiple chains of devices to be contained within a single device. On Push 2’s display, Racks have special icons that distinguish them from regular devices.
To open a Rack, select it using the corresponding upper display button. Then press this button again. The Rack will unfold, revealing the devices in the currently selected chain. An unfolded Rack appears in the display with an underline that extends to the end of the enclosed devices. Each press of a selected Rack’s upper display button will toggle it open or closed. (Note that Drum Racks cannot be folded or unfolded directly from Push 2. They will appear in Push 2’s display as folded or unfolded depending on how they were set within Live.)
When the Rack itself is selected, the eight encoders control the Rack’s Macros (see ‘Using the Macro Controls’). Once a Rack is open, you can select one of its contained devices by pressing the relevant upper display button. After selecting a different device, the encoders will then control its parameters instead.
To access the devices on additional chains within a multi-chain Rack, press and hold the Rack’s upper display button. The Rack’s chains will be shown at the bottom of the display and can be selected via the corresponding lower display buttons.
Track Control And Mixing
To control volumes, pans, or sends with the encoders, press the Mix button.
Each press of the Mix button toggles between Track Mix Mode and Global Mix Mode. In Track Mix Mode, the first two upper display buttons select between mix parameters for the selected track and input and output routing options for that track. The lower display buttons are used to select the track. With Mix selected, the encoders adjust volume, pan, and send levels for the currently selected track.
(Tip: Hold Shift while adjusting the encoders for fine-tune control.)
If your Set contains more than six return tracks, the two rightmost upper display buttons will change to arrows, which allow you to shift the available parameters left or right.
With Input & Output selected, all of the track’s routing and monitoring options can be adjusted from the encoders.
In Global Mix Mode, the encoders adjust either volumes, pans, or send levels for the eight visible tracks. Select which parameter will be controlled via the upper display buttons.
If your Set contains more than six return tracks, the rightmost upper display button will change to an arrow, which allows you to shift the available sends to the right. Volumes and Pans will always remain visible.
If your Set contains more than eight tracks, the left and right arrow keys allow you to shift the visible tracks left or right.
Press the Master button to select the Master track. Press Master again to return to the previously selected track.
Note that when Split Stereo Pan Mode (see ‘The Live Mixer’) is active while in Global Mix Mode, the display will show the current pan value, but the pan dial will be disabled. In Track Mix Mode, the display will show either the pan control or stereo pan sliders, depending on the active pan mode.
Rack and Group Track Mixing
On Push 2’s display, Group Tracks and tracks that contain Instrument or Drum Racks have special icons that distinguish them.
These types of tracks can be unfolded, allowing you to use the Mix Modes to control the tracks and chains within them. To unfold one of these tracks, select it using the corresponding lower display button. Then press this button again. The Group Track or Rack will unfold, revealing the enclosed tracks or chains. An unfolded track appears in the display with an underline that extends to the end of the enclosed tracks or chains. Each press of a selected track’s lower display button will toggle it open or closed.
Use the left and right arrow keys to access additional chains or tracks that may have been pushed off the display after unfolding. Tip: When working with an unfolded Drum Rack, hold Select and tap a pad to jump to that pad in the mixer. This can make it easier to mix with a large Drum Rack.
Recording Automation
Changes that you make to device and mixer parameters can be recorded to your clips as automation, so that the sound will change over time as the clip plays. To record automation, press Push 2’s Automation button so that it turns red.
This toggles Live’s Session Automation Arm button, allowing you to record changes you make to Push 2’s encoders as part of the clip. When you’re done recording parameter changes, press the Automation button again to turn it off. To delete the changes you’ve recorded for a particular parameter, press and hold the Delete button and touch the corresponding encoder. If automation hasn’t been recorded for a parameter, holding Delete and touching an encoder will reset the corresponding parameter to its default value.
Automated parameters are shown with a white dot next to the parameter in the display. Parameters that you have overridden (by manually adjusting the parameter while not recording) will show a gray dot.
To reenable all automation that you have manually overridden press and hold Shift and press the Automation button.
Step Sequencing Automation
In both the drum and melodic step sequencers, it’s possible to automate parameters for the selected step.
The parameters that are available will change depending on the display mode you are currently in.
When in Clip Mode, hold one or more steps to access note-specific parameters (see ‘Note-Specific Parameters’).
When in Device Mode or Mix Mode, hold one or more steps in order to create and edit device or mixer automation for only the selected step(s). While holding a step and tweaking an encoder, the corresponding parameter’s automation value will be adjusted specifically for the time represented by that step. Note that per-step automation can be created for any step, even if that step doesn’t contain notes.
Clip Mode
Press the Clip button to enter Clip Mode, where you can adjust various parameters for the selected clip.
When working with an audio track, if no clip is selected, Push will prompt you to load a sample.
The display colors reflect the color of the clip, and the clip’s name is highlighted in the upper-left corner. Some of the adjustable parameters change depending on the type of clip selected.
In MIDI tracks containing Drum Racks, notes are displayed in their respective pad color. In all MIDI tracks, the velocity of each note is indicated by its opacity.
When a clip is playing on the selected track, the display follows the clip’s song position and scrolls automatically.
For both MIDI and audio clips, the second upper display button toggles Loop on or off. With Loop on, you can set the Loop Position, which is where within the clip the loop will begin. Loop Length sets how many bars and/or beats long the loop is, as measured from the loop position. Start Offset allows you to begin playback at a different point within the loop, rather than at the loop’s start position. If the Loop Position and Start Offset are at the same position, moving the Loop Position will result in the Start Offset moving along with it. With Loop off, you can control the Start and End position. This is the region that will play (once) when the clip is launched.
Hold Shift while adjusting any of these controls to adjust by 16th-note subdivisions.
You can Zoom in or out of the sample with the first encoder. The position you’ll zoom to is centered around the last position encoder you touched (Start, Length, Loop, etc.)
When working with an audio clip, you can also set the clip’s Warp Mode, gain, and transposition. Hold Shift while adjusting Transpose to adjust in cents rather than in whole semitones. (Note: This adjusts the Detune parameter in Live’s Clip View.)
Using MIDI Tracks in Clip Mode
When working with MIDI tracks in Clip Mode, you can view and refine played or sequenced MIDI from Push 2.
The display will change depending on the currently selected pad layout.
In addition to the Zoom, Start, End, and Loop controls available in Clip Mode (see ‘Clip Mode’), all pad layouts provide an additional Crop control, which lets you delete material that falls outside the selected loop.
Real-Time Playing Layouts
When recording your real-time playing using the 64 Notes, 64 Pads or 64 Slices layouts, Clip Mode’s display lets you see the incoming MIDI notes, and the view adjusts so that all existing notes fit on the display at the same time (Note that this “folded” display is also shown in Session Mode (see ‘Controlling Live’s Session View’).)
Sequencing Layouts
In the melodic and drum step sequencer layouts, a semi-transparent white box on the display indicates the sequenceable area. This represents the area on the pads where you can add, delete or adjust notes.
Each sequenceable area corresponds to one page of steps. A box on the far left side of the display indicates which pitch range the sequenceable area is in.
As notes are added, lines will appear on the far left side of the display. These lines indicate which pitch ranges contain notes. You can use these indicator lines to find and edit notes quickly, without looking at your computer screen.
Pitch ranges with a higher density of notes are represented by thicker lines.
Melodic Sequencer
The Melodic Sequencer layout has a range of eight notes on each page. The sequenceable area can be moved horizontally via the loop length pads or Page Left/Right buttons, or vertically via the Octave Up/Down buttons or touch strip.
Melodic Sequencer + 32 Notes
In this layout, the display will adjust to fit all notes in the clip. When a note(s) that exist in the clip is selected, their sequenceable area will be highlighted on the display. This makes it quicker to locate and edit steps containing the selected note(s). The sequenceable area can be moved horizontally via the Page Left/Right buttons or the loop length pads, which can be accessed momentarily in the fifth row by holding the Layout button.
Drums/Slicing Loop Selector and 16 Velocities
The Loop Selector and 16 Velocities layouts show the selected pad only. The sequenceable area can be moved horizontally via the loop length pads or Page Left/Right buttons, or vertically by selecting a different pad.
Note-Specific Parameters
When working in any sequencing layout in Clip Mode, you can adjust note settings for each step. To access these settings, simply press and hold a step. The display will zoom to the page containing that step, and switch the controls to the step’s note settings. Notes contained within the selected step will be highlighted.
You can then adjust the corresponding encoders in order to:
- Nudge notes backwards or forwards in time. The value represents the percentage that the note is offset from the previous grid line. (Negative values indicate that the note occurs before the grid line.)
- adjust the coarse Length of the selected notes.
- Fine tune the length adjustment of the selected notes
- change the Velocity of the selected notes.
You can also adjust these note-specific parameters for multiple steps at the same time. To do this, press and hold all of the pads you’d like to adjust, and then tweak the encoders. The display will show the range of values for the selected steps.
Tip: you can also create notes with your desired Nudge, Length, and Velocity values by holding an empty step and then tweaking any of these encoders.
When working with drums, you can adjust nudge, length, and velocity for every note played by a particular pad by pressing and holding the Select button, pressing the pad, and then adjusting the encoders.
Controlling Live’s Session View
Press Push 2’s Session button to switch from Note Mode to Session Mode. (Press and hold the Session button to temporarily toggle Session Mode. Releasing the button will then return to Note Mode. Likewise, pressing and holding Note while in Session Mode will temporarily toggle Note Mode.)
In Session Mode, the 8×8 pad grid will now launch clips and the Scene/Grid Buttons will launch scenes. Pressing a pad triggers the clip in the corresponding location in Live’s Session View. If the track is selected, pressing the button records a new clip.
The pads light up in different colors so you know what’s going on:
- The color of all playing or stopped clips is reflected on the pads.
- Playing clips pulse in their color.
- Recording clips pulse between red and the clip’s color.
Clip colors can be changed when in Session Mode. To do this, hold Shift and press a pad that contains a clip. Then tap one of the pads on the outer ring to choose that color for the selected clip.
Pressing the Mute or Solo buttons will mute or solo the currently selected track, respectively. Hold Mute or Solo and press any track’s lower display button to mute or solo that track. Holding the Mute or Solo button for a few moments will lock it on. You can then release the button and toggle tracks on and off just by pressing the corresponding lower display buttons. Press Mute or Solo again to unlock it.
Pressing the Stop Clip button will stop the playing clip in the currently selected track. Hold Stop Clip and press any track’s lower display button to stop the playing clip in that track.
Holding the Stop Clip button for a few moments will lock it on. You can then release Stop Clip and stop clips just by pressing the lower display button for the track you would like to stop. While Stop Clip is locked on, the lower display buttons will pulse for any tracks that contain a currently playing clip. Press Stop Clip again to unlock it.
To stop all clips, press and hold Shift, and then press Stop Clip.
Push 2 tells you what’s going on in the software, but, importantly, the software also reflects what’s happening on the hardware. The clip slots currently being controlled by Push 2’s pad grid are shown in Live with a colored border.
Hold the Duplicate button and press a clip to copy it. Continue holding Duplicate and tap another clip slot to paste the clip there.
The arrows and Shift button increase the scope of the eight-by-eight grid.
- Pressing the up or down arrows moves you up or down one scene at a time. Pressing the Octave Up or Down buttons moves eight scenes up or down.
- The left and right arrow keys move you left or right one track at a time. The Page left and right buttons move eight tracks at a time.
While working in Session Mode when the focus is on Clip Mode, the display is “folded”, which means all notes within a clip will fit on the display at any given time. Being able to see all notes within a clip allows you to quickly identify it before launching it. (Note: to select a clip without launching it, press and hold the Select button while tapping the pad containing that clip.)
While recording MIDI from an external source (such as a MIDI sequencer or MIDI keyboard), the folded display lets you see all incoming notes.
When in Session Mode, holding the Layout button gives you momentary access to the Session Overview, which is explained in more detail below.
Session Overview
Push 2’s Session Overview lets you navigate through large Live Sets quickly without looking at your computer screen.
Holding the Layout button gives you momentary access to Session Overview, where the pad grid zooms out to reveal an overview of your Session View. You can also lock the Session Overview in place by holding Shift and pressing the Layout button. To unlock the Session Overview, press the Layout button again.
In the Session Overview, each pad represents an eight-scene-by-eight-track block of clips, giving you a matrix of 64 scenes by 64 tracks. Hit a pad to focus on that section of the Session View. For example, pressing the pad in row three, column one will put the focus on scenes 17-24 and tracks 1-8. Furthermore, each scene launch button represents a block of 64 scenes (if they are available in your Set.)
In the Session Overview, the color coding is a little different:
- White: indicates the currently selected block of clips, which will be surrounded by the colored border in the software.
- Green: there are clips playing in that block of clips (though that may not be the block of clips selected).
- No color: there are no tracks or scenes in that range.
Press the Setup button to adjust brightness, the sensitivity of Push 2’s velocity response, and other settings.
When Pad Sensitivity is turned up, it takes less force to trigger a higher velocity. A Pad Sensitivity of 10 results in higher output levels at any given input velocity, while a setting of 0 results in lower output levels at the same velocity. The default (and recommended) setting is 5.
Pad Gain boosts or cuts the overall velocity curve. Higher values shift the curve towards the top of the velocity range, while lower values reduce it. This control has a stronger effect at medium velocities. The default (and recommended) setting is 5.
Pad Dynamics adjusts the spread of velocities across the output range. At a setting of 10, most velocities will result in high or low output, without much in the middle. At 0, most velocities will result in medium output levels (assuming Pad Gain is set to 5). The default (and recommended) setting is 5.
The easiest way to understand the relationship of the three velocity controls is by observing the changes in the graphical curve below them. The striking force (input) is shown on the horizontal axis, while the output level is shown on the vertical axis.
Tip: To use a linear velocity curve, set Pad Gain to 4 and Pad Dynamics to 7.
Display Light adjusts the brightness of Push 2’s display, while LED Brightness adjusts the brightness of the pads and buttons. At very low LED Brightness settings, pads may appear to be the wrong color. The default (and recommended) setting for both controls is 100%.
The Workflow option determines how Push 2 behaves when the Duplicate, New, or Up/Down arrow buttons are pressed. Which mode you choose depends on how you like to organize your musical ideas. In Scene Workflow (which is the default), musical ideas are organized and navigated in scenes. In Clip Workflow, you’re working with only the currently selected clip.
In Scene Workflow:
- Duplicate creates a new scene containing all of the currently playing clips, and seamlessly switches to playing them back. This is the same as the Capture and Insert Scene command in Live’s Create menu (see ‘Editing Scenes’).
- New is identical to Duplicate, except that it does not duplicate the currently selected clip. Instead, an empty clip slot is prepared, allowing you to create a new idea in the current track.
- the up and down arrows move up or down by a single scene. Playback of the clips in the new scene begins seamlessly.
In Clip Workflow:
- Duplicate creates a copy of the currently selected clip in the next clip slot, while continuing playback of any currently playing clips in other tracks. (Tip: hold Shift while pressing Duplicate to create a new scene containing all of the currently playing clips.)
- New prepares an empty clip slot on the currently selected track. Clips in other tracks are not affected.
- the up and down arrows move up or down by a single scene. Playback of the currently selected track’s clip in the new scene begins seamlessly. Clips in other tracks are not affected.
Push 2 Control Reference
The function of each button and control is explained below.
Tap Tempo — As you press once every beat, the tempo of the Live Set will follow your tapping. If the “Start Playback with Tap Tempo” button is enabled in Live’s Record/Warp/Launch Preferences, you can also use tapping to count in: If you are working in a 4:4 signature, it takes four taps to start song playback at the tapped tempo. The encoder above the button adjusts Live’s tempo in increments of one BPM. Holding Shift while adjusting will set the tempo in increments of .1 BPM.
Metronome — Toggles Live’s metronome on or off. The right encoder sets the amount of swing applied when Quantizing, Record Quantizing or when Repeat is pressed.
Delete — In Note Mode, this button deletes the selected clip. When working with a Drum Rack, hold Delete and press a pad to delete that pad’s notes in the clip (or the pad itself if there are no recorded notes). In Session Mode, hold Delete and then press a clip to delete that clip. Hold Delete and select a device or track with the upper and lower display buttons to delete the device or track. Hold Delete and touch an encoder to delete automation controlled by that encoder. If automation has not been recorded for a particular parameter, holding Delete and touching the corresponding encoder will reset that parameter to its default value. In Simpler’s Slicing Mode, hold Delete and tap a pad to delete that slice. If the Arrangement View is in focus in Live, presing Delete will delete the currently selected clip in the Arrangement.
Undo — Undoes the last action. Press and hold Shift while pressing Undo to Redo. Note that Push 2’s Undo button applies Live’s Undo functionality, so it will undo actions in your Live Set even if they were done without using Push 2.
Mute — Mutes the currently selected track. Hold Mute while pressing another track’s lower display button to mute that track. Hold Mute while pressing a Drum Rack pad to mute the pad. Hold Mute while pressing a step sequencer step to deactivate the step. Hold Mute while pressing a device’s upper display button to deactivate the device. Holding the Mute button for a few moments will lock it on. You can then release Mute and toggle devices or tracks on and off just by pressing the corresponding upper or lower display buttons. Press Mute again to unlock it.
Solo — Solos the currently selected track. Hold Solo while pressing another track’s lower display button to solo that track. Hold Solo while pressing a Drum Rack pad to solo the pad. Holding the Solo button for a few moments will lock it on. You can then release Solo and toggle a track’s solo on and off just by pressing the corresponding lower display button. Press Solo again to unlock it.
Stop Clip — Stops the playing clip in the currently selected track. Hold Stop Clip and press any track’s lower display button to stop the playing clip in that track. While Stop Clip is held down, the lower display buttons will pulse for any tracks that contain a currently playing clip. Press Stop Clip again to unlock it. Hold Shift and press Stop Clip to stop all clips.
Convert — Converts the current instrument or clip into a different format. The details of the conversion depend on what is selected when you press Convert:
- While working with a Simpler in either Classic or One-Shot Mode (see ‘Working with Samples’), pressing Convert will create a new MIDI track containing a Drum Rack, with a copy of the Simpler on the first pad. All other devices that were in the original track will also be copied to the new track.
- While working with a Simpler in Slicing Mode, pressing Convert will replace the Simpler on the same track with a Drum Rack that contains all of the slices mapped to individual pads.
- While working with a Drum Rack, pressing Convert will create a new MIDI track containing all of the devices that were on the selected pad.
- While working with an audio clip, pressing Convert allows you to choose between:
- Creating a new MIDI track containing a Simpler or a new MIDI track containing a Drum Rack, with the sample loaded to a Simpler on the first pad. Warp markers and related settings will be preserved in the new Simpler, as will all other devices that were in the original track.
- Converting a Harmony (see ‘Convert Harmony to New MIDI Track’), Melody (see ‘Convert Melody to New MIDI Track’), or Drums (see ‘Convert Drums to New MIDI Track’) to a new MIDI track.
Double Loop — Doubles the material within the loop, as well as the length of the loop.
Quantize — Press and release to quantize the selected notes (or all notes in the clip if there is no selection). Hold Quantize and press a drum pad to quantize that pad’s notes. For audio clips, Quantize will affect transients. Press and hold Quantize to access quantization settings. After changing these settings, press once to exit and then press and release to apply your changes.
Duplicate — In Scene Workflow, Duplicate creates a new scene containing all of the currently playing clips. In Clip Workflow, Duplicate creates a copy of the currently selected clip in the next clip slot, while continuing playback of any currently playing clips in other tracks. Hold Duplicate while pressing a Drum Rack pad to copy the pad and paste it to a new location in the Drum Rack. Hold Duplicate while pressing a track selection button to duplicate that track. In Session Mode, hold Duplicate and press a clip to copy it. Continue holding Duplicate and tap another clip slot to paste the clip there.
New — Pressing New stops the selected clip and prepares Live to record new material. This allows you to practice before making a new recording.
Fixed Length — When enabled, all newly created clips will be a fixed number of bars. When disabled, new clips will continue to record until you press the Record, New or Play/Stop buttons. Press and hold, then use the lower display buttons to specify the fixed recording length. Tip: enabling Fixed Length while recording will switch recording off and loop the last few bars of the clip, depending on the Fixed Length setting.
Automate — Toggles Live’s Automation Record button. When on, your parameter changes will be recorded into playing Session View clips. Hold Shift and press Automate to reenable any automation that you have overridden. Hold Delete and press the Automation button to delete all automation in a clip.
Record — With the Session View focused in Live, press the Record button to begin recording a Session clip. Pressing Record again will stop recording but will continue playing back the clip. Pressing Record a third time will enable overdub mode, allowing you to record into the clip while it plays back. Hold Record and press the lower display button for a track to manually arm it. With the Arrangement View focused in Live, pressing Record will toggle Arrangement Recording on and off. You can also trigger Arrangement Recording while Live’s Session View is in focus by holding Shift and pressing Record. Note that this behavior is reversed when the Arrangement is in focus; holding Shift and pressing Record will then toggle Session recording.
Play/Stop — Toggles the play button in Live’s transport bar. While already stopped, hold Shift and press Play/Stop to return Live’s transport to 1.1.1 without starting playback.
Touch Strip — When an instrument track is selected, the touch strip adjusts pitch bend or modulation wheel amount when playing in real-time, or the available range of notes when step sequencing. Pitch bend is selected by default when an instrument track is selected. To change the functionality of the touch strip, hold Select and tap the strip. This toggles between pitch bend and mod wheel functionality each time you tap it. The display will briefly show the current mode each time you change it. Note that pitch bend and modulation wheel functionality is only available when playing instruments in real time, and not when using the Melodic Sequencer. When a Drum Rack track is selected, the touch strip selects the Drum Rack bank.
Encoders and display buttons — The encoders and the two banks of eight buttons above and below the display change function depending on a variety of factors, including the selected track type, the current mode, etc. In all modes, the far-right encoder controls the volume of the Master track (or the Pre-Cue volume if Shift is held.) Holding Shift while adjusting any of the encoders allows you to fine-tune whichever parameter is currently being controlled by that encoder.
Add Device — Opens Browse Mode to add a new device to the currently selected track. Devices will load to the right of the previously-selected device, although note that MIDI effects will always be placed before the instrument in the track and audio effects will always be placed after it.
Add Track — Puts Push 2 into Browse Mode, allowing you to select which type of track you’d like to add (MIDI, Audio, or Return) and optionally load a device to the new track at the same time. If the Add Track button is pressed while a track within a Group Track is selected, any new tracks will be inserted into that Group Track.
Master — Press the Master button to select the Master track. Press Master again to return to the previously selected track.
Scene/Grid buttons — These buttons change their functionality depending on whether Session Mode or Note Mode is selected. When Session Mode is selected, these buttons launch Session View scenes. (Tip: hold the Select button while pressing a Scene button to select the scene without launching it.) When Note Mode is selected, the Scene/Grid buttons determine the rhythmic resolution of the step sequencer grid and the rhythmic resolution of repeated notes (when Repeat is enabled.)
Setup — Press to adjust brightness, the sensitivity of Push 2’s velocity response, and other settings (see ‘Setup Menu’).
User — All of Push 2’s built-in functionality can be disabled via User Mode. This allows Push 2 to be reprogrammed to control alternate functions in Live or other software. (Tip: Push 2’s relative encoders work best in “Relative (2’s Comp.)” mode. To ensure this mode is selected, turn the encoder slowly to the left during mapping.)
Device — Press to enter Device Mode, which allows you to use the encoders and upper display buttons to control parameters in Live’s devices and third-party plug-ins (see ‘Working With Instruments and Effects’). While in another mode, press and hold to temporarily toggle to Device Mode. Releasing the button will then return to the previous mode.
Browse — Press to enter Browse Mode, where you can load instruments and effects to tracks. (see ‘Browsing and Loading Sounds’)
Mix — Each press of the Mix button toggles between Track Mix Mode and Global Mix Mode. In Track Mix Mode, the encoders adjust volume, pan, and send levels for the currently selected track. The lower display buttons are used to select the track (see ‘Track Control And Mixing’). While in another mode, press and hold to temporarily toggle to Mix Mode. Releasing the button will then return to the previous mode.
Clip — Press to enter Clip Mode, where you can adjust parameters for the selected clip (see ‘Clip Mode’). While in another mode, press and hold to temporarily toggle to Clip Mode. Releasing the button will then return to the previous mode.
Arrow Keys — Navigate through your Live Set (in Session Mode) and between tracks or scenes/clips (in Note Mode). In Browse Mode, use the arrows to move between columns of items in the browser.
Repeat — when Repeat is enabled, holding down a pad will retrigger the note. The Scene/Grid buttons change the rhythmic value of the repeated note. Press and hold Repeat to temporarily enable it.
Accent — when Accent is enabled, all incoming notes (whether step sequenced or played in real-time) are played at full velocity. Press and hold Accent to temporarily enable it.
Scale — When Note Mode is on and an instrument track is selected, pressing this button allows you to select which scale will be played on the pads. Note that this button has no effect when a Drum Rack track is selected or when in Session Mode.
- Fixed On/Off: When Fixed Mode is on, the notes on the pad grid remain in the same positions when you change keys; the bottom-left pad will always play C (except in keys that don’t contain a C, in which case the bottom-left pad will play the nearest note in the key.) When Fixed is off, the notes on the pad grid shift so that the bottom-left pad always plays the root of the selected key.
- In Key/Chromatic: With In Key selected, the pad grid is effectively “folded” so that only notes within the key are available. In Chromatic Mode, the pad grid contains all notes. Notes that are in the key are lit, while notes that are not in the key are unlit.
- Scale selection: Using the upper and lower display buttons, you can change the key played by the pad grid. You can change to a variety of scale types using encoders 2 through 7.
Layout — Press to change the layout of the pad grid. When in Session Mode, Layout toggles the Session Overview on or off (see ‘Session Overview’). When in Note Mode, the layout options depend on the type of track that is currently selected and the current mode.
- MIDI track containing an instrument — toggles between enabling the pad grid for realtime playing of notes and melodic step sequencing.
- MIDI track containing a Drum Rack (or a Simpler in Slicing Mode) — toggles between the three-section pad grid (real-time playing, step sequencing, and loop length) and the 64-pad layout.
Note — Press to enter Note Mode. When enabled, the pads change functionality based on the type of track that is currently selected. While in Session Mode, press and hold Note to temporarily toggle to Note Mode. Releasing the button will then return to Session mode.
- MIDI track containing an instrument — the pads plays notes (or slices of a sample, when using Simpler in Slicing Mode.) Pressing Layout toggles between real-time playing and step sequencing.
- MIDI track containing a Drum Rack — with the Loop Selector layout selected, the pad grid is divided; the lower-left 16 pads play the Drum Rack, the lower-right 16 pads adjust the loop length of the clip, and the upper four rows control the step sequencer. Press Layout to switch to 16 Velocities layout. Here, the bottom right 16 pads represent 16 different velocities for the selected Drum Rack pad. Press Layout again to switch to the 64-pad layout, allowing you to play drums across the entire 8×8 pad grid.
Session — Press to enter Session Mode. When enabled, the pad grid changes to launch clips in Live’s Session View. While in Note Mode, press and hold Session to temporarily toggle to Session Mode. Releasing the button will then return to Note Mode.
Octave Up/Down — If an instrument track is selected, these buttons shift the pads up or down by octave. If a Drum Rack is selected, these buttons shift the Drum Rack’s pad overview up or down by 16 pads. In Session Mode, these buttons shift control of the Session View up or down by eight scenes. These buttons will be unlit if no additional octaves are available.
Page Left/Right — When working with the drum or melodic step sequencers, these buttons navigate to the previous or next page of steps. In Session Mode, these buttons shift control of the Session View left or right by eight tracks.
Shift — Press and hold Shift while pressing other buttons to access additional functionality. Hold Shift while turning encoders for finer resolution.
Select — In Session Mode, hold Select and press a clip to select the clip without launching it. This will also display the clip name in the display. In Note Mode, hold Select and press a Drum Rack pad to select it without triggering the pad.
Footswitches
Two ports on the back of Push 2 allow you to connect momentary footswitches. Footswitch 1 acts as a sustain pedal. Footswitch 2 gives you hands-free control of Push 2’s recording functionality. A single tap of the footswitch will toggle the Record button, thus switching between recording/overdubbing and playback of the current clip. Quickly double-tapping the footswitch is the same as pressing the New button.
Note that certain footswitches may behave “backwards”; for example, notes may sustain only when the pedal is not depressed. Footswitch polarity can usually be corrected by connecting the footswitch to the port while depressing it, but we recommend using footswitches with a physical polarity switch.
Push 3, наконец, здесь! Ableton удивляет всех нас своей полностью переработанной третьей итерацией контроллера DAW. Ableton Push 3 поставляется в двух версиях, одна из которых работает автономно. По словам Ableton, эта модель разрабатывалась более десяти лет!
Основные моменты:
- Ableton Live 11 (все версии) автономно
- Мобильная DAW и контроллер
- Батарея в комплекте
- Встроенный аудиоинтерфейс, включая вход/выход ADAT
- 4x резюме
- Дополнительный порт USB-A для дополнительных (MPE) контроллеров
- WI-FI
- Max-for-Live в коробке
- Контроллер для Ableton Live
- Улучшенный рабочий процесс с новыми кнопками
Ни один другой MIDI-контроллер не переплетен так тесно, как Push с Ableton Live. Еще в 2013 году, когда Ableton представила первую итерацию Push в сотрудничестве с Akai, уже было ясно, что это не обычный MIDI-контроллер. Это дало вам полный контроль над DAW и обеспечило творческий рабочий процесс для создания треков — это и было Push. Затем в 2015 году Ableton выпустила Push 2, теперь с собственной разработкой оборудования, улучшенным рабочим процессом и новыми функциями. После этого ничего. Годы спекуляций и молчания. Но в кулуарах и во время бесед за кофе всегда было ясно: они, должно быть, работают над чем-то новым. И сегодня день. Ableton представляет нового члена семейства Push — Ableton Push 3.
Ableton Push 3 поставляется с собственной проприетарной операционной системой, и для полной загрузки требуется от 30 до 45 секунд, в зависимости от того, насколько большим был последний загруженный проект. Кстати: ОС Push основана на Linux и была специально модифицирована, чтобы соответствовать рабочему процессу Live. Ableton Live 11 Intro предустановлен на Ableton Push 3, так что вы можете сразу приступить к работе.

После первого запуска вам необходимо авторизовать Push 3 и зарегистрировать его в своей учетной записи Ableton. Чтобы это работало, вам нужно активировать WiFi Push 3 и подключить его к вашей локальной сети. После того, как Push получит доступ, устройство отобразит QR-код, который вы просто сканируете своим смартфоном, чтобы завершить процесс. Кроме того, Push 3 показывает код, который вы вводите на странице ableton.com/my-push. И Push 3, и ваш смартфон или компьютер должны быть в одной и той же сети Wi-Fi, чтобы процесс регистрации работал. Далее на дисплее появляется шестизначное число, которое необходимо ввести на сайте. После завершения регистрации Push 3 автоматически загружает версию Ableton Live, которой вы владеете.
Помимо обновленных, гораздо более ярких триггерных пэдов 8×8, в графическом интерфейсе Push есть три новые функции. По сравнению с почти таким же большим Push 2, пара функций Live получила специальные кнопки. Некоторые функции, такие как MIDI Capture, уже были доступны в Push 2, но получить к ним доступ было немного сложно. Помимо кнопки Capture, Push 3 также имеет возможность блокировки кнопок для блокировки дорожек. Кроме того, есть кнопки для загрузки, сохранения и редактирования песен, устройств и клипов. Также есть кнопка «Hotswap» для замены устройств на лету.
Ableton Push 3 обеспечивает около двух с половиной часов автономной работы при создании полноценного трека с множеством инструментов и эффектов. Этого определенно достаточно, чтобы преодолеть перебои в подаче электроэнергии во время производственного сеанса. Зарядка аккумулятора тоже занимает довольно много времени, опять же два с половиной часа. Если выключить Push 3, он заряжается намного быстрее.
Если ваш Ableton Push 3 находится в той же сети Wi-Fi, что и ваш компьютер, и у вас установлена последняя версия Live, устройство мгновенно распознается и отображается в браузере Live. И тогда это просто вопрос перетаскивания. Сэмплы, проекты, пресеты, клипы — отправка чего угодно туда и обратно очень проста. Любая песня, которую вы создали на Push 3, загружается с теми же настройками и звучит одинаково, когда вы открываете ее в Live. Так и должно быть.
Если вы подключите Push 3 через USB-C к компьютеру и запустите Ableton Live, вы сможете использовать устройство в режиме контроллера, что очень похоже на то, как Push 2 дистанционно управляет Ableton Live. Конечно, тогда вы не получите автономных функций. Внешнее оборудование, такое как контроллеры MPE, синтезатор или драм-машина, можно подключить к дополнительному порту USB-A. Push 3 мгновенно распознает их.
Ableton с самого начала сделала расширяемость основной функцией Push 3. Если вам не хватает места на жестком диске, это так же просто, как открыть устройство (это всего лишь пара винтов), извлечь старый жесткий диск и подключить новый, большего размера. Таким образом, вы также можете заменить батарею, если она больше не загружается полностью. Также есть слот для второго ЦП, если встроенный недостаточно мощный для вас.
Кроме того, вы можете расширить аудиовходы/выходы Push 3 через ADAT для восьми дополнительных входов и выходов. Таким образом, вы даже можете интегрировать микрофонные предусилители. Благодаря этим расширениям автономная версия превращается в полноценный микшер и центральный контроллер полной студийной установки.
Ableton Push 3 также хорошо работает в сочетании с модульной системой, полумодульным синтезатором или аппаратной драм-машиной. Два выхода экспрессии также функционируют как выходы CV для двух отдельных сигналов каждый (с дополнительными Y-кабелями).
Ableton Push 3 уже доступен на Ableton.com. Он поставляется в двух разных моделях. Есть версия контроллера за 949 евро. Полностью укомплектованное автономное оборудование продается за 1899 евро. Для тех, кто выберет меньшую версию, будет доступен комплект обновления за 999 евро. Он включает в себя элемент Intel®-NUC-Compute размером с кредитную карту с ЦП, ОЗУ, Wi-Fi, увеличенной батареей и жестким диском на 256 ГБ и превращает версию контроллера в автономную версию. Этот комплект обновления будет доступен на сайте Ableton.com ближе к концу года.
Автономная версия весит около 4 кг и имеет размеры 316 x 381 x 30 мм (Ш x Т x В), включая резиновые ножки. Push 3 включает в себя восемь энкодеров, переключатель включения / выключения на задней панели, три бесконечных энкодера с возможностью нажатия, причем больший из них также обеспечивает функциональность джойстика X / Y, 71 резиновую кнопку для доступа к различным функциям и меню, ползунок для колеса модуляции и высоты тона, а также большое «поле» контроллера MPE с сеткой кнопок 8×8 с подсветкой. Помимо самого устройства в комплект поставки входят внешний блок питания (65 Вт), кабель USB-C, краткое руководство и постер «Push 3».
Что касается ввода/вывода, вы получаете стереовыход, выход для наушников, два аудиовхода (2x моно или 1x стерео), два выхода для педали экспрессии, которые также можно использовать как четыре выхода CV с двумя дополнительными Y-кабелями, мини-разъем MIDI In. /Out (тип A) и вход/выход ADAT. Порт USB-C можно использовать как для зарядки, так и в качестве входа USB MIDI. Имеется дополнительный вход USB-A для подключения дополнительного оборудования (совместимого с классом USB).
Литий-ионной батареи хватает на 2,5 часа, она встроена в автономную версию. Вы можете заряжать его через USB (на дисплее отображается состояние зарядки). Вы получаете дополнительную подробную информацию на веб-сайте Ableton в виде загрузок, обучающих видео и руководств в формате PDF. Обновления прошивки устанавливаются автоматически при подключении устройства к локальной сети Wi-Fi.
Push 3 наконец-то здесь! Ableton приятно удивили всех третьей итерацией своего полностью обновленного DAW-контроллера. Ableton Push 3 поставляется в двух версиях, одна из которых работает автономно.
По словам Ableton, эта новинка находилась в разработке более десяти лет. Далее вас ждет перевод обзора Marcus Schmahl, которому до выхода удалось протестировать контроллер. Спойлер: в новинку сложно не влюбиться!
Ableton Push 3 standalone — основные моменты
- Ableton Live 11 (все версии) автономный
- Мобильная DAW и контроллер
- Батарея в комплекте
- Встроенный аудиоинтерфейс, включая вход/выход ADAT
- 4x CV выхода
- Вторичный порт USB-A для дополнительных (MPE) контроллеров
- WIFI
- Управление Max-for-Live
- Контроллер для Ableton Live
- Улучшенный рабочий процесс с новыми кнопками
Ableton Push 3 здесь
Ни один другой MIDI-контроллер не связан так тесно, как Push с Ableton Live. Еще в 2013 году, когда Ableton представили первую итерацию Push в сотрудничестве с Akai, уже было ясно, что это не обычный MIDI-контроллер. Он давал полный контроль над DAW и привносил творческий подход к созданию треков — это был Push. Затем в 2015 году Ableton выпустили Push 2, теперь уже с собственными аппаратными наработками, улучшенным рабочим процессом и новыми функциями. После этого — ничего. Годы спекуляций и молчания. Но в кулуарах и во время случайных бесед за чашкой кофе многие причастные после недолгих обсуждений приходили к выводу: они точно работают над чем-то новым. И сегодня этот день настал. Ableton показали новейшего члена семейства Push — Ableton Push 3.

Но что именно нового и как Push 3 впишется в рабочий процесс студии? Если Push 3 является автономным устройством, то как обстоят дела с мобильной рабочей средой? В последние несколько дней Marcus внимательно изучал оба аспекта. Полный углубленный обзор выходит за рамки этой статьи, поэтому считайте это подробным первым впечатлением.
Распаковка Ableton Push 3 Standalone
Открыв упаковку с Ableton Push 3 внутри, ненароком вспоминаешь распаковку продуктов от Apple. Картонная коробка кажется достаточно прочной, чтобы служить временной заменой настоящему футляру. Как только вы открываете коробку, в ней оказывается устройство, блок питания и кабель USB-C. Push 3 просто сияет своими огромными белыми кнопками, будто в ожидании занять центральное место в сетапе.
Под гораздо более стильно выглядящим Ableton Push 3 находится краткое руководство пользователя, плакат и обязательные рекомендации по безопасности. Push благодаря четырем резиновым ножкам сидит на столе плотно. Для ввода/вывода на задней панели есть множество портов для дополнительных MIDI-контроллеров, USB-подключения питания, студийных мониторов или пары наушников. Общая схема работы осталась прежней, так что если вы знакомы с Push 1 или Push 2, будете чувствовать себя как рыба в воде. Именно это и хочется сразу протестировать. Итак, давайте достанем контроллер из коробки, подключим блок питания и нажмем кнопку включения. Уже интересно, так как некоторые из белых триггерных кнопок начали мигать. Процесс запуска начался.
Push 3 — первый контакт
Ableton Push 3 поставляется с собственной проприетарной операционной системой, которой требуется от 30 до 45 секунд для полной загрузки, в зависимости от того, насколько большим был последний загруженный проект. Кстати, ОС Push основана на Linux, и она была специально модифицирована, чтобы соответствовать рабочему процессу Live. Ableton Live 11 Intro предустановлен на Ableton Push 3, так что вы можете сразу же приступить к работе.

После первого запуска необходимо авторизовать Push 3 и зарегистрировать его в своей учетной записи Ableton. Для этого надо активировать WiFi Push 3 и подключить его к локальной сети. После того, как Push получит доступ, устройство отобразит QR-код, который достаточно отсканировать смартфоном, чтобы завершить процесс. В качестве альтернативы, Push 3 отображает код, который надо ввести на сайте ableton.com/my-push. И Push 3, и смартфон или компьютер должны находиться в одной сети WiFi, чтобы процесс регистрации прошел успешно. Далее на дисплее появляется шестизначный номер, который нужно ввести на сайте. После регистрации Push 3 автоматически загружает версию Ableton Live, которой вы владеете.


Чуть детальнее о железе
Помимо обновленных, гораздо более ярких триггерных пэдов 8×8, в графическом интерфейсе Push привлекают внимание три новые функции. По сравнению с почти таким же большим Push 2, несколько функций Live получили собственные кнопки. Некоторые функции, такие как MIDI Capture, уже были доступны на Push 2, но доступ к ним был несколько затруднен. Помимо кнопки Capture, Push 3 также оснащен специальной кнопкой блокировки треков. Кроме того, есть кнопки для загрузки, сохранения и редактирования песен, устройств и клипов. Также есть кнопка «Hotswap» для быстрого переключения устройств.

Теперь и темп, и величина свинга могут быть установлены с помощью одного нажимаемого энкодера. То же самое касается громкости выхода. Теперь громкость главного выхода, выхода cue, выхода для наушников и master можно установить с помощью одного энкодера. Простым нажатием на него можно переключаться между различными настройками. Очень приятным дополнением является нажимаемый мастер-энкодер на правой стороне Ableton Push 3. Он также действует как одномерный джойстик (только слева направо). Все в Push 3 кажется невероятно надежным и высококачественным. Он идеально подходит для работы в дороге и на сцене!
Управление Live из коробки
Заядлый пользователь Push 2 с легкостью освоит Ableton Push 3 даже без руководства. Во время работы совсем не замечаешь, что на самом деле Push подключен к компьютеру — желания воспользоваться мышью или клавиатурой вообще не возникает. Напротив, сразу начинаешь быстро ориентироваться по звукам, творить на этой стильной черной коробочке в разноцветных огоньках. Далее только остается сохранить идеи и перенести их на компьютер. Благо, последнее тоже не составляет труда.

Переходим к проигрыванию нот и аккордов. Развитие MPE дошло до того, что это уже почти мейнстрим в индустрии. После первой волны с Roli Seaboard, лидирующей на этом поприще, появился Osmose. Как его можно превзойти? Скажем так, массив из 8×8 триггерных пэдов на Push 3 — серьезный соперник. На самом деле это не 64 отдельных пэда, а один гигантский MPE-пэд для воспроизведения нот и ввода значений контроллера. Хотя технически это один гигантский пэд, этого вообще не замечаешь.
Главное преимущество такой установки в том, что вы можете скользить по каждому пэду слева направо (скоро будет добавлено и второе направление — сверху вниз) для создания полифонических скольжений нот или модуляции эффектов. Кроме того пэд во время удерживания, нажатия или перемещения, — когда Push 3 запускает MPE-инструмент, — воспринимается как нечто живое. Если вы загрузите один из готовых пресетов MPE, например, звук пэда, и просто слегка подвигаете пальцами по триггерам, то мгновенно услышите гигантские бесконечно развивающиеся дроуны.
Мобильный продакшн с Ableton Push 3
Ableton значительно улучшили подсветку дисплея и пэдов по сравнению с Push 2. Даже когда солнце светит прямо на устройство, все остается хорошо видимым. Однако Push 3 нагревается с нижней стороны, так что будьте осторожны, если долго держите его на коленях! Это связано со встроенным процессором, оперативной памятью и жестким диском. Будет хорошо установить Push 3 на стол или хотя бы на какуюнибудь подставку. Так будет организован постоянный поток воздуха для охлаждения.
Ableton Push 3 обеспечивает около двух с половиной часов автономной работы при создании полноценного трека с большим количеством инструментов и эффектов. Этого определенно достаточно, чтобы пережить перебои с электричеством в процессе творчества. Зарядка аккумулятора также держит довольно долго — два с половиной часа. Если выключить Push 3, зарядка происходит гораздо быстрее.

Саунд дизайн с помощью Push 3 и Max-for-Live в студии
Да, вы все правильно поняли. Можно использовать практически любое устройство Max-for-Live непосредственно на Push 3! Уже одно это открывает огромное поле для экспериментов, полное дополнительных синтезаторов, сэмплеров, секвенсоров и аудиоэффектов. Можно загрузить любое устройство, даже то, которое поставляется с дополнительными сэмплами, или любой гранулярный девайс, и просто играть на Push. К гораздо более урезанному графическому интерфейсу дисплея Push действительно нужно немного привыкнуть, чтобы понять, как получить доступ ко всему в устройстве Max-for-Live.
Если ваш Ableton Push 3 находится в той же сети WiFi, что и компьютер, и у вас установлена последняя версия Live, устройство мгновенно распознается и отображается в браузере Live. А дальше все просто — перетащите устройство. Сэмплы, проекты, пресеты, клипы — пересылать что-либо туда и обратно проще простого. Любая композиция, созданная на Push 3, загружается с теми же настройками и звучит так же, когда вы открываете ее в Live. И так оно и должно быть.
Если вы подключите Push 3 через USB-C к компьютеру и запустите Ableton Live, то сможете использовать устройство в режиме контроллера, что очень похоже на то, как Push 2 дистанционно управляет Ableton Live. Конечно, в этом случае вы не получите автономных функций. Внешние устройства, такие как контроллеры MPE, синтезатор или драм-машина, могут быть подключены к вторичному порту USB-A. Push 3 мгновенно распознает их.
Модульная концепция с рассчетом на будущее
Ableton с самого начала сделал расширяемость основной особенностью Push 3. Если вам не хватает места на жестком диске, достаточно просто открыть устройство (это всего лишь пара винтов), вынуть старый жесткий диск и вставить новый, большего размера. Таким образом можно также заменить батарею, если она больше не заряжается полностью. Есть также слот для второго процессора, если встроенный недостаточно мощный.
Кроме того, можно расширить аудио вход/выход Push 3 через ADAT на восемь дополнительных входов и выходов. Таким образом, получится даже интегрировать микрофонные предусилители. Благодаря этим расширениям автономная версия превращается в полноценный микшер и центральный контроллер полной студийной установки.
Ableton Push 3 также хорошо работает в сочетании с модульной системой, полумодульным синтезатором или аппаратной драм-машиной. Два выхода экспрессии также работают как CV-выходы для двух отдельных сигналов каждый (с дополнительными Y-кабелями).
Заключение
Тестовая версия Ableton Push 3 работала практически безупречно, четко и плавно. Marcus работал с устройством несколько дней подряд без каких-либо сбоев или серьезных проблем. Два или три раза он слышал какие-то потрескивающие звуки, когда запускал проекты с большим количеством инструментов и эффектов. Но давайте будем честны: такое случается и с Live, и с любой другой DAW. Как отметил Marcus, Push 3 интегрирован с Ableton просто идеально. Во время работы с Push 3 редко вспоминаешь, что он подключен к компьютеру. Тем более, что теперь контроллер действительно может быть к нему и не подключен.

Сложно найти какие-то изъяны и моменты, которые хотелось бы отметить как неприятные. Конечно, цена, вероятно, будет предметом спора для некоторых. Но имейте в виду, что Push 3 — это комплексное решение для производства музыки. Здесь вы получаете практически все. Конечно, Ableton мог бы добавить в комплект Live 11 Suite. Но удержать стоимость на уровне с таким количеством аппаратных компонентов, с ОС, которая будет постоянно развиваться в течение многих лет, с множеством новых функций, должно быть, было не малым достижением. Правда, хотелось бы специальную кнопку записи сессии (для записи сессионных клипов в аранжировку). И было бы здорово иметь возможность подключить USB-флешку или внешний жесткий диск напрямую для передачи данных во время работы.

Ableton могут просто устранить любую ошибку или добавить дополнительные функции в будущих обновлениях программного обеспечения. В этом и заключается преимущество такой открытой системы. Не забывайте, что новое автономное устройство — это не полноценный аранжировщик, а мощный исполнительский инструмент и мобильное средство для создания ритмов. Аранжировка треков в полном объеме по-прежнему происходит в Live. Ableton Push 3 способен значительно улучшить студийный сетап. Он также отлично подходит для выступлений на сцене, для создания музыки на ходу, в саду или во время путешествий. С нетерпением ждем будущих обновлений с дополнительными функциями. А такая интеграция с Max-for-Live… об этом многие мечтали, и теперь она здесь.
Что внутри и сколько стоит Ableton Push 3?
Ableton Push 3 можно приобрести на сайте Ableton.com прямо сейчас. Он поставляется в двух разных моделях. Версия с контроллером продается по цене 949 евро. Полностью укомплектованное отдельное оборудование продается за 1899 евро. Для тех, кто выберет меньшую версию, будет выпущен комплект модернизации за 999 евро. Он включает в себя элемент Intel®-NUC-Compute размером с кредитную карту с процессором, оперативной памятью, WiFi, расширенной батареей и жестким диском на 256 Гб. Последний превращает версию контроллера в автономную. Этот комплект для модернизации будет доступен на сайте Ableton.com ближе к концу года.
Автономная версия весит почти 4 килограмма и имеет размеры 316 x 381 x 30 мм (Ш x Т x В), включая резиновые ножки. Push 3 включает в себя восемь энкодеров, переключатель On/Off на задней панели, три бесконечных энкодера с возможностью клика, причем больший из них также обеспечивает функциональность джойстика X/Y, 71 резиновую кнопку для доступа к различным функциям и меню, слайдер для мод-колеса и питч-бенда, а также большое «поле» контроллера MPE с подсветкой и сеткой кнопок 8×8. Помимо устройства, в комплект поставки входит внешний блок питания (65 Вт), кабель USB-C, краткое руководство пользователя и плакат «Push 3».
Что касается входов/выходов, то вы получаете стерео выход, выход для наушников, два аудиовхода (2x моно или 1x стерео), два выхода для педали экспрессии, которые также можно использовать как четыре CV-выхода с помощью двух дополнительных Y-кабелей, MIDI-вход/выход minijack (тип A) и ADAT-вход/выход. Порт USB-C может использоваться как для зарядки, так и в качестве входа USB MIDI. Есть дополнительный вход USB-A для подключения дополнительного оборудования.
Литий-ионный аккумулятор работает в течение 2,5 часов, он встроен в автономную версию. Вы можете заряжать его через USB (на дисплее отображается состояние зарядки). Дополнительную, подробную информацию можно получить на сайте Ableton в виде загрузок, обучающих видео и PDF-руководств. Обновления прошивки устанавливаются автоматически, когда устройство подключено к локальному WiFi.