- Manuals
- Brands
- Akai Manuals
- DJ Equipment
- FORCE
- User manual
-
Contents
-
Table of Contents
-
Bookmarks
Quick Links
User Guide
English
Manual Version 1.0
Related Manuals for Akai FORCE
Summary of Contents for Akai FORCE
-
Page 1
User Guide English Manual Version 1.0… -
Page 2: Table Of Contents
Table of Contents Introduction …………. 6 Tutorial …………..14 Support ………….. 6 Starting Up …………14 About This User Guide ……..6 Launching Clips ……….14 Important Notes ……….6 Editing Clips & Tracks ……..17 Clip Edit Mode ……….. 18 Region View ………..
-
Page 3
Menu …………60 Operation …………… 37 Save …………… 61 Preferences ………… 62 General Features ……….37 Info…………. 62 Wi-Fi …………62 Control Types ……….37 Bluetooth ……….. 63 Knobs …………. 37 Sequencer ……….63 Parameter Values ……….38 Sync …………64 Drop-Down Menus / Lists ……. -
Page 4
Modes …………104 Sample Edit Mode ……..172 Settings …………174 Trim Mode ………… 175 Matrix Mode ……….105 Assigning Samples ……..178 Processing Slices & Samples ….180 Step Sequencer ……..107 Chop Mode ……….184 Converting or Assigning Slices ….187 XYFX Mode ………. -
Page 5
Appendix ………….. 221 Effects & Parameters ……..221 Reverbs ………… 221 Delays …………225 Flangers ……….. 229 Chorus …………. 230 Autopans ……….231 Tremolos ……….231 Phasers ………… 232 HP (High-Pass) Filters ……233 LP (Low-Pass) Filters ……. 234 Filters (Other) ……….. 235 Parametric EQs …….. -
Page 6: Introduction
Introduction Thank you for purchasing the Force. At Akai Professional, we know how serious music is to you. That’s why we design our equipment with only one thing in mind—to make your performance the best it can be. Support For the latest information about this product (documentation, technical specifications, system requirements, compatibility information, etc.) and product registration, visit akaipro.com.
-
Page 7: Setup
Setup Here is just an example of how to use Force in your setup. Items not listed under Introduction > Box Contents of your included Quickstart Guide are sold separately. Synthesizer Guitar Microphone Flash Drive Power Headphones Powered Monitors MIDI Keyboard…
-
Page 8: Features
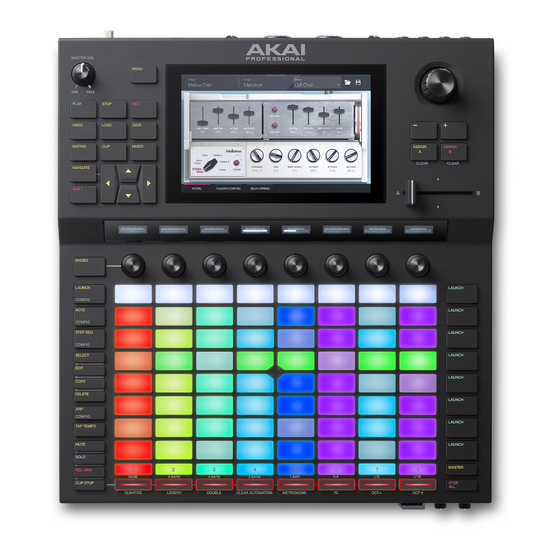
Features This chapter explains the features and functions of your Force. Top Panel…
-
Page 9
1. Display: This full-color multi-touch display shows information relevant to Force’s current operation. Touch the display (and use the hardware controls) to control the Force interface. See Display to learn how to use some basic functions. 2. Menu: Press this button to open the menu. You can tap an option on the menu screen to enter that mode, view, etc. -
Page 10
24. Launch/Config: Press this button to set the Clip Launch Pads to Launch mode. In Launch mode, each pad represents a single clip slot. The eight columns represent eight tracks while the eight rows represent eight scenes. You can launch the entire scene by pressing the Scene Launch buttons to the right of the row of clips. Press Shift and press this button to configure the Launch mode settings. -
Page 11: Display
Display Here is some general information about how to use the Force display: Tap a button or option to select it. Use the data dial or –/+ buttons to change its setting or value. In Matrix View, tap a filled clip slot to launch the clip.
-
Page 12: Rear Panel
3. Power Switch: Press this button to turn Force’s power on or off. 4. Link: Connect a standard Ethernet cable to this port to use Ableton Link and other compatible devices with Force. Operation > General Features > Menu > Preferences > Sync for more information.
-
Page 13: Front Panel
Front Panel 2 3 4 1. SD Card Slot: Insert a standard SD/SDHC card into this slot to access its files directly using Force. 2. Phones (1/4” / 6.35 mm): Connect standard 1/4” (6.35 mm) stereo headphones to this output.
-
Page 14: Tutorial
When you first power on your Force, you can select a demo project to help get you started, select Empty Project at the bottom of the screen to load a blank template, or select User Template to load a saved custom template.
-
Page 15
Press the Launch button to make sure the clip launch pads are in Launch Mode. In this pad mode, each pad represents a single clip in a track. The lighted pads represent the clips shown on the display, and the dim pads are empty clips. -
Page 16
While one scene is playing, try launching clips from other rows to experiment with different variations. You can also assign Tracks to Force’s crossfader. This allows you to seamlessly transition between clips from multiple tracks. 1. Press and hold the Assign A button and press the Track Assign button for Track 1 – Kick Loop. The track name at the top of the display will now show an A icon. -
Page 17: Editing Clips & Tracks
MIDI events by a particular type, for instance, Aftertouch messages or Track Automation. Force’s Track Edit Mode is used to edit the parameters of the track itself. This mode is not available for audio tracks. For drum tracks, you can edit the parameters of the four layers as well as all synthesis parameters and insert effect settings.
-
Page 18: Clip Edit Mode
Clip Edit Mode First, let’s look at Clip Edit Mode, where you can view and edit clip information and parameters. To enter Clip Edit Mode, do either of the following: • Press Clip. • Press Menu and then tap Clip Edit. When you first enter Clip Edit Mode, you will see the Clip View page.
-
Page 19
Let’s edit one of the clips in our demo project: 1. Make sure the clip launch pads are in Launch Mode by pressing the Launch button. 2. Press and hold the Select button, then press the first clip launch pad for Track 7 – SFX. 3. -
Page 20: Region View
In Clip Edit Mode, depending on the type of clip selected, you can also edit an audio clip using Region View or edit MIDI note events using Event View. Region View In Region View, you can edit parameters of the audio clip itself, such as length, levels, tuning and BPM. Let’s start by making some edits to an audio clip using Region View.
-
Page 21
In Region View, you can also use Force’s powerful tool to adjust the tempo of any sample to match your project’s tempo without changing the pitch. To sync an audio clip to the project tempo: 1. Load the desired sample to an empty clip launch pad using the Browser. -
Page 22: Event View
Clip Edit Mode will appear differently when using a clip with MIDI data. Drum, Keygroup, Plugin, MIDI and CV tracks all use Event View instead of Region View, which allows you to edit MIDI data. Event View Event View for a drum track Event View for a keygroup, plugin, MIDI or CV track Now let’s make some edits to a MIDI clip using Event View.
-
Page 23: List View
List View List View in Clip Edit Mode is similar to Event View, but uses a scrolling list workflow to display MIDI note event parameters. This allows you to quickly filter your MIDI events by a particular type using the View menu or by the current playhead position using the time counter at the top of the display.
-
Page 24: Track Edit Mode
Track Edit Mode In addition to editing MIDI note events using Clip Edit Mode, you can edit the parameters of a track using Track Edit Mode. This mode is not available for audio tracks. To enter the Track Edit Mode, do either of the following: •…
-
Page 25
You can also apply effects to a track with Track Edit mode. Let’s try adding an effect to the bass track. 1. While in Track Edit Mode, press and hold the Track Select button for Track 6 – Classic Bass to select the track. 2. -
Page 26
When a Plugin track is selected, Track Edit Mode shows the parameters of the loaded plugin. 1. Press Matrix to enter Matrix Mode. 2. Press and hold the track selector button for Track 5 – Hype Chords. 3. Launch the first clip in Track 5 – Hype Chords. 4. -
Page 27: Renaming & Saving
Renaming & Saving After making changes to clips and tracks, you may want to do some renaming and save your project before going further. To rename a track: 1. Press Matrix to enter Matrix mode. 2. Double-tap the track name at the top of the display. 3.
-
Page 28
Force Documents is a shortcut to the Force Documents folder on the internal drive of Force. If you have storage devices connected to the USB ports or SD card slot of Force, they will appear in this column, as well. -
Page 29: Using The Browser
You can also quickly audition samples by using the Previous and Next buttons on the display, or the – and + buttons on Force. When you move to a new sample, it will automatically be loaded to the selected pad. If you decide to not use the sample, the old sample will automatically be deleted when a new one is loaded to the same pad.
-
Page 30: Mixing Tracks
Mixing Tracks Force’s mixer allows you to adjust parameters such as level, stereo panning and routing the same way you would with a traditional mixer or digital audio workstation. To open the Mixer, press Mixer. Alternatively, press Menu and tap Mixer.
-
Page 31
Next, tap the Inserts & I/O tab. On this page, you can add insert effects to tracks, as well as control input and output routing. Let’s try adding an effect to a track: 1. Tap an insert slot in Track 4 – Hat Loop to open the Inserts window. -
Page 32: Cueing Tracks
7. Launch a clip in the track you have cued. You should hear both the master mix and the audio of the cued track. 8. Using headphones attached to the Phones Output on Force’s front panel, and/or speakers connected to Outputs 3/4, listen to the cued audio to make sure it is in sync with your main mix.
-
Page 33: Recording Clips
Recording Clips Now that you’re more familiar with the basics of clip launching and editing, let’s try recording new clips to add to the project. Before recording, let’s create a new scene and an empty clip to record into: 1. Press Matrix to open Matrix Mode on the display. 2.
-
Page 34
When set to REC Button then Pad, first press the record button, then tap any pad to begin recording. This is the default mode when Force is powered on. Check the Fixed Length Recording box to stop recording after the clip length set in the Fixed Length (Bars) field. -
Page 35: Recording With The Step Sequencer
Recording with the Step Sequencer When sequencing drums, you can use Force’s built-in Step Sequencer to quickly enter note events by using the clip launch pads as «step buttons,» simulating the experience of a traditional step-sequencer-style drum machine. When using the Step Sequencer, you can assign the clip launch pads to three different modes: Drum: In this mode, the top four rows of pads represent each step in the clip.
-
Page 36
Let’s use the Drum mode to sequence a drum pattern using the Step Sequencer. 1. Select Track 2 – Top Loop and add a new empty clip as described above. 2. Make sure the clip you are recording into is playing, otherwise you won’t hear the pattern you are creating. 3. -
Page 37: Operation
Operation This chapter explains the complete features and functions of your Force hardware. Important: • When the left-most button at the bottom of the screen shows an upward arrow (), it means there are additional buttons you can use when you press and hold Shift. Press and hold Shift to show the secondary buttons, and any of them, if desired.
-
Page 38: Parameter Values
Parameter Values To set the value for a parameter, do either of the following: • Tap the field to select it, and then use the data dial or –/+ buttons to adjust the value. When the value has decimal places, you can sometimes press and hold Shift and then use the data dial or –/+ buttons to adjust the value by smaller increments.
-
Page 39: Selectors
Selectors Selectors show all available options. One of them is always selected. The selected option is highlighted while the others are dark. To select an option, tap it. Buttons Buttons usually have two states: selected and deselected (active or inactive, respectively).
-
Page 40: Sliders
Sliders To adjust the position of a slider, do any of the following: • Tap and drag the slider to the desired position. • Tap the desired position (this works only on some sliders). • Tap the slider to select it, and then use the data dial or –/+ buttons to adjust the position (this works only on some sliders).
-
Page 41: Event View Tools
Event View Tools In the Event View in Clip Mode, these four icons enable you to use different functions in the grid. Tap one to select its mode: Pencil: Draw Mode: To enter a note in an empty grid square, tap the grid square. To select a note, tap it.
-
Page 42: Audio Region Edit Tools
Audio Region Edit Tools In Audio Region Edit Mode in Clip Mode, these six tool icons enable you to use different functions in the waveform. Tap one to select its mode: Marquee: Marquee Mode: To select a track region, tap the upper third of it. To select multiple track regions, tap and drag across the grid to create a box that highlights them.
-
Page 43: Pad Modes
These modes are accessed by pressing their respective Launch/Config, Note/Config, and Step Seq/Config buttons on the Force hardware. At any time, you can also temporarily view any of the pad modes by pressing and holding the Launch, Note, or Step Seq buttons. This allows you to quickly make changes such as launching a different clip or editing the step sequencer.
-
Page 44: Note Mode
Note Mode Note Mode is used for playing drum kits or melodic tracks like keygroups or plugins. To enter Note Mode, press the Note button while a drum, keygroup, plugin, MIDI or CV track is selected. The appearance of the clip launch pads will change depending on the type of track selected. When a drum track is selected, the clip launch pads will appear in Drum Note Mode;…
-
Page 45: Melodic Note Mode
Melodic Note Mode In Melodic Note Mode, the clip launch pads can be used like a traditional keyboard controller to play melodic notes and chords. For instance, the image to the right shows the clip launch pads set to play a scale in Melodic Note Mode.
-
Page 46
Use the Pad Rows field to determine how the notes are laid out on Force’s 8×8 pad grid: Continuous Start on 5th Start on 3rd Start on root Start on 4th Start on 2nd Use the Base Note and Octave fields to set the starting point of the scale (pitch and register). The available notes are all chromatic notes across the range of the pads. -
Page 47: Launch & Note Mode
Launch & Note Mode In addition to using the entire 8×8 pad matrix for Launch Mode or Note Mode, you can split the rows of clip launch pads into half Launch Mode and half Note Mode. To enter Launch & Note Mode, press the Launch and Note buttons at the same time.
-
Page 48: Step Sequencer
Step Sequencer The Step Sequencer pad mode is used to create or edit clips by using the pads as «step buttons,» simulating the experience of a traditional step-sequencer-style drum machine. This pad mode is often used in conjunction with the Step Sequencer mode on the display, but can be used while any mode is on the display.
-
Page 49: Melodic
Melodic In Melodic Step Sequencer Mode, the bottom four rows of the pads are used like Melodic Note Mode, with the pads representing notes in a scale. Press a clip launch pad to select a note. The currently selected note will be lit bright white. Hold Shift and press the Track Assign buttons marked Oct-/ Oct+ to change the octave.
-
Page 50: Tracks
A keygroup track uses one or more samples as its sound source. It contains (1) a list of samples and (2) the settings for each sample (i.e., pitch tuning, effects, etc.). Keygroup tracks are used to play samples chromatically with a MIDI keyboard or the Force pads. See Keygroup Tracks for more information.
-
Page 51: Audio Tracks
Audio Tracks An audio track uses recorded or imported samples as its sound source. To create an audio track: 1. Press Matrix to enter Matrix Mode. 2. At the top of the screen, press the + icon to add a new track. If you cannot see the + icon, press the right cursor to move the matrix view until it is shown.
-
Page 52: Drum Tracks
Drum Tracks A drum track uses one or more samples as its sound source. It contains (1) a list of samples and (2) the settings for each sample (i.e., pad assignments, loop points, pitch tuning, effects, etc.). Drum tracks are used mostly for creating drum parts and quickly and easily assigning samples to pads.
-
Page 53
Alternatively, assign samples in a drum track in Track Edit Mode in one of these two ways: 1. Press Menu, and then tap Track Edit to enter Track Edit Mode. Alternatively, press and hold Shift and press Clip. 2. Tap the Samples tab. This lets you view the samples assigned to all four layers of the current pad as well as tuning and level parameters for each layer. -
Page 54: Keygroup Tracks
A keygroup track uses one or more samples as its sound source. It contains (1) a list of samples and (2) the settings for each sample (i.e., pitch tuning, effects, etc.). Keygroup tracks are used to play samples chromatically with a MIDI keyboard or the Force pads. To create a keygroup track: 1.
-
Page 55
To assign samples in a keygroup track: 1. Press Menu, and then tap Track Edit to enter Track Edit Mode. Alternatively, press and hold Shift and press Clip. 2. Tap Samples. This lets you view the samples assigned to all four layers of the current keygroup as well as tuning and level parameters for each layer. -
Page 56: Plugin Tracks
Plugin Tracks A plugin track contains an instance of a plugin through which you can send your track’s MIDI data. To create a plugin track: 1. Press Matrix to enter Matrix Mode. 2. At the top of the screen, press the + icon to add a new track. If you cannot see the + icon, press the right cursor to move the matrix view until it is shown.
-
Page 57
To load a plugin to the track: 1. Double-tap the track name at the top of the screen to open the Track Settings window. 2. Double-tap the Plugin field. In the list that appears, tap the desired plugin. Alternatively, use the data dial or the –/+ buttons to select a plugin. -
Page 58: Midi Tracks
MIDI Tracks A MIDI track lets you send your track’s MIDI data to an external MIDI device like a synth or drum machine. To create a MIDI track: 1. Press Matrix to enter Matrix Mode. 2. At the top of the screen, press the + icon to add a new track. If you cannot see the + icon, press the right cursor to move the matrix view until it is shown.
-
Page 59: Cv Tracks
CV Tracks A CV track lets you send your control voltage (CV) signals to an external device like a synth or drum machine that uses CV. To create a CV track: 1. Press Matrix to enter Matrix Mode. 2. At the top of the screen, press the + icon to add a new track. If you cannot see the + icon, press the right cursor to move the matrix view until it is shown.
-
Page 60: Menu
Menu The Menu lets you select any of the 14 modes or save your project. You can also use it to set your preferences, save your project, set sync behavior or view your system resources. To open the Menu, press Menu, or tap the icon in the upper-left corner of the screen while on the normal page of your current mode.
-
Page 61: Save
Internal is the internal drive of Force. Force Documents is a shortcut to the Force Documents folder on the internal drive of Force. If you have storage devices connected to USB ports or SD card slot of Force, they will appear in this column, as well.
-
Page 62: Preferences
Update Mode without saving your current project. Wi-Fi The settings on this screen will determine how your Force hardware’s wireless connection works, so you can use Ableton Link, a new technology that synchronizes beat, phase and tempo of Ableton Live and Ableton Link-enabled applications over a wireless or wired network.
-
Page 63: Bluetooth
Bluetooth The settings on this screen will determine how your Force hardware’s Bluetooth connection works, so you can use Bluetooth MIDI controllers (e.g., LPD8 Wireless or LPK25 Wireless) or a Bluetooth computer keyboard with it. These settings are available only when used in Standalone Mode.
-
Page 64: Sync
Screen Brightness: This determines the brightness of the screen during normal operation: normal brightness (Day) or dimmed (Night). Date: This is the current date, formatted as Month / Day / Year. When saving files on Force in Standalone Mode, the file will include the current date in its metadata.
-
Page 65: Project Defaults
Project Defaults The settings on this screen determine various default values for any new project that you create. New Project Dialog: This determines what options you see when you start a new project. When set to Off, a new project will be empty with no preconfigured settings except for the project defaults shown here. When set to Demo, you can choose to load a demo project (from several different genres) as a starting point or an empty project.
-
Page 66: Sync
Mode Tap this icon to switch Force to Computer Mode. In the screen that appears, select whether you want to continue to Computer Mode or Cancel and return to your current mode and project. It is recommended to save your project before switching to Computer Mode since you cannot freely switch between Standalone and Computer Modes without also closing your current project.
-
Page 67: System Resources
System Resources Tap one of these icons to show the System Resources window for Force. The indicators in this window show current usage statistics: CPU: The CPU indicator shows the current CPU as a percentage. RAM Usage: The Mem indicator shows your Force hardware’s current RAM usage.
-
Page 68: Timing Correct (Tc)
Timing Correct (TC) The Timing Correct window contains various settings to help quantize the events in your project. You can quantize note events on MIDI tracks or track regions on audio tracks (though you cannot apply all types of quantization to audio tracks).
-
Page 69
Use the Time Division selector to set the quantization value. Events will “snap” to these time divisions on the grid. The T indicates a triplet-based value. Use the Swing field to set the amount of swing from 50% to 75%. Swing lets you “shuffle” your beats—from subtle to extreme. -
Page 70: Metronome (Click/Metro)
T indicates a triplet-based time division. Use the Sound field to select the sound that you want to hear for the metronome: Sidestick 1, Sidestick 2, Clap, Metroclick, Shake, Tambourine, or Force Click. Use the Volume knob to set the volume of your metronome click.
-
Page 71: Automation
Automation You can set the automation for individual tracks to be “written,” “read,” or disabled entirely by using the track automation button in the channel strip in the Mixer. Tap the track automation button to cycle through its three states: When off, the track will ignore automation data.
-
Page 72: Arpeggiator
Arpeggiator Force includes a full-featured arpeggiator and phrase player for melodic track types, as well as traditional note repeat functionality. To enable the arpeggiator, press the Arp button. To configure the arpeggiator setting, hold Shift and press the Arp button to open the Arpeggiator window.
-
Page 73
The Arp mode section of the Arpeggiator window is available when the Action is set to Arp. When this action is selected, hold down a chord and the arpeggiator will play a pattern based on the notes held. Use the Pattern field to set how the arpeggiator triggers the held notes. -
Page 74: Effects
Effects You can apply various effects to the pads, keygroups, tracks and master outputs, using insert and send/return effects. This chapter can help you get a good overall understanding of how the effects work. Appendix > Effects & Parameters for a list of all available effects (with a brief description of each) and their editable parameters.
-
Page 75
To view, load, edit, or clear effects, tap the area under the Inserts field. This usually appears in a channel strip (next to a level slider and pan knob). When viewing loaded effects, you will see this window: To select an effect, use the field for each insert slot. A window (described below) will appear. -
Page 76: Insert Effects
Insert Effects Pads You can load up to four insert effects to each pad. You can do this in the Pad Mixer or Track Edit Mode. Tip: When using pad insert effects, they will be applied to the selected pad only. This means that you could apply unique combinations of effects to each pad within a kit.
-
Page 77: Keygroups
Keygroups You can load up to four insert effects to each keygroup. You can do this in the Pad Mixer or Track Edit Mode. Important: When using keygroup insert effects, they will be applied to that keygroup only. Keep this in mind if you load insert effects to multiple keygroups with overlapping note ranges—the effects will overlap in that range as well.
-
Page 78: Tracks
Tracks You can load up to four insert effects to each track. You can do this in the Mixer or XYFX Mode. Note: In XYFX Mode, the effects act like a single insert effect on that track. In fact, XYFX is the name of the insert effect that is loaded when use this mode.
-
Page 79: Masters
Masters You can load up to four insert effects to each master output (a stereo pair of channels: Outputs 1/2 or Outputs 3/4). You can do this in the Mixer. To load a master insert effect in the Mixer: 1. Press the Master button to show the Returns and Master Outputs in the Mixer. 2.
-
Page 80: Send/Return Effects
Send/Return Effects Send/return effects work in the following way: 1. A pad or drum, keygroup, plugin or audio track sends its audio to a return at a designated send level. 2. That audio is processed by the effects on the return. Each return can have up to four insert effects loaded and activated.
-
Page 81: Pads
Pads You can set the send levels for individual pads in Track Edit Mode or the Pad Mixer. To set the send levels for a pad in Track Edit Mode: 1. While editing the desired clip in Track Edit Mode, press the desired clip launch pad to select it. 2.
-
Page 82: Keygroups
Keygroups You can set the send levels for keygroups in Track Edit Mode or the Pad Mixer. To set the send levels for a keygroup in Track Edit Mode: 1. While using the desired track, press the desired pad to select its keygroup. Alternatively, use the Keygroup field at the top of the screen.
-
Page 83: Audio And Plugin Tracks
Audio and Plugin Tracks You can set the send levels for audio and plugin tracks in the Mixer only. To set the send levels for an audio or plugin track: 1. Tap the Send tab at the bottom of the screen. 2.
-
Page 84: Plugins
Plugins Force includes four new plugins from AIR Music Technology to help you get started making music right out of the box. To learn more about plugin tracks, see Operation > General Features > Tracks > Plugin Tracks. Bassline The AIR Bassline plugin emulates the sound of classic mono synths, with a contemporary twist.
-
Page 85
Velocity / Master / Chorus Use this tab to adjust the Velocity Control settings, Master volume. You can also apply and adjust the settings for the built-in Chorus effect. Parameter Description Value Range Velocity Amp Control The amount of effect velocity has on amplitude 0–100% control. -
Page 86
Compressor / Hype Use this tab to apply and adjust the settings for the built-in Compressor and Hype effects. Parameter Description Value Range Compressor Threshold Signal level after which the compressor will be applied. 0.0 – -60. dB Ratio Amount of compression applied. 1.0:1 –… -
Page 87: Electric
Electric The AIR Electric plugin emulates the sound of classic electric pianos. While viewing any of the tabs listed below, you can quickly enable or disable the Bell and Noise sounds, as well as the built-in effects (Tremolo, Tube, Chorus, Delay and Spring Reverb). When viewing a specific tab, you can enable or disable the sound or effect by pressing the circle in the upper-right corner of each section.
-
Page 88
Bell / Noise Use this tab to apply and adjust the settings for the Bell and Noise sounds. Parameter Description Value Range Bell Tune Pitch of the bell sound, in semitones above the root 0– 60 semitones pitch. Dry/PU Mix of Dry versus Pickup signal for the bell sound. -100% –… -
Page 89
Trem / Tube / Chorus Use this tab to apply and adjust the settings for the built-in Tremolo, Tube (Over Drive), and Chorus effects. Parameter Description Value Range Tremolo Rate Modulation speed of the effect. When Sync is set to Free: 0.25 – 13.00 Hz When Sync is set to Sync: 8/4 –… -
Page 90
Spring Reverb Use this tab to apply and adjust the settings for the built-in Spring Reverb effect. Parameter Description Value Range Pre-Delay Length of time between dry signal and reverberated signal. 0 ms – 250 ms Time Length of reverb tail. 1.0 –… -
Page 91: Hype
Hype The AIR Hype plugin is a modern style dual-oscillator synthesizer that includes a wide variety of built-in effects for endless combinations of sound, as well as convenient macro controls for lightning-fast adjustments. Macro Use this tab to adjust the macro settings for the plugin. You can access the Effect on/off switches in all tabs.
-
Page 92
Filter / Amp Use this tab to adjust the filter and amplitude envelope settings. Parameter Description Value Range Filter Cutoff Cutoff frequency for the filter. 0–100% Reso Amount of resonance of the filter. 0–100% Filter Envelope Attack Length of time for the filter to reach full level. 0–100% Decay Length of time for the filter to reach sustain level. -
Page 93
Effects 1 Use this tab to adjust the settings for the Low-Frequency Oscillator and Modulation, Distortion and Hype effects. Parameter Description Value Range Rate Speed of the low frequency oscillator. When Sync is set to 1st Note or Each Note: 0.03 – 30.00 Hz When Sync is set to Temp+Note or Tempo+Beat: 8/4 –… -
Page 94
Effects 2 Use this tab to adjust the settings for the Delay, Reverb, Compressor, Pumper and Limiter effects. Parameter Description Value Range Delay Time Amount of time between the dry signal and the 1/32 – 8/4 delayed signal. Feedback Amount of signal fed back into the delay line. 0–100% Freq Adjusts the filter cutoff frequency of the delayed… -
Page 95
Setup Use this tab to adjust the plugin setup parameters. Parameter Description Value Range Setup Transpose Transposition of the plugin, in semitones. -36 – +36 Tune Fine tuning of the plugin, in cents. -100 – +100 Glide Time Amount of time to slide from the pitch of one note to 0 ms –… -
Page 96: Tubesynth
TubeSynth The AIR TubeSynth plugin emulates the sound of classic vintage analog polysynths. TubeSynth is based on the highly acclaimed AIR Vacuum Pro desktop synth plugin and also includes 5 integrated AIR effects. Oscillator Use this tab to adjust the settings for the two variable Oscillators and the Sub Oscillator.
-
Page 97
Mixer / Filter Use this tab to control EQ for Oscillator 2, set the levels of the oscillators and effects, and edit the low-pass filter. Parameter Description Value Range Osc 2 EQ Gain Amount of gain applied to the selected Frequency. -48 –… -
Page 98
Envelope Use this tab to adjust the various envelope settings. Parameter Description Value Range Filter Envelope Attack Length of time for the filter to reach full level. 1.00 ms – 100 s Decay Length of time for the filter to reach sustain level. 1.00 ms –… -
Page 99
Use this tab to adjust the settings for the low-frequency oscillators. Parameter Description Value Range LFO 1/LFO 2 Shape Waveshape of the low-frequency oscillator. Sine, Square. Saw Up, Saw Down, Pump, S&H, Drift Destination Where the low-frequency oscillator is sent. LFO1: Off, Pitch, Filter, Level, LFO2: Pitch, Osc 1/2 Shape, Osc 1/2 Pitch, LPF, Quad… -
Page 100
Setup Use this tab to adjust plugin setup parameters. Parameter Description Value Range Controller Destinations Velocity 1 Send Velocity data to one of the following control Amp, Cutoff, Osc1 destinations. Shape, Osc2 Shape, Osc1&2 Shape Depth Amount of modulation applied. 0–100% Velocity 2 Send Velocity data to one of the following control… -
Page 101
Chorus Use this tab to apply and adjust the settings for the built-in Chorus effect. Parameter Description Value Range Rate Modulation speed of the effect. 0.01 – 10.0 Hz Delay Length of time the wet signal is offset from the dry signal. 0.00 –… -
Page 102
Reverb / Compressor / Hype Use this tab to apply and adjust the settings for the built-in Reverb, Compressor and Hype effects. Parameter Description Value Range Reverb Mode Type of reverb applied. Hall, Stadium, Room, Abstract Time Length of reverb tail. 0.4 s –… -
Page 103: Standalone Vs. Computer Mode
The Force hardware will not communicate with a computer over a USB connection. • Any files (projects, samples, etc.) that you save or load are in the internal hard drive on your Force or a connected USB drive or SD card.
-
Page 104: Modes
Modes The Force hardware has a Menu page that lets you select any one of several modes. This chapter describes the various features and functions of each one. Click a button below to skip directly to that chapter.
-
Page 105: Matrix Mode
Matrix Mode Matrix Mode gives you an overview of your tracks and clips. To enter Matrix Mode, do one of the following: • Press Matrix. • Press Menu, and then tap Matrix. To create a new clip, double-tap an empty clip slot. To launch a clip, tap an existing clip.
-
Page 106
Record button to begin recording on the highlighted clip slot. When set to REC Button then Pad, first press the record button, then tap any pad to begin recording. This is the default mode when Force is powered on. -
Page 107: Step Sequencer
Step Sequencer The Step Sequencer lets you create or edit clips by using the pads as “step buttons,” simulating the experience of a traditional step-sequencer-style drum machine. This is available for MIDI tracks only, not audio tracks. To enter the Step Sequencer, press Menu, and then tap Step Sequencer. If you have not yet created a clip for the track, you will be prompted to do so.
-
Page 108
The current bar number is shown in the upper-left corner. 3. Press the pads of your Force hardware, or tap a button at the bottom of the sequencer. Each pad corresponds to a step in the bar and will light with a color corresponding to its velocity. -
Page 109
Use the Flip Steps button to switch which steps have notes entered and which do not have notes. Steps that previously had no notes will now have notes at full velocity (127). Steps that previously had notes will now be empty. Tap Presets to show or hide the preset velocity controls. -
Page 110
The third button will apply ascending or descending velocities to the steps. Each time you tap it, it will cycle through these options: • Across the entire bar, the velocities will ascend to a peak and then descend from it. •… -
Page 111: Xyfx Mode
XYFX Mode XYFX Mode turns the touchscreen into an XY pad where each axis represents the range of an effect parameter. As you move your finger on the XY pad, the current position will determine the current value of the two parameters.
-
Page 112
Touch or move your finger on the gridded part of the screen. A marker will follow your finger to indicate the current position. The X axis is the horizontal axis, increasing in value as you move right. The Y axis is the vertical axis, increasing in value as you move up. -
Page 113
XY Mode with a manually controlled effect. Use the Attack knob to set the length of the attack phase of the envelope, which is triggered when you touch the XY pad. In other words, this determines how long it takes the effect to fully respond to your touch. Use the Release knob to set the length of the release phase of the envelope, which is triggered when you release the XY pad. -
Page 114: Navigate Mode
Navigate Mode Navigate Mode lets you quickly select which 8×8 grouping of clips is currently in focus for the clip launch pads and Matrix Mode. To enter Navigate Mode, press Navigate. To move the matrix view, do any of the following: Use the cursors to move the view one row or column at a time.
-
Page 115: Browser
Internal is the internal drive of Force. Force Documents is a shortcut to the Force Documents folder on the internal drive of Force. If you have storage devices connected to USB ports or SD card slot of Force, they will appear in this column, as well.
-
Page 116
(Devices that are uninitialized or do not have a file system will not be recognized by the Force hardware and consequently cannot be formatted.) -
Page 117
Use the six Content buttons to show specific locations in the internal drive of Force and filter them automatically by file type: Audio Clips: Tap this button to enter the Expansions folder on the internal drive, viewing audio files only. -
Page 118: Clip Edit Mode
Clip Edit Mode Clip Edit Mode lets you view and edit clips from your project. Clip View The Clip View lets you view and edit the parameters of the clip container itself. This view has three different appearances: one of audio track, one for drum tracks and one for keygroup, plugin, MIDI and CV tracks. To enter the Clip Edit View, do either of the following: •…
-
Page 119
Use the Start fields to set the starting location of the clip when launched. Alternatively, drag the start marker. Use the Loop Start fields to set the starting location of the clip loop. Alternatively, drag the loop start marker. Use the Loop Length fields to set the total length of the loop. Alternatively, drag the loop end marker Use the Launch Quantize field to set the quantization for launching the clip. -
Page 120: Event View
Event View The Event View lets you view and edit the note events of each clip of a track in a project and their velocities. This mode has two different appearances: one for drum tracks and one for keygroup tracks, MIDI tracks, and plugin tracks.
-
Page 121
In the Event View, these four tool icons enable you to use different functions in the grid. Tap one to select its mode: Pencil: Draw Mode: To enter a note in an empty grid square, tap the grid square. To select a note, tap it. To move a note, tap and drag it to another grid square. -
Page 122
Regardless of which tool is selected, you can do any of the following to move, lengthen, shorten, or transpose any selected note/notes. To automatically set the grid to view one pad bank and two bars, tap the grid-and-magnifying-glass icon in the upper-left corner. -
Page 123: Editing Events
The Event View also contains a velocity lane where you can easily adjust note velocities. The velocity lane in the Event View. The taller velocity lane in the Event View. To show or hide the velocity lane: 1. Tap the up arrow (∧) button in the lower-right corner to show the velocity lane. 2.
-
Page 124
The Pitch Quantize function forces the pitches of note events into a specific scale. To select the desired root note of the scale, use the Root Note field. To select a type of scale, use the Scale field. To determine which note events will be quantized, tap the Only apply to selected events checkbox. -
Page 125
The Generate Random Events function creates random melodic or drum patterns in the current clip. To select the type of events you want to create, use the Event Type field to select Drum Events or Melodic Events. To select how the events will be created relative to the existing events on the track, use the Replace field: Replace All Events: Select this option to replace all events in the clip with the randomly generated ones. -
Page 126
If Event Type is set to Melodic Events: To define a specific note range over which the events will be generated, use the Start Note or End Note fields. To enable or disable legato, tap the Legato checkbox. When on, the generated notes will be extended or shortened to create a long, unbroken phrase from the first note event’s start point to the last note event’s end point. -
Page 127
Force. If you have storage devices connected to USB ports or SD card slot of Force, they will appear in this column, as well. To enter a folder, double-tap it. Alternatively, turn the data dial or use the –/+ buttons to move through the list, and press the… -
Page 128: Region View
Region View The Region View lets you view and edit the view and edit the clips of audio tracks. This mode is not available for other track types. The top of the screen shows the timing information and editing tools. The time counter at the top of the screen indicates the current playhead position.
-
Page 129
Mute: Mute Mode: To mute or unmute a clip region (or multiple selected clip regions), tap it. Magnifying Glass: Navigation Mode: To move to another part of the clip, tap and drag it. To zoom in or out, spread or pinch your fingers (respectively) on the grid. You can do this vertically, horizontally, or both at the same time. -
Page 130
To reverse the selected clip region, tap Reverse. To mute the selected clip region, tap Mute. To lengthen or shorten the selected clip region without changing its pitch, tap Warp, which will enable the Semi, Fine, and BPM fields next to it. Use the BPM field to change the tempo, which will change the length of the clip region accordingly. -
Page 131: List View
List View List View has some of the features of the Event View—as well as some additional ones—but with a different interface/workflow. The time counter at the top of the screen indicates the current playhead position. The clock icon at the top of the screen opens the Timing Correct window. See General Features >…
-
Page 132
The Settings window lets you configure certain List Edit Mode settings. To view the Settings, tap the gear icon. Use the Hitting Pad Selects All Events selector to turn the feature on or off. When On, pressing a pad will automatically select all note events for that pad in the selected clip on that track. -
Page 133
The red arrow () on the left side of the list represents the audio playhead’s current position. If your clip is playing, the arrow will move accordingly. The following icons indicate the corresponding types of events: Note MIDI Automation (Volume, Pan, Mute, Solo) MIDI CC Automation (0–127) MIDI Parameter Automation (Aftertouch, Pitchbend, Channel Pressure, or Program Change) Mixer Automation (Volume, Pan, Mute, Solo, or Send 1–4) -
Page 134
To select an event, tap it. To select multiple events, press and hold Shift and tap each event. To insert a note event, press Rec or Overdub so the button is lit, and then press a pad. A note event will be created at the current location using the pad you pressed. -
Page 135: Track Edit Mode
Track Edit Mode Track Edit Mode contains all parameters for editing your Tracks. For drum tracks, this mode includes the parameters of four layers as well as all synthesis parameters and insert effect settings. See the Drum Tracks section to learn more. For keygroup tracks, this mode contains slightly more parameters than drum tracks.
-
Page 136
Tap the location icon at the top of the screen (between the Track and Pad fields) to open the Edit Zones window, which is a feature for drum tracks. This window displays an overview of any selected pads. Use the Mode selector to set how the selected pads will be edited: •… -
Page 137
Tap the down-arrow icon at the top of the screen (next to the Track field) to open the Flatten Pad window, which renders all samples on a pad as an audio sample and places it on the first layer of that pad. The resulting sample is the audio signal produced by that pad at full velocity (127) after the pad channel strip, which means that it includes any assigned pad insert effects and the results of warping the sample. -
Page 138: Master
Master In the Master tab, you can set the playback mode and tuning for the overall Track. Polyphony sets the playback mode for the track’s pads. In Mono Mode, only one pad will sound at a time. If a pad is played while another (or the same one) is still playing its sample/samples, the new pad will immediately mute all other currently playing pads in that track.
-
Page 139: Samples
Samples Each pad can trigger up to four samples, which are assigned in four individual layers. Each layer has identical, independently assignable parameters. Tap Samples to cycle through its three available tabs. On all three sections, you can access the Settings window, which lets you configure certain settings in the Samples tab. To view the Settings, tap the gear icon.
-
Page 140
The first Samples tab contains the sample waveform for each layer and controls for its pitch, timing, and playback. The upper half of the screen shows the waveform of the sample on the currently selected layer. The lower half shows the editing controls. -
Page 141
The green/S marker and red/E marker are the start point and end point (respectively). These two points define the region of the sample that will be played. To move the start point or end point, do any of the following: •… -
Page 142
Use the Reverse button to select in which direction the sample will play. When on, the sample will play in reverse. When off, the sample will play in the normal forward direction. Use the Pad Loop button to cycle through the available Pad Loop modes. Important: For Pad Loop to work, you must (1) set the Sample Play field (in the LFO Modulation tab) to Note On instead of One Shot and (2) set the Slice field (in the first Samples tab) to Pad instead of All or a slice number. -
Page 143
Tap Warp to enable or disable warping of the sample. When enabled, lengthening or shortening the sample (based on the BPM) will not change its pitch. When disabled, lengthening or shortening the sample will also change its pitch and vice versa. Use the Stretch field to set the “stretch factor,”… -
Page 144
The second Samples tab contains controls for its pitch and volume level. Semi lets you transpose the selected layer 36 up to semitones up or down. This will affect the length of the sample (if Warp is off). This is the same as the Semi field on the first Samples tab. Fine provides fine-tuning of each layer by cents. -
Page 145
The third Samples tab contains the control for its offset. Use the Offset slider to determine a time offset for the sample’s playback. • Positive values (right of center): When the pad is played, playback will start immediately but at a later point in the sample specified by the offset value. -
Page 146: Pan Velocity
For example, you may have three samples of a drum hit with low force, medium force, and high force. You can set each sample to a layer and set the Velocity ranges so only low velocities trigger the low-force sample, only mid-range…
-
Page 147: Filter/Envelope
Filter/Envelope Use the Type field to select a filter for the selected pad. See Appendix > Glossary > Filter for an explanation of the available filter types. Use the Cutoff knob to set the cutoff frequency for low-pass and high-pass filter types or the center frequency for band-pass and band-stop filter types.
-
Page 148: Lfo Modulation
LFO Modulation The Modes controls let you set the behavior for each pad’s samples in a drum track. Use the Mute Group field to assign the selected pad to one of the 32 available groups. When pads assigned to the same mute group receive MIDI notes, the last pad played will silence all other pads in that mute group.
-
Page 149
Use the Pad Polyphony field to determine how the pad’s sound behaves when multiple hits are registered. When set to Mono, only one pad will sound at a time. If a pad is played while another (or the same one) is still playing its sample/samples, the new pad will immediately mute all other currently playing pads in that track. -
Page 150: Effects
Effects Inserts You can select up to four insert effects for each pad. To learn how to use insert effects, please see General Features > Effects > Insert Effects. To add an effect: 1. Double-tap the desired Inserts slot. A list of effects will appear. 2.
-
Page 151
To adjust the effect’s parameters, tap the pencil icon. Use the sliders to set the value of each parameter. These values affect only this instance of the effect; insert effects are not global. To load an effect preset, tap the folder icon next to the preset name at the top of the display to open the file browser. To save a new effect preset, tap the disk icon next to the insert selector at the top of the display. -
Page 152: Keygroup Tracks
Keygroup Tracks When using keygroup tracks, Track Edit Mode lets you edit the parameters for each keygroup. To select a keygroup, press a pad within that keygroup. Its parameters will appear on the screen immediately. Alternatively, use the Keygroup field at the top of the screen. To view a specific tab of parameters, tap the Master, Samples, Pan Velocity, Filter/Env, LFO Modulation, or Effects button at the bottom of the screen.
-
Page 153: Master
Master In the Master tab, you can set the playback mode and tuning for the overall track. Polyphony sets the playback mode for the track’s keygroups. In Mono Mode, only one keygroup will sound at a time. If a keygroup is played while another (or the same one) is still playing its sample/samples, the new keygroup will immediately mute all other currently playing keygroups in that track.
-
Page 154
Level controls the overall volume level of the loaded sample/samples. Pan controls the overall panning of the loaded sample/samples in the stereo field. Note Range lets you restrict the key range used for a sample’s playback. Only notes with a key number higher or equal (Lo) or lower and equal (Hi) to the selected value will trigger a sound. -
Page 155
Layer Play determines how multiple samples assigned to the same pad are played: • Cycle (Cyc): Each time the pad is played, it will play the next layer’s sample. In other words, the samples will cycle through the layers as follows: 1, 2, 3, 4, 1, 2, 3, 4… etc. •… -
Page 156: Samples
Samples Each keygroup can trigger up to four samples, which are assigned in four individual layers. Each layer has identical, independently assignable parameters. Tap Samples to cycle through its three available tabs. On all three sections, you can access the Settings window, which lets you configure certain settings in the Samples tab. To view the Settings, tap the gear icon.
-
Page 157
The first Samples tab contains the sample waveform for each layer and controls for its pitch, timing, and playback. The upper half of the screen shows the waveform of the sample on the currently selected layer. The lower half shows the editing controls. -
Page 158
The green/S marker and red/E marker are the start point and end point (respectively). These two points define the region of the sample that will be played. To move the start point or end point, do any of the following: •… -
Page 159
Use the Reverse button to select in which direction the sample will play. When on, the sample will play in reverse. When off, the sample will play in the normal forward direction. Use the Pad Loop button to cycle through the available Pad Loop modes. Important: For Pad Loop to work, you must (1) set the Sample Play field (in the Master tab) to Note On instead of One Shot and (2) set the Slice field (in the first Samples tab) to Pad instead of All or a slice number. -
Page 160
The second Samples tab contains controls for its pitch and volume level. Semi lets you transpose the selected layer 36 up to semitones up or down. This will affect the length of the sample (if Warp is off). This is the same as the Semi field on the first Samples tab. Fine provides fine-tuning of each layer by cents. -
Page 161
The third Samples tab contains the control for its offset. Use the Offset slider to determine a time offset for the sample’s playback. • Positive values (right of center): When the pad is played, playback will start immediately but at a later point in the sample specified by the offset value. -
Page 162: Pan Velocity
For example, you may have three samples of a piano key with low force, medium force, and high force. You can set each sample to a layer and set the Velocity ranges so only low velocities trigger the low-force sample, only mid-range velocities trigger the medium-force sample, and only high velocities trigger the high-force sample.
-
Page 163: Filter/Envelope
Filter/Envelope Use the Type field to select a filter for the selected pad. See Appendix > Glossary > Filter for an explanation of the available filter types. Use the Cutoff knob to set the cutoff frequency for low-pass and high-pass filter types or the center frequency for band-pass and band-stop filter types.
-
Page 164: Lfo Modulation
LFO Modulation The Velocity Sensitivity controls determine how much the velocity affects the pitch of the sound (Pitch), the attack of the filter envelope (Attack), the volume level of the sound (Amp), and the panning of the sound (Pan). When you press a pad softly, only minimal modulation is applied. When you press it harder, the modulation amount also gets stronger depending on the setting of the corresponding knob.
-
Page 165
Use the Rate field to determine the LFO frequency. At lower values, it might take some time for the LFO to complete a cycle, while higher values will come closer to audible range. Use the Sync field to set if the LFO’s rate is synchronized with the tempo. You can select one of several time divisions (a . -
Page 166: Effects
Effects Inserts You can select up to four insert effects for each keygroup. To learn how to use insert effects, please see General Features > Effects > Insert Effects. Important: When using keygroup insert effects, they will be applied to that keygroup only. Keep this in mind if you load insert effects to multiple keygroups with overlapping note ranges—the effects will overlap in that range as well.
-
Page 167
To adjust the effect’s parameters, tap the pencil icon. Use the sliders to set the value of each parameter. These values affect only this instance of the effect; insert effects are not global. To load an effect preset, tap the folder icon next to the preset name at the top of the display to open the file browser. To save a new effect preset, tap the disk icon next to the insert selector at the top of the display. -
Page 168: Plugin Tracks
Plugin Tracks For plugin tracks, you will see an overview of all available plugin parameters with a slider for each, or a visual representation of the plugin interface. Use the sliders to set the value of each parameter, or use the plugin interface. Use the tabs at the bottom of the screen to access the available parameters.
-
Page 169: Midi Tracks
MIDI Tracks For MIDI tracks, you will see an overview of all available MIDI CCs with a slider for each. Use the sliders to set the value of each parameter. Use the six tabs at the bottom of the screen to access the available parameters.
-
Page 170: Cv Tracks
CV Tracks For CV tracks, you will see an overview of all available CV outputs with a slider for each. Use the sliders to set the value of each parameter. Use the six tabs at the bottom of the screen to access the available parameters.
-
Page 171: Anatomy Of An Envelope
Anatomy of an Envelope An envelope creates a variable control signal. It can be used, for instance, to modulate the filter settings of a sound over a given period of time. For drum tracks, use the AD/AHDS selector to select an AD or AHDS envelope. When Sample Play is set to Note-On, it will use an ADSR envelope.
-
Page 172: Sample Edit Mode
Sample Edit Mode Sample Edit Mode lets you edit samples using various functions. To enter Sample Edit Mode, press Menu, and then tap Sample Edit. To select a sample to edit, use the Sample field at the top of the screen. To edit the name of the sample, tap the keyboard icon next to the name at the top of the screen, and use the virtual keyboard that appears.
-
Page 173
The upper half of the screen shows the waveform. The lower half shows the editing controls. The waveform display shows the “active” section of the sample waveform. Swipe left or right on the waveform to move through it. Above the waveform is the timeline, shown in Samples, Time (in seconds and milliseconds), or Beats. You can select the measurement units you want to show in the Settings. -
Page 174: Settings
Settings The Settings window lets you configure certain Sample Edit Mode settings. To view the Settings, tap the gear icon. Use the Cue Play Mode selector to set how the cue playhead will play audio. • One Shot: Tapping Play Cue will play the entire sample from the cue playhead. •…
-
Page 175: Trim Mode
Trim Mode We recommend using Trim Mode to crop the start and/or ends from a sample. To enter Trim Mode, tap the Trim/Chop button in the lower-left corner so it says Trim. Use the Start and End fields to set the position of the start point and end point of the sample (respectively). Alternatively, tap and drag the start (S) or end (E) marker left or right, or use Knobs 1 and 2 to adjust the start point or Knobs 3 and 4 to adjust the end point when the knobs are in screen mode.
-
Page 176
Use the Tune field to transpose the sample up or down from its original pitch. Tap From BPM to open the Edit Tuning window, which lets you tune a sample to the project. Use the Beats field to match the number of beats in the sample. To tune the sample to the project, tap Match. -
Page 177
Use the Root Note field to set the root note of the sample. This defines which note will play the sample at its original pitch when in a keygroup track. Tap X-Fade to open the X-Fade window, which lets you apply real-time crossfade looping to sample playback. Before applying a crossfade, make sure the Loop Lock setting is Off and the Loop function is set to Forward. -
Page 178: Assigning Samples
Assigning Samples You can assign your new sample directly to a pad from Trim Mode. To assign a sample, tap Assign at the bottom of the screen to open the Assign Sample window. Important: Assigning a sample to a pad in this way will replace the sample on the first layer of the pad. If you set the Assign To field to Assign slice to a pad, the pad will simply refer to the slice in this sample instead of creating a new sample.
-
Page 179
If you set the Assign To field to Make new sample, this will create a new sample in your project. (The original sample will remain as it is.) Use the Pad field to select the desired pad. Alternatively, press the desired pad. -
Page 180: Processing Slices & Samples
Processing Slices & Samples Tap the Process button to open the Process window, where you can select an editing option for the sample. Use the Function field to select an editing process. Double-tap it or tap Function at the bottom of the screen to open the Function window, which displays an overview of all available editing processes.
-
Page 181
The Silence process replaces the region between the start point and end point with silence. The Extract process deletes the regions before the start point and after the end point and saves it as a new sample in your current project. -
Page 182
The Fade In process sets a fade-in between the start point and end point. The following types are available: • Linear fades the audio in with a linear curve—a straight line between the start and end. • Log fades the audio in with a logarithmic curve—quickly rising at the start and flattening out towards the end. -
Page 183
The Gain Change process raises or lowers the volume of the sample. You can adjust it up to 18 dB, higher or lower. This function is different than Normalize because it will allow volumes beyond clipping level. This may be a desired effect, but remember to watch your output level! The Copy process saves a copy of the sample. -
Page 184: Chop Mode
Chop Mode Whereas Trim Mode crops only the start and/or end off of a sample, Chop Mode divides the sample into multiple regions called slices. We recommend using Chop Mode when working with a long sample with different sounds throughout (e.g., a drum loop or a long melodic or harmonic passage). To enter Chop Mode, tap the Trim/Chop button in the lower-left corner so it says Chop.
-
Page 185
To play a slice, when the headphones icon (in the upper-right corner) is selected, tap a slice in the waveform. When the One Shot feature is enabled, you can press a pad once to play the entire slice. When this is disabled, pressing the pad and holding it will play the slice;… -
Page 186
When Link Slices is enabled, changing the start point of a slice will also change the end point of the previous slice. Similarly, changing the end point of a slice will also change the start point of the next slice. Disable Link Slices if you are trying to create slices that use non-contiguous parts of the sample. -
Page 187: Converting Or Assigning Slices
Converting or Assigning Slices You can assign your new sample directly to a pad from Chop Mode. You can also convert it into a new track or patched phrase. To convert or assign a sample, press and hold Shift, and then tap Convert at the bottom of the screen to open the Convert or Assign Slices window.
-
Page 188
If you set the Convert To field to New track with new samples, this will create a new sample from each slice and assign them to pads in a new track. The new track will be named after the sample and appended with ch. The new samples will be appended with SI-# (where # is a consecutive number). -
Page 189
If you set the Convert To field to Assign slice to a pad, the pad will simply refer to the slice in this sample instead of creating a new sample. This is useful for reducing clutter in your project. Important: Assigning a sample to a pad in this way will replace the sample on the first layer of the pad. -
Page 190: Processing Slices
If you set the Convert To field to Patched phrase, this will create a new sample that will play based on the tempo of your project, and places it in the current project. The patched phrase will have the same name as the original sample but appended with pp and will use a different icon when viewing your project information.
-
Page 191
The Silence process replaces the region between the start point and end point with silence. The Extract process deletes the regions before the start point and after the end point and saves it as a new sample (with a name you enter) in your current project. -
Page 192
The Fade In process sets a fade-in between the start point and end point. The following types are available: • Linear fades the audio in with a linear curve—a straight line between the start and end. • Log fades the audio in with a logarithmic curve—quickly rising at the start and flattening out towards the end. -
Page 193: Sampler
1. Make sure to reduce the volume levels of your audio source and speakers, headphones, and/or monitors before you make any connections to avoid “pops” or feedback. 2. Connect your audio source to the input/inputs of your Force hardware. For line-level devices such as a synthesizer, set the Line/Inst switch to Line; for instrument-level devices such as a guitar, set the switch to Inst.
-
Page 194
The upper-left Input Source field defines whether you are going to record an external audio signal, which you can set to the pair of inputs (Input 1,2) or a single input (Input 1–2). You can also select an internal signal from within your Force hardware (Resample L, Resample R, or Resample L+R). -
Page 195
For reference, the Sample Length counter shows you the length of your sample during the recording procedure. Tap Arm to record-arm the Sampler. The button will then change to Record and show Waiting for signal. At that point, start recording by doing either of the following: •… -
Page 196
After you stop your recording, the Keep or Discard Sample window will appear. Use the New Sample field to name the new sample. Tap it and use the virtual keyboard that appears. Use the Track field to assign the new sample to a track. Select <none> if you want to save it to the project without assigning it to a track. -
Page 197: Auto Sampler
Auto Sampler The Sampler page also contains the Auto Sampler, which lets you capture and covert any plugin preset or external instrument preset into a keygroup sampler patch. To open the auto sampler, tap the keyboard icon next to the record button in Sampler View. The current track will be selected as the auto sample source.
-
Page 198
Looping Use the Enable looping field to select how the resulting samples can or cannot be looped: • Off: The sample will not loop. • Forward: You can hold down the pad to cause that sample to repeat from the Loop Position to the end of the sample. -
Page 199: Looper
1. Make sure to reduce the volume levels of your audio source and speakers/headphones/monitors before you make any connections to avoid “pops” or feedback. 2. Connect your audio source to the input/inputs of your Force hardware. For line-level devices such as a synthesizer, set the Line/Inst switch to Line; for instrument-level devices such as a guitar, set the switch to Inst.
-
Page 200
The upper-left Input Source field defines whether you are going to record an external audio signal, which you can set to the pair of inputs (Input 1,2) or a single input (Input 1–2). You can also select an internal signal from within your Force hardware (Resample L, Resample R, or Resample L+R). -
Page 201
To record with the Looper: Important: To record without erasing any audio you’ve already recorded in the loop, use the Overdub button. To overwrite the audio you’ve already recorded, use the Replace button. If Record To is set to Play: To start recording, tap the Replace or Overdub button as the loop is playing. -
Page 202
To export the loop as a clip: 1. Tap Export to open the Looper Export window. 2. Use the Audio Track field to select the audio track you would like to export the clip to. 3. Use the Clip field to select the clip slot where you would like to place the loop. 4. -
Page 203: Knobs
Knobs Knobs Edit Mode lets you determine what the knobs control in other modes. This is helpful when you want to use the knobs to control parameters that might not be shown in the current mode—or parameters that are shown across different modes. To enter Knobs Edit Mode, do either of the following: •…
-
Page 204: Screen
Screen In the Screen Knobs Edit Mode, the knobs will control only the parameter or group of parameters in your currently selected mode (e.g., Mixer, Sample Edit Mode, etc.).
-
Page 205: Project
Project In the Project Knobs Edit Mode, the knobs control 16 parameters within the current project. Next to the top row of knobs on the screen, tap one of these tabs to select the type of parameters you want to control with the knobs: •…
-
Page 206
Use the Parameter field to select the parameter you want to control with the currently selected knob. When the Track tab is selected, the following options are available. When a Drum Track is selected, and Type is set to Track: Mixer: Off, Volume, Pan, Mute, Solo, Send 1–4 Track: Off, Master Semi Tune, Master Fine Tune Insert 1–4: Off, other available parameters depending on the effect… -
Page 207
When the Return tab is selected, the following options are available: Mixer: Off, Volume, Pan, Mute Insert 1–4: Off, other available parameters depend on the effect When the Master tab is selected, the following options are available: Mixer: Off, Volume, Pan, Mute, Crossfader position, Crossfader curve, Crossfader breakpoint Insert 1–4: Off, other available parameters depend on the effect Tap the Momentary checkbox to turn momentary behavior on or off. -
Page 208: Track
Track In the Track Knobs Edit Mode, the knobs control 16 parameters within the currently selected track. Next to the second row of knobs on the screen, tap one of these tabs to select the type of parameters you want to control with the knobs: •…
-
Page 209
When a Drum Track is selected, and Type is set to Pad: Mixer: Off, Level, Pan, Pad Mute, Pad Solo, Send 1–4 Track: Amp Env Hold Layer Sample Pan (1–4) LFO to Filter Velocity to Amp Tuning Amp Env Sustain Layer Semi Tune (1–4) LFO to Amp Velocity to Pan… -
Page 210: Volume
Volume In the Volume Knobs Edit Mode, the knobs control the volume level of all tracks in the project. In the Pan Knobs Edit Mode, the knobs control the stereo panning of all tracks in the project. Sends In the Sends 1–4 Knobs Edit Modes, the knobs control the level of the selected Send for all tracks in the project.
-
Page 211: Mixer
Mixer In the Mixer, you can set levels, stereo panning, and other settings for your tracks, returns and masters. To open the Mixer, do either of the following: • Press Menu, and then tap Mixer. • Press Mixer. The Mixer works like an audio mixer with various settings for each track, with up to 8 tracks shown on the display at once.
-
Page 212: Volume
Volume The Volume tab gives you an overview of the volume level of your tracks. Tap a level slider and then use the data dial or –/+ buttons to adjust the volume level of the currently selected track, return or master. Alternatively, tap and drag a level slider to adjust the volume level. The level sliders and meters in each pad show a visual representation of the level.
-
Page 213: Sends
Sends The Sends tab gives you an overview of the Sends 1–4 level of your tracks. Use the M and S buttons to mute and solo the track. When Cue Tracks is enabled, the S button will become a Headphones button. Use the automation button to set the automation status of the track.
-
Page 214: Inserts & I/O
Inserts & I/O The Inserts & I/O tab lets you view and edit insert effects and audio routing for your tracks. Use the M and S buttons to mute and solo the track. When Cue Tracks is enabled, the S button will become a Headphones button.
-
Page 215: Pad Mixer
Pad Mixer In the Pad Mixer, you can set levels, stereo panning, and other settings for individual pads. This mode is only available for Drum and Keygroup tracks. To open the Pad Mixer, do either of the following: • Press Menu, and then tap Pad Mixer. •…
-
Page 216: Volume
Volume The Volume tab gives you an overview of the volume level of your pads. Tap a level slider and then use the data dial or –/+ buttons to adjust the volume level of the currently selected pad. Alternatively, tap and drag the level slider to adjust the volume level. The level sliders and meters in each pad show a visual representation of the level.
-
Page 217: Sends
Sends Use the M and S buttons to mute and solo the pad. Use the send knobs to adjust the send level of the pads. Tap the knob and use the data dial or –/+ buttons to adjust the level. To learn how to use send effects, please see General Features >…
-
Page 218: Inserts & I/O
Inserts & I/O Use the M and S buttons to mute and solo the pad. Use the four insert fields to add insert effects to the pad. Empty insert slots will show a + icon. Inserts with a loaded effect will show the name of the effect. To learn how to use insert effects, please see General Features >…
-
Page 219: Pad Color Mode
Pad Color Mode Pad Color Mode lets you assign specific colors to your pads in a drum track. To enter Pad Color Mode: 1. Make sure you have first selected a drum track. 2. Enter Matrix Mode or the Mixer. 3.
-
Page 220
Tip: To select the color button corresponding a specific pad’s color, press and hold Shift, and then press the pad or tap it on the screen. Press a pad on your Force hardware or tap it on the screen to assign the selected color to it. -
Page 221: Appendix
Appendix Effects & Parameters This chapter lists the available effects. To learn more about how effects work with Force, please see General Features > Effects. Note: Some of these effects have a “sync” version (e.g., Flanger Sync, Autopan Sync, etc.) whose rates will be affected by the current tempo.
-
Page 222
AIR Reverb This is a spatial effect, with a wide range of reverb types to add space or room to your audio signal. Parameter Values Default Value Pre-Delay 0–250 ms 0 ms Reverb Room Size 0–100% 100% Time 0.4 ms – +inf s 1.9 s 0–100% Early Reflection… -
Page 223
Reverb Small This is a spatial effect, designed to emulate a small room. Parameter Value Range Default Value Dry/Wet 0–100 (dry–wet) Pre-Delay 1–100 Early Reflection 0–100 Density 0–100 Diffuse 0–100 Decay 0–100 Lo-Cut 0–100 Hi-Cut 0–100 Reverb Medium This is a spatial effect, designed to emulate a medium room. Parameter Value Range Default Value… -
Page 224
Reverb Large 2 This is a less CPU-intensive spatial effect, emulating the Parameter Value Range Default Value sound of a large hall. Dry/Wet 0–100 (dry–wet) Pre-Delay 1–100 Early Reflection 0–100 Density 0–100 Diffuse 0–100 Decay 0–100 Lo-Cut 0–100 Hi-Cut 0–100 Reverb In Gate This is a hall reverb with an additional control. -
Page 225: Delays
Delays Delays the original signal for a specified period of time and plays it back over an adjustable period of time. Options: Delay, AIR Diff Delay, Delay Mono, Delay Mono Sync, Delay Stereo, Delay Sync (Stereo), Delay Delay Delay Analog, Delay Analog Sync, Delay Tape…
-
Page 226
Delay Mono Sync Parameter Value Range Default Value Dry/Wet 0–100 (dry–wet) Time 1 bar – 1/16 triplets 1/4 Feedback 0–100 Damping 0–100 Delay Stereo Stereo Delay operates similarly to Mono Delay but in true Parameter Value Range Default Value stereo. Dry/Wet 0–100 (dry–wet) Time… -
Page 227
Delay Analog Analog Delay is similar to the Mono Delay, except that it’s Parameter Value Range Default Value designed to emulate an analog “Bucket Brigade”-style delay. Dry/Wet 0–100 (dry–wet) This delay has a unique character to it that gives a warmer sound by adding subtle inaccuracies in phase and timing. -
Page 228
Delay Multi-Tap This delay is a mono delay which has three delay generators Parameter Value Range Default Value with independently adjustable delay times and stereo Dry/Wet 0–100 (dry–wet) position. Time 1 2–2000 ms Time 2 2–2000 ms Time 3 2–2000 ms Feedback 0–100 Pan 1… -
Page 229: Flangers
Flangers A flanger is a modulated delay to emulate the sound created when running two analog tape machines in parallel with a slight time misalignment. Slow Rate settings can produce a “whooshing” jet engine sound, while faster rates result in more of a “warble.”…
-
Page 230: Chorus
Chorus A chorus effect uses an LFO to modulate the pitch and a delay of the input signal, which are then added to the dry signal. In small amounts, this creates the illusion of multiple voices playing at once. Turn up the Feedback and Depth for more pronounced “shimmering”…
-
Page 231: Autopans
Autopans This effect uses an LFO to move the incoming signal back and forth across the stereo field, creating a rotary effect. Options: Autopan, Autopan Sync Autopan Parameter Value Range Default Value Dry/Wet 0–100 (dry–wet) Rate 0–100 Autopan Sync Parameter Value Range Default Value Dry/Wet…
-
Page 232: Phasers
Phasers The phaser is a classic effect, created by multiple ganged all-pass filters to create “notches,” or sharp spikes, in the frequency spectrum. The frequencies of these all-pass filters are usually modulated by an LFO to create a sweeping sound. Options: Phaser, Phaser…
-
Page 233: Hp (High-Pass) Filters
HP (High-Pass) Filters Options: Filter, HP Filter Sweep, HP Filter Sync, HP Shelving Filter HP Filter This effect is a static filter without modulation. Parameter Value Range Default Value Frequency 10–19999 Hz 1500 Resonance 0–100 HP Filter Sweep This effect is a high-pass filter with its cutoff frequency Parameter Value Range Default Value…
-
Page 234: Lp (Low-Pass) Filters
LP (Low-Pass) Filters Options: Filter, LP Filter Sweep, LP Filter Sync, LP Shelving Filter LP Filter This effect is a static filter without modulation. Parameter Value Range Default Value Frequency 10–19999 Hz 1500 Resonance 0–100 LP Filter Sweep This effect is a low-pass filter with its cutoff frequency Parameter Value Range Default Value…
-
Page 235: Filters (Other)
Filters (Other) Options: AIR Filter Gate, AIR Filter AIR Filter Gate This effect chops your audio using a Parameter Value Range Default Value rhythmic gate effect and then applies a Pattern Straight, Pulse, Pumper, Marching, Straight variable filter effect. Fader, Offbeats, Off+Pan, L/R Pan, LL/RR Pan, Slow Pan, Rand Pan, Shorter, Longer, Reverse, Random, Keyed 1–2, Half Time, 12-Step,…
-
Page 236: Parametric Eqs
Parametric EQs Options: AIR Para 2-Band, 2-Shelf, PEQ 4-Band AIR Para EQ This effect is a powerful four-band parametric equalizer with Parameter Value Range Default Value four independent EQ ranges, adjustable Low and High EQ High Freq 1.2 – 20.0 kHz 6.00 kHz filter types, and dedicated Low Cut and High Cut.
-
Page 237
PEQ 2-Band, 2-Shelf This effect is a combination of one two-band parametric Parameter Value Range Default Value equalizer and two shelving filters. Low Frequency 22–1000 Hz Frequency 1 82–3900 Hz Frequency 2 220–10000 Hz 2200 High Frequency 560–19999 Hz 5600 0–100 0–100 Low Gain… -
Page 238: Distortions
Distortions Options: Distortion, AIR Tube Drive, Distortion Amp, Distortion Fuzz, Distortion Grimey, Distortion Overdrive, Distortion Custom AIR Distortion This effect is a multi-type distortion that adds color to your Parameter Value Range Default Value audio signal. Mode Hard, Soft, Wrap Hard Drive 0 –…
-
Page 239
Distortion Fuzz This popular effect uses hard clipping of the audio signal, Parameter Value Range Default Value which, at extreme settings, can turn a standard waveform Dry/Wet 0–100 (dry–wet) into a square wave, producing a “razor” effect. Drive 0–100 Output 0–100 0–100 Low-Mid… -
Page 240: Compressors
Compressors A compressor is an effect that changes the dynamic range of a signal by automatically reducing its gain. Options: Compressor, Compressor Master, Compressor Opto, Compressor VCA, Compressor Vintage AIR Compressor This basic compressor effect changes the dynamic range of Parameter Value Range Default Value…
-
Page 241: Bit Reducers
Compressor VCA This compressor is more modern-sounding, with a slightly Parameter Value Range Default Value more transparent sound. A VCA Compressor tends to have Dry/Wet 0–100 (dry–wet) quicker attack and release times than an Opto Compressor. Input -6 – 18 dB Attack 0–100 Release…
-
Page 242: Other
Other Options: AIR Channel Strip, Enhancer, Ensemble, AIR Freq Shift, AIR Fuzz Wah, AIR Kill Lo-Fi, Maximizer, AIR Noise Gate, AIR Pitch Shifter, Pumper, AIR Stereo Width, AIR Talk Box, Transient, Auto Wah, Frequency Shifter, Mother Ducker Input, Mother Ducker, Transient Shaper AIR Channel Strip This specially-designed plugin combines multiple effects with a fast interface.
-
Page 243
AIR Ensemble This effect applies fluid, shimmering modulation effects to Parameter Value Range Default Value the audio signal. Rate 0.01 – 10.0 Hz 1.00 Hz Depth 0.00 – 24.00 ms 6.00 ms Width 0–100% 100% 0–100% (dry–wet) Mod. Delay 0.00 – 24.00 ms 0.00 ms Mod. -
Page 244
AIR Kill EQ This effect can zap out the Low, Mid or High broadband Parameter Value Range Default Value frequency from an audio signal. High Thru, Kill Thru Thru, Kill Thru Thru, Kill Thru Output -20.0 – +20.0 dB 0.0 dB High Gain -Inf –… -
Page 245
AIR Maximizer This effect is a limiter optimized for professional mastering. Parameter Value Range Default Value Threshold -40.0 – 0.0 dB -20.0 dB Ceiling -20.0 – 0.0 dB FS -5.0 dB FS Look Ahead 0.0 – 20.0 ms 0.0 ms Knee Hard, Soft Hard… -
Page 246
AIR Stereo Width This effect creates a wider stereo presence in an audio Parameter Value Range Default Value signal. Width 0–200% 100% Delay 0.0 – 8.0 ms 0.0 ms Level Trim -Inf – 0.0 – +12.0 dB 0.0 dB Pan Trim L100 –… -
Page 247
Auto Wah This effect is a low-pass filter modulated by an envelope that Parameter Value Range Default Value yields a classic funky “wah-wah”- like sound. The envelope Dry/Wet 0–100 (dry–wet) is triggered by the incoming signal’s amplitude. The amount of the envelope on the cutoff frequency is user-definable. Resonance 0–100 Attack… -
Page 248
Transient Shaper A transient shaper can be used to enhance or soften the Parameter Value Range Default Value Attack and Release phases of audio material. Dry/Wet 0–100 (dry–wet) Attack 0–100 Release 0–100 Output 0–100… -
Page 249: Glossary
The higher the bit rate, the more precise the information about a sample (i.e., its dynamics’ resolution). Normal audio CDs are 16-bit. The Force hardware supports full 24-bit resolution. A clip is a container for recorded audio or MIDI information. Clips that share a common type, Clip such as clips of a particular drum kit or plugin, are grouped into tracks.
-
Page 250
(CV messages determine the pitch of notes while Gate messages determine note activation and length). Gate messages are sent from the CV out ports of your Force hardware and to the CV/Gate in ports of your external device. -
Page 251
LFO is an acronym for low-frequency oscillator. The LFO generates a periodic oscillation at a low frequency and features variable waveshapes. Similar to an envelope, an LFO can be used to modulate a sound-shaping component. MIDI MIDI stands for musical instrument digital interface. Developed in the early 1980s, MIDI enables interaction between various types of electronic music instruments from different manufacturers. -
Page 252
Sample When you tap the pads on your Force hardware, you can trigger sounds that we call samples. Samples are digitized snippets of audio that can be recorded using the recording (sampling) function of your Force hardware or loaded from the Browser. -
Page 253
The Warp feature lengthens or shortens a region of an audio track or sample without changing Warp its pitch. This enables you to fit the length of an audio track or sample to the length of a clip, a bar in your clip, etc. while maintaining its original key. Please note that the Warp algorithms are very CPU-intensive and can result in audio drop-outs during playback if used too freely. -
Page 254: Sata Drive Installation
SATA drive panel. Do not overtighten the screws, but make sure the drive is secure and does not shake. 6. Place the SATA drive panel back onto the bottom panel of your Force hardware, and use the original screws to secure it in place.
-
Page 255: Midi Machine Control (Mmc)
To set up your Force hardware to send MMC messages to an external device: 1. Use an included 1/8″-to-MIDI adapter and a standard 5-pin MIDI cable (not included) to connect your Force hardware’s MIDI Out to the MIDI input of your external device.
-
Page 256: Technical Specifications
Technical Specifications Specifications are subject to change without notice. (64) velocity- and pressure-sensitive pads, RGB-backlit Mechanical Pads Knobs (8) 360° touch-sensitive Knobs (1) 360° encoder for display navigation and selection via push (5) 270° knobs for gain, mix & level adjustment Buttons (56) dedicated function buttons;…
-
Page 257: Trademarks & Licenses
Trademarks & Licenses Akai Professional and MPC are trademarks of inMusic Brands, Inc., registered in the U.S. and other countries. Ableton is a trademark of Ableton AG. The Bluetooth word mark and logos are registered trademarks owned by Bluetooth SIG, Inc. and any use of such marks by Akai Professional is under license.

Force 3.1 представляет собой новую версию программного обеспечения для грувбоксов Force с революционными возможностями и функциональностью наряду с новыми наборами сэмплов и инструментами обработки звука.
Апдейт включает в себя три новых синтезаторных плагина, семь новых плагинов эффектов, обработку вокала Vocal Suite, потоковое воспроизведение с диска, поддержку
USB-аудиоинтерфейсов и многое другое.
Новые инструменты, плагины Insert Effect и набор обработок для вокала AIR
С момента своего выпуска Force установил новый уровень для систем автономного аппаратного производства музыки. Обновление Force 3.1 развивает успех продукта, добавляя три новых инструмента: AIR Solina, AIR Mellotron и WayOutWare Odyssey.
Эти новые инструменты являются точным воссозданием культовых синтезаторов и клавишных. Теперь они снабжены насыщенным графическим интерфейсом для ещё большего удобства взаимодействия и визуального отклика на действия пользователя.
У инструментов Mellotron и Solina в секции обработки есть эффект Flavor, позволяющий добавить в звучание дополнительную текстуру и эмоции с помощью Distortion, Noise, Flutter и других эффектов.
Force 3.1 также привносит семь новых эффект-плагинов для творческой аранжировки, микширования и мастеринга. Группа эффектов теперь включает в себя Stutter, Half Speed, Granulator, Diffuser Delay и Stereo Delay и позволяет создавать уникальные дропы и переходы. Чтобы получить особенно плотный микс, используйте Diode Clipper для добавления дисторшна и AIR Limiter для динамической обработки.
Новый пакет AIR Vocal Suite предоставляет широкие возможности для создания и сведения идеального вокала прямо в грувбоксе. Адаптивный вокальный тюнер справляется с любыми задачами по обработке голоса, включая тонкую настройку коррекции высоты тона и автотюн, встречающийся во всех жанрах современной музыки. AIR Doubler добавляет глубину и объём сольному или групповому вокалу по всей ширине спектра. Инструмент AIR Harmonizer преобразует любой одиночный голос в четырёхстройное звучание.
Новые возможности работы с внешними носителями
Теперь владельцы Akai Professional Force могут повысить эффективность работы благодаря возможности потоковой передачи данных с внешних устройств хранения файлов.
Потоковая передача данных с внешних дисков позволяет более эффективно распределять системные ресурсы и повысить производительность системы в целом. Это поможет записывать более длинные треки, выступать на сцене с диджейскими сетами или программировать большие группы клавишных инструментов на фоне ускоренной загрузки проекта.
Обновления в области рабочего процесса и возможностей расширения
Новые возможности работы с внешними дисками позволяют увеличить количество каналов до 32 и маршрутизировать их через один USB-кабель. Соответственно, владельцы Akai Professional Force смогут записывать больше треков непосредственно в грувбокс или направлять аудио на внешнее оборудование.
Барабаны и группы клавишных получили новую функцию портаменто, а также новые инструменты настройки огибающей: Akai Sample Tail и десять эффектов для пэдов ударных, включая Ringmod, Bitcrush, Tubedrive, Lowpass и другие.
Force 3.1 также добавляет новую функциональность в шины (Submix/Return/Master). Теперь запись, воспроизведение и редактирование автоматизации работают по единому процессу на шинах и на стандартных треках. Расширена интеграция MIDI.
Краткий список новых возможностей Force 3.1:
• Три новых инструмента Solina, Odyssey и Mellotron
• Новый набор эффектов AIR Vocal Insert с автоматической настройкой вокала, AIR Doubler и AIR Harmonizer
• Потоковая передача данных с внешних дисков
• Поддержка внешних USB-аудиоинтерфейсов
• Новый уровень MIDI-совместимости, позволяющий загружать MIDI-файлы
• Семь новых эффект-плагинов, таких как Half Speed, Diode Clipper и Stutter
• Усовершенствования движка барабанов и клавишных групп, включая Akai Pro Sample Tail, Dedicated Pitch Envelope и Keygroup
• Портаменто
• Десять новых эффектов для барабанных пэдов, включая Ringmod, Bitcrush, Decimator и другие
• Новые функциональные возможности для шин (Submix/Return/Master), включая автоматизацию
• Автоматическое определение тональности сэмплов
Посмотреть инструкция для AKAI Force бесплатно. Руководство относится к категории DJ-система, 5 человек(а) дали ему среднюю оценку 8.6. Руководство доступно на следующих языках: английский. У вас есть вопрос о AKAI Force или вам нужна помощь? Задайте свой вопрос здесь
Не можете найти ответ на свой вопрос в руководстве? Вы можете найти ответ на свой вопрос ниже, в разделе часто задаваемых вопросов о AKAI Force.
Какой вес AKAI Force?
AKAI Force имеет вес 3870 g.
Когда звук считается слишком громким?
Уровень звука выше 80 децибел может нанести вред слуху. Уровень звука выше 120 децибел может нанести прямое повреждение слуху. Вероятность повреждения слуха зависит от частоты и продолжительности прослушивания.
Какой размер экрана AKAI Force?
Размер экрана AKAI Force составляет 6.9 «.
Какая высота AKAI Force?
AKAI Force имеет высоту 72.5 mm.
Какая ширина AKAI Force?
AKAI Force имеет ширину 350 mm.
Какая толщина AKAI Force?
AKAI Force имеет толщину 389 mm.
Какой тип USB-подключения AKAI Force имеет?
AKAI Force имеет USB Type-A, USB Type-B подключение.
Инструкция AKAI Force доступно в русский?
К сожалению, у нас нет руководства для AKAI Force, доступного в русский. Это руководство доступно в английский.
Не нашли свой вопрос? Задайте свой вопрос здесь
-
Page 1
User Guide English Manual Version 1.0… -
Page 2: Table Of Contents
Table of Contents Introduction …………. 6 Tutorial …………..14 Support ………….. 6 Starting Up …………14 About This User Guide ……..6 Launching Clips ……….14 Important Notes ……….6 Editing Clips & Tracks ……..17 Clip Edit Mode ……….. 18 Region View ………..
-
Page 3
Menu …………60 Operation …………… 37 Save …………… 61 Preferences ………… 62 General Features ……….37 Info…………. 62 Wi-Fi …………62 Control Types ……….37 Bluetooth ……….. 63 Knobs …………. 37 Sequencer ……….63 Parameter Values ……….38 Sync …………64 Drop-Down Menus / Lists ……. -
Page 4
Modes …………104 Sample Edit Mode ……..172 Settings …………174 Trim Mode ………… 175 Matrix Mode ……….105 Assigning Samples ……..178 Processing Slices & Samples ….180 Step Sequencer ……..107 Chop Mode ……….184 Converting or Assigning Slices ….187 XYFX Mode ………. -
Page 5
Appendix ………….. 221 Effects & Parameters ……..221 Reverbs ………… 221 Delays …………225 Flangers ……….. 229 Chorus …………. 230 Autopans ……….231 Tremolos ……….231 Phasers ………… 232 HP (High-Pass) Filters ……233 LP (Low-Pass) Filters ……. 234 Filters (Other) ……….. 235 Parametric EQs …….. -
Page 6: Introduction
Introduction Thank you for purchasing the Force. At Akai Professional, we know how serious music is to you. That’s why we design our equipment with only one thing in mind—to make your performance the best it can be. Support For the latest information about this product (documentation, technical specifications, system requirements, compatibility information, etc.) and product registration, visit akaipro.com.
-
Page 7: Setup
Setup Here is just an example of how to use Force in your setup. Items not listed under Introduction > Box Contents of your included Quickstart Guide are sold separately. Synthesizer Guitar Microphone Flash Drive Power Headphones Powered Monitors MIDI Keyboard…
-
Page 8: Features
Features This chapter explains the features and functions of your Force. Top Panel…
-
Page 9
1. Display: This full-color multi-touch display shows information relevant to Force’s current operation. Touch the display (and use the hardware controls) to control the Force interface. See Display to learn how to use some basic functions. 2. Menu: Press this button to open the menu. You can tap an option on the menu screen to enter that mode, view, etc. -
Page 10
24. Launch/Config: Press this button to set the Clip Launch Pads to Launch mode. In Launch mode, each pad represents a single clip slot. The eight columns represent eight tracks while the eight rows represent eight scenes. You can launch the entire scene by pressing the Scene Launch buttons to the right of the row of clips. Press Shift and press this button to configure the Launch mode settings. -
Page 11: Display
Display Here is some general information about how to use the Force display: Tap a button or option to select it. Use the data dial or –/+ buttons to change its setting or value. In Matrix View, tap a filled clip slot to launch the clip.
-
Page 12: Rear Panel
3. Power Switch: Press this button to turn Force’s power on or off. 4. Link: Connect a standard Ethernet cable to this port to use Ableton Link and other compatible devices with Force. Operation > General Features > Menu > Preferences > Sync for more information.
-
Page 13: Front Panel
Front Panel 2 3 4 1. SD Card Slot: Insert a standard SD/SDHC card into this slot to access its files directly using Force. 2. Phones (1/4” / 6.35 mm): Connect standard 1/4” (6.35 mm) stereo headphones to this output.
-
Page 14: Tutorial
When you first power on your Force, you can select a demo project to help get you started, select Empty Project at the bottom of the screen to load a blank template, or select User Template to load a saved custom template.
-
Page 15
Press the Launch button to make sure the clip launch pads are in Launch Mode. In this pad mode, each pad represents a single clip in a track. The lighted pads represent the clips shown on the display, and the dim pads are empty clips. -
Page 16
While one scene is playing, try launching clips from other rows to experiment with different variations. You can also assign Tracks to Force’s crossfader. This allows you to seamlessly transition between clips from multiple tracks. 1. Press and hold the Assign A button and press the Track Assign button for Track 1 – Kick Loop. The track name at the top of the display will now show an A icon. -
Page 17: Editing Clips & Tracks
MIDI events by a particular type, for instance, Aftertouch messages or Track Automation. Force’s Track Edit Mode is used to edit the parameters of the track itself. This mode is not available for audio tracks. For drum tracks, you can edit the parameters of the four layers as well as all synthesis parameters and insert effect settings.
-
Page 18: Clip Edit Mode
Clip Edit Mode First, let’s look at Clip Edit Mode, where you can view and edit clip information and parameters. To enter Clip Edit Mode, do either of the following: • Press Clip. • Press Menu and then tap Clip Edit. When you first enter Clip Edit Mode, you will see the Clip View page.
-
Page 19
Let’s edit one of the clips in our demo project: 1. Make sure the clip launch pads are in Launch Mode by pressing the Launch button. 2. Press and hold the Select button, then press the first clip launch pad for Track 7 – SFX. 3. -
Page 20: Region View
In Clip Edit Mode, depending on the type of clip selected, you can also edit an audio clip using Region View or edit MIDI note events using Event View. Region View In Region View, you can edit parameters of the audio clip itself, such as length, levels, tuning and BPM. Let’s start by making some edits to an audio clip using Region View.
-
Page 21
In Region View, you can also use Force’s powerful tool to adjust the tempo of any sample to match your project’s tempo without changing the pitch. To sync an audio clip to the project tempo: 1. Load the desired sample to an empty clip launch pad using the Browser. -
Page 22: Event View
Clip Edit Mode will appear differently when using a clip with MIDI data. Drum, Keygroup, Plugin, MIDI and CV tracks all use Event View instead of Region View, which allows you to edit MIDI data. Event View Event View for a drum track Event View for a keygroup, plugin, MIDI or CV track Now let’s make some edits to a MIDI clip using Event View.
-
Page 23: List View
List View List View in Clip Edit Mode is similar to Event View, but uses a scrolling list workflow to display MIDI note event parameters. This allows you to quickly filter your MIDI events by a particular type using the View menu or by the current playhead position using the time counter at the top of the display.
-
Page 24: Track Edit Mode
Track Edit Mode In addition to editing MIDI note events using Clip Edit Mode, you can edit the parameters of a track using Track Edit Mode. This mode is not available for audio tracks. To enter the Track Edit Mode, do either of the following: •…
-
Page 25
You can also apply effects to a track with Track Edit mode. Let’s try adding an effect to the bass track. 1. While in Track Edit Mode, press and hold the Track Select button for Track 6 – Classic Bass to select the track. 2. -
Page 26
When a Plugin track is selected, Track Edit Mode shows the parameters of the loaded plugin. 1. Press Matrix to enter Matrix Mode. 2. Press and hold the track selector button for Track 5 – Hype Chords. 3. Launch the first clip in Track 5 – Hype Chords. 4. -
Page 27: Renaming & Saving
Renaming & Saving After making changes to clips and tracks, you may want to do some renaming and save your project before going further. To rename a track: 1. Press Matrix to enter Matrix mode. 2. Double-tap the track name at the top of the display. 3.
-
Page 28
Force Documents is a shortcut to the Force Documents folder on the internal drive of Force. If you have storage devices connected to the USB ports or SD card slot of Force, they will appear in this column, as well. -
Page 29: Using The Browser
You can also quickly audition samples by using the Previous and Next buttons on the display, or the – and + buttons on Force. When you move to a new sample, it will automatically be loaded to the selected pad. If you decide to not use the sample, the old sample will automatically be deleted when a new one is loaded to the same pad.
-
Page 30: Mixing Tracks
Mixing Tracks Force’s mixer allows you to adjust parameters such as level, stereo panning and routing the same way you would with a traditional mixer or digital audio workstation. To open the Mixer, press Mixer. Alternatively, press Menu and tap Mixer.
-
Page 31
Next, tap the Inserts & I/O tab. On this page, you can add insert effects to tracks, as well as control input and output routing. Let’s try adding an effect to a track: 1. Tap an insert slot in Track 4 – Hat Loop to open the Inserts window. -
Page 32: Cueing Tracks
7. Launch a clip in the track you have cued. You should hear both the master mix and the audio of the cued track. 8. Using headphones attached to the Phones Output on Force’s front panel, and/or speakers connected to Outputs 3/4, listen to the cued audio to make sure it is in sync with your main mix.
-
Page 33: Recording Clips
Recording Clips Now that you’re more familiar with the basics of clip launching and editing, let’s try recording new clips to add to the project. Before recording, let’s create a new scene and an empty clip to record into: 1. Press Matrix to open Matrix Mode on the display. 2.
-
Page 34
When set to REC Button then Pad, first press the record button, then tap any pad to begin recording. This is the default mode when Force is powered on. Check the Fixed Length Recording box to stop recording after the clip length set in the Fixed Length (Bars) field. -
Page 35: Recording With The Step Sequencer
Recording with the Step Sequencer When sequencing drums, you can use Force’s built-in Step Sequencer to quickly enter note events by using the clip launch pads as «step buttons,» simulating the experience of a traditional step-sequencer-style drum machine. When using the Step Sequencer, you can assign the clip launch pads to three different modes: Drum: In this mode, the top four rows of pads represent each step in the clip.
-
Page 36
Let’s use the Drum mode to sequence a drum pattern using the Step Sequencer. 1. Select Track 2 – Top Loop and add a new empty clip as described above. 2. Make sure the clip you are recording into is playing, otherwise you won’t hear the pattern you are creating. 3. -
Page 37: Operation
Operation This chapter explains the complete features and functions of your Force hardware. Important: • When the left-most button at the bottom of the screen shows an upward arrow (), it means there are additional buttons you can use when you press and hold Shift. Press and hold Shift to show the secondary buttons, and any of them, if desired.
-
Page 38: Parameter Values
Parameter Values To set the value for a parameter, do either of the following: • Tap the field to select it, and then use the data dial or –/+ buttons to adjust the value. When the value has decimal places, you can sometimes press and hold Shift and then use the data dial or –/+ buttons to adjust the value by smaller increments.
-
Page 39: Selectors
Selectors Selectors show all available options. One of them is always selected. The selected option is highlighted while the others are dark. To select an option, tap it. Buttons Buttons usually have two states: selected and deselected (active or inactive, respectively).
-
Page 40: Sliders
Sliders To adjust the position of a slider, do any of the following: • Tap and drag the slider to the desired position. • Tap the desired position (this works only on some sliders). • Tap the slider to select it, and then use the data dial or –/+ buttons to adjust the position (this works only on some sliders).
-
Page 41: Event View Tools
Event View Tools In the Event View in Clip Mode, these four icons enable you to use different functions in the grid. Tap one to select its mode: Pencil: Draw Mode: To enter a note in an empty grid square, tap the grid square. To select a note, tap it.
-
Page 42: Audio Region Edit Tools
Audio Region Edit Tools In Audio Region Edit Mode in Clip Mode, these six tool icons enable you to use different functions in the waveform. Tap one to select its mode: Marquee: Marquee Mode: To select a track region, tap the upper third of it. To select multiple track regions, tap and drag across the grid to create a box that highlights them.
-
Page 43: Pad Modes
These modes are accessed by pressing their respective Launch/Config, Note/Config, and Step Seq/Config buttons on the Force hardware. At any time, you can also temporarily view any of the pad modes by pressing and holding the Launch, Note, or Step Seq buttons. This allows you to quickly make changes such as launching a different clip or editing the step sequencer.
-
Page 44: Note Mode
Note Mode Note Mode is used for playing drum kits or melodic tracks like keygroups or plugins. To enter Note Mode, press the Note button while a drum, keygroup, plugin, MIDI or CV track is selected. The appearance of the clip launch pads will change depending on the type of track selected. When a drum track is selected, the clip launch pads will appear in Drum Note Mode;…
-
Page 45: Melodic Note Mode
Melodic Note Mode In Melodic Note Mode, the clip launch pads can be used like a traditional keyboard controller to play melodic notes and chords. For instance, the image to the right shows the clip launch pads set to play a scale in Melodic Note Mode.
-
Page 46
Use the Pad Rows field to determine how the notes are laid out on Force’s 8×8 pad grid: Continuous Start on 5th Start on 3rd Start on root Start on 4th Start on 2nd Use the Base Note and Octave fields to set the starting point of the scale (pitch and register). The available notes are all chromatic notes across the range of the pads. -
Page 47: Launch & Note Mode
Launch & Note Mode In addition to using the entire 8×8 pad matrix for Launch Mode or Note Mode, you can split the rows of clip launch pads into half Launch Mode and half Note Mode. To enter Launch & Note Mode, press the Launch and Note buttons at the same time.
-
Page 48: Step Sequencer
Step Sequencer The Step Sequencer pad mode is used to create or edit clips by using the pads as «step buttons,» simulating the experience of a traditional step-sequencer-style drum machine. This pad mode is often used in conjunction with the Step Sequencer mode on the display, but can be used while any mode is on the display.
-
Page 49: Melodic
Melodic In Melodic Step Sequencer Mode, the bottom four rows of the pads are used like Melodic Note Mode, with the pads representing notes in a scale. Press a clip launch pad to select a note. The currently selected note will be lit bright white. Hold Shift and press the Track Assign buttons marked Oct-/ Oct+ to change the octave.
-
Page 50: Tracks
A keygroup track uses one or more samples as its sound source. It contains (1) a list of samples and (2) the settings for each sample (i.e., pitch tuning, effects, etc.). Keygroup tracks are used to play samples chromatically with a MIDI keyboard or the Force pads. See Keygroup Tracks for more information.
-
Page 51: Audio Tracks
Audio Tracks An audio track uses recorded or imported samples as its sound source. To create an audio track: 1. Press Matrix to enter Matrix Mode. 2. At the top of the screen, press the + icon to add a new track. If you cannot see the + icon, press the right cursor to move the matrix view until it is shown.
-
Page 52: Drum Tracks
Drum Tracks A drum track uses one or more samples as its sound source. It contains (1) a list of samples and (2) the settings for each sample (i.e., pad assignments, loop points, pitch tuning, effects, etc.). Drum tracks are used mostly for creating drum parts and quickly and easily assigning samples to pads.
-
Page 53
Alternatively, assign samples in a drum track in Track Edit Mode in one of these two ways: 1. Press Menu, and then tap Track Edit to enter Track Edit Mode. Alternatively, press and hold Shift and press Clip. 2. Tap the Samples tab. This lets you view the samples assigned to all four layers of the current pad as well as tuning and level parameters for each layer. -
Page 54: Keygroup Tracks
A keygroup track uses one or more samples as its sound source. It contains (1) a list of samples and (2) the settings for each sample (i.e., pitch tuning, effects, etc.). Keygroup tracks are used to play samples chromatically with a MIDI keyboard or the Force pads. To create a keygroup track: 1.
-
Page 55
To assign samples in a keygroup track: 1. Press Menu, and then tap Track Edit to enter Track Edit Mode. Alternatively, press and hold Shift and press Clip. 2. Tap Samples. This lets you view the samples assigned to all four layers of the current keygroup as well as tuning and level parameters for each layer. -
Page 56: Plugin Tracks
Plugin Tracks A plugin track contains an instance of a plugin through which you can send your track’s MIDI data. To create a plugin track: 1. Press Matrix to enter Matrix Mode. 2. At the top of the screen, press the + icon to add a new track. If you cannot see the + icon, press the right cursor to move the matrix view until it is shown.
-
Page 57
To load a plugin to the track: 1. Double-tap the track name at the top of the screen to open the Track Settings window. 2. Double-tap the Plugin field. In the list that appears, tap the desired plugin. Alternatively, use the data dial or the –/+ buttons to select a plugin. -
Page 58: Midi Tracks
MIDI Tracks A MIDI track lets you send your track’s MIDI data to an external MIDI device like a synth or drum machine. To create a MIDI track: 1. Press Matrix to enter Matrix Mode. 2. At the top of the screen, press the + icon to add a new track. If you cannot see the + icon, press the right cursor to move the matrix view until it is shown.
-
Page 59: Cv Tracks
CV Tracks A CV track lets you send your control voltage (CV) signals to an external device like a synth or drum machine that uses CV. To create a CV track: 1. Press Matrix to enter Matrix Mode. 2. At the top of the screen, press the + icon to add a new track. If you cannot see the + icon, press the right cursor to move the matrix view until it is shown.
-
Page 60: Menu
Menu The Menu lets you select any of the 14 modes or save your project. You can also use it to set your preferences, save your project, set sync behavior or view your system resources. To open the Menu, press Menu, or tap the icon in the upper-left corner of the screen while on the normal page of your current mode.
-
Page 61: Save
Internal is the internal drive of Force. Force Documents is a shortcut to the Force Documents folder on the internal drive of Force. If you have storage devices connected to USB ports or SD card slot of Force, they will appear in this column, as well.
-
Page 62: Preferences
Update Mode without saving your current project. Wi-Fi The settings on this screen will determine how your Force hardware’s wireless connection works, so you can use Ableton Link, a new technology that synchronizes beat, phase and tempo of Ableton Live and Ableton Link-enabled applications over a wireless or wired network.
-
Page 63: Bluetooth
Bluetooth The settings on this screen will determine how your Force hardware’s Bluetooth connection works, so you can use Bluetooth MIDI controllers (e.g., LPD8 Wireless or LPK25 Wireless) or a Bluetooth computer keyboard with it. These settings are available only when used in Standalone Mode.
-
Page 64: Sync
Screen Brightness: This determines the brightness of the screen during normal operation: normal brightness (Day) or dimmed (Night). Date: This is the current date, formatted as Month / Day / Year. When saving files on Force in Standalone Mode, the file will include the current date in its metadata.
-
Page 65: Project Defaults
Project Defaults The settings on this screen determine various default values for any new project that you create. New Project Dialog: This determines what options you see when you start a new project. When set to Off, a new project will be empty with no preconfigured settings except for the project defaults shown here. When set to Demo, you can choose to load a demo project (from several different genres) as a starting point or an empty project.
-
Page 66: Sync
Mode Tap this icon to switch Force to Computer Mode. In the screen that appears, select whether you want to continue to Computer Mode or Cancel and return to your current mode and project. It is recommended to save your project before switching to Computer Mode since you cannot freely switch between Standalone and Computer Modes without also closing your current project.
-
Page 67: System Resources
System Resources Tap one of these icons to show the System Resources window for Force. The indicators in this window show current usage statistics: CPU: The CPU indicator shows the current CPU as a percentage. RAM Usage: The Mem indicator shows your Force hardware’s current RAM usage.
-
Page 68: Timing Correct (Tc)
Timing Correct (TC) The Timing Correct window contains various settings to help quantize the events in your project. You can quantize note events on MIDI tracks or track regions on audio tracks (though you cannot apply all types of quantization to audio tracks).
-
Page 69
Use the Time Division selector to set the quantization value. Events will “snap” to these time divisions on the grid. The T indicates a triplet-based value. Use the Swing field to set the amount of swing from 50% to 75%. Swing lets you “shuffle” your beats—from subtle to extreme. -
Page 70: Metronome (Click/Metro)
T indicates a triplet-based time division. Use the Sound field to select the sound that you want to hear for the metronome: Sidestick 1, Sidestick 2, Clap, Metroclick, Shake, Tambourine, or Force Click. Use the Volume knob to set the volume of your metronome click.
-
Page 71: Automation
Automation You can set the automation for individual tracks to be “written,” “read,” or disabled entirely by using the track automation button in the channel strip in the Mixer. Tap the track automation button to cycle through its three states: When off, the track will ignore automation data.
-
Page 72: Arpeggiator
Arpeggiator Force includes a full-featured arpeggiator and phrase player for melodic track types, as well as traditional note repeat functionality. To enable the arpeggiator, press the Arp button. To configure the arpeggiator setting, hold Shift and press the Arp button to open the Arpeggiator window.
-
Page 73
The Arp mode section of the Arpeggiator window is available when the Action is set to Arp. When this action is selected, hold down a chord and the arpeggiator will play a pattern based on the notes held. Use the Pattern field to set how the arpeggiator triggers the held notes. -
Page 74: Effects
Effects You can apply various effects to the pads, keygroups, tracks and master outputs, using insert and send/return effects. This chapter can help you get a good overall understanding of how the effects work. Appendix > Effects & Parameters for a list of all available effects (with a brief description of each) and their editable parameters.
-
Page 75
To view, load, edit, or clear effects, tap the area under the Inserts field. This usually appears in a channel strip (next to a level slider and pan knob). When viewing loaded effects, you will see this window: To select an effect, use the field for each insert slot. A window (described below) will appear. -
Page 76: Insert Effects
Insert Effects Pads You can load up to four insert effects to each pad. You can do this in the Pad Mixer or Track Edit Mode. Tip: When using pad insert effects, they will be applied to the selected pad only. This means that you could apply unique combinations of effects to each pad within a kit.
-
Page 77: Keygroups
Keygroups You can load up to four insert effects to each keygroup. You can do this in the Pad Mixer or Track Edit Mode. Important: When using keygroup insert effects, they will be applied to that keygroup only. Keep this in mind if you load insert effects to multiple keygroups with overlapping note ranges—the effects will overlap in that range as well.
-
Page 78: Tracks
Tracks You can load up to four insert effects to each track. You can do this in the Mixer or XYFX Mode. Note: In XYFX Mode, the effects act like a single insert effect on that track. In fact, XYFX is the name of the insert effect that is loaded when use this mode.
-
Page 79: Masters
Masters You can load up to four insert effects to each master output (a stereo pair of channels: Outputs 1/2 or Outputs 3/4). You can do this in the Mixer. To load a master insert effect in the Mixer: 1. Press the Master button to show the Returns and Master Outputs in the Mixer. 2.
-
Page 80: Send/Return Effects
Send/Return Effects Send/return effects work in the following way: 1. A pad or drum, keygroup, plugin or audio track sends its audio to a return at a designated send level. 2. That audio is processed by the effects on the return. Each return can have up to four insert effects loaded and activated.
-
Page 81: Pads
Pads You can set the send levels for individual pads in Track Edit Mode or the Pad Mixer. To set the send levels for a pad in Track Edit Mode: 1. While editing the desired clip in Track Edit Mode, press the desired clip launch pad to select it. 2.
-
Page 82: Keygroups
Keygroups You can set the send levels for keygroups in Track Edit Mode or the Pad Mixer. To set the send levels for a keygroup in Track Edit Mode: 1. While using the desired track, press the desired pad to select its keygroup. Alternatively, use the Keygroup field at the top of the screen.
-
Page 83: Audio And Plugin Tracks
Audio and Plugin Tracks You can set the send levels for audio and plugin tracks in the Mixer only. To set the send levels for an audio or plugin track: 1. Tap the Send tab at the bottom of the screen. 2.
-
Page 84: Plugins
Plugins Force includes four new plugins from AIR Music Technology to help you get started making music right out of the box. To learn more about plugin tracks, see Operation > General Features > Tracks > Plugin Tracks. Bassline The AIR Bassline plugin emulates the sound of classic mono synths, with a contemporary twist.
-
Page 85
Velocity / Master / Chorus Use this tab to adjust the Velocity Control settings, Master volume. You can also apply and adjust the settings for the built-in Chorus effect. Parameter Description Value Range Velocity Amp Control The amount of effect velocity has on amplitude 0–100% control. -
Page 86
Compressor / Hype Use this tab to apply and adjust the settings for the built-in Compressor and Hype effects. Parameter Description Value Range Compressor Threshold Signal level after which the compressor will be applied. 0.0 – -60. dB Ratio Amount of compression applied. 1.0:1 –… -
Page 87: Electric
Electric The AIR Electric plugin emulates the sound of classic electric pianos. While viewing any of the tabs listed below, you can quickly enable or disable the Bell and Noise sounds, as well as the built-in effects (Tremolo, Tube, Chorus, Delay and Spring Reverb). When viewing a specific tab, you can enable or disable the sound or effect by pressing the circle in the upper-right corner of each section.
-
Page 88
Bell / Noise Use this tab to apply and adjust the settings for the Bell and Noise sounds. Parameter Description Value Range Bell Tune Pitch of the bell sound, in semitones above the root 0– 60 semitones pitch. Dry/PU Mix of Dry versus Pickup signal for the bell sound. -100% –… -
Page 89
Trem / Tube / Chorus Use this tab to apply and adjust the settings for the built-in Tremolo, Tube (Over Drive), and Chorus effects. Parameter Description Value Range Tremolo Rate Modulation speed of the effect. When Sync is set to Free: 0.25 – 13.00 Hz When Sync is set to Sync: 8/4 –… -
Page 90
Spring Reverb Use this tab to apply and adjust the settings for the built-in Spring Reverb effect. Parameter Description Value Range Pre-Delay Length of time between dry signal and reverberated signal. 0 ms – 250 ms Time Length of reverb tail. 1.0 –… -
Page 91: Hype
Hype The AIR Hype plugin is a modern style dual-oscillator synthesizer that includes a wide variety of built-in effects for endless combinations of sound, as well as convenient macro controls for lightning-fast adjustments. Macro Use this tab to adjust the macro settings for the plugin. You can access the Effect on/off switches in all tabs.
-
Page 92
Filter / Amp Use this tab to adjust the filter and amplitude envelope settings. Parameter Description Value Range Filter Cutoff Cutoff frequency for the filter. 0–100% Reso Amount of resonance of the filter. 0–100% Filter Envelope Attack Length of time for the filter to reach full level. 0–100% Decay Length of time for the filter to reach sustain level. -
Page 93
Effects 1 Use this tab to adjust the settings for the Low-Frequency Oscillator and Modulation, Distortion and Hype effects. Parameter Description Value Range Rate Speed of the low frequency oscillator. When Sync is set to 1st Note or Each Note: 0.03 – 30.00 Hz When Sync is set to Temp+Note or Tempo+Beat: 8/4 –… -
Page 94
Effects 2 Use this tab to adjust the settings for the Delay, Reverb, Compressor, Pumper and Limiter effects. Parameter Description Value Range Delay Time Amount of time between the dry signal and the 1/32 – 8/4 delayed signal. Feedback Amount of signal fed back into the delay line. 0–100% Freq Adjusts the filter cutoff frequency of the delayed… -
Page 95
Setup Use this tab to adjust the plugin setup parameters. Parameter Description Value Range Setup Transpose Transposition of the plugin, in semitones. -36 – +36 Tune Fine tuning of the plugin, in cents. -100 – +100 Glide Time Amount of time to slide from the pitch of one note to 0 ms –… -
Page 96: Tubesynth
TubeSynth The AIR TubeSynth plugin emulates the sound of classic vintage analog polysynths. TubeSynth is based on the highly acclaimed AIR Vacuum Pro desktop synth plugin and also includes 5 integrated AIR effects. Oscillator Use this tab to adjust the settings for the two variable Oscillators and the Sub Oscillator.
-
Page 97
Mixer / Filter Use this tab to control EQ for Oscillator 2, set the levels of the oscillators and effects, and edit the low-pass filter. Parameter Description Value Range Osc 2 EQ Gain Amount of gain applied to the selected Frequency. -48 –… -
Page 98
Envelope Use this tab to adjust the various envelope settings. Parameter Description Value Range Filter Envelope Attack Length of time for the filter to reach full level. 1.00 ms – 100 s Decay Length of time for the filter to reach sustain level. 1.00 ms –… -
Page 99
Use this tab to adjust the settings for the low-frequency oscillators. Parameter Description Value Range LFO 1/LFO 2 Shape Waveshape of the low-frequency oscillator. Sine, Square. Saw Up, Saw Down, Pump, S&H, Drift Destination Where the low-frequency oscillator is sent. LFO1: Off, Pitch, Filter, Level, LFO2: Pitch, Osc 1/2 Shape, Osc 1/2 Pitch, LPF, Quad… -
Page 100
Setup Use this tab to adjust plugin setup parameters. Parameter Description Value Range Controller Destinations Velocity 1 Send Velocity data to one of the following control Amp, Cutoff, Osc1 destinations. Shape, Osc2 Shape, Osc1&2 Shape Depth Amount of modulation applied. 0–100% Velocity 2 Send Velocity data to one of the following control… -
Page 101
Chorus Use this tab to apply and adjust the settings for the built-in Chorus effect. Parameter Description Value Range Rate Modulation speed of the effect. 0.01 – 10.0 Hz Delay Length of time the wet signal is offset from the dry signal. 0.00 –… -
Page 102
Reverb / Compressor / Hype Use this tab to apply and adjust the settings for the built-in Reverb, Compressor and Hype effects. Parameter Description Value Range Reverb Mode Type of reverb applied. Hall, Stadium, Room, Abstract Time Length of reverb tail. 0.4 s –… -
Page 103: Standalone Vs. Computer Mode
The Force hardware will not communicate with a computer over a USB connection. • Any files (projects, samples, etc.) that you save or load are in the internal hard drive on your Force or a connected USB drive or SD card.
-
Page 104: Modes
Modes The Force hardware has a Menu page that lets you select any one of several modes. This chapter describes the various features and functions of each one. Click a button below to skip directly to that chapter.
-
Page 105: Matrix Mode
Matrix Mode Matrix Mode gives you an overview of your tracks and clips. To enter Matrix Mode, do one of the following: • Press Matrix. • Press Menu, and then tap Matrix. To create a new clip, double-tap an empty clip slot. To launch a clip, tap an existing clip.
-
Page 106
Record button to begin recording on the highlighted clip slot. When set to REC Button then Pad, first press the record button, then tap any pad to begin recording. This is the default mode when Force is powered on. -
Page 107: Step Sequencer
Step Sequencer The Step Sequencer lets you create or edit clips by using the pads as “step buttons,” simulating the experience of a traditional step-sequencer-style drum machine. This is available for MIDI tracks only, not audio tracks. To enter the Step Sequencer, press Menu, and then tap Step Sequencer. If you have not yet created a clip for the track, you will be prompted to do so.
-
Page 108
The current bar number is shown in the upper-left corner. 3. Press the pads of your Force hardware, or tap a button at the bottom of the sequencer. Each pad corresponds to a step in the bar and will light with a color corresponding to its velocity. -
Page 109
Use the Flip Steps button to switch which steps have notes entered and which do not have notes. Steps that previously had no notes will now have notes at full velocity (127). Steps that previously had notes will now be empty. Tap Presets to show or hide the preset velocity controls. -
Page 110
The third button will apply ascending or descending velocities to the steps. Each time you tap it, it will cycle through these options: • Across the entire bar, the velocities will ascend to a peak and then descend from it. •… -
Page 111: Xyfx Mode
XYFX Mode XYFX Mode turns the touchscreen into an XY pad where each axis represents the range of an effect parameter. As you move your finger on the XY pad, the current position will determine the current value of the two parameters.
-
Page 112
Touch or move your finger on the gridded part of the screen. A marker will follow your finger to indicate the current position. The X axis is the horizontal axis, increasing in value as you move right. The Y axis is the vertical axis, increasing in value as you move up. -
Page 113
XY Mode with a manually controlled effect. Use the Attack knob to set the length of the attack phase of the envelope, which is triggered when you touch the XY pad. In other words, this determines how long it takes the effect to fully respond to your touch. Use the Release knob to set the length of the release phase of the envelope, which is triggered when you release the XY pad. -
Page 114: Navigate Mode
Navigate Mode Navigate Mode lets you quickly select which 8×8 grouping of clips is currently in focus for the clip launch pads and Matrix Mode. To enter Navigate Mode, press Navigate. To move the matrix view, do any of the following: Use the cursors to move the view one row or column at a time.
-
Page 115: Browser
Internal is the internal drive of Force. Force Documents is a shortcut to the Force Documents folder on the internal drive of Force. If you have storage devices connected to USB ports or SD card slot of Force, they will appear in this column, as well.
-
Page 116
(Devices that are uninitialized or do not have a file system will not be recognized by the Force hardware and consequently cannot be formatted.) -
Page 117
Use the six Content buttons to show specific locations in the internal drive of Force and filter them automatically by file type: Audio Clips: Tap this button to enter the Expansions folder on the internal drive, viewing audio files only. -
Page 118: Clip Edit Mode
Clip Edit Mode Clip Edit Mode lets you view and edit clips from your project. Clip View The Clip View lets you view and edit the parameters of the clip container itself. This view has three different appearances: one of audio track, one for drum tracks and one for keygroup, plugin, MIDI and CV tracks. To enter the Clip Edit View, do either of the following: •…
-
Page 119
Use the Start fields to set the starting location of the clip when launched. Alternatively, drag the start marker. Use the Loop Start fields to set the starting location of the clip loop. Alternatively, drag the loop start marker. Use the Loop Length fields to set the total length of the loop. Alternatively, drag the loop end marker Use the Launch Quantize field to set the quantization for launching the clip. -
Page 120: Event View
Event View The Event View lets you view and edit the note events of each clip of a track in a project and their velocities. This mode has two different appearances: one for drum tracks and one for keygroup tracks, MIDI tracks, and plugin tracks.
-
Page 121
In the Event View, these four tool icons enable you to use different functions in the grid. Tap one to select its mode: Pencil: Draw Mode: To enter a note in an empty grid square, tap the grid square. To select a note, tap it. To move a note, tap and drag it to another grid square. -
Page 122
Regardless of which tool is selected, you can do any of the following to move, lengthen, shorten, or transpose any selected note/notes. To automatically set the grid to view one pad bank and two bars, tap the grid-and-magnifying-glass icon in the upper-left corner. -
Page 123: Editing Events
The Event View also contains a velocity lane where you can easily adjust note velocities. The velocity lane in the Event View. The taller velocity lane in the Event View. To show or hide the velocity lane: 1. Tap the up arrow (∧) button in the lower-right corner to show the velocity lane. 2.
-
Page 124
The Pitch Quantize function forces the pitches of note events into a specific scale. To select the desired root note of the scale, use the Root Note field. To select a type of scale, use the Scale field. To determine which note events will be quantized, tap the Only apply to selected events checkbox. -
Page 125
The Generate Random Events function creates random melodic or drum patterns in the current clip. To select the type of events you want to create, use the Event Type field to select Drum Events or Melodic Events. To select how the events will be created relative to the existing events on the track, use the Replace field: Replace All Events: Select this option to replace all events in the clip with the randomly generated ones. -
Page 126
If Event Type is set to Melodic Events: To define a specific note range over which the events will be generated, use the Start Note or End Note fields. To enable or disable legato, tap the Legato checkbox. When on, the generated notes will be extended or shortened to create a long, unbroken phrase from the first note event’s start point to the last note event’s end point. -
Page 127
Force. If you have storage devices connected to USB ports or SD card slot of Force, they will appear in this column, as well. To enter a folder, double-tap it. Alternatively, turn the data dial or use the –/+ buttons to move through the list, and press the… -
Page 128: Region View
Region View The Region View lets you view and edit the view and edit the clips of audio tracks. This mode is not available for other track types. The top of the screen shows the timing information and editing tools. The time counter at the top of the screen indicates the current playhead position.
-
Page 129
Mute: Mute Mode: To mute or unmute a clip region (or multiple selected clip regions), tap it. Magnifying Glass: Navigation Mode: To move to another part of the clip, tap and drag it. To zoom in or out, spread or pinch your fingers (respectively) on the grid. You can do this vertically, horizontally, or both at the same time. -
Page 130
To reverse the selected clip region, tap Reverse. To mute the selected clip region, tap Mute. To lengthen or shorten the selected clip region without changing its pitch, tap Warp, which will enable the Semi, Fine, and BPM fields next to it. Use the BPM field to change the tempo, which will change the length of the clip region accordingly. -
Page 131: List View
List View List View has some of the features of the Event View—as well as some additional ones—but with a different interface/workflow. The time counter at the top of the screen indicates the current playhead position. The clock icon at the top of the screen opens the Timing Correct window. See General Features >…
-
Page 132
The Settings window lets you configure certain List Edit Mode settings. To view the Settings, tap the gear icon. Use the Hitting Pad Selects All Events selector to turn the feature on or off. When On, pressing a pad will automatically select all note events for that pad in the selected clip on that track. -
Page 133
The red arrow () on the left side of the list represents the audio playhead’s current position. If your clip is playing, the arrow will move accordingly. The following icons indicate the corresponding types of events: Note MIDI Automation (Volume, Pan, Mute, Solo) MIDI CC Automation (0–127) MIDI Parameter Automation (Aftertouch, Pitchbend, Channel Pressure, or Program Change) Mixer Automation (Volume, Pan, Mute, Solo, or Send 1–4) -
Page 134
To select an event, tap it. To select multiple events, press and hold Shift and tap each event. To insert a note event, press Rec or Overdub so the button is lit, and then press a pad. A note event will be created at the current location using the pad you pressed. -
Page 135: Track Edit Mode
Track Edit Mode Track Edit Mode contains all parameters for editing your Tracks. For drum tracks, this mode includes the parameters of four layers as well as all synthesis parameters and insert effect settings. See the Drum Tracks section to learn more. For keygroup tracks, this mode contains slightly more parameters than drum tracks.
-
Page 136
Tap the location icon at the top of the screen (between the Track and Pad fields) to open the Edit Zones window, which is a feature for drum tracks. This window displays an overview of any selected pads. Use the Mode selector to set how the selected pads will be edited: •… -
Page 137
Tap the down-arrow icon at the top of the screen (next to the Track field) to open the Flatten Pad window, which renders all samples on a pad as an audio sample and places it on the first layer of that pad. The resulting sample is the audio signal produced by that pad at full velocity (127) after the pad channel strip, which means that it includes any assigned pad insert effects and the results of warping the sample. -
Page 138: Master
Master In the Master tab, you can set the playback mode and tuning for the overall Track. Polyphony sets the playback mode for the track’s pads. In Mono Mode, only one pad will sound at a time. If a pad is played while another (or the same one) is still playing its sample/samples, the new pad will immediately mute all other currently playing pads in that track.
-
Page 139: Samples
Samples Each pad can trigger up to four samples, which are assigned in four individual layers. Each layer has identical, independently assignable parameters. Tap Samples to cycle through its three available tabs. On all three sections, you can access the Settings window, which lets you configure certain settings in the Samples tab. To view the Settings, tap the gear icon.
-
Page 140
The first Samples tab contains the sample waveform for each layer and controls for its pitch, timing, and playback. The upper half of the screen shows the waveform of the sample on the currently selected layer. The lower half shows the editing controls. -
Page 141
The green/S marker and red/E marker are the start point and end point (respectively). These two points define the region of the sample that will be played. To move the start point or end point, do any of the following: •… -
Page 142
Use the Reverse button to select in which direction the sample will play. When on, the sample will play in reverse. When off, the sample will play in the normal forward direction. Use the Pad Loop button to cycle through the available Pad Loop modes. Important: For Pad Loop to work, you must (1) set the Sample Play field (in the LFO Modulation tab) to Note On instead of One Shot and (2) set the Slice field (in the first Samples tab) to Pad instead of All or a slice number. -
Page 143
Tap Warp to enable or disable warping of the sample. When enabled, lengthening or shortening the sample (based on the BPM) will not change its pitch. When disabled, lengthening or shortening the sample will also change its pitch and vice versa. Use the Stretch field to set the “stretch factor,”… -
Page 144
The second Samples tab contains controls for its pitch and volume level. Semi lets you transpose the selected layer 36 up to semitones up or down. This will affect the length of the sample (if Warp is off). This is the same as the Semi field on the first Samples tab. Fine provides fine-tuning of each layer by cents. -
Page 145
The third Samples tab contains the control for its offset. Use the Offset slider to determine a time offset for the sample’s playback. • Positive values (right of center): When the pad is played, playback will start immediately but at a later point in the sample specified by the offset value. -
Page 146: Pan Velocity
For example, you may have three samples of a drum hit with low force, medium force, and high force. You can set each sample to a layer and set the Velocity ranges so only low velocities trigger the low-force sample, only mid-range…
-
Page 147: Filter/Envelope
Filter/Envelope Use the Type field to select a filter for the selected pad. See Appendix > Glossary > Filter for an explanation of the available filter types. Use the Cutoff knob to set the cutoff frequency for low-pass and high-pass filter types or the center frequency for band-pass and band-stop filter types.
-
Page 148: Lfo Modulation
LFO Modulation The Modes controls let you set the behavior for each pad’s samples in a drum track. Use the Mute Group field to assign the selected pad to one of the 32 available groups. When pads assigned to the same mute group receive MIDI notes, the last pad played will silence all other pads in that mute group.
-
Page 149
Use the Pad Polyphony field to determine how the pad’s sound behaves when multiple hits are registered. When set to Mono, only one pad will sound at a time. If a pad is played while another (or the same one) is still playing its sample/samples, the new pad will immediately mute all other currently playing pads in that track. -
Page 150: Effects
Effects Inserts You can select up to four insert effects for each pad. To learn how to use insert effects, please see General Features > Effects > Insert Effects. To add an effect: 1. Double-tap the desired Inserts slot. A list of effects will appear. 2.
-
Page 151
To adjust the effect’s parameters, tap the pencil icon. Use the sliders to set the value of each parameter. These values affect only this instance of the effect; insert effects are not global. To load an effect preset, tap the folder icon next to the preset name at the top of the display to open the file browser. To save a new effect preset, tap the disk icon next to the insert selector at the top of the display. -
Page 152: Keygroup Tracks
Keygroup Tracks When using keygroup tracks, Track Edit Mode lets you edit the parameters for each keygroup. To select a keygroup, press a pad within that keygroup. Its parameters will appear on the screen immediately. Alternatively, use the Keygroup field at the top of the screen. To view a specific tab of parameters, tap the Master, Samples, Pan Velocity, Filter/Env, LFO Modulation, or Effects button at the bottom of the screen.
-
Page 153: Master
Master In the Master tab, you can set the playback mode and tuning for the overall track. Polyphony sets the playback mode for the track’s keygroups. In Mono Mode, only one keygroup will sound at a time. If a keygroup is played while another (or the same one) is still playing its sample/samples, the new keygroup will immediately mute all other currently playing keygroups in that track.
-
Page 154
Level controls the overall volume level of the loaded sample/samples. Pan controls the overall panning of the loaded sample/samples in the stereo field. Note Range lets you restrict the key range used for a sample’s playback. Only notes with a key number higher or equal (Lo) or lower and equal (Hi) to the selected value will trigger a sound. -
Page 155
Layer Play determines how multiple samples assigned to the same pad are played: • Cycle (Cyc): Each time the pad is played, it will play the next layer’s sample. In other words, the samples will cycle through the layers as follows: 1, 2, 3, 4, 1, 2, 3, 4… etc. •… -
Page 156: Samples
Samples Each keygroup can trigger up to four samples, which are assigned in four individual layers. Each layer has identical, independently assignable parameters. Tap Samples to cycle through its three available tabs. On all three sections, you can access the Settings window, which lets you configure certain settings in the Samples tab. To view the Settings, tap the gear icon.
-
Page 157
The first Samples tab contains the sample waveform for each layer and controls for its pitch, timing, and playback. The upper half of the screen shows the waveform of the sample on the currently selected layer. The lower half shows the editing controls. -
Page 158
The green/S marker and red/E marker are the start point and end point (respectively). These two points define the region of the sample that will be played. To move the start point or end point, do any of the following: •… -
Page 159
Use the Reverse button to select in which direction the sample will play. When on, the sample will play in reverse. When off, the sample will play in the normal forward direction. Use the Pad Loop button to cycle through the available Pad Loop modes. Important: For Pad Loop to work, you must (1) set the Sample Play field (in the Master tab) to Note On instead of One Shot and (2) set the Slice field (in the first Samples tab) to Pad instead of All or a slice number. -
Page 160
The second Samples tab contains controls for its pitch and volume level. Semi lets you transpose the selected layer 36 up to semitones up or down. This will affect the length of the sample (if Warp is off). This is the same as the Semi field on the first Samples tab. Fine provides fine-tuning of each layer by cents. -
Page 161
The third Samples tab contains the control for its offset. Use the Offset slider to determine a time offset for the sample’s playback. • Positive values (right of center): When the pad is played, playback will start immediately but at a later point in the sample specified by the offset value. -
Page 162: Pan Velocity
For example, you may have three samples of a piano key with low force, medium force, and high force. You can set each sample to a layer and set the Velocity ranges so only low velocities trigger the low-force sample, only mid-range velocities trigger the medium-force sample, and only high velocities trigger the high-force sample.
-
Page 163: Filter/Envelope
Filter/Envelope Use the Type field to select a filter for the selected pad. See Appendix > Glossary > Filter for an explanation of the available filter types. Use the Cutoff knob to set the cutoff frequency for low-pass and high-pass filter types or the center frequency for band-pass and band-stop filter types.
-
Page 164: Lfo Modulation
LFO Modulation The Velocity Sensitivity controls determine how much the velocity affects the pitch of the sound (Pitch), the attack of the filter envelope (Attack), the volume level of the sound (Amp), and the panning of the sound (Pan). When you press a pad softly, only minimal modulation is applied. When you press it harder, the modulation amount also gets stronger depending on the setting of the corresponding knob.
-
Page 165
Use the Rate field to determine the LFO frequency. At lower values, it might take some time for the LFO to complete a cycle, while higher values will come closer to audible range. Use the Sync field to set if the LFO’s rate is synchronized with the tempo. You can select one of several time divisions (a . -
Page 166: Effects
Effects Inserts You can select up to four insert effects for each keygroup. To learn how to use insert effects, please see General Features > Effects > Insert Effects. Important: When using keygroup insert effects, they will be applied to that keygroup only. Keep this in mind if you load insert effects to multiple keygroups with overlapping note ranges—the effects will overlap in that range as well.
-
Page 167
To adjust the effect’s parameters, tap the pencil icon. Use the sliders to set the value of each parameter. These values affect only this instance of the effect; insert effects are not global. To load an effect preset, tap the folder icon next to the preset name at the top of the display to open the file browser. To save a new effect preset, tap the disk icon next to the insert selector at the top of the display. -
Page 168: Plugin Tracks
Plugin Tracks For plugin tracks, you will see an overview of all available plugin parameters with a slider for each, or a visual representation of the plugin interface. Use the sliders to set the value of each parameter, or use the plugin interface. Use the tabs at the bottom of the screen to access the available parameters.
-
Page 169: Midi Tracks
MIDI Tracks For MIDI tracks, you will see an overview of all available MIDI CCs with a slider for each. Use the sliders to set the value of each parameter. Use the six tabs at the bottom of the screen to access the available parameters.
-
Page 170: Cv Tracks
CV Tracks For CV tracks, you will see an overview of all available CV outputs with a slider for each. Use the sliders to set the value of each parameter. Use the six tabs at the bottom of the screen to access the available parameters.
-
Page 171: Anatomy Of An Envelope
Anatomy of an Envelope An envelope creates a variable control signal. It can be used, for instance, to modulate the filter settings of a sound over a given period of time. For drum tracks, use the AD/AHDS selector to select an AD or AHDS envelope. When Sample Play is set to Note-On, it will use an ADSR envelope.
-
Page 172: Sample Edit Mode
Sample Edit Mode Sample Edit Mode lets you edit samples using various functions. To enter Sample Edit Mode, press Menu, and then tap Sample Edit. To select a sample to edit, use the Sample field at the top of the screen. To edit the name of the sample, tap the keyboard icon next to the name at the top of the screen, and use the virtual keyboard that appears.
-
Page 173
The upper half of the screen shows the waveform. The lower half shows the editing controls. The waveform display shows the “active” section of the sample waveform. Swipe left or right on the waveform to move through it. Above the waveform is the timeline, shown in Samples, Time (in seconds and milliseconds), or Beats. You can select the measurement units you want to show in the Settings. -
Page 174: Settings
Settings The Settings window lets you configure certain Sample Edit Mode settings. To view the Settings, tap the gear icon. Use the Cue Play Mode selector to set how the cue playhead will play audio. • One Shot: Tapping Play Cue will play the entire sample from the cue playhead. •…
-
Page 175: Trim Mode
Trim Mode We recommend using Trim Mode to crop the start and/or ends from a sample. To enter Trim Mode, tap the Trim/Chop button in the lower-left corner so it says Trim. Use the Start and End fields to set the position of the start point and end point of the sample (respectively). Alternatively, tap and drag the start (S) or end (E) marker left or right, or use Knobs 1 and 2 to adjust the start point or Knobs 3 and 4 to adjust the end point when the knobs are in screen mode.
-
Page 176
Use the Tune field to transpose the sample up or down from its original pitch. Tap From BPM to open the Edit Tuning window, which lets you tune a sample to the project. Use the Beats field to match the number of beats in the sample. To tune the sample to the project, tap Match. -
Page 177
Use the Root Note field to set the root note of the sample. This defines which note will play the sample at its original pitch when in a keygroup track. Tap X-Fade to open the X-Fade window, which lets you apply real-time crossfade looping to sample playback. Before applying a crossfade, make sure the Loop Lock setting is Off and the Loop function is set to Forward. -
Page 178: Assigning Samples
Assigning Samples You can assign your new sample directly to a pad from Trim Mode. To assign a sample, tap Assign at the bottom of the screen to open the Assign Sample window. Important: Assigning a sample to a pad in this way will replace the sample on the first layer of the pad. If you set the Assign To field to Assign slice to a pad, the pad will simply refer to the slice in this sample instead of creating a new sample.
-
Page 179
If you set the Assign To field to Make new sample, this will create a new sample in your project. (The original sample will remain as it is.) Use the Pad field to select the desired pad. Alternatively, press the desired pad. -
Page 180: Processing Slices & Samples
Processing Slices & Samples Tap the Process button to open the Process window, where you can select an editing option for the sample. Use the Function field to select an editing process. Double-tap it or tap Function at the bottom of the screen to open the Function window, which displays an overview of all available editing processes.
-
Page 181
The Silence process replaces the region between the start point and end point with silence. The Extract process deletes the regions before the start point and after the end point and saves it as a new sample in your current project. -
Page 182
The Fade In process sets a fade-in between the start point and end point. The following types are available: • Linear fades the audio in with a linear curve—a straight line between the start and end. • Log fades the audio in with a logarithmic curve—quickly rising at the start and flattening out towards the end. -
Page 183
The Gain Change process raises or lowers the volume of the sample. You can adjust it up to 18 dB, higher or lower. This function is different than Normalize because it will allow volumes beyond clipping level. This may be a desired effect, but remember to watch your output level! The Copy process saves a copy of the sample. -
Page 184: Chop Mode
Chop Mode Whereas Trim Mode crops only the start and/or end off of a sample, Chop Mode divides the sample into multiple regions called slices. We recommend using Chop Mode when working with a long sample with different sounds throughout (e.g., a drum loop or a long melodic or harmonic passage). To enter Chop Mode, tap the Trim/Chop button in the lower-left corner so it says Chop.
-
Page 185
To play a slice, when the headphones icon (in the upper-right corner) is selected, tap a slice in the waveform. When the One Shot feature is enabled, you can press a pad once to play the entire slice. When this is disabled, pressing the pad and holding it will play the slice;… -
Page 186
When Link Slices is enabled, changing the start point of a slice will also change the end point of the previous slice. Similarly, changing the end point of a slice will also change the start point of the next slice. Disable Link Slices if you are trying to create slices that use non-contiguous parts of the sample. -
Page 187: Converting Or Assigning Slices
Converting or Assigning Slices You can assign your new sample directly to a pad from Chop Mode. You can also convert it into a new track or patched phrase. To convert or assign a sample, press and hold Shift, and then tap Convert at the bottom of the screen to open the Convert or Assign Slices window.
-
Page 188
If you set the Convert To field to New track with new samples, this will create a new sample from each slice and assign them to pads in a new track. The new track will be named after the sample and appended with ch. The new samples will be appended with SI-# (where # is a consecutive number). -
Page 189
If you set the Convert To field to Assign slice to a pad, the pad will simply refer to the slice in this sample instead of creating a new sample. This is useful for reducing clutter in your project. Important: Assigning a sample to a pad in this way will replace the sample on the first layer of the pad. -
Page 190: Processing Slices
If you set the Convert To field to Patched phrase, this will create a new sample that will play based on the tempo of your project, and places it in the current project. The patched phrase will have the same name as the original sample but appended with pp and will use a different icon when viewing your project information.
-
Page 191
The Silence process replaces the region between the start point and end point with silence. The Extract process deletes the regions before the start point and after the end point and saves it as a new sample (with a name you enter) in your current project. -
Page 192
The Fade In process sets a fade-in between the start point and end point. The following types are available: • Linear fades the audio in with a linear curve—a straight line between the start and end. • Log fades the audio in with a logarithmic curve—quickly rising at the start and flattening out towards the end. -
Page 193: Sampler
1. Make sure to reduce the volume levels of your audio source and speakers, headphones, and/or monitors before you make any connections to avoid “pops” or feedback. 2. Connect your audio source to the input/inputs of your Force hardware. For line-level devices such as a synthesizer, set the Line/Inst switch to Line; for instrument-level devices such as a guitar, set the switch to Inst.
-
Page 194
The upper-left Input Source field defines whether you are going to record an external audio signal, which you can set to the pair of inputs (Input 1,2) or a single input (Input 1–2). You can also select an internal signal from within your Force hardware (Resample L, Resample R, or Resample L+R). -
Page 195
For reference, the Sample Length counter shows you the length of your sample during the recording procedure. Tap Arm to record-arm the Sampler. The button will then change to Record and show Waiting for signal. At that point, start recording by doing either of the following: •… -
Page 196
After you stop your recording, the Keep or Discard Sample window will appear. Use the New Sample field to name the new sample. Tap it and use the virtual keyboard that appears. Use the Track field to assign the new sample to a track. Select <none> if you want to save it to the project without assigning it to a track. -
Page 197: Auto Sampler
Auto Sampler The Sampler page also contains the Auto Sampler, which lets you capture and covert any plugin preset or external instrument preset into a keygroup sampler patch. To open the auto sampler, tap the keyboard icon next to the record button in Sampler View. The current track will be selected as the auto sample source.
-
Page 198
Looping Use the Enable looping field to select how the resulting samples can or cannot be looped: • Off: The sample will not loop. • Forward: You can hold down the pad to cause that sample to repeat from the Loop Position to the end of the sample. -
Page 199: Looper
1. Make sure to reduce the volume levels of your audio source and speakers/headphones/monitors before you make any connections to avoid “pops” or feedback. 2. Connect your audio source to the input/inputs of your Force hardware. For line-level devices such as a synthesizer, set the Line/Inst switch to Line; for instrument-level devices such as a guitar, set the switch to Inst.
-
Page 200
The upper-left Input Source field defines whether you are going to record an external audio signal, which you can set to the pair of inputs (Input 1,2) or a single input (Input 1–2). You can also select an internal signal from within your Force hardware (Resample L, Resample R, or Resample L+R). -
Page 201
To record with the Looper: Important: To record without erasing any audio you’ve already recorded in the loop, use the Overdub button. To overwrite the audio you’ve already recorded, use the Replace button. If Record To is set to Play: To start recording, tap the Replace or Overdub button as the loop is playing. -
Page 202
To export the loop as a clip: 1. Tap Export to open the Looper Export window. 2. Use the Audio Track field to select the audio track you would like to export the clip to. 3. Use the Clip field to select the clip slot where you would like to place the loop. 4. -
Page 203: Knobs
Knobs Knobs Edit Mode lets you determine what the knobs control in other modes. This is helpful when you want to use the knobs to control parameters that might not be shown in the current mode—or parameters that are shown across different modes. To enter Knobs Edit Mode, do either of the following: •…
-
Page 204: Screen
Screen In the Screen Knobs Edit Mode, the knobs will control only the parameter or group of parameters in your currently selected mode (e.g., Mixer, Sample Edit Mode, etc.).
-
Page 205: Project
Project In the Project Knobs Edit Mode, the knobs control 16 parameters within the current project. Next to the top row of knobs on the screen, tap one of these tabs to select the type of parameters you want to control with the knobs: •…
-
Page 206
Use the Parameter field to select the parameter you want to control with the currently selected knob. When the Track tab is selected, the following options are available. When a Drum Track is selected, and Type is set to Track: Mixer: Off, Volume, Pan, Mute, Solo, Send 1–4 Track: Off, Master Semi Tune, Master Fine Tune Insert 1–4: Off, other available parameters depending on the effect… -
Page 207
When the Return tab is selected, the following options are available: Mixer: Off, Volume, Pan, Mute Insert 1–4: Off, other available parameters depend on the effect When the Master tab is selected, the following options are available: Mixer: Off, Volume, Pan, Mute, Crossfader position, Crossfader curve, Crossfader breakpoint Insert 1–4: Off, other available parameters depend on the effect Tap the Momentary checkbox to turn momentary behavior on or off. -
Page 208: Track
Track In the Track Knobs Edit Mode, the knobs control 16 parameters within the currently selected track. Next to the second row of knobs on the screen, tap one of these tabs to select the type of parameters you want to control with the knobs: •…
-
Page 209
When a Drum Track is selected, and Type is set to Pad: Mixer: Off, Level, Pan, Pad Mute, Pad Solo, Send 1–4 Track: Amp Env Hold Layer Sample Pan (1–4) LFO to Filter Velocity to Amp Tuning Amp Env Sustain Layer Semi Tune (1–4) LFO to Amp Velocity to Pan… -
Page 210: Volume
Volume In the Volume Knobs Edit Mode, the knobs control the volume level of all tracks in the project. In the Pan Knobs Edit Mode, the knobs control the stereo panning of all tracks in the project. Sends In the Sends 1–4 Knobs Edit Modes, the knobs control the level of the selected Send for all tracks in the project.
-
Page 211: Mixer
Mixer In the Mixer, you can set levels, stereo panning, and other settings for your tracks, returns and masters. To open the Mixer, do either of the following: • Press Menu, and then tap Mixer. • Press Mixer. The Mixer works like an audio mixer with various settings for each track, with up to 8 tracks shown on the display at once.
-
Page 212: Volume
Volume The Volume tab gives you an overview of the volume level of your tracks. Tap a level slider and then use the data dial or –/+ buttons to adjust the volume level of the currently selected track, return or master. Alternatively, tap and drag a level slider to adjust the volume level. The level sliders and meters in each pad show a visual representation of the level.
-
Page 213: Sends
Sends The Sends tab gives you an overview of the Sends 1–4 level of your tracks. Use the M and S buttons to mute and solo the track. When Cue Tracks is enabled, the S button will become a Headphones button. Use the automation button to set the automation status of the track.
-
Page 214: Inserts & I/O
Inserts & I/O The Inserts & I/O tab lets you view and edit insert effects and audio routing for your tracks. Use the M and S buttons to mute and solo the track. When Cue Tracks is enabled, the S button will become a Headphones button.
-
Page 215: Pad Mixer
Pad Mixer In the Pad Mixer, you can set levels, stereo panning, and other settings for individual pads. This mode is only available for Drum and Keygroup tracks. To open the Pad Mixer, do either of the following: • Press Menu, and then tap Pad Mixer. •…
-
Page 216: Volume
Volume The Volume tab gives you an overview of the volume level of your pads. Tap a level slider and then use the data dial or –/+ buttons to adjust the volume level of the currently selected pad. Alternatively, tap and drag the level slider to adjust the volume level. The level sliders and meters in each pad show a visual representation of the level.
-
Page 217: Sends
Sends Use the M and S buttons to mute and solo the pad. Use the send knobs to adjust the send level of the pads. Tap the knob and use the data dial or –/+ buttons to adjust the level. To learn how to use send effects, please see General Features >…
-
Page 218: Inserts & I/O
Inserts & I/O Use the M and S buttons to mute and solo the pad. Use the four insert fields to add insert effects to the pad. Empty insert slots will show a + icon. Inserts with a loaded effect will show the name of the effect. To learn how to use insert effects, please see General Features >…
-
Page 219: Pad Color Mode
Pad Color Mode Pad Color Mode lets you assign specific colors to your pads in a drum track. To enter Pad Color Mode: 1. Make sure you have first selected a drum track. 2. Enter Matrix Mode or the Mixer. 3.
-
Page 220
Tip: To select the color button corresponding a specific pad’s color, press and hold Shift, and then press the pad or tap it on the screen. Press a pad on your Force hardware or tap it on the screen to assign the selected color to it. -
Page 221: Appendix
Appendix Effects & Parameters This chapter lists the available effects. To learn more about how effects work with Force, please see General Features > Effects. Note: Some of these effects have a “sync” version (e.g., Flanger Sync, Autopan Sync, etc.) whose rates will be affected by the current tempo.
-
Page 222
AIR Reverb This is a spatial effect, with a wide range of reverb types to add space or room to your audio signal. Parameter Values Default Value Pre-Delay 0–250 ms 0 ms Reverb Room Size 0–100% 100% Time 0.4 ms – +inf s 1.9 s 0–100% Early Reflection… -
Page 223
Reverb Small This is a spatial effect, designed to emulate a small room. Parameter Value Range Default Value Dry/Wet 0–100 (dry–wet) Pre-Delay 1–100 Early Reflection 0–100 Density 0–100 Diffuse 0–100 Decay 0–100 Lo-Cut 0–100 Hi-Cut 0–100 Reverb Medium This is a spatial effect, designed to emulate a medium room. Parameter Value Range Default Value… -
Page 224
Reverb Large 2 This is a less CPU-intensive spatial effect, emulating the Parameter Value Range Default Value sound of a large hall. Dry/Wet 0–100 (dry–wet) Pre-Delay 1–100 Early Reflection 0–100 Density 0–100 Diffuse 0–100 Decay 0–100 Lo-Cut 0–100 Hi-Cut 0–100 Reverb In Gate This is a hall reverb with an additional control. -
Page 225: Delays
Delays Delays the original signal for a specified period of time and plays it back over an adjustable period of time. Options: Delay, AIR Diff Delay, Delay Mono, Delay Mono Sync, Delay Stereo, Delay Sync (Stereo), Delay Delay Delay Analog, Delay Analog Sync, Delay Tape…
-
Page 226
Delay Mono Sync Parameter Value Range Default Value Dry/Wet 0–100 (dry–wet) Time 1 bar – 1/16 triplets 1/4 Feedback 0–100 Damping 0–100 Delay Stereo Stereo Delay operates similarly to Mono Delay but in true Parameter Value Range Default Value stereo. Dry/Wet 0–100 (dry–wet) Time… -
Page 227
Delay Analog Analog Delay is similar to the Mono Delay, except that it’s Parameter Value Range Default Value designed to emulate an analog “Bucket Brigade”-style delay. Dry/Wet 0–100 (dry–wet) This delay has a unique character to it that gives a warmer sound by adding subtle inaccuracies in phase and timing. -
Page 228
Delay Multi-Tap This delay is a mono delay which has three delay generators Parameter Value Range Default Value with independently adjustable delay times and stereo Dry/Wet 0–100 (dry–wet) position. Time 1 2–2000 ms Time 2 2–2000 ms Time 3 2–2000 ms Feedback 0–100 Pan 1… -
Page 229: Flangers
Flangers A flanger is a modulated delay to emulate the sound created when running two analog tape machines in parallel with a slight time misalignment. Slow Rate settings can produce a “whooshing” jet engine sound, while faster rates result in more of a “warble.”…
-
Page 230: Chorus
Chorus A chorus effect uses an LFO to modulate the pitch and a delay of the input signal, which are then added to the dry signal. In small amounts, this creates the illusion of multiple voices playing at once. Turn up the Feedback and Depth for more pronounced “shimmering”…
-
Page 231: Autopans
Autopans This effect uses an LFO to move the incoming signal back and forth across the stereo field, creating a rotary effect. Options: Autopan, Autopan Sync Autopan Parameter Value Range Default Value Dry/Wet 0–100 (dry–wet) Rate 0–100 Autopan Sync Parameter Value Range Default Value Dry/Wet…
-
Page 232: Phasers
Phasers The phaser is a classic effect, created by multiple ganged all-pass filters to create “notches,” or sharp spikes, in the frequency spectrum. The frequencies of these all-pass filters are usually modulated by an LFO to create a sweeping sound. Options: Phaser, Phaser…
-
Page 233: Hp (High-Pass) Filters
HP (High-Pass) Filters Options: Filter, HP Filter Sweep, HP Filter Sync, HP Shelving Filter HP Filter This effect is a static filter without modulation. Parameter Value Range Default Value Frequency 10–19999 Hz 1500 Resonance 0–100 HP Filter Sweep This effect is a high-pass filter with its cutoff frequency Parameter Value Range Default Value…
-
Page 234: Lp (Low-Pass) Filters
LP (Low-Pass) Filters Options: Filter, LP Filter Sweep, LP Filter Sync, LP Shelving Filter LP Filter This effect is a static filter without modulation. Parameter Value Range Default Value Frequency 10–19999 Hz 1500 Resonance 0–100 LP Filter Sweep This effect is a low-pass filter with its cutoff frequency Parameter Value Range Default Value…
-
Page 235: Filters (Other)
Filters (Other) Options: AIR Filter Gate, AIR Filter AIR Filter Gate This effect chops your audio using a Parameter Value Range Default Value rhythmic gate effect and then applies a Pattern Straight, Pulse, Pumper, Marching, Straight variable filter effect. Fader, Offbeats, Off+Pan, L/R Pan, LL/RR Pan, Slow Pan, Rand Pan, Shorter, Longer, Reverse, Random, Keyed 1–2, Half Time, 12-Step,…
-
Page 236: Parametric Eqs
Parametric EQs Options: AIR Para 2-Band, 2-Shelf, PEQ 4-Band AIR Para EQ This effect is a powerful four-band parametric equalizer with Parameter Value Range Default Value four independent EQ ranges, adjustable Low and High EQ High Freq 1.2 – 20.0 kHz 6.00 kHz filter types, and dedicated Low Cut and High Cut.
-
Page 237
PEQ 2-Band, 2-Shelf This effect is a combination of one two-band parametric Parameter Value Range Default Value equalizer and two shelving filters. Low Frequency 22–1000 Hz Frequency 1 82–3900 Hz Frequency 2 220–10000 Hz 2200 High Frequency 560–19999 Hz 5600 0–100 0–100 Low Gain… -
Page 238: Distortions
Distortions Options: Distortion, AIR Tube Drive, Distortion Amp, Distortion Fuzz, Distortion Grimey, Distortion Overdrive, Distortion Custom AIR Distortion This effect is a multi-type distortion that adds color to your Parameter Value Range Default Value audio signal. Mode Hard, Soft, Wrap Hard Drive 0 –…
-
Page 239
Distortion Fuzz This popular effect uses hard clipping of the audio signal, Parameter Value Range Default Value which, at extreme settings, can turn a standard waveform Dry/Wet 0–100 (dry–wet) into a square wave, producing a “razor” effect. Drive 0–100 Output 0–100 0–100 Low-Mid… -
Page 240: Compressors
Compressors A compressor is an effect that changes the dynamic range of a signal by automatically reducing its gain. Options: Compressor, Compressor Master, Compressor Opto, Compressor VCA, Compressor Vintage AIR Compressor This basic compressor effect changes the dynamic range of Parameter Value Range Default Value…
-
Page 241: Bit Reducers
Compressor VCA This compressor is more modern-sounding, with a slightly Parameter Value Range Default Value more transparent sound. A VCA Compressor tends to have Dry/Wet 0–100 (dry–wet) quicker attack and release times than an Opto Compressor. Input -6 – 18 dB Attack 0–100 Release…
-
Page 242: Other
Other Options: AIR Channel Strip, Enhancer, Ensemble, AIR Freq Shift, AIR Fuzz Wah, AIR Kill Lo-Fi, Maximizer, AIR Noise Gate, AIR Pitch Shifter, Pumper, AIR Stereo Width, AIR Talk Box, Transient, Auto Wah, Frequency Shifter, Mother Ducker Input, Mother Ducker, Transient Shaper AIR Channel Strip This specially-designed plugin combines multiple effects with a fast interface.
-
Page 243
AIR Ensemble This effect applies fluid, shimmering modulation effects to Parameter Value Range Default Value the audio signal. Rate 0.01 – 10.0 Hz 1.00 Hz Depth 0.00 – 24.00 ms 6.00 ms Width 0–100% 100% 0–100% (dry–wet) Mod. Delay 0.00 – 24.00 ms 0.00 ms Mod. -
Page 244
AIR Kill EQ This effect can zap out the Low, Mid or High broadband Parameter Value Range Default Value frequency from an audio signal. High Thru, Kill Thru Thru, Kill Thru Thru, Kill Thru Output -20.0 – +20.0 dB 0.0 dB High Gain -Inf –… -
Page 245
AIR Maximizer This effect is a limiter optimized for professional mastering. Parameter Value Range Default Value Threshold -40.0 – 0.0 dB -20.0 dB Ceiling -20.0 – 0.0 dB FS -5.0 dB FS Look Ahead 0.0 – 20.0 ms 0.0 ms Knee Hard, Soft Hard… -
Page 246
AIR Stereo Width This effect creates a wider stereo presence in an audio Parameter Value Range Default Value signal. Width 0–200% 100% Delay 0.0 – 8.0 ms 0.0 ms Level Trim -Inf – 0.0 – +12.0 dB 0.0 dB Pan Trim L100 –… -
Page 247
Auto Wah This effect is a low-pass filter modulated by an envelope that Parameter Value Range Default Value yields a classic funky “wah-wah”- like sound. The envelope Dry/Wet 0–100 (dry–wet) is triggered by the incoming signal’s amplitude. The amount of the envelope on the cutoff frequency is user-definable. Resonance 0–100 Attack… -
Page 248
Transient Shaper A transient shaper can be used to enhance or soften the Parameter Value Range Default Value Attack and Release phases of audio material. Dry/Wet 0–100 (dry–wet) Attack 0–100 Release 0–100 Output 0–100… -
Page 249: Glossary
The higher the bit rate, the more precise the information about a sample (i.e., its dynamics’ resolution). Normal audio CDs are 16-bit. The Force hardware supports full 24-bit resolution. A clip is a container for recorded audio or MIDI information. Clips that share a common type, Clip such as clips of a particular drum kit or plugin, are grouped into tracks.
-
Page 250
(CV messages determine the pitch of notes while Gate messages determine note activation and length). Gate messages are sent from the CV out ports of your Force hardware and to the CV/Gate in ports of your external device. -
Page 251
LFO is an acronym for low-frequency oscillator. The LFO generates a periodic oscillation at a low frequency and features variable waveshapes. Similar to an envelope, an LFO can be used to modulate a sound-shaping component. MIDI MIDI stands for musical instrument digital interface. Developed in the early 1980s, MIDI enables interaction between various types of electronic music instruments from different manufacturers. -
Page 252
Sample When you tap the pads on your Force hardware, you can trigger sounds that we call samples. Samples are digitized snippets of audio that can be recorded using the recording (sampling) function of your Force hardware or loaded from the Browser. -
Page 253
The Warp feature lengthens or shortens a region of an audio track or sample without changing Warp its pitch. This enables you to fit the length of an audio track or sample to the length of a clip, a bar in your clip, etc. while maintaining its original key. Please note that the Warp algorithms are very CPU-intensive and can result in audio drop-outs during playback if used too freely. -
Page 254: Sata Drive Installation
SATA drive panel. Do not overtighten the screws, but make sure the drive is secure and does not shake. 6. Place the SATA drive panel back onto the bottom panel of your Force hardware, and use the original screws to secure it in place.
-
Page 255: Midi Machine Control (Mmc)
To set up your Force hardware to send MMC messages to an external device: 1. Use an included 1/8″-to-MIDI adapter and a standard 5-pin MIDI cable (not included) to connect your Force hardware’s MIDI Out to the MIDI input of your external device.
-
Page 256: Technical Specifications
Technical Specifications Specifications are subject to change without notice. (64) velocity- and pressure-sensitive pads, RGB-backlit Mechanical Pads Knobs (8) 360° touch-sensitive Knobs (1) 360° encoder for display navigation and selection via push (5) 270° knobs for gain, mix & level adjustment Buttons (56) dedicated function buttons;…
-
Page 257: Trademarks & Licenses
Trademarks & Licenses Akai Professional and MPC are trademarks of inMusic Brands, Inc., registered in the U.S. and other countries. Ableton is a trademark of Ableton AG. The Bluetooth word mark and logos are registered trademarks owned by Bluetooth SIG, Inc. and any use of such marks by Akai Professional is under license.
USB MIDI-клавиатура Akai Pro 25Key Force
Руководство пользователя контроллера

Инструкция по началу работы
Введение
Спасибо за покупку Силы. Мы в Akai Professional знаем, насколько серьезной для вас является музыка. Вот почему мы разрабатываем наше оборудование, имея в виду только одну цель — сделать вашу производительность максимально возможной.
Комплектация

важно: Войти akaipro.com и найдите webстраница для Форс-мажор чтобы загрузить полное руководство пользователя.
Поддержка
Для получения последней информации об этом продукте (документация, технические характеристики, системные требования, информация о совместимости и т. Д.) И регистрации продукта посетите akaipro.com.
Для получения дополнительной поддержки по продукту посетите akaipro.com/support.
Установка
Элементы, не указанные в разделе «Введение»> «Содержимое упаковки», продаются отдельно.

Первые шаги
В этом разделе описывается, как выполнять основные задачи с помощью Force.
важно: Войти akaipro.com и найдите webстраница для Форс-мажор чтобы загрузить полное руководство пользователя.
При первом включении Force вы можете выбрать демонстрационный проект, который поможет вам начать работу, выберите пустой Проекты под застройку внизу экрана, чтобы загрузить пустой шаблон, или выберите Шаблон пользователя для загрузки сохраненного пользовательского шаблона.
Для этого руководства коснитесь значка Дип Хаус – Цвета Демонстрационный проект, чтобы загрузить его.
После загрузки демо Force автоматически откроется Матрица режим. Этот режим отображения дает вамview вашего проекта и отражает макет 8×8 пусковые площадки клипа, Использовать курсор кнопки для перемещения текущего view матрицы по одной строке или столбцу за раз.
Запуск клипов
Каждый столбец в матричном режиме представляет собой дорожку. Треки могут использоваться для хранения аудиоampлес, ударные установки, инструмент plugins и более. в Дип Хаус – Цвета проект, вы увидите треки, помеченные Ударная петля, Верхняя петля, Заполнение и многое другое на дисплее.
Чтобы создать новую дорожку, коснитесь значка + в верхней части дисплея или нажмите и удерживайте пустую Селектор треков кнопка. Возможно, вам потребуется прокрутить матрицу вправо с помощью курсоры чтобы показать пустой трек.
Каждая дорожка состоит из клипов, которые представляют собой короткие последовательности аудио или MIDI. Одновременно может воспроизводиться только один клип на дорожке. Давайте попробуем поиграть с несколькими клипами, чтобы увидеть, как они работают.
- Нажмите Презентация кнопку, чтобы убедиться, что пусковые площадки клипа есть Режим запуска. В этом режиме пэда каждый пэд представляет один клип на дорожке. Подсвеченные пэды представляют клипы, отображаемые на дисплее, а тусклые пэды — пустые клипы.
- Коснитесь первого клипа в Трек 8 — Ударная установка чтобы начать играть в нее. стартовая площадка клипа будет медленно мигать зеленым цветом, указывая на то, что он активен, а клип на дисплее покажет положение указателя воспроизведения в клипе.
- Находясь в режиме запуска, нажмите кнопку стартовая площадка клипа под пэдом, который воспроизводится в данный момент. Второй клип начнет воспроизводиться после следующего такта.
- Клипы будут воспроизводиться до тех пор, пока не будет запущен другой клип на той же дорожке, пока воспроизведение не будет остановлено или пока клип не будет остановлен во время воспроизведения.
Чтобы остановить клип, сначала нажмите клип стоп кнопка для назначения Отслеживание назначения кнопки для режима остановки.
Затем нажмите Отслеживание назначения кнопка трека с воспроизводимым клипом. Вы также можете нажать кнопку Остановить все клипы кнопку для остановки клипов на всех дорожках. - Чтобы создать новый клип, введите Matrix view на дисплее и дважды коснитесь пустого слота клипа на дорожке.
Новые клипы всегда создаются с длиной по умолчанию, которую можно установить, удерживая Shift и нажимая вторую Отслеживание назначения кнопку.
Кроме того, вы можете создать пустой клип, используя пусковые площадки клипа. Сначала нажмите кнопку Презентация кнопку для входа в режим запуска. Нажмите и удерживайте кнопку Выберите кнопку, затем дважды коснитесь пустой площадки.
Помимо запуска клипов на дорожке, вы можете запускать несколько клипов на дорожках в одном ряду. Каждый ряд клипов называется сценой, и их можно использовать для аранжировки различных частей песни.
- Нажмите самую верхнюю Запуск сцены кнопку, чтобы запустить первый ряд клипов, а затем продолжить запуск других сцен по порядку.
- Пока воспроизводится одна сцена, попробуйте запустить клипы из других рядов, чтобы поэкспериментировать с разными вариациями.
- Чтобы создать новую сцену, нажмите и удерживайте Редактировать кнопку, затем нажмите Запуск сцены кнопку.
Вы также можете назначать треки кроссфейдеру Force. Это позволяет плавно переходить между клипами с нескольких дорожек.
- Чтобы назначить дорожку стороне кроссфейдера, нажмите и удерживайте Назначить А/Б кнопки и нажмите a Отслеживание назначения.
- Чтобы сбросить назначения кроссфейдера, удерживайте Shift и нажмите Назначить А or Назначить Б кнопку.
Режим нот
Помимо использования пэдов для запуска клипов, вы можете использовать их для хроматического воспроизведения и записи нот, как если бы вы использовали MIDI-клавиатуру, или для воспроизведения и записи набора ударных. Это включается нажатием кнопки Внимание кнопка для входа Режим нот.
- В Дип Хаус – Цвета проект, выберите Трек 6 — Классический бас. При использовании мелодической дорожки, такой как Keygroup или Plugin, основная нота или аккорд будет подсвечена одним цветом, а ноты или аккорды между ними будут подсвечены бледно-голубым цветом.
- Выберите Трек 2 — Верхняя петля. При использовании драм-трека нижний левый квадрант 16 пусковые площадки клипа загорится и может использоваться для игры на ударной установке.
- Держать Shift и нажмите Внимание для настройки параметров режима Note для каждой дорожки.
Шаг секвенсер
При записи ударных вы также можете использовать встроенную функцию Force. Шаг секвенсер чтобы быстро вводить нотные события, используя панели запуска клипов в качестве «пошаговых кнопок», имитируя работу традиционной драм-машины в стиле пошагового секвенсора.
- В Дип Хаус – Цвета проект, выберите Трек 8 — Ударная установка и выберите пустой слот клипа.
- Нажмите Шаг секвенсер кнопка для циклического переключения между режимами пошагового секвенсора для пусковые площадки для зажимов. Выберите Барабанить Режим.
- В режиме пэда Drum Step Sequencer верхние четыре ряда пусковые площадки клипа представлять шаги в последовательности. Нижние четыре строки разбиты на две группы по 4 столбца.
Используйте нижний левый квадрант для игры на ударной установке. Последний сыгранный пэд будет выбран для секвенсора.
Коснитесь любого пэда в четырех верхних рядах, чтобы вставить выбранный звук ударных на этом шаге последовательности. Последовательность начнет воспроизводиться автоматически при вставке шага.
Нижний правый квадрант используется для установки скорости нот. В этом квадранте выберите нижний левый пэд, чтобы установить скорость воспроизведения. Остальные пэды, слева направо вверх, представляют минимальную и максимальную фиксированную скорость. - Или нажмите Меню и затем нажмите Шаг секвенсер использовать дисплей для последовательности событий нот.
Редактирование клипов и дорожек
Теперь, когда вы знакомы с основами запуска клипов, давайте попробуем отредактировать клипы и дорожки для еще большей настройки вашего проекта.
- Нажмите Клип войти Режим редактирования клипа, или нажмите Меню и затем нажмите Клип Редактировать.
- In Клип View, Вы можете view и редактировать параметры самого клипа, такие как длина, режим запуска и квантование.
Чтобы выбрать клип, нажмите и удерживайте Выберите и нажмите стартовая площадка клипа. - В зависимости от выбранного типа клипа вы также можете отредактировать аудиоклип, используя Регион View или отредактируйте события нот MIDI, используя События View.
Помимо режима редактирования клипа, вы можете редактировать параметры дорожки, используя Режим редактирования дорожки. Этот режим недоступен для звуковых дорожек.
- Держать Shift и затем нажмите Клип чтобы войти в режим редактирования дорожки, или нажмите Меню и затем нажмите Отслеживание редактирования.
- Используйте Режим нот для выбора пэда или группы клавиш, которые вы хотите отредактировать, и используйте вкладки страниц для редактирования различных доступных параметров.
Микширование треков
Микшер Force позволяет настраивать такие параметры, как уровень, панорамирование и маршрутизация стереозвука так же, как в традиционном микшере или цифровой звуковой рабочей станции.
- Нажмите Смеситель для открытия Смеситель, или нажмите Меню и затем нажмите Смеситель.
- Микшер содержит четыре вкладки страниц, которые позволяют вам управлять различными настройками для дорожек и мастер-записи.
Коснитесь и перетащите палец, чтобы просмотреть доступные дорожки, или используйте курсор кнопки.
Особенности
Важнo: Посещение akaipro.com и найдите webстраница для Форс-мажор чтобы загрузить полное руководство пользователя.
Верхняя панель

- Дисплей: На этом полноцветном мультисенсорном дисплее отображается информация, относящаяся к текущей операции Force. Коснитесь дисплея (и используйте аппаратные средства управления) для управления интерфейсом Force. Видеть Монитор чтобы узнать, как использовать некоторые основные функции.
- Меню: Нажмите эту кнопку, чтобы открыть меню. Вы можете коснуться параметра на экране меню, чтобы войти в этот режим, view, и т.д.
- Общий объем: Поверните эту ручку, чтобы отрегулировать уровень громкости Мастер Л/П выходы.
- Play: Нажмите эту кнопку, чтобы начать воспроизведение.
- Stop: Нажмите эту кнопку, чтобы остановить воспроизведение. Дважды нажмите эту кнопку, чтобы немедленно остановить все звуки.
- Запись: Нажмите эту кнопку, чтобы начать или остановить запись.
- расстегивать: Нажмите эту кнопку, чтобы отменить последнее действие.
Нажмите Shift и эта кнопка, чтобы повторить последнее действие, которое вы отменили. - нагрузка: Нажмите эту кнопку, чтобы открыть Браузер, в котором вы можете загружать проекты, клипы и многое другое.
- Save.: Нажмите эту кнопку, чтобы сохранить проект, сampфайл или отслеживать, или начать новый проект с нуля.
- матрица: Нажмите эту кнопку, чтобы открыть матрицу. View, болееview вашего проекта с 8×8 view ваших клипов.
Функции: Находясь в любом из режимов меню или пэда, вы можете нажать и удерживать кнопку другого режима, чтобы мгновенно переключиться в этот режим. Вы вернетесь в предыдущий режим, когда отпустите кнопку. - Клип: Нажмите эту кнопку, чтобы открыть редактор клипов. View, что дает более мелкие детали одного клипа.
Нажмите Shift и эта кнопка, чтобы открыть редактирование трека View, где вы можете редактировать параметры своей ударной установки, плагина, треков MIDI или CV. - Смеситель: Нажмите эту кнопку, чтобы открыть микшер. View, где вы можете управлять громкостью, панорамированием и отправкой каждой дорожки.
При использовании драм-трека нажмите Shift и эта кнопка, чтобы открыть Pad Mixer View, где вы можете управлять громкостью, панорамированием и отправкой каждого пэда. - Откройте: нажмите эту кнопку, чтобы открыть окно навигации. view, что дает вам болееview всего проекта. Коснитесь раздела, чтобы перейти на Матрицу view прямо в этот раздел.
Нажмите Shift и эта кнопка, чтобы открыть XYFX. - курсоры: Нажимайте эти кнопки, чтобы перемещать матрицу. View и пэды по одной строке или столбцу за раз.
Нажмите Shift и нажимайте эти кнопки для перемещения по восьми строкам или столбцам за раз. - Shift: Нажмите и удерживайте эту кнопку, чтобы получить доступ к дополнительным функциям некоторых кнопок.
- Набор данных: Поверните этот диск, чтобы просмотреть доступные опции меню или отрегулировать значения параметров выбранного поля на дисплее. Нажатие диска также работает как кнопка ввода.
Нажмите Shift и поверните этот диск для более точной настройки параметров. - –/+: Нажмите эти кнопки, чтобы увеличить или уменьшить значение выбранного поля на дисплее.
- Назначить A/Назначить B: Нажмите одну из этих кнопок и Назначить режим кнопку, чтобы назначить соответствующую дорожку кроссфейдеру группы A или B.
Нажмите Shift и нажмите одну из этих кнопок, чтобы сбросить все назначения кроссфейдера A или B. - Кроссфейдер: Используйте этот кроссфейдер для микширования между клипами, назначенными на группу A или B.
- Назначаемые ручки: Используйте эти регуляторы для управления панорамированием трека, уровнями посыла трека или другими назначаемыми пользователем параметрами. Использовать Knobs кнопку, чтобы изменить активный банк регуляторов или режим (описано ниже). Полоса дисплея над каждой ручкой показывает параметр, которым она управляет, и его текущее значение или настройку.
- Ручки Кнопка: Нажмите эту кнопку для циклического переключения между двумя банками ручек для текущего активного режима. Полоса дисплея над регуляторами будет отображать текущие активные параметры.
Нажмите и удерживайте эту кнопку, чтобы быстро выбрать один из нескольких предустановленных режимов управления ручкой.
Нажмите Shift и эта кнопка, чтобы открыть режим регуляторов, где вы можете редактировать назначения регуляторов. - Площадки для запуска клипов: Используйте пэды, чувствительные к силе нажатия, в этом 8×8 для запуска клипов, воспроизведения нот и многого другого в зависимости от активного режима.
- Кнопки запуска сцены: Вы можете нажать одну из этих кнопок, чтобы запустить соответствующую сцену, представленную рядом клипов слева от нее.
Нажмите Редактировать кнопку и одну из этих кнопок, чтобы быстро вставить новую строку, захватить текущий воспроизводимый клип (ы) в качестве новой сцены или очистить строку. - Запуск/Конфигурация: Нажмите эту кнопку, чтобы установить пусковые площадки клипа в режим запуска. В режиме запуска каждый пэд представляет собой один слот клипа. Восемь столбцов представляют восемь дорожек, а восемь строк — восемь сцен. Вы можете запустить всю сцену, нажав кнопку сцены Презентация кнопки справа от ряда клипов.
Нажмите Shift и нажмите эту кнопку, чтобы настроить параметры режима запуска. - Примечание/Конфигурация: Нажмите эту кнопку, чтобы установить пусковые площадки клипа в режим заметок. В режиме Note вы можете использовать пэды для воспроизведения настраиваемой гаммы MIDI-нот.
Находясь в режиме Note и используя дорожку Keygroup, Plugin, MIDI или CV, нажмите и удерживайте эту кнопку, чтобы выбрать различные режимы воспроизведения, такие как гаммы, аккорды, последовательности и т. д. Находясь в режиме ноты и используя трек ударных, нажмите и удерживайте эту кнопку, чтобы выбрать временной интервал для повтора ноты.
Нажмите Shift и нажмите эту кнопку, чтобы настроить параметры режима ноты, такие как масштаб и основная нота. Вы также можете нажать и удерживать эту кнопку, чтобы быстро выбрать режим. - Последовательность шагов/конфигурация: Нажимайте эту кнопку несколько раз, чтобы переключаться между тремя разными пэдами. views для использования пошагового секвенсора.
Нажмите и удерживайте эту кнопку, чтобы быстро выбрать режим пошагового секвенсора.
Нажмите Shift и нажмите эту кнопку, чтобы настроить параметры пошагового секвенсора. - Кнопки редактирования: нажмите и удерживайте одну из этих кнопок, чтобы отредактировать клип или дорожку следующим образом:
• Выберите: Нажмите и удерживайте эту кнопку, чтобы view текущий выбранный клип. Удерживая, коснитесь другого стартовая площадка клипа для выбора другого клипа.
• Редактировать: Нажмите и удерживайте эту кнопку, затем коснитесь стартовая площадка клипа or Селектор треков кнопка для редактирования клипа или дорожки соответственно.
Удерживайте эту кнопку и нажмите любую Запуск сцены кнопку, чтобы открыть окно «Редактировать строку», в котором можно быстро добавить или удалить строки в матрице.
• Копировать: нажмите и удерживайте эту кнопку, чтобы скопировать клип или дорожку. Удерживая, коснитесь клипа стартовая площадка or Селектор треков кнопку клипа или дорожки, которую вы хотите скопировать, затем коснитесь нового пэда или кнопки, чтобы скопировать его.
• Удалить: Нажмите и удерживайте эту кнопку, затем коснитесь стартовая площадка клипа or Селектор треков кнопку, чтобы удалить его. - Арп/конфигурация: Нажмите эту кнопку, чтобы включить или отключить внутренний арпеджиатор, скорость которого зависит от текущих настроек темпа и разделения времени.
Нажмите Shift и эта кнопка для настройки параметров арпеджиатора. - Tap Tempo: Нажмите эту кнопку с нужной скоростью, чтобы ввести новый темп.
Нажмите Shift и эта кнопка, чтобы открыть окно темпа, где вы можете ввести новый темп. - Master: Нажмите эту кнопку, чтобы view основной и обратный каналы.
- Селекторы дорожек: Нажмите одну из этих кнопок, чтобы выбрать дорожку, представленную столбцом клипов прямо над ней.
Нажмите и удерживайте Shift а затем нажмите одну из этих кнопок, чтобы выбрать параметр Global Quantization: Нет, 8 делений, 4 деления, 2 деления, 1 деление, 1/4, 1/8 или 1/16. - Кнопки режима назначения: Нажмите одну из этих кнопок, чтобы установить функцию Отслеживание назначения кнопки при нажатии:
• сурдинка: Нажмите эту кнопку, чтобы отключить звук дорожки.
• соло: Нажмите эту кнопку, чтобы солировать дорожку.
Нажмите Shift и эта кнопка для настройки кнопки соло и поведения кроссфейдера.
• Запись руки: Нажмите эту кнопку, чтобы включить запись трека.
• клип стоп: Нажмите эту кнопку, чтобы остановить воспроизведение клипа на дорожке. - Назначение трека: Нажмите одну из этих кнопок, чтобы применить назначение к дорожке, представленной столбцом клипов прямо над ней. Использовать Кнопки назначения режима для установки функции назначения.
Нажмите и удерживайте Shift а затем нажмите одну из этих кнопок, чтобы получить доступ к второстепенным функциям, указанным под кнопками. - Остановить все клипы: Нажмите эту кнопку, чтобы остановить все клипы, когда они достигнут конца.
Монитор
Вот некоторая общая информация о том, как использовать Силу. дисплей:
Коснитесь кнопки или параметра, чтобы выбрать его. Использовать набор данных или –/+ кнопки, чтобы изменить его настройку или значение.

Дважды коснитесь элемента управления, чтобы получить доступ к расширенным параметрам редактирования. В некоторых случаях отображается цифровая клавиатура, которую можно использовать для ввода значения (альтернатива набор данных или –/+ кнопки). Коснитесь верхней левой части экрана, чтобы вернуться к предыдущему view.
В матрице View, дважды коснитесь пустой ячейки клипа на дорожке, чтобы создать новый клип.

Разведите два пальца для увеличения (например, части сигнала).ampле). Сведите два пальца, чтобы уменьшить масштаб.

Задняя панель

- Входная мощность: Подключите прилагаемый адаптер питания (19 В, 3.42 А, положительный центр) к этому разъему, а затем к электрической розетке.
- Ограничение адаптера питания: Закрепите кабель адаптера питания на этом ограничителе, чтобы он не
случайное отсоединение. - Выключатель: Нажмите эту кнопку, чтобы включить или выключить питание Force.
- Ссылка: Подключите стандартный кабель Ethernet к этому порту, чтобы использовать Ableton Link и другие совместимые устройства с Force. Загрузите полное руководство пользователя для получения дополнительной информации.
- Порт USB-B: Используйте прилагаемый USB-кабель, чтобы подключить этот USB-порт с высокой удерживающей силой к свободному USB-порту на вашем компьютере.
- Порты USB-A: Подключите флэш-накопители USB к этим портам USB, чтобы получить доступ к их fileнапрямую используя Силу.
- Вход 1/2 (XLR или 1/4 дюйма / 6.35 мм): Используйте стандартные кабели XLR или 1/4 дюйма (6.35 мм) TRS для подключения этих входов к источникам звука (микрофону, микшеру, синтезатору и т. д.). При использовании кабеля 1/4″ микрофонный предусилительamp удаляется из цепи, а Строка/Инст переключатель можно использовать для установки импеданса.
Поверните Gain ручки для установки входного уровня каждого из них. - Gain: Используйте эти регуляторы для регулировки усиления входящего сигнала от Вход 1/2 на задней панели. Будьте осторожны при установке этого регулятора на более высокие уровни, которые могут привести к искажению сигнала.
- Строка/Инст: Используйте эти переключатели для установки Вход 1/2 для приема источника звука линейного или инструментального уровня при использовании соединения 1/4″.
- Фантомное питание (+48В): Этот переключатель активирует и деактивирует фантомное питание для Входы 1/2 при использовании соединения XLR. При активации на оба входа подается фантомное питание +48 В. Обратите внимание, что большинство динамических микрофонов не требуют фантомного питания, в то время как большинство конденсаторных микрофонов do. Обратитесь к документации вашего микрофона, чтобы узнать, требуется ли ему фантомное питание.
- Выходы (1/4 дюйма / 6.35 мм): используйте стандартные кабели TRS 1/4 дюйма (6.35 мм) для подключения этих выходов к мониторам, микшеру и т. д.). Мастер Л/П выходы такие же Выходы 1,2.
- MIDI выход: Подключите к этому выходу совместимые 1/8″ MIDI-устройства или используйте входящий в комплект адаптер 1/8″-toMIDI для подключения стандартного 5-контактного MIDI-кабеля от этого выхода к MIDI-входу внешнего MIDI-устройства (синтезатора, драм-машины, так далее.).
- MIDI вход: Подключите к этому входу совместимые 1/8-дюймовые MIDI-устройства или используйте входящий в комплект адаптер 1/8-дюйма к MIDI для подключения стандартного 5-контактного MIDI-кабеля от этого входа к MIDI-выходу внешнего MIDI-устройства (синтезатора, барабана). машина и др.).
- MIDI через: Подключите к этому сквозному порту совместимые 1/8-дюймовые MIDI-устройства или используйте входящий в комплект адаптер 1/8-дюйма-MIDI для подключения стандартного 5-контактного MIDI-кабеля от этого входа к MIDI-выходу внешнего MIDI-устройства (синтезатора). , драм-машина и др.). Входящий MIDI от MIDI вход порт будет передан на этот выход.
- Резюме/Выход: Используйте стандартные кабели TS 1/8” (3.5 мм) для подключения этих выходов к дополнительным модульным устройствам. Сила отправит контрольный томtage (CV) и/или данные шлюза по этому соединению.
- Разъем для замка Kensington®: Вы можете использовать этот слот, чтобы прикрепить Force к столу или другой поверхности.
Передняя панель

- Слот для SD-карты: Вставьте стандартную карту SD/SDHC в этот слот, чтобы получить доступ к ее fileнапрямую используя Силу.
- Телефоны (1/4” / 6.35 мм): Подключите к этому выходу стандартные стереонаушники 1/4” (6.35 мм).
- Объем телефонов: Поверните эту ручку, чтобы отрегулировать громкость выход телефонов.
- Кий Микс: Поверните эту ручку, чтобы отрегулировать баланс между Master и 3/4 сигналы в наушниках. Мастер – это сигнал, посылаемый Основные выходы. 3/4 это сигнал, отправленный из Выходы 3/4.
Приложение
Технические спецификации

Технические характеристики могут быть изменены без предварительного уведомления.
Торговые марки и лицензии
Akai Professional является товарным знаком inMusic Brands, Inc., зарегистрированным в США и других странах.
Ableton — торговая марка Ableton AG.
Словесный товарный знак и логотипы Bluetooth являются зарегистрированными товарными знаками, принадлежащими Bluetooth SIG, Inc., и любое использование таких знаков компанией Akai Professional осуществляется по лицензии.
Kensington и логотип K & Lock являются зарегистрированными товарными знаками ACCO Brands.
SD и SDHC являются зарегистрированными торговыми марками SD-3C, LLC.
Все другие названия продуктов, названия компаний, товарные знаки или торговые наименования являются собственностью их соответствующих владельцев.
Этот продукт содержит технологии, которые используются по лицензии. Для получения дополнительной информации, пожалуйста, посетите akaipro.com/product-legal.
![]()
akaipro.com