Скачать
QUICKSTART GUIDE
ENGLISH ( 3 – 15 )
MANUAL DE INICIO RÁPIDO
ESPAÑOL ( 16 – 28 )
GUIDE D’UTILISATION RAPIDE
FRANÇAIS ( 29 – 41 )
GUIDA RAPIDA
ITALIANO ( 42 – 54 )
KURZANLEITUNG
DEUTSCH ( 55 – 67 )
Table of Contents for Alesis Performance Pad Pro:
-
5 TOP PANEL PHYSICAL LAYOUT 1 222 33 4 5 6 77 8 910 11 12 14 16 17 18 19 202122 23 24 25 26 14 14 14 14 15 12 13 3 2 2222 GENERAL CONTROLS 1. LCD – The display helps you keep track of system parameters and settings as you use the PerformancePad Pro. 2. PADS – The 8 pads are used to trigger sounds on the PerformancePad Pro. The pads can address 3 different types of sounds: drums, percussion and bass. To select which s
-
22 PAGE 12: OUTPUT Background The PerformancePad Pro includes one independent stereo output. This allows several output assignment options: Mono: Plug into one of the output pair jacks; the PerformancePad Pro is smart enough to know that plugging in one plug means you must want mono. Any pan settings are ignored. Do not plug into both outputs, or stereo will be activated. Stereo with Fixed Placement: Plug the left Main output into the left channel o
-
35 Removing a Fill from Your Song While in Record mode, there are two ways to remove a Fill from a Song: When the Fill step appears, press the A button for an A Pattern or press the B button for a B Pattern and the Fill will be removed. When the Fill step appears, press and hold the FILL button and press ERASE. Inserting a New Step Between Two Existing Song Steps 1. The PerformancePad Pro should be in Step Edit Mode. 2. Use the PAGE UP / DOWN buttons to select the step number that the inserted step should occupy.
-
41 Page 10 / CHECK AVAILABLE MEMORY (MEM FREE) This page shows the approximate amount of free memory available (expressed as a percentage of the total amount). It is important to check memory from time to time because the PerformancePad Pro always requires some free memory for proper operation. If the available memory falls below 15% or so, immediately save the PerformancePad Pro’s data as described below. Some operations may not be possible even if a small
-
30 EDITING PATTERNS – TRANSPOSITION Each Pattern on the PerformancePad Pro has a Pattern Transposition setting (0 by default). This setting allows you to quickly transpose the selected Pattern’s Bass content. The Pattern Transposition setting will be stored along with all other Pattern parameters once the Pattern is saved into memory (See “Editing Patterns – Save/Copy Functions” section for information on
-
12 THE INSTRUMENT LAYERS The PerformancePad Pro allows you to play three different kinds of sounds with the pads. These sounds are available in three different Play Modes or Banks. These are DRUM, PERC and BASS and are accessible by pressing the corresponding button on the top panel. DRUM – This Pad Play mode allows you to play up to twelve Drum sounds with the pads PERC – This Pad Play mode allows you to pla
-
37 LOOP A PATTERN INDEFINITELY In Song Perform mode, pressing and holding FILL until the end of a song step will cause that step to repeat. For example, you can use this feature if a soloist decides to take another few bars. START FROM THE MIDDLE OF A SONG You need not start a Song from the beginning each time; in Record mode, a Song can start at any Song step. 1. Make sure the PerformancePad Pro is in Record mode (Press the REC button), even if you don’t plan to record anyt
-
33 RECORDING A SONG IN REAL-TIME To record a sequence of Patterns in real-time, follow the steps below: 1. Switch to Pattern Mode (the display should say PATTERN) and select the first Pattern which you would like to use in your Song. Remember to specify A, B or FILL sub- pattern as well. 2. Press the PATTERN / SONG button again to switch back to Song Mode (the display should show SONG). 3. Press the REC
-
9 Throughout the text, button names are shown in UPPER CASE and words that appear on the display are shown in BOLD. When referring to a numbered step in a set of steps, the step number will be in parenthesis— for example, step (4)—to prevent confusion with Song steps or step edit mode. DISPLAY LAYOUT The LCD is divided into several «windows.» Each window contains informati
-
39 Page 4 / ASSIGN MIDI NOTE NUMBERS TO DRUM PADS (NOTE) This page allows you to specify which MIDI Note Number is associated with a given pad. This number describes both the MIDI Note which will trigger the pad when controlling the PerformancePad Pro externally, as well as the MIDI Note which will be sent out to other MIDI devices when the associated pad is struck. The display shows the note number/name in the upper left, and the drum pad number in the upper right window. 1. First, select which instru
-
4 CONNECTION DIAGRAM 1. Plug 1/4″ TS cables from the MAIN OUTPUTS to an amplifier, mixer, or speaker system. For mono sound, you can connect only one output. 2. Alternatively, you can connect a pair of 1/4″ TRS headphones to the PHONES OUTPUT to practice quietly. 3. Connect a MIDI device, such as a sampler or sound module, to the MIDI OUT of the PerformancePad Pro. 4. If you have 1/4″ TS footswitches,
-
31 First, you will need to make sure that you are in Pattern Mode (PATTERN should be displayed in the upper right corner of the screen). To enter Pattern Step Edit Mode, press the STEP EDIT button. The display now shows the beat and sub-beat. If a drum event exists on this beat/sub-beat, the display will also show the drum pad that played the event and the event volume. If more than one drum event occurs on the same sub-beat, the PAGE UP/DOWN buttons step forw
-
43 UNDERSTANDING RHYTHMIC NOTATION Measures A piece of music is divided into smaller units called measures (also called bars), and each measure is divided into beats. In the PerformancePad Pro, each beat is further sub-divided into 96 sub-beats. Rhythmic Values for Notes With a measure written in a 4/4 time signature, there are 4 beats per measure, and each beat represents a quarter (1/4) note. Thus, there are 4 quarter notes per measure of 4/4 music. With a 3/4 time signature the «numerator&qu
-
14 Conversely, if B Main is playing and you press Fill, after B Fill has played, the PerformancePad Pro will transition to the A Main Pattern. You can select the Fill at any time while the Main Pattern is playing. However, Fills do not have to be transitional Patterns. If you press the FILL button before the Fill has finished playing and hold it down until after the Fill has played (i.e., past th
Questions, Opinions and Exploitation Impressions:
You can ask a question, express your opinion or share our experience of Alesis Performance Pad Pro device using right now.
![]()
QUICKSTART GUIDE
ENGLISH ( 3 – 15 )
MANUAL DE INICIO RÁPIDO
ESPAÑOL ( 16 – 28 )
GUIDE D’UTILISATION RAPIDE
FRANÇAIS ( 29 – 41 )
GUIDA RAPIDA
ITALIANO ( 42 – 54 )
KURZANLEITUNG
DEUTSCH ( 55 – 67 )
QUICKSTART GUIDE (ENGLISH)
BOX CONTENTS
Please make sure the following items can be located in the box:
PerformancePad Pro
Power Adapter (12V DC 500mA)
Quickstart Manual
Reference Manual
Safety and Warranty Information
READ THE SAFETY AND WARRANTY INFORMATION BOOKLET BEFORE USING THIS PRODUCT!
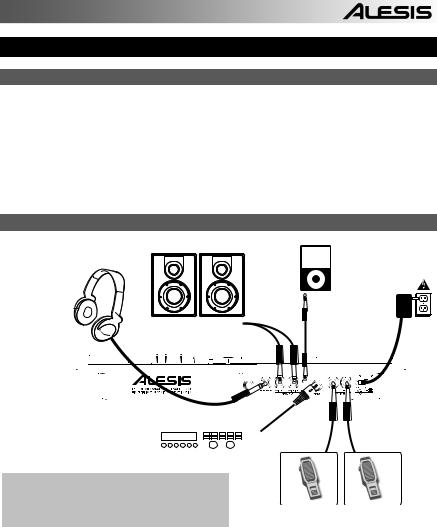
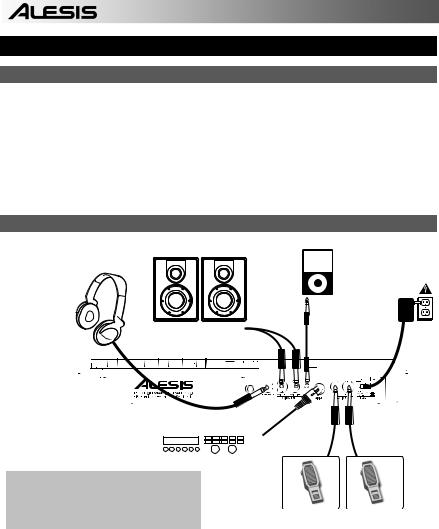
CONNECTION DIAGRAM
1
4
3
As you hook up the PerformancePad Pro, the volume control on your power amp and the PerformancePad Pro should be all the way down, and power to both units should be off.
1.Plug ¼” TS cables from the MAIN OUTPUTS to an amplifier, mixer, or speakesystem. For mono sound, you can connect only one output.
2.Alternatively, you can connect a pair of ¼” TRS headphones to the PHONES OUTPUT.
3.If you have 1/4″ TS footswitches, connect them to the Hi-Hat and Kick jacks.
4.Plug the included power adapter (12V DC 500mA) into the adapter jack and the adapter into a power source.
5.Press the POWER switch to turn on the unit.
6.Tap the pads to hear sounds. You can switch among the three different sound categories for the pads by pressing the corresponding button (DRUMS, PERC, BASS).
7.Adjust the volume control on the rear panel to a suitable listening level.
3
INTRODUCTION TO THE PerformancePad Pro
Welcome to the PerformancePad Pro Professional Drum Machine. The PerformancePad Pro allows you to quickly and easily program drum, percussion and bass sounds into rhythm Patterns and to turn these Patterns into Songs.
Let’s begin with a quick explanation of some of the key elements:
PATTERNS VS. SONGS
PATTERNS – When recording with a drum machine, it’s often easier to divide a song into shorter individual Patterns and work on these rather than record an entire song. A typical Pattern might be 8,16, or 32 beats long, and correspond to a verse, chorus, bridge, instrumental, intro, etc. Think of Patterns as the building blocks for your Songs. The PerformancePad Pro holds 100 Preset (i.e., can’t be edited) Patterns and 100 user-programmable Patterns, each of which can be from 1 to 128 beats long.
SONGS are collections of Patterns which are sequenced together. With the PerformancePad Pro, you can either program your patterns in the order in which they should be played, or you can select Patterns in real-time and the PerformancePad Pro will remember your performance.
THE 2 TYPES OF PATTERNS
Tip: To hear a demo song, hold [PATTERN / SONG] and press [PLAY].
The PerformancePad Pro introduces exciting new Song construction techniques. The PerformancePad Pro excels at live performance—something usually not associated with drum machines. The key to using these advanced features is to understand the different types of available Patterns.
PRESET Patterns provide a variety of rock, jazz, pop, and other rhythms programmed by professional drummers.
USER Patterns are Patterns you can program, edit, and save. The PRESET/USER button selects between these two master banks of Patterns. The only way to modify a Preset Pattern is to copy it to a User Pattern, where it can be edited.
THE 4 SUB-PATTERNS
There are 100 of each type of Pattern, numbered 00-99. However, each numbered Pattern actually contains four different «sub-Patterns»:
A pair of independent MAIN Patterns (A and B, selected by their respective buttons).
A pair of associated FILL Patterns (A Fill and B Fill, selected by pressing the FILL button when either A or B is selected). The Fills primarily provide transitional Patterns between Main Patterns, which makes for more realistic drum parts. The associated Fill Patterns share the same length, Drum Set, and name as their Main Patterns (e.g., if A is 16 beats, A Fill is 16 beats). Otherwise, they are independent.
The reason for pairing the two different A and B Patterns together is simply so that you can switch back and forth between them rapidly in live performance or while improvising.
4
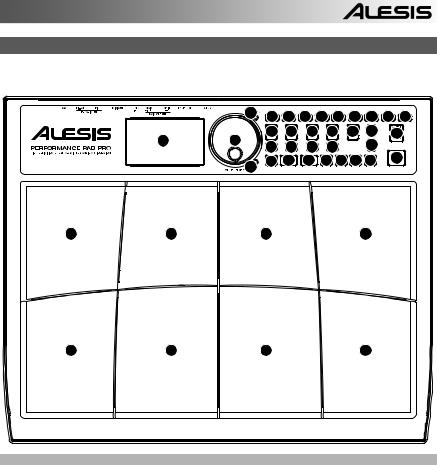
OVERVIEW OF THE CONTROLS
Now that we have introduced you to the infrastructure of the PerformancePad Pro, let’s dive in and take a closer look at some of the controls.
|
5 |
16 |
17 |
18 |
22 |
21 |
20 |
10 |
9 |
23 |
||
|
14 |
14 |
14 |
14 |
14 |
12 |
15 |
|||||
|
1 |
13 |
3 |
19 |
12 |
|||||||
|
3 |
3 |
||||||||||
|
26 |
24 |
25 |
7 |
7 |
8 |
11 |
4 |
||||
|
6 |
|||||||||||
GENERAL CONTROLS:
1.LCD – The display helps you keep track of system parameters and settings as you use the PerformancePad Pro.
2.PADS – The 8 pads are used to trigger sounds on the PerformancePad Pro. The pads can address 3 different types of sounds: drums, percussion and bass. To select which sounds are controlled by the pads, press one of the three Pad Play buttons (DRUM, PERC, BASS). In addition, the pads can be used to trigger entire Patterns while in Pattern Play Mode.
3.PAD PLAY BUTTONS – These 3 buttons select which sounds are triggered when you hit the pads. Press the corresponding button to control the following sounds with the pads:
BASS – Selects the Bass sounds associated with the current Drum Set. In addition, you can hold down this button and use the INC / DEC buttons or the VALUE dial to transpose the bass sounds up or down an octave.
DRUMS – Selects the Drum sounds associated with the current Drum Set. PERC – Selects the Percussion sounds associated with the current Drum Set.
4.TAP TEMPO – You can use this button to tap in a tempo. The PerformancePad Pro will average the time between successive taps and will derive a tempo. You can also change the tempo by holding down the TAP TEMPO button and using the VALUE dial, the INC / DEC buttons or entering a value with the numeric keypad.
5.TEMPO LED – This LED will blink at a rate equal to the tempo displayed on the screen’s bottom right corner.
6.REC LED – This LED will light when the PerformancePad Pro is recording. It will blink when you are required to confirm or cancel an action.
5

7.A & B – Each Pattern consists of two Main sub-patterns – A & B. You can select each of the two sub-patterns by pressing its corresponding button. These sub-patterns allow you to program variation in your Patterns (i.e. sub-pattern A is the verse, sub-pattern B is the chorus).
8.FILL – Each Pattern also includes two Fills associated with each of the two sub-patterns. The Fills are used to transition from one sub-pattern to another (i.e. transition from verse to chorus).
9.ERASE – This button allows you to erase Patterns or Songs. Hold this button down and the screen will prompt you to verify that you want to erase the selected element. To erase the part, press the REC button while the ERASE button is being held down. In addition, ERASE allows you to erase specific events in real-time as you compose your patterns. Simply hold down the ERASE button as the Pattern plays and press the pad corresponding to the sound you wish to erase. Any events assigned to the pad will be erased from the moment the pad is pressed until either the pad or the ERASE button is released.
10.SAVE / COPY – This button allows you to save, copy or append the selected Pattern or Song to a specific location, in addition to various other save / copy functions. The different functions can be accessed by pressing the PAGE UP button while holding down SAVE / COPY.
|
PATTERN |
SONG |
|||||||||
|
Saves the selected Pattern, along with all sub- |
Saves the selected Song to memory, |
|||||||||
|
patterns, to a specific location, overwriting any |
||||||||||
|
overwriting any data which may exist. |
||||||||||
|
data which may already exist. |
||||||||||
|
SAVE |
1. |
Press and hold SAVE / COPY. |
||||||||
|
1. Press and hold SAVE / COPY. |
||||||||||
|
2. Select the destination with the DATA dial |
||||||||||
|
2. |
Select the destination with the DATA dial |
|||||||||
|
or INC / DEC buttons. |
||||||||||
|
or INC / DEC buttons. |
||||||||||
|
3. |
Press REC to save. |
|||||||||
|
3. |
Press REC to save. |
|||||||||
|
Copies only the selected sub-pattern to the |
||||||||||
|
destination’s sub-pattern. |
||||||||||
|
1. |
Press and hold the SAVE / COPY button. |
|||||||||
|
2. |
Press PAGE RIGHT |
|||||||||
|
COPY |
3. |
Select the destination Pattern |
with |
the |
||||||
|
DATA dial or INC / DEC buttons. |
||||||||||
|
4. |
Press A, B or FILL to select the |
|||||||||
|
destination sub-pattern. |
||||||||||
|
5. |
Press REC to copy. |
|||||||||
|
Appends the current Pattern and all its sub- |
Appends the current Song to another Song. |
|||||||||
|
patterns to a selected Pattern. |
Note |
that |
||||||||
|
Note that the combined Song length cannot |
||||||||||
|
Patterns can only be appended to Patterns of |
||||||||||
|
exceed more than 254 steps. |
||||||||||
|
the same time signature. |
||||||||||
|
APPEND |
1. Press and hold the SAVE / COPY button. |
|||||||||
|
1. |
Press and hold the SAVE / COPY button. |
|||||||||
|
2. |
Press PAGE RIGHT. |
|||||||||
|
2. |
Press PAGE RIGHT twice. |
|||||||||
|
3. |
Select the destination with the DATA dial. |
|||||||||
|
3. |
Select the destination with the DATA dial. |
|||||||||
|
4. |
Press REC to append. |
|||||||||
|
4. |
Press REC to append. |
|||||||||
11.MUTE – This button allows you to mute a selected instrument layer. Hold down the button and press DRUM, PERC or BASS to mute the corresponding instrument layer. To un-mute the layer, press the corresponding button again while MUTE is being held down.
NAVIGATION BUTTONS:
12.INC / DEC – These buttons are used to increment and decrement through values and settings on the PerformancePad Pro.
13.VALUE DIAL – This dial can also be used to increment and decrement values and settings.
14.NUMBER BUTTONS – Alternatively, you may use the number buttons to input values.
15.PAGE UP / DOWN – These two buttons are used to go between pages of options when browsing menus and settings.
6

MODE BUTTONS:
16.PATTERN / SONG – This button toggles between the two different modes on the PerformancePad Pro. In Pattern Mode, you can play, record and edit individual patterns. Patterns are short (i.e. 8- beat, 16-beat, etc) rhythm sequences which are assembled together to create Songs. A Song is a sequence of Patterns. In Song Mode, you can perform or program your Patterns to create a Song. The currently-selected mode will be indicated on the display.
17.PRESET / USER – This button toggles between Preset and User Patterns. The selected mode will be indicated in the upper right corner of the display.
Preset Patterns provide a variety of rock, jazz, pop and other rhythms programmed by professional drummers and cannot be overwritten or edited (the only way a Preset Pattern can be edited is to copy it to a User Pattern).
User Patterns are Patterns you can program, edit and save as you wish.
18.STEP EDIT – Pressing this button enters Step Edit Mode for Pattern or Song editing, depending on which of the two modes is selected. This mode allows you to “step” through your Pattern or Song sequence to correct any mistakes. The display will indicate STEP EDIT while in Step Edit Mode, and the current step will be displayed on the top line. To move through the steps of the sequence, use the PAGE UP / DOWN buttons.
19.PTN PLAY – This button enables Pattern Play Mode. In this mode, you can play pre-selected Patterns in a sequence, using the pads to trigger the Patterns in real-time. See “Playing Patterns With the Pads” section.
SETUP BUTTONS:
20.SYSTEM SETUP – Pressing this button calls up various system settings and preferences, such as MIDI options, note assignments, and clocking. The display will indicate SYSTEM and SETUP when you are in System Setup. You can move between the different pages of settings with the PAGE UP / DOWN buttons and change the settings on the selected page with the VALUE dial or the INC / DEC buttons. To exit System Setup, press the System Setup button again.
21.RECORD SETUP – Pressing this button calls up various recording settings, such as Quantization, Swing, Pattern Length, Time Signature, etc. The display will indicate RECORD and SETUP while you are in Record Setup Mode. You can move between the different pages of settings with the PAGE UP / DOWN buttons and change the settings on the selected page with the VALUE dial or the INC / DEC buttons. To exit Record Setup, press the Record Setup button again.
22.DRUM SET – This button calls up the Drum Set Mode options, where you can select different drum/percussion sounds, bass sounds, change individual pad sounds and modify parameters such as Volume, Tuning, Panning, etc. The display will indicate DRUM SET while you are in Drum Set Mode. You can use the PAGE UP / DOWN buttons to move between the different pages of settings and you can use the VALUE dial or INC / DEC buttons to change the settings on the selected page. When you modify or customize a Drum Set, you will need to make sure that you save it (press the SAVE button, then press REC to confirm) in order to be able to access it later. To exit Drum Set Mode, press the Drum Set button again.
23.EFFECTS – This button calls up the Effects menu, where you can select the effects which are stored and recalled with every Drum Set. These effects include Reverb, EQ / Compression and feature ready-to-use presets. To move between the different pages in the Effects Menu, use the PAGE UP / DOWN buttons. You can use the VALUE dial or INC / DEC buttons to enable and disable the selected effect or to change the displayed settings.
TRANSPORT CONTROL BUTTONS:
24.PLAY – If the PerformancePad Pro is stopped, pressing PLAY will play the sequence from the current position. If the PerformancePad Pro is playing, pressing PLAY will pause the sequence. To go to the beginning of the current pattern (or current step if in Song Mode) press PAGE DOWN. To go to the beginning of the next pattern (or the next step if in Song Mode) press PAGE UP.
25.STOP – Press this button to stop the current sequence and go back to the start of the Pattern or Song. Quickly pressing STOP twice sends a MIDI Panic message to the internal voices of the PerformancePad Pro and to external devices connected via MIDI. A Panic message effectively stops all sounds which may be playing. This is useful in situations where a certain sound may be stuck and will not turn off.
26.REC – Press and hold this button before pressing PLAY to initiate recording. The REC button also functions as an ENTER command, when prompted for action by the display (for example, when erasing songs).
7
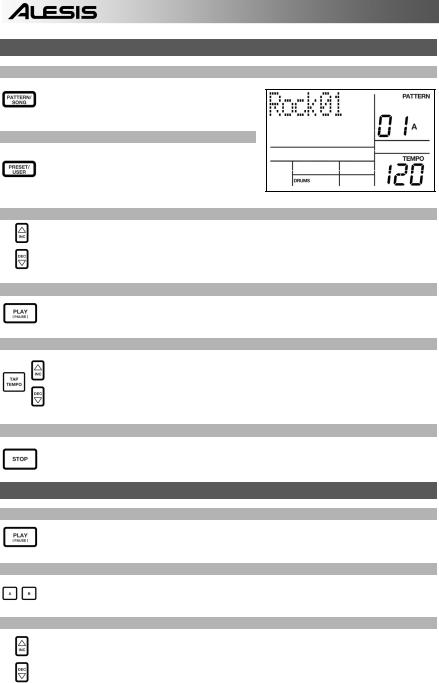
PLAYING PATTERNS
STEP 1
If the display’s upper right window shows SONG, press the PATTERN / SONG button once to select Pattern Mode.
STEP 2
If the display’s upper right window shows USER, press the PRESET / USER button once until USER disappears; this selects the Preset patterns.
STEP 3
Press the INC / DEC buttons or use the VALUE dial to select a Pattern. You can also enter a Pattern number (00-99) with the number buttons. Use a “leading zero” (i.e. 01, 02, 03) for the first nine Patterns.
STEP 4
Press PLAY to start the Pattern.
STEP 5
Adjust the tempo by holding the TAP TEMPO button and pressing the INC / DEC buttons or turning the VALUE dial. You may also tap in a new tempo with the TAP TEMPO button. The PerformancePad Pro will average the time between taps and derive the tempo accordingly.
STEP 6
Press STOP to stop the Pattern.
PLAYING SEQUENCES OF PATTERNS
STEP 1
Begin by selecting a Pattern and pressing PLAY.
STEP 2
If an A Pattern is playing, press the B button (or press A if a B pattern is playing). The alternate Pattern will begin playing as soon as the currently-selected Pattern reaches its end.
STEP 3
You can call up a different Pattern number while the PerformancePad Pro is playing. Press the INC / DEC buttons or use the VALUE dial to select a Pattern. You may also enter a Pattern number with the number buttons.
8
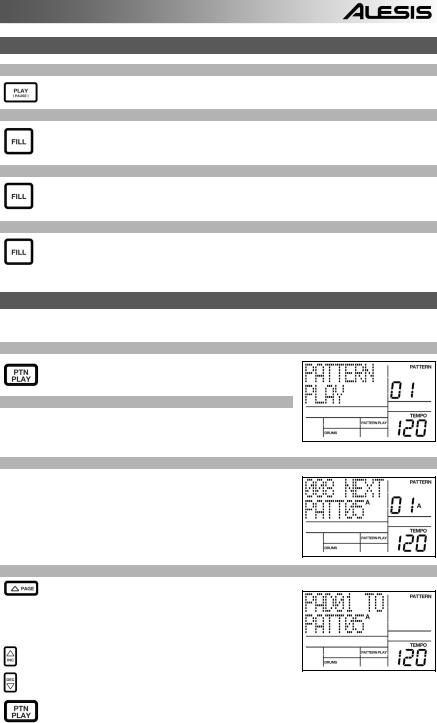
PLAYING FILLS
STEP 1
Begin by selecting a Pattern and pressing PLAY.
STEP 2
Press and release the FILL button while the main A Pattern is playing. You’ll hear a drum fill that leads right into the associated B Pattern.
STEP 3
Press the FILL button again. A different fill will transition from the B Pattern back into the A Pattern.
STEP 4
Fills do not always have to be transitional Patterns. Suppose an A Pattern is playing. If you press the FILL button, a fill will start – but this time, keep the FILL button held down until after the fill has finished playing. This cancels the transition to the alternate pattern (in this example, the A pattern would continue playing).
PLAYING PATTERNS WITH THE PADS
The PerformancePad Pro allows you to play sequences of Pattern by triggering Patterns with the pads. This mode is called Pattern Play Mode.
STEP 1
Press the PTN PLAY button – this will enter Pattern Play
Mode. The display will indicate PATTERN PLAY.
STEP 2
Try tapping a pad. The Pattern associated with the pad will begin playing. As the Pattern reaches its end, it will continue to loop from the beginning.
STEP 3
Now try hitting another pad. The Pattern associated with the pad will begin playing as soon as the previously selected Pattern reaches its end.
STEP 4
To change the Pattern assigned to a pad, press the
PAGE UP button.
Press the pad which you would like to modify.
Now use the VALUE dial, INC / DEC, or number buttons to select the Pattern to be triggered with the pad. You may also specify A, B or Fill for the selected Pattern.
Finally, press PTN PLAY again to exit the edit screen and continue performing.
9

RECORDING YOUR OWN PATTERNS
STEP 1
If the display’s upper right window shows SONG, press the PATTERN / SONG button once to select Pattern Mode (PATTERN will be displayed).
STEP 2
If the display’s upper right window does not show USER, press the PRESET / USER button once to select User Patterns (USER will be displayed in the upper right corner).
STEP 3
Press the INC / DEC buttons or use the VALUE dial or number buttons to select an empty Pattern. If the Pattern is empty, the display will read EMPTY PATT.
STEP 4
Press the RECORD SETUP button to enter the Record Setup Menu. This menu allows you to customize recording settings, such as Quantization and Swing, which will affect the way that your patterns are recorded. Alternatively, you may choose to use the default settings in which case you should skip to Step 8.
STEP 5
On Page 1 of the Record Setup (page is indicated in lower right corner of screen), you can select the Quantization interval with the INC / DEC buttons or the VALUE dial. Quantization shifts your playing to the specified beat while you play, so choose the desired value before playing out your rhythms. Choose higher quantization settings for more precise and rhythmically complex playing.
STEP 6
To go to the Swing setting, press the PAGE UP button twice so PAGE 3 (SWING SELECT) is displayed on the screen. The Swing setting imparts the kind of feel found in shuffles and some jazz tunes, by shifting the timing of pairs of equal-valued notes. Select the Swing setting with the INC / DEC buttons or the VALUE dial. Possible values are OFF, 54%, 58%, 62%.
STEP 7
Once you have selected your Swing and Quantization settings, exit the Record Setup menu by pressing the RECORD SETUP button again.
STEP 8
Now you are ready to start recording your Pattern. Press and hold the REC button, then press PLAY to begin recording. The REC LED will illuminate to let you know that you are recording.
10
![]()
STEP 9
You will hear a metronome sound and the top line of the screen will display the Pattern’s current Beat Number. Play the pads to the beat. As the Pattern loops, you can add more layers until you are satisfied. Note that the Quantization and Swing settings will affect how your pattern is recorded.
STEP 10
You can layer sounds from any of the three categories (Drums, Percussion, Bass) by pressing the corresponding button (DRUMS, PERC, BASS) and then playing out a sequence on the pads.
STEP 11
If you make a mistake while recording, you can erase the sound while the Pattern is looping by holding down ERASE then holding down the pad corresponding to the sound for the duration which you would like to erase.
STEP 12
Once you are satisfied with the Pattern you have recorded, press the STOP button to stop the recording.
STEP 13
To hear the Pattern, press the PLAY button.
STEP 14
To record more Patterns, select another Pattern with the INC / DEC buttons or VALUE dial, and repeat the procedure above.
MUTING INSTRUMENT LAYERS
The PerformancePad Pro allows you to mute any of its three instrument layers (drums, percussion, bass) in real-time.
For example, you can mute the drum track by holding down MUTE and then pressing DRUM. To un-mute the drums, press the DRUM button again while MUTE is being held down.
11
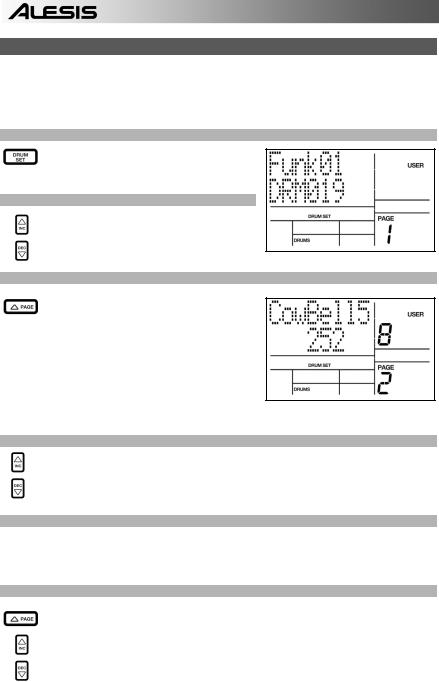
LOADING AND CREATING DRUM SETS
The PerformancePad Pro has 100 Preset and 100 Editable Drum Sets (groups of sounds). After pressing the DRUM SET button, you can use the INC / DEC buttons, the VALUE dial, or the number buttons to select a different set (each set can have its own sounds, tuning, volume, panning, etc). You may also edit individual pad sounds within each kit. In addition, you may also choose different Bass sounds for each kit.
STEP 1
Press the DRUM SET button to bring up the Drum Set Menu. You will see the screen shown on the right.
STEP 2
Use the INC / DEC buttons, the VALUE dial, or the number buttons to select a Drum Set (00-99).
STEP 3
Try hitting the pads to audition the sounds in the kit. To change a specific pad’s sound, press the PAGE UP button (page 2).
Press a pad to bring up its properties. The number of the pad will be indicated in the upper right corner of the display (8 in this example), the name of the sound assigned to the pad will be displayed on the top line (CowBell5 in this example) and the number of the sound will be displayed on the bottom line (252 in this example).
STEP 4
To switch the pad to a different sound, use the INC / DEC buttons, the VALUE dial, or the number buttons to select another sound.
STEP 5
To change the sounds of another pad, simply press the pad and repeat step 4.
STEP 6
While in Drum Set Mode, press the PAGE UP button to view other pages of parameters, such as Volume, Tuning, Panning, etc. for the selected pad.
Again, Use the INC / DEC buttons, the VALUE dial, or the number buttons to change the setting for the selected pad.
12

STEP 7
Note that Drums and Percussion sounds are grouped in each Drum Set. This means that changing the drum sounds to a different set on page 1 of the Drum Set menu will cause the Percussion sounds to change as well (although individual pad sounds may be replaced freely once a Drum Set has been loaded). You can, however, independently choose a different set of Bass sounds for the selected set. Press the BASS button while on page 1 of Drum Set Mode (if you have navigated to other pages, use the PAGE UP / DOWN buttons to return to page 1). You will see the screen shown on the right.
STEP 8
Now use the INC / DEC buttons, the VALUE dial or the number buttons to select a different set of bass sounds for the Drum Set you are currently editing. You can also view and edit a variety of settings for the bass sounds by using the PAGE UP / DOWN buttons to move between parameter pages.
STEP 9
Once you are happy with your Drum Set, you will need to save it, Otherwise, your settings will be lost once you turn off the unit. To save your set, press and hold the SAVE button. While holding down SAVE, use the INC / DEC buttons, the VALUE dial, or the number buttons to select the destination where you would like to save your Drum Set.
You will notice that the REC LED will being to blink, indicating that user input is required. To save the Drum Set to the selected destination, press the REC button.
STEP 10
To exit the Drum Set menus at any time, press the DRUM SET button once.
13

CREATING AND ERASING SONGS
The PerformancePad Pro can remember the order in which you selected Patterns, which variations were selected, and when you selected fills. Recording this information in PerformancePad Pro’s Song Mode creates a complete Song. Begin with the PerformancePad Pro stopped.
STEP 1
Select Song Mode by pressing the PATTERN /
SONG button so the display says SONG.
STEP 2
The display should say EMPTY SONG. If not, press the INC / DEC buttons (or use the VALUE dial) to select an empty song.
STEP 3
Choose a Pattern for Song step 1 by switching back to Pattern Mode (press SONG / PATTERN so PATTERN is displayed). User Patterns should not be selected for now, so if the display says USER, press PRESET / USER button so USER is no longer illuminated. Now, use the INC / DEC buttons or the VALUE dial to select the first pattern.
STEP 4
Press the PATTERN / SONG buttons to switch back to Song Mode (the display will show
SONG).
STEP 5
Press the REC button to enable Record Mode (the REC LED will illuminate). Now press the PLAY button to begin recording the Song. You will see the screen shown on the right. The first three-digit number (000 in this example) shows the current Song Step. The second three-digit number (005 in this example) shows the Beat Number of the currently selected Pattern. The Pattern selected for this step is shown on the second line (PATT 05 in this example). A, B or FILL will be shown as well, depending on which iteration of the Pattern has been chosen.
STEP 6
To select the Pattern which should be played next, use the INC / DEC buttons. Alternatively, you can use the VALUE dial or you can enter the Pattern number with the number keys. Remember to add a leading zero for patterns 0-9 (i.e. 00, 05, 09, etc). The screen will change to display NEXT and the cued Pattern number on the bottom line. The Pattern will begin playing as soon as the current Pattern plays through its end.
14
STEP 7
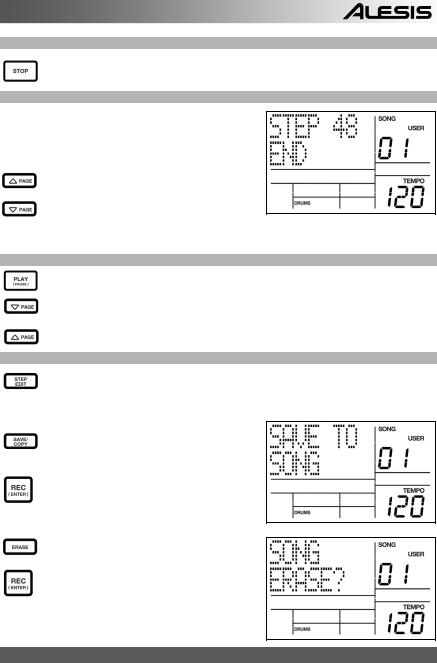
Once you have finished creating the sequence of Patterns for your Song, press the STOP button to stop the recording.
STEP 8
You will see the screen displayed on the right. The top line will indicate the last step of the Song (STEP 48 in this example) and the bottom line will say END.
To move between the steps, use the PAGE UP / DOWN buttons. Each step of the sequence will show the Pattern associated with it. If you have made any errors, you can correct them by selecting a different pattern for the step, using the INC / DEC buttons, the VALUE dial, or the number buttons.
STEP 9
To hear the sequence from the beginning (step 00), press the PLAY button.
To audition the sequence from the start of the currently selected step (indicated on the top line), press the PAGE DOWN button.
To audition the sequence from the start of the next song step, press the PAGE UP button.
STEP 10
If you are satisfied with the Song, great! Now you will need to save it so you can access it later. If you are in Step Edit Mode, press the STEP EDIT button once so the song name is displayed on the top line (it should display NO NAME unless the song has already been given a title).
To save the Song, press and hold the SAVE / COPY button. You will see SAVE TO SONG displayed on the screen and you will notice that the REC LED will begin to blink.
To confirm that you want to save the Song, press the REC button while holding down SAVE / COPY.
However, if you are not satisfied with the Song and wish to erase it, simply press and hold the ERASE button while in Song Mode. You will see SONG ERASE? displayed on the screen and the REC LED will begin to blink, indicating that user action is required. Press REC to erase the Song. If you change your mind, simply release the ERASE button and your Song will not be erased.
FACTORY RESET
To restore the PerformancePad Pro’s factory presets, hold the SAVE / COPY button and ERASE button simultaneously while turning on the PerformancePad Pro. (NOTE: This will erase all user data, including User Drum Sets, Patterns, Songs, etc.)
15
GUÍA DE INICIO RÁPIDO (ESPAÑOL)
CONTENIDO DE LA CAJA
Asegúrese de que la caja contenga los siguientes elementos:
•PerformancePad Pro
•Adaptador de alimentación (12 V CC 500 mA)
•Manual de inicio rápido
•Manual de referencia
•Información sobre la seguridad y la garantía
¡LEA EL FOLLETO DE INFORMACIÓN SOBRE LA SEGURIDAD Y LA GARANTÍA ANTES DE USAR ESTE PRODUCTO!
DIAGRAMA DE CONEXIÓN
1
4
3
Cuando se conecta la PerformancePad Pro, el control de volumen de su amplificador de potencia y de la PerformancePad Pro deben estar totalmente al mínimo y la alimentación de ambas unidades debe estar apagada.
1.Enchufe los cables TS de ¼” TS de las SALIDAS PRINCIPALES a un amplificador, mezclador o sistema de altavoces. Para obtener sonido monofónico, puede conectar una sola salida.
2.Como alternativa, puede conectar un par de auriculares TRS de ¼” a la SALIDA PARA AURICULARES.
3.Si tiene interruptores de pedal TS de ¼”, enchúfelos a los conectores de Hi-Hat y Kick.
4.Enchufe el adaptador de alimentación incluido (12V CC 500 mA) al jack para el adaptador y al suministro eléctrico.
5.Pulse el interruptor POWER para encender la unidad.
6.Dé golpecitos a los pads para escuchar los sonidos. Puede conmutar entre las tres categorías de sonido diferentes de los pads pulsando el botón correspondiente (DRUMS, PERC, BASS).
7.Ajuste el control de volumen del panel trasero a un nivel de escucha apropiado.
16

INTRODUCCIÓN A PerformancePad Pro
Bienvenido a la caja de ritmos profesional PerformancePad Pro. La PerformancePad Pro le permite programar rápida y fácilmente sonidos de tambores, percusión y bajo en patrones de ritmo y convertir estos patrones en temas musicales.
Comencemos por explicar rápidamente algunos de los elementos más importantes:
PATRONES Y TEMAS MUSICALES
PATRONES — Al grabar con una caja de ritmos, a menudo es más fácil dividir un tema en patrones individuales y trabajar sobre estos en vez de grabar toda el tema. Un patrón típico puede consistir de 8, 16 ó 32 beats de longitud, y corresponden a un verso, coro, puente, parte instrumental, introducción, etc. Imagine que los patrones son los bloques de construcción de sus temas musicales. La PerformancePad Pro contiene 100 patrones predeterminados (es decir que no se puede editar) y 100 patrones programables por el usuario, cada uno de los cuales puede ser de 1 a 128 beats de longitud.
Los TEMAS MUSICALES son grupos de patrones unidos en secuencia. Con la PerformancePad Pro, puede programar sus patrones en el orden en que se deben reproducir o seleccionarlos en tiempo real, en cuyo caso la PerformancePad Pro recuerda su interpretación.
LOS 2 TIPOS DE PATRONES
Consejo: Para escuchar un demo de la canción, mantenga [PATTERN / SONG] y pulse [PLAY].
La PerformancePad Pro introduce nuevas y excitantes técnicas de construcción de temas. Es excelente para las interpretaciones en vivo —algo que normalmente no se asocia a las cajas de ritmo. La clave para utilizar estas características avanzadas es entender los diferentes tipos de patrones disponibles.
Los patrones PREDETERMINADOS proporcionan una variedad de rock, jazz pop, y otros ritmos programados por bateristas profesionales.
Los patrones del USUARIO son patrones que usted puede programar, editar y guardar. El botón PRESET/USER selecciona entre estos dos bancos maestros de patrones. La única manera de modificar un patrón predeterminado es copiarlo a un patrón de usuario, donde se puede editar.
LOS 4 SUBPATRONES
Hay 100 de cada tipo de patrones, numerados del 00 al 99. Sin embargo, cada patrón numerado contiene en realidad cuatro “subpatrones” diferentes:
Un par de patrones independientes PRINCIPALES (A y B, seleccionados por sus botones respectivos).
Un par de patrones de RELLENO asociados (rellenos A y B, seleccionados al presionar el botón FILL cuando se seleccione ya sea A o B. Los rellenos principalmente proporcionan patrones de transición entre los patrones principales, que resulta en partes de batería más realistas. Los patrones de relleno asociados comparten la misma longitud, configuración de batería y nombre de sus patrones principales (por ej., si A es de 16 beats, el relleno A es de16 beats). En los demás aspectos, son independientes.
La razón de arreglar en pares los dos diferentes patrones A y B en conjunto es simplemente que se pueda conmutar hacia delante o hacia atrás entre ellos rápidamente en una ejecución en vivo o mientras improvisa.
17
DESCRIPCIÓN GENERAL DE LOS CONTROLES
Ahora que le hemos introducido en la infraestructura de la PerformancePad Pro, echemos un vistazo más detenido a algunos de los controles.
|
5 |
16 |
17 |
18 |
22 |
21 |
20 |
10 |
9 |
23 |
||
|
14 |
14 |
14 |
14 |
14 |
12 |
15 |
|||||
|
1 |
13 |
3 |
19 |
12 |
|||||||
|
3 |
3 |
||||||||||
|
26 |
24 |
25 |
7 |
7 |
8 |
11 |
4 |
||||
|
6 |
|||||||||||
CONTROLES GENERALES:
1.LCD – La pantalla le ayuda a mantener el seguimiento de los parámetros y valores de ajuste del sistema mientras usa la PerformancePad Pro.
2.PADS – Los 8 pads se usan para disparar sonidos en la PerformancePad Pro. Los pads pueden admitir 3 tipos de sonidos diferentes: tambores, percusión y bajo. Para seleccionar los sonidos a controlar con los pads, pulse uno de los tres botones de reproducción de pads (DRUM, PERC, BASS). Además, los pads se pueden usar para disparar patrones enteros en modo de reproducción de patrones.
3.BOTONES DE REPRODUCCIÓN DE PADS – Estos 3 botones seleccionan los sonidos que se disparan cuando usted golpea los pads. Pulse el botón correspondiente para controlar los siguientes sonidos con los pads:
BASS – Selecciona los sonidos de bajos asociados con la configuración de batería actual. Además, puede mantener pulsado el botón y usar los botones INC / DEC (Aumentar/Disminuir) o el cuadrante VALUE (Valor) para transponer los sonidos de bajo una octava hacia arriba o abajo.
DRUMS – Selecciona los sonidos de tambor asociados con la configuración de batería actual. PERC – Selecciona los sonidos de percusión asociados con la configuración de batería actual.
4.TAP TEMPO – Puede usar este botón para marcar un tempo. La PerformancePad Pro promedia el tiempo entre golpecitos sucesivos y deduce el tempo. También es posible cambiar el tempo manteniendo pulsado el botón TAP TEMPO y usando el cuadrante VALUE o los botones INC / DEC.
5.LED DE TEMPO – Este LED parpadea con una frecuencia igual al tempo mostrado en la esquina inferior derecha de la pantalla.
18

6.LED REC – Este LED se enciende cuando la PerformancePad Pro está grabando. Parpadea cuando se le requiere que confirme o cancele una acción.
7.A y B – Cada patrón consiste en dos subpatrones principales – A y B. Puede seleccionar cada uno de los dos subpatrones pulsando su botón correspondiente. Estos subpatrones le permiten programar variaciones en sus patrones (por ej., el subpatrón A es el verso y el B el coro).
8.FILL – Cada patrón incluye también dos rellenos asociados con cada uno de los dos subpatrones. Los rellenos se usan para hacer la transición entre un subpatrón y otro (por ej., transición de verso a coro).
9.ERASE – Este botón le permite borrar patrones o temas. Mantenga oprimido este botón y la pantalla le solicitará que verifique que desea borrar el elemento seleccionado. Para borrar la parte, pulse el botón REC mientras se mantiene oprimido el botón ERASE. Además, ERASE le permite borrar eventos específicos en tiempo real cuando compone sus patrones. Simplemente, mantenga oprimido el botón ERASE mientras se reproduce el patrón y presione el pad correspondiente al sonido que desea borrar. Todos los eventos asignados al pad se borran desde el momento en que se presiona el pad hasta que se suelta el pad o el botón ERASE.
10.SAVE / COPY (Guardar / Copiar) – Este botón le permite guardar, copiar o anexar el patrón o tema seleccionado a una ubicación específica, además de otras funciones diversas de copiar / guardar. Es posible acceder a las diferentes funciones pulsando el botón PAGE UP (RePág) mientras se mantiene pulsado SAVE / COPY.
|
PATRÓN |
TEMA |
||||||||
|
Guarda el patrón seleccionado, junto con todos |
Guarda el tema seleccionado en la memoria, |
||||||||
|
los subpatrones, en una ubicación específica, |
|||||||||
|
sobrescribiendo los datos que puedan |
|||||||||
|
sobrescribiendo todos los datos que puedan |
|||||||||
|
existir. |
|||||||||
|
existir. |
|||||||||
|
GUARDAR |
1. |
Pulse y retenga SAVE / COPY. |
|||||||
|
1. |
Pulse y retenga SAVE / COPY. |
||||||||
|
2. |
Seleccione el destino con el cuadrante |
||||||||
|
2. |
Seleccione el destino con el |
cuadrante |
|||||||
|
DATA o los botones INC / DEC. |
|||||||||
|
DATA o los botones INC / DEC. |
3. |
||||||||
|
3. |
Pulse REC para guardar. |
||||||||
|
Pulse REC para guardar. |
|||||||||
|
Copia sólo el subpatrón seleccionado en el |
|||||||||
|
subpatrón de destino. |
|||||||||
|
1. |
Presione y retenga el botón SAVE / |
||||||||
|
COPY. |
|||||||||
|
2. |
Pulse PAGE a la derecha. |
||||||||
|
COPIAR |
3. |
Seleccione el patrón de |
destino con |
el |
|||||
|
cuadrante DATA o los botones INC / |
|||||||||
|
DEC. |
|||||||||
|
4. |
Pulse A, B o FILL para seleccionar el |
||||||||
|
subpatrón de destino. |
|||||||||
|
5. |
Pulse REC para copiar. |
||||||||
|
Anexa el patrón actual y todos sus subpatrones |
Anexa el tema actual a otro tema. Tenga en |
||||||||
|
a un patrón seleccionado. |
Note |
que los |
|||||||
|
cuenta que la duración del tema combinado |
|||||||||
|
patrones se pueden anexar a patrones con la |
|||||||||
|
no puede exceder los 254 pasos. |
|||||||||
|
misma firma de tiempo. |
|||||||||
|
1. |
Presione y retenga el botón SAVE / |
||||||||
|
ANEXAR |
1. |
Presione y retenga el |
botón |
SAVE |
/ |
||||
|
COPY. |
|||||||||
|
COPY. |
|||||||||
|
2. |
Pulse PAGE a la derecha. |
||||||||
|
2. |
Pulse PAGE a la derecha dos veces. |
||||||||
|
3. |
Seleccione el destino con el cuadrante |
||||||||
|
3. |
Seleccione el destino con el |
cuadrante |
|||||||
|
DATA. |
|||||||||
|
DATA. |
|||||||||
|
4. |
Pulse REC para anexar. |
||||||||
|
4. |
Pulse REC para anexar. |
||||||||
11.MUTE (Silenciamiento) – Este botón le permite silenciar una capa de instrumentos seleccionada. Mantenga pulsado el botón y pulse DRUM, PERC o BASS para silenciar la capa de instrumentos correspondiente. Para anular el silenciamiento de la capa, pulse nuevamente el botón correspondiente mientras mantiene pulsado MUTE.
BOTONES DE NAVEGACIÓN:
12.INC / DEC – Estos botones se usan para incrementar y disminuir los valores y ajustes de la PerformancePad Pro.
13.CUADRANTE VALUE – Este cuadrante también se puede usar para incrementar y disminuir valores y ajustes.
14.BOTONES DE NÚMEROS – Puede usar como alternativa los botones de números para introducir valores.
15.PAGE (ARRIBA / ABAJO) – Estos dos botones se usan para cambiar de páginas de opciones mientras se navega por menús y ajustes.
19

BOTONES DE MODO:
16.PATTERN / SONG – Este botón conmuta entre los dos modos diferentes de la PerformancePad Pro. En modo Pattern (Patrón), puede reproducir, grabar y editar patrones individuales. Los patrones son breves secuencias de ritmos (de 8 beats, 16 beats, etc.) que se ensamblan para crear temas musicales. Un tema es una secuencia de patrones. En modo Song (Tema) puede interpretar o programar sus patrones para crear un tema musical. El modo seleccionado se muestra en la pantalla.
17.PRESET / USER – Este botón conmuta entre los patrones predeterminados y del usuario. El modo seleccionado se indica en la esquina superior derecha de la pantalla. Los patrones predeterminados proporcionan una variedad de ritmos de rock, jazz, pop y otros programados por bateristas profesionales y no se pueden sobrescribir o editar (la única manera para poder editar un patrón predeterminado es copiarlo a un patrón del usuario). Los patrones del usuario son patrones que usted puede programar, editar y guardar como desee.
18.STEP EDIT – Al pulsar este botón se entra al modo de edición por pasos para patrones o temas, según cuál de los dos modos esté seleccionado. Este modo le permite avanzar “por pasos” por la secuencia de su patrón o tema para corregir los posibles errores. La pantalla indica STEP EDIT cuando se está en modo de edición por pasos y el paso actual aparece en la línea superior. Para recorrer los pasos de la secuencia, use los botones PAGE hacia arriba o abajo.
19.PTN PLAY – Este botón activa el modo de reproducción de patrones. En este modo, puede reproducir los patrones preseleccionados en secuencia, usando los pads para disparar los patrones en tiempo real. Consulte la sección “Reproducción de patrones con los pads”.
BOTONES SETUP (DE CONFIGURACIÓN):
20.SYSTEM SETUP – Al pulsar este botón se invocan diversos parámetros y preferencias del sistema, tales como opciones MIDI, asignaciones de notas y temporización. Cuando está en modo de configuración del sistema, la pantalla indica SYSTEM y SETUP. Puede desplazarse entre las diferentes páginas de parámetros con los botones PAGE hacia arriba y abajo, y cambiar los valores en la página seleccionada con el cuadrante VALUE o los botones INC / DEC. Para salir de la configuración del sistema pulse el botón System Setup nuevamente
21.RECORD SETUP – Al pulsar este botón se invocan diversos parámetros, de la grabación, como cuantización, swing, duración de patrón, firma de tiempo, etc. Cuando está en modo de configuración de grabación, la pantalla indica RECORD y SETUP. Puede desplazarse entre las diferentes páginas de parámetros con los botones PAGE hacia arriba y abajo, y cambiar los valores en la página seleccionada con el cuadrante VALUE o los botones INC / DEC. Para salir de la configuración de grabación pulse el botón Record Setup nuevamente
22.DRUM SET – Este botón invoca las opciones del modo de configuración de batería, en el que puede seleccionar diferentes sonidos de tambores/percusión, sonidos de bajo, cambiar sonidos de pads individuales y modificar parámetros tales como volumen, afinación, panning, etc. Cuando está en modo de configuración de batería, la pantalla indica DRUM SET. Puede usar los botones PAGE hacia arriba o abajo para desplazarse entre las diferentes páginas de parámetros y el cuadrante VALUE o los botones INC / DEC para cambiar los valores en la página seleccionada. Cuando modifica o personaliza una configuración de batería, debe asegurarse de guardarla (pulse el botón SAVE y luego REC para confirmar) a fin de poder acceder a ella más adelante. Para salir del modo de configuración de batería, pulse el botón Drum Set nuevamente.
23.EFFECTS – Este botón activa el menú Effects (Efectos), donde puede seleccionar los efectos que se almacenan y recuperan cada configuración de batería. Estos efectos incluyen reverberación, ecualización / compresión y presets listos para usar. Para desplazarse entre las diferentes páginas del menú Effects, use los botones PAGE hacia arriba y abajo. Puede usar el cuadrante VALUE o los botones INC / DEC para activar y desactivar el efecto seleccionado o para cambiar los valores mostrados.
BOTONES DE CONTROLE DE TRANSPORTE:
24.PLAY – Si la PerformancePad Pro está detenida, al pulsar PLAY se reproduce la secuencia desde la posición actual. Si la PerformancePad Pro está reproduciendo, al pulsar PLAY se produce una pausa en la secuencia. Para ir al comienzo del patrón actual (o al paso actual si está en modo de tema) pulse PAGE ABAJO. Para ir al comienzo del siguiente patrón (o al paso siguiente si está en modo de tema) pulse PAGE ARRIBA.
25.STOP – Pulse este botón para detener la secuencia actual y volver al comienzo del patrón o tema. Si se pulsa STOP rápidamente dos veces, se envía un mensaje Panic MIDI a las voces internas de la PerformancePad Pro y a los dispositivos externos conectados vía MIDI. El mensaje Panic detiene efectivamente todos los sonidos que se puedan estar reproduciendo. Esto es útil en situaciones donde un cierto sonido puede quedar pegado y no se desactive.
26.REC – Pulse y retenga este botón antes de pulsar PLAY para iniciar la grabación. El botón REC también funciona como comando ENTER, cuando la pantalla le solicita acción (por ejemplo, cuando se borran temas).
20
![]()
CÓMO REPRODUCIR PATRONES
PASO 1
Si la ventana superior derecha de la pantalla muestra SONG (Tema), presione el botón PATTERN/SONG una vez para seleccionar el modo de patrón.
PASO 2
Si la ventana superior derecha de la pantalla muestra USER (Usuario), pulse el botón PRESET / USER una vez hasta que desaparezca —de esta forma se seleccionan los patrones predeterminados.
PASO 3
Pulse los botones INC / DEC o use el cuadrante VALUE para seleccionar un patrón. También puede introducir un número de patrón (00-99) con los botones numéricos. Use un “cero no significativo” (01, 02, 03) para los primeros nueve patrones.
PASO 4
Pulse PLAY para iniciar el patrón.
PASO 5
Ajuste el tempo manteniendo oprimido el botón TAP TEMPO y pulsando los botones INC / DEC o girando el cuadrante VALUE. También puede marcar un nuevo tempo con el botón TAP TEMPO. La PerformancePad Pro promedia el tiempo entre golpecitos y calcula el tempo en consecuencia.
PASO 6
Pulse STOP para detener el patrón.
CÓMO REPRODUCIR SECUENCIAS DE PATRONES
PASO 1
Comience seleccionando un patrón y pulse PLAY.
PASO 2
Si está tocando un Patrón A, pulse el botón B (o pulse A si está tocando un patrón B). El patrón alternativo comenzará a reproducir en cuanto termine el patrón actualmente seleccionado.
PASO 3
Puede activar un número de patrón diferente mientras la PerformancePad Pro está reproduciendo. Pulse los botones INC / DEC o use el cuadrante VALUE para seleccionar un patrón. Puede introducir también un número de patrón con los botones numéricos.
21
 Loading…
Руководства Alesis Performance Pad Pro Размер файлов: 9683 KB, Язык: English, Формат: pdf, Платформа: Windows/Linux, Дата: 2015-11-11
На данной странице вы можете скачать руководства Alesis Performance Pad Pro. Мы предлагаем вам ознакомиться с руководством пользователя, инструкцией по сервисному обслуживанию и ремонту.
Также здесь вы найдете список заказных номеров на комплектующие Alesis Performance Pad Pro.
Все файлы предоставляются исключительно в ознакомительных целях. И не являютя руководством по ремонту, а направлены лишь на то чтобы помочь вам более детально ознакомиться с принципом построения устройства.
Содержимое представленных здесь руководств требуют от вас знания технического английского языка.
Если вы собираетесь скачать руководство по сервисному обслуживанию Alesis Performance Pad Pro, иными словами сервис мануал, вы дожны обладать хотя бы минимальными познаниями в области электроники и пониманием базовых принципов работы электромеханических устройств.
Для просмотра руководств вам понадобится Adobe Acrobat Reader версии 9 и выше либо другая программа для просмотра pdf файлов.
В связи с популярностью информации представленной на сайте и ее бесплатного предоставления конечному пользователю, убедительная просьба использовать специальные программные продукты для многопотокового скачивания файлов.
Руководства для Alesis Performance Pad Pro
- Руководство пользователя (User manual)
- Руководство по сервисному обслуживанию (Service manual)
- Руководство по ремонту (Repair manual)
- Перечень комплектующих (PartList)
-
Alesis PERFORMANCE PAD PRO — page 1
QUICKSTART GUIDE ENGLISH ( 3 – 15 ) MANUAL DE INICIO RÁ PIDO ESPAÑOL ( 16 – 28 ) GUIDE D’UTILISATION RAPIDE FRANÇAIS ( 29 – 41 ) GUIDA RAPIDA ITALIANO ( 42 – 54 ) KURZANLEITUNG DEUTSCH ( 55 – 67 ) …
-
Alesis PERFORMANCE PAD PRO — page 2
…
-
Alesis PERFORMANCE PAD PRO — page 3
3 QUICKSTART GUIDE (ENGLISH) BOX CONTENTS Please make sure the following items c an be located in the box: PerformancePad Pro Power Adapter (12V DC 500mA) Quickstart Manual Reference Manual Safety and W arranty Inform ation READ THE SAFETY AND WARRANTY INFORMAT I ON BOOKLET BEFORE USING THIS PRODUCT! CONNECTION DIAG RAM 1. Plug …
-
Alesis PERFORMANCE PAD PRO — page 4
4 Tip: To hear a demo song, hold [PATTERN / SO NG] and press [PLAY]. INTRODUCTION TO THE PerformancePad Pro Welcome to the PerformancePad Pro Professional Dr um Machine. The Perfor mancePad Pro al lows you to quickly and easily program drum, percussion and bass s ounds into rhythm Patterns and to turn these Patterns into Songs. Let’s begin with a …
-
Alesis PERFORMANCE PAD PRO — page 5
5 OVERVIEW OF THE CONTROLS Now that we have introduced you to the infrastructure of the PerformancePad Pro , let’s dive in and take a closer look at so me of the con trols. 1 22 2 33 4 5 6 77 8 9 10 11 12 14 16 17 18 19 20 21 22 23 24 25 26 14 14 14 14 15 12 13 3 2 22 2 2 GENERAL CONTROLS: 1. LCD – The display helps you keep track of system par …
-
Alesis PERFORMANCE PAD PRO — page 6
6 7. A & B – Each Pattern consists of tw o Main sub-patterns – A & B. Y ou can select each of the two sub-patterns by pressing its corresponding button. These sub-patterns allow you to program variation in your Patter ns (i.e. sub-pattern A is the verse, sub-patte rn B is the chorus). 8. FILL – Each Pattern also includes two Fills ass …
-
Alesis PERFORMANCE PAD PRO — page 7
7 MODE BUTTONS: 16. PATTERN / SONG – This button toggles betw een the two different modes on the Per formancePad Pro. In Pattern Mode, you can play, record and edi t indiv idual patterns. Patterns are short (i.e. 8- beat, 16-beat, etc) rhythm sequences which are assembled together to crea te Songs. A Song is a sequence of Patterns. In Song Mode, …
-
Alesis PERFORMANCE PAD PRO — page 8
8 PLAYING PATTERNS STEP 1 If the display’s upper right window shows SONG , press the PATTERN / SONG button once to select Pattern M ode. STEP 2 If the display’s upper right window shows USER , press the PRESET / USER button once until USER disappears; this selects the Preset patterns. STEP 3 Press the INC / DEC buttons or use the VALUE dial to …
-
Alesis PERFORMANCE PAD PRO — page 9
9 PLAYING FILLS STEP 1 Begin by selecting a Pa ttern and pressing PLA Y. STEP 2 Press and release the FILL button while the main A Pattern is playing . You’ll hear a drum fill that leads right into the associated B Pattern. STEP 3 Press the FILL button again. A di fferent fill will transition from the B Pa ttern back into the A Pattern. STEP 4 Fi …
-
Alesis PERFORMANCE PAD PRO — page 10
10 RECORDING YOUR OW N PATTERNS STEP 1 If the display’s upper right window shows SONG , press the PATTERN / SONG button o nce to select Pattern Mode ( PATTERN will be displayed). STEP 2 If the display’s upper right window d oes not show USER , press the PRESET / USER button once to select User Patterns ( USER will be displayed in the upper righ …
-
Alesis PERFORMANCE PAD PRO — page 11
11 STEP 9 You will hear a metronome sound and the top line of the screen will display the Patte rn’s current Beat Number. Play the pads to the beat. As the Pattern loops, you can add more layers until you are satisfied. Note that the Quantization and Swing settings will affect how your pattern is recorded. STEP 10 You can layer sounds from any of …
-
Alesis PERFORMANCE PAD PRO — page 12
12 LOADING AND CREA TING DRUM SETS The PerformancePad Pro has 100 Preset and 100 Edit able Drum Sets (groups of sounds). After pressing the DRUM SET button, yo u can use the INC / DEC buttons, the VALUE dial, or the number buttons to select a different set (each set can have its ow n sounds, tuning, volume, panning, e tc). You may also edit individ …
-
Alesis PERFORMANCE PAD PRO — page 13
13 STEP 7 Note that Drums and Percussion sounds are grouped in each Drum Set. This means that changing the drum sounds to a differ ent set on page 1 of the Drum Set menu will cause the Percussion sounds to change as well (although individual pad sounds may be replaced freely once a Drum Set has been loaded). You can, however, independently choos e …
-
Alesis PERFORMANCE PAD PRO — page 14
14 CREATING AN D ERASI NG SONGS The PerformancePad Pro can remember the order in wh ich you selected Patterns, which vari ations were selected, and when you selected fills. Recording th is information in Performa ncePad Pro’s Song Mode creates a complete Song. Begin wi th the PerformancePad Pro stopped. STEP 1 Select Song Mode by pressing the PAT …
-
Alesis PERFORMANCE PAD PRO — page 15
15 STEP 7 Once you have finished creating the sequence of Pa tterns for your Song, press the STOP button to stop the recording. STEP 8 You will see the screen displayed on the right. The top line will indicate t he last step of the Song ( STEP 48 in this example) and the bottom line will say END . To move between the steps, use the PAGE UP / DOWN b …
-
Alesis PERFORMANCE PAD PRO — page 16
16 GUÍA DE INICIO RÁPIDO (ESPAÑOL) CONTENIDO DE LA CAJA Asegúrese de que la caja contenga los siguientes elementos: • PerformancePad Pro • Adaptador de alimentación (12 V CC 500 mA) • Manual de inicio rápido • Manual de referencia • Información sobre la s eguridad y la garantía ¡LEA EL FOLLETO DE INFORMACIÓN SOBRE LA SEGURIDAD Y …
-
Alesis PERFORMANCE PAD PRO — page 17
17 Consejo: Para escuchar un demo de la canción, mantenga [PATTERN / SONG] y pulse [PLAY]. INTRODUCCIÓN A PerformancePad Pro Bienvenido a la caja de ritmos profes ional Performa ncePad Pro. La PerformancePad Pro le permi te programar rápida y fácilmente sonidos de tambores, perc usión y bajo en patrones de ritmo y convertir estos patrones en t …
-
Alesis PERFORMANCE PAD PRO — page 18
18 DESCRIPCIÓN GENERAL DE LOS CONTRO LES Ahora que le hemos introducido en l a infraestructur a de la PerformancePad Pro, echemos u n vistazo más detenido a algunos de los con troles. 1 22 2 33 4 5 6 77 8 9 10 11 12 14 16 17 18 19 20 21 22 23 24 25 26 14 14 14 14 15 12 13 3 2 22 2 2 CONTROLES GENERALES: 1. LCD – La pantalla le ayuda a mantener …
-
Alesis PERFORMANCE PAD PRO — page 19
19 6. LED REC – Este LED se enciende cuando la Perfor mancePad Pro está grabando. Parpadea cuando se le requiere que confi rme o cancele una acción. 7. A y B – Cada patrón consiste en dos subpatrones principales – A y B. Pu ede seleccionar cada uno de los dos subpatrones pulsando su botón corres pondiente. Estos subpatrones le permi ten p …
-
Alesis PERFORMANCE PAD PRO — page 20
20 BOTONES DE MODO: 16. PATTERN / SONG – Este botón conmuta entre los d os modos diferentes de la PerformancePad Pro. En modo Pattern (Patrón), puede reprod ucir, grabar y editar patrones indivi duales. Los patrones son bre ves secuencias de ritmos (de 8 beats, 16 beats, e tc.) que se ensamblan par a crear temas musicales. Un tema es una secuen …
-
Alesis PERFORMANCE PAD PRO — page 21
21 CÓMO R EPRODUC IR PAT RONES PASO 1 Si la ventana superior derecha de la panta lla muestra SONG (Tema), presione el botón PATTERN/SONG una vez para seleccionar el modo de patrón. PASO 2 Si la ventana superior derecha de la panta lla muestra USER (Usuario), pulse el botón PRESET / USER una vez hasta que desaparezca —de esta forma se seleccio …
-
Alesis PERFORMANCE PAD PRO — page 22
22 CÓMO REPR ODUCIR RELLENO S PASO 1 Comience seleccionando un patrón y pulse PLAY . PASO 2 Presione y suelte el botón FILL (relleno) mientras se está reproduciendo el patrón principal A. Escuchará un relleno de ba tería que conduce directa mente al patrón B correspondiente. PASO 3 Presione el botón FILL otra vez. Un relleno di feren te re …
-
Alesis PERFORMANCE PAD PRO — page 23
23 CÓMO GRABAR SUS PROPIOS PATRONES PASO 1 Si la ventana superior derecha de la pan talla muestra SONG (Tema), presione el botón PATTERN/SONG una vez para seleccionar el modo de patrón (ap arece PATTERN ). PASO 2 Si en la ventana superior derecha de la pantalla no aparece USER , pulse el botón PRESET / USER una vez para seleccionar los patrones …
-
Alesis PERFORMANCE PAD PRO — page 24
24 PASO 8 De esta forma queda listo para comenzar a gr abar su patr ón. Pulse y retenga el bo tón REC y pulse PLAY para iniciar la grabación. Se ilumina el LED REC para hacerle saber que está grabando. PASO 9 Escuchará un sonido de metrónomo y la línea superior de la pantalla mostrará el número de beat actual del patrón . Toque los pads d …
-
Alesis PERFORMANCE PAD PRO — page 25
25 CÓMO CARGAR Y C REAR CONFIGURACIO NES DE BATERÍA La PerformancePad Pro cuenta con 100 confi g uraciones de batería (grupo de sonidos) predeterminados y 100 editables. Después de pulsar el botón DRUM SET, puede usar los boto nes INC / DEC, el cuadrante VALUE o los botones de númer os para seleccionar una configuración diferente (cada confi …
-
Alesis PERFORMANCE PAD PRO — page 26
26 PASO 7 Tome nota de que los sonidos de tambores y percusión se agrupan en cada configuración de batería. Esto significa que cambiar lo s sonidos de tambores a un conjunto di ferente en la página 1 del menú Drum Set causa que los sonidos de percusión cambien también (si bien los sonidos de pads individuales se pueden reemplazar libremente …
-
Alesis PERFORMANCE PAD PRO — page 27
27 CÓMO CREAR Y BORRAR TEMAS La PerformancePad Pro puede recordar el orden en que el usuario seleccionó los patrones, qué variaciones fueron seleccionadas y cuándo se seleccionaron los rellenos. Al grabarse esta información en el modo de canción de PerformancePad Pro, se crea un tema c ompleto. Comience con la PerformancePad Pro detenida . PA …
-
Alesis PERFORMANCE PAD PRO — page 28
28 PASO 7 Una vez que termine de crear la secuencia de patrones de su tema, pulse el botón STOP para detener la gra bación. PASO 8 Verá la pantalla ilustrada a la derecha. La línea superior indica el último paso del tema ( STEP 48 en este ejemplo) y la línea in ferior indicará END (Fin) . Para desplazarse entre los pasos, use los botones PAG …
-
Alesis PERFORMANCE PAD PRO — page 29
29 GUIDE D’UTILISATION RAPIDE (FRANÇAIS) CONTENUE DE LA BOÎT E Assurez-vous que tous les arti cles énu mérés ci-dessous se retrouven t dans la boîte : PerformancePad Pro Bloc d’alimentation (12 V CA 500 mA) Guide d’utilisation simplifié Guide de référence Consignes de sécurité et in formation sur la garan tie …
-
Alesis PERFORMANCE PAD PRO — page 30
30 Conseil: Pour écouter un morceau de démo, maintenez [PATTERN / SONG] et appuyez sur [PLAY]. INTRODUCTION AU PerformancePad Pro Voici la boîte à rythmes professionnelle Performanc ePad Pro. La PerformancePad Pro vous pe rmet de programmer rapidement et facilement des sons de batterie, percussion et de grosse cai sse dans enchaînements rythmi …
-
Alesis PERFORMANCE PAD PRO — page 31
31 SURVOL DES COMMANDES Maintenant que nous vous avons pr ésenté l’infrastructur e du PerformancePad Pro, nous regarderons les commandes de plus près. 1 22 2 33 4 5 6 77 8 9 10 11 12 14 16 17 18 19 20 21 22 23 24 25 26 14 14 14 14 15 12 13 3 2 22 2 2 COMMANDES PRINCIPALES : 1. ACL – L’écr an d’affichage vous permet de garder un oeil sur …
-
Alesis PERFORMANCE PAD PRO — page 32
32 7. A et B – Chaque enchaînement est fait de deux sous enchaînements princip aux, A et B. Vous pouvez sélectionner chacun des deu x sous enchaînemen ts en appuyant sur la tou che correspondante. Ces s ous enchaînements vous perme ttent d’ajouter des variations dans vos ench aînements (par exemple, l e sous enchaînement A est le coup …
-
Alesis PERFORMANCE PAD PRO — page 33
33 TOUCHES DES MODES : 16. PATTERN/SONG – Cette touche permet d’alterner entre les deux modes différents du PerformancePad Pro. En Pattern Mode, il est possible des faire la lecture, enregis trer et de modifier des enchaînements individuels. Les enchaînements sont de courtes séquences rythmiques (par exemple, 8 mesures, 16 mesures, etc.) …
-
Alesis PERFORMANCE PAD PRO — page 34
34 TOUCHES DE DÉFILEMENT : 24. PLAY — If the PerformancePad Pro is stopped, pressing PLAY will play the sequence from the curr ent position. Si le PerformancePad Pro est en cours de lect ure et que la touche PLAY est en foncée, la séquence sera pausée. Pour retourn er au début de l’enchaînement en cours (ou étape en cours si v ous êtes en …
-
Alesis PERFORMANCE PAD PRO — page 35
35 UTILISATION DE SÉQUENCES D’ENCHAÎNE MENTS ÉTAPE 1 Commencez par sélectionner un enchaînemen t et en appuyant ensuite sur la touche PLAY. ÉTAPE 2 Si un enchaînement A joue, appuyez sur la touche B (ou A si c’est un enchaînement B qui joue). L’enchaînement d’alternance commence à jouer aussitôt que l’enchaîn ement en cours se …
-
Alesis PERFORMANCE PAD PRO — page 36
36 ÉTAPE 3 Frappez un autre pad. L’enchaînement assigné au pad commencera à jouer dès que l’enchaînement précédent tire à sa fin. ÉTAPE 4 Pour modifier l’enchaînement assigné à un pad, appuyez sur la touche PAGE HAUT. Appuyez sur le pad que vous désirez modifier. Maintenant, utilisez la molette VALUE, les touches INC/DEC ou l …
-
Alesis PERFORMANCE PAD PRO — page 37
37 ÉTAPE 5 Sur la page 1 (indiqué dans le coin inférieur droit de l’écran) du menu de configuration d’e nregistrement (Record Setup), vous pouvez sélectionner l’intervalle de quantification à l’aide des touches INC/DEC ou de la molette VALUE . La quantifica tion modifie le son au rythme spécifié lorsque vous jouez, alors il est pré …
-
Alesis PERFORMANCE PAD PRO — page 38
38 ÉTAPE 12 Une fois satisfait avec l’ enchaînement que vous av ez enregistré, appuyez sur la touche STOP afin de faire arrêter l’enregistrement. ÉTAPE 13 Pour écouter l’enchaînemen t, appuyez sur la touche P LAY. ÉTAPE 14 Pour enregistrer d’autres enchaînements, sélectionnez un aut re enchaînem ent à l’aide des touches INC/DE …
-
Alesis PERFORMANCE PAD PRO — page 39
39 ÉTAPE 4 Pour changer le son du pad, utilisez les touches INC/DEC, la molette VALUE, ou encore les touches numérotées afin de séle ctionner un son différen t. ÉTAPE 5 Pour changer les sons d’un autre pad, appuyez si mplement sur le pad et répétez l’é tape 4. ÉTAPE 6 Depuis le mode Drum Set, appuyez sur la t ouche PAGE HAUT afin de v …
-
Alesis PERFORMANCE PAD PRO — page 40
40 LA COMPOSITIO N ET LA SUPPRES SION DE CHANSO NS Le PerformancePad Pro peut mémoriser l’ordre des enc haînements sélectionnés, quelles variations on t été sélectionnées et où vous avez pl acé des sons de remplissage. L’enr egistrement d e cette information en mode Song dans le PerformancePad Pro pe rmet de composer une chanson co …
-
Alesis PERFORMANCE PAD PRO — page 41
41 ÉTAPE 7 Une fois satisfait avec la séquence d’enchaînement que vous avez enregistré pour votre chanson, appuyez sur la touc he STOP afin de faire arrêter l’enreg istrement. ÉTAPE 8 La fenêtre de droite s’affiche. La première ligne indique la dernière étape de la chanso n ( STEP 48 , dans cet exemple) et la dernière ligne indique …
-
Alesis PERFORMANCE PAD PRO — page 42
42 GUIDA RAPIDA (ITALIANO) CONTENUTI DELL A CONFEZIONE Assicurarsi che tutti gli elementi el encati di segui to si trovino nella confezione: PerformancePad Pro Adattatore di alimentazione (12V CC 500mA) Manuale rapido Manuale di riferimento Istruzioni di sicurezza e garanzia PRIMA DI UTILIZZARE IL PRODOTTO, LEGGE RE ATTENTAMENTE …
-
Alesis PERFORMANCE PAD PRO — page 43
43 Nota bene: Per ascoltare un demo di canzoni, hold [PATTERN / SONG] e premere [PLAY]. INTRODUZIONE ALL’ Performance Pad Pro Benvenuti alla Drum Machine Professionale Per formancePad Pro. L’PerformancePad Pro pe rmette di programmare rapidamente e con facilità suoni di ba tt erie, percussioni e bassi in pattern ritm ici e di trasformare tali …
-
Alesis PERFORMANCE PAD PRO — page 44
44 PANORAMICA DE I COMANDI Ora che vi abbiamo introdotto all’infra struttura dell’PerformancePad Pro, tuffiamoci più in profondità e osserviamo più da vicino alcuni dei comandi. 1 22 2 33 4 5 6 77 8 9 10 11 12 14 16 17 18 19 20 21 22 23 24 25 26 14 14 14 14 15 12 13 3 2 22 2 2 COMANDI GENERALI: 1. LCD – Il display vi aiuta a tenere d’occ …
-
Alesis PERFORMANCE PAD PRO — page 45
45 6. LED REC – Questo LED si accende quando l’PerformancePad Pro sta registrando . Lampeggerà quando è necessario confermare o ann ullare un’azione. 7. A & B – Ogni Pattern è composto da due sub-pattern principali: A & B. Si può selezionare ciascuno dei due sub-pattern premendo il puls ante corrispondente. Questi sub-pattern vi …
-
Alesis PERFORMANCE PAD PRO — page 46
46 TASTI MODE (MODALITÀ) : 16. PATTERN / CANZONE (SO NG) – Questo tasto commuta tra le due moda lità sull’PerformancePad Pro. In modalità Pattern si possono suonare, registrare e modific are pattern singoli. I pattern sono brevi (cioè 8 battiti, 16 battiti, ecc.) sequenze ritmiche che vengon o unite a creare canzoni. Una Canzone è u na seq …
-
Alesis PERFORMANCE PAD PRO — page 47
47 RIPRODUZIONE DI PAT TERN FASE 1 Se la finestra superiore destra del display mostra la scritta SONG , premere il tasto PATTERN / SONG una volta per selezionare la modalità Pattern. FASE 2 Se la finestra superiore destra del display mostra la scritta USER , premere il tasto PRESET / USER una volta fino a quando la scritta USER non scompare: così …
-
Alesis PERFORMANCE PAD PRO — page 48
48 RIPRODUZIONE DI FILL FASE 1 Iniziare selezionando un Pattern e premendo PLAY. FASE 2 Premere e rilasciare il tasto FILL mentre il pattern A princip ale viene riprodotto. Si sentirà un fill di batteria che porta direttamente al p attern B associato. FASE 3 Premere nuovamente il tasto FILL. Un fill diverso transiterà dal pattern B tornando al pa …
-
Alesis PERFORMANCE PAD PRO — page 49
49 REGISTRAZIONE DI PA TTERN PERSONALIZZATI FASE 1 Se la finestra superiore destra del display mostra SONG , premere una volta il tasto PATTERN / SONG per selezionare la modalità Pattern ( PATTERN apparirà a display). FASE 2 Se la finestra superiore destra del display non mostra USER , premere una volta il tasto PRESET / USER per selezionare “U …
-
Alesis PERFORMANCE PAD PRO — page 50
50 FASE 8 Ora siete pronti a registrare il vostro pa tte rn. Premere e tenere premuto il tasto REC, quindi premere PLAY per iniziare a registrare. Il LED REC si illuminerà per farvi sapere che state registrando. FASE 9 Si sentirà il suono di un metronomo e la linea superiore dello schermo mostrerà il numero di battiti correnti del pattern. Suona …
-
Alesis PERFORMANCE PAD PRO — page 51
51 CARICARE E CREARE DR UM SET L’PerformancePad Pro è dotato di 10 0 Drum Set pre definiti (Preset) e di 100 Drum Set modificabili (gruppi di suoni). Dopo aver premuto il tasto DRUM SET, si possono utilizzare i tasti INC / DEC, la rotella VALUE o i tasti numerici per selezionare un set diverso (ogni set può avere i propri suoni, intonazioni, vo …
-
Alesis PERFORMANCE PAD PRO — page 52
52 FASE 7 Va notato che i suoni di Batteria e Percussioni sono raggruppati in ciascun Drum Set. Ciò significa che modificando i suoni di batteria ad un set diverso a pagina 1 del menu Drum Set farà sì che i suoni delle Percussioni cambieranno a loro volta (nonostante suoni individuali di ogn i pad possano essere sostituiti liberamente una volta …
-
Alesis PERFORMANCE PAD PRO — page 53
53 CREARE E CANCELLARE CANZONI L’PerformancePad Pro è in grado di ricordare l’ordine in cui vengono selezionati i pattern, quali variazioni vengono selezionate e quando sono s tati selezionati fill. La registrazione di queste informazioni nella modalità Song dell’Performa nc ePad Pro crea una canzone completa . Iniziare con l’Performan …
-
Alesis PERFORMANCE PAD PRO — page 54
54 FASE 7 Una volta finito di creare la sequenza di patte rn per la vostra canzone, premere il tasto STOP per interrompere la registrazione. FASE 8 Apparirà la schermata illustrata a s inistra. Da linea superiore indicherà l’ultimo intervallo della canzone ( STEP 48 in questo esempio) e da lin ea inferiore dirà END . Per spostarsi lungo gli …
-
Alesis PERFORMANCE PAD PRO — page 55
55 AUFBAUANLEITUNG (DEUTSCH) INHALT DER VE RPACKUNG Überprüfen Sie bitte, da ss folgende Bestandt eile in der Verpackung enthal ten sind: PerformancePad Pro Netzteil (12V DC 500mA) Kurzanleitung Bedienungsanleitung Sicherheits- und Garantiei nformationen BITTE LESEN SIE DIE SICHERHEITS- UND GARANTIEINFORMATIONEN VOR DER VERWEN …
-
Alesis PERFORMANCE PAD PRO — page 56
56 Hinweis: Um eine Demo-Songs hören, halten Sie [PATTERN / SONG ] und drücken Sie [PLAY]. EINFÜHRUNG ZUR PerformancePad Pro Willkommen zur PerformancePad Pro Professional Drum Machine. Die PerformancePad Pro er möglicht es Ihnen, auf einfache Weise Drum-, Percussion- und Bass-Sounds zu einem rhythmischen Pattern zusammenzufügen. Patterns lass …
-
Alesis PERFORMANCE PAD PRO — page 57
57 ÜBERBLIC K ÜBER DI E BEDIENELEMENTE Nun, da wir die Grundfunktionen der PerformanceP ad Pro kennen gelernt haben, PerformancePad Pro, sollten wir uns die Bedienelemen te des Gerätes genauer ansehen. 1 22 2 33 4 5 6 77 8 9 10 11 12 14 16 17 18 19 20 21 22 23 24 25 26 14 14 14 14 15 12 13 3 2 22 2 2 ALLGEMEINE BEDIENELEMENTE: 1. LCD – Das Dis …
-
Alesis PERFORMANCE PAD PRO — page 58
58 6. REC LED – Wenn diese LED leuchtet, nimmt die Perf ormancePad Pro auf. Die LED blinkt, wenn ein Vorgang eine Bestätigu ng benötigt oder abgebrochen werden soll. 7. A & B – Jedes Pattern besteht aus 2 Main Sub-Patterns – A & B. Jedes dieser zwei Sub-Patterns lässt sich durch drücken der jeweiligen dazugehö rige n Taste auswä …
-
Alesis PERFORMANCE PAD PRO — page 59
59 MODE TASTEN: 16. PATTERN / SONG – Mit diesen beiden Taste n schalten Sie zwischen den beiden Modi der PerformancePad Pro um. Im Patte rn Modus können Sie unt erschiedliche Patterns abspiel en, aufnehmen und bearbeiten. Patterns sind meistens kurze (8 Takte oder 16 Takte zum Beispiel) Rhyth mus- Sequenzen, sie sich zu Son gs zusammenstellen la …
-
Alesis PERFORMANCE PAD PRO — page 60
60 PATTERNS ABSPIELEN SCHRITT 1 Falls das Display in der oberen rechten Ecke SONG anzeigt, drücken Sie die PATTERN / SONG Taste einmal, um den Pattern Modus auszuwählen. SCHRITT 2 Wenn im rechten oberen Displaybereich USER angezeigt wird, drücken Sie PRESET / USER einmal, bis USER verschwindet; dadurch wählen Sie die Preset Patterns aus. SCHRIT …
-
Alesis PERFORMANCE PAD PRO — page 61
61 FILLS ABSPIELEN SCHRITT 1 Wählen Sie ein Pattern aus u nd drücken Sie PLAY. SCHRITT 2 Drücken Sie während der Wiederga be des Main A Patterns die FILL Taste und lassen Sie sie l os. Sie hören nun ein Drum Fill, welches dann zum dazugehörige n B Pattern führt. SCHRITT 3 Drücken Sie noch einmal die FILL Taste. Ein anderes Fill erklingt und …
-
Alesis PERFORMANCE PAD PRO — page 62
62 AUFNAHME IHRER E IGENEN PATTERNS SCHRITT 1 Falls in der rechten oberen Seite des Displays SONG anzeigt, drücken Sie einmal die PATTERN / SONG Taste, um den Pattern Modus auszuwählen ( PATTERN wird dann angezeigt). SCHRITT 2 Wenn in der rechten oberen Ecke des Displays nicht USER steht , drücken Sie einmal die PRESET / USER Taste. Dadurch wäh …
-
Alesis PERFORMANCE PAD PRO — page 63
63 SCHRITT 8 Nun können Sie mit der Aufnahme Ihres Patte rns beginnen. Halten Sie die R EC Taste gedrückt und drücken Sie dabei PLAY zum St arten d er Aufnahme. Die REC LED leuchtet und zeigt Ihnen an, dass die Aufnahme läuft. SCHRITT 9 Nun hören Sie einen Metronomsound und in der oberen Zeile des Displays sehen Sie die aktuelle Taktnummer des …
-
Alesis PERFORMANCE PAD PRO — page 64
64 DRUM SETS LADEN UND ERZEUGE N In der PerformancePad Pro befinden s ich 100 Preset und 100 editierba re Drum Sets (Soundgruppen). Nachdem Sie mit der DRUM SET Taste in den Dr um Set Modus gewechselt sind, haben Sie die Möglichkeit mit den INC / DEC Tasten, dem VA LUE Rad oder dem Ziffernblock ein Drum Set auszuwählen. Jedes Set besteht aus best …
-
Alesis PERFORMANCE PAD PRO — page 65
65 SCHRITT 7 Beachten Sie dass Drums und Percussion Sounds in jedem Drum Set zusammengefasst sind. Das bedeutet, dass bei der Änderung der Drum Sounds zu einem anderen Set auf Seite 1 des Drum Set Menüs sich auch die Percussion Sounds ändern (auch wenn sich einzelne Pad Sounds nach dem Laden eines Drum Sets austauschen lassen). Sie könn en jedo …
-
Alesis PERFORMANCE PAD PRO — page 66
66 SONGS ERZEUGEN U ND LÖSCHEN Die PerformancePad Pro ist in der Lage, sich di e Reihenfolge der von Ihnen ausgewählten Patterns, der gewählten Variationen und die gewählten Fills zu merken . Die Aufnahme dieser In formationen im Song Modus der PerformancePad Pro erzeugt einen ko mpletten Song. Be ginnen wir bei gestoppter Wiedergabe. SCHRITT 1 …
-
Alesis PERFORMANCE PAD PRO — page 67
67 SCHRITT 7 Nachdem Sie Ihre Pattern Sequenz als Song aufgenommen haben, drücken Sie die STOP Taste, um die Song Aufnahme zu been den. SCHRITT 8 Nun sehen Sie im Display die hier rechts dargestellte Anzeige. Die obere Zeil e zeigt den letzten Step des Songs ( STEP 4 8 in diesem Beispiel) an. In der unteren Zeile steht END . Um zwischen den Steps …
-
Alesis PERFORMANCE PAD PRO — page 68
TECHNICAL SPECIF ICATIONS Audio Outputs 2 TS 1/4″ (main), 1 TRS 1/4 » (phones) SNR: 94 dB (A-weighted) THD+N: ~0.004% @ 1.38 kHz Pads 8 velocity sensitive Sample/DAC B it Resolution 16 / 24 Sounds 500 (w/Dynamic Articulation™) Sounds Accessible via Pads 12 Sounds Accessible via MIDI 120 Polyphony 32-voice Panning 7-position user program …