Перейти к контенту
![]()
Русские электронные инструкции по эксплуатации
Постоянно обновляемый большой каталог документации по эксплуатации и использованию современных устройств и оборудования на русском языке. Бесплатное скачивание файлов.
Поиск:
Главная
Просмотр инструкции в pdf


Инструкция по эксплуатации беспроводных наушников Honor AM-H1C Black.
Скачать инструкцию к беспроводным наушникам Honor AM-H1C Black (2,20 МБ)

Беспроводные наушники
« Инструкция к беспроводным наушникам Honor AM-H1C White
» Инструкция к беспроводным наушникам Audio-Technica ATH-SR30BT Black
Вам также может быть интересно

Инструкция к смартфону Honor X8 6+128GB Titanium Silver

Инструкция к смартфону Honor 10 64Gb Phantom
.jpg)
Инструкция к смартфону Honor View 20 256GB Phantom Red (PCT-L29)
.jpg)
Инструкция к смартфону Honor 20 Lite 4+128GB Sapphire Blue (MAR-LX1H)
.jpg)
Инструкция к умным часам Honor MagicWatch 2 Flax Brown (MNS-B19)

Инструкция к беспроводным наушникам Honor Sport Pro AM66-L Red

Инструкция к смартфону Honor 8 Lite 32Gb

Инструкция к фитнес-браслетам Honor Band 5 Midnight Navy
Добавить комментарий
Имя *
Email *
Сайт
Комментарий


![]()


Сохранить моё имя, email и адрес сайта в этом браузере для последующих моих комментариев.
- Добавить инструкцию
- Заказать инструкцию
- Политика конфиденциальности

Quick Start Guide
Guide de démarrage rapide
Краткое руководство пользователя
Guía de inicio rápido
Kablosuz Bluetooth Kulaklık Hızlı Başlangıç Klavuzu
Короткий посібник


Contents
English …………………………………………………………………………………………… 1
Français ……………………………………………………………………………………….. 11
Русский ……………………………………………………………………………………….. 22
Español………………………………………………………………………………………… 37
Türkçe …………………………………………………………………………………………. 48
Українська …………………………………………………………………………………… 60


English
1
Appearance
● Comes with three pairs of detachable eartips in Small, Large, and Sport sizes.
● Comes with one pair of detachable silicone rubber rings (one for each side).
Power on
Power on your charging case to power on your FlyPods.
Place your FlyPods in the charging case, open the charging case, and then
press and hold the Function button for 2 seconds until the indicator turns
on and flashes blue. Your charging case and FlyPods are now powered on
and in Pairing mode. If the indicator does not turn on, please charge your
charging case and try again.

English
2
Connections and pairing
Pairing
1. Open the charging case with your FlyPods placed inside and press and hold
the function button for 2 seconds until the indicator flashes blue. Your FlyPods
are now in Pairing mode.
2. Enable Bluetooth on your phone and pair with the Bluetooth device «FlyPods
Lite».
Bluetooth connections may be affected by local electromagnetic
interference, and this may prevent you from pairing your FlyPods with your
phone or cause your FlyPods to disconnect or be unable to play any
Automatic reconnection
When your FlyPods are placed in the charging case, they will automatically
connect to the most recently paired phone when you open the charging case.
Your phone must have Bluetooth enabled and be within Bluetooth range of
your FlyPods.
Reconnection logic
In the event that your FlyPods disconnect from your phone due to exceeding the
Bluetooth connection range:
● If you return to Bluetooth range within 10 minutes, your FlyPods will
automatically reconnect to your phone.
● If you return to Bluetooth range between 10–30 minutes, your FlyPods will
need to manually reconnect to your phone.
● If you do not return to Bluetooth range within 30 minutes, your FlyPods will
enter Hibernation mode. Wearing your FlyPods will wake them back up and
allow them to reconnect to your phone when you return to Bluetooth range.

English
3
If your FlyPods do not automatically reconnect to your phone, please
reconnect manually on your phone’s Bluetooth connection screen.
Calls
Double—tap either of your FlyPods to answer an incoming call or hang up your current
call.
You must be wearing your FlyPods correctly for this function to work. If
your call is processed incorrectly, please adjust your FlyPods to the correct
Music control
● When you are not in the middle of a call, double—tap the right earbud to play or
pause music.
● Removing an earbud from your ear will pause the music.
You must be wearing your FlyPods correctly for this function to work.
Waking up voice assistant
Double—tap the left earbud to wake up voice assistant.
You must be wearing your FlyPods correctly for this function to work.
Restoring factory settings
1. Place your FlyPods in the charging case and ensure that the charging case is
open.
2. Press and hold the Function button on the charging case for 10 seconds or
longer until the indicator flashes red, green, and then blue. Your FlyPods have
now been restored to their factory settings.

English
4
Charging
Charging your FlyPods
● When your FlyPods are placed in their charging case, the indicator on the case
will flash blue and then turn off. Your FlyPods will then enter Charging mode.
Charging your charging case
● When the indicator on your charging case flashes red, this means that its
battery level is low and needs to be charged.
● When the indicator on your charging case turns steady green during charging,
this means that your charging case is fully charged.
Download and install the app
Note: For best performance, scan the QR code below with your phone to download
and install the latest firmware update for your FlyPods. Firmware updates for your
FlyPods will be released from time to time.
Safety information
Before using the device, read and comply with the following precautions carefully to
ensure optimal device performance and avoid danger or violation of laws and
regulations.
●
To prevent possible hearing damage, do not listen at high volume levels
for long periods.

English
5
● Do not use the device at locations where the use of wireless devices is prohibited
due to potential interference with other electronic devices, which may cause
safety hazards.
● In clinics and hospitals where the use of wireless devices is prohibited, please
comply with the regulations and power off the device.
● Some wireless devices may interfere with implantable medical devices and other
medical equipment, such as pacemakers, cochlear implants, and hearing aids.
Consult the manufacturer of your medical equipment for more information.
● When using the device, keep it at least 15 cm away from medical devices.
● When using the earphones to listen to music or make calls, please use the
minimum volume necessary in order to avoid damaging your hearing. Prolonged
exposure to high volume sounds may result in permanent hearing damage.
● Please reduce your audio volume while driving in order to reduce distractions and
avoid accidents.
● Observe all local traffic laws and regulations while using this device. Do not use
this device while driving.
● Keep in mind that while driving, safety is your primary responsibility, and avoid
engaging in distracting activities.
● The device’s wireless signal may interfere with your car’s electronic systems.
Please contact your car manufacturer for more information.
● Wireless devices may interfere with an aircraft’s flight systems. Adhere to in—
aircraft regulations and power off your device when required.
● If you use your FlyPods while performing activities that require your concentration,
such as riding a bike or walking in a potentially dangerous area such as near a
construction site or railroad, please pay attention to your safety and the safety of
those around you. It is recommended that you either lower the volume on your
FlyPods or remove your FlyPods in order to increase your awareness of your
surroundings.
● Avoid dusty, damp, or dirty environments. Avoid magnetic fields. Using the device
in these environments may result in circuit malfunctions.
● Keep the device away from appliances with strong magnetic or electrical fields,
such as microwave ovens and refrigerators.
● Do not use the device during thunderstorms to avoid any lightning—related

English
6
damage or injury.
● Use the device at temperatures between –10°C and +55°C, and store the device
and its accessories at temperatures between –40°C and +70°C. Extreme heat or
cold may damage the device. At temperatures below 5°C, the performance of the
battery will be degraded.
● Do not place the device in places that are easily exposed to direct sunlight such
as on a car’s dashboard or on a window sill.
● Do not place the device near exposed heat or ignition sources (such as heaters,
microwaves, ovens, stove fire, candles, and so on).
● Do not place sharp metal objects, such as large pins, near the receiver or
speaker of the device. Otherwise, metal objects may be attached, which may
cause damage to you.
● The device and its accessories may contain small components. Keep the device
and its accessories out of the reach of children. Otherwise, children may damage
the device and its accessories by mistake, or swallow the small components,
which may result in hazards such as choking.
● The device is not a toy, and children should only use it under adult supervision.
● You can only use device manufacturer—approved accessories for this model
number. The use of other accessories may void the device warranty, lead to
injury, or violate the related regulations of the country where the device is located.
Contact an authorized Huawei Customer Service Center to obtain approved
accessories.
● Connecting the device to non—approved or incompatible power supplies, chargers,
or batteries is not advised as this may cause fires or explosions.
● Do not disassemble or modify the device, insert foreign objects, or submerge in
water or other liquids to prevent leakage, overheating, fires, or explosions.
● Do not drop, squeeze, or puncture the battery. Avoid applying external pressure
to the battery as this may cause its electronic circuitry to short or overheat.
● The device is equipped with a non—removable internal battery. Do not attempt to
replace the battery yourself to avoid damaging the battery or device. The battery
should only be replaced by professional personnel at an authorized Huawei
Customer Service Center.
● Please dispose of the battery in accordance to local recycling laws and

English
7
regulations. Do not dispose of the battery in normal household waste. Improper
handling of the battery may cause explosive hazards.
● When the device is being charged, make sure the power outlet is close to the
device and easy to reach.
● When the device is fully charged or when not charging the device, disconnect the
charger from the device and unplug the charger from the power outlet.
● Ensure that the device and its accessories are dry. Do not attempt to dry the
device using an external heating device such as a microwave oven or hair dryer.
● Avoid placing the device and its accessories in environments that are too hot or
cold as this may cause device malfunctions or even explosions.
● Stop using the device, close all apps, and disconnect all connected devices
before cleaning and performing maintenance on the device.
● Do not use strong chemicals, cleaning agents, or strong detergents to clean the
device and its accessories. Instead, only clean the device and its accessories
using a clean, soft, and dry cloth.
● Do not place magnetic stripe cards (such as bank cards or phone cards) near the
device for extended periods of time as this may damage the magnetic stripe card.
● Please do not disassemble or modify the device and its accessories without prior
authorization. Any resulting damage in this case will not be covered by
manufacturer’s warranty. If the device suffers an error or ceases to function
properly, please contact an authorized Huawei Customer Service Center for
assistance.
● Avoid disposing the device and its accessories as ordinary household waste.
● Respect local laws on the disposal of electronic products and their accessories
and support recycling efforts.
Disposal and recycling information
The crossed—out wheeled—bin symbol on your product, battery,
literature or packaging reminds you that all electronic products and
batteries must be taken to separate waste collection points at the end
of their working lives; they must not be disposed of in the normal waste
stream with household garbage. It is the responsibility of the user to
dispose of the equipment using a designated collection point or service
for separate recycling of waste electrical and electronic equipment (WEEE) and
batteries according to local laws.

English
8
Proper collection and recycling of your equipment helps ensure electrical and
electronic equipment (EEE) waste is recycled in a manner that conserves valuable
materials and protects human health and the environment, improper handling,
accidental breakage, damage, and/or improper recycling at the end of its life may be
harmful for health and environment. For more information about where and how to
drop off your EEE waste, please contact your local authorities, retailer or household
waste disposal service or visit the website http://consumer.huawei.com/en/.
Reduction of hazardous substances
This device and its electrical accessories are compliant with local applicable rules on
the restriction of the use of certain hazardous substances in electrical and electronic
equipment, such as EU REACH, RoHS and Batteries (where included) regulations.
For declarations of conformity about REACH and RoHS, please visit our web site
http://consumer.huawei.com/certification.
EU regulatory conformance
RF Exposure
Your device is a low—power radio transmitter and receiver. As recommended by
international guidelines, the device is designed not to exceed the limits established
by the European Commission for exposure to radio waves.
Statement
Hereby, Huawei Technologies Co., Ltd. declares that this device AM—H1C / AM—
H1CL / AM—H1CR is in compliance with the essential requirements and other
relevant provisions of Directive 2014/53/EU.
The most recent and valid version of the DoC (Declaration of Conformity) can be
viewed at http://consumer.huawei.com/certification.
This device may be operated in all member states of the EU.
Observe national and local regulations where the device is used.
This device may be restricted for use, depending on the local network.
Frequency Bands and Power
Maximum radio—frequency power transmitted in the frequency bands in which the
radio equipment operates: The maximum power for all bands is less than the highest
limit value specified in the related Harmonized Standard.
The frequency bands and transmitting power (radiated and/or conducted) nominal
limits applicable to this radio equipment are as follows: Bluetooth: 2400MHZ—
2483.5MHZ. Left < 10dBm, Right < 9dBm.
Accessories and Software Information
Optional accessories can be purchased from a licensed vendor as required. The

English
9
following accessories are recommended:
Batteries: ZJ1254C, 682723
The product software version is 1.0.0.119. Software updates will be released by the
manufacturer to fix bugs or enhance functions after the product has been released.
All software versions released by the manufacturer have been verified and are still
compliant with the related rules.
All RF parameters (for example, frequency range and output power) are not
accessible to the user, and cannot be changed by the user.
For the most recent information about accessories and software, please see the DoC
(Declaration of Conformity) at http://consumer.huawei.com/certification.
FCC Regulatory Compliance
RF Exposure
Your device is a low—power radio transmitter and receiver. As recommended by
international guidelines, the device is designed not to exceed the limits established
by the Federal Communications Commission for exposure to radio waves.
FCC statement
This equipment has been tested and found to comply with the limits for a Class B
digital device, pursuant to Part 15 of the FCC Rules. These limits are designed to
provide reasonable protection against harmful interference in a residential installation.
This equipment generates, uses and can radiate radio frequency energy and, if not
installed and used in accordance with the instructions, may cause harmful
interference to radio communications. However, there is no guarantee that
interference will not occur in a particular installation. If this equipment does cause
harmful interference to radio or television reception, which can be determined by
turning the equipment off and on, the user is encouraged to try to correct the
interference by one or more of the following measures:
—Reorient or relocate the receiving antenna.
—Increase the separation between the equipment and receiver.
—Connect the equipment into an outlet on a circuit different from that to which the
receiver is connected.
—Consult the dealer or an experienced radio/TV technician for help.
This device complies with Part 15 of the FCC Rules. Operation is subject
to the following two conditions: (1) this device may not cause harmful interference,
and (2) this device must accept any interference received, including interference that
may cause undesired operation.
Caution: Any changes or modifications to this device not expressly approved by

English
10
Huawei Technologies Co., Ltd. for compliance could void the user’s authority to
operate the equipment.
Responsible Party — Contact for FCC Information only
Huawei Device USA Inc.
5700 Tennyson Parkway, Suite 300
Plano, TX 75024
Main: 214-919—6800
Legal statement
Copyright © Huawei Technologies Co., Ltd. 2019. All rights reserved.
This document is for reference only. Nothing in this guide constitutes a warranty of
any kind, express or implied.
All pictures and illustrations in this guide, including but not limited to the product color,
size, and display content, are for your reference only. The actual product may vary.
Nothing in this guide constitutes a warranty of any kind, express or implied.
Please visit http://consumer.huawei.com/us/support/index.htm for recent updated
hotline and email address in your country or region.
The Bluetooth
®
word mark and logos are registered trademarks owned by Bluetooth
SIG, Inc. and any use of such marks by Huawei Technologies Co., Ltd. is under
license.
Privacy protection
To understand how we protect your personal information, please visit
http://consumer.huawei.com/privacy—policy and read our privacy policy.
For United States warranty card information, visit
http://consumer.huawei.com/us/support/warranty—policy/index.htm.

Français
11
Apparence
● Livré avec 3 paires d’embouts détachables dans les tailles suivantes : Petit (P),
Grand (G) et Sport.
● Livré avec une paire d’anneaux détachables en silicone (un pour chaque côté).
Mise sous tension
Mettez sous tension votre boîtier de charge pour mettre en marche vos FlyPods.
Placez vos FlyPods dans votre boîtier de charge, ouvrez—le puis maintenez
enfoncé le bouton Marche/arrêt pendant 2 secondes jusqu’à ce que le
voyant s’allume et clignote en bleu. Votre boîtier de charge et les FlyPods
sont désormais en marche et en mode Association. Si le voyant ne
s’allume pas, veuillez charger votre boîtier de charge et réessayer.
Français
12
Connexions et association
Association et connexion
1. Ouvrez le boîtier de charge avec vos FlyPods placés à l’intérieur, appuyez sur
le bouton Marche/arrêt et maintenez—le enfoncé pendant 2 secondes jusqu’à ce
que le voyant clignote en bleu. Vos FlyPods sont maintenant en mode
Association.
2. Activez le Bluetooth sur votre téléphone et associez—le à l’appareil Bluetooth
«FlyPods Lite».
Les interférences électromagnétiques locales peuvent affecter les
connexions Bluetooth, ce qui peut vous empêcher d’associer vos FlyPods
à votre téléphone ou engendrer la déconnexion de vos FlyPods voire
l’impossibilité de lire du son.
Nouvelle connexion automatique
Lorsque vos FlyPod sont placés dans le boîtier de charge, ils se connectent
automatiquement au dernier téléphone associé lors de l’ouverture du boîtier.
La fonction Bluetooth doit être activée sur votre téléphone et ce dernier doit
se trouver dans la portée Bluetooth de vos FlyPods.
Logique de reconnexion
Au cas où vos FlyPods se déconnectent de votre téléphone du fait d’une portée de
connexion Bluetooth trop importante :
● Si vous revenez à portée de la connexion Bluetooth dans les 10 min, vos
FlyPods se reconnecteront automatiquement à votre téléphone.
● Si vous revenez à portée de la connexion Bluetooth dans les 10 à 30 min, vous
devrez vous reconnecter manuellement à votre téléphone.
● Si vous ne revenez pas à portée de la connexion Bluetooth dans les 30 min,
vos FlyPods se mettront en veille. Porter vos FlyPods les réactivera et vous
Français
13
permettrez de les reconnecter à votre téléphone lorsque vous revenez à portée
de la connexion Bluetooth.
Si vos FlyPods ne se reconnectent pas automatiquement à votre
téléphone, veuillez vous reconnecter manuellement sur l’écran de
connexion Bluetooth de votre téléphone.
Appels
Appuyez deux fois sur vos FlyPods pour répondre à un appel entrant ou mettre fin à
l’appel en cours.
Vous devez porter correctement vos FlyPods pour pouvoir utiliser cette
fonction. Si votre appel n’est pas traité correctement, ajustez vos FlyPods
Contrôle de la musique
● Lorsque vous n’êtes pas en train de passer un appel, tapotez deux fois sur
l’écouteur droit pour écouter ou mettre en pause la musique.
● Retirer un écouteur de votre oreille mettra la musique en pause.
Vous devez porter correctement vos FlyPods pour pouvoir utiliser cette
fonction.
Activer l’assistant vocal
Tapotez deux fois sur l’écouteur gauche pour activer l’assistant vocal.
Vous devez porter correctement vos FlyPods pour pouvoir utiliser cette
fonction.
Restauration des paramètres d’usine
1. Placez vos FlyPods dans le boîtier de charge et assurez—vous que le boîtier de
charge est ouvert.
2. Appuyez sur le bouton Marche/arrêt sur le boîtier de charge et maintenez—le

Français
14
enfoncé pendant 10 secondes ou plus jusqu’à ce que le voyant clignote en rouge,
vert puis bleu. Les paramètres d’usine de vos FlyPods ont désormais été
restaurés.
Chargement en cours
Chargement de vos FlyPods
● Lorsque vos FlyPods sont placés dans le boîtier de charge, le voyant sur le
boîtier clignote en bleu puis s’éteint. Vos FlyPods entreront alors en mode de
charge.
Chargement du boîtier de charge
● Lorsque le voyant sur le boîtier de charge clignote en rouge, cela signifie que
le niveau de batterie est faible et qu’elle a besoin d’être chargée.
● Lorsque le voyant sur le boîtier de charge devient vert pendant le chargement,
cela signifie que votre boîtier de charge est complètement chargé.
Téléchargement et installation de l’application
Remarque : pour de meilleurs résultats, vous pouvez scanner le QR code ci—
dessous avec votre téléphone pour télécharger et installer la dernière mise à jour du
firmware de vos FlyPods. Les mises à jour du firmware de vos FlyPods seront
disponibles de temps en temps.
Consignes de sécurité
Avant d’utiliser l’appareil, lisez attentivement les précautions ci—dessous pour garantir
les performances optimales, éviter tout danger ou enfreindre des lois ou des
règlements.

Français
15
●
Pour éviter des lésions auditives, n’utilisez pas de volumes sonores
élevés pendant des périodes prolongées.
● N’utilisez pas l’appareil dans des lieux interdisant l’utilisation d’appareils sans fil,
car il pourrait interférer avec d’autres appareils électroniques et engendrer des
risques en matière de sécurité.
● Dans les cliniques et les hôpitaux où l’utilisation d’appareils sans fil est interdite,
veuillez vous conformer aux réglementations et éteindre l’appareil.
● Certains appareils sans fil sont susceptibles d‘interférer avec des dispositifs
médicaux implantables et d’autres appareils à vocation médicale, tels que les
stimulateurs cardiaques, les implants cochléaires ou les prothèses auditives.
Consultez le fabricant de votre dispositif médical pour en savoir plus.
● Lorsque vous utilisez l’appareil, gardez une distance d’au moins 15 cm avec les
dispositifs médicaux.
● Lorsque vous utilisez les écouteurs pour écouter de la musique ou passer des
appels, veuillez utiliser le volume minimum nécessaire afin d’éviter
d’endommager votre audition. L’exposition prolongée à des volumes élevés
pourrait entraîner des lésions auditives permanentes.
● Veuillez réduire le volume audio lorsque vous conduisez afin de réduire les
distractions et éviter les accidents.
● Utilisez cet appareil en respectant l’ensemble des réglementations relatives au
Code de la route localement applicable. N’utilisez pas cet appareil pendant la
conduite.
● Gardez à l’esprit qu’en conduisant, la sécurité est votre principale responsabilité
et évitez de vous laisser distraire.
● Le signal sans fil de l’appareil pourrait interférer avec les systèmes électroniques
de votre véhicule. Veuillez contacter le fabricant de votre véhicule pour plus de
détails.
● Des appareils sans fil peuvent interférer avec les systèmes de vol d’un avion.
Respectez la réglementation dans les avions et éteignez votre appareil si
nécessaire.
● Si vous utilisez vos FlyPods au cours d’activités nécessitant votre concentration,
comme faire du vélo ou marcher dans une zone potentiellement dangereuse, par

Français
16
exemple à proximité d’un chantier de construction ou d’un chemin de fer, faites
attention à votre sécurité et à celle de votre entourage. Nous vous
recommandons de baisser le volume de vos FlyPods ou de les retirer afin de
mieux appréhender votre environnement.
● Évitez les environnements poussiéreux, humides ou sales. Évitez les champs
magnétiques. L’utilisation de l’appareil dans ces environnements risque de
provoquer des dysfonctionnements des circuits.
● Tenez l’appareil éloigné des appareils avec des champs magnétiques ou
électriques forts (fours à micro—ondes, par exemple, ou réfrigérateurs).
● N’utilisez pas l’appareil pendant des orages pour éviter les dommages corporels
et ceux causés par la foudre.
● Utilisez l’appareil à des températures comprises entre —10 et +55°C et conservez
l’appareil et ses accessoires à des températures comprises entre —40 et +70°C.
Des températures extrêmes peuvent endommager l’appareil. À une température
inférieure à 5°C, les performances de la batterie se dégraderont.
● Ne placez pas l’appareil dans des endroits facilement exposés à la lumière
directe du soleil, par exemple sur un tableau de bord de voiture ou sur un rebord
de fenêtre.
● Ne placez pas l’appareil à proximité de sources de chaleur ou d’allumage (tels
qu’un chauffage, un micro—ondes, un four, un poêle, une bougie, etc.).
● Ne placez pas d’objets métalliques pointus, tels que de grandes épingles, à
proximité du récepteur ou du haut—parleur de l’appareil. Sinon, des objets
métalliques peuvent adhérer et vous blesser.
● L’appareil et ses accessoires peuvent contenir des composants de petite taille.
Gardez l’appareil et ses accessoires hors de la portée des enfants. Les enfants
pourraient endommager l’appareil et ses accessoires par erreur ou avaler les
petits composants, ce qui pourrait entraîner des risques d’étouffement.
● L’appareil n’est pas un jouet, et les enfants doivent uniquement l’utiliser sous la
supervision d’un adulte.
● Vous ne pouvez utiliser que les accessoires approuvés par le fabricant de
l’appareil pour ce numéro de modèle. L’utilisation d’autres accessoires peut
annuler la garantie de l’appareil, entraîner des blessures ou enfreindre les
réglementations du pays dans lequel se trouve l’appareil. Contactez un centre
technique client Huawei agréé pour obtenir des accessoires approuvés.

Français
17
● Il est déconseillé de connecter l’appareil à des alimentations, des chargeurs ou
des batteries non approuvés ou incompatibles, car cela pourrait provoquer un
incendie ou des explosions.
● Ne démontez et ne modifiez pas l’appareil, n’insérez pas d’objet étranger et ne le
mettez pas dans l’eau ou tout autre liquide afin d’éviter les risques de fuite, de
surchauffe, d’incendie ou d’explosion.
● Ne laissez pas tomber la batterie, ne l’écrasez pas et ne la percez pas. Évitez
d’appliquer une pression externe sur la batterie, car cela pourrait provoquer un
court—circuit ou une surchauffe des circuits électroniques.
● L’appareil est doté d’une batterie interne non démontable. N’essayez pas de
remplacer vous—même la batterie afin d’éviter d’endommager celle—ci ou l’appareil.
Cette opération doit être réalisée par un professionnel dans un centre de service
clientèle Huawei agréé.
● Veuillez respecter les lois et la réglementation locales en matière de recyclage.
Ne mettez pas la batterie au rebut avec les ordures ménagères. Une
manipulation inadéquate de la batterie peut provoquer un risque d’explosion.
● Lorsque l’appareil est en cours de rechargement, assurez—vous que la prise de
courant est proche de l’appareil et facile à atteindre.
● Une fois votre appareil complètement chargé ou lorsqu’il n’est pas en cours de
chargement, déconnectez le câble de chargement de l’appareil et débranchez le
chargeur de la prise de courant.
● Assurez—vous que l’appareil et ses accessoires restent secs. N’essayez pas de
sécher l’appareil avec une source de chaleur externe (four à micro—ondes ou
sèche—cheveux).
● Évitez de placer l’appareil et ses accessoires dans des environnements avec des
températures trop élevées ou basses car cela peut provoquer un
dysfonctionnement de l’appareil voire une explosion.
● Arrêtez d’utiliser l’appareil, fermez toutes les applications et déconnectez tous les
appareils connectés avant de nettoyer et d’effectuer la maintenance de l’appareil.
● N’utilisez pas de produits chimiques, de produits de nettoyage ou de détergents
puissants pour nettoyer l’appareil et ses accessoires. Optez plutôt pour
l’utilisation d’un tissu propre, doux et sec pour nettoyer l’appareil.
● Ne placez pas de carte à bande magnétique (telles que des cartes bancaires ou

Français
18
des cartes téléphoniques) à proximité de votre appareil pendant une période
prolongée, car cela pourrait l’endommager.
● Ne tentez pas de démonter ou de modifier l’appareil ou ses accessoires vous—
même sans autorisation préalable. Sinon, tout dommage qui en découle ne sera
pas couvert par la garantie fabricant. S’il y a une erreur avec l’appareil ou s’il
cesse de fonctionner correctement, veuillez contacter un centre de service
clientèle Huawei agréé pour obtenir de l’aide.
● Évitez de jeter l’appareil et ses accessoires comme des déchets ménagers
ordinaires.
● Respectez la réglementation locale sur la mise au rebut de produits électroniques
et de leurs accessoires et apportez votre contribution à leur recyclage.
Consignes de mise au rebut et de recyclage
Sur votre produit, la batterie, l’emballage ou dans la documentation, le
symbole d’une poubelle roulante barrée d’une croix vous rappelle que
tous les produits électroniques et toutes les batteries doivent être
apportés à des points de collecte distincts de ceux des ordures
ménagères normales lorsqu’ils arrivent en fin de cycle de vie. Ils ne
doivent en aucun cas être déposés dans le circuit standard des
déchets ménagers. Il incombe à l’utilisateur de se débarrasser de l’équipement en se
rendant dans un centre de collecte ou point de service désigné pour le recyclage
séparé des déchets d’équipements électriques et électroniques (DEEE) et des
batteries en conformité avec la réglementation locale.
La collecte et le recyclage adéquats de votre équipement contribuent à garantir que
les équipements électriques et électroniques (EEE) sont recyclés de façon à
récupérer les matériaux précieux et à protéger la santé des êtres humains et
l’environnement ; une manipulation inadéquate, un bris accidentel, des dommages
ou un mauvais recyclage à la fin de sa vie risqueraient d’être nocifs pour la santé et
l’environnement. Pour en savoir plus sur les lieux de collecte et la manière de vous
débarrasser de vos déchets électriques et électroniques, contactez les autorités
locales, votre détaillant ou le service des ordures ménagères, ou rendez—vous sur le
site http://consumer.huawei.com/en/.
Réduction des substances dangereuses
Cet appareil et ses accessoires électriques respectent les règles locales applicables
sur la restriction dans l’utilisation de certaines substances dangereuses dans les
équipements électriques et électroniques, telles les directives REACH, RoHS et les

Français
19
réglementations sur les batteries (le cas échéant) de l’UE. Pour les déclarations de
conformité REACH et RoHS, consultez notre site Web à l’adresse
http://consumer.huawei.com/certification.
Conformité réglementaire UE
Exposition aux radiofréquences
Votre appareil est un émetteur et récepteur radio de faible puissance. Comme les
directives internationales le recommandent, l’appareil est conçu pour ne pas
dépasser les limites d’exposition aux ondes radio établies par la Commission
européenne.
Déclaration
Par la présente, Huawei Technologies Co., Ltd. déclare que cet appareil AM—H1C /
AM—H1CL / AM—H1CR est conforme aux exigences fondamentales et aux autres
dispositions pertinentes de la directive 2014/53/UE.
La version la plus récente et en vigueur de la déclaration de conformité (DoC) peut
être consultée sur http://consumer.huawei.com/certification.
Cet appareil peut être utilisé dans tous les pays membres de l’UE.
Respectez les réglementations nationales et locales des pays où l’appareil est utilisé.
Selon le réseau local, l’utilisation de cet appareil peut être sujette à des restrictions.
Bandes de fréquence et puissance
Puissance radioélectrique maximale transmise sur les bandes de fréquence sur
lesquelles fonctionne l’équipement radiotéléphonique : la puissance maximale pour
toutes les bandes est inférieure à la valeur limite la plus élevée spécifiée dans la
norme harmonisée correspondante.
Les limites nominales des bandes de fréquences et de la puissance d’émission
(rayonnées et/ou par conduction) applicables à cet équipement radio sont les
suivantes : Bluetooth : 2400MHZ—2483.5MHZ. Gauche < 10dBm, Droite < 9dBm.
Informations relatives aux accessoires et aux logiciels
Si nécessaire, il est possible d’acheter des accessoires optionnels auprès d’un
fournisseur agréé. Les accessoires suivants sont recommandés :
Batteries : ZJ1254C, 682723
La version logicielle du produit est 1.0.0.119. Les mises à jour logicielles seront
publiées par le fabricant pour corriger les bogues ou améliorer les fonctionnalités
après la sortie du produit. Toutes les versions des logiciels publiées par le fabricant
ont été vérifiées et sont toujours conformes aux règles connexes.
Aucun paramètre de radiofréquence (par exemple la plage de fréquences et la
puissance de sortie) n’est accessible à l’utilisateur et ne peut être modifié par celui—ci.
 Loading…
Наушники honor am h1c являются популярным выбором среди пользователей, которые ценят качественный звук и удобство использования. Они имеют множество функций, таких как шумоподавление, беспроводное подключение и управление сенсорными жестами.
Однако, чтобы наслаждаться всеми возможностями этих наушников, необходимо правильно настроить их. В этой статье мы расскажем вам, как настроить наушники honor am h1c шаг за шагом, чтобы вы могли получить наилучший звук и комфортное использование.
Первым шагом является проверка наличия заряда наушников. Убедитесь, что наушники полностью заряжены, чтобы избежать режима экономии заряда во время использования. Это можно сделать, подключив наушники к источнику питания с помощью кабеля USB и дождавшись полного заряда.
Затем включите наушники, нажав на кнопку питания. После включения наушники перейдут в режим ожидания и вы будете готовы к их настройке.
Содержание
- Подготовка к настройке наушников honor am h1c
- Распаковка и проверка комплектации
- Зарядка наушников
- Подключение наушников к устройству
- Установка приложения honor am h1c
- Настройка функциональных возможностей наушников
- 1. Регулировка громкости
- 2. Изменение трека
- 3. Ответ на звонок
- 4. Активация голосового помощника
- 5. Подключение через Bluetooth
- 6. Настройки звука
- 7. Зарядка наушников
Подготовка к настройке наушников honor am h1c
Перед началом процесса настройки наушников honor am h1c необходимо выполнить некоторые подготовительные шаги:
- Убедитесь, что у вас есть смартфон или планшет с поддержкой Bluetooth — этот тип наушников работает по беспроводному соединению.
- Убедитесь, что наушники полностью заряжены — это гарантирует бесперебойную работу в процессе настройки.
- Установите приложение Huawei AI Life на свое устройство — оно позволит вам управлять и настраивать функции наушников.
Если все подготовительные шаги выполнены, можно приступать к процессу настройки наушников honor am h1c. Инструкции по настройке будут зависеть от устройства, которое вы используете, поэтому имейте в виду, что следующие шаги могут незначительно отличаться в зависимости от вашего устройства.
Распаковка и проверка комплектации
Перед началом использования наушников honor am h1c рекомендуется провести их распаковку и проверку комплектации. Это позволит убедиться, что все необходимые компоненты присутствуют и находятся в исправном состоянии.
Следуйте инструкции ниже, чтобы правильно распаковать наушники honor am h1c и проверить комплектацию:
- Возьмите коробку с наушниками и аккуратно разрежьте скотч, фиксирующий ее крышку.
- Откройте крышку коробки и извлеките ее содержимое.
- Перед вами должна появиться инструкция по эксплуатации, гарантийный талон и сам набор наушников.
Теперь проведите проверку комплектации:
- Убедитесь, что наушники находятся в рабочем состоянии, не имеют видимых повреждений и полностью заряжены.
- Проверьте наличие всех дополнительных компонентов, таких как кабель для зарядки и переходник для подключения наушников к устройству.
- Проверьте, что все компоненты находятся в исправном состоянии и отсутствуют повреждения.
- Если вы заметили какие-либо дефекты или отсутствие компонентов, обратитесь в магазин или свяжитесь с производителем для получения помощи.
Теперь, когда вы убедились в исправности и комплектации наушников honor am h1c, вы можете приступить к их настройке и использованию. Следуйте следующим разделам инструкции для получения более подробной информации.
| Компоненты | Описание |
|---|---|
| Наушники | Беспроводные наушники honor am h1c с функцией шумоподавления. |
| Кабель для зарядки | USB-кабель для зарядки наушников. |
| Переходник для подключения | Переходник для подключения наушников к различным устройствам. |
| Инструкция по эксплуатации | Подробная инструкция по настройке и использованию наушников. |
| Гарантийный талон | Документ, подтверждающий гарантию на товар. |
Зарядка наушников
Для правильной работы и длительного использования наушников Honor AM H1C необходимо следить за их зарядкой. В этом разделе мы расскажем, как правильно зарядить наушники и обеспечить им максимальную эффективность.
1. Подключите кабель Micro USB к разъему зарядки наушников. Разъем находится на правом наушнике, его можно легко обнаружить по маркировке «DC 5V».
2. Подключите другой конец кабеля Micro USB к USB-порту вашего компьютера, ноутбука или зарядного устройства.
3. Когда наушники подключены к источнику питания, индикатор зарядки на правом наушнике начнет мигать синим светом, что означает, что процесс зарядки начался.
4. Полная зарядка наушников может занять около 2-3 часов. Во время зарядки индикатор будет мигать, а после полной зарядки перестанет мигать и останется включенным.
5. При необходимости можно проверить уровень заряда наушников, удерживая кнопку питания на правом наушнике. При нажатии на кнопку индикатор зарядки будет отображать уровень заряда:
- Зеленый свет — уровень заряда более 70%
- Желтый свет — уровень заряда от 30% до 70%
- Красный свет — уровень заряда менее 30%
6. Не рекомендуется использовать наушники при низком уровне заряда, так как это может негативно сказаться на их работе и эффективности.
7. Если вы не планируете использовать наушники в течение продолжительного времени, рекомендуется полностью зарядить их перед хранением. Таким образом, вы сохраните заряд наушников и длину их службы.
Внимание: не забывайте отсоединять кабель зарядки после полной зарядки наушников, чтобы избежать повреждения батареи и предотвратить перегрев наушников.
Следуя приведенным выше инструкциям по зарядке наушников Honor AM H1C, вы обеспечите их надлежащую работу и продлите их срок службы.
Подключение наушников к устройству
Для подключения наушников honor am h1c к вашему устройству следуйте этой инструкции:
- Возьмите наушники и найдите разъем для подключения. Обычно он находится на одном из концов шнура.
- Проверьте, есть ли на вашем устройстве разъем для наушников. Он может быть разного типа: аналоговый (3.5 мм), USB или беспроводной.
- Если у вашего устройства есть аналоговый разъем для наушников (3.5 мм), вставьте штекер наушников в этот разъем (обычно зеленого цвета).
- Если устройство не имеет аналогового разъема, но имеет USB-разъем, вставьте штекер в соответствующий USB-порт.
- Если наушники поддерживают беспроводное подключение, включите беспроводной режим на наушниках и устройстве, а затем выполните процедуру сопряжения (инструкции о сопряжении можно найти в руководстве пользователя наушников).
- Убедитесь, что настройки звука на вашем устройстве сконфигурированы для использования наушников. В большинстве случаев это можно сделать в разделе «Звук» или «Настройки звука» устройства.
Теперь наушники honor am h1c должны быть успешно подключены к вашему устройству и готовы к использованию. Приятного прослушивания!
Установка приложения honor am h1c
Чтобы использовать наушники honor am h1c, вам потребуется установить соответствующее приложение на ваш смартфон. Вот пошаговая инструкция, как это сделать:
- Откройте приложение Play Маркет на вашем Android устройстве
- Введите «honor am h1c» в строку поиска в верхней части экрана
- Нажмите на иконку приложения honor am h1c в результате поиска
- Нажмите на кнопку «Установить» и подождите, пока приложение загрузится и установится на ваше устройство
- После установки откройте приложение и следуйте инструкциям по подключению и настройке наушников honor am h1c
После завершения настройки вы сможете наслаждаться всеми функциями и возможностями, которые предлагает приложение honor am h1c!
Настройка функциональных возможностей наушников
Наушники Honor AM H1C предоставляют большой набор функций, которые могут быть настроены в соответствии с вашими предпочтениями. В этом разделе вы найдете подробную информацию о том, как настроить функциональные возможности наушников.
1. Регулировка громкости
Вы можете легко регулировать громкость звука, который воспроизводится через наушники. Для этого удерживайте кнопку «+» или «-» на боковой стороне наушника в течение нескольких секунд, пока не достигнете желаемого уровня громкости.
2. Изменение трека
Чтобы переключиться на следующий трек, нажмите кнопку «Вперед» на боковой стороне правого наушника. Чтобы вернуться к предыдущему треку, нажмите кнопку «Назад» на боковой стороне левого наушника.
3. Ответ на звонок
Когда у вас поступает звонок, вы можете ответить на него, нажав кнопку между наушниками. Эта кнопка также может использоваться для завершения звонка или отклонения входящего вызова.
4. Активация голосового помощника
Если ваш смартфон поддерживает голосового помощника, вы можете активировать его, нажав кнопку наушника и произнести команду в микрофон.
5. Подключение через Bluetooth
Для подключения наушников к устройству через Bluetooth, включите Bluetooth на вашем устройстве и на наушниках. Затем найдите наушники в списке доступных устройств и нажмите на них, чтобы установить подключение.
6. Настройки звука
Вы можете настроить звук наушников, предварительно открыв настройки на вашем устройстве и выбрав наушники в списке устройств. В зависимости от модели устройства и операционной системы, ваши настройки звука могут отличаться.
7. Зарядка наушников
Для зарядки наушников используйте кабель Micro USB, который поставляется вместе с наушниками. Подключите его к порту наушников и к USB-порту на вашем компьютере или зарядном устройстве. Убедитесь, что наушники полностью заряжены перед использованием.
Это лишь некоторые из функциональных возможностей, которые можно настроить на наушниках Honor AM H1C. Изучите руководство пользователя, чтобы узнать больше о всех доступных функциях и способах их настройки.
Содержание
- Инструкция для беспроводных наушников Honor Flypods Lite
- Внешний вид bluetooth наушников Honor Flypods Lite
- Купившие Honor Flypods Lite также покупают
- Как включить наушники Honor Flypods Lite
- Подключение беспроводных наушников Honor Flypods Lite к телефону
- Автоматическое повторное подключение наушников Honor Flypods Lite
- Порядок повторного подключения
- Купившие Honor Flypods Lite также смотрят
- Как пользоваться bluetooth наушниками Honor Flypods Lite
- Вызовы
- Управление воспроизведением музыки
- Активация голосового помощника
- Сброс настроек наушников Honor Flypods Lite на заводские
- Подборка по запросу — Где купить «Honor Flypods Lite»
- Как заряжать наушники Honor Flypods Lite
- Зарядка наушников FlyPods
- Зарядка зарядного чехла (кейса) Honor Flypods Lite
- Установка мобильного приложения для наушников Honor Flypods Lite
- Характеристики беспроводных наушников Honor Flypods Lite
- Как подключить блютуз наушники Honor и Huawei к телефону
- Как подключить беспроводные наушники Хонор и Хуавей к телефону через Bluetooth
- Включение Блютуза на телефоне
- Подготовка Bluetooth-устройства к сопряжению
- FreeLace
- FreeBuds Lite
- FlyPods Lite
- Первое сопряжение устройства со смартфоном
- Подключение Bluetooth-устройства с телефоном, который ранее уже подключался
- Как подключать беспроводные наушники Huawei и Honor к другим устройствам
- Подключение Блютуз наушников к ПК или ноутбуку
- Возможные проблемы
- Смартфон не видит наушники
- Звук моно и плохого качества
- Сопряжение наушников HUAWEI FreeBuds и FreeLace
- Подключение наушников к телефону или планшету
- Подключение наушников к компьютеру
- Подключение наушников к мультимедийной системе автомобиля по Bluetooth или к другим Bluetooth-устройствам
Инструкция для беспроводных наушников Honor Flypods Lite
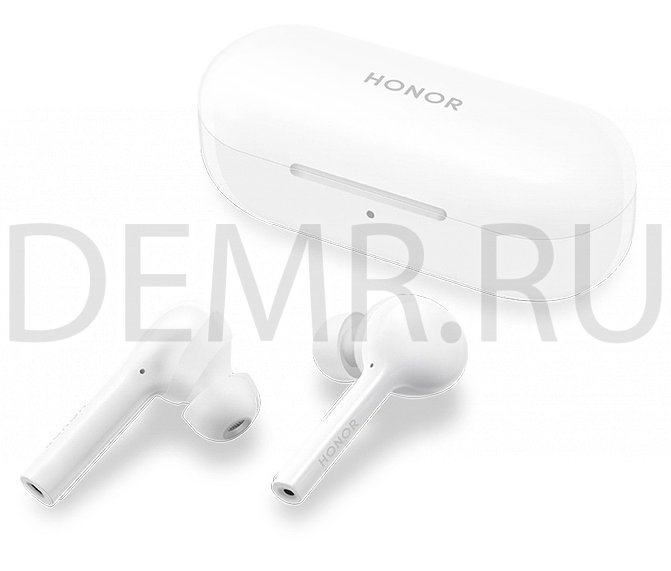
Внешний вид bluetooth наушников Honor Flypods Lite

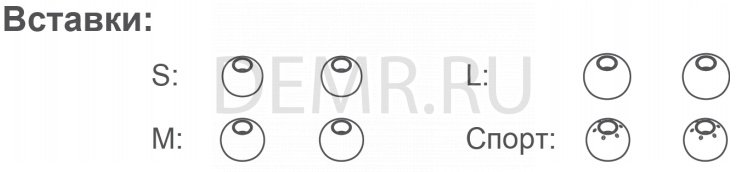
✓ В комплект поставки входит три пары съемных вставок малого (S), среднего (M) и большого (L) размера, а также специальные вставки для занятий спортом.
✓ В комплект поставки входит одна пара съемных резиновых колец (для каждого наушника).
Купившие Honor Flypods Lite также покупают
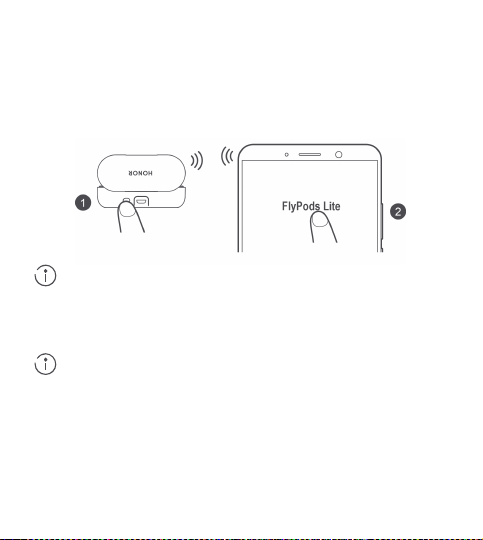
Как включить наушники Honor Flypods Lite
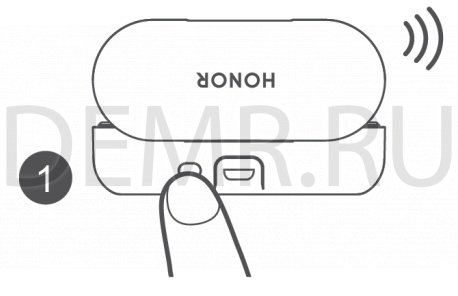
Чтобы включить наушники FlyPods, включите зарядный чехол.
Поместите наушники FlyPods в зарядный чехол, откройте крышку зарядного чехла, нажмите и удерживайте функциональную кнопку 2 секунды, пока не загорится индикатор и не начнет мигать синим. После этого зарядный чехол и наушники FlyPods включатся и перейдут в режим сопряжения. Если индикатор не загорается, зарядите зарядный чехол и повторите попытку.
Подключение беспроводных наушников Honor Flypods Lite к телефону
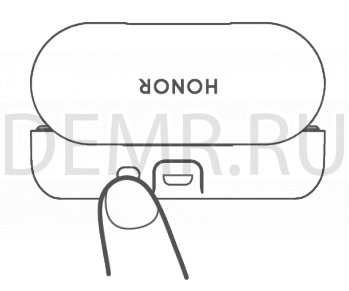
1. Откройте зарядный чехол (оба наушника Honor FlyPods Lite должны быть в чехле), нажмите и удерживайте функциональную кнопку 2 секунды, пока не загорится индикатор и не начнет мигать синим. Наушники FlyPods перешли в режим сопряжения.
2. Включите Bluetooth на телефоне и сопрягите его с Bluetooth-наушниками FlyPods Lite.

На качество Bluetooth-соединения могут влиять электромагнитные помехи, которые могут помешать установлению сопряжения между телефоном и наушниками FlyPods, привести к разрыву соединения с наушниками FlyPods или невозможности воспроизведения звука.
Автоматическое повторное подключение наушников Honor Flypods Lite
Когда наушники FlyPods в зарядном чехле, при открытии крышки зарядного чехла они автоматически подключаются к телефону, с которым последним было установлено сопряжение.
На телефоне должен быть включен Bluetooth, телефон должен находиться в зоне действия Bluetooth наушников FlyPods.
Порядок повторного подключения
Наушники Honor Flypods Lite отключаются от телефона из-за выхода из зоны действия Bluetooth.
✓ Если вы вернетесь в зону действия Bluetooth в течение 10 минут, наушники FlyPods автоматически подключаться к телефону.
✓ Если вы возвращаетесь в зону действия Bluetooth в течение 10–30 минут, вам необходимо будет подключиться к телефону вручную.
✓ Если вы не возвращаетесь в зону действия Bluetooth в течение 30 минут, наушники FlyPods переходят в режим гибернации. Чтобы активировать наушники FlyPods и повторно подключиться к телефону после возврата в зону действия Bluetooth, наденьте наушники.
Если наушники FlyPods не подключаются к телефону автоматически, подключите их вручную на экране установления Bluetooth-соединения телефона.
Купившие Honor Flypods Lite также смотрят
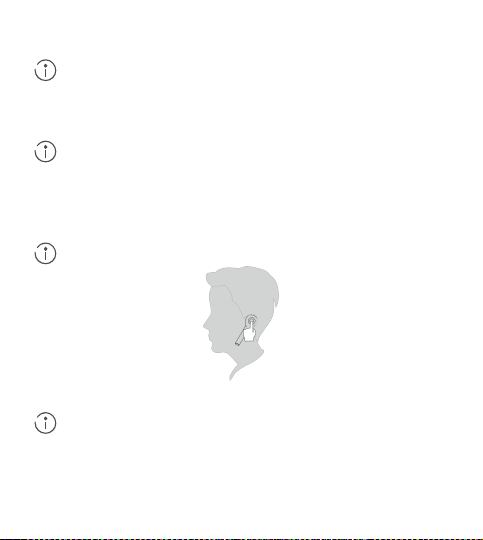
Как пользоваться bluetooth наушниками Honor Flypods Lite
Вызовы
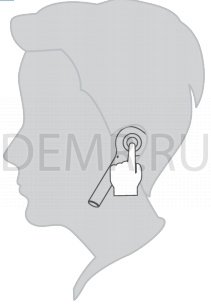
Дважды коснитесь наушника Honor Flypods Lite, чтобы ответить на входящий вызов или завершить текущий разговор.
Эта функция будет работать корректно, только если вы правильно наденете наушники FlyPods. В случае некорректной обработки вызова отрегулируйте положение наушников FlyPods в ушах.
Управление воспроизведением музыки
✓ Если Вы не разговариваете, дважды коснитесь правого наушника, чтобы включить или приостановить воспроизведение музыки.
✓ Извлечение наушника приостанавливает воспроизведение композиции.
Эта функция будет работать корректно, только если вы правильно наденете наушники FlyPods.
Активация голосового помощника
Дважды коснитесь левого наушника, чтобы активировать голосового помощника.
Эта функция будет работать корректно, только если вы правильно наденете наушники FlyPods.
Сброс настроек наушников Honor Flypods Lite на заводские
1. Поместите наушники FlyPods в зарядный чехол и убедитесь, что крышка зарядного чехла открыта.
2. Нажмите и удерживайте функциональную кнопку на зарядном чехле 10 секунд или дольше, пока индикатор не начнет попеременно мигать красным, зеленым и синим. На наушниках FlyPods восстановлены заводские настройки.
Подборка по запросу — Где купить «Honor Flypods Lite»
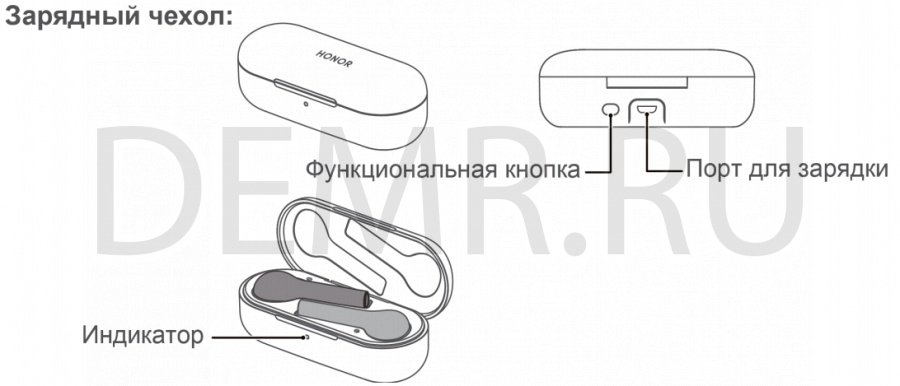
Как заряжать наушники Honor Flypods Lite
Зарядка наушников FlyPods
✓ Когда наушники FlyPods в зарядном чехле, индикатор на чехле мигает синим, затем гаснет. После этого наушники FlyPods переходят в режим зарядки.
Зарядка зарядного чехла (кейса) Honor Flypods Lite
✓ Когда индикатор на зарядном чехле мигает красным, уровень заряда батареи низкий, зарядный чехол необходимо зарядить.
✓ Когда индикатор на зарядном чехле загорается зеленым во время зарядки, зарядный чехол заряжен.
Установка мобильного приложения для наушников Honor Flypods Lite
Отсканируйте с помощью телефона нижеприведенный QR-код, чтобы загрузить и установить последнюю версию ПО наушников FlyPods. Новые версии ПО для наушников FlyPods предоставляются периодически.

Характеристики беспроводных наушников Honor Flypods Lite
Модель Honor FlyPods Lite
Функция гарнитуры есть
Минимальная воспроизводимая частота 20 Гц
Максимальная воспроизводимая частота 20000 Гц
Микрофон есть
Расположение микрофона в корпусе
Версия Bluetooth 4.2
Время автономной работы до 3 ч
Радиус беспроводной связи 10 м
Степень пылевлагозащиты IP IP54
Особенности, дополнительно функция быстрой зарядки
Вес 11 г
Источник
Как подключить блютуз наушники Honor и Huawei к телефону
Если ранее проводная гарнитура была единственным выбором для пользователей, то сегодня огромную популярность завоевали уже беспроводные устройства. Подключение осуществляется через Bluetooth. В статье мы рассмотрим, как подключить беспроводные наушники Хонор и Хуавей к телефону.

Как подключить беспроводные наушники Хонор и Хуавей к телефону через Bluetooth
Инструкция по подключению гарнитуры по Блютуз не отличается сложностью. Сам процесс можно разделить на три этапа:
- Активация Bluetooth.
- Включение другого устройства.
- Сопряжение.
Изучим каждый шаг отдельно.
Включение Блютуза на телефоне
Изначально необходимо включить Bluetooth на телефоне:
- Вытяните верхнюю шторку.
- Зажмите пальцем на значке Блютуз.

- В открывшемся окне перетяните ползунок на позицию «Вкл.».
- Там же будут представлены устройства, обнаруженные беспроводной технологией.
Подготовка Bluetooth-устройства к сопряжению
Второй этап подразумевает включение данной опции на самой гарнитуре. Инструкция:
- Включите наушники.
- При нажатии кнопки включения автоматически активируется Bluetooth.
- Мигающий индикатор оповестит о готовности к подключению.
Представленный алгоритм подходит не только для беспроводных моделей Huawei, но также для Xiaomi или Samsung. В основном беспроводной аксессуар прилагаются вместе с зарядным устройством в виде кейса с отдельным зарядным, но некоторые модели предусматривают другой тип подзарядки. При попытке подключения не доставайте их из футляра.
FreeLace
Главной особенностью FreeLace является скрытый USB, который достается возле регуляторов громкости. Таким образом их можно подзарядить не только при помощи кейса, а к примеру, через ноутбук или сам смартфон.

Активация не отличается сложностью. Достаточно зажать кнопку питания и дождаться, когда замигает индикатор. Моргание лампочки означает, что гаджет готов к обнаружению. Проверьте список видимых устройств в телефоне и выберите нужное.
FreeBuds Lite
Поместите FreeBuds Lite в кейс и откройте крышку. Затем нужно зажать клавишу возле USB, что запустит соединение по Блютуз. После сопряжения их можно достать с футляра.
FlyPods Lite
Активация FlyPods Lite осуществляется также, как и в описании FreeBuds Lite. То есть, не вынимая гаджет из футляра, нажмите кнопку питания и подождите, когда индикатор загорится белым.
Первое сопряжение устройства со смартфоном
Заключительный этап – выбрать обнаруженное устройство в телефоне и наслаждаться музыкой. Когда замигает лампочка, загляните в смартфон и в меню Bluetooth выберите нужный гаджет.
Учтите, некоторые модели гарнитуры требуют пароль для сопряжения. По умолчанию устанавливается 0000 в качестве кода, который запросит система в момент попытки соединения.
Если у Вас остались вопросы или есть жалобы — сообщите нам
Подключение Bluetooth-устройства с телефоном, который ранее уже подключался
Если вы ранее производили соединение, то повторное подключение не потребует тех же действий. Например, вы используете модель Honor Sport AM61 от Хуавей, тогда для последующих активаций достаточно включить Блютуз на обоих гаджетах.
Как подключать беспроводные наушники Huawei и Honor к другим устройствам
Как подключить беспроводные наушники Honor и Huawei к iPhone или другому смартфону? Китайский производитель учитывает многие нюансы при разработке полезных гаджетов. Так, он предусмотрел использование гарнитуры не только в смартфонах Хуавей, но также и в других моделях.
Подключение Блютуз наушников к ПК или ноутбуку
Также подключить гарнитуру можно к ноутбуку. Для этого, в ПК должна быть функция Блютуз. Инструкция по сопряжению идентична приложенным выше. Активируйте опцию для беспроводной связи и выполните подключение.

Возможные проблемы
Среди распространенных проблем выделяют очевидную разрядку гаджета. Часто пользователи забывают помещать устройство в кейс или ставить на подзарядку, что в дальнейшем вызывает ложные мысли о неполадке. Наушники следует хранить только в специальном чехле, и несмотря на долгое время работы не стоит забывать про заряд аккумулятора. Ниже изучим другие возможные проблемы.
Смартфон не видит наушники
Если смартфон не видит гарнитуру, то попробуйте вручную выполнить сопряжение. Включив Bluetooth, запустите поиск, а затем выберите из предложенного списка название модели гарнитуры. Представленное решение не принесло результата? Часто причиной выступает системный сбой Андроида. Перезагрузите мобильник и повторите процедуру.
Звук моно и плохого качества
Следующая проблема заключается в плохом качестве звука, не соответствующий описанным характеристикам. Обычно данная неполадка связана с ошибочным определением протокола. То есть, Андроид не смог запустить A2DP – профиль для воспроизведения стереозвука. Для исправления неполадки перезагрузите оба гаджета – смартфон и наушники.
Второе решение подразумевает повторное сопряжение. Для этого нужно удалить уже подключенную гарнитуру. Перейдите в меню Блютуз и нажмите на значок «i» возле названия беспроводного устройства. Затем нажмите «Отменить сопряжение».

После, снова выполните подключение гаджета, как при первом разе.
Источник
Сопряжение наушников HUAWEI FreeBuds и FreeLace
Сопряжение наушников HUAWEI FreeBuds и FreeLace
Чтобы сопрячь и подключить наушники, выполните следующие действия. Если не удается обнаружить наушники или подключить их к устройству, см. раздел «Не удается обнаружить наушники Huawei или подключить их к устройству».
Для получения более подробной информации о сопряжении наушников другого бренда (не Huawei) с вашим телефоном или планшетом см. раздел «Телефон или планшет Huawei не может обнаружить Bluetooth-наушники или Bluetooth-динамик».
Подключение наушников к телефону или планшету
- Переведите наушники в режим сопряжения (для более подробной информации см. информацию в таблице 1, таблице 2 и таблице 3 в разделе с ответами на часто задаваемые вопросы).
- На телефоне или планшете перейдите в раздел Настройки > Bluetooth и нажмите на имя наушников, чтобы установить сопряжение и подключить наушники к устройству.
Подключение наушников к компьютеру
- Подключение к компьютеру с Windows 10
Подключение наушников к мультимедийной системе автомобиля по Bluetooth или к другим Bluetooth-устройствам
- Переведите наушники в режим сопряжения (для более подробной информации см. информацию в таблице 1, таблице 2 и таблице 3 в разделе с ответами на часто задаваемые вопросы).
- Найдите настройки Bluetooth мультимедийной системы автомобиля, выполните поиск Bluetoothустройств и выберите имя наушников. Для получения более подробной информации о настройках Bluetooth мультимедийной системы автомобиля обратитесь к поставщику устройства.
- FreeBuds Pro
- FreeBuds 4
- FreeBuds 3
- FreeBuds 4i
Поместите наушники в зарядный чехол и оставьте чехол открытым. Нажмите и удерживайте функциональную кнопку на зарядном чехле в течение 2 секунд, пока индикатор не начнет мигать.
- FreeBuds 3i
- FreeBuds Lite
- FreeBuds
- FlyPods 3
- FlyPods Lite
Поместите наушники в зарядный чехол и оставьте чехол открытым. Нажмите и удерживайте функциональную кнопку на зарядном чехле в течение 2 секунд, пока индикатор не начнет мигать.

- FreeBuds 2 Pro
- FreeBuds 2
- FlyPods Pro
- FlyPods
Поместите наушники в зарядный чехол и оставьте чехол открытым. Нажмите и удерживайте функциональную кнопку на зарядном чехле в течение 2 секунд, пока индикатор не начнет мигать.

Нажмите на кнопку питания и удерживайте ее в течение 4–6 секунд, пока индикатор не начнет мигать белым.
- Спортивные наушники Huawei Sport Bluetooth Headphones
- Спортивные наушники HONOR Sport Bluetooth Earphones
Нажмите и удерживайте функциональную кнопку в течение 2–4 секунд, чтобы включить наушники. Затем индикатор будет попеременно мигать красным и синим.

Когда наушники включены, нажмите на кнопку управления Bluetooth-соединением и удерживайте ее в течение 2 секунд, пока индикатор не начнет мигать белым.
Источник