Описание товара

- Anycubic LeviQ
- Умное автовыравнивание.

- Двойной винтовой двигатель
- Гладкий & надежная работа.

- Огромный размер здания
- 400*400*450мм.

- Обнаружение биения
- Интеллектуальный мониторинг подачи нити.

- Технические характеристики
- ● Прокачка: Автоматическая, 25 очков прокачки
- ● Площадь панели: 7,95 дюйма² / 51,3 см²
- ● Обнаружение биения нити: Поддержка
- ● Материал для печати: PLA / ABS / PETG & TPU
- ● Размер сопла: ø 0,4 мм (сменное)
- ● Температура сопла: ≤ 500 °F / 260 °C
- ● Температура горячего слоя: ≤ 194 °F / 90 °C
- ● Средняя скорость: 3,1–3,9 дюйма/с /80–100 мм/с
- ● Панель управления: 4,3-дюймовый сенсорный ЖК-экран
- ● Ось Z: стержень с двойной резьбой
- ● Размер печати: 17,7 х 15,7 х 15,7 дюйма / 450 х 400 х 400 мм (HWD)
- ● Объем печати: 19,02 галлона. / 72,0 л
- ● Размеры машины: 720 х 715 х 665 мм
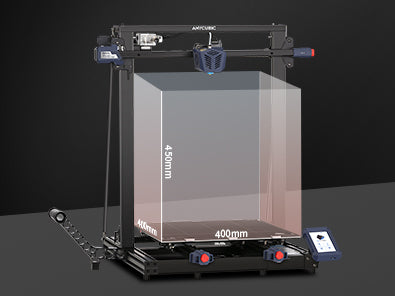
- Разблокируйте безграничное творчество
- Размер снова увеличился, достигнув 400*400*450мм. Создание мира для воображения, чтобы разгуляться.

- Прокачка без забот
- Выравнивание Anycubic Horizon может автоматически компенсировать неровности горячего слоя. Выравнивание и печать можно выполнить с помощью одной кнопки, простого управления и удобного пользовательского интерфейса.

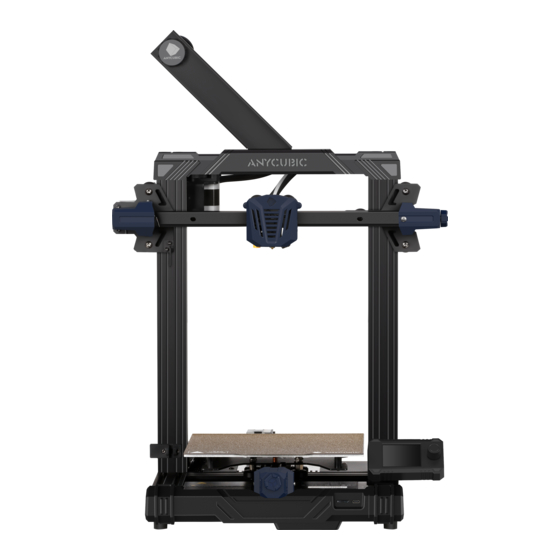
- Гладкий & Стабильная работа
- Движущиеся части по оси Z с двойной резьбой уменьшают колебания при печати.

- Удобный сенсорный экран
- Принтер оснащен чувствительным 4,3-дюймовым сенсорным ЖК-экраном с полноцветным дисплеем, упрощающим навигацию.

- Излишне ждать
- Максимальная скорость печати составляет 180 мм/с (средняя скорость составляет 80 мм/с, что на 167% быстрее, чем у конкурирующих продуктов). Более высокая скорость позволяет вам получать больше удовольствия от 3D-печати.

- Начать быстро
- Модульная конструкция позволяет собрать принтер всего за 10 минут, что очень удобно в использовании.

- Отличная адгезия & Удаление
- Платформа для печати блокирует детали во время печати, когда она горячая, а после охлаждения детали можно легко снять. Ее можно использовать повторно без потери производительности.

- Обнаружение биения нити
- Оснащенный датчиком биения нити, он может интеллектуально контролировать подачу нити. Если в вашем принтере закончится нить, он автоматически остановится без потери прогресса печати.
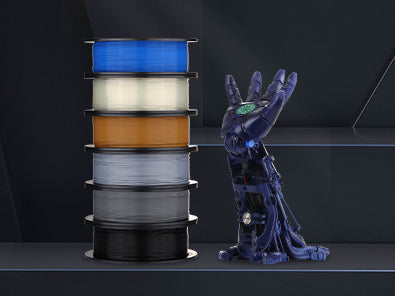
- Поддерживаются все нити
- Anycubic предлагает различные виды и цвета филаментов, которые имеют равномерный и гладкий выход, что дает вам больше возможностей для творчества.
Список деталей

База

Карборундовое стекло

Диагональная штанга

Экран монитора

Нить

Держатель нити

Сопло

Рамка

Набор инструментов

Пружинная шайба

SD-карта

Кард-ридер

Шнур питания

Зажим нагревательного стола

Сальник

Гайка

Винты
|
|
|
|
| Технология печати | SLA-печать на основе ЖК-дисплеев | SLA-печать на основе ЖК-дисплеев | FDM (Моделирование наплавленных отложений) |
| Разрешение XY | 3840*2400 пикселей | 5760*3600 пикселей | Никто |
| Объем сборки | 132мм*80мм*165мм | 197мм*122мм*245мм | 245*245*260мм |
| Макс. Скорость печати | 50 мм/с | 80 мм/с | 100 мм/с |
| Материалы для печати | 405 нм УФ-смола | 405 нм УФ-смола | PLA, ABS, PETG, Древесина |
| Ось Z Точность | 0,01 мм | 0,01 мм | 0,002 мм |


-

- Anycubic Kobra
- FDM (Моделирование методом Послойного наплавления)
- Объем Сборки: 220 * 220 * 250 мм
- Филамент: PLA, TPU, ABS, PETG, Holz
- Автоматическое Выравнивание
-

- Anycubic Kobra Plus
- FDM (Моделирование методом Послойного наплавления)
- Объем Сборки: 300 x 300 x 350 мм
- Филамент: PLA, TPU, ABS, PETG, Holz
- Автоматическое Выравнивание
-
- Anycubic Kobra Max
- FDM (Моделирование методом Послойного наплавления)
- Объем Сборки: 400 x 400 x 450 мм
- Филамент: PLA, TPU, ABS, PETG, Holz
- Автоматическое Выравнивание
-
Anycubic Care

Прошивка

Водитель

Слайсер

Тестовая модель

Пожалуйста, нажмите на нее, чтобы загрузить.

Оказание услуг
Доставка
Salesbeat Dismiss
Фамилия и имя (Обязательно)
Укажите ваш е-mail (Обязательно)
Напишите ваш телефон (Обязательно)
Комментарий (Не обязательно)
Payment method
Онлайн оплата на сайте банковской картой или с помощью платежных средств: ЮMoney, Тинькоф, Сбер, телефоном через онлайн сервис Yookassa СбербанкаВыберите этот способ оплаты, если хотите запросить счет для оплаты юридическими лицами (обмен юридически значимыми документами по телекоммуникационным каналам)Не получается оформить, перезвоните!
- Manuals
- Brands
- AnyCubic Manuals
- 3D Printers
- Kobra Go
- User manual
-
Contents
-
Table of Contents
-
Troubleshooting
-
Bookmarks
Quick Links
Related Manuals for AnyCubic Kobra Go
Summary of Contents for AnyCubic Kobra Go
-
Page 2
Dear customer, Thank you for choosing Anycubic products. Maybe you are familiar with 3D printing technology or have purchased Anycubic printers before, but we still highly recommend that you read this manual carefully. The installation techniques and precautions in this manual can help you avoid any unnecessary damage or frustration. -
Page 3: Table Of Contents
Contents Safety Instructions Technical Specification Packing List Product Overview Menu Directory Installation Software Resume from Outage Maintenance Troubleshooting…
-
Page 4: Safety Instructions
It is recommended to use protection glasses when cleaning/sanding the printed models to avoid small particles in eyes. Keep the Anycubic 3D printer and its accessories out of the reach of children. Vapors or fumes may be irritating at operating temperature. Always use the Anycubic 3D printer in an open and well ventilated area.
-
Page 5: Technical Specification
Technical Specification Printing Technology FDM (Fused Deposition Modeling) Build Size 220 mm(L) × 220 mm(W) × 250 mm(H) Layer Thickness 0.05 — 0.3 mm Positioning Accuracy X / Y / Z 0.0125 / 0.0125 / 0.00125 mm Extruder Quantity Single Nozzle Diameter 0.4 mm Print Speed…
-
Page 6
Technical Specification Software Slicing Software Cura, Simplify3D, Repetier-HOST Software Input Formats .STL, .OBJ, .JPG, .PNG Software Output Formats GCode Connectivity Memory card; Data cable (expert users only) Electrical Power Input 110 V / 220 V AC, 50 / 60 Hz Rated Power 400 W Physical Dimensions… -
Page 7: Packing List
Packing List Printer base XE axis kit Print head Z-axis passive block X-axis limit switch kit Screen kit X-axis tensioner Z-axis motor kit Top beam X-axis profile Z-axis profile(left) Z-axis profile(right) T-shaped screw rod Anti-Backlash Nut Filament Holder Assembly Instruction Assembly Instruction Lubricant Tool Kit…
-
Page 8
Packing List Spare buckles and cable ties、 Power cord Spare nozzle Teflon tube Card Reader Photoelectric Synchronous belt Memory Card switch blank * All pictures shown are for illustrative purposes only. The actual product may vary due to product optimization. -
Page 9: Product Overview
Product Overview Front Filament holder Print head Printing platform Touchscreen Y belt tensioner Data cable port Memory card slot…
-
Page 10
Product Overview Back Lead screw X motor X belt tensioner Z motor Power switch Voltage regulator Y motor… -
Page 11: Menu Directory
Menu Directory Move X Move Y Main Screen Model 1 Move Z Model 2 Home ..Print from SD Card Disable Steppers Move Axis Menu Leveling Preheat PLA Preheat ABS Auto Prepare Load Leveling Filament Z Offset Unload Configuration Filament Language About…
-
Page 12: Installation
If there are some tiny scratches on the aluminum beams or slight unevenness on the platform, it is normal and won’t affect the printing quality. Thank you very much for your kind understanding. Team ANYCUBIC…
-
Page 13: Software
Double click Ultimaker_Cura-4.12.0-win64, and follow the steps as shown below. * Ultimaker Cura 4.12.0 is used for example here, please refer to the memory card for the actual version. * File path: Memory card → “Files_ English_Anycubic Kobra Go” → “Cura” → “Windows” or “Mac”. ①…
-
Page 14
Introduction to slicing software ③ ④ ⑤ ⑥ * Printing online requires the installation of a driver, as shown below. If you don’t print online, you don’t need to install it. -
Page 15
Introduction to slicing software 2. Machine Settings Upon completion of installation, the first launch of the software will display the following welcome screen. Click Get started to start the machine settings. ① ② 4.12.0… -
Page 16
Introduction to slicing software ③ ④ ⑤… -
Page 17
Introduction to slicing software 切片软件操作介绍 ⑥ ⑦ ⑧… -
Page 18
Introduction to slicing software 切片软件操作介绍 ⑧… -
Page 19
3. Import the Configuration File After continuous testing, we provided users the suggested printing parameters of different filaments for Anycubic Kobra Go, and the user could directly import the parameter files to the software. (1) Click Settings → Configure setting visibility…, and then tick Check all box to make all settings visible. -
Page 20
Introduction to slicing software (3) Select the profile that you just imported, and then click the Activate button。… -
Page 21
Introduction to slicing software * Note: An interface may pop up after clicking the Activate button. If so, please check the values of listed parameters. You can click Keep to keep the custom values or click Discard to enable the values in the profile. -
Page 22
Introduction to slicing software Supplementary Explanation ① You can customize some parameters after importing the profile, but we still recommend that you use the parameters in the profile that we provide. ② The paremeter Build Plate Adhesion → Build Plate Adhesion Type needs to be set to “None”… -
Page 23
Introduction to slicing software 4. Manipulate 3D model in Cura * Model files can be downloaded from www.anycubic.com (ANYCUBIC website) and www.thingiverse.com. (1) Click the open file button in the top left corner to import the model file or directly drag the file into the software. -
Page 24
Introduction to slicing software Other operations: ① Press the mouse wheel and move the mouse to move the platform. ② Scroll the mouse wheel to zoom in and out the platform. ③ Right click and move the mouse to change the viewing angle. * Note: When moving the model, make sure that the model is in the printable area. -
Page 25
Introduction to slicing software Use the layer slider and simulation view to check important parts of your 3D slice. Layer Slider… -
Page 26
Introduction to slicing software 6. Print offline and online There are two operational modes for Anycubic Kobra Go: print offline and print online. • Print offline: Insert memory card into the memory card slot, click on the Home Menu “Print” to enter the file list, and print a selected file (GCode files ONLY). -
Page 27
* Anycubic Kobra Go uses CH340 chip for communication. * CH340 driver file path: “Files_English_Anycubic Kobra Go” → “Driver_CH341”. There are two versions, Windows and Mac version. (* CH341 driver file is suitable for CH340 chip). -
Page 28
Introduction to slicing software (2) Here we take Windows PC system for example. Double click “CH341SerSetup.exe” and follow the wizard to install it. If the driver has installed automatically in step (1), skip this step. * After the installation is completed, refer to the method in step (1) to see if the driver has been identified (no exclamation mark). -
Page 29: Resume From Outage
Resume from Outage In case of a power loss during printing, the machine will automatically save the printing status. After restarting, you will see the interface shown below, please click «Continue» to continue your printing or “Cancel” to cancel it.
-
Page 30: Maintenance
Maintenance It is necessary to perform routine maintenance to the 3D printer to achieve consistent and quality results. Some maintenance suggestions are shown as below: 1. Clean the nozzle with a needle under preheating conditions. If the filament residue in the nozzle could not be cleared 100%, please replace the nozzle. 2.
-
Page 31: Troubleshooting
Troubleshooting 1. Motor shaking or abnormal sound The motor cable are not connected properly. Please Check each connection ① and then inspect the cable routing for any faults. Drive current is too large / small (please contact customer service). ② The motor is damaged.
-
Page 32
Please check if the soft cable above the screen is loose. ① Inspect if the touchscreen has been pressed by something. ② Check if screen has cracks, if so, please contact our after sale service via ③ official website www.anycubic.com… -
Page 33
Troubleshooting 8. T0 sensor abnormal Check the wiring of the hotend and ensure a good connection. ① Check if there is any pins bent inside the connector. ② 9. Print head move abnormal The setting of machine type in slicing software is wrong. Please see page 17 ①… -
Page 34
Troubleshooting The printing temperature is too high, which causes the fluidity and viscosity ③ of the filament to be strong. The printing temperature needs to be set a little lower. 13. Nozzle is too low or too high when printing Nozzle is too close to the platform, resulting in insufficient extrusion of ①… -
Page 35
ATTENTION 1. Anycubic 3D printer generates high temperature. DO NOT reach inside of the printer during operation. Contact with extruded materials may cause burns. 2. Use high temperature resistant gloves when operating the product. 3. This equipment is not suitable for use in locations where children are likely to be present.
Всем привет. Небольшие мысли относительно нового принтера Anycubic Kobra Max в сравнении с Anycubic Chiron после трёх лет его эксплуатации. В статье будут только фото, относительно кобры.
Очень быстрая доставка. Со склада в РФ до Иркутска СДЭКом дошло за 5 рабочих дней.
Технические характеристики можно найти в интернете.

Компановка и инструмент в комплекте
Упаковано очень хорошо в большую коробку, проложенную мягким пенопластом. Все движущиеся части зафиксорованы широкими стяжками.

Относительно того, что кладут в комплект — можно посмотреть на Али, кому интересно.
Что мне не понравилось:
- Пластиковый шпатель. Бесполезная вещь для ФДМ. Отдал ребёнку играться. В комплекте с хироном идёт железный
- Маленькие кусачки под детскую руку. Тоже ушло сыну. Ему как раз. С хироном, если не ошибаюсь идут классические синие.
- Гаечные ключи 2 штуки. Нужны, чтобы зафиксировать голову и калибровать стол. Очень мягкий металл, гнётся руками. Маленький ключ не пережил калибровку стола.
- MicroSD флэшка. Вопрос, когда потеряется.
- 10 метров пла пластика. Новичкам мало, опытным ни о чём.
Что понравилось:
- Длинный USB кабель.
- Г образные ключи. Конечно маленькие, но удобно
Сборка и настройка принтера
Тестовые модели и мануал можно найти здесь на офф сайте.
Всё довольно просто и продуманно. Так же просто, как и с хироном.
От распаковки до пробной печати калибровочного кубика, если смотреть по чистому времени работы, неспешно с ребёнком — примерно 40 минут, с учётом того, что разбирал хотенд, вскрывал корпус с материнкой.
Тестовый кубик распечатался идеально. Калибровка по размерам не требуется.
На флэшке идут в том числе профили под резину и кура 4.2.6. С учётом того, что перешёл на куру 5.0 просто настроил её по инструкции.
Ещё минут 30 потратил на ручную докалибровку стола после автовыравнивания печатая плоские кубики по углам.
Что понравилось по сравнению с Хироном
Интересный мотор с валом для стола

Два ремня GT2 6 мм вместо одного на 10 по центру у хирона.
Ближе к трём годам эксплуатации мотор по столу заклинило намертво, что утянуло за собой и маму.Если кто поделится ссылкой на данный мотор на али, буду признателен.
EndStop не на голове экструдера
У хирона при работе с головой, замене хотенда и прочих работах вечно отлетали короткие провода от ендстопа, который был в самой голове
Но вызывает сомнения кастомайз уникубика относительно платки ендстопа, так что не исключено, что проще ендстоп в данном случае будет перепаивать

Кастомайз головы экструдера

Обдув с двух сторон из литого пластика — класс. В отличие от хирона, где элемент обдува от бокового вентиляторы был печатным, который довольно быстро сломался
Встроенная подстветка в голову — довольно прикольно.
Хотенд и подключаемая плата

Наконец то все разъёмы термистора и нагревателей классического стандарта 2.54. На хироне вентили и термистор имели более мелкий разъём. Из-за него периодически приходилось покупать новые комплекты нагревательных блоков. Под конец эксплуатации хирона даже сама мама на разъёме головы стала слетать.
Провод от вентилятора также приходилось перепаивать со стандартного разъёма 2.54.
По плате. Более продуманная схема фиксации вместо красного разъёма, который уже спустя год выдавал глюки по температуре, а под конец жизни принтера пришлось тянуть провода к нагревателю и термистору напрямую от платы. А провода термистора вообще припаивал к платке экрана.
Оптимизировали плату подключения экструдера

Добавили боковые фиксаторы портала. На хироне в принципе модели высотой 40 см и не печатал. Больше по плоскости печатаю, но всё равно приятно.
Стоит отметить более продуманную организацию кабелей
Один большой вентилятор на обдув радиаторов
Более удобная фиксация ультрабазы на нагревательном столе. Ультрабазу можно купить отдельно. Относительно эксплуатации хирона — спустя пол года на ультрабазе уже печатал на лак. Спустя ещё два года по центру немного отслоилось стекло, но на печать не влияло.
Нейтральные вещи
Экран принтера на английском языке. Или китайском. Меня всё устраивает, но кто-то может захочет русский язык.
Нагревательный блок вместо классических e3d/mk8 заменён на вулкан с небольшим кастомайзом, но подойдёт и обычный вулкан.

Что не понравилось
Подача филамента слева. У хирона подача справа и мне так нравилось больше.
Радиатор обдува драйверов и платы закреплён на крышке, которая фактически лежит на полу.
Вшитые драйвера прямо в плату. Толи TMC2208, толи TMC2209. Где-то читал, что есть режим стелсчоп. Очень маленькие радиаторы. Под TMC считаю, должны быть более крупные.
Очередная кастомайз плата. В общем, смотрим фото.

Со стороны стола в корпусе с электроникой довольно большое отверстие, в которое наверняка будет сыпаться мусор, так что немного позднее придётся распечатать туда заглушку.
В каких-то обзорах писали, что пластиковые натяжители ремня довольно хлипкие и есть вероятность их поломок. В принципе согласен с этим.
МикроСД — как писал выше, относительно комплектухи. Неудобно вставлять, есть риск потери. Стандартная СД карточка или ЮСБ флэшка по моему мнению были бы более удачным вариантом.
Выводы
Чисто субъективные.
Качество печати из коробки хорошее. Примеры печати можно найти в ютубе и прочих обзорах. После тестового кубика поставил печать заказов, которые к сожалению не могу публиковать. Качество меня устроило.
В общем, неплохой принтер за свои деньги, который, надеюсь, излечен от детских болезней хирона и более продуман.P.S> На момент отправки статьи в публикацию у меня 23 вечера, так что на все ваши вопросы и комментарии постараюсь ответить утром.Всем хорошей недели.
Описание товара
- Anycubic LeviQ
- Умное автовыравнивание.
- Двойной винтовой двигатель
- Гладкий & надежная работа.
- Огромный размер здания
- 400*400*450мм.
- Обнаружение биения
- Интеллектуальный мониторинг подачи нити.
- Технические характеристики
- ● Прокачка: Автоматическая, 25 очков прокачки
- ● Площадь панели: 7,95 дюйма² / 51,3 см²
- ● Обнаружение биения нити: Поддержка
- ● Материал для печати: PLA / ABS / PETG & TPU
- ● Размер сопла: ø 0,4 мм (сменное)
- ● Температура сопла: ≤ 500 °F / 260 °C
- ● Температура горячего слоя: ≤ 194 °F / 90 °C
- ● Средняя скорость: 3,1–3,9 дюйма/с /80–100 мм/с
- ● Панель управления: 4,3-дюймовый сенсорный ЖК-экран
- ● Ось Z: стержень с двойной резьбой
- ● Размер печати: 17,7 х 15,7 х 15,7 дюйма / 450 х 400 х 400 мм (HWD)
- ● Объем печати: 19,02 галлона. / 72,0 л
- ● Размеры машины: 720 х 715 х 665 мм
- Разблокируйте безграничное творчество
- Размер снова увеличился, достигнув 400*400*450мм. Создание мира для воображения, чтобы разгуляться.
- Прокачка без забот
- Выравнивание Anycubic Horizon может автоматически компенсировать неровности горячего слоя. Выравнивание и печать можно выполнить с помощью одной кнопки, простого управления и удобного пользовательского интерфейса.
- Гладкий & Стабильная работа
- Движущиеся части по оси Z с двойной резьбой уменьшают колебания при печати.
- Удобный сенсорный экран
- Принтер оснащен чувствительным 4,3-дюймовым сенсорным ЖК-экраном с полноцветным дисплеем, упрощающим навигацию.
- Излишне ждать
- Максимальная скорость печати составляет 180 мм/с (средняя скорость составляет 80 мм/с, что на 167% быстрее, чем у конкурирующих продуктов). Более высокая скорость позволяет вам получать больше удовольствия от 3D-печати.
- Начать быстро
- Модульная конструкция позволяет собрать принтер всего за 10 минут, что очень удобно в использовании.
- Отличная адгезия & Удаление
- Платформа для печати блокирует детали во время печати, когда она горячая, а после охлаждения детали можно легко снять. Ее можно использовать повторно без потери производительности.
- Обнаружение биения нити
- Оснащенный датчиком биения нити, он может интеллектуально контролировать подачу нити. Если в вашем принтере закончится нить, он автоматически остановится без потери прогресса печати.
- Поддерживаются все нити
- Anycubic предлагает различные виды и цвета филаментов, которые имеют равномерный и гладкий выход, что дает вам больше возможностей для творчества.
Список деталей
База
Карборундовое стекло
Диагональная штанга
Экран монитора
Нить
Держатель нити
Сопло
Рамка
Набор инструментов
Пружинная шайба
SD-карта
Кард-ридер
Шнур питания
Зажим нагревательного стола
Сальник
Гайка
Винты
|
|
|
|
| Технология печати | SLA-печать на основе ЖК-дисплеев | SLA-печать на основе ЖК-дисплеев | FDM (Моделирование наплавленных отложений) |
| Разрешение XY | 3840*2400 пикселей | 5760*3600 пикселей | Никто |
| Объем сборки | 132мм*80мм*165мм | 197мм*122мм*245мм | 245*245*260мм |
| Макс. Скорость печати | 50 мм/с | 80 мм/с | 100 мм/с |
| Материалы для печати | 405 нм УФ-смола | 405 нм УФ-смола | PLA, ABS, PETG, Древесина |
| Ось Z Точность | 0,01 мм | 0,01 мм | 0,002 мм |
-
- Anycubic Kobra
- FDM (Моделирование методом Послойного наплавления)
- Объем Сборки: 220 * 220 * 250 мм
- Филамент: PLA, TPU, ABS, PETG, Holz
- Автоматическое Выравнивание
-
- Anycubic Kobra Plus
- FDM (Моделирование методом Послойного наплавления)
- Объем Сборки: 300 x 300 x 350 мм
- Филамент: PLA, TPU, ABS, PETG, Holz
- Автоматическое Выравнивание
-
- Anycubic Kobra Max
- FDM (Моделирование методом Послойного наплавления)
- Объем Сборки: 400 x 400 x 450 мм
- Филамент: PLA, TPU, ABS, PETG, Holz
- Автоматическое Выравнивание
-
Anycubic Care
Прошивка
Водитель
Слайсер
Тестовая модель
Пожалуйста, нажмите на нее, чтобы загрузить.
Оказание услуг
Manual
English:
- Anycubic Kobra Manual_EN
- Anycubic Kobra Plus Manual_EN
- Anycubic Kobra Max Manual_EN
- Anycubic Kobra Go Manual_EN
- Anycubic Kobra Neo Manual_EN
Firmware
- Anycubic Kobra Firmware
- Anycubic Kobra Plus Firmware
- Anycubic Kobra Max Firmware
- Anycubic Kobra Neo Firmware
- Anycubic Kobra Go Firmware
Driver
- H341
Slicer
- Cura_Win
- Cura_Mac
Video Tutorials
Leveling Operation for Anycubic Kobra
Install the Material Break Detection Module for Anycubic Kobra
Replace the Proximity Switches for Anycubic Kobra
Replace the Extruder for Anycubic Kobra
Heatbed Replacement Tutorial for Anycubic Kobra
Replace the Motherboard For Anycubic Kobra
Replace the Print Head for Anycubic Kobra
Anycubic Kobra Plus Unboxing Video
Replace the Motherboard for Anycubic Kobra Plus
Heatbed Replacement Tutorial for Anycubic Kobra Max
Replace Motherboard for Anycubic Kobra Max
Install Y-axis Shaft Bushing for Anycubic Kobra Max
Replace the Print Head for Anycubic Kobra Max
Replace the Power Supply for Anycubic Kobra Max
Replace The Hot Bed for Anycubic Kobra Go
Installation And Leveling Guide Anycubic Kobra Go
Replace the Proximity Switches for Anycubic Kobra Go
Leveling Operation for Anycubic Kobra Go
Replace the Motherboard for Anycubic Kobra Go
Replace the Print Head Module for Anycubic Korba Go
Unboxing for Anycubic Kobra Neo
Leveling Operation for Anycubic Kobra Neo
Replace The Hot Bed for Anycubic Kobra Neo
Replace the Proximity Switches for Anycubic Kobra Neo
Replace the Power Supply for Anycubic Kobra Neo
Replace the Motherboard for Anycubic Kobra Neo
Back to News
- Manuals
- Brands
- AnyCubic Manuals
- 3D Printers
- Kobra Go
- User manual
-
Contents
-
Table of Contents
-
Troubleshooting
-
Bookmarks
Quick Links
Related Manuals for AnyCubic Kobra Go
Summary of Contents for AnyCubic Kobra Go
-
Page 2
Dear customer, Thank you for choosing Anycubic products. Maybe you are familiar with 3D printing technology or have purchased Anycubic printers before, but we still highly recommend that you read this manual carefully. The installation techniques and precautions in this manual can help you avoid any unnecessary damage or frustration. -
Page 3: Table Of Contents
Contents Safety Instructions Technical Specification Packing List Product Overview Menu Directory Installation Software Resume from Outage Maintenance Troubleshooting…
-
Page 4: Safety Instructions
It is recommended to use protection glasses when cleaning/sanding the printed models to avoid small particles in eyes. Keep the Anycubic 3D printer and its accessories out of the reach of children. Vapors or fumes may be irritating at operating temperature. Always use the Anycubic 3D printer in an open and well ventilated area.
-
Page 5: Technical Specification
Technical Specification Printing Technology FDM (Fused Deposition Modeling) Build Size 220 mm(L) × 220 mm(W) × 250 mm(H) Layer Thickness 0.05 — 0.3 mm Positioning Accuracy X / Y / Z 0.0125 / 0.0125 / 0.00125 mm Extruder Quantity Single Nozzle Diameter 0.4 mm Print Speed…
-
Page 6
Technical Specification Software Slicing Software Cura, Simplify3D, Repetier-HOST Software Input Formats .STL, .OBJ, .JPG, .PNG Software Output Formats GCode Connectivity Memory card; Data cable (expert users only) Electrical Power Input 110 V / 220 V AC, 50 / 60 Hz Rated Power 400 W Physical Dimensions… -
Page 7: Packing List
Packing List Printer base XE axis kit Print head Z-axis passive block X-axis limit switch kit Screen kit X-axis tensioner Z-axis motor kit Top beam X-axis profile Z-axis profile(left) Z-axis profile(right) T-shaped screw rod Anti-Backlash Nut Filament Holder Assembly Instruction Assembly Instruction Lubricant Tool Kit…
-
Page 8
Packing List Spare buckles and cable ties、 Power cord Spare nozzle Teflon tube Card Reader Photoelectric Synchronous belt Memory Card switch blank * All pictures shown are for illustrative purposes only. The actual product may vary due to product optimization. -
Page 9: Product Overview
Product Overview Front Filament holder Print head Printing platform Touchscreen Y belt tensioner Data cable port Memory card slot…
-
Page 10
Product Overview Back Lead screw X motor X belt tensioner Z motor Power switch Voltage regulator Y motor… -
Page 11: Menu Directory
Menu Directory Move X Move Y Main Screen Model 1 Move Z Model 2 Home ..Print from SD Card Disable Steppers Move Axis Menu Leveling Preheat PLA Preheat ABS Auto Prepare Load Leveling Filament Z Offset Unload Configuration Filament Language About…
-
Page 12: Installation
If there are some tiny scratches on the aluminum beams or slight unevenness on the platform, it is normal and won’t affect the printing quality. Thank you very much for your kind understanding. Team ANYCUBIC…
-
Page 13: Software
Double click Ultimaker_Cura-4.12.0-win64, and follow the steps as shown below. * Ultimaker Cura 4.12.0 is used for example here, please refer to the memory card for the actual version. * File path: Memory card → “Files_ English_Anycubic Kobra Go” → “Cura” → “Windows” or “Mac”. ①…
-
Page 14
Introduction to slicing software ③ ④ ⑤ ⑥ * Printing online requires the installation of a driver, as shown below. If you don’t print online, you don’t need to install it. -
Page 15
Introduction to slicing software 2. Machine Settings Upon completion of installation, the first launch of the software will display the following welcome screen. Click Get started to start the machine settings. ① ② 4.12.0… -
Page 16
Introduction to slicing software ③ ④ ⑤… -
Page 17
Introduction to slicing software 切片软件操作介绍 ⑥ ⑦ ⑧… -
Page 18
Introduction to slicing software 切片软件操作介绍 ⑧… -
Page 19
3. Import the Configuration File After continuous testing, we provided users the suggested printing parameters of different filaments for Anycubic Kobra Go, and the user could directly import the parameter files to the software. (1) Click Settings → Configure setting visibility…, and then tick Check all box to make all settings visible. -
Page 20
Introduction to slicing software (3) Select the profile that you just imported, and then click the Activate button。… -
Page 21
Introduction to slicing software * Note: An interface may pop up after clicking the Activate button. If so, please check the values of listed parameters. You can click Keep to keep the custom values or click Discard to enable the values in the profile. -
Page 22
Introduction to slicing software Supplementary Explanation ① You can customize some parameters after importing the profile, but we still recommend that you use the parameters in the profile that we provide. ② The paremeter Build Plate Adhesion → Build Plate Adhesion Type needs to be set to “None”… -
Page 23
Introduction to slicing software 4. Manipulate 3D model in Cura * Model files can be downloaded from www.anycubic.com (ANYCUBIC website) and www.thingiverse.com. (1) Click the open file button in the top left corner to import the model file or directly drag the file into the software. -
Page 24
Introduction to slicing software Other operations: ① Press the mouse wheel and move the mouse to move the platform. ② Scroll the mouse wheel to zoom in and out the platform. ③ Right click and move the mouse to change the viewing angle. * Note: When moving the model, make sure that the model is in the printable area. -
Page 25
Introduction to slicing software Use the layer slider and simulation view to check important parts of your 3D slice. Layer Slider… -
Page 26
Introduction to slicing software 6. Print offline and online There are two operational modes for Anycubic Kobra Go: print offline and print online. • Print offline: Insert memory card into the memory card slot, click on the Home Menu “Print” to enter the file list, and print a selected file (GCode files ONLY). -
Page 27
* Anycubic Kobra Go uses CH340 chip for communication. * CH340 driver file path: “Files_English_Anycubic Kobra Go” → “Driver_CH341”. There are two versions, Windows and Mac version. (* CH341 driver file is suitable for CH340 chip). -
Page 28
Introduction to slicing software (2) Here we take Windows PC system for example. Double click “CH341SerSetup.exe” and follow the wizard to install it. If the driver has installed automatically in step (1), skip this step. * After the installation is completed, refer to the method in step (1) to see if the driver has been identified (no exclamation mark). -
Page 29: Resume From Outage
Resume from Outage In case of a power loss during printing, the machine will automatically save the printing status. After restarting, you will see the interface shown below, please click «Continue» to continue your printing or “Cancel” to cancel it.
-
Page 30: Maintenance
Maintenance It is necessary to perform routine maintenance to the 3D printer to achieve consistent and quality results. Some maintenance suggestions are shown as below: 1. Clean the nozzle with a needle under preheating conditions. If the filament residue in the nozzle could not be cleared 100%, please replace the nozzle. 2.
-
Page 31: Troubleshooting
Troubleshooting 1. Motor shaking or abnormal sound The motor cable are not connected properly. Please Check each connection ① and then inspect the cable routing for any faults. Drive current is too large / small (please contact customer service). ② The motor is damaged.
-
Page 32
Please check if the soft cable above the screen is loose. ① Inspect if the touchscreen has been pressed by something. ② Check if screen has cracks, if so, please contact our after sale service via ③ official website www.anycubic.com… -
Page 33
Troubleshooting 8. T0 sensor abnormal Check the wiring of the hotend and ensure a good connection. ① Check if there is any pins bent inside the connector. ② 9. Print head move abnormal The setting of machine type in slicing software is wrong. Please see page 17 ①… -
Page 34
Troubleshooting The printing temperature is too high, which causes the fluidity and viscosity ③ of the filament to be strong. The printing temperature needs to be set a little lower. 13. Nozzle is too low or too high when printing Nozzle is too close to the platform, resulting in insufficient extrusion of ①… -
Page 35
ATTENTION 1. Anycubic 3D printer generates high temperature. DO NOT reach inside of the printer during operation. Contact with extruded materials may cause burns. 2. Use high temperature resistant gloves when operating the product. 3. This equipment is not suitable for use in locations where children are likely to be present.