-
Contents
-
Table of Contents
-
Bookmarks
Quick Links
AC1350 Wireless
Dual Band Router
Five an te nn a s for fa ster AC
W i- Fi an d g re a te r cove rag e
C60
MU-MIMO Technology for
450Mbps + 867Mbps
2× Faster Performance
Dual Band Wi-Fi
Beamforming Technology
for Better Coverage
Related Manuals for TP-Link Archer C60 AC1350
Summary of Contents for TP-Link Archer C60 AC1350
-
Page 1
AC1350 Wireless Dual Band Router Five an te nn a s for fa ster AC W i- Fi an d g re a te r cove rag e MU-MIMO Technology for Beamforming Technology 450Mbps + 867Mbps 2× Faster Performance for Better Coverage Dual Band Wi-Fi… -
Page 2
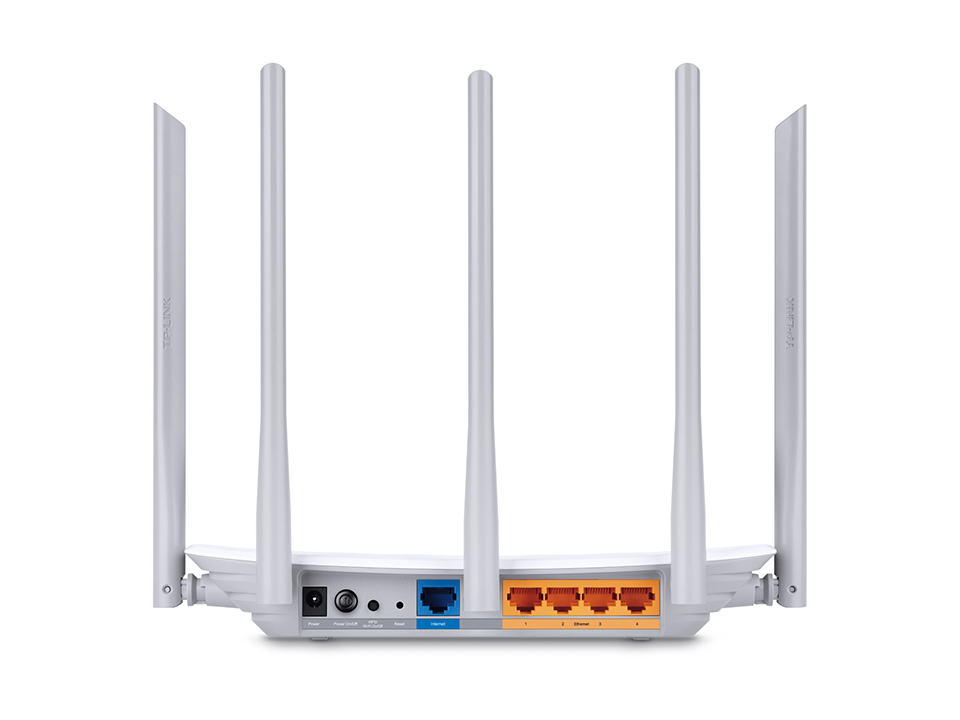
The router’s 5GHz band reaches 867Mbps so you can game online and stream in HD simultaneously. 2.4GHz 450Mbps 5GHz 867Mbps Power Power WPS/ Reset Internet Ethernet Ports On/Off Wi-Fi Access On/Off TP-Link AC1350 Wireless Dual Band Router… -
Page 3
Archer C60’s signal towards them to optimize wireless connections. MU-MIMO Router Traditional Router Archer C60 Regular Router Simultaneously sends data to multiple devices Sends data to one device at a time TP-Link AC1350 Wireless Dual Band Router… -
Page 4
· Support 802.11 ac – Provides a data transfer rate 3 times faster reliable and efficient wireless connection than 802.11n for each stream TP-Link AC1350 Wireless Dual Band Router… -
Page 5
· Hassle-free Management with Tether App – Network management is made easy with the TP-Link Tether App, · Encryptions for Secure Network – WPA-PSK and WPA2-PSK available on any Android and iOS device encryptions provide active protection against security threats ·… -
Page 6
Enable/Disable Wireless Radio, WDS Bridge, WMM, Wireless Statistics Power Power WPS/ Reset Internet Ethernet Ports On/Off Wi-Fi Access · Wireless Security: Enable/Disable SSID Broadcast, 64/128-bit WEP, On/Off WPA/WPA2, WPA-PSK/WPA-PSK2 encryptions, QSS, Wireless MAC Filter TP-Link AC1350 Wireless Dual Band Router… -
Page 7
Specifications are subject to change without notice. TP-Link is a registered trademark of TP-Link Technologies Co., Ltd. Other brands and product names are trademarks or registered trademarks of their respective holders. Copyright ©2017 TP-Link Technologies Co., Ltd. All rights reserved. -
Page 8
User Guide AC1350 Wireless Dual Band Router Archer C60 REV2.0.0 1910012074… -
Page 9: Table Of Contents
Chapter 5. TP-Link Cloud Service ……..21…
-
Page 10
Chapter 8. QoS……….. . . 36 8. -
Page 11
13. 4. 1. Online Upgrade ……….. . . 73 13. -
Page 12: About This Guide
The Quick Installation Guide can be found where you find this guide or inside the package of the router. Specifications can be found on the product page at http://www.tp-link.com. A Technical Support Forum is provided for you to discuss our products at http://forum.tp-link.com.
-
Page 13: Chapter 1. Get To Know About Your Router
Chapter Get to Know About Your Router This chapter introduces what the router can do and shows its appearance. It contains the following sections: • Product Overview • Panel Layout…
-
Page 14: Product Overview
Ethernet ports supply high-speed connection to your wired devices. Moreover, it is simple and convenient to set up and use the TP-Link router due to its intuitive web interface and the powerful Tether app.
-
Page 15: The Back Panel
Chapter 1 Get to Know About Your Router LED Explanation Name Status Indication The 2.4GHz wireless band is enabled. (2.4GHz Wireless) The 2.4GHz wireless band is disabled. The 5GHz wireless band is enabled. (5GHz Wireless) The 5GHz wireless band is disabled. At least one powered-on device is connected to the router’s LAN port.
-
Page 16
Chapter 1 Get to Know About Your Router Item Description Press this button, and immediately press the WPS button on your device. The WPS LED of the router should change from flashing to solid on, indicating WPS/Wi-Fi On/Off successful WPS connection. Button Press and hold the Wi-Fi button for about 2 seconds to turn on or off the wireless function of your router. -
Page 17: Chapter 2. Connect The Hardware
Chapter Connect the Hardware This chapter contains the following sections: • Position Your Router • Connect Your Router…
-
Page 18: Position Your Router
Chapter 2 Connect the Hardware 2. 1. Position Your Router • The product should not be located in a place where it will be exposed to moisture or excessive heat. • Place the router in a location where it can be connected to multiple devices as well as to a power source.
-
Page 19
Chapter 2 Connect the Hardware 2. Connect the modem to your router’s Internet port with an Ethernet cable. 3. Turn on the modem, and then wait about 2 minutes for it to restart. 4. Connect the power adapter to the router and turn on the router. 5. -
Page 20
Chapter 2 Connect the Hardware • Method 3: Use the WPS button Wireless devices that support WPS, including Android phones, tablets, and most USB network adapters, can be connected to your router through this method. Note: • WPS is not supported by iOS devices. •… -
Page 21: Chapter 3. Log In To Your Router
Chapter Log In to Your Router…
-
Page 22
• If the login window does not appear, please refer to the Section. • If you have registered a TP-Link ID and bound your cloud router to it, the login password you created here will be ineffective. Please log in to the cloud router using your TP-Link ID. -
Page 23: Chapter 4. Set Up Internet Connection
Chapter Set Up Internet Connection This chapter introduces how to connect your router to the internet. The router is equipped with a web-based Quick Setup wizard. It has necessary ISP information built in, automates many of the steps and verifies that those steps have been successfully completed.
-
Page 24: Use Quick Setup Wizard
ISP. Follow the steps below to check or modify your internet connection settings. 1. Visit http://tplinkwifi.net, and log in with your TP-Link ID or the password you set for the router.
-
Page 25
Chapter 4 Set Up Internet Connection Note: If you are unsure of what your connection type is, click Auto Detect. Since different connection types require different cables and connection information, you can also refer to the demonstrations in Step 4 to determine your connection type. -
Page 26
Chapter 4 Set Up Internet Connection 3 ) If you choose PPPoE, enter the username password provided by your ISP. PPPoE users usually have DSL cable modems. 4 ) If you choose L2TP, enter the username password and choose the Secondary Connection provided by your ISP. -
Page 27
Chapter 4 Set Up Internet Connection 5 ) If you choose PPTP, enter the username and password, and choose the Secondary Connection provided by your ISP. Different parameters are needed according to the Secondary Connection you have chosen. 5. Click Save. 6. -
Page 28: Set Up An Ipv6 Internet Connection
Your ISP provides information about one of the following IPv6 internet connection types: PPPoE, Dynamic IP(SLAAC/DHCPv6), Static IP, 6to4 tunnel, Pass-Through (Bridge). 1. Visit http://tplinkwifi.net, and log in with your TP-Link ID or the password you set for the router.
-
Page 29
Chapter 4 Set Up Internet Connection Dynamic IP(SLAAC/DHCPv6): Click Advanced to input further information if your ISP requires. Click Save and then click Renew. PPPoE: By default, the router uses the IPv4 account to connect to the IPv6 server. Click Advanced to input further information if your ISP requires. -
Page 30
Chapter 4 Set Up Internet Connection 6to4 Tunnel: An IPv4 internet connection type is a prerequisite for this connection type (Manually Set Up Your Internet Connection). Click Advanced input further information if your ISP requires. Click Save and then click Connect. Pass-Through (Bridge): Click Save… -
Page 31
Chapter 4 Set Up Internet Connection 5. Configure LAN ports. Windows users are recommended to choose from the first two types. Fill in Address Prefix provided by your ISP, and click Save. Tips: Find Help on the web management page to know more about items. 6. -
Page 32: Chapter 5. Tp-Link Cloud Service
TP-Link Cloud service provides a better way to manage your cloud devices. Log in to your router with a TP-Link ID, and you can easily monitor and manage your home network when you are out and about via the Tether app on your smartphone or tablet. To ensure that your router stays new and gets better over time, the TP-Link Cloud will notify you when an important firmware upgrade is avaliable.
-
Page 33: Register A Tp-Link Id
IDs. • Once the router is bound to your TP-Link ID, you need to log in to the router with the TP-Link ID. • Once you have registered a TP-Link ID on the web management page, you can only register another TP-Link ID via the Tether APP.
-
Page 34: Manage The User Tp-Link Ids
2. Enter the current password, then a new password twice. And click Save. 5. 3. Manage the User TP-Link IDs The TP-Link ID used to log in to the router for the first time will be automatically bound as the Admin account.
-
Page 35: Add Tp-Link Id To Manage The Router
3. Click , enter another TP-Link ID as needed and click Save. Note: If you need another TP-Link ID, please register a new one via the Tether app. Install Tether referring to Install the Tether App on Your Smartphones or Tablets.
-
Page 36: Manage The Router Via The Tp-Link Tether App
Locally Manage Your Router Using the Tether App 1. Connect your device to the router’s wireless network. 2. Launch the Tether app, select the model of your router and log in with your TP-Link ID or the password your set for the router.
-
Page 37: Remotely Manage Your Router Using The Tether App
• TP-Link Cloud router with the latest firmware. Refer to Upgrade the Firmware update your router to the latest firmware version. • A TP-Link ID bound to your router. If you don’t have a TP-Link ID, refer to Register a TP-Link ID to get one.
-
Page 38
Chapter 5 TP-Link Cloud Service 2. Enter the email address and the password of your TP-Link ID, and then tap Login. 3. Select the model of your router from the My Cloud Device list. -
Page 39
Chapter 5 TP-Link Cloud Service 4. On the home page, you can check your internet status and connected devices, or click to manage your router remotely as needed. -
Page 40: Chapter 6. Guest Network
Chapter Guest Network This function allows you to provide Wi-Fi access for guests without disclosing your main network. When you have guests in your house, apartment, or workplace, you can create a guest network for them. In addition, you can customize guest network options to ensure network security and privacy.
-
Page 41: Create A Network For Guests
Chapter 6 Guest Network 6. 1. Create a Network for Guests 1. Visit http://tplinkwifi.net, and log in with your TP-Link ID or the password you set for the router. 2. Go to Advanced > Guest Network. Locate the Wireless section.
-
Page 42: Customize Guest Network Options
Chapter 6 Guest Network 6. 2. Customize Guest Network Options 1. Visit http://tplinkwifi.net, and log in with your TP-Link ID or the password you set for the router. 2. Go to Advanced > Guest Network. Locate the Settings section. 3. Customize guest network options according to your needs.
-
Page 43: Chapter 7. Parental Controls
Chapter Parental Controls This function allows you to block inappropriate, explicit and malicious websites, and control access to specified websites at specified time.
-
Page 44
Wikipedia.org from 18:00 (6PM) to 22:00 (10PM) at the weekend and not other times. How can I 1. Visit http://tplinkwifi.net, and log in with your TP-Link ID or do that? the password you set for the router. 2. Go to Advanced >… -
Page 45
Chapter 7 Parental Controls 5. Enter a Description for the entry, tick the Enable This Entry checkbox, and then click OK. 6. Select Whitelist as the restriction policy. Tips: • With Blacklist selected, the controlled devices cannot access any websites containing the specified keywords during the Internet Access Time period. -
Page 46
Chapter 7 Parental Controls Done! Now you can control your children’s internet access as needed. -
Page 47: Chapter 8. Qos
Chapter This chapter introduces how to create a QoS (Quality of Service) rule to specify prioritization of traffic and minimize the impact caused when the connection is under heavy load. It contains the following sections: • Prioritize Internet Traffic with QoS…
-
Page 48: Prioritize Internet Traffic With Qos
Internet for my phone. How can I 1. Enable QoS and set bandwidth allocation. do that? 1 ) Visit http://tplinkwifi.net, and log in with your TP-Link ID or the password you set for the router. 2 ) Go to Advanced >…
-
Page 49
Chapter 8 2 ) Choose the respective device from the list. 3 ) Click OK. 3. Refer to the steps above to apply other QoS rules if any. Note: If you want to delete a QoS rule, click to remove the responding rule from the list. Done! Now QoS is implemented to prioritize Internet traffic. -
Page 50: Chapter 9. Network Security
Chapter Network Security This chapter guides you on how to protect your home network from cyber attacks and unauthorized users by implementing these three network security functions. You can protect your home network against DoS (Denial of Service) attacks from flooding your network with server requests using DoS Protection, block or allow specific client devices to access your network using Access Control, or you can prevent ARP spoofing and ARP attacks using IP &…
-
Page 51: Protect The Network From Cyber Attacks
DoS Protection can protect your home network against DoS attacks from flooding your network with server requests. Follow the steps below to configure DoS Protection. 1. Visit http://tplinkwifi.net, and log in with your TP-Link ID or the password you set for the router.
-
Page 52: Access Control
Block or allow specific client devices to access my network (via wired or wireless). How can I 1. Visit http://tplinkwifi.net, and log in with your TP-Link ID or do that? the password you set for the router. 2. Go to Advanced >…
-
Page 53: Ip & Mac Binding
Chapter 9 Network Security 3 ) Click Block above the Online Devices table. The selected devices will be added to Devices in Blacklist automatically. To allow specific device(s): 1 ) Select Whitelist and click Save. 2 ) Click in the Devices in Whitelist section.
-
Page 54
Chapter 9 Network Security I want to: Prevent ARP spoofing and ARP attacks. How can I 1. Visit http://tplinkwifi.net, and log in with your TP-Link ID or do that? the password you set for the router. 2. Go to Advanced >… -
Page 55: Chapter 10. Nat Forwarding
The TP-Link router supports four forwarding rules. If two or more rules are set, the priority of implementation from high to low is Virtual Servers, Port Triggering, UPNP and DMZ.
-
Page 56: Share Local Resources On The Internet By Virtual Servers
How can I 1. Assign a static IP address to your PC, for example do that? 192.168.0.100. 2. Visit http://tplinkwifi.net, and log in with your TP-Link ID or the password you set for the router. 3. Go to Advanced >…
-
Page 57: Open Ports Dynamically By Port Triggering
VoIPs, video players and common applications including MSN Gaming Zone, Dialpad and Quick Time 4 players, etc. Follow the steps below to configure the Port Triggering rules: 1. Visit http://tplinkwifi.net, and log in with your TP-Link ID or the password you set for the router. 2. Go to Advanced >…
-
Page 58: Make Applications Free From Port Restriction By Dmz
Chapter 10 NAT Forwarding 3. Click View Existing Applications, and select the desired application. The Triggering Port, External Port Protocol will be automatically filled in. The following picture takes application MSN Gaming Zone as an example. 4. Click OK. Tips: •…
-
Page 59: Make Xbox Online Games Run Smoothly By Upnp
How can I 1. Assign a static IP address to your PC, for example do that? 192.168.0.100. 2. Visit http://tplinkwifi.net, and log in with your TP-Link ID or the password you set for the router. 3. Go to Advanced >…
-
Page 60
Therefore, you can play Xbox online games without a hitch. Internet XBOX Router If necessary, you can follow the steps to change the status of UPnP. 1. Visit http://tplinkwifi.net, and log in with your TP-Link ID or the password you set for the router. 2. Go to Advanced >… -
Page 61: Chapter 11. Vpn Server
Chapter VPN Server The VPN (Virtual Private Networking) Server allows you to access your home network in a secured way through internet when you are out of home. The router offers two ways to setup VPN connection: OpenVPN and PPTP (Point to Point Tunneling Protocol) VPN. OpenVPN is somewhat complex but with greater security and more stable.
-
Page 62: Use Openvpn To Access Your Home Network
VPN client software on the remote device. Please follow the steps below to set up an OpenVPN connection. 11. 1. 1. Step1. Set up OpenVPN Server on Your Router 1. Visit http://tplinkwifi.net, and log in with your TP-Link ID or the password you set for the router. 2. Go to Advanced >…
-
Page 63: Step 2. Configure Openvpn Connection On Your Remote Device
Chapter 11 VPN Server 6. Select your Client Access type. Select Home Network Only if you only want the remote device to access your home network; select Internet and Home Network you also want the remote device to access internet through the VPN Server. 7.
-
Page 64: Step 1. Set Up Pptp Vpn Server On Your Router
Chapter 11 VPN Server 11. 2. 1. Step 1. Set up PPTP VPN Server on Your Router 1. Visit http://tplinkwifi.net, and log in with your TP-Link ID or the password you set for the router. 2. Go to Advanced >…
-
Page 65: Step 2. Configure Pptp Vpn Connection On Your Remote Device
Chapter 11 VPN Server 1 ) Click Add. 2 ) Enter the Username Password to authenticate devices to the PPTP VPN Server. 3 ) Click OK. 11. 2. 2. Step 2. Configure PPTP VPN Connection on Your Remote Device The remote device can use the Windows built-in PPTP software or a third-party PPTP software to connect to PPTP Server.
-
Page 66
Chapter 11 VPN Server 3. Select Connect to a workplace and click Next. 4. Select Use my Internet connection (VPN). -
Page 67
Chapter 11 VPN Server 5. Enter the internet IP address of the router (for example: 218.18.1.73) in the Internet address field. Click Next. 6. Enter the User name Password you have set for the PPTP VPN server on your router, and click Connect. -
Page 68
Chapter 11 VPN Server 7. The PPTP VPN connection is created and ready to use. -
Page 69: Chapter 12. Customize Your Network Settings
Chapter Customize Your Network Settings This chapter guides you on how to configure advanced network features. It contains the following sections: • Change the LAN Settings • Configure to Support IPTV Service • Specify DHCP Server Settings • Set Up a Dynamic DNS Service Account •…
-
Page 70: Change The Lan Settings
If the IP address conflicts with another device on your local network or your network requires a specific IP subnet, you can change it. 1. Visit http://tplinkwifi.net, and log in with your TP-Link ID or the password you set for the router. 2. Go to Advanced >…
-
Page 71
Chapter 12 Customize Your Network Settings 2 ) Click Save. 3 ) After configuring IGMP proxy, IPTV can work behind your router now. You can connect your set-top box to any of the router’s Ethernet port. If IGMP is not the technology your ISP applies to provide IPTV service: 1 ) Tick Enable… -
Page 72: Specify Dhcp Server Settings
IP Address Pool. You can change the settings of the DHCP Server if necessary, and you can reserve LAN IP addresses for specified client devices. 1. Visit http://tplinkwifi.net, and log in with your TP-Link ID or the password you set for the router.
-
Page 73: Set Up A Dynamic Dns Service Account
Note: DDNS does not work if the ISP assigns a private WAN IP address (such as 192.168.1.x) to the router. 1. Visit http://tplinkwifi.net, and log in with your TP-Link ID or the password you set for the router. 2. Go to Advanced >…
-
Page 74
Chapter 12 Customize Your Network Settings Note: To enjoy TP-Link’s DDNS service, you have to log in with a TP-Link ID. If you have not logged in with one, click 4. Click Register in the Domain Name List if you have chosen TP-Link, and enter the Domain Name as needed. -
Page 75: Create Static Routes
Chapter 12 Customize Your Network Settings 5. Click Login and Save. Tips: If you want to use a new DDNS account, please click Logout first, and then log in with a new account. 12. 5. Create Static Routes Static routing is a form of routing that is configured manually by a network administrator or a user by adding entries into a routing table.
-
Page 76
1. Change the routers’ LAN IP addresses to two different IP I do that? addresses on the same subnet. Disable Router B’s DHCP function. 2. Visit http://tplinkwifi.net, and log in with your TP-Link ID or the password you set for Router A. 3. Go to Network >… -
Page 77: Specify Wireless Settings
The preset SSID and password can be found on the label of the router. You can customize the wireless settings according to your needs. Visit http://tplinkwifi.net, and log in with your TP-Link ID or the password you set for the router.
-
Page 78: Use Wps For Wireless Connection
12. 7. Use WPS for Wireless Connection Wi-Fi Protected Setup (WPS) provides an easier approach to set up a security-protected Wi-Fi connection. 1. Visit http://tplinkwifi.net, and log in with your TP-Link ID or the password you set for the router. 2. Go to Advanced >…
-
Page 79: Use The Wps Wizard For Wi-Fi Connections
Chapter 12 Customize Your Network Settings • PIN (Personal Identification Number) is an eight-character identification number preset to each router. WPS supported devices can connect to your router with the PIN. The default PIN is printed on the label of the router. 12.
-
Page 80: Chapter 13. Manage The Router
Chapter Manage the Router This chapter will show you the configuration for managing and maintaining your router. It contains the following sections: • Set Up System Time • Control LEDs • Test the Network Connectivity • Upgrade the Firmware • Backup and Restore Configuration Settings •…
-
Page 81: Set Up System Time
Parental Controls. You can choose the way to obtain the system time as needed. 1. Visit http://tplinkwifi.net, and log in with your TP-Link ID or the password you set for the router.
-
Page 82: Control Leds
The router‘s LEDs indicate router’s activities and status. You can turn on or turn off the LEDs either from the web management page or by pressing the LED button. 1. Visit http://tplinkwifi.net, and log in with your TP-Link ID or the password you set for the router.
-
Page 83: Test The Network Connectivity
13. 3. Test the Network Connectivity Diagnostics is used to test the connectivity between the router and the host or other network devices. 1. Visit http://tplinkwifi.net, and log in with your TP-Link ID or the password you set for the router. 2. Go to Advanced >…
-
Page 84: Upgrade The Firmware
Do NOT turn off the router during the firmware upgrade. 13. 4. 1. Online Upgrade 1. Visit http://tplinkwifi.net, and log in with your TP-Link ID or the password you set for the router. 2. When the latest firmware is available for your router, the update icon will display in the top-right corner of the page.
-
Page 85: Manual Upgrade
Firmware Upgrade page. 13. 4. 2. Manual Upgrade 1. Download the latest firmware file for the router from www.tp-link.com. 2. Visit http://tplinkwifi.net, and log in with your TP-Link ID or the password you set for the router. 3. Go to Advanced >…
-
Page 86: Restore Interrupted Upgrade After Power Failure
Moreover, if necessary you can erase the current settings and reset the router to the default factory settings. 1. Visit http://tplinkwifi.net, and log in with your TP-Link ID or the password you set for the router.
-
Page 87: Change The Administrator Account
• During the resetting process, do not turn off the router. • After reset, you can still use the current login password or the TP-Link ID to log in to the web management page. ¾ To reset the router to factory default settings: 1.
-
Page 88: Password Recovery
This feature allows you to recover the login password you set for you router in case you forget it. Note: If you are using a TP-Link ID to log in to the web management page, the Password Recovery feature will be disabled. To manage the TP-Link ID, go to Basic >…
-
Page 89: Local Management
This feature allows you to limit the number of client devices on your LAN from accessing the router by using the MAC address-based authentication. 1. Visit http://tplinkwifi.net, and log in with your TP-Link ID or the password you set for the router.
-
Page 90: Remote Management
6. Click OK. 13. 9. Remote Management This feature allows you to control remote devices’ authority to manage the router. 1. Visit http://tplinkwifi.net, and log in with your TP-Link ID or the password you set for the router. 2. Go to Advanced >…
-
Page 91: System Log
When the router does not work normally, you can save the system log and send it to the technical support for troubleshooting. ¾ To save the system log locally: 1. Visit http://tplinkwifi.net, and log in your TP-Link ID or the password you set for the router. 2. Go to Advanced >…
-
Page 92
It would be great if the system logs could be sent to my mailbox at 8 a.m. every day. 1. Visit http://tplinkwifi.net, and log in with your TP-Link ID or the password you set for the router. -
Page 93: Monitor The Internet Traffic Statistics
The Traffic Statistics page displays the network traffic of the LAN, WAN and WLAN sent and received packets, allowing you to monitor the volume of internet traffic statistics. 1. Visit http://tplinkwifi.net, and log in with your TP-Link ID or the password you set for the router.
-
Page 94
Chapter 13 Manage the Router 3. Toggle on Traffic Statistics, and then you can monitor the traffic statistics in Traffic Statistics List section. Click Refresh to update the statistic information on the page. Click Reset All to reset all statistic values in the list to zero. Click Delete All to delete all statistic information in the list. -
Page 95: Faq
Q2. What should I do if I forget my web management password? • If you are using a TP-Link ID to log in, or you have enabled the Password Recovery feature of the router, click…
-
Page 96
4 ) Click LAN settings and deselect the following three options and click OK. 5 ) Go to Advanced > Restore advanced settings, click to save the settings. -
Page 97
WDS bridging function can be enabled either in 2.4GHz frequency or 5GHz frequency for a dual-band router. We use the WDS bridging function in 2.4GHz frequency as example. 1. Visit http://tplinkwifi.net, and log in with your TP-Link ID or the password you set for the router. -
Page 98
of the root router is 192.168.0.1, the IP address of the extended router can be 192.168.0.2~192.168.0.254. We take 192.168.0.2 as example.) 2 ) Click Save. Note: Log in to the web management page again if the IP address of the router is altered. 3. -
Page 99
1. Visit http://tplinkwifi.net, and log in with your TP-Link ID or the password you set for the router. 2. Go to Advanced > Status to check internet status: As the follow picture shows, if IP Address is a valid one, please try the methods below and try again: •… -
Page 100
• Make sure the physical connection between the router and the modem is proper. • Clone the MAC address of your computer. 1 ) Visit http://tplinkwifi.net, and log in with your TP-Link ID or the password you set for the router. -
Page 101
• Modify the LAN IP address of the router. Note: Most TP-Link routers use 192.168.0.1/192.168.1.1 as their default LAN IP address, which may conflict with the IP range of your existing ADSL modem/router. If so, the router is not able to communicate with your modem and you can’t access the internet. -
Page 102
1 ) Confirm your internet connection type, which can be learned from the ISP. 2 ) Visit http://tplinkwifi.net, and log in with your TP-Link ID or the password you set for the router. 3 ) Go to Advanced > Network >… -
Page 103
2 ) Exit the wireless configuration tool (the TP-Link Utility, for example). 3 ) Select and right click on… -
Page 104
1 ) Sometimes you will be asked to type in a PIN number when you connect to the wireless network for the first time. This PIN number is different from the Wireless Password/Network Security Key, usually you can only find it on the label of your router. -
Page 105
Specifications are subject to change without notice. is a registered trademark of TP-Link Technologies Co., Ltd. Other brands and product names are trademarks or registered trademarks of their respective holders. No part of the specifications may be reproduced in any form or by any means or used to make any derivative such as translation, transformation, or adaptation without permission from TP-Link Technologies Co., Ltd. -
Page 106
FCC STATEMENT This equipment has been tested and found to comply with the limits for a Class B digital device, pursuant to part 15 of the FCC Rules. These limits are designed to provide reasonable protection against harmful interference in a residential installation. This equipment generates, uses and can radiate radio frequency energy and, if not installed and used in accordance with the instructions, may cause harmful interference to radio communications. -
Page 107
CE Mark Warning This is a class B product. In a domestic environment, this product may cause radio interference, in which case the user may be required to take adequate measures. RF Exposure Information This device meets the EU requirements (1999/5/EC Article 3.1a) on the limitation of exposure of the general public to electromagnetic fields by way of health protection. -
Page 108
Déclaration d’exposition aux radiations: Cet équipement est conforme aux limites d’exposition aux rayonnements IC établies pour un environnement non contrôlé. Cet équipement doit être installé et utilisé avec un minimum de 20 cm de distance entre la source de rayonnement et votre corps. Industry Canada Statement CAN ICES-3 (B)/NMB-3(B) Korea Warning Statements:… -
Page 109
Safety Information • When product has power button, the power button is one of the way to shut off the product; when there is no power button, the only way to completely shut off power is to disconnect the product or the power adapter from the power source. •…
На чтение 11 мин Просмотров 3.5к.

Максим aka WisH
Высшее образование по специальности «Информационные системы». Опыт работы системным администратором — 5 лет.
Задать вопрос
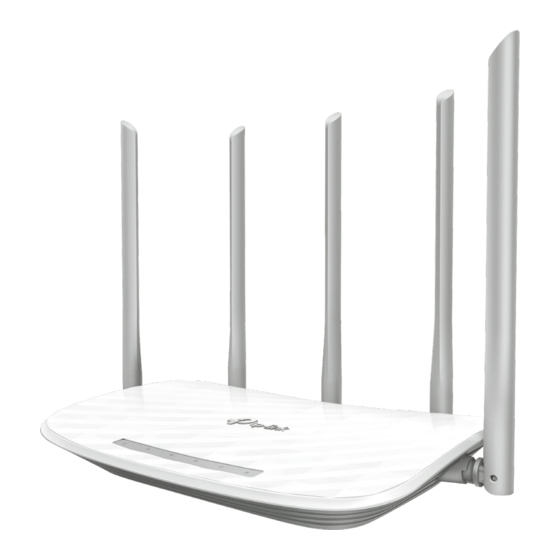
Сейчас провайдеры предоставляют высокоскоростной интернет, который способны поддерживать смартфоны, но не выдерживают старые маршрутизаторы. Поэтому требуется покупка новых, с лучшими функциями. Сегодня расскажем про такой роутер и про его настройку — TP-Link Archer C60.
Содержание
- Технические характеристики
- Подключение
- Вход в настройки роутера
- Автоматическая настройка
- Ручная настройка
- Wi-Fi
- Настройка IP TV
- Смена пароля
- Режим повторителя
- Обновление прошивки
- Сброс настроек
- Отзывы
Технические характеристики
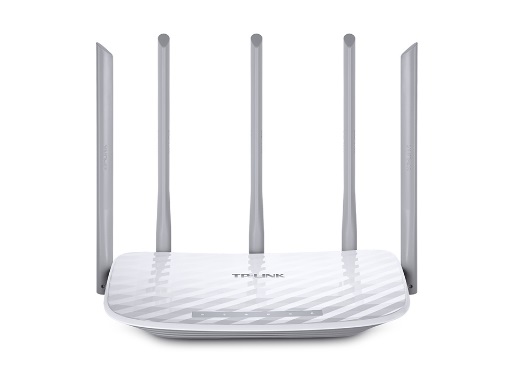
Archer C60 AC1350 — двухдиапазонный Wi-Fi роутер с рядом полезных опций:
- Wi-Fi стандарта AC повышает производительность беспроводных устройств;
- три 2,4 ГГц антенны и две 5 ГГц антенны;
- MU-MIMO позволяет взаимодействовать сразу с двумя устройствами, что увеличивает эффективность в два раза;
- технология Beamforming обеспечивает высокопроизводительное подключение к Wi-Fi (начиная с аппаратной версии 2.0);
- расширенные возможности ПО, включая родительский контроль и гостевую сеть;
- мобильное приложение Tether для управления роутером со смартфона.
Вообще его технические характеристики выглядят следующим образом:
- интерфейс: 4 порта LAN 10/100 Мбит/с и 1 порт WAN 10/100 Мбит/с;
- два процессора: Qualcomm QCA9561 и Qualcomm QCA9882;
- стандарты беспроводных сетей: IEEE 802.11ac/n/a 5 ГГц и IEEE 802.11b/g/n 2,4 ГГц;
- скорость беспроводной передачи данных 450 Мбит/с (2,4 ГГц) и 867 Мбит/с (5 ГГц);
- оперативная память: 64 МБ;
- встроенная память: 8 МБ.
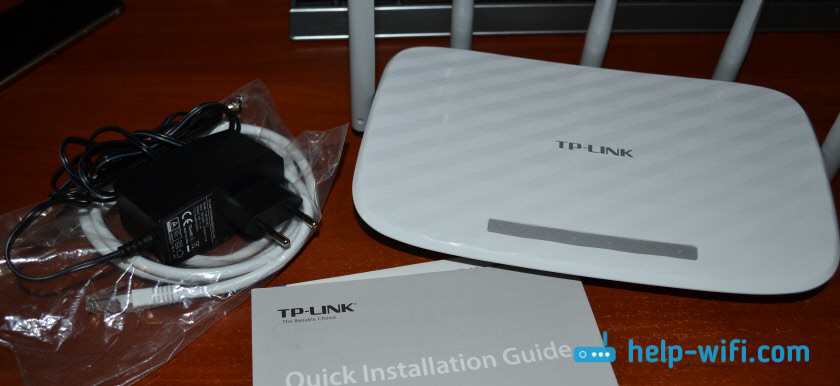
Дальнейший обзор характеристик TP-Link Archer C60 не имеет смысла. Роутер современный, так что поддерживает все протоколы передачи информации, также обладает стандартным набором возможностей и программного обеспечения. Это не просто маршрутизатор, а целый интернет-центром. ТП-Линк Арчер С60 способен принять на себя функции небольшого сервера, который будет стоять между домашней сетью и интернетом. Выпускается только белого цвета с 5 антеннами, поэтому впишется не в любой интерьер.
Подключение
Первым делом нужно подключить Archer C60 к сети. Выберите место, где он не будет мешать. Там необходима розетка, а также нормальная температура, не должно быть слишком влажно. Роутер работает в широком диапазоне температур, но критические значения снизят срок работы.

Подключаем кабель от провайдера в разъем WAN с надписью «Ethernet». Он выделен синим и стоит отдельно от остальных, так что перепутать его с другими невозможно. После этого переходите к подключению шнура от блока питания в разъем Power, здесь проблем не будет, потому что других похожих на девайсе нет. Дальше переходим к настройке.
Вход в настройки роутера
Настроить Wi-Fi роутер TP-Link Archer C60 можно через вайфай или через провод. Для настройки через беспроводную сеть придется узнать ее название и пароль. Написаны они на наклейке на нижней части роутера, так же, как и данные для подключения по проводу.
Дальше действия будут немного отличаться :
- Wi-FI. Найдите со своего мобильного телефона или ноутбука указанное имя вайфай сети и подключитесь к ней, введя пароль.
- Проводное подключение. Воткните шнур, идущий в комплекте с роутером, в одно из желтых гнезд LAN на его задней части и соедините его с компьютером.
А вот дальнейшие действия одинаковы для обоих вариантов. Открывайте браузер на любом устройстве, подключенном к роутеру ТП Линк Арчер С60. Вводите там в адресной строке данные для входа: tplinkwifi.net или 192.168.0.1, дальше в появившемся окне введите логин и пароль (в стандартном сочетании admin и admin, проверьте на наклейке).

С вайфаем все сработает без проблем. Заминки возникают при подключении по кабелю. Чтобы это исправить перейдите в «Центр управления сетями и общим доступом».
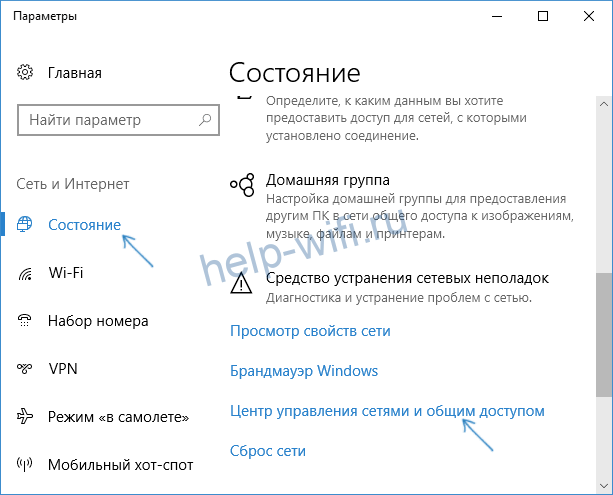
Чтобы туда попасть, достаточно в любой операционной системе открыть «Панель управления» и выбрать раздел «Сеть и Интернет». Теперь перейдите в изменение параметров адаптера, эта настройка расположена в левой части открывшегося окна. Там найдите свое подключение, обычно оно активно и выделено цветом, неактивные все серые. Кликните по нему правой кнопкой мыши, нажмите на свойства, перейдите в раздел “Ipv4” и поставьте автоматическое получение адреса. Это нужно, чтобы роутер смог выдать правильный адрес компу.

Автоматическая настройка
После первого входа посмотрите на верхнюю часть страницы. Там должен быть доступен раздел «Быстрая настройка» или «Quick Setup». Он позволит провести настройки в одном окне и довольно быстро. Сам он ничего делать не будет, только задавать вопросы. Нужно знать на них ответы, а для этого прочитайте инструкцию по установке от своего провайдера или свяжитесь с техподдержкой. Без знания логина и пароля, а также протокола подключения ничего не получится. Возможно, у вас стоит активация по МАС-адресу, такой вопрос тоже будет. Быстро ответьте на них и роутер настроится сам. Всю информацию стоит записать, она понадобится при сбоях или точечной ручной настройке.
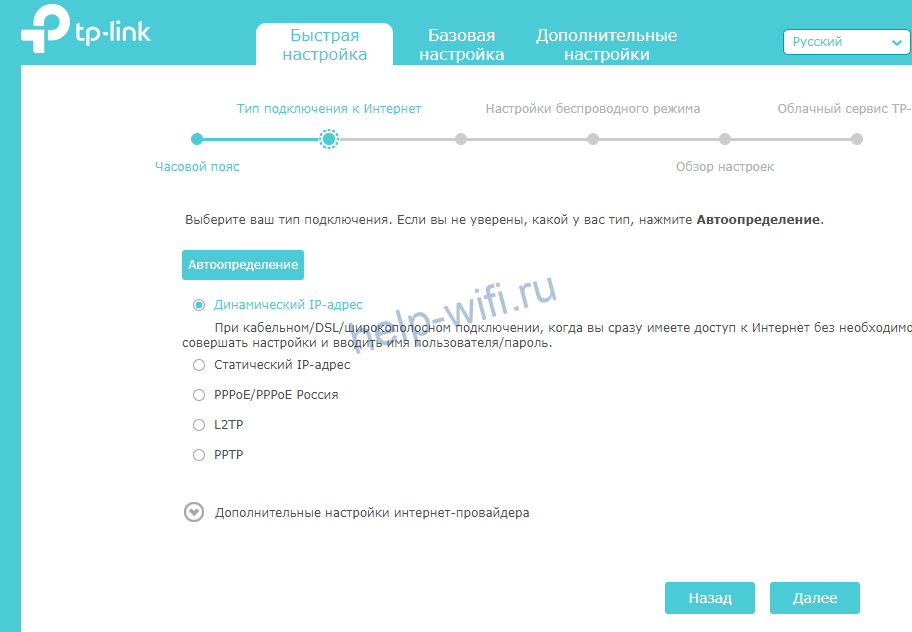
- В первом пункте вводится часовой пояс. Во втором запрашивают способ подключения к провайдеру, нажмите на кнопку автоопределения. В зависимости от выбранного типа, возможно, придется заполнить дополнительные поля.
- В следующем окне как раз и будет вопрос про МАС – адрес. Если авторизация выполняется по нему, то клонируйте адрес компьютера, если нет, то не трогайте.

- В следующем разделе выполняется настройка беспроводной сети. Придумайте имя и пароль и введите данные здесь. Предпоследнее окно показывает все выбранные настройки, чтобы можно было вернуться и исправить, если что-то неправильно. Иногда здесь же предлагают пройти регистрацию в облачных сервисах разработчика, это не обязательно.
Ручная настройка
Если после быстрой настройки инет не заработал, то придется проверять и забивать все параметры вручную. Быстрая настройка предполагает только основные вопросы, которые справляются с настройкой под большинство провайдеров. У некоторых слишком хитрые настройки или есть какая-то важная мелочь, которая не учитывается в автоматическом варианте. Тогда придется поэтапно пройти по настройкам и проверить каждый раздел.
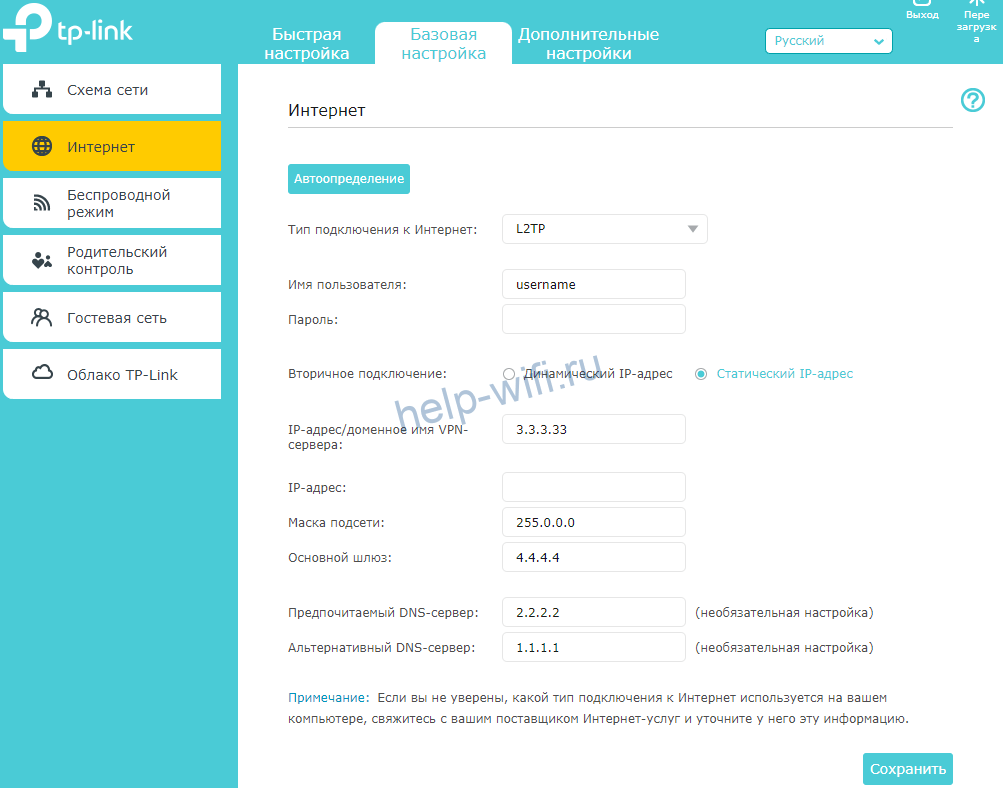
Зайдите в веб-интерфейс роутера. Перейдите на страницу «Базовая настройка», оттуда в раздел «Интернет». На английском выглядит как «Basic» – «Internet».

На этом этапе и потребуется все данные по параметрам от провайдера. В верхней части выберите способ подключения. Там есть выпадающий список, в котором перечислены все доступные для устройства варианты. Список параметров для ввода будет меняться в зависимости от того, какой протокол выбран. Выберите свой и правильно впишите параметры. После этого все начнет работать сразу же.
В случае динамического адреса, роутер должен заработать сразу, потому что никаких данных вводить не нужно. Если у вас выбран статический адрес, то следует ввести свой адрес, адрес шлюза, маску подсети и DNS-сервер. Все это прописано в договоре. В случае «PPPoE/PPPoE Россия» основной настройкой является логин и пароль.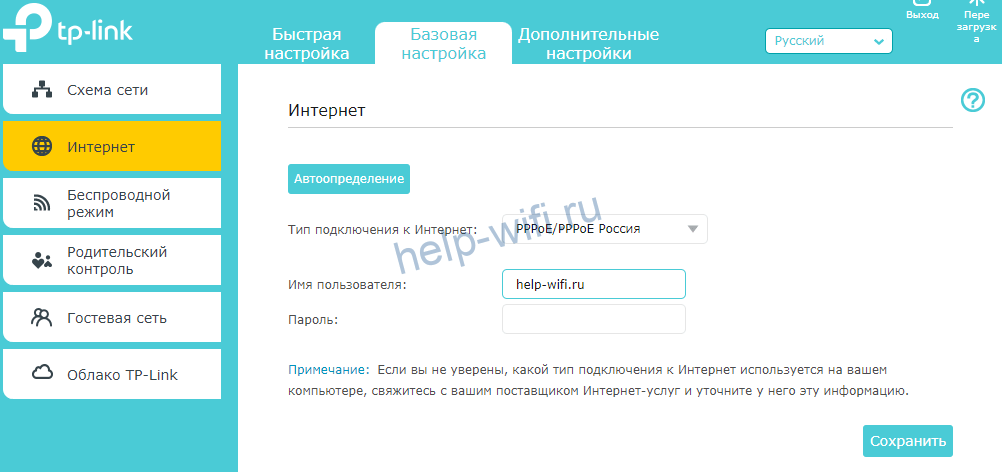
Если провайдер требует что-то еще, то все пункты находятся под галочкой «Дополнительные настройки».
Наибольшее количество настроек требуется при протоколах L2TP и PPTP. На самом деле сложного здесь ничего нет, нужно ввести данные, предоставленные провайдером в договоре. Необязательные пункты не меняйте. Те, что не указаны в инструкции от провайдера, оставляйте в первоначальном виде.
Wi-Fi
У вас уже есть работающая сеть. Её параметры написаны на нижней части роутера, так что потерять или забыть их не получится. Только пароль может оказаться слишком слабым или слишком сложным для запоминания. В этом случае нужно перенастроить беспроводную сеть. В английском варианте это «Basic» – «Wireless», а в русском «Базовая настройка» — «Беспроводной режим». Здесь все упрощено и сокращено до минимума. Если хочется покопаться во всех параметрах, то переходите в режим дополнительных настроек.

Здесь и менять-то особо ничего не надо. Маршрутизатор по стандарту выбирает лучшие параметры. Установите имя и пароль, остальное можете оставить в стандартных параметрах. Если есть какие-то свои пожелания, например, по каналам и его ширине, либо по рабочим протоколам, то изменяется здесь все просто.
Настройка IP TV
Обычно приставки начинают работать даже если их воткнуть в разъем. Но в некоторых случаях роутеру нужно указать на то, что именно сюда подключена приставка. Это связано с настройками самого провайдера. Нет ничего сложно в организации такого подключения. Перейдите в дополнительные настройки (advanced), оттуда в сеть (network), а дальше к IPTV.
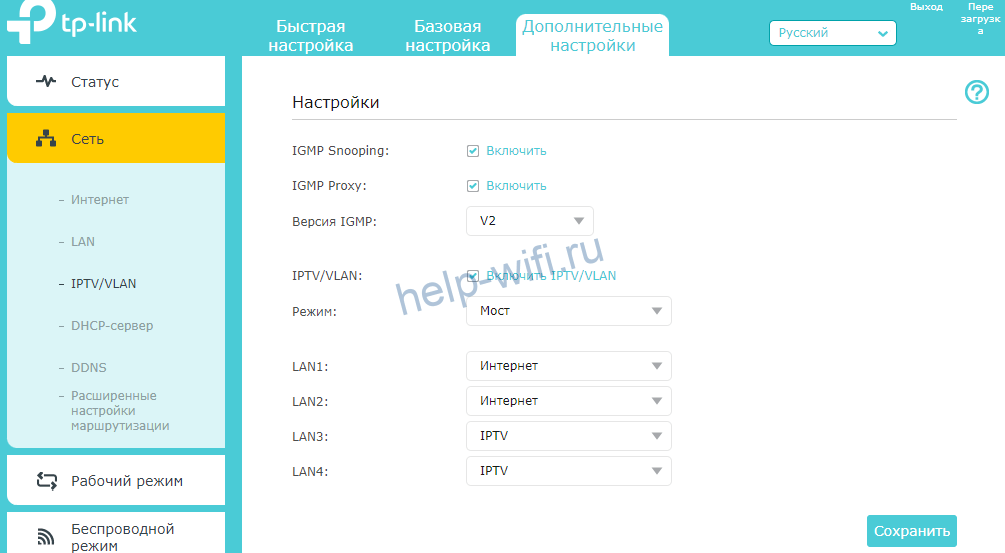
В открывшемся окне включите нужный режим, нажав на галочку. Выберите режим моста (bridge), и укажите тот порт, к которому подключена приставка. Они все подписаны на задней панели роутера, так что с номером не ошибетесь. На этом все, сохраняйте настройки и выходите.
Смена пароля
Если настраиваем роутер не в первый раз, то пароль уже может быть изменен. Данные для входа стандартными оставлять не стоит, особенно на вайфае или роутере. Иначе любой любопытный, который заучил стандартные комбинации логина и пароля, попадет к вам в домашнюю сеть и сделает в ней что угодно.
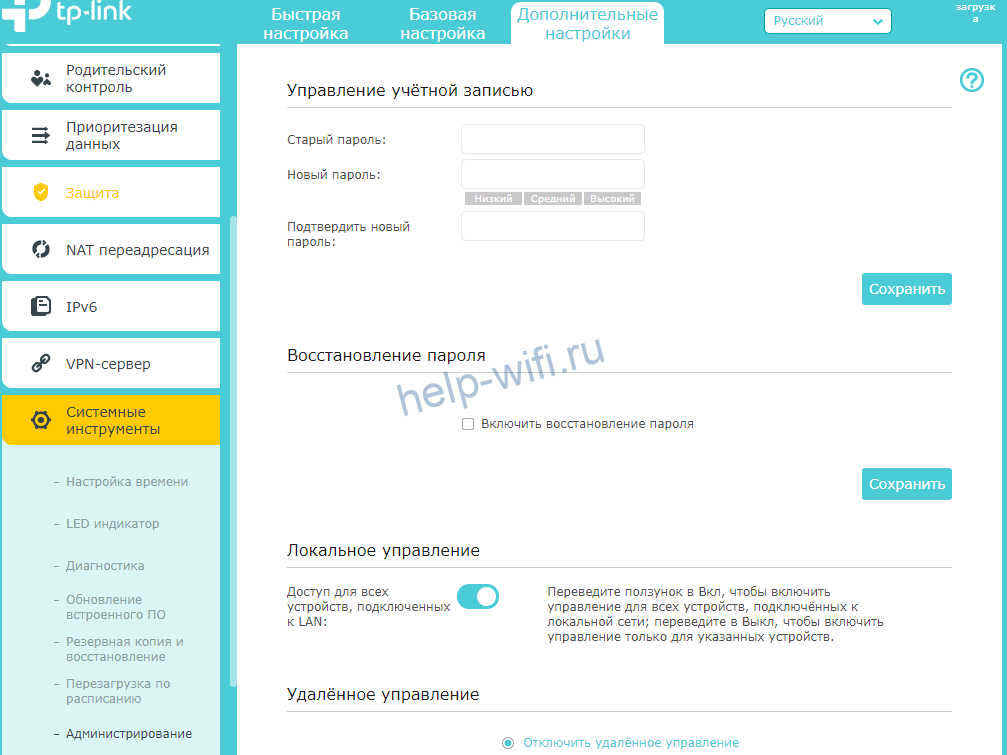
Перейдите в дополнительные настройки, оттуда к системным инструментам, а дальше к администрированию. Здесь введите старый пароль, а потом два раза новый. Подтвердите изменения и завершайте работу.
Режим повторителя
Роутер работает в качестве репитера, который также называется усилителем или повторителем. Режим позволяет расширить поле покрытия беспроводной сети. Он подхватывает сигнал от предыдущего маршрутизатора, к которому подключен кабель от провайдера, и передает его дальше. Таким образом расширяется сигнал от одного входа на большое расстояние.
Режима повторителя у этой модели, к сожалению, нет. В качестве альтернативы доступен режим моста.
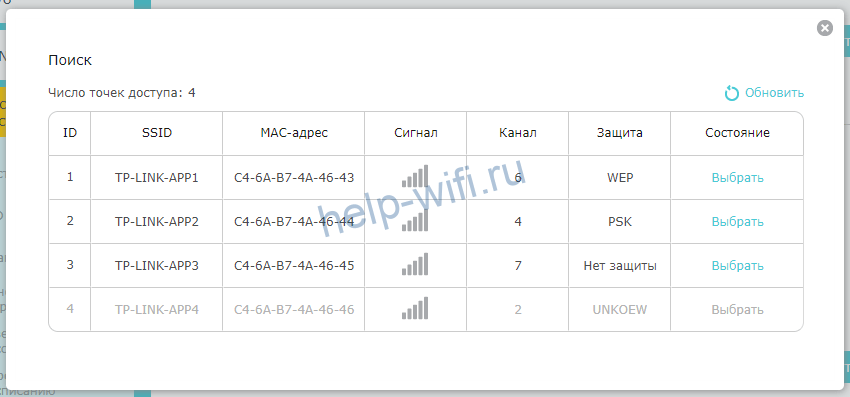
Для начала зайдите в дополнительные настройки. Оттуда перейдите к системным инструментам, а дальше к параметрам системы. Теперь мотайте до того диапазона, на котором работает первый роутер. Дойдите до нежного раздела с частотой и поставьте там галку на включение WDS.
Появится новые данные в той же частоте. Кликните по кнопке поиска, чтобы перейти к списку доступных сетей. Здесь выберите нужную, нажмите на кнопку выбора и введите пароль от неё.
В том же меню выберите тип защиты для новой общей сети и поставьте пароль. Лучше оставить все так же, как на первой сетке. Тогда не потребуется ничего вводить при переключении между ними.

Теперь перейдите к разделу Сеть и там выберите DHCP. Здесь снимите галочку с активации сервера, ведь раздавать адреса будет первый маршрутизатор. Обычно на этом настройка заканчивается, но есть еще один пункт, который стоит проверить. Зайдите в раздел Сеть и перейдите в LAN. Здесь стоит адрес роутера. Он не должен совпадать с адресом первого маршрутизатора и должен быть в той же сети. Например, адрес второго 192.168.0.2, если адрес главного 192.168.0.1. Или там стоит автоматическое получение и тогда все нормально. После смены адреса придется перезайти в личный кабинет, ведь его адрес сменится.
Обновление прошивки
Чем новее прошивка устройства, тем лучше оно работает и меньше бывает сбоев. Если сбой произойдет во время процедуры, то выскочит куча ошибок и перешивать придется вручную. Так что лучше сделать резервную копию, чтобы откатиться на неё, если что-то пойдет не так. Перейдите в раздел дополнительных настроек, оттуда в системные инструменты, а дальше в резервное копирование и восстановление.
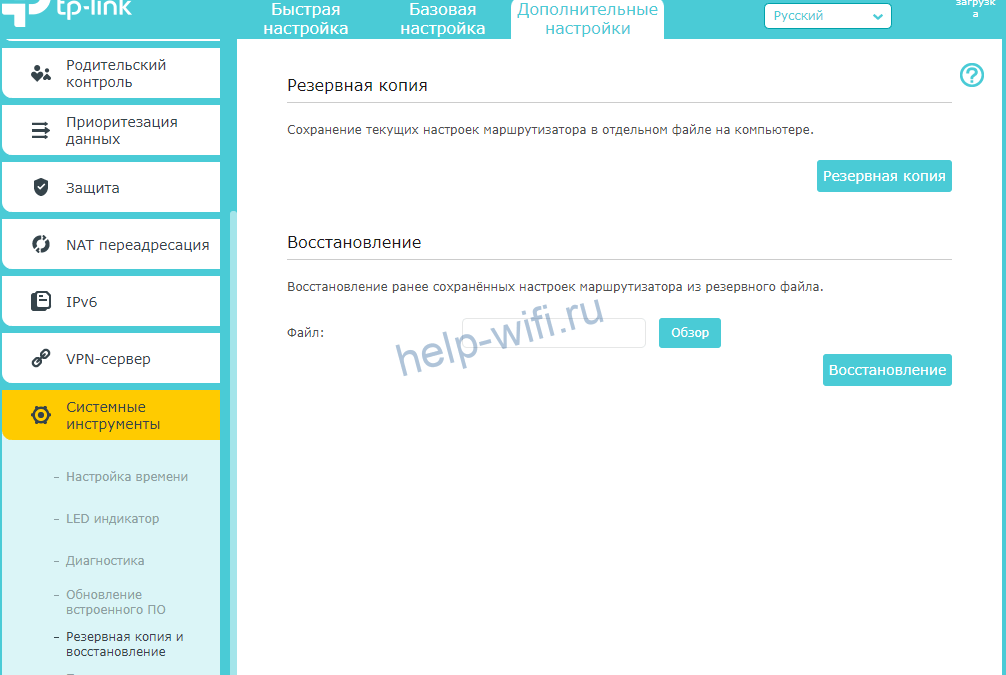
Здесь создайте резервную копию, восстановление происходит в этом же разделе. Обновление ПО находится на один пункт выше. Здесь нажмите на поиск и обновление. Скачивание и установка произойдут автоматически. Есть возможность ручной установки, но это дольше и требуется больше действий. Лучше выберите момент, когда не планируется отключение электричества и сеть не слишком загружена.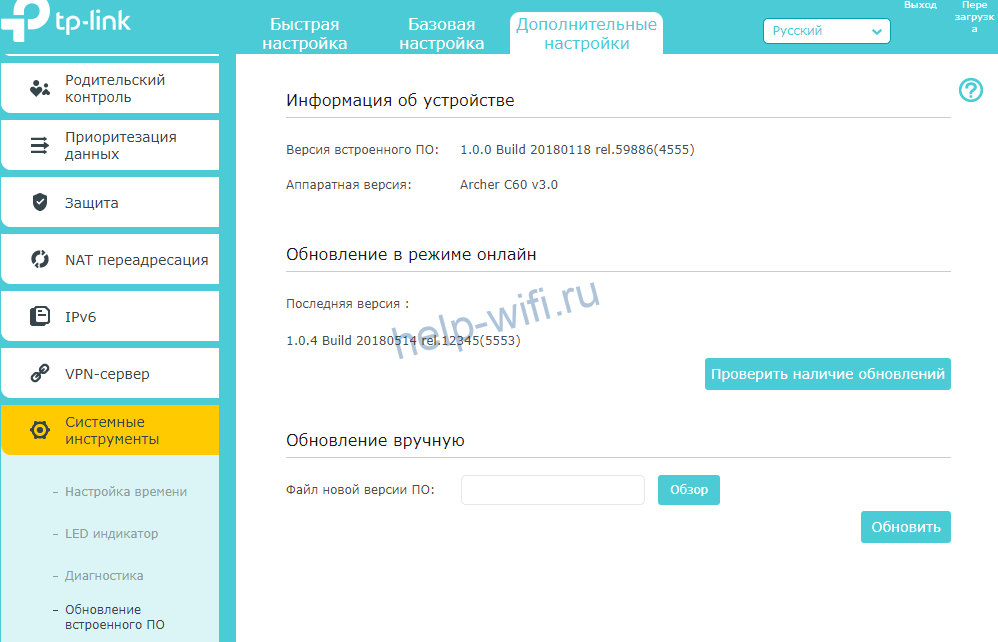
Сброс настроек
Если что-то пошло не так: забыли пароль, запутались в настройках и теперь ничего не работает, после обновления роутер превратился в кирпич — то выход остается один. Сброс до заводских настроек. Все установки и все данные уничтожатся, обновлений не будет, останется голая первая версия. Зато все заработает.
Сброс проводится просто. Возьмите роутер и найдите на задней панели (куда идут провода), кнопку reset. Обычно она маленькая и находится в отверстии. Нажмите на неё чем-то тонким, но не острым и подержите 15 секунд. Роутер перезагрузится и будет совершенно пуст.
Отзывы
Если рассматривать отзывы на TP-Link Archer C60, то получается, что сигнал идет хорошо, хватает на квартиру и дом. Люди хвалят простую настройку и мощный сигнал. Некоторые ругают слабый процессор и плохую техподдержку. Насчет первого пункта есть сомнения, для такого устройства вполне нормальная мощность, если не пытаться развернуть на нем полноценный сервер. Что касается техподдержки, то дозвониться бывает сложновато, зато у TP-Link появились официальный русскоязычный Telegram-чат и поддержка по WhatsApp.
Очередная инструкция по настройке роутеров, и сегодня мы будем настраивать TP-Link Archer C60 (AC1350). Я уже делал обзор этой модели, его вы можете посмотреть по этой ссылке. Там вы найдете характеристики, и сможете оставить свой отзыв о TP-Link Archer C60.
Обычно, все инструкции по настройке маршрутизаторов получаются длинными и скучными. Очень много разных моментов и нюансов, о которых нужно рассказать. Много вариантов настроек и т. д. Ведь у всех разные устройства, провайдеры, установки. Эту инструкцию я постараюсь сделать максимально простой и короткой. По сути, для нормальной работы маршрутизатора нужно всего лишь задать параметры для подключения к интернет-провайдеру, сменить имя Wi-Fi сети и установить пароль на Wi-Fi.
Настройка роутера TP-Link Archer C60 практически ничем не отличается от настройки других маршрутизаторов компании TP-Link. Новых моделей, где установлена уже обновленная панель управления. Да и вообще, алгоритм действий при настройке маршрутизатора будет всегда практически одинаковым, в независимости от производителя, или модели.
Подключаем TP-Link Archer C60 и заходим в панель управления
Есть два способа настроить роутер:
- Подключится к нему по сетевому кабелю, который идет в комплекте. В таком случае у вас должен быть ноутбук, или стационарный компьютер на котором есть сетевая карта. Это лучший способ. Если есть возможность, то на момент настройки я советую подключать роутер по кабелю.
- По Wi-Fi сети. На заводских настройках роутер сразу раздает Wi-Fi сеть. Мы можем к ней подключится, зайти в панель управления и задать необходимые настройки. Этот способ подойдет тем, у кого нет LAN порта на ноутбуке, или вообще нет компьютера. Настроить можно и с телефона, или планшета. Подробнее об этом я писал здесь https://help-wifi.com/sovety-po-nastrojke/kak-nastroit-wi-fi-router-s-plansheta-ili-telefona/. Для настройки TP-Link Archer C60 можно использовать фирменное приложение для мобильных устройств TP-LINK Tether.
По кабелю:
Достаточно подключить роутер к компьютеру. Так же, сразу к роутеру подключите интернет в WAN порт. Вот схема подключения.

По Wi-Fi:
В этом случае достаточно включить питание роутера, подключить к нему интернет, и подключить свое устройство к Wi-Fi сети, которая будет иметь заводское название.

Чтобы подключится к этой сети, понадобится пароль. Заводской пароль (PIN), название Wi-Fi сетей (на частоте 5GHz, и 2.4GHz), MAC-адрес, IP-адрес роутера и заводские имя пользователя и пароль указаны снизу роутера на наклейке.
Процесс настройки я буду показывать на примере маршрутизатора с заводскими настройками. Перед написанием этой статьи я сбросил их к заводским. Поэтому, если вы уже пробовали настроить роутер, или он был настроен раньше, у вас настройки могут отличатся. Если роутер уже пробовали настроить, то лучше сделать сброс настроек. Для этого, нужно чем-то острым на 10 секунд зажать кнопку Reset.

Роутер будет перезагружен, а настройки восстановлены.
Чтобы зайти в панель управления Archer C60, достаточно открыть браузер и перейти по адресу http://tplinkwifi.net (или 192.168.0.1), и указать заводские имя пользователя и пароль (admin и admin). Если вы их еще не меняли.

Если вы столкнулись с какой-то проблемой, и не получается зайти в настройки маршрутизатора, то смотрите решения из этой статьи: https://help-wifi.com/oshibki-i-polomki/chto-delat-esli-ne-zaxodit-v-nastrojki-routera-na-192-168-0-1-ili-192-168-1-1/. И отдельная инструкция по входу в панель управления маршрутизаторов TP-Link.
Откроется панель управления, и роутер сразу предложит нам сменить заводские имя пользователя и пароль для входа в настройки. Я рекомендую это сделать. Просто укажите новый логин (я оставил admin), и два раза новый пароль.

Когда следующий раз будете входить в настройки, то нужно будет указать установленный пароль и имя пользователя. Если забудете их, то придется делать сброс настроек к заводским (писал об этом выше).
Сразу откроется мастер быстрой настройки. Классная штука. С его помощью можно пошагово настроить маршрутизатор (указать регион, параметры подключения к интернету, настройки Wi-Fi сетей). Можете попробовать.
Не знаю как у вас, но в маем случае настройки были только на английском. Переключить язык не получилось. Возможно, нужно просто обновить прошивку. Но я не проверял.

Я покажу как задать необходимые параметры в разных разделах настроек. Не буду использовать мастер быстрой настройки.
Настройка интернета
Важный момент. Напомню, что кабель от вашего интернет-провайдера, или модема должен быть подключен в WAN порт роутера.
Если для подключения к интернету вы раньше запускали подключение к интернету (высокоскоростное подключение), то теперь это делать не нужно. Роутер будет устанавливать это подключение. Это важно.
Для подключения к интернету, ваш провайдер использует какой-то тип подключения. Это может быть: Динамический IP, PPPoE, L2TP, PPTP, или Статический IP. Вы должны обязательно знать, какой тип подключения использует ваш провайдер. Иначе никак. Так же, хорошо бы сразу узнать, использует ли провайдер привязку по MAC-адресу (это редкость, но бывает). Эту информацию можно узнать непосредственно у провайдера, или в договоре по подключению.
Если у вас популярный тип подключения Динамический IP (без привязки по MAC-адресу), то интернет должен сразу заработать через роутер. Так как в настройках роутера по умолчанию стоит Динамический IP. Вы сразу можете переходить к настройкам Wi-Fi сети.
Если же интернет через роутер не работает (без доступа к интернету, или ограничено), то нужно задать параметры для подключения к провайдеру. Для этого перейдите на вкладку «Advanced» – «Network» – «Internet».
Там выбираем свой тип подключения, и задаем необходимые параметры. Обычно, это имя пользователя, пароль, и адрес сервера. Например, я выбрал PPPoE.

После того как задали все параметры, нажимаем на кнопку «Connect». Если роутер подключится к интернету, то сохраняем настройки роутера. Если не подключится, то проверяем настройки. Уточняем параметры у провайдера.
Точно так же настраивается L2TP и PPTP. Только там помимо имени пользователя и пароля нужно будет еще указать адрес сервера (который так же выдает провайдер).
Наша цель, чтобы роутер установил соединение с провайдером.
Настройка Wi-Fi сети и пароля на TP-Link Archer C60
Из настроек Wi-Fi сети я советую сменить только название самой сети, и конечно же пароль. Так как роутер у нас двухдиапазонный, то настройки нужно задать для обеих сетей. Или, если необходимо, можно отключить один из диапазонов. Сейчас объясню.
Так как нам не нужно менять какие-то особые параметры, то открываем базовые настройки на вкладке «Basic» – «Wireless».
Там вы увидите настройки двух сетей: 2.4GHz Wireless и 5GHz Wireless. Меняем название (SSID) и пароль для каждого диапазона. Пароль должен быть минимум из 8 символов. Английскими буквами.

Если, например, вам на данный момент не нужна сеть на частоте 5GHz (ну нет у вас устройств, которые ее поддерживают), то ее можно отключить. Просто убрав возле нее галочку «Enable Wireless Radio», и сохранив настройки.
После сохранения настройки, вам нужно будет заново подключится у Wi-Fi сети. Указав новый пароль, который мы только что установили.
Если вы забудете пароль от Wi-Fi, то всегда сможете посмотреть его в настройках роутера. Или, воспользоваться советами из статьи: https://help-wifi.com/reshenie-problem-i-oshibok/kak-uznat-svoj-parol-ot-wi-fi-ili-chto-delat-esli-zabyli-parol/.
Настройка IPTV
Настройки IPTV задаются в разделе «Advanced» – «Network» – «IPTV».
Достаточно подключить приставку в один из LAN портов роутера Archer C60, и задать в настройках этот порт под IPTV. В режиме моста.

Думаю, с этим проблем не возникнет.
Все, мы закончили настройку маршрутизатора TP-Link Archer C60. Надеюсь, у вас все получилось. Если вы столкнулись с какими-то проблемами, то сделайте сброс настроек, и попробуйте настроить еще раз. Уточните настройки у провайдера.
Задавайте вопросы в комментариях, и делитесь своим опытом. Всего хорошего!
- Частным лицам
- Помощь и поддержка
- Домашний билайн
- Домашний интернет
- Настройка роутера
- TP-Link Archer C60
|
|
Имя беспроводной сети (SSID) по умолчанию |
Диапазон 2.4 ГГц; TP-LINK_XXXXXX (где X — последовательность символов) Диапазон 5 ГГц; TP-LINK_XXXXXX_5G (где X — последовательность символов) |
|
Пароль для беспроводной сети (Wi-Fi) по умолчанию |
Указан на дне роутера |
|
|
Адрес роутера |
192.168.0.1 |
|
|
Доступ на web-интерфейс |
логин admin |
|
|
Официальный сайт |
Шаг 1 из 1
Подключите кабель, который вам провели в квартиру наши монтажники в порт Internet, а компьютер подключите в любой из Ethernet портов. Вы так же можете соединить ваш ПК с роутером по беспроводной сети, но на первичном этапе настройки лучше использовать кабель.
Попробуйте открыть любую страницу в браузере или введите в адресную строку login.beeline.ru или 83.102.180.167 — откроется страница авторизации, на которой нужно ввести данные:
В поле «Логин» — имя пользователя по договору (089/085).
В поле «Пароль» — пароль от домашнего интернета.
После чего нажмите кнопку «Войти».

Отобразится информация, что авторизация успешно пройдена и для установки соединения нужно подождать 10 минут.
Используйте аппаратный сброс настроек, если требуется настроить устройство заново (удалить все пользовательские настройки), нет доступа к веб-странице интерфейса настроек роутера, после настройки роутера интернет-соединение не установилось или пароль доступа к нему был утерян.
Внимание! При выполнении аппаратного сброса настроек все пользовательские установки будут сброшены на заводские параметры!
На корпусе устройства имеется углубленная кнопка СБРОС (RESET, RESTORE), позволяющая сбросить настройки на заводские установки. Кнопку СБРОС (RESET, RESTORE) вы сможете найти на той же стороне корпуса роутера, где располагаются остальные разъемы и кнопки. В редких случаях кнопка может располагаться на дне роутера.
Для того, чтобы сбросить настройки роутера на заводские установки выполните следующие действия:
Включите питание роутера и дождитесь полной загрузки устройства. Нажмите кнопку СБРОС (RESET, RESTORE), используя заостренный тонкий предмет (например, скрепку) и удерживайте 30 секунд, затем отпустите кнопку.
После этого роутер перезагрузится с установками по умолчанию (заводскими настройками) и потребуется повторная его настройка.
После настройки роутера проверьте работу Интернета, открыв любую Web-страницу
Тарифы на Домашний интернет в Пятигорске
для дома 100 ›

100
Мбит/с

Wi-Fi-роутер
не входит в тариф
В тариф не входит Wi-Fi-роутер. Вы можете взять Wi-Fi-роутер в аренду за 150,00 ₽/мес!
для дома 300 ›
300
Мбит/с
Wi-Fi-роутер
не входит в тариф
В тариф не входит Wi-Fi-роутер. Вы можете взять Wi-Fi-роутер в аренду за 150,00 ₽/мес!
Игровой Премиум ›
600
Мбит/с
Wi-Fi-роутер
не входит в тариф
В тариф не входит Wi-Fi-роутер. Вы можете взять Wi-Fi-роутер в аренду за 75,00 ₽/мес!
Домашний интернет с ТВ и мобильной связью ещё выгоднее
-
Инструкции по эксплуатации
1

TP-LINK Archer C60 инструкция по эксплуатации
(2 страницы)
- Языки:Русский
-
Тип:
PDF -
Размер:
534.48 KB -
Описание:
Wi-Fi роутер (маршрутизатор)
Просмотр
На NoDevice можно скачать инструкцию по эксплуатации для TP-LINK Archer C60. Руководство пользователя необходимо для ознакомления с правилами установки и эксплуатации TP-LINK Archer C60. Инструкции по использованию помогут правильно настроить TP-LINK Archer C60, исправить ошибки и выявить неполадки.