-
Contents
-
Table of Contents
-
Bookmarks
Quick Links
Related Manuals for Arturia MICROFREAK
Summary of Contents for Arturia MICROFREAK
-
Page 1
USER MANUAL… -
Page 2
Holger STEINBRINK Minoru KOIKE Randall LEE Jose RENDON Jack VAN Special thanks to Mutable Instruments for providing the Plaits code under MIT license. © ARTURIA SA – 2019 – All rights reserved. 11 Chemin de la Dhuy 38240 Meylan FRANCE www.arturia.com… -
Page 3
Information contained in this manual is subject to change without notice and does not represent a commitment on the part of Arturia. The software described in this manual is provided under the terms of a license agreement or non-disclosure agreement. The software license agreement specifies the terms and conditions for its lawful use. -
Page 4
Thank you for purchasing MicroFreak! This manual covers the features and operation of Arturia’s MicroFreak, the latest in a long line of powerful virtual instruments. Be sure to register your product as soon as possible! When you purchased MicroFreak you were sent a serial number and an unlock code by e-mail. -
Page 5
We are confident that MicroFreak will prove to be an invaluable companion as you sail the waters of your imagination. -
Page 6: Table Of Contents
2.4. Precautions include, but are not limited to, the following: ……………. 6 2.5. Register your Instrument…………………………7 2.6. Connecting the MicroFreak to the World ………………….7 MicroFreak Overview…………………………8 3.1. Front panel overview …………………………..8 3.1.1. Top Row ……………………………………….. 8 3.1.2.
-
Page 7
13.3.1. A hidden feature ………………………………….80 13.3.2. First experiment: mixing pitches …………………………… 80 13.3.3. Second experiment: Hoketus …………………………….. 81 MicroFreak Configuration ……………………..82 14.1. Utility & MIDI Control Center……………………….. 83 14.2. MIDI Control Center…………………………. 86 14.2.1. MIDI Control Center settings …………………………….. 86… -
Page 8
Control voltages: Pitch, Gate and Pressure ………………………… 91 15.1.2. MIDI and CV/Gate signals: DAW configuration ……………………..93 15.2. Clock sources/destinations ……………………….93 15.3. The MicroFreak and your Modular System………………..94 Cheat Sheet …………………………… 95 Software License Agreement …………………….. 97 Declaration of Conformity……………………..99… -
Page 9: Welcome And Introduction
Whatever you do, take the time to get to know the MicroFreak inside out. It will help you to avoid a situation where you sit in front of your system tweaking knobs randomly, without understanding what’s happening, but hoping that something magical will happen.
-
Page 10: About Reading Manuals
Second and third readings give you a better understanding of the structure of an instrument/plugin. Beyond that, reading becomes a source of creative input that inspires you to think of new ways to use the instrument. Arturia — User Manual MicroFreak — Welcome and Introduction…
-
Page 11: Installation
Arturia. Arturia accepts no responsibility for damage caused by use of an unauthorized power supply. The MicroFreak has a touch capacitive keyboard. It can be used with a power bank, but for it to be fully functional the MicroFreak must be properly grounded. It’s why we recommend that you use the three pin wall plug provided by Arturia.
-
Page 12: Register Your Instrument
Connect to your Arturia account, go to the section “My Registered Products”, and add the MicroFreak synthesizer by entering its serial number, as printed on the sticker located under the machine. 2.6. Connecting the MicroFreak to the World Always power-off all audio gear before making any connections.
-
Page 13: Microfreak Overview
3. MICROFREAK OVERVIEW You’re probably anxious to start exploring your MicroFreak, so in this chapter, we’ll guide you through the front panel and explain what the knobs on the front panel do. If you are new to synthesis, it may help to read the chapters about the Digital Oscillator [p.35], the…
-
Page 14
Their sound will be similar as they all share the same analog filter. The amplitude (volume) of each voice can be different on the MicroFreak, which is not possible on most paraphonic synthesizers. You might call the MicroFreak paraphony a form of extended paraphony. -
Page 15
The Preset Encoder next to the display enables you to browse through the MicroFreak presets. It will display the name of the preset and its category. Of the 256 presets, the first 128 slots are filled with factory presets and 32 templates you can use as a starting point for sound design. -
Page 16
Preset Volume, the Bend Range, Pressure mode, and many other settings. 3.1.1.7. Master Volume The Master volume sets the Global volume of your MicroFreak. If you need one preset to be louder than another you can set its relative volume in Utility: select Utility>Preset>Preset volume. -
Page 17: Middle Row
The Digital Oscillator The other parts of the MicroFreak — the Analog Filter, the Envelopes, and the LFO — exist only to shape/mangle/wobble the sound of Digital Oscillator. The Type, Wave, Timbre, and Shape knobs enable you to control the actual parameters of the Digital Oscillator [p.35]…
-
Page 18
The focus of this beam is called Resonance. The point where the filtering becomes effective is called the cutoff point. The are three types of filters in the MicroFreak: a Low Pass Filter (LPF), a Band Pass Filter (BPF), and a High Pass Filter (HPF). The Low Pass Filter attenuates (weakens) or removes frequencies above the cutoff frequency. -
Page 19: Bottom Row
Control the shape of the Fall stage of the Cycling Envelope In addition you can use Shift to transpose sequences, reload them or copy an Arpeggio to a sequence. Please refer to chapter 12 [p.72] chapter 13 [p.67] for details Arturia — User Manual MicroFreak — MicroFreak Overview…
-
Page 20
The Rate knob sets the BPM (speed). When you press it, the Sync LED will light up to indicate that Sync is activated. The Rate knob modifies the Time Division, based on the previously set BPM (1/4th, 1/8th, …) Arturia — User Manual MicroFreak — MicroFreak Overview… -
Page 21
Rate knob setting. 3.1.3.5. The General Envelope Generator The Envelope Generator is one of the basic building blocks of MicroFreak. It enables you to shape the overall loudness of a tone or the timbre of a sound. It’s a sound sculpting tool. -
Page 22
Dice icons that enable you to create variations on the Sequencer and Arpeggiator patterns. The keyboard of the MicroFreak is touch capacitive and has 25 keys. When played the keys generate gate, a pitch, and pressure. It covers a two-octave range, which can be extended using the Octave Down/Up buttons. -
Page 23: Rear Panel Overview
Rear Panel Overview 3.2.1. Audio outputs The headphone output is a standard 3.5 mm TS or TRS jack. The output of the MicroFreak is monaural. Connecting stereo headphones will merely provide the identical sound on the left and right sides (i.e., mono).
-
Page 24: Clock Input/Output
The USB connector The USB port is also used to connect the MicroFreak to Arturia’s MIDI Control Center. This software enables you to configure various settings, update the firmware of the MicroFreak and to manage your presets.
-
Page 25: Power Switch
DC is used. If you plug in DC power the MicroFreak will reset. The On/Off switch Note: The power requirements of the MicroFreak are so low that you can power it with the same power bank you use to recharge your phone or tablet when you’re in a place without power outlets.
-
Page 26: Signal Flow
3.3. Signal Flow Working with the MicroFreak becomes a lot easier when you understand how signals flow in the machine. The Digital Oscillator generates a waveform, which is then sent to the Filter and an analog VCA. The main Envelope is hardwired (a fixed connection) with the VCA. When you press the «Amp Mod»…
-
Page 27: The Microfreak Presets
However, you may want to keep those intact if you have limited experience with the MicroFreak or with music synthesis in general. In that case, select one of the presets in the range 129 to 256 to save your sounds.
-
Page 28
MIDI Control Center, and load the newly sorted presets back into the MicroFreak. The «Template» category is intended as an in between category where you can store particularly interesting presets that you want to explore further. -
Page 29: Tweaking The Preset Configurations
What difference does it make when I change the Glide setting from Time to Rate? Utility>Preset>Glide Mode • Does Resetting Envelope make sequence snappier? Utility>Preset>Envelope reset • Will changing the sequence smooth settings create a different mood? Utility>Preset>Seq (1-4) smooth Arturia — User Manual MicroFreak — The MicroFreak Presets…
-
Page 30
Set sequence smoothing for sequencer MOD track 2 [OFF, ON] smooth Set sequence smoothing for sequencer MOD track 3 [OFF, ON] smooth Set sequence smoothing for sequencer MOD track 4 [OFF, ON] Arturia — User Manual MicroFreak — The MicroFreak Presets… -
Page 31: Panel
You can only use the Panel button once: after you’ve loaded a preset. Once you press it, it does its magic, matches knobs and Panel settings and then has no further use until you load another preset and want to repeat its magic. The Panel button Arturia — User Manual MicroFreak — The MicroFreak Presets…
-
Page 32: Understanding Digitally-Controlled Analog
4.5. Understanding Digitally-Controlled Analog Unlike analog synths, every module in the MicroFreak is controlled digitally, even its analog filter. It’s the best of both worlds: the warmth and hands-on control of real analog, with the ability to save and recall patches and settings.
-
Page 33: Making Connections
MicroFreak. When you apply a control signal you can decide to only use a certain amount of it; using the Matrix encoder you can dial-in any amount from -100% to +100%.
-
Page 34: The Matrix And Its Encoder
Digital Oscillator and the Filter). The Matrix is the main switchboard where you make and break these connections. It is the key to unlocking the timbral secrets of the MicroFreak. Mastering the Matrix will help you to create sounds that fit your musical taste.
-
Page 35: Sources And Destinations
Pitch, Wave, and Timbre are modulators that enable you to modify the sound of the Digital Oscillator, the basic sound source of MicroFreak. Cutoff modulates the cutoff frequency of the Filter. Sound generated by the Digital Oscillator will pass through the Analog Filter, which enables you to remove or emphasize certain frequencies within the sound.
-
Page 36: Assigning Destinations
MicroFreak. We’ve since then learned how powerful this feature is. The fixed destinations on the Matrix can only cover a small number of possible destinations on the MicroFreak. With the assignable destinations you can turn (almost) every knob on the MicroFreak into a destination for modulation control.
-
Page 37
Cycling Envelope to modulate vibrato depth. Select whatever freaky setting suits you. Experiment with changing the settings of the Cycling Envelope. Note: In paraphonic mode all voices will be assigned simultaneously as a destination. Arturia — User Manual MicroFreak — Making Connections… -
Page 38: Freaky Ideas
Modulating the Digital Oscillator: This will probably become one of the most used techniques on the MicroFreak: modulate Wave, Timbre and Shape of the Digital Oscillator with the (unsynced) LFO and Cycling Envelope. By letting them control different aspects of the Digital Oscillator with different speeds you can create ever-changing timbre patterns that never repeat.
-
Page 39
Cycling Envelope control its own level. The EMS Synthi was famous for this kind of circular routings, mostly because this technique enables you to create sounds that are unique and difficult to replicate. Arturia — User Manual MicroFreak — Making Connections… -
Page 40: The Digital Oscillator
6. THE DIGITAL OSCILLATOR The Digital Oscillator is the very heart of the MicroFreak. It’s the digital circuit that generates the core sound of this instrument. The other parts of the MicroFreak — the Analog Filter, the Envelopes, and the LFO — exist only to shape/mangle/wobble the sound of the Digital Oscillator.
-
Page 41: The Parameter Controls
Type: Type enables you to select an oscillator model. Each type has a specific character. A unique feature of the MicroFreak is that you can change the oscillator type with modulation. If you modulate the oscillator type with the LFO, it will change from one model to another very quickly, creating bizarre changes in timbre.
-
Page 42: Superwave Oscillator (Superwave)
Wave: Selection of the waveform to be multiplied: Saw, Square, Triangle and Sinus Detune: Sets the detuning amount. Volume: Sets the amplitude of the detuned waves. Arturia — User Manual MicroFreak — The Digital Oscillator…
-
Page 43: Wavetable Oscillator (Wavetable)
Sculpting: When turning the timbre knob you morph between a sine and a triangle wave. A harmonic derived from a sine wave will sound different from a harmonic built from a triangle wave. Chorus: Adds chorus to the oscillator sound, making it wider. Arturia — User Manual MicroFreak — The Digital Oscillator…
-
Page 44: Karplusstrong (Karplusstr)
In the descriptions below we describe the functions of the Oscillator models in a basic way. For in-depth info about Plaits and its waveforms, please refer to https://mutable- instruments.net/modules/plaits/manual/. Note: The names of the knobs on the MicroFreak will differ from the names used in the Plaits oscillator documentation. MicroFreak name Plaits name…
-
Page 45: Virtual Analog (V.analog)
A wavefolder prevents this from happening by folding the wave. Wave: Sets the waveshaper waveform. Amount: Sets wavefolder amount. Asym: Sets waveform asymmetry. Arturia — User Manual MicroFreak — The Digital Oscillator…
-
Page 46: Two Operator Fm (Two Op.fm)
Interval: Sets the frequency ratio between formants one and two. Formant: Sets the formant frequency. Shape: Sets formant width and shape. This controls the shape of the window by which a sum of two synchronized sine oscillators is multplied. Arturia — User Manual MicroFreak — The Digital Oscillator…
-
Page 47: Chords (Chords)
Waveform: Sets the waveform. The first half of the knob goes through a selection of «string- machine like» raw waveforms (different combinations of the organ and string “drawbars”); the second half of the knob scans a small wavetable containing 16 waveforms. Arturia — User Manual MicroFreak — The Digital Oscillator…
-
Page 48: Vowel And Speech Synthesis (Speech)
LFO (press Assign1 and turn the Shape control) • set the modulation amount to about 80 • select the triangle wave on the LFO and set LFO speed to about 80Hz There’s your song! Arturia — User Manual MicroFreak — The Digital Oscillator…
-
Page 49: Modal Resonator (Modal)
Inharm: amount of inharmonicity, or material selection. Timbre: excitation brightness and dust density. Decay: damping, decay time (energy absorption). Freaky idea: The MicroFreak is paraphonic. When you arpeggiate or sequence chords and modulate the damping simultaneously, you can selectively dampen certain steps in your sequence/arpeggio.
-
Page 50: The Filter: Sound In Close-Up
7.1. Modifying sound There are three types of Filter in the MicroFreak: a Low Pass Filter (LPF), a Band Pass Filter (BPF), and a High Pass Filter (HPF). The Low Pass Filter attenuates (weakens) or removes frequencies above the cutoff frequency.
-
Page 51: Low Pass Filter
Note: For the technically inclined: the MicroFreak filter has a 12dB roll-off. This means that it is somewhat less obtrusive than its 24dB cousin, which has a much steeper slope. The 12dB filter will do more justice to the oscillators of the MicroFreak, which have rich and complex harmonics (grains, wavetables/shapers, FM, etc.)
-
Page 52: Cutoff Frequency
What turns the filter into a compelling musical tool is changing the cutoff point and its resonance dynamically. In the MicroFreak you do this by using an LFO, an Arpeggiator, or an Envelope to control the cutoff frequency and resonance of the filter.
-
Page 53: Cutoff Modulation
The MicroFreak is «hardwired» to do this. Right next to the sustain control of the main envelope you’ll see a knob named Filter Amt (Amount). That’s where you determine how much the envelope will modulate the cutoff frequency of the Filter.
-
Page 54: The Lfo
8. THE LFO An LFO (short for Low-Frequency Oscillator) can produce various waveforms at sub-audio level. These waveforms can then be used to modulate other parts of the MicroFreak. For example: • the pitch of the Oscillator • the cutoff frequency of the Filter •…
-
Page 55: Lfo Rate
The Rate knob sets the speed of the LFO (0.06Hz up to 100Hz). By default, the LFO is not synced to the clock of the MicroFreak and will not follow changes in speed of the MicroFreak clock. By pressing the Rate encoder of the LFO you enable LFO sync.
-
Page 56: Freaky Tips And Tricks
Matrix, one trick is to use the LFO to turn glide on and off (set its amount to zero). In synced mode, you can make the LFO activate Glide every other sequencer step or every fourth step. Arturia — User Manual MicroFreak — The LFO…
-
Page 57: The Envelope Generator
MicroFreak, to start the LFO or the Envelopes. A gate is usually longer: anywhere from a few milliseconds to a few seconds.
-
Page 58: Envelope Stages
With the MicroFreak the keyboard is the primary source of gates. When your finger touches the keyboard and you hold it there for a moment, you generate a gate. The gate starts the envelope cycle and the first stage, the Attack, begins. The envelope then continues to the Decay/Release stage and the Sustain stage.
-
Page 59: The Amp Mod Button
In the Fall/Shape stage, you set the time that the envelope will take to diminish to zero. • The Hold/Sustain stage is part of the Fall/Shape stage, it sets the level of the hold stage. Arturia — User Manual MicroFreak — The Envelope Generator…
-
Page 60
Arpeggiator/Sequencer. To hear its effect activate the Arpeggiator, set the speed of the Arpeggiator to about 55 bpm, and press a chord. You’ll hear how the Cycling Envelope retriggers every time the Arpeggiator moves to the next step. Arturia — User Manual MicroFreak — The Envelope Generator… -
Page 61: About Changing Shapes
Note: Keep in mind that using the Matrix encoder you can make both positive-going and negative-going voltages. If, for example, you apply a negative-going voltage to the Fall stage, the Fall stage becomes shorter when you apply more pressure. Arturia — User Manual MicroFreak — The Envelope Generator…
-
Page 62
The LFO set to a chaotic, random wave controls the Amount of the Cycling Envelope (assign link in Matrix) The Cycling Envelope controls the decay/release or sustain time of the Main Envelope (assign link in Matrix). Arturia — User Manual MicroFreak — The Envelope Generator… -
Page 63: The Keyboard Section
Now, many decades later, the Arturia MicroFreak reintroduces the capacitive keyboard. The MicroFreak has a touch capacitive keyboard of 25 keys. On closer inspection, you’ll see hundreds of copper-colored little dots on the surface of the keyboard. These dots will register your touch as aftertouch or as velocity.
-
Page 64: Another Look At Gates And Triggers
Envelope chapter [p.52] we touched briefly on the subject of gates and triggers. These also play an important role when you play the keyboard. In the MicroFreak the keyboard is the primary source of gates. When your finger touches the keyboard and you hold it there for a moment, you generate a gate.
-
Page 65: Using Keyboard Responsiveness
Utility>CV/Gate>Pressure Range. The selectable range is 0V to 10V. The keyboard voltage is available at the back of the MicroFreak at the Pressure output. You could use it to open up an external filter, modulate the speed of a sequencer, modify the damping of a resonator or whatever else is at your disposal.
-
Page 66: Octave Buttons
(pitch-wise) on a poorly-lit stage. The keyboard itself is two octaves but the whole pitch range is eight octaves, which should facilitate all but the most extreme musical adventures. Note: Octave shift is saved with the preset. Arturia — User Manual MicroFreak — The Keyboard Section…
-
Page 67: Tutorial: Modulating Lfo Speed
To achieve this with the MicroFreak, define one of the Assignable destinations on the Matrix to the LFO Rate and connect the pressure output of the keyboard to this newly created patch point.
-
Page 68: Using The Icon Strip
Note: Hold does not work with external MIDI. If you need to hold external MIDI note(s), send the MicroFreak a Sustain message. Arturia — User Manual MicroFreak — Using the Icon Strip…
-
Page 69: Sequencer And Arpeggiator
These offer extensive Arpeggiator and Sequencer functionality. Arpeggio and Sequencer control Icons We’ve devoted separate chapters to these buttons to do them justice. Please refer to Arpeggiator [p.67] the Sequencer [p.72] chapters for more details. Arturia — User Manual MicroFreak — Using the Icon Strip…
-
Page 70: The Touch Strip
Anything in between has a gate length percentage. We call this string of gate lengths the Status. In a new sequence, all steps will have the default gate length. Arturia — User Manual MicroFreak — Using the Icon Strip…
-
Page 71: Bend
The pitch will then jump instantly to that pitch. Another thing that makes the MicroFreak unique is that you can specify how the Bend strip will react to your touch. When in standard mode (which is the default) the bend strip will behave as described above.
-
Page 72: The Arpeggiator
Click Pattern to put the Arpeggiator in a semi-random mode. Keys you press in a legato fashion on the keyboard are used by the Pattern algorithm to generate arpeggio patterns. Each time you press a key the MicroFreak will generate a new pattern. It’s a bit like having a third sequencer.
-
Page 73: Creating Pattern Variations
12.1.2. Transferring Arpeggios to the Sequencer Arpeggios are great for discovering melodic grooves that work. The MicroFreak has a nifty feature that enables you to transfer an Arpeggio pattern to a sequencer. It works like this: •…
-
Page 74: Arpeggio Rate
1/4 note triplet • 1/8 note • 1/8 note triplet • 1/16 note • 1/16 note triplet • 1/32 note • 1/32 note triplet Note: 1/4 corresponds to a standard metronome tick. Arturia — User Manual MicroFreak — The Arpeggiator…
-
Page 75: Using Sync
The MicroFreak can sync to your DAW or external synth in different ways: its Rate dial allows you to sync proportionally; at double speed, at half-speed, or somewhere in between.
-
Page 76: Arpeggiator Fun
LFO or the Cycling Envelope generator. You then emulate a monochord, a medieval instrument which has 30 or more strings all tuned to the same pitch but with now and then a string tuned one pitch above or below the base pitch. Arturia — User Manual MicroFreak — The Arpeggiator…
-
Page 77: The Sequencer
13. THE SEQUENCER The sequencer of the Microfreak is like a hidden gem. At first look you may not even notice it is there, but once you’ve discovered what it can do it becomes indispensable for creating sound on the MicroFreak.
-
Page 78: Using The Sequencer
An alternative way to start real-time recording is to press the O button (Rec) while the sequencer is playing. Note: In «Play» mode the MicroFreak will send MIDI clocks and analog clock signals that you can use to sync an external sequencer. When you toggle between Play and Stop the MicroFreak will send MIDI start and stop signals that will start/stop external sequencers.
-
Page 79: Selecting And Playing A Sequence Pattern
If you want to undo the most recent recording of a sequence pattern, hold Shift and press the icon of the sequence you want to reset to its previous state (A or B). The MicroFreak will then load the most recently saved sequence pattern from memory and erase the existing one.
-
Page 80: Recording A Sequence
MIDI data stream. If there is a START/PLAY signal in the stream (a Play button is pressed on an external sequencer or MIDI start command initiated in a DAW) the sequencer will go into real-time recording mode. Arturia — User Manual MicroFreak — The Sequencer…
-
Page 81
«play» is turned off and press record • turn the Rate/Swing encoder to «scrub» through the sequence. The MicroFreak will play back all data stored in a step including modulation events you have stored in the modulation tracks [p.77]. -
Page 82: The Modulation Tracks
Now turn a knob you want to record. While turning the knob nothing will be recorded, but you monitor what is happening. Once you’ve found a knob position that you want to record, let go of the knob. MicroFreak will take a snapshot of the knob and store it with the step.
-
Page 83
Note: It is not possible to assign SHIFT + Knob parameters such as the Shape of the Cycling Envelope stages. Neither can you assign control buttons (Shift, Amp | Mod LFO Mode) or icon buttons (Spice, Dice, etc.) Arturia — User Manual MicroFreak — The Sequencer… -
Page 84: Real-Time Recording Of Modulation
Note: It is possible to record knob movements from external controllers in the Sequencers and to Record knob movements of the MicroFreak on external devices such a DAW. For an overview of knobs/parameters that can be recorded in a modulation track refer to the table in the step-time recording paragraph above.
-
Page 85: A Hidden Feature
LFO. Applying more modulation will make the pitch stream of the sequence more extreme. Applying negative modulation (anything below zero is negative) will invert the pitch modulation. Arturia — User Manual MicroFreak — The Sequencer…
-
Page 86: Second Experiment: Hoketus
Hoketus is an ancient technique. It’s when you restrict yourself to using only one pitch in a running sequence, but change everything else: timbre, attack, decay, pressure, rhythm. The MicroFreak can lift this technique to new heights because it has modulation options that composers and performers in ancient times could only dream of.
-
Page 87: Microfreak Configuration
A=441 Hz, then all of your presets will use that tuning standard. That’s a good thing. You can change these settings on the MicroFreak in Utility or on your computer in the MIDI Control Center (MCC). In Utility on the MicroFreak, you can adjust settings specifically for a preset.
-
Page 88: Utility & Midi Control Center
Sets sequence smoothing for sequencer MOD track 2 [OFF, ON] smooth Sets sequence smoothing for sequencer MOD track 3 [OFF, ON] smooth Sets sequence smoothing for sequencer MOD track 4 [OFF, ON] Arturia — User Manual MicroFreak — MicroFreak Configuration…
-
Page 89
Category Parameter Description Utility CV/Gate Pitch format [1V/ Defines the voltage level the MicroFreak will output at the Oct, Hz/V, 1.2V/ CV out. 1V/Oct (eurorack and others), Hz/V or 1.2V/Oct Oct] (Buchla) Gate format [S- Defines the gate voltage level the MicroFreak will output… -
Page 90
Velocity curve [Lin Sets the keyboard response curve for Velocity Log, Exp] Factory reset Resets your MicroFreak to the original Factory settings, erases [Cancel, changes you made in Utility and erases your presets Yes] User preset Erases User presets only. Remember first to make a backup to… -
Page 91: Midi Control Center
MicroFreak The MIDI Control Center manual has general descriptions of the features that are common to all Arturia products. In the section below we will only refer to settings specific to the MicroFreak. 14.2.1. MIDI Control Center settings The MIDI settings are all using the MIDI Control Center’s Device tab.
-
Page 92
MIDI, but they’re disconnected from the MicroFreak. This is convenient if you’re working with a DAW; you’ll hear the keyboard and controls on the MicroFreak when its track is selected, and MIDI is being sent back to trigger it, but you won’t hear it when DAW tracks assigned to other instruments are selected. -
Page 93
CV pitch format (1V/Oct, Hz/V, 1.2V/Oct) — Defines the voltage level the MicroFreak will output at the CV out. 1v/Oct (Eurorack and others), Hz/V, or 1.2V/Oct (Buchla). CV Gate format (S-Trig, V-Trig 5V, V-Trig 12V) — Defines the gate voltage level the MicroFreak will output at the Gate out. -
Page 94
Log requires the least amount of force to play louder notes, but it’s harder to • control the dynamics at lower levels Exponential is less jumpy at lower dynamic levels, but it takes more force to • reach high dynamic levels. Arturia — User Manual MicroFreak — MicroFreak Configuration… -
Page 95: Connecting External Gear
Center. The MIDI Control Center software allows you to define a wide variety of settings on the MicroFreak. However, the MicroFreak is so powerful on its own that there may be times when you want to use it without a computer attached! In this case, you can use a standard USB mobile phone charger or a power bank to power the unit and connect everything else as shown in the following diagrams.
-
Page 96: Cv/Gate Functions
And of course, MicroFreak can send and receive MIDI data using the USB port of your computer. MIDI to Modular 15.1. CV/GATE FUNCTIONS The MicroFreak provides direct access to some of the best music technology the world has produced in the last six decades: USB, MIDI, Clock and CV/Gate out connectors are all present on its rear panel in a space not much larger than a pencil.
-
Page 97
Volt to make an oscillator rise one octave in pitch. This is the most commonly used standard. Please refer to the documentation of your external gear if you cannot get external oscillators to track properly. Changing the Volt/Octave setting may bring the solution. Arturia — User Manual MicroFreak — Connecting external gear… -
Page 98: Midi And Cv/Gate Signals: Daw Configuration
15.1.2. MIDI and CV/Gate signals: DAW configuration You can of course use a DAW to play back MIDI tracks on the MicroFreak. To make this possible the MIDI channel of the desired track of the DAW must match the MIDI channel of the MicroFreak.
-
Page 99: The Microfreak And Your Modular System
Pitch, Velocity and Pressure outputs you can use to control external oscillators. You can of course also control your modular system with the MIDI out on the MicroFreak. For this to work you need a module that translates MIDI to Pitch and Gate signals.
-
Page 100: Cheat Sheet
Transpose Arpeggio (note: In Arp Hold mode, lasts until new Arp is keyboard played.) Shift + Up | A Transfer current Arpeggio to sequencer A Shift + Order | B Transfer current Arpeggio to sequencer B Arturia — User Manual MicroFreak — Cheat Sheet…
-
Page 101
Function Swing Shift + Swing Set Swing rate Category Key combination Function Cycling Envelope Shift + Rise Set Attack shape of Cycling Envelope Shift + Fall Set Decay shape of Cycling Envelope Arturia — User Manual MicroFreak — Cheat Sheet… -
Page 102: Software License Agreement
The License is not a sale of the original SOFTWARE. 2. Grant of License Arturia grants you a non-exclusive license for the use of the software according to the terms and conditions of this Agreement. You may not lease, loan or sub- license the software.
-
Page 103
(a) return of the purchase price or (b) replacement of the disk that does not meet the Limited Warranty and which is returned to Arturia with a copy of your receipt. This limited Warranty is void if failure of the software has resulted from accident, abuse, modification, or misapplication. -
Page 104: Declaration Of Conformity
Important notice: DO NOT MODIFY THE UNIT! This product, when installed as indicate in the instructions contained in this manual, meets FCC requirement. Modifications not expressly approved by Arturia may avoid your authority, granted by the FCC, to use the product.
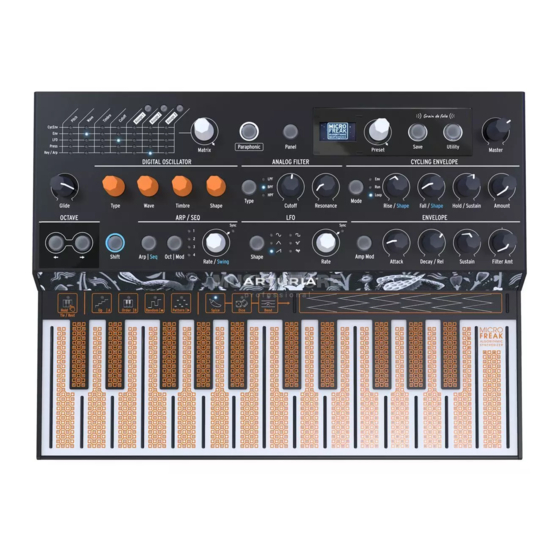
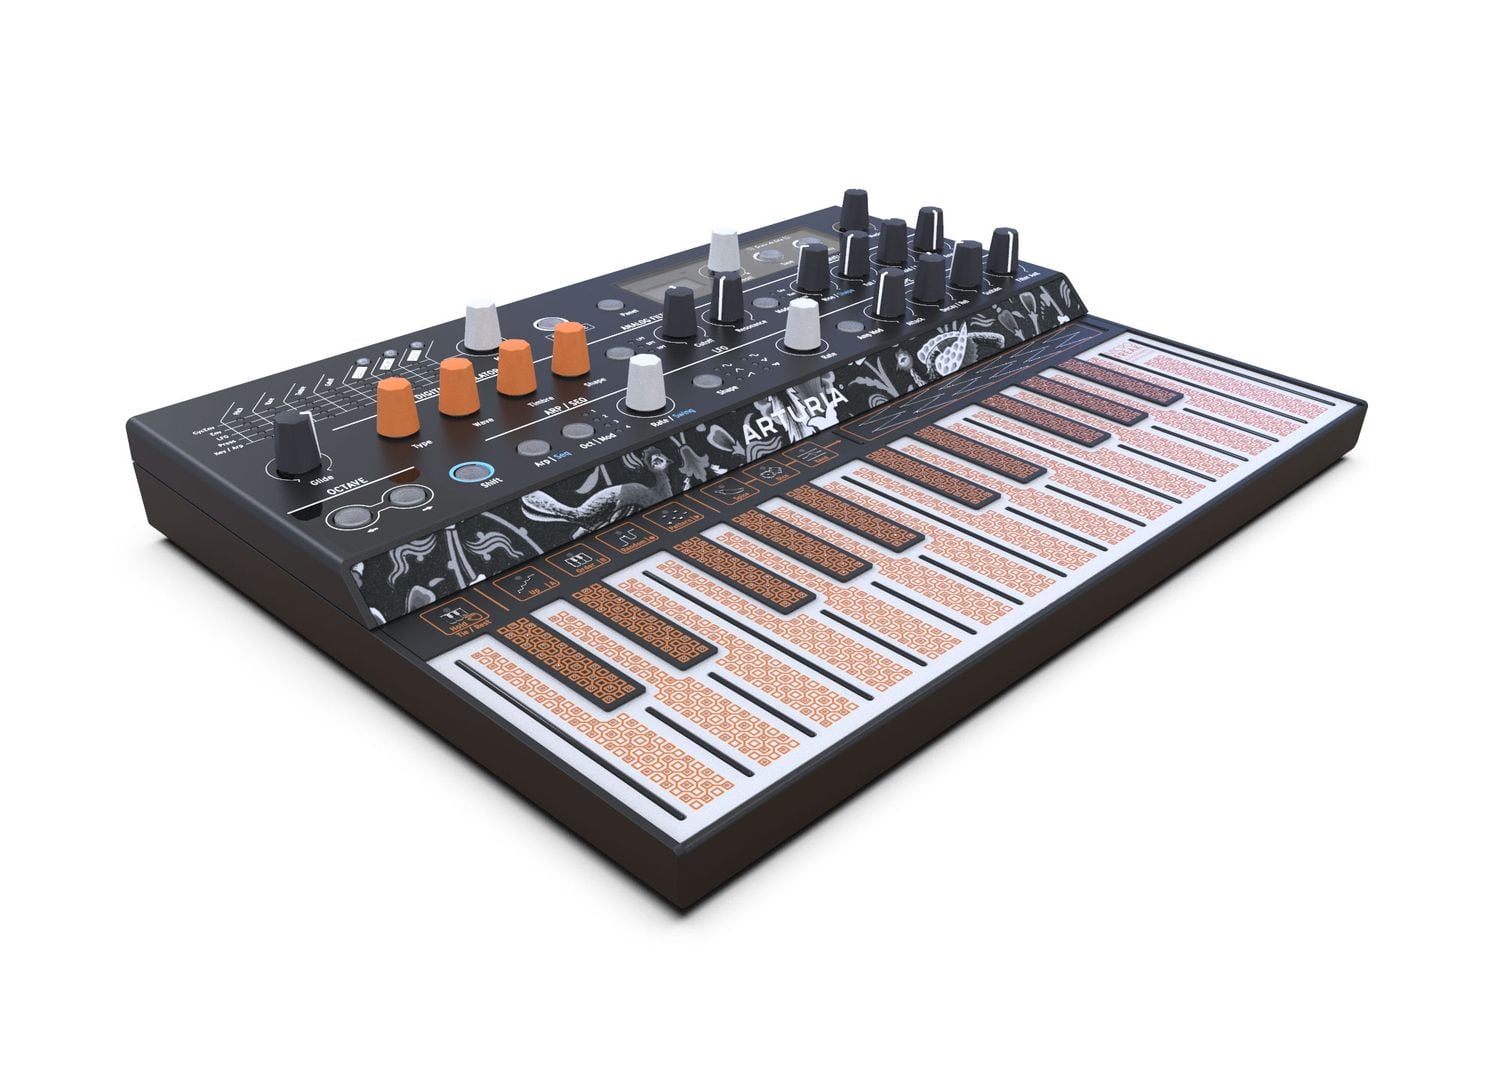
Новый синтезатор MicroFreak от Arturia — это очень своеобразный инструмент, который покорит сердце любого музыканта, жаждущего экспериментов. Он сочетает в себе практически безграничные возможности цифровых осцилляторов и таблично-волнового синтеза с теплым чарующим характером аналоговых фильтров. Его клавиатура выполнена по уникальной технологии и состоит из печатных плат, которые наделяют MicroFreak функцией полифонического послекасания. Синтезатор также обладает некоторыми возможностями для добавления контролируемого рандома последовательностям.
Характеристики:
- Синтезатор включает 192 слота для пресетов, 128 из которых заводские
- 11 цифровых осцилляторов с различными режимами, включая совместно разработанные с Mutable Instruments
- Аналоговый резонансный фильтр, 12 дБ/октава, режимы: LowPass, BandPass, HighPass
- ADSR огибающая
- Цикличная огибающая с двумя режимами: огибающая и LFO
- LFO с возможностью синхронизации: Sine, Tri, Saw, Square, Random, Slew Random
- Матрица модуляции с 5 источниками и 7 целевыми параметрами (3 из которых пользовательские)
- Монофонический или парафонический режимы — до 4 голосов
- 25-клавишная емкостная клавиатура с полифоническим послекасанием
- Емкостная сенсорная полоса
- OLED-дисплей для отображения изменений параметров
- Мощный арпеджиатор с режимами: Up, Order, Random, Pattern, а также уникальными функциями рандомизации последовательностей Spice и DiceGate
- 64-шаговый секвенсор: 2 паттерна на пресет; 4 дорожки автоматизации на пресет
- CV/Gate/Mod выходы
- Разъемы USB, ClockиMIDIвход/выход
- Мастер выход на 6,35 мм и выход на наушники на 3,5 мм
- Габариты устройства: 311 х 233 х 55 мм
- Вес: 1,02 кг
Цифровой осциллятор
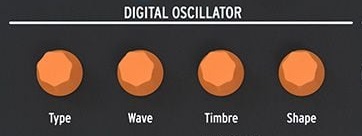
Цифровой осциллятор MicroFreak поражает своими возможностями. Его движок способен на физическое моделирование, таблично-волновой синтез, виртуальный аналог и многое другое. Всего на данный момент осциллятор имеет 11 режимов работы, 4 из которых разработаны самой Arturia, а дополнительные 7 были созданы в сотрудничестве с компанией Mutable Instruments, основной деятельностью которой является производство Eurorack модулей. В свой цифровой осциллятор Arturia интегрировали открытый код популярного модуля Plaits. Самое прекрасное во всей этой истории то, что Arturia обещает дополнять этот список с выходом обновлений в будущем.
Секция осциллятора включает 4 оранжевых энкодера: Type, Wave, Timbre и Shape. Первый позволяет выбрать движок осциллятора, а 3 остальных используются для тонкой настройки его звука. Давайте кратко пройдемся по представленным в первой прошивке режимам:
- Superwave: Тонко расстроенные пилообразные, квадратные, синусоидальные или треугольные волны, которые позволяют создавать очень жирные синтезированные звуки. Идеально подходит для накручивания плавных туманных пэдов или трансовых плаков.
- Harmo: Как можно понять из названия, принцип работы этого осциллятора строится на насыщении звука гармониками. Для этого у вас в распоряжении 32 синусоидальных волны и возможность модулировать их громкость. Данный режим позволяет создавать сложные, гармонически насыщенные, резонирующие звуки, которые в последствии можно формировать с помощью фильтра.
- KarplusStr.:метод синтеза, использующий физическое моделирование для воссоздания звучания струнных инструментов: от мягкого пиццикато до визжащих аккордов.
- Wavetable: Таблично-волновой синтез как он есть. Данный режим содержит 16 волновых таблиц, количество которых тоже обещают расширить.
- Pl.VA: Виртуальный аналоговый осциллятор, воссоздающий традиционные методы синтеза в цифровой форме для сочетания классических и современных звуков.
- Pl.Waveshpr: Волна треугольной формы, обработанная вейвшейпером и вейфолдером. Хорошо подходит для создания агрессивных металлических звуков.
- Pl.FM: Простой, но мощный FM-осциллятор с двумя операторами с синусоидальными волнами, модулирующими фазу друг друга для создания резких, кислотных звуков.
- Pl.Grain: Гранулярный движок синтеза, который отлично подходит для добавления текстуры и характера секвенциям.
- Pl.Chords: Парафонический движок синтеза, который воспроизводит копии одного звука с заданными интервалами, создавая стандартные аккорды нажатием на одну клавишу.
- Pl.Speech: Движок, способный генерировать гласные, формантные звуки, а также формировать простые слова. Если правильно заавтоматизировать этот осциллятор с помощью матрицы модуляции, ваш MicroFreak оживет.
- Pl.Modal: Создает уникальные негармонические колебания. Идеально подходит для добавления текстуры или необычных обертонов в вашу музыку.
Аналоговый фильтр
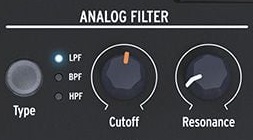
MicroFreak – не полностью цифровой синтезатор. Наряду с многорежимным цифровым осциллятором, он также оборудован аналоговым резонансным фильтром с тремя режимами работы (Low-, Band- и High-pass) и срезом 12 дБ на октаву в стиле OberheimSEM. Этот фильтр построен на основе метода переменных состояния (state-variable), поэтому он способен самовозбуждаться в пиковых значениях резонанса. В секции фильтра есть два регулятора для настройки частоты среза и резонанса, а также переключатель режима работы.
LFO, огибающая и цикличная огибающая
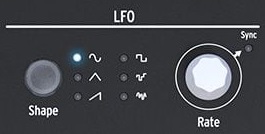
MicroFreak оснащен двумя различными огибающими и LFO с функцией синхронизации. Секция LFO имеет регулятор для настройки частоты колебаний и переключатель режимов работы: Sine, Tri, Saw, Square, Random, SlewRandom.
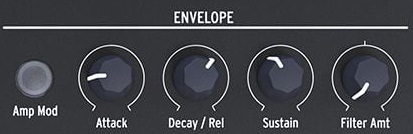
Основную огибающую можно привязать к усилителю для его модуляции. Это довольно стандартная ADSR-огибающая с затуханием (Release), привязанным ко времени спада (Decay). Помимо регуляторов основных параметров в этой секции также имеется ручка для настройки действия огибающей на фильтр.

Цикличная огибающая имеет несколько режимов работы, два из которых позволяют автоматически перезапускать огибающую, превращая ее в LFO с переменным временем нарастания, удержания и спада с экспоненциальной, линейной или логарифмической кривыми. В режиме Run огибающая работает, как свободный LFO, т.е. его фаза перезапускается только тогда, когда поступает соответствующая MIDI-команда, а в режиме Envelope фаза низкочастотного осциллятора запускается с начала по нажатию клавиши на клавиатуре. Оставшийся режим позволяет огибающей работать в обычном режиме. Из регуляторов в этой секции представлены ручки для настройки времени нарастания и спада, они же используются для изменения формы кривых, а также регуляторы уровня сустейна и глубины модуляции. Ну и, само собой, переключатель режима работы огибающей.
Клавиатура

Одна из наиболее примечательных особенностей MicroFreak — это клавиатура из печатных плат с 25 клавишами. Она не только позволяет вам проигрывать ноты в стандартном режиме, но также может определять силу нажатия и обладает функцией послекасания для каждой клавиши в отдельности. Последнюю функцию можно использовать для контролирования любого параметра синтезатора в зависимости от площади нажатия на клавишу после ее срабатывания. Важно отметить, что эта клавиатура не имеет движущихся частей, так что если вы сильно привыкли к стандартным клавиатурам, вам такое решение может не понравиться. Однако, использование печатных плат в качестве сенсоров позволило добиться поразительной скорости срабатывания.
Также благодаря выходам USB, MIDI и CV MicroFreak можно использовать в качестве MIDI-контроллера для управления инструментами в DAW и аналоговыми или модульными синтезаторами. Но по-настоящему эта особенность раскрывается, если контролируемый инструмент также поддерживает функцию полифонического послекасания.
Секвенсор

Секвенсор MicroFreak — это не просто старый синтезаторный секвенсор, это двухрежимный полифонический арпеджиатор/секвенсор с инновационными функциями, которые будут подогревать творческий процесс. Сенсорные кнопки над клавиатурой предоставляют доступ к основным параметрам секвенсора. Он также позволяет записывать до 4 автоматизаций параметров на шаг, а сенсорная полоса может использоваться в качестве регулятора изменения высоты тона или для управления глубиной функций «Spice» и «Dice», которые помогут вам разнообразить и оживить ваши последовательности.
Dice: Этот параметр изменяет арпеджио или секвенцию без изменения высоты тона и налету создает нечто абсолютно новое и зачастую интересное. Точнее, Dice рандомно изменяет длительность каждой ноты, вплоть до полного отключения каких-либо нот из последовательности.
Spice: Позволяет настроить глубину воздействия предыдущего параметра на последовательность.
Матрица модуляции
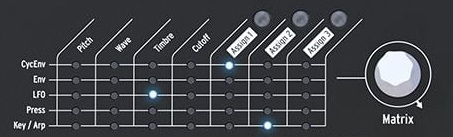
Несмотря на свои небольшие размеры, MicroFreak имеет довольно мощную матрицу модуляции. Всего в ней представлено 5 источников и 7 целевых параметров, 3 из которых назначаются самим пользователем. Управление матрицей очень простое и производится с помощью нажимаемого энкодера Matrix: регулятор необходимо просто прокрутить до нужного параметра и щелкнуть на энкодер.
Источники: CyclingEnvelope, Envelope, LFO, Press, Key/Arp
Целевыепараметры: Pitch, Wave, Timbre, Cutoff, +3 пользовательских
Экран и пресеты
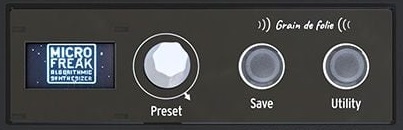
Маленький OLED-дисплей отображает изменения любого параметра синтезатора, так что вы всегда будете знать, какие изменения вы вносите.
Хотя изучение возможностей нового синтезатора само по себе может быть очень увлекательным, приятно иметь возможность быстро пролистывать некоторые пресеты, чтобы понять возможности нового устройства. MicroFreak содержит 128 предустановленных патчей и позволяет создавать, редактировать и сохранять свои собственные. Нажимной энкодер Preset позволяет вам выбрать, применить и переименовать любой пресет.
Возможности подключения

Синтезатор оснащен выходами CV, Gate, позволяющими передавать сигналы о высоте тона и длительности нажатия клавиши, а также Pressure, соответствующим послекасанию, на любой синтезатор, совместимый с CV/Gate. Вы также можете подключить его к DAW через USB или использовать входящие в комплект MIDI-кабели. Это позволяет вам подключить его к любимой MIDI-клавиатуре или использовать секвенсор MicroFreak, например, для управления другим синтезатором. Помимо этого, есть вход, выход Clock для синхронизации с внешним оборудованием, 6,3 мм Jack-выход для записи аудиосигнала, а также 3,5 мм выход на наушники. Питание устройства осуществляется с помощью блока питания 12 ВDC 1 А или по шине USB.
Итог
За счет своей низкой цены MicroFreak идеально подойдет в качестве первого синтезатора, а уже бывалых ценителей музыкального оборудования он сможет порадовать огромной палитрой уникальных звуков.
Эта небольшая музыкальная машинка оснащена универсальным цифровым осциллятором, позволяющим вам с легкостью создавать уникальные и интересные звуки. Он обладает множеством различных звуковых движков, которые затянут на долгие часы как новичков, так и опытных профессионалов исследовать совершенно новые, неизведанные возможности.
Посмотреть инструкция для Arturia MicroFreak бесплатно. Руководство относится к категории синтезаторы, 5 человек(а) дали ему среднюю оценку 8.7. Руководство доступно на следующих языках: английский. У вас есть вопрос о Arturia MicroFreak или вам нужна помощь? Задайте свой вопрос здесь
Не можете найти ответ на свой вопрос в руководстве? Вы можете найти ответ на свой вопрос ниже, в разделе часто задаваемых вопросов о Arturia MicroFreak.
Какой вес Arturia MicroFreak?
Arturia MicroFreak имеет вес 1020 g.
Какая высота Arturia MicroFreak?
Arturia MicroFreak имеет высоту 55 mm.
Какая ширина Arturia MicroFreak?
Arturia MicroFreak имеет ширину 311 mm.
Какая толщина Arturia MicroFreak?
Arturia MicroFreak имеет толщину 233 mm.
Инструкция Arturia MicroFreak доступно в русский?
К сожалению, у нас нет руководства для Arturia MicroFreak, доступного в русский. Это руководство доступно в английский.
Не нашли свой вопрос? Задайте свой вопрос здесь