-
Драйверы
64
-
Инструкции по эксплуатации
8
Языки:

ASUS B85M-G инструкция по эксплуатации
(76 страниц)
- Языки:Английский
-
Тип:
PDF -
Размер:
3.38 MB -
Описание:
B85M-G User’s Manual (English)
Просмотр

ASUS B85M-G инструкция по эксплуатации
(78 страниц)
- Языки:Японский
-
Тип:
PDF -
Размер:
5.5 MB -
Описание:
B85M-G User’s Manual (Japanese)
Просмотр

ASUS B85M-G инструкция по эксплуатации
(78 страниц)
- Языки:Китайский
-
Тип:
PDF -
Размер:
6.06 MB -
Описание:
B85M-G User’s Manual(Traditional Chinese)
Просмотр

ASUS B85M-G инструкция по эксплуатации
(76 страниц)
- Языки:Японский
-
Тип:
PDF -
Размер:
6.23 MB -
Описание:
B85M-G User’s Manual (Japanese)
Просмотр

ASUS B85M-G инструкция по эксплуатации
(78 страниц)
- Языки:Японский
-
Тип:
PDF -
Размер:
3.71 MB -
Описание:
B85M-G User’s Manual (Japanese)
Просмотр

ASUS B85M-G инструкция по эксплуатации
(76 страниц)
- Языки:Китайский
-
Тип:
PDF -
Размер:
4.07 MB -
Описание:
B85M-G User’s Manual(Traditional Chinese)
Просмотр

ASUS B85M-G инструкция по эксплуатации
(75 страниц)
- Языки:Испанский
-
Тип:
PDF -
Размер:
4.58 MB -
Описание:
B85M-G User’s Manual (Spanish)
Просмотр

ASUS B85M-G инструкция по эксплуатации
(76 страниц)
- Языки:Японский
-
Тип:
PDF -
Размер:
3.62 MB -
Описание:
B85M-G User’s Manual (Japanese)
Просмотр
На NoDevice можно скачать инструкцию по эксплуатации для ASUS B85M-G. Руководство пользователя необходимо для ознакомления с правилами установки и эксплуатации ASUS B85M-G. Инструкции по использованию помогут правильно настроить ASUS B85M-G, исправить ошибки и выявить неполадки.
Руководства пользователя
- Руководства пользователя
- Декларация соответствия
Версия J9884
5.5 MB
B85M-G User’s Manual (Japanese)
Версия E10276
91.95 KB
HDMI insert (English)
Версия J9858
6.23 MB
B85M-G User’s Manual (Japanese)
Версия E9884
5.99 MB
B85M-G User’s Manual (English)
Версия T9884
6.06 MB
B85M-G User’s Manual(Traditional Chinese)
Версия C9884
6.1 MB
B85M-G User’s Manual (Simplified Chinese)
Версия E8522
3.38 MB
B85M-G User’s Manual (English)
Версия E8146
3.38 MB
B85M-G User’s Manual (English)
Версия T8146
4.07 MB
B85M-G User’s Manual(Traditional Chinese)
Версия C8146
4.13 MB
B85M-G User’s Manual (Simplified Chinese)
Версия —
2.09 MB
LGA1150 CPU installation Manual
Версия Q8146
6.87 MB
B85M-G Quick Start Guide for Multiple Languages
Версия S8146
4.58 MB
B85M-G User’s Manual (Spanish)
Версия J8146
3.62 MB
B85M-G User’s Manual (Japanese)
- Manuals
- Brands
- Asus Manuals
- Motherboard
- B85M-G
- User manual
-
Contents
-
Table of Contents
-
Bookmarks
Quick Links
Related Manuals for Asus B85M-G
Summary of Contents for Asus B85M-G
-
Page 1
B85M-G… -
Page 2
Product warranty or service will not be extended if: (1) the product is repaired, modified or altered, unless such repair, modification of alteration is authorized in writing by ASUS; or (2) the serial number of the product is defaced or missing. -
Page 3: Table Of Contents
Contents Safety information …………………. iv About this guide ………………….iv Package contents ………………….. vi B85M-G specifications summary …………….vi Product introduction Before you proceed ………………. 1-1 Motherboard overview …………….1-1 Central Processing Unit (CPU) …………..1-3 System memory ………………1-7 Expansion slots………………
-
Page 4: Safety Information
Safety information Electrical safety • To prevent electrical shock hazard, disconnect the power cable from the electrical outlet before relocating the system. • When adding or removing devices to or from the system, ensure that the power cables for the devices are unplugged before the signal cables are connected. If possible, disconnect all power cables from the existing system before you add a device.
-
Page 5: Conventions Used In This Guide
Refer to the following sources for additional information and for product and software updates. ASUS websites The ASUS website provides updated information on ASUS hardware and software products. Refer to the ASUS contact information. Optional documentation Your product package may include optional documentation, such as warranty flyers, that may have been added by your dealer.
-
Page 6: Package Contents
4 x DIMM, max. 32GB, DDR3 1600 / 1333 / 1066 MHz, non-ECC, un- buffered memory Dual-channel memory architecture * Refer to www.asus.com for the latest Memory QVL (Qualified Vendors List). ® ** Due to Intel chipset limitation, the DDR3 1600MHz and higher memory modules on XMP mode will run at the maximum transfer rate of DDR3 1600MHz.
-
Page 7
8 x USB 2.0 ports (4 ports at midboard, 4 ports at back panel) ASUS DIGI+ VRM: ASUS unique features — ASUS DIGI+VRM: Digital Power Design for the CPU — ASUS 3 Phase Power Design ASUS Exclusive Features: — ASUS USB 3.0 Boost… -
Page 8
1 x 4-pin ATX 12V power connector BIOS features 64Mb Flash ROM, EFI BIOS, PnP, DMI v2.0, WfM2.0, SM BIOS v2.7, ACPI v2.0a, SLP 3.0, EUP-ready, Multi-language BIOS, ASUS EZ Flash 2, ASUS CrashFree BIOS 3 Manageability WOL by PME, WOR by PME, PXE… -
Page 9: Product Introduction
1.2.2 Screw holes Place six screws into the holes indicated by circles to secure the motherboard to the chassis. Do not overtighten the screws! Doing so can damage the motherboard. ASUS B85M-G…
-
Page 10: Motherboard Layout
Place this side towards the rear of the chassis B85M-G 1.2.3 Motherboard layout 19.3cm(7.6in) KBMS CPU_FAN DIGI +VRM ATX12V USB910 USB3_56 HDMI 1442 CHA_FAN LAN_USB34 BATTERY AUDIO PCIEX16 B85M-G 8111G 64Mb BIOS PCIEX1_1 Super Intel ® SB_PWR PCIEX1_2 SPDIF_OUT SATA6G_4…
-
Page 11: Central Processing Unit (Cpu)
Central Processing Unit (CPU) This motherboard comes with a surface mount LGA1150 socket designed for the Intel ® generation Core™ i7 / Core™ i5 / Core™ i3, Pentium , Celeron processors. ® ® B85M-G B85M-G CPU socket LGA1150 ASUS B85M-G…
-
Page 12: Installing The Cpu
Contact your retailer immediately if the PnP cap is missing, or if you see any damage to the PnP cap/socket contacts/motherboard components. ASUS will shoulder the cost of repair only if the damage is shipment/ transit-related.
-
Page 13: Cpu Heatsink And Fan Assembly Installation
1.3.2 CPU heatsink and fan assembly installation Apply the Thermal Interface Material to the CPU heatsink and CPU before you install the heatsink and fan if necessary. ASUS B85M-G…
-
Page 14
To install the CPU heatsink and fan assembly To uninstall the CPU heatsink and fan assembly Chapter 1: Product introduction… -
Page 15: System Memory
This motherboard does not support DIMMs made up of 512 megabits (Mb) chips or less. • The maximum 32GB memory capacity can be supported with 8GB or above DIMMs. ASUS will update the memory QVL once the DIMMs are available in the market. ASUS B85M-G…
-
Page 16: Installing A Dimm
For system stability, use a more efficient memory cooling system to support a full memory load (4 DIMMs) or overclocking condition. • Visit the ASUS website at: www.asus.com for the latest QVL. 1.4.3 Installing a DIMM Unplug the power supply before adding or removing DIMMs or other system components.
-
Page 17: Expansion Slots
When using PCI cards on shared slots, ensure that the drivers support “Share IRQ” or that the cards do not need IRQ assignments. Otherwise, conflicts will arise between the two PCI groups, making the system unstable and the card inoperable. ASUS B85M-G…
-
Page 18: Clear Rtc Ram
B85M-G Normal Clear RTC (Default) B85M-G Clear RTC RAM To erase the RTC RAM: Turn OFF the computer and unplug the power cord. Move the jumper cap from pins 1-2 (default) to pins 2-3. Keep the cap on pins 2-3 for about 5-10 seconds, then move the cap back to pins 1-2.
-
Page 19: Keyboard And Usb Device Wake-Up
KB_USBPWB +5VSB B85M-G (Default) B85M-G Keyboard and USB device wake up • The USB device wake-up feature requires a power supply that can provide 500mA on the +5VSB lead for each USB port; otherwise, the system would not power up.
-
Page 20: Connectors
Connectors 1.7.1 Rear panel connectors PS/2 mouse port (green). This port is for a PS/2 mouse. Video Graphics Adapter (VGA) port. This 15-pin port is for a VGA monitor or other VGA-compatible devices. LAN (RJ-45) port. This port allows Gigabit connection to a Local Area Network (LAN) through a network hub.
-
Page 21
(Pixel Clock = H total x V Total x Frame Rate (Screen refresh rate)): HDMI port: 300 MHz DVI port: 165 MHz VGA port: 180 MHz PS/2 keyboard port (purple). This port is for a PS/2 keyboard. ASUS B85M-G 1-13… -
Page 22: Internal Connectors
• If you are uncertain about the minimum power supply requirement for your system, refer to the Recommended Power Supply Wattage Calculator at http://support.asus. com/PowerSupplyCalculator/PSCalculator.aspx?SLanguage=en-us for details. LPT connector (26-1 pin LPT) The LPT (Line Printing Terminal) connector supports devices such as a printer. LPT standardizes as IEEE 1284, which is the parallel port interface on IBM PC-compatible computers.
-
Page 23: Front Panel Audio Connector
B85M-G HD-audio-compliant Legacy AC’97 pin definition compliant definition B85M-G Front panel audio connector • We recommend that you connect a high-definition front panel audio module to this connector to avail of the motherboard’s high-definition audio capability. • If you want to connect a high-definition front panel audio module to this connector, set the Front Panel Type item in the BIOS setup to [HD].
-
Page 24
1A (12 W) fan power. Speaker connector (4-pin SPEAKER) The 4-pin connector is for the chassis-mounted system warning speaker. The speaker allows you hear system beeps and warnings. SPEAKER B85M-G PIN 1 B85M-G Speaker Out Connector 1-16 Chapter 1: Product introduction… -
Page 25
These connectors connect to Serial ATA 3.0 Gb/s hard disk drives and optical drives via Serial ATA 3.0 Gb/s signal cables. SATA3G_1 SATA3G_2 B85M-G B85M-G Intel SATA 3.0Gb/s connectors ® When using hot-plug and NCQ, set the SATA Mode Selection item in the BIOS to [AHCI]. See section 2.6.3 SATA Configuration for details. -
Page 26
IntA_P1_SSRX- USB3+5V USB3+5V PIN 1 B85M-G USB3.0 Front panel connector The USB 3.0 module is purchased separately. USB 2.0 connectors (10-1 pin USB1112, USB1314) These connectors are for USB 2.0 ports. Connect the USB module cable to any of these connectors, then install the module to a slot opening at the back of the system chassis. -
Page 27: System Panel Connector
PWR BTN PIN 1 B85M-G +HDD_LED RESET B85M-G System panel connector • System power LED (2-pin PWR_LED) This 2-pin connector is for the system power LED. Connect the chassis power LED cable to this connector. The system power LED lights up when you turn on the system power, and blinks when the system is in sleep mode.
-
Page 28: Onboard Leds
Remove the jumper caps only when you intend to use the chassis intrusion detection feature. CHASSIS B85M-G B85M-G Chassis intrusion connector Onboard LEDs Standby Power LED The motherboard comes with a standby power LED that lights up to indicate that the system is ON, in sleep mode, or in soft-off mode.
-
Page 29: Software Support
Place the Support DVD into the optical drive. If Autorun is enabled in your computer, the DVD automatically displays the Specials screen which lists the unique features of your ASUS motherboard. Click Drivers, Utilities, AHCI Driver, Manual, Contact and Specials tabs to display their respective menus.
-
Page 30: Bios Information
Managing and updating your BIOS Save a copy of the original motherboard BIOS file to a USB flash disk in case you need to restore the BIOS in the future. Copy the original motherboard BIOS using the ASUS Update utility.
-
Page 31: Asus Ez Flash
2.1.2 ASUS EZ Flash 2 The ASUS EZ Flash 2 feature allows you to update the BIOS without using an OS-based utility. Before you start using this utility, download the latest BIOS file from the ASUS website at www.asus.com. To update the BIOS using EZ Flash 2: Insert the USB flash disk that contains the latest BIOS file to the USB port.
-
Page 32: Asus Crashfree Bios 3 Utility
2.1.3 ASUS CrashFree BIOS 3 utility The ASUS CrashFree BIOS 3 is an auto recovery tool that allows you to restore the BIOS file when it fails or gets corrupted during the updating process. You can restore a corrupted BIOS file using the motherboard support DVD or a USB flash drive that contains the updated BIOS file.
-
Page 33
Insert the USB flash drive with the latest BIOS file and BIOS Updater to the USB port. Boot your computer. When the ASUS Logo appears, press <F8> to show the BIOS Boot Device Select Menu. Insert the support DVD into the optical drive and select the optical drive as the boot device. -
Page 34
Ensure to load the BIOS default settings to ensure system compatibility and stability. Select the Load Optimized Defaults item under the Exit menu. Refer to section 2.10 Exit menu for details. • Ensure to connect all SATA hard disk drives after updating the BIOS file if you have disconnected them. ASUS B85M-G… -
Page 35: Bios Setup Program
The BIOS setup screens shown in this section are for reference purposes only, and may not exactly match what you see on your screen. • Visit the ASUS website at www.asus.com to download the latest BIOS file for this motherboard. •…
-
Page 36: Advanced Mode
The Advanced Mode provides advanced options for experienced end-users to configure the BIOS settings. The figure below shows an example of the Advanced Mode. Refer to the following sections for the detailed configurations. To access the EZ Mode, click Exit, then select ASUS EZ Mode or press F7. ASUS B85M-G…
-
Page 37: Menu Bar
Back button Menu items Menu bar Configuration fields General help Last modified settings Pop-up window Submenu item Navigation keys Quick note Scroll bar Menu bar The menu bar on top of the screen has the following main items: My Favorites For saving the frequently-used system settings and configuration Main For changing the basic system configuration…
-
Page 38: My Favorites
This button allows you to enter notes of the activities that you have done in BIOS. Last Modified button This button shows the items that you last modified and saved in BIOS Setup. My Favorites MyFavorites is your personal space where you can easily save and access your favorite BIOS items. ASUS B85M-G…
-
Page 39: Main Menu
Adding items to My Favorites To add frequently-used BIOS items to My Favorites: Use the arrow keys to select an item that you want to add. When using a mouse, hover the pointer to the item. Press <F4> on your keyboard or right-click on your mouse to add the item to My Favorites page.
-
Page 40: Administrator Password
Select the User Password item and press <Enter>. From the Enter Current Password box, key in the current password, then press <Enter>. From the Create New Password box, key in a new password, then press <Enter>. Confirm the password when prompted. ASUS B85M-G 2-11…
-
Page 41: Ai Tweaker Menu
To clear the user password, follow the same steps as in changing a user password, but press <Enter> when prompted to create/confirm the password. After you clear the password, the User Password item on top of the screen shows Not Installed. Ai Tweaker menu The Ai Tweaker menu items allow you to configure overclocking-related items.
-
Page 42
Memory Profile (X.M.P.) Technology, select this item to set the profiles supported by your memory modules for optimizing the system performance. 2.5.2 ASUS MultiCore Enhancement [Enabled] [Enabled] Default set to [Enabled] for maximum performance under XMP/Manual/ User-defined memory frequency mode. -
Page 43
The following two items appear only when you set the CPU Core Ratio to [Sync All Cores] or [Per Core]. 1-Core Ratio Limit [Auto] Select [Auto] to apply the CPU default Turbo Ratio setting or manually assign a 1-Core Limit value, which should be higher than or equal to the 2-Core Ratio Limit. 2-/3-/4-Core Ratio Limit [Auto] These items become configurable only when you set the CPU Core Ratio item to [Per Core]. -
Page 44: Dram Timing Control
Configuration options: [Auto] [1 DRAM Clock] – [15 DRAM Clock] DRAM CKE Minimum pulse width [Auto] Configuration options: [Auto] [1 DRAM Clock] – [15 DRAM Clock] DRAM CAS# Write to Latency [Auto] Configuration options: [Auto] [1 DRAM Clock] – [31 DRAM Clock] ASUS B85M-G 2-15…
-
Page 45
RTL IOL control DRAM RTL initial Value [Auto] Configuration options: [Auto] [1 DRAM Clock] – [63 DRAM Clock] DRAM RTL (CHA) [Auto] Configuration options: [Auto] [1 DRAM Clock] – [63 DRAM Clock] DRAM RTL (CHB) [Auto] Configuration options: [Auto] [1 DRAM Clock] – [63 DRAM Clock] DRAM IO-L (CHA) [Auto] Configuration options: [Auto] [Delay 1 Clock] — [Delay 15 Clock] DRAM IO-L (CHB) [Auto]… -
Page 46
Channel B DIMM Control [Enable Bot…] Configuration options: [Enable Both DIMMS] [Disable DIMM0] [Disable DIMM1] [Disable Both DIMMS] Scrambler Setting [Optimized …] Configuration options: [Optimized (ASUS)] [Default (MRC)] 2.5.12 DIGI+ VRM CPU Load-Line Calibration [Auto] Load-line is defined by Intel VRM specification and affects CPU voltage. The CPU working voltage will decrease proportionally to CPU loading. -
Page 47: Cpu Power Management
CPU Power Duty Control [T.Probe] DIGI + VRM Duty Control adjusts the current of every VRM phase and the thermal conditions of every component. [T. Probe] Select to maintain the VRM thermal balance. [Extreme] Select to maintain the current VRM balance. CPU Current Capability [Auto] Allows you to configure the total power range, and extends the overclocking frequency range simultaneously.
-
Page 48
Power Saving Level 1 Threshhold [Auto] Allows you to set the power saving level 1 threshhold. Use the <+> and <-> keys to adjust the value. Power Saving Level 2 Threshhold [Auto] Allows you to set the power saving level 2 threshhold. ASUS B85M-G 2-19… -
Page 49
Use the <+> and <-> keys to adjust the value. Power Saving Level 3 Threshhold [Auto] Allows you to set the power saving level 3 threshhold. Use the <+> and <-> keys to adjust the value. 2.5.14 Extreme OV [Disabled] By default, this item is set to [Disabled] and helps provide over voltage protection for the CPU. -
Page 50
This item appears only when you set the CPU Graphics Voltage to [Adaptive Mode] and allows you to set the additional turbo mode CPU graphics voltage. The values range from 0.001V to 1.920V with a 0.001V interval. ASUS B85M-G 2-21… -
Page 51
Total Adaptive Mode CPU Graphics Voltage [Auto] This item appears only when you set the CPU Graphics Voltage to [Adaptive Mode] and allows you to set the total adaptive mode CPU graphics voltage. The values range from 0.001V to 1.920V with a 0.001V interval. 2.5.18 CPU System Agent Voltage Offset Mode Sign [+] This item allows you to set the CPU system agent voltage offset mode sign. -
Page 52: Advanced Menu
The Advanced menu items allow you to change the settings for the CPU and other system devices. Be cautious when changing the settings of the Advanced menu items. Incorrect field values can cause the system to malfunction. ASUS B85M-G 2-23…
-
Page 53: Cpu Configuration
2.6.1 CPU Configuration The items in this menu show the CPU-related information that the BIOS automatically detects. The items shown in submenu may be different due to the CPU you installed. Intel Adaptive Thermal Monitor [Enabled] ® [Enabled] Enables the overheated CPU to throttle its clock speed to cool down. [Disabled] Disables the CPU thermal monitor function.
-
Page 54: Cpu Power Management Configuration
Allows you to choose short or long latency for C6. Configuration options: [Short] [Long] Package C State Support [Auto] Allows you to disable or enable the whole C-State package support. Configuration options: [Auto] [Enabled] [C0/C1] [C2] [C3] [C6] [CPU C7] [CPU C7s] ASUS B85M-G 2-25…
-
Page 55: Pch Configuration
2.6.2 PCH Configuration PCI Express Configuration DMI Link ASPM Control [Auto] Allows you to control the Active State Power Managemennt on both NB and SB side of the DMI Link. Configuration options: [Auto] [Enabled] [Disabled] ASPM Support [Disabled] Allows you to set the ASPM support. Configuration options: [Disabled] [Auto] [L0s] [L1] L0sL1].
-
Page 56: Sata Configuration
Allows you to enable or disable VT-d function on MCH. Configuration options: [Enabled] [Disabled] CPU Audio Device [Enabled] Allows you to enable or disable CPU SA Audio Device. Configuration options: [Enabled] [Disabled] DVI Port Audio [Disabled] Allows you to enable or disable the DVI port. Configuration options: [Enabled] [Disabled] ASUS B85M-G 2-27…
-
Page 57: Graphics Configuration
Graphics Configuration Allows you to select a primary display from iGPU, and PCIe graphical devices. Primary Display [Auto] Allows you to select which of the iGPU/PCIE Graphics device should be the Primary Display. Configuration options: [Auto] [IGPU] [PCIE] iGPU Memory [Auto] Allows you to select the amount of system memory allocated to DVMT 5.0 used by the iGPU.
-
Page 58: Usb Configuration
Allows you to enable or disable PCIE express native power management. Configuration options: [Enabled] [Disabled] Native ASPM [Disabled] The item appears only when you set the previous item to [Enabled] and allows you to enable or disable ASPM. Configuration options: [Enabled] [Disabled] ASUS B85M-G 2-29…
-
Page 59: Onboard Devices Configuration
2.6.7 Onboard Devices Configuration HD Audio Controller [Enabled] [Enabled] Enables the HD Audio Device. [Disabled] Disables the HD Audio Device. The following item appears only when you set the HD Audio Controller item to [Enabled]. Front Panel Type [HD] Allows you to set the front panel audio connector (AAFP) mode to legacy AC’97 or high- definition audio depending on the audio standard that the front panel audio module supports.
-
Page 60: Apm
Enables Ring to generate a wake event. Power On By RTC [Disabled] [Disabled] Disables RTC to generate a wake event. [Enabled] When set to [Enabled], the items RTC Alarm Date (Days) and Hour/ Minute/Second will become user-configurable with set values. ASUS B85M-G 2-31…
-
Page 61: Monitor Menu
2.6.9 Network Stack Network Stack [Disabled] This item allows user to disable or enable the UEFI network stack. Configuration options: [Disabled] [Enabled] The following two items appear only when you set the previous item to [Enabled]. Ipv4 PXE Support [Enabled] This item allows user to disable or enable the Ipv4 PXE Boot support.
-
Page 62
Use the <+> and <-> keys to adjust the maximum CPU fan duty cycle. The values range from 20% to 100%. When the CPU temperature reaches the upper limit, the CPU fan will operate at the maximum duty cycle. ASUS B85M-G 2-33… -
Page 63
CPU Lower Temperature [20] Displays the lower limit of the CPU temperature. CPU Fan Min. Duty Cycle(%) [20] Use the <+> and <-> keys to adjust the minimum CPU fan duty cycle. The values range from 20% to 100%. When the CPU temperature is under the lower limit, the CPU fan will operate at the minimum duty cycle. -
Page 64: Boot Menu
POST time. [Full Initialization] All USB devices will be available during POST. This process will extend the POST time. [Partial Initialization] For a faster POST time, only the USB ports with keyboard and mouse connections will be detected. ASUS B85M-G 2-35…
-
Page 65
Display the boot logo during POST. [Disabled] Hide the logo during POST. Set this item to [Enabled] to use the ASUS MyLogo 2™ feature. Boot Logo Size Control [Auto] This item appears only when you set Boot Logo Display to [Enabled] and allows you to adjust the boot logo size. -
Page 66
Boot from Storage Devices [Legacy OpROM first] Allows you to select the type of storage devices that you want to launch. Configuration options: [Both, Legacy OpROM first] [Both, UEFI first] [Legacy OpROM first] [UEFI driver first] [Ignore] ASUS B85M-G 2-37… -
Page 67: Secure Boot
Boot from PCIe/PCI Expansion Devices [Legacy OpROM first] Allows you to select the type of PCIe/PCI expansion devices that you want to launch. Configuration options: [Legacy OpROM first] [UEFI driver first] 2.8.9 Secure Boot Allows you to configure the Windows Secure Boot settings and manage its keys to protect ®…
-
Page 68
Append DBX from file Allows you to load the additional DBX from a storage device so that more db’s images cannot be loaded. The DBX file must be formatted as a UEFI variable structure with time-based authenticated variable. ASUS B85M-G 2-39… -
Page 69: Boot Option Priorities
• To select the boot device during system startup, press <F8> when ASUS Logo appears. • To access Windows OS in Safe Mode, do any of the following: •…
-
Page 70: Tools Menu
<Enter> to display the submenu. 2.9.1 ASUS EZ Flash 2 Utility Allows you to run ASUS EZ Flash 2. Press [Enter] to launch the ASUS EZ Flash 2 screen. For more details, see section 2.1.2 ASUS EZ Flash 2. 2.9.2 ASUS O.C.
-
Page 71: Exit Menu
This option allows you to exit the Setup program without saving your changes. When you select this option or if you press <Esc>, a confirmation window appears. Select Yes to discard changes and exit. ASUS EZ Mode This option allows you to enter the EZ Mode screen. Launch EFI Shell from filesystem device This option allows you to attempt to launch the EFI Shell application (shellx64.efi) from one of…
-
Page 72: Appendices
Cet appareil est conforme aux normes CNR exemptes de licence d’Industrie Canada. Le fonctionnement est soumis aux deux conditions suivantes : (1) cet appareil ne doit pas provoquer d’interférences et (2) cet appareil doit accepter toute interférence, y compris celles susceptibles de provoquer un fonctionnement non souhaité de l’appareil. B85M-G…
-
Page 73: Canadian Department Of Communications Statement
ASUS Recycling/Takeback Services ASUS recycling and takeback programs come from our commitment to the highest standards for protecting our environment. We believe in providing solutions for you to be able to responsibly recycle our products, batteries, other components as well as the packaging materials.
-
Page 74: Asus Contact Information
+1-812-282-3777 +1-510-608-4555 Web site usa.asus.com Technical Support Telephone +1-812-282-2787 Support fax +1-812-284-0883 Online support support.asus.com ASUS COMPUTER GmbH (Germany and Austria) Address Harkort Str. 21-23, D-40880 Ratingen, Germany +49-2102-959911 Web site www.asus.de Online contact www.asus.de/sales Technical Support Telephone +49-1805-010923* Support Fax…
-
Page 75
Appendices…
Страница скачивания руководства по обслуживанию Asus Computer Hardware B85M-G
Размер: 3,54 MB
Добавлено: 2014-06-27 14:20:38
Количество страниц: 75
Скачивание руководства по обслуживанию Asus Computer Hardware B85M-G должно начаться в течении нескольких секунд. Если загрузка не началась автоматически в течение 10 секунд, нажмите на Прямая ссылка. Если у Вас остаются проблемы со скачиванием инструкции Asus Computer Hardware B85M-G, свяжитесь с нами, используя формуляр для сообщения об ошибках.;
Далеко не всем пользователям необходимо флагманское решение формата ATX, ведь некоторые планируют сборку компактной офисной либо домашней мультимедийной системы, и при этом не готовы существенно тратиться на покупку. Если взглянуть на спецификацию героини нашего обзора, материнской платы ASUS B85M-G, то на первый взгляд она выглядит весьма заманчивым кандидатом на покупку для реализации озвученных выше планов. Новинка предлагает не только компактный форм-фактор microATX, но и сравнительно доступную стоимость порядка $75 – 80. При этом она обладает поддержкой портов COM и LPT, актуальных в офисной среде, а также современных интерфейсов USB 3.0 и SATA 6 Гбит/с. Давайте же перейдем непосредственно к обзору и выясним, так ли она хороша, как может показаться на первый взгляд.
Спецификация материнской платы ASUS B85M-G:
Intel Core i7 / Core i5 / Core i3 / Pentium / Celeron четвертого поколения
Частота используемой памяти
1600 / 1333 / 1066 МГц
4 x DDR3 DIMM-слота с поддержкой до 32 ГБ памяти
1 x PCI Express 3.0 x16
2 x PCI Express 2.0 x1
Чипсет Intel B85 поддерживает:
4 x SATA 6 Гбит/с (желтые)
2 x SATA 3 Гбит/с (темно-коричневые)
1 x Realtek 8111G (10/100/1000 Мбит/с)
Кодек Realtek ALC887
1 х 24-контактный разъем питания ATX
1 x 4-контактный разъем питания ATX12V
1 x разъем вентилятора CPU (4-контактный)
1 x разъем подключения системного вентилятора (4-контактный)
Алюминиевый радиатор на чипсете
Внешние порты I/O
2 х PS/2 (для подключения мышки и клавиатуры)
Внутренние порты I/O
1 x USB 3.0 с поддержкой подключения двух USB 3.0 (19-контактный)
2 x USB 2.0, каждый с поддержкой подключения двух USB 2.0
4 x SATA 6 Гбит/с
2 x SATA 3 Гбит/с
1 x коннектор вывода звука на переднюю панель
1 x блок коннекторов передней панели
1 x джампер для сброса CMOS
64 Mбит Flash ROM UEFI AMI BIOS
PnP, ACPI 2.0a, SM BIOS 2.7, DMI 2.0, WfM 2.0
брошюра с описанием гарантии
диск с драйверами и утилитами
2 x кабеля SATA
1 х заглушка интерфейсной панели
ASUS
Новые версии BIOS и драйверов можно скачать со страницы поддержки
Упаковка и комплектация

Материнская плата ASUS B85M-G поставляется в привычной картонной коробке, украшенной полиграфией в фирменном стиле. Ключевым элементом дизайна лицевой панели, помимо наименований компании-производителя и модели устройства, выступает логотип технологии ASUS 5X Protection. Дополнительно здесь можно обратить внимание на поддержку операционной системы Windows 8.1, а также пакета технологий Intel Small Business Advantage.

На обратной стороне упаковки можно ознакомиться с изображением тестируемой новинки, ее краткими техническими характеристиками, а также с ключевыми особенностями и преимуществами:
- ASUS 5X Protection – подразумевает использование цифровой подсистемы питания ASUS DIGI+ VRM, защиты внешних интерфейсов и модулей оперативной памяти от повышенного тока и тока короткого замыкания, качественных твердотельных конденсаторов со сроком службы 5 000 часов при температуре 105°С, стальной интерфейсной панели с повышенной стойкостью к коррозийным процессам и микросхем для защиты от электростатических разрядов.
- USB 3.0 Boost – для ускорения работы интерфейса USB 3.0 реализована поддержка протокола UASP.
- Fan Xpert – интеллектуальная система управления вентиляторами, позволяющая добиться эффективного охлаждения компьютера при минимальном уровне шума.
- AI Suite 3 – в комплекте с материнской платой поставляется фирменное ПО, при помощи которого можно производить тонкую настройку ряда параметров системы, не заходя в BIOS.
- GPU Boost – технология автоматического разгона интегрированной в процессор графической подсистемы.
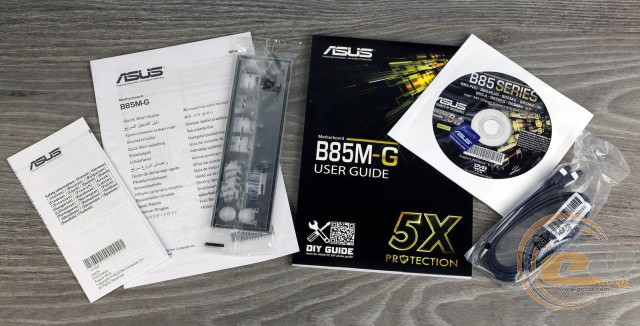
В коробке с ASUS B85M-G мы обнаружили вполне стандартный для недорогой модели набор аксессуаров:
- диск с драйверами и утилитами;
- инструкцию пользователя;
- два кабеля SATA;
- заглушку интерфейсной панели.
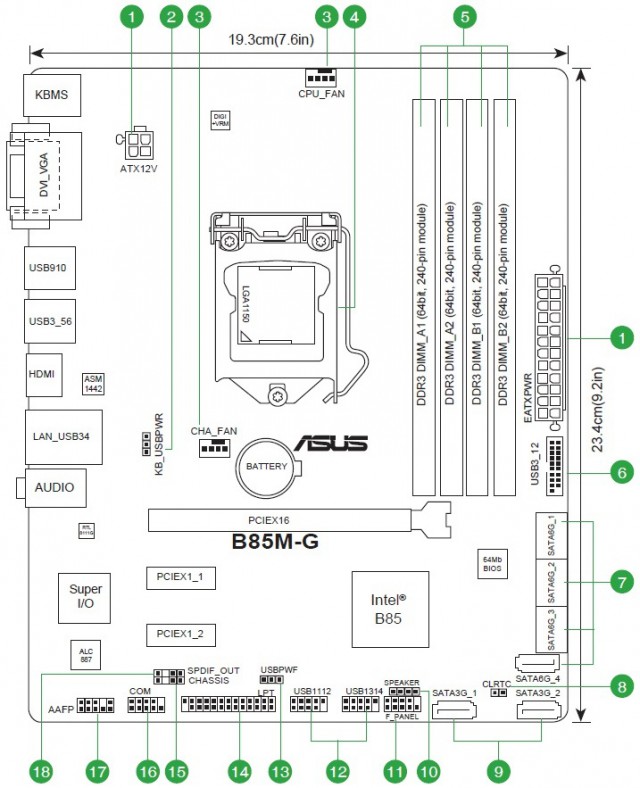
Дизайн и особенности платы

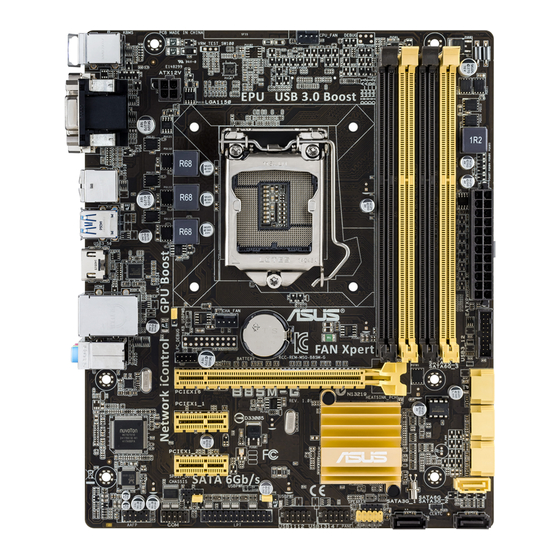
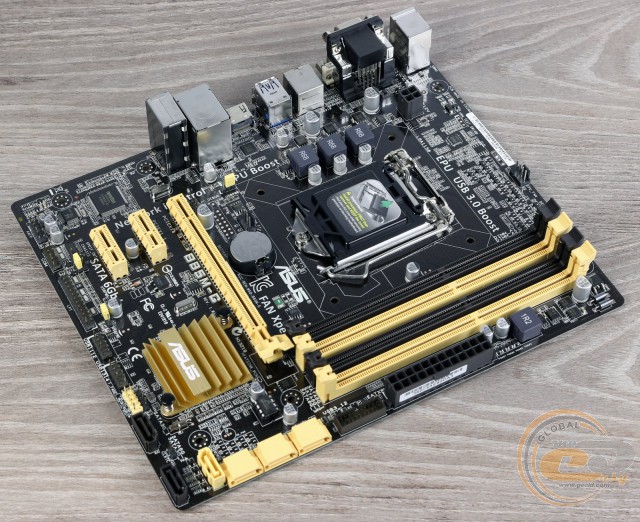
Материнская плата ASUS B85M-G выполнена на печатной плате темно-коричневого цвета в формате microATX (233 х 193 мм). Отдельной благодарности компания ASUS заслуживает за грамотный подход к оформлению внешнего вида: несмотря на свою относительно доступную стоимость, выглядит новинка достаточно свежо и стильно.
Что же касается компоновки набортных элементов, то все порты и разъемы расположены на оптимальных местах, поэтому проблем со сборкой системы на основе новинки у вас не возникнет.
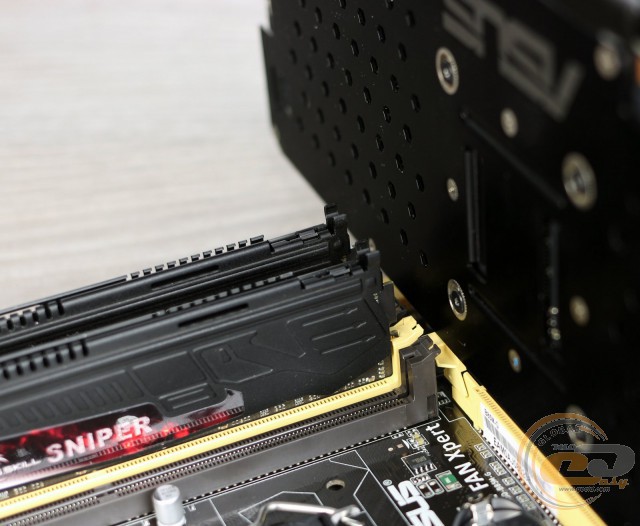
Как видим, производитель позаботился о том, чтоб установленная видеокарта не мешала подключению и отключению модулей оперативной памяти, оснастив DIMM-слоты защелками только с одной стороны.
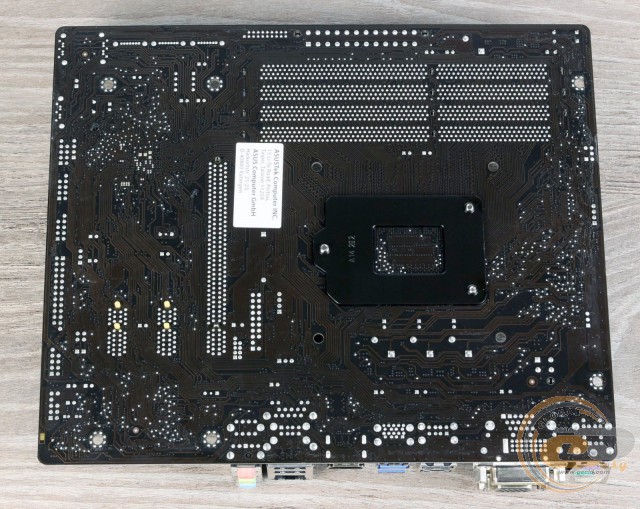
Взглянув на обратную сторону новинки, можно обратить внимание на стандартную опорную пластину процессорного разъема, а также на тот факт, что радиатор охлаждения чипсета закреплен на пластиковых клипсах.
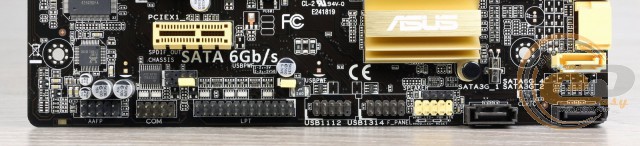
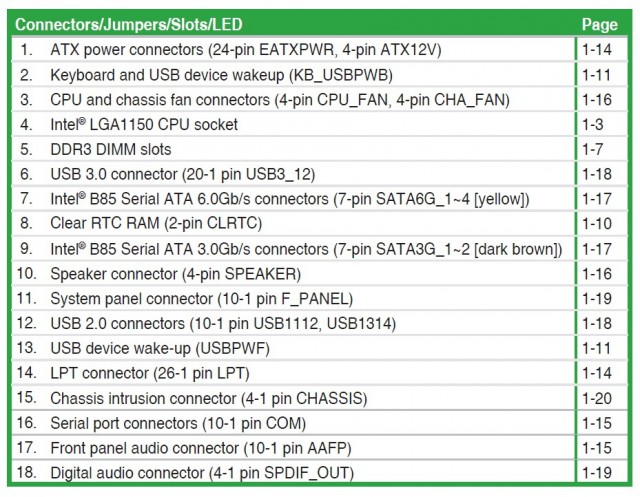
В нижней части текстолита расположены следующие порты и разъемы: колодка подключения аудиоразъемов передней панели, S/PDIF Out, разъемы COM и LPT, джампер для сброса CMOS, две колодки для активации дополнительных интерфейсов USB 2.0, а также колодка подключения фронтальной панели. Всего на плате реализована поддержка восьми портов USB 2.0: четырех внутренних и четырех на интерфейсной панели. Все они реализованы силами чипсета Intel B85.

Возможности организации дисковой подсистемы представлены четырьмя портами SATA 6 Гбит/с желтого цвета и двумя SATA 3 Гбит/с темно-коричневого. Все разъемы функционируют благодаря набору системной логики.
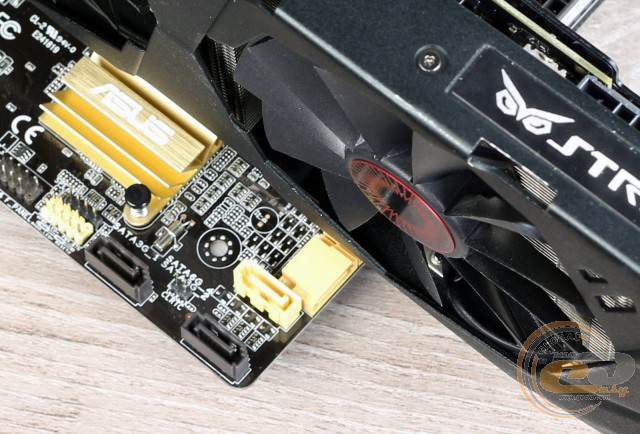
Отметим, что при установке габаритных видеокарт доступ к нескольким портам SATA может быть затруднен, но не перекрыт полностью. В случае установки графического ускорителя с трехслотовым кулером, расположенный перпендикулярно порт SATA 6 Гбит/с будет недоступен.
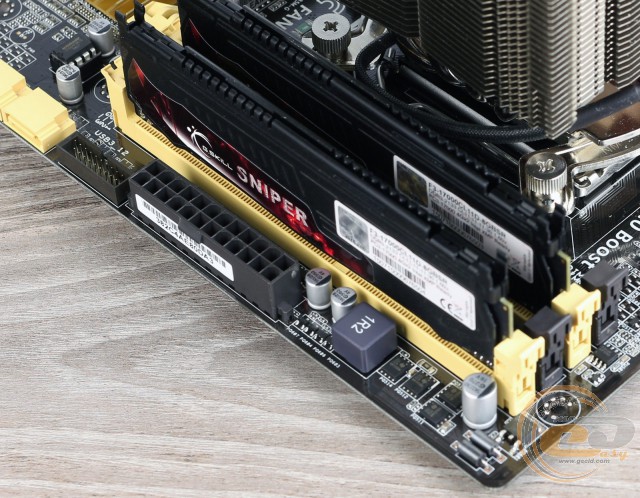
Системная плата ASUS B85M-G оснащена четырьмя DIMM-слотами для установки модулей оперативной памяти стандарта DDR3, которые для большего удобства оборудованы защелками только с одной стороны. Оперативная память может работать в двухканальном режиме. Для его реализации планки необходимо устанавливать либо в первый и третий, либо во второй и четвертый слоты. Поддерживаются модули, работающие на частотах от 1333 до 1600 МГц в номинальном режиме. Максимальный объем памяти может достигать 32 ГБ, чего будет достаточно практически для любых поставленных задач.
Дополнительно отметим колодку для подключения выносной панели с портами USB 3.0. Всего на тестируемой модели их четыре: два внешних и два внутренних. Все они реализованы силами чипсета.
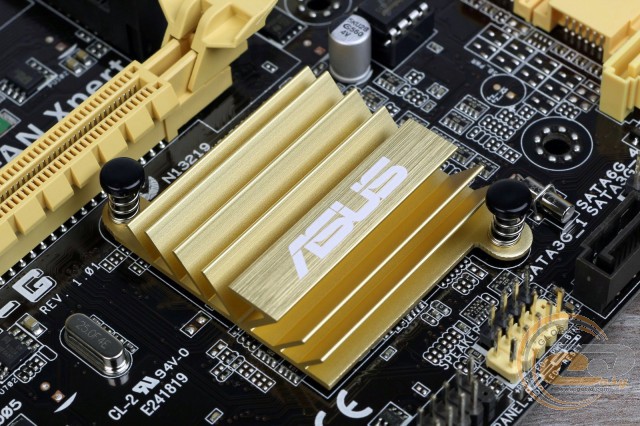
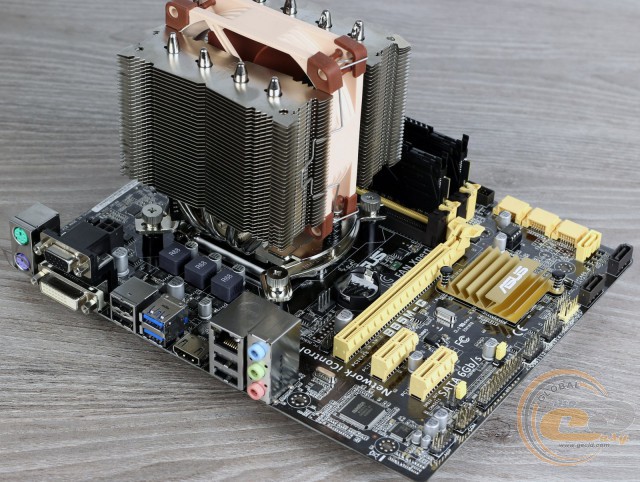
Система охлаждения рассматриваемой платы состоит только из одного алюминиевого радиатора, который осуществляет отвод тепла от набора системной логики Intel B85. В процессе тестирования были зафиксированы следующие температурные показатели:
- радиатор охлаждения чипсета – 35,8°C;
- полевые транзисторы подсистемы питания процессора – 81,0°C (при разгоне − 97,7°C);
- дроссели подсистемы питания процессора – 61,1°C (при разгоне − 78,1°C);
- ШИМ-контроллер ASP1253 − 46,5°C (при разгоне − 49,8°C).
Полученные результаты можно охарактеризовать как средние. В номинальном режиме никаких проблем нет, но при значительном оверклокинге неприятно сказывается отсутствие радиатора на МОП-транзисторах подсистемы питания. В защиту ASUS B85M-G скажем, что она изначально и не позиционируется в качестве решения для разгонных экспериментов.
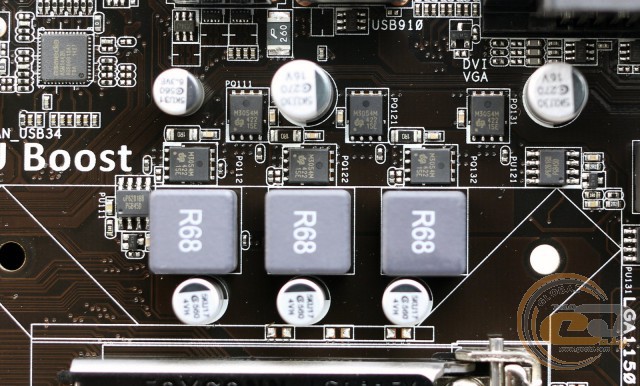
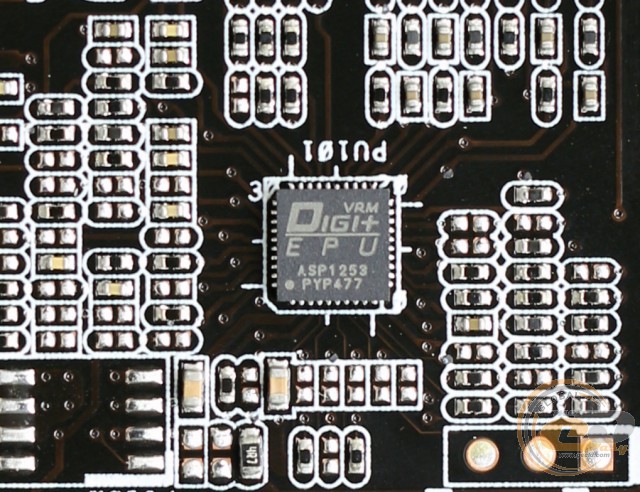
Питание процессора осуществляется по 3-фазной схеме для вычислительных ядер и дополнительных узлов. Сам преобразователь основан на ШИМ-контроллере ASP1253. Все компоненты узла питания процессора отличаются высокой степенью надежности: используются твердотельные конденсаторы с увеличенным сроком службы и дроссели с ферритовым сердечником. Для подачи напряжения питания предназначены основной 24-контактный и дополнительный 4-контактный разъемы.

Для расширения функциональности материнской платы ASUS B85M-G у пользователя есть в распоряжении три слота:
- PCI Express 3.0 x16 (в режиме х16);
- PCI Express 2.0 x1;
- PCI Express 2.0 x1.
Отметим, что в случае установки видеокарты с двухслотовой системой охлаждения, у вас в свободном доступе останется только слот PCI Express 2.0 x1.

Если же вы решили воспользоваться возможностями интегрированного в CPU графического ядра, то в вашем распоряжении три видеовыхода: HDMI, DVI-D и D-Sub, переключение между которыми осуществляется силами микросхемы ASMedia ASM1442K.
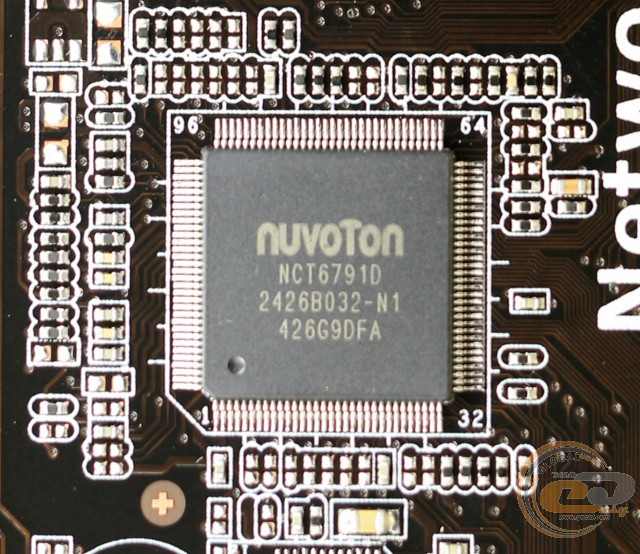
Возможности Multi I/O возложены на микросхему NUVOTON NCT6791D, которая управляет работой системного вентилятора, портами COM, LPT и PS/2, а также обеспечивает мониторинг.
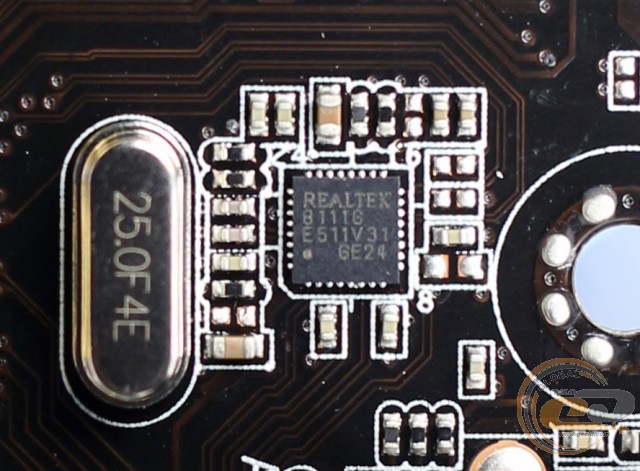
Для поддержки сетевых соединений служит гигабитный LAN-контроллер Realtek 8111G. А фирменная утилита Network iControl поможет управлять сетевыми ресурсами в режиме реального времени.

Звуковая подсистема рассматриваемой материнской платы основана на 8-канальном HDA-кодеке Realtek ALC887, который поддерживает аудиосистемы форматов 2/4/5.1/7.1.
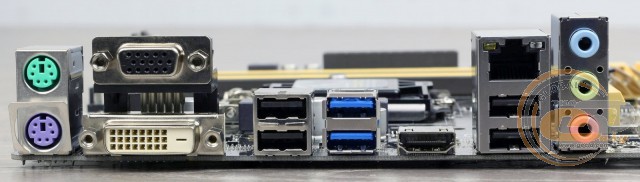
Интерфейсная панель модели ASUS B85M-G включает в себя следующие порты:
- 1 x DVI-D;
- 1 x D-Sub;
- 1 x HDMI;
- 2 x PS/2 для подключения мышки и клавиатуры;
- 1 x LAN (RJ45);
- 2 x USB 3.0;
- 4 x USB 2.0;
- 3 x аудиопорта.
Конфигурация интерфейсной панели выгодно отличается поддержкой портов USB 3.0, а также тремя видеовыходами, включая цифровые HDMI и DVI-D. Отдельно отметим возможность вынесения на интерфейсную панель ПК портов COM и LPT при помощи соответствующих разъемов на печатной плате. А среди особенностей выделим лишь неудобное подключение многоканальной акустики, для чего придется использовать аудиовыходы на фронтальной панели корпуса или передавать звук по HDMI.
У ASUS B85M-G имеются стандартные возможности для организации охлаждения внутри системного корпуса. В наличии два 4-контактных разъема для подключения вентиляторов, один из которых служит для охлаждения центрального процессора, тогда как другой предназначен для системной вертушки.
UEFI BIOS
Тестируемая новинка использует современный предзагрузчик на основе графического интерфейса UEFI, осуществлять настройки в котором можно при помощи мышки. Он предлагает два основных сценария использования.
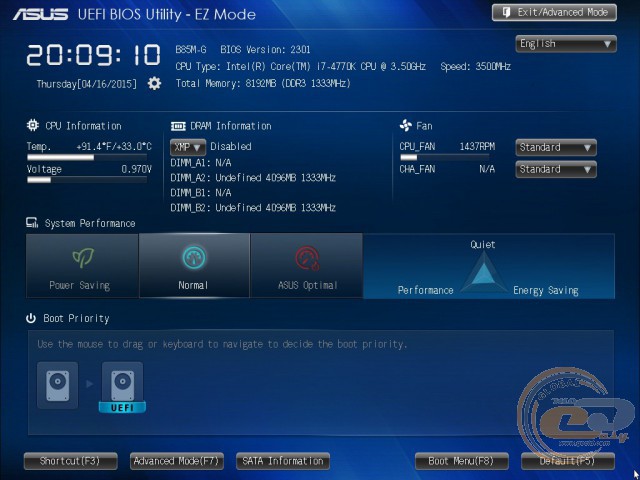
«EZ Mode», в котором все необходимые настройки сгруппированы на одном экране.
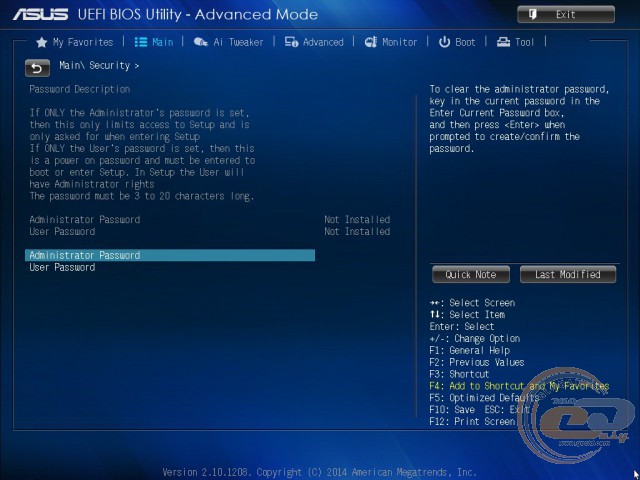
Либо привычный «Advanced Mode», где все настройки необходимо производить вручную.
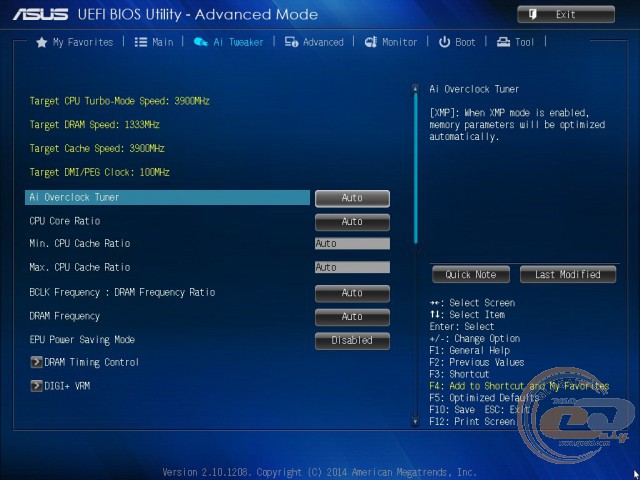
Все связанные с разгоном системы настройки находятся во вкладке «Ai Tweaker».
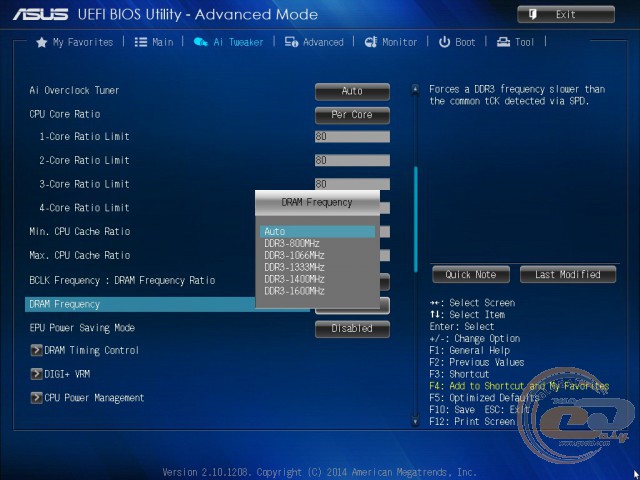
Множитель частоты памяти позволяет устанавливать скорость подключенных модулей в пределах от 800 до 1600 МГц.
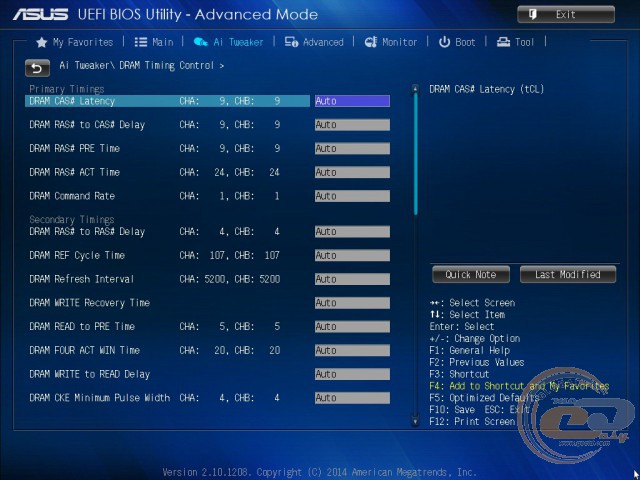
Также при необходимости можно получить доступ к регулировкам задержек памяти.
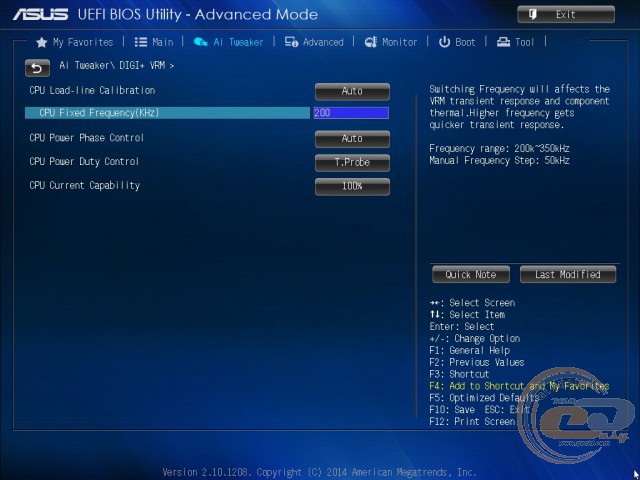
Для увеличения стабильности при разгоне могут послужить настройки управления цифровой подсистемой питания DIGI+ VRM.
Настройки, необходимые для разгона и оптимизации системы, сведены в таблицу:
![]()

First Edition V1
Copyright © 2013 ASUSTeK COMPUTER INC. All Rights Reserved.
No part of this manual, including the products and software described in it, may be reproduced, transmitted, transcribed, stored in a retrieval system, or translated into any language in any form or by any means, except documentation kept by the purchaser for backup purposes, without the express written permission of ASUSTeK COMPUTER INC. (“ASUS”).
Product warranty or service will not be extended if: (1) the product is repaired, modified or altered, unless such repair, modification of alteration is authorized in writing by ASUS; or (2) the serial number of the product is defaced or missing.
ASUS PROVIDES THIS MANUAL “AS IS” WITHOUT WARRANTY OF ANY KIND, EITHER EXPRESS OR IMPLIED, INCLUDING BUT NOT LIMITED TO THE IMPLIED WARRANTIES OR CONDITIONS OF MERCHANTABILITY OR FITNESS FOR A PARTICULAR PURPOSE. IN NO EVENT SHALL ASUS, ITS DIRECTORS, OFFICERS, EMPLOYEES OR AGENTS BE LIABLE FOR ANY INDIRECT, SPECIAL, INCIDENTAL, OR CONSEQUENTIAL DAMAGES (INCLUDING DAMAGES FOR LOSS OF PROFITS, LOSS OF BUSINESS, LOSS OF USE OR DATA, INTERRUPTION OF BUSINESS AND THE LIKE), EVEN IF ASUS HAS BEEN ADVISED OF THE POSSIBILITY OF SUCH DAMAGES ARISING FROM ANY DEFECT OR ERROR IN THIS MANUAL OR PRODUCT.
SPECIFICATIONS AND INFORMATION CONTAINED IN THIS MANUAL ARE FURNISHED FOR INFORMATIONAL USE ONLY, AND ARE SUBJECT TO CHANGE AT ANY TIME WITHOUT NOTICE, AND SHOULD NOT BE CONSTRUED AS A COMMITMENT BY ASUS. ASUS ASSUMES NO RESPONSIBILITY OR LIABILITY FOR ANY ERRORS OR INACCURACIES THAT MAY APPEAR IN THIS MANUAL, INCLUDING THE PRODUCTS AND SOFTWARE DESCRIBED IN IT.
Products and corporate names appearing in this manual may or may not be registered trademarks or copyrights of their respective companies, and are used only for identification or explanation and to the owners’ benefit, without intent to infringe.
Offer to Provide Source Code of Certain Software
This product contains copyrighted software that is licensed under the General Public License (“GPL”), under the Lesser General Public License Version (“LGPL”) and/or other Free Open Source Software Licenses. Such software in this product is distributed without any warranty to the extent permitted by the applicable law. Copies of these licenses are included in this product.
Where the applicable license entitles you to the source code of such software and/or other additional data, you may obtain it for a period of three years after our last shipment of the product, either
(1) for free by downloading it from http://support.asus.com/download
(2) for the cost of reproduction and shipment, which is dependent on the preferred carrier and the location where you want to have it shipped to, by sending a request to:
ASUSTeK Computer Inc.
Legal Compliance Dept.
Beitou, Taipei 112
In your request please provide the name, model number and version, as stated in the About Box of the product for which you wish to obtain the corresponding source code and your contact details so that we can coordinate the terms and cost of shipment with you.
The source code will be distributed WITHOUT ANY WARRANTY and licensed under the same license as the corresponding binary/object code.
This offer is valid to anyone in receipt of this information.
Q8146
B85M-G
Quick Start Guide
빠른 시작 설명서
Кратко упътване за бърз старт
Greitos darbo pradžios vadovas
Stručná příručka
Īsa pamācība
Quick Start-vejledning
Hurtigstartsveiledning
Snelstartgids
Guia de consulta rápida
Lühijuhend
Instrukcja szybkiej instalacji
Краткое руководство
Guide de démarrage rapide
Ghid de pornire rapidă
Pikakäynnistysopas
Guía de inicio rápida
Schnellstarthilfe
Vodič za brzo korišćenje
Οδηγός γρήγορης έναρξης
Stručný návod na spustenie
Beüzemelési útmutató
Snabbstartsguide
Guida Rapida
คู่มือเริ่มต้นอย่างเร็ว
Panduan Ringkas
Hızlı Başlatma Kılavuzu
クイックスタートガイド
Höôùng daãn khôûi ñoäng nhanh
Q8146
First Edition
May 2013
Copyright © ASUSTeK Computer Inc.
All Rights Reserved
15060-0DQ1K000