- Manuals
- Brands
- Baby Lock Manuals
- Sewing Machine
- Evolution BLE8W-2
Manuals and User Guides for Baby Lock Evolution BLE8W-2. We have 2 Baby Lock Evolution BLE8W-2 manuals available for free PDF download: Instruction And Reference Manual, Quick Reference Threading Manual

Baby Lock Evolution BLE8W-2 Instruction And Reference Manual (92 pages)
Brand: Baby Lock
|
Category: Sewing Machine
|
Size: 7.3 MB
Table of Contents
-
Important Safety Instructions
2
-
Table of Contents
4
-
Overview
6
-
How Your Machine Operates
6
-
Overview of the Evolution
7
-
Accessories
8
-
Needles
9
-
Thread
9
-
Optional Accessories
9
-
Setting up Your Evolution
10
-
Setting up Your Evolution
11
-
Cutting Blade Lock Switch
12
-
Cutting Blade Cover and Sewing Table
12
-
Upper Looper Positioning Lever
12
-
Thread Cutter
13
-
Presser Foot Pressure Adjustment
13
-
Snap-On Presser Foot
13
-
Stitch Length/Rolled Hem
14
-
Stitch Width
14
-
Differential Feed
15
-
Overlock Thread Delivery System
16
-
Stitch Selector Lever
16
-
Wave Selector Lever
16
-
Side Cover
16
-
Chain/Cover Stitch Tension Dials
17
-
Needle Tension Dial
17
-
Chain Looper Tension Dial
17
-
2-Thread Subsidiary Looper
18
-
Upper and Lower Looper Thread Fine-Tuning Knob
18
-
Notes
19
-
-
Threading
20
-
Threading Preparation
20
-
Threading Your Evolution
21
-
Locked Position for Threading
21
-
Thread Stand and Thread Port Reference Chart
21
-
Lower Looper
22
-
Upper Looper
22
-
Chain Looper
23
-
Chain/Cover Needles
24
-
Left Chain/Cover Needle — C-1
24
-
Center Chain/Cover Needle — C-2
24
-
Right Chain/Cover Needle — C-3
24
-
-
Overlock Needles
25
-
Left Overlock Needle — O-1
25
-
Right Overlock Needle — O-2
25
-
-
How to Use the Needle Threader
26
-
Front Cover Seam Guide
26
-
Start to Sew
27
-
To Chain-Off of the Fabric
27
-
Clearing the Stitch Width Fingers
28
-
Re-Threading Loopers
28
-
-
OVERLOCK STITCHES — Express Stitches
29
-
4-Thread Overedging
29
-
Overlock Seam
29
-
4-Thread Overlock
30
-
3-Thread Overlock — Wide
31
-
3-Thread Overlock — Narrow
32
-
3-Thread Overlock — Narrow Hem
33
-
Rolled Edging
34
-
3-Thread Rolled Edge
34
-
Seaming Sheers
35
-
Lettuce Edge
35
-
Belt Loops and Button Loops
35
-
Returning to Standard Serging
35
-
3-Thread Flatlock — Narrow
36
-
2-Thread Overlock
37
-
Converting from 3-Thread to 2-Thread Overlock
37
-
2-Thread Flatlock — Wide
38
-
2-Thread Flatlock — Narrow
39
-
Blanket Stitch — Decorative Stitch
40
-
Ladder Stitch — Decorative Stitch
41
-
Wave Stitch
42
-
Converting from Normal Serging to Wave
42
-
3-Thread Wave Stitch
43
-
3-Thread Rolled Wave Stitch
44
-
3-Thread Reversed Wave Stitch
45
-
-
CHAIN/COVER STITCH — Express Stitches
46
-
Chain Stitching
46
-
Chain Stitch — Tension Adjustment
47
-
-
Cover Stitch — Right Narrow — 3Mm
48
-
Cover Stitch Tension Adjustment
49
-
-
Cover Stitch — Left Narrow — 3Mm
50
-
Cover Stitch Tension Adjustment
51
-
-
Cover Stitch — Wide — 6Mm
52
-
Cover Stitch Tension Adjustment
53
-
Triple Cover Stitch — 6Mm
54
-
-
Triple Cover Stitch Tension Adjustment
55
-
-
COMBINATION STITCH — Expressive Stitches
56
-
4-Thread Safety Stitch
56
-
5-Thread Safety Stitch
58
-
7-Thread Wave Stitch
60
-
7-Thread Reversed Wave Stitch
62
-
8-Thread Stitch
64
-
Expressive Stiches: Chain/Cover Stitches Combined with Overlock Stitches
66
-
«Expressive» Combinations
66
-
-
Techniques
68
-
Turning Corners — Chain Stitch
68
-
Turning Corners — Cover Stitch
68
-
Turning Outside Corners — Overlock
69
-
Turning Inside Corners — Overlock
69
-
Flat Hemming — Cover Stitch
70
-
Hemming in the Round — Cover Stitch
70
-
Blind Hemming — Overlock
71
-
Sewing Curves — Overlock
71
-
Inserting Tapes — Overlock
72
-
Inserting Tapes — Cover Stitch
72
-
Flatlock «Decorative» — Overlock
73
-
Securing Ends — Overlock
74
-
Securing Chain and Cover Stitching
76
-
Notes
77
-
-
Specialty Threads
78
-
Using Specialty Threads
78
-
Lightweight Threads
78
-
Medium Weight Threads
78
-
Heavy Weight Threads
78
-
-
Bypassing the Threading Port
79
-
Looper Threading Tool
80
-
Thread Cradle for Loopers
81
-
Specialty Thread Guide Chart
82
-
Specialty Thread Guide Chart
83
-
-
Maintenance
84
-
Troubleshooting
84
-
Troubleshooting
85
-
Replacing Needles
86
-
Replacing Cutting Blades
87
-
Replacing LED Lighting
87
-
Cleaning
88
-
-
Technical Data
89
-
Stitch Selection Chart
90
-
Chart for Stitch Selection Setting for Chain/Cover and Combination Stitches
90
-
Advertisement

Baby Lock Evolution BLE8W-2 Quick Reference Threading Manual (6 pages)
Brand: Baby Lock
|
Category: Sewing Machine
|
Size: 10.48 MB
Advertisement
Related Products
-
Baby Lock evolve BLE8W
-
Baby Lock Evolve BLE8
-
Baby Lock imagine wave BLE3ATW
-
Baby Lock imagine BLE1AT-2
-
Baby Lock Enlighten BLE3ATW-2
-
Baby Lock EclipseDX BLE1DX-2
-
Baby Lock Eclipse SX BLE1SX-2
-
Baby Lock Acclaim BLES4
-
Baby Lock Triumph BLETS8
-
Baby Lock BLE1EX
Baby Lock Categories
Sewing Machine
Sewing Machine Accessories
PDA
Software
Accessories
More Baby Lock Manuals
Производитель: Babylock
2 обзора:
5.0 (Отличный товар)
8-ми (4, 3, 2-x) — ниточный оверлок + 3-х игольная 4-х ниточная плоскошовная машина (коверлок) Бэбилок Эволюшн BLE8W-2
Коверлок BabyLock Evolution BLE8-2 умеет выполнять все стандартные 2-х, 3-х и 4-х ниточные краеобметочные швы, разнообразные распошивальные строчки, а также всевозможные их комбинации. Всего 58 швейных операций, включая эксклюзивный волнообразный шов Wave от BabyLock.
Машина оснащена эксклюзивной пневматической системой заправки нитей в петлители ExtraordinAir™, делая этот процесс невероятно простым. Также коверлок автоматически устанавливает натяжения нитей с помощью системы Automatic Thread Delivery, позволяя получить качественные строчки практически на любых материалах.
Переход с одной оверлочной строчки на другую предельно упрощен. Нож быстро и удобно отключается, а для перехода на ролевый шов достаточно установить нужную длину стежка и переключить автомат натяжения в режим подрубки.
Настройка натяжения игольных нитей коверлока Baby Lock Evolution значительно упрощена. Все три игольные нити настраиваются вращением одного регулятора — больше не надо тратить время, чтобы сообразить, какие из регуляторов натяжения нужно подстраивать.
3 светодиода обеспечивают яркое и долговечное освещение. Система безопасности отвечает за прекращение работы машины при открытии передней и боковой крышек.
Особенности:
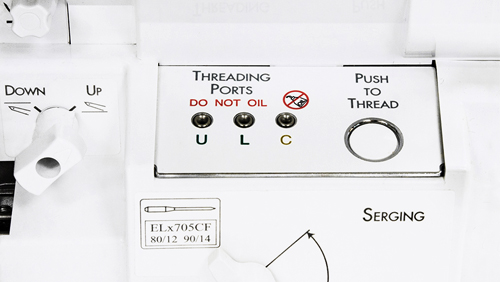
Система заправки петлителей ExtraordinAir™
Машина оснащена уникальной системой воздушной заправки. Вставьте нить в нужный порт, нажмите на кнопку и пневматическая система мгновенно заправит нить в нужный петлитель.
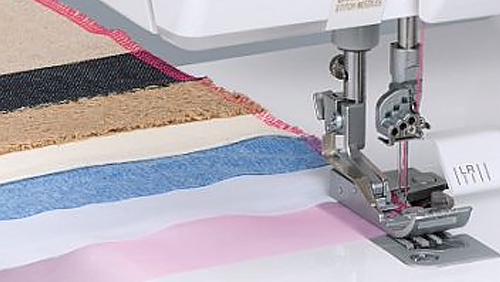
Система автоматической подачи нити
Никогда больше не беспокойтесь о регулировках натяжения нити благодаря Automatic Thread delivery. Наслаждайтесь совершенными стежками независимо от типа ткани, которую Вы используете.
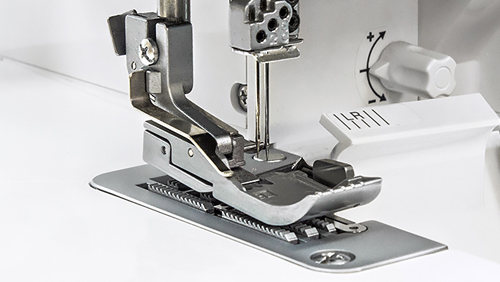
Вертикальное проникновение иглы
В то время как иглы большинства машин входят в ткань под углом, нажимая на ткань (что может привести к ее повреждению), иглы BabyLock входят в ткань строго вертикально и двигаются строго вверх и вниз. Эта исключительная особенность защищает ткань.
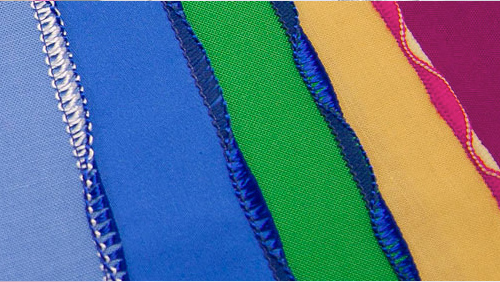
Эксклюзивная волновая строчка Wave
Модель Ovation позволяет выполнять эксклюзивную строчку от Babylock — волнообразный шов Wave, сочетающий в себе обработку края материала и декоративную отделку. Вы можете использовать Wave либо в виде оверлочной строчки, либо как плоский шов, и он будет смотреться одинаково эффектно.
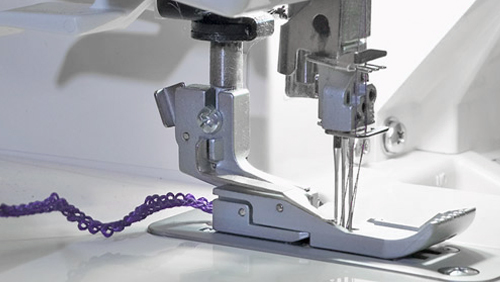
Шитьё без ткани
Baby Lock — первый в мире коверлок, образующий цепочку из ниток при выполнении плоского шва без ткани! Теперь окончание шитья распошивальным швом ничем не отличается от оверлочного — в конце строчки за краем ткани будет тянуться цепочка из ниток
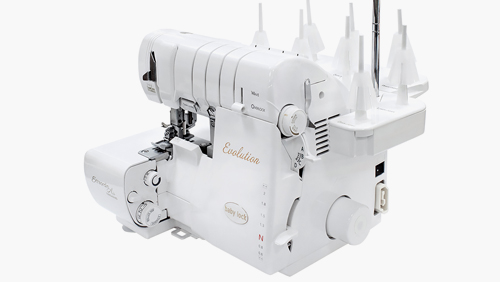
Мощность
Babylock Evolution оснащен мощным мотором 120 Вт, что намного больше большинства оверлоков. Это позволяет ему справляться с тяжелыми тканями и сложными участками при шитье, а также шить на высокой скорости. А благодаря качественной сборке он отличается довольно тихой работой. Профессиональное и качественное шитье прямо у вас дома!
Инструкции для BabyLock Evolution BLE8W-2:
![]() Инструкция по эксплуатации Babylock Evolution BLE8w-2 (PDF, 68МB, рус)
Инструкция по эксплуатации Babylock Evolution BLE8w-2 (PDF, 68МB, рус)
Характеристики BabyLock Evolution BLE8W-2:
- Максимальная длина стежка

- 4 мм
- Количество строчек

- 22
- Длина платформы

- 9,5 см
- Высота подъема лапки (нормальная/максимальная)

- 4,5
- Электронный стабилизатор усилия прокола

- нет
- Регулятор (ограничитель) максимальной скорости

- нет
- Нитевдеватель

- нет
- Регулятор давления лапки

- есть
- Потребляемая мощность

- 120 Вт
- Тип освещения
- 3 светодиодных LED источника
- Мусоросборник
- нет
- Чехол

- Мягкий
- Швейный советник

- нет
- Коленный рычаг подъема лапки

- нет
- Дифференциальный транспортер ткани

- есть
- Облегчённая заправка петлителей

- есть. Пневматическая заправка
- Рукавная платформа
- нет
- Стандарт игл

- EL x 705
- Страна разработки
- Япония
- Страна производства
- Япония
- Гарантия
- 1 год
- Максимальная скорость шитья
- 1500 ст/мин
- Вес без упаковки
- 8,3 кг
- Вес с упаковкой
- 10 кг
Комплектация
- Педаль
- Мягкий чехол
- Столик для плоских швов с 2 отверстиями
- Насадка с нитенаправителями
- Щетка для текстильного волокна с инструментом для установки иглы
- Набор игл
- Ключ специальный для установки игл
- Пинцет
- Сменный верхний нож
- Нитевдеватель иглы
- Нитевдеватель петлителя
- Отвертка
- Ниточные сетки 8 шт
- Шпулечные колпачки 8 шт
- Губчатые диски 8 шт
- Конические держатели 8 шт
Популярные аксессуары для BabyLock Evolution BLE8W-2

Наличие:
есть

Наличие:
есть

Наличие:
есть

Наличие:
есть

Наличие:
есть

Наличие:
есть

Наличие:
есть
Обратите внимание!
«Швейный Мир» является официальным дистрибьютором швейных машин фирмы Babylock. Покупая Babylock в наших магазинах, Вы получите качественную машину обеспеченную гарантийным и сервисным обслуживанием.
Отзывы о товаре BabyLock Evolution BLE8W-2
-
Пичугина Анна Юрьевна7 Янв ’20
-
Отличный товар
Мои первые оверлок и распошивалка в одной машине Бебилок! Очень доступно изложены в инструкции все приемы и правила переходов на новые строчки. На третий день самостоятельного изучения сшила футболку для сына. Отличные строчки, автоматическая заправка нитей, быстрый переход от оверлока на каверлок, множество вариантов швов — просто чудо японской техники — все просто и качественно. Долго сомневалась, поскольку покупка дорогостоящая, прочитала массу отзывов, в итоге заказала. Заказ пришел быстро. Классная машина, всем советую
-
Людмила Б.14 Июн ’19
-
Отличный товар
Хочу поблагодарить за отличное обслуживание весь коллектив интернет-магазина «Швейный мир». С их помощью сделан достойный выбор такого товара как оверлок BabyLock Evolution BLE8W-2. Надеюсь на дальнейшее сотрудничество по выбору швейных аксесуаров к этой замечательной технике. С уважением, Людмила.
Отзывы о товаре могут оставлять только зарегистрированные покупатели.
Table of Contents for Baby Lock Evolution BLE8W-2:
-
O V E R V I E W 11 Thread Cutter Presser Foot Pressure Adjustment Snap-On Presser Foot There is a thread cutter located on the left side of your Evolution. At the end of a seam, sew off the fabric edge and continue sewing to create a 5-6 inch (12.5-15cm) thread chain. Bring the chain of thread up and from the back to front through the thread cutter. The presser foot pressure has been preset at the factory and rarely needs adjustment. You may find it necessary, however, to decrease the pressure for thick fabrics or increase pressure for thin fabrics to feed more s
-
With the great features of Overlock Stitching and Chain/Cover Stitching on the Evolution, many different stitch- es branch off from the basic «Express» stitches. The following combinations can let you «Express» your cre- ativity as never before. Use the «Stitch Selection Chart»at the back of the manual for threading your Evolution with the different com- binations. The most common used combinations are the: 8-Thread Stitch — 4-Thread Ove
-
O V E R V I E W 15 Chain/Cover Stitch Tension Dials The tension system of the chain and cover stitches are completely separate from the system being used on the overlock stitches. Unlike the thread delivery system of the overlock stitches, the tensions of the chain / cover stitch needles and chain looper are adjusted by dials located on the outer sides of your Evolution. Needle Tension Dial The needle tension dial is located on the top left side of the machine. One tension dial controls all 3 of the chain/cover stitch needle selections.
-
The narrow cover stitch consists of two rows of straight stitching on the top side of the fabric with the overlock stitch on the underside of the fabric. This stitch is very common in the garment industry to hem knit garments. The narrow cover stitch is used on fine knits such as jersey and single knits for hemming or topstitching. The cover stitch is not limited to knit fabrics. It also works well with woven fabrics. The Left Narrow cover stitch is formed using two «C» needle positions
-
The 2-thread function provides an economical and less bulky means of overedging all fabrics. The standard 2-thread overlock is the same as a 2-thread flatlock stitch. When sewn with specialty threads, 2-thread sewing makes decorative seams and edges for activewear, chil- dren’s clothing , ruffles, and hemlines. O V E R L O C K S T I T C H E S E X P R E S S 35 2-Thread Overlock Converting from 3-Thread to 2-Thread Overlock Either overlook needle may be engaged for 2-thread overlock sewing. 1. Open the front
-
Balanced tension — Chain stitch has correct tension when the needle thread sews a straight seam on the top side and the chain looper thread forms loops on the under side of the fabric. Needle thread is too loose — Turn the chain/cover needle thread tension dial to a higher number. Or turn the chain looper tension dial to a narrower dash for looser tension. (Narrow dashes are looser tension). Needle thread is too tight — Turn the chain/cover needle
-
Balanced tension — Triple Cover stitch has correct tension when the needle thread sew three rows of straight stitching on the top side and the chain looper forms a zig zag on the underside of the fabric. Needle thread is too loose — Turn the chain/cover needle thread tension dial to a higher number. Or turn the chain looper tension dial away from the wide dash at the words «Cover Stitch» , but, staying within the solid gold line. This will tighten th
-
To lock the end of the seam: 1. Take one stitch off the end of the seam (fig. A). 2. Raise the presser foot and bring the needle(s) to the highest position. Pull back gently on the fabric to clear the stitch fingers. 3. Turn the fabric over, end to end (fig. B), and reposition it under the presser foot with the needle at the seam edge, aligned with the previ- ous needle line (fig. C). 4. Lower presser foot and sew 5-6 stitches over the previous stitches, being careful not to cut them. You may want to flip the cutting blade
-
17 Notes:
-
O V E R V I E W 4 How Your Machine Operates Sometimes called an overlock machine or overlocker, the serger is different from any conventional sewing machine you have used. Awareness of its simple operation will enable you to become more proficient in its use. Please read all instructions before using your new machine. A serger is kind of a knitting process that loops two, three or four threads together to create a
Questions, Opinions and Exploitation Impressions:
You can ask a question, express your opinion or share our experience of Baby Lock Evolution BLE8W-2 device using right now.

- Manuals
- Brands
- Baby Lock Manuals
- Sewing Machine
- Evolution BLE8W-2
- Instruction and reference manual
-
Contents
-
Table of Contents
-
Troubleshooting
-
Bookmarks
Quick Links
Related Manuals for Baby Lock Evolution BLE8W-2
Summary of Contents for Baby Lock Evolution BLE8W-2
-
Page 2: Important Safety Instructions
«IMPORTANT SAFETY INSTRUCTIONS» When using overlock machine, basic safety precautions should always be followed, including the following. Read all instructions before using this overlock machine. DANGER- To reduce the risk of electric shock. 1. The overlock machine should never be left unattended when plugged in. Always unplug this overlock machine from the electrical outlet immediately after using and before cleaning.
-
Page 3
Your Baby Lock Evolution is a high-quality, dependable machine. It gives you the ability to seam, overcast and trim all in one operation. Fabrics and threads you previously avoided are now a joy to sew because the Baby Lock Evolution handles all varieties with equal ease. -
Page 4: Table Of Contents
Table of Contents OVERVIEW ……………………4 How Your Machine Operates ……………… 4 Overview of the Evolution ………………5 Accessories ………………….6 Needles ……………………7 Thread ……………………7 Optional Accessories ………………..7 Setting Up Your Evolution………………8/9 Cutting Blade Lock Switch ………………10 Cutting Blade Cover and Sewing Table …………..
-
Page 5
Table of Contents (Cont.) Converting from 3-Thread to 2-Thread Overlock……….35 2-Thread Flatlock — Wide ………………36 2-Thread Flatlock — Narrow ………………. 37 Blanket Stitch — Decorative Stitch…………….38 Ladder Stitch — Decorative Stitch …………….39 Wave Stitch………………….40 Converting from Normal Serging to Wave …………40 3-Thread Wave Stitch ………………. -
Page 6: Overview
A serger is kind of a knitting process that loops two, three or four threads together to create a stitch. Your Baby Lock Evolution operates with one or two needles in the overlock position and one or two loopers to form an overlock stitch.
-
Page 7: Overview Of The Evolution
Overview of the Evolution 1. Upper looper positioning lever 18. Threading lever 2. Presser foot adjusting screw 19. Chain looper threading port 3. Thread cutter 20. Threading button 4. Presser foot thread release lever* 21. Differential feed adjusting lever 5. Chain/cover stitch needle tension dial 22.
-
Page 8: Accessories
Accessories Your Baby Lock Evolution serger has a built-in accessory compartment. To open, swing the «lid» on the thread spoolstand to the right to reveal the tray holding some of the accessories listed below. Others may be found in the machine packing materials.
-
Page 9: Needles
Needles Your Baby Lock Evolution serger is set up to use either Schmetz or Organ ELx705CF needles size 90/14. This is suitable for most medium and heavyweight fabrics. For lightweight fabrics use size 80/12, ELx705CF nee- dles. The ELx705CF needle is a semi-ballpoint design and is suitable for knits and wovens.
-
Page 10: Setting Up Your Evolution
1. Remove machine from box After removing the packing materials from the box, gently lift your Baby Lock serger by grasping the handle provided on the top of the machine. Place the machine on a serger sewing table or any level surface that pro- vides ample work area to the left.
-
Page 11: Setting Up Your Evolution
Setting Up Your Evolution (Cont.) 6. Position the telescopic thread guide. Raise the telescopic thread guide to its highest position. Rotate the shaft to the left and right until each section «clicks» into a locked position (fig. D). 7. Thread guide extension To install: Snap &…
-
Page 12: Cutting Blade Lock Switch
Your machine is pre-set to sew an overlock with a chain stitch. The upper blade is engaged to cut the fabric while sewing. Of course, you may select to engage or disengage the cutting blade. You can change the blade cover to the sewing table and lock the upper looper down when sewing only the chain stitch.
-
Page 13: Thread Cutter
Thread Cutter There is a thread cutter located on the left side of your Evolution. At the end of a seam, sew off the fabric edge and continue sewing to create a 5-6 inch (12.5-15cm) thread chain. Bring the chain of thread up and from the back to front through the thread cutter.
-
Page 14: Stitch Length/Rolled Hem
Stitch Length/Rolled Hem The stitch length / rolled hem adjusting dial is conveniently located just to the left of the front cover, near the base plate (fig. A). The dial shows two stitch- length ranges, from 0.75, for the shortest stitch, to 4 for the longest. As the dial indicates, one range is for standard sewing and one is for rolled edging or nar- row seaming.
-
Page 15: Differential Feed
Differential Feed Your Baby Lock serger is equipped with differential feed.The set of feed dogs work independently in order to ensure smooth sewing on all fabrics. When the differential feed adjusting lever, located at the machine’s right, front edge is set on «N» for normal feeding, the feed dogs move the same distance.
-
Page 16: Overlock Thread Delivery System
Overlock Thread Delivery System The Baby Lock Evolution revolutionizes the way a serger works with its exclusive overlock Thread Delivery System. You no longer have to manually adjust the tension settings for the type of overlock stitch you are sewing. Select the type of overlock stitch you wish to serge, the Evolution will automatically feed the correct amount of thread through the needles, the loopers and thread guides to form a perfect stitch every time.
-
Page 17: Chain/Cover Stitch Tension Dials
Chain/Cover Stitch Tension Dials The tension system of the chain and cover stitches are completely separate from the system being used on the overlock stitches. Unlike the thread delivery system of the overlock stitches, the tensions of the chain / cover stitch needles and chain looper are adjusted by dials located on the outer sides of your Evolution.
-
Page 18: 2-Thread Subsidiary Looper
Upper and Lower Looper Thread Fine-Tuning Knob No adjustments are needed when sewing with most fabrics and threads on your Baby Lock Evolution, but certain threads or fabrics may require minor fine-tuning of the looper delivery system to perfect your stitches. Increase or decrease the delivery of the looper threads with the upper and lower looper thread fine-tuning knob.
-
Page 19: Notes
Notes:…
-
Page 20: Threading
Threading Preparation When using threads on cones or king spools place the cone or spool secure- ly over the cone holders furnished on your machine. To avoid bending the thread stand, you may need to place one hand under the stand while posi- tioning the cone.
-
Page 21: Threading Your Evolution
Threading Your Evolution Your Baby Lock Evolution is equipped with an exclusive «Electrionic Extraordin Air Threading System» for fast, easy threading of the upper, lower, and chain loopers. One touch of the «Push to Thread» button will automatically thread the loopers. It is no longer necessary to use tweezers for threading the thread guides.
-
Page 22: Lower Looper
Lower Looper 1. With the presser foot up and threding lever in the threading position (fig. A page 19). 2. Place the thread cone or spool on the «LOWER LOOPER» spool pin on the thread stand. Slip the thread into the telescopic antenna thread guide «L»…
-
Page 23: Chain Looper
Chain Looper 1. With the presser foot in the up position, open the front cover and move the threading lever into the thread- ing position (fig. A page 19). 2. Set the stitch selector lever to «D» position for easy threading of the chain looper tension dial. 3.
-
Page 24: Chain/Cover Needles
Chain / Cover Needles Left Chain/Cover Needle C-1 1. Raise presser foot, place the thread on the «Chain Needle 1» spool pin. Slip the thread into the telescopic anten- na thread guide «C1» directly above the spool. See drawings below for reference. 2.
-
Page 25: Overlock Needles
Overlock Needles Left Overlock Needle — O-1 1. Place the thread on the «OVERLOCK NEEDLE 1» spool pin (fig. C, page 19). Bring the thread end through the telescopic guide directly above the thread. Bring the thread through thread guide at top of machine and down the «overlock needle I»…
-
Page 26: How To Use The Needle Threader
How To Use The Needle Threader 1. Hold the needle threader with the arrow mark on top. Place the thread in the groove of the needle thread- er. (fig.A) 2. Push the needle threader against needle and slide down the groove of the needle to the eye. Push the thread into the eye of the needle.
-
Page 27: Start To Sew
Start To Sew When threading is complete, the loose threads should initially interlock on fabric. This is most important when sewing the chain or cover stitches. 1. Cut all threads to 4 inch (10cm) in length. 2. Place fabric under the presser foot directly below the needles (fig.
-
Page 28: Clearing The Stitch Width Fingers
(page 20/21). Close the front cover and sew a test sample. Note: When re-threading your Baby Lock Evolution using the «Extraordin Air Threading» feature, make sure that the previous thread that was in the looper (tube) is completely removed. This will eliminate any chance of…
-
Page 29: Overlock Stitches — Express Stitches
4-Thread Overedging Overedging to finish facings, hems and seams before construc- tion, is one of the most basic uses of a serger, such as making a garment or project with 5/8 inch (16mm) pressed open seams (fig. To overedge, place the single layer of fabric in front of the press- er foot, aligning the cut edge with upper cutting blade.
-
Page 30: 4-Thread Overlock
4-Thread Overlock With the Evolution overlock Thread Delivery System, the upper and lower looper threads lock together evenly over the cut fabric edge(s) to form a flat, non-rolling pattern of overlocking stitches on both sides of the fabric. The left (O1) needle thread interlocks with both looper threads at the stitching line to create the seam. The right (O2) needle thread, visible on the top side of the stitch, interlocks with both the loopers to add durability.
-
Page 31: 3-Thread Overlock — Wide
3-Thread Overlock — Wide The 3-thread overlock wide stitch is perfect for edge-finishing most woven fabrics and for seaming knits that do not require the extra durability that a fourth thread provides. To convert your serger to a 3-thread overlock wide (5.5-7.5mm), cut the O- 2 needle thread just above the needle eye (fig.
-
Page 32: 3-Thread Overlock — Narrow
3-Thread Overlock — Narrow To convert to narrow 3-thread overlock (3.0-5.0mm), cut the O-1 needle thread (fig. A). Remove the O-1 needle and O-1 needle thread completely from the machine. Tighten the needle clamp screw slightly to prevent the screw from work- ing out (fig.
-
Page 33: 3-Thread Overlock — Narrow Hem
3-Thread Overlock — Narrow Hem Narrow Hem is an attractive finish for light to medium weight fabrics. Remove the O-1 needle and needle thread completely from the machine. Clear the stitch fingers. Turn the stitch length adjusting dial clockwise to the rolled hem range. Set the length at «1» (fig. A) and the stitch width at 3.0 (fig.
-
Page 34: Rolled Edging
Rolled Edging The rolled edge setting is used to achieve the narrowest stitch possible (1.5mm) on your Baby Lock serger. The stitch is suitable for seaming sheer and lightweight fabrics and for edging and hemming lightweight fabrics. 3-Thread Rolled Edge With the stitch selector set on «D», a narrow hem can become a rolled edge.
-
Page 35: Seaming Sheers
Seaming Sheers Use the 3-thread rolled hem setting when sewing sheer fabrics. Set the stitch length at 2.5. Sew the seams, aligning the fabric edge with the serger’s seam guides, trimming away the excess seam allowance. Lettuce Edge A frilly or «lettuce» edge can be created on most light and medium weight stretch and on bias edges of soft, woven fabrics.
-
Page 36: 3-Thread Flatlock — Narrow
3-Thread Flatlock — Narrow Flatlock seams are most suited to fabrics which do not ravel such as interlock knits, tricot, sweatshirt fleece and synthetic suede. The needle thread is carried below the fabric and to the cut edge of the fabric.
-
Page 37: 2-Thread Overlock
2-Thread Overlock The 2-thread function provides an economical and less bulky means of overedging all fabrics. The standard 2-thread overlock is the same as a 2-thread flatlock stitch. When sewn with specialty threads, 2-thread sewing makes decorative seams and edges for activewear, chil- dren’s clothing , ruffles, and hemlines.
-
Page 38: 2-Thread Flatlock — Wide
2-Thread Flatlock — Wide When sewn on a fold, flatlocking can create a decorative effect within the body of a garment or project. Either follow placement lines on your pattern or design your own special effects by stitching the fabric before laying out pattern pieces.
-
Page 39: 2-Thread Flatlock — Narrow
2-Thread Flatlock — Narrow Sew a 2-thread flatlock seam then pull the two fabric layers apart until the seam lies flat (fig. A). Because the threads show on the outside as well as the inside of the garment or project, the flatlock seam is often considered a decora- tive application (fig.
-
Page 40: Blanket Stitch — Decorative Stitch
Blanket Stitch — Decorative Stitch Set up the machine for 2-thread flatlock — wide but the needle thread- ing path is different for this technique. 1. Insert a size 90 top stitch needle in left overlock needle position. 2. Engage the threading lever in threading position. 3.
-
Page 41: Ladder Stitch — Decorative Stitch
Ladder Stitch — Decorative Stitch Set up the machine for 2-thread flatlock — wide but the needle thread- Ladder ing path is different for this technique. Right Side Right 1. Insert a size 90 top stitch needle in left overlock needle position. Side 2.
-
Page 42: Wave Stitch
Wave Stitch The Wave Stitch provides a decorative «wavy» edging on fabric. (This is not to be confused with «Lettuce Edge» on page 33). The upper looper thread and the lower looper thread gradually appear every 25 stitches to create a stitch that looks like a «Wave». When using different color specialty threads (pages 76 /77) for the upper or lower loopers, the Wave stitch creates an attractive stitch for edging.
-
Page 43: 3-Thread Wave Stitch
3-Thread Wave Stitch 1. Move the Wave Selector lever from «OVERLOCK» to «WAVE». 2. Cut the threads from the thread cones and remove from the thread paths. 3. Engage the threading lever in threading position for threading the loopers (page 19). 4.
-
Page 44: 3-Thread Rolled Wave Stitch
3-Thread Rolled Wave Stitch 1. Move the Wave Selector lever from «OVERLOCK» to «WAVE». 2. Cut the threads from the thread cones and remove from the thread paths. 3. Engage the threading lever in threading position, for threading the loopers (page 19). 4.
-
Page 45: 3-Thread Reversed Wave Stitch
3-Thread Reversed Wave Stitch You can also get the wave stitch in the back of fabric by crossing the upper and lower looper threads before the threading port. This Reversed Wave Stitch is attractive for expressive stitch with decorative cover stitches. (fig. A) 1.
-
Page 46: Chain/Cover Stitch — Express Stitches
Chain Stitching The chain stitch is formed using two threads, one thread in the needle and one thread in the chain looper. Chain Stitching looks like a straight stitch on the top of the fabric while the chain looper thread forms a chain on the underside of the fabric.
-
Page 47: Chain Stitch — Tension Adjustment
Chain Stitching (Cont.) Tension Adjustment Balanced tension — Balanced tension Chain stitch has correct tension when the needle thread sews a straight seam on the top side and the chain looper thread forms loops on the under side of the fabric. under side top side Needle thread is too loose -…
-
Page 48: Cover Stitch — Right Narrow — 3Mm
Cover Stitch — Right Narrow — 3mm The narrow cover stitch consists of two rows of straight stitching on the top side of the fabric with an overlock stitch on the underside of the fabric. This stitch is very common in the garment industry to hem knit garments.
-
Page 49: Cover Stitch Tension Adjustment
Cover Stitch — Right Narrow (Cont.) Tension Adjustment Balanced tension — Balanced tension Cover stitch has correct tension when the needle thread sews two rows of straight stitching on the top side and the chain looper forms a zig zag under side on the underside of the fabric.
-
Page 50: Cover Stitch — Left Narrow — 3Mm
Cover Stitch — Left Narrow — 3mm The narrow cover stitch consists of two rows of straight stitching on the top side of the fabric with the overlock stitch on the underside of the fabric. This stitch is very common in the garment industry to hem knit garments. The narrow cover stitch is used on fine knits such as jersey and single knits for hemming or topstitching.
-
Page 51: Cover Stitch Tension Adjustment
Cover Stitch — Left Narrow (Cont.) Tension Adjustment Balanced tension — Balanced tension Cover stitch has correct tension when the needle thread sews two rows of straight stitching on the top side and the chain looper forms a zig zag under side on the underside of the fabric.
-
Page 52: Cover Stitch — Wide — 6Mm
Cover Stitch — Wide — 6mm The wide cover stitch consists of two rows of straight stitching on top the fabric with an overlock stitch on the underside of the fabric. This stitch is very common in the garment industry to hem heavier knit fabrics such as double knits, sweatshirt fleece, and polar fleece.
-
Page 53: Cover Stitch Tension Adjustment
Cover Stitch — Wide — 6mm (Cont.) Tension Adjustment Balanced tension — Balanced tension Cover stitch has correct tension when the needle thread sew two rows of straight stitching on the top side and the chain looper forms a zig zag under side on the underside of the fabric.
-
Page 54: Triple Cover Stitch — 6Mm
Triple Cover Stitch — 6mm The Triple Cover Stitch can be used for topstitching, hemming, and elastic application . The stitch can also be used as a decorative stitch upside down with the overlock side on the right side of the fabric. The gar- ment industry uses the Triple Cover Stitch frequently in activewear.
-
Page 55: Triple Cover Stitch Tension Adjustment
Triple Cover Stitch (Cont.) Tension Adjustment Balanced tension — Balanced tension Triple Cover stitch has correct tension when the needle thread sew three rows of straight stitching on the top side and the chain looper under side forms a zig zag on the underside of the fabric. top side Needle thread is too loose — Needle thread is too loose…
-
Page 56: Combination Stitch — Expressive Stitches
4-Thread Safety Stitch The 4-thread safety stitch is perfect for all types of woven fabrics ranging from fine to heavy weight fabrics. This stitch is designed to seam and overlock the edge in one step, thus creating a garment industry standard safety stitch.
-
Page 57
4-Thread Safety Stitch (Cont.) 4-Thread Safety Stitch: 2-Thread Chain w/2-Thread Wide Overlock 5/8 inch (16mm) 1/2 inch (13mm) 3/8 inch (9.5mm) Chain Chain Stitch Stitch Stitch Needle Looper Size Needle Looper Length Width Selector Tension Tension Dial Dial 5/8 inch C,L, Chain C-1, O-1… -
Page 58: 5-Thread Safety Stitch
5-Thread Safety Stitch The 5-thread safety stitch is perfect for all types of woven fabrics ranging from fine to heavy weight. This stitch is designed to seam and overlock the edge in one step, thus creating a garment industry standard stitch. As well as woven fabrics, the 5-thread safety stitch is for stabilizing knits, sweater knits and long seams on woven fabrics.
-
Page 59
5-Thread Safety Stitch (Cont.) 5-Thread Safety Stitch: 2-Thread Chain w/3-Thread wide Overlock 5/8 inch (16mm) 1/2 inch (13mm) 3/8inch (9.5mm) Chain Chain Stitch Stitch Stitch Needle Looper Size Needle Looper Length Width Selector Tension Tension Dial Dial 5/8 inch Chain C-1, O-1 U,L,C 2.5-3.5… -
Page 60: 7-Thread Wave Stitch
7-Thread Wave Stitch 7-Thread Wave Stitch is a combined stitch of 3-Thread Wave and 4-Thread triple cover stitch. This stitch looks gorgeous with decorative threads appearing on wave stitch and triple cover stitch. For the 7-Thread Wave Stitch: 1. Use standard blade cover. 2.
-
Page 61
7-Thread Wave Stitch (Cont.) Variations of Stitches 6-Thread Stitch 6-Thread Stitch 7-Thread Stitch Cover Stitch Wide Cover Stitch Wide Triple Cover Stitch w/ 3-Thread Wave Stitch w/ 3-Thread Rolled Wave w/ 3-Thread Wave Stitch 5-Thread Stitch 5-Thread Stitch 6-Thread Stitch Right Chain Stitch Right Chain Stitch Cover Stitch Narrow Left… -
Page 62: 7-Thread Reversed Wave Stitch
7-Thread Reversed Wave Stitch 7-Thread Reversed Wave Stitch is a combined stitch of 3-Thread Reverse Wave and 4-Thread triple cover stitch. This stitch looks gorgeous with decorative threads appearing on wave stitch and triple cover stitch in the back of fabric. For the 7-Thread Reversed Wave Stitch: 1.
-
Page 63
7-Thread Reversed Wave Stitch (Cont.) Variations of Stitches 7-Thread Stitch 6-Thread Stitch 5-Thread Stitch Triple Cover Stitch Cover Stitch Wide Right Chain Stitch w/ 3-Thread Reversed w/ 3-Thread Reversed w/ 3-Thread Reversed Wave Stitch Wave Stitch Wave Stitch… -
Page 64: 8-Thread Stitch
8-Thread Stitch 8-Thread Stitch is a combined stitch of 4-thread overlock and 4-thread triple cover stitch. The 8-thread stitch is perfect for garment construction on heavy weight woven fabrics and used as a decora- tive topstitching with decorative overlock edge finish. The stitch is very durable as well as being a decorative stitch.
-
Page 65
8-Thread Stitch (Cont.) Variations of Stitches 8-Thread Stitch 7-Thread — wide 7-Thread — narrow Triple Cover Stitch Triple Cover Stitch Triple Cover Stitch w/3-Thread Overlock Wide w/3-Thread Overlock Narrow w/ 4-Thread Overlock… -
Page 66: Expressive Stiches: Chain/Cover Stitches Combined With Overlock Stitches
Expressive Stitches: Chain/Cover Stitches Combined with Overlock Stitches With the great features of Overlock Stitching and Chain/Cover Stitching on the Evolution, many different stitch- es branch off from the basic «Express» stitches. The following combinations can let you «Express» your cre- ativity as never before.
-
Page 67
Expressive Stitches (Cont.) 3-Thread Overlock Wide & Chain C-3 needle position 3-Thread Overlock Wide & Chain C-2 needle position 3-Thread Overlock Wide & Chain C-1 needle position 3-Thread Overlock Wide & Right Narrow Cover Stitch 3-Thread Overlock Wide & Left Narrow Cover Stitch 3-Thread Overlock Wide &… -
Page 68: Techniques
Turning Corners — Chain Stitch Sew to the point in fabric where you want to turn a corner. Stop the machine. Turn the handwheel toward you (counterclockwise) by hand, making sure the needle is going down in the fabric. Slowly start to raise the needle OUT OF FABRIC.
-
Page 69: Turning Outside Corners — Overlock
Turning Outside Corner — Overlock 1. Stitch along one edge until you reach the corner. Take one stitch off the edge of the fabric (fig. A). (As you approach the edge, you may want to stop and manually turn the handwheel towards you.) 2.
-
Page 70: Flat Hemming — Cover Stitch
5. Sew hem. 6. Sew seam on garment. Note: Optional guide or attachments will help with hemming (fig.B). Ask your Baby Lock retailer. Hemming in the Round — Cover Stitch 1. Sew all seams on the garment. 2. Measure, turn up and press the hem on garment.
-
Page 71: Blind Hemming — Overlock
Blind Hemming — Overlock Your Baby Lock Evolution can create a sturdy, nearly invisible blind- hem. 1. Set the machine for 2-Thread Overlock with the O-2 needle threaded. Set the stitch width at 5.0 and the stitch length at 4.0 in the standard range.
-
Page 72: Inserting Tapes — Overlock
Inserting Tapes — Overlock The slot in the standard presser foot is designed to guide stabilizing tape, narrow elastic or decorative ribbon into the stitching. Insert tape or elastic into the slot and under the back of the foot (fig. A). Adjust the stitch width to match the tape width.
-
Page 73: Flatlock «Decorative» — Overlock
Flatlock «Decorative» — Overlock The flatlock stitch need not be limited at seamlines. When sewn on a fold, flatlocking can create attractive decorative effects within the body of a garment or project. Either follow placement lines on your pattern or design your own special effects by stitching the fabric before laying out pattern pieces.
-
Page 74: Securing Ends — Overlock
Securing Ends — Overlock The serger stitch will not unravel readily, and in most cases serged seams are secured by an intersecting seam. If that’s not the case, these are several options for securing seam (fig. A). 1. Leave a 3 inch (7.5cm) chain, separate the threads and tie a knot. 2.
-
Page 75
Securing Ends — Overlock (Cont.) To lock the end of the seam: 1. Take one stitch off the end of the seam (fig. A). 2. Raise the presser foot and bring the needle(s) to the highest position. Pull back gently on the fabric to clear the stitch fingers. 3. -
Page 76: Securing Chain And Cover Stitching
Securing Chain and Cover Stitching The Chain Stitch and Cover Stitch can easily be removed. Trim the chain tail to edge of fabric at the «end» of the seam and pull on the chain looper thread on underside of the fabric. This will give you the opportunity to «Unsew»…
-
Page 77: Notes
Notes:…
-
Page 78: Specialty Threads
Using Specialty Threads Beautiful stitches can be formed by serging with specialty threads, cords, and ribbons. These heavy or shiny threads can be used to enhance the appearance of a stitch, add strength and elasticity, or create special effects. It depends on the thread you choose for the chosen technique. Some specialty threads work well through the needle and loopers, while others are too heavy to be threaded through the needle and are for looper use only.
-
Page 79: Bypassing The Threading Port
Bypassing the Threading Port Heavy weight threads can be used through your regular looper thread paths. Specific techniques may require that the thread bypass the thread port for the thread pull to be loosened. Start with the machine threaded with regular serger thread. 1.
-
Page 80: Looper Threading Tool
Looper Threading Tool 1. Open the front cover and raise the presser foot. 2. At the threading port, cut the looper thread that is to be replaced. Remove thread from under the foot and the upper thread guides. Replace cone of thread with specialty thread. 3.
-
Page 81: Thread Cradle For Loopers
Thread Cradle for Loopers 1. Open the front cover and raise the presser foot. 2. At the threading port, clip the looper thread that is to be replaced. (fig.A) Remove thread from under the foot and the upper thread guides. Replace cone of thread with specialty thread.
-
Page 82: Specialty Thread Guide Chart
Specialty Thread Guide Chart OVERLOCK Topstitching Wooly Nylon Metallic Threads Buttonhole Twist (Medium weight) (Lightweight) STITCHES (Medium weight) Decorative Edging APPLICATION Decorative Edging Rolled Hem Decorative Topstitching Decorative Flatlocking Soft seams on Lingerie and sportswear 4-Thread Seams Not recommended Use in loopers only For decorative exposed seams.
-
Page 83: Specialty Thread Guide Chart
Specialty Thread Guide Chart (Cont.) OVERLOCK Clear Nylon Lingerie Thread, Decorative Thread: Rayon or Polyester (Lightweight) Décor, Candlelight, STITCHES Machine-embroidery Pearl Crown Rayon ※1 Thread (Heavy weight) ※3 (Lightweight) ※2 APPLICATION Techniques requiring Lingerie and light-weight Decorative edging Decorative flatlocking thread invisibility.
-
Page 84: Maintenance
Troubleshooting Before taking your machine in for service, check the following: Machine fails to start: 1. Are electrical plugs properly connected? 2. Is the power switch on? 3. Check household circuit breaker or fuse. 4. Is the lock button release lever in the unlocked position? Thread breaks: 1.
-
Page 85: Troubleshooting
Troubleshooting (Cont.) Stitch Unbalanced: 1. Is the serger threaded correctly? 2. Is the proper presser foot on the serger? 3. Is the correct needle inserted and threaded? Chain or Cover Stitch unbalanced: 1. Is the thread in the tensions? 2. Are the tensions set correctly for the chain/cover needles? 3.
-
Page 86: Replacing Needles
Replacing Needles Needle Identification (fig. A)- The chain/cover stitch needle are on the front portion of the needle clamp and are identified by C-1,C-2 and C-3. C-1-Left chain/cover stitch needle can be used for chain stitch, left narrow cover stitch, wide cover stitch or triple cover stitch. C-2-Center chain/cover stitch needle can be used for a chain stitch, left narrow cover stitch, right narrow cover stitch or triple cover stitch.
-
Page 87: Replacing Cutting Blades
If for some reason your machine does not cut or perform as it should be, please take your machine to your nearest Baby Lock retailer. It is possible that the result of poor cutting may indicate other problems. TO REPLACE MOVING BLADE proceed as follow;…
-
Page 88: Cleaning
Cleaning Your Baby Lock will operate at best performance if it is kept clean at all times. The serger’s cutting action cre- ates much more lint than you will find on conventional sewing machine. Your serger’s major moving parts are well protected and do not need to be oiled.
-
Page 89: Technical Data
Technical Data…
-
Page 92
BLE8W(2)-TA EI-33(2)-E 2009 6.1500…
Содержание:
- Операции
- Комплектация
- Надежность
- Удобство использования
- Регулировки
- Шум
Операции
Коверлок Baby Lock Evolution — это машина с эксклюзивной «Системой подачи нити», которая не требует сложных регулировок натяжения, работает с нитками любого типа и тканями любого типа, выполняет оверлочные швы, цепной стежок, закрывающие строчки!!! Идеальный стежок на любой ткани! Можно шить плотную ткань, потом шелк, потом опять плотную и разными нитками и без дополнительной регулировки.
Количество операций для коверлока, как и для оверлока — условное понятие, т.к. самих переключателей строчек нет. Вы можете получить необходимый вид шва путем заправки нитей в иглы и петлители в различной последовательности, использования разного количества иголок. Данный коверлок выполняет 31 вид строчки. Это самое большое количество строчек, которое на сегодняшний день может выполнять коверлок.
- 4-ниточный оверлочный шов
- 3-ниточный оверлочный шов — широкий
- 3-ниточный оверлочный шов — узкий
- 3-ниточный оверлочный шов — узкий с подрубкой кромки
- 2-ниточный плоский шов — широкий (флэтлок)
- 2-ниточный плоский шов — узкий (флэтлок)
- 2-ниточная одеяльная строчка
- 2-ниточная строчка лесенка
- 3-ниточная волновая строчка
- 3-ниточная ролевая волновая строчка
- 3-ниточная обратная волновая строчка
- Цепочная строчка левая
- Цепочная строчка правая
- Цепочная строчка центральная
- Закрывающая строчка — левая узкая
- Закрывающая строчка — правая узкая
- Закрывающая строчка широкая
- Тройная закрывающая строчка
- 6-ниточная строчка (закрывающая узкая левая+3-ниточная ролевая)
- 6-ниточная строчка (цепочная+4-х ниточный оверлочный шов)
- 5-ниточная строчка (цепочная + 3-хниточный широкий оверлочный шов)
- 4-ниточная строчка (цепочная + 2-х ниточный широкий оверлочный шов)
- 7-ниточная (тройная закрывающая+3-х ниточная волновая строчка)
- 6-ниточная строчка (широкая закрывающая + 3-х ниточная волновая строчка)
- 7-ниточная строчка (тройная закрывающая + 3-х ниточная обратная волновая строчка)
- 7-ниточная строчка (закрывающая шировая+4-х ниточный оверлочный шов)
- 7-ниточная строчка (тройная закрывающая+3-х ниточный оверлочный шов)
- 6-ниточная строчка (закрывающая левая узкая+3-х ниточный широкий оверлочный шов)
- 8-ниточная строчка (тройная закрывающая строчка+4-х ниточный оверлочный шов)
3-ниточный плоский шов — узкий
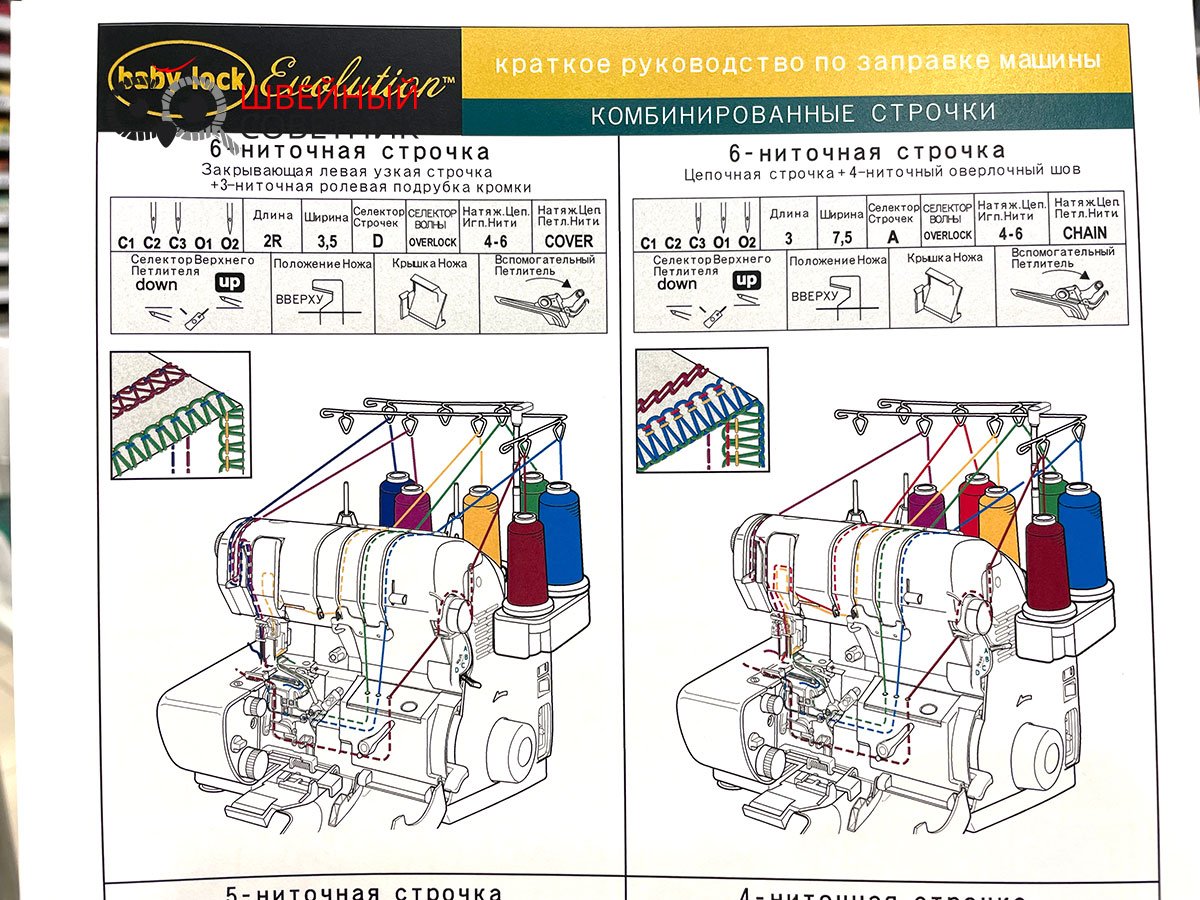
Все виды строчек с названиями, путь заправки нитей, базовые параметры для той или иной строчки есть в краткой инструкции. Инструкция выполнена в цвете, с хорошим качеством печати, рисунки крупнее, все хорошо видно.
Комплектация
В данной модели в общем-то обычная комплектация для коверлоков.
- Инструкция по эксплуатации
- Кратное руководство по заправке машины нитками (цветная схема на каждый шов)
- плоский столик для цепной и закрывающих строчек
- Насадка с нитенаправителями
- Установочные винты для столика (2 шт.)
- Щетка для чистки с отверстием для установки иглы
- Набор игл ассорти системы ELx705 CF
- Ключ специальный (отвертка для замены иголок)
- Пинцет
- Сменное верхнее лезвие (нож)
- Нитевдеватель
- Винты оверлочной иглы ( запасные 2 шт)
- Винты цепочной иглы ( запасные 2 шт)
- Нитевдеватель петлителя
- Отвертка
- Ниточные сетки ( 8 шт.) отделение для хранения принадлежностей
- Шпулечные колпачки (тарелочки 8 шт.)
- Губчатые диски (8 шт.)
- Конические держатели (8 шт.)
Единственное чего не хватает в комплектации — это мусоросборник! Вот тут производитель явно промахнулся.
У Бэбилока встроенное отделение для хранения принадлежностей. Находится оно справа под шпуледержателями. Чтобы его открыть, нужно отвернуть крышку вправо. Тут хранится все самое необходимое для работы.
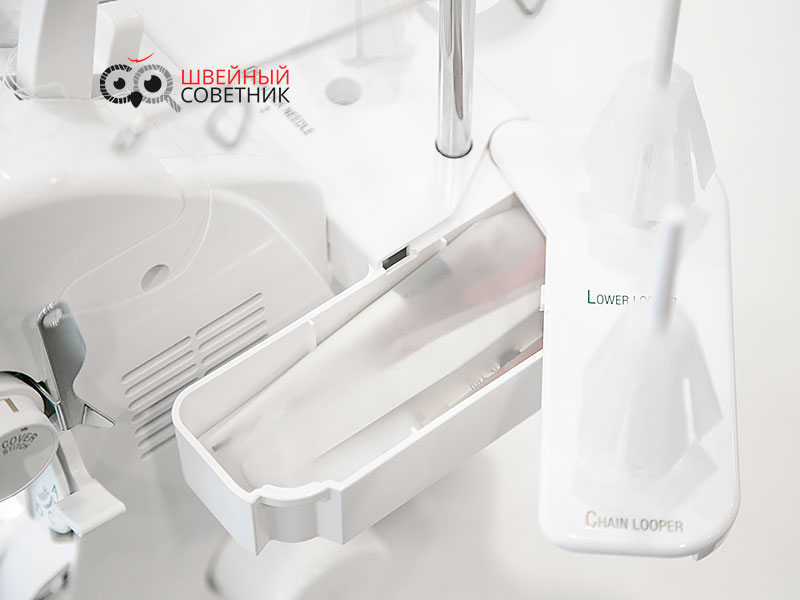
Работа коверлока рассчитана на иглы системы ELx705 CF. Не пытайтесь использовать для этого коверлока обычные иглы от швейных машин другого типа или размера. Ни к чему хорошему это не приведет. Для шитья трикотажныйх тканей, джерси рекомендуем использовать иглы ELx705 SUK CF. (Иглы этой системы имеют наполовину закругленное острие. СF-обозначение с хромовым покрытием, которое придает игле дополнительную износоустойчивость). Производитель рекомендует шить ткани тяжелые и средней плотности иглами №90/14 , а легкие №80/12.
Применяйте только иглы типа ELx705 размеров 80/12-90/14! Всегда выполняйте образцы для проверки правильного подбора ткани/иглы/нити.
Надежность
У Baby Lock Evolution металлический каркас. Не смотря на небольшие размеры его вес 9.5 кг. Скорость шитья достигает 1500 стежков в минуту. На ножках присоски, поэтому коверлок стоит на столе как «вкопанный».
Указанная потребляемая мощность
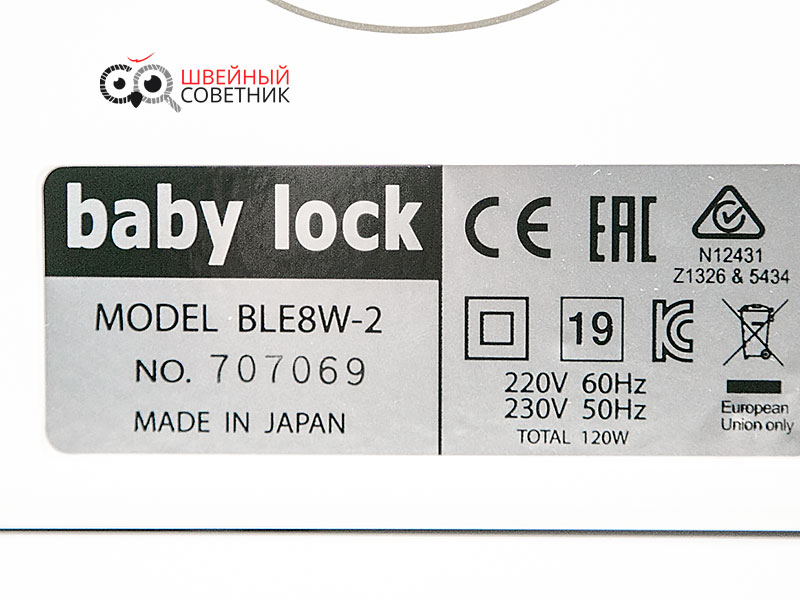
Удобство использования
Хорошее освещение рабочей зоны обеспечивают три светодиода — два слева от иглы и один справа.
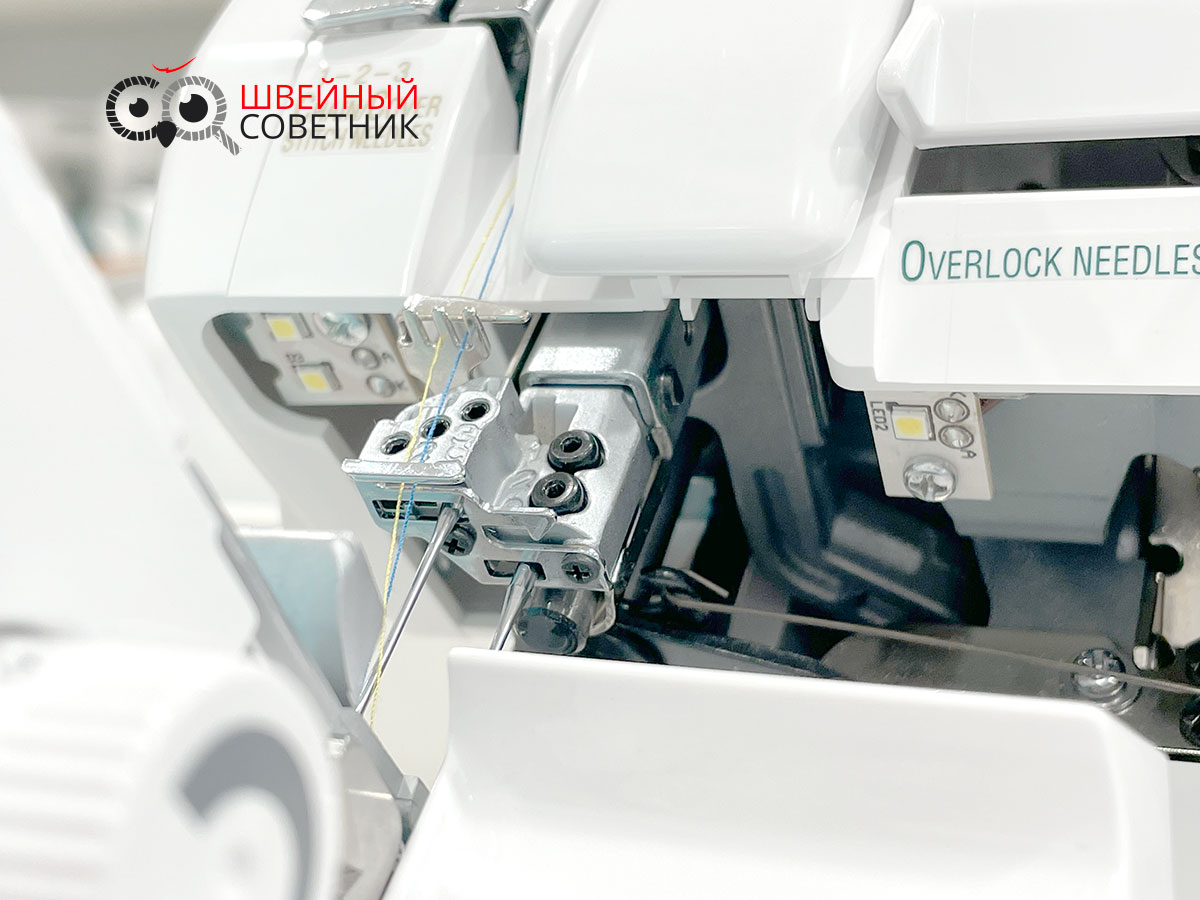
У Baby Lock Evolution есть система блокировки коверлока. При открытой передней крышке и крышке режущего лезвия (ножа) машина шить не будет. Тем самым обеспечивая Вашу безопасность.
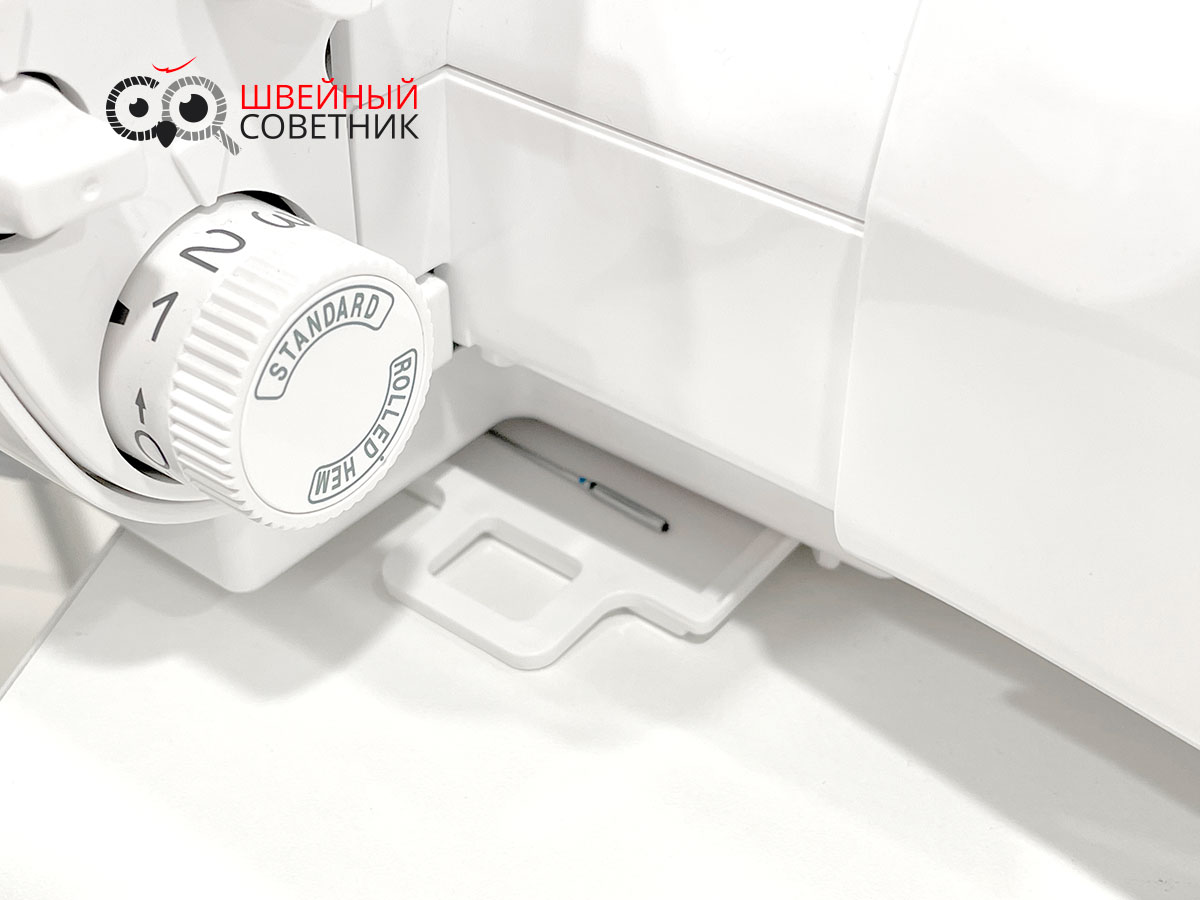
Часто швеи не успевают поймать иголку при замене и она падает внутрь машины. Но и тут производитель все продумал . В самом низу слева расположен поддон для выпавшей иглы. Мелочь, но очень удобно. Потянул поддон на себя, и вот она иголочка как на ладони.
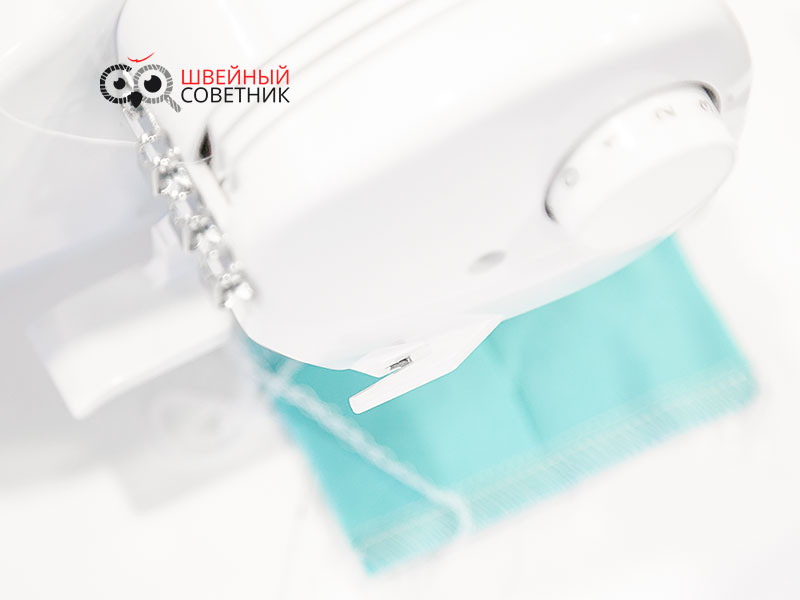
Справа сбоку расположен очень острый нож для обрезки ниток.
Удобство заправки коверлока
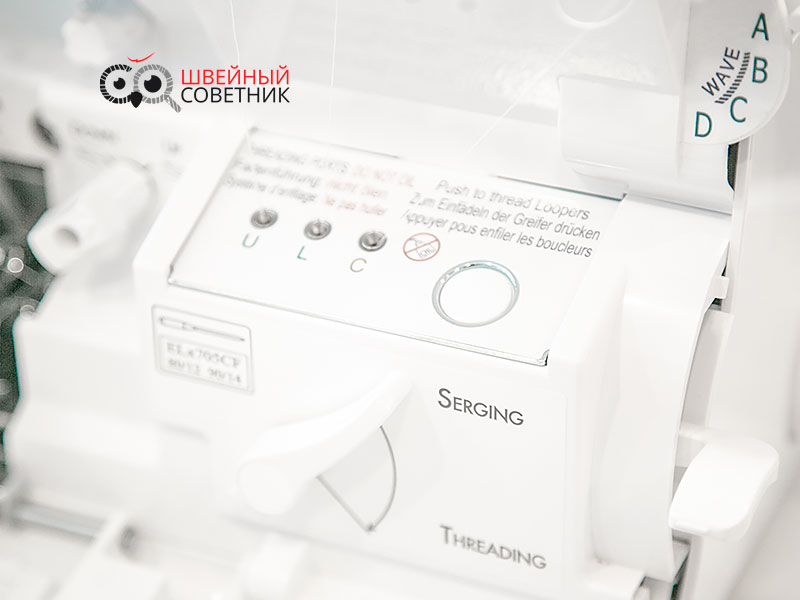
Несомненным плюсом и превосходством Бэбилока Эволюшин является заправка нити. Он оснащен эксклюзивной электронной системой автоматической заправки нитками верхнего, нижнего и цепочного петлителя. Больше не нужно соблюдать очередность заправки петлителей, проверять за все ли крючки Вы заправили нить и пользоваться пинцетом.
Достаточно просто нажать на кнопку заправки петлителей. При этом все петлители могут быть заправлены одновременно или по одному. Если отодвинуть крышку петлителей, то мы увидим очередность действий при заправке петлителей.
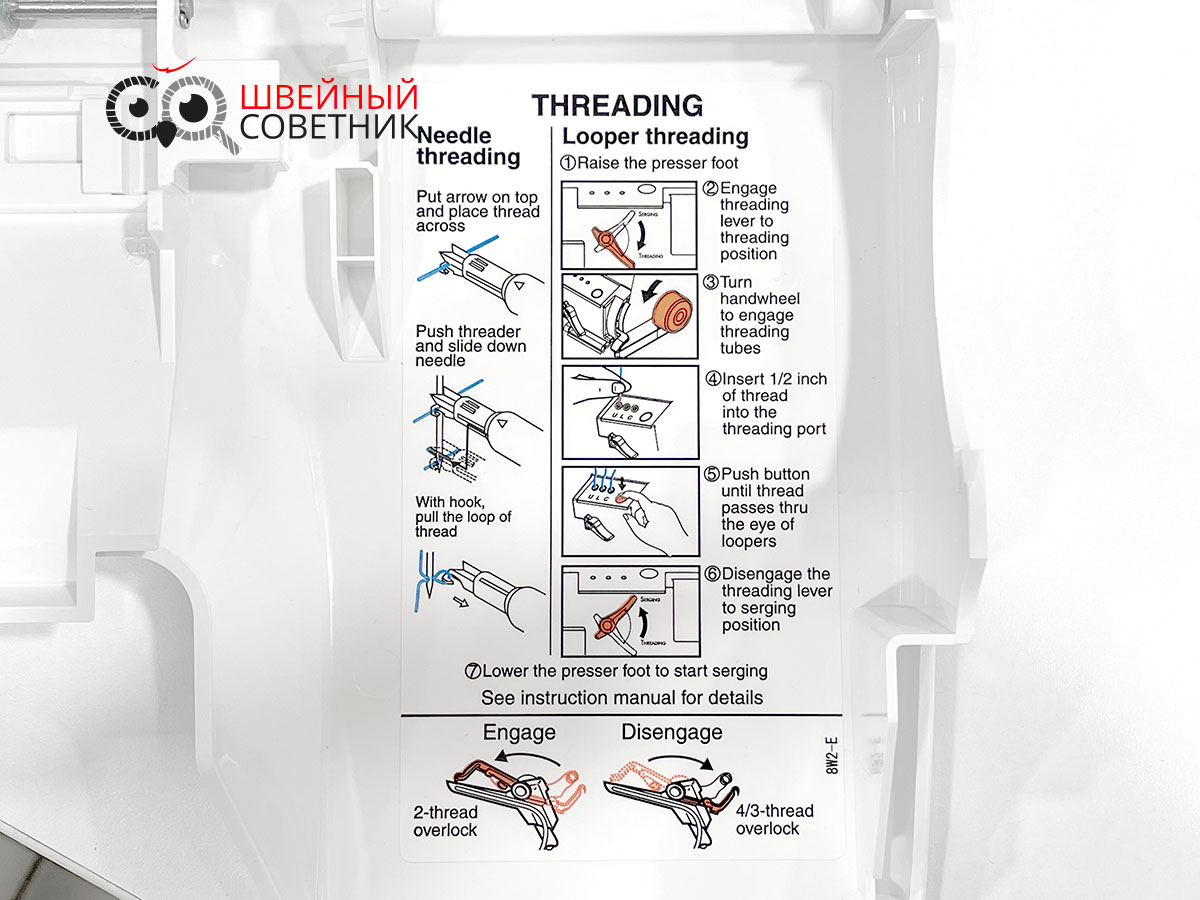
После того как все нити заправлены, пропустите их под лапку влево. Опустите лапку, нажмите на педаль и провяжите цепочку длиной примерно 7 см, только после этого делайте пробную строчку.
Цепочку ниток и пробную строчку нужно выполнять после каждой заправки ниток, чтобы при необходимости откорректировать их натяжение, ширину и длину стежка, а также подачу ткани.
Регулировки
А слева сверху на корпусе расположен регулятор давления лапки на ткань. Прижим лапки отрегулирован на заводе-изготовителе заранее и редко требует регулировки. Тем не менее, иногда необходимо изменить давление лапки, например, при шитье легких и плотных тканей. Берем обычную монетку, подходящую по диаметру, для усилия давления поворачиваем винт регулировки по часовой стрелке и против часовой стрелке, чтобы ослабить его.
- Уменьшайте прижим для легких тканей.
- Увеличивайте прижим для тяжелых тканей.
- Всегда делайте пробную строчку, чтобы определить нужную степень прижима лапки для обрабатываемой ткани.
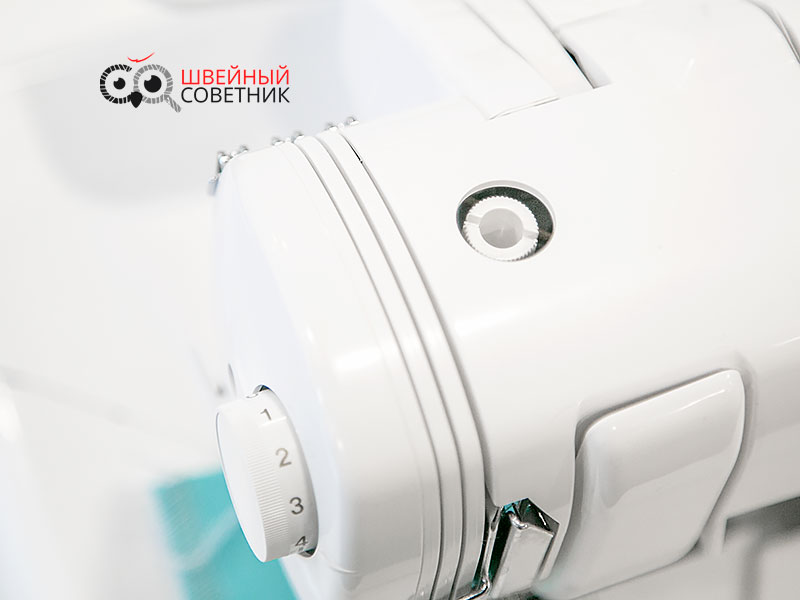
Натяжение ниток в иглах при шитье распошивальных швов или цепочного шва можно подстроить регулятором, который расположен на корпусе справа вверху. Тут все как обычно, чем больше цифра, тем сильнее натяжение. Но в отличие от обычных распошивалок, натяжение регулируется сразу на всех иглах одновременно.
Слева внизу на корпусе находится регулятор ширины шва (верхняя ручка). Ширина обметки определяется с помощью левой или правой иглы, а также настройки ширины обрезки/положения ножа. С его помощью можно менять ширину шва от 3,0 до 7,0 мм. Большие числа обозначают ширину стежка от левой иглы, а меньшие числа — от правой. Положение «М» используется для ролевого подрубочного шва.
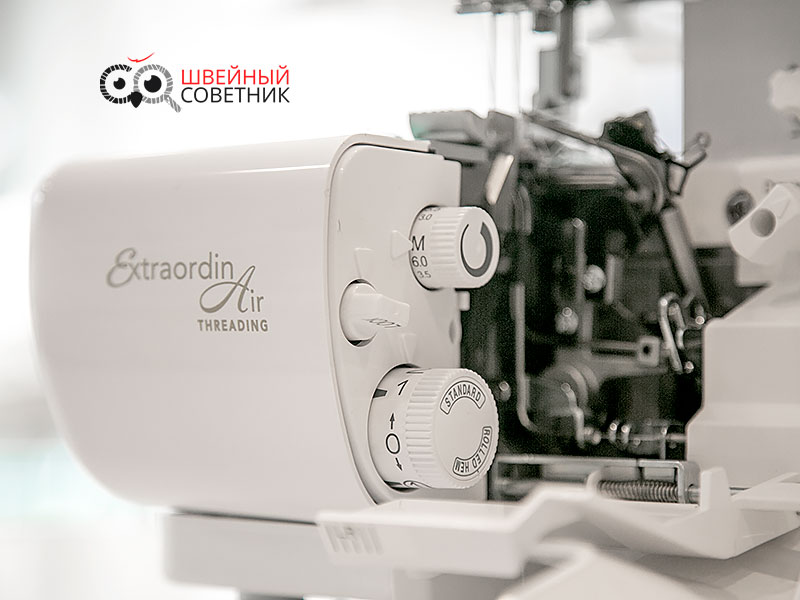
Посередине расположен рычаг отключения ножа. Нож отключается для выполнения цепного шва и плоских швов. Также можно выполнять некоторые оверлочные операции с отключенным ножом. Чтобы заблокировать нож внизу, т.е. отключить его, нужно повернуть регулятор по часовой стрелке, чтобы надпись LOCK оказалась сверху.
Регулятор длины стежка также находится слева на корпусе внизу. Диапазон длин стежка от 0.75 до 4 мм. В большинстве случаев положение standart . При шитье плотных тканей лучше ставить длину от 2,5 до 4 мм. А вот при выполнении ролевых швов выбирайте длину стежка от 1 до 2 мм- положение rolled. При переключении на ролевый шов, язычок ширителя уберется автоматически.
Baby Lock имеет систему дифференциальной подачи ткани. Это два транспортера , которые двигаются независимо друг от друга, тем самым обеспечивая равномерное шитье различных тканей. Рычаг регулировки дифференциальной подачи ткани расположен справа на корпусе коверлока. Положение «N» — это нормальная подача ткани. Такое положение используется для обработки большинства тканей.
При установке рычага дифференциала в положение от N до 2-х устраняется волнистость швов при обработке трикотажа, обработке ткани по диагонали. А при максимальном положении на 2.0 даже можно сосбаривать легкую ткань. Если же Вам нужно растянуть ткань, выбирайте положение от 0.6 до N. И помните. плотность ткани и длина стежка влияет на сосбариваемость или растяжение ткани. Всегда делайте пробные строчки!
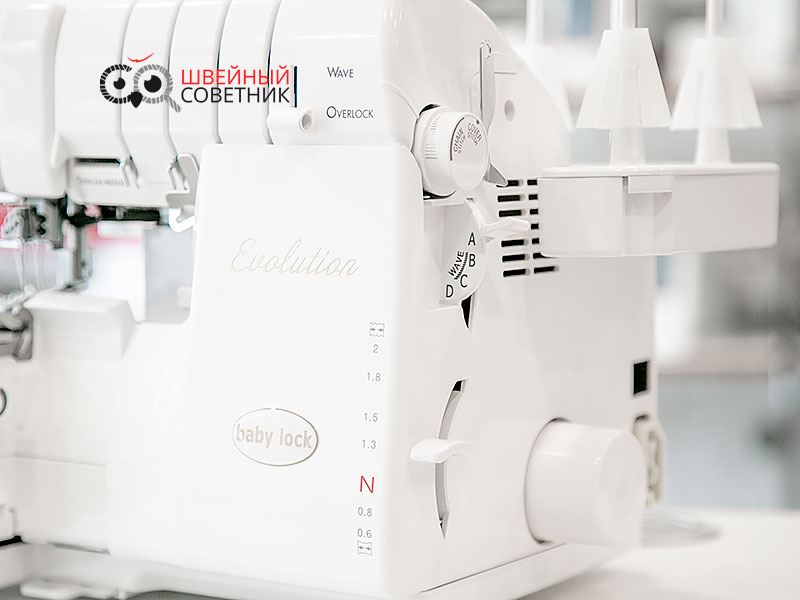
Над рычагом дифференциала расположен рычаг селектора строчек. Если Вы внимательно посмотрели у Baby Lock Evolution нет регуляторов натяжение нити. Натяжение для каждого типа строчки контролируется этим рычагом. Есть четыре положения А-B-C-D. Поэтому очень важно правильно заправить нитки для того или иного шва по схеме и поставить рычаг в нужное положение. Посмотреть схему заправки можно в инструкции или в специальном цветном вкладыше, который идет в комплекте с коверлоком. А вот чтобы не запутаться, какую нитку куда ставить сзади на платформе все подписано. Золотым цветом нитки для распошивальных швов, а зеленым для оверлочных.
Еще выше расположена головка натяжения в цепочном петлителе. Она разделена на два значения — это натяжение для закрывающей строчки и натяжение цепочного шва. Чем ближе значение настройки к широкой сплошной метке, тем слабее натяжение закрывающей строчки ( широкий, узкий или тройной плоский шов).
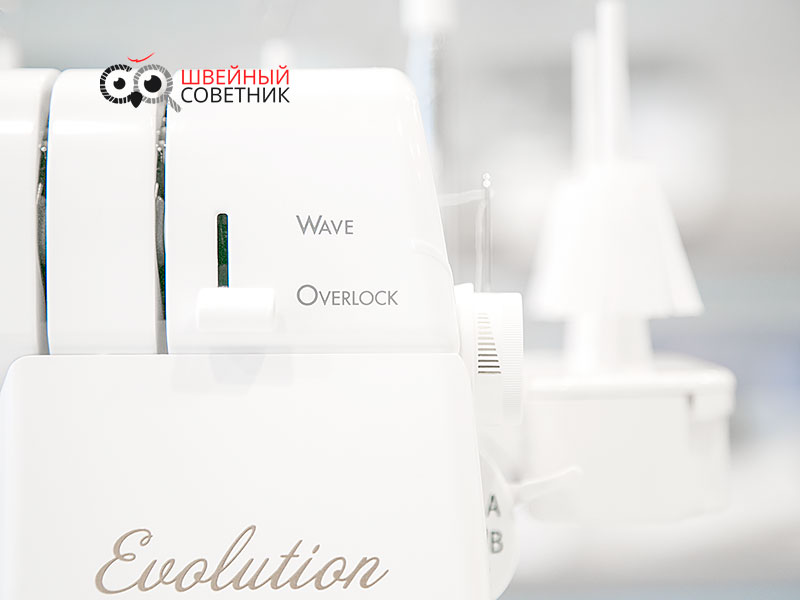
Справа на корпусе расположен рычаг селектора волны. Для обычной оверлочной строчки переводим рычаг в положение OVERLOCK, а для декоративной WAVE, Baby lock — это единственный коверлок. который выполняет такую великолепную строчку.
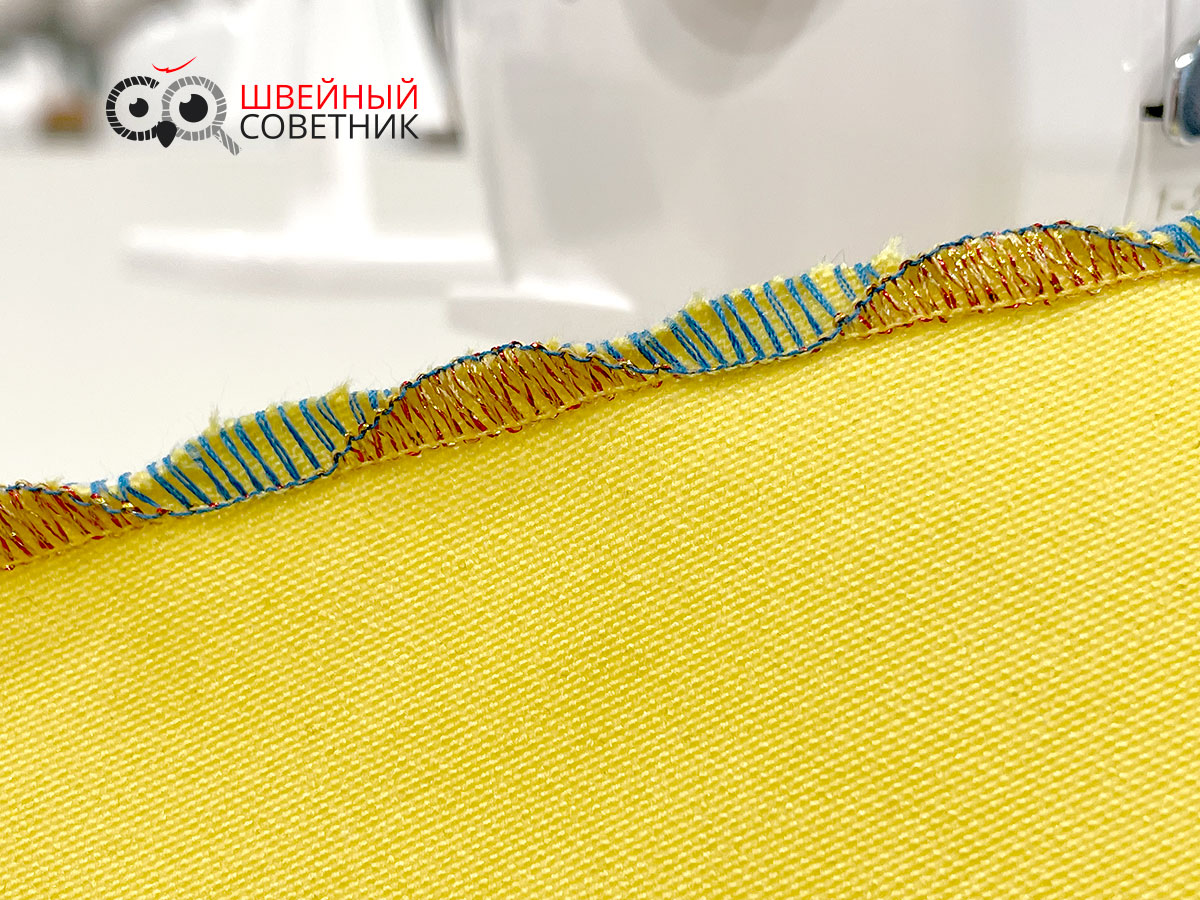
Для выполнения двухниточных швов подключаем конвертер. Он хранится в крышке петлителей. Одеваем его на верхний петлитель, при этом носик конвертера должен попасть сзади в ушко верхнего петлителя.
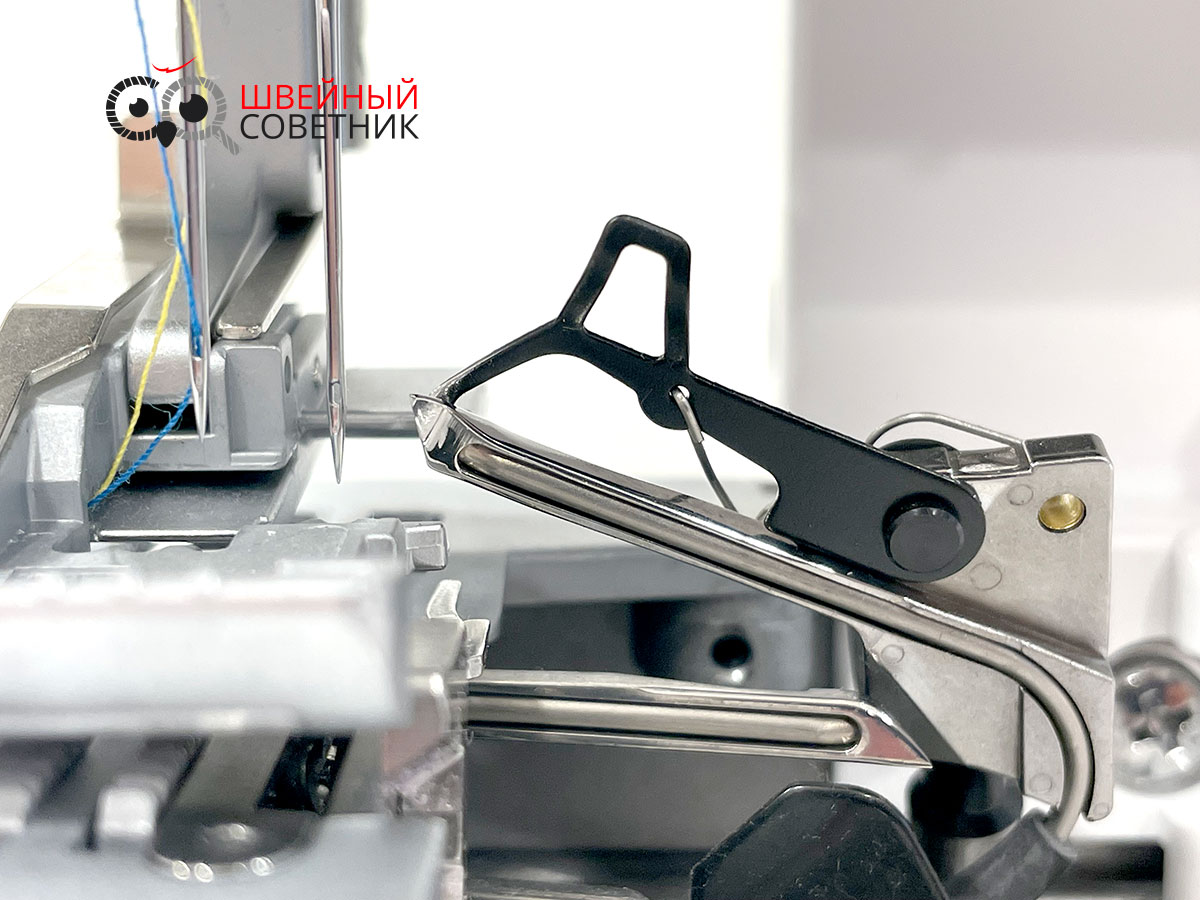
Если у коверлока нет регуляторов натяжения нитей, то можно подумать, что регулировки и не понадобятся. Отчасти это так. Для большинства тканей они и не потребуются. А что делать со сложными и капризными полотнами, нитками? Для таких случаев производитель установил регулятор тонкой настройки натяжения нити верхнего и нижнего петлителя.
Расположен он на корпусе прямо посередине коверлока . Если нужно подтянуть натяжение — поворачиваем ручку по часовой стролке в сторону +. А если ослабить — то против часовой стрелки в сторону минуса. И заметьте, Вам не надо в отдельности регулировать натяжение петлителей как в обычных оверлоках или коверлоках. С помощью этого регулятора натяжение корректно отрегулируется сразу и сверху и снизу.
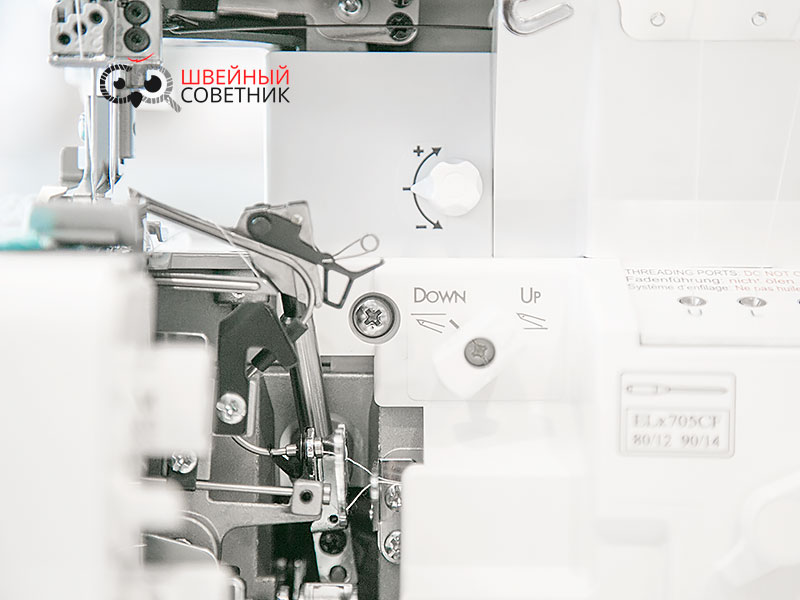
Рычаг отключения верхнего петлителя находится под передней крышкой справа под регулятором тонкой настройки натяжения. Если нам в работе не нужен верхний петлитель, то переключатель переводим влево — Down (для выполнения распошивальных швов и цепочного шва). и соответственно для оверлочных швов переключаем рычаг вправо в положение Up.
Также переустанавливаем иглы на распошивальные швы. Они установлены вертикально, а значит лучше протыкают плотную (толстую) ткань и меньше ломаются.
И так для выполнения распошивальных швов (сшивание внахлест, отстрочка горловины, подгибка низа трикотажных изделий) и цепного шва.
- Отключаем верхний петлитель.
- Отключаем верхний нож.
- Устанавливаем крышку плоского шва.
- Убираем оверлочные иглы.
- Устанавливаем иглы плоского шва.
- Заправляем нить в цепной петлитель и иглы.
Поверьте, у Baby Lock эти операции проделать очень легко и все благодаря системе быстрой заправки воздухом петлителей!
При выполнении плоских швов и цепного шва Baby Lock делает цепочку
Результаты проверки на качество шитья
- Органза (3-х ниточный ролевый шов) — Отлично
- Джинс (4-х ниточный оверлочный шов)— Отлично
- Трикотаж кулирка, футер с начесом (4-х ниточный оверлочный шов)— Отлично
- Трикотаж (3-х ниточный сверхэластичный шов)— Отлично
- Трикотаж (распошивальный шов)— Отлично
Проверка производилась на лапке универсальной и без дополнительных материалов и приспособлений.
Шум
Коверлок работает немного громче, чем обычные оверлоки. Но звук не раздражает.
Измерения проводились в домашних условиях. Коверлок располагался на деревянном столе. Шумомер MS 6708 установлен на расстоянии 40 см от коверлока. Погрешность шумомера ± 1,5 ДбА. Наше измерение не следует сравнивать с таблицами усредненных значений, т.к. измерение производилось исключительно по нашим ТУ.

