Портативная рация Baofeng UV-82 купить у официального представителя
Производитель Baofeng хорошо известен не только в России, но и во всем Мире. Компания долгие годы занимается выпуском средств радиосвязи. Продукция этого изготовителя реализуется повсеместно, ведь далеко не каждая компания сегодня предлагает к приобретению рации с интересным дизайном, продуманным функционалом, еще и по привлекательной стоимости. Купить радиостанцию Baofeng UV 82 можно у нас. Но для начала предлагаем ознакомиться с особенностями и основными преимуществами устройства.
Описание рации
Можно сказать, что рация Baofeng UV 82 является улучшенной версией другого популярного аппарата от этого производителя – UV 5R. Если сравнивать эту модель с предшественником, то в первую очередь стоит отметить, что аппарат слегка потяжелел (240 г), вытянулся и стал тоньше. Но трансивер как и прежде остается легким и удобным в использовании. Он легко помещается в карман, его наличие в рюкзаке никак не будет ощущаться, что особенно актуально для путешественников и туристов. Антенна качественная, гибкая. Сверху корпуса светодиод индикации режимов работы. Рядом регулятор, при помощи которого включаются радиостанции и регулируется громкость. Мощный фонарик установлен между регулятором и разъемом антенны.
При заказе, пожалуйста, выберите опцию «Цвет».
Если Вы не выбрали цвет, то мы отправим произвольный.
Комплектация
Баофенг UV 82 поставляется вместе со всем необходимым для комфортного использования устройства комплектующим: стакан для зарядки с адаптером питания, аккумулятор, антенна, ремешок и клипса, гарнитура в комплекте. Все это помещено в простую, но удобную упаковочную коробку небольшого размера. Скачать инструкцию по эксплуатации радиостанции можно на нашем сайте, в ней можно узнать об основных характеристиках и особенностях обслуживания.
Только у нас — бесплатное программирование LPD и PMR каналов по Вашему желанию при заказе!
Пожалуйста, при необходимости выберите соответствующую опцию.
Характеристики
Отличия между Baofeng UV 82 и UV-5R, конечно же, стоит искать не только в дизайне, но и в характеристиках. Это также двухдиапазонная модель (можно прослушивать один канал и общаться на другом). Но, если в UV-5R эта функция реализована посредством специальной кнопки, жать на которую не всегда удобно в силу определенных обстоятельств, то в модели радиостанции Baofeng UV 82 предусмотрена сдвоенная клавиша PTT для передачи сигнала.
Так как обе рации схожи, то и технические характеристики практически идентичны:
- два режима работы – канальный и частотный;
- диапазон частот: VHF 136–174, UHF 400–520.
Выходная мощность рации 5 Вт, существует модификация с 8 Вт выходной мощности и с тремя уровнями ее регулировки. За счет этого Баофенг УВ 82 способен принимать и передавать сигнал до 10 км на открытой местности и на расстояние до 3 км в условиях города. Один из главных плюсов аппарата – достаточно качественная модуляция. Это особенность повышает разборчивость речи и способствует насыщению звука.
Что касается аккумулятора аппарат, то и здесь можно обнаружить несколько несомненных плюсов. Первый – довольно надежное крепление батареи, выдерживающее даже сильные тряски. То есть, риск того, что аккумулятор случайно отсоединится от устройства, фактически сведен к нулю. Второй плюс – заявленный объем аккумулятора. Он равен 2800 mAh. За счет этих и других преимуществ Baofeng UV82 8W получил хорошие отзывы.
Также, просим обратить ваше внимание на модель с увеличенным объемом аккумулятора, Baofeng UV 82 с аккумулятором на 3800 мАч. С ней время работы вашей рации увеличится в 1.5-2 раза.
Область применения
Впечатляющие характеристики Baofeng UV 82 по заслугам оценили радиолюбители и ценители активного отдыха. Аппарат считается вполне удачным, широкое распространение модели обусловлено сбалансированным соотношением цены, качества и функциональных возможностей. За счет дальности действия, функционала, удобства пользования и хорошей разборчивости голоса собеседника радиостанция особенно популярна среди охотников, рыбаков, любителей просканировать частоты, и среди тех, кто увлекается активными играми, например страйкболом и пейнтболом.
Купить аппарат в нашем интернет-магазине
Эта радиостанция отличается неплохими характеристиками, приличным качеством изготовления, высокой мощностью и нормальной чувствительностью. Рация отлично лежит в руке, в условиях прямой видимости демонстрирует великолепные результаты даже со штатной антенной. Купить Baofeng UV 82 всегда можно в нашем интернет-магазине. Мы предлагаем проверенную и качественную продукцию с гарантией.
Преимущества сотрудничества с нами:
- различные и удобные варианты оплаты;
- быстрая доставка в любой город России;
- консультации и помощь в выборе средств связи;
- приемлемые цены;
- гарантийное и послегарантийное обслуживание;
- продажа исключительно надежных и проверенных аппаратов.
Купить рации Баофенг УВ 82 проще простого — для этого достаточно сделать заказ на нашем сайте. Если у Вас возникли вопросы или требуется консультация, то вы можете позвонить нам бесплатно по номеру телефона или заказать обратный звонок. Наш менеджер свяжется с вами в кратчайшие сроки и предоставит интересующую информацию. Отправка заказов в пункт выдачи или курьером в любой город России осуществляется ежедневно по рабочим дням!
Baofeng UV-82 Manual

SAFETY INFORMATION
The following safety precautions shall always be observed during operation, service and repair of this equipment.
- This equipment shall be serviced by qualified technicians only.
- Do not modify the radio for any reason.
- Use only BAOFENG supplied or approved batteries and chargers.
- Do not use any portable radio that has a damaged antenna. If a damaged antenna comes into contact with your skin, a minor burn can result.
- Turn off your radio prior to entering any area with explosive and flammable materials.
- Do not charge your battery in a location with explosive and flammable materials.
- To avoid electromagnetic interference and/or compatibility conflicts, turn off your radio in any area where posted notices instruct you to do so.
- Turn off your radio before boarding an aircraft. Any use of a radio must be in accordance with airline regulations or crew instructions.
- Turn off your radio before entering a blasting area.
- For vehicles with an air bag, do not place a radio in the area over an air bag or in the air bag deployment area.
- Do not expose the radio to direct sunlight over a long time, nor place it close to heating source.
- When transmitting with a portable radio, hold the radio in a vertical position with the microphone 3 to 4 centimeters away from your lips. Keep antenna at least 2.5 centimeters away from your body when transmitting.
If you wear a radio on your body, ensure the radio and its antenna are at least 2.5 centimeters away from your body when transmitting.
FEATURES AND FUNCTIONS
- Dual-band handheld transceiver with display function menu on the display «LCD».
- Commercial FM radio receiver (65 MHz ~ 108 MHz). -Frequency Mode/Channel Mode
- DTMF encoded.
- Incorporates 105 codes «DCS» and 50 privacy codes «CTCSS» programmable. -CTCSS & DCS Scanning
- CTCSS & DCS Direct input
- Function «VOX» (voice operated transmission).
- Alarm function.
- Up to 128 memory channels.
- Broadband (Wide) / Narrowband (Narrow), selectable.
- Display illumination and programmable keyboard.
- Function «beep» on the keyboard.
- Dual Standby/dual reception. -Crossband reception/transmission
- Selectable Frequency Step 6.25/12.5 kHz.
- Function «OFFSET» (frequency offset for repeater access).
- Frequency reverse
- Battery saving function «SAVE».
- Timer transmission «TOT» programmable.
- Selecting the Scan Mode.
- Function Busy Channel Lock «BCLO».
- Built-in RX CTCSS/DCS scan
- Built-in LED flashlight.
- Programmable by PC.
- Level Threshold «Squelch» adjustable from 0 to 9. -Tone end of transmission
- Built-in key lock
UNPACKING AND CHECKING EQUIPMENTS
Carefully unpack the transceiver. We recommend that you identify the items listed in the following before discarding the packing material. If any items are missing or have been damaged during shipment, please contact your dealers immediately.
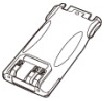
Battery Pack

Antenna
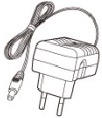
Adapter

Drop-in Charging Tray

Belt Clip

Handstrap
Note:
- Items included in the package, may differ from those listed in the table above depending on the country of purchase. For more information, consult your dealer or vendor.
OPTIONAL ACCESSORIES

Note:
- Consult the dealer or retailer for information about options available.
INSTALLATION OF ACCESSORIES
INSTALLING THE ANTENNA
Install the antenna as shown in the figure below and turn it clockwise until it stops.

Note:
- When installing the antenna, don’t rotate it by its top, holding it by its base and turn.
- If you use an external antenna, make sure the ‘SWR’ is about 1.5:1 or less, to avoid damage to the transceiver’s final transistors.
- Do not hold the antenna with your hand or wrap the outside of it to avoid bad operation of the transceiver.
- Never transmit without an antenna.
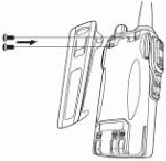
INSTALLING THE BELT CLIP
If necessary, install the belt clip at the rear of the battery compartment cover as shown in the figure below.
Note:
- Do not use any kind of glue to fix the screw on the belt clip. The solvents Glue may damage the battery casing.
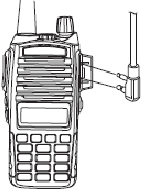
MICRO HEADSET INSTALLATION OF EXTERNAL
Plug the external micro-headset connector into the jack of ‘SP. & MIC’ of the transceiver as shown in the figure below.
BATTERY INSTALLATION
BATTERY CHARGING
Use only the charger specified by the manufacturer. The charger’s LED indicates the charging progress.
| CHARGING STATUS | LED INDICATION |
| Standby (no-load) | Red LED flashes, while Green LED glows |
| Charging | Red LED solidly glows |
| Fully Charged | Green LED solidly glows |
| Error | Red LED flashes, while Green LED glows |
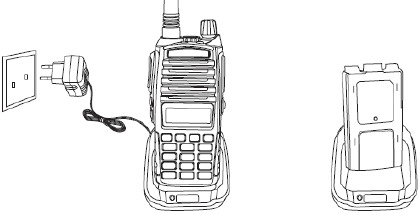
Please follow these steps:
- Plug the power cord into the adapter.
- Plug the AC connector of the adapter into the AC outlet socket.
- Plug the DC connector of the adapter into the DC socket on the back of the charger.
- Place the radio with the battery attached, or the battery alone, in the charger.
- Make sure the battery is in good contact with the charging terminals. The charging process initiates when the red LED lights.
- The green LED lights about 4 hours later indicating the battery is fully charged. Then remove the radio with the battery attached or the battery alone from the charger.
BATTERY INFORMATION
INITIAL USE
New batteries are shipped uncharged fully from the factory. Charge a new battery for 5 hours before initial use. The maximum battery capacity and performance is achieved after three full charge/discharge cycles. If you notice the battery power runs low, please recharge the battery.
- To reduce the risk of injury, charge only the battery specified by the manufacturer. Other batteries may burst, causing bodily injury and property damage.
- To avoid risk of personal injury, do not dispose of batteries in a fire!
- Dispose of batteries according to local regulations (e.g. recycling). Do not dispose as household waste.
- Never attempt to disassemble the battery.
BATTERY TIPS
- When charging your battery, keep it at a temperature among 5°C — 40°C. Temperature out of the limit may cause battery leakage or damage.
- When charging a battery attached to a radio, turn the radio off to ensure a full charge.
- Do not cut off the power supply or remove the battery when charging a battery.
- Never charge a battery that is wet. Please dry it with a soft cloth prior to charge.
- The battery will eventually wear out. When the operating time (talk-time and standby time) is noticeably shorter than normal performance, it is time to buy a new battery.
PROLONG BATTERY LIFE
- Battery performance will be greatly decreased at a temperature below 0°C. A spare battery is necessary in cold weather. The cold battery unable to work in this situation may work under room temperature, so keep it for later use.
- The dust on the battery contact may cause the battery cannot work or charge. Please use a clean dry cloth to wipe it before attaching the battery to the radio.
BATTERY STORAGE
- Fully charge a battery before you store it for a long time, to avoid battery damage due to over-discharge.
- Recharge a battery after several months’ storage (Li-Ion batteries: 6 months), to avoid battery capacity reduction due to over-discharge.
- Store your battery in a cool and dry place under room temperature, to reduce self-discharge.
PARTS, CONTROLS AND KEYS
RADIO OVERVIEW
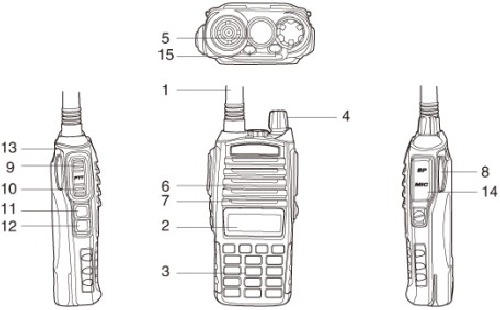
- Antenna
- LCD
- Keypad
- Knob (ON/OFF, volume)
- Flashlight
- Speaker
- Microphone
- Battery latch
- PTT-A
- PTT-B
- SK-side key1/F
- SK-side key2/M
- Strap buckle
- Accessory jack
- LED indicator
COMMAND/KEY DEFINITION
- [PTT A]:
Use for the Transmission of specified channel while dual standby is activated on.(If the dual standby is not activated on, it is not valid) - [PTT B]:
Use for the Transmission of more specified channels which selected by pressing UP or DOWN key while standby. - SK -SIDE KEY1/[F]:
- Press the [F] button, to activate the FM Radio on; Press it again to deactivate the FM Radio.
- Press and hold on the [F] button, to activate the alarm function; Press and hold it again, to deactivate the alarm function.
- SK -SIDE KEY2/[M]:
Press the [M] button, to turn on the flashlight; Press it again to turn off. Press and hold on the [M] button, to monitor the signal. - COPYING
Connecting the two radios with special data cable, press and hold SK -SIDE KEY2/[M] (or numerical key 2 or 3), then power on, you will see ‘COPYING’ on the LCD, that means data is being copied from one radio to another. - FUNCTION KEYPAD:
- [MENU]key:
- To enter the menu of the radio and confirm the setting.
- Press and hold [MENU] button, then power on, to switch the frequency mode and channel mode.
- [▲][▼]key:
- Press and hold [▲] or [▼] key for frequency up or down fast.
- Press [▲] or [▼] key, the scanning will be opposite.
- [EXIT/AB]key:
- To cancel /clear or exit.
- While standby, press [EXIT/AB] key to switch between Channel A and Channel B.
- Under FM radio mode, press [EXIT/AB] key to switch the FM radio band 65-75MHz/76-108MHz.
- [MENU]key:
- NUMERIC KEYPAD:
- Used to enter information for programming the radio’s lists and the non‐standard CTCSS
- Under transmission mode, press the numeric key to send the signal code( the code should be set by PC software).

- ACCESSORY JACK:
The jack is used to connect audio accessories, or other accessories such as programming cable.
‘LCD’ DISPLAY
The display icons appear when certain operations or specific features are activated.
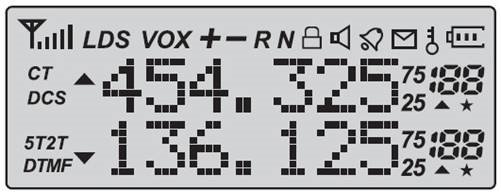
| Icon | Description |
| CT | ‘CTCSS’ activated. |
| DCS | ‘DCS’ activated. |
| + | Frequency Shift + |
| — | Frequency Shift — |
| + — | Frequency offset direction for accessing repeaters. |
| S | Dual Watch/Dual Reception functions activated. |
| VOX | Function ‘VOX’ enabled. |
| R | Reverse function activated. |
| N | Wide Band selected. |
 |
Battery Level indicator |
 |
Keypad lock function activated. |
| L | Low transmit power. |
| ▲▼ | Operation frequency. |
 |
Signal Strength Level. |
| 188 | Operating channel. |
| 75/25 |
1750 Hz TONE FOR ACCESS TO REPEATERS
The user needs to establish long distance communications through an amateur radio repeater which is activated after receiving a 1750 Hz tone. Press and hold on the [PTT],then press the [F] button to transmit a 1750Hz tone.
BASIC OPERATION
RADIO ON OFF/VOLUME CONTROL
- Make sure the antenna and battery are installed correctly and the battery charged.
- Rotate the knob clockwise to turn the radio on, and rotate the knob fully counter-clockwise until a ‘click’ is heard to turn the radio off. Turn the knob clockwise to increase the volume, or counter-clockwise to decrease the volume.
SELECTING A FREQUENCY OR CHANNEL
- Press the key [▲] or [▼] to select the desired frequency/channel you want. The display shows the frequency / channel selected.
- Press and hold down the key [▲] or [▼] for frequency up or down fast.
Note:
- You can not select a channel if not previously stored.
ADVANCED OPERATION
You can program your transceiver operating in the setup menu to suit your needs or preferences.
| Menu | Function/Description | Available settings |
| 0 | SQL (Squelch level) | 0‐9 |
| 1 | STEP(Frequency step) | 6.25/12.5/kHz |
| 2 | TXP(Transmit power) | HIGH/LOW |
| 3 | SAVE( Battery save, 1:1/1:2/1:3/1:4) | OFF/1/2/3/4 |
| 4 | VOX(Voice operated transmission) | OFF/0‐10 |
| 5 | W/N( Wideband/narrowband) | WIDE/NARR |
| 6 | ABR(Display illumination) | OFF/1/2/3/4/5s |
| 7 | TDR(Dual watch/dual reception) | OFF/ON |
| 8 | BEEP(Keypad beep) | OFF/ON |
| 9 | TOT(Transmission timer) | 15/30/45/60…/585/600seconds |
| 10 | R‐DCS(Reception digital coded squelch) | OFF/D023N…D754I |
| 11 | R‐CTS(Reception Continuous Tone Coded Squelch) | 67.0Hz…254.1Hz |
| 12 | T‐DCS(Transmission digital coded squelch) | OFF/D023N…D754I |
| 13 | T‐CTS(Transmission Continuous Tone Coded Squelch) | 67.0Hz…254.1Hz |
| 14 | VOICE(Voice prompt) | OFF/ON |
| 15 | ANI(Automatic number identification of the radio, only can be set by PC software. | |
| 16 | DTMFST(The DTMF tone of transmitting code.) | OFF/DT‐ST/ANI‐ST/DT+ANI |
| 17 | S‐CODE(Signal code, only could be set by PC software.) | 1,…,15 groups |
| 18 | SC‐REV(Scan resume method) | TO/CO/SE |
| 19 | PTT‐ID(press or release the PTT button to transmit the signal code) | OFF/BOT/EOT/BOTH |
| 20 | PTT‐LT(delay the signal code sending) | 0,…,30ms |
| 21 | MDF‐A(under channel mode, A channel displays. Note: name display only can be set by PC software. | FREQ/CH/NAME |
| 22 | MDF‐B(under channel mode, B channel displays. Note: name display only can be set by PC software. | FREQ/CH/NAME |
| 23 | BCL(busy channel lockout) | OFF/ON |
| 24 | AUTOLK(keypad locked automatically) | OFF/ON |
| 25 | SFT‐D(direction of frequency shift) | OFF/+/‐ |
| 26 | OFFSET(frequency shift) | 00.000…69.990 |
| 27 | MEMCH(stored in memory channels) | 000,…127 |
| 28 | DELCH(delete the memory channels) | 000,…127 |
| 29 | WT‐LED(illumination display color of standby) | OFF/BLUE/ORANGE/PURPLE |
| 30 | RX‐LED(illumination display color of reception) | OFF/BLUE/ORANGE/PURPLE |
| 31 | TX‐LED(illumination display color of transmitting) | OFF/BLUE/ORANGE/PURPLE |
| 32 | AL‐MOD(alarm mode) | SITE/TONE/CODE |
| 33 | BAND(band selection) | VHF/UHF |
| 34 | TX‐AB(transmitting selection while in dual watch/ reception) | OFF/A/B |
| 35 | STE(Tail Tone Elimination) | OFF/ON |
| 36 | RP_STE(Tail tone elimination in communication through repeater) | OFF/1,2,3…10 |
| 37 | RPT_RL(Delay the tail tone of repeater) | OFF/1,2,3…10 |
| 38 | PONMGS(Boot display) | FULL/MGS |
| 39 | ROGER(tone end of transmission) | ON/OFF |
| 40 | A/B‐BP(Tone end of reception) | OFF/A/B |
| 41 | RESET (Restore to default setting) | VFO/ALL |
- Press the key MENU,then press the key ▲ ▼ or to select the desired menu.
- Press the key MENU again, come to the parameter setting.
- Press the key ▲ or ▼ to select the desired parameter.
- Press the key MENU to confirm and save, press the key EXIT to cancel setting or clear the input.
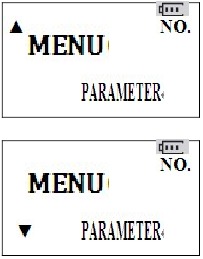
Note:
- Under channel mode, the following menu settings are invalid: CTCSS,DCS,W/N,PTT‐ID,BCL,SCAN ADD TO,S‐CODE,CHANNEL NAME. Only the H/L power could be changed by pressing ‘#’.
«SQL» (SQUELCH)
- The squelch mute the speaker of the transceiver in the absence of reception. With the squelch level correctly set, you will hear sound only while actually receiving signals and significantly reduces battery current consumption. It is recommended that you set Level 5.
FUNCTION «VOX» (VOICE OPERATED TRANSMISSION)
- This function is not necessary to push the [PTT] on the transceiver for a transmission. Transmission is activated automatically by detecting the radio voice. When finish speaking, the transmission automatically terminated and the transceiver will automatically receive signal. Be sure to adjust the VOX Gain level to an appropriate sensitivity to allow smooth transmission.
SELECT WIDEBAND OR NARROW BAND «W/N» (12.5kHz/6.25kHz)
In areas where the RF signals are saturated, you must use the narrow band of transmission to avoid interference in adjacent channels.
TDR (DUAL WATCH/DUAL RECEPTION)
This feature allows you to operate between frequency A and frequency B. Periodically, the transceiver checks whether a signal is received on another frequency that we have scheduled. If you receive a signal, the unit will remain in the frequency until the received signal disappears.
TOT(TRANSMISSION TIMER)
This function can automatically control the time we transmit each time you press [PTT] on the transceiver. This feature is very useful to avoid overheating excessive power transistors of the transceiver. The transceiver will be off transmission automatically once the set time.
CTCSS/DCS
In some cases only want to establish communications in a closed user group at a particular frequency or channel, for it will use «CTCSS» or code «DCS» for reception. The «squelch» opens only when receiving a frequency with «CTCSS» or codes «DCS» same as the programmed in your transceiver. If codes of the received signal differs from those programmed in your transceiver, the «squelch» will not open and the received signal can be heard.
Note:
- The use of «CTCSS» or «DCS» in a communication, does not guarantee complete confidentiality communication.
ANI
- ANI (Automatic Number Identification) is also known as PTT ID because an ID is transmitted when the PTT button of the radio is pressed and/or released. This ID tells the dispatcher which field radio was keyed. Only could be set by PC software.
DTMFST (DTMF TONE OF TRANSMITTING CODE)
First you should set the PTT‐ID as BOT/EOT/BOTH
- «OFF»—Under transmitting mode, you can’t hear the DTMF tone, while you press the key to transmit the code or code automatically transmitted.
- «DT‐ST»—Under transmitting mode, you can hear the DTMF tone, while you press the key to transmit the code.
- «ANI‐ST»—under transmitting mode, you can hear the DTMF tone, while the code automatically transmitted.
- «DT‐ANI»—under transmitting mode, you can hear the DTMF tone, while you press the key to transmit the code or the code automatically transmitted.
SC -REV (SCAN RESUME METHOD)
This transceiver allows you to scan memory channels, all the bands or part of the bands. When the transceiver detects a communication, the scan will stop automatically.
Notes:
- «TO» (Time Operation):
Scanning will stop when it detects an active signal. The scanning will stop on each channel or active frequency for a predetermined time, after that time the scan will resume automatically. - «CO» (Carrier Operation):
The scanning will stop and remain in the frequency or channel, until the active signal disappears. - «SE»(Search Operation):
The scanning will stop and remain in the frequency or channel after it detects an active signal.
PTT- ID (PTT OR RELEASE PTT TO TRANSMIT THE SIGNAL CODE)
- This feature allows you to know who call you.
- «OFF»—Don’t transmit the code while push the PTT button.
- «BOT»‐Transmit the code while push the PTT button.(the code only could be set by PC software.)
- «EOT»‐Transmit the code while release the PTT button.
- «BOTH»‐Transmit the code while push or release the PTT button.
BCL (BUSY CHANNEL LOCKOUT)
The BCLO feature prevents the radio’s transmitter from being activated if a signal strong enough to break through the «noise» squelch is present. On a frequency where stations using different CTCSS or DCS codes may be active, BCLO prevents you from disrupting their communications accidentally (because your radio may be muted by its own tone decoder).
SFT- D (DIRECTION OF FREQUENCY SHIFT)
The «OFFSET» is the difference or offset between the reception frequency and the frequency of transmission for access to amateur radio repeaters. Set the «OFFSET» according to the «OFFSET» amateur radio repeater through which want to communicate.
OFFSET (FREQUENCY SHIFT)
When communicating via a repeater, the direction of displacement of frequency should be timed to the displacement of the transmission frequency is higher or lower than the receiving frequency. example: If we want to make a communication through amateur radio repeater whose frequency input is 145,000 MHz and 145,600 MHz is output, we select the «OFFSET» of the previous section in 0600 and the direction of travel «SHIFT» programmed to [-], so the transceiver will always 145,600 MHz in frequency and when you press [PTT] to transmit transceiver, the frequency will automatically move to 145,000 MHz.
Note: Under VFO mode, you can do like this. If you need the TX and RX frequency different under Channel mode, you can directly store different RX and TX frequency into one channel through MENU 27.
STE (TAIL TONE ELIMATION)
This function is used to activate or deactivate the transmission end of the transceiver. this final tone transmission only be used in communications between transceivers and not in communications through a repeater, which must be deactivated.
THE INSTRUCTIONS TO SAVE CHANNEL
A complete memory channel includes RX frequency, TX frequency, CTCSS, DCS, RF Power, Bandwidth, PTT-ID, BCL, ANI, Scan add to, Channel Name, etc. Except for the setting of Scan add to and Channel Name, other settings could be finished by keypad under VFO mode.
Example: We want programming all the data into CH106, please do as following:
| RX Frequency | 440.625MHz |
| TX Frequency | 430.625MHz |
| RX CTCSS | 100.0Hz |
| TX DCS | 250.3Hz |
| RF Power | High |
| Bandwidth | Wide |
| PTT-ID | OFF |
- We have to check whether there are any data in CH106 or not. Come to MENU 28, if there is a ‘CH’ before ‘106’, that means there are data. So please delete it and you will find there is not a ‘CH’ before ‘106’, or else you can’t have new data in this channel.
- Press and hold [MENU] key, then power on, come to VFO mode. Press [EXIT/AB] key to select frequency A (UP).
- Enter 440.625MHz
- Now through the MENU, you can set other parameters. CTCSS,DCS, RF Power, Bandwidth, etc.
- After you finish all the other settings, press [MENU] key, then come to MENU 27, press [MENU] key two times, you will know all the data have been stored into CH106, however now only RX frequency was stored. At the same time, you press [MENU] key another two times, you will store the TX frequency, of course the TX and RX frequency are same.
Note: If you want the TX frequency 430.625 stored into CH106, you should do the same steps after you store the RX frequency into CH106.
CTCSS/DCS SCANNING
Before setting the CTCSS/DCS scanning, you should have a RX frequency and cancel the Dual Standby function, ensure the radio is working under VFO mode. Come to MENU 11, press [MENU] one time, then press [*/SCAN] key, at the same time, you should press the PTT of another radio, then you will see the CTCSS scanning automatically. When the scanning stops, that means you find the same CTCSS as that of another radio, now press [MENU] to store the CTCSS.
REPEATER TAIL TONE
We all know that repeaters receive on one frequency and simultaneously retransmit that same information on a different frequency. We hear the courtesy tone almost every time we use the repeater. It’s that innocuous beep that lets us know that the repeater is alive and, most importantly, that it has heard us. The MENU 35, 36,37 are very helpful settings while your radio work through repeater. MENU 35 and MENU 36 better be set OFF. The parameter of MENU 37 is from 1-10, better set 5.
CTCSS TABLE
| Nº | Tone (Hz) |
Nº | Tone (Hz) |
Nº | Tone (Hz) |
Nº | Tone (Hz) |
Nº | Tone (Hz) |
| 1 | 67.0 | 11 | 94.8 | 21 | 131.8 | 31 | 171.3 | 41 | 203.5 |
| 2 | 69.3 | 12 | 97.4 | 22 | 136.5 | 32 | 173.8 | 42 | 206.5 |
| 3 | 71.9 | 13 | 100.0 | 23 | 141.3 | 33 | 177.3 | 43 | 210.7 |
| 4 | 74.4 | 14 | 103.5 | 24 | 146.2 | 34 | 179.9 | 44 | 218.1 |
| 5 | 77.0 | 15 | 107.2 | 25 | 151.4 | 35 | 183.5 | 45 | 225.7 |
| 6 | 79.7 | 16 | 110.9 | 26 | 156.7 | 36 | 186.2 | 46 | 229.1 |
| 7 | 82.5 | 17 | 114.8 | 27 | 159.8 | 37 | 189.9 | 47 | 233.6 |
| 8 | 85.4 | 18 | 118.8 | 28 | 162.2 | 38 | 192.8 | 48 | 241.8 |
| 9 | 88.5 | 19 | 123.0 | 29 | 165.5 | 39 | 196.6 | 49 | 250.3 |
| 10 | 91.5 | 20 | 127.3 | 30 | 167.9 | 40 | 199.5 | 50 | 254.1 |
DCS TABLE
| Nº | Code | Nº | Code | Nº | Code | Nº | Code | Nº | Code |
| 1 | D023N | 22 | D131N | 43 | D251N | 64 | D371N | 85 | D532N |
| 2 | D025N | 23 | D132N | 44 | D252N | 65 | D411N | 86 | D546N |
| 3 | D026N | 24 | D134N | 45 | D255N | 66 | D412N | 87 | D565N |
| 4 | D031N | 25 | D143N | 46 | D261N | 67 | D413N | 88 | D606N |
| 5 | D032N | 26 | D145N | 47 | D263N | 68 | D423N | 89 | D612N |
| 6 | D036N | 27 | D152N | 48 | D265N | 69 | D431N | 90 | D624N |
| 7 | D043N | 28 | D155N | 49 | D266N | 70 | D432N | 91 | D627N |
| 8 | D047N | 29 | D156N | 50 | D271N | 71 | D445N | 92 | D631N |
| 9 | D051N | 30 | D162N | 51 | D274N | 72 | D446N | 93 | D632N |
| 10 | D053N | 31 | D165N | 52 | D306N | 73 | D452N | 94 | D645N |
| 11 | D054N | 32 | D172N | 53 | D311N | 74 | D454N | 95 | D654N |
| 12 | D065N | 33 | D174N | 54 | D315N | 75 | D455N | 96 | D662N |
| 13 | D071N | 34 | D205N | 55 | D325N | 76 | D462N | 97 | D664N |
| 14 | D072N | 35 | D212N | 56 | D331N | 77 | D464N | 98 | D703N |
| 15 | D073N | 36 | D223N | 57 | D332N | 78 | D465N | 99 | D712N |
| 16 | D074N | 37 | D225N | 58 | D343N | 79 | D466N | 100 | D723N |
| 17 | D114N | 38 | D226N | 59 | D346N | 80 | D503N | 101 | D731N |
| 18 | D115N | 39 | D243N | 60 | D351N | 81 | D506N | 102 | D732N |
| 19 | D116N | 40 | D244N | 61 | D356N | 82 | D516N | 103 | D734N |
| 20 | D122N | 41 | D245N | 62 | D364N | 83 | D523N | 104 | D743N |
| 21 | D125N | 42 | D246N | 63 | D365N | 84 | D526N | 105 | D754N |
TECHNICAL SPECIFICATION
GENERAL
| Frequency range: | 65MHz‐108MHz(Only commercial FM radio reception) VHF:136MHz‐174MHz (Rx/Tx) UHF:400MHz‐480MHz (Rx/Tx) |
| Memory channels: | Up to 128 channels |
| Frequency stability: | 2.5ppm |
| Frequency step: | 6.25kHz/12.5kHz |
| Antenna impedance: | 50Ω |
| Operating temperature: | ‐20°C to +60°C |
| Supply voltage: | Rechargeable Lithium‐Ion mAh 7.4V/1800 |
| Consumption in standby: | |
| Consumption in reception: | 380mA |
| Consumption in transmission: | ≤1.4 A |
| Mode of operation: | Simplex or semi‐duplex |
| Duty cycle: | 03/03/54 min (Rx / Tx / Standby) |
| Dimensions: | 58mm x 110mm x 32mm |
| Weight: | 130 g (approximate) |
TRANSMITTER
| RF power: | 5W for UHF Band / 0.1W for VHF Bad. |
| Type of modulation: | FM |
| Emission class: | 5K41F3E for 12.5 kHz Channel spacing and 2K30F3E for 6.25 kHz channel spacing |
| Maximum deviation: | ≤±5 kHz/≤±2.5 kHz (W/N) |
| Spurious emissions: | <‐60 dB |
RECEIVER
| Receiver sensitivity: | 0.2 μV(at 12 dB SINAD) |
| Intermodulation: | 60 dB |
| Audio output: | 1W |
| Spurious Radiation: | ≧65dB |
Note:
- All specifications shown are subject to change without notice.
TROUBLESHOOTING
| Problem | Possible cause / solution |
| The radio does not start. | The battery is low, replace the battery with a charged battery or proceed to the battery. The battery is not installed correctly, remove the battery and reattach it. |
| The battery runs down quickly. | The battery life has come to an end, replace the battery with a new one. The battery is fully charged, make sure the battery is made in full. |
| The receiving indicator LED lights but do not hear the speaker. |
Make sure the volume setting is too low. Make sure the undertones «CTCSS» or code «DCS» are the same as those programmed in the transceiver of the other members of your group. |
| When transmitting, the other members of his group do not receive the communication. |
Make sure the undertones «CTCSS» or code «DCS» programmed in your transceiver are the same as those programmed in the transceiver of the other members of your group. Your partner or you, are too far. You or your partner are in a bad area of RF signal propagation. |
| In «standby» mode, the transceiver transmits without pressing the «PTT». |
Check the level adjustment function «VOX» is not set too sensitive. |
| Receive communications from other user groups while communicating with your group. |
Change frequency or channel. Change the undertones «CTCSS» or code «DCS» in your group. |
| Communication with other members of your group is poor or low quality. |
You or your partner is too far away or in an area of poor radio signal propagation, such as inside a tunnel, inside an underground car park, in a mountainous area, including large metal structures, etc.. |
| Once these checks, if you still have problems with the transceiver, check with your distributor, dealer or service center. |
WARRANTY: (Better buy the radios from local dealer)
Warranty is valid provided it is complete and properly filled in legibly and clearly present the seal and name of the dealer and have attached the bill proof of purchase of equipment.
The device described in this Certificate is guaranteed for a period of TWO YEARS from the date of sale to the final user. This Warranty Certificate is unique and not transferable and may not be reissued for new or original or copy. Substitution of product failure or any part thereof shall not involve extension of the guarantee. The warranty covers the replacement and free replacement of all parts that are defective in materials and components used in manufacturing and / or assembly of the apparatus.
The warranty does not cover any faults caused by accident, improper installation and use, electric shock (eg storms), connect a power other than that specified, reverse polarity in the diet, or claims due to deterioration in the external appearance of normal use, nor the amount or condition of the accessories.
Checking the accessories is the responsibility of the purchaser at the time of purchasing the device.
The warranty does not cover rechargeable batteries even if they are part of the equipment purchased as they are considered consumables, the impairment must be reported within a period of fifteen days from the date of purchase.
The warranty is void on the following assumptions:
- Devices that have been manipulated by another or by anyone other than authorized service provider.
- Equipment and accessories in which the serial number has been altered, deleted or filed unreadable. 3. ‐ Use of the product than as intended.
To make use of the guarantee is necessary to give the dealer or any of the Authorised Service the defective device with its accessories and the following documentation:
- Warranty Certificate duly completed and sealed.
- Original invoice which clearly identifies the device and the date of purchase.
- Description of the faults.
The warranty terms contained in this Certificate of Guarantee do not exclude, modify or restrict the statutory rights of the buyer by virtue of the laws in force at the time of purchase, but are added to them.
SAFETY TRAINING INFORMATION
Your BAOFENG radio generates RF electromagnetic en-ergy during transmit mode. This radio is designed for and classified as «Occupational Use Only», meaning it must be used only during the course of employment by individuals aware of the hazards, Warning and the ways to minimize such hazards. This radio is not intended for use by the «General Population» in an uncontrolled environment.
This radio has been tested and complies with the FCC RF exposure limits for «Occupational Use Only.» In addition, your Quansheng radio complies with the following Standards and Guidelines with regard to RF energy and electromagnetic energy levels and evaluation of such levels for exposure to humans:
- KDB 865664 D01 SAR Measurement 100 MHz to 6 GHz v01r03, Evaluating Compliance with FCC Guidelines for Human Exposure to Radio Frequency Electromagnetic Fields.
- American National Standards Institute (C95.1–1992), IEEE Standard for Safety Levels with Respect to Human Exposure to Radio Frequency Electromagnetic Fields, 3 kHz to 300 GHz.
- American National Standards Institute (C95.3–1992), IEEE Recommended Practice for the Measurement of Potential y Hazardous Electromagnetic Fields— RF and Microwave.
To ensure that your exposure to RF electromagnetic energy is within the FCC allowable limits for occupational use, always adhere to the following CAUTION guidelines:
- DO NOT operate the radio without a proper antenna attached, as this may damage the radio and may also cause you to exceed FCC RF exposure limits. A proper antenna is the antenna supplied with this radio by the manufacturer or an antenna specifically authorized by the manufacturer for use with this radio.
- DO NOT transmit for more than 50% of total radio use time («50% duty cycle»). Transmitting more than 50% of the time can cause FCC RF exposure compliance requirements to be exceeded. The radio is transmitting when the «TX indicator» lights red. You can cause the radio to transmit by pressing the «PTT» switch.
- ALWAYS use BAOFENG authorized accessories (antennas, batteries, belt clips, speaker/mics, etc). Use of unauthorized accessories can cause the FCC RF exposure compliance requirements to be exceeded. Body-worn operations are restricted to belt-clips, holsters or similar accessories that have no metallic component in the assembly and that provide at least 1.5 cm separation between the device, including its antenna, and the user’s body. To provide the recipients of your transmission the best sound quality, hold the antenna at least 5 cm (2 inches) from mouth, and slightly off to one side. The information listed above provides the user with the information needed to make him or her aware of RF exposure, and what to do to assure that this radio operates within the FCC RF exposure limits of this radio.
Electromagnetic Interference/Compatibility
During transmissions, your BAOFENG radio generates RF energy that can possibly cause interference with other devices or systems. To avoid such interference, turn off the radio in areas where signs are posted to do so. DO NOT operate the transmitter in areas that are sensitive to electromagnetic radiation such as hospitals, aircraft, and blasting sites.
This device complies with Part 90 of the FCC rules. Operation is subject to the following two conditions: (1) This device may not cause harmful interference, and (2) this device must except any interference received, including interference that may cause undesired operation.

Videos
Baofeng (UV82 & UV5R) Beginners Guide Video
Documents / Resources
Download manual
Here you can download full pdf version of manual, it may contain additional safety instructions, warranty information, FCC rules, etc.
Download Baofeng UV-82 Manual
Baofeng UV 82 — это портативная радиостанция, с заявленной мощностью 8 ватт, которая понравится — сторожам, водителям, охранным организациям, строителям, охотникам, рыболовам и любителям активного вида спорта.
Функции рации:
- Наличие дисплея с полной информацией используемых функций
- FM — приемник
- Частотные и канальные режимы отображения на дисплее (CH001 или 443.075)
- Поддержка кодировок каналов, для уменьшения вероятности прослушивания радиопереговоров, к сожалению в одностороннем порядке
- Наличие функции сканирования каналов
- Великолепная функция VOX (передача без использования кнопки передачи, то есть как только говоришь радиостанция выходит на передачу.
- Кнопка тревоги передающая в эфир
- 128 каналов памяти
- Регулировка мощности передачи 5w или 1w
- Крутая вещь (для взрослых-детей) — переключение цвета подсветки в состоянии покоя, приема и передачи. В кажном положении свой цвет.
- Включение и отключение звука клавиатуры
- Функция одновременного приема с двух каналов «S»
- Изменение шага частоты 2,5/5/6,25/10/12,5/25/50 кГц
- Режим экономии аккумулятора
- Возможность ограничения времени передачи (для болтунов, учитесь говорить кратко и по существу, если не являетесь таковым, то не включайте этот режим).
- Наличие фонарика, встроенный
- Настройка шумодава от 0 до 9
- Тон окончания передачи
- Блок дисплея

Baofeng UV-82 – полупрофессиональная рация УКВ диапазона, усовершенствованная UV-5R.
Наши покупатели часто интересуются: нужно ли программирование рации Baofeng? Хорошая новость: чаще всего не требуется, почти все настройки делаются с помощью клавиатуры.
Включение
Подключите антенну, присоедините аккумулятор и поставьте на зарядку; она будет завершена, когда светодиод сменит цвет с красного на зеленый.
Для включения поверните колесико регулировки громкости от себя. В комплекте с рацией – инструкция на английском языке. Откройте ее на странице 14 (пункты меню по номерам).
Основные кнопки
Чтобы выйти в эфир, удерживайте одну из верхних кнопок (A или B) на левой стороне рации.
Под ними находятся еще две: короткое нажатие на F включает FM радио, а удерживание подаёт заранее определенный тревожный сигнал. M зажигает фонарик.
Меню
На дисплее вы видите две частоты, соответствующие кнопкам A и B. Стрелка показывает, какой из приёмников сейчас настраивается.
Нажмите кнопку MENU в левом верхнем углу клавиатуры. Перемещайтесь по пунктам с помощью клавиш со стрелками или набирайте номер на клавиатуре.
Вход в настройки – повторное нажатие MENU, выход без сохранения – правая верхняя кнопка (EXT/AB).

Мощность
Рацию Baofeng UV-82 можно приобрести в двух версиях: 2 или 3 режима мощности (1 Вт, 5 Вт, 8 Вт).
Номер пункта меню – 2 (ТХР).
Частотный и канальный режимы
В частотном вы можете вводить значение с клавиатуры и изменять с помощью стрелок. Настройки вносите в ячейку памяти и обращайтесь к ней по номеру в канальном. Переключайтесь между режимами с помощью удерживания кнопки MENU при включении рации.
Для начала перейдите в частотный (должно получаться вводить цифры с клавиатуры).
Настройка каналов
Переключите диапазон (BAND, 33) на UHF (433 и 446 MHz), так как VHF (144-146 MHz) в России предназначен для спецслужб. В UHF есть два поддиапазона – LPD и PMR.
У раций Баофенг в LPD диапазоне 69 каналов с шагом 25 kHz, он начинается с 433.075 MHz, а в PMR – 8 c шагом 12.5 kHz, начинающихся с 446.025 MHz. У PMR больше мощность и дальность, а у LPD больше каналов, что важно для большой группы.
Наберите с клавиатуры стартовую частоту и установите шаг 25 kHz для LPD и 12.5 kHz для PMR в пункте меню STEP (1).
Занесите в память частоты каналов, пользуясь таблицей.
Диапазон VHF может понадобиться в лесу, но при регулярном использовании есть вероятность получения штрафа с изъятием радиостанции.
Искать каналы можно также сканированием (SCAN) задав параметры поиска в 18 пункте меню (SC-REV). Связь не обязательно осуществлять на частоте официальных каналов, важно не выходить на границы диапазонов.
Как сохранить частоту
Изначально каналов нет, переключать их нельзя. Настройте нужный канал и выберете 27 пункт – МЕМ-СН, с помощью стрелок укажите его номер и сохраните повторным нажатием MENU.
Настройка шумоподавления
Пункт номер 1 (SQL). Учитывайте, что при больших значениях есть вероятность не услышать собеседника.
Настройка субтона и цифрового кода
Субтон CTCSS и цифровой код DCS устанавливаются для каждого канала (ячейки памяти) отдельно.
Используйте их, чтобы не слышать чужие голоса. Лучше поставить одинаковые субтоны на передачу и прием (всего им посвящено 4 пункта меню – R-DCS и T-DCS, R-CTCSS и T-CTCSS, подробности в инструкции).
Выбор модуляции
Узкая или широкая полоса модуляции задается пунктом 5 (WN, W – wide, N – narrow).
Для LPD каналов c шагом 25 kHz лучше Wide, а для PMR каналов с шагом 12.5 kHz – Narrow.
Тревожный сигнал
Подается нажатием и удержанием кнопки F на левой стороне рации. Способ подачи определяется в 32 пункте меню (AL-MOD).
Голосовое сопровождение
В пункте меню VOICE (14) можно и нужно отключить голосовое сопровождение ввода, если нет проблем со зрением.
Настройка блокировки клавиатуры
Пункт 24 – AUTOLK.
Прошивка
Программирование рации через COM-порт компьютера может потребоваться для задания ANI-кода, который будет передаваться по тревожной кнопке, ввода буквенного имени канала и других специальных настроек.
Заключение
Теперь вы знаете, как настроить рацию Баофенг.
Baofeng 82 – продвинутая модель, продолжающая линейку раций с дисплеем и клавиатурой.
У нас вы можете купить рации, комплекты раций, антенны, аккумуляторы, зарядные устройства, чехлы, кабели для программирования и другие аксессуары!
