- Инструкции →
- Бытовая техника →
- Кухонная →
- Посудомоечные машины →
- Blomberg →
- Blomberg GSS 1380 X
Модель, к которой подходит эта инструкция: Blomberg GSS 1380 X
Скачать инструкцию к Blomberg GSS 1380 X (8.1 Мб)
Данная инструкция написана на русском языке
Вопросы и отзывы о Blomberg GSS 1380 X
Пожалуйста, если у вас есть вопрос или отзыв, напишите пару строк в форме ниже.
Если вы скачали инструкцию, но не смогли разобраться, как пользоваться той или иной функцией прибора,
напишите свой вопрос, наши специалисты постараются найти ответ на ваш вопрос.
![]()
3/4”

 min 10
AQUASAFE+
21

 18
18
|
max 110 cm |
110 |
|
|
100 |
||
|
12cm |
70 80 90 |
|
|
min 50 cm |
60 |
|
|
50 |
||
|
min 4cm |
||
|
40 |
||
|
30 |
||
|
20 |
||
|
10 |
||
|
0 |
AQUASAFE+ (depends on the model)
The Aquasafe+- system protects you from water damage which may be caused at the water inlet hose.
Do not immerse the system’s valve box into water; it contains electrical components.
In case of damage, pull out the power supply plug. Do not shorten or lengthen the hose insert, since it contains electrical cables and components.
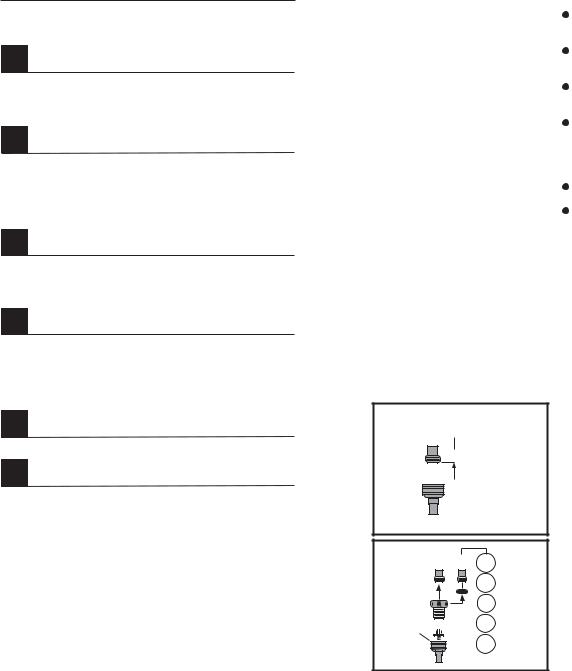
Water drainage
Connecting the drainage hose.
Take care to ensure that the water intake hose is not bent or squeezed.
Check that the drainage hose is firmly seated in place.
Extension hoses
If a hose extension is required, a drainage hose of equal quality must be used
The maximum length must not exceed 4m. Otherwise, the machine’s cleaning process is negatively influenced.
Siphon connection
The drainage height must be between 50 and 100 cm above the floor.
Use hose clamps to fasten the drainage hose to the siphon.
Electrical connection
Please refer to the type plate for information on current type, mains voltage, and fuse protection.
The type plate is located on the inside of the door.
The mains plug must be freely accessible after installation. Power cables and insulated cables must not be accessible after installation.
11 Service
If your machine ever experiences faults in operation, check the notes and advice in the operating manual.
If this does not fix the problem, our customer service staff is available to you.
Dear customer,
Before starting, it is essential that you read carefully right through the installation and operation instruction booklet before plugging in to the mains socket. The following instructions should prevent the risk of personal injury and/or damages to the machine.
Please keep these documents for later reference in a safe place.
This operating manual has been written for different machines and some of the features mentioned here may not apply to your specific machine.
23
|
Table of contents |
||
|
Introduction |
||
|
1 |
Disposal |
Page 3 |
|
Recycling……………………………………………………. |
3 |
|
|
Disposal of your old machine………………………… |
3 |
|
|
2 |
Safety Instructions |
Page 3 |
|
Before installation………………………………………… |
3 |
|
|
Before first use ……………………………………………. |
3 |
|
|
Children’s safety………………………………………….. |
4 |
|
|
For daily operation ………………………………………. |
4 |
|
|
In the case of problems………………………………… |
4 |
|
|
3 |
Get to know your machine |
Page 5 |
|
View of the machine…………………………………….. |
5 |
|
|
Control panel………………………………………………. |
5 |
|
|
4 |
How to use your dishwasher |
Page 6 |
|
Softening water …………………………………………… |
6 |
|
|
Filling the dishwasher salt …………………………….. |
7 |
|
|
Filling the rinse aid dispenser ……………………….. |
8 |
|
|
Filling the detergent dispenser………………………. |
8 |
|
|
What should not be washed |
||
|
5 |
in your dishwasher |
Page 10 |
|
6 |
Loading the dishwasher |
Page 10 |
|
General ……………………………………………………. |
10 |
|
|
Lower basket …………………………………………….. |
11 |
|
|
Cutlery basket …………………………………………… |
11 |
|
|
Upper basket…………………………………………….. |
12 |
3/4”
 min 10
3/4” 1/2” CH
DK
S
3/4”  N
N
SF
Installing your dishwasher
Choose a suitable location for your dishwasher. Take care to ensure that the machine is standing safely and levelly.
Unevenness in the floor can be equalised by adjusting the screw feet. When the machine is standing correctly, the door can be closed without difficulties.
Water inlet and drainage hoses must be placed so that they can move freely in order to avoid bending or squeezing them.
The machine may not be hooked up in rooms with a temperature below 0° Celsius.
Water connection
The dishwasher may be connected to cold and warm water to a max. temperature of 60° Celsius.
The dishwasher may not be connected to open warm water devices and flow-through water heaters.
Permissible water pressure:
|
Lowest permissible water |
When the water pressure is |
|
pressure: |
below 1 bar, please contact your |
|
0,3 bar = 3 N/cm² = 30 kPa |
technician. |
|
Highest permissible water |
When the water pressure is above |
|
pressure: |
10 bar, a pressure reduction valve |
|
10 bar = 100N/cm² = 1MPa |
must be installed (available in trade |
|
supply stores). |
Connect water inlet hose
Take care to ensure that the water inlet hose is not bent or squeezed. Do not install a used hose set.
Use a screw-on hose connector to connect the water inlet hose to a water tap with an external thread with a measurement of 3/4 inches.
If required, use a filter inset to filter deposits from the pipes.
Check that the connection does not leak.
 Attention
For safety reasons, close the tap after every rinse process.
22
1

9 Technical features
|
Load capacity |
10 |
|
Permissible water pressure |
0,3 –10 bar (= 3 – 100 N/cm² |
|
= 0,01-1,0Mpa) |
|
|
Electrical connection |
230 Volt, 10 Amps |
|
(see type plate) |
|
|
Total power |
2000 W |
|
Heater power |
1800 W |
Because we continually strive to improve our products, we may change our specifications and designs without prior notice.
This device corresponds to the following EU Directives:
|
73/23/EC |
Low Voltage Directive |
|
89/336/EC |
EMV directive |
|
93/68/EC |
CE identification directive |
|
DIN EN 50242 |
Electric dishwasher for |
|
domestic use Testing method |
|
|
for utilization properties |
10 Directions for assembly
Safety notes for installation
Prior to installing and using your machine, please check it for possible transport damage.
If the machine is damaged, please contact your supplier. Never install and use damaged machines.
The following directions must be observed in order to connect the dishwasher properly.
Make sure that the data on the type plate correspond to the current and voltage of your power supply connections before putting the machine into operation. The connection of the machine may only be made using a properly grounded socket. Ensure that the grounding is in accordance with regulations.
The grounded socket must be easily accessible and close to the machine.
Do not use extension cables or multiple adapters.
There is a possibility of fire hazard through overheating.
Hardwiring may only be carried out by a qualified electrician.
Check the power cable, the water inlet hose and the drainage hose. Damaged parts may only be exchanged by customer service personnel or by a qualified electrical service expert.
|
7 How to clean your dishwasher |
Seite |
13 |
|
Cleaning the filters …………………………………….. |
14 |
|
|
Cleaning the spray arms …………………………….. |
15 |
|
|
Cleaning the filter inset ………………………………. |
15 |
|
|
8 Trouble shooting What, if…. |
Seite 14 |
|
|
The dishwasher will not run ………………………… |
14 |
|
|
The cleaning results are unsatisfactory ………… |
15 |
|
|
9 Technical Data |
Seite 21 |
|
|
10 Directions for assembly |
Seite 21 |
|
|
Safety notes for installation …………………………. |
21 |
|
|
Installing your dishwasher…………………………… |
22 |
|
|
Water connection ………………………………………. |
22 |
|
|
Water drainage………………………………………….. |
23 |
|
|
Electrical connection ………………………………….. |
23 |
|
|
11 Service |
Seite |
23 |
2
21

1 Disposal
Recycling
The packaging and some parts of your machine are made from recyclable materials. These materials are marked up with recycling symbol and material type information (PE, PS, POM).
Remove the packaging material and dispose of it in accordance with regulations prior to taking the machine into operation.
 Warning
Packaging materials may be dangerous to children. Reusable substances may be dropped off at the local disposal facilities. You may obtain further information from the authorities and disposal facilities.
Disposal of your old machine
Dispose of your old machine in accordance with the disposal guidelines which are in effect at the location where you reside. To avoid dangers, please make the machine unusable until the time of transport.
Pull out the mains plug and cut the power cable. Render the door lock unusable.
2 Safety Instructions
Before installation
Check the machine for transport damages. Never install and use damaged machines. If in doubt, contact your supplier.
Before first use
See Notes for Installation on page 22.
Have the grounding system installed by a qualified electrician.
The manufacturer cannot be hold liable for any damages that are due to operating the machine without proper grounding.
Before operating the system, please check that the data given on the type plate are in accordance with the data of your power supply.
The dishwasher must be separated from the mains during installation.
|
Dishes break |
|||
|
Possible causes |
How to fix these problems |
||
|
— |
Improper loading |
— |
Load the dishwasher as suggested in the directions. |
|
— |
Overloaded baskets |
— |
Do not overload the dish baskets. Dishes may hit against |
|
each other and break. |
Foam
Possible causes
—The dishes were pre-washed by hand with a large amount of dish detergent
—Rinse aid has accidentally leaked into the machine
—The cover of the rinse aid dispenser was not closed.
How to fix these problems
—Dishes do not need to be pre-washed. Coarse dirt may be removed with a dishcloth, or you may hold the dishes under running water.
—If rinse aid has been spilled during refilling, remove the agent using a paper cloth or sponge.
—Always take care to ensure that the lid is closed after refilling the rinse aid dispenser.
Water remains inside the machine after the rinse cycle
|
Possible causes |
How to fix these problems |
||
|
— |
Clogged filters |
— |
Clean all strainers and filters as described in the manual |
|
— |
Drain hose bent. Relief hose |
— |
Ensure that the relief hose is properly placed. |
|
blocked or bent. |
20
3
 Loading…
Table of Contents for Blomberg GSS 1380:
-
9 Detergents There are 3 types of detergents: 1. Phosphate and containing chlorine 2. Phosphate containing, no chlorine 3. Neither containing phosphate nor chlorine The new compact powders are normally phosphate free. As phosphates have water softening properties, we suggest you add salt to the salt container even if the hardness of your water is only 6°dH. In hard water areas, if a phosphate free detergent is used, white marks on the dishes and glasse
-
4 The connection of the machine to the mains may not be made by using an extension cable. Extension cables do not provide the necessary safety (e.g. danger of overheating). Always use the original plug delivered with the machine. The plug must be freely accessible after the machine has been installed. Childrens safety Do not allow children to play with the machine. Dishwasher detergents may have caustic effects in the areas of the eyes, mouth and throat. Please note the safety notes provided by the manufacturers of the deter
-
1 Table of contents Introduction What should not be washed in your dishwasher Page 10 Loading the dishwasher General …………………………………………………….10 Lower basket ……………………………………………..11 Cutlery basket ……………………………………………11 Upper basket……………………………………………..12 Page 10 5 6 Disposal Page 3 Recycling…………………………………………………….3 Disposal of your old machine…………………………3 1 Safety I
-
17 Possible causes — The lid of the salt container is not closing properly. — The hardness is not selected properly; too little salt is being used. — Salt loss Possible causes — Smell of new machine — Filters are dirty — Dishes stand in the machine for a few days without being washed Possible causes — Excessive use of detergent when water hardness is low, cleaning temperature is too high Smell Rust stains, destruction
-
11 Cutlery basket Lower basket Suggestions for loading the dishwasher Use the lower basket for plates, bowls, pots etc. 4 folding plate support rods (depending on the model) Enable you to make more room for larger dishes To fold: Lift rods ( ) and fold over to side ( ) 1 2 1 A B C D 2 12 Height setting with empty basket In this model, the height setting of the upper basket may be changed using the wheels which are present at two height levels. Release the latches on both the r
-
15 The cleaning results are unsatisfactory Possible causes — Improper loading — Wrong programme selection — Spray arms are not turning — Clogged filters — Filters are not placed in their proper positions — Spray arm nozzles are clogged — Overloaded baskets — Detergent is moist or clumping — Too little detergent — Too little rinse aid — The lid of the detergent dispenser remained open. — Using cutlery with a low surface quality The dishes are not becoming clean How
-
5 8 Time pre-selection 9 Key lock 10 Programme selection button 6 (-) Button 7 (+) Button 11 Start/Pause button 12 Economy button 13 Door handle 14 On/Off button 9 Detergent dispenser 10 Filters 11 Door 12 Control panel 13 Turbo fan heat drying system (depending on the model) 1 Housing 2 Upper basket with rack 3 Guiding track for the upper basket 4 Upper spray arm 5 Lower basket 6 Salt con
-
16 Possible causes — Improper loading — Insufficient rinse aid supply — Dishes are removed too soon — Wrong programme selection — Using cutlery with a low surface quality Possible causes — Wrong programme selection — Detergent is moist or clumping — Using cutlery with a low surface quality Possible causes — Insufficient rinse aid supply Calcium streaks, misty appearance Tea, coffee or other stains The dishes are not becoming dry How to fix these problems — Load th
-
2 How to clean your dishwasher Seite 13 Trouble shooting What, if…. Seite 14 The dishwasher will not run …………………………14 The cleaning results are unsatisfactory …………15 Technical Data Seite 21 Directions for assembly Safety notes for installation ………………………….21 Installing your dishwasher……………………………22 Water connection ……………………………………….22 Water drainage…………………………………………..23 Electrical connection …………………………………..
-
23 Water drainage Connecting the drainage hose. Take care to ensure that the water intake hose is not bent or squeezed. Check that the drainage hose is firmly seated in place. Extension hoses If a hose extension is required, a drainage hose of equal quality must be used The maximum length must not exceed 4m. Otherwise, the machines cleaning process is negatively influenced. Siphon connection The drainage height must be between 50 and 100 cm above the floor. Use hose clamps to fasten the drainag
-
20 Possible causes — Improper loading — Overloaded baskets Possible causes — The dishes were pre-washed by hand with a large amount of dish detergent — Rinse aid has accidentally leaked into the machine — The cover of the rinse aid dispenser was not closed. Possible causes — Clogged filters — Drain hose bent. Relief hose blocked or bent. Foam Water remains inside the machine after the rinse cycle Dishes break How to fix these problems — Load the dishwasher as suggested in the directions. — Do not overl
Questions, Opinions and Exploitation Impressions:
You can ask a question, express your opinion or share our experience of Blomberg GSS 1380 device using right now.
Смотреть руководство для Blomberg GSS 1380 X ниже. Все руководства на ManualsCat.com могут просматриваться абсолютно бесплатно. Нажав кнопку «Выбор языка» вы можете изменить язык руководства, которое хотите просмотреть.

MANUALSCAT | RU
Вопросы и ответы
У вас есть вопрос о Blomberg GSS 1380 X, но вы не можете найти ответ в пользовательском руководстве? Возможно, пользователи ManualsCat.com смогут помочь вам и ответят на ваш вопрос. Заполните форму ниже — и ваш вопрос будет отображаться под руководством для Blomberg GSS 1380 X. Пожалуйста, убедитесь, что вы опишите свои трудности с Blomberg GSS 1380 X как можно более детально. Чем более детальным является ваш вопрос, тем более высоки шансы, что другой пользователь быстро ответит на него. Вам будет автоматически отправлено электронное письмо, чтобы проинформировать вас, когда кто-то из пользователей ответит на ваш вопрос.
Задать вопрос о Blomberg GSS 1380 X
- Бренд:
- Blomberg
- Продукт:
- посудомоечные машины
- Модель/название:
- GSS 1380 X
- Тип файла:
- Доступные языки:
- немецкий
Сопутствующие товары Blomberg GSS 1380 X
Download
Add to my manuals
Share
URL of this page:
HTML Link:
Bookmark this page
Manual will be automatically added to «My Manuals»
Print this page
- Manuals
- Brands
- Blomberg Manuals
- Dishwasher
- GSN 1380
- Operation instruction manual
Blomberg gsn 1380: operation instruction
Hide thumbs
Also See for GSN 1380:
- Manual (14 pages)
1
2
3
4
5
6
7
8
9
10
11
12
13
14
-
page
of
14/
14 -
Bookmarks
Advertisement
Quick Links
Download this manual
Previous Page
Next Page
- 1
- 2
- 3
- 4
- 5
Advertisement
Related Manuals for Blomberg GSN 1380
-
Dishwasher Blomberg GSN 1380 Manual
(14 pages)
-
Dishwasher Blomberg GSN 1580 User Manual
Blomberg gsn 1580: user guide (13 pages)
-
Dishwasher Blomberg GSN-1580 Manual
(14 pages)
-
Dishwasher Blomberg GSN 1220 Operation Instruction Manual
Blomberg gsn 1220: operation instruction (14 pages)
-
Dishwasher Blomberg GSS 1220 Operation Instruction Manual
Blomberg gss 1220: operation instruction (12 pages)
-

Dishwasher Blomberg GSS 1380 Operation Instruction Manual
Blomberg gss 1380: operation instruction (12 pages)
-
Dishwasher Blomberg GSN 1580L Operating Manual
Blomberg gsn 1580l: operating manual (20 pages)
-

Dishwasher Blomberg GSN 9121 Instruction Manual
(28 pages)
-
Dishwasher Blomberg GSS9470X Instruction Manual
(34 pages)
-
Dishwasher Blomberg GSN 9580 A Instruction Manual
(44 pages)
-

Dishwasher Blomberg GSN 9476 A Instruction Manual
Dishwasher (36 pages)
-
Dishwasher Blomberg GSN9123 User Manual
(38 pages)
-

Dishwasher Blomberg GVN 1380 User Manual
Blomberg gvn 1380: user guide (9 pages)
-
Dishwasher Blomberg GUN 1210 Operation Instruction Manual
Blomberg gun 1210: operation instruction (14 pages)
-
Dishwasher Blomberg GUN 1380 Operation Instruction Manual
Blomberg gun 1380: operation instruction (14 pages)
-
Dishwasher Blomberg GVN 9483 E Instruction Manual
Dishwasher (30 pages)
Summary of Contents for Blomberg GSN 1380
-
Page 9
— Note — — Note -… -
Page 10
Three-in-one: Two-in-one:…