 Течение сахарного диабета напрямую зависит от показателя глюкозы в крови. Избыточное количество или ее нехватка опасны для людей, страдающих этим заболеванием, так как могут вызвать различные осложнения, включая наступление комы.
Для контроля гликемии, а также выбора дальнейшей тактики лечения пациенту достаточно приобрести специальный медицинский прибор – глюкометр.
Популярной моделью у больных диабетом является устройство Акку Чек Актив.
h2>Особенности и преимущества глюкометра
Устройство удобно использовать для ежедневного контроля гликемии.
Особенности глюкометра:

- для выполнения замера уровня глюкозы требуется около 2 мкл крови (примерно 1 капля). О недостаточном количестве исследуемого материала прибор оповещает специальным звуковым сигналом, означающим необходимость проведения повторного замера после замены тестовой полоски;
- прибор позволяет измерить уровень глюкозы, который может находиться в диапазоне 0,6-33,3 ммоль/л;
- в упаковке с полосками для глюкометра есть специальная кодовая пластинка, которая имеет идентичный изображенной на этикетке коробки трехзначный номер. Проведение замера значения сахара на приборе будет невозможным, если кодировка цифр не совпадет. Усовершенствованные модели уже не требуют кодировки, поэтому при покупке тест-полосок имеющийся в упаковке чип активации можно спокойно утилизировать;
- устройство включается автоматически после установки полоски при условии, что кодовая пластинка от новой упаковки уже вставлена в глюкометр;
- глюкометр оснащен жидкокристаллическим дисплеем, имеющим 96 сегментов;
- после каждого замера к полученному результату можно добавить примечание об обстоятельствах, повлиявших на значение глюкозы, с помощью специальной функции. Для этого достаточно выбрать в меню прибора соответствующую маркировку, например, до/после еды или обозначающую особый случай (физическую нагрузку, внеплановый перекус);
- условия температурного хранения без батареи составляют от -25 до +70°С, а с элементом питания от -20 до +50°С;
- уровень влажности, допустимый в рамках эксплуатации прибора, не должен превышать 85%;
- измерения не следует проводить в местах, превышающих высоту уровня моря более чем на 4000 метров.
Преимущества:
- встроенная в приборе память способна сохранить до 500 замеров, которые можно сортировать для получения среднего значения глюкозы за неделю, 14 дней, месяц и квартал;
- данные, полученные в результате исследований гликемии, можно перенести на персональный компьютер, используя специальный USB-порт. В старых моделях GC для этих целей установлен только инфракрасный порт, разъема USB нет;
- результаты исследования после выполнения анализа видны на экране прибора уже через 5 секунд;
- для совершения измерения не требуется нажимать на устройстве никаких кнопок;
- новые модели устройства не требуют кодировки;
- экран оснащен специальной подсветкой, что дает возможность комфортно использовать прибор даже людям со сниженной остротой зрения;
- на экране отображается индикатор батареи, что позволяет не пропустить время ее замены;
- глюкометр отключается автоматически по истечении 30 секунд, если он работает в режиме ожидания;
- прибор удобно носить в сумке благодаря небольшому весу (около 50 г);
Прибор достаточно прост в использовании, поэтому успешно применяется как взрослыми пациентами, так и детьми.
Комплектация прибора
В комплектацию устройства входят следующие составляющие:

- Сам глюкометр с одной батареей.
- Устройство Акку Чек Софткликс, используемое для прокалывания пальца и получения крови.
- 10 ланцетов.
- 10 тестовых полосок.
- Чехол, необходимый для транспортировки устройства.
- Кабель USB.
- Гарантийный талон.
- Руководство по эксплуатации глюкометра и прибора для прокалывания пальца на русском языке.
При заполненном продавцом талоне устанавливается срок гарантийного использования 50 лет.
Инструкция по применению
Процесс измерения сахара в крови занимает несколько этапов:
- подготовка к исследованию;
- получение крови;
- измерение значения сахара.
Правила подготовки к исследованию:
- Необходимо вымыть с мылом руки.
- Пальцы следует предварительно размять, совершив массирующие движения.
- Приготовить заранее измерительную полоску к глюкометру. Если прибор требует кодировки, нужно проверить соответствие кода на чипе активации с номером на упаковке полосок.
- Установить ланцет в устройство Акку Чек Софткликс, удалив предварительно защитный колпачок.
- Выставить соответствующую глубину прокола на Софткликс. Детям достаточно прокрутить регулятор на 1 шаг, а взрослому человеку чаще всего требуется глубина в 3 единицы.

Правила получения крови:
- Палец на руке, из которого будет взята кровь, следует обработать ваткой, смоченной в спирте.
- Приложить Акку Чек Софткликс к пальцу или же мочке уха и нажать на кнопку, обозначающую спуск.
- Нужно слегка надавить на зону возле прокола, чтобы получить достаточное количество крови.
Правила выполнения анализа:
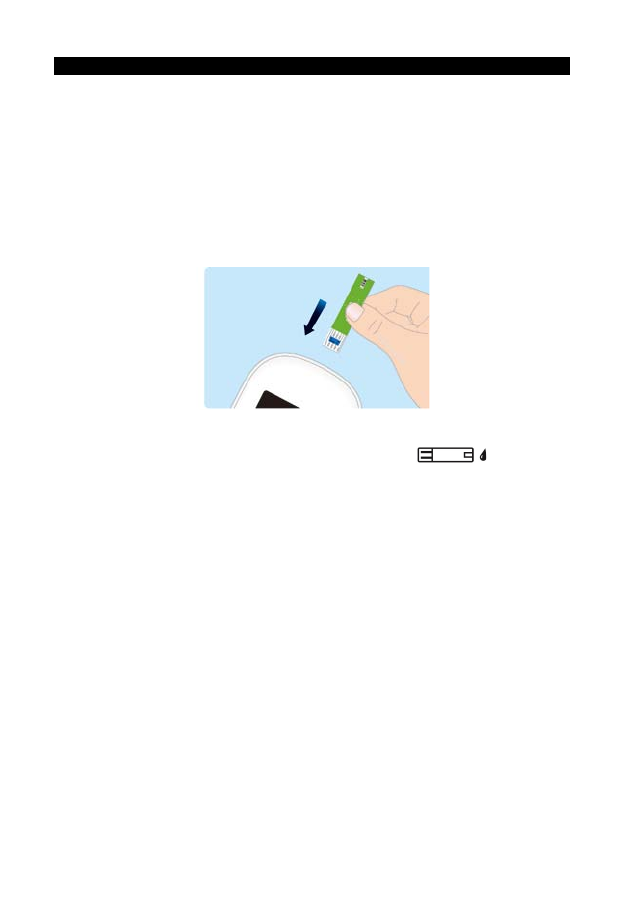
- Установить приготовленную тестовую полоску в глюкометр.
- Прикоснуться пальцем руки/мочкой уха с каплей крови к зеленому полю на полоске и подождать результата. Если крови окажется недостаточно, будет слышно соответствующее звуковое оповещение.
- Запомнить значение показателя глюкозы, который появится на дисплее.
- При желании можно провести маркировку полученного показателя.
Следует помнить, что просроченные измерительные полоски не пригодны для выполнения анализа, так как они могут выдавать недостоверные результаты.
Синхронизация с ПК и комплектующие
В приборе есть USB разъем, к которому подключается кабель со штекером Micro-B. Другой конец кабеля нужно соединить с персональным компьютером. Для синхронизации данных потребуется специальное программное обеспечение и вычислительное устройство, которое можно получить, обратившись в соответствующий Информационный центр.

1. Дисплей 2. Кнопки 3. Крышка оптического датчика 4. Оптический датчик 5. Направляющая для тест-полоски 6. Фиксатор крышки батарейного отсека 7. USB-порт 8. Кодовая пластинка 9. Отсек для батареи 10. Табличка с техническими данными 11. Тубус для тест-полосок 12. Тест-полоска 13. Контрольные растворы 14. Кодовая пластинка 15. Батарея
Для глюкометра требуется постоянно приобретать такой расходный материал, как тестовые полоски и ланцеты.
Цены за упаковку полосок и ланцетов:
- в упаковке полосок может быть 50 или 100 штук. Стоимость варьируется от 950 до 1700 рублей в зависимости от их количества в коробке;
- ланцеты выпускаются в количестве 25 или 200 штук. Стоимость их составляет от 150 до 400 рублей за упаковку.
Возможные ошибки и проблемы
Для корректной работы глюкометра следует проводить его проверку с помощью контрольного раствора, который представляет собой чистую глюкозу. Его можно приобрести отдельно в любом магазине медицинской техники.
Проверять глюкометр необходимо в следующих ситуациях:
- использование новой упаковки тестовых полосок;
- после проведенной чистки устройства;
- при искажении полученных показаний на приборе.
 Для проверки глюкометра на измерительную полоску следует нанести не кровь, а контрольный раствор с низким или высоким уровнем глюкозы. После выведения на дисплей результата замера его нужно сравнить с исходными показателями, изображенными на тубусе от полосок.
При работе с прибором могут возникать следующие ошибки:
- Е5 (с эмблемой солнышка). В таком случае достаточно убрать дисплей от солнечных лучей. Если же указанной эмблемы нет, то прибор подвергается усиленному электромагнитному воздействию;
- Е1. Ошибка появляется при неправильно установленной полоске;
- Е2. Это сообщение появляется при низких показателях глюкозы (ниже 0,6 ммоль/л);
- Н1 – результат измерения оказался выше 33 ммоль/л;
- ЕЕЕ. Ошибка сигнализирует о неисправности глюкометра.
Перечисленные ошибки встречаются у пациентов наиболее часто. При появлении других проблем следует ознакомиться с инструкцией к устройству.
Мнение пользователей
Из отзывов пациентов можно сделать вывод, что прибор Акку Чек Мобайл достаточно удобен и прост в использовании, но некоторые отмечают непродуманность техники синхронизации с ПК, поскольку нужные программы отсутствуют в комплектации и необходимо их искать в интернете.
Пользуюсь прибором больше года. По сравнению с предыдущими приборами этот глюкометр мне всегда выдавал верные значения глюкозы. Я специально несколько раз сверяла свои показатели на устройстве с результатами анализа в поликлинике. Дочь помогла мне установить напоминание о выполнении замеров, поэтому я теперь не забываю своевременно контролировать сахар. Очень удобно пользоваться такой функцией.
Светлана, 51 год
Купил Акку Чек Актив по рекомендации врача. Разочарование почувствовал сразу, как только решил перенести данные на компьютер. Пришлось потратить время, чтобы найти, а затем установить нужные программы для синхронизации. Очень неудобно. К остальным функциям прибора замечаний нет: выдает результат быстро и без больших погрешностей в цифрах.
Игорь, 45 лет
Видео-материал с подробным обзором глюкометра и правилами его использования:
Комплект Акку Чек Актив очень популярен, поэтому его можно приобрести практически во всех аптеках (интернет или розничных), а также в специальных магазинах, реализующих медицинские приборы.
Стоимость составляет от 700 рублей.
Как пользоваться глюкометром
Статью подготовил Кривогуз И.М., семейный врач, инфекционист.
Специально для сайта medprostor.by
Содержание:
- Что такое глюкометр, принцип действия?
- Как правильно настроить глюкометр?
- Как правильно пользоваться глюкометром?
- Краткое описание
Любые нарушения обмена углеводов, включая сахарный диабет 1 или 2 типа, требуют контроля уровня глюкозы в крови. Для этого применяется прибор глюкометр. Как пользоваться полосками и самим аппаратом, калибровать его для получения достоверных результатов указано в инструкции. В целом большинство приборов имеют сходства в принципе определения глюкозы и использовании.

Что такое глюкометр, принцип действия?
Глюкометр – это прибор, при помощи которого проводится определение уровня глюкозы в крови. Все современные приборы осуществляют измерения, основываясь на 3 принципах действия:
-
Фотометрия – по силе изменения цвета реагента после контакта с кровью определяется концентрация глюкозы.
-
Биосенсорное измерение – кровь наносится на полоску, глюкоза реагирует с определенным соединением, что приводит к изменению электрического потенциала, который регистрируется прибором.
-
Электрохимическое определение (кулонометрия) – анализ концентрации глюкозы осуществляется за счет подсчета общего заряда электронов после реакции крови с определенными соединениями.
Для получения достоверного результата важно правильно использовать глюкометр. Инструкция по применению содержит всю информацию об этапах определения глюкозы в крови, а также калибровки прибора.
Как правильно настроить глюкометр?
Перед первым использованием каждый прибор должен быть правильно настроен. Практически во всех глюкометрах, независимо от принципа действия и производителя, базовые настройки включают следующие параметры:
-
Дата и время.
-
Язык экранного меню.
-
Единицы измерения сахара (в большинстве случаев устанавливается измерение в единицах ммоль/л).
-
Диапазон измерения с установкой граничной нижней и верхней концентрации сахара, которые задаются индивидуально для каждого человека – если во время измерения прибор определяет, что концентрация глюкозы выше или ниже установленных граничных уровней, то он подает звуковой сигнал, а затем выводит показатель на дисплей.
-
Калибровка прибора – большинство моделей включают в комплект специальную калибровочную жидкость с определенным уровнем сахара. Ее наносят на тест-полоску, после чего сверяют результат на дисплее со значением, которое дает инструкция по эксплуатации глюкометра.
Правильная настройка, проведенная перед тем, как использовать глюкометр, дает возможность получать достоверные результаты измерений в будущем.
Как правильно пользоваться глюкометром?
Алгоритм действий, который определяет, как правильно использовать глюкометр, зависит от модели прибора. Для большинства представителей особенности применения имеют сходства:
-
Для увеличения притока крови к пальцам встряхивают рукой.
-
Тщательно вымывают кисти, палец обрабатывают раствором антисептика (70% раствор спирта).
-
В специальное отверстие на приборе вставляют тест-полоску до упора (обычно слышен характерный щелчок).
-
Осуществляют прокол пальца специальным скарификатором или автоматической ручкой-прокалывателем.
-
Каплю крови наносят на тест полоску.
-
Дожидаются появления результата на дисплее (в зависимости от модели глюкометра следует подождать от 5 до 40 секунд).
-
Извлекают использованную тест-полоску и утилизируют ее.
Нюансы и отличия в отношении того, как пользоваться глюкометром, указаны в инструкции к каждой конкретной модели.
О том, какой лучше задать диапазон допустимых значений сахара, лучше проконсультироваться с лечащим врачом. В некоторых инструкциях о том, как правильно пользоваться глюкометром, есть видео на диске. Это удобно, так как после просмотра риск ошибок становится минимальным.
Краткая инструкция по применению глюкометра
- Перед его применением необходимо установить базовые настройки (дата и время, язык устройства, ед. измерения).
- Затем необходимо указать диапазон измерения (нижнее и верхнее значение концентрации сахара) и провести первичную калибровку глюкометра (калибровочной жидкостью).
- для каждого прибора есть свои правила указанные инструкции, но общие положения необходимо выполнять, такие как гигиена рук, они должны быть чистыми, прокол пальца осуществляется специальным скарификатором, тест полоску вставляют в прибор до упора (после использования необходимо утилизировать), результаты использования глюкометра происходят в диапазоне от 5 до 40 секунд.
Количество глюкозы в крови — главный критерий оценки состояния здоровья человека. Изменения показаний в сторону сильного увеличения или уменьшения свидетельствуют о развитии болезни. Определить уровень сахара в крови помогает медицинский прибор — глюкометр. Процедура делает возможным контролировать состояние организма и вовремя фиксировать изменения углеводного обмена у людей, которые страдают сахарным диабетом.
Принцип работы глюкометра
Как работает глюкометр на основе фотометрического и электрохимического принципа действия, объясним ниже.
Фотометрия — по силе изменения цвета реагента после контакта с кровью определяется концентрация глюкозы. Прибор, используя оптический блок и контрольные образцы, делает сравнение и выводит результаты. Показания глюкометра фотометрического типа характеризуются неточностью. В ходе эксплуатации линзы оптики прибора загрязняются, теряют фокус из-за смещения от ударов или вибрации.
Электрохимическое определение — анализ концентрации глюкозы происходит за счет подсчета общего заряда электронов после реакции крови с химическими соединениями. Контрольный элемент — тест полоска. На полоске нанесены контактные группы, покрытые слоем реагента. При нанесении капли крови на тест происходит химическая реакция. Выделяемое электричество формирует протекающий между контактами ток. Показания высчитываются на основе серии замеров. Анализ продолжается до тех пор, пока значение тока не перестает меняться, до окончания реакции между химическим составом контрольной полосы и глюкозой.
В набор глюкометра входит измерительный прибор, тест-полоски и колющий инструмент со сменными ланцетами.

Нормы сахара в крови
Уровень сахара в крови меняется в течение дня. Зависит от приема лекарств, пищи и физической нагрузки. Нервное напряжение влияет на точность результата, поэтому важно оставаться спокойным в момент измерения. Рекомендуется измерять сахар глюкометром неоднократно в течение дня: до приема пищи и через 2 часа после.
Среднестатистические показатели нормы глюкозы:
- до еды — от 3,5 до 5,5 ммоль/л;
- после приема пищи — от 7 до 7,8 ммоль/л.
Если уровень сахара в крови слегка завышен, скорректируйте собственное питание, удалите из рациона вредные продукты, отрегулируйте собственный режим сна, и тем самым вернете уровень глюкозы в норму. Если уровень сахара в крови слегка понижен, скушайте сладкое.
Настройка и правила использования глюкометра
Для получения достоверного результата важно знать, как правильно измерять сахар глюкометром. Прежде чем измерять, важно правильно настроить. После первого включения задаются базовые параметры:
- Дата и время.
- Язык экранного меню.
- Единицы измерения. Устанавливается измерение в единицах ммоль/л.
- Установка границ нижней и верхней концентрации сахара. Какой лучше задать диапазон допустимых значений сахара, лучше проконсультироваться с лечащим врачом. Когда прибор определяет, что концентрация глюкозы выше или ниже установленных граничных уровней, то подается звуковой сигнал и выводится показатель на дисплей.
- Калибровка прибора. Большинство производителей включают в комплект специальную калибровочную жидкость с заданным уровнем сахара, который наносят на тест-полоску. После сверяют результат на дисплее со значением, которое дает инструкция по эксплуатации прибора.
Правильная настройка, перед тем как измерять глюкометром, дает преимущество получать достоверные результаты измерений в будущем.
Правила при использовании глюкометра
С этим прибором в домашних условиях справится каждый человек. Нюансы и отличия в отношении того, как пользоваться глюкометром, указаны в инструкции к каждой конкретной модели. Главное — наличие расходных материалов (тест-полосок) с действующим сроком годности. Испорченные изделия не дадут необходимой точности. Правила использования в различных моделях схожи:
- Встряхивание рукой для увеличения притока крови к пальцам;
- Тщательное мытье рук;
- Дезинфекция места прокола раствором антисептика;
- Дождаться, пока дезинфицирующий состав испарится;
- Вставка полоски в аппарат до упора;
- Прокол кончика пальца специальным скарификатором (ланцетом или ручкой-прокалывателем);
- Нанесение крови на тест-полоску;
- Дождаться появления результата на дисплее (5‒40 секунд);
- Извлечь использованную тест-полоску и утилизировать.
В фотометрический аппарат полоска вставляется с уже нанесенной кровью. В электрохимический помещается чистой.
Как измерить уровень сахара глюкометром?
Информация как правильно измерить сахар в крови глюкометром содержится в инструкции по применению. Измерение сахара глюкометром выглядит следующим образом:
- Достаньте тест-полоску и вставьте в глюкометр.
- С помощью ланцета проколите палец.
- Первая капля крови не используется для анализа.
- Вторую каплю наносят на тест-полоску, ориентируясь на специальные пометки.
- Дождитесь втягивания необходимого количества крови в индикатор и появления результатов измерения на экране глюкометра.
- Запишите показания.
Глюкометр доступен каждому. Приобрести прибор могут не только диабетики, но и люди, которые контролируют и поддерживают свое здоровье. Востребованные модели можно купить в Минске в магазинах «Польза» или на сайте polza-shop.by


i
Blood Glucose Monitoring System
Dear VivaChek™ Ino Sound System User,
Thank you for choosing the VivaChek™ Ino Sound Blood Glucose Monitoring
System! VivaChek™ Ino Sound Blood Glucose Monitoring System is designed for
easy test of blood glucose and helps you keep blood glucose under control.
Read this User’s Manual carefully before you use your meter system. This manual
will help you to get comfortable using the VivaChek™ Ino Sound Blood Glucose
Monitoring System and get reliable test results. Please keep your User’s Manual in
a safe place; you may want to refer it in the future.
Thank you again for choosing the VivaChek™ Ino Sound System.
Principle and Intended Use
VivaChek™ Ino Sound Blood Glucose Monitoring System is comprised of the
VivaChek™ Ino Sound Blood Glucose Meter and the VivaChek™ Ino Blood
Glucose Test Strips. The VivaChek™ Ino Sound Blood Glucose Monitoring System
(Meter Model: VGM09) is designed to quantitatively measure the glucose
concentration in fresh capillary whole blood. It is used at home as a way to monitor
the effectiveness of diabetes control programs. This system is intended to be used
by a single patient and should not be shared.
The VivaChek™ Ino Sound Blood Glucose Monitoring System is not used for the
diagnosis of or screening of diabetes or for neonatal use.
The VivaChek™ Ino Blood Glucose Control Solution is for use with the VivaChek™
Ino Sound Blood Glucose Meter and VivaChek™ Ino Strips as a quality control
check to verify that the meter and test strip are working together properly, and that
the test is performing correctly.

ii
TABLE OF CONTENTS
1. Understanding Your Testing Tools………………………………….. 1
Your Meter System Overview………………………………………….. 1
Your Meter Display………………………………………………………. 2
Important Safety Information………………………………………………
4
Limitations……………………………………………………………………
5
2. Setting Up Your System……………………………………………….. 6
Set the Time and Date………………………………………………………
Set sound feature………….……………………………………………….
Pairing your meter with the Smartphone……………………………….
Using your meter without the app
3. Taking a Test……………………………………………………………..… 9
Preparing the Test Strip…………………………………………………. 9
Getting a Blood Drop and Testing…………………………………………
10
Discard the Used Test Strip…..…………………………………………… 11
Testing with Control Solution…………………………….…………………
15
Using the Meter Memory………………………………………………….. 17
4. Maintenance and Troubleshooting…………………………………… 18
Replace Batteries………………………………………………………….
Caring for Your Glucose Monitoring System…………………………….
Cleaning and Disinfection………………………………………………….
18
Troubleshooting Guide……………………………………………………..
Symptoms of High or Low Blood Glucose……………………………….
5. Technical Information……………………………………………………. 23
System Specifications………………………………………………………
23
Warranty……………………………………………………………………..
24
1
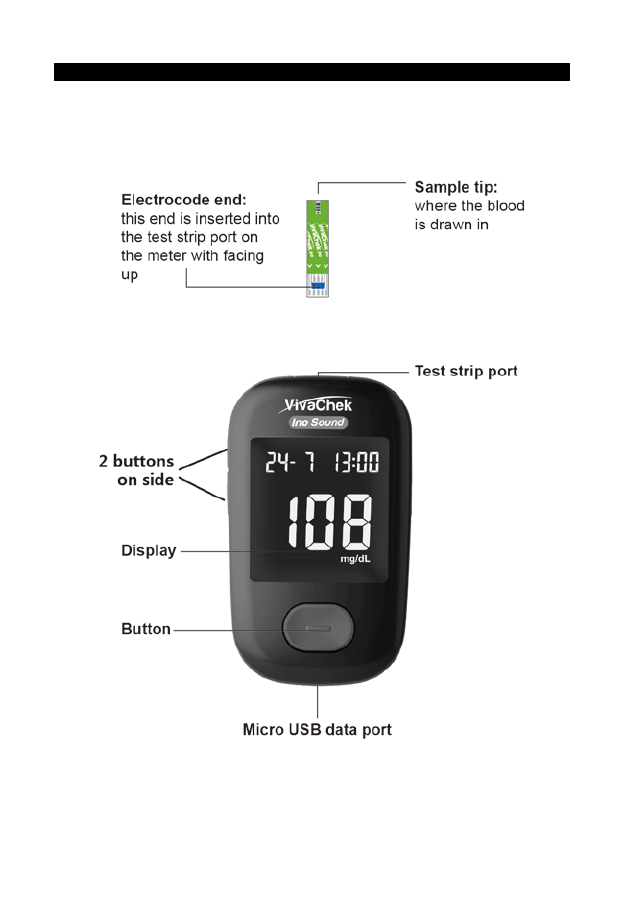
CHARPTER 1: UNDERSTANDING YOUR TESTING TOOLS
Your Meter System Overview
The VivaChek™ Ino Sound Blood Glucose Meter and Strip
2
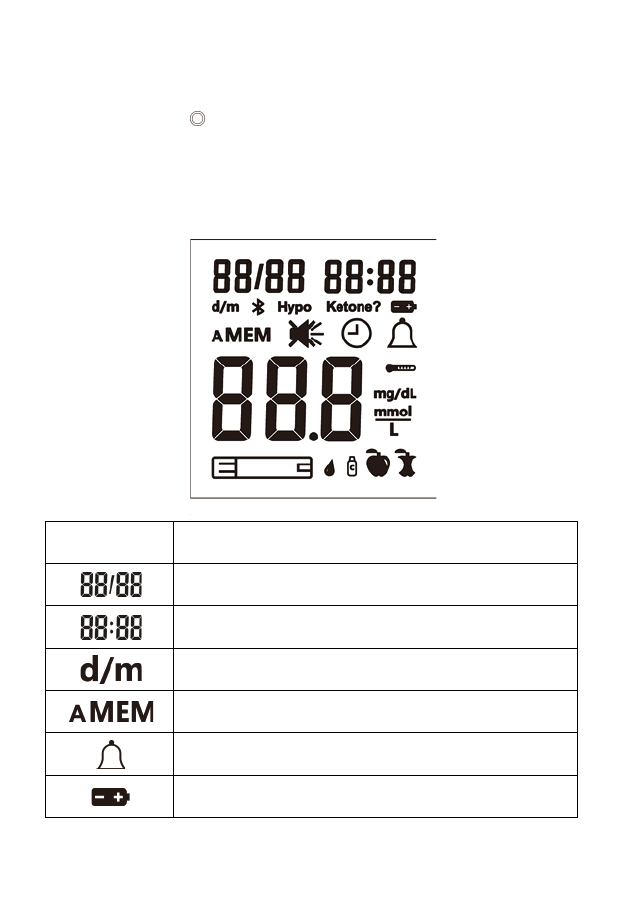
Your Meter Display
The picture below shows all the symbols that appear on your meter display.
Please make sure the display is working properly before testing. When the meter is
off, press and hold for 3 seconds to see the complete display. All display
segments will appear for 10 seconds. If you need more than 10 seconds to check
the display, repeat the above operation.
All of the segments should be clear and exactly like the picture below. If not,
contact VivaChek Customer Support at 800—951—8430 (7 days a week. 9 a.m.—5
p.m. Eastern Time) for help. Please contact your health care professional if you
need help.
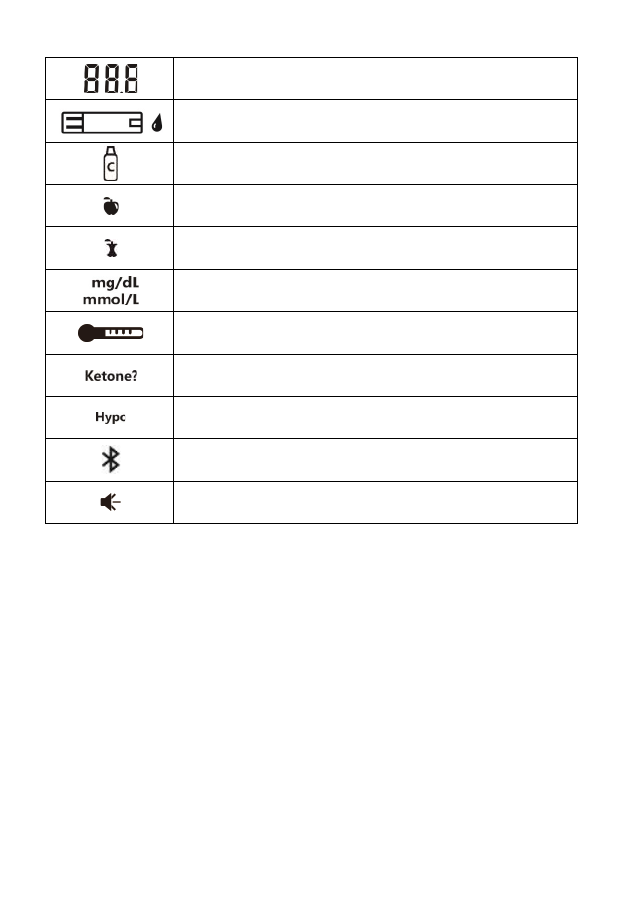
Icon What it Means
The top left area on the screen indicates the date.
The top right area on the screen indicates the time.
Date, month.
Indicates average memory
Indicates the alarms have been set.
Indicates a low battery or it needs to be replaced.
3
Center area on the display that shows test results or error
codes.
Indicates the system is ready to test.
Control test result.
Pre-meal marker.
Post-meal marker.
Test results are displayed as mg/dL or mmol/L according to
local government regulation.
Indicates the temperature is not suitable for testing.
Ketone warning.
Indicates that a low test result may cause hypoglycaemia.
Bluetooth
Sound on or off
Notes:
Your VivaChek™ Ino Sound meter is pre—set with beep sound function, the meter
will beep when:
• turn on the meter.
• the test strip is inserted and ready to apply blood or control solution.
• sufficient blood or control solution is pulled into the test strip.
• the test is complete.
• it is time to perform a test if you set the test alarms.
• if any error occurs during operation.
Meter Use and Precautions
• The meter is preset to display blood glucose concentration in either millimoles per
liter (mmol/L) or milligrams per deciliter (mg/dL). This depends on your country’s
standard unit of measurement. This unit of measure cannot be adjusted. The
meter will be set to mg/dL by default when sold in the United States.
• Meter will shut off by itself after 2 minutes of inactivity.
4
• Do not get water or other liquids inside the meter.
• Keep the strip port area clean.
• Keep your meter dry. Avoid exposing it to extreme temperatures or humidity. Do
not leave it in your car.
• Do not drop the meter or get it wet. If you do, check the meter by running a
quality control test. Refer to Quality Control Test for instructions.
• Do not take the meter apart. This will void the warranty.
• Refer to the Caring for Your Meter section for details on cleaning the meter.
• Keep the meter and all associated parts out of reach of children.
Note: Follow proper precautions and all local regulations when disposing of the
meter and used batteries.
Important Safety Information
• The meter is single patient use. Do not share them with anyone including
other family members! Do not use on multiple patients!
• Always keep the test strips in the original vial. Tightly close the vial
immediately after you have removed the test strip.
• Do not use the meter if it is dropping into water or splashing water on to it.
• Wash and dry your hands well before and after testing.
• Test strips and Safety lancets are for single use only.
• Do not drop blood directly on the flat surface of the test strip.
• Check the expiration dates and discard dates on your test strips vial label
(or on the foil pouch) and control solution bottle label.
• Use only VivaChek™ Ino test strip with your VivaChek™ Ino Sound meter.
• Use only VivaChek™ Ino control solution with your VivaChek™ Ino Sound
meter and VivaChek™ Ino strip.
• For self—testers, consult your physician or diabetes health care professional
before making any adjustments to your medication, diet or activity routines.
• If the system is used in a manner not specified by the manufacturer,
the protection provided by the system can be impaired.
Potential Biohazard
All parts of the kit are considered biohazardous and can potentially transmit
infectious diseases, even after you have performed cleaning and disinfection.
Note:
1. The meter and safety lancet are for single patient use. Do not share them with
anyone!
2. All parts of the kit are considered biohazardous. They can potentially transmit
infectious diseases from blood borne pathogens, even after you have
performed cleaning and disinfection. Please follow proper precautions when
handling your meter and lancing device.
3. Cross—use of meter and lancing device may cause Bloodborne Pathogens
Transmission. For more information, please refer to the FDA Public Health
Notification: “Use of Fingerstick Devices on More than One Person Poses Risk
for Transmitting Bloodborne Pathogens: Initial Communication” (2010) at

5
http://www.fda.gov/MedicalDevices/Safety/AlertsandNotices/ucm224025.htm.
You may also refer to the CDC Clinical Reminder: “Use of Fingerstick Devices
on More than One Person Poses Risk for Transmitting Bloodborne Pathogens”
(2010) at http://www.cdc.gov/injectionsafety/Fingerstick-DevicesBGM.html.
Limitations
• Very high (above 70%) and very low (below 20%) hematocrit levels can
cause false results. Talk to your health care professional to find out your
hematocrit level.
• If you are taking vitamin C (ascorbic acid > 3 mg/dL) then your glucose
results using this meter may not be reliable.
• The system is tested to accurately read the measurement of glucose in
whole blood within the range of 45 to 600 mg/dL.
• The VivaChek™ Ino Sound Blood Glucose Monitoring System has been
tested and shown to work properly up to 9777ft (2980 meters).
• Critically ill patients should not be tested with this system.
• Patient who is taking oxygen therapy is not recommended for testing with
VivaChek™ Ino Sound Blood Glucose Monitoring System.
• Blood samples from patients in shock, or with severe dehydration or from
patients in a hyperosmolar state (with or without ketosis) have not been
tested and are not recommended for testing with VivaChek™ Ino Sound
Blood Glucose Monitoring System.
• The VivaChek™ Ino Sound Blood Glucose Monitoring System should not
be used following xylose absorption procedures.
• Not for neonatal use.
• Not for screening or diagnosis of diabetes mellitus.
Note: This device complies with part 15 of the FCC Rules. Operation is subject to the following
two conditions:
(1) This device may not cause harmful interference, and
(2) This device must accept any interference received, including interference that may cause
undesired operation.
Please note that changes or modifications not expressly approved by the party responsible for
compliance could void the user’s authority to operate the equipment.
Note: This equipment has been tested and found to comply with the limits for a Class B digital
device, pursuant to part 15 of the FCC Rules. These limits are designed to provide reasonable
protection against harmful interference in a residential installation. This equipment generates,
uses and can radiate radio frequency energy and, if not installed and used in accordance with
the instructions, may cause harmful interference to radio communications. However, there is no
guarantee that interference will not occur in a particular installation. If this equipment does cause
harmful interference to radio or television reception, which can be determined by turning the
equipment off and on, the user is encouraged to try to correct the interference by one or more of
the following measures:
Reorient or relocate the receiving antenna.
Increase the separation between the equipment and receiver.
Connect the equipment into an outlet on a circuit different from that to which the receiver
is connected.
Consult the dealer or an experienced radio/TV technician for help.

6
CHAPTER 2: SETTING UP YOUR SYSTEM
Before you first time using your meter or if you change your meter batteries, you
should check and update your meter settings.
Set the Time and Date
1. Enter the setting mode and set the date
The year will now flash. Press side button to adjust it then press and hold power
button until the meter beeps to set. Then it will shift to next digit for setting. Repeat
the above action until the year setting is completed.
The month will now flash. Press side button to adjust the month, press and hold
power button until the meter beeps to set.
The date will now flash. Press side button to adjust the date, press and hold
power button until the meter beeps to set. Then it will shift to next digit for setting.
Repeat the above action until the year setting is completed.
Note:
Before you first time use your meter system for testing, please adjust the meter
settings to set the date and time, ensuring that results stored in the memory are
shown with the correct date and time.
2. Set the Time
The hour will now flashing. Press side button to adjust the current hour, press and
hold power button until the meter beeps to set. Then it will shift to next digit for
setting. Repeat the above action until the hour setting is completed.
The minute will now flash. Press side button to adjust the minute, press and hold
power button to set. You will hear a long beep.
Set the sound feature
After set the time, the and “On” will now flash. Press side button to select “On”
or “OFF”. Press and hold power button to set.
Now you have completed your meter set up. A symbol of a test strip appears letting
you know the meter is ready to test.
7
Pairing your meter with the Smartphone
Pairing prepares your VivaChek™ Ino Sound Meter and Smartphone to
communicate with each other. The devices must be within 5 meters of each other
to pair and sync. Download the GlucoWell™ app before pairing your meter and
Smartphone.
Note: it is compatible with iPhone mobile phones with iOS 8.0 or above operating
system.
WARNING
DO NOT pair another person’s meter with your Smartphone.
To pair the Smartphone with your meter, turn your meter on and follow these steps:
1. When you turn on your meter, the ( ) symbol will appear to indicate
Bluetooth® is on.
2. To turn on Bluetooth® on your Smartphone tap the Settings icon on the home
screen.
3. Next select Bluetooth and set Bluetooth to ON. Your devices are now
searching for each other.
4. Look for a device named VivaChek. This is your meter.
5. Tap on the entry that represents your VivaChek™ Ino Sound meter.
6. Enter your meter passcode using the keypad. The passcode is the last 5 digits
from the Serial Number on the back of your meter.
7. Tap Pair
8. Wait for the Smartphone status to say “Connected”. Congratulations! Your
meter and Smartphone are now paired. Before testing, you must now initially
sync the meter with the app.
NOTE: The button will continue to blink with blue light after successful pairing.
Using your meter without the app
The meter can be used without a Smartphone or the app. You can still test your
blood glucose and review your results on the meter screen.
Your meter automatically stores up to 1000 results with the time and date. Test
results are stored from the newest to the oldest. If there are already 1000 records
in memory, the oldest record will be erased to make room for a new one.
8
CHAPTER 3: TAKING A TEST
Set up your meter correctly and have all the materials you will need ready before
you begin testing. This including your VivaChek™ Ino Sound meter, the
VivaChek™ Ino test strips and VivaChek™ Safety Lancets.
Preparing the Test Strip
1. Wash and dry your hands well before testing.
2. Remove a test strip from the test strip vial (or the foil pouch). Tightly close the
vial cap immediately after you have removed the test strip.
3. Insert the test strip into the meter in the direction of the arrows. Meter turns
on after a beep.
4. A symbol with a test strip with a flashing blood () will appear
letting you know the meter is ready to test.
Note:
Check the expiration and discard dates on the test strip vial. All expiration dates
are printed in Year—Month format. 2019/01 indicates January, 2019. Your
VivaChek™ Ino test strips have 4 months shelf life after you first open the test strip
vial. Write the discard date on the vial label when you first open it. Make sure the
test strip does not appear damaged. Prior to testing, wipe the test site with an
alcohol swab or soapy water. Use warm water wash hands to increase blood flow if
necessary. Then dry your hands and the test site thoroughly. Make sure there is no
cream or lotion on the test site.
9
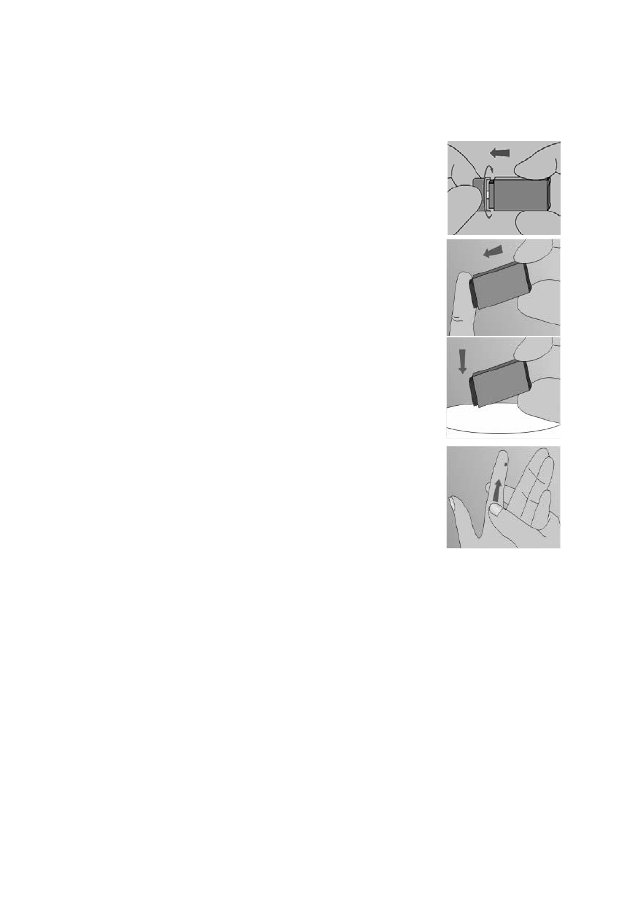
Getting a Blood Drop and Testing
Here is an example of how to use a VivaChek™ Safety Lancet for fingertip
blood sampling. If you use a different single—use auto—disabling safety lancet
or lancing device, please follow the manufacturer’s instructions.
1. Carefully rotate and pull off the protective cap.
Avoid placing your thumb or fingers over the
uncapped end of the safety lancet.
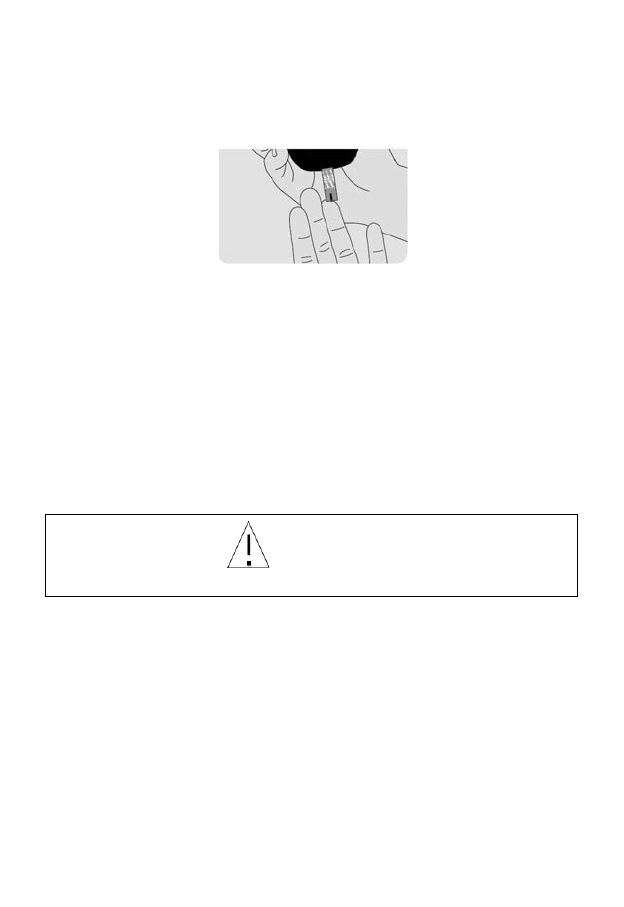
2. Hold the safety lancet against the puncture site.
Note: Before using a single—use auto—disabling
safety lancet for blood sampling, wash both hands
with soap and warm water and disinfect the puncture
site with a topical skin antiseptic such as an alcohol
swab.
3. Gently press the safety lancet against the puncture
site to lance the skin. Listen for an audible click. This
indicates that the safety feature of the device has
been activated. Dispose of the lancet in an
appropriate biohazard sharps container. Please see
the Caution Statement.
4. Gently massage from the surrounding area toward
the puncture site to collect the required blood
volume.
For the greatest reduction in pain, lance on the sides
of the fingertips. Rotation of sites is recommended. Repeated punctures in
the same spot can make fingers sore and callused.
Caution Statement
• Do not use the single—use auto—disabling safety lancet if the cap is
missing or loose.
• Always use a new, sterile single-use auto—disabling safety lancet. Do
not reuse the single—use auto—disabling safety lancet.
• Avoid getting the single—use auto—disabling safety lancet dirty with hand
lotion, oil, dirt or debris.
• Single—use auto—disabling safety lancets appropriate biohazard sharps
container. If a biohazard sharps container is not available use a heavy
duty plastic container such as a laundry detergent bottle. Ensure the
container is leak—resistant and has a hard puncture proof lid. Do not
place loose sharps into the trash and do not flush down the toilet. Do
not place sharps into the recycle bin as they are not recyclable.
10
5. Immediately touch the tip of the test strip to the drop of blood. The blood
pulled into the test strip through the tip. Make sure that the blood sample
has been fully filled the check window on the strip tip. Hold the tip of the test
strip in the blood drop until the meter beeps.
Note:
If the blood sample does not fill the check window, do not add a second drop.
Discard the test strip and start over with a new test strip.
6. The meter counts down 5 seconds and your result appears on the display
after a beep. The test result will automatically be stored in the meter
memory. Please do not touch the test strip during the countdown as this
may result in an error.
Discard the Used Test Strip
You can discard the used test strip by slide the strip ejector to the direction of arrow.
Meter turns off automatically after a beep.
Potential Biohazard
Dispose of the used test strips as medical waste.
Alternative Site Testing
The forearm and palm areas have less nerve endings than the fingertip. Because
of this, you may find that obtaining blood from these sites is less painful than from
the fingertip. The procedure for forearm and palm sampling is different. You need
the lancing device with clear cap to draw blood from these sites. The clear cap is
not adjustable for puncture depth. And our starter kit is not included the lancing
device, and please contact Customer Support at 800—951—8430 for information
about purchasing the lancing device. Please contact your health care professional
if you need help.
Blood samples for glucose testing may be taken from sites other than your
fingertips. Alternative site testing using blood from the forearm or palm may give
glucose results that significantly differ from fingertip blood. Differences occur when

11
blood glucose levels are changing rapidly, such as after a meal, after insulin, and
during or after exercise.
The lancing device with clear cap is not included in the kit. Please purchase it
separately if you need. Please refer to the lancing device insert which you
purchase for AST testing.
1. Unscrew the lancing device cover from the body of the lancing device. Insert a
sterile lancet into the lancing device and push it until the lancet is fully inserted.
2. Hold the lancet firmly in the lancing device and twist the safety tab of the lancet
until it is loose, then pull the safety tab off the lancet. Save the safety tab for
disposing of the used lancet.
3. Screw the clear cap onto the lancing device.
4. Choose a puncture site on the forearm or palm. Select a soft and fleshy area of
the forearm or palm that is clean and dry, away from bone, and free of visible
veins and hair. To bring fresh blood to the surface of the puncture site, massage
the puncture site vigorously for a few seconds until you feel it getting warm.

12
5. Place the lancing device against the puncture site. Press and hold the clear
cap against the puncture site for a few seconds. Press the release button of
the lancing device, but do not immediately lift the lancing device from the
puncture site. Continue to hold the lancing device against the puncture site
until you can confirm a sufficient blood sample has formed.
Notes:
• Consult your doctor or health care professional to determine if alternative site
testing is right for you.
• Alternative site testing is not recommended if you have hypoglycemic
unawareness (you do not recognize the symptoms of or cannot tell when you
have low blood glucose). Please consult with your doctor or health care
professional if you have a low blood glucose level.
• Select a soft, fleshy area of skin that is free from hair, moles and visible veins
for alternative site testing. Wash the site with soap and warm water, then rinse
and dry thoroughly.
• Use alternative site testing for blood glucose tests only when it is more than 2
hours after: ·A meal ·Taking medication · Exercise
IMPORTANT: There are important differences among forearm, palm and fingertip
samples that you should know. Important Information about forearm and palm
glucose testing:
• You should consult your doctor before choosing to perform forearm or palm
testing.
• When blood levels are changing rapidly, such as after a meal, insulin dose or
exercise, blood from the fingertips may show these changes more rapidly than
blood from other areas.
• You should use fingertips if testing is within 2 hours of a meal, insulin dose or
exercise. You should also use fingertip testing any time you feel glucose levels
are changing rapidly.
• You should test with the fingertips anytime there is a concern for hypoglycemia
or you suffer from hypoglycemia unawareness.

13
Expected Diabetes Control Goal:
Blood glucose values will vary depending on food intake, medication dosages,
health, stress, or exercise. Ideally, to control the glucose level as close to a normal
(non—diabetic) blood glucose level as you safely can.
Expected blood glucose levels for people without diabetes:1
Time Range, mg/dL Range, mmol/L
Fasting and Before Meals 70—100 3.9 – 5.6
2 hours after meals Less than 140 Less than 7.8
Reference:
1. ADA Clinical Practice Recommendations, 2015.
Warning:
• If your blood glucose reading is under 50 mg/dL or you see LO (less than
20 mg/dL) on the meter display, contact your health care professional as
soon as possible.
• If you test result is above 250 mg/dL or you see HI (greater than 600 mg/dL)
on the meter display, contact your health care professional as soon as
possible.
• Do not change your medication therapy based on VivaChek™ Ino Sound
test result before consult your health care provider.
• If you want to mark your result (only in Advanced Mode (L-2)) you will need
to do it before removing the test strip.
Questionable or Inconsistent Results:
If your blood glucose result does not match how you feel, please:
• Check the expiration date and the discard date of the test strip. Make sure
that the test strip vial has not been opened for more than 4 months.
• Confirm the temperature in which you are testing is between 41—113°F.
• Make sure that the test strip vial has been tightly capped.
• Make sure the test strip has been stored at 36—86°F, 10—90% humidity..
• Make sure the test strip was used immediately after removing from the test
strip vial (or the foil pouch).
• Make sure that you followed the test procedure correctly.
• Perform a control solution test (See Performing a Control Test for
instructions).
After checking all of the conditions listed above, repeat the test with a new test strip.
If you are still unsure of the problem, please contact VivaChek Customer Support
at 800—951—8430 (7 days a week. 9 a.m.—5 p.m. Eastern Time). Please contact your
health care professional if you need help.

14
Testing with Control Solution
Why Perform Control Tests
Performing a control test lets you know that your meter and test strips are working
properly to give reliable test results. You should perform a control test when:
• At least once a week
• You open a new box of test strips
• You want to check the meter and test strips
• Your test strips were stored in extreme temperature or humidity
• After cleaning your meter
• You dropped the meter
• Your test result does not match with how you feel
About the Control Solutions
• Only use VivaChek™ Ino Control Solutions (1, 2 or 3) to practice on the
system.
• Your meter automatically recognizes the control solution.
• The control solution results are not including in the average value
calculation.
• Store the control solution at 36—86°F, 10—90% humidity.
• All expiration dates are printed in Year—Month format. 2019/01 indicates
January, 2019.
• Do not use control solution that is past the expiration date or discard date
(the control solution will expire 4 months after the bottle is opened for the
first time).
• Shake the bottle well before use.
• Close the bottle tightly after use.
Performing a Control Test
1. Remove test strip from the test strip vial (or the foil pouch). Tightly close the
vial cap immediately after you have removed the test strip.
Note: Check the expiration and discard dates of the test strips. Do not use the
expired test strip.
2. Insert a test strip into the meter in the direction of the arrows.
3. The meter turns on after a beep. An image of a test strip with a flashing blood
drop () will appear letting you know the meter is ready to
test.
15
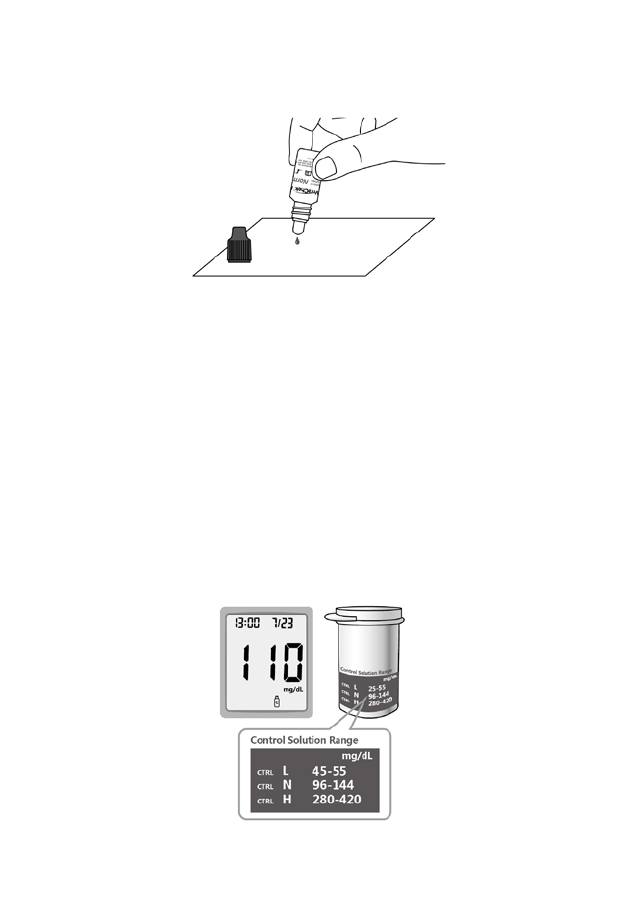
4. Shake the control solution bottle thoroughly. Squeeze the control solution
bottle gently and discard the first drop. Squeeze out a second small drop on
a clean nonabsorbent surface.
Note: Do not apply control solution to the test strip directly from the bottle.
5. Immediately touch the tip of the test strip to the drop of control solution. The
control solution is pulled into the test strip through the strip tip.
Note:
If the control solution sample does not fill the check window, do not add a second
drop. Discard the test strip and start over with a new test strip.
6. Hold it in the drop until the meter beeps, and then you see the meter count
down on the screen and followed with your control test result after a beep.
Note:
The meter will automatically recognize and mark the control result for you. Control
results are not included in the 7, 14 and 30 day average calculation.
Understand Your Control Test Result
Compare your control test result with the ranges printed on the test strip vial label.

16
Notes:
If your control test result is out of range:
• Check the expiration dates and discard dates of the test strip and control solution.
Make sure that the test strip vial and the control solution bottle have not been
opened for more than 4 months. Discard any expired test strips or control solution.
• Confirm the temperature in which you are testing is between 59—104°F.
• Make sure that you stored strip and control solution at 36—86°F, 10—90%
humidity.
• Make sure that the test strip vial and the control solution bottle have been tightly
capped.
• Make sure the test strip was used immediately after removing from the test strip
vial (or the foil pouch).
• Make sure the control solution was mixed well.
• Confirm that you are using VivaChek™ Ino brand control solution.
• Make sure that you followed the test procedure correctly.
After checking all of the conditions listed above, repeat the control solution test with
a new test strip. If your results still fall out of the range indicated on the test strip
vial label, your meter or test strips may not be working properly. DO NOT use the
system to test blood. Contact VivaChek Customer Support at 800—951—8430 (7
days a week. 9 a.m.—5 p.m. Eastern Time) for help. Please contact your health care
professional if you need help.
To turn your meter off, just remove the test strip. Dispose of the used test strips as
medical waste. The result will be automatically marked and stored in the meter
memory. Control results will be not included in your blood glucose averages.
Using the Meter Memory
Your meter automatically stores up to 1000 results with the time and date. Test
results are stored from the newest to the oldest.
Notes:
• If there are already 1000 records in memory, the oldest record will be erased
to make room for a new one.
• It is very important to set the correct time and date in the meter, please
make sure the time and date are correct after you change your batteries.
Viewing Your Test Results
When your meter is off, press to turn the meter on. After a beep, a symbol of a
test strip flashes on the display. Continue to press to review previous results in
order. Results will be shown starting with the most recent. Each result will show the
date and time the test was taken.
When END appears on the display, you have viewed all of the results in the
memory.
17
CHARTER 4:MAINTENANCE AND TROUBLESHOOTING
Proper maintenance is recommended for best results.
Replace the Battery
When the meter needs to be replace, the Battery symbol ( ) will appear.
1. Turn off your meter before changing the batteries.
2. Press firmly on the battery cover and slide.
Note:
After you change the batteries, your meter prompts you to confirm the meter’s time
and date settings. All the test results are saved in the memory.
3. Lift out the old batteries.
4. Place the new batteries under the prongs and into the battery compartment.
5. Slide the battery cover back into place, lining up with the open slots, and close
firmly.
Warning:
Keep batteries away from children. The batteries are poisonous. If swallowed,
immediately contact your doctor or poison control centre. Discard batteries
according to your local environmental regulations.
Caring for Your Glucose Monitoring System
• Store meter in the carrying case provided whenever possible.
• Wash and dry hands well before handling to keep the meter and test strips
free of water and other contaminants.
• VivaChek™ Ino Sound Blood Glucose Meter is a precision electronic
instrument. Please handle it with care.
• Avoid exposing meter and test strips to excessive humidity, heat, cold, dust,
or dirt.
Cleaning and Disinfection
Your VivaChek™ Ino Sound Blood Glucose Meter should be cleaned and
disinfected a minimum of once per week. Use only CloroxTM Healthcare Bleach
Germicidal Wipes, which has been proven to be safe to use with the VivaChek™
Ino Sound Blood Glucose Meter.

18
Cleaning is part of your normal care and maintenance and should be performed
prior to disinfection, but cleaning does not kill germs. After use and exposure to
blood, all parts of this kit can potentially transmit infectious diseases. Disinfecting
reduces the risk of transmitting infectious diseases.
Cleaning your meter
The meter should be cleaned whenever they are visibly dirty or a minimum of once
per week. For cleaning, first use one piece of Clorox™ Healthcare Bleach
Germicidal Wipes (EPA Registration No. 67619—12) to clean the entire meter
surface for 1 minute. This pre—cleaning is to prepare the meter surface for a
disinfection process.
Disinfecting your meter
The meter should be disinfected a minimum of once per week. The meter
disinfection process has been validated through repeated disinfection cycles,
which is equivalent to 5 years of meter usage based on once daily cleaning and
disinfection processes. This is to ensure that your meter will operate properly, even
with the disinfection process applied to it for 5 years.
After cleaning your meter, use one piece of Clorox™ Healthcare Bleach Germicidal
Wipes (EPA Registration No. 67619—12) to wipe the meter. The wipe will be wiped
using 2 pass, where one pass equals a back and forth motion for a total of 4
motions. And then, please expose the meter to air dry for at least 2 minute as
specified on the disinfectant wipe manufacturer’s label.
Disinfection is performed using one wipe to ensure that the treated the surface of
the meter remained visibly wet during the contact time.
CloroxTM Healthcare Bleach Germicidal Wipes containing Sodium hypochlorite
0.55%, which has been proven to be safe to use with the VivaChek™ Ino Sound
system. CloroxTM Healthcare Bleach Germicidal Wipes are available through
CLOROX PROFESSIONAL PRODUCTS CO. You can purchase them by visiting
their website at www.cloroxprofessional.com. CloroxTM Healthcare Bleach
Germicidal Wipes are also available at internet retailers such as www.amazon.com,
or for more information call VivaChek Customer Support at 800—951—8430
(available 7 days a week, 8 a.m.— 5 p.m. Eastern Time). Please contact your health
care professional if you need help.
Wash hands thoroughly with soap and water after disinfecting procedure.
Notes:
• Do not use alcohol or any other solvent.
• Do not allow liquid, dirt, dust, blood, or control solution to enter the test strip
port or the data port.
• Do not squeeze the wipe or gauze into test strip port.

19
• Do not spray cleaning solution on the meter.
• Do not immerse the meter in any liquid.
Notes:
Although it has not been observed, some alterations may appear on your meter
due to the cleaning and disinfection procedure. Such as: cloudy display window,
plastic housing cracking, meter buttons do not function, partial display on full
screen, unable to execute the meter’s initial set up, etc. Stop using the meter and
please contact Customer Support for help.
If you have questions about cleaning or disinfecting, or if you see evidence of
physical damage, contact VivaChek Customer Support at 800—951—8430 (available
7 days a week, 8 a.m.— 5 p.m. Eastern Time). Please contact your health care
professional if you need help.
Troubleshooting Guide
E1
Blood or control solution
was applied to the test strip
before the flashing drop
appeared on the display
Discard the test strip and repeat
the test with a new test strip. Wait
until you see the flashing blood
drop on the display before testing.
E2
used or contaminated test
strip.
Discard the test strip and repeat
the test with a new test strip. Wait
until you see the flashing blood
drop on the display before testing.
E3
Discard the test strip and repeat
the test with a new test strip. Make
sure that you are using a
VivaChek™ Ino test strip from
VivaChek Laboratories, Inc..
E4
Incorrect sample. Discard the test strip and repeat
the test with a new test strip. Make
sure that only human capillary
blood and VivaChek™ Ino control
solution can be used for the test.
E5
Temperature out of range.
Move to an area that is within the
operating range for the meter. Let
temperature for 20 minutes before
20
E6,E7
hardware issue. Take out batteries and restart the
meter. If the problem continues,
contact VivaChek Customer Support
at 800—951—8430 (available 7 days a
week, 8 a.m.— 5 p.m. Eastern Time).
Please contact your health care
professional if you need help.
E10 Insufficient sample.
Repeat test and apply enough
sample to fill the test strip check
window.
Indicates a low battery. Replace new batteries.
Hi
600 mg/dL.
Wash and dry your hands well and
the test site. Repeat the test using
a new test strip. If your result still
flashes HI, contact your health
care professional as soon as
possible.
Caution:
Glucose levels above 250 mg/dL(13.9 mmol/L) may indicate a potential serious
Lo
45 mg/dL.
Repeat the test using a new test
strip. If your result still flashes LO,
professional as soon as possible.
Caution:
Glucose levels below 50 mg/dL (2.8 mmol/L) may indicate a potential serious

21
Symptoms of High or Low Blood Glucose
You can better understand your test results by being aware of the symptoms of
high or low blood glucose. According to the American Diabetes Association, some
of the most common symptoms are:
Warning:
If you are experiencing any of these symptoms, test your blood glucose. If your test
result is under 50 mg/dL or above 250 mg/dL, contact your health care professional
immediately.
Low blood glucose
(Hypoglycemia):
• shakiness
• sweating
• fast heartbeat
• blurred vision
• confusion
• passing out
• irritability
• seizure
• extreme hunger
• dizziness
High blood glucose
(Hyperglycemia):
• frequent urination
• excessive thirst
• blurred vision
• increased fatigue
•
Ketones (ketoacidosis):
• shortness of breath
• nausea or vomiting
• very dry mouth
22
CHAPTER 5: TECHNICAL INFORMATION
System Specifications:
Feature Specification
Measurement range 45 to 600 mg/dL
Result calibration Plasma-equivalent
Sample Fresh capillary whole blood
Sample volume: 0.8 µL
Test time 5 seconds
Power source Two AAA LR03 1.5V batteries
Glucose units of measure The meter is pre-set to milligrams per deciliter (mg/dL)
Memory Up to 1000 records with date and time
Automatic shutoff 2 minutes after last action
Dimensions 89 mm x 52 mm x 25 mm
Display size 32 mm x 32 mm
Weight Approximately 63g
Operating temperature 41—113°F
Operating relative humidity 10-90% (non—condensing)
Hematocrit range 20—70%
Data port Micro USB
Bluetooth Version 4.1

23
Warranty
Please complete the warranty card that came with this product and mail it to
VivaChek Laboratories, Inc.
913 N market Street
Wilmington, De, 19801, USA
If the meter fails to work for any reason other than obvious abuse within the first
five (5) years from purchase, we will replace it with a new meter free of charge. For
your records, also write the purchase date of your product here.
Date of purchase: ________________________________________________
Note:
This warranty applies only to the meter in the original purchase, and does not apply
to the batteries supplied with the meter.
 Контроль гликемии позволяет людям, страдающим любым типом сахарного диабета, улучшить свое состояние и предотвратить развитие опасных осложнений.
Для выполнения мониторинга уровня глюкозы в домашних условиях рекомендуется использовать специальные устройства – глюкометры. Пациенты часто выбирают Ай Чек (iCheck) среди всего многообразия приборов.
h2>Для чего предназначен АйЧек?
 Глюкометр iCheck представляет собой универсальное устройство, предназначенное для измерения содержащегося в крови уровня сахара. Он очень прост и достаточно удобен в использовании, поэтому может с легкостью применяться для тестирования показателя у взрослых людей и детей.
Особенность и принцип работы:
- В основе работы прибора лежит биосенсорная технология. Окисление сахара, содержащегося в крови, происходит под воздействием фермента устройства глюкоз-оксидазы. В результате этого процесса образуется сила тока, способная определить концентрацию глюкозы и отобразить ее значение на дисплее в ммоль/л.
- В каждой упаковке тест-полосок имеется чип, передающий информацию с расходных материалов на глюкометр посредством кодировки.
- Контакты, которые установлены на полосках, не запускают работу прибора в момент неверной установки.
- Тестовые пластинки покрыты специальным слоем защиты, что дает возможность пациенту не заботиться о точном касании и не переживать за получение некорректного результата.
- Контрольные поля, которыми оснащены полоски, после впитывания необходимого для измерения количества крови меняют свой цвет, сообщая тем самым об успешно проведенном анализе.
Глюкометр стал популярен в России не так давно, но уже успел расположить к себе многих пользователей и завоевать их доверие. Кроме того, этот прибор часто рекомендуется врачами, так как в рамках государственной поддержки людям, страдающим диабетом, выдают на него бесплатные тест-полоски в поликлинике, что является весомым аргументом для многих пациентов.
Преимущества устройства
Устройство для контроля гликемии iCheck отличается от конкурентов своими техническими характеристиками и стоимостью, как самого прибора, так и расходных материалов к нему.
Преимущества глюкометра:
- Полоски для измерения крови реализуются по низкой цене по сравнению со стоимостью расходного материала на другие приборы. Длительное время тестовые пластинки выпускались совместно с ланцетами, что было очень выгодно. Практически все новые партии продаются уже без игл для совершения проколов. Их можно приобретать только за отдельную плату.
- Прибор имеет бессрочную гарантию.

- Устройство удобно держать в руках.
- Значения измерений отображаются на экране крупными символами, что ценно для людей с низкой остротой зрения.
- Управлять прибором достаточно просто благодаря расположенным на нем двум большим кнопкам.
- Запуск устройства происходит автоматически после установки тестовой полоски.
- Отключение прибора происходит спустя 3 минуты после последнего использования.
- Память, встроенная в глюкометр, позволяет хранить до 180 измерений.
- Результаты тестирований можно переносить на персональный компьютер, используя для этой цели специальный кабель. Такая функция позволяет фиксировать гликемию в таблице. Результаты измерений можно распечатать и проанализировать совместно с лечащим врачом, чтобы при необходимости скорректировать проводимую схему терапии.
- Кровь впитывается тестовой полоской за 1 секунду.
- Для проведения исследования достаточно небольшой капли.
- Прибор компактный, поэтому им легко пользоваться в любых местах.
- Устройство предоставляет возможность произвести расчет среднего значения гликемии за неделю, 14 дней, месяц и квартал.
Технические характеристики и комплектация
Прибор имеет следующие технические характеристики:
- время, необходимое для выведения результата замера на дисплей прибора, составляет 9 секунд.
- для выполнения замера необходимо 1,2 мкл крови.
- диапазон выдаваемых устройством значений глюкозы составляет от 1,7 до 41,7 ммоль/л.
- измерение происходит электрохимическим методом.
- память прибора рассчитана на 180 замеров.
- калибровка устройства происходит по цельной крови.
- кодирование глюкометра выполняется путем установки специального чипа, входящего в состав каждой новой упаковки тестовых полосок.
- для работы прибора требуется батарея CR2032.
- устройство весит 50 г.
В комплектацию прибора входит:
- Прибор iCheck, измеряющий уровень глюкозы.
- Устройство для выполнения прокола.

- Ланцеты в количестве 25 штук.
- Чип с кодом, используемый для активации каждой новой упаковки тестовых пластин.
- Полоски для глюкометра (25 штук).
- Чехол, необходимый для транспортировки устройства.
- Батарея.
- Руководство по использованию прибора (на русском языке).
Тестовые полоски не всегда имеются в комплекте. Иногда их приходится приобретать отдельно. Сроки хранения полосок не превышает 18 месяцев со дня изготовления, а начатую упаковку следует использовать в течение 90 дней. Расходный материал для глюкометра должен храниться в помещении с влажностью воздуха не более 85% и температурой в диапазоне от 4 до 32 градусов. Тестовые полоски не должны попадать под воздействие солнечных лучей.
Инструкция по применению
Исследование крови посредством глюкометра iCheck проводится в несколько этапов:
- Подготовка.
- Забор крови.
- Процесс измерения и расшифровки значения.
Подготовка должна проходить следующим образом:
- Руки следует вымыть, используя специальные для этого средства.
- Пальцы следует размять с помощью легкого массажа.
- Установить кодовую пластину в глюкометр (если планируется использовать новую упаковку полосок).
- Заменить ланцет в приборе, предназначенном для прокалывания, и установить на нем желаемую глубину. Для этого используется специальный регулятор.
Правила получения крови:
- Обработать палец спиртом.
- Приложить устройство для прокола и нажать на кнопку спуска.
- Получить достаточное количество крови, требуемое для проведения измерения.
Правила выполнения анализа:
- Установить в прибор новую полоску.
- Приложить палец с полученной каплей к соответствующему полю на полоске, чтобы кровь впиталась.
- Дождаться появления результата измерения.
Следует помнить, что просроченные тест-полоски не следует использовать для исследования, так как они могут выдавать неточные результаты.
Чип с кодом подходит лишь к той упаковке тестовых пластин, с которыми он реализовывался. После того как полоски закончились, его нужно утилизировать. Если использовать один и тот же кодовый чип, значения гликемии могут оказаться недостоверными.
Подробная видео-инструкция о пользовании прибором iCheck:
Мнения пользователей
В отзывах пациентов о глюкометре АйЧек (iCheck) часто отмечается доступность цены на расходники, что является безусловным преимуществом, однако некоторые отмечают, что прибор дает неточные результаты измерений.
Глюкометр iCheck я получила в районной поликлинике бесплатно, как только выявили сахарный диабет. Очень удобно, что тест-полоски к нему можно купить практически в любой аптеке. Стоимость гораздо ниже, чем на расходные материалы к другим глюкометрам, поэтому я могу себе позволить приобретать их ежемесячно. Очень понравилось пользоваться прибором.
Ксения, 57 лет
Купила глюкометр iCheck по совету своей знакомой, которая уже давно болеет диабетом и успела сменить несколько приборов. Могу сказать, что была приятно удивлена ценой на тестовые полоски. Жаль, что они продаются только упаковками по 50 штук и без ланцетов. Раньше, оказывается, в комплекте шли и ланцеты, но сейчас их приходится покупать отдельно. Несколько раз сравнивала результаты измерений на этом приборе с лабораторными значениями. Погрешность составляла 2 единицы. Считаю, что это слишком много. Прибором пользуюсь только из-за низкой цены на полоски, так как значения глюкозы на нем не всегда достоверные.
Светлана, 48 лет
Приобрести глюкометр и расходные материалы к нему можно в любых аптеках, включая интернет-сервисы, или в специализированных магазинах.
Стоимость глюкометра Icheck составляет примерно 1200 рублей. Тест-полоски продаются упаковкой по 50 штук. Цена каждой коробки составляет около 750 рублей. Ланцеты продаются отдельно, по стоимости около 400 рублей за 200 штук. В некоторых магазинах можно найти комплект полосок вместе с ланцетами за 1000 рублей.