- Manuals
- Brands
- Bompani Manuals
- Oven
- Oven
- Instruction manual
-
Contents
-
Table of Contents
-
Bookmarks
Quick Links
INSTRUCTION
M A N U A L
librettoIstruzioniItalstile_EN.indd 1
3-12-2007 12:31:38
Related Manuals for Bompani Oven
Summary of Contents for Bompani Oven
-
Page 1
INSTRUCTION M A N U A L librettoIstruzioniItalstile_EN.indd 1 3-12-2007 12:31:38… -
Page 2
Congratulations on your purchase of an oven from the Bompani collection. This new prod- uct, designed and produced with quality materials, combining innovation and technology, is intended to assist you in putting your recipes into practice. We therefore ask that you read and… -
Page 3: For Your Safety
• Although our product complies with the regulations concerning surface temperatures (“cold door”), children should be kept away from the oven’s control panel and door when it is in operation. •…
-
Page 4: Main Unit Overview
INSTRUCTIONS FOR CORRECT USE OF THE OVEN fi g.1 Control panel Selector knob Power on light Timer-minute minder Thermostat light Thermostat knob Grill Oven light CONTROL PANEL FOR BUILT-IN INSTALLATION with multipurpose oven Front left-hand plate Rear left-hand plate Selector…
-
Page 5: First Start-Up
Heat the oven for the first time empty with the thermostat at the highest setting and the door closed for at least 30 minutes. Then switch off the oven, open the door and ventilate the kitchen. The smell noticed is due to the evaporation of the substances used to keep the oven in good condition.
-
Page 6: Oven Functions
50° and 250°C (some models of oven may have a Max setting). When the yellow light on the control panel comes on, the oven is heating up. When the oven temperature reaches the thermostat setting, the light goes out.
-
Page 7: Using Cooking Functions
This cuts off the electricity supply: do not attempt to repair the fault yourself; call your nearest Service Centre. The oven should be left to heat up for at least 10 minutes before food for cooking is placed inside it.
-
Page 8: Grilling
If you wish to grill meat or fish, coat with a little oil or fat and place them on the shelf. The oven is heated from below only. The shelf height depends on the thickness of the food. The dripping pan should be placed on one of the lowest runners, but not too far below the food.
-
Page 9: Cooking Pizza
Cooking meat and fi sh Meat can be placed in oven-dishes or pans, or straight on the shelf. If using only the shelf, ALWAYS pour a little water into the dripping pan and fi t it onto the runners underneath the shelf.
-
Page 10
Food for cooking Weight Cooking shelf Temperature Preheating time Cooking time (kg) position from (C°) (minutes) (minutes) the bottom Pasta Lasagne 60-75 Cannelloni 40-50 Pasta au gratin 40-50 Meat Veal 85-90 Chicken 90-100 Duck 100-110 Rabbit 70-80 Lamb 90-95 Fish Mackerel 180-200 35-40… -
Page 11: Programming Cooking
• Turn the setting knob clockwise to the time required. • When the time is up, the oven will start a buzzer which stops automatically. The spring-clock does not switch the oven on and off fi g.3 How to use the electronic timer (Fig. 4) •…
-
Page 12
Automatic operation with cooking duration and end time programmed Example: It is 9.25 a.m.; you wish the oven to start operating at 11.00 a.m. and fi nish cook- ing at 12.00 noon (cooking duration 1 hour). Proceed as follows: Press the key and within 5 seconds press the “+”… -
Page 13
Semiautomatic operation with cooking duration Example: It is 11.35 a.m. and you wish the oven to keep operating for the next 25 minutes. Proceed as follows: Press the key and within 5 seconds press the “+” key until the display shows 00.25 (because you wish the oven to remain on for 25 minutes);… -
Page 14
How to use the three-button timer (Fig. 5). • Allows programming of the duration of cooking in the oven. If the cooking procedure does not require monitoring, it can also take place in the user’s absence. • On installation or after a power blackout, the display fl ashes. This indicates that the correct time has to be set. -
Page 15
The minute fi gures will remain unchanged. Manual Operation • After the correct time has been set, the oven can be used in manual mode with the aid of the oven thermostat knobs and the selector switch ( symbol on). -
Page 16
Turn the thermostat knob back to the solid dot symbol. Turn the selector knob back to 0. fi g.6 Note: If no programming function is used, the oven only works with the programming knob turned to manual. How to use the spring-clock (Fig.7) Programming the clock •… -
Page 17: Using Push-Pull Knobs
(or dial pointer) is on the cooking time required. • At the end of the set time, the oven switches off and the buzzer sounds continuously. • To stop the buzzer, turn the knob (A) to the left, without pressing, until the hand is on the symbol of a bell with a line through it (or position the pointer in line with the bell).
-
Page 18: Care And Cleaning
2.1. Cleaning Oven Cleaning Advice • The first rule is to clean the oven often. For natural cleaning, use only hot water with bicarbonate of soda and/or lemon juice and/or white wine vinegar dissolved in it. • Do not use steam-cleaners.
-
Page 19: Using The Self-Cleaning Oven
Oven interiors are also enamelled and must be cleaned using specific products, easily available from retailers. It is best to clean the oven after each use, while still warm. We advise you not to allow dirt to build up over time since it is more difficult to remove layers of dirt and there is a risk of leaving permanent marks on the enamel.
-
Page 20: Maintenance
Changing the oven light bulb To replace the oven light bulb, follow the instructions provided below: Switch the oven off and disconnect it from the power supply. The bulb is in the top right-hand corner of back wall of the oven;…
-
Page 21
* Foods might come into contact: Inside the oven chamber, with oven shelves, dripping pans, confectionary trays, oven door glazing, rubber gaskets, and the sides of the oven itself. On the hob, with pan stands, burners and the hob skin. -
Page 22: General Safety
3.2 General Safety • This appliance is intended solely for domestic use. The oven must only be used for prepar- ing food. • The electricity supply must always be disconnected before any procedures inside the oven or where there is the risk of accessing live parts.
-
Page 23
If the malfunction is in the electri- cal system, call in skilled staff. THE OVEN LIGHT DOES NOT COME ON Turn the selector to a function, or contact a Service Centre to purchase a light bulb… -
Page 24: For The Installation Engineer
The packaging materials (plastic bags, expanded polystyrene, nails, etc.) must not be left within reach of children since they are potentially hazardous. • Check that the accessories are in the bottom of the packaging. • Do not make improper use of the oven door handle during transport and installation. librettoIstruzioniItalstile_EN.indd 24 3-12-2007 12:31:45…
-
Page 25: Building-In The Oven
Make sure that the screws are inserted towards the centre of the wood in the cabinet: (see Fig.1-3 page 25). Before fixing the screws, also ensure that the oven is correctly aligned with the floor with the aid of a spirit level.
-
Page 26
fig.1 fig.2 fig.3 librettoIstruzioniItalstile_EN.indd 26 3-12-2007 12:31:47… -
Page 27: After Sales Service
The serial number (N.). This information will be found on the nameplate. The nameplate is on the outside of the oven, and can be seen in the position shown below when the door is opened. Mod. — N° Mod. — N°…
-
Page 28
BOMPANI ITALIA Spa. — Via Emilia Est, 1465 41100 Modena — Italy Tel + 39 059 282278 — Fax +39 059 281774 www.bompani.it — bompani_italia@bompaniitalia.it Ed. 04/12/2007 335229 librettoIstruzioniItalstile_EN.indd 28 3-12-2007 12:31:49…
- Главная
- Встраиваемые рабочие поверхности
- Bompani

- Тип поверхностиварочная
- Способ подключенияэлектрическая
- Установказависимая
- Рабочая поверхностьстеклокерамика
- Дизайн ДОМИНОНет
- Чугунные решеткиНет
- РамкаНет
- Глубина50.5 см
- Ширина56 см
- Показать все
Перед приобретением Bompani BO 273 ZA по самой низкой цене, изучите характеристики, плюсы и минусы модели, отзывы покупателей.
Характеристики Bompani BO 273 ZA
*
| Тип поверхности | варочная |
| Способ подключения | электрическая |
| Установка | зависимая |
| Рабочая поверхность | стеклокерамика |
| Дизайн ДОМИНО | Нет |
| Чугунные решетки | Нет |
| Рамка | Нет |
Габариты*
| Глубина | 50.5 см |
| Ширина | 57.5 см |
| Высота | 5.5 см |
Конфорки*
| Конфорка-гриль | Нет |
| Электрические керамические | 4 |
| Экспресс-конфорки | 2 |
| WOK | Нет |
| Количество конфорок | 4 |
| Галогенные | 2 |
Панель управления*
| Переключатели | сенсорные |
| Таймер конфорок | Нет |
| Кнопка блокировки работы поверхности | Есть |
| Расположение панели | сбоку |
| Электроподжиг | Нет |
Другие функции и особенности*
| Распознавание наличия посуды | Нет |
| Защитное отключение конфорок | Есть |
| Индикатор остаточного тепла | Есть |
| Кратковременная пауза | Нет |
| Автоматика закипания | Нет |
| Газ-контроль | Нет |
| Автовыбор ширины зоны нагрева | Нет |
| Цвет панели конфорок | серебристый |
* Точные параметры уточняйте на сайте продавца.
Отзывы пользователей о Bompani BO 273 ZA
Bompani BO 273 ZA: Характеристики
`
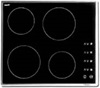
электрическая варочная панель, зависимая, стеклокерамика, 57.50х50.50х5.50 см, серебристый
Общие характеристики
Тип панели
электрическая варочная поверхность
Габариты (ВхШхГ)
5.5 x 57.5 x 50.5 см
Размеры для встраивания (ШхГ)
56 x 49 см
Конфорки
Материал панели
стеклокерамика
Панель управления
Расположение панели
сбоку
Кнопка блокировки панели
есть
Особенности
Индикатор остаточного тепла
есть
Совместимые духовки
BO 243 KB
Технические параметры
Цвет
панели конфорок – серебристый
5 (из 5 возможных)
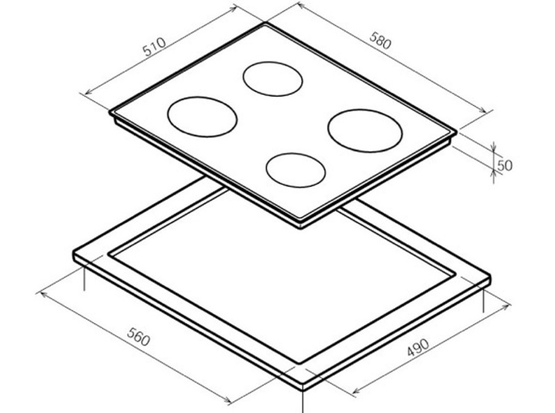
Варочная поверхность. Черный. 60 см.
Варочная поверхность BO273TM/E
Технические характеристики:
- Электрическая стеклокерамическая встраиваемая варочная поверхность;
- Без рамки;
- Cенсорное управление;
- Фронтальное расположение;
- Сенсорное включение/выключение с системой безопасности;
- Блокировка от детей;
- Таймер 0-99 мин;
- Размеры встраивания (ШхГхВ) 560 x 490 x 55 мм;
- Размер (ШхГхВ) — 580 х 510 х 50 мм.
4 hi-light зоны нагрева:
- 2 конфорки диаметром 145 мм 1200W;
- 2 конфорки диаметром 180 мм 1800W.
Раздельное сенсорное управление со следующими функциями:
- Включение;
- 9 уровней нагрева;
- «Н» индикация остаточного тепла.
Варочная панель
-
Количество конфорок
4
Габариты
-
Высота, см
5 -
Глубина, см
51 -
Ширина, см
58
Основные характеристики
-
Тип
электрическая панель независимая -
Гарантия
2 года -
Назначение
Приготовление пищи
Управление
-
Размещение панели управления
фронтальное -
Тип управления
сенсорное
- Встраиваемые рабочие поверхности
- Встраиваемые рабочие поверхности Bompani
- 🔥🔥🔥 купить поверхности рабочие встраиваемые из Германии оптом
- Bompani BO 273 ZA (IX)
")
варочная электрическая, зависимая, панель конфорок: стеклокерамика, цвет: черный, габариты (ВхШхГ): 5.5×57.5×50.5 см

Отзывы о Bompani BO 273 ZA (IX)
Пока никто не оставил отзывов. Оставить отзыв
Оставить отзыв о Bompani BO 273 ZA (IX)
Опишите насколько вы довольны или не довольны покупкой Bompani BO 273 ZA (IX)
ВОПРОСЫ И ОТВЕТЫ
Задать вопрос Bompani BO 273 ZA (IX)
У вас не работает Bompani BO 273 ZA (IX), опишите вашу проблему полностью.