Bosch TCA5309 Series Benvenuto Classic Manual
Safety instructions
Please read these instructions carefully and keep for future reference!
This fully automatic espresso machine is designed for preparation of small amounts of coffee for domestic use or for use in non-commercial, householdlike environments, such as staff kitchens in shops, offices, agricultural and other small businesses or for use by guests at bed-and-breakfast establishments, small hotels and similar residential facilities.
Risk of electric shock!
Connect and operate the appliance only in accordance with the specifications on the rating label.
Do not use if either the power cord or the appliance is damaged.
Use indoors at room temperature only.
This appliance is not intended for use by persons (including children) with reduced physical, sensory or mental capabilities, or lack of experience and knowledge, unless they have been given supervision or instruction concerning use of the appliance by a person responsible for their safety.
Keep children away from the appliance. Children should be supervised to ensure that they do not play with the appliance. In the event of malfunction, unplug the appliance immediately.
To avoid potential hazards, repairs such as replacing a damaged cord should only be performed by our service personnel.
Never immerse the appliance or power cord in water.
Do not reach into the grinding unit.
Use the appliance only in frost free rooms.
Risk of scalding!
The nozzle for hot water and steam 8 gets very hot. Hold the nozzle 8 by the plastic part only, not by the metal parts. When steam or hot water is released, the nozzle 8 may initially sputter.
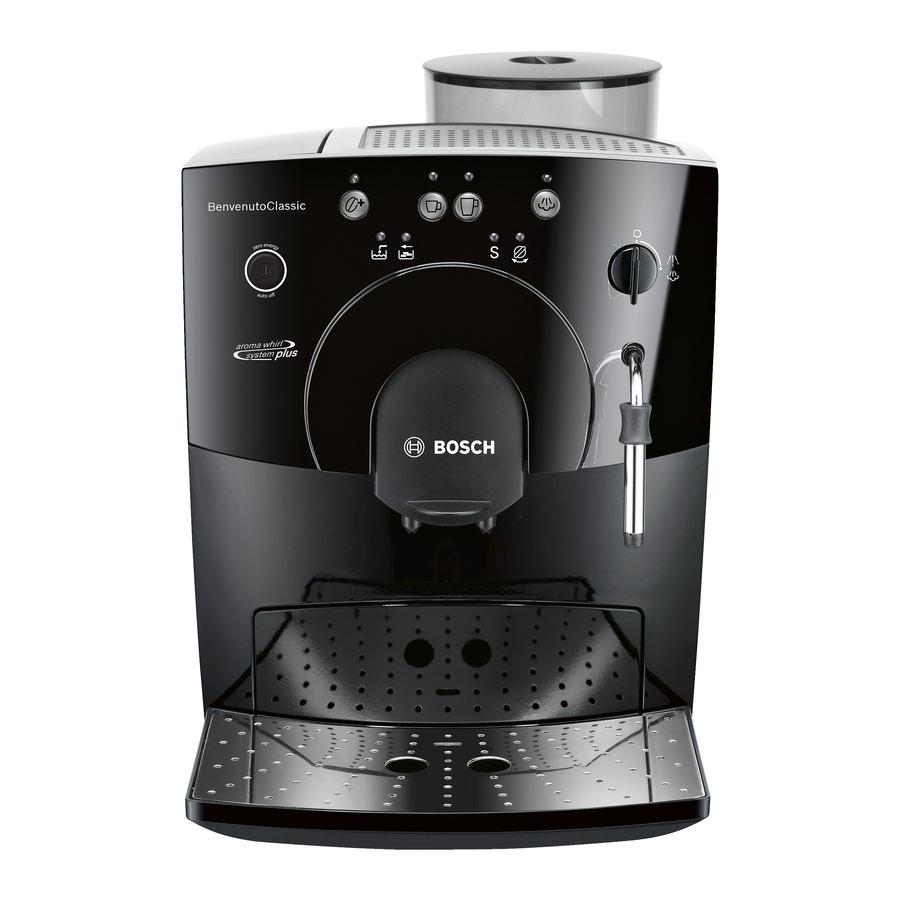
Overview


- Power switch (on/off) auto off
- Coffee strength button

- Coffee dispensing button

- Coffee dispensing button

- Steam generation button

- Hot water / steam dial

- LED display
- Add water

- Empty tray

- Run service programme S
- Turn dial

- Add water
- Nozzle (for hot water / steam)
- Plastic mounting
- Sleeve
- Nozzle tip
- Height- adjustable coffee outlet
- Lid for water tank
- Removable water tank
- Bean container with aroma cover
- Cleaning tablet duct
- Cup shelf (warming function)
- Sliding switch for adjusting grind
- Grate
- Coffee grounds tray
- Residual water tray
- Float
- Cord storage compartment
- Doors to brewing unit
- Brewing unit
- Button (red)
- Handle
Before using for the first time
General
Fill the water tank with fresh, uncarbonated water only, and if possible, use only beans for fully automatic coffee and espresso machines. Do not use coffee beans that have been glazed, caramelized or treated with other additives containing sugar, since they will block the grinding unit. This appliance can be adjusted for use with different water hardness values (see «Set ting the water hardness»).
Switching on the appliance
- Place the appliance on a flat, water resistant surface.
- Pull enough of the power cord out of the storage compartment and plug it into the electrical socket.
- Remove and rinse the water tank 11 and fill it with fresh cold water. Do not fill above the «max» mark.
- Replace the water tank 11 and push it firmly down into place.
- Fill the bean container with coffee beans.
- Make sure that the hot water / steam dial 6 is at «O«.
- Press the power switch 1 auto off to switch on the appliance.
Filling the system
When switched on for the first time, the water pipes in the appliance must be filled.
The appliance is ready for use as soon as both LEDs light up.
Controls
Power switch auto off
The auto off power switch can be used to turn the power supply on or off. After switching on the power supply, the appliance heats up, rinses and is then ready for use. The dispensing buttons 3  and 4
and 4  both light up. The appliance does not rinse if it is still warm when switched on.
If the appliance is not manually switched off, it will switch off automatically after approx. 10 minutes after the last dispens ing operation and then rinse. The pre set switch off time can be changed (see section «Automatic Switch Off auto off»). The appliance will not rinse if:
- there was no coffee drawn after switching on the machine.
- steam was drawn shortly before switching off the machine.
- only hot water or steam were drawn.
Coffee strength button
By pressing the button  , the coffee strength can be set:LED does not light = Normal settingLED lights = Strong settingLED flashing = Bean container empty
Dispensing button Small coffee
With this button, a small cup (approx. 40ml) of coffee can be dispensed.
- Press the button 3
 . The LED will start to flash. The coffee is ground, brewed and poured into the cup. Both LEDs light up as soon as the process is finished.
The beverage size can be changed (see section «Changing volume dispensed»).
Dispensing button Large coffee
With this button, a large cup F Large coffee (approx. 125ml) of coffee can be dispensed.
- Press the button 4
 . The LED will start to flash. The coffee is ground, brewed and poured into the cup. Both LEDs light up as soon as the process is finished.
The beverage size can be changed (see section «Changing volume dispensed»)
Steam generation button
The steam button  generates steam for foaming or warming.
Steam dispensing dial
Hot water or steam can be dispensed by turning the dial to  or
or  . To dispense steam, the steam generation button
  must be pressed first (see «Steam for foam ing milk»).
LED display
The various LEDs indicate the following:
 on on |
The water tank is empty and needs to be filled |
 on on |
Trays full: Empty and replace them |
 flashing flashing |
Trays missing: Reinsert them |
| S on | Run the service programme (see «Service programme») |
| S flashing | Service programme in operation |
 on on |
Turn dial to  |
 flashing flashing |
Turn dial to «O« |
Settings and displays
Setting the water hardness
It is important that the water hardness be set correctly, so that the appliance indicates accurately when the descaling programme should be run. The factory setting is a water hardness of 4.
You can check the water hardness by asking your local water supplier.
| Degree | Water hardness | |
| German (°dH) | French (°fH) | |
| 1 | 1 7 | 1 13 |
| 2 | 8 15 | 14 27 |
| 3 | 16 23 | 28 42 |
| 4 | 24 30 | 43 54 |
The appliance must be ready for use.
If a water filter (optional extra Order No. 461732) is used, the water hardness should be set to 1.
Note: If no button is pressed within 90 s econds, the appliance switches to stand by mode without saving the new settings. In this case, the previous water hardness setting is retained.
The appliance must be rinsed when a filter is first used and after changing the filter.
- Fill the tank with water up to the «0,5 l» mark.
- Place a suitable container (approx. «0,5 l») under the nozzle 8.
- Set the dial 6 to
 .
. - When water stops coming out of the nozzle 8, set the dial back to «O«.
- Fill the water tank and the water pipes
(see «Switching on the appliance / Filling the system»).
Adjusting the grinding unit
Sliding switch 15 adjusts the degree of grinding, from coarse to fine.
Adjust the grinding unit only while it is running! Otherwise the appliance may be damaged.
Tip: For dark roast coffee beans, choose a coarser grind; for light roast beans, select a finer grind.
Automatic switch-off auto off
The pre set automatic switch off time of approx. 10 minutes can be changed.
- To do this, press and hold the dispensing button 3
 and the button 5
  at the same time for at least 5 seconds. The LEDs that light up, 7a, b, c and d (
  ,
,  , S,
, S,  ), represent the switch off time set.
By pressing the button 5 the switch-off time can be selected: the switch LED 7a ( ) lights up
= Appliance switches off after approx. 10 minutes.
LED 7a and 7b ( , )
= Appliance switches off after approx. 30 minutes.
LED 7a, 7b and 7c ( , , S ) light up
= Appliance switches off after approx. 1 hour.
LED 7a, 7b, 7c and 7d ( ,
,  , S,
, S,  )
)
= Appliance switches off after approx. 4 hours.
Pressing button 2 saves the s election.
Setting the temperature
This fully automatic coffee machine allows the user to change the temperature of the coffee.
- To do this, press and hold the dispensing buttons 3
 and 4
and 4  at the same time for at least 5 seconds. The LEDs that light up, 7a, b and c (
  ,
,  , S ), represent the temperature set. By pressing the button 5
  , the temperature can now be selected:
LED 7a ( ) lights up
= Low temperature
LED 7a and 7b ( ,
,  ) light up
= Medium temperature.
LED 7a, 7b and 7c ( ,
,  , S ) light up
= High temperature.
Pressing button 2  saves the selection.
Float
The float 19 in the water tray 18 showswhen the tray needs emptying.
- If the float 19 is clearly visible, empty the water tray 18.
Using coffee beans
This fully automatic espresso / coffee machine grinds beans freshly for each brew. If possible, use only beans for fully automatic coffee and espresso machines.
Deep freeze or store in a cool place in sealed, airtight containers. Coffee beans can be ground while frozen.
Fill the water tank with fresh water every day. The tank must always contain sufficient water for operating the appliance. Do not allow it to become empty.
Tip: Pre warm cups, especially small, thick espresso cups, by placing on the cup shelf 14 or rinsing with hot water.
The appliance must be ready for use.
It is possible to dispense the same amount of coffee a second time.
Note: The second cup is brewed using the previously ground coffee.
Changing volume dispensed
The pre set quantities for dispensing button 3  (approx. 40ml) and dispensing button 4
  (approx. 125 ml) can be changed.
Reset: The appliance must be ready for use.
The standard factory settings have now been reactivated.
Preparing hot water
The appliance must be ready for use.
This function allows water to be heated for a cup of tea, for example.
The nozzle gets very hot. Do not touch the metal parts.
- Place an appropriate cup under the nozzle 8.
- Push the sleeve on the nozzle 8 all the way down.
- Turn the dial 6 to
 .
.
Risk of scalding
When the dial is set to , the nozzle may sputter a little. Do not touch the nozzle 8 or point it at anyone.
- End the process by turning the dial 6 back to «O«.
Steam for foaming milk
The appliance must be ready for use. You can foam the milk first and add the coffee on top, or foam the milk separately and pour it into the coffee.
The nozzle gets very hot. Do not touch the metal parts.
- Push the sleeve on the nozzle 8 all the way down.
- Fill the cup approximately 1/3 full of milk.
- Press the steam button
 . The LED will start to flash.
The appliance will heat up for approx. 20 seconds.
- Immerse the nozzle 8 deep into the milk, but do not let it touch the bottom of the cup.
- As soon as the LED J lights up, turn the rotary button 6 to .
Risk of scalding
When the dial 6 is set to , the nozzle 8 may sputter. Escaping steam is very hot and may cause liquids to sputter. Do not touch the nozzle 8 or point it at anyone.
Note: When the nozzle 8 has cooled down, clean immediately. Dried residue is difficult to remove.
Tip: If possible, use cold low fat (1,5% fat) milk.
Steam for heating drinks
The nozzle gets very hot. Do not touch the metal parts.
The appliance must be ready for use.
- Push the sleeve on the nozzle 8 all the way up.
- Press the steam button
 . The LED will start to flash.
The appliance will now heat up for approx. 20 seconds.
Risk of scalding
When the dial 6 is set to , the nozzle 8 may sputter a little. Escaping steam is very hot and may cause liquid to sputter. Do not touch the nozzle 8 or point it at anyone.
- End the process by turning the dial 6 back to «O».
To generate more steam, press the steam butto
 again and repeat the whole process.
Note: When the nozzle 8 has cooled down, clean immediately. Dried residue is difficult to remove.
Maintenance and daily cleaning
Risk of electric shock!
Unplug the appliance before cleaning it.
Never immerse the appliance in water.
Do not use a steam cleaner.
- Wipe the outside of the appliance with a damp cloth. Do not use scouring agents.
- Always remove any limescale, coffee, milk or descaling fluid residue immedi ately. Such residue can cause corrosion.
- Wash all removable parts by hand only.
- Rinse out the water tank 11 with water only.
- Remove, empty and clean the trays for coffee grounds 17 and residual water 18.
- Wipe out the inside of the appliance (tray holders).
- Open the door to the brewing unit 21 and remove any coffee residues. Close the door.
Note: If the appliance is cold when switched on, or if it is switched off after dispensing coffee, it rinses automatically; in other words the system cleans itself.
Nozzle for hot water / steam
- Unscrew the nozzle 8 from the steam pipe.
- Dismantle all parts.
- Clean with a caustic cleaning solution and a soft brush. Clean the tip of the nozzle 8c with a blunt needle.
- Thoroughly rinse and dry all parts.
Brewing unit
The brewing unit can be removed for cleaning.
- Switch off the appliance using the power switch 1 auto off.
- Open the door 21 to the brewing unit 22.
- Hold the red button 22a down and push the handle 22b up until you hear it engage.
- Grasp the brewing unit 22 by the handle, remove carefully, and rinse under running water. Do not use cleaning agents. Do not place in the dishwasher.
- Vacuum the inside of the appliance, or clean it with a damp cloth.
- Reinsert the brewing unit 22 all the way into the appliance.
- Hold the red button 22a down and push the handle 22b down as far as it goes, until you hear it engage. The brewing unit is now secure.
- Close the door of the brewing unit.
Service programme
Combined cleaning and descaling process
If the S LED lights up while the appliance is on, the service programme must be run immediately to clean and descale the appli ance. If the service programme is not run as instructed, the appliance may be damaged.
Specially developed descaling (Order No. 310967) and cleaning agents (Order No. 310575) can be obtained from our customer service department.
Each time you run the service programme, follow the instructions for using the cleaning and descaling agents.
Never interrupt the service programme!
Do not drink the liquids!
Never use vinegar or vinegar based products!
Never put descaling tablets or other des caling materials into the duct for cleaning tablets! The S LED flashes while the service pro gramme is running (approx. 40 minutes).
If there is a filter in the water tank, it must be removed before the service programme is run.
Starting the service programme
The appliance must be ready for use.
The S LED starts to flash and the appliance rinses the coffee dispenser through twice.
- Empty and reinsert the grounds tray 17.
The LEDs for button  and
and  «Add water» light up.
- Place one cleaning tablet in the duct 13.
- Fill the water tank with lukewarm water, add descaling agent and dissolve com pletely (total liquid 0,5 litres)
or
pour prepared descaling mixture into the water tank (total liquid 0,5 litres). - Press the steam button
 process begins. Duration approx. 10 min . The descaling utes. The descaling solution flows into the water tray 18.
The  LED lights up.
- Place a suitable container (approx. 0,5 litres) under the nozzle 8.
- Set the dial 6 to . The descaling process begins. Duration approx. 5 min utes. The descaling solution flows into the container.
The  LED lights up
- Empty and reinsert the grounds tray 17.
The steam button LED  lights up.
- Empty and clean the water tank 11, fill with fresh water up to the «max» mark and reinsert.
- Place a suitable container (approx.0,5 litres) under the nozzle 8.
- Press the steam button
 . The cleaning process begins. Water flows into the container.
The  LED flashes.
- Turn the dial 6 to «O». The cleaning process begins. Duration approx. 10 minutes. Liquid flows into the coffee grounds tray 17 inside the appliance, then out through the coffee outlet.
The  LED lights up.
- Empty, clean and reinsert the trays 17 and 18.
The appliance starts to heat up and is ready for use once the LEDs for dispensing buttons 3  and 4
and 4  light up.
If the service programme is interrupted, e.g. due to a power cut, it is vital that the appliance be rinsed before it is used again.
The appliance must be ready for use.
The  and steam button
  LEDs flash.
- Rinse the water tank 11 thoroughly and fill with fresh water.
- Press the steam button
 is rinsed and liquid flows into the tray.
The  LED lights up.
- Hold a cup under the nozzle 8 and turn the dial 6 to . Water runs into the cup.
The  LED flashes.
- Turn the dial 6 back to «O».
The appliance rinses and is ready for use again.
Anti-freeze
In order to avoid damage through cold during transportation and storage, the appli ance must be emptied completely first.
The appliance must be ready for use.
Disposal
This appliance is labelled in accordance with the European Directive 2002/96/EG relating to waste electrical and electronic equipment – WEEE. The directive provides the framework for the EU wide take back and disposal of end of life appliances.
Please ask your specialist retailer about current disposal facilities.
Guarantee
The guarantee conditions for this appliance are as defined by our representative in the country in which it is sold. Details regarding these conditions can be obtained from the dealer from whom the appliance was pur chased. The bill of sale or receipt must be produced when making any claim under the terms of this guarantee.
Right of modification reserved.
Troubleshooting
| Problem | Possible cause | Solution |
| No hot water or steam discharge. | Nozzle 8 is blocked. | Clean nozzle 8. |
| Foam insufficient or too runny. | Sleeve b on nozzle 8 not in correct position. | Push down sleeve b on nozzle 8. |
| Milk not suitable for foaming. | Use cold low fat (1,5% fat) milk. | |
| Coffee dispensing slows to a trickle. | Coffee is ground too fine. | Adjust the grinding unit to a coarser setting. |
| Coffee not dispensed. | Water tank not filled or not correctly positioned. | Fill water tank and make sure it is in the right posi tion. If necessary, fill water pipes (see «Switching on the appliance»). |
| Coffee has no «crema» (creamy foam). | Unsuitable type of coffee. Beans no longer fresh. | Change type of coffee used. Use fresh beans. |
| Degree of grinding inappro priate for beans. | Optimize degree of grinding. | |
| Grinding unit does not grind the beans. | Beans are not falling into the grinding unit (beans too oily). | Gently tap the bean container. |
| Grinding unit makes a loud noise. | Foreign objects in the grind ing unit (e.g. grit, which can be found even in superior types of coffee). | Call the hotline. |
LED S and button  flash alternately. flash alternately. |
The brewing unit 22 is missing, or is not properly inserted or secured. | Insert and secure the brewing unit 22. |
| If you are unable to solve the problem, please call the hotline. You will find the telephone numbers at the back of these instructions. |

Documents / Resources
Download manual
Here you can download full pdf version of manual, it may contain additional safety instructions, warranty information, FCC rules, etc.
Download Bosch TCA5309 Series Benvenuto Classic Manual
![]() размер PDF файла инструкции 1,1mb
размер PDF файла инструкции 1,1mb
de Gebrauchsanleitung
en Operating instructions
fr Notice dЂЂЂutilisation
nl Gebruiksaanwijzing
es Instrucciones de uso
pt Instru—Ґes de utiliza—“o
ru Инструкция по эксплуатации
it Instruzioni per lЂЂЂuso
pl Instrukcja obsтugi
TCAP53.. de Deutsch 2
en English 12
fr Fran—ais 22
nl Nederlands 32
es EspaЎol 42
pt Portuguљs 52
ru Pycckий 62
it Italiano 73
pl Polski 83
$
P
%
&
‘
( 2
Robert Bosch Hausger”te GmbH
de
Sicherheitshinweise
Die Gebrauchsanleitung bitte sorgf”ltig
durchlesen, danach handeln und
aufbewahren!
Dieser Espressovollautomat ist f¬r
die Verarbeitung haushalts¬blicher
Mengen im Haushalt oder in haus-
halts”hnlichen, nicht-gewerblichen
Anwendungen bestimmt. Haushalts-
”hnliche Anwen dun gen umfassen z. B. die Verwendung in Mitarbeiterk¬chen
von L”den, B¬ros, landwirtschaftlichen
und anderen gewerblichen Betrieben,
sowie die Nutzung durch G”ste von
Pensionen, kleinen Ho tels und ”hnlichen
Wohneinrich tungen.
QStromschlaggefahr!
Ger”t nur gem”Џ Angaben auf dem Typen]
schild anschlieЏen und betreiben.
Nur benutzen, wenn Zuleitung und Ger”t
keine Besch”digungen aufweisen.
Ger”t nur in Innenr”umen bei Raum ]
temperatur verwenden.
Personen (auch Kinder) mit verminderten
k¦rperlichen Sinneswahrnehmungs] oder
geistigen F”higkeiten oder mit mangeln]
der Erfahrung und Wissen, das Ger”t
nicht bedienen lassen, auЏer sie werden
beaufsichtigt oder hatten eine Einweisung
bez¬glich des Gebrauchs des Ger”tes
durch eine Person, die f¬r ihre Sicherheit
verantwortlich ist.
Kinder vom Ger”t fernhalten. Kinder beauf]
sichtigen, um zu verhindern, dass sie mit
dem Ger”t spielen.
Im Fehlerfall sofort den Netzstecker ziehen.
Reparaturen am Ger”t, wie z. B. eine
besch”digte Zuleitung auswechseln, d¬rfen
nur durch unseren Kundendienst ausgef¬hrt
werden, um Gef”hrdungen zu vermeiden.
Ger”t oder Netzkabel niemals in Wasser
tauchen.
Nicht in das Mahlwerk greifen.
Ger”t nur in frostfreien R”umen verwenden.
Q Verbr¬hungsgefahr!
Die D¬se f¬r HeiЏwasser / Dampf 8 wird
sehr heiЏ. Die D¬se 8 nur am Kunststoffgriff
anfassen und nicht auf K¦rperteile halten.
Die D¬se 8 kann bei Bezug von Dampf oder
HeiЏwasser am Anfang spritzen.
Auf einen Blick
Bilder A-E
1 Netzschalter (Ein/Aus)
auto off
2 Taste Kaffeest”rke ’
3 Bezugstaste E
4 Bezugstaste F
5 Taste h (Dampf aufheizen)
6 Drehknopf g / h
(HeiЏwasser / Dampfbezug)
7 Anzeige LED
a Wasser f¬llen H
b Schalen leeren I
c Serviceprogramm durchf¬hren S
d Drehknopf bet”tigen J
8 D¬se (f¬r HeiЏwasser / Dampf)
a Kunststoffgriff
b H¬lse
c D¬senspitze
9 H¦henverstellbarer Kaffeeauslauf
10 Deckel Wassertank
11 Abnehmbarer Wassertank
12 Bohnenbeh”lter mit Aromadeckel
13 Schacht Reinigungstabletten
14 Tassenablage (Vorw”rmfunktion)
15 Schiebeschalter Kaffeemahlgrad
16 Abstellgitter
17 Schale f¬r Kaffeesatz
18 Schale f¬r Restwasser
19 Schwimmer
20 Kabelfach
21 T¬r zur Br¬heinheit
22 Br¬heinheit
a Druckknopf (rot)
b Griff 3
TCA53 03/2012
de
Vor dem ersten Gebrauch
Allgemeines
Nur reines Wasser ohne Kohlens”ure
und vorzugsweise Espresso] oder Voll]
auto ma ten]Bohnenmischungen in die
ent sprech en den Beh”lter f¬llen. Keine
glasierten, karamellisierten oder mit sons]
tigen zucker haltigen Zus”tzen behandelte
Kaffeebohnen verwenden, sie verstopfen
das Mahlwerk. Bei diesem Ger”t ist die
Wasserh”rte einstellbar (siehe Kapitel
ЂЂЂWasserh”rte einstellenЂЂЂ).
Ger”t in Betrieb nehmen ЂЂЂ Das Ger”t auf eine wasserfeste, ebene Fl”che stellen.
ЂЂЂ Netzstecker auf die passende L”nge aus dem Kabelfach ziehen und anschlieЏen.
ЂЂЂ Wassertank 11 abnehmen, aussp¬len
und mit frischem, kaltem Wasser f¬llen.
Die Markierung ЂЂЂmaxЂЂЂ beachten.
ЂЂЂ Den Wassertank 11 gerade aufsetzen
und ganz nach unten dr¬cken.
ЂЂЂ Bohnenbeh”lter mit Kaffeebohnen f¬llen.
ЂЂЂ Vergewissern, dass der Drehknopf 6 auf
ЂЂЂ O ЂЂЂ steht.
ЂЂЂ Netzschalter 1 auto off zum Einschalten
dr¬cken.
System f¬llen
Bei der ersten Inbetriebnahme muss das
Wasserleitungssystem im Ger”t noch gef¬llt
werden. ЂЂЂ Eine Tasse unter die D¬se 8 stellen.
ЂЂЂ Den Drehknopf 6 auf g / h stellen,
etwas Wasser l”uft in die Tasse.
Sobald J blinkt, den Drehknopf 6 auf ЂЂЂ OЂЂЂ
zur¬ckstellen.
ЂЂЂ Nun blinken die LED der Bezugstasten 3 E und 4 F , das Ger”t sp¬lt und heizt
auf.
Das Ger”t ist betriebsbereit , sobald beide
LED leuchten.
Bedienelemente
1 Netzschalter auto off
Mit dem Netzschalter auto off wird die
Stromzufuhr ein] oder ausgeschaltet.
Nach dem Einschalten des Netzschal]
ters heizt das Ger”t auf, sp¬lt und ist
dann betriebsbereit, die beiden LED der
Bezugstasten 3 E und 4 F leuchten.
Das Ger”t sp¬lt nicht, wenn es beim Ein]
schalten noch warm ist.
Wird das Ger”t nicht manuell ausgeschal]
tet, schaltet es ca. 10 Minuten nach dem
letzten Bezug automatisch ab, das Ger”t
sp¬lt. Die voreingestellte Abschaltzeit kann
ver”ndert werden (siehe Kapitel ЂЂЂAuto]
matische Abschaltung auto offЂЂЂ).
Das Ger”t sp¬lt nicht, wenn:
ЂЂЂ nach dem Einschalten kein Kaffee bezogen wurde.
ЂЂЂ kurz vor dem Ausschalten Dampf bezogen wurde.
ЂЂЂ nur heiЏes Wasser oder Dampf bezogen wurde.
2 Taste Kaffeest”rke ’
Durch Dr¬cken der Taste ’ kann die
Kaffeest”rke eingestellt werden: ’ LED leuchtet nicht = Einstellung normal
’ LED leuchtet = Einstellung stark
’ LED blinkt = Kaffeebohnenbeh”lter leer
3 Bezugstaste E Kaffee klein
Mit dieser Taste kann eine kleine Tasse
(ca. 40ml) Kaffee bezogen werden. ЂЂЂ Die Taste 3 E dr¬cken, die LED dar¬ber
blinkt. Der Kaffee wird gemahlen, gebr¬ht
und l”uft in die Tasse, beide LED leuch]
ten sobald der Vorgang beendet ist.
Die Getr”nkegr¦Џe kann ver”ndert werden
(siehe Kapitel ЂЂЂFl¬ssigkeitsmenge dauerhaft
”ndernЂЂЂ). 4
Robert Bosch Hausger”te GmbH
de
4 Bezugstaste F Kaffee groЏ
Mit dieser Taste kann eine groЏe Tasse
(ca. 125ml) Kaffee bezogen werden. ЂЂЂ Die Taste 4 F dr¬cken, die LED dar¬ber
blinkt. Der Kaffee wird gemahlen, gebr¬ht
und l”uft in die Tasse, beide LED leuch]
ten sobald der Vorgang beendet ist.
Die Getr”nkegr¦Џe kann ver”ndert werden
(siehe Kapitel ЂЂЂFl¬ssigkeitsmenge dauerhaft
”ndernЂЂЂ).
5 Taste h Dampf
Durch Dr¬cken der Taste h wird im Ger”t
Dampf zum Aufsch”umen oder Erw”rmen
erzeugt.
6 Drehknopf Dampfbezug
Durch Drehen des Drehknopfes auf g
bzw. h kann heiЏes Wasser oder Dampf
bezogen werden. F¬r den Bezug von
Dampf muss vorher zus”tzlich die Taste 5
h gedr¬ckt werden (siehe Kapitel ЂЂЂDampf
zum Milch aufsch”umenЂЂЂ).
7 Anzeige LED
Das Leuchten und Blinken der jeweiligen
LED zeigt folgendes an:
H leuchtet Der Wassertank ist leer und
muss wieder gef¬llt werden.
I leuchtet Die Schalen sind voll:
Schalen leeren und wieder
einsetzen.
I blinkt Die Schalen fehlen:
Schalen wieder einsetzen.
S leuchtet Das Serviceprogramm muss
durchgef¬hrt werden, siehe
Kapitel ЂЂЂService]ProgrammЂЂЂ.
S blinkt Das Serviceprogramm ist in
Betrieb.
J
leuchtet Der Drehknopf muss auf
g / h gedreht werden.
J
blinkt Der Drehknopf muss auf ЂЂЂ OЂЂЂ
gedreht werden. Einstellungen und
optische Anzeige
Wasserh”rte einstellen
Die richtige Einstellung der Wasserh”rte ist
wichtig, damit das Ger”t rechtzeitig anzeigt,
wenn es entkalkt werden muss. Die vorein]
gestellte Wasserh”rte ist 4.
Die Wasserh”rte kann bei der ¦rtlichen
Wasserversorgung nachgefragt werden.
Stufe Wasserh”rtegrad
Deutsch (`dH) Franz¦sisch (`fH)
1
2
3
4 1]7
8]15
16]23
24]30 1]13
14]27
28]42
43]54
Das Ger”t muss betriebsbereit sein.
ЂЂЂ Die Taste
h
mind. 5 Sek. gedr¬ckt
halten. Die Anzahl der nun leuchtenden
LED 7a H , b I , c S , d J symbolisiert
die eingestellte Wasserh”rte.
ЂЂЂ Taste h nun so oft dr¬cken, bis die
LED f¬r die gew¬nschte Wasser h”rte
auleuchten; z. B. f¬r Wasserh”rte 3
leuchten 7a,b und c auf ( H, I , S ).
ЂЂЂ Taste
2 ’ einmal dr¬cken. Die einge]
stellten LED blinken kurz auf, die ausge]
w”hlte Wasserh”rte ist gespeichert.
Bei Einsatz des Wasserilters (Sonder zu be]
h¦r Best.]Nr. 461732) ist die Wasserh”rte 1
einzustellen.
Hinweis:
Wird innerhalb von 90 Sek.
keine Taste bet”tigt, geht das Ger”t ohne
Speicherung in die Kaffeebereitschaft.
Die
vorher gespeicherte Wasserh”rte bleibt
erhalten. 5
TCA53 03/2012
de
Beim ersten Einsatz des Filters oder nach
einem Filterwechsel muss das Ger”t
gesp¬lt werden. ЂЂЂ Wassertank bis zur Markierung ЂЂЂ0,5 lЂЂЂ mit Wasser f¬llen.
ЂЂЂ Ein ausreichend groЏes Gef”Џ (ca. 0,5 l) unter die D¬se 8 stellen.
ЂЂЂ Den Drehknopf 6 auf
g / h stellen.
ЂЂЂ Kommt kein Wasser mehr aus der D¬se, den Drehknopf auf ЂЂЂ OЂЂЂ zur¬ckstellen.
ЂЂЂ Wassertank f¬llen und das Wasser] leitungs system f¬llen (siehe ЂЂЂGer”t in
Betrieb nehmen / System f¬llenЂЂЂ).
Mahlgrad einstellen
Mit dem Schiebeschalter 15 f¬r Kaffeemahl]
grad kann die gew¬nschte Feinheit des
Kaffeepulvers eingestellt werden.
Q Achtung
Den Mahlgrad nur bei laufendem Mahlwerk
verstellen! Das Ger”t kann sonst besch”]
digt werden.
ЂЂЂ Bezugstaste 4 F dr¬cken.
ЂЂЂ Bei laufendem Mahlwerk den Schiebe]
schalter 15 auf die gew¬nschte Position
stellen: je kleiner der Punkt desto feiner
das Kaffeepulver.
i Die neue Einstellung macht sich erst bei
der zweiten oder dritten Tasse Kaffee
bemerkbar.
Tipp: Bei dunkel ger¦steten Bohnen einen
gr¦beren, bei helleren Bohnen einen feine]
ren Mahlgrad einstellen.
Automatische Abschaltung auto off
Die voreingestellte automatische Abschalt]
zeit von ca. 10 Minuten kann ver”ndert
werden. ЂЂЂ Dazu die Bezugstaste 3 E und die Taste
5 h gleichzeitig mindestens 5 Sekunden
gedr¬ckt halten. Die nun leuchtenden
LED 7a, b , c und d (H , I , S , J ) symbo]
lisieren die eingestellte Abschaltzeit. Nun
kann durch Dr¬cken der Taste 5 h die
Auswahl f¬r die Abschaltzeit vorgenom]
men werden:
Спросить у мастера «Что делать?»
— Вам ответят при первой возможности.
Использование инструкции для кофемашины BOSCH TCA 5309 бесплатно. Инструкция по эксплуатации BOSCH TCA 5309 доступна для скачивания из открытых источников.
инструкцияBosch Benvenuto Classic TCA5309

Register your new Bosch now:
www.bosch-home.com/welcome
Moodpic 1
63,2 x 50,25mm
CMYK & GREY
Moodpic 2
98,6 x 46,7mm
CMYK & GREY
TCA 53..
de Gebrauchsanleitung
en Instruction manual
fr Mode d’emploi
nl Gebruiksaanwijzing
es Instrucciones de uso
pt Instruções de serviço
ru Инструкция по эксплуатации
it Istruzioni per l’uso
pl Instrukcja obsługi
Посмотреть инструкция для Bosch Benvenuto Classic TCA5309 бесплатно. Руководство относится к категории кофеварки, 137 человек(а) дали ему среднюю оценку 8.2. Руководство доступно на следующих языках: английский. У вас есть вопрос о Bosch Benvenuto Classic TCA5309 или вам нужна помощь? Задайте свой вопрос здесь
Главная
| Bosch | |
| Benvenuto Classic TCA5309 | TCA5309 | |
| кофеварка | |
| 4242002703718 | |
| английский | |
| Руководство пользователя (PDF) |
Производительность
| Вместимость в чашках | — чашек |
| Тип кофе | Кофе в зернах |
| Тип кофеварки | Автоматическая |
| Максимальное рабочее давление | 15 бар |
| Емкость водного резервуара | 1.8 L |
| Вместимость кофейных зерен | 250 g |
| Встроенная мельница | Да |
| Регулируемые настройки кофемолки | Да |
| Тип продукта | Машина для эспрессо |
| Размещение бытового устройства | Столешница |
| Количество настроек температуры | 3 |
| Количество носиков | 2 |
| Автоматическое удаление накипи | Да |
| Подогреватель чашек | Да |
| Водяной фильтр | Да |
| Паропровод | Да |
| Регулируемое количество воды | Да |
| Регулируемая температура | Да |
| Емкость для молока | Нет |
| Система подачи горячей воды | Да |
Эргономика
| Съемный резервуар для воды | Да |
| Длина шнура | 1 m |
| Цвет товара | Черный |
| Материал корпуса | — |
| Встроенный экран | Нет |
| Съемный лоток для капель | Да |
Вес и размеры
| Ширина | 260 mm |
| Глубина | 450 mm |
| Высота | 340 mm |
| Вес | 3280 g |
Энергопитание
| Входящее напряжение сети | 220–240 V |
| Частота входящего переменного тока | 50 Hz |
| Автовыключение | Да |
| Мощность | 1400 W |
Программы и функции приготовления пищи
| Приготовление кофе | Да |
| Приготовление эспрессо | Да |
| Приготовление капучино | Да |
показать больше
Не можете найти ответ на свой вопрос в руководстве? Вы можете найти ответ на свой вопрос ниже, в разделе часто задаваемых вопросов о Bosch Benvenuto Classic TCA5309.
Какой вес Bosch Benvenuto Classic TCA5309?
Bosch Benvenuto Classic TCA5309 имеет вес 3280 g.
Как часто следует очищать кофеварку от накипи?
Частота очистки кофеварки от накипи зависит от частоты ее использования и жесткости воды. При использовании воды высокой жесткости кофеварку рекомендуется очищать от накипи раз в месяц. При использовании воды низкой жесткости рекомендуется проводить чистку раз в квартал.
Какой лучший способ очистки кофеварки от накипи?
Для очистки кофеварки от накипи рекомендуется использовать жидкие средства на которых есть отметка о возможности использования их для чистки кофеварки.
Что такое эспрессо?
Эспрессо — небольшое количество концентрированного кофе.
Как долго можно хранить кофе в зернах?
Срок годности указывается на упаковке кофе в зернах. Данный срок годности действителен, пока упаковка не открыта.
Как лучше всего хранить кофе?
Кофе рекомендуется хранить в герметичной, чистой емкости.
Как помол сказывается на вкусе кофе?
Помол сильно влияет на вкус кофе. Если кофейные зерна измельчены очень мелко — это усилит вкус кофе, при более крупном помоле кофе будет иметь более мягкий вкус.
Какая высота Bosch Benvenuto Classic TCA5309?
Bosch Benvenuto Classic TCA5309 имеет высоту 340 mm.
Какая ширина Bosch Benvenuto Classic TCA5309?
Bosch Benvenuto Classic TCA5309 имеет ширину 260 mm.
Какая толщина Bosch Benvenuto Classic TCA5309?
Bosch Benvenuto Classic TCA5309 имеет толщину 450 mm.
Инструкция Bosch Benvenuto Classic TCA5309 доступно в русский?
К сожалению, у нас нет руководства для Bosch Benvenuto Classic TCA5309, доступного в русский. Это руководство доступно в английский.
Не нашли свой вопрос? Задайте свой вопрос здесь