
Casio SGW-500 / линейка Collection / модуль 5269 / год 2012
Инструкция к модулю Casio 5269
- Смотреть онлайн → (без скачивания, удобно на мобильных и планшетах);
- Скачать русскую инструкцию → (типичная “как у всех”, не всегда понятные картинки);
- Скачать английскую инструкцию → (детальная, много фото, более понятная).
Сложно настроить? Спрашивай на форуме Casio →
Читайте новости о любимых часах SGW-500 на блоге
[display-posts tag=”SGW-500″ posts_per_page=”4″]
Все новости о SGW-500 →
Побывайте на заводе Casio, изучайте последние новинки часов на Casioblog.RU


![]()
MO1208-EA © 2012 CASIO COMPUTER CO., LTD.
Operation Guide 5269
ENGLISH
Congratulations upon your selection of this CASIO watch.
Warning!
• The measurement functions built into this watch are not intended for taking measurements that require professional or industrial precision. Values produced by this watch should be considered as reasonable representations only.
• Note that CASIO COMPUTER CO., LTD. assumes no responsibility for any damage or loss suffered by you or any third party arising through the use of this product or its malfunction.
E-1
•To ensure correct direction readings by this watch, be sure to perform bidirectional calibration before using it. The watch may produce incorrect direction readings if you do not perform bidirectional calibration. For more information, see “To perform bidirectional calibration” (page E-36).
•Keep the watch away from audio speakers, magnetic necklace, cell phone, and other devices that generate strong magnetism. Exposure to strong magnetism can magnetize the watch and cause incorrect direction readings. If incorrect readings continue even after you perform bidirectional calibration, it could mean that your watch has been magnetized. If this happens, contact your original retailer or an authorized CASIO Service Center.
E-2
About This Manual
• Depending on the model of your watch, digital display text appears either as dark figures on a light background, or light figures on a dark background. All sample displays in this manual are shown using dark figures on a light background.
• Button operations are indicated using the letters shown in the illustration.
• Note that the product illustrations in this manual are intended for reference only, and so the actual product may appear somewhat different than depicted by an illustration.
E-3
|
Things to check before using the watch |
3. Set the current time. |
|||
|
See “Configuring Current Time and Date Settings” (page E-22). |
||||
|
1. Check the Home City and the daylight saving time (DST) setting. |
||||
Use the procedure under “Configuring Home City Settings” (page E-17) to configure your Home City and daylight saving time settings.
Important!
Proper World Time Mode, Sunrise/Sunset Mode, and Moon Age Mode data depend on correct Home City, time, and date settings in the Timekeeping Mode. Make sure you configure these settings correctly.
2. Configure latitude and longitude settings for your current location.
See “To select a Home City by configuring latitude and longitude settings” (page E-20).
The watch is now ready for use.
E-4 E-5
|
Contents |
E-26 Hand Home Position Adjustment |
||
|
E-26 To adjust home positions |
|||
E-3 About This Manual
E-4 Things to check before using the watch
E-11 Mode Reference Guide
E-16 Timekeeping
E-17 Configuring Home City Settings
E-17 To configure Home City settings
E-19 To change the Daylight Saving Time (summer time) setting
E-20 Configuring Latitude and Longitude Settings for Your Current Location
E-20 To select a Home City by configuring latitude and longitude settings
E-22 Configuring Current Time and Date Settings
E-22 To change the current time and date settings
E-6
E-29 Taking Direction Readings
E-30 To take a direction reading
E-36 To perform bidirectional calibration
E-38 To perform magnetic declination correction
E-43 Thermometer
E-43 To enter and exit the Thermometer Mode
E-45 To correct the temperature value
E-47 Specifying Temperature Unit
E-47 To specify the temperature unit
E-49 Looking up Sunrise and Sunset Times
E-49 To look up the sunrise and sunset times on a specific date E-50 To toggle between sunrise time and sunset time
E-51 To view the sunrise/sunset time for a particular date
E-7
|
E-52 |
Using Moon Data |
E-60 Using the Countdown Timer |
|
|
E-52 To look up the Moon age on a specific date |
E-60 |
To enter the Countdown Timer Mode |
|
|
E-54 |
Using the Alarm |
E-60 |
To specify the countdown start time |
E-54 To enter the Alarm Mode E-55 To set an alarm time E-56 To test the alarm
E-57 To turn an alarm and the Hourly Time Signal on and off E-57 To stop the alarm
E-58 Using the Stopwatch
E-58 To enter the Stopwatch Mode
E-58 To perform an elapsed time operation E-58 To pause at a split time
E-61 To perform a countdown timer operation
E-62 To stop the alarm
E-63 Checking the Current Time in a Different Time Zone
E-63 To enter the World Time Mode
E-64 To view the time in another time zone
E-64 To specify standard time or daylight saving time (DST) for a city
E-65 Illumination
E-65 To turn on illumination
E-66 To change the illumination duration
E-68 Button Operation Tone
E-68 To turn the button operation tone on and off

Operation Guide 5269
|
E-70 Troubleshooting |
Mode Reference Guide |
||||
|
E-75 Specifications |
Your watch has 9 “modes”. The mode you should select depends on what you want to do. |
||||
|
To do this: |
Enter this mode: |
See: |
|||
|
• View the current time and date in the Home City |
|||||
|
• Configure Home City and daylight saving time (DST) settings |
Timekeeping Mode |
E-16 |
|||
|
• Configure current location latitude and longitude settings |
|||||
|
• Configure time and date settings |
|||||
|
• Determine your current bearing or the direction from your current |
Digital Compass |
||||
|
location to a destination as a direction indicator and angle value |
E-29 |
||||
|
Mode |
|||||
|
• Determine your current location using the watch and a map |
|||||
|
Determine the temperature at your current location |
Thermometer Mode |
E-43 |
|||
|
View the sunrise and sunset times for a specific date |
Sunrise/Sunset Mode |
E-49 |
|||
|
Determine a Moon age value |
Moon Age Mode |
E-52 |
|||
|
Set an alarm time |
Alarm Mode |
E-54 |
|||
|
Use the stopwatch to measure elapsed time |
Stopwatch Mode |
E-58 |
|||
|
Use the countdown timer |
Countdown Timer Mode |
E-60 |
|||
|
View the current time in one of 48 cities (31 time zones) around the globe |
World Time Mode |
E-63 |
|||
|
E-10 |
E-11 |
||||
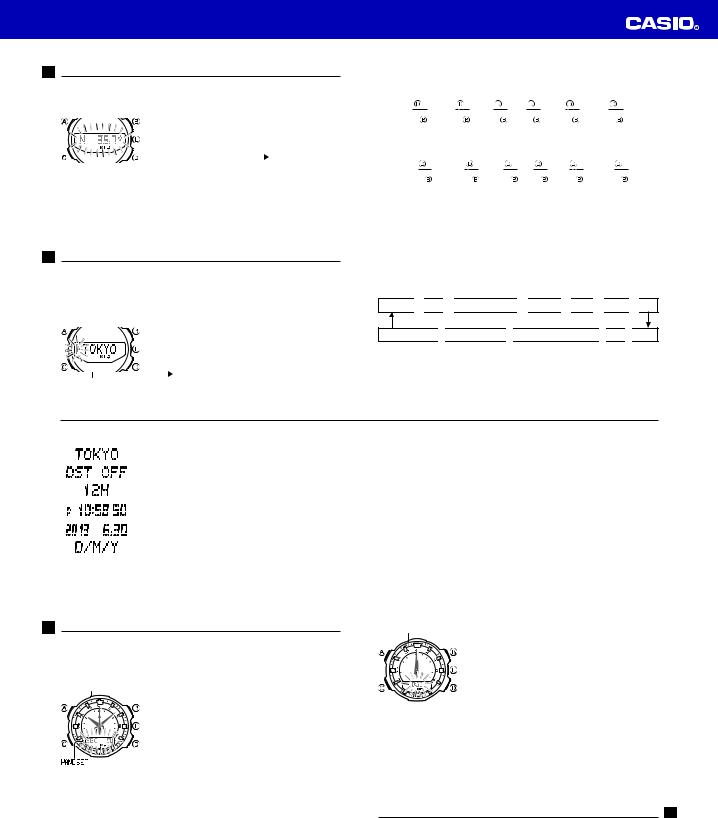
Selecting a Mode
•The illustration below shows which buttons you need to press to navigate between modes.
•To return to the Timekeeping Mode from any other mode, hold down C for about two seconds.
•In any mode, press L to illuminate the display.
|
Alarm Mode |
Moon Age Mode |
|
Stopwatch Mode |
Countdown Timer Mode |
|
Sunrise/Sunset Mode |
Timekeeping Mode |
Digital Compass Mode |
|||||||||
World Time Mode
Thermometer Mode
General Functions (All Modes)
The functions and operations described in this section can be used in all of the modes.
Auto Return Features
• If you do not perform any operation for a certain amount of time in certain modes as shown in the table below, the watch will automatically return to the Timekeeping Mode.
|
Mode |
No operation time |
|
Digital Compass, Thermometer |
1 to 2 minutes |
|
Sunrise/Sunset, Moon Age, Alarm |
2 to 3 minutes |
• If you leave a setting screen (one with flashing digits) on the digital display for two or three minutes without performing any operation, the watch exits the setting screen automatically.
Initial Screens
When you enter the Sunrise/Sunset Mode, Digital Compass Mode, Alarm Mode, or World Time Mode, the data you were viewing when you last exited the mode will appear first.
Scrolling
The B and D buttons are used on the setting screen to scroll through available settings on the digital display. In most cases, holding down these buttons during a scroll operation scrolls through the data at high speed.
Timekeeping
Use the Timekeeping Mode to set and view the current time and date.
•Each press of A in the Timekeeping Mode toggles the digital display between the current date and the current time.
•You can select one of the two following Date Screen display formats: SUN 6.30 or SUN 30.6. For information about how to select the format, see “Date Display Format” under “To change the current time and date settings” (page E-22).
|
Date screen |
Regular timekeeping screen |
|
|
Day of week |
Month Day |
Hour : Minutes Seconds |
Configuring Home City Settings
There are two Home City settings: actually selecting the Home City and selecting either standard time or daylight saving time (DST).
To configure Home City settings
1. In the Timekeeping Mode, hold down A for at least two
City Name seconds until ADJUST appears on the digital display. This is the setting mode. Release A after ADJUST appears.
• The city name of the currently selected Home City
data will appear on the digital display with an arrow ( ) flashing to the left.
•The watch will exit the setting mode automatically if you do not perform any operation for about two or three minutes.
•For details about city data, see the “City Data Table” at the back of this manual.
2.Press D (East) and B (West) to scroll through city names until the one you want to use as your Home City data is displayed.
3.Press C to display the DST setting screen.
4.Press D to toggle between Daylight Saving Time (DST ON) and Standard Time (DST OFF).
5.When the setting is the way you want, press A twice to
|
return to the Timekeeping Mode. |
|
|
• The DST indicator appears to indicate that Daylight |
|
|
Saving Time is turned on. |
|
|
Note |
|
|
• After you specify city data, the watch will use UTC* |
|
|
Setting |
offsets to calculate the current time for other time |
|
zones based on the current time in your Home City. |
|
|
DST indicator |
* Coordinated Universal Time, the world-wide |
|
scientific standard of timekeeping. |
|
|
The reference point for UTC is Greenwich, England. |
To change the Daylight Saving Time (summer time) setting
1.In the Timekeeping Mode, hold down A for at least two
seconds until ADJUST appears on the digital display. Release A after ADJUST appears.
•The name of the city currently selected as your Home City will appear on the digital display with an arrow ( ) flashing to the left.
2.Press C to display the DST setting screen.
3.Press D to toggle between Daylight Saving Time (DST ON) and Standard Time (DST OFF).
4.When the setting is the way you want, press A twice to return to the Timekeeping Mode.
•The DST indicator appears to indicate that Daylight Saving Time is turned on.
Operation Guide 5269
Configuring Latitude and Longitude Settings for Your Current Location
You can ensure correct display of sunrise and sunset time settings, and of moon ages by configuring latitude and longitude settings for your current location.
To select a Home City by configuring latitude and longitude settings
1.In the Timekeeping Mode, hold down A for at least two
seconds until ADJUST appears on the digital display. This is the setting mode. Release A after ADJUST
appears.
• Your current Home City data will appear on the digital display with an arrow ( ) flashing to the left.
2.Press A to display the latitude setting screen with the current latitude setting flashing.
Configuring Current Time and Date Settings
You can use the procedure below to adjust the current time and date settings if they are not correct.
Changing the digital Home City data should cause the analog time setting to change accordingly. If the analog time does not indicate the digital time, check the home positions of the hands and make adjustments if necessary (page E-26).
To change the current time and date settings
1.In the Timekeeping Mode, hold down A for at least two seconds until ADJUST appears on the digital display.
This is the setting mode. Release A after ADJUST
appears.
• The name of the city currently selected as your Home City will appear on the digital display with an arrow
( ) flashing to the left.
City name
E-22
|
Screen |
To do this: |
Do this: |
|
Change the city name |
Use D (East) and |
|
|
B (West). |
||
|
Toggle between Daylight Saving Time |
Press D. |
|
|
(DST ON) and Standard Time (DST OFF). |
||
|
Toggle between 12-hour (12H) and 24-hour |
Press D. |
|
|
(24H) timekeeping. |
||
|
Reset the seconds to 00 |
Press D. |
|
|
Change the hour or minute |
Use D (+) and |
|
|
Change the year, month, or day |
B (–). |
|
|
Select the date display format (DMY, YMD, |
Press D. |
|
|
MDY) |
||
Note
•For information about selecting a Home City and configuring the DST setting, see “Configuring Home City Settings” (page E-17).
•The watch’s built-in full automatic calendar makes allowances for different month lengths and leap years. Once you set the date, there should be no reason to change it except after you have the watch’s battery replaced.
•Changing your Home City setting will initialize the latitude and longitude settings to the location of the Home City.
5.When the settings are the way you want, press A twice to return to the Timekeeping Mode.
Hand Home Position Adjustment
The hour, minute, and second hands of this watch can be put out of position by strong magnetism or strong impact. When this happens, you can use the procedure below to adjust the hand positions.
|
To adjust home positions |
|
|
Second hand |
1. In the Timekeeping Mode, hold down A for at least |
|
four seconds until HAND SET appears on the digital |
|
|
display. This is the setting mode. Release A after |
|
|
HAND SET appears. |
|
|
• This will cause SEC 00 to flash on the digital |
|
|
display, indicating the second hand adjustment |
|
|
mode. |
Hour and minute hands
Correct hour and minute hand positions
2.Check the position of the second hand.
•If the second hand is pointing to 12 o’clock, it is in the correct home position. If it isn’t, use D (forward) and B (back) to adjust the second hand position so it points to 12 o’clock.
•Holding down either button will cause the second hand to move at high speed.
3.Press C. This will cause 0:00 to flash on the digital display, indicating the hour and minute adjustment mode.
4.Check the positions of the hour and minute hands.
•The hands are in the correct home positions if they are pointing to 12 o’clock. If they aren’t, use D (forward) and B (back) to adjust their positions.
•Holding down either button will cause the hour and minute hands to move at high speed.
5.Press A to exit the setting screen.
•This will cause the hour and minute hands to move to the current Timekeeping Mode time.
Taking Direction Readings
The watch has a magnetic sensor that makes it possible to take digital compass readings. You can use the digital compass to find the direction to a specific objective and to determine your current position.
•See “Magnetic North and True North” (page E-40) for information about the two types of north. For information about maximizing digital compass accuracy, see “Calibrating Direction Readings” (page E-34) and “Digital Compass Precautions” (page E-40).
 Loading…
You can only view or download manuals with
Sign Up and get 5 for free
Upload your files to the site. You get 1 for each file you add
Get 1 for every time someone downloads your manual
Buy as many as you need
 Loading…
You can only view or download manuals with
Sign Up and get 5 for free
Upload your files to the site. You get 1 for each file you add
Get 1 for every time someone downloads your manual
Buy as many as you need
CASIO
SGW-500
Модуль 5269
Руководство пользователя
Прежде всего прочтите эту важную информацию
Батарея
При первых признаках недостаточности питания (нечеткость изображения или
отсутствие подсветки) необходимо заменить батарею у ближайшего дилера или
дистрибьютора фирмы «CASIO». В приобретенных вами часах, содержится
батарея, установленная изготовителем для тестовых испытаний, поэтому срок
службы этой батареи по сравнению со стандартным, вероятно, будет сокращен
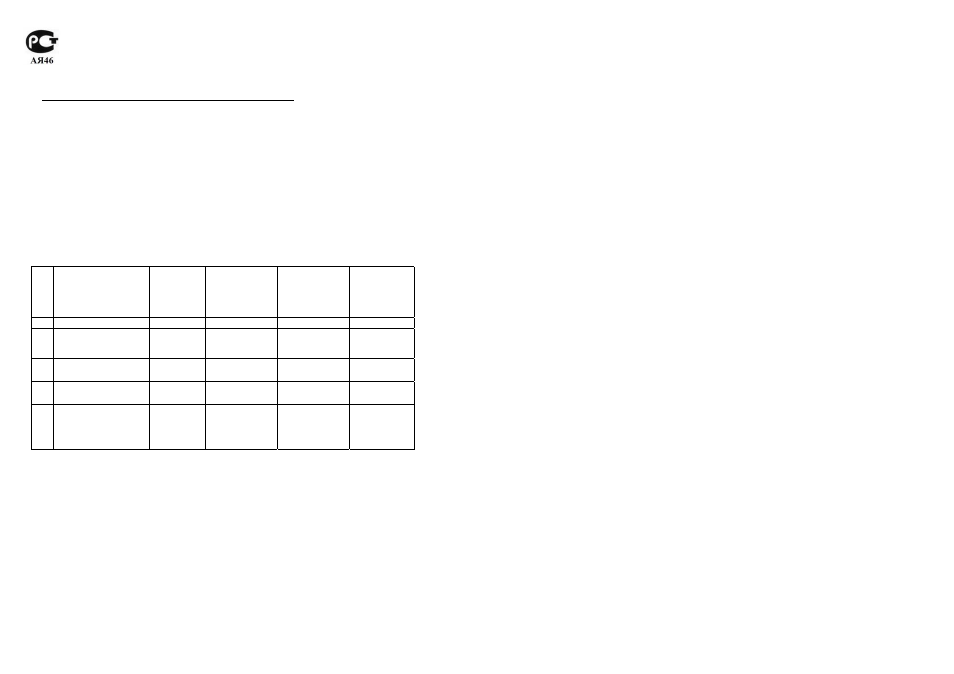
Защита от воды
Часы классифицируются по разрядам (с I по V разряд) в соответствии со
степенью их защищенности от воды. Уточните разряд ваших часов с помощью
приведенной ниже таблицы, чтобы определить правила их использования.
Маркировка
на корпусе
Брызги,
дождь и
т.п.
Плавание,
мытье
машины и
т.п.
Подводное
плавание,
ныряние и
т.п.
Ныряние с
аквалангом
I
—
Нет
Нет
Нет
Нет
II
WATER
RESISTANT
Да
Нет
Нет
Нет
III
50M WATER
RESISTANT
Да
Да
Нет
Нет
IV 100M WATER
RESISTANT
Да
Да
Да
Нет
V
200M WATER
RESISTANT
300M WATER
RESISTANT
Да
Да
Да
Да
Примечания для соответствующих разделов.
I. Часы не защищены от воды. Избегайте попадания любой влаги.
III. Если часы подверглись воздействию соленой воды, то тщательно промойте
их и вытрите насухо.
IV. Если часы подверглись воздействию соленой воды, то тщательно промойте
их и вытрите насухо.
V. Часы могут использоваться при погружении с аквалангом (за исключением
таких глубин, при которых требуется гелиево-кислородная смесь).
ВНИМАНИЕ!!!
Для всех категорий часов запрещается:
нажимать кнопки под водой
переводить стрелки под водой
отвинчивать переводную головку под водой
ВАЖНО!!!
Особенностью некоторых защищенных от воды часов является наличие у
них кожаных ремешков. Не надевайте эти часы во время плавания или
какой-либо другой деятельности, при которой ремешок погружается в воду.
Уход за вашими часами
Замена резиновой прокладки, защищающей часы от попадания воды и пыли,
должна осуществляться через каждые 2-3 года.
Если внутрь часов попадет влага, то немедленно проверьте их у ближайшего
к вам дилера или дистрибьютора фирмы CASIO.
Не подвергайте часы воздействию слишком высоких или низких температур.
Хотя часы рассчитаны на использование их в обычных условиях, тем не
менее, вы должны избегать грубого обращения с ними и не допускать их
падения.
Не застегивайте ремешок слишком туго. Между вашим запястьем и
ремешком должен проходить палец.
Для очистки часов и ремешка используйте сухую мягкую ткань, либо мягкую
ткань, смоченную в водном растворе мягкого нейтрального моющего
средства. Никогда не используйте легко испаряющимися средствами
(например, такими, как бензин, растворители, распыляющиеся чистящие
средства и т.п.).
Когда вы не пользуетесь вашими часами, храните их в сухом месте.
Избегайте попадания на часы бензина, чистящих растворителей, аэрозолей из
распылителей, клеящих веществ, краски и т.п. Химические реакции,
вызываемые этими материалами, приводят к повреждению прокладок,
корпуса и полировки часов.
Особенностью некоторых моделей часов является наличие на их ремешке
изображений, выполненных шелкографией. Будьте осторожны при чистке
таких ремешков, чтобы не испортить эти рисунки.
Для часов с полимерными ремешками…
Вы можете обнаружить белесое порошкообразное вещество на ремешке.
Это вещество не вредно для вашей кожи или одежды и может быть легко
удалено путем протирания мягкой тканью.
Попадание на полимерный ремешок пота или влаги, а также хранение его в
условиях высокой влажности может привести к повреждению, разрыву или
растрескиванию ремешка. Для того чтобы обеспечить длительный срок
службы полимерного ремешка, как можно чаще протирайте его от грязи и
воды мягкой тканью.
Для часов с флуоресцентными корпусами и ремешками…
Длительное облучение прямым солнечным светом может привести к
постепенному исчезновению флуоресцентной окраски.
Длительный контакт с влагой может вызвать постепенное исчезновение
флуоресцентной окраски. В случае попадания на поверхность часов любой
 05:00
05:00
Настройка Casio SGW-500H-2BVER
![Видео Часы Casio Outgear SGW-500H-2B [SGW-500H-2BER] - Инструкция, как настроить от PresidentWatches.Ru (автор: ПрезидентВотчес.Ру)](https://i.ytimg.com/vi/OeV_IL5o0XE/mqdefault.jpg) 09:46
09:46
Часы Casio Outgear SGW-500H-2B [SGW-500H-2BER] — Инструкция, как настроить от PresidentWatches.Ru
 03:04
03:04
CASIO OUTGEAR ANALOG DIGITAL SGW-500H-1B TWIN SENSOR — UNBOXING
![Видео Casio Outgear SGW-500HD-1B [SGW-500HD-1BER] - Инструкция, Как настроить от PresidentWatches.Ru (автор: ПрезидентВотчес.Ру)](https://i.ytimg.com/vi/kIiLiaPi8Ao/mqdefault.jpg) 11:43
11:43
Casio Outgear SGW-500HD-1B [SGW-500HD-1BER] — Инструкция, Как настроить от PresidentWatches.Ru
![Видео Часы Casio Outgear SGW-500H-1B [SGW-500H-1BER] - Инструкция, как настроить от PresidentWatches.Ru (автор: ПрезидентВотчес.Ру)](https://i.ytimg.com/vi/FbZbskMp-dg/mqdefault.jpg) 09:08
09:08
Часы Casio Outgear SGW-500H-1B [SGW-500H-1BER] — Инструкция, как настроить от PresidentWatches.Ru
 03:56
03:56
casio sgw 500h watch review
 02:53
02:53
Обзор часов Casio Pro Trek SGW-500H-1BVER
Руководство пользователя Прежде всего прочтите эту важную и…
Часы Casio
- Изображение
- Текст
CASIO
SGW-500
Модуль 5269
Руководство пользователя
Прежде всего прочтите эту важную информацию
Батарея
При первых признаках недостаточности питания (нечеткость изображения или
отсутствие подсветки) необходимо заменить батарею у ближайшего дилера или
дистрибьютора фирмы «CASIO». В приобретенных вами часах, содержится
батарея, установленная изготовителем для тестовых испытаний, поэтому срок
службы этой батареи по сравнению со стандартным, вероятно, будет сокращен
Защита от воды
Часы классифицируются по разрядам (с I по V разряд) в соответствии со
степенью их защищенности от воды. Уточните разряд ваших часов с помощью
приведенной ниже таблицы, чтобы определить правила их использования.
Маркировка
на корпусе
Брызги,
дождь и
т.п.
Плавание,
мытье
машины и
т.п.
Подводное
плавание,
ныряние и
т.п.
Ныряние с
аквалангом
I
—
Нет
Нет
Нет
Нет
II
WATER
RESISTANT
Да
Нет
Нет
Нет
III
50M WATER
RESISTANT
Да
Да
Нет
Нет
IV 100M WATER
RESISTANT
Да
Да
Да
Нет
V
200M WATER
RESISTANT
300M WATER
RESISTANT
Да
Да
Да
Да
Примечания для соответствующих разделов.
I. Часы не защищены от воды. Избегайте попадания любой влаги.
III. Если часы подверглись воздействию соленой воды, то тщательно промойте
их и вытрите насухо.
IV. Если часы подверглись воздействию соленой воды, то тщательно промойте
их и вытрите насухо.
V. Часы могут использоваться при погружении с аквалангом (за исключением
таких глубин, при которых требуется гелиево-кислородная смесь).
ВНИМАНИЕ!!!
Для всех категорий часов запрещается:
нажимать кнопки под водой
переводить стрелки под водой
отвинчивать переводную головку под водой
ВАЖНО!!!
Особенностью некоторых защищенных от воды часов является наличие у
них кожаных ремешков. Не надевайте эти часы во время плавания или
какой-либо другой деятельности, при которой ремешок погружается в воду.
Уход за вашими часами
Замена резиновой прокладки, защищающей часы от попадания воды и пыли,
должна осуществляться через каждые 2-3 года.
Если внутрь часов попадет влага, то немедленно проверьте их у ближайшего
к вам дилера или дистрибьютора фирмы CASIO.
Не подвергайте часы воздействию слишком высоких или низких температур.
Хотя часы рассчитаны на использование их в обычных условиях, тем не
менее, вы должны избегать грубого обращения с ними и не допускать их
падения.
Не застегивайте ремешок слишком туго. Между вашим запястьем и
ремешком должен проходить палец.
Для очистки часов и ремешка используйте сухую мягкую ткань, либо мягкую
ткань, смоченную в водном растворе мягкого нейтрального моющего
средства. Никогда не используйте легко испаряющимися средствами
(например, такими, как бензин, растворители, распыляющиеся чистящие
средства и т.п.).
Когда вы не пользуетесь вашими часами, храните их в сухом месте.
Избегайте попадания на часы бензина, чистящих растворителей, аэрозолей из
распылителей, клеящих веществ, краски и т.п. Химические реакции,
вызываемые этими материалами, приводят к повреждению прокладок,
корпуса и полировки часов.
Особенностью некоторых моделей часов является наличие на их ремешке
изображений, выполненных шелкографией. Будьте осторожны при чистке
таких ремешков, чтобы не испортить эти рисунки.
Для часов с полимерными ремешками…
Вы можете обнаружить белесое порошкообразное вещество на ремешке.
Это вещество не вредно для вашей кожи или одежды и может быть легко
удалено путем протирания мягкой тканью.
Попадание на полимерный ремешок пота или влаги, а также хранение его в
условиях высокой влажности может привести к повреждению, разрыву или
растрескиванию ремешка. Для того чтобы обеспечить длительный срок
службы полимерного ремешка, как можно чаще протирайте его от грязи и
воды мягкой тканью.
Для часов с флуоресцентными корпусами и ремешками…
Длительное облучение прямым солнечным светом может привести к
постепенному исчезновению флуоресцентной окраски.
Длительный контакт с влагой может вызвать постепенное исчезновение
флуоресцентной окраски. В случае попадания на поверхность часов любой

влаги, как можно скорее удалите ее.
Длительный контакт с влажной поверхностью может привести к
обесцвечиванию флуоресцентной окраски. Следите за отсутствием влаги на
флуоресцентной поверхности и избегайте ее контакта с другими поверхностями.
Сильное трение поверхности, имеющей нанесенную флуоресцентную краску, о
другую поверхность может привести к переносу флуоресцентной краски на эту
поверхность.
Фирма «CASIO COMPUTER CO., LTD» не несет ответственности за какой бы то ни
было ущерб, который может возникнуть при использовании этих часов, и не
принимает никаких претензий со стороны третьих лиц.
ОБЩЕЕ ОПИСАНИЕ РЕЖИМОВ РАБОТЫ
На рисунке изображен общий вид часов в Режиме Текущего
Времени.
Последовательное нажатие кнопки “C” обеспечивает переход из
разряда в разряд в следующей последовательности: Режим
Текущего Времени – Режим Восхода/Заката солнца – Режим
Лунного Времени – Режим Звукового Сигнала – Режим
Секундомера – Режим Таймера Обратного Отсчета – Режим
Времени города другого часового пояса – Режим Текущего
Времени.
Для входа в Режим Компаса из Режима Текущего
Времени/Термометра нажимайте кнопку “B”. Для возврата в
Режим Текущего Времени используйте кнопку “С”.
Для входа в Режим Термометра из Режима Текущего
Времени/Компаса нажимайте кнопку “D”. Для возврата в Режим Текущего Времени
используйте кнопку “С”.
Для включения подсветки в любом режиме нажмите кнопку “L”.
РЕЖИМ ТЕКУЩЕГО ВРЕМЕНИ
Нажатие копки “А” в Режиме Текущего Времени переключает значения даты (день
недели, месяц, число) и времени (часы, минуты, секунды).
Установка города текущего местоположения
1.
В Режиме Текущего Времени нажимайте и удерживайте кнопку “А” до
появления индикации “ADJUST”.
При этом на дисплее появится индикация города, выбранного в качестве города
Вашего текущего местоположения, с мигающей индикацией ► с левой стороны.
Если Вы не производите каких-либо действий в течение в течение 2-3 минут,
часы автоматически выходят из режима установок.
2.
Для выбора города Вашего текущего местоположения используйте кнопки “D” и
“В”.
3.
Для перехода к установкам летнего времени нажмите кнопку “С”.
4.
Для включения (ON)/выключения (OFF) летнего времени нажимайте кнопку
“D”.
5.
По окончании установок дважды нажмите кнопку “А” для возврата в Режим
Текущего Времени.
Ввод данных долготы/широты Вашего текущего местоположения
Для того, чтобы часы могли правильно рассчитывать возраст Луны, Вам
необходимо ввести правильные значения широты и долготы Вашего текущего
местоположения:
1.
В Режиме Текущего Времени нажмите и удерживайте кнопку “А” до
появления кода индикатора “ADJUST”.
На дисплее появится код города, выбранного в качестве города другого
часового пояса, и индикатор “►” слева он названия города.
2.
Нажмите кнопку “А” для перехода к установкам широты.
3.
С помощью кнопок “D” и “В” введите необходимые значения широты с
интервалом в 0.1º
S 62.0º — S 61.9º — W 0.1º — N 0º — N 0.1º — N 61.9º — N 62.0º
Удерживание кнопок в нажатом состоянии позволяет производить измерения
с большей скоростью.
4.
По окончании вода значения широты, нажмите кнопку “С” для перехода к
установкам долготы.
5.
С помощью кнопок “D” и “В” введите необходимые значения долготы с
интервалом в 0.1º
W 179.9º – W 179.8º – W 0.1º – E 0º – E 0.1º – E179.9º – E 180º
6.
По окончании установок нажмите кнопку “А”.
Установка текущего времени и даты
1.
В Режиме Текущего Времени нажимайте и удерживайте кнопку “А” до
появления индикации “ADJUST”.
При этом на дисплее появится индикация города, выбранного в качестве
города Вашего текущего местоположения, с мигающей индикацией ► с
левой стороны.
2.
Для выбора города Вашего текущего местоположения используйте кнопки
“D” и “В”.
3.
Нажимайте кнопку “С” для перехода из разряда в разряд в следующей
последовательности: Код города – Режим Летнего Времени (DST) – 12/24
часовой формат представления времени – Секунды – Часы – Минуты – Год –
Месяц – Число – Включение/Выключение звука кнопок – Режим изменения
продолжительности подсветки – Формат данных дисплея – Код города.
4.
Если вы выбрали для коррекции секунды (изображение секунд мигает),
нажмите кнопку “D” для сброса значения счетчика секунд в 00. Если вы
нажмете кнопку “D” при значении счетчика секунд между 30 и 59, то
значение счетчика установится в 00 и 1 прибавится к счетчику минут, если
значение счетчика секунд будет между 00 и 29, то изменение счетчика минут
не произойдет.
5.
Для изменения значений минут и т.д. используйте кнопку “D” для увеличения
и кнопку “В” для уменьшения выбранного значения.
День недели устанавливается автоматически в соответствии с датой.

Значение даты может быть установлено в диапазоне от…
Страница 3
- Изображение
- Текст
Значение даты может быть установлено в диапазоне от 1 января 2001 года до 31
декабря 2099 года.
6.
Для выбора кода города используйте кнопки “D” и “В”.
7.
Для переключения 12/24 часового формата представления времени нажимайте
кнопку “D”.
При выбранном 12-ти часовом формате представления времени индикатор “Р”
обозначает значение времени после полудня.
8.
Для включения (DST ON)/выключения (DST OFF) летнего времени используйте
кнопку “D”.
9.
Для выбора формата представления данных на дисплее (DMY (день/месяц/год),
YMD (год/месяц/день), MDY (месяц/день/год) используйте кнопку “D”.
10.
По окончании установок дважды нажмите кнопку “А”.
Корректировка положения стрелок
Если показания часовой, минутной и секундной стрелок часов становятся неверными,
причиной чего может быть близкое нахождение предметов высокого магнитного
излучения, проведите процесс корректировки стрелок:
1.
В Режиме Текущего Времени нажимайте и удерживайте кнопку “А” в течение 4х
секунд до появления индикации “HAND SET”.
При этом на дисплее появится индикатор “SEC 00”, обозначающий переход в
режим корректировки секундной стрелки.
2.
Проверьте положение секундной стрелки, которая должна находиться в
положении 12:00 часов. Если секундная стрелка находится в другом положении,
используйте кнопки “D” и “В” для ее корректировки.
3.
По окончании корректировки секундной стрелки нажмите кнопку “С” для
перехода к корректировке минутной и часовой стрелок. При этом на дисплее
появится индикатор “0:00”.
4.
Для выбора города Вашего текущего местоположения используйте кнопки “D” и
“В”.
5.
Проверьте положение часовой и минутной стрелок, которые должны находиться
в положении 12:00 часов. Если они находятся в другом положении, используйте
кнопки “D” и “В” для корректировки.
6.
По окончании установок дважды нажмите кнопку “А” для возврата в Режим
Текущего Времени.
РЕЖИМ КОМПАСА
Встроенный датчик часов распознает магнетический север и на этом основании
определяет одно из 16 стороны горизонта.
Проведение измерений
1.
Расположите часы на горизонтальной поверхности или горизонтально.
Направление 12-ти часов указывает на то направление горизонта, которое вы
хотите определить.
2.
В Режиме Текущего времени или Режиму Компаса нажмите кнопку “В” для
начала измерений.
На дисплее часов появляется индикатор “COMPASS” во время проведения
измерений.
По окончании измерений секундная стрелка часов будет показывать
направление севера, а индикатор компаса – то направления, на которое
указывает положение 12-ти часов.
N
Север
NNE Север-Северо-Восток
NE Северо-Восток
E
Восток
ESE Восток-Юго-Восток
SE Юго-Восток
S
Юг
SSW Юг – Юго-Запад
SW Юго-Запад
W Запад
WNW Запад – Северо-Запад
NW Северо-Запад
ENE Восток-Северо-Восток
SSE Юг-Юго-Восток
WSW Запад-Юго-Запад
NNW Север-Северо-Запад
3.
После начала работы компаса измерения ведутся каждую секунду в течение
20-ти секунд, а затем автоматически останавливаются. Индикатор
направления будет показывать “—”, что означает окончание измерений.
Если Вы не производите каких-либо действий в течение в течение 2-3 минут,
часы автоматически выходят из режима установок.
4.
По окончании измерений нажмите кнопку “С” для возврата в Режим
Текущего Времени.
Использование компаса для определения Вашего текущего местоположения на
карте
1.
Разверните запястье так, чтобы рука находилась в горизонтальном положении
по отношении к Вам.
2.
В Режиме Текущего Времени или Компаса нажмите кнопку “В” для
определения направления Вашего текущего местоположения.
3.
Поверните карту (не поворачивая часы!) так, чтобы направление севера на
карте совпадало с направлением севера на компасе часов.
Если компас часов настроен изображать магнитный север – направление
магнитного севера должно совпадать с направлением магнитного севера на
карте. Если компас часов настроен с отклонением от магнитного севера, все
равно – направление севера на карте должно совпадать с направлением севера
на компасе часов.
4.
Определите место Вашего текущего местоположения.
Калибровка магнитного сенсора
Если Вам кажется, что показания компаса неверные, проведите его калибровку. Вы
можете использовать два типа калибровки: калибровку магнитного склонения или
двунаправленную.

Двунаправленная калибровка Вы можете использовать любые про…
Страница 4
- Изображение
- Текст
Двунаправленная калибровка
Вы можете использовать любые противоположные направления стороны света для
проведения двунаправленной калибровки, при этом направления должны находиться
под углом 180 градусов друг к другу.
Двунаправленную калибровку лучше проводит в том месте, где собираетесь проводить
измерения.
Не перемещайте часы во время проведение двунаправленной калибровки.
1.
В Режиме Компаса нажмите и удерживайте кнопку “А” в течение 2х секунд.
2.
Нажмите кнопку “D” для перехода к двунаправленной калибровке.
При этом секундная стрелка переместится в положение 12ти часов, с левой
стороны дисплея будет мигать индикатор “↑”, а индикатор “-1-” будет
обозначать начало проведения калибровки часов.
3.
Расположите часы на ровную поверхность и нажмите кнопку “В” для
калибровки первого направления. Во время измерений на дисплее присутствует
индикатор “. — — -”.
4.
После завершения процесса калибровки на дисплее появляется индикатор “OK”.
После этого мигающий индикатор поменяется на “↓” и на дисплее появится
индикатор “- 2 -”, означая, что часы готовы для калибровки следующего
направления.
5.
Поверните часы на 180 градусов.
6.
Нажмите кнопку “В” для начала калибровки второго направления. Во время
измерений на дисплее присутствует индикатор “. — — -”.
7.
По окончании калибровки на дисплее появится индикатор “OK”, и часы
автоматически перейдут в Режим Компаса.
Если на дисплее появляется индикатор “ERR”, нажмите кнопку “В” для
повторного проведения калибровки.
Калибровка магнитного склонения
Проводя данный вид калибровки, вы вводите значение угла магнитного склонения
(разницу между магнитным севером и действительным севером).
Вы может использовать данный вид калибровки, если угол магнитного склонения
изображен на Вашей карте, которую вы используете. Обратите внимание на то, что
необходимо ввести только целые числа (например, угол равен 7.4, вы вводите значение
7).
1.
В Режиме Компаса нажмите и удерживайте кнопку “А” в течение 2х секунд до
появления дисплея двунаправленной калибровки.
2.
Нажмите кнопку “C” для перехода у калибровке магнитного склонения (“DEC”).
3.
С помощью кнопок “D” и “B” произведите необходимые изменения:
“OFF”(калибровка отключена)
“E” (магнитный север указывает на восток, восточная калибровка)
“W” (магнитный север указывает на запад, западная калибровка).
4.
Вы можете выключить калибровку магнитного склонения одновременно нажав
кнопки “D” и “В”.
5.
По окончании установок нажмите кнопку “А”.
РЕЖИМ ТЕРМОМЕТРА
Данные часы снабжены датчиком измерения температуры окружающей среды. На
правильные показания температуры может повлиять температура тела, прямые
солнечные часы или попадание влаги.
Мониторинг температуры окружающей среды
1.
Нажмите кнопку “D” для того, чтобы войти в Режим Термометра из Режимов
Текущего Времени и Компаса.
При этом на дисплее часов появится индикатор “THERMO”, означающий, что
часы производят измерения температуры. Значения измерений появятся на
дисплее после 5 секунд.
2.
После нажатия кнопки “D” измерения производятся каждые 5 секунд в
течение 1-2 минут.
3.
Если Вы не производите каких-либо действий в течение в течение 2-3 минут,
часы автоматически выходят из режима установок.
4.
Для возврата в Режим Текущего Времени нажмите кнопку “С”.
Показания температуры представляются в градусах Цельсия (С) или
Фаренгейта (F).
Диапазон измерений температуры – от -10.0ºС до 60.0ºС (от 14ºF до 140.0ºF).
Если во время измерений на дисплее часов появляется индикатор “ERR”,
обозначающий ошибку, начните измерения заново. Если данный индикатор
появится снова, необходимо обратиться в сервисный центр CASIO, так как
это можно означать неполадку датчика измерения температуры.
Калибровка датчика температуры
Датчик давления/температуры откалиброван производителем и не нуждается
предварительной калибровке перед началом использования. При значительной
погрешности в показаниях датчик может быть откалиброван повторно.
1.
В Режиме Термометра нажмите и удерживайте кнопку “А” до появления
текущего значения температуры.
2.
Используйте кнопку “D” для увеличения и кнопку “В” для уменьшения
значения датчика.
Каждое нажатие кнопки меняет значение на 0.1ºС (0.2 ºF).
Для сброса значения в исходное, одновременно нажмите кнопки “В” и “D”.
При этом на дисплее появится индикация “OFF”.
3.
По окончании установок нажмите кнопку “А”.
Изменение единицы измерения температуры
1.
В Режиме Текущего Времени нажмите и удерживайте кнопку “А” до
появления мигающей индикации кода города, что означает начало установок.
2.
Затем нажмите кнопку “С” для перехода установкам единицы измерения
температуры, на дисплее будет мигать индикатор ºС или ºF.
3.
Нажимайте кнопку “D” для переключения единиц температуры градусы
Цельсия – Фаренгейта (ºС – ºF).

4.
По окончании установок дважды нажмите кнопку “А”.
Просмотр времени восхода и заката солнца
В данном режиме Вы можете просматривать время восхода и заката солнца для
конкретной даты и местоположения.
Вход в режим Восхода/Заката солнца
1.
В Режиме Текущего Времени нажмите кнопку “С” для входа в Режим
Восхода/Заката солнца.
На дисплее появится индикатор “SUNRISE TIME” или “SUNSET TIME”, после
этого – значения года, месяца и числа.
Затем на дисплее появится индикатор “CALC”, означая процесс расчета данных.
2.
По окончании расчета на дисплее часов появится значение времени восхода или
заката солнца для текущей даты.
При каждом входе в Режим Восхода/Заката появляется то значение времени,
которое было просмотрено в последний раз после выхода из данного режима.
Перед тем, как использовать Режим Восхода/Заката солнца, необходимо ввести
значение кода города, долготы и широты того местоположения, данные которого
вы хотите просмотреть. Все данные времени рассчитываются на основе
введенных значений.
Для переключения значений времени восхода и заката используйте кнопку “A”.
Просмотр времени восхода/заката солнца для конкретной даты
В Режиме Восхода/Заката используйте кнопки “В” и “D” для выбора даты просмотра
значений.
На дисплее часов при этом появится значение времени восхода или заката для
выбранной даты.
Вы можете выбрать дату в диапазоне от 1 января 2000 года до 31 декабря 2009
года.
Если Вы считаете, что показания времени неверные, проверьте установки города
Вашего текущего местоположения, широты и долготы.
Все значения времени рассчитываются для местности на уровне моря.
РЕЖИМ ВОЗРАСТА ЛУНЫ
В данном режиме вы можете просмотреть возраст Луны для 12:00 часов определенной
даты.
Выбор даты представления данных
1.
Для входа в Режим Возраста Луны нажимайте кнопку “С”.
На дисплее часов появится индикатор”MOON AGE”, затем значения текущего
года, месяца и числа.
После этого на дисплее появится индикатор “CALC”, означая процесс расчета
возраста Луны. По окончании расчета на дисплее часов появится значение
возраста луны для текущей даты.
2.
Используйте кнопки “В” и “D” для выбора даты просмотра значений.
После выбора даты на дисплее появится индикатор “CALC”, затем значение
возраста Луны.
Возраст Луны рассчитывается с точностью +/- 1 день.
Если Вы считаете, что показание неверные, проверьте установки Режима
Текущего Времени.
3.
По окончании установок нажмите кнопку “С”.
РЕЖИМ ЗВУКОВОГО СИГНАЛА
Вы можете установить пять различных звуковых сигналов.
По достижении установленного времени сигнал включится на 10 секунд.
Если включен режим индикации начала часа, короткий звукового сигнал
будет подаваться в начале каждого часа.
Вы можете остановить звучание сигнала нажатием любой кнопки.
Для входа в Режим Звукового Сигнала нажмите кнопку “С”. При этом на
дисплее появится индикатор “ALARM”, а затем – текущее установленное
время будильника и номер будильника (от -1 до -5) или индикатор
сигнализации начала часа.
Установка будильника
1.
В Режиме Звукового Сигнала нажимайте кнопки “D” или “В” для выбора
типа сигнала:
-1 – -2 – -3 – -4 – -5 – SIG (индикация начала часа).
2.
После выбора типа сигнала нажмите и удерживайте кнопку “А” в течение 3-х
секунд до появления мигающего значения времени будильника.
3.
Нажимайте кнопку “С” для перехода от установки к установке в следующей
последовательности: Часы – Минуты.
4.
Нажимайте кнопки “D” и “В” для изменения выбранного значения.
5.
По окончании установок нажмите кнопку “А”.
Проверка звучания сигнала
В Режиме Звукового Сигнала нажмите кнопку “D” для проверки звучания сигнала.
Включение/выключение звукового сигнала и индикации начала часа
В Режиме Звукового Сигнала нажимайте кнопки “D” или “В” для выбора типа
сигнала.
Для его включения/выключения нажимайте кнопку “А”.
При выбранном обычном звуковом сигнале не дисплее появляется индикатор
– “ALARM”,
При выбранной индикации начала часа – индикатор “SIG”.
РЕЖИМ СЕКУНДОМЕРА
Режим Секундомера позволяет регистрировать отдельные отрезки времени и время
с промежуточным результатом.
Рабочий Диапазон Общего Измеряемого Времени ограничен 23 часами 59
минутами, 59.99 секундами.
Для входа в Режим Секундомера нажмите кнопку “С”. При этом на дисплее
появится индикатор “STW”, а затем значение времени секундомера.

Измерение отдельных отрезков времени
D (Старт) – D (Стоп) – D (Повторный старт) – D (Стоп) – B (Сброс).
Измерение времени с промежуточным результатом
D (Старт) – B (Промежуточный результат. Индикатор SPL) – B (Повторный старт) – D
(Стоп) – B (Сброс).
РЕЖИМ ТАЙМЕРА ОБРАТНОГО ОТСЧЕТА
Таймер обратного отсчета может быть установлен в диапазоне от одной секунды
до 100 минут.
Когда обратный отсчет времени достигает нуля, раздается длинный звуковой
сигнал.
Для входа в Режим Таймера нажмите кнопку “С”. При этом на дисплее появится
индикатор “TIMER”, затем – значение времени обратного отсчета.
Установка стартового времени таймера
1.
Войдите в Режим Таймера.
Если часы находятся в процессе измерений, нажмите кнопку “D” для остановки
отсчета, и затем кнопку “В” для сброса текущих значений в значение стартового
времени.
2.
Затем нажмите и удерживайте кнопку “А”. Изображение в разряде минут начнет
мигать, что означает начало установок.
3.
Нажимайте кнопку “С” для перехода от установки к установке в следующей
последовательности: Минуты – Секунды – Минуты.
4.
Используйте кнопку “D” для увеличения и кнопку “В” для уменьшения
выбранного значения.
Если вы хотите установить значение 100 минут в качестве времени обратного
отсчета, введите значение “00’00”.
5.
По окончании установок нажмите кнопку “А”.
Использование таймера
Если часы находятся в процессе измерений, нажмите кнопку “D” для остановки
отсчета, и затем кнопку “В” для сброса текущих значений в значение стартового
времени.
1.
Нажмите кнопку “D” в Режиме Таймера для запуска обратного отсчета времени.
2.
Нажмите кнопку “D” снова для остановки обратного отсчета времени.
3.
Вы можете продолжить обратный отсчет, нажав кнопку “D”.
4.
После остановки обратного отсчета времени можно нажать кнопку “В” для того,
чтоб сбросить время обратного отсчета в стартовое значение.
РЕЖИМ ВРЕМЕНИ ГОРОДА ДРУГОГО ЧАСОВОГО ПОЯСА
В данном режиме вы можете просмотреть местное время в любом из 48 городов (31
часовых поясов).
Значения Времени города другого часового пояса устанавливаются автоматически
со значениями текущего времени.
Для входа в данный режим нажмите кнопку “С”, при этом на дисплее появится
индикатор “WORLD TIME”, затем код города, выбранный в качестве города другого
часового пояса, а затем – значение времени в данном городе.
Просмотр текущего времени в другом городе
В Режиме города другого часового пояса используйте кнопки “В” и “D” для выбора
города, значение которого хотите просмотреть.
Переключение летнего времени
С помощью кнопок “В” и “D” выберите город, значение летнего времени которого
хотите изменить.
Нажимайте кнопку “А” для включения (“DST ON”)/выключения (“DST OFF”)
летнего времени.
Подсветка
В любом режиме нажмите кнопку “L” для включения подсветки часов.
Подсветка часов автоматически выключается при звучании любых звуковых
сигналов.
Подсветка выполнена на светодиодных панелях (LED), мощность которых
падает после определенного срока использования.
Во время освещения часы испускают слышимый сигнал. Это происходит
потому, что элементы подсветки вибрируют, это не является показателем
неисправности часов.
Подсветку трудно разглядеть, если на часы падают прямые солнечные лучи.
Частое использование подсветки сокращает жизнь элемента питания.
Изменение продолжительности подсветки
7.
В Режиме Текущего Времени нажмите и удерживайте кнопку “А” до
появления кода индикатора “ADJUST”.
На дисплее появится код города, выбранного в качестве города другого
часового пояса, и индикатор “►” слева он названия города.
8.
Десять раз нажмите кнопку “С” до появления индикатора “LIGHT 1” или
“LIGHT 3”.
9.
Для переключения продолжительности подсветки (3 секунды – 1,5 секунды)
нажимайте кнопку “D”.
10.
По окончании установок дважды нажмите кнопку “А”.
Включение/выключение звука кнопок
1.
В Режиме Текущего Времени нажмите и удерживайте кнопку “А” до
появления кода индикатора “ADJUST”.
11.
На дисплее появится код города, выбранного в качестве города другого
часового пояса, и индикатор “►” слева он названия города.
2.
Десять раз нажмите кнопку “С” до появления индикатора “ MUTE” или “KEY
♪””.

3.
Для включения (“KEY ♪”)/выключения (“MUTE”) звука кнопок нажимайте
кнопку “D”.
4.
По окончании установок дважды нажмите кнопку “А”.
Индикатор заряда элемента питания
Если на дисплее часов появляется мигающий индикатор батарейки – заряда элемента
питания недостаточно для нормальной работы часов. В данном случае необходимо
заменить батарейку.
ТЕХНИЧЕСКИЕ ХАРАКТЕРИСТИКИ
Точность хода при нормальной температуре +/-15сек. в месяц
Режим текущего времени
час, минуты, секунды, «До полудня»/ «После
полудня» , год, месяц, число, день недели.
Календарная система
Автоматический календарь с 2000г. по 2099г.
Прочее
12/24 формат представления времени
Режим времени другого часового пояса
текущее время в 48 городах (31 часовых
поясах)
Режим компаса
определение сторон света
Прочее
двунаправленная калибровки,
калибровка магнитного склонения
Режим термометра
Прочее
калибровка датчика, выбор единицы
представления температуры
Режим времени восхода/заката солнца
Режим Лунного времени
Режим звукового сигнала
5
ежедневных звуковых сигналов, индикация
начала часа
Режим секундомера
Максимальный диапазон измерений 23
часа 59 мин. 59,99 сек.
Режимы измерений
отдельные отрезки времени, время с
промежуточным результатом
Режим таймера
Единица измерений
1 секунда
Диапазон измерений
1 секунда – 100 минут
Прочее
подсветка (светодиод), выбор
продолжительности подсветки,
включение/выключение звука кнопок,
индикация заряда элемента питания
Элемент питания
2 батарейки типа SR927W
Срок службы элемента питания
2 года из расчета использования подсветки
часов 1.5 сек./день, использования компаса
20
секунд в день (20 раз в месяц), 2 минуты
измерений температуры (с интервалом в 5
секунд) раз в неделю, использования
будильника 20 секунд в день.
Код города
Город
Разница по
Гринвичу
(GMT)
Другие крупные
города данной
часовой зоны
PPG
-11.0
Паго-Паго
HNL
Гонолулу
-10.00
Папеэте
ANC
Анкара
-09.00
Ном
YVR
Ванкувер -08.00
Ванкувер
LAX
Лос Анджелес -08.00 Лас Вегас, Сиэтл,
Доусон Сити
YEA
Эдмонтон -07.00
DEN
Денвер
-07.00
Эль Пасо
MEX
Мехико -06.00
Мехико Сити
CHI
Чикаго
-06.00
Хьюстон, Даллас,
Новый Орлеан
NYC
Нью Йорк -05.00
Монреаль,
Детроит, Бостон,
Панама Сити,
Гавана, Лима,
Богота
SCL
Сантьяго -04.00
YHZ
Галифакс -04.00
YYT
Св.Джонс -03.50
RIO
Рио Де Жанейро -03.00
Сан Пауло, Буэнос
Айрес, Бразилиа,
Монтевидео
FEN
Фернандо де Норона -03.00
RAI
-01.00
Прая
UTC
+00.0
LIS
Лиссабон +00.0
Дублин,
Касабланка,
Дакар, Абиджан
LON
Лондон +00.0
MAD
Мадрид +01.00
PAR
Париж +01.00
Амстердам, Алжир
ROM
Рим +01.00
BER
Берлин +01.00
STO
Стокгольм +01.00
ATH
Афины +02.00
CAI
Каир +02.00
JRS
Иерусалим +02.00
JED
Джидда +03.00
Кувейт, Эр-Рияд,
Аден, Аддис Абаба,
Найроби, Шираз
MOW
Москва +03.00
Москва

THR
Тегеран +03.05
DXB
Дубаи +04.00
Абу Даби, Мускат
KBL
Кабул +04.05
KHI
Карачи +05.00
DEL
Дели +05.50
Мумбаи, Кольката
KTM
Катманду +5.75
DAC
Дакка
+06.00
Коломбо
RGN
Янгон
+06.50
BKK
Бангкок +07.00
Ханой, Вьентьян
SIN
Сингапур +08.00
HKG
Гон Конг +08.00
Куала Лумпур,
Манила, Перт,
Улан Батор
BJS
Бейжинг +08.00
TPE
Тайпей +08.00
SEL
Сеул +09.00
Сеул
TYO
Токио +09.00
Пхеньян
ADL
Аделаида +09.05
Дарвин
GUM
Гуам +10.00
SYD
Сидней +10.00
Мельбурн,
Рабауль
NOU
Нумеа +11.00
Вила
WLG
Веллингтон
+12.00
Нади, Науру,
Крайстчерч
Город
Долгота
Широта
Абу Даби 54
ºE
24ºN
Аддис Абеба
39 ºE
9 ºN
Аделаида 139
ºE
35ºS
Амстердам
5 ºE
52 ºN
Анкоридж 150ºW
61
ºN
Афины
24 ºE
38 ºN
Бангкок 100
ºE
14
ºN
Бейрут
35 ºE
34 ºN
Бостон 71ºW
42
ºN
Бразилия
48 ºW
16 ºS
Буэнос Айрес 58ºW
35
ºS
Каир
31 ºE
30 ºN
Чикаго
88 ºW
42 ºN
Кристчерч 173
ºE
43
ºS
Дакар 17ºW
15
ºN
Дамаск
36 ºE
33 ºN
Дели
77 ºE
29 ºN
Денвер 105
ºW
40
ºN
Детройт
83 ºW
42 ºN
Дакка
90 ºE
24 ºN
Дубай
55 ºE
25 ºN
Дублин
6 ºW
53 ºN
Эдмонтон 114
ºW
54
ºN
Эль Пасо 106
ºW
32
ºN
Фернандо де Норонья
32 ºW
4 ºS
Франкфурт
9 ºE
50 ºN
Гуам 145ºE
13
ºN
Гамбург 10ºE
54
ºN
Ханой 106
ºE
21
ºN
Хельсинки
25 ºE
60 ºN
Гон Конг 114ºE
22
ºN
Гонолулу 158ºW
21
ºN
Хьюстон
95 ºW
30 ºN
Стамбул
29 ºE
41 ºN
Джакарта 107ºE
6
ºS
Джидда 39ºE
21
ºN
Кабул
69 ºE
35 ºN
Карачи 67ºE
25
ºN
Катманду
85 ºE
28 ºN
Куала Лумпур 102
ºE
3
ºN
Кувейт
48 ºE
29 ºN
Лас Вегас 115
ºW
36
ºN
Лима 77ºW
12
ºS
Лиссабон 9ºW
39
ºN
Лондон 0ºE
51
ºN
Лос Анджелес 118ºW
34
ºN
Мадрид
4 ºW
40 ºN
Манила 121ºE
15
ºN
Мельбурн 145ºE
38
ºS
Мехико сити
99 ºW
19 ºN
Майами 80ºW
26
ºN
Милан
9 ºE
45 ºN
Монреаль
74 ºW
45 ºN
Найроби
37 ºE
1 ºS
Науру 167
ºE
1
ºS
Новый Орлеан
90 ºW
30 ºN
Нью Йорк
74 ºW
41 ºN
Нумеа 166ºE
22
ºS
Паго-Паго 171ºW
14
ºS
Панама 80ºW
9
ºN
Папете 150ºW
18
ºS

ºS Информация о товаре Наименование: часы наручные электрон…
Страница 9
- Изображение
- Текст
Париж
2 ºE
49 ºN
Перт 116
ºE
32
ºS
Пном Пен 105
ºE
12
ºN
Порт Вила 168
ºE
18
ºS
Прая
24 ºW
15 ºN
Пьонгьянг 126
ºE
39
ºN
Рио де Жанейро
43 ºE
23 ºS
Рим
12 ºE
42 ºN
Сан Франциско 122
ºW
38
ºN
Сантьяго
71 ºW
33 ºS
Сан Пауло
47 ºW
24 ºS
Сиэтл 122ºW
48
ºN
Сеул 127
ºE
38
ºN
Сингапур 104
ºE
1
ºN
Св. Джонс
53 ºW
48 ºN
Стокгольм
18 ºE
59 ºN
Сидней
151ºE
34 ºS
Тайпей 122
ºE
25
ºN
Тегеран
51 ºE
36 ºN
Токио 140
ºE
36
ºN
Ванкувер 123
ºW
49
ºN
Вена
16 ºE
48 ºN
Веллингтон 175
ºE
41
ºS
Информация о товаре
Наименование:
часы наручные электронные / электронно-механические кварцевые
(муж./жен.)
Торговая марка:
CASIO
Фирма изготовитель:
CASIO COMPUTER Co.,Ltd.
(КАСИО Компьютер Ко. Лимитед)
Адрес изготовителя:
6-2, Hon-machi 1-chome,
Shibuya-ku,Tokyo 151-8543, Japan
Импортер:
ООО «Касио», 127055, Москва, ул. Сущевская, д.27, стр. 1, Россия
Страна-изготовитель:
Гарантийный срок:
1 год
Адрес уполномоченной
организации для принятия
претензий:
указан в гарантийном талоне
Продукция соответствует ГОСТ 26270-98 (п.4.35)
Сертификат соответствия № РОСС JP. АЯ46.Д42228 / РОСС JP. АЯ46.Д42071 / РОСС JP. АЯ46.Д42230

Нажмите на кнопку для помощи


Комментарии
Комментарии
Casio SGW-500 / линейка Collection / модуль 5269 / год 2012
Инструкция к модулю Casio 5269
- Смотреть онлайн → (без скачивания, удобно на мобильных и планшетах);
- Скачать русскую инструкцию → (типичная “как у всех”, не всегда понятные картинки);
- Скачать английскую инструкцию → (детальная, много фото, более понятная).
Сложно настроить? Спрашивай на форуме Casio →
Читайте новости о любимых часах SGW-500 на блоге
[display-posts tag=”SGW-500″ posts_per_page=”4″]
Все новости о SGW-500 →
Побывайте на заводе Casio, изучайте последние новинки часов на Casioblog.RU

MO1208-EA
© 2012 CASIO COMPUTER CO., LTD.
E-1
ENGLISH
Congratulations upon your selection of this CASIO watch.
Warning!
•
The measurement functions built into this watch are not intended for taking
measurements that require professional or industrial precision. Values produced
by this watch should be considered as reasonable representations only.
• Note that CASIO COMPUTER CO., LTD. assumes no responsibility for any
damage or loss suffered by you or any third party arising through the use of
this product or its malfunction.
E-2
• To ensure correct direction readings by this watch, be sure to perform
bidirectional calibration before using it. The watch may produce incorrect
direction readings if you do not perform bidirectional calibration. For more
information, see “To perform bidirectional calibration” (page E-36).
• Keep the watch away from audio speakers, magnetic necklace, cell phone,
and other devices that generate strong magnetism. Exposure to strong
magnetism can magnetize the watch and cause incorrect direction readings. If
incorrect readings continue even after you perform bidirectional calibration, it
could mean that your watch has been magnetized. If this happens, contact
your original retailer or an authorized CASIO Service Center.
E-3
About This Manual
• Depending on the model of your watch, digital display
text appears either as dark fi gures on a light
background, or light fi gures on a dark background. All
sample displays in this manual are shown using dark
fi gures on a light background.
• Button operations are indicated using the letters shown
in the illustration.
• Note that the product illustrations in this manual are
intended for reference only, and so the actual product
may appear somewhat different than depicted by an
illustration.
E-4
Things to check before using the watch
1. Check the Home City and the daylight saving time (DST) setting.
Use the procedure under “Confi guring Home City Settings” (page E-17) to confi gure
your Home City and daylight saving time settings.
Important!
Proper World Time Mode, Sunrise/Sunset Mode, and Moon Age Mode data depend
on correct Home City, time, and date settings in the Timekeeping Mode. Make sure
you confi gure these settings correctly.
2. Confi gure latitude and longitude settings for your current location.
See “To select a Home City by confi guring latitude and longitude settings” (page
E-20).
E-5
3. Set the current time.
See “Confi guring Current Time and Date Settings” (page E-22).
The watch is now ready for use.
E-6
Contents
E-3 About This Manual
E-4 Things to check before using the watch
E-11 Mode Reference Guide
E-16 Timekeeping
E-17 Confi guring Home City Settings
E-17 To confi gure Home City settings
E-19 To change the Daylight Saving Time (summer time) setting
E-20 Confi guring Latitude and Longitude Settings for Your Current Location
E-20 To select a Home City by confi guring latitude and longitude settings
E-22 Confi guring Current Time and Date Settings
E-22 To change the current time and date settings
E-7
E-26 Hand Home Position Adjustment
E-26 To adjust home positions
E-29 Taking Direction Readings
E-30 To take a direction reading
E-36 To perform bidirectional calibration
E-38 To perform magnetic declination correction
E-43 Thermometer
E-43 To enter and exit the Thermometer Mode
E-45 To correct the temperature value
E-47 Specifying Temperature Unit
E-47 To specify the temperature unit
E-49 Looking up Sunrise and Sunset Times
E-49 To look up the sunrise and sunset times on a specifi c date
E-50 To toggle between sunrise time and sunset time
E-51 To view the sunrise/sunset time for a particular date
E-8
E-52 Using Moon Data
E-52 To look up the Moon age on a specifi c date
E-54 Using the Alarm
E-54 To enter the Alarm Mode
E-55 To set an alarm time
E-56 To test the alarm
E-57 To turn an alarm and the Hourly Time Signal on and off
E-57 To stop the alarm
E-58 Using the Stopwatch
E-58 To enter the Stopwatch Mode
E-58 To perform an elapsed time operation
E-58 To pause at a split time
E-9
E-60 Using the Countdown Timer
E-60 To enter the Countdown Timer Mode
E-60 To specify the countdown start time
E-61 To perform a countdown timer operation
E-62 To stop the alarm
E-63 Checking the Current Time in a Different Time Zone
E-63 To enter the World Time Mode
E-64 To view the time in another time zone
E-64 To specify standard time or daylight saving time (DST) for a city
E-65 Illumination
E-65 To turn on illumination
E-66 To change the illumination duration
E-68 Button Operation Tone
E-68 To turn the button operation tone on and off
Operation Guide 5269
![]()
MO1208-EA © 2012 CASIO COMPUTER CO., LTD.
Operation Guide 5269
ENGLISH
Congratulations upon your selection of this CASIO watch.
Warning!
• The measurement functions built into this watch are not intended for taking measurements that require professional or industrial precision. Values produced by this watch should be considered as reasonable representations only.
• Note that CASIO COMPUTER CO., LTD. assumes no responsibility for any damage or loss suffered by you or any third party arising through the use of this product or its malfunction.
E-1
•To ensure correct direction readings by this watch, be sure to perform bidirectional calibration before using it. The watch may produce incorrect direction readings if you do not perform bidirectional calibration. For more information, see “To perform bidirectional calibration” (page E-36).
•Keep the watch away from audio speakers, magnetic necklace, cell phone, and other devices that generate strong magnetism. Exposure to strong magnetism can magnetize the watch and cause incorrect direction readings. If incorrect readings continue even after you perform bidirectional calibration, it could mean that your watch has been magnetized. If this happens, contact your original retailer or an authorized CASIO Service Center.
E-2
About This Manual
• Depending on the model of your watch, digital display text appears either as dark figures on a light background, or light figures on a dark background. All sample displays in this manual are shown using dark figures on a light background.
• Button operations are indicated using the letters shown in the illustration.
• Note that the product illustrations in this manual are intended for reference only, and so the actual product may appear somewhat different than depicted by an illustration.
E-3
|
Things to check before using the watch |
3. Set the current time. |
|||
|
See “Configuring Current Time and Date Settings” (page E-22). |
||||
|
1. Check the Home City and the daylight saving time (DST) setting. |
||||
Use the procedure under “Configuring Home City Settings” (page E-17) to configure your Home City and daylight saving time settings.
Important!
Proper World Time Mode, Sunrise/Sunset Mode, and Moon Age Mode data depend on correct Home City, time, and date settings in the Timekeeping Mode. Make sure you configure these settings correctly.
2. Configure latitude and longitude settings for your current location.
See “To select a Home City by configuring latitude and longitude settings” (page E-20).
The watch is now ready for use.
E-4 E-5
|
Contents |
E-26 Hand Home Position Adjustment |
||
|
E-26 To adjust home positions |
|||
E-3 About This Manual
E-4 Things to check before using the watch
E-11 Mode Reference Guide
E-16 Timekeeping
E-17 Configuring Home City Settings
E-17 To configure Home City settings
E-19 To change the Daylight Saving Time (summer time) setting
E-20 Configuring Latitude and Longitude Settings for Your Current Location
E-20 To select a Home City by configuring latitude and longitude settings
E-22 Configuring Current Time and Date Settings
E-22 To change the current time and date settings
E-6
E-29 Taking Direction Readings
E-30 To take a direction reading
E-36 To perform bidirectional calibration
E-38 To perform magnetic declination correction
E-43 Thermometer
E-43 To enter and exit the Thermometer Mode
E-45 To correct the temperature value
E-47 Specifying Temperature Unit
E-47 To specify the temperature unit
E-49 Looking up Sunrise and Sunset Times
E-49 To look up the sunrise and sunset times on a specific date E-50 To toggle between sunrise time and sunset time
E-51 To view the sunrise/sunset time for a particular date
E-7
|
E-52 |
Using Moon Data |
E-60 Using the Countdown Timer |
|
|
E-52 To look up the Moon age on a specific date |
E-60 |
To enter the Countdown Timer Mode |
|
|
E-54 |
Using the Alarm |
E-60 |
To specify the countdown start time |
E-54 To enter the Alarm Mode E-55 To set an alarm time E-56 To test the alarm
E-57 To turn an alarm and the Hourly Time Signal on and off E-57 To stop the alarm
E-58 Using the Stopwatch
E-58 To enter the Stopwatch Mode
E-58 To perform an elapsed time operation E-58 To pause at a split time
E-61 To perform a countdown timer operation
E-62 To stop the alarm
E-63 Checking the Current Time in a Different Time Zone
E-63 To enter the World Time Mode
E-64 To view the time in another time zone
E-64 To specify standard time or daylight saving time (DST) for a city
E-65 Illumination
E-65 To turn on illumination
E-66 To change the illumination duration
E-68 Button Operation Tone
E-68 To turn the button operation tone on and off
Operation Guide 5269
|
E-70 Troubleshooting |
Mode Reference Guide |
||||
|
E-75 Specifications |
Your watch has 9 “modes”. The mode you should select depends on what you want to do. |
||||
|
To do this: |
Enter this mode: |
See: |
|||
|
• View the current time and date in the Home City |
|||||
|
• Configure Home City and daylight saving time (DST) settings |
Timekeeping Mode |
E-16 |
|||
|
• Configure current location latitude and longitude settings |
|||||
|
• Configure time and date settings |
|||||
|
• Determine your current bearing or the direction from your current |
Digital Compass |
||||
|
location to a destination as a direction indicator and angle value |
E-29 |
||||
|
Mode |
|||||
|
• Determine your current location using the watch and a map |
|||||
|
Determine the temperature at your current location |
Thermometer Mode |
E-43 |
|||
|
View the sunrise and sunset times for a specific date |
Sunrise/Sunset Mode |
E-49 |
|||
|
Determine a Moon age value |
Moon Age Mode |
E-52 |
|||
|
Set an alarm time |
Alarm Mode |
E-54 |
|||
|
Use the stopwatch to measure elapsed time |
Stopwatch Mode |
E-58 |
|||
|
Use the countdown timer |
Countdown Timer Mode |
E-60 |
|||
|
View the current time in one of 48 cities (31 time zones) around the globe |
World Time Mode |
E-63 |
|||
|
E-10 |
E-11 |
||||
Selecting a Mode
•The illustration below shows which buttons you need to press to navigate between modes.
•To return to the Timekeeping Mode from any other mode, hold down C for about two seconds.
•In any mode, press L to illuminate the display.
|
Alarm Mode |
Moon Age Mode |
|
Stopwatch Mode |
Countdown Timer Mode |
|
Sunrise/Sunset Mode |
Timekeeping Mode |
Digital Compass Mode |
|||||||||
World Time Mode
Thermometer Mode
General Functions (All Modes)
The functions and operations described in this section can be used in all of the modes.
Auto Return Features
• If you do not perform any operation for a certain amount of time in certain modes as shown in the table below, the watch will automatically return to the Timekeeping Mode.
|
Mode |
No operation time |
|
Digital Compass, Thermometer |
1 to 2 minutes |
|
Sunrise/Sunset, Moon Age, Alarm |
2 to 3 minutes |
• If you leave a setting screen (one with flashing digits) on the digital display for two or three minutes without performing any operation, the watch exits the setting screen automatically.
Initial Screens
When you enter the Sunrise/Sunset Mode, Digital Compass Mode, Alarm Mode, or World Time Mode, the data you were viewing when you last exited the mode will appear first.
Scrolling
The B and D buttons are used on the setting screen to scroll through available settings on the digital display. In most cases, holding down these buttons during a scroll operation scrolls through the data at high speed.
Timekeeping
Use the Timekeeping Mode to set and view the current time and date.
•Each press of A in the Timekeeping Mode toggles the digital display between the current date and the current time.
•You can select one of the two following Date Screen display formats: SUN 6.30 or SUN 30.6. For information about how to select the format, see “Date Display Format” under “To change the current time and date settings” (page E-22).
|
Date screen |
Regular timekeeping screen |
|
|
Day of week |
Month Day |
Hour : Minutes Seconds |
Configuring Home City Settings
There are two Home City settings: actually selecting the Home City and selecting either standard time or daylight saving time (DST).
To configure Home City settings
1. In the Timekeeping Mode, hold down A for at least two
City Name seconds until ADJUST appears on the digital display. This is the setting mode. Release A after ADJUST appears.
• The city name of the currently selected Home City
data will appear on the digital display with an arrow ( ) flashing to the left.
•The watch will exit the setting mode automatically if you do not perform any operation for about two or three minutes.
•For details about city data, see the “City Data Table” at the back of this manual.
2.Press D (East) and B (West) to scroll through city names until the one you want to use as your Home City data is displayed.
3.Press C to display the DST setting screen.
4.Press D to toggle between Daylight Saving Time (DST ON) and Standard Time (DST OFF).
5.When the setting is the way you want, press A twice to
|
return to the Timekeeping Mode. |
|
|
• The DST indicator appears to indicate that Daylight |
|
|
Saving Time is turned on. |
|
|
Note |
|
|
• After you specify city data, the watch will use UTC* |
|
|
Setting |
offsets to calculate the current time for other time |
|
zones based on the current time in your Home City. |
|
|
DST indicator |
* Coordinated Universal Time, the world-wide |
|
scientific standard of timekeeping. |
|
|
The reference point for UTC is Greenwich, England. |
To change the Daylight Saving Time (summer time) setting
1.In the Timekeeping Mode, hold down A for at least two
seconds until ADJUST appears on the digital display. Release A after ADJUST appears.
•The name of the city currently selected as your Home City will appear on the digital display with an arrow ( ) flashing to the left.
2.Press C to display the DST setting screen.
3.Press D to toggle between Daylight Saving Time (DST ON) and Standard Time (DST OFF).
4.When the setting is the way you want, press A twice to return to the Timekeeping Mode.
•The DST indicator appears to indicate that Daylight Saving Time is turned on.
Operation Guide 5269
Configuring Latitude and Longitude Settings for Your Current Location
You can ensure correct display of sunrise and sunset time settings, and of moon ages by configuring latitude and longitude settings for your current location.
To select a Home City by configuring latitude and longitude settings
1.In the Timekeeping Mode, hold down A for at least two
seconds until ADJUST appears on the digital display. This is the setting mode. Release A after ADJUST
appears.
• Your current Home City data will appear on the digital display with an arrow ( ) flashing to the left.
2.Press A to display the latitude setting screen with the current latitude setting flashing.
Configuring Current Time and Date Settings
You can use the procedure below to adjust the current time and date settings if they are not correct.
Changing the digital Home City data should cause the analog time setting to change accordingly. If the analog time does not indicate the digital time, check the home positions of the hands and make adjustments if necessary (page E-26).
To change the current time and date settings
1.In the Timekeeping Mode, hold down A for at least two seconds until ADJUST appears on the digital display.
This is the setting mode. Release A after ADJUST
appears.
• The name of the city currently selected as your Home City will appear on the digital display with an arrow
( ) flashing to the left.
City name
E-22
|
Screen |
To do this: |
Do this: |
|
Change the city name |
Use D (East) and |
|
|
B (West). |
||
|
Toggle between Daylight Saving Time |
Press D. |
|
|
(DST ON) and Standard Time (DST OFF). |
||
|
Toggle between 12-hour (12H) and 24-hour |
Press D. |
|
|
(24H) timekeeping. |
||
|
Reset the seconds to 00 |
Press D. |
|
|
Change the hour or minute |
Use D (+) and |
|
|
Change the year, month, or day |
B (–). |
|
|
Select the date display format (DMY, YMD, |
Press D. |
|
|
MDY) |
||
Note
•For information about selecting a Home City and configuring the DST setting, see “Configuring Home City Settings” (page E-17).
•The watch’s built-in full automatic calendar makes allowances for different month lengths and leap years. Once you set the date, there should be no reason to change it except after you have the watch’s battery replaced.
•Changing your Home City setting will initialize the latitude and longitude settings to the location of the Home City.
5.When the settings are the way you want, press A twice to return to the Timekeeping Mode.
Hand Home Position Adjustment
The hour, minute, and second hands of this watch can be put out of position by strong magnetism or strong impact. When this happens, you can use the procedure below to adjust the hand positions.
|
To adjust home positions |
|
|
Second hand |
1. In the Timekeeping Mode, hold down A for at least |
|
four seconds until HAND SET appears on the digital |
|
|
display. This is the setting mode. Release A after |
|
|
HAND SET appears. |
|
|
• This will cause SEC 00 to flash on the digital |
|
|
display, indicating the second hand adjustment |
|
|
mode. |
Hour and minute hands
Correct hour and minute hand positions
2.Check the position of the second hand.
•If the second hand is pointing to 12 o’clock, it is in the correct home position. If it isn’t, use D (forward) and B (back) to adjust the second hand position so it points to 12 o’clock.
•Holding down either button will cause the second hand to move at high speed.
3.Press C. This will cause 0:00 to flash on the digital display, indicating the hour and minute adjustment mode.
4.Check the positions of the hour and minute hands.
•The hands are in the correct home positions if they are pointing to 12 o’clock. If they aren’t, use D (forward) and B (back) to adjust their positions.
•Holding down either button will cause the hour and minute hands to move at high speed.
5.Press A to exit the setting screen.
•This will cause the hour and minute hands to move to the current Timekeeping Mode time.
Taking Direction Readings
The watch has a magnetic sensor that makes it possible to take digital compass readings. You can use the digital compass to find the direction to a specific objective and to determine your current position.
•See “Magnetic North and True North” (page E-40) for information about the two types of north. For information about maximizing digital compass accuracy, see “Calibrating Direction Readings” (page E-34) and “Digital Compass Precautions” (page E-40).
Loading…
You can only view or download manuals with
Sign Up and get 5 for free
Upload your files to the site. You get 1 for each file you add
Get 1 for every time someone downloads your manual
Buy as many as you need
View a manual of the Casio SGW-500H-1BVER below. All manuals on ManualsCat.com can be viewed completely free of charge. By using the ‘Select a language’ button, you can choose the language of the manual you want to view.

MANUALSCAT | EN
Question & answers
Have a question about the Casio SGW-500H-1BVER but cannot find the answer in the user manual? Perhaps the users of ManualsCat.com can help you answer your question. By filling in the form below, your question will appear below the manual of the Casio SGW-500H-1BVER. Please make sure that you describe your difficulty with the Casio SGW-500H-1BVER as precisely as you can. The more precies your question is, the higher the chances of quickly receiving an answer from another user. You will automatically be sent an e-mail to inform you when someone has reacted to your question.
Ask a question about the Casio SGW-500H-1BVER
Page: 1
MO1208-EA © 2012 CASIO COMPUTER CO., LTD.
E-1
ENGLISH
Congratulations upon your selection of this CASIO watch.
Warning!
• The measurement functions built into this watch are not intended for taking
measurements that require professional or industrial precision. Values produced
by this watch should be considered as reasonable representations only.
• Note that CASIO COMPUTER CO., LTD. assumes no responsibility for any
damage or loss suffered by you or any third party arising through the use of
this product or its malfunction.
E-2
• To ensure correct direction readings by this watch, be sure to perform
bidirectional calibration before using it. The watch may produce incorrect
direction readings if you do not perform bidirectional calibration. For more
information, see “To perform bidirectional calibration” (page E-36).
• Keep the watch away from audio speakers, magnetic necklace, cell phone,
and other devices that generate strong magnetism. Exposure to strong
magnetism can magnetize the watch and cause incorrect direction readings. If
incorrect readings continue even after you perform bidirectional calibration, it
could mean that your watch has been magnetized. If this happens, contact
your original retailer or an authorized CASIO Service Center.
E-3
About This Manual
• Depending on the model of your watch, digital display
text appears either as dark figures on a light
background, or light figures on a dark background. All
sample displays in this manual are shown using dark
figures on a light background.
• Button operations are indicated using the letters shown
in the illustration.
• Note that the product illustrations in this manual are
intended for reference only, and so the actual product
may appear somewhat different than depicted by an
illustration.
E-4
Things to check before using the watch
1. Check the Home City and the daylight saving time (DST) setting.
Use the procedure under “Configuring Home City Settings” (page E-17) to configure
your Home City and daylight saving time settings.
Important!
Proper World Time Mode, Sunrise/Sunset Mode, and Moon Age Mode data depend
on correct Home City, time, and date settings in the Timekeeping Mode. Make sure
you configure these settings correctly.
2. Configure latitude and longitude settings for your current location.
See “To select a Home City by configuring latitude and longitude settings” (page
E-20).
E-5
3. Set the current time.
See “Configuring Current Time and Date Settings” (page E-22).
The watch is now ready for use.
E-6
Contents
E-3 About This Manual
E-4 Things to check before using the watch
E-11 Mode Reference Guide
E-16 Timekeeping
E-17 Configuring Home City Settings
E-17 To configure Home City settings
E-19 To change the Daylight Saving Time (summer time) setting
E-20 Configuring Latitude and Longitude Settings for Your Current Location
E-20 To select a Home City by configuring latitude and longitude settings
E-22 Configuring Current Time and Date Settings
E-22 To change the current time and date settings
E-7
E-26 Hand Home Position Adjustment
E-26 To adjust home positions
E-29 Taking Direction Readings
E-30 To take a direction reading
E-36 To perform bidirectional calibration
E-38 To perform magnetic declination correction
E-43 Thermometer
E-43 To enter and exit the Thermometer Mode
E-45 To correct the temperature value
E-47 Specifying Temperature Unit
E-47 To specify the temperature unit
E-49 Looking up Sunrise and Sunset Times
E-49 To look up the sunrise and sunset times on a specific date
E-50 To toggle between sunrise time and sunset time
E-51 To view the sunrise/sunset time for a particular date
E-8
E-52 Using Moon Data
E-52 To look up the Moon age on a specific date
E-54 Using the Alarm
E-54 To enter the Alarm Mode
E-55 To set an alarm time
E-56 To test the alarm
E-57 To turn an alarm and the Hourly Time Signal on and off
E-57 To stop the alarm
E-58 Using the Stopwatch
E-58 To enter the Stopwatch Mode
E-58 To perform an elapsed time operation
E-58 To pause at a split time
E-9
E-60 Using the Countdown Timer
E-60 To enter the Countdown Timer Mode
E-60 To specify the countdown start time
E-61 To perform a countdown timer operation
E-62 To stop the alarm
E-63 Checking the Current Time in a Different Time Zone
E-63 To enter the World Time Mode
E-64 To view the time in another time zone
E-64 To specify standard time or daylight saving time (DST) for a city
E-65 Illumination
E-65 To turn on illumination
E-66 To change the illumination duration
E-68 Button Operation Tone
E-68 To turn the button operation tone on and off
Operation Guide 5269
Page: 2
E-10
E-70 Troubleshooting
E-75 Specifications
E-11
Mode Reference Guide
Your watch has 9 “modes”. The mode you should select depends on what you want to do.
To do this: Enter this mode: See:
• View the current time and date in the Home City
• Configure Home City and daylight saving time (DST) settings
• Configure current location latitude and longitude settings
• Configure time and date settings
Timekeeping Mode E-16
• Determine your current bearing or the direction from your current
location to a destination as a direction indicator and angle value
• Determine your current location using the watch and a map
Digital Compass
Mode
E-29
Determine the temperature at your current location Thermometer Mode E-43
View the sunrise and sunset times for a specific date Sunrise/Sunset Mode E-49
Determine a Moon age value Moon Age Mode E-52
Set an alarm time Alarm Mode E-54
Use the stopwatch to measure elapsed time Stopwatch Mode E-58
Use the countdown timer Countdown Timer Mode E-60
View the current time in one of 48 cities (31 time zones) around the globe World Time Mode E-63
E-12
Selecting a Mode
• The illustration below shows which buttons you need to press to navigate between
modes.
• To return to the Timekeeping Mode from any other mode, hold down C for about
two seconds.
• In any mode, press L to illuminate the display.
Alarm Mode Moon Age Mode
Stopwatch Mode Countdown Timer Mode
Alarm Mode Moon Age Mode
Stopwatch Mode Countdown Timer Mode
E-13
Timekeeping Mode
Thermometer Mode
Sunrise/Sunset Mode
World Time Mode
Digital Compass Mode
Timekeeping Mode
Thermometer Mode
Sunrise/Sunset Mode
World Time Mode
Digital Compass Mode
E-14
General Functions (All Modes)
The functions and operations described in this section can be used in all of the modes.
Auto Return Features
• If you do not perform any operation for a certain amount of time in certain modes as
shown in the table below, the watch will automatically return to the Timekeeping
Mode.
Mode No operation time
Digital Compass, Thermometer 1 to 2 minutes
Sunrise/Sunset, Moon Age, Alarm 2 to 3 minutes
• If you leave a setting screen (one with flashing digits) on the digital display for two
or three minutes without performing any operation, the watch exits the setting
screen automatically.
E-15
Initial Screens
When you enter the Sunrise/Sunset Mode, Digital Compass Mode, Alarm Mode, or
World Time Mode, the data you were viewing when you last exited the mode will
appear first.
Scrolling
The B and D buttons are used on the setting screen to scroll through available
settings on the digital display. In most cases, holding down these buttons during a
scroll operation scrolls through the data at high speed.
E-16
Timekeeping
Use the Timekeeping Mode to set and view the current time and date.
• Each press of A in the Timekeeping Mode toggles the digital display between the
current date and the current time.
• You can select one of the two following Date Screen display formats: SUN 6.30 or
SUN 30.6. For information about how to select the format, see “Date Display
Format” under “To change the current time and date settings” (page E-22).
Day of week Month Day Hour : Minutes Seconds
Date screen Regular timekeeping screen
E-17
Configuring Home City Settings
There are two Home City settings: actually selecting the Home City and selecting
either standard time or daylight saving time (DST).
To configure Home City settings
1. In the Timekeeping Mode, hold down A for at least two
seconds until ADJUST appears on the digital display.
This is the setting mode. Release A after ADJUST
appears.
• The city name of the currently selected Home City
data will appear on the digital display with an arrow
( ) flashing to the left.
• The watch will exit the setting mode automatically if
you do not perform any operation for about two or
three minutes.
• For details about city data, see the “City Data Table”
at the back of this manual.
City Name
City Name
E-18
2. Press D (East) and B (West) to scroll through city names until the one you want
to use as your Home City data is displayed.
3. Press C to display the DST setting screen.
4. Press D to toggle between Daylight Saving Time (DST ON) and Standard Time
(DST OFF).
5. When the setting is the way you want, press A twice to
return to the Timekeeping Mode.
• The DST indicator appears to indicate that Daylight
Saving Time is turned on.
Note
• After you specify city data, the watch will use UTC*
offsets to calculate the current time for other time
zones based on the current time in your Home City.
* Coordinated Universal Time, the world-wide
scientific standard of timekeeping.
The reference point for UTC is Greenwich, England.
Setting
DST indicator
Setting
DST indicator
E-19
To change the Daylight Saving Time (summer time) setting
1. In the Timekeeping Mode, hold down A for at least two
seconds until ADJUST appears on the digital display.
Release A after ADJUST appears.
• The name of the city currently selected as your
Home City will appear on the digital display with an
arrow ( ) flashing to the left.
2. Press C to display the DST setting screen.
3. Press D to toggle between Daylight Saving Time
(DST ON) and Standard Time (DST OFF).
4. When the setting is the way you want, press A twice to
return to the Timekeeping Mode.
• The DST indicator appears to indicate that Daylight
Saving Time is turned on.
Setting
DST indicator
Setting
DST indicator
Operation Guide 5269
Page: 3
E-20
Configuring Latitude and Longitude Settings for Your Current Location
You can ensure correct display of sunrise and sunset time settings, and of moon ages
by configuring latitude and longitude settings for your current location.
To select a Home City by configuring latitude and longitude settings
1. In the Timekeeping Mode, hold down A for at least two
seconds until ADJUST appears on the digital display.
This is the setting mode. Release A after ADJUST
appears.
• Your current Home City data will appear on the
digital display with an arrow ( ) flashing to the left.
2. Press A to display the latitude setting screen with the
current latitude setting flashing.
E-21
3. Use D (+) and B (–) to change the flashing value in 0.1° increments.
• Holding down D or B while the latitude or longitude setting screen is
displayed will scroll the value to the left of the decimal point (the value to the
right does not change) at high speed.
S 62.0° S 61.9° S 0.1° N 0° N 0.1° N 61.9° N 62.0°
4. When the latitude is the value you want, press C to display the longitude setting
screen with the current longitude setting flashing.
5. Use D (+) and B (–) to change the flashing value in 0.1° increments.
W 179.9° W 179.8° W 0.1° E 0° E 0.1° E 179.9° E 180°
6. When the settings are the way you want, press A to return to the Timekeeping
Mode.
E-22
Configuring Current Time and Date Settings
You can use the procedure below to adjust the current time and date settings if they
are not correct.
Changing the digital Home City data should cause the analog time setting to change
accordingly. If the analog time does not indicate the digital time, check the home
positions of the hands and make adjustments if necessary (page E-26).
To change the current time and date settings
1. In the Timekeeping Mode, hold down A for at least two
seconds until ADJUST appears on the digital display.
This is the setting mode. Release A after ADJUST
appears.
• The name of the city currently selected as your Home
City will appear on the digital display with an arrow
( ) flashing to the left.
City name
City name
E-23
2. Use D and B to select the city data you want.
• Select your Home City data before changing any other setting.
• For full information on city data, see the “City Data Table” at the back of this
manual.
3. Press C to move the flashing in the sequence shown below to select the other settings.
DST
Date Display Format Illumination Duration Button Operation Tone On/Off Day
12/24-Hour Format Seconds Hour Minute Year
Month
City data
• The following steps explain how to configure timekeeping settings only.
4. When the timekeeping setting you want to change is flashing, use B and/or D to
change it as described below.
E-24
Screen To do this: Do this:
Change the city name
Use D (East) and
B (West).
Toggle between Daylight Saving Time
(DST ON) and Standard Time (DST OFF). Press D.
Toggle between 12-hour (12H) and 24-hour
(24H) timekeeping.
Press D.
Reset the seconds to 00 Press D.
Change the hour or minute
Use D (+) and
B (–).
Change the year, month, or day
Select the date display format (DMY, YMD,
MDY)
Press D.
5. When the settings are the way you want, press A twice to return to the
Timekeeping Mode.
E-25
Note
• For information about selecting a Home City and configuring the DST setting, see
“Configuring Home City Settings” (page E-17).
• The watch’s built-in full automatic calendar makes allowances for different month
lengths and leap years. Once you set the date, there should be no reason to
change it except after you have the watch’s battery replaced.
• Changing your Home City setting will initialize the latitude and longitude settings to
the location of the Home City.
E-26
Hand Home Position Adjustment
The hour, minute, and second hands of this watch can be put out of position by strong
magnetism or strong impact. When this happens, you can use the procedure below to
adjust the hand positions.
To adjust home positions
1. In the Timekeeping Mode, hold down A for at least
four seconds until HAND SET appears on the digital
display. This is the setting mode. Release A after
HAND SET appears.
• This will cause SEC 00 to flash on the digital
display, indicating the second hand adjustment
mode.
Second hand
Second hand
E-27
2. Check the position of the second hand.
• If the second hand is pointing to 12 o’clock, it is in
the correct home position. If it isn’t, use D (forward)
and B (back) to adjust the second hand position
so it points to 12 o’clock.
• Holding down either button will cause the second
hand to move at high speed.
3. Press C. This will cause 0:00 to flash on the digital
display, indicating the hour and minute adjustment
mode.
4. Check the positions of the hour and minute hands.
• The hands are in the correct home positions if they
are pointing to 12 o’clock. If they aren’t, use D
(forward) and B (back) to adjust their positions.
• Holding down either button will cause the hour and
minute hands to move at high speed.
Correct hour and
minute hand positions
Hour and minute hands
Correct hour and
minute hand positions
Hour and minute hands
E-28
5. Press A to exit the setting screen.
• This will cause the hour and minute hands to move to the current Timekeeping
Mode time.
E-29
Taking Direction Readings
The watch has a magnetic sensor that makes it possible to take digital compass
readings. You can use the digital compass to find the direction to a specific objective
and to determine your current position.
• See “Magnetic North and True North” (page E-40) for information about the two
types of north. For information about maximizing digital compass accuracy, see
“Calibrating Direction Readings” (page E-34) and “Digital Compass Precautions”
(page E-40).
Operation Guide 5269
Page: 4
E-30
To take a direction reading
1. Point the 12 o’clock position of the watch in the
direction you want to read.
2. In the Timekeeping Mode or Thermometer Mode, keep
the watch horizontal as you press B.
• COMPASS will appear on the digital display and
then direction reading will start.
• After the watch completes a reading, the second
hand will indicate north. The direction indicator
will show a literal indicator (abbreviation) for the
direction where 12 o’clock of the watch is pointed. A
direction angle will also be displayed.
Starting a digital compass direction reading causes
consecutive readings to be taken each second for
20 seconds. After a series of consecutive readings
is complete, — — — appears in place of the literal
direction indicator on the display.
• See “Digital Compass Readings” (page E-31) for
information about what appears on the digital display.
NW
0
W
NW
W
WSW
S
W
S
S
W
S SSE
S
E
E
S
E
E
ENE
N
E
N
N
E
N
NNW
90
180
270
12 o’clock position
North pointer
Direction
indicator
Angle value
(in degrees)
NW
0
W
NW
W
WSW
S
W
S
S
W
S SSE
S
E
E
S
E
E
ENE
N
E
N
N
E
N
NNW
90
180
270
12 o’clock position
North pointer
Direction
indicator
Angle value
(in degrees)
E-31
3. Press C to return to the Timekeeping Mode.
• If you do not perform any button operation for one or two minutes, the watch
will automatically return to the Timekeeping Mode.
Digital Compass Readings
• The following table shows the meanings of each of the direction abbreviations that appear
on the digital display.
Direction Meaning Direction Meaning Direction Meaning Direction Meaning
N North NNE North-
northeast
NE Northeast ENE East-
northeast
E East ESE East-
southeast
SE Southeast SSE South-
southeast
S South SSW South-
southwest
SW Southwest WSW West-
southwest
W West WNW West-
northwest
NW Northwest NNW North-
northwest
E-32
Example: Determining your current position and your
objective on a map
Having an idea of your current location and the direction
to your destination is important when mountain climbing or
hiking. In this example, we show you how to plot directions
on a map and determine your current location using
direction measurements taken by the watch.
1. In the Timekeeping Mode or Thermometer Mode, press
B.
N
N
North indicated
on the map
North indicated by
north pointer
N
N
North indicated
on the map
North indicated by
north pointer
E-33
2. Rotate the map (without moving the watch) until north on the map is aligned with
north as indicated by the watch’s second hand.
Depending on how the watch is set up, it may be indicating magnetic north or true
north.
Magnetic north: Indicates north in accordance with the Earth’s magnetic field.
True north: Indicates the direction to the North Pole.
• For information about setting the watch up to indicate magnetic north or true
north, see “Magnetic Declination Correction” (page E-37).
3. Determine your location and destination by checking the map and the geographic
contours around you.
E-34
Calibrating Direction Readings
You can use the information in this section to calibrate direction readings, which helps
to improve digital compass accuracy.
Direction Reading Calibration Methods
Important!
• To ensure correct direction readings by this watch, be sure to perform bidirectional
calibration before using it. The watch may produce incorrect direction readings if
you do not perform bidirectional calibration.
• Keep the watch away from audio speakers, magnetic necklace, cell phone, and
other devices that generate strong magnetism. Exposure to strong magnetism can
magnetize the watch and cause incorrect direction readings. If incorrect readings
continue even after you perform bidirectional calibration, it could mean that your
watch has been magnetized. If this happens, contact your original retailer or an
authorized CASIO Service Center.
E-35
Bidirectional Calibration
• Use this method when using the watch to take readings in an area where magnetic
force is present, or if you notice that the readings produced by the watch are
different from another compass.
Magnetic Declination Calibration
• You can use this method to specify a magnetic declination value, which sets the
digital compass up to take magnetic north or true north readings.
Precautions about bidirectional calibration
• You can use any two opposing directions for bidirectional calibration. You must,
however, make sure that they are 180 degrees opposite each other. Remember
that if you perform the procedure incorrectly, you will get wrong bearing sensor
readings.
• Do not move the watch while calibration of either direction is in progress.
• You should perform bidirectional calibration in an environment that is the same as
that where you plan to be taking direction readings. If you plan to take direction
readings in an open field, for example, calibrate in an open field.
E-36
To perform bidirectional calibration
1. In the Digital Compass Mode, hold down A for two
seconds.
• This will cause the bidirectional calibration screen to
appear on the digital display.
• The second hand will move to 12 o’clock. This
causes an arrow ( ) symbol to flash on the left
side of the digital display and -1- to be displayed to
indicate that the watch is ready for calibration of the
first direction.
2. Place the watch on a level surface facing any direction
you want, and press B to calibrate the first direction.
• — — — will remain on the digital display while
calibration is in progress. OK will appear when
first direction calibration is complete. About one
second after that, the flashing arrow will change to
point downwards ( ) and -2- will be displayed. This
means that the watch is ready for calibration of the
second direction.
E-37
3. Rotate the watch 180 degrees.
4. Press B again to calibrate the second direction.
• — — — will remain on the digital display while
calibration is in progress. OK will appear when
second direction calibration is complete.
• If ERR appears on the digital display, press B
again to restart calibration.
• Magnetic Declination Correction
With magnetic declination correction, you input a magnetic declination angle
(difference between magnetic north and true north), which allows the watch to
indicate true north. You can perform this procedure when the magnetic declination
angle is indicated on the map you are using. Note that you can input the declination
angle in whole degree units only, so you may need to round off the value specified on
the map. If your map indicates the declination angle as 7.4°, you should input 7°. In
the case of 7.6° input 8°, for 7.5° you can input 7° or 8°.
E-38
To perform magnetic declination correction
1. In the Digital Compass Mode, hold down A for two
seconds.
• This will cause the bidirectional calibration screen
to appear on the digital display.
2. Press C to display the magnetic declination setting
screen (DEC).
3. Use D (East) and B (West) to change the settings.
• The following explains magnetic declination angle
direction settings.
OFF: No magnetic declination correction performed.
The northerly magnetic declination setting
(DEC) will be 0°.
E: When magnetic north is to the east (east
declination)
W: When magnetic north is to the west (west
declination)
Magnetic declination
angle direction value
(E, W, or OFF)
Magnetic declination
angle value
Magnetic declination
angle direction value
(E, W, or OFF)
Magnetic declination
angle value
E-39
• You can select a value within the range of W 90° to E 90° with these settings.
• You can turn off (OFF) magnetic declination correction by pressing D and B
at the same time.
• The illustration, for example, shows the value you should input and the direction
setting you should select when the map shows a magnetic declination of 7°
West.
4. When the setting is the way you want, press A to exit the setting screen.
Operation Guide 5269
Page: 5
E-40
Digital Compass Precautions
Magnetic North and True North
The northerly direction can be expressed either as
magnetic north or true north, which are different from each
other. Also, it is important to keep in mind that magnetic
north moves over time.
• Magnetic north is the north that is indicated by the
needle of a compass.
• True north, which is the location of the North Pole of the
Earth’s axis, is the north that is normally indicated on
maps.
• The difference between magnetic north and true north
is called the “declination”. The closer you get to the
North Pole, the greater the declination angle.
True north
Earth
Magnetic north
True north
Earth
Magnetic north
E-41
Location
• Taking a direction reading when you are near a source of strong magnetism can
cause large errors in readings. Because of this, you should avoid taking direction
readings while in the vicinity of the following types of objects: permanent magnets
(magnetic necklaces, etc.), concentrations of metal (metal doors, lockers, etc.),
high tension wires, aerial wires, household appliances (TVs, personal computers,
washing machines, freezers, etc.).
• Accurate direction readings are impossible while in a train, boat, air plane, etc.
• Accurate readings are also impossible indoors, especially inside ferroconcrete
structures. This is because the metal framework of such structures picks up
magnetism from appliances, etc.
E-42
Storage
• The precision of the bearing sensor may deteriorate if the watch becomes
magnetized. Because of this, you should store the watch away from magnets or any
other sources of strong magnetism, including: permanent magnets (magnetic
necklaces, etc.) and household appliances (TVs, personal computers, washing
machines, freezers, etc.).
• Whenever you suspect that the watch may have become magnetized, perform the
procedure under “To perform bidirectional calibration” (page E-36).
E-43
Thermometer
This watch uses a temperature sensor to take temperature readings.
To enter and exit the Thermometer Mode
1. In the Timekeeping Mode or Digital Compass Mode,
press D.
• THERMO will appear on the digital display for about
one second indicating that temperature readings
are being taken. After that, the measurement result
will appear.
• The watch will take temperature readings every five
seconds for one or two minutes.
• To restart temperature readings, press D.
2. Press C to return to the Timekeeping Mode.
• If you do not perform any button operation for one
or two minutes after temperature measurement is
complete, the watch will automatically return to the
Timekeeping Mode.
Temperature
Temperature
E-44
Temperature
• Temperature is displayed in units of 0.1°C (or 0.2°F).
• The displayed temperature value changes to —.- °C (or °F) if a measured
temperature falls outside the range of –10.0°C to 60.0°C (14.0°F to 140.0°F). The
temperature value will reappear as soon as the measured temperature is within the
allowable range.
Display Units
You can select either Celsius (°C) or Fahrenheit (°F) for the displayed temperature
value. See “To specify temperature unit” (page E-47) for more information.
Temperature Sensor Calibration
The watch’s temperature sensor is calibrated at the factory and normally requires no
further adjustment. If you notice serious errors in the temperature readings produced
by the watch, you can calibrate the sensor to correct the errors.
E-45
Important!
• Incorrectly calibrating the temperature sensor can result in incorrect readings.
Carefully read the following before doing anything.
– Compare the readings produced by the watch with those of another reliable and
accurate thermometer.
– If adjustment is required, remove the watch from your wrist and wait for 20 or 30
minutes to give the temperature of the watch time to stabilize.
To correct the temperature value
You can correct the temperature readings displayed by
the watch in accordance with another measuring
instrument for more accurate readings.
1. In the Thermometer Mode, hold down A until the
current temperature value flashes on the digital display.
This is the setting screen.
E-46
2. Use D (+) and B (–) to calibrate the temperature value with the reading of another
instrument.
• Each press of a button changes the temperature value in units of 0.1°C (0.2°F).
• To return the currently flashing value to its initial factory default setting, press
B and D at the same time. OFF will appear at the flashing location for about
one second, followed by the initial default value.
3. Press A to return to the Thermometer Mode.
Thermometer Precautions
• Temperature measurements are affected by your body temperature (while you are
wearing the watch), direct sunlight, and moisture. To achieve a more accurate
temperature measurement, remove the watch from your wrist, place it in a well
ventilated location out of direct sunlight, and wipe all moisture from the case. It
takes approximately 20 to 30 minutes for the case of the watch to reach the actual
surrounding temperature.
• When taking temperature readings, it is best to remove the watch from your wrist in
order to eliminate the effects of body heat. Remove the watch from your wrist and
allow it to hang freely from your bag or in another location where it is not exposed
to direct sunlight.
E-47
Specifying Temperature Unit
Use the procedure below to specify the temperature unit to be used in the
Thermometer Mode.
Important!
When TOKYO is selected as the Home City, the
temperature unit is set automatically to Celsius (°C).
These settings cannot be changed.
To specify the temperature unit
1. Enter the Thermometer Mode and then hold down A for
about two seconds until the current temperature value
flashes on the digital display. This is the setting screen.
2. Press C to display the temperature unit setting screen
with either °C or °F (the current setting) flashing.
E-48
3. Press D to toggle the temperature unit between °C (Celsius) and °F (Fahrenheit).
4. After the setting is the way you want, press A to exit the setting screen.
E-49
Looking up Sunrise and Sunset Times
You can use the Sunrise/Sunset Mode to look up the sunrise and sunset times for a
particular date (year, month, day) and location.
To look up the sunrise and sunset times on a specific date
Use C to select the Sunrise/Sunset Mode as shown on
page E-13.
• SUNRISE TIME or SUNSET TIME will appear on the
digital display for about one second. After that the
current year, month, and day will appear for about one
second.
• Next, CALC will appear to indicate that calculation is in
progress. After the calculation is complete, the sunrise
time or sunset time for the current date will appear.
• What appears first when the enter the Sunrise/Sunset
Mode (either the sunrise time or sunset time) will be the
time that was displayed when you last exited the
Sunrise/Sunset Mode.
Sunrise time or
sunset time
(or )
Sunrise time or
sunset time
(or )
Operation Guide 5269
Page: 6
E-50
Note
• Sunrise and sunset times are calculated in accordance with the current date based
on the currently specified Home City, latitude, and longitude.
• Before trying to use the Sunrise/Sunset Mode, you need to configure settings for the
Home City, longitude, and latitude for the location whose sunrise and sunset times
you want to view.
To toggle between sunrise time and sunset time
Press A.
E-51
To view the sunrise/sunset time for a particular date
While the sunrise time or sunset time is displayed in the
Sunrise/Sunset Mode, use B (+) and D (–) to scroll
through the dates.
• The sunrise time or sunset time for the currently
selected date will appear on the digital display.
• You can select any date between January 1, 2000 and
December 31, 2099.
Note
• If you think that the sunrise and/or sunset times
are not correct for some reason, check the watch’s
Home City, longitude and latitude settings.
• The sunrise and sunset times displayed by this
watch are times at sea level. Sunrise and sunset
times are different at altitudes other than sea level.
Sunrise time or
sunset time
Sunrise time or
sunset time
E-52
Using Moon Data
The Moon Age Mode displays a value that indicates the Moon age at noon on the
current date.
To look up the Moon age on a specific date
1. Use C to select the Moon Age Mode (MOON AGE) as
shown on page E-12.
• MOON AGE will appear on the digital display for
about one second. After that the current year, month,
and day will appear for about one second.
• Next, CALC will appear on the digital display
indicating that Moon age calculation is in progress.
After the calculation is complete, the Moon age value
for the current date will appear.
Moon age
Moon age
E-53
2. While a Moon age value is displayed you can use the D (+) and B (–) buttons to
scroll from day to day.
• Scrolling to another day will cause CALC to appear on the digital display for one
second indicating that Moon age calculation is in progress. The Moon age for
the selected data will appear when calculation is complete.
• Hold down C for two seconds to return to the Timekeeping Mode.
Note
• Moon age is calculated to an accuracy of ±1 day.
• If the Moon data is not correct, check your Timekeeping Mode settings and correct
them if necessary.
E-54
Using the Alarm
You can set five independent daily alarms. When a daily
alarm is turned on, an alarm tone will sound for about 10
seconds each day when the time in the Timekeeping
Mode reaches the preset alarm time. This is true even if
the watch is not in the Timekeeping Mode.
You can also turn on an Hourly Time Signal, which will
cause the watch to beep twice every hour on the hour.
To enter the Alarm Mode
Use C to select the Alarm Mode (ALARM) as shown on
page E-12.
• ALARM will appear on the digital display for about one
second. After that, the digital display will show the
current alarm time and alarm number (–1 to –5), or the
hourly time signal setting. In the case of an alarm, the
digital display alternates at one-second intervals
between the alarm number and the on/off setting screen.
Alarm time
(Hour : Minutes) or SIG
Alternates
(1 second)
Alarm
number
Alarm time
(Hour : Minutes) or SIG
Alternates
(1 second)
Alarm
number
E-55
• The alarm number indicates an alarm screen. SIG is shown when the Hourly Time
Signal screen is on the digital display.
• When you enter the Alarm Mode, the data you were viewing when you last exited
the mode appears first.
To set an alarm time
1. In the Alarm Mode, use D and B to scroll through the
alarm screens until the one whose time you want to set
is displayed.
−1 −2 −3
SIG −5 −4
2. Hold down A until the alarm time starts to flash. This is
the setting screen.
E-56
3. Press C to move the flashing between the hour and minute settings.
4. While a setting is flashing, use D (+) and B (–) to change it.
• When setting the alarm time using the 12-hour format, take care to set the time
correctly as a.m. or p.m.
5. Press A to exit the setting screen.
To test the alarm
In the Alarm Mode, hold down D to sound the alarm.
E-57
To turn an alarm and the Hourly Time Signal on and off
1. In the Alarm Mode, use D and B to select an alarm or
the Hourly Time Signal.
2. When the alarm or the Hourly Time Signal you want is
selected, press A to toggle it between on and off.
• The alarm on indicator (when any alarm is on) and the
Hourly Time Signal on indicator (when the Hourly
Time Signal is on) are shown on the digital display
in all modes.
To stop the alarm
Press any button.
Alarm on indicator
Hourly time signal
on indicator
Alarm on indicator
Hourly time signal
on indicator
E-58
Using the Stopwatch
The stopwatch measures elapsed time and split times.
To enter the Stopwatch Mode
Use C to select the Stopwatch Mode (STW) as shown on
page E-12.
• STW will appear on the digital display for about one
second. Next, the digital display will change to show
the stopwatch time.
To perform an elapsed time operation
D D D D B
Start Stop (Restart) (Stop) Reset
To pause at a split time
D B B D B
Start Split Split release Stop Reset
Hours
Minutes
1/100 second
Seconds
Hours
Minutes
1/100 second
Seconds
E-59
• Digital display alternates between SPL and the 1/100-second value at one-second
intervals.
Note
• The Stopwatch Mode can indicate elapsed time up to 23 hours, 59 minutes, 59.99
seconds.
• Once started, stopwatch timing continues until you press B to reset it, even if you
exit the Stopwatch Mode to another mode and even if timing reaches the stopwatch
limit defined above.
• Exiting the Stopwatch Mode while a split time is frozen on the digital display clears
the split time and returns to elapsed time measurement.
Operation Guide 5269
Page: 7
E-60
Using the Countdown Timer
The countdown timer can be configured to start at a preset time and sound an alarm
when the end of the countdown is reached.
To enter the Countdown Timer Mode
Use C to select the Countdown Timer Mode (TIMER) as
shown on page E-12.
• TIMER will appear on the digital display for about one
second. Next, the digital display will change to show
the countdown time.
To specify the countdown start time
1. Enter the Countdown Timer Mode.
• If a countdown is in progress (indicated by the
seconds counting down), press D to stop it and
then press B to reset to the current countdown
start time.
Countdown time
(Minutes, seconds)
Countdown time
(Minutes, seconds)
E-61
• If a countdown is paused, press B to reset to the current countdown start
time.
2. Hold down A until the minute setting of the current countdown start time starts to
flash. This is the setting screen.
3. Press C to move the flashing between the minute and second settings.
4. Use D (+) and B (–) to change the flashing item.
• To set the starting value of the countdown time to 100 minutes, set 00’00».
5. Press A to exit the setting screen.
To perform a countdown timer operation
D D D D B
Start Stop (Restart) (Stop) Reset
• Before starting a countdown timer operation, check to make sure that a countdown
operation is not already in progress (indicated by the seconds counting down). If it
is, press D to stop it and then B to reset to the countdown start time.
E-62
• An alarm sounds for ten seconds when the end of the countdown is reached. This
alarm will sound in all modes. The countdown time is reset to its starting value
automatically after the alarm sounds.
To stop the alarm
Press any button.
E-63
Checking the Current Time in a Different Time Zone
You can use the World Time Mode to view the current time in one of 31 time zones (48
cities) around the globe. The city that is currently selected in the World Time Mode is
called the “World Time City”.
To enter the World Time Mode
Use C to select the World Time Mode (WORLD TIME)
as shown on page E-13.
• WORLD TIME will appear on the digital display for
about one second. Next, the name of the currently
selected World Time city will scroll across the digital
display. Finally, the current time in the World Time city
will appear.
• To display the World Time city name again, press A.
Currently
selected
World
Time City
Current time in the
currently selected
World Time City
Currently
selected
World
Time City
Current time in the
currently selected
World Time City
E-64
To view the time in another time zone
In the World Time Mode, use B (East) and D (West) to scroll through World Time
cities and view the current time in displayed city.
To specify standard time or daylight saving time (DST) for a city
1. In the World Time Mode, use B (East) and D (West) to
display the world time city (time zone) whose Standard
Time/Daylight Saving Time setting you want to change.
2. Hold down A for at least two seconds to toggle
between Daylight Saving Time (DST ON) and Standard
Time (DST OFF).
• Changing the DST setting of your Home City in the
World Time Mode will also change the DST setting
of the Timekeeping Mode time.
• Note that you cannot switch between standard time/daylight saving time
(DST) while UTC is selected as the World Time City.
• Note that the standard time/daylight saving time (DST) setting affects only the
currently selected time zone. Other time zones are not affected.
DST indicator
DST indicator
E-65
Illumination
The display of the watch is illuminated for easy reading in
the dark.
To turn on illumination
In any mode (except when a setting screen is on the
digital display), press L to illuminate the display.
• You can use the procedure below to select either 1.5
seconds or three seconds as the illumination duration.
When you press L, the display will remain illuminated
for about 1.5 seconds or three seconds, depending on
the current illumination duration setting.
E-66
To change the illumination duration
1. In the Timekeeping Mode, hold down A for at least two seconds until ADJUST
appears on the digital display. This is the setting mode. Release A after ADJUST
appears.
• The name of the city currently selected as your Home City will appear on the
digital display with an arrow ( ) flashing to the left.
2. Press C 10 times until LIGHT 1 or LIGHT 3 is displayed.
• See step 3 under “To change the current time and date settings” (page E-22)
for information about how to scroll through setting screens.
3. Press D to toggle the illumination duration between three seconds (LIGHT 3
displayed) and 1.5 seconds (LIGHT 1 displayed).
4. When the setting is the way you want, press A twice to return to the Timekeeping
Mode.
E-67
Illumination Precautions
• Illumination may be hard to see when viewed under direct sunlight.
• Illumination turns off automatically whenever an alarm sounds.
• Illumination will not turn on while an alarm is sounding, while high-speed hand
movement is in progress, while a sensor is taking a reading, or while the watch is
performing calculation (CALC displayed). Illumination will turn on if L is pressed
between sensor reading operations.
• Frequent use of illumination runs down the battery.
E-68
Button Operation Tone
The button operation tone sounds any time you press one of the watch’s buttons. You
can turn the button operation tone on or off as desired.
• Even if you turn off the button operation tone, the alarm, Hourly Time Signal, and
Countdown Timer Mode alarm all operate normally.
To turn the button operation tone on and off
1. In the Timekeeping Mode, hold down A for at least two
seconds until ADJUST appears on the digital display.
This is the setting mode. Release A after ADJUST
appears.
• The name of the city currently selected as your
Home City will appear on the digital display with an
arrow ( ) flashing to the left.
E-69
2. Use C to cycle through settings on the digital display until the current button
operation tone setting (MUTE or KEY ) is displayed.
• See step 3 under “To change the current time and date settings” (page E-22)
for information about how to scroll through setting screens.
3. Press D to toggle the button operation tone between on (KEY ) and off (MUTE).
4. When the setting is the way you want, press A twice to return to the Timekeeping
Mode.
Operation Guide 5269
Page: 8
E-70
Troubleshooting
Time Setting
■ Why is the current time setting off by a couple of hours?
Your Home City setting may be wrong (page E-17). Check your Home City setting and
correct it, if necessary.
■ Why is the current time setting off by one hour?
You may need to change your Home City’s standard time/daylight saving time (DST)
setting. Use the procedure under “To change the current time and date settings” (page
E-22) to change the standard time/daylight saving time (DST) setting.
Sensor modes
■ Why can’t I change the temperature unit setting?
The temperature unit setting is always Celsius (°C) whenever TOKYO is selected as
the Home City. In this case, the setting cannot be changed.
E-71
■ Why does “ERR” appear while a sensor operation is in progress?
Subjecting the watch to strong impact can cause sensor malfunction or improper
contact of internal circuitry. When this happens, ERR (error) will appear on the digital
display and sensor operations will be disabled.
Direction Reading and
Temperature Measurement
• If ERR appears while a measurement operation is being performed in a sensor
mode, restart the measurement. If ERR appears on the digital display again, it can
mean there is something wrong with the sensor.
• If ERR keeps appearing during measurement, it can mean there is a problem with
the applicable sensor.
E-72
■ Why does “ERR” appear on the digital display following bidirectional
calibration?
If — — — appears and then changes to ERR (error) on the calibration screen, it means
that there is something wrong with the sensor.
• If ERR disappears after about one second, try performing the calibration again.
• If ERR keeps appearing, contact your original dealer or nearest authorized CASIO
distributor to have the watch checked.
Whenever you have a sensor malfunction, take the watch to your original dealer or
nearest authorized CASIO distributor as soon as possible.
■ What causes incorrect direction readings?
• Incorrect bidirectional calibration. Perform bidirectional calibration (page E-36).
• Nearby source of strong magnetism, such as a household appliance, a large steel
bridge, a steel beam, overhead wires, etc., or an attempt to perform direction
measurement on a train, boat, etc. Move away from large metal objects and try
again.
E-73
■ What causes different direction readings to produce different results at the
same location?
Magnetism generated by nearby high-tension wires is interfering with detection of
terrestrial magnetism. Move away from the high-tension wires and try again.
■ Why am I having problems taking direction readings indoors?
A TV, personal computer, speakers, or some other object is interfering with terrestrial
magnetism readings. Move away from the object causing the interference or take the
direction reading outdoors. Indoor direction readings are particularly difficult inside
ferro-concrete structures. Remember that you will not be able to take direction
readings inside of trains, airplanes, etc.
E-74
Battery
■ Why is the low battery alert flashing?
Battery power is low. Watch operations are disabled while
the low battery alert is flashing on the digital display.
If the low battery alert disappears after battery power
recovers but then starts to flash again after a short while,
it means that you need to have the watch’s battery
replaced.
Low battery alert
Low battery alert
E-75
Specifications
Accuracy at normal temperature: ±30 seconds a month
Digital Timekeeping: Hour, minutes, seconds, a.m. (A)/p.m. (P), month, day, day of
the week
Time format: 12-hour and 24-hour
Calendar system: Full Auto-calendar pre-programmed from the year 2000 to 2099
Other: Home City (can be assigned one of 48 city codes); Standard Time / Daylight
Saving Time (summer time)
Analog Timekeeping: Hour, minutes (hand moves every 10 seconds), seconds
Digital Compass: North indicated by second hand; 20 seconds continuous readings;
Calibration (bidirectional); Magnetic declination correction; Magnetic north
indication; display of one of 16 direction indicators; Angle value 0° to 359°
Thermometer:
Measurement and display range: –10.0 to 60.0°C (or 14.0 to 140.0°F)
Display unit: 0.1°C (or 0.2°F)
Reading timing: 5-second intervals for 1 to 2 minutes
E-76
Bearing Sensor Precision:
Direction: Within ±15°
Values are guaranteed for a temperature range of –10°C to 40°C (14°F to 104°F).
Temperature Sensor Precision:
±2°C (±3.6°F) in range of –10°C to 60°C (14.0°F to 140.0°F)
Moon Age: Display of Moon age values for specific dates
Sunrise/Sunset: Sunrise time and sunset time for specific date
Alarms: 5 daily alarms; hourly time signal
Stopwatch:
Measuring unit: 1/100 second
Measuring capacity: 23:59 59.99
Measuring modes: Elapsed time, split time
Countdown Timer:
Measuring unit: 1 second
Countdown start time setting range: 1 second to 100 minutes (1-minute
increments and 1-second increments)
E-77
World Time: 48 cities (31 time zones)
Other: Daylight Saving Time/Standard Time
Illumination: LED (Light-emitting diode); Selectable illumination duration
(approximately 1.5 seconds or 3 seconds)
Other: Button operation tone on/off
Battery: Two silver oxide batteries (Type: SR927W)
Approximate battery operating time: 2 years under the following conditions:
• 1 illumination operation (1.5 seconds) per day
• 20 seconds of continuous direction readings, 20 times per month
• 2 minutes of continuous temperature readings (5-second intervals), once per
week
• 20 seconds of alarm operation per day
Frequent use of illumination runs down the battery.
City Code Table
UTC Offset/
GMT Differential
City Name Latitude (°)
North Latitude +,
South Latitude –
Longitude (°)
East Longitude +,
West Longitude –
0.0 UTC 51.5 0
0.0 Lisbon 38.7 –9.1
0.0 London 51.5 –0.1
1.0 Madrid 40.4 –3.7
1.0 Paris 48.9 2.4
1.0 Rome 41.9 12.5
1.0 Berlin 52.5 13.4
1.0 Stockholm 59.3 18.1
2.0 Athens 38.0 23.7
2.0 Cairo 30.0 31.2
L L-1
UTC Offset/
GMT Differential
City Name Latitude (°)
North Latitude +,
South Latitude –
Longitude (°)
East Longitude +,
West Longitude –
2.0 Jerusalem 31.8 35.2
3.0 Moscow 55.8 37.6
3.0 Jeddah 21.5 39.2
3.5 Tehran 35.7 51.4
4.0 Dubai 25.3 55.3
4.5 Kabul 34.5 69.2
5.0 Karachi 24.9 67.0
5.5 Delhi 28.6 77.2
5.75 Kathmandu 27.7 85.3
6.0 Dhaka 23.7 90.4
6.5 Yangon 16.8 96.2
7.0 Bangkok 13.7 100.5
Operation Guide 5269
Page: 9
L-2
UTC Offset/
GMT Differential
City Name Latitude (°)
North Latitude +,
South Latitude –
Longitude (°)
East Longitude +,
West Longitude –
8.0 Singapore 1.3 103.8
8.0 Hong Kong 22.4 114.1
8.0 Beijing 39.9 116.4
8.0 Taipei 25.1 121.6
9.0 Seoul 37.6 127.0
9.0 Tokyo 35.7 139.7
9.5 Adelaide –34.9 138.6
10.0 Guam 13.4 144.8
10.0 Sydney –33.9 151.2
11.0 Noumea –22.3 166.5
12.0 Wellington –41.3 174.8
–11.0 Pago Pago –14.3 –170.7
L-3
UTC Offset/
GMT Differential
City Name Latitude (°)
North Latitude +,
South Latitude –
Longitude (°)
East Longitude +,
West Longitude –
–10.0 Honolulu 21.3 –157.9
–9.0 Anchorage 61.2 –149.9
–8.0 Vancouver 49.3 –123.1
–8.0 Los Angeles 34.1 –118.2
–7.0 Edmonton 53.5 –113.5
–7.0 Denver 39.7 –105.0
–6.0 Mexico City 19.4 –99.1
–6.0 Chicago 41.9 –87.6
–5.0 New York 40.7 –74.0
–4.0 Santiago –33.4 –70.6
–4.0 Halifax 44.6 –63.6
–3.5 St.Johns 47.6 –52.7
L-4
UTC Offset/
GMT Differential
City Name Latitude (°)
North Latitude +,
South Latitude –
Longitude (°)
East Longitude +,
West Longitude –
–3.0 Rio De Janeiro –22.9 –43.2
–2.0 Fernando de Noronha –3.8 –32.4
–1.0 Praia 14.9 –23.5
• UTC Offset/GMT Differential: Based on data for June 2012
• The rules governing global times (GMT differential and UTC offset) and summer
time are determined by each individual country.
Operation Guide 5269
Loading…
You can only view or download manuals with
Sign Up and get 5 for free
Upload your files to the site. You get 1 for each file you add
Get 1 for every time someone downloads your manual
Buy as many as you need
View a manual of the Casio SGW-500H-1BVER below. All manuals on ManualsCat.com can be viewed completely free of charge. By using the ‘Select a language’ button, you can choose the language of the manual you want to view.
MANUALSCAT | EN
Question & answers
Have a question about the Casio SGW-500H-1BVER but cannot find the answer in the user manual? Perhaps the users of ManualsCat.com can help you answer your question. By filling in the form below, your question will appear below the manual of the Casio SGW-500H-1BVER. Please make sure that you describe your difficulty with the Casio SGW-500H-1BVER as precisely as you can. The more precies your question is, the higher the chances of quickly receiving an answer from another user. You will automatically be sent an e-mail to inform you when someone has reacted to your question.
Ask a question about the Casio SGW-500H-1BVER
Page: 1
MO1208-EA © 2012 CASIO COMPUTER CO., LTD.
E-1
ENGLISH
Congratulations upon your selection of this CASIO watch.
Warning!
• The measurement functions built into this watch are not intended for taking
measurements that require professional or industrial precision. Values produced
by this watch should be considered as reasonable representations only.
• Note that CASIO COMPUTER CO., LTD. assumes no responsibility for any
damage or loss suffered by you or any third party arising through the use of
this product or its malfunction.
E-2
• To ensure correct direction readings by this watch, be sure to perform
bidirectional calibration before using it. The watch may produce incorrect
direction readings if you do not perform bidirectional calibration. For more
information, see “To perform bidirectional calibration” (page E-36).
• Keep the watch away from audio speakers, magnetic necklace, cell phone,
and other devices that generate strong magnetism. Exposure to strong
magnetism can magnetize the watch and cause incorrect direction readings. If
incorrect readings continue even after you perform bidirectional calibration, it
could mean that your watch has been magnetized. If this happens, contact
your original retailer or an authorized CASIO Service Center.
E-3
About This Manual
• Depending on the model of your watch, digital display
text appears either as dark figures on a light
background, or light figures on a dark background. All
sample displays in this manual are shown using dark
figures on a light background.
• Button operations are indicated using the letters shown
in the illustration.
• Note that the product illustrations in this manual are
intended for reference only, and so the actual product
may appear somewhat different than depicted by an
illustration.
E-4
Things to check before using the watch
1. Check the Home City and the daylight saving time (DST) setting.
Use the procedure under “Configuring Home City Settings” (page E-17) to configure
your Home City and daylight saving time settings.
Important!
Proper World Time Mode, Sunrise/Sunset Mode, and Moon Age Mode data depend
on correct Home City, time, and date settings in the Timekeeping Mode. Make sure
you configure these settings correctly.
2. Configure latitude and longitude settings for your current location.
See “To select a Home City by configuring latitude and longitude settings” (page
E-20).
E-5
3. Set the current time.
See “Configuring Current Time and Date Settings” (page E-22).
The watch is now ready for use.
E-6
Contents
E-3 About This Manual
E-4 Things to check before using the watch
E-11 Mode Reference Guide
E-16 Timekeeping
E-17 Configuring Home City Settings
E-17 To configure Home City settings
E-19 To change the Daylight Saving Time (summer time) setting
E-20 Configuring Latitude and Longitude Settings for Your Current Location
E-20 To select a Home City by configuring latitude and longitude settings
E-22 Configuring Current Time and Date Settings
E-22 To change the current time and date settings
E-7
E-26 Hand Home Position Adjustment
E-26 To adjust home positions
E-29 Taking Direction Readings
E-30 To take a direction reading
E-36 To perform bidirectional calibration
E-38 To perform magnetic declination correction
E-43 Thermometer
E-43 To enter and exit the Thermometer Mode
E-45 To correct the temperature value
E-47 Specifying Temperature Unit
E-47 To specify the temperature unit
E-49 Looking up Sunrise and Sunset Times
E-49 To look up the sunrise and sunset times on a specific date
E-50 To toggle between sunrise time and sunset time
E-51 To view the sunrise/sunset time for a particular date
E-8
E-52 Using Moon Data
E-52 To look up the Moon age on a specific date
E-54 Using the Alarm
E-54 To enter the Alarm Mode
E-55 To set an alarm time
E-56 To test the alarm
E-57 To turn an alarm and the Hourly Time Signal on and off
E-57 To stop the alarm
E-58 Using the Stopwatch
E-58 To enter the Stopwatch Mode
E-58 To perform an elapsed time operation
E-58 To pause at a split time
E-9
E-60 Using the Countdown Timer
E-60 To enter the Countdown Timer Mode
E-60 To specify the countdown start time
E-61 To perform a countdown timer operation
E-62 To stop the alarm
E-63 Checking the Current Time in a Different Time Zone
E-63 To enter the World Time Mode
E-64 To view the time in another time zone
E-64 To specify standard time or daylight saving time (DST) for a city
E-65 Illumination
E-65 To turn on illumination
E-66 To change the illumination duration
E-68 Button Operation Tone
E-68 To turn the button operation tone on and off
Operation Guide 5269
Page: 2
E-10
E-70 Troubleshooting
E-75 Specifications
E-11
Mode Reference Guide
Your watch has 9 “modes”. The mode you should select depends on what you want to do.
To do this: Enter this mode: See:
• View the current time and date in the Home City
• Configure Home City and daylight saving time (DST) settings
• Configure current location latitude and longitude settings
• Configure time and date settings
Timekeeping Mode E-16
• Determine your current bearing or the direction from your current
location to a destination as a direction indicator and angle value
• Determine your current location using the watch and a map
Digital Compass
Mode
E-29
Determine the temperature at your current location Thermometer Mode E-43
View the sunrise and sunset times for a specific date Sunrise/Sunset Mode E-49
Determine a Moon age value Moon Age Mode E-52
Set an alarm time Alarm Mode E-54
Use the stopwatch to measure elapsed time Stopwatch Mode E-58
Use the countdown timer Countdown Timer Mode E-60
View the current time in one of 48 cities (31 time zones) around the globe World Time Mode E-63
E-12
Selecting a Mode
• The illustration below shows which buttons you need to press to navigate between
modes.
• To return to the Timekeeping Mode from any other mode, hold down C for about
two seconds.
• In any mode, press L to illuminate the display.
Alarm Mode Moon Age Mode
Stopwatch Mode Countdown Timer Mode
Alarm Mode Moon Age Mode
Stopwatch Mode Countdown Timer Mode
E-13
Timekeeping Mode
Thermometer Mode
Sunrise/Sunset Mode
World Time Mode
Digital Compass Mode
Timekeeping Mode
Thermometer Mode
Sunrise/Sunset Mode
World Time Mode
Digital Compass Mode
E-14
General Functions (All Modes)
The functions and operations described in this section can be used in all of the modes.
Auto Return Features
• If you do not perform any operation for a certain amount of time in certain modes as
shown in the table below, the watch will automatically return to the Timekeeping
Mode.
Mode No operation time
Digital Compass, Thermometer 1 to 2 minutes
Sunrise/Sunset, Moon Age, Alarm 2 to 3 minutes
• If you leave a setting screen (one with flashing digits) on the digital display for two
or three minutes without performing any operation, the watch exits the setting
screen automatically.
E-15
Initial Screens
When you enter the Sunrise/Sunset Mode, Digital Compass Mode, Alarm Mode, or
World Time Mode, the data you were viewing when you last exited the mode will
appear first.
Scrolling
The B and D buttons are used on the setting screen to scroll through available
settings on the digital display. In most cases, holding down these buttons during a
scroll operation scrolls through the data at high speed.
E-16
Timekeeping
Use the Timekeeping Mode to set and view the current time and date.
• Each press of A in the Timekeeping Mode toggles the digital display between the
current date and the current time.
• You can select one of the two following Date Screen display formats: SUN 6.30 or
SUN 30.6. For information about how to select the format, see “Date Display
Format” under “To change the current time and date settings” (page E-22).
Day of week Month Day Hour : Minutes Seconds
Date screen Regular timekeeping screen
E-17
Configuring Home City Settings
There are two Home City settings: actually selecting the Home City and selecting
either standard time or daylight saving time (DST).
To configure Home City settings
1. In the Timekeeping Mode, hold down A for at least two
seconds until ADJUST appears on the digital display.
This is the setting mode. Release A after ADJUST
appears.
• The city name of the currently selected Home City
data will appear on the digital display with an arrow
( ) flashing to the left.
• The watch will exit the setting mode automatically if
you do not perform any operation for about two or
three minutes.
• For details about city data, see the “City Data Table”
at the back of this manual.
City Name
City Name
E-18
2. Press D (East) and B (West) to scroll through city names until the one you want
to use as your Home City data is displayed.
3. Press C to display the DST setting screen.
4. Press D to toggle between Daylight Saving Time (DST ON) and Standard Time
(DST OFF).
5. When the setting is the way you want, press A twice to
return to the Timekeeping Mode.
• The DST indicator appears to indicate that Daylight
Saving Time is turned on.
Note
• After you specify city data, the watch will use UTC*
offsets to calculate the current time for other time
zones based on the current time in your Home City.
* Coordinated Universal Time, the world-wide
scientific standard of timekeeping.
The reference point for UTC is Greenwich, England.
Setting
DST indicator
Setting
DST indicator
E-19
To change the Daylight Saving Time (summer time) setting
1. In the Timekeeping Mode, hold down A for at least two
seconds until ADJUST appears on the digital display.
Release A after ADJUST appears.
• The name of the city currently selected as your
Home City will appear on the digital display with an
arrow ( ) flashing to the left.
2. Press C to display the DST setting screen.
3. Press D to toggle between Daylight Saving Time
(DST ON) and Standard Time (DST OFF).
4. When the setting is the way you want, press A twice to
return to the Timekeeping Mode.
• The DST indicator appears to indicate that Daylight
Saving Time is turned on.
Setting
DST indicator
Setting
DST indicator
Operation Guide 5269
Page: 3
E-20
Configuring Latitude and Longitude Settings for Your Current Location
You can ensure correct display of sunrise and sunset time settings, and of moon ages
by configuring latitude and longitude settings for your current location.
To select a Home City by configuring latitude and longitude settings
1. In the Timekeeping Mode, hold down A for at least two
seconds until ADJUST appears on the digital display.
This is the setting mode. Release A after ADJUST
appears.
• Your current Home City data will appear on the
digital display with an arrow ( ) flashing to the left.
2. Press A to display the latitude setting screen with the
current latitude setting flashing.
E-21
3. Use D (+) and B (–) to change the flashing value in 0.1° increments.
• Holding down D or B while the latitude or longitude setting screen is
displayed will scroll the value to the left of the decimal point (the value to the
right does not change) at high speed.
S 62.0° S 61.9° S 0.1° N 0° N 0.1° N 61.9° N 62.0°
4. When the latitude is the value you want, press C to display the longitude setting
screen with the current longitude setting flashing.
5. Use D (+) and B (–) to change the flashing value in 0.1° increments.
W 179.9° W 179.8° W 0.1° E 0° E 0.1° E 179.9° E 180°
6. When the settings are the way you want, press A to return to the Timekeeping
Mode.
E-22
Configuring Current Time and Date Settings
You can use the procedure below to adjust the current time and date settings if they
are not correct.
Changing the digital Home City data should cause the analog time setting to change
accordingly. If the analog time does not indicate the digital time, check the home
positions of the hands and make adjustments if necessary (page E-26).
To change the current time and date settings
1. In the Timekeeping Mode, hold down A for at least two
seconds until ADJUST appears on the digital display.
This is the setting mode. Release A after ADJUST
appears.
• The name of the city currently selected as your Home
City will appear on the digital display with an arrow
( ) flashing to the left.
City name
City name
E-23
2. Use D and B to select the city data you want.
• Select your Home City data before changing any other setting.
• For full information on city data, see the “City Data Table” at the back of this
manual.
3. Press C to move the flashing in the sequence shown below to select the other settings.
DST
Date Display Format Illumination Duration Button Operation Tone On/Off Day
12/24-Hour Format Seconds Hour Minute Year
Month
City data
• The following steps explain how to configure timekeeping settings only.
4. When the timekeeping setting you want to change is flashing, use B and/or D to
change it as described below.
E-24
Screen To do this: Do this:
Change the city name
Use D (East) and
B (West).
Toggle between Daylight Saving Time
(DST ON) and Standard Time (DST OFF). Press D.
Toggle between 12-hour (12H) and 24-hour
(24H) timekeeping.
Press D.
Reset the seconds to 00 Press D.
Change the hour or minute
Use D (+) and
B (–).
Change the year, month, or day
Select the date display format (DMY, YMD,
MDY)
Press D.
5. When the settings are the way you want, press A twice to return to the
Timekeeping Mode.
E-25
Note
• For information about selecting a Home City and configuring the DST setting, see
“Configuring Home City Settings” (page E-17).
• The watch’s built-in full automatic calendar makes allowances for different month
lengths and leap years. Once you set the date, there should be no reason to
change it except after you have the watch’s battery replaced.
• Changing your Home City setting will initialize the latitude and longitude settings to
the location of the Home City.
E-26
Hand Home Position Adjustment
The hour, minute, and second hands of this watch can be put out of position by strong
magnetism or strong impact. When this happens, you can use the procedure below to
adjust the hand positions.
To adjust home positions
1. In the Timekeeping Mode, hold down A for at least
four seconds until HAND SET appears on the digital
display. This is the setting mode. Release A after
HAND SET appears.
• This will cause SEC 00 to flash on the digital
display, indicating the second hand adjustment
mode.
Second hand
Second hand
E-27
2. Check the position of the second hand.
• If the second hand is pointing to 12 o’clock, it is in
the correct home position. If it isn’t, use D (forward)
and B (back) to adjust the second hand position
so it points to 12 o’clock.
• Holding down either button will cause the second
hand to move at high speed.
3. Press C. This will cause 0:00 to flash on the digital
display, indicating the hour and minute adjustment
mode.
4. Check the positions of the hour and minute hands.
• The hands are in the correct home positions if they
are pointing to 12 o’clock. If they aren’t, use D
(forward) and B (back) to adjust their positions.
• Holding down either button will cause the hour and
minute hands to move at high speed.
Correct hour and
minute hand positions
Hour and minute hands
Correct hour and
minute hand positions
Hour and minute hands
E-28
5. Press A to exit the setting screen.
• This will cause the hour and minute hands to move to the current Timekeeping
Mode time.
E-29
Taking Direction Readings
The watch has a magnetic sensor that makes it possible to take digital compass
readings. You can use the digital compass to find the direction to a specific objective
and to determine your current position.
• See “Magnetic North and True North” (page E-40) for information about the two
types of north. For information about maximizing digital compass accuracy, see
“Calibrating Direction Readings” (page E-34) and “Digital Compass Precautions”
(page E-40).
Operation Guide 5269
Page: 4
E-30
To take a direction reading
1. Point the 12 o’clock position of the watch in the
direction you want to read.
2. In the Timekeeping Mode or Thermometer Mode, keep
the watch horizontal as you press B.
• COMPASS will appear on the digital display and
then direction reading will start.
• After the watch completes a reading, the second
hand will indicate north. The direction indicator
will show a literal indicator (abbreviation) for the
direction where 12 o’clock of the watch is pointed. A
direction angle will also be displayed.
Starting a digital compass direction reading causes
consecutive readings to be taken each second for
20 seconds. After a series of consecutive readings
is complete, — — — appears in place of the literal
direction indicator on the display.
• See “Digital Compass Readings” (page E-31) for
information about what appears on the digital display.
NW
0
W
NW
W
WSW
S
W
S
S
W
S SSE
S
E
E
S
E
E
ENE
N
E
N
N
E
N
NNW
90
180
270
12 o’clock position
North pointer
Direction
indicator
Angle value
(in degrees)
NW
0
W
NW
W
WSW
S
W
S
S
W
S SSE
S
E
E
S
E
E
ENE
N
E
N
N
E
N
NNW
90
180
270
12 o’clock position
North pointer
Direction
indicator
Angle value
(in degrees)
E-31
3. Press C to return to the Timekeeping Mode.
• If you do not perform any button operation for one or two minutes, the watch
will automatically return to the Timekeeping Mode.
Digital Compass Readings
• The following table shows the meanings of each of the direction abbreviations that appear
on the digital display.
Direction Meaning Direction Meaning Direction Meaning Direction Meaning
N North NNE North-
northeast
NE Northeast ENE East-
northeast
E East ESE East-
southeast
SE Southeast SSE South-
southeast
S South SSW South-
southwest
SW Southwest WSW West-
southwest
W West WNW West-
northwest
NW Northwest NNW North-
northwest
E-32
Example: Determining your current position and your
objective on a map
Having an idea of your current location and the direction
to your destination is important when mountain climbing or
hiking. In this example, we show you how to plot directions
on a map and determine your current location using
direction measurements taken by the watch.
1. In the Timekeeping Mode or Thermometer Mode, press
B.
N
N
North indicated
on the map
North indicated by
north pointer
N
N
North indicated
on the map
North indicated by
north pointer
E-33
2. Rotate the map (without moving the watch) until north on the map is aligned with
north as indicated by the watch’s second hand.
Depending on how the watch is set up, it may be indicating magnetic north or true
north.
Magnetic north: Indicates north in accordance with the Earth’s magnetic field.
True north: Indicates the direction to the North Pole.
• For information about setting the watch up to indicate magnetic north or true
north, see “Magnetic Declination Correction” (page E-37).
3. Determine your location and destination by checking the map and the geographic
contours around you.
E-34
Calibrating Direction Readings
You can use the information in this section to calibrate direction readings, which helps
to improve digital compass accuracy.
Direction Reading Calibration Methods
Important!
• To ensure correct direction readings by this watch, be sure to perform bidirectional
calibration before using it. The watch may produce incorrect direction readings if
you do not perform bidirectional calibration.
• Keep the watch away from audio speakers, magnetic necklace, cell phone, and
other devices that generate strong magnetism. Exposure to strong magnetism can
magnetize the watch and cause incorrect direction readings. If incorrect readings
continue even after you perform bidirectional calibration, it could mean that your
watch has been magnetized. If this happens, contact your original retailer or an
authorized CASIO Service Center.
E-35
Bidirectional Calibration
• Use this method when using the watch to take readings in an area where magnetic
force is present, or if you notice that the readings produced by the watch are
different from another compass.
Magnetic Declination Calibration
• You can use this method to specify a magnetic declination value, which sets the
digital compass up to take magnetic north or true north readings.
Precautions about bidirectional calibration
• You can use any two opposing directions for bidirectional calibration. You must,
however, make sure that they are 180 degrees opposite each other. Remember
that if you perform the procedure incorrectly, you will get wrong bearing sensor
readings.
• Do not move the watch while calibration of either direction is in progress.
• You should perform bidirectional calibration in an environment that is the same as
that where you plan to be taking direction readings. If you plan to take direction
readings in an open field, for example, calibrate in an open field.
E-36
To perform bidirectional calibration
1. In the Digital Compass Mode, hold down A for two
seconds.
• This will cause the bidirectional calibration screen to
appear on the digital display.
• The second hand will move to 12 o’clock. This
causes an arrow ( ) symbol to flash on the left
side of the digital display and -1- to be displayed to
indicate that the watch is ready for calibration of the
first direction.
2. Place the watch on a level surface facing any direction
you want, and press B to calibrate the first direction.
• — — — will remain on the digital display while
calibration is in progress. OK will appear when
first direction calibration is complete. About one
second after that, the flashing arrow will change to
point downwards ( ) and -2- will be displayed. This
means that the watch is ready for calibration of the
second direction.
E-37
3. Rotate the watch 180 degrees.
4. Press B again to calibrate the second direction.
• — — — will remain on the digital display while
calibration is in progress. OK will appear when
second direction calibration is complete.
• If ERR appears on the digital display, press B
again to restart calibration.
• Magnetic Declination Correction
With magnetic declination correction, you input a magnetic declination angle
(difference between magnetic north and true north), which allows the watch to
indicate true north. You can perform this procedure when the magnetic declination
angle is indicated on the map you are using. Note that you can input the declination
angle in whole degree units only, so you may need to round off the value specified on
the map. If your map indicates the declination angle as 7.4°, you should input 7°. In
the case of 7.6° input 8°, for 7.5° you can input 7° or 8°.
E-38
To perform magnetic declination correction
1. In the Digital Compass Mode, hold down A for two
seconds.
• This will cause the bidirectional calibration screen
to appear on the digital display.
2. Press C to display the magnetic declination setting
screen (DEC).
3. Use D (East) and B (West) to change the settings.
• The following explains magnetic declination angle
direction settings.
OFF: No magnetic declination correction performed.
The northerly magnetic declination setting
(DEC) will be 0°.
E: When magnetic north is to the east (east
declination)
W: When magnetic north is to the west (west
declination)
Magnetic declination
angle direction value
(E, W, or OFF)
Magnetic declination
angle value
Magnetic declination
angle direction value
(E, W, or OFF)
Magnetic declination
angle value
E-39
• You can select a value within the range of W 90° to E 90° with these settings.
• You can turn off (OFF) magnetic declination correction by pressing D and B
at the same time.
• The illustration, for example, shows the value you should input and the direction
setting you should select when the map shows a magnetic declination of 7°
West.
4. When the setting is the way you want, press A to exit the setting screen.
Operation Guide 5269
Page: 5
E-40
Digital Compass Precautions
Magnetic North and True North
The northerly direction can be expressed either as
magnetic north or true north, which are different from each
other. Also, it is important to keep in mind that magnetic
north moves over time.
• Magnetic north is the north that is indicated by the
needle of a compass.
• True north, which is the location of the North Pole of the
Earth’s axis, is the north that is normally indicated on
maps.
• The difference between magnetic north and true north
is called the “declination”. The closer you get to the
North Pole, the greater the declination angle.
True north
Earth
Magnetic north
True north
Earth
Magnetic north
E-41
Location
• Taking a direction reading when you are near a source of strong magnetism can
cause large errors in readings. Because of this, you should avoid taking direction
readings while in the vicinity of the following types of objects: permanent magnets
(magnetic necklaces, etc.), concentrations of metal (metal doors, lockers, etc.),
high tension wires, aerial wires, household appliances (TVs, personal computers,
washing machines, freezers, etc.).
• Accurate direction readings are impossible while in a train, boat, air plane, etc.
• Accurate readings are also impossible indoors, especially inside ferroconcrete
structures. This is because the metal framework of such structures picks up
magnetism from appliances, etc.
E-42
Storage
• The precision of the bearing sensor may deteriorate if the watch becomes
magnetized. Because of this, you should store the watch away from magnets or any
other sources of strong magnetism, including: permanent magnets (magnetic
necklaces, etc.) and household appliances (TVs, personal computers, washing
machines, freezers, etc.).
• Whenever you suspect that the watch may have become magnetized, perform the
procedure under “To perform bidirectional calibration” (page E-36).
E-43
Thermometer
This watch uses a temperature sensor to take temperature readings.
To enter and exit the Thermometer Mode
1. In the Timekeeping Mode or Digital Compass Mode,
press D.
• THERMO will appear on the digital display for about
one second indicating that temperature readings
are being taken. After that, the measurement result
will appear.
• The watch will take temperature readings every five
seconds for one or two minutes.
• To restart temperature readings, press D.
2. Press C to return to the Timekeeping Mode.
• If you do not perform any button operation for one
or two minutes after temperature measurement is
complete, the watch will automatically return to the
Timekeeping Mode.
Temperature
Temperature
E-44
Temperature
• Temperature is displayed in units of 0.1°C (or 0.2°F).
• The displayed temperature value changes to —.- °C (or °F) if a measured
temperature falls outside the range of –10.0°C to 60.0°C (14.0°F to 140.0°F). The
temperature value will reappear as soon as the measured temperature is within the
allowable range.
Display Units
You can select either Celsius (°C) or Fahrenheit (°F) for the displayed temperature
value. See “To specify temperature unit” (page E-47) for more information.
Temperature Sensor Calibration
The watch’s temperature sensor is calibrated at the factory and normally requires no
further adjustment. If you notice serious errors in the temperature readings produced
by the watch, you can calibrate the sensor to correct the errors.
E-45
Important!
• Incorrectly calibrating the temperature sensor can result in incorrect readings.
Carefully read the following before doing anything.
– Compare the readings produced by the watch with those of another reliable and
accurate thermometer.
– If adjustment is required, remove the watch from your wrist and wait for 20 or 30
minutes to give the temperature of the watch time to stabilize.
To correct the temperature value
You can correct the temperature readings displayed by
the watch in accordance with another measuring
instrument for more accurate readings.
1. In the Thermometer Mode, hold down A until the
current temperature value flashes on the digital display.
This is the setting screen.
E-46
2. Use D (+) and B (–) to calibrate the temperature value with the reading of another
instrument.
• Each press of a button changes the temperature value in units of 0.1°C (0.2°F).
• To return the currently flashing value to its initial factory default setting, press
B and D at the same time. OFF will appear at the flashing location for about
one second, followed by the initial default value.
3. Press A to return to the Thermometer Mode.
Thermometer Precautions
• Temperature measurements are affected by your body temperature (while you are
wearing the watch), direct sunlight, and moisture. To achieve a more accurate
temperature measurement, remove the watch from your wrist, place it in a well
ventilated location out of direct sunlight, and wipe all moisture from the case. It
takes approximately 20 to 30 minutes for the case of the watch to reach the actual
surrounding temperature.
• When taking temperature readings, it is best to remove the watch from your wrist in
order to eliminate the effects of body heat. Remove the watch from your wrist and
allow it to hang freely from your bag or in another location where it is not exposed
to direct sunlight.
E-47
Specifying Temperature Unit
Use the procedure below to specify the temperature unit to be used in the
Thermometer Mode.
Important!
When TOKYO is selected as the Home City, the
temperature unit is set automatically to Celsius (°C).
These settings cannot be changed.
To specify the temperature unit
1. Enter the Thermometer Mode and then hold down A for
about two seconds until the current temperature value
flashes on the digital display. This is the setting screen.
2. Press C to display the temperature unit setting screen
with either °C or °F (the current setting) flashing.
E-48
3. Press D to toggle the temperature unit between °C (Celsius) and °F (Fahrenheit).
4. After the setting is the way you want, press A to exit the setting screen.
E-49
Looking up Sunrise and Sunset Times
You can use the Sunrise/Sunset Mode to look up the sunrise and sunset times for a
particular date (year, month, day) and location.
To look up the sunrise and sunset times on a specific date
Use C to select the Sunrise/Sunset Mode as shown on
page E-13.
• SUNRISE TIME or SUNSET TIME will appear on the
digital display for about one second. After that the
current year, month, and day will appear for about one
second.
• Next, CALC will appear to indicate that calculation is in
progress. After the calculation is complete, the sunrise
time or sunset time for the current date will appear.
• What appears first when the enter the Sunrise/Sunset
Mode (either the sunrise time or sunset time) will be the
time that was displayed when you last exited the
Sunrise/Sunset Mode.
Sunrise time or
sunset time
(or )
Sunrise time or
sunset time
(or )
Operation Guide 5269
Page: 6
E-50
Note
• Sunrise and sunset times are calculated in accordance with the current date based
on the currently specified Home City, latitude, and longitude.
• Before trying to use the Sunrise/Sunset Mode, you need to configure settings for the
Home City, longitude, and latitude for the location whose sunrise and sunset times
you want to view.
To toggle between sunrise time and sunset time
Press A.
E-51
To view the sunrise/sunset time for a particular date
While the sunrise time or sunset time is displayed in the
Sunrise/Sunset Mode, use B (+) and D (–) to scroll
through the dates.
• The sunrise time or sunset time for the currently
selected date will appear on the digital display.
• You can select any date between January 1, 2000 and
December 31, 2099.
Note
• If you think that the sunrise and/or sunset times
are not correct for some reason, check the watch’s
Home City, longitude and latitude settings.
• The sunrise and sunset times displayed by this
watch are times at sea level. Sunrise and sunset
times are different at altitudes other than sea level.
Sunrise time or
sunset time
Sunrise time or
sunset time
E-52
Using Moon Data
The Moon Age Mode displays a value that indicates the Moon age at noon on the
current date.
To look up the Moon age on a specific date
1. Use C to select the Moon Age Mode (MOON AGE) as
shown on page E-12.
• MOON AGE will appear on the digital display for
about one second. After that the current year, month,
and day will appear for about one second.
• Next, CALC will appear on the digital display
indicating that Moon age calculation is in progress.
After the calculation is complete, the Moon age value
for the current date will appear.
Moon age
Moon age
E-53
2. While a Moon age value is displayed you can use the D (+) and B (–) buttons to
scroll from day to day.
• Scrolling to another day will cause CALC to appear on the digital display for one
second indicating that Moon age calculation is in progress. The Moon age for
the selected data will appear when calculation is complete.
• Hold down C for two seconds to return to the Timekeeping Mode.
Note
• Moon age is calculated to an accuracy of ±1 day.
• If the Moon data is not correct, check your Timekeeping Mode settings and correct
them if necessary.
E-54
Using the Alarm
You can set five independent daily alarms. When a daily
alarm is turned on, an alarm tone will sound for about 10
seconds each day when the time in the Timekeeping
Mode reaches the preset alarm time. This is true even if
the watch is not in the Timekeeping Mode.
You can also turn on an Hourly Time Signal, which will
cause the watch to beep twice every hour on the hour.
To enter the Alarm Mode
Use C to select the Alarm Mode (ALARM) as shown on
page E-12.
• ALARM will appear on the digital display for about one
second. After that, the digital display will show the
current alarm time and alarm number (–1 to –5), or the
hourly time signal setting. In the case of an alarm, the
digital display alternates at one-second intervals
between the alarm number and the on/off setting screen.
Alarm time
(Hour : Minutes) or SIG
Alternates
(1 second)
Alarm
number
Alarm time
(Hour : Minutes) or SIG
Alternates
(1 second)
Alarm
number
E-55
• The alarm number indicates an alarm screen. SIG is shown when the Hourly Time
Signal screen is on the digital display.
• When you enter the Alarm Mode, the data you were viewing when you last exited
the mode appears first.
To set an alarm time
1. In the Alarm Mode, use D and B to scroll through the
alarm screens until the one whose time you want to set
is displayed.
−1 −2 −3
SIG −5 −4
2. Hold down A until the alarm time starts to flash. This is
the setting screen.
E-56
3. Press C to move the flashing between the hour and minute settings.
4. While a setting is flashing, use D (+) and B (–) to change it.
• When setting the alarm time using the 12-hour format, take care to set the time
correctly as a.m. or p.m.
5. Press A to exit the setting screen.
To test the alarm
In the Alarm Mode, hold down D to sound the alarm.
E-57
To turn an alarm and the Hourly Time Signal on and off
1. In the Alarm Mode, use D and B to select an alarm or
the Hourly Time Signal.
2. When the alarm or the Hourly Time Signal you want is
selected, press A to toggle it between on and off.
• The alarm on indicator (when any alarm is on) and the
Hourly Time Signal on indicator (when the Hourly
Time Signal is on) are shown on the digital display
in all modes.
To stop the alarm
Press any button.
Alarm on indicator
Hourly time signal
on indicator
Alarm on indicator
Hourly time signal
on indicator
E-58
Using the Stopwatch
The stopwatch measures elapsed time and split times.
To enter the Stopwatch Mode
Use C to select the Stopwatch Mode (STW) as shown on
page E-12.
• STW will appear on the digital display for about one
second. Next, the digital display will change to show
the stopwatch time.
To perform an elapsed time operation
D D D D B
Start Stop (Restart) (Stop) Reset
To pause at a split time
D B B D B
Start Split Split release Stop Reset
Hours
Minutes
1/100 second
Seconds
Hours
Minutes
1/100 second
Seconds
E-59
• Digital display alternates between SPL and the 1/100-second value at one-second
intervals.
Note
• The Stopwatch Mode can indicate elapsed time up to 23 hours, 59 minutes, 59.99
seconds.
• Once started, stopwatch timing continues until you press B to reset it, even if you
exit the Stopwatch Mode to another mode and even if timing reaches the stopwatch
limit defined above.
• Exiting the Stopwatch Mode while a split time is frozen on the digital display clears
the split time and returns to elapsed time measurement.
Operation Guide 5269
Page: 7
E-60
Using the Countdown Timer
The countdown timer can be configured to start at a preset time and sound an alarm
when the end of the countdown is reached.
To enter the Countdown Timer Mode
Use C to select the Countdown Timer Mode (TIMER) as
shown on page E-12.
• TIMER will appear on the digital display for about one
second. Next, the digital display will change to show
the countdown time.
To specify the countdown start time
1. Enter the Countdown Timer Mode.
• If a countdown is in progress (indicated by the
seconds counting down), press D to stop it and
then press B to reset to the current countdown
start time.
Countdown time
(Minutes, seconds)
Countdown time
(Minutes, seconds)
E-61
• If a countdown is paused, press B to reset to the current countdown start
time.
2. Hold down A until the minute setting of the current countdown start time starts to
flash. This is the setting screen.
3. Press C to move the flashing between the minute and second settings.
4. Use D (+) and B (–) to change the flashing item.
• To set the starting value of the countdown time to 100 minutes, set 00’00».
5. Press A to exit the setting screen.
To perform a countdown timer operation
D D D D B
Start Stop (Restart) (Stop) Reset
• Before starting a countdown timer operation, check to make sure that a countdown
operation is not already in progress (indicated by the seconds counting down). If it
is, press D to stop it and then B to reset to the countdown start time.
E-62
• An alarm sounds for ten seconds when the end of the countdown is reached. This
alarm will sound in all modes. The countdown time is reset to its starting value
automatically after the alarm sounds.
To stop the alarm
Press any button.
E-63
Checking the Current Time in a Different Time Zone
You can use the World Time Mode to view the current time in one of 31 time zones (48
cities) around the globe. The city that is currently selected in the World Time Mode is
called the “World Time City”.
To enter the World Time Mode
Use C to select the World Time Mode (WORLD TIME)
as shown on page E-13.
• WORLD TIME will appear on the digital display for
about one second. Next, the name of the currently
selected World Time city will scroll across the digital
display. Finally, the current time in the World Time city
will appear.
• To display the World Time city name again, press A.
Currently
selected
World
Time City
Current time in the
currently selected
World Time City
Currently
selected
World
Time City
Current time in the
currently selected
World Time City
E-64
To view the time in another time zone
In the World Time Mode, use B (East) and D (West) to scroll through World Time
cities and view the current time in displayed city.
To specify standard time or daylight saving time (DST) for a city
1. In the World Time Mode, use B (East) and D (West) to
display the world time city (time zone) whose Standard
Time/Daylight Saving Time setting you want to change.
2. Hold down A for at least two seconds to toggle
between Daylight Saving Time (DST ON) and Standard
Time (DST OFF).
• Changing the DST setting of your Home City in the
World Time Mode will also change the DST setting
of the Timekeeping Mode time.
• Note that you cannot switch between standard time/daylight saving time
(DST) while UTC is selected as the World Time City.
• Note that the standard time/daylight saving time (DST) setting affects only the
currently selected time zone. Other time zones are not affected.
DST indicator
DST indicator
E-65
Illumination
The display of the watch is illuminated for easy reading in
the dark.
To turn on illumination
In any mode (except when a setting screen is on the
digital display), press L to illuminate the display.
• You can use the procedure below to select either 1.5
seconds or three seconds as the illumination duration.
When you press L, the display will remain illuminated
for about 1.5 seconds or three seconds, depending on
the current illumination duration setting.
E-66
To change the illumination duration
1. In the Timekeeping Mode, hold down A for at least two seconds until ADJUST
appears on the digital display. This is the setting mode. Release A after ADJUST
appears.
• The name of the city currently selected as your Home City will appear on the
digital display with an arrow ( ) flashing to the left.
2. Press C 10 times until LIGHT 1 or LIGHT 3 is displayed.
• See step 3 under “To change the current time and date settings” (page E-22)
for information about how to scroll through setting screens.
3. Press D to toggle the illumination duration between three seconds (LIGHT 3
displayed) and 1.5 seconds (LIGHT 1 displayed).
4. When the setting is the way you want, press A twice to return to the Timekeeping
Mode.
E-67
Illumination Precautions
• Illumination may be hard to see when viewed under direct sunlight.
• Illumination turns off automatically whenever an alarm sounds.
• Illumination will not turn on while an alarm is sounding, while high-speed hand
movement is in progress, while a sensor is taking a reading, or while the watch is
performing calculation (CALC displayed). Illumination will turn on if L is pressed
between sensor reading operations.
• Frequent use of illumination runs down the battery.
E-68
Button Operation Tone
The button operation tone sounds any time you press one of the watch’s buttons. You
can turn the button operation tone on or off as desired.
• Even if you turn off the button operation tone, the alarm, Hourly Time Signal, and
Countdown Timer Mode alarm all operate normally.
To turn the button operation tone on and off
1. In the Timekeeping Mode, hold down A for at least two
seconds until ADJUST appears on the digital display.
This is the setting mode. Release A after ADJUST
appears.
• The name of the city currently selected as your
Home City will appear on the digital display with an
arrow ( ) flashing to the left.
E-69
2. Use C to cycle through settings on the digital display until the current button
operation tone setting (MUTE or KEY ) is displayed.
• See step 3 under “To change the current time and date settings” (page E-22)
for information about how to scroll through setting screens.
3. Press D to toggle the button operation tone between on (KEY ) and off (MUTE).
4. When the setting is the way you want, press A twice to return to the Timekeeping
Mode.
Operation Guide 5269
Page: 8
E-70
Troubleshooting
Time Setting
■ Why is the current time setting off by a couple of hours?
Your Home City setting may be wrong (page E-17). Check your Home City setting and
correct it, if necessary.
■ Why is the current time setting off by one hour?
You may need to change your Home City’s standard time/daylight saving time (DST)
setting. Use the procedure under “To change the current time and date settings” (page
E-22) to change the standard time/daylight saving time (DST) setting.
Sensor modes
■ Why can’t I change the temperature unit setting?
The temperature unit setting is always Celsius (°C) whenever TOKYO is selected as
the Home City. In this case, the setting cannot be changed.
E-71
■ Why does “ERR” appear while a sensor operation is in progress?
Subjecting the watch to strong impact can cause sensor malfunction or improper
contact of internal circuitry. When this happens, ERR (error) will appear on the digital
display and sensor operations will be disabled.
Direction Reading and
Temperature Measurement
• If ERR appears while a measurement operation is being performed in a sensor
mode, restart the measurement. If ERR appears on the digital display again, it can
mean there is something wrong with the sensor.
• If ERR keeps appearing during measurement, it can mean there is a problem with
the applicable sensor.
E-72
■ Why does “ERR” appear on the digital display following bidirectional
calibration?
If — — — appears and then changes to ERR (error) on the calibration screen, it means
that there is something wrong with the sensor.
• If ERR disappears after about one second, try performing the calibration again.
• If ERR keeps appearing, contact your original dealer or nearest authorized CASIO
distributor to have the watch checked.
Whenever you have a sensor malfunction, take the watch to your original dealer or
nearest authorized CASIO distributor as soon as possible.
■ What causes incorrect direction readings?
• Incorrect bidirectional calibration. Perform bidirectional calibration (page E-36).
• Nearby source of strong magnetism, such as a household appliance, a large steel
bridge, a steel beam, overhead wires, etc., or an attempt to perform direction
measurement on a train, boat, etc. Move away from large metal objects and try
again.
E-73
■ What causes different direction readings to produce different results at the
same location?
Magnetism generated by nearby high-tension wires is interfering with detection of
terrestrial magnetism. Move away from the high-tension wires and try again.
■ Why am I having problems taking direction readings indoors?
A TV, personal computer, speakers, or some other object is interfering with terrestrial
magnetism readings. Move away from the object causing the interference or take the
direction reading outdoors. Indoor direction readings are particularly difficult inside
ferro-concrete structures. Remember that you will not be able to take direction
readings inside of trains, airplanes, etc.
E-74
Battery
■ Why is the low battery alert flashing?
Battery power is low. Watch operations are disabled while
the low battery alert is flashing on the digital display.
If the low battery alert disappears after battery power
recovers but then starts to flash again after a short while,
it means that you need to have the watch’s battery
replaced.
Low battery alert
Low battery alert
E-75
Specifications
Accuracy at normal temperature: ±30 seconds a month
Digital Timekeeping: Hour, minutes, seconds, a.m. (A)/p.m. (P), month, day, day of
the week
Time format: 12-hour and 24-hour
Calendar system: Full Auto-calendar pre-programmed from the year 2000 to 2099
Other: Home City (can be assigned one of 48 city codes); Standard Time / Daylight
Saving Time (summer time)
Analog Timekeeping: Hour, minutes (hand moves every 10 seconds), seconds
Digital Compass: North indicated by second hand; 20 seconds continuous readings;
Calibration (bidirectional); Magnetic declination correction; Magnetic north
indication; display of one of 16 direction indicators; Angle value 0° to 359°
Thermometer:
Measurement and display range: –10.0 to 60.0°C (or 14.0 to 140.0°F)
Display unit: 0.1°C (or 0.2°F)
Reading timing: 5-second intervals for 1 to 2 minutes
E-76
Bearing Sensor Precision:
Direction: Within ±15°
Values are guaranteed for a temperature range of –10°C to 40°C (14°F to 104°F).
Temperature Sensor Precision:
±2°C (±3.6°F) in range of –10°C to 60°C (14.0°F to 140.0°F)
Moon Age: Display of Moon age values for specific dates
Sunrise/Sunset: Sunrise time and sunset time for specific date
Alarms: 5 daily alarms; hourly time signal
Stopwatch:
Measuring unit: 1/100 second
Measuring capacity: 23:59 59.99
Measuring modes: Elapsed time, split time
Countdown Timer:
Measuring unit: 1 second
Countdown start time setting range: 1 second to 100 minutes (1-minute
increments and 1-second increments)
E-77
World Time: 48 cities (31 time zones)
Other: Daylight Saving Time/Standard Time
Illumination: LED (Light-emitting diode); Selectable illumination duration
(approximately 1.5 seconds or 3 seconds)
Other: Button operation tone on/off
Battery: Two silver oxide batteries (Type: SR927W)
Approximate battery operating time: 2 years under the following conditions:
• 1 illumination operation (1.5 seconds) per day
• 20 seconds of continuous direction readings, 20 times per month
• 2 minutes of continuous temperature readings (5-second intervals), once per
week
• 20 seconds of alarm operation per day
Frequent use of illumination runs down the battery.
City Code Table
UTC Offset/
GMT Differential
City Name Latitude (°)
North Latitude +,
South Latitude –
Longitude (°)
East Longitude +,
West Longitude –
0.0 UTC 51.5 0
0.0 Lisbon 38.7 –9.1
0.0 London 51.5 –0.1
1.0 Madrid 40.4 –3.7
1.0 Paris 48.9 2.4
1.0 Rome 41.9 12.5
1.0 Berlin 52.5 13.4
1.0 Stockholm 59.3 18.1
2.0 Athens 38.0 23.7
2.0 Cairo 30.0 31.2
L L-1
UTC Offset/
GMT Differential
City Name Latitude (°)
North Latitude +,
South Latitude –
Longitude (°)
East Longitude +,
West Longitude –
2.0 Jerusalem 31.8 35.2
3.0 Moscow 55.8 37.6
3.0 Jeddah 21.5 39.2
3.5 Tehran 35.7 51.4
4.0 Dubai 25.3 55.3
4.5 Kabul 34.5 69.2
5.0 Karachi 24.9 67.0
5.5 Delhi 28.6 77.2
5.75 Kathmandu 27.7 85.3
6.0 Dhaka 23.7 90.4
6.5 Yangon 16.8 96.2
7.0 Bangkok 13.7 100.5
Operation Guide 5269
Page: 9
L-2
UTC Offset/
GMT Differential
City Name Latitude (°)
North Latitude +,
South Latitude –
Longitude (°)
East Longitude +,
West Longitude –
8.0 Singapore 1.3 103.8
8.0 Hong Kong 22.4 114.1
8.0 Beijing 39.9 116.4
8.0 Taipei 25.1 121.6
9.0 Seoul 37.6 127.0
9.0 Tokyo 35.7 139.7
9.5 Adelaide –34.9 138.6
10.0 Guam 13.4 144.8
10.0 Sydney –33.9 151.2
11.0 Noumea –22.3 166.5
12.0 Wellington –41.3 174.8
–11.0 Pago Pago –14.3 –170.7
L-3
UTC Offset/
GMT Differential
City Name Latitude (°)
North Latitude +,
South Latitude –
Longitude (°)
East Longitude +,
West Longitude –
–10.0 Honolulu 21.3 –157.9
–9.0 Anchorage 61.2 –149.9
–8.0 Vancouver 49.3 –123.1
–8.0 Los Angeles 34.1 –118.2
–7.0 Edmonton 53.5 –113.5
–7.0 Denver 39.7 –105.0
–6.0 Mexico City 19.4 –99.1
–6.0 Chicago 41.9 –87.6
–5.0 New York 40.7 –74.0
–4.0 Santiago –33.4 –70.6
–4.0 Halifax 44.6 –63.6
–3.5 St.Johns 47.6 –52.7
L-4
UTC Offset/
GMT Differential
City Name Latitude (°)
North Latitude +,
South Latitude –
Longitude (°)
East Longitude +,
West Longitude –
–3.0 Rio De Janeiro –22.9 –43.2
–2.0 Fernando de Noronha –3.8 –32.4
–1.0 Praia 14.9 –23.5
• UTC Offset/GMT Differential: Based on data for June 2012
• The rules governing global times (GMT differential and UTC offset) and summer
time are determined by each individual country.
Operation Guide 5269
CASIO
SGW-500
Модуль 5269
Руководство пользователя
Прежде всего прочтите эту важную информацию
Батарея
При первых признаках недостаточности питания (нечеткость изображения или
отсутствие подсветки) необходимо заменить батарею у ближайшего дилера или
дистрибьютора фирмы «CASIO». В приобретенных вами часах, содержится
батарея, установленная изготовителем для тестовых испытаний, поэтому срок
службы этой батареи по сравнению со стандартным, вероятно, будет сокращен
Защита от воды
Часы классифицируются по разрядам (с I по V разряд) в соответствии со
степенью их защищенности от воды. Уточните разряд ваших часов с помощью
приведенной ниже таблицы, чтобы определить правила их использования.
Маркировка
на корпусе
Брызги,
дождь и
т.п.
Плавание,
мытье
машины и
т.п.
Подводное
плавание,
ныряние и
т.п.
Ныряние с
аквалангом
I
—
Нет
Нет
Нет
Нет
II
WATER
RESISTANT
Да
Нет
Нет
Нет
III
50M WATER
RESISTANT
Да
Да
Нет
Нет
IV 100M WATER
RESISTANT
Да
Да
Да
Нет
V
200M WATER
RESISTANT
300M WATER
RESISTANT
Да
Да
Да
Да
Примечания для соответствующих разделов.
I. Часы не защищены от воды. Избегайте попадания любой влаги.
III. Если часы подверглись воздействию соленой воды, то тщательно промойте
их и вытрите насухо.
IV. Если часы подверглись воздействию соленой воды, то тщательно промойте
их и вытрите насухо.
V. Часы могут использоваться при погружении с аквалангом (за исключением
таких глубин, при которых требуется гелиево-кислородная смесь).
ВНИМАНИЕ!!!
Для всех категорий часов запрещается:
нажимать кнопки под водой
переводить стрелки под водой
отвинчивать переводную головку под водой
ВАЖНО!!!
Особенностью некоторых защищенных от воды часов является наличие у
них кожаных ремешков. Не надевайте эти часы во время плавания или
какой-либо другой деятельности, при которой ремешок погружается в воду.
Уход за вашими часами
Замена резиновой прокладки, защищающей часы от попадания воды и пыли,
должна осуществляться через каждые 2-3 года.
Если внутрь часов попадет влага, то немедленно проверьте их у ближайшего
к вам дилера или дистрибьютора фирмы CASIO.
Не подвергайте часы воздействию слишком высоких или низких температур.
Хотя часы рассчитаны на использование их в обычных условиях, тем не
менее, вы должны избегать грубого обращения с ними и не допускать их
падения.
Не застегивайте ремешок слишком туго. Между вашим запястьем и
ремешком должен проходить палец.
Для очистки часов и ремешка используйте сухую мягкую ткань, либо мягкую
ткань, смоченную в водном растворе мягкого нейтрального моющего
средства. Никогда не используйте легко испаряющимися средствами
(например, такими, как бензин, растворители, распыляющиеся чистящие
средства и т.п.).
Когда вы не пользуетесь вашими часами, храните их в сухом месте.
Избегайте попадания на часы бензина, чистящих растворителей, аэрозолей из
распылителей, клеящих веществ, краски и т.п. Химические реакции,
вызываемые этими материалами, приводят к повреждению прокладок,
корпуса и полировки часов.
Особенностью некоторых моделей часов является наличие на их ремешке
изображений, выполненных шелкографией. Будьте осторожны при чистке
таких ремешков, чтобы не испортить эти рисунки.
Для часов с полимерными ремешками…
Вы можете обнаружить белесое порошкообразное вещество на ремешке.
Это вещество не вредно для вашей кожи или одежды и может быть легко
удалено путем протирания мягкой тканью.
Попадание на полимерный ремешок пота или влаги, а также хранение его в
условиях высокой влажности может привести к повреждению, разрыву или
растрескиванию ремешка. Для того чтобы обеспечить длительный срок
службы полимерного ремешка, как можно чаще протирайте его от грязи и
воды мягкой тканью.
Для часов с флуоресцентными корпусами и ремешками…
Длительное облучение прямым солнечным светом может привести к
постепенному исчезновению флуоресцентной окраски.
Длительный контакт с влагой может вызвать постепенное исчезновение
флуоресцентной окраски. В случае попадания на поверхность часов любой