Очень часто настройка часов Casio становится не такой уж и простой задачей. Цифровой дисплей, стрелки, множество функций и кнопок — все это может запутать даже искушенного пользователя, не говоря уже о новичке, который только купил часы Casio.
В данном материале постараемся объяснить общий принцип настройки времени в ProTrek-ах на примере конкретных популярных моделей [которых очень много на рынке], подробно разобрать последовательность действий. Логика работы в целом повторяется от модели к модели, вам лишь важно разобраться в базовых процессах настройки. Имейте ввиду, настройка стрелок и электронного времени совершенно разная. Цифровым дисплеем легче оперировать, а вот для стрелок нужно чуть ли не запоминание последовательности действий. В рамках статьи будет описан процесс настройки времени для: PRW-3000, PRW-5000, PRG-550, PRG-240, PRG-270.
Если же ваши часы не попали в данный список, все равно можете ознакомиться с настройкой, либо перейти к полному списку инструкций для ProTrek-ов.
Выберите одну из серий
[tabs slidertype=”top tabs”] [tabcontainer] [tabtext]PRW-3000[/tabtext] [tabtext]PRW-5000[/tabtext] [tabtext]PRG-550[/tabtext][tabtext]PRG-240[/tabtext][tabtext]PRG-270[/tabtext] [/tabcontainer] [tabcontent] [tab]
Рассмотрим настройку времени для серии PRW-3000

Перед настройкой проверьте, что часы находятся в режиме текущего времени. В этом режиме на дисплее отображается время [или дата] и день недели, а индикатор режима часов указывает на Time [не у всех часов есть такой индикатор]. Примерно так выглядит режим текущего времени в ProTrek PRW-3000:
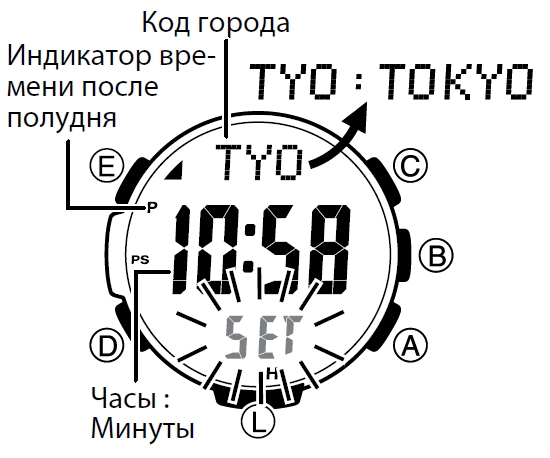
Теперь можно приступать к настройке времени:
- В режиме Текущего времени нажмите и удерживайте кнопку E около 2 секунд. Это действие приведет к тому, что сначала на экране отобразится мигающий индикатор SET Hold и в верхней части экрана – индикатор CITY. После этого в верхней части экрана отобразится в виде бегущей строки индикатор кода города текущего местонахождения и его название. После этого вы можете отпустить кнопку Е.
- С помощью кнопки D выберите параметр, настройку которого необходимо выполнить, в указанной ни;е последовательности:

- Когда начинает мигать индикатор нужного параметре, с помощью кнопок А и/или С выполните его настройку в соответствии с тем, как показано в таблице.


- Для выхода из режима настройки нажмите кнопку Е 2 раза.
[/tab] [tab]
Рассмотрим настройку времени для серии PRW-5000

Убедитесь, что часы находятся в режиме текущего времени. В этом режиме на экране отображается текущее время и дата. Примерно так это выглядит в PRW-5000:
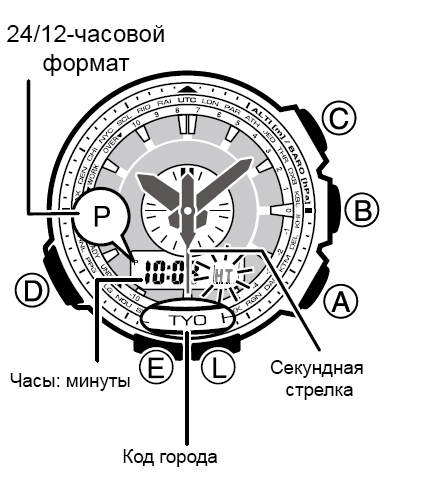
- В Режиме Текущего Времени нажимайте и удерживайте кнопку “Е”: Сначала на дисплее появляется индикация “ Hold SET ”, затем мигающий индикатор “HT”, и секундная стрелка не переходит в положение города Вашего текущего местоположения.
- Для выбора города Вашего текущего местоположения используйте кнопку “А” (для перемещения секундной стрелки по направлению часовой стрелки).
- Нажимайте кнопку “D” для перехода из разряда в разряд в следующей последовательности:

- Если вы выбрали для коррекции секунды (изображение секунд мигает), нажмите кнопку “А” для сброса значения счетчика секунд в 00. Если вы нажмете кнопку “А” при значении счетчика секунд между 30 и 59, то
значение счетчика установится в 00 и 1 прибавится к счетчику минут, если значение счетчика секунд будет между 00 и 29, то изменение счетчика минут не произойдет. - Для изменения значений минут и т.д. используйте кнопку “А” для увеличения и кнопку “С” для уменьшения выбранного значения. День недели устанавливается автоматически в соответствии с датой. Значение даты может быть установлено в диапазоне от 1 января 2001 года до 31 декабря 2099 года.
- Для выбора кода города используйте кнопки “А” и “С”.
- Для переключения 12/24 часового формата представления времени нажимайте кнопку “А”. При выбранном 12-ти часовом формате представления времени индикатор “Р” обозначает значение времени после полудня.
- Для переключения режимов летнего времени нажимайте кнопку “А” в следующей последовательности: автопереключение летнего времени (AUTO) – летнее время выключено (OFF) – летнее время включено (ON).
- По окончании установок дважды нажмите кнопку “Е”.
В случае, если стрелочное время отличается от цифрового, нужно выполнить корректировку положения стрелок:
Автокорректировка положения стрелок
- Нажмите кнопку “D” для входа в Режим Корректировки Стрелок Часов.
- На цифровом дисплее часов будет представлено текущее значение времени. Вы можете сравнить показания дисплея и стрелок часов.
- Нажмите и удерживайте кнопку “А” в течение 3-х секунд. При этом на дисплее появится индикация “Hold HS”, индикатор “H-S” будет мигать. Затем начнется процесс автокорректировки положения стрелок часов.
- Для прекращения корректировки и возврата в Режим Текущего Времени нажмите кнопку “А”.
Самостоятельная корректировка положения стрелок
- Войдите в Режим Корректировки Стрелок Часов.
- При этом на дисплее появится индикатор “HS”, а затем часы перейдут в Режим Текущего Времени. Вы можете сравнить показания дисплея и стрелок часов.
- Нажмите и удерживайте кнопку “Е” – при этом на дисплее появится индикация “Hold SET” и будет мигать индикатор “SEC 00”.
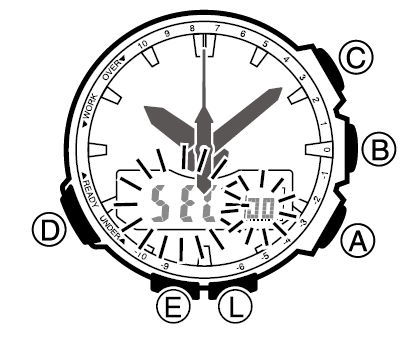
- Проверьте, что секундная стрелка часов переходит в положении 12-ти часов. Если этого не происходит, нажмите кнопку “А” для перемещения стрелки в нужное положение.
- После этого нажмите кнопку “D”. Часы переходят в корректировку положения часовой и минутной стрелок.

- Проверьте, что часовая и минутная стрелки часов переходят в положении 12-ти часов. Еслиэ стрелки не находятся в этом положении, используйте кнопки “А” и “С” для их корректировки.
- По окончании установок нажмите кнопку “Е”. После корректировки положения стрелок проведите самостоятельную калибровку часов (при этом переместив часы в положение, где прием сигнала калибровки будет наиболее удачен).
[/tab] [tab]
Рассмотрим настройку времени для серии PRG-550

Убедитесь в том, что часы находятся в режиме текущего времени [обычно активирован по умолчанию]. В этом режиме на экране отображается текущее время или дата. Так выглядит режим текущего времени у ProTrek PRG-550:

Далее можно приступать к настройке времени:
- В Режиме Текущего Времени нажимайте и удерживайте кнопку “ Е”. Сначала на дисплее появляется индикация “ Hold SET ”, затем мигающий индикатор “HT”, и секундная стрелка не переходит в положение города Вашего текущего местоположения.
- Для выбора города Вашего текущего местоположения используйте кнопку “А” (для перемещения секундной стрелки по направлению часовой стрелки).
- Нажимайте кнопку “D” для перехода из разряда в разряд в следующей последовательности:

- Если вы выбрали для коррекции секунды (изображение секунд мигает), нажмите кнопку “ А” для сброса значения счетчика секунд в 00. Если вы нажмете кнопку “ А” при значении счетчика секунд между 30 и 59, то значение счетчика установится в 00 и 1 прибавится к счетчику минут, если значение счетчика секунд будет между 00 и 29, то изменение счетчика минут не произойдет.
- Для изменения значений минут и т.д. используйте кнопку “ А” для увеличения и кнопку “ С” для уменьшения выбранного значения. День недели устанавливается автоматически в соответствии с датой. Значение даты может быть установлено в диапазоне от 1 января 2001 года до 31 декабря 2099 года.
- Для выбора кода города используйте кнопки “ А” и “ С”.
- Для переключения 12/24 часового формата представления времени нажимайте кнопку “ А”. При выбранном 12-ти часовом формате представления времени индикатор “ Р” обозначает значение времени после полудня.
- Для переключения режимов летнего времени нажимайте кнопку “ А” в следующей последовательности: летнее время включено (ON) – летнее время выключено (OFF).
- По окончании установок нажмите кнопку “ Е”.
Бывает, что стрелки могут сбиться и показывать неправильно время [чаще всего из-за удара или магнитного воздействия]. В таком случае нужно выполнить корректировку стрелок вручную:

- Нажмите кнопку D для выбора режима Ручной корректировки.
- На цифровом экране отобразится индикатор HS, затем время режима Текущего времени.
- Проверьте соответствие аналогового времени цифровому.
- Нажмите и удерживайте кнопку Е до тех пор, пока не выполнятся следующие условия:
- На цифровом экран отобразится надпись Hold SET. – Надпись
SEC 00 мигает. - Секундная стрелка должна переместиться в положение 12:00. Если это не произошло, нажмите кнопку А, чтобы переместить секундную стрелку в положение 12:00.
- На цифровом экран отобразится надпись Hold SET. – Надпись
- После того, как секундная стрелка переместится в положение 12:00, нажмите кнопку D.

- Часовая и минутная стрелки должны переместиться в положение 12:00. Если это не произошло, нажмите кнопку А (+) или С (–), чтобы переместить стрелки в положение 12:00.
- Повторное нажатие на кнопку D приведет к возврату секундной стрелки в положение, в котором она была до выполнения п. 2.
- Для завершения ручной корректировки нажмите кнопку Е.
[/tab] [tab]
Рассмотрим настройку времени для серии PRG-240

Перед настройкой нужно убедиться, что часы находятся в режиме текущего времени. В этом режиме на дисплее отображается текущее время и дата. Так выглядит режим текущего времени у PRG-240:

Далее приступаем к настройке времени:
- В Режиме Текущего Времени нажимайте и удерживайте кнопку “ Е” до того, как начнет мигать индикация кода города Вашего текущего местоположения. До появления индикации кода города на дисплее появляется индикация “SET Hold”, удерживайте кнопку в нажатом состоянии, пока не пропадет данная индикация, и появится индикация когда города.
- Для выбора города Вашего текущего местоположения используйте кнопки “А” и “ С”.
- Нажимайте кнопку “D” для перехода из разряда в разряд в следующей последовательности:

- Если вы выбрали для коррекции секунды (изображение секунд мигает), нажмите кнопку “ А” для сброса значения счетчика секунд в 00. Если вы нажмете кнопку “ А” при значении счетчика секунд между 30 и 59, то значение счетчика установится в 00 и 1 прибавится к счетчику минут, если значение счетчика секунд будет между 00 и 29, то изменение счетчика минут не произойдет.
- Для изменения значений минут и т.д. используйте кнопку “ А” для увеличения и кнопку “ С” для уменьшения выбранного значения. День недели устанавливается автоматически в соответствии с датой. Значение даты может быть установлено в диапазоне от 1 января 2001 года до 31 декабря 2099 года. Для выбора кода города используйте кнопки “ А” и “ С”.
- Для переключения 12/24 часового формата представления времени нажимайте кнопку “ А”. При выбранном 12-ти часовом формате представления времени индикатор “ Р” обозначает значение времени после полудня.
- По окончании установок дважды нажмите кнопку “ Е”.
[/tab] [tab]
Рассмотрим настройку времени для серии PRG-270

Сначала убедитесь, что часы находятся в режиме текущего времени [обычно включен по умолчанию]. В этом режиме на экране отображается текущее время или дата. Так это выглядит в часах ProTrek PRG-270:

- В режиме Текущего времени нажмите и удерживайте кнопку E около 2 секунд. Это действие приведет к тому, что сначала на экране отобразится мигающий индикатор SET Hold и в верхней части экрана – индикатор CITY. После этого в верхней части экрана отобразится в виде бегущей строки индикатор кода города текущего местонахождения и его название. После этого вы можете отпустить кнопку Е.
- С помощью кнопки D выберите параметр, настройку которого необходимо выполнить, в указанной ниже последовательности:

- Когда начинает мигать индикатор нужного параметре, с помощью кнопок А и/или С выполните его настройку в соответствии с тем, как показано в таблице.


- Для выхода из режима настройки нажмите кнопку Е 2 раза.
[/tab] [/tabcontent] [/tabs]
Мы рассмотрели настройку времени только для самых популярных серий часов G-Shock. Если у вас другая модель, тогда инструкцию для нее вы можете найти по номеру модуля часов G-Shock:
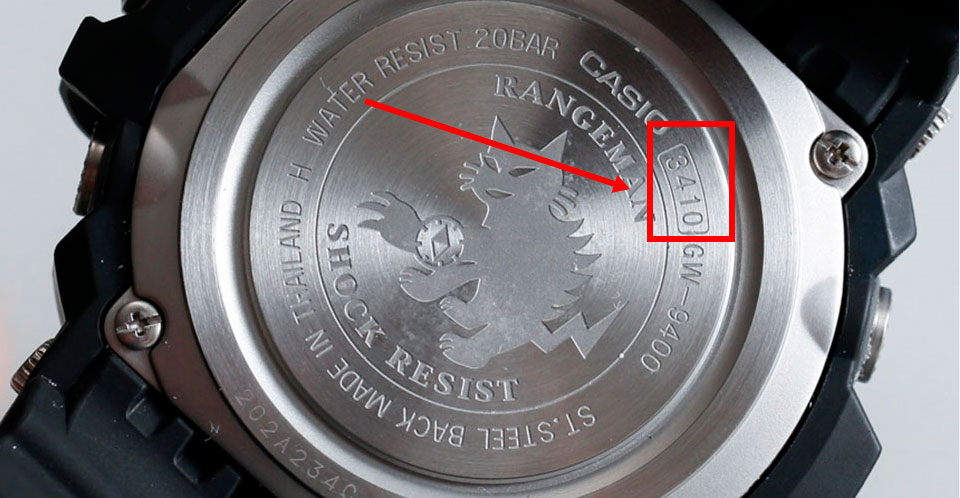
*номер модуля расположен на задней крышке часов — как правило 4 цифры (легче всего искать с помощью поиска CTRL + F на клавиатуре)
2172 — SPF-100
2271 — PAG-40
2271 — PRG-40
2273 — SPF-40
2572 — SPS-300
2632 — PAS-400
2767 — PAG-60
2782 — SPF-60
2894 — PAG-80
2894 — PRG-80
2894 — PRG-90
3043 — PAW-1100
3043 — PAW-1200
3047 — SPW-1000
3070 — PAW-1300
3134 — PRW-1500
3134 — PAW-1500
3172 — PRW-2000
3172 — PAW-2000
3172 — PRW-2000T
3172 — PRX-2000
3173 — PRG-260
3246 — PRG-240
3246 — PAG-240
3258 — PRW-2500
3414 — PRW-3000
3414 — PRW-3500
3415 — PRG-270
3443 — PRG-300
3444 — PRW-3100
3444 — PRW-3510
3444 — PRW-S3100
3451 — SGW-600
5114 — PRW-5000
5213 — PRG-550
5214 — PRW-5100
5242 — PRX-7000
5365 — PRW-6000
5365 — PRW-S6100
5415 — PRG-280
5470 — PRW-6100
5470 — PRX-8000
5470 — PRX-8163
5480 — PRW-7000
5497 — PRG-600
5545 — PRG-650
Все равно не нашли инструкцию и не знаете как настроить точное время? Тогда вам нужно посмотреть на наш главный каталог инструкций. Вероятно, у вас не ProTrek, а другое модельное направление (либо мы еще не успели обновить информацию).
На этой странице вы найдете инструкции Pro Trek в самым популярным моделям. Все руководства предоставляются на русском языке, но если вас по какой-либо причине это не устраивает, можете скачать другие инструкции на этой странице. Читайте информацию под заголовком «Альтернативный метод поиска» и да улыбнется вам удача!
Как искать?
Все очень просто. Для начала вам нужно визуально сравнить свои часы с изображением на фото. Если подходит — жмите по «Скачать». Однако запомните, что цвет/принт ваших часов, включая браслет и его материалы, могут отличаться. Сравнивайте по внешним параметрам циферблата и тогда вы точно не прогадаете. Надеемся, что у вас все получится!
Инструкции для скачивания
Итак, не пора ли нам найти нужную инструкцию? Смотрим ниже и выбираем подходящий вариант.

ПРЯМЫЕ ССЫЛКИ ДЛЯ СКАЧИВАНИЯ:
- Скачать для PRW-3000 / модуль 3414
- Скачать для PRG-270 / модуль 3415
- Скачать для PRG-260 / модуль 3173
- Скачать для PRW-5000 / модуль 5114
- Скачать для PRG-550 / модуль 5213
- Скачать для PRW-500 / модуль 3143
- Скачать для PRW-2000 / модуль 3172
- Скачать для PRW-2500 / модуль 3258
- Скачать для PRW-5100 / модуль 5214
- Скачать для PRG-240 / модуль 3246
- Скачать для PRW-1300 / модуль 3070
- Скачать для PRW-1500 / модуль 3134
- Скачать для SPS-300 / модуль 2572
- Скачать для PRX-7000 / модуль 5242
Ищите другие инструкции?
Если вам нужна документация к другим коллекциям часов Casio, ищите их по следующим ссылкам:
- ИНСТРУКЦИИ G-SHOCK
- ИНСТРУКЦИИ BABY-G
- ИНСТРУКЦИИ EDIFICE
CASIO PRO TREK PRG-340 Manual

Operating Precautions
Water Resistance
- The information below applies to watches with WATER RESIST or WATER RESISTANT marked on the back cover.
Water Resistance Under Daily Use
| Marking on watch front or on back cover | No BAR mark |
Example of Daily Use
| Hand washing, rain | Yes |
| Water-related work, swimming | No |
| Windsurfing | No |
| Skin diving | No |
Enhanced Water Resistance Under Daily Use
5 Atmospheres
| Marking on watch front or on back cover | 5BAR |
Example of Daily Use
| Hand washing, rain | Yes |
| Water-related work, swimming | Yes |
| Windsurfing | No |
| Skin diving | No |
10 Atmospheres
| Marking on watch front or on back cover | 10BAR |
Example of Daily Use
| Hand washing, rain | Yes |
| Water-related work, swimming | Yes |
| Windsurfing | Yes |
| Skin diving | Yes |
20 Atmospheres
| Marking on watch front or on back cover | 20BAR |
Example of Daily Use
| Hand washing, rain | Yes |
| Water-related work, swimming | Yes |
| Windsurfing | Yes |
| Skin diving | Yes |
- Do not use your watch for scuba diving or other types of diving that requires air tanks.
- Watches that do not have WATER RESIST or WATER RESISTANT marked on the
- back cover are not protected against the effects of sweat. Avoid using such a watch under conditions where it will be exposed to large amounts of sweat or moisture, or to direct splashing with water.
- Even if a watch is water resistant, note the usage precautions described below. Such types of use reduce water resistance performance and can cause fogging of the glass.
- Do not operate the crown or buttons while your watch is submersed in water or wet.
- Avoid wearing your watch while in the bath.
- Do not wear your watch while in a heated swimming pool, sauna, or any other high temperature/high humidity environment.
- Do not wear your watch while washing your hands or face, while doing housework, or while performing any other task that involves soaps or detergents.
- After submersion in seawater, use plain water to rinse all salt and dirt from your watch.
- To maintain water resistance, have the gaskets of your watch replaced periodically (about once every two or three years).
- A trained technician will inspect your watch for proper water resistance whenever you have its battery replaced. Battery replacement requires the use of special tools. Always request battery replacement from your original retailer or from an authorized CASIO service center.
- Some water-resistant watches come with fashionable leather bands. Avoid swimming, washing, or any other activity that causes direct exposure of a leather band to water.
- The inside surface of the watch glass may fog when the watch is exposed to a sudden drop in temperature. No problem is indicated if the fogging clears up relatively quickly. Sudden and extreme temperature changes (such as coming into an air conditioned room in the summer and standing close to an air conditioner outlet, or leaving a heated room in the winter and allowing your watch to come into contact with snow) can cause it to take longer for glass fogging to clear up. If glass fogging does not clear up or if you notice moisture inside of the glass, immediately stop using your watch and take it to your original retailer or to an authorized CASIO service center.
- Your water-resistant watch has been tested in accordance with International Organization for Standardization regulations.
Band
- Tightening the band too tightly can cause you to sweat and make it difficult for air to pass under the band, which can lead to skin irritation. Do not fasten the band too tightly. There should be enough room between the band and your wrist so you can insert your finger.
- Deterioration, rust, and other conditions can cause the band to break or come off of your watch, which in turn can cause band pins to fly out of position or to fall out. This creates the risk of your watch falling from your wrist and becoming lost, and also creates the risk of personal injury. Always take good care of your band and keep it clean.
- Immediately stop using a band if you even notice any of the following: loss of band flexibility, band cracks, band discoloration, band looseness, band connecting pin flying or falling out, or any other abnormality. Take your watch to your original retailer or to a CASIO service center for inspection and repair (for which you will be charged) or to have the band replaced (for which you will be charged).
Temperature
- Never leave your watch on the dashboard of a car, near a heater, or in any other location that is subject to very high temperatures. Do not leave your watch where it will be exposed to very low temperatures. Temperature extremes can cause your watch to lose or gain time, to stop, or otherwise malfunction.
- Leaving your watch in an area hotter than +60°C (140°F) for long periods can lead to problems with its LCD. The LCD may become difficult to read at temperatures lower than 0°C (32°F) and greater than +40°C (104°F).
Impact
- Your watch is designed to withstand impact incurred during normal daily use and during light activity such as playing catch, tennis, etc. Dropping your watch or otherwise subjecting it to strong impact, however, can lead to malfunction. Note that watches with shock-resistant designs (G-SHOCK, BABY-G, G-MS) can be worn while operating a chain saw or engaging in other activities that generate strong vibration, or while engaging in strenuous sports activities (motocross, etc.)
Magnetism
- Though operation of your watch normally is not affected by magnetism, its accuracy may be affected if the watch itself becomes magnetized. Also, very strong magnetism (from medical equipment, etc.) should be avoided because it can cause malfunction of your watch and damage to electronic components.
Electrostatic Charge
- Exposure to very strong electrostatic charge can cause your watch to display the wrong time. Very strong electrostatic charge even can damage electronic components.
- Electrostatic charge can cause the display to go blank momentarily or cause a rainbow effect on the display.
Chemicals
- Do not allow your watch to come into contact with thinner, gasoline, solvents, oils, or fats, or with any cleaners, adhesives, paints, medicines, or cosmetics that contain such ingredients. Doing so can cause discoloration of or damage to the resin case, resin band, leather, and other parts.
Storage
- If you do not plan to use your watch for a long time, thoroughly wipe it free of all dirt, sweat, and moisture, and store it in a cool, dry place.
Resin Components
- Allowing your watch to remain in contact with other items or storing it together with other items for long periods while it is wet can cause color on resin components to transfer to the other items, or the color of the other items to transfer to the resin components of your watch. Be sure to dry off your watch thoroughly before storing it and make sure it is not in contact with other items.
- Leaving your watch where it is exposed to direct sunlight (ultraviolet rays) for long periods or failure to clean dirt from your watch for long periods can cause it to become discolored.
- Friction caused by certain conditions (strong external force, sustained rubbing, impact, etc.) can cause discoloration of painted components.
- If there are printed figures on the band, strong rubbing of the printed area can cause discoloration.
- Leaving your watch wet for long periods can cause fluorescent color to fade. Wipe the watch dry as soon as possible after it becomes wet.
- Semi-transparent resin parts can become discolored due to sweat and dirt, and if exposed to high temperatures and humidity for long periods.
- Daily use and long-term storage of your watch can lead to deterioration, breaking, or bending of resin components. The extent of such damage depends on usage conditions and storage conditions.
Leather Band
- Allowing your watch to remain in contact with other items or storing it together with other items for long periods while it is wet can cause the color of the leather band to transfer to the other items or the color of the other items to transfer to the leather band. Be sure to dry off your watch thoroughly with a soft cloth before storing it and make sure it is not in contact with other items.
- Leaving a leather band where it is exposed to direct sunlight (ultraviolet rays) for long periods or failure to clean dirt from a leather band for long periods can cause it to become discolored.
Exposing a leather band to rubbing or dirt can cause color transfer and discoloration.
Metal Components
- Failure to clean dirt from metal components can lead to formation of rust, even if components are stainless steel or plated. If metal components exposed to sweat or water, wipe thoroughly with a soft, absorbent cloth and then place the watch in a well-ventilated location to dry.
- Use a soft toothbrush or similar tool to scrub the metal with a weak solution of water and a mild neutral detergent, or with soapy water. Next, rinse with water to remove all remaining detergent and then wipe dry with a soft absorbent cloth. When washing metal components, wrap the watch case with kitchen plastic wrap so it does not come into contact with the detergent or soap.
Bacteria and Odor Resistant Band
- The bacteria and odor resistant band protects against odor generated by the formation of bacteria from sweat, which ensures comfort and hygiene. In order to ensure maximum bacteria and odor resistance, keep the band clean. Use an absorbent soft cloth to thoroughly wipe the band clean of dirt, sweat, and moisture. A bacteria and odor resistant band suppresses the formation of organisms and bacteria. It does not protect against rash due to allergic reaction, etc.
Liquid Crystal Display
- Display figures may be difficult to read when viewed from an angle.
Watch with Data Memory
- Allowing the battery to go dead, replacing the battery, or having your watch repaired can cause all data in watch memory to be lost. Note that CASIO Computer Co., Ltd. assumes no responsibility for any damages or losses caused by data lost due to malfunction or repair of your watch, replacement of the battery, etc. Be sure to keep separate written copies of all important data.
Watch Sensors
- A watch sensor is a precision instrument. Never try to take it apart. Never try to insert any objects into the openings of a sensor, and take care to ensure that dirt, dust, or other foreign matter does not get into it. After using your watch where it has been immersed in saltwater, rinse it thoroughly with fresh water.
Note that CASIO Computer Co., Ltd. assumes no responsibility for any damage or loss suffered by you or any third party arising through the use of your watch or its malfunction.
User Maintenance
Caring for Your Watch
Remember that you wear your watch next to your skin, just like a piece of clothing. To ensure your watch performs at the level for which it is designed, keep it clean by frequently wiping with a soft cloth to keep your watch and band free of dirt, sweat, water and other foreign matter.
- Whenever your watch is exposed to sea water or mud, rinse it off with clean fresh water.
- For a metal band or a resin band with metal parts, use a soft toothbrush or similar tool to scrub the band with a weak solution of water and a mild neutral detergent, or with soapy water. Next, rinse with water to remove all remaining detergent and then wipe dry with a soft absorbent cloth. When washing the band, wrap the watch case with kitchen plastic wrap so it does not come into contact with the detergent or soap.
- For a resin band, wash with water and then wipe dry with a soft cloth. Note that sometimes a smudge like pattern may appear on the surface of a resin band. This will not have any effect on your skin or clothing. Wipe with a cloth to remove the smudge pattern.
- Clean water and sweat from a leather band by wiping with a soft cloth.
- Not operating a watch crown, buttons, or rotary bezel could lead to later problems with their operation. Periodically rotate the crown and rotary bezel, and press buttons to maintain proper operation.
Dangers of Poor Watch Care
Rust
- Though the metal steel used for your watch is highly rust-resistant, rust can form if your watch is not cleaned after it becomes dirty.
- Dirt on your watch can make it impossible for oxygen to come into contact with the metal, which can lead to breakdown of the oxidization layer on the metal surface and the formation of rust.
- Rust can cause sharp areas on metal components and can cause band pins to fly out of position or to fall out. If you ever notice any abnormality immediately stop using your watch and take it to your original retailer or to an authorized CASIO service center.
- Even if the surface of the metal appears clean, sweat and rust in crevasses can soil the sleeves of clothing, cause skin irritation, and even interfere with watch performance.
Premature Wear
- Leaving sweat or water on a resin band or bezel, or storing your watch an area subject to high moisture can lead to premature wear, cuts, and breaks.
Skin Irritation
- Individuals with sensitive skin or in poor physical condition may experience skin irritation when wearing a watch. Such individuals should keep their leather band or resin band particularly clean. Should you ever experience a rash or other skin irritation, immediately remove your watch and contact a skin care professional.
Battery
- The special rechargeable battery used by your watch is not intended to be removed or replaced by you. Use of a rechargeable battery other than the special one specified for your watch can damage your watch.
- The rechargeable (secondary) battery is charged when the solar panel is exposed to light, so it does not require regular replacement as the primary battery requires. Note, however, that long use or operating conditions can cause the capacity or charging efficiency of the rechargeable battery to deteriorate. If you feel that the amount of operation provided by charging is too short, contact your original retailer or CASIO service center.
Before Getting Started…
This section provides an overview of the watch and introduces convenient ways it can be used.
Watch Features
- Solar Charging
Sunlight and artificial light generate electricity for watch operation as it charges. - World Time
Displays the current time in any one of 48 cities (31 time zones) around the globe and UTC. - Alarm and Hourly Time Signal
An alarm sounds whenever a time specified by you is reached. - Digital Compass
You can use the Compass Mode to determine the direction of north, and to check your bearing to a destination. - Altitude Measurement
You can use this mode to take an altitude reading at your current location. You can record the altitude, along with the date and time of the measurement. You can also measure the altitude differential between two points. - Barometric Pressure and Temperature Measurement
You can display the current barometric pressure tendency, which helps you be on the alert for noteworthy pressure changes. The watch can be used to take current air temperature readings. - Viewing Altitude Records
You can view or delete records of altitude measurements. - Sunrise and Sunset Times
You can look up the sunrise and sunset times for a specified date and location. - Stopwatch
The stopwatch performs elapsed time measurement up to 999 hours, 59 minutes, 59.9 seconds in 1/10 second units. - Timer
Countdown from a start time specified by you. An alarm sounds when the countdown reaches zero.
- This watch is not a special-purpose measuring instrument. Measurement function readings are intended for general reference only.
- Whenever using the Digital Compass of this watch for serious trekking, mountain climbing, or other activities, be sure to always take along another compass to confirm readings. If the readings produced by the Digital Compass of this watch are different from those of the other compass, perform 2-point calibration of the Digital Compass to ensure better accuracy.
- Compass readings and calibration will not be possible if the watch is in the vicinity of a permanent magnet (magnetic accessory, etc.), metal objects, high-voltage wires, aerial wires, or electrical household appliances (TV, computer, cellphone, etc.)
 Digital Compass
- Compass readings and calibration will not be possible if the watch is in the vicinity of a permanent magnet (magnetic accessory, etc.), metal objects, high-voltage wires, aerial wires, or electrical household appliances (TV, computer, cellphone, etc.)
- The watch’s Altimeter Mode calculates and displays relative altitude based on barometric pressure readings produced by its pressure sensor. Because of this, altitude values displayed by the watch may be different from your actual elevation and/or sea level elevation indicated for the area where you are located. Regular calibration in accordance with the local altitude (elevation) indications is recommended.
 Altitude Measurement
Note:
The illustrations included in this operation guide have been created to facilitate explanation. An illustration may differ somewhat from the item it represents.
General Guide

A button
Pressing this button in the Timekeeping Mode enters the Altimeter Mode.
B button
Pressing this button in the Timekeeping Mode enters the Barometer/Temperature Mode.
C button
Pressing this button in the Timekeeping Mode enters the Compass Mode.
D button
Each press cycles between watch modes.
In any mode, hold down this button for at least two seconds to return to the Timekeeping Mode.
E button
Pressing this button in the Timekeeping Mode cycles between displays.
L button
Press to turn on illumination.
Indicators
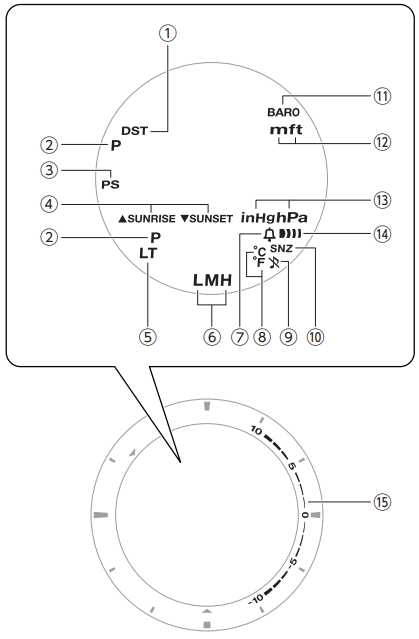
- Displayed while the watch is indicating summer time.
- Displayed during p.m. times while 12-hour timekeeping is being used.
- Displayed while Power Saving is enabled.
- Displayed when the watch is in the Sunrise/Sunset Mode.
- Displayed while Auto Light is enabled.
- Shows the current charge level.
- Appears when the hourly time signal is on.
- Shows the temperature unit being used.
- Displayed while the button operation tone is disabled.
- Displayed while the snooze alarm is turned on.
- Displayed while barometric pressure change indication is enabled.
- Shows the altitude unit being used.
- Shows the barometric pressure measurement unit.
- Displayed when an alarm is turned on.
- Graphic display of the altitude/barometric pressure differential.
Navigating Between Modes
Your watch has the modes shown below.
- To return to the Timekeeping Mode from any other mode, hold down (D) for at least two seconds.
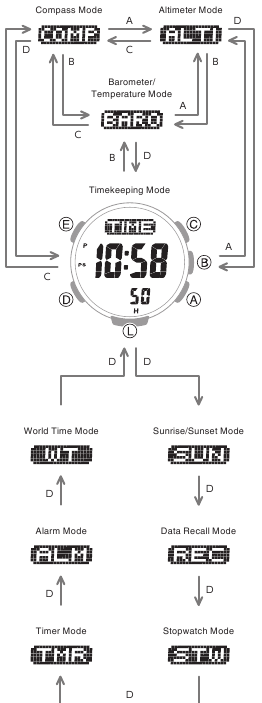
Use the buttons in the illustration above to navigate between modes.
Mode Overview
Timekeeping Mode
In this mode, the digital display shows the current date and time.
You can also display the items below in the upper display area by pressing (E).
- Month, day
- Barometric pressure graph
Day of the week, date
Altimeter Mode
Use this mode to take an altitude reading for your current location. Altitude Measurement

- Altitude graph/altitude differential
- Altitude
- Current time
Compass Mode
Use this mode to take direction and bearing angle readings. Digital Compass
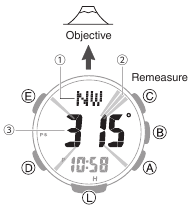
- Bearing at 12 o’clock
- Graphic pointer indicating north
- Bearing angle at 12 o’clock
Barometer/Temperature Mode
Use this mode to take barometric pressure and temperature readings for your current location. Barometric Pressure and Temperature Measurement

- Barometric pressure graph
- Barometric pressure
- Temperature
- Barometric pressure differential graphic
Data Recall Mode
Use this mode to view altitude records Viewing Altitude Records
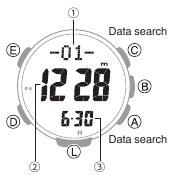
- Record number
- Altitude
- Recording date
Stopwatch Mode
Use this mode to measure elapsed time. Stopwatch

- Stopwatch hours
- Stopwatch minutes
- Stopwatch seconds
- Stopwatch 1/10 second
Timer Mode
Use this mode to countdown from a desired start time. Timer
Timer

- Timer hours
- Timer minutes
- Timer seconds
Alarm Mode
The watch will beep when an alarm time is reached. Alarm and Hourly Time Signal

- Alarm or hourly time signal status (on/off)
- Alarm number
- Alarm hour
- Alarm minute
World Time Mode
You can view the current time in 48 cities (31 time zones), and UTC (Coordinated Universal Time) time. World Time
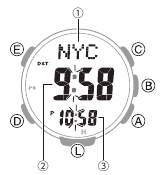
- City Codes (World Time Codes)
- World Time City current time
- Home City time
Charging
This watch runs on power supplied from a rechargeable (secondary) battery that is charged by a solar panel. The solar panel is integrated into the face of the watch, and power is generated whenever the face is exposed to light.
Charging the Watch
When you are not wearing the watch, put it in a location where it is exposed to bright light.
While you are wearing the watch, make sure that its face (solar panel) is not blocked from light by the sleeve of your clothing. Power generation efficiency is reduced even when the face of the watch is blocked only partially.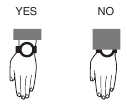
- Some light sources and environments can cause the watch to become extremely hot during charging, which creates the risk of burn injury and damage to internal watch components.
Avoid charging the watch under conditions like the ones described below, where the temperatures may exceed 60°C (140°F).- On the dashboard of a vehicle parked in the sun
- Near incandescent lamps, camera lights, halogen lamps, or other sources of heat
- In locations exposed to direct sunlight for long periods and other hot locations
- The display panel may become black (or white, depending on the LCD type) under very high temperatures. This is temporary, and the display will return to normal at lower temperatures.
Checking the Charge Level
A display indicator shows the watch’s current charge level.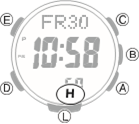
Charge Level 1: Good
All functions enabled.
Charge Level 2: Good
All functions enabled.
Charge Level 3: Low
[L] and [LOW] flash on the display and the functions below become disabled.
- Compass, altitude, barometric pressure/ temperature measurements
- Face illumination
- Sounds (alarm, etc.)

Charge Level 4: Low
When the battery charge drops lower than Level 3, [CHG] starts to flash on the display and all functions become disabled.
Charge Level 5: Dead
The digital display will go blank if the battery goes dead. Memory data is lost, and watch settings are returned to their initial factory defaults.
- Should the battery go low or go dead, expose the face (solar panel) to light as soon as possible.
Note :
When [H], [M], and [L] are all flashing on the display, it means that all functions are disabled due to momentary battery power consumption. [H], [M], and [L] are flashing on the display.
Charging Time Guidelines
The table below shows guidelines for approximate charging times.
Charging Times Required for 1 Day of Operation
| Light Level (Lux) | Approximate Charging Time |
| 50,000 | 5 minutes |
| 10,000 | 24 minutes |
| 5,000 | 48 minutes |
| 500 | 8 hours |
Times Required to Achieve Next Charge Level
- Sunny day, outdoors (50,000 lux)
| Dead battery → Medium charge | 2 hours |
| Medium charge → High charge | 15 hours |
| High charge → Full charge | 4 hours |
- Sunny day, near a window (10,000 lux)
| Dead battery → Medium charge | 6 hours |
| Medium charge → High charge | 73 hours |
| High charge → Full charge | 20 hours |
- Overcast day, near a window (5,000 lux)
| Dead battery → Medium charge | 11 hours |
| Medium charge → High charge | 148 hours |
| High charge → Full charge | 40 hours |
- Indoor fluorescent lighting (500 lux)
| Dead battery → Medium charge | 147 hours |
| Medium charge → High charge | — |
| High charge → Full charge | — |
Note :
Actual charging time depends on the local charging environment.
Power Saving Function
Leaving the watch in a dark location for about one hour between the hours of 10 p.m. and 6 a.m. will cause the display to go blank, and the watch to enter Level 1 power saving. If the watch is left in this condition for six or seven days, the watch will enter Level 2 power saving.
Power Saving Level 1:
Digital display goes blank to save power.
Power Saving Level 2:
Digital display goes blank to save power. All functions are disabled.
Recovering from Power Saving Operation
Use one of the operations below to exit power saving.
- Press any button.
- Move the watch to a bright location.
- Trigger auto light by angling the watch towards your face.
Note:
- The watch will not enter power saving in the cases below.
- While in the Stopwatch Mode
- While in the Timer Mode
- While the barometric pressure change indicator is displayed
- You can enable or disable Power Saving.
 Configuring Power Saving Function Settings
 - Note that the watch also may enter power saving if its face is blocked from light by your sleeve while you are wearing it.
Viewing the Face in the Dark
The face of the watch can be illuminated for viewing in the dark.
To illuminate the face manually
Pressing (L) turns on illumination.
- Illumination will turn off automatically if an alarm starts to sound.
- Illumination may not turn on while a sensor is taking a reading.

To illuminate the face when Auto Light is enabled
If Auto Light is enabled, face illumination will turn on automatically whenever the watch is positioned at an angle of 40 degrees or more.
Note :
- Auto Light is disabled when any one of the conditions below exists.
- Alarm, timer alert, or other beeper sounding
- Watch in the Compass Mode
- While sunrise/sunset times are being calculated
Configuring the Auto Light Setting
- Enter the Timekeeping Mode.
 Navigating Between Modes
 - Hold down (L) for at least three seconds to toggle Auto Light between enabled and disabled.
- [LT] is displayed while Auto Light is enabled.
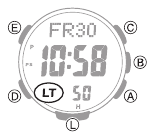
- [LT] is displayed while Auto Light is enabled.
Note :
Auto Light is disabled while [CHG] is shown on the display.
Specifying the Illumination Duration
You can select either 1.5 seconds or three seconds as the illumination duration.
- Enter the Timekeeping Mode.
 Navigating Between Modes
 - Hold down (E) for at least two seconds. Release the button when the name of the currently selected Home City appears on the display.
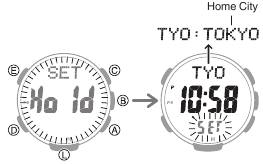
- Press (D) 10 times.
[LIGHT] appears on the display with [1] or [3] flashing. - Press (A) to select an illumination duration.
[1]: 1.5-second illumination
[3]: 3-second illumination
- Press (E) twice to complete the setting operation.
Time Adjustment
Use the procedures in this section to adjust the date and time settings.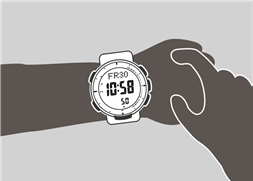
Adjusting the Current Time Setting
Use the procedures below to adjust the current date and time settings, and to select a Home City.
Setting a Home City
Use the procedure in this section to select a city to use as your Home City. If you are in an area that observes summer time, you can also enable or disable summer time.
- Enter the Timekeeping Mode.
 Navigating Between Modes
 - Hold down (E) for at least two seconds. Release the button when the name of the currently selected Home City appears on the display.
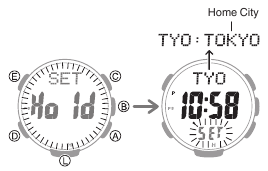
- Use (A) and (C) to change the Home City setting.
- Holding down (A) or (C) scrolls through settings at high speed.
- For details refer to the information below.
 City Table
- Press (D).
- Use (A) to change the summer time setting.
- [OFF]
The watch always indicates standard time. - [ON]
The watch always indicates summer time.
- Press (E) twice to complete the setting operation.
Note :
While the setting is being configured, the watch will exit the setting operation automatically after about two or three minutes of non-operation.
Setting the Time/Date
Use the procedure below to change the time and date settings.
- Enter the Timekeeping Mode.
 Navigating Between Modes
 - Hold down (E) for at least two seconds. Release the button when the name of the currently selected Home City appears on the display.
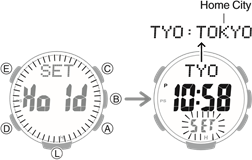
- Use (D) to display the setting you want to change.
- Each press of (D) cycles through settings in the sequence shown below.
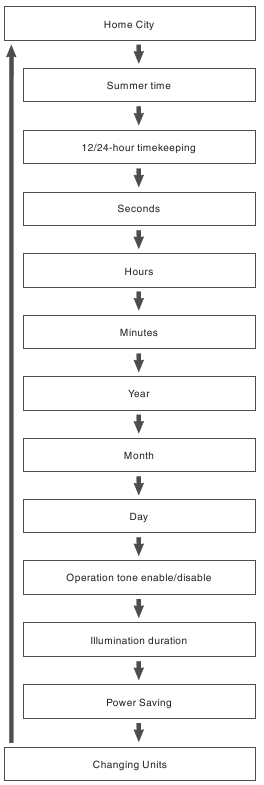
- Configure the date and time settings.
- While the seconds are flashing, pressing (A) will reset them to 00. 1 is added to the minutes when the current seconds count is between 30 and 59 seconds.
- For all the other settings, use (A) and (C) to change the flashing setting. Holding down (A) or (C) scrolls through settings at high speed.
- Repeat steps 3 and 4 to select time and date settings.
- Press (E) twice to complete the setting operation.
Note :
While the setting is being configured, the watch will exit the setting operation automatically after about two or three minutes of non-operation.
Switching between 12-hour and 24hour Timekeeping
You can specify either 12-hour format or 24hour format for the time display.
- Enter the Timekeeping Mode.
 Navigating Between Modes
 - Hold down (E) for at least two seconds. Release the button when the name of the currently selected Home City appears on the display.
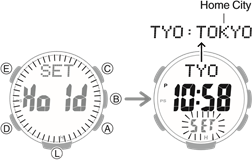
- Press (D) twice.
This causes [12H] or [24H] to flash on the display.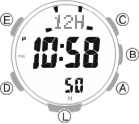
- Press (A) to select [12H] (12-hour timekeeping) or [24H] (24-hour timekeeping).
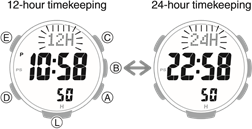
- Press (E) twice to complete the setting operation.
Note :
While the setting is being configured, the watch will exit the setting operation automatically after about two or three minutes of non-operation.
World Time
You can view the current time in 48 cities (31 time zones), and UTC (Coordinated Universal Time) time.
Checking World Time
- Enter the World Time Mode.
 Navigating Between Modes
This displays [WT]. After one second, the city code and name of your currently selected World Time City appears.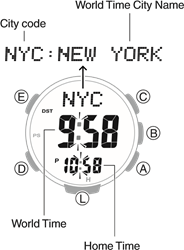
Specifying a World Time City
Use the procedure in this section to select a World Time city. If you are in an area that observes summer time, you can also enable or disable summer time.
- Enter the World Time Mode.
 Navigating Between Modes
 - Use (A) and (C) to display the city you want to specify as a World Time City.
- Holding down (A) or (C) scrolls through settings at high speed.
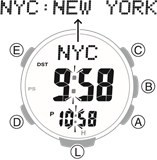
- Holding down (A) or (C) scrolls through settings at high speed.
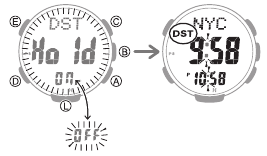
- To change the summer time setting, hold down (E) for about two seconds.
This causes [DST] [Hold] [On] or [DST] [Hold] [OFF] to flash on the display. After that, the setting is changed.- [DST] [Hold] [On] flashing on the display indicates summer time.
- [DST] [Hold] [OFF] flashing on the display indicates standard time.
- [DST] is displayed while summer time is selected.
Note :
- While [UTC] is selected as the city, you will not be able to change or check the summer time setting.
- The summer time setting you configure is applied to the currently selected city only. It does not affect other cities.
Alarm and Hourly Time Signal
The watch will beep when the alarm time is reached. You can configure up to four standard daily alarms, and one daily alarm with snooze. The hourly time signal causes the watch to beep every hour on the hour.
- Snooze causes the alarm to sound up to seven times, at five-minute intervals.
- The alarm sound is muted in the cases described below.
Configuring Alarm Settings
- Enter the Alarm Mode.
 Navigating Between Modes
 - Use (A) and (C) to select the alarm ([AL-1] to [AL-4], or [SNZ]) whose setting you want to change.
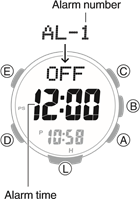
- Hold down (E) for at least two seconds. Release the button when the hour setting starts to flash.
- Use (A) and (C) to change the hour setting.
- Holding down (A) or (C) scrolls through settings at high speed.
- If you are using 12-hour timekeeping, [P] indicates p.m.
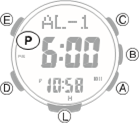
- Press (D).
This causes the minutes digits to flash.
- Use (A) and (C) to set the minute setting.
- Press (E) to complete the setting operation.
Note :
If you do not perform any operation for about three minutes while in the Alarm mode, the watch automatically returns to the Timekeeping Mode.
To stop the alarm
To stop the alarm after it starts to sound when an alarm time is reached, press any button.
Snooze causes the alarm to sound up to seven times, at five-minute intervals. To cancel a snooze alarm, turn [SNZ] off. Turning Off an Alarm or the Hourly Time Signal
Note :
A beeper sounds for 10 seconds when an alarm time is reached.
Configuring the Hourly Time Signal Setting
- Enter the Alarm Mode.
 Navigating Between Modes
 - Press (A) or (C) to display the hourly time signal screen ([SIG]).
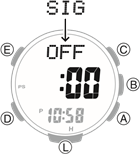
- Press (B) to toggle the hourly time signal between enabled and disabled.
Turning Off an Alarm or the Hourly Time Signal
To stop an alarm or the hourly time signal from sounding, perform the steps below to turn it off.
- To have an alarm or hourly time signal sound again, turn it back on.
Note :
- Indicators are displayed while any of the alarms or the hourly time signal is turned on.
- The applicable indicators are not displayed while all of the alarms are turned off and/or the hourly time signal is turned off.

- Enter the Alarm Mode.
 Navigating Between Modes
 - Use (A) and (C) to scroll through the alarm ([AL-1] to [AL-4], [SNZ]) and hourly time signal (
 ) screens until the one you want to turn off is displayed.
- Press (B) to turn off the displayed alarm or the hourly time signal.
Note :
If ![]() (alarm) is still displayed after you turn off an alarm, it means that at least one of the other alarms is still turned on. To turn off all of the alarms, repeat steps 2 and 3 until the
(alarm) is still displayed after you turn off an alarm, it means that at least one of the other alarms is still turned on. To turn off all of the alarms, repeat steps 2 and 3 until the ![]() (alarm) indicator is no longer displayed.
(alarm) indicator is no longer displayed.
Digital Compass
You can use the Compass Mode to determine the direction of north, and to check your bearing to a destination.
Taking a Compass Reading
- Enter the Compass Mode.
 Navigating Between Modes
- Entering the Compass Mode starts compass readings.
- Keeping the watch horizontal, point 12 o’clock in the direction of your desired objective.
The digital display shows one of 16 literal direction indications and the bearing angle.- To retrigger the compass operation, press (C).
Interpreting Bearing Readings
Directions: N (North), E (East), W (West), S (South)
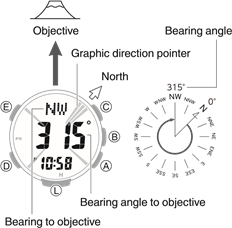
- The graphic direction pointer indicates north, south, east, and west. The graphic direction pointer indicating north consists of three lines.

Note :
- Normally the Compass Mode indicates magnetic north. You can also configure settings to indicate true north.
 Setting Up for True North Readings (Magnetic Declination Calibration)
 Magnetic North and True North
 - After the initial reading is displayed, the watch will continue to take readings approximately every second for approximately the next 60 seconds. After measurement is complete, the graphic direction pointer disappears from the display, and [- — -] is shown for the bearing to your objective and its bearing angle.
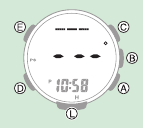
- If four directions (north, south, east, west) and your target bearing are not displayed on the screen when you press (C), the bearing recorded in the bearing memory may be displayed instead of four directions. Press (E) to clear the recording bearing.
 Saving a Bearing to an Objective (Bearing Memory)
 - Auto Light will not illuminate the face while a compass operation is in progress.
- If an alarm or other beeper sounds, or if you turn on illumination by pressing (L) while a compass operation is in progress, the compass operation will be suspended momentarily. The compass operation will resume when the beeper stops or illumination turns off.
- If you do not perform any operation for about two or three minutes while in the Compass Mode, the watch automatically returns to the Timekeeping Mode.
Aligning a Map with Actual Surroundings (Setting a Map)
Setting a map means to align the map so the directions indicated on it are aligned with the actual directions of your location. Once you set a map, you can more easily get a grasp of the relationship between map markings and actual geographic contours. To set a map with this watch, align north on the map with the north indication of the watch. Once you set the map, you can compare your bearing on the map with your surroundings, which will help you determine your current location and destination.
Note that map reading skills and experience are required to determine your current location and destination on a map.
Saving a Bearing to an Objective (Bearing Memory)
You can use record the bearing to a destination. Displaying the recorded bearing makes it possible to progress towards your target destination when the visibility is poor.
- Enter the Compass Mode.
 Navigating Between Modes
 - Keeping the watch horizontal, point 12 o’clock in the direction of the objective your want to record.
- Press (E).
The direction of the 12 o’clock position of the watch is recorded as the target direction and indicated by the graphic direction pointer.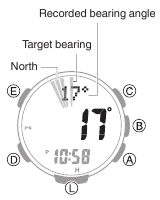
- To clear a recorded bearing, press (E).
Calibrating Compass Readings
Perform 2-point calibration whenever you notice the watch’s compass readings are different from those of another compass, or before setting out on a climb or trek.
- Note that accurate compass readings and/or calibration will not be possible in an area where strong magnetism is present.
 Digital Compass Reading Precautions
2-Point Calibration
- Enter the Compass Mode.
 Navigating Between Modes
 - Hold down (E) for at least two seconds until the three-line graphic direction pointer flashes at 12 o’clock. Release the button when [CALIBRATION] [-1-] appears on the display.
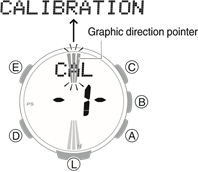
- While keeping the watch horizontal, press (C).
This starts calibration of the first point, which causes [- — -] to appear on the display. [Turn 180°] appears on the display when calibration is successful, and the three-line graphic direction pointer flashes at 6 o’clock. One second later, [CALIBRATION] [-2-] appears on the display.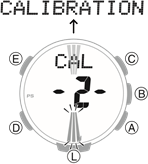
- Rotate the watch 180 degrees, taking care to be as exact as possible.
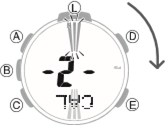
- Press (C).
- This starts calibration of the second point, which causes [- — -] to appear on the display.
- When calibration is successful, [OK] appears on the display and the watch returns to the Digital Compass screen.
Note :
[ERR] [-1-] appears if calibration fails for some reason. If this happens, restart the above procedure from step 3.
Setting Up for True North Readings (Magnetic Declination Calibration)
If you want the watch to indicate true north instead of magnetic north, you need to specify your current location’s magnetic declination direction (east or west) and declination angle. Magnetic North and True North
- The magnetic declination angle value can be set in 1° (degree) units only. Use a value that is closest to the angle you want to set. Example: For an angle of 7.4°, set 7°. Example: For an angle of 7°40′ (7 degrees, 40 minutes), set 8°.
Note :
Magnetic declination angles (east or west) and angle degree values for specific locations can be found on geographic maps, mountain climbing maps, and other maps that include contour lines.
- Enter the Compass Mode.
 Navigating Between Modes
 - Hold down (E) for at least two seconds until the three-line graphic direction pointer flashes at 12 o’clock. Release the button when [CALIBRATION] [-1-] appears on the display.
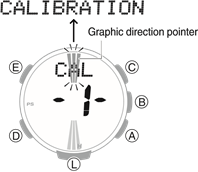
- Press (D).
This displays [DEC] [0°].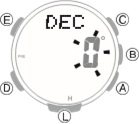
- Use (A) (East) and (C) (West) to change the magnetic declination direction and angle.
- Holding down (A) or (C) scrolls through settings at high speed.
Setting range: 90° west to 90° east
[OFF]: Magnetic north
[E]: East declination (Magnetic north is east of true north.)
[W]: West declination (Magnetic north is west of true north.) - To return the setting to [OFF], press (A) and (C) at the same time.

- Holding down (A) or (C) scrolls through settings at high speed.
- Press (E) to complete the setting operation.
Magnetic North and True North
There are actually two types of north: magnetic north and true north.
Magnetic north: North indicated by the needle of a compass
True north: Direction to the North Pole
As shown in the illustration below, magnetic north and true north are not the same.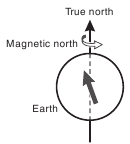
Note :
The north indicated on commercially available maps is normally true north.
Digital Compass Reading Precautions
Location During Use
Taking readings near sources of strong magnetism can cause reading error. Keep the watch away from the following types of items.
Permanent magnets (magnetic accessories, etc.), metal objects, high-voltage wires, aerial wires, electrical household appliances (TVs, computers, cellphones, etc.)
- Note that correct direction readings are not possible indoors, especially inside of reinforced concrete structures.
- Accurate direction readings are not possible on electric trains, on boats, on aircraft, etc.
Storage Location
Exposure of the watch to magnetism can affect the accuracy of digital compass readings. Keep the watch away from the types of items below.
Permanent magnets (magnetic accessories, etc.), metal objects, electrical household appliances (TVs, computers, cellphones, etc.)
Altitude Measurement
The watch takes altitude readings and displays results based on air pressure measurements taken by a built-in pressure sensor.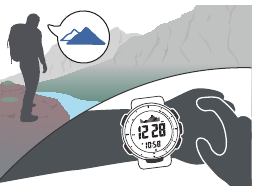
Checking the Current Altitude
- Enter the Altimeter Mode.
 Navigating Between Modes
Note :
- Measurement range: -700 to 10,000 meters (-2,300 to 32,800 feet) (Measurement unit: 1 meter (5 feet)) Note that calibrating altitude readings will cause a change in the measurement range.
- [- — -] will appear for the measured value if it is outside the allowable range.
Altitude Graph Screen
Altitude Differential Screen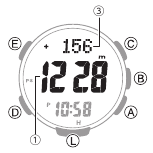
- Current location altitude
- Altitude graph
- Differential between reference altitude and current altitude
Interpreting Altitude Graph Contents
* 1 square ( ) is 10 m.
Calibrating Altitude Readings (Offset)
To minimize the difference between locally indicated and measured values, you should update the reference altitude value (offset) before setting off and during treks or any other activities where you take altitude readings.
Also, you can ensure accurate measurements by checking a map local altitude indications or some other source for your current location’s altitude, and regularly calibrating watch readings with the latest information while mountain climbing.
Note :
- You can find out the altitude at your current location from signs, maps, on the Internet, etc.
- Differences between actual altitude and watch readings can be caused by the factors below.
- Changes in barometric pressure
- Changes in temperature caused by variations in barometric pressure and by elevation
- Though altitude readings can be taken without calibration, doing so may produce readings that are very different from indications by altitude markers, etc.
- Enter the Altimeter Mode.
 Navigating Between Modes
 - Hold down (E) for at least two seconds. Release the button when [ALTI] appears on the display.
This displays the current altitude and enters the Altitude Offset Mode.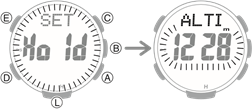
- Use (A) and (C) to change the altitude value to an elevation value obtained from another source.
Setting range: -10,000 to 10,000 meters (or -32,800 to 32,800 feet)
Setting unit: 1 meter (or 5 feet)- Holding down (A) or (C) scrolls through settings at high speed.
- To return the altitude setting to its initial factory default, press (A) and (C) at the same time.
- This displays [OFF].
- Press (E) to complete the setting operation.
Note :
While the setting is being configured, the watch will exit the setting operation automatically after about two or three minutes of non-operation.
Setting a Reference Altitude and Taking Altitude Differential Readings
You can use the procedure below to display the differential between a reference altitude and another altitude. This makes it easy to display the altitude differential between two points while climbing or trekking.
Select the Altitude Differential Screen. Changing Displayed Information
- Use the contour lines on your map to determine the altitude differential between your current location and your destination.
- Take an altitude reading of your current location.
 Checking the Current Altitude
 - Use (E) to set your current location as the reference altitude.
This makes the altitude differential ±0 m (±0 feet).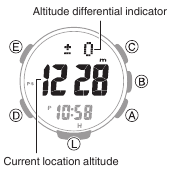
- While comparing the difference between the altitude you found on the map and the altitude differential displayed by the watch, advance towards your destination.
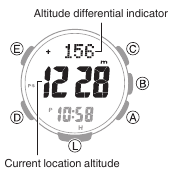
- When the altitude differential you found on the map is the same as that displayed by the watch, it means you are close to your destination.
Note :
[- — — -] appears when the altitude differential is outside the measurement range (±3,000 m).
Setting the Measurement Interval for Auto Record Data and Climb Record Data
You can select an auto measurement interval of either five seconds or two minutes.
- Enter the Altimeter Mode.
 Navigating Between Modes
 - Hold down (E) for at least two seconds. Release the button when [ALTI] appears on the display.
This displays the altitude for your current location.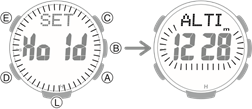
- Press (D).
This causes the auto measurement interval to appear on the display.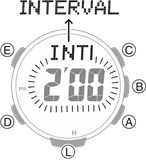
- Press (A) to toggle the auto measurement interval between [0’05] and [2’00]
[0’05]: Readings taken every second for the first three minutes, and then every five seconds for about the next one hour.
[2’00]: Readings taken every second for the first three minutes, and then every two minutes for about the next 12 hours. - Press (E) to complete the setting operation.
Note :
- While the setting is being configured, the watch will exit the setting operation automatically after about two or three minutes of non-operation.
- The watch will automatically return to the Timekeeping Mode if you do not perform any operation in the Altimeter Mode for about one hour while [0’05] is selected as the measurement interval or about 12 hours while [2’00] is selected.
Changing Displayed Information
In the Altimeter Mode, you can use the procedure below to select either the Altitude Graph Screen or Altitude Differential Screen.
- Enter the Altimeter Mode.
 Navigating Between Modes
 - Hold down (E) for at least two seconds. Release the button when [ALTI] appears on the display.
This displays the altitude for your current location.
- Press (D) twice.
After [DISP] appears on the display, the altitude graph or [DIFF] (altitude differential) flashes on the display. - Use (A) to toggle between the screens.
Each press of (A) toggles between the Altitude Graph Screen and the Altitude Differential Screen.
- Press (E) to complete the setting operation.
Note :
While the setting is being configured, the watch will exit the setting operation automatically after about two or three minutes of non-operation.
Recording Altitude Readings
Use the procedure below to record measured altitude data. There are three types of altitude data: manually recorded data, auto record data, and climb record data.
- Use the Data Recall Mode to view or delete records.
 Viewing Altitude Records
Manually Recorded Data
The date and time are also recorded along with the altitude measurement. The watch has memory for up to 30 measurement records, and records are sequentially assigned numbers from [-01-] to [-30-].
- Enter the Altimeter Mode.
 Navigating Between Modes
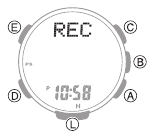
 - Hold down (A) for at least two seconds until [REC] stops flashing.
This records the current altitude, date, and time.- If you do not remove your finger and continue to press (A), climb recording will be toggled between enabled and disabled.
- If you do not remove your finger and continue to press (A), climb recording will be toggled between enabled and disabled.
Note :
Recording altitude data when there are already 30 records in memory automatically deletes the oldest record to make room for the new one.
Auto Record Data
Entering the Altimeter Mode automatically starts altitude data measurement at regular intervals. Each auto record data measurement uses one memory record. Each record includes the date (month, day) and time of the measurement, along with the altitude data (high/low altitude, cumulative ascent/descent). Auto Record and Climb Record Data Contents
- You can select the measurement interval.
 Setting the Measurement Interval for Auto Record Data and Climb Record
Note :
Auto recording ends when you exit the Altimeter Mode. Re-entering the Altimeter Mode restarts recording of cumulative values from where it was stopped when you last exited the Altimeter Mode.
Climb Record Data
Starting a climb record operation automatically records altitude data at regular intervals, even if you exit the Altimeter Mode. Each record includes the date (month, day) and time of the measurement, along with the altitude data (high/low altitude, cumulative ascent/descent). The watch has memory for up to 14 measurement data records, and records are sequentially assigned numbers from [Mt.1] to [Mt.14].
 Auto Record and Climb Record Data Contents
- Altitude is measured and recorded at regular intervals for up to 12 hours even if you exit the Altimeter Mode.
- You can select the measurement interval.
 Setting the Measurement Interval for Auto Record Data and Climb Record Data
 - Recording automatically stops when battery power goes low.
Note :
Climb record data can be recorded for up to 14 climbs. It includes high and low altitudes, and cumulative ascent and descent.
To start measurement
- Enter the Altimeter Mode.
 Navigating Between Modes
 - Hold down (A) for at least five seconds. Release the button when [Trek] and mountain climbing graphic segments appear on the display.
This starts recording of altitude data (high/ low altitude, cumulative ascent/descent).
- Mountain climbing graphic segments flash or are displayed around the periphery of the display while recording is in progress. Each segment represents 12 minutes, and one lap around the periphery represents 12 hours.
To stop measurement
- Enter the Altimeter Mode.
 Navigating Between Modes
 - Hold down (A) for at least five seconds. Release the button when [Trek] [END] appears on the display.
This stops altitude data (high/low altitude, cumulative ascent/descent) recording.
Note :
If you want to record more than 15 data records, delete old records to make room for the new data. Deleting a Particular Record
Auto Record and Climb Record Data Contents
The altitude data below is recorded by auto record and climb record operations.
High Altitude (MAX): ![]()
Low Altitude (MIN): ![]()
Cumulative Ascent (ASC):  *
*
Cumulative Descent (DSC):  *
*
* Cumulative ascent and cumulative descent values are updated whenever there is a difference of at least ±15 m (±49 feet) from one reading to the next.
Note :
- In the case of auto record data, the auto record operation ends if you exit the Altimeter Mode. Re-entering the Altimeter Mode restarts recording of cumulative values from where it was stopped when you last exited the Altimeter Mode.
- For climb record data, auto measurement continues even if you exit the Altimeter Mode.
Specifying the Altitude Measurement Unit
You can select either meters (m) or feet (ft) as the Altimeter Mode display unit.
- When Tokyo (TYO) is set as the Home City, the altitude unit is fixed as meters (m) and cannot be changed.
- Enter the Timekeeping Mode.
 Navigating Between Modes
 - Hold down (E) for at least two seconds. Release the button when the name of the currently selected Home City appears on the display.
Example: When your Home City is London
- Press (D) 12 times.
This displays [UNIT].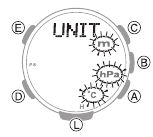
- Use (A) to select an altitude unit. [m]: Meters [ft]: Feet

- Press (E) twice to complete the setting operation.
Note :
While the setting is being configured, the watch will exit the setting operation automatically after about two or three minutes of non-operation.
Altitude Reading Precautions
Effects of Temperature
When taking altitude readings, take the steps below to keep the watch at as stable a temperature as possible. Changes in temperature can affect altitude readings.
- Take readings with the watch on your wrist.
- Take readings in an area where temperature is stable.
Altitude Readings
- Do not use this watch while skydiving, hang gliding, paragliding, gyrocopter flying, glider flying, or engaged in other activities where altitude changes suddenly.
- Altitude readings produced by this watch are not intended for special-purpose or industrial level use.
- In an aircraft, the watch measures the incabin pressurized air pressure, so readings will not match altitudes announced by the crew.
Altitude Readings (Relative Altitude)
This watch uses International Standard Atmosphere (ISA) relative altitude data defined by the International Civil Aviation Organization (ICAO). Barometric pressure generally becomes lower as altitude increases.
Correct measurement may not be possible under the conditions below.
- During unstable atmospheric conditions
- During sudden temperature changes
- After the watch has been subjected to strong impact
Barometric Pressure and Temperature Measurement
You can use the watch to take barometric pressure and temperature readings for your current location.
Measuring Barometric Pressure and Temperature
- Enter the Barometer/Temperature Mode.
 Navigating Between Modes
Entering the Barometer/Temperature Mode starts measurement, and displays the barometric pressure and temperature at your current location, and a barometric pressure graph.- After you enter the Barometer/ Temperature Mode, the watch takes readings about every five seconds for three minutes. After that, a measurement is taken about every two minutes.
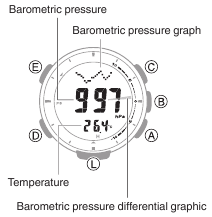
- To re-trigger measurement, press (B).
- To return to the Timekeeping Mode, press (D).
- After you enter the Barometer/ Temperature Mode, the watch takes readings about every five seconds for three minutes. After that, a measurement is taken about every two minutes.
Note :
- The watch will automatically return to the Timekeeping Mode if you do not perform any operation in the Barometer/Temperature Mode for about one hour.
- Measurement ranges are shown below. [- — -] will appear for the measured value if it is outside the allowable range.
Barometric pressure measurement:260 hPa to 1,100 hPa (7.65 inHg to 32.45 inHg)
Thermometer measurement: -10.0°C to 60.0°C (14.0°F to 140.0°F)
Checking Changes in Barometric Pressure Over Time
Your watch shows a graph of barometric pressure readings taken at two-hour intervals. You can view barometric pressure readings for the past 42 hours. The square (v) at the far right of the graph indicates the latest barometric pressure reading.
Predicting Upcoming Weather
Note :
Large changes in barometric pressure and/or temperature can cause past data readings to be plotted outside of the visible area of the graph. Though plots are not visible, the data is still maintained in watch memory.
Checking the Change Between Two Barometric Pressure Readings (Barometric Pressure Differential)
In the Barometer/Temperature Mode, the display shows the current measured value, and a graphic indicator of the differential between the automatically measured current value and the latest value measured at twohour intervals.
Example: Barometric pressure differential of -3 hPa (approximately -0.9 inHg)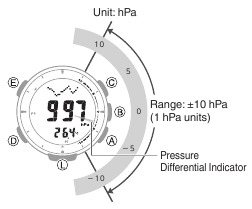
Note :
The barometric pressure differential graphic indicator will not be displayed if the barometric pressure differential exceeds ±10 hPa, or if the barometric pressure measurement value exceeds the measurement range.
Sudden Barometric Pressure Change Indications
Whenever the watch detects a significant change in air pressure readings (due to sudden ascent or descent, or to the passage of a low-pressure or high-pressure area), it will beep to let you know. An arrow will also flash on the display at this time if the watch is in the Barometer/Temperature Mode, or if it is in the Timekeeping Mode with the barometric pressure graph displayed. The arrow that appears shows the direction of the pressure change. These alerts are called «Barometric Pressure Change Indications».
- To ensure correct barometric pressure change indicator operation, enable it in a location where the altitude is constant (such as a lodge, camp area, or on the ocean).
- A change in altitude causes a change in air pressure. Because of this, correct readings are impossible. Do not take readings while ascending or descending a mountain, etc.
- Enter the Barometer/Temperature Mode.
 Navigating Between Modes
 - Hold down (B) for at least two seconds.
If Barometric Pressure Change
Indications are enabled, [INFO] [Hold] [On] flash on the display, and then [BARO] appears
- To disable Barometric Pressure Change Indication, hold down (B) again for at least two seconds.
[INFO] [Hold] [OFF] flash on the display, and then [BARO] disappears.
Note :
- If the Barometric Pressure Change Indication is enabled, readings are taken every two minutes even while the watch is not in the Barometer/ Temperature Mode.
- The Barometric Pressure Change Indication becomes disabled automatically 24 hours after it is enabled.
- Power Saving is disabled while barometric pressure trend information is enabled.
 Power Saving Function
 - You will not be able to turn on Barometric Pressure Change
Indication while the charge level of the watch’s battery is low. - Low battery power will also cause
Barometric Pressure Change
Indication to turn off.
Correcting Measured Barometric Pressure and Temperature Values (Offset)
The watch’s built-in pressure sensor and temperature sensor are adjusted at the factory and normally do not require correction. However, you can correct the displayed value if you notice major errors in readings.
- The watch will not be able to produce correct barometric pressure readings if you make a mistake during the correction procedure. Check to ensure that the values you use for calibration produces correct pressure and temperature readings.
- Before adjusting the temperature sensor, remove the watch from your wrist and leave it in the area where you plan to measure temperature for about 20 or 30 minutes to allow the case temperature to become the same as the air temperature.
- Enter the Barometer/Temperature Mode.
 Navigating Between Modes
 - Hold down (E) for at least two seconds. Release the button when [TEMP] appears on the display.
This causes the temperature reading to flash on the display.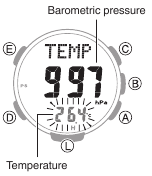
- Press (D) to select the temperature correction or barometric pressure correction screen.
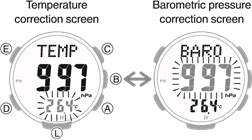
- Use (A) and (C) to change the value.
Temperature Setting Unit: 0.1°C (or 0.2°F)
Barometric Pressure Setting Unit: 1 hPa (or 0.05 inHg)- Holding down (A) or (C) scrolls through settings at high speed.
- To return the barometric pressure setting to its initial factory default, press (A) and (C) at the same time.
- Press (E) to complete the setting operation.
Note :
While the setting is being configured, the watch will exit the setting operation automatically after about two or three minutes of non-operation.
Specifying the Barometric Pressure Unit
You can specify either hectopascals (hPa) or inches of mercury (inHg) as the display unit for barometric pressure values.
- When Tokyo (TYO) is the Home City, the barometric pressure unit is fixed as hectopascals (hPa) and cannot be changed.
- Enter the Timekeeping Mode.
 Navigating Between Modes
 - Hold down (E) for at least two seconds. Release the button when the name of the currently selected Home City appears on the display.
Example: When your Home City is London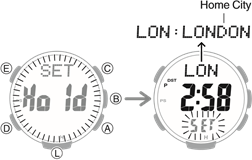
- Press (D) 12 times.
This displays [UNIT].
- Use (B) to select a barometric pressure unit.
[hPa]: Hectopascals
[inHg]: Inches of mercury
- Press (E) twice to complete the setting operation.
Note :
While the setting is being configured, the watch will exit the setting operation automatically after about two or three minutes of non-operation.
Specifying the Temperature Measurement Unit
You can select either Celsius (°C) or Fahrenheit (°F) as the temperature display unit.
- When Tokyo (TYO) is the Home City, the temperature unit is fixed as Celsius (°C) and cannot be changed.
- Enter the Timekeeping Mode.
 Navigating Between Modes
 - Hold down (E) for at least two seconds. Release the button when the name of the currently selected Home City appears on the display.
Example: When your Home City is London
- Press (D) 12 times.
This displays [UNIT].
- Use (C) to select a temperature unit.
[°C]: Celsius
[°F]: Fahrenheit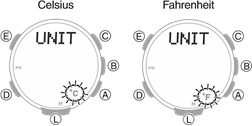
- Press (E) twice to complete the setting operation.
Note :
While the setting is being configured, the watch will exit the setting operation automatically after about two or three minutes of non-operation.
Barometric Pressure and Temperature Reading Precautions
Barometric Pressure Reading Precautions
- The barometric pressure graph produced by this watch can be used to obtain an idea of upcoming weather conditions. However, this watch should not be used in place of precision instruments required for official weather prediction and reporting.
- Pressure sensor readings can be affected by sudden changes in temperature. Because of this, there may be some error in the readings produced by the watch.
Temperature Reading Precautions
- Body temperature, direct sunlight, and humidity all have an effect on temperature readings. To help ensure more accurate temperature readings, remove the watch from your wrist, wipe it dry of any moisture, and place it in a well-ventilated location not exposed to direct sunlight. You should be able to take temperature readings after about 20 to 30 minutes.
Viewing Altitude Records
You can use the Data Recall Mode to view manually recorded, auto recorded, and climb record altitude measurement data. l Recording Altitude Readings
Viewing Recorded Data
- Enter the Data Recall Mode.
 Navigating Between Modes
This displays a record of data recorded in the Altimeter Mode. - Press (B) to select manually recorded data, auto record data, or climb record data.

* Each press of (B) scrolls through climb data records from record 1 ([Mt.1]) up to a maximum of record 14 ([Mt.14]). - Use (A) and (C) to display the data you want to view.
- Holding down (A) or (C) scrolls through settings at high speed.
Manually Recorded Data ([-01-] to [-30-])
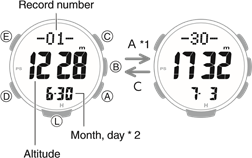
*1 Each press of the button scrolls through manually recorded data records from record 1 ([-01-]) up to a maximum of record 30 ([-30-]).
*2 The date (month, day) and time alternate on the display at one-second intervals.
Auto Record Data

*1 The recording date (month, day) and time alternate on the display at one-second intervals.
*2 The date (month, day) and year when accumulation started alternate on the display at one-second intervals.
Climb Record Data ([Mt.1] to [Mt.14])

*1 The recording date (month, day) and time alternate on the display at one-second intervals.
*2 The date (month, day) and year when accumulation started alternate on the display at one-second intervals.
Note :
- If there is no data left in memory due to a data delete operation, error, or some other reason, [- — — -] or [0] will appear on the display.
- If the cumulative ascent (ASC) or cumulative descent (DSC) value exceeds 99,999 m (327,995 feet), it will revert to 0 and continue from there.
- If you do not perform any operation for about two or three minutes while in the Data Recall Mode, the watch automatically returns to the Timekeeping Mode.
Deleting Data
Note :
Data cannot be deleted while a climb record data measurement operation is in progress.
Deleting a Particular Record
- Enter the Data Recall Mode.
 Navigating Between Modes
 - Use (B) to select the data you want to delete.
- If you selected manually recorded data, use (A) and (C) to select the data you want to delete.
- Hold down the (E) button for at least two seconds. Release the button as soon as [Clear] stops flashing.
This deletes the record you selected.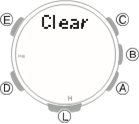
Note that holding down (E) for at least five seconds while manually recorded data is selected will delete all manually recorded data.
Deleting All Manually Recorded Data
- Enter the Data Recall Mode
 Navigating Between Modes
 - Use (B) to select manually recorded data.
- Hold down (E) for at least five seconds. Release the button when [Clear] [ALL] stops flashing.
This deletes all manually recorded data.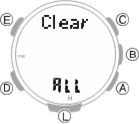
Sunrise and Sunset Times
You can use the procedures in this section to check the sunrise and sunset times for a specified date (year, month, day) and location.
Looking Up Today’s Sunrise and Sunset Times
- Enter the Sunrise/Sunset Mode. l Navigating Between Modes
 Navigating Between Modes
This displays the current date’s sunrise and sunset times for your Home City.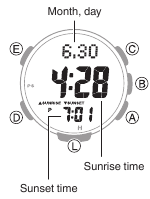
Looking Up Sunrise and Sunset Times by Specifying a Day
- Enter the Sunrise/Sunset Mode.
 Navigating Between Modes
 - Use (A) and (C) to select the day you want.
This displays the sunrise and sunset times for the day you specified.- Holding down (A) or (C) scrolls through settings at high speed.

- Holding down (A) or (C) scrolls through settings at high speed.
Looking Up Sunrise and Sunset Times by Specifying a Location
- Enter the Timekeeping Mode.
 Navigating Between Modes
 - Hold down (E) for at least two seconds. Release the button when the name of the currently selected Home City appears on the display.
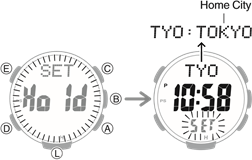
- Use (A) and (C) to select the city name of the location whose sunrise/sunset times you want to look up.
- Holding down (A) or (C) scrolls through settings at high speed.
- If you don’t need to specify a latitude and longitude, press (E) twice and advance to step 8.
- Press (E).
This displays the latitude or longitude setting screen. - Press (D) to toggle between the latitude and longitude setting screens.
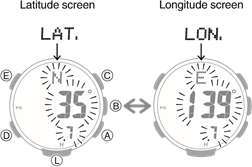
- Use (A) and (C) to specify an angle
Setting ranges are shown below.
Latitude: 65.0°S (65.0 degrees south latitude) to 0.0°N to 65.0°N (65.0 degrees north latitude)
Longitude: 179.9°W (179.9 degrees west longitude) to 0.0°E to 180.0°E (180.0 degrees east longitude)- You can change the setting in 0.1° increments.
- Holding down (A) or (C) scrolls through settings at high speed.
- Press (E) to return to the Timekeeping Mode.
- Press (D).
This displays the sunrise/sunset times for the location you specified.
Note :
While the setting is being configured, the watch will exit the setting operation automatically after about two or three minutes of non-operation.
Stopwatch
The stopwatch performs elapsed time measurement up to 999 hours, 59 minutes, 59.9 seconds in 1/10 second units.
It can also measure split times.
Measuring Elapsed Time
- Enter the Stopwatch Mode.
 Navigating Between Modes
 - Use the operations below to measure elapsed time.
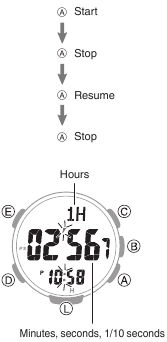
- Press (C) to reset the stopwatch to all zeros.
Measuring a Split Time
- Enter the Stopwatch Mode.
 Navigating Between Modes
 - Use the operations below to measure elapsed time.
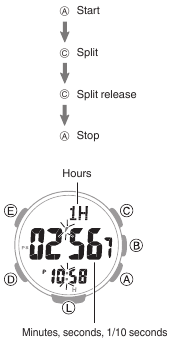
- Press (C) to reset the stopwatch to all zeros.
Timing the First and Second Place Finishers
- Enter the Stopwatch Mode.
 Navigating Between Modes
 - Use the operations below to measure elapsed time.

* Displays the time of the first finisher.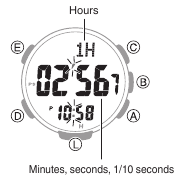
- Press (C) to display the time of the second place finisher.
- Press (C) to reset the stopwatch to all zeros.
Timer
The timer counts down from a start time specified by you. A beeper sounds when the end of the countdown is reached.
- The beeper will not sound if battery power is low.
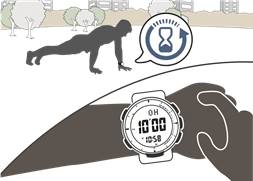
Setting a Start Time
The countdown start time can be set in 1minute units up to 24 hours.
- Enter the Timer Mode.
 Navigating Between Modes
 - Hold down (E) for at least two seconds. Release the button when the hour setting starts to flash.
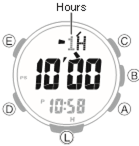
- Use (A) and (C) to change the timer hours setting.
- Holding down (A) or (C) scrolls through settings at high speed.
- Press (D).
This causes the minutes digits to flash.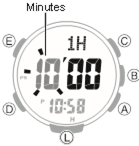
- Use (A) and (C) to change the minutes setting.
- Press (E) to complete the setting operation.
Note :
- While the setting is being configured, the watch will exit the setting operation automatically after about two or three minutes of non-operation.
- Setting a start time of «0H00’00» will perform a countdown of 24 hours.
Using the Timer
- Enter the Timer Mode.
 Navigating Between Modes
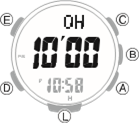
- Use the operations below to perform a timer operation.
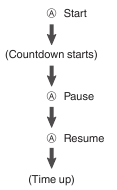
- A beeper will sound for 10 seconds to let you know when the end of a countdown is reached.
- You can reset a paused countdown to its start time, by pressing (C).
- Press any button to stop the tone.
Other Settings
This section explains other watch settings you can configure.
Enabling the Button Operation Tone
Use the procedure below to enable or disable the tone that sounds when you press a button.
- Enter the Timekeeping Mode.
 Navigating Between Modes
 - Hold down (E) for at least two seconds. Release the button when the name of the currently selected Home City appears on the display.

- Press (D) nine times.
This causes [key ] or [MUTE] to flash on the display.
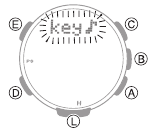
- Press (A) to select [key
 ] or [MUTE].
[key ]: Operation tone enabled.
[MUTE]: Operation tone disabled.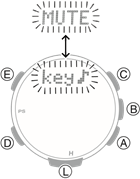
- Press (E) twice to complete the setting operation.
● [ ] is displayed while the operation tone is muted.
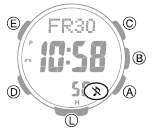
Note :
- While the setting is being configured, the watch will exit the setting operation automatically after about two or three minutes of non-operation.
- Note that alarm and timer tones will still sound even while the operation tone is muted.
Configuring Power Saving Function Settings
- Enter the Timekeeping Mode.
 Navigating Between Modes
 - Hold down (E) for at least two seconds. Release the button when the name of the currently selected Home City appears on the display.

- Press (D) 11 times.
This displays [POWER SAVING].
- Press (A) to toggle between on and off.
[On]: Power Saving enabled.
[OFF]: Power Saving disabled. - Press (E) twice to complete the setting operation.
Note :
- While the setting is being configured, the watch will exit the setting operation automatically after about two or three minutes of non-operation.
- For details about Power Saving, refer to the information below.
 Power Saving Function
Other Information
This section provides non-operational information you also need to know. Refer to this information as required.
City Table


- The information in the above table is current as of January 2022.
- Time zones may change and UTC differentials may become different from those shown in the table above.
Specifications
Accuracy: ±15 seconds a month
Basic Functions:
Hour, minute, second, month, day, day of the week
Barometric pressure graph a.m./p.m.(P)/24-hour timekeeping
Full Auto Calendar (2000 to 2099)
Digital Compass:
Measurement range: 0° to 359°
Measurement unit: 1°
Continuous Bearing Measurement (1 minute)
Compass calibration (2-point calibration, magnetic declination angle)
North, south, east, west indication (fourdirection graphic pointer)
Bearing memory
Altimeter (relative altitude):
Measuring range: -700 to 10,000 m (or -2,300 to 32,800 ft.)
Display range: -10,000 m to 10,000 m (or -32,800 to 32,800 ft.) (Altitude calibration can be used to display any 10,700 m within the range above.) Measuring unit: 1 m (or 5 ft.)
Measuring interval: 2 minutes/5 seconds
Altitude calibration
Altitude graph
Altitude differential measurement: -3,000 to +3,000m (or -9,840 to 9,840 ft.)
Reference altitude setting
Altitude Memory
Manually Recorded Data
Recording of altitude, date (month, day), and time by button operation. Up to 30 records.
Auto Record Data
One record of high altitude, low altitude, cumulative ascent, cumulative descent
Climb Record Data
Up to 14 records of high altitude, low altitude, cumulative ascent, cumulative descent
Barometer:
Measurement range: 260 to 1,100 hPa (or 7.65 to 32.45 inHg)
Display range: 260 to 1,100 hPa (or 7.65 to 32.45 inHg)
Measurement unit: 1 hPa (or 0.05 inHg)
Barometric pressure adjustment
Barometric pressure graph
Barometric pressure differential graphic
Barometric pressure change indications
Temperature:
Measuring range: -10.0°C to 60.0°C (or 14.0°F to 140.0°F)
Display range: -10.0°C to 60.0°C (or 14.0°F to 140.0°F)
Measuring unit: 0.1°C (or 0.2°F)
Temperature Correction
Sensor Accuracy:
Direction
Measurement accuracy: Within ±10° Accuracy guaranteed temperature range: 10°C to 40°C (50°F to 104°F) Bearing graph within ±2 gradations
Pressure
Measurement accuracy: Within ±3 hPa (0.1 inHg)
(Altimeter measurement accuracy: Within ±75 m (246 ft.))
Guaranteed accuracy temperature range: -10°C to 40°C (14°F to 104°F)
- Strong impact or prolonged exposure to temperature extremes may negatively affect accuracy.
Temperature
Measurement accuracy: Within ±2°C (3.6°F)
Accuracy guaranteed temperature range: -10°C to 60°C (14°F to 140°F)
Sunrise/Sunset Functions:
Sunrise and sunset times
Day select
Stopwatch:
Measuring unit: 1/10 seconds
Measuring range 999 hours, 59 minutes, 59.9 seconds (1000 hours)
Measurement Functions
Elapsed time, cumulative time, split times, 1st and 2nd place finisher times
Timer:
Setting unit: 1 minute
Countdown range: 24 hours
Countdown unit: 1 second
Time up alert duration: 10 seconds
Alarm:
Time alarms
Alarms: 5 (with one snooze alarm)
Setting units: Hours, minutes
Alarm tone duration: 10 seconds Hourly time signal: Beep every hour on the hour
World Time:
48 cities (31 time zones) and Coordinated
Universal Time (UTC) Summer time
Other:
High-brightness LED light (Full Auto Light, afterglow, 1.5 or 3-second illumination duration setting), power saving, battery power indicator, operation tone on/off
Power Supply:
Solar panel and one rechargeable battery
Battery operating time: Approximately 7 months
Conditions:
Illumination: 1.5 seconds/day
Beeper: 10 seconds/day Digital Compass Operations: 20 times/ month
Mountain climbing: Once/month (Altitude readings: Approximately 1 hour; Barometric pressure change indication measurements:
Approximately 24 hours)
Barometric Pressure Graph: Measurement every 2 hours
Display: 18 hours/day
Specifications are subject to change without notice.
Troubleshooting
Altitude Measurement
| Q1 | Readings produce different results at the same location. Watch readings are different from altitude information available from other sources. Correct altitude readings are not possible. |
Relative altitude is calculated based on changes in barometric pressure measured by the watch’s pressure sensor. This means that barometric pressure changes can cause readings taken at the same location to be different. Also note that the value displayed by the watch may be different from the actual elevation and/or sea level elevation indicated for the area where you are located. When using the watch’s altimeter while mountain climbing, it is recommended that you regularly calibrate its readings in accordance with local altitude (elevation) indications. l Calibrating Altitude Readings (Offset)
| Q2 | [ERR] appears during measurement. |
There may be a problem with the sensor. Try taking another measurement.
If [ERR] keeps appearing after multiple measurement attempts, contact a CASIO service center or your original retailer.
Digital Compass
| Q1 | The entire display is flashing. |
Abnormal magnetism has been detected. Move away from any potential source of strong magnetism and try taking a reading again. Digital Compass Reading Precautions
- If the display flashes again, it could mean that the watch itself has become magnetized. Move away from any potential source of strong magnetism, perform 2point calibration, and then try taking a reading again.
 Calibrating Compass Readings
| Q2 | [ERR] appears during measurement. |
There is a problem with the sensor or there may be a source strong magnetic force nearby. Move away from any potential source of strong magnetism and try taking a reading again. If [ERR] keeps appearing after multiple measurement attempts, contact a CASIO service center or your original retailer. Digital Compass Reading Precautions
| Q3 | [ERR] appears following 2-point calibration. |
[ERR] on the display could indicate a sensor problem.
- If [ERR] disappears after about one second, try performing 2-point calibration again.
- If [ERR] keeps appearing after multiple attempts, contact a CASIO service center or your original retailer.
| Q4 | Direction information indicated by the watch is different from that indicated by a backup compass. |
Move away from any potential source of strong magnetism, perform 2-point calibration, and then try taking a reading again. Calibrating Compass Readings
 Digital Compass Reading Precautions
| Q5 | Readings at the same location produce different results. Cannot take readings indoors. |
Move away from any potential source of strong magnetism and try taking a reading again. Digital Compass Reading Precautions
Barometric Pressure Measurement
| Q1 | The barometric pressure differential graphic is not displayed after barometric pressure measurement. |
The barometric pressure differential graphic is not displayed if the barometric pressure measurement value exceeds the allowable measurement range (260hPa to 1,100hPa) or if the barometric pressure differential exceeds ±10hPa. If [ERR] is displayed, there may be a problem with the sensor. Checking the Change Between Two Barometric Pressure Readings (Barometric Pressure Differential)
| Q2 | [ERR] appears during measurement. |
There may be a problem with the sensor. Try taking another measurement. If [ERR] keeps appearing after multiple measurement attempts, contact a CASIO service center or your original retailer.
Temperature Measurement
| Q1 | [ERR] appears during measurement. |
There may be a problem with the sensor. Try taking another measurement. If [ERR] keeps appearing after multiple measurement attempts, contact a CASIO service center or your original retailer.
World Time
| Q1 | The time for a World Time City is not correct. |
The summer time setting (standard time/ summer time) may be wrong. Specifying a World Time City
Alarm and Hourly Time Signal
| Q1 | An alarm does not sound. |
- Is the watch’s battery charged?
- → Keep the watch exposed to light until it recharges sufficiently.
 Charging
- → Keep the watch exposed to light until it recharges sufficiently.
- Other than the above.
- → The alarm’s settings may not be configured. Configure the alarm settings.
 Configuring Alarm Settings
- → The alarm’s settings may not be configured. Configure the alarm settings.
| Q2 | The hourly time signal does not sound. |
- Is the watch’s battery charged?
- → Keep the watch exposed to light until it recharges sufficiently.
 Charging
- → Keep the watch exposed to light until it recharges sufficiently.
- Other than the above.
- → The hourly time signal may be disabled. Enable the hourly time signal.
 Configuring the Hourly Time Signal Setting
- → The hourly time signal may be disabled. Enable the hourly time signal.
Charging
| Q1 | The watch does not work even though it is exposed to light. |
The watch stops operating whenever the battery goes dead. Keep the watch exposed to light until it recharges sufficiently. Checking the Charge Level
| Q2 | [H], [M], and [L] are flashing on the display. |
The watch is in the charge recovery mode.
Wait until the recovery process is complete (about 15 minutes). The watch will recover more quickly if you place it in a brightly lit location.
| Q3 | [CHG] is flashing on the display. |
The charge level of the watch is extremely low. Immediately expose the watch to light to charge it.  Checking the Charge Level
Other
| Q1 | I can’t find the information I need here. |
Visit the website below:
https://world.casio.com/support/

Documents / Resources
References
 Support | CASIO
Download manual
Here you can download full pdf version of manual, it may contain additional safety instructions, warranty information, FCC rules, etc.
Download CASIO PRO TREK PRG-340 Manual

A button
Pressing this button in the Timekeeping Mode enters the Altimeter Mode.
B button
Pressing this button in the Timekeeping Mode enters the Barometer/Temperature Mode.
C button
Pressing this button in the Timekeeping Mode enters the Compass Mode.
D button
Each press cycles between watch modes.
In any mode, hold down this button for at least two seconds to return to the Timekeeping Mode.
E button
Pressing this button in the Timekeeping Mode cycles between displays.
L button
Press to turn on illumination.
Indicators

- Displayed while the watch is indicating summer time.
- Displayed during p.m. times while 12-hour timekeeping is being used.
- Displayed while Power Saving is enabled.
- Displayed when the watch is in the Sunrise/Sunset Mode.
- Displayed while Auto Light is enabled.
- Shows the current charge level.
- Appears when the hourly time signal is on.
- Shows the temperature unit being used.
- Displayed while the button operation tone is disabled.
- Displayed while the snooze alarm is turned on.
- Displayed while barometric pressure change indication is enabled.
- Shows the altitude unit being used.
- Shows the barometric pressure measurement unit.
- Displayed when an alarm is turned on.
- Graphic display of the altitude/barometric pressure differential.
Navigating Between Modes
Your watch has the modes shown below.
- To return to the Timekeeping Mode from any other mode, hold down (D) for at least two seconds.

Use the buttons in the illustration above to navigate between modes.
Mode Overview
Timekeeping Mode
In this mode, the digital display shows the current date and time.
You can also display the items below in the upper display area by pressing (E).
- Month, day
- Barometric pressure graph
Day of the week, date
Altimeter Mode
Use this mode to take an altitude reading for your current location. Altitude Measurement

- Altitude graph/altitude differential
- Altitude
- Current time
Compass Mode
Use this mode to take direction and bearing angle readings. Digital Compass

- Bearing at 12 o’clock
- Graphic pointer indicating north
- Bearing angle at 12 o’clock
Barometer/Temperature Mode
Use this mode to take barometric pressure and temperature readings for your current location. Barometric Pressure and Temperature Measurement

- Barometric pressure graph
- Barometric pressure
- Temperature
- Barometric pressure differential graphic
Data Recall Mode
Use this mode to view altitude records Viewing Altitude Records

- Record number
- Altitude
- Recording date
Stopwatch Mode
Use this mode to measure elapsed time. Stopwatch

- Stopwatch hours
- Stopwatch minutes
- Stopwatch seconds
- Stopwatch 1/10 second
Timer Mode
Use this mode to countdown from a desired start time. Timer
Timer

- Timer hours
- Timer minutes
- Timer seconds
Alarm Mode
The watch will beep when an alarm time is reached. Alarm and Hourly Time Signal

- Alarm or hourly time signal status (on/off)
- Alarm number
- Alarm hour
- Alarm minute
World Time Mode
You can view the current time in 48 cities (31 time zones), and UTC (Coordinated Universal Time) time. World Time

- City Codes (World Time Codes)
- World Time City current time
- Home City time
Charging
This watch runs on power supplied from a rechargeable (secondary) battery that is charged by a solar panel. The solar panel is integrated into the face of the watch, and power is generated whenever the face is exposed to light.
Charging the Watch
When you are not wearing the watch, put it in a location where it is exposed to bright light.
While you are wearing the watch, make sure that its face (solar panel) is not blocked from light by the sleeve of your clothing. Power generation efficiency is reduced even when the face of the watch is blocked only partially.
- Some light sources and environments can cause the watch to become extremely hot during charging, which creates the risk of burn injury and damage to internal watch components.
Avoid charging the watch under conditions like the ones described below, where the temperatures may exceed 60°C (140°F).- On the dashboard of a vehicle parked in the sun
- Near incandescent lamps, camera lights, halogen lamps, or other sources of heat
- In locations exposed to direct sunlight for long periods and other hot locations
- The display panel may become black (or white, depending on the LCD type) under very high temperatures. This is temporary, and the display will return to normal at lower temperatures.
Checking the Charge Level
A display indicator shows the watch’s current charge level.
Charge Level 1: Good
All functions enabled.
Charge Level 2: Good
All functions enabled.
Charge Level 3: Low
[L] and [LOW] flash on the display and the functions below become disabled.
- Compass, altitude, barometric pressure/ temperature measurements
- Face illumination
- Sounds (alarm, etc.)

Charge Level 4: Low
When the battery charge drops lower than Level 3, [CHG] starts to flash on the display and all functions become disabled.
Charge Level 5: Dead
The digital display will go blank if the battery goes dead. Memory data is lost, and watch settings are returned to their initial factory defaults.
- Should the battery go low or go dead, expose the face (solar panel) to light as soon as possible.
Note :
When [H], [M], and [L] are all flashing on the display, it means that all functions are disabled due to momentary battery power consumption. [H], [M], and [L] are flashing on the display.
Charging Time Guidelines
The table below shows guidelines for approximate charging times.
Charging Times Required for 1 Day of Operation
| Light Level (Lux) | Approximate Charging Time |
| 50,000 | 5 minutes |
| 10,000 | 24 minutes |
| 5,000 | 48 minutes |
| 500 | 8 hours |
Times Required to Achieve Next Charge Level
- Sunny day, outdoors (50,000 lux)
| Dead battery → Medium charge | 2 hours |
| Medium charge → High charge | 15 hours |
| High charge → Full charge | 4 hours |
- Sunny day, near a window (10,000 lux)
| Dead battery → Medium charge | 6 hours |
| Medium charge → High charge | 73 hours |
| High charge → Full charge | 20 hours |
- Overcast day, near a window (5,000 lux)
| Dead battery → Medium charge | 11 hours |
| Medium charge → High charge | 148 hours |
| High charge → Full charge | 40 hours |
- Indoor fluorescent lighting (500 lux)
| Dead battery → Medium charge | 147 hours |
| Medium charge → High charge | — |
| High charge → Full charge | — |
Note :
Actual charging time depends on the local charging environment.
Power Saving Function
Leaving the watch in a dark location for about one hour between the hours of 10 p.m. and 6 a.m. will cause the display to go blank, and the watch to enter Level 1 power saving. If the watch is left in this condition for six or seven days, the watch will enter Level 2 power saving.
Power Saving Level 1:
Digital display goes blank to save power.
Power Saving Level 2:
Digital display goes blank to save power. All functions are disabled.
Recovering from Power Saving Operation
Use one of the operations below to exit power saving.
- Press any button.
- Move the watch to a bright location.
- Trigger auto light by angling the watch towards your face.
Note:
- The watch will not enter power saving in the cases below.
- While in the Stopwatch Mode
- While in the Timer Mode
- While the barometric pressure change indicator is displayed
- You can enable or disable Power Saving.
 Configuring Power Saving Function Settings
 - Note that the watch also may enter power saving if its face is blocked from light by your sleeve while you are wearing it.
Viewing the Face in the Dark
The face of the watch can be illuminated for viewing in the dark.
To illuminate the face manually
Pressing (L) turns on illumination.
- Illumination will turn off automatically if an alarm starts to sound.
- Illumination may not turn on while a sensor is taking a reading.

To illuminate the face when Auto Light is enabled
If Auto Light is enabled, face illumination will turn on automatically whenever the watch is positioned at an angle of 40 degrees or more.
Note :
- Auto Light is disabled when any one of the conditions below exists.
- Alarm, timer alert, or other beeper sounding
- Watch in the Compass Mode
- While sunrise/sunset times are being calculated
Configuring the Auto Light Setting
- Enter the Timekeeping Mode.
 Navigating Between Modes
 - Hold down (L) for at least three seconds to toggle Auto Light between enabled and disabled.
- [LT] is displayed while Auto Light is enabled.

- [LT] is displayed while Auto Light is enabled.
Note :
Auto Light is disabled while [CHG] is shown on the display.
Specifying the Illumination Duration
You can select either 1.5 seconds or three seconds as the illumination duration.
- Enter the Timekeeping Mode.
 Navigating Between Modes
 - Hold down (E) for at least two seconds. Release the button when the name of the currently selected Home City appears on the display.

- Press (D) 10 times.
[LIGHT] appears on the display with [1] or [3] flashing. - Press (A) to select an illumination duration.
[1]: 1.5-second illumination
[3]: 3-second illumination
- Press (E) twice to complete the setting operation.
Time Adjustment
Use the procedures in this section to adjust the date and time settings.
Adjusting the Current Time Setting
Use the procedures below to adjust the current date and time settings, and to select a Home City.
Setting a Home City
Use the procedure in this section to select a city to use as your Home City. If you are in an area that observes summer time, you can also enable or disable summer time.
- Enter the Timekeeping Mode.
 Navigating Between Modes
 - Hold down (E) for at least two seconds. Release the button when the name of the currently selected Home City appears on the display.

- Use (A) and (C) to change the Home City setting.
- Holding down (A) or (C) scrolls through settings at high speed.
- For details refer to the information below.
 City Table
- Press (D).
- Use (A) to change the summer time setting.
- [OFF]
The watch always indicates standard time. - [ON]
The watch always indicates summer time.
- Press (E) twice to complete the setting operation.
Note :
While the setting is being configured, the watch will exit the setting operation automatically after about two or three minutes of non-operation.
Setting the Time/Date
Use the procedure below to change the time and date settings.
- Enter the Timekeeping Mode.
 Navigating Between Modes
 - Hold down (E) for at least two seconds. Release the button when the name of the currently selected Home City appears on the display.

- Use (D) to display the setting you want to change.
- Each press of (D) cycles through settings in the sequence shown below.

- Configure the date and time settings.
- While the seconds are flashing, pressing (A) will reset them to 00. 1 is added to the minutes when the current seconds count is between 30 and 59 seconds.
- For all the other settings, use (A) and (C) to change the flashing setting. Holding down (A) or (C) scrolls through settings at high speed.
- Repeat steps 3 and 4 to select time and date settings.
- Press (E) twice to complete the setting operation.
Note :
While the setting is being configured, the watch will exit the setting operation automatically after about two or three minutes of non-operation.
Switching between 12-hour and 24hour Timekeeping
You can specify either 12-hour format or 24hour format for the time display.
- Enter the Timekeeping Mode.
 Navigating Between Modes
 - Hold down (E) for at least two seconds. Release the button when the name of the currently selected Home City appears on the display.

- Press (D) twice.
This causes [12H] or [24H] to flash on the display.
- Press (A) to select [12H] (12-hour timekeeping) or [24H] (24-hour timekeeping).

- Press (E) twice to complete the setting operation.
Note :
While the setting is being configured, the watch will exit the setting operation automatically after about two or three minutes of non-operation.
World Time
You can view the current time in 48 cities (31 time zones), and UTC (Coordinated Universal Time) time.
Checking World Time
- Enter the World Time Mode.
 Navigating Between Modes
This displays [WT]. After one second, the city code and name of your currently selected World Time City appears.
Specifying a World Time City
Use the procedure in this section to select a World Time city. If you are in an area that observes summer time, you can also enable or disable summer time.
- Enter the World Time Mode.
 Navigating Between Modes
 - Use (A) and (C) to display the city you want to specify as a World Time City.
- Holding down (A) or (C) scrolls through settings at high speed.

- Holding down (A) or (C) scrolls through settings at high speed.
- To change the summer time setting, hold down (E) for about two seconds.
This causes [DST] [Hold] [On] or [DST] [Hold] [OFF] to flash on the display. After that, the setting is changed.- [DST] [Hold] [On] flashing on the display indicates summer time.
- [DST] [Hold] [OFF] flashing on the display indicates standard time.
- [DST] is displayed while summer time is selected.

Note :
- While [UTC] is selected as the city, you will not be able to change or check the summer time setting.
- The summer time setting you configure is applied to the currently selected city only. It does not affect other cities.
Alarm and Hourly Time Signal
The watch will beep when the alarm time is reached. You can configure up to four standard daily alarms, and one daily alarm with snooze. The hourly time signal causes the watch to beep every hour on the hour.
- Snooze causes the alarm to sound up to seven times, at five-minute intervals.
- The alarm sound is muted in the cases described below.
Configuring Alarm Settings
- Enter the Alarm Mode.
 Navigating Between Modes
 - Use (A) and (C) to select the alarm ([AL-1] to [AL-4], or [SNZ]) whose setting you want to change.

- Hold down (E) for at least two seconds. Release the button when the hour setting starts to flash.
- Use (A) and (C) to change the hour setting.
- Holding down (A) or (C) scrolls through settings at high speed.
- If you are using 12-hour timekeeping, [P] indicates p.m.

- Press (D).
This causes the minutes digits to flash.
- Use (A) and (C) to set the minute setting.
- Press (E) to complete the setting operation.
Note :
If you do not perform any operation for about three minutes while in the Alarm mode, the watch automatically returns to the Timekeeping Mode.
To stop the alarm
To stop the alarm after it starts to sound when an alarm time is reached, press any button.
Snooze causes the alarm to sound up to seven times, at five-minute intervals. To cancel a snooze alarm, turn [SNZ] off. Turning Off an Alarm or the Hourly Time Signal
Note :
A beeper sounds for 10 seconds when an alarm time is reached.
Configuring the Hourly Time Signal Setting
- Enter the Alarm Mode.
 Navigating Between Modes
 - Press (A) or (C) to display the hourly time signal screen ([SIG]).

- Press (B) to toggle the hourly time signal between enabled and disabled.
Turning Off an Alarm or the Hourly Time Signal
To stop an alarm or the hourly time signal from sounding, perform the steps below to turn it off.
- To have an alarm or hourly time signal sound again, turn it back on.
Note :
- Indicators are displayed while any of the alarms or the hourly time signal is turned on.
- The applicable indicators are not displayed while all of the alarms are turned off and/or the hourly time signal is turned off.

- Enter the Alarm Mode.
 Navigating Between Modes
 - Use (A) and (C) to scroll through the alarm ([AL-1] to [AL-4], [SNZ]) and hourly time signal (
 ) screens until the one you want to turn off is displayed.
- Press (B) to turn off the displayed alarm or the hourly time signal.
Note :
If ![]() (alarm) is still displayed after you turn off an alarm, it means that at least one of the other alarms is still turned on. To turn off all of the alarms, repeat steps 2 and 3 until the
(alarm) is still displayed after you turn off an alarm, it means that at least one of the other alarms is still turned on. To turn off all of the alarms, repeat steps 2 and 3 until the ![]() (alarm) indicator is no longer displayed.
(alarm) indicator is no longer displayed.
Digital Compass
You can use the Compass Mode to determine the direction of north, and to check your bearing to a destination.
Taking a Compass Reading
- Enter the Compass Mode.
 Navigating Between Modes
- Entering the Compass Mode starts compass readings.
- Keeping the watch horizontal, point 12 o’clock in the direction of your desired objective.
The digital display shows one of 16 literal direction indications and the bearing angle.- To retrigger the compass operation, press (C).
Interpreting Bearing Readings
Directions: N (North), E (East), W (West), S (South)

- The graphic direction pointer indicates north, south, east, and west. The graphic direction pointer indicating north consists of three lines.

Note :
- Normally the Compass Mode indicates magnetic north. You can also configure settings to indicate true north.
 Setting Up for True North Readings (Magnetic Declination Calibration)
 Magnetic North and True North
 - After the initial reading is displayed, the watch will continue to take readings approximately every second for approximately the next 60 seconds. After measurement is complete, the graphic direction pointer disappears from the display, and [- — -] is shown for the bearing to your objective and its bearing angle.

- If four directions (north, south, east, west) and your target bearing are not displayed on the screen when you press (C), the bearing recorded in the bearing memory may be displayed instead of four directions. Press (E) to clear the recording bearing.
 Saving a Bearing to an Objective (Bearing Memory)
 - Auto Light will not illuminate the face while a compass operation is in progress.
- If an alarm or other beeper sounds, or if you turn on illumination by pressing (L) while a compass operation is in progress, the compass operation will be suspended momentarily. The compass operation will resume when the beeper stops or illumination turns off.
- If you do not perform any operation for about two or three minutes while in the Compass Mode, the watch automatically returns to the Timekeeping Mode.
Aligning a Map with Actual Surroundings (Setting a Map)
Setting a map means to align the map so the directions indicated on it are aligned with the actual directions of your location. Once you set a map, you can more easily get a grasp of the relationship between map markings and actual geographic contours. To set a map with this watch, align north on the map with the north indication of the watch. Once you set the map, you can compare your bearing on the map with your surroundings, which will help you determine your current location and destination.
Note that map reading skills and experience are required to determine your current location and destination on a map.
Saving a Bearing to an Objective (Bearing Memory)
You can use record the bearing to a destination. Displaying the recorded bearing makes it possible to progress towards your target destination when the visibility is poor.
- Enter the Compass Mode.
 Navigating Between Modes
 - Keeping the watch horizontal, point 12 o’clock in the direction of the objective your want to record.
- Press (E).
The direction of the 12 o’clock position of the watch is recorded as the target direction and indicated by the graphic direction pointer.
- To clear a recorded bearing, press (E).
Calibrating Compass Readings
Perform 2-point calibration whenever you notice the watch’s compass readings are different from those of another compass, or before setting out on a climb or trek.
- Note that accurate compass readings and/or calibration will not be possible in an area where strong magnetism is present.
 Digital Compass Reading Precautions
2-Point Calibration
- Enter the Compass Mode.
 Navigating Between Modes
 - Hold down (E) for at least two seconds until the three-line graphic direction pointer flashes at 12 o’clock. Release the button when [CALIBRATION] [-1-] appears on the display.

- While keeping the watch horizontal, press (C).
This starts calibration of the first point, which causes [- — -] to appear on the display. [Turn 180°] appears on the display when calibration is successful, and the three-line graphic direction pointer flashes at 6 o’clock. One second later, [CALIBRATION] [-2-] appears on the display.
- Rotate the watch 180 degrees, taking care to be as exact as possible.

- Press (C).
- This starts calibration of the second point, which causes [- — -] to appear on the display.
- When calibration is successful, [OK] appears on the display and the watch returns to the Digital Compass screen.
Note :
[ERR] [-1-] appears if calibration fails for some reason. If this happens, restart the above procedure from step 3.
Setting Up for True North Readings (Magnetic Declination Calibration)
If you want the watch to indicate true north instead of magnetic north, you need to specify your current location’s magnetic declination direction (east or west) and declination angle. Magnetic North and True North
- The magnetic declination angle value can be set in 1° (degree) units only. Use a value that is closest to the angle you want to set. Example: For an angle of 7.4°, set 7°. Example: For an angle of 7°40′ (7 degrees, 40 minutes), set 8°.
Note :
Magnetic declination angles (east or west) and angle degree values for specific locations can be found on geographic maps, mountain climbing maps, and other maps that include contour lines.
- Enter the Compass Mode.
 Navigating Between Modes
 - Hold down (E) for at least two seconds until the three-line graphic direction pointer flashes at 12 o’clock. Release the button when [CALIBRATION] [-1-] appears on the display.

- Press (D).
This displays [DEC] [0°].
- Use (A) (East) and (C) (West) to change the magnetic declination direction and angle.
- Holding down (A) or (C) scrolls through settings at high speed.
Setting range: 90° west to 90° east
[OFF]: Magnetic north
[E]: East declination (Magnetic north is east of true north.)
[W]: West declination (Magnetic north is west of true north.) - To return the setting to [OFF], press (A) and (C) at the same time.

- Holding down (A) or (C) scrolls through settings at high speed.
- Press (E) to complete the setting operation.
Magnetic North and True North
There are actually two types of north: magnetic north and true north.
Magnetic north: North indicated by the needle of a compass
True north: Direction to the North Pole
As shown in the illustration below, magnetic north and true north are not the same.
Note :
The north indicated on commercially available maps is normally true north.
Digital Compass Reading Precautions
Location During Use
Taking readings near sources of strong magnetism can cause reading error. Keep the watch away from the following types of items.
Permanent magnets (magnetic accessories, etc.), metal objects, high-voltage wires, aerial wires, electrical household appliances (TVs, computers, cellphones, etc.)
- Note that correct direction readings are not possible indoors, especially inside of reinforced concrete structures.
- Accurate direction readings are not possible on electric trains, on boats, on aircraft, etc.
Storage Location
Exposure of the watch to magnetism can affect the accuracy of digital compass readings. Keep the watch away from the types of items below.
Permanent magnets (magnetic accessories, etc.), metal objects, electrical household appliances (TVs, computers, cellphones, etc.)
Altitude Measurement
The watch takes altitude readings and displays results based on air pressure measurements taken by a built-in pressure sensor.
Checking the Current Altitude
- Enter the Altimeter Mode.
 Navigating Between Modes
Note :
- Measurement range: -700 to 10,000 meters (-2,300 to 32,800 feet) (Measurement unit: 1 meter (5 feet)) Note that calibrating altitude readings will cause a change in the measurement range.
- [- — -] will appear for the measured value if it is outside the allowable range.
Altitude Graph Screen
Altitude Differential Screen
- Current location altitude
- Altitude graph
- Differential between reference altitude and current altitude
Interpreting Altitude Graph Contents
* 1 square ( ) is 10 m.
Calibrating Altitude Readings (Offset)
To minimize the difference between locally indicated and measured values, you should update the reference altitude value (offset) before setting off and during treks or any other activities where you take altitude readings.
Also, you can ensure accurate measurements by checking a map local altitude indications or some other source for your current location’s altitude, and regularly calibrating watch readings with the latest information while mountain climbing.
Note :
- You can find out the altitude at your current location from signs, maps, on the Internet, etc.
- Differences between actual altitude and watch readings can be caused by the factors below.
- Changes in barometric pressure
- Changes in temperature caused by variations in barometric pressure and by elevation
- Though altitude readings can be taken without calibration, doing so may produce readings that are very different from indications by altitude markers, etc.
- Enter the Altimeter Mode.
 Navigating Between Modes
 - Hold down (E) for at least two seconds. Release the button when [ALTI] appears on the display.
This displays the current altitude and enters the Altitude Offset Mode.
- Use (A) and (C) to change the altitude value to an elevation value obtained from another source.
Setting range: -10,000 to 10,000 meters (or -32,800 to 32,800 feet)
Setting unit: 1 meter (or 5 feet)- Holding down (A) or (C) scrolls through settings at high speed.
- To return the altitude setting to its initial factory default, press (A) and (C) at the same time.
- This displays [OFF].
- Press (E) to complete the setting operation.
Note :
While the setting is being configured, the watch will exit the setting operation automatically after about two or three minutes of non-operation.
Setting a Reference Altitude and Taking Altitude Differential Readings
You can use the procedure below to display the differential between a reference altitude and another altitude. This makes it easy to display the altitude differential between two points while climbing or trekking.
Select the Altitude Differential Screen. Changing Displayed Information
- Use the contour lines on your map to determine the altitude differential between your current location and your destination.
- Take an altitude reading of your current location.
 Checking the Current Altitude
 - Use (E) to set your current location as the reference altitude.
This makes the altitude differential ±0 m (±0 feet).
- While comparing the difference between the altitude you found on the map and the altitude differential displayed by the watch, advance towards your destination.

- When the altitude differential you found on the map is the same as that displayed by the watch, it means you are close to your destination.
Note :
[- — — -] appears when the altitude differential is outside the measurement range (±3,000 m).
Setting the Measurement Interval for Auto Record Data and Climb Record Data
You can select an auto measurement interval of either five seconds or two minutes.
- Enter the Altimeter Mode.
 Navigating Between Modes
 - Hold down (E) for at least two seconds. Release the button when [ALTI] appears on the display.
This displays the altitude for your current location.
- Press (D).
This causes the auto measurement interval to appear on the display.
- Press (A) to toggle the auto measurement interval between [0’05] and [2’00]
[0’05]: Readings taken every second for the first three minutes, and then every five seconds for about the next one hour.
[2’00]: Readings taken every second for the first three minutes, and then every two minutes for about the next 12 hours. - Press (E) to complete the setting operation.
Note :
- While the setting is being configured, the watch will exit the setting operation automatically after about two or three minutes of non-operation.
- The watch will automatically return to the Timekeeping Mode if you do not perform any operation in the Altimeter Mode for about one hour while [0’05] is selected as the measurement interval or about 12 hours while [2’00] is selected.
Changing Displayed Information
In the Altimeter Mode, you can use the procedure below to select either the Altitude Graph Screen or Altitude Differential Screen.
- Enter the Altimeter Mode.
 Navigating Between Modes
 - Hold down (E) for at least two seconds. Release the button when [ALTI] appears on the display.
This displays the altitude for your current location.
- Press (D) twice.
After [DISP] appears on the display, the altitude graph or [DIFF] (altitude differential) flashes on the display. - Use (A) to toggle between the screens.
Each press of (A) toggles between the Altitude Graph Screen and the Altitude Differential Screen.
- Press (E) to complete the setting operation.
Note :
While the setting is being configured, the watch will exit the setting operation automatically after about two or three minutes of non-operation.
Recording Altitude Readings
Use the procedure below to record measured altitude data. There are three types of altitude data: manually recorded data, auto record data, and climb record data.
- Use the Data Recall Mode to view or delete records.
 Viewing Altitude Records
Manually Recorded Data
The date and time are also recorded along with the altitude measurement. The watch has memory for up to 30 measurement records, and records are sequentially assigned numbers from [-01-] to [-30-].
- Enter the Altimeter Mode.
 Navigating Between Modes
 - Hold down (A) for at least two seconds until [REC] stops flashing.
This records the current altitude, date, and time.- If you do not remove your finger and continue to press (A), climb recording will be toggled between enabled and disabled.

- If you do not remove your finger and continue to press (A), climb recording will be toggled between enabled and disabled.
Note :
Recording altitude data when there are already 30 records in memory automatically deletes the oldest record to make room for the new one.
Auto Record Data
Entering the Altimeter Mode automatically starts altitude data measurement at regular intervals. Each auto record data measurement uses one memory record. Each record includes the date (month, day) and time of the measurement, along with the altitude data (high/low altitude, cumulative ascent/descent). Auto Record and Climb Record Data Contents
- You can select the measurement interval.
 Setting the Measurement Interval for Auto Record Data and Climb Record
Note :
Auto recording ends when you exit the Altimeter Mode. Re-entering the Altimeter Mode restarts recording of cumulative values from where it was stopped when you last exited the Altimeter Mode.
Climb Record Data
Starting a climb record operation automatically records altitude data at regular intervals, even if you exit the Altimeter Mode. Each record includes the date (month, day) and time of the measurement, along with the altitude data (high/low altitude, cumulative ascent/descent). The watch has memory for up to 14 measurement data records, and records are sequentially assigned numbers from [Mt.1] to [Mt.14].
 Auto Record and Climb Record Data Contents
- Altitude is measured and recorded at regular intervals for up to 12 hours even if you exit the Altimeter Mode.
- You can select the measurement interval.
 Setting the Measurement Interval for Auto Record Data and Climb Record Data
 - Recording automatically stops when battery power goes low.
Note :
Climb record data can be recorded for up to 14 climbs. It includes high and low altitudes, and cumulative ascent and descent.
To start measurement
- Enter the Altimeter Mode.
 Navigating Between Modes
 - Hold down (A) for at least five seconds. Release the button when [Trek] and mountain climbing graphic segments appear on the display.
This starts recording of altitude data (high/ low altitude, cumulative ascent/descent).
- Mountain climbing graphic segments flash or are displayed around the periphery of the display while recording is in progress. Each segment represents 12 minutes, and one lap around the periphery represents 12 hours.
To stop measurement
- Enter the Altimeter Mode.
 Navigating Between Modes
 - Hold down (A) for at least five seconds. Release the button when [Trek] [END] appears on the display.
This stops altitude data (high/low altitude, cumulative ascent/descent) recording.
Note :
If you want to record more than 15 data records, delete old records to make room for the new data. Deleting a Particular Record
Auto Record and Climb Record Data Contents
The altitude data below is recorded by auto record and climb record operations.
High Altitude (MAX): ![]()
Low Altitude (MIN): ![]()
Cumulative Ascent (ASC):  *
*
Cumulative Descent (DSC):  *
*
* Cumulative ascent and cumulative descent values are updated whenever there is a difference of at least ±15 m (±49 feet) from one reading to the next.
Note :
- In the case of auto record data, the auto record operation ends if you exit the Altimeter Mode. Re-entering the Altimeter Mode restarts recording of cumulative values from where it was stopped when you last exited the Altimeter Mode.
- For climb record data, auto measurement continues even if you exit the Altimeter Mode.
Specifying the Altitude Measurement Unit
You can select either meters (m) or feet (ft) as the Altimeter Mode display unit.
- When Tokyo (TYO) is set as the Home City, the altitude unit is fixed as meters (m) and cannot be changed.
- Enter the Timekeeping Mode.
 Navigating Between Modes
 - Hold down (E) for at least two seconds. Release the button when the name of the currently selected Home City appears on the display.
Example: When your Home City is London
- Press (D) 12 times.
This displays [UNIT].
- Use (A) to select an altitude unit. [m]: Meters [ft]: Feet

- Press (E) twice to complete the setting operation.
Note :
While the setting is being configured, the watch will exit the setting operation automatically after about two or three minutes of non-operation.
Altitude Reading Precautions
Effects of Temperature
When taking altitude readings, take the steps below to keep the watch at as stable a temperature as possible. Changes in temperature can affect altitude readings.
- Take readings with the watch on your wrist.
- Take readings in an area where temperature is stable.
Altitude Readings
- Do not use this watch while skydiving, hang gliding, paragliding, gyrocopter flying, glider flying, or engaged in other activities where altitude changes suddenly.
- Altitude readings produced by this watch are not intended for special-purpose or industrial level use.
- In an aircraft, the watch measures the incabin pressurized air pressure, so readings will not match altitudes announced by the crew.
Altitude Readings (Relative Altitude)
This watch uses International Standard Atmosphere (ISA) relative altitude data defined by the International Civil Aviation Organization (ICAO). Barometric pressure generally becomes lower as altitude increases.
Correct measurement may not be possible under the conditions below.
- During unstable atmospheric conditions
- During sudden temperature changes
- After the watch has been subjected to strong impact
Barometric Pressure and Temperature Measurement
You can use the watch to take barometric pressure and temperature readings for your current location.
Measuring Barometric Pressure and Temperature
- Enter the Barometer/Temperature Mode.
 Navigating Between Modes
Entering the Barometer/Temperature Mode starts measurement, and displays the barometric pressure and temperature at your current location, and a barometric pressure graph.- After you enter the Barometer/ Temperature Mode, the watch takes readings about every five seconds for three minutes. After that, a measurement is taken about every two minutes.

- To re-trigger measurement, press (B).
- To return to the Timekeeping Mode, press (D).
- After you enter the Barometer/ Temperature Mode, the watch takes readings about every five seconds for three minutes. After that, a measurement is taken about every two minutes.
Note :
- The watch will automatically return to the Timekeeping Mode if you do not perform any operation in the Barometer/Temperature Mode for about one hour.
- Measurement ranges are shown below. [- — -] will appear for the measured value if it is outside the allowable range.
Barometric pressure measurement:260 hPa to 1,100 hPa (7.65 inHg to 32.45 inHg)
Thermometer measurement: -10.0°C to 60.0°C (14.0°F to 140.0°F)
Checking Changes in Barometric Pressure Over Time
Your watch shows a graph of barometric pressure readings taken at two-hour intervals. You can view barometric pressure readings for the past 42 hours. The square (v) at the far right of the graph indicates the latest barometric pressure reading.
Predicting Upcoming Weather
Note :
Large changes in barometric pressure and/or temperature can cause past data readings to be plotted outside of the visible area of the graph. Though plots are not visible, the data is still maintained in watch memory.
Checking the Change Between Two Barometric Pressure Readings (Barometric Pressure Differential)
In the Barometer/Temperature Mode, the display shows the current measured value, and a graphic indicator of the differential between the automatically measured current value and the latest value measured at twohour intervals.
Example: Barometric pressure differential of -3 hPa (approximately -0.9 inHg)
Note :
The barometric pressure differential graphic indicator will not be displayed if the barometric pressure differential exceeds ±10 hPa, or if the barometric pressure measurement value exceeds the measurement range.
Sudden Barometric Pressure Change Indications
Whenever the watch detects a significant change in air pressure readings (due to sudden ascent or descent, or to the passage of a low-pressure or high-pressure area), it will beep to let you know. An arrow will also flash on the display at this time if the watch is in the Barometer/Temperature Mode, or if it is in the Timekeeping Mode with the barometric pressure graph displayed. The arrow that appears shows the direction of the pressure change. These alerts are called «Barometric Pressure Change Indications».
- To ensure correct barometric pressure change indicator operation, enable it in a location where the altitude is constant (such as a lodge, camp area, or on the ocean).
- A change in altitude causes a change in air pressure. Because of this, correct readings are impossible. Do not take readings while ascending or descending a mountain, etc.
- Enter the Barometer/Temperature Mode.
 Navigating Between Modes
 - Hold down (B) for at least two seconds.
If Barometric Pressure Change
Indications are enabled, [INFO] [Hold] [On] flash on the display, and then [BARO] appears
- To disable Barometric Pressure Change Indication, hold down (B) again for at least two seconds.
[INFO] [Hold] [OFF] flash on the display, and then [BARO] disappears.
Note :
- If the Barometric Pressure Change Indication is enabled, readings are taken every two minutes even while the watch is not in the Barometer/ Temperature Mode.
- The Barometric Pressure Change Indication becomes disabled automatically 24 hours after it is enabled.
- Power Saving is disabled while barometric pressure trend information is enabled.
 Power Saving Function
 - You will not be able to turn on Barometric Pressure Change
Indication while the charge level of the watch’s battery is low. - Low battery power will also cause
Barometric Pressure Change
Indication to turn off.
Correcting Measured Barometric Pressure and Temperature Values (Offset)
The watch’s built-in pressure sensor and temperature sensor are adjusted at the factory and normally do not require correction. However, you can correct the displayed value if you notice major errors in readings.
- The watch will not be able to produce correct barometric pressure readings if you make a mistake during the correction procedure. Check to ensure that the values you use for calibration produces correct pressure and temperature readings.
- Before adjusting the temperature sensor, remove the watch from your wrist and leave it in the area where you plan to measure temperature for about 20 or 30 minutes to allow the case temperature to become the same as the air temperature.
- Enter the Barometer/Temperature Mode.
 Navigating Between Modes
 - Hold down (E) for at least two seconds. Release the button when [TEMP] appears on the display.
This causes the temperature reading to flash on the display.
- Press (D) to select the temperature correction or barometric pressure correction screen.

- Use (A) and (C) to change the value.
Temperature Setting Unit: 0.1°C (or 0.2°F)
Barometric Pressure Setting Unit: 1 hPa (or 0.05 inHg)- Holding down (A) or (C) scrolls through settings at high speed.
- To return the barometric pressure setting to its initial factory default, press (A) and (C) at the same time.
- Press (E) to complete the setting operation.
Note :
While the setting is being configured, the watch will exit the setting operation automatically after about two or three minutes of non-operation.
Specifying the Barometric Pressure Unit
You can specify either hectopascals (hPa) or inches of mercury (inHg) as the display unit for barometric pressure values.
- When Tokyo (TYO) is the Home City, the barometric pressure unit is fixed as hectopascals (hPa) and cannot be changed.
- Enter the Timekeeping Mode.
 Navigating Between Modes
 - Hold down (E) for at least two seconds. Release the button when the name of the currently selected Home City appears on the display.
Example: When your Home City is London
- Press (D) 12 times.
This displays [UNIT].
- Use (B) to select a barometric pressure unit.
[hPa]: Hectopascals
[inHg]: Inches of mercury
- Press (E) twice to complete the setting operation.
Note :
While the setting is being configured, the watch will exit the setting operation automatically after about two or three minutes of non-operation.
Specifying the Temperature Measurement Unit
You can select either Celsius (°C) or Fahrenheit (°F) as the temperature display unit.
- When Tokyo (TYO) is the Home City, the temperature unit is fixed as Celsius (°C) and cannot be changed.
- Enter the Timekeeping Mode.
 Navigating Between Modes
 - Hold down (E) for at least two seconds. Release the button when the name of the currently selected Home City appears on the display.
Example: When your Home City is London
- Press (D) 12 times.
This displays [UNIT].
- Use (C) to select a temperature unit.
[°C]: Celsius
[°F]: Fahrenheit
- Press (E) twice to complete the setting operation.
Note :
While the setting is being configured, the watch will exit the setting operation automatically after about two or three minutes of non-operation.
Barometric Pressure and Temperature Reading Precautions
Barometric Pressure Reading Precautions
- The barometric pressure graph produced by this watch can be used to obtain an idea of upcoming weather conditions. However, this watch should not be used in place of precision instruments required for official weather prediction and reporting.
- Pressure sensor readings can be affected by sudden changes in temperature. Because of this, there may be some error in the readings produced by the watch.
Temperature Reading Precautions
- Body temperature, direct sunlight, and humidity all have an effect on temperature readings. To help ensure more accurate temperature readings, remove the watch from your wrist, wipe it dry of any moisture, and place it in a well-ventilated location not exposed to direct sunlight. You should be able to take temperature readings after about 20 to 30 minutes.
Viewing Altitude Records
You can use the Data Recall Mode to view manually recorded, auto recorded, and climb record altitude measurement data. l Recording Altitude Readings
Viewing Recorded Data
- Enter the Data Recall Mode.
 Navigating Between Modes
This displays a record of data recorded in the Altimeter Mode. - Press (B) to select manually recorded data, auto record data, or climb record data.

* Each press of (B) scrolls through climb data records from record 1 ([Mt.1]) up to a maximum of record 14 ([Mt.14]). - Use (A) and (C) to display the data you want to view.
- Holding down (A) or (C) scrolls through settings at high speed.
Manually Recorded Data ([-01-] to [-30-])

*1 Each press of the button scrolls through manually recorded data records from record 1 ([-01-]) up to a maximum of record 30 ([-30-]).
*2 The date (month, day) and time alternate on the display at one-second intervals.
Auto Record Data

*1 The recording date (month, day) and time alternate on the display at one-second intervals.
*2 The date (month, day) and year when accumulation started alternate on the display at one-second intervals.
Climb Record Data ([Mt.1] to [Mt.14])

*1 The recording date (month, day) and time alternate on the display at one-second intervals.
*2 The date (month, day) and year when accumulation started alternate on the display at one-second intervals.
Note :
- If there is no data left in memory due to a data delete operation, error, or some other reason, [- — — -] or [0] will appear on the display.
- If the cumulative ascent (ASC) or cumulative descent (DSC) value exceeds 99,999 m (327,995 feet), it will revert to 0 and continue from there.
- If you do not perform any operation for about two or three minutes while in the Data Recall Mode, the watch automatically returns to the Timekeeping Mode.
Deleting Data
Note :
Data cannot be deleted while a climb record data measurement operation is in progress.
Deleting a Particular Record
- Enter the Data Recall Mode.
 Navigating Between Modes
 - Use (B) to select the data you want to delete.
- If you selected manually recorded data, use (A) and (C) to select the data you want to delete.
- Hold down the (E) button for at least two seconds. Release the button as soon as [Clear] stops flashing.
This deletes the record you selected.
Note that holding down (E) for at least five seconds while manually recorded data is selected will delete all manually recorded data.
Deleting All Manually Recorded Data
- Enter the Data Recall Mode
 Navigating Between Modes
 - Use (B) to select manually recorded data.
- Hold down (E) for at least five seconds. Release the button when [Clear] [ALL] stops flashing.
This deletes all manually recorded data.
Sunrise and Sunset Times
You can use the procedures in this section to check the sunrise and sunset times for a specified date (year, month, day) and location.
Looking Up Today’s Sunrise and Sunset Times
- Enter the Sunrise/Sunset Mode. l Navigating Between Modes
 Navigating Between Modes
This displays the current date’s sunrise and sunset times for your Home City.
Looking Up Sunrise and Sunset Times by Specifying a Day
- Enter the Sunrise/Sunset Mode.
 Navigating Between Modes
 - Use (A) and (C) to select the day you want.
This displays the sunrise and sunset times for the day you specified.- Holding down (A) or (C) scrolls through settings at high speed.

- Holding down (A) or (C) scrolls through settings at high speed.
Looking Up Sunrise and Sunset Times by Specifying a Location
- Enter the Timekeeping Mode.
 Navigating Between Modes
 - Hold down (E) for at least two seconds. Release the button when the name of the currently selected Home City appears on the display.

- Use (A) and (C) to select the city name of the location whose sunrise/sunset times you want to look up.
- Holding down (A) or (C) scrolls through settings at high speed.
- If you don’t need to specify a latitude and longitude, press (E) twice and advance to step 8.
- Press (E).
This displays the latitude or longitude setting screen. - Press (D) to toggle between the latitude and longitude setting screens.

- Use (A) and (C) to specify an angle
Setting ranges are shown below.
Latitude: 65.0°S (65.0 degrees south latitude) to 0.0°N to 65.0°N (65.0 degrees north latitude)
Longitude: 179.9°W (179.9 degrees west longitude) to 0.0°E to 180.0°E (180.0 degrees east longitude)- You can change the setting in 0.1° increments.
- Holding down (A) or (C) scrolls through settings at high speed.
- Press (E) to return to the Timekeeping Mode.
- Press (D).
This displays the sunrise/sunset times for the location you specified.
Note :
While the setting is being configured, the watch will exit the setting operation automatically after about two or three minutes of non-operation.
Stopwatch
The stopwatch performs elapsed time measurement up to 999 hours, 59 minutes, 59.9 seconds in 1/10 second units.
It can also measure split times.
Measuring Elapsed Time
- Enter the Stopwatch Mode.
 Navigating Between Modes
 - Use the operations below to measure elapsed time.

- Press (C) to reset the stopwatch to all zeros.
Measuring a Split Time
- Enter the Stopwatch Mode.
 Navigating Between Modes
 - Use the operations below to measure elapsed time.

- Press (C) to reset the stopwatch to all zeros.
Timing the First and Second Place Finishers
- Enter the Stopwatch Mode.
 Navigating Between Modes
 - Use the operations below to measure elapsed time.

* Displays the time of the first finisher.
- Press (C) to display the time of the second place finisher.
- Press (C) to reset the stopwatch to all zeros.
Timer
The timer counts down from a start time specified by you. A beeper sounds when the end of the countdown is reached.
- The beeper will not sound if battery power is low.

Setting a Start Time
The countdown start time can be set in 1minute units up to 24 hours.
- Enter the Timer Mode.
 Navigating Between Modes
 - Hold down (E) for at least two seconds. Release the button when the hour setting starts to flash.

- Use (A) and (C) to change the timer hours setting.
- Holding down (A) or (C) scrolls through settings at high speed.
- Press (D).
This causes the minutes digits to flash.
- Use (A) and (C) to change the minutes setting.
- Press (E) to complete the setting operation.
Note :
- While the setting is being configured, the watch will exit the setting operation automatically after about two or three minutes of non-operation.
- Setting a start time of «0H00’00» will perform a countdown of 24 hours.
Using the Timer
- Enter the Timer Mode.
 Navigating Between Modes
- Use the operations below to perform a timer operation.

- A beeper will sound for 10 seconds to let you know when the end of a countdown is reached.
- You can reset a paused countdown to its start time, by pressing (C).
- Press any button to stop the tone.
Other Settings
This section explains other watch settings you can configure.
Enabling the Button Operation Tone
Use the procedure below to enable or disable the tone that sounds when you press a button.
- Enter the Timekeeping Mode.
 Navigating Between Modes
 - Hold down (E) for at least two seconds. Release the button when the name of the currently selected Home City appears on the display.

- Press (D) nine times.
This causes [key ] or [MUTE] to flash on the display.
- Press (A) to select [key
 ] or [MUTE].
[key ]: Operation tone enabled.
[MUTE]: Operation tone disabled.
- Press (E) twice to complete the setting operation.
● [ ] is displayed while the operation tone is muted.
Note :
- While the setting is being configured, the watch will exit the setting operation automatically after about two or three minutes of non-operation.
- Note that alarm and timer tones will still sound even while the operation tone is muted.
Configuring Power Saving Function Settings
- Enter the Timekeeping Mode.
 Navigating Between Modes
 - Hold down (E) for at least two seconds. Release the button when the name of the currently selected Home City appears on the display.

- Press (D) 11 times.
This displays [POWER SAVING].
- Press (A) to toggle between on and off.
[On]: Power Saving enabled.
[OFF]: Power Saving disabled. - Press (E) twice to complete the setting operation.
Note :
- While the setting is being configured, the watch will exit the setting operation automatically after about two or three minutes of non-operation.
- For details about Power Saving, refer to the information below.
 Power Saving Function
Other Information
This section provides non-operational information you also need to know. Refer to this information as required.
City Table


- The information in the above table is current as of January 2022.
- Time zones may change and UTC differentials may become different from those shown in the table above.
Specifications
Accuracy: ±15 seconds a month
Basic Functions:
Hour, minute, second, month, day, day of the week
Barometric pressure graph a.m./p.m.(P)/24-hour timekeeping
Full Auto Calendar (2000 to 2099)
Digital Compass:
Measurement range: 0° to 359°
Measurement unit: 1°
Continuous Bearing Measurement (1 minute)
Compass calibration (2-point calibration, magnetic declination angle)
North, south, east, west indication (fourdirection graphic pointer)
Bearing memory
Altimeter (relative altitude):
Measuring range: -700 to 10,000 m (or -2,300 to 32,800 ft.)
Display range: -10,000 m to 10,000 m (or -32,800 to 32,800 ft.) (Altitude calibration can be used to display any 10,700 m within the range above.) Measuring unit: 1 m (or 5 ft.)
Measuring interval: 2 minutes/5 seconds
Altitude calibration
Altitude graph
Altitude differential measurement: -3,000 to +3,000m (or -9,840 to 9,840 ft.)
Reference altitude setting
Altitude Memory
Manually Recorded Data
Recording of altitude, date (month, day), and time by button operation. Up to 30 records.
Auto Record Data
One record of high altitude, low altitude, cumulative ascent, cumulative descent
Climb Record Data
Up to 14 records of high altitude, low altitude, cumulative ascent, cumulative descent
Barometer:
Measurement range: 260 to 1,100 hPa (or 7.65 to 32.45 inHg)
Display range: 260 to 1,100 hPa (or 7.65 to 32.45 inHg)
Measurement unit: 1 hPa (or 0.05 inHg)
Barometric pressure adjustment
Barometric pressure graph
Barometric pressure differential graphic
Barometric pressure change indications
Temperature:
Measuring range: -10.0°C to 60.0°C (or 14.0°F to 140.0°F)
Display range: -10.0°C to 60.0°C (or 14.0°F to 140.0°F)
Measuring unit: 0.1°C (or 0.2°F)
Temperature Correction
Sensor Accuracy:
Direction
Measurement accuracy: Within ±10° Accuracy guaranteed temperature range: 10°C to 40°C (50°F to 104°F) Bearing graph within ±2 gradations
Pressure
Measurement accuracy: Within ±3 hPa (0.1 inHg)
(Altimeter measurement accuracy: Within ±75 m (246 ft.))
Guaranteed accuracy temperature range: -10°C to 40°C (14°F to 104°F)
- Strong impact or prolonged exposure to temperature extremes may negatively affect accuracy.
Temperature
Measurement accuracy: Within ±2°C (3.6°F)
Accuracy guaranteed temperature range: -10°C to 60°C (14°F to 140°F)
Sunrise/Sunset Functions:
Sunrise and sunset times
Day select
Stopwatch:
Measuring unit: 1/10 seconds
Measuring range 999 hours, 59 minutes, 59.9 seconds (1000 hours)
Measurement Functions
Elapsed time, cumulative time, split times, 1st and 2nd place finisher times
Timer:
Setting unit: 1 minute
Countdown range: 24 hours
Countdown unit: 1 second
Time up alert duration: 10 seconds
Alarm:
Time alarms
Alarms: 5 (with one snooze alarm)
Setting units: Hours, minutes
Alarm tone duration: 10 seconds Hourly time signal: Beep every hour on the hour
World Time:
48 cities (31 time zones) and Coordinated
Universal Time (UTC) Summer time
Other:
High-brightness LED light (Full Auto Light, afterglow, 1.5 or 3-second illumination duration setting), power saving, battery power indicator, operation tone on/off
Power Supply:
Solar panel and one rechargeable battery
Battery operating time: Approximately 7 months
Conditions:
Illumination: 1.5 seconds/day
Beeper: 10 seconds/day Digital Compass Operations: 20 times/ month
Mountain climbing: Once/month (Altitude readings: Approximately 1 hour; Barometric pressure change indication measurements:
Approximately 24 hours)
Barometric Pressure Graph: Measurement every 2 hours
Display: 18 hours/day
Specifications are subject to change without notice.
Troubleshooting
Altitude Measurement
| Q1 | Readings produce different results at the same location. Watch readings are different from altitude information available from other sources. Correct altitude readings are not possible. |
Relative altitude is calculated based on changes in barometric pressure measured by the watch’s pressure sensor. This means that barometric pressure changes can cause readings taken at the same location to be different. Also note that the value displayed by the watch may be different from the actual elevation and/or sea level elevation indicated for the area where you are located. When using the watch’s altimeter while mountain climbing, it is recommended that you regularly calibrate its readings in accordance with local altitude (elevation) indications. l Calibrating Altitude Readings (Offset)
| Q2 | [ERR] appears during measurement. |
There may be a problem with the sensor. Try taking another measurement.
If [ERR] keeps appearing after multiple measurement attempts, contact a CASIO service center or your original retailer.
Digital Compass
| Q1 | The entire display is flashing. |
Abnormal magnetism has been detected. Move away from any potential source of strong magnetism and try taking a reading again. Digital Compass Reading Precautions
- If the display flashes again, it could mean that the watch itself has become magnetized. Move away from any potential source of strong magnetism, perform 2point calibration, and then try taking a reading again.
 Calibrating Compass Readings
| Q2 | [ERR] appears during measurement. |
There is a problem with the sensor or there may be a source strong magnetic force nearby. Move away from any potential source of strong magnetism and try taking a reading again. If [ERR] keeps appearing after multiple measurement attempts, contact a CASIO service center or your original retailer. Digital Compass Reading Precautions
| Q3 | [ERR] appears following 2-point calibration. |
[ERR] on the display could indicate a sensor problem.
- If [ERR] disappears after about one second, try performing 2-point calibration again.
- If [ERR] keeps appearing after multiple attempts, contact a CASIO service center or your original retailer.
| Q4 | Direction information indicated by the watch is different from that indicated by a backup compass. |
Move away from any potential source of strong magnetism, perform 2-point calibration, and then try taking a reading again. Calibrating Compass Readings
 Digital Compass Reading Precautions
| Q5 | Readings at the same location produce different results. Cannot take readings indoors. |
Move away from any potential source of strong magnetism and try taking a reading again. Digital Compass Reading Precautions
Barometric Pressure Measurement
| Q1 | The barometric pressure differential graphic is not displayed after barometric pressure measurement. |
The barometric pressure differential graphic is not displayed if the barometric pressure measurement value exceeds the allowable measurement range (260hPa to 1,100hPa) or if the barometric pressure differential exceeds ±10hPa. If [ERR] is displayed, there may be a problem with the sensor. Checking the Change Between Two Barometric Pressure Readings (Barometric Pressure Differential)
| Q2 | [ERR] appears during measurement. |
There may be a problem with the sensor. Try taking another measurement. If [ERR] keeps appearing after multiple measurement attempts, contact a CASIO service center or your original retailer.
Temperature Measurement
| Q1 | [ERR] appears during measurement. |
There may be a problem with the sensor. Try taking another measurement. If [ERR] keeps appearing after multiple measurement attempts, contact a CASIO service center or your original retailer.
World Time
| Q1 | The time for a World Time City is not correct. |
The summer time setting (standard time/ summer time) may be wrong. Specifying a World Time City
Alarm and Hourly Time Signal
| Q1 | An alarm does not sound. |
- Is the watch’s battery charged?
- → Keep the watch exposed to light until it recharges sufficiently.
 Charging
- → Keep the watch exposed to light until it recharges sufficiently.
- Other than the above.
- → The alarm’s settings may not be configured. Configure the alarm settings.
 Configuring Alarm Settings
- → The alarm’s settings may not be configured. Configure the alarm settings.
| Q2 | The hourly time signal does not sound. |
- Is the watch’s battery charged?
- → Keep the watch exposed to light until it recharges sufficiently.
 Charging
- → Keep the watch exposed to light until it recharges sufficiently.
- Other than the above.
- → The hourly time signal may be disabled. Enable the hourly time signal.
 Configuring the Hourly Time Signal Setting
- → The hourly time signal may be disabled. Enable the hourly time signal.
Charging
| Q1 | The watch does not work even though it is exposed to light. |
The watch stops operating whenever the battery goes dead. Keep the watch exposed to light until it recharges sufficiently. Checking the Charge Level
| Q2 | [H], [M], and [L] are flashing on the display. |
The watch is in the charge recovery mode.
Wait until the recovery process is complete (about 15 minutes). The watch will recover more quickly if you place it in a brightly lit location.
| Q3 | [CHG] is flashing on the display. |
The charge level of the watch is extremely low. Immediately expose the watch to light to charge it.  Checking the Charge Level
Other
| Q1 | I can’t find the information I need here. |
Visit the website below:
https://world.casio.com/support/

Documents / Resources
References
 Support | CASIO
Download manual
Here you can download full pdf version of manual, it may contain additional safety instructions, warranty information, FCC rules, etc.
Download CASIO PRO TREK PRG-340 Manual

- Регистрация
- Войти
Инструкции » Часы / Радиоприёмники » CASIO PRO TREK
|
Всего инструкций в разделе: 73 |


| инструкция | устройство | размер |
| CASIO Pro Trek PRW-2500-1E | наручные часы | 328.24 kB |
| CASIO Pro Trek PRG-600YB-3E | наручные часы | 617.91 kB |
| CASIO Pro Trek PRG-270-1E | наручные часы | 9.85 MB |
| CASIO Pro Trek PRG-240-1E | наручные часы | 339.58 kB |
| CASIO PRO-TREK PRG-300-1A4 | наручные часы | 478.13 kB |
| CASIO PRO-TREK PRG-600YL-5E | наручные часы | 6.45 MB |
| CASIO PRO-TREK PRG-600YB-3E | наручные часы | 6.49 MB |
| CASIO PRO-TREK PRG-330-1AER | наручные часы | 478.13 kB |
| CASIO PRO-TREK PRG-330-1E | наручные часы | 478.13 kB |
| CASIO PRO-TREK PRW-3000-1E | наручные часы | 23.23 MB |
| CASIO PRO-TREK PRW-3500-1E | наручные часы | 23.23 MB |
| CASIO PRO-TREK PRG-650-1E | наручные часы | 6.45 MB |
| CASIO PRO-TREK PRG-650Y-1E | наручные часы | 6.45 MB |
| CASIO PRO-TREK SGW-450HD-1B | наручные часы | 287.97 kB |
| CASIO PRO-TREK PRG-270-1E | наручные часы | 9.85 MB |
| CASIO PRO-TREK PRG-600-1E | наручные часы | 6.49 MB |
| CASIO PRO-TREK PRW-6000Y-1A | наручные часы | 298.68 kB |
| CASIO PRO-TREK PRW-6000-1E | наручные часы | 298.68 kB |
| CASIO PRO-TREK PRW-6100Y-1A | наручные часы | 980.26 kB |
| CASIO PRO-TREK PRG-600Y-1E | наручные часы | 6.49 MB |
| CASIO PRO-TREK SGW-450H-2B | наручные часы | 287.97 kB |
| CASIO PRO-TREK SGW-1000-2B | наручные часы | 550.81 kB |
| CASIO PRO-TREK PRW-7000-1A | наручные часы | 9.39 MB |
| CASIO PRO-TREK SGW-100-2B | наручные часы | 317.75 kB |
| PRO TREK PRG-550-1A9 | наручные часы | 352.35 kB |
«— 1 2 3 —»
Что удобнее для чтения книг?
Планшет
Электронная книга
Смартфон
Книга в бумажном переплёте
Не читаю книг

© 2010- ManualBase.ru
- Статьи
- О сайте
- Помощь
- Контакты
- Пользовательское соглашение
- Политика обработки персональных данных
© 2010- ManualBase.ru
