Преимущества и предназначение:
- высокий пусковой крутящий момент (0,5 Гц, в 1,5 раза выше номинального крутящего момента), значительная устойчивость к перегрузкам, гибкость и удобство в эксплуатации, PID в прямом и обратном направлении и др.
- Преобразователи частоты этой серии можно раз делить на мини-преобразователи частоты, преобразователи частоты общего типа (мощные инвертеры), преобразователи частоты для вентиляторов и водяных насосов (для малых нагрузок). Они способны адаптироваться к высоким нагрузкам, стабильны и надежны в работе, поддерживают функцию автоматического энергосбережения и др.
- Преобразователи частоты могут применяться для управления электрическими двигателями и другими автоматическими системами (например, в бумажной и текстильной промышленности, для подачи воды, бетона, красок и красителей, в городских системах, в пищевой, химической и горной промышленности, в металлургии).
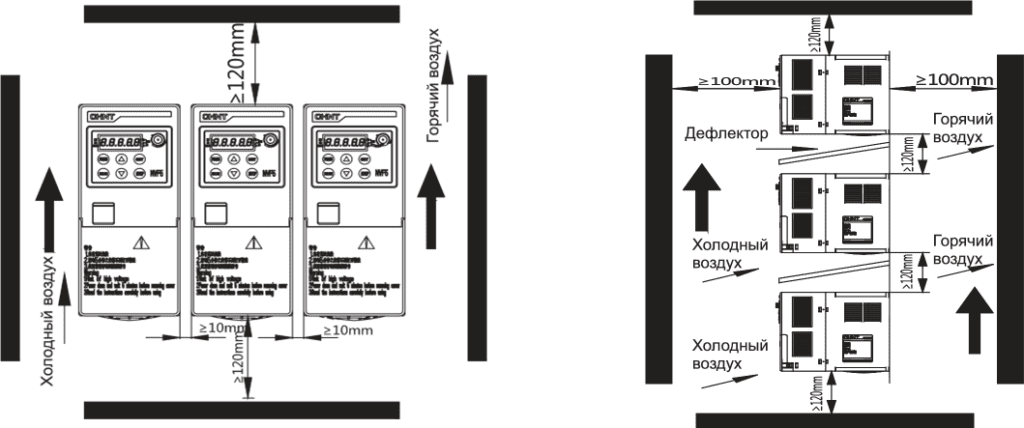
Необходимые установочные размеры
Описание контакта питания
| Обозначение | Наименование | Описание |
|---|---|---|
| R , S , T | Вход основного источника питания | Входные клеммы трехфазного питания переменного тока, соединенные с сетью заземления |
| L1 , L2 | Вход основного источника питания | Входные клеммы трехфазного питания переменного тока, соединенные с сетью заземления |
| U , V , W | Выход инвертора | Выходные клеммы трехфазного питания переменного тока, соединенные с электродвигателем переменного тока |
| Заземление | Клеммы заземления, обеспечивают надежное заземление | |
| P+ P- | Клеммы шины постоянного тока | Однофазный тип DC+ и DC |
| P B | Клеммы внешнего тормозного резистора | Клеммы трехфазного тормозного резистора |
| P+ B | Клеммы внешнего тормозного резистора | Клеммы однофазного тормозного резистора |
Базовая схема электрических соединений
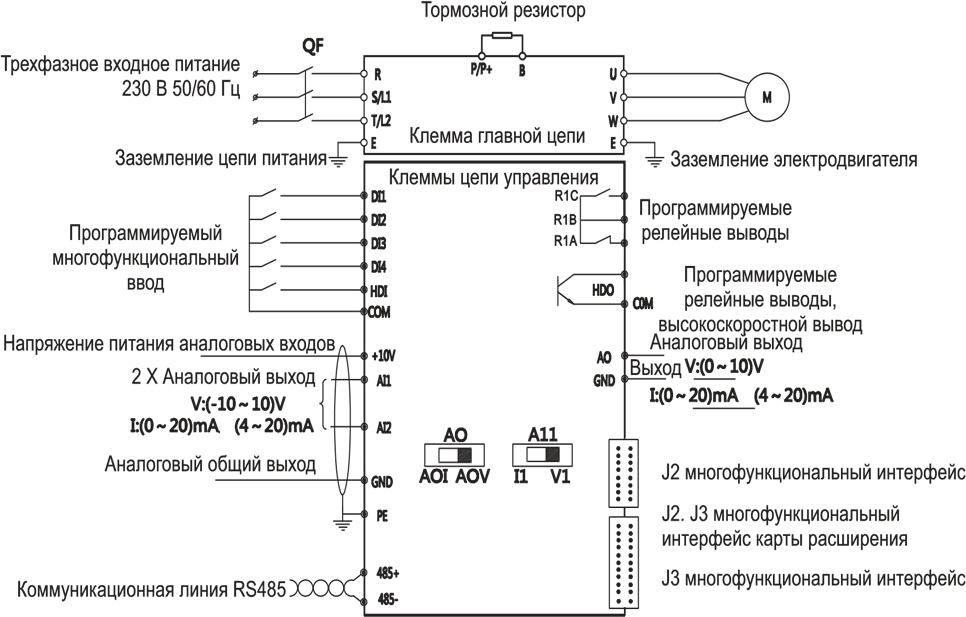
- DIP-выключатель AO: Левый (0–20) мА или (4–20) мА Аналоговый токовый вывод;
- Правый (0–10) В Аналоговый вывод напряжения.
- Dip-выключатель AI1: Левый, (0~20) мА или (4–20) мА Аналоговый токовый ввод;
- Правый, (0–10) В Аналоговый вывод напряжения.
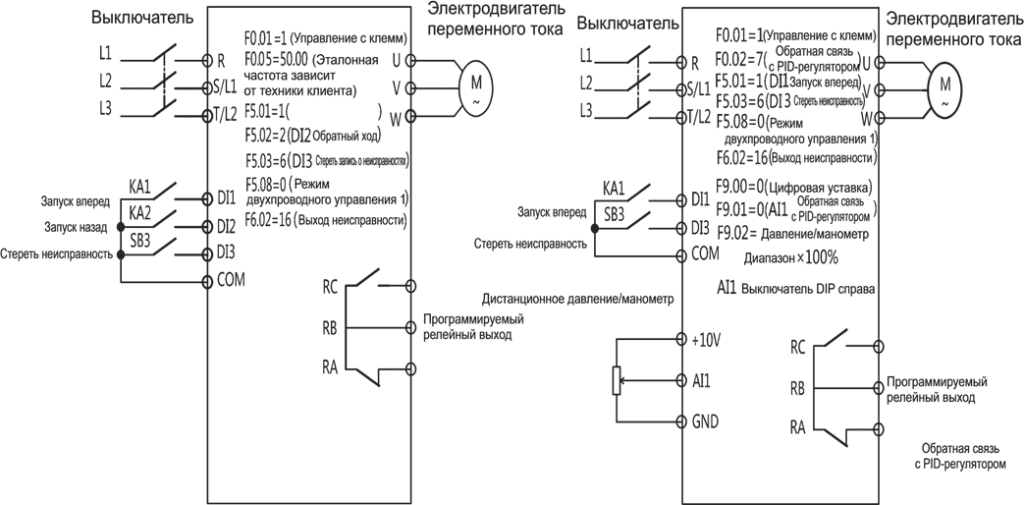
Пример подключения:
Панель управления и индикаторы
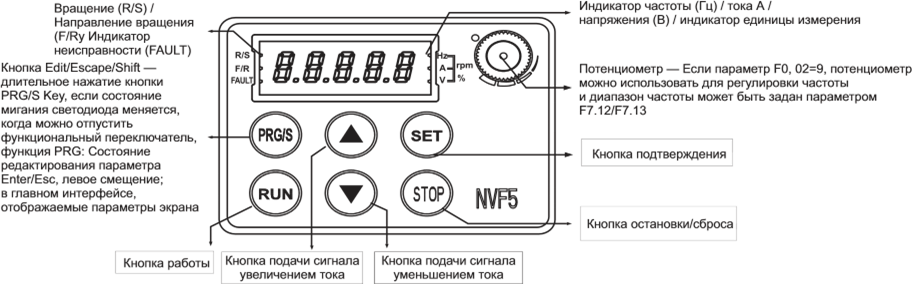
| Кнопка | Описание |
| Выбор режима меню параметров (F7.11) Режим меню простых параметров (U1)Режим меню пользовательских параметров (U2)Режим меню пользовательских инженерно-технических параметров (U3) | |
| Система отображает главный интерфейс Комбинаторная кнопка блокировки В режиме пользовательского меню, меню первого уровня Добавление параметров пользователя | |
| Система отображает главный интерфейс Комбинаторная кнопка разблокировки В режиме пользовательского меню, меню следующего уровня Удаление параметров пользователя |
Список параметров ЧП
Пример задания параметра:
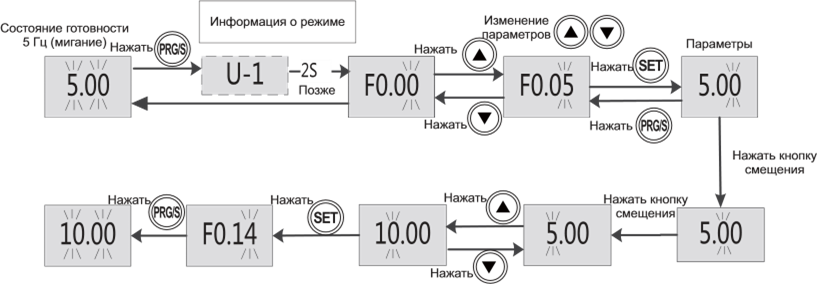
| Код | Наименование | Описание параметра | По умолчанию |
|---|---|---|---|
| F0.00 | Режим управления электродвигателями |
0: Векторное управление без датчиков 1: Резервирование 2: Режим V/F |
0 |
| F0.01 | Источник команды | 0: Цельная клавиатура 1: Цифровой вывод 2: Коммуникационный 3: Панель дистанционного управления |
0 |
| F0.02 | Справ. значение основной частоты |
0: Цифровая уставка 1: AH 2: AI2 3: Резервирование 4: Справ. зн. на высокочастотном импульсном входе HDI 5: Предв. настройка справ. зн. скорости 6: Справ. ПЛК 7: Справ. PID закрытого контура 8: Резервирование 9: Справ. потенциометра |
0 |
| F0.05 | Цифровая уставка | F0.09-Мин. частота~F0.08-Макс. частота | 5.00 Гц |
| F0.14 | Время ускорения 1 | (0,0–6500,0) с | Зависит от Серии |
| F0.15 | Время снижения скорости 1 | (0,0–6500,0) с | Зависит от Серии |
| F0.20 | Заводские настройки параметров | 0: Без действия 1: Удалить журнал регистрации ошибок 2: Сбросить до заводских настроек (кроме параметров электродвигателя NP и параметра F7.11) 3: Сбросить группу пользовательских параметров до заводских настроек (кроме параметров электродвигателя NP и параметра F7.11) 4: Все параметры сбрасываются до заводских настроек 5: Вспомогательные параметры 6: Использование вспомогательных параметров 7: Сохранение вспомогательных параметров Примечание: Только при использовании вспомогательных параметров вспомогательные параметры можно сохранить. Иначе при отключении и повторной подаче питания к инвертору, кроме обновленных параметров, другие параметры всегда возвращаются к начальному значению. |
0 |
| F2.00 | Тип электродвигателя | 0: Индукционный электродвигатель переменного тока 1: Резервирование 2: Резервирование |
|
| F2.01 | Питание электродвигателя NP | (0,1–1000,0) кВт | Зависит от типа электродвигателя |
| F2.02 | Напряжение электродвигателя NP |
0 В — Номинальное напряжение инвертора | Зависит от типа электродвигателя |
| F2.03 | Ток электродвигателя NP | (0,1–1000,0) A | Зависит от типа электродвигателя |
| F2.04 | Частота электродвигателя NP | 0,01 Гц ~ F0.07 | Зависит от типа электродвигателя |
| F2.05 | Количество полюсов двигателя | 2 ~ 24 | 4 |
| F2.06 | Обороты электродвигателя NP | 0-60000 об/мин | 1430 об/мин |
| F2.22 | Автоматическая настройка электродвигателя | 0: Выключено 1: Статическая настройка 2: Настройка вращения |
0 |
| F7.11 | Режим меню параметров |
1: Режим простого меню 2: Режим пользовательского меню 3: Режим технологического меню |
1 |
Список возможных неисправностей и ошибок ЧП
| Код | Тип неисправности | Причина неисправности | Действие (срабатывание) |
|---|---|---|---|
| E.OC1 E.OC2 E.OV1 E.OV2 E.OV3 |
— Перегрузка инвертора по току во время ускорения — Перегрузка инвертора по току во время торможения — Перегрузка инвертора по току во время работы на постоянной скорости — Перегрузка инвертора по напряжению во время ускорения — Перегрузка инвертора по напряжению во время торможения — Перегрузка инвертора по напряжению во время работы на постоянной скорости |
Низкое напряжение сети Напрямую и быстро запустите вращение двигателя Неправильные данные с паспортной таблички двигателя Слишком низкая мощность инвертора Неподходящая кривая V/F Потенциальная энергетическая нагрузка или большая инерционная нагрузка Ускорение/торможение Время слишком мало Быстрое изменение нагрузки Короткое замыкание электродвигателя на землю Неправильное напряжение питания Запустите снова электродвигатель на высоких оборотах Потенциальная энергетическая нагрузка или большая инерционная нагрузка Увеличьте время торможения Проверьте настройку параметров ASR в векторном режиме управления Большая инерционная нагрузка |
Проверьте время ускорения увеличения подачи питания Автоматическая настройка электродвигателя Увеличьте уровень питания инвертора Отрегулируйте кривую напряжения/частоты или отрегулируйте ручное усиление крутящего момента Добавить реген. Компоненты тормоза Проверка нагрузки Проверьте кабель двигателя Проверьте питание инвертора Запустите инвертор при остановленном электродвигателе Добавить реген. Компоненты тормоза Увеличьте время торможения См. раздел «Группа параметров F3» и как задать ASR |
| E.SPI | Ослабленная фаза на входе | Ослабленная фаза R.S.T | Проверка проводки на клемме основного питания Проверьте напряжение питания Проверьте кабель двигателя Проверьте двигатель и кабель |
| E.SPO | Ослабленная фаза на выходе | Ослабленная фаза U.V.W | Проверка проводки на клемме основного питания Проверьте напряжение питания Проверьте кабель двигателя Проверьте двигатель и кабель |
| E.FO | Срабатывание защиты силового модуля | Замыкание между фазами линии трехфазного питания или короткое замыкание на землю Мгновенная перегрузка инвертора по току Засорение вентиляционного канала или повреждение вентилятора Температура окружающей среды слишком высокая Ослабление проводки ввода/вывода или розетки Форма волны тока неисправна ввиду вывода Ослабление фазы и другие причины Повреждение вспомогательного источника питания, пониженное напряжение привода Неисправность БТИЗ-модуля Отклонения в работе панели управления |
Повторная укладка проводки, убедитесь в наличии изоляции электродвигателя См. устранение сверхтока Очистите канал вентилятора и замените вентилятор Низкая температура окружающей среды Проверьте проводку и проложите новую, Проверка проводки Попросите техническую поддержку Chint |
| E.OH1 | Перегрев теплоотвода | Температура окружающей среды слишком высокая Засорение канала вентилятора Повреждение вентилятора Неисправность IGBT Ошибка цепи проверки температуры |
Примите меры к снижению температуры окружающей среды Очистите вентиляционный канал или замените вентилятор Попросите техническую поддержку Chint |
| E.OH2 | Перегрев выпрямительного моста | Температура окружающей среды слишком высокая Засорение канала вентилятора Повреждение вентилятора Неисправность IGBT Ошибка цепи проверки температуры |
Примите меры к снижению температуры окружающей среды Очистите вентиляционный канал или замените вентилятор Попросите техническую поддержку Chint |
| E.OL1 | Перегрузка двигателя | Неправильная степень перегрузки электродвигателя Двигатель глохнет или частая смена нагрузки Длительная работа на низкой скорости с чрезмерной нагрузкой Низкое напряжение сети Неподходящая кривая напряжения/частоты Неправильные данные с заводской таблички электродвигателя Чрезмерная нагрузка Чрезмерный ток пост. тока Ускорение Время слишком мало |
Неправильная степень перегрузки электродвигателя Проверьте нагрузку электродвигателя Выбор преобразователя частоты Проверьте напряжение сети Отрегулируйте кривую напряжения/ частоты или отрегулируйте ручное усиление крутящего момента Автоматическая настройка электродвигателя Увеличьте уровень питания инвертора Снизьте пост. ток торможения Увеличьте длительность торможения Увеличьте время разгона |
| E.OL2 | Перегрузка инвертора | Неправильная степень перегрузки электродвигателя Двигатель глохнет или частая смена нагрузки Длительная работа на низкой скорости с чрезмерной нагрузкой Низкое напряжение сети Неподходящая кривая напряжения/частоты Неправильные данные с заводской таблички электродвигателя Чрезмерная нагрузка Чрезмерный ток пост. тока Ускорение Время слишком мало |
Неправильная степень перегрузки электродвигателя Проверьте нагрузку электродвигателя Выбор преобразователя частоты Проверьте напряжение сети Отрегулируйте кривую напряжения/ частоты или отрегулируйте ручное усиление крутящего момента Автоматическая настройка электродвигателя Увеличьте уровень питания инвертора Снизьте пост. ток торможения Увеличьте длительность торможения Увеличьте время разгона |
| E.tE | Автоматическая настройка | Заданы неправильные данные электродвигателя Автоматическая настройка обратного вращения запрещена при обратном ходе Плохой контакт линии соединения электродвигателя Превышение времени автоматической настройки |
Задание данных электродвигателя Запретить обратное направление Проверьте кабель двигателя Проверьте Параметр F0.08 (Максимальная частота), меньше ли он номинальной частоты |
| E.StG | Короткое замыкание электродвигателя на землю | Короткое замыкание электродвигателя на землю | Проверьте кабель двигателя |
| E.LL | Неисправность потери нагрузки | Ток инвертора менее значения Параметра FE.18 |
Проверьте наличие потери нагрузки и проверьте настройки параметра FE.17, FE.18, FE.18 |
Скачать полную инструкцию.
RU
- Manuals
- Brands
- CHINT Manuals
- Inverter
- NVF5 Series
Manuals and User Guides for CHINT NVF5 Series. We have 2 CHINT NVF5 Series manuals available for free PDF download: User Instructions, Quick Start-Up Wizard
CHINT NVF5 Series User Instructions (148 pages)
Brand: CHINT
|
Category: Inverter
|
Size: 4.55 MB
Table of Contents
-
Table of Contents
3
-
Chapter 1 Safety Information
5
-
Safety Definition
5
-
Safety Precautions
5
-
Precautions for Users
7
-
Notice of Scrap
9
-
-
Chapter 2 Product Overview
10
-
Catalog Numbers Description
10
-
Nameplate Description
10
-
Specifications and Models
10
-
Technical Specifications
11
-
Product Appearance and Diagram
13
-
Product Dimensions and Weights
14
-
IP22 Top Protective Cover Description
15
-
-
Chapter 3 Installation and Wiring
17
-
Peripherial Components Description
17
-
Peripherial Components Selection and Guideline
17
-
Installation
20
-
Description of the Cover
21
-
Wiring of Power Terminal and I/O Terminal
22
-
I/O Terminal Description
26
-
EMC Precautions
28
-
-
Chapter 4 Integral Keypad
30
-
Integral Keypad Instructions
30
-
Integral Keypad LED Light and Display
31
-
Parameter Menu Mode
33
-
Integral Keypad Lock and Password Setting
36
-
-
Chapter 5 Simple Parameter Menu and Commissioning Process
38
-
Simple Parameter Menu List
38
-
Simple Commissioning Process
40
-
-
Chapter 6 Parameter Function Description
42
-
Start Source Setting
42
-
Frequency Reference Setting
46
-
Start and Stop Setting
61
-
Motor Auto Tuning
66
-
V/F Parameters
68
-
Vector Control Parameters
71
-
Overcurrent Stall Protection
75
-
Overvoltage Stall Depress
75
-
Protective Function
76
-
Monitoring Function
82
-
I/O Terminal Parameter Setting
82
-
Ride through Function
89
-
Jogging
90
-
Skip Frequency
91
-
Forward and Reverse Switch
91
-
Regenerative Braking
92
-
Frequency Detection Output(Fdt
92
-
Output Current Zero Point Detection
93
-
Running Timer
93
-
Start at Power up
94
-
Sleep Wake Mode
94
-
-
Chapter 7 Troubleshooting
95
-
Diagnostic
95
-
Abnormal Operation and Solution
99
-
-
Chapter 8 Maintenance
101
-
Maintenance Instructions
101
-
Maintenance Items
101
-
Routine Maintenance
102
-
Regular Maintenance
102
-
Spare Parts Replacement
103
-
Storage
104
-
-
Appendix A RS485-MODBUS Communication Instructions
105
-
Networking Mode
105
-
Interface Mode
105
-
Communication Mode
105
-
Protocol Format
106
-
Protocol Application
107
-
Control Command, State Information and Fault Information
109
-
Parameter Management
112
-
Network Wiring
113
-
Definition of Communication Exception Code
113
-
-
Appendix B Parameter List
115
-
Appendix C Accessiories
146
-
Quality Commitment
147
Advertisement

CHINT NVF5 Series Quick Start-Up Wizard (8 pages)
Brand: CHINT
|
Category: Inverter
|
Size: 0.96 MB
Table of Contents
-
Installation and Wiring
2
-
Analog Voltage Output
3
-
Integral Keypad
4
-
Simple Parameter Menu and Commissioning Process
5
Advertisement
Related Products
-
CHINT NVF5-0.4/TD2
-
CHINT NVF5-0.75/TD2-B
-
CHINT NVF5-0.75/TD2
-
CHINT NVF5-0.4/TD2-B
-
CHINT NVF5-2.2/TD2
-
CHINT NVF5-1.5/TD2
-
CHINT NVF5-1.5/TD2-B
-
CHINT NVF5-2.2/TD2-B
-
CHINT NVF5-0.4/TS4-B
-
CHINT NVF5-0.75/TS4-B
CHINT Categories
Circuit breakers
![]()
Switch
Controller
Relays
Industrial Electrical
More CHINT Manuals

NVF5 Series Inverter Preface Preface Thank you for choosing Chint NVF5 series Inverter. NVF5 series Inverter adopts the speed sensorless vector control technology, It has the features of fast load response, low frequency high torque and strong overload capability,Realized the precise control of industrial equipments.NVF5 series inverter has performance of stable voltage output、torque limited、speed track、simple PLC、process PID etc.Satisfying the requrements of many industrial equipments,such as Drawing Machine、Textile、Macine Tools、Logistic、packaging、Food、Plastic Cement、Fans and Pumps. NVF5 series Inverter are designed with internal EMC circuit to depress electromagnetic interference and full thinking of EMC、dust、oil pollution of the customer site.The modular design of NVF5 can reduce dust and oil stains into the machine.All NVF5 series can realize IP22 with optional top protective cover. NVF5 series Inverter has three levels parameter menus:Simple mode,Customized mode and Engineering mode.Be able to meet requirement of different users.The simple mode is easy to learn,is intended for beginners;The custom mode is able to customize specific parameter menu,is intended for specific equipment debugger;The engineering mode contains all user parameters,is intended for professional engineers. The manual is intended for qualified personnel and provided instructions and features of NVF5, including Product selection, installation and programming, parameter explanation, etc. To ensure proper use of the inverter, please read this manual carefully before using. Plase save it for using later. If having any problems which cannot be solved during use, please contact corresponding Chint channels or directly contact the Chint technical personnel for help. (Customer service phone: 400-1177-797) The company reserves the right to constantly optimize and improve NVF5 series inverter, information is subject to change without notice. NVF5 Series User Manual Table of Content Table of Contents Chapter 1 Safety Information .................................................................... - 1 1.1 Safety Definition ............................................................................................... - 1 1.2 Safety Precautions ........................................................................................... - 1 1.3 Precautions for Users ....................................................................................... - 3 1.4 Notice of Scrap................................................................................................. - 5 - Chapter 2 Product Overview ..................................................................... - 6 2.1 Catalog Numbers Description .......................................................................... - 6 2.2 Nameplate Description ..................................................................................... - 6 2.3 Specifications and Models................................................................................ - 6 2.4 Technical Specifications ................................................................................... - 7 2.5 Product Appearance and Diagram ................................................................... - 9 2.6 Product Dimensions and Weights .................................................................. - 10 2.7 IP22 Top Protective Cover Description ........................................................... - 11 - Chapter 3 Installation and Wiring ........................................................... - 13 3.1 Peripherial Components Description .............................................................. - 13 3.2 Peripherial Components Selection and Guideline .......................................... - 13 3.3 Installation ...................................................................................................... - 16 3.4 Description of the cover.................................................................................. - 17 3.5 Wiring of Power Terminal and I/O Terminal .................................................... - 18 3.6 I/O Terminal Description ................................................................................. - 22 3.7 EMC Precautions ........................................................................................... - 24 - Chapter 4 Integral Keypad ....................................................................... - 26 4.1 Integral Keypad Instructions ........................................................................... - 26 4.2 Integral Keypad LED Light and Display .......................................................... - 27 4.3 Parameter Menu Mode................................................................................... - 29 4.4 Integral Keypad Lock and Password Setting .................................................. - 32 - Chapter 5 Simple Parameter Menu and Commissioning Process ......... - 34 5.1 Simple Parameter Menu List .......................................................................... - 34 5.2 Simple Commissioning Process ..................................................................... - 36 - Chapter 6 Parameter Function Description ............................................ - 38 6.1 Start Source Setting ....................................................................................... - 38 6.2 Frequency Reference Setting......................................................................... - 42 6.3 Start and Stop Setting .................................................................................... - 57 6.4 Motor Auto Tuning .......................................................................................... - 62 6.5 V/F Parameters .............................................................................................. - 64 6.6 Vector Control Parameters ............................................................................. - 67 6.7 OverCurrent Stall Protection .......................................................................... - 71 6.8 OverVoltage Stall Depress ............................................................................. - 71 6.9 Protective Function ........................................................................................ - 72 6.10 Monitoring Function ...................................................................................... - 78 6.11 I/O Terminal Parameter Setting .................................................................... - 78 6.12 Ride Through Function ................................................................................. - 85 6.13 Jogging......................................................................................................... - 86 -1- NVF5 Series User Manual Table of Content 6.14 Skip Frequency ............................................................................................ - 87 6.15 Forward and Reverse Switch ....................................................................... - 87 6.16 Regenerative Braking ................................................................................... - 88 6.17 Frequency Detection Output(FDT) .......................................................... - 88 6.18 Output Current Zero Point Detection ............................................................ - 89 6.19 Running Timer .............................................................................................. - 89 6.20 Start At Power Up ......................................................................................... - 90 6.21 Sleep Wake Mode ........................................................................................ - 90 - Chapter 7 Troubleshooting...................................................................... - 91 7.1 Diagnostic ...................................................................................................... - 91 7.2 Abnormal Operation and Solution .................................................................. - 95 - Chapter 8 Maintenance ............................................................................ - 97 8.1 Maintenance Instructions ............................................................................... - 97 8.2 Maintenance Items ......................................................................................... - 97 8.3 Routine Maintenance ..................................................................................... - 98 8.4 Regular Maintenance ..................................................................................... - 98 8.5 Spare Parts Replacement .............................................................................. - 99 8.6 Storage......................................................................................................... - 100 - Appendix A RS485-MODBUS Communication Instructions ................ - 101 A.1 Networking Mode ......................................................................................... - 101 A.2 Interface Mode ............................................................................................. - 101 A.3 Communication Mode .................................................................................. - 101 A.4 Protocol Format ........................................................................................... - 102 A.5 Protocol Application ..................................................................................... - 103 A.6 Control Command, State Information and Fault Information ........................ - 105 A.7 Parameter Management .............................................................................. - 108 A.8 Network Wiring ............................................................................................ - 109 A.9 Definition of Communication Exception Code .............................................. - 109 - Appendix B Parameter list .................................................................... - 111 Appendix C Accessiories ...................................................................... - 142 Quality Commitment .............................................................................. - 143 - -2- NVF5 Series User Manual Chapter 1 Safety Information Chapter 1 Safety Information Before conducting transfer, installation, running and maintenance, please read the user manual carefully and conform to all safety guidelines for the application. Failue to comply may result in personal injury and/or equipment damage or even death of people. In the event of personal injury and equipment damage caused by noncompliance with the safety guidelines by you or your clients, Chint can not assume any responsibility. 1.1 Safety Definition Sign Danger ! Attention Description The occasion where death or serious injury may be caused by the mis-operation. The occasion where intermediate or slight injury or property damage may be caused by mis-operation. 1.2 Safety Precautions 1.2.1 Before installation Danger In case of a damaged inverter or components lack, it is not suggested to conduct installation or running; otherwise, the danger of fire or injury may be caused! It is not allowed to contact with the power terminals, the control circuit terminals, electronic parts and components of the inverter by hand directly! ! Attention Installation is not allowed in case that the nameplate is inconsistent with your order requirements! Installation is not allowed in case that material objects are inconsistent with the packing list! 1.2.2 Installation Danger Installation must be conducted by qualified personnel in case of the danger of electric shock! Please install the inverter on the metal equipmen(supplementary enclosure) or other non-combustible objects in case of the danger of fire! It is not permitted to place combustibles nearby in case of the danger of fire! The products should be installed with either fuses or an input circuit breaker between the inverter and power supply in case of danger of fire! -1- NVF5 Series User Manual Chapter 1 Safety Information It is not permitted to install the inverter in an environemnt containing explosive gases in case of the danger of explosion! It is not permitted to insall the inverter at a place directly exposed in sunlight in case of the danger of equipment damage! It is not permitted to install the inverter on occasions where water splashing in case of the danger of equipment damage! ! Attention In the transfer process, it is not allowed to make the integral keypad and the cover plate under pressure in case of the danger that they fall off and damage equipment and person! Please install the inverter on the place capabel of bearing the weight in case that the inverter falls off and damages equipment and person! In the installation process, it is not permitted to leave metal objects in the machine in case of the danger of fire! 1.2.3 Wiring Danger Wiring must be conducted by qualified personnel in case of the danger of electric shock! Wiring is not allowed to be conducted unless complete disconnection of the input power is confirmed in case of the danger of electric shock! The ground terminal of the inverter must be reliably grounded in case of the danger of electric shock! The exposed parts of cables used for main circuit connection must be well wrapped with insulating tape in case of the danger of electric shock! It is not allowed to realize short circuit between P and B in case of the danger of fire and equipment damage! The main circuit terminal and the cable lug must be connected firmly in case of the danger of equipment damage! The I/O terminals besides RA, RB and RC are prohibited to wire with AC 230V in case of the danger of equipment damage! ! Attention The voltage withstand test has been finished before leaving the factory; the users no longer have to conduct the test again, otherwise the improper test could damage the device! When the cable length of the motor is greater than 50 meters, output AC reactor is suggested in case of the danger of equipment damage! 1.2.4 Running -2- NVF5 Series User Manual Chapter 1 Safety Information Danger The inverter must be covered with the cover plate before power on in case of the danger of electric shock and explosion! The inverters which have been stored for more than 2 years must been done precharge experiment. When energized, the voltage regulator is used to slowly increase the voltage in case of the danger of electric shock and explosion! During power-on, it is not allowed to touch the terminals by hand in case of the danger of electric shock! It is not permitted to operate the inverter with a damp hand in case of the danger of electric shock! After replacing control boards,the inverter will begin running after parameters are correctly set in case of the danger of equipment damage! The products is intended for qualified personnel to test during running in case of the danger of personal injury or equipment damage! Please don’t change original factory parameters in case of the danger of equipment damage! ! Attention Please ensure the power phase and rated voltage are consistent with the nameplate of the product in case of the danger of equipment damage! Check connection of the main circuit of the inverter to ensure disappearance of short circuit and fastened conenction in case of the danger of equipment damage! It is not permitted to control the inverter start and stop frequently in a power-on and power-off mode in case of the danger of equipment damage! 1.3 Precautions for Users Safety Information Compared with power frequency running Constant-torque low-speed running Electronic thermal protection value of motor Running over 50Hz Description The inverter is a voltage source type machine and the output voltage is PWM waves including harmonics. Therefore, the temperature rise, noise and vibration of the motor will slightly increase compared with power frequency running. When the inverter drives common AC induction motor to run at a low speed for a long term, the output torque maybe reduced due to the heat dissipation effect of the motor. If it is required to run at a low speed and constant-torque for a long term, a variable frequency motor must be used. When using an adaptive motor, the inverter could perform thermal protection on the motor. In case that the motor is not matched with the inverter in rated capacity, the protection threshold value must be adjusted or other protection must be taken for guaranteeing safe running of the motor. In case that the motor runs at the frequency over 50Hz, in addition to increase of the vibration and noise of the motor, the applied -3- NVF5 Series User Manual Lubrication of mechanical devices Negative torque load Mechanical resonance point of load Occasion of frequently start and stop Motor insulation check before connection to inverter Capacitor or voltage dependent component for improving power factors Contactor and switching devices installed on the output of the inverter Outside rated voltage Lightening surge protection Altitude and Chapter 1 Safety Information speed range of motor bearings and mechanical devices must be ensured, please inquiry in advance if having questions. The gearbox, gears and other mechanical devices needing lubrication probably be damaged when running at a low speed for a long term , please inquiry in advance if having questions. For lift load , negative torque is often generated, the inverter may trip due to overcurrent or overvoltage, and then a appropriate brake assembly should be selected. Within the output frequency range, the inverter may encounter the mechanical resonance point of the load, now the skip frequency shold be selected. Selecting DI terminals to control the start/stop of the inverter. It is prohibited to use contactors and other switching devices at the input side of the inverter for direct and frequent start/stop in case of equipment damage. When the motor is used for the first time or before the motor is used again after being placed for a long time, insulation check shall be conducted to prevent the effectiveness of insulation of a motor winding in case of the damage to the inverter. Wiring is shown in the following figure. In the testing process, it is supposed to adopt a 500V voltage type megger and guarantee that the insulation resistance is not less than 5MΩ. Since the inverter PWM output waveform, fault trip of the inverter or damage to devices may be caused if a capacitor or an anti-thunder piezoresistor installed at the inverter output must be removed. If a contactor and other switching devices will be used between the output of the inverter and the motor, please ensure that switch operation is performed on the inverter whitout running; otherwise, the inverter may be damaged. It is not suggested to use the inverter beyond the allowable operating voltage range, and please use a corresponding voltage increasing/decreasing device for voltage transformation if needed. A surge protection device installed in the inverter.The inverter has certain self-protection ability to inductive thunder. In the areas at the altitude exceeding 1000 meters, The inverter can -4- NVF5 Series User Manual derating application be used with dreating. The following figure shows a relation curve of the rated current of the inverter and altitude. Current 100% 90% 80% Altitude 1000m 2000m 3000m 1.4 Notice of Scrap Danger The electrolytic capacitor of the main circuit and the electrolytic capacitor on the printed board may explode in the burning process. Plastic parts such as the panel may produce poisonous gases when burning. Please treat the discarded inverter as industrial waste. -5- NVF5 Series User Manual Chapter 2 Product Overview Chapter 2 Product Overview 2.1 Catalog Numbers Description NVF5 0.4 Product Model Applicable Motor Power (kW) / B T D 2 T: Universal Model Number of Inverter Input Phases Input Voltage Rating D: Single Phase Brake Unit B: Standard Embedded 2:230V 4:380V~ 440V S: Three Phases Blank: No Embedded Figure 2-1-1 Products Naming Rules 2.2 Nameplate Description 1.Product 2.Catalog No. 3.Power Rating 4.Rated Input 5.Rated Output 6.Standard 7.CE Certificate 8.Factory No. NOTE:NVF5 Serieal Inverters maintained CE certificate and complied with European Low Voltage(LVD) Directive and Electromagnetic Compatibility(EMC) Directive. Figure 2-2-1 Nameplate 2.3 Specifications and Models -6- NVF5 Series User Manual Chapter 2 Product Overview Table 2.1 Inverter Model and Specification Output Power Input Curren Catalog No. Capacity Current t kVA A A Power Supply NVF5-0.4/TD2 1.0 5.4 2.5 0.4 1.9 10.3 5 0.75 2.9 15.5 7.5 1.5 4.2 20 10 2.2 NVF5-0.4/TS4-B 0.8 2.3 1.5 0.4 NVF5-0.75/TS4-B 1.5 3.4 2.7 0.75 NVF5-1.5/TS4-B 3.0 5.1 4.2 1.5 NVF5-2.2/TS4-B 4.0 6.6 5.8 2.2 NVF5-3.7/TS4-B 5.9 12.1 10.5 3.7 NVF5-5.5/TS4-B 8.6 13.1 13 5.5 NVF5-7.5/TS4-B 11.0 22.2 17 7.5 NVF5-0.4/TD2-B NVF5-0.75/TD2 Single-Phase AC 230V NVF5-0.75/TD2-B NVF5-1.5/TD2 NVF5-1.5/TD2-B NVF5-2.2/TD2 NVF5-2.2/TD2-B Three-Phase AC 380V~440V Adaptiv e Motor kW Brak e Unit Optio nal(e mbed ded) Stan dard( embe dded) 2.4 Technical Specifications Item Input Voltage range Form2.2 Specifications Description Three-phase 380~440V : 380 V(-15%)~440 V(+15%) Single-phase 230V:230 V(±15%) Frequency range (47~63)Hz Voltage Output Frequency Overload capacity Control mode Main control function Start torque 0~rated input voltage (0~400)Hz 150% of rated current for up to 1 minute,and 180% of rated current for up to 2 seconds SVC control、V/F control、Torque control SVC:150% rated torque at 0.5Hz V/F:100% rated torque at 1Hz Carrier frequency 1kHz~15kHz -7- NVF5 Series User Manual Chapter 2 Product Overview Speed range SVC:1:100;V/F:1:50 Speed control accuracy ±0.5% of peak speed in SVC mode Frequency resolution Digital setting:0.01Hz; Analog setting:Max. frequency×0.5% Linear V/F curve;(2、1.7、1.2、multi-point)power reduced torque curve 4 types of linear Accel./Decel. curve;S-curve Accel./Decel.curve Accel./Decel. Over-current stall protection, over-voltage stall protection, torque limit, RPM tracking, simple PLC, Distinct features process PID, multi-segment speed control, automatic slip compensation, automatic torque boost, pre-excitation function, instant power cut function 5 multifunctional digital programmable input (including Digital input 1 high-speed pulse input terminal) 1 multifunctional digital programmable output (speed Digital output up to 100kHz) 2 analog signal input, (0~20)mA, (4~20)mA current Analog input signal input or (0~10)V, (-10~+10)V voltage signal input can be selected 1 analog signal output, (0~20)mA, (4~20)mA current Analog output signal output or (0~10)V, (-10~+10)V voltage signal Peripheral output can be selected interface A pair of N.O. contacts and a pair of N.C. contacts, Relay output contact capacity: 3A/250V Communication Standard RS485 communication. External operation interface panel can be connected; Embedded braking unit is optional for single-phase Braking function models, and standard for three-phase models. Display of over 20 parameters including frequency Operation panel setting, output frequency, output voltage, and output current. Protections against over-current, over-voltage, under-voltage, overheat, overload, input phase loss, Protection function output phase loss, load loss, and motor ground short circuit. The occasion is supposed to be indoor, not directly exposed in sunlight and free of dust, corrosive gas, Occasion combustible gas, oil mist, water vapor, water drops or saline matter. Environment Without derating below 1000 meters. Above 1000 Altitude meters derate 10% for every 1000 meters but shall not exceed 3000 meters. Temperature (-10~+45)℃ V/F curve -8- NVF5 Series User Manual Chapter 2 Product Overview (Temperature at(45~50)℃,derate 1% for every 1 ℃ Humidity Vibration Storage Structure IP level Cooling mode Materials Installation mode (5~95)%RH,non-condensing Vibration accel. speed≤5.8m/s² (-40~+70)℃ IP20(Standard),IP22 with accessories Cooling Fan Plastic for all series ≤2.2kW Din rail or screw(Single-phase 2.2kW only screw);>2.2kW screw 2.5 Product Appearance and Diagram Figure 2-5-1 NVF5-0.4/TD2~NVF5-2.2/TD2/NVF5-0.4/TS4-B~NVF5-2.2/TS4-B Appearance Diagram (The cooling fan of NVF5-2.2/TD2 at the bottom of the Inverter) -9- NVF5 Series User Manual Chapter 2 Product Overview Figure 2-5-2 NVF5-3.7/TS4-B~NVF5-7.5/TS4-B Appearance Diagram 2.6 Product Dimensions and Weights W d W1 H H1 63.4 D Figure 2-6-1 NVF5-0.4/TD2~NVF5-2.2/TD2/NVF5-0.4/TS4-B~NVF5-2.2/TS4-B Appearance Diagram - 10 - NVF5 Series User Manual Chapter 2 Product Overview W D W1 H H1 d Figure 2-6-2 NVF5-3.7/TS4-B~NVF5-7.5/TS4-B Appearance Diagram And Installtion Dimension Table 2.3Dimensions and Weights(Unit:mm) Mounting Catalog No. W H D W1 H1 hole d Weight kg NVF5-0.4/TD2 NVF5-0.4/TD2-B NVF5-0.75/TD2 NVF5-0.75/TD2-B 75 148 125.2 64 137.5 Φ5.3 1.2 75 148 146.7 64 137.5 Φ5.3 1.25 75 148 125.2 64 137.5 Φ5.3 1.03 89.5 206 149.2 78.5 196.8 Φ5.5 1.79 118 216 163.4 105 205 Φ6 2.78 NVF5-1.5/TD2 NVF5-1.5/TD2-B NVF5-2.2/TD2 NVF5-2.2/TD2-B NVF5-0.4/TS4-B NVF5-0.75/TS4-B NVF5-1.5/TS4-B NVF5-2.2/TS4-B NVF5-3.7/TS4-B NVF5-5.5/TS4-B NVF5-7.5/TS4-B 2.7 IP22 Top Protective Cover Description - 11 - NVF5 Series User Manual Chapter 2 Product Overview An optional Top Protective Cover may be selected to realize IP 22 protection level.The Top Protective Cover consists of two parts:Protective Cover and Bracket.You can refer to the figure 2-6-3 to install( a Installing Bracket ;b InstallingProtective Cover),Apperance after being installed shown as Figure 2-6-4 Figure 2-6-3 Installing Bracket and Proctive Cover diagram Figure 2-6-4 Apperance after being installed - 12 - NVF5 Series User Manual Chapter 3 Installation and Wiring Chapter 3 Installation and Wiring 3.1 Peripherial Components Description 3.2 Peripherial Components Selection and Guideline - 13 - NVF5 Series User Manual Chapter 3 Installation and Wiring Input Current A Recommend ed Circuit Breaker A Recommend ed Contactor A Cable Specificatio n mm² 5.4 16 10 2.5 10.3 25 16 2.5 15.5 32 25 4 20 40 32 6 NVF5-0.4/TS4-B 2.3 10 10 2.5 NVF5-0.75/TS4-B 3.3 10 10 2.5 NVF5-1.5/TS4-B 5.1 16 10 2.5 NVF5-2.2/TS4-B 6.6 16 10 4 NVF5-3.7/TS4-B 12.1 25 16 4 NVF5-5.5/TS4-B 13.1 32 25 6 NVF5-7.5/TS4-B 22.2 40 32 6 Catalog No. NVF5-0.4/TD2 NVF5-0.4/TD2-B NVF5-0.75/TD2 NVF5-0.75/TD2-B NVF5-1.5/TD2 NVF5-1.5/TD2-B NVF5-2.2/TD2 NVF5-2.2/TD2-B 3.2.1 Input AC Reactor Descriptions The AC input reactor are used to reduce harmonics and improve impedance.When the enviroment need higher harmonic requirements,an optional AC input reactor should be selected.Please refer to the reactor specifications of reactor provider below. Power Input Current AC input reactor Catalog No. Supply A Three-Phas e AC380V~440 V NVF5-0.4/TS4-B 2.3 ACL-00037-AL8M40-2L NVF5-0.75/TS4-B 3.3 ACL-00037-AL8M40-2L NVF5-1.5/TS4-B 5.1 ACL-00050-AL4M20-2L NVF5-2.2/TS4-B 6.6 ACL-00075-AL3M00-2L NVF5-3.7/TS4-B 12.1 ACL-0010-AL2M20-2L NVF5-5.5/TS4-B 13.1 ACL-0015-AL1M42-2L NVF5-7.5/TS4-B 22.2 ACL-0020-AL1M08-2L 3.2.2 Brake Resistor Description Table 3.1 Brake Resistor Specifications - 14 - NVF5 Series User Manual Power Supply V Chapter 3 Installation and Wiring Motor Power kW Catalog No. NVF5-0.4/TD2 NVF5-0.4/TD2-B NVF5-0.75/TD2 AC NVF5-0.75/TD2-B 230V NVF5-1.5/TD2 NVF5-1.5/TD2-B NVF5-2.2/TD2 NVF5-2.2/TD2-B NVF5-0.4/TS4-B NVF5-0.75/TS4-B NVF5-1.5/TS4-B AC NVF5-2.2/TS4-B 380V~440V NVF5-3.7/TS4-B NVF5-5.5/TS4-B NVF5-7.5/TS4-B Resistance Value Ω Power W -- -- 150 80 100 150 2.2 75 250 0.4 0.75 1.5 2.2 3.7 5.5 7.5 -800 400 300 200 150 100 -80 150 250 400 500 800 Brake Unit 0.4 0.75 1.5 Optional (embedded) Standard (embedded) Note: The usage and working conditions needs to be considered when selecting brake resistor. The following is a description of brake resistor selection: (1)Brake Resistor Calculation When the output current equals half the rated current of the motor, the same braking torque can be obtained as the rated torque of the motor,so the rough calculation of brake resistor is:𝑅𝑅𝐵𝐵 = 2∗𝑈𝑈𝐷𝐷 𝐼𝐼𝑀𝑀𝑀𝑀 ,𝑈𝑈𝐷𝐷 is brake voltage,𝐼𝐼𝑀𝑀𝑀𝑀 is motor rated current,to ensure that the inverter is not damaged, the minimum value of the brake resistor is 𝑅𝑅𝐵𝐵𝐵𝐵𝐵𝐵𝐵𝐵 when the current flowing through the brake resistor is motor rated current. When selecting the resistance of the brake resistor, it must not be less than the below value. 𝑈𝑈 𝑅𝑅𝐵𝐵𝐵𝐵𝐵𝐵𝐵𝐵 = 𝐷𝐷 𝐼𝐼𝑀𝑀𝑀𝑀 According to the above description, the selection range of brake resistor is: 𝑈𝑈𝐷𝐷 𝐼𝐼𝑀𝑀𝑀𝑀 < 𝑅𝑅 ≤ 2∗𝑈𝑈𝐷𝐷 𝐼𝐼𝑀𝑀𝑀𝑀 (2)Brake Resistor Power Calculation 𝑈𝑈 2 The power of brake resistor:𝑃𝑃0 = 𝐷𝐷 𝑅𝑅 The brake resistor power is mainly determined by the brake utilization rate ED%. Because the braking time of the system is relatively short, the temperature rise of the braking resistor is not enough to achieve a stable temperature rise.So the principle for determining the brake resistor capacity is to minimize the brake resistor capacity if the temperature rise of the brake resistor does not exceed its allowable value (i.e. the rated temperature rise),The rough algorithm is as follows: 𝑃𝑃𝐵𝐵 = 𝜆𝜆 ∗ 𝑃𝑃 ∗ 𝐸𝐸𝐸𝐸% = 𝜆𝜆 ∗ 𝜆𝜆 = 1 − |𝑅𝑅−𝑅𝑅𝐵𝐵 | 𝑅𝑅𝐵𝐵 2 𝑈𝑈𝐷𝐷 𝑅𝑅 ∗ 𝐸𝐸𝐸𝐸%, 1 is brake resistor derating coefficient(Normally select ) 。 6 - 15 - NVF5 Series User Manual Chapter 3 Installation and Wiring R is actual brake resistor resistance,PB is brake resistor power. 3.2.3 Output AC Reactor Descriptions The cable between Inverter and Motor should not be too long.If the cable is too long,the distributed capacitance will be large, the harmonic current will be generated easily. The output AC reactor should be selected when the motor cable is too long.Please refer to the table below: Catalog No. Input Current A Min.Cable (m) Length AC output reactor NVF5-0.4/TS4-B 1.5 50 OCL-00030-ALU2100-1L NVF5-0.75/TS4-B 2.7 50 OCL-00030-ALU2100-1L NVF5-1.5/TS4-B 4.2 50 OCL-00050-ALU2000-1L NVF5-2.2/TS4-B 5.8 50 OCL-00065-ALU1500-1L NVF5-3.7/TS4-B 10.5 50 OCL-0011-ALU1200-1L NVF5-5.5/TS4-B 13 70 OCL-0016-ALU900-1L NVF5-7.5/TS4-B 17 100 OCL-0020-ALU700-1L 3.3 Installation The inverter shall be installed at an indoor place ,good in ventilation and generally in a vertical mode. When using inverter, please pay attention to installation distance requirement. The following are examples of multiple side-by-side installations and multiple vertical installations. (1)multiple side-by-side installations Figure 3-3-1 Side-by-side Installatio Diagram - 16 - NVF5 Series User Manual Chapter 3 Installation and Wiring (2)multiple vertical installation Figure 3-3-2 Vertical installation Diagram (3)Installation Confirmation Step1:Check whether the packing box is damaged or damp,whether the label of the package consistent with the inverter which you purchased,whether the label of the package consistent with the inverter nameplate; Step2:Check whether the internal accessories of the inverter are complete; Step3:Check wheter the installation environment、installation distance、installation position are correct; If there are any abnormal,please contact Chint technical support. 3.4 Description of the cover - 17 - NVF5 Series User Manual Chapter 3 Installation and Wiring Figure 3-4-1 NVF5-0.4/TD2 ~ NVF5-2.2/TS4-B Cover Diagram Figure 3-4-2 NVF5-3.7/TS4-B~NVF5-7.5/TS4-B Cover Diagram 3.5 Wiring of Power Terminal and I/O Terminal 3.5.1 Power Terminal Description NVF5-0.4/TD2~ NVF5-2.2/TS4-B Screwdriver can only be used PH0 most , NVF5-3.7/TS4-B~ NVF5-7.5/TS4-B Screwdriver can only be used PH1 most. (1)Single-Phase 230V series(NVF5-0.4/TD2~2.2/TD2) Figure 3-5-1 Power Terminals NVF5-0.4/TD2~2.2/TD2 - 18 - NVF5 Series User Manual Chapter 3 Installation and Wiring (2) Three-Phase 380V series(NVF5-0.4/TS4-B~7.5/TS4-B) Figure 3-5-2 Power Terminals NVF5-0.4/TS4-B~7.5/TS4-B Table 3.2 Power Terminals Descriptions Name Function Description Terminal R、S、T Main Power Supply Input L1、L2 Main Power Supply Input U、V、W Inverter Output Grounding P+ P- P B P+ B DC Bus Terminals Outer Brake Resistor Terminals The three-phase AC input terminals ,connecting with the power grid The Single-Phase AC input terminals ,connecting with the power grid The three-phase AC output terminals ,connecting with the AC motor Grounding terminals,ensure reliable grounding Single phase type DC+ and DCThree phase type brake resistor terminals Single phase type brake resistor terminals 3.5.2 I/O Terminals Descriptions The control cable of the I/O terminals should be 1mm2, the requirement of stripping the control cable is(8~11)mm(Shown as Figure 3-5-2) ,the cable core should be fully contacted with the terminals,the bare cable core should not be outside of the terminals,or short circuit will be occurred between cable core. the Control Cable Type Terminal +10V Power Supply GND Figure 3-5-2 Requirement of Stripping Table 3.3 I/O Terminals Function Name Function +10V Power Supply +10V Power Supply Grounding Supply+10V Power Supply Analog Signal and + 10V Power Supply Grounding - 19 - Specification Output Current Max.5mA NVF5 Series User Manual AI1 Analog Input AI2 Chapter 3 Installation and Wiring Analog Single End Input AI1 Analog Single End Input AI2 Input Voltage Signal Range: DIP switch select current or voltage of AI1, AI1 and AI2 dafaults are voltage signal (-10~+10)V Input Current Signal: ( 0 ~ 20 ) mA or (4~20)mA Output Voltage Signal Range : Analog Output AO 485+ Comm 485DI1 DI2 Digital Input DI3 DI4 HDI Analog Output RS485 Comm . Interface Digital Input 1 Digital Input 2 Digital Input 3 Digital Input 4 Output analog Voltage/Current,Selected by DIP switch,refer to parameter F6.08 (0~10)V Output Current Signal Range: 485 Differential positive end 485 Differential negative end (4~20)mA Standard RS485 Interface,using twisted pair or shielded wire DI1 DI4 ~ signal signal ( 0 ~ 20 ) mA or Max.frequency Programmable digital input,refer to parametersF5.01~F5.05 High Speed Pulse Input Terminal : 200Hz HDI ; Max.frequency 100kHz ; Input Voltage Range+ ( 20 ~ 24 ) V , Com : Common end Voltage Range:+ (20~24)V Digital Output HDO High Speed Pulse Output Terminal Programmable Speed Pulse Terminals,refer parameter F6.09 High Output to Current Range : (0~50)mA Output Frequency Range : (0~100) kHz(See F6.12) Power Supply +24V +24V Power Supply External + 24V Supply - 20 - Power Output Current Max.:100mA NVF5 Series User Manual COM Chapter 3 Installation and Wiring +24V Power Supply Common Internal Isolation between COM and GND R1A-R1B:N.C.; +24V Common R1A Relay Output R1B Relay Output Programmable Relay Output Terminals,refer to parameter F6.02 R1C R1B-R1C:N.O. Contact Capacity: NO 5A /NC 3A 250V(AC) 3.5.3 Power terminal and I/O terminal block diagram Brake resistor Single-phase input power QF 230V 50/60Hz Three-phase input power Main circuit terminal 380V~440V 50/60Hz Power grounding Motor grounding Control circuit terminal Programmable relay outputs Programmable Multifunction Input Programmable open collector high-speed output Analog input power supply 2 x Analog input V:(-10~10)V I:(0~20)mA or (4~20)mA Analog input common Analog output Output V:(0~10)V I:(0~20)mA or (4~20)mA AO AOI AOV A11 I1 V1 J2 Multifunction interface J2、J3 Multifunction extension card interface J3 Multifunction interface RS485 communication Figure 3-5-3 Inverter Terminal Wiring Diagram AO Dip Switch:Left, (0~20)mA or (4~20)mA Analog Current Ouput;Right, (0~10) V Analog Voltage Output. AI1 Dip Swith:Left, (0~20)mA or (4~20)mA Analog Current input;Right, (0~10) VAnalog Voltage input. AI2:Current Output need to be customized - 21 - NVF5 Series User Manual Chapter 3 Installation and Wiring 3.5.4 Wiring Checking Step One:Whether the inverter rated power and rated input voltage match with the motor specifications; Step Two:The single-phase input power supply is connected with inverter input power terminals L1, L2; The three-phase input power supply is connected with inverter input power terminals R, S, T Step Three:When using brake resistor,for single-phase machine,the brake resistor will be connected between P+、B,for three-phase machine,the brake resistor will be connected between P、B; Step Four:Whether the motor cable is connected to inverter motor terminal U、 V、 W; Step Five:Whether the Grounding is connected correctly; Step Six:Whether the power cable satisfy the current carrying requirement and the 2 1mm control cable is recommended,the power cable and control cable are separated; Step Seven:If the motor output cable exceed 50m,the AC output reactor should be installed; Step Eight:The cable of brake unit should be less than 10m,the twisted cable or paralle double line should be wired; Step Nine : Analog Input 、 Output signal are easy to disturbed by external interference,so the shield cable should be selected and the shielding layer should be well grounded,the length of shield cable should be short as possible; 3.6 I/O Terminal Description 3.6.1 Multifunctional DI Terminal Using Description (1) COM is the Common terminal of DI1~DI4 and HDI,Digital inut terminals connect +24V。DI1~DI4 and HDI connection is as below: Dry contact mode,using internal +24V power supply of the inverter Figure 3-6-1 Using Internal+24VPower Supply Connecting Mode - 22 - NVF5 Series User Manual Chapter 3 Installation and Wiring (2) Source pole(Sink pole)mode,using internal +24V power supply of the inverter, PLC is NPN type and common emitter type mode. Figure 3-6-2 Using Inverter Internal +24V Power Supply Connecting Mode 3.6.2 Multifunctional DO Terminal Using Description (1) HDO is used as digital pulse frequency output,can be connected with inverter internal +24V power supply,refer to figure3-6-3: Figure 3-6-3 HDO Connection Mode1 (2) HDO is used as digital pulse frequency output,also can be connected with external power supply,refer to figure3-6-4 - 23 - NVF5 Series User Manual Chapter 3 Installation and Wiring Figure 3-6-4 HDO Connection Mode2 3.7 EMC Precautions The inverter can produce electromagnetic interference,this interference will affect automation devices and instruments probably.Correct installation can reduce electromagnetic nosie of devices and improve the interference resistance . To ensure that the inverter can run normally for a long time, please refer to the following installation description. 3.7.1Field Wiring Equipment classification:When multiple equipment is mounted in a common enclosure,such as inverter, filter, PLC and detection instrument . According to the ability in emitting electromagnetic noise externally and bearing noise, the devices are classified into strong-noise devices and noise-sensitive devices. The same type equipment shall be installed in the same area. The different type equipment shall be kept distance of 20cm or above. It is suggested to isolate different areas spatially through metal shells or grounding partition plates in the enclosure. Wiring in the enclosure: Main power cables and signal cables are generally arranged in the enclosure. The signal cables are easy to be interfered by the main power cables and then cause equipment trip. So, the signal cables and the main power cables are supposed to be distributed in different areas, not in the same cable tray, it is prohibited to arrange parallel wiring and alternate wiring of the signal cables and the main power cables in the close distance of 20cm, and the signal cables and the main power cables shall not be bound together either. If a signal cable must go across a power cable, a 90-degree angle shall be maintained between the signal cable and the power cable. Input and output cables of the main power shall not be alternately arranged or bound together. 3.7.2 Noise Suppression and Grounding The inverter must be grounded reliably in the operating process. Grounding is conducted for the safety of equipment and people and furthermore provides a simplest and most effective method with lowest cost for solving EMC problems, thereby deserving priority in consideration. Shielding cables shall be adopted for all control terminals of the inverter. The shielding layer is grounded nearby the inlet of the inverter. Cable clamps are adopted for - 24 - NVF5 Series User Manual Chapter 3 Installation and Wiring grounding to realize 360-degree circular connection. It is prohibited to twist the shielding layer before connecting it to the inverter in case that the shielding effect is lowered greatly or even lost. A shielding cable or an independent cable tray shall be adopted between the inverter and the motor. One end of the shielding layer of the motor cable or the metal shell of the cable tray is connected nearby the inverter, and the other end is connected with motor shell. The grounding cable shall be as short and thick as possible so as to lower grounding impedance, grounding cables shall be far away from the input side and the output side of noise-sensitive devices. 3.7.3 Leakage Current Suppression Leakage currents include line leakage currents and grounding leakage currents. The magnitude of a leakage current depends on distributed capacitance of the system in the wiring process and the carrier frequency of the inverter. The leakage current can be effectively lowered by reducing the carrier frequency and using motor cables as short as possible. When the motor cable is long (50m or above), an AC output reactor or a sine wave filter shall be installed at the output side of the inverter; when the motor cable is longer, it is supposed to install one reactor at a certain distance. Two classification and expression modes of leakage currents are: Grounding leakage current: means the leakage current flowing through a common grounding cable. It may flow into the inverter as well as other devices through the grounding cable. The leakage current may cause malfunction to a residual-current circuit breaker, a relay or other devices. Lines leakage current: means the leakage current flowing through distributed capacitors among the cables at the input side and the output side of the inverter. The magnitude of the leakage current is relevant to the carrier frequency of the inverter, the length of the motor cable and the sectional area of the cable. The higher the carrier frequency of the inverter, the longer the motor cable and the larger the sectional area of the cable, the larger the leakage current is. - 25 - NVF5 Series User Manual Chapter 4 Integral Keypad Chapter 4 Integral Keypad 4.1 Integral Keypad Instructions Figure 4-1-1 LED Integral Keypad Table 4.1 Key Key Function Description of the Keypad Description Long press PRG/S key,if the LED flash state is changed,then you can loosen this function switch key. PRG function:Enter and exit parameters group in parameter edit state Shift function : In parameter edit state,bit left shift ; In main interface,switch display parameters Run Key Stop key when normal state;Reset fault key when fault state Increase key(Change parameter group No.、parameters and so on) , When inverter is power on,you can use▲key increase frequency reference directly. Setting frequency changing rate can be changed by parameter F0.12 Decrease key(Change parameter group No.、parameters and so on ), When inverter is power on,you can use▼key decrease frequency reference directly. Setting frequency changing rate can be modified by parameter F0.12 - 26 - NVF5 Series User Manual Chapter 4 Integral Keypad Enter key(Save a change/Enter next level parameter menu) When parameter F0.02 = 9,the potentiometer can be used on adjusting frequency.Also you can modify parameter F7.12 and F7.13 to adjust frequency range. 1、When flash,long press PRG/S key,when all flash,loosen this function switch key; 2、When standy by and setting frequency flash,long pressPRG/Skey,when ! all not flash,loosen this function switch key; Attention 3、When parameter interface falsh,long pressPRG/Skey-Not flash,loosen this key to switch function;If no flash,Long pressPRG/Skey-Flash,loosen this key to switch function; Except single key function, keys can also realize the combination key function,See Table 4.2. Table 4.2 Combination key Function Description Key Description Parameter Menu Mode Selection(F7.11) + + + 1、 Simple Parameter Menu Mode(U-1) ; 2、 Custom Parameter Menu Mode(U-2) ; 3、 Engineering Parameter Menu Mode(U-3) 。 The system is under Lock Combinational Key the main interface In custom menu mode,in menu level Add custom parameters one The system is under Unlock Combinational Key the main interface In custom menu mode,in next level Delete custom parameters menu 4.2 Integral Keypad LED Light and Display Inverter LED keypad has 5 bits display、3 Unit Indicators、3 Status Indicators. Correspondence between display symbols and characters / numbers,refer to table4.3 - 27 - NVF5 Series User Manual Chapter 4 Integral Keypad Table 4.3 Correspondence between display symbols and characters / numbers LED LED LED LED Meaning Meaning Meaning Meaning Display Display Display Display 0 A I S 1 b J T 2 C L t 3 c N U 4 d n v 5 E O y 6 F o - 7 G P 8. 8 H q . 9 h r k The 3 unit indicators correspond to units such as Hz, A, V and so on,Shown as figure Unit Indicator Description Frequency Unit ○ Hz Hz Hz+A rpm Current Unit ○ A A A+V ○ V Speed Unit Percentage Unit % Voltage Unit V Figure 4-2-1 Unit Indicator Description The 3 unit indicators 3:meaning shown as table 4.4 Table 4.4 Status Indicator Description Indicator Display Current Status Light Running Status Running Status(RUN) Light Off Stop Status Light Running in default direction Running Direction(F/R) Light Off Running reverse Light Fault Status Fault(FAULT) Light Off Normal Status - 28 - NVF5 Series User Manual Chapter 4 Integral Keypad 4.3 Parameter Menu Mode 4.3.1 Parameter Menu Mode Description For user quickly find and use parameter codes,NVF5 has three types of parameter menu mode. Simple Parameter Menu:Include some basic commissioning parameters(See Chapter 5-Simple Menu Description) ,suitable for basic applications. Custom Parameter Menu:Users can tailor select parameters according to their application.There is no parameter when default mode,users can configure by custom operation.See Chapter 4.3.3 Engineering Parameter Menu:Users can find all inverter parameters(See Appendix B,open for qualified personnel to conduct professional commissioning.See Charpter 6 4.3.2 Menu Mode Selection The inverter has three types of parameter menu modes,default is simple mode.Users can select parameter menu mode by changing parameter F7.11 or combinational key (PRG/S key+SET key). (1) Change parameter menu mode by combinational key: Ready Status: 5.00Hz Flash Keep pressing Then press key key Press U-3 U-1 5.00 Press Press U-3 Press 5.00 Press Figure 4-3-1 Combinational Key (2)Select by changing parameter F7.11 Table 4.5 Menu Mode Selection Code Name Parameter Description F7.11 Menu Mode Selection Default 1、 Simple Menu Mode(U-1) ; 2、 Custom Menu Mode(U-2) ; 3、 Engineering Menu Mode(U-3); Changing menu mode in simple menu state example: - 29 - 1 NVF5 Series User Manual Chapter 4 Integral Keypad Change parameter No. using Parameter menu mode information 2S U-1 later Ready status: 5.00Hz flash Press 5.00 F0.00 F0 Press Pamameters Press 1 F7.11 Press Press Parameter menu mode information F0 2S later Press Press U-3 Press 5.00 Press 3 Press Figure 4-3-2 Changing Menu Mode in Simple Menu State Example 1 、When changing menu by combinational key ,entering menu is the seleted menu,the value of parameter F7.11 will change 2、When changing menu by parameter F7.11,will jump to main interface, menu mode will be changed. 3、Custom menu mode will consist of users selected parameters. ! Attention 4、The main difference between the simple menu, custom menu and the engineering menu is Simple menu and custom menu are two level menu display,but engineering menu are three level menu display. 4.3.3 Three Type Menu Parameter Setting (1) Simple Menu Mode Illustrate by setting parameter F0.05,modify 5.00Hz to 10.00Hz. Ready status: 5.00Hz flash Press 5.00 Parameter menu mode information 2S U-1 later Press F0.00 F0 ` Press 10.00 F0.14 Press Change parameter No. using F0.05 Press Press Parameters 5.00 Press Press Press Shift key Press 10.00 5.00 Press Shift key 5.00 Press Figure 4-3-3 Simple Menu Mode Parameter Setting (2) Parameter Setting in Custom Menu Mode Custom menu mode is user tailor select parameter according to application,there is no parameter when in default mode. User should add the required parameters first time. - 30 - NVF5 Series User Manual Chapter 4 Integral Keypad Below example show the custom parameter adding process by adding parameters F0.00 and F1.02,see figure 4-3-4 Ready status: 5.00Hz flash Parameter menu mode information 2S U-2 later Press 5.00 The first level menu: Group F0 Press F0 Add F0.00 Successfully added info. Press -Add- Press Press 2S later Press Press Press -Add- The second level menu: Index F0.00 Press F1.00 F1.02 F0 F1 Press Press F0.01 Press Press 2s later F1.03 Press Press F1 F0.00 Return to initial parameter setting mode Figure 4-3-4 First Time Adding Parameter in Custom Mode After adding parameters F0.00 and F1.02 , if users want to check or modify parameters,users can refer to Simple Menu Mode operation,see figure 4-3-3.If users want to“Delete”or “Add again”,see the progress below: Ready status: 5.00Hz flash Parameter menu mode information Press U-2 5.00 2S later Press Press F1.02 F0 F0.00 2s后 -AddSuccessfully added indication F1.02 Press 0.0 Press Keep pressing F0 2S later Add and press meanwhile Press -dELSuccessfully deleted indication Press F0.00 F0.00 Keep pressing and press meanwhile dEL Press Press Add Display”Add” after all deleted Figure 4-3-5 Custom Menu Mode Operation - 31 - 5.0 Press Press Press F0.01 Press Press Press Press F0.02 Change parameter index using dEL-A NVF5 Series User Manual Chapter 4 Integral Keypad (3) Engineering Menu Mode Parameter Setting Engineering Menu includes all parameters of inverter(See Appendix B) ,open for qualified personnel to conduct professional commissioning. Illustrate by setting parameter F0.05,modify 5.00Hz to 10.00Hz,see below operation progress,you can refer to this to modify other parameters. The first level menu: Group F0 Parameter menu mode information Ready status: 5.00Hz flash Press U-3 5.00 2s later Press F0 Press F0.00 Press F0.05 Press Press F0.06 Parameter value is 5.00 F0.05 5.00 Press Press Press Press Updated parameter value is: 10.00 Change parameter index Using Press Press Press 10.00 The second level menu: Index F0.00 10.00 5.00 Press Shift key Press Shift key 5.00 Press Fast update parameter Using key Figure 4-3-6 Engineering Menu Mode Parameter Setting 4.4 Integral Keypad Lock and Password Setting 4.4.1 Keypad Lock Table 4.6 Keypad Lock and Unlock Description Key/Parameter Description 0:No Lock 1:Lock Setting F7.01 2:Reserve 3:Lock except PRG/S key(SHIFT function) 4:Lock except RUN、STOP key + The system is under the main interface Lock Combinational Key + The system is under the main interface Unlock Combinational Key After locked,the keypad displays LOC1;After unlocked,the keypad displays UNLOC。 4.4.2 Keypad Password Setting - 32 - NVF5 Series User Manual F7.00 Chapter 4 Integral Keypad 0000:No Password User Password Others:Passwrod When parameter F7.00 set to non-zero value(Password) , exit parameter edit status,the password is effective,and the keypad displays P.SET,press PRG/S key again, the keypad displays“0000”,users should input correct password then enter into the parameter edit status.After setting the user password correctly,if there is no keypad operation in 1 minute,the inverter will be locked again. If the password is cleared,the keypad displays P.CLr(If users forget the setting password,you can ask for Chint technical support for getting help) - 33 - NVF5 Series User Manual Commissioning Process Chapter 5 Simple Parameter Menu and Chapter 5 Simple Parameter Menu and Commissioning Process 5.1 Simple Parameter Menu List Code Name F0.00 Motor Control Mode Attribute Parameter Description Default 0:Sensorless Vector Control ◎ 1:Reserve 0 2:V/F Mode 0:Integral Keypad F0.01 Command Source ○ 1:Digital Terminal 2:Communication 0 3:Remote Panel 0:Digital Given 1:AI1 2:AI2 3:Reserve F0.02 Main Frequency Reference ○ 4 : High Speed Pulse HDI Reference 5:Preset Speed Reference 0 6:Simple PLC Reference 7:Close Loop PID Reference 8:Reserve 9:Potentiometer Reference F0.05 F0.14 F0.15 Digital Given Accelerate Time 1 Decelerate Time 1 ○ F0.09~F0.08 ○ (0.0~6500.0)s ○ (0.0~6500.0)s - 34 - 5.00Hz Depend on Series Depend on Series NVF5 Series User Manual Commissioning Process Chapter 5 Simple Parameter Menu and 0:No Effect 1:Fault Log Clear 2:Set to Factory Default(Except Motor NP Parameters and Parameter F7.11) 3 : Reset Custom Parameter Group to Factory Default(Except Motor NP Parameters and Parameter F7.11) F0.20 Parameter Factory Default ◎ 4:All Parameter Reset to Factory Default 5:Back Up Parameters 0 6:Using Back Up Parameters 7:Saving Back Up Parameters Note:Only when you are using backup parameters,backup parameter are able to be saved.Otherwise when power off then re-power the inverter,except the updated parameters other parameters are always initial value. 0:AC Induction Motor F2.00 ○ Motor Type 0 1:Reserve 2:Reserve F2.01 F2.02 F2.03 F2.04 F2.05 F2.06 Motor NP Power Motor NP Voltage Motor NP Current Motor NP Frequency Motor Poles Motor NP RPM ◎ (0.1 ~ 1000.0) kW ◎ 0V ~ Inverter Rated Voltage ◎ (0.1~1000.0)A ◎ 0.01Hz ~ F0.07 ◎ 2 ~ 24 Depend on motor type Depend on motor type Depend on motor type Depend on motor type 4 ◎ (0~60000)rpm 1430rpm 0:No Operation F2.22 Motor Auto Tuning ◎ 1:Static Tune 2:Rotate Tune - 35 - 0 NVF5 Series User Manual Commissioning Process Chapter 5 Simple Parameter Menu and 1:Simple Menu Mode F7.11 Parameter Menu Mode ◎ 2:Custom Menu Mode 3:Engineering Menu Mode 5.2 Simple Commissioning Process - 36 - 1 NVF5 Series User Manual Commissioning Process Confirm the main circuit and control circuit correct Chapter 5 Simple Parameter Menu and Refer to Chapter 3 -“Installation and Wiring” for check correct wiring After power on, the default 5.00Hz will be displayed on NVF5 integral keypad screen normally Set NVF5 motor control mode according to parameter F0.00 definition. The default mode is V/F control. Power on Select motor control mode by parameter F0.00 Input the correct motor nameplate data in parameter group F2 (F2.01~F2.06) Input the correct motor nameplate data Need motor auto tuning Yes Can disconnect motor load? Yes No No Set parameter F2.22 to 1, press RUN key to conduct static motor auto tuning Set parameter F2.22 to 2, press RUN key to conduct rotate motor auto tuning If the motor runs reverse, change parameter F0.06 or change the 3-phase motor cables. Default reference frequency is 5.00Hz. It can be changed as required. Run the motor at 5.00Hz and check the motor running direction Set reference frequency by parameter F0.05 Set Accel. and Decel. time When the inverter is ready, press Run key to start the motor without load, measure and check the 3phase current balance If the inverter is running normally without load, the inverter can be tested with load, measure and confirm the 3-phase current balance, and also confirm the current less than rated motor current Set Accel.time and Decel.time by parameter F0.14 and F0.15 The output current value of inverter is almost the same as the value displayed on integral keypad of NVF5, motor running direction refer to parameter F0.06 After testing completed, stop the inverter, prepare to set other parameters as equipment required Record the current value and parameters After testing completed, stop the inverter and set other parameters as required Figure 5-2-1 Simple Commsissioning Process Digram - 37 - NVF5 Series User Manual Chapter 6 Parameter Function Description Chapter 6 Parameter Function Description 6.1 Start Source Setting Command control is used to control inverter start、stop、run forward、run reverse、 jog. There are 4 types of command control:Integral Keypad、Terminal、Comm.、Remote Keypad,Command reference channel can be selected by parameter F0.01. Code Name Default Setting Range Description Integral 0 Keypad Speed Reference F0.01 1 Terminal 2 Comm. 3 Remote Keypad 0 Channel Selection 6.1.1 Integral Keypad Command Setting parameter F0.01=0,Press RUN、STOP key to run or stop inverter.Press RUN key,RUN indicator light;In Run mode,Press STOP key to stop inverter,RUN indicator light off. 6.1.2 Terminal Command Setting parameter F0.01=1,Start and Stop inverter by DI terminals.Setting parameter F5.08 select DI terminals control mode.There are four types of DI terminals control mode,Two Wire Control Mode1、Two Wire Control Mode 2、Three Wire Control Mode 1、 Three Wire Control Mode 2。 Code Name Default Setting Range 0 1 Terminal 0 F5.08 2 Control Mode 3 Description Two Wire Mode1 Two Wire Mode 2 Three Wire Mode 1 Three Wire Mode 2 Control Control Control Control Users can select DI1 ~ DI4 and HDI as DI terminals command channel by setting parameters F5.01 ~ F5.05 to select DI1 ~ DI4 and HDI function. Two Wire Control Mode1: As shown in the following figure,When K1 is closed,the inverter will run forward; When K2 is closed,the inverter will run reverse;When K1、K2 is closed or opened at the - 38 - NVF5 Series User Manual Chapter 6 Parameter Function Description same time,the inverter will stop. K1 K2 RUN 0 0 STOP 1 1 0 1 1 PLC K1 Run Reverse Run Forward DI1 K2 Inverter 0 +24V DI2 COM STOP Figure 6-1-1 Two Wire Control Mode1 Parameters Setting as below: Code Name Command Channel Selection Terminal Control Mode Selection DI1 Function Selection DI2 Function Selection F0.01 F5.08 F5.01 F5.02 Values Description 1 Terminal Control 0 Two Wire Control Mode1 1 Forward(FWD) 2 Reverse(REV) Two Wire Control Mode 2: In this mode,DI1 is Run Enable input terminal,DI2 control the direction.Shown in the below figure,in this mode when K1 is closed,K2 is opened,the inverter will run forward, K2 is closed the inverter will run reverse;when K1 is opened,the inverter will stop. K1 K2 RUN 0 0 STOP 1 1 0 1 1 PLC K1 STOP K2 Run Forward Run Reverse DI1 DI2 Inverter 0 +24V COM Figure 6-1-2 Two Wire Control Mode2 Parameters Setting as below: Code Name F0.01 Values Command Channel Selection - 39 - 1 Description Terminal Control NVF5 Series User Manual F5.08 F5.01 Chapter 6 Parameter Function Description Terminal Control Mode Selection DI1 Function Selection 1 F5.02 Two Wire Control Mode2 1 Forward(“Enable”) 2 Reverse (“Forward/Reverse DI2 Function Selection Running”) Three Wire Mode 1: In this mode,DI3 is Run Enable input terminal,the direction is separately controlled by DI1、DI2.Shown as below figure,in this mode when SB1 is closed,when pressing SB2,the inverter will run forward,when pressing SB3,the inverter will run reverse,when SB1 is opened,the inverter will stop. In normal Start and Running process,SB1 must be kept closed ,SB2、SB3 will be taken effect in rising edge,the running status of the inverter will be decided by the final action of these 3 buttons. +24V PLC SB2 DI1 Inverter SB1 DI3 SB3 DI2 COM Figure 6-1-3Three Wire Control Mode1 Parameter Seeting shown as below: Code Name F0.01 F5.08 F5.01 F5.02 F5.03 Command Channel Selection Terminal Control Mode Selection DI1 Function Selection DI2 Function Selection DI3 Function Selection Three Wire Control Mode2: - 40 - Values Description 1 Terminal Control 2 Three Wire Control Mode1 1 2 5 Forward(FWD) Reverse(REV) Three Wire Control NVF5 Series User Manual Chapter 6 Parameter Function Description In this mode,DI3 is Run Enable input terminal,after Running command is given by DI1,DI2 control the direction.As shown in the below figure,when SB1 is closed,when pressing SB2 the inverter will start,when K is opened the inverter will run forward,when K is closed the inverter will run reverse;when SB1 is opened the inverter will stop. In normal Start and Running process,SB1 must be kept closed,SB2 will be took effect in rising edge. +24V PLC SB2 0 1 RUN Inverter DI1 K SB1 Run Forward Run Reverse DI3 K DI2 COM Figure 6-1-4 Three Wire Control Mode2 Paremeters Setting as below: Code Name F0.01 F5.08 F5.01 F5.02 F5.03 Command Channel Selection Terminal Control Mode Selection DI1 Function Selection DI2 Function Selection DI3 Function Selection Values Description 1 Terminal Control 3 Three Wire Control Mode 2 1 Forward(“Enable”) 2 Reverse(“FWD/REV 5 Switch”) Three Wire Control Mode 6.1.3 “Comm.”Setting Control Set parameter F0.01=2,can realize Start、Stop command by Comm. control NVF5 supports Modbus Communication mode. See Appendix A about Modbus protocol description. 6.1.4 “Remote Keypad”Setting Set parameter F0.01=3,when remote keypad is used,the inverter can be realized RUN、STOP by remote keypad.When pressing RUN key,the inverter will start,RUN indicator light;In running mode,press STOP key the inverter will stop,RUN indicator light off. - 41 - NVF5 Series User Manual Chapter 6 Parameter Function Description 6.2 Frequency Reference Setting There are threr kinds of frequency reference modes,Main frequency reference、Aux. frequency reference、Main and aux. frequency reference sum mode. 6.2.1 Main Frequency Reference Selection Set parameter F0.02,select main frequency reference.There are 9 kinds of main frequency reference modes. Setting Code Name Default Description Range 0 Digital GIven 1 AI1 2 AI2 3 Reserve Main Frequency 4 HDI F0.02 0 Source Selection 5 Preset Speed 6 Simple PLC 7 PID 8 Reverse 9 Potentiometer 6.2.2 Setting Main Frequency Reference in Keypad(Digital Given) Set main frequency reference in keypad(Digital Given),there are 4 kinds of modes to set main frequency reference using UP、DOWN to set : When parameter F0.13 ones place is 0(No memory when power off) ,that is to say when the inverter stop or re-power on,the setting frequency value will recover to the value of parameter F0.05 setting. When parameter F0.13 ones place is 1(Memory when power off) ,that is to say when the inverter power failure and power on again,the setting frequency value is the value of the last power failure. When parameter F0.13 tens place is 1(Stop frequency recover to initial value),Set parameter F0.05-Digital Given Frequency using integral keypad,then using UP、 DOWN key on the keypad to adjust frequency reference,the update frequency value will be cleared when inverter stops. When parameter F0.13 tens place is 0(Inverter stop but frequency reference hold)F0.13,Set parameter F0.05-Digital Given Frequency using integral keypad, then using UP、DOWN key on the keypad to adjust frequency reference, the update frequency value will be reserved when inverter stops. Code Name Default Setting Range Description F0.05 Digital Given 5.00Hz F0.09 ~ F0.08 - F0.07 Digital Given 50.00Hz F0.08 ~ 600.00Hz - - 42 - NVF5 Series User Manual F0.08 F0.09 Chapter 6 Parameter Function Description Digital Given Digital Given 50.00Hz F0.09 ~ F0.07 - 0.00Hz 0.00 Hz ~ F0.08 - 0x0000 ~ 0x1111 Ones Place:After Speed Setting by Integral Keypad(UP/DN) 0 : Frequency setting non storage when power off 1 : Frequency setting storage when power off Tens Place:After Speed Setting by Integral Keypad(UP/DN) 0 : Frequency maintain when stop 1:Frequency restet to initial when stop Hundreds Place : After Speed Setting by Digital Terminals(UP/DN) 0 : Frequency setting non storage when power off 1:Frequency setting (UP/DN) F0.13 Regulation 0x0000 Control 6.2.3 Analog Main Frequency Setting(AI1、AI2 setting) Setting main frequency reference by AI1、AI2,there are 4 kinds of different AI curves for each AI channel,See below setting progress: Setting Procedure (Step1)Set AI Parameter Main Frequency Selection: as frequency source:Select channel according to AI channel specification Description AI Source F0.02=1:AI1 as main frequency souce F0.02=2:AI2 as main frequency souce F0.02 (Step2)AI Curve selection: F5.24 Select suitable AI curve AI Curve Selection (Step3)AI curve setting F5.25 ~ F5.28 Curve 1Setting modes: F5.29 ~ F5.32 Curve 2Setting - 43 - NVF5 Series User Manual Set AI Voltage / Current input sacale Chapter 6 Parameter Function Description F5.33 ~ F5.36 Curve 3Setting F5.37 ~ F5.44 Curve 4Setting F5.21 ~ F5.22 AI1、AI2 (Step4)AI curve setting modes: AI curve selection and filter time setting Filter Setting AI Curve Modes: There are 4 kinds of AI curve modes,curve 1、curve 2、curve 3 are 2 points style curve, refer to parameters F5.25 ~ F5.36.Curve parameters F5.37 ~ F5.44。 Code Name Curve 1 Min. Reference F5.25 Curve 1 Min. Reference F5.26 Setting Curve 1 Max. Reference F5.27 Curve 1 Max. Reference F5.28 Setting Curve 2 Min. Reference F5.29 Curve 2 Min. Reference F5.30 Setting Curve 2 Max. Reference F5.31 Curve 2 Max. Reference F5.32 Setting Curve 3 Min. Reference F5.33 Curve 3 Min. Reference F5.34 Setting Curve 3 Max. Reference F5.35 Curve 3 Max. Reference F5.36 Setting 4 is 4 points style curve 为 4,refer to Default Setting Range Description 0.00V 0.00V ~ F5.27 0.0% (-100.0 ~ +100.0)% 10.00V F5.25 ~ +11.00V 100.0% (-100.0~ +100.0)% 100.0% is 0.00V 0.00V ~ F5.31 the Scale 0.0% (-100.0~ +100.0)% percentage 10.00V F5.29 ~ +11.00V of F0.07- 100.0% (-100.0~ +100.0)% Max. Output 0.00V 0.00V ~ F5.35 Frequency 0.0% (-100.0~ +100.0)% 10.00V F5.33 ~ +11.00V 100.0% (-100.0~ +100.0)% The setting of the AI curve is actually to set the scale relationship between the analog input voltage (or the analog input current ) and the corresponding frequency setting . When AI signal is as frequency reference,100% of the voltage or current analog input corresponds to the percentage of relative (Max. Output Frequency F0.07). For 2 points style curve setting and parameters description, please see below figure, (Curve 2、curve - 44 - NVF5 Series User Manual Chapter 6 Parameter Function Description 3 are same) : Frequence setting% Max. Ref. level Min. Ref. level Reference V Max.Ref. Min. Ref. Figure 6-2-1 AI Curve 1 Setting The curve 4 is similar as curve 1 ~ 3,most 4 point curve can be set up which can achieve more flexible correspondence.When setting curve 4, the minimum input voltage, inflection point 1 voltage, inflection point 2 voltage and maximum voltage of the curve must be increased in turn. Setting level% Min. Ref. level Inflection2 Reference Inflection1 Reference Max. Ref. level Min.Ref Reference V Inflection1 Reference Inflection2 Max.Ref Reference . Figure 6-2-2 AI Curve 4 Setting Code Name Default Setting Range F5.37 Curve 4 Min. Reference Curve 4 Min. Reference Setting Curve 4 Break Point 1 Reference Curve 4 Break Point 1 Setting Curve 4 Break Point 2 Reference 0.00V -10.0V~ F5.39 0.0% (-100.0~+100.0)% 3.00V F5.37 ~ F5.41 30.0% (-100.0~+100.0)% 6.00V F5.39 ~ F5.43 F5.38 F5.39 F5.40 F5.41 - 45 - Descripti on 100.0% is the scale percenta ge of F0.07-Ma NVF5 Series User Manual F5.42 F5.43 F5.44 Chapter 6 Parameter Function Description Curve 4 Break Point 2 Setting Curve 4 Max. Reference Curve 4 Max. Reference Setting 60.0% (-100.0~+100.0)% x. Output 10.00V F5.41 ~ +11.00V Frequenc 100.0% (-100.0~+100.0)% y AI Curve Selection: The setting curves of the analog input terminals AI1 and AI2 are selected by the bits and ten bits of the parameter F5.24. The bigger the filtering time of AI input, the stronger the anti-interference ability, but the slower the adjusting response; the smaller the filtering time, the faster the adjusting response, but the weaker the anti-interference ability. Code Name Default Setting Range Description F5.21 AI1 Filter 0.10s (0.00 ~ 10.00)s - F5.22 AI2 Filter 0.10s (0.00 ~ 10.00)s Ones Place:AI1 Curve Selection 0:Curve1 1:Curve 2 2:Curve 3 3:Curve 4 F5.24 Curve Selection 0x0000 0x0000 ~ 0x3333 Tens Place:AI2 Curve Selection 0:Curve1 1:Curve2 2:Curve 3 3:Curve 4 Hundreds Place:Reserve Thousandd Place: Reserve 6.2.4 HDI Main Frequency Setting Set parameter F0.02=4,select HDI as main frequency reference. The pulse given can only be selected by HDI,you can configure parameter F5.00 to realize. The relationship between input pulse frequency and corresponding setting of HDI terminal can be set by parameters F5.15 ~ F5.18. The correspondence is linear relationship, and 100.0% of the pulse input is the percentage of the relative maximum frequency F0.07. - 46 - NVF5 Series User Manual Code F5.00 Chapter 6 Parameter Function Description Name Default HDI Input Type Selection Setting Range Description 0 ~ 1 0: HDI-High Speed Pulse Input 1:Common 0 DI(Same as DI1~DI4) F5.15 HDI Min. Input Pulse F5.16 HDI Min. Setting F5.17 HDI Max. Input Pulse F5.18 HDI Max. Input Pulse Setting Input Pulse 0.0 KHz 0.0 KHz ~ F5.17 0.0% 100.0 KHz (-100.0~+100.0)% 100.0% (-100.0~+100.0)% F5.15 ~ 100.0KHz 100.0% is the Scale Percentage of F0.07Max. Output Frequency 6.2.5 Preset Speed Main Frequency Setting NVF5 can realize 15 preset frequency at most,assigns 4 digital inputs used to select as frequency reference.Also can be selected less than 4 DI to configure preset speed,For missing bits, state 0 is calculated. When the main frequency reference is preset speed, the function selection of DI terminal should be set to the value of 24-27, that is, the input terminal of preset speed should be specified.The Multi-Preset Frequency can be set in parameter group FA,see below parameter setting: Code Name Default Setting Range Description DI1 Function 24 : Preset Speed 1 Selection Terminal 1 DI2 Function F5.02 2 25 : Preset Speed Selection DI3 Function Terminal 2 F5.03 9 0 ~ 63 Selection 26 : Preset Speed DI4 Function Terminal 3 F5.04 12 Selection 27 : Preset Speed HDI Function F5.05 0 Terminal 4 Selection The scale of preset speed is the percentage of Max. frequency F0.07. The positive and negative parameters determine the direction of operation. If the value is negative, it means the inverter runs in the opposite direction. Assigns 4 digital inputs as preset frequency input channel - K1~K4,and compose 4 F5.01 binary digits:Among them, 1 means effective, and 0 means ineffective. The state can be combined into 15 states. These 15 states correspond to 15 setting values.See below figure: - 47 - NVF5 Series User Manual Chapter 6 Parameter Function Description K4 K3 K2 K1 Setting 0 0 0 1 0 0 1 0 0 0 1 1 0 1 0 0 0 1 0 1 0 1 1 0 0 1 1 1 1 0 0 0 1 0 0 1 1 0 1 0 1 0 1 1 1 1 0 0 1 1 0 1 1 1 1 0 1 1 1 1 Preset Speed1 Preset Speed 2 Preset Speed 3 Preset Speed 4 Preset Speed 5 Preset Speed 6 Preset Speed 7 Preset Speed 8 Preset Speed 9 Preset Speed 10 Preset Speed 11 Preset Speed 12 Preset Speed 13 Preset Speed 14 Preset Speed 15 Paramet er Range FA.31 (-100.0~100.0)% FA.32 (-100.0~100.0)% FA.33 (-100.0~100.0)% FA.34 (-100.0~100.0)% FA.35 (-100.0~100.0)% FA.36 (-100.0~100.0)% FA.37 (-100.0~100.0)% FA.38 (-100.0~100.0)% FA.39 (-100.0~100.0)% FA.40 (-100.0~100.0)% FA.41 (-100.0~100.0)% FA.42 (-100.0~100.0)% FA.43 (-100.0~100.0)% FA.44 (-100.0~100.0)% FA.45 (-100.0~100.0)% Comm ents 100.0 % is the Scale percent age of F0.07Max. Output Freque ncy, the running directio n is decide d by positiv e/negti ve of the param eter, negtive means run reverse 6.2.6 Simple PLC Main Frequency Setting When selecting Simple PLC as the main frequency reference, through the setting of parameter FA.00 to select the operation mode of simple PLC, whether memory the Simple PLC running step and running frequency or not when power failure or inverter stop: Setting Code Name Default Description Range Ones Place:PLC Running Mode 0:Single Cycle then stop FA.00 Simple PLC Running Mode Selection 0x0000 0x0000 ~ 0x1112 1:Single Cycel then holding the end valu 2:Continuous cycle Tens Place:Store when Stop 0:No Store - 48 - NVF5 Series User Manual Chapter 6 Parameter Function Description 1 : Store stop step and frequency Hundreds Place : Store when power off 0:No Store 1 : Store stop step and frequency Thousands Place : Step Time Unit Selection 0:Second 1:Minute When the running frequency of the simple PLC is selected by preset speed N(FA.01 ons place 0) ,you need to configure parameter FA.31 ~ FA.45(Please refer to 6.2.5 about the setting) ,parameter FA.01 ~ FA.30, Set the running time, acceleration and deceleration time and running direction of each step; When setting simple PLC as the frequency reference, if setting Simple PLC function forbidden (terminal function 40), the system will switch to FA. 46 standby channel for adjustment. Code Name Default Setting Range Description Ones Place : Frequency Source0:Multi-Step Frequency 1:AI1 2:AI2 3:Reserve 4:HDI 5:PID Output FA.01 Step 1 Setting 0x0000 0x0000 0x0315 ~ Tens Place : Running Direction 0:Forward 1:Reserve Hundreds Place : Accel./Decel. Time 0 : Accel./Decel. Time 1 1 : Accel./Decel. Time 2 2 : Accel./Decel. - 49 - NVF5 Series User Manual Chapter 6 Parameter Function Description Time 3 3 : Accel./Decel. Time 4 FA.02 FA.03 FA.04 FA.05 FA.06 FA.07 FA.08 FA.09 FA.10 FA.11 FA.12 FA.13 FA.14 FA.15 FA.16 FA.17 FA.18 FA.19 FA.20 FA.21 FA.22 FA.23 FA.24 FA.25 FA.26 FA.27 FA.28 FA.29 FA.30 Step 1Running Time Step 2 Setting Step 2Running Time Step 3 Setting Step 3Running Time Step 4 Setting Step 4Running Time Step 5 Setting Step 5Running Time Step 6 Setting Step 6Running Time Step 7 Setting Step 7Running Time Step 8 Setting Step 8Running Time Step 9 Setting Step 9Running Time Step 10 Setting Step 10Running Time Step 11 Setting Step 11Running Time Step 12 Setting Step 12Running Time Step 13 Setting Step 13Running Time Step 14 Setting Step 14Running Time Step 15 Setting Step 15Running Time 20.0 0.0~ 6500.0 - 0x0000 Same as FA.01 - 20.0 0.0~ 6500.0 - 0x0000 Same as FA.01 - 20.0 0.0~ 6500.0 - 0x0000 Same as FA.01 - 20.0 0.0~ 6500.0 - 0x0000 Same as FA.01 - 20.0 0.0~ 6500.0 - 0x0000 Same as FA.01 - 20.0 0.0~ 6500.0 - 0x0000 Same as FA.01 - 20.0 0.0~ 6500.0 - 0x0000 Same as FA.01 - 20.0 0.0~ 6500.0 - 0x0000 Same as FA.01 - 20.0 0.0~ 6500.0 - 0x0000 Same as FA.01 - 20.0 0.0~ 6500.0 - 0x0000 Same as FA.01 - 20.0 0.0~ 6500.0 - 0x0000 Same as FA.01 - 20.0 0.0~ 6500.0 - 0x0000 Same as FA.01 - 20.0 0.0~ 6500.0 - 0x0000 Same as FA.01 - 20.0 0.0~ 6500.0 - 0x0000 Same as FA.01 - 20.0 0.0~ 6500.0 - - 50 - NVF5 Series User Manual Chapter 6 Parameter Function Description 0:Digital GIven PLC Back Channel Selection FA.46 1:AI1 Up 0 0~4 2:AI2 3:Reverse 4:HDI f3 f1 f2 a2 a3 f14 d4 f4 d5 a1 Simple PLC Running a13 a5 T1 T2 T3 a15 f15 a14 f13 T4 T5 d15 d13 f5 T6~T12 T13 T14 T15 Simple PLC Step Complete Indication Simple PLC Cycle Complete indication Figure 6-2-3 Simple PLC as Main Frequency Reference There are 3 kinds of operation mode for inverter Simple PLC function:Single cycle then stop、single cycle then hold the final value、continuous cycle,please see the below process figure: Single Cycle then Stop: f3 f1 f2 a2 a3 f14 d4 a14 f4 d5 a13 a1 a5 Simple PLC Running T1 T2 T3 T4 d13 f5 T6~T12 T13 T14 RUN Command Figure 6-2-4 Simple PLC Single Cycle then Stop Mode d15 f15 f13 Single Cycle then Hold The Final Value: - 51 - T15 NVF5 Series User Manual Chapter 6 Parameter Function Description f14 f3 f1 f2 a2 d4 f4 a3 a14 f13 d5 a13 a1 a5 Simple PLC Running T1 T3 T2 d15 f15 d13 f5 T4 T6~T12 T13 T14 T15 RUN Command Figure 6-2-5 Simple PLC Single Cycle then Hold The Final Value Mode Continuous Cycle: f15 f15 f2 f2 f14 f1 f1 f14 f1 a1 f5 f5 Second Cycle First Cycle RUN Command Figure 6-2-6 Simple PLC Continuous Cycle Mode 6.2.7 Process PID Main Frequency Setting Process PID control is a common method of process control. Through proportional, integral and differential calculation of the difference between the feedback signal and the target signal of the controlled variable, the output frequency of the inverter is adjusted by the closed-loop, so that the controlled variable can be stabilized at the target value; When the PID is used as reference, if the PID forbidden is set at the same time (terminal function 44), the system will switch to the F9.29 standby channel for regulation. - 52 - NVF5 Series User Manual F9.02 0 AI1 1 AI2 2 Reserved 3 HDI 4 AI1 AI2 Reserved F9.00 PID ref. source selection + - PID para. switch para.1(F9.03~F9.05) para.2(F9.17~F9.19) switch condition(F9.20~ F9.22) F9.15 close loop adjust feature PID pause (DI1~DI4 function 43) PID offset limit (PID offset≤F9.10) 5 6 F9.14 (close loop output reserve selection) Comm. command Multi-segment command Chapter 6 Parameter Function Description 0 1 2 AI1+AI2 3 AI1-AI2 4 MIN(AI1,AI2) 5 MAX(AI1,AI2) 6 HDI Comm. command 7 8 F0.02=7 Main Frequency PID input F0.03=7 Aux. Frequency PID input 5 6 F0.04 Main and Aux. frequency calculation Frequency command F9.01 feedback channel selection Figure 6-2-7 Process PID Main Frequency Setting Code Name Default Setting Range Description 0:Digital Given 1:AI1 F9.00 PID Reference Selection 2:AI2 1 0 ~ 6 3:Reserve 4:HDI 5:Reserve 6:Preset Speed 0:AI1 1:AI2 2:Reserve F9.01 Feedback Selection 1 0 ~ 6 3:AI1+AI2 4:AI1-AI2 5:MIN(AI1,AI2) 6:MAX(AI1,AI2) 7:HDI - 53 - NVF5 Series User Manual Chapter 6 Parameter Function Description 8:Reserve (0.0 ~ 100.0)% - 20.0 0.0 ~ 100.0 - F9.03 Reference Digital Given Setting KP F9.04 Ki 2.00 0.01 ~ 10.00 - F9.05 Kd 0.000 0.000 ~ 10.000 - F9.06 Sampling Period Reference Change Time Feedback Filter Time PID Output Filter Time Offset Limit 0.50s (0.01 ~ 50.00)s - 0.00s (0.00 ~ 650.00)s - 0.00s (0.00 ~ 60.00)s - 0.00s (0.00 ~ 60.00)s - 0.0% (0.0 ~ 100.0)% - Differential limiting The Max. Positive Offset between the Two Outputs The Max. Negative Offset between the Two Outputs 0.10% (0.00 ~ 100.00)% - 1.00% (0.00 ~ 100.00)% - 1.00% (0.00 ~ 100.00)% - 0 0:Close Loop Output is Negative,Inverter Run in Lower Limit Frequency 1:Close Loop Output is Negative,Inverter Run Reverse - 0 ~ 1 Direction F9.02 F9.07 F9.08 F9.09 F9.10 F9.11 F9.12 F9.13 F9.14 Close Loop Output Invert Selection 50.0% 0 F9.15 Close Loop Adjust 0 1 : : Direction F9.17 Integral Adjustment Selection Kp2 F9.18 Ki2 2.00 0.01 ~ 10.00 - F9.19 Kd2 Parameter Switch Selection 0.000 0 ~ 10.000 - 0 ~ 2 - F9.16 F9.20 0x0000 0x0000~ 0x0011 - 20.0 0.0 ~ 100.0 - 0 - 54 - Positive Negative NVF5 Series User Manual Chapter 6 Parameter Function Description F9.21 Switch Offset 1 20.0% 0.0% ~ F9.22 - F9.22 Switch Offset 2 Close Loop Preset Value Preset Value Holding Time Reference Feedback Level Feedback Loss Detection Value Feedback Loss Detection Time 80.0% F9.21 ~ 100.0% - 0.0% (0.0 ~ 100.0)% - 0.00s (0.00 ~ 650.00)s - 1000 0 ~ 65535 - 0.0% (0.0 ~ 100.0)% - (0.0 ~ 20.0)s - F9.23 F9.24 F9.25 F9.26 F9.27 0.0 0 : No F9.28 Close Loop Calculation Mode 0 0 ~ 1 F9.29 Close Loop BackupsChannel Selection 0 0~4 calculate when stop 1:Calculate when stop 0:Digital Given 1:AI1 2:AI2 3:Reserve 4:HDI Larger Proportional Gain Kp Larger Integral Gain Ki Smaller Integral Gain Ki Smaller Proportion Gain Kp Feedback Offset limit Larger Differential Gain Kd Smaller Differential Gain Kd Ref. Output Freq. time time Figure 6-2-8 Process PID Influence - 55 - NVF5 Series User Manual Chapter 6 Parameter Function Description 6.2.8 Communication Mian Frequency Setting See Appendix A – Modbus Communication Protocol 6.2.9 Auxiliary Frequency Input Setting Set parameter F0.03 to select Aux. Frequency as speed reference,the setting mode is same as main frequency setting mode,refer to “6.2.1 Main Frequency Reference Setting”about the parameter setting progress. Setting Code Name Default Description Range F0.03 Auxiliary Frequency Source Option 0 0 Digital Given(F0.05) 1 2 3 4 5 6 7 8 9 AI1 AI2 Reserve HDI Preset Speed Simple PLC PID Reserve Potentiometer 6.2.10 Select Main and Auxiliary Frequency Sum Mode See parameter F0.04 Auxiliary frequency . Code Name F0.04 Set the relationship between target frequency and Main and Main Aux. Frequency Source Computing Default 0x0000 Setting Range Description 0x0000 ~ 0x0031 Ones Place : Frequency Source Selection 0 : Main Frequency Ref. 1 : Computing Result Tens Place : Main Aux. Frequency Source Computing 0:Main + Aux. 1:Mian – Aux. 2 : MAX(the bigger one of both) 3 : MIN(the smaller one of both) 6.2.11 Frequency Limit(Frequenct Setting) - 56 - NVF5 Series User Manual Chapter 6 Parameter Function Description Frequency highest Limit:Limit max. output frequency,motor is not allowed to run over the highest limit frequency; Frequency Lowest Limit:Limit min. output frequency,motor is not allowed to run below the lowest limit frequency; Max. Output Frequency:Limit the Max. output frequency. Code F0.07 F0.08 F0.09 Name Max. Frequency Maximum Frequency Minimum Frequency Output Default Setting Range Description 50.00 Hz F0.08 ~ 600.00Hz - 50.00 Hz F0.09 ~ F0.07 - 0.00 Hz 0.00Hz ~ F0.08 - 6.3 Start and Stop Setting 6.3.1 Start Mode NVF5 has three starting modes: Starting from starting frequency, first braking then starting from starting frequency, speed tracking and restart.Set parameter F1.00 to select NVF5 start mode. Code Name Default Setting Range Description 0 : Start from the F1.00 0 0 ~ 2 starting frequency 1 : First brake and then start from the starting frequency 2 : Speed tracking (including direction discrimination) and then start 0.00Hz (0.00~ 10.00)Hz - 0. 0s (0.0 ~ 100.0)s - Start Mode Selection F1.02 Direct starting frequency Starting frequency Holding time F1.03 DC braking current Before starting 0.0% (0.0 ~ 100.0)% F1.04 DC brakin time Before starting 0.0s (0.0~ 100.0)s F1.01 Starting from starting frequency - 57 - 100% ( Inverter Rated Current) - NVF5 Series User Manual Chapter 6 Parameter Function Description Set parameter F1.00=0 , directly start inverter ,suitable for most kinds of load.Set parameter F1.01-direct starting frequency:suitable for some constant torque load. Setting Freq. Freq. Hz Start Freq. Start Freq. Holding time time Figure 6-3-1 Directly Start Time Sequence Chart First Braking then Starting from Starting Frequency Set parameter F1.00=1,Set parameter F1.01 ~ F1.04DC brake function before start,suitable for motor rotate when start . Freq. Hz Output vol. (RMS value) RUN command Time t DC injection brake level DC injection brake time Time t Figure 6-3-2 First Braking then Starting Time Sequence Chart Speed Tracking(including direction discrimination) and Restart Set parameter F1.00=2,the start mode of the inverter is speed tracking and restart (The inverter first judge the speed and direction of the motor, and then starts with the tracking motor frequency)suitable for large inertia load. If the motor is still running by large inertia load when the inverter start, the over-current can be avoided by adopting speed tracking and restarting. - 58 - NVF5 Series User Manual Chapter 6 Parameter Function Description Outmut freq. Mrtru speed Affeleuatirq Mrtru speed tuafkiqg time Time Figure 6-3-3 Speed Tracking and then Start Time Sequence Chart 6.3.2 Stop Mode The NVF5 has three kinds of stop modes,ramp deceleration stop、coast stop、ramp stop+DC injection braking stop.Set parameter F1.05 to select stop mode. Code Name Default Setting Range Description 0: Decel. Ramp F1.05 Stop Mode F1.07 DC braking Starting frequency DC braking wait time F1.08 DC braking current F1.06 Stop 1:Coast Stop 2:Ramp Stop+DC Injection Brake 0 0 ~ 2 0.00Hz 0.00Hz ~ F0.07 -- 0.0s (0.0 ~ 100.0)s -- 0.0% (0.0 ~ 100.0)% 100%(Inverter Rated Current) DC braking time 0.0s F1.09 (0.0 ~ 100.0)s -Ramp Decel. Stop Set parameter F1.05=0,the inverter ramp decel. Stop.When the stop command is effective,the inverter will ramp deceleration stop ,when the frequency decelerate to 0 ,the inverter stop. - 59 - NVF5 Series User Manual Chapter 6 Parameter Function Description Freq. Running freq. Time Deceleration time Sqlm clmmana Figure 6-3-4 Ramp Decel. Stop Time Sequence Chart Coast Stop Set parameter F1.05=1,inverter coast stop. When the stop command is effective,the inverter immediately stops output and the motor will execute coast stop. Freq. Coast stop by load inertial Time Sqlm clmmana Figure 6-3-5 Coast Stop Time Sequence Chart Ramp Stop+DC Injection Braking Stop Set parameter F1.05=2, inverter ramp stop,after the frequency drops to the DC braking starting frequency of parameter F1.06, the inverter starts DC braking. Freq. Hz DC braking starting Freq. Output Vol. (RMS value) Time t DC brake waiting time DC brake level DC brake time RUN command Figure 6-3-6 Ramp Stop+DC Injection Braking Stop Time Sequence Chart - 60 - NVF5 Series User Manual Chapter 6 Parameter Function Description 6.3.3 Accel./Decel. Time and Curve Setting The acceleration time refers to the time required for the inverter to accelerate from zero to F0.07-maximum output frequency;the deceleration time refers to the time required for the inverter to decelerate from F0.07-maximum output frequency to zero. Linear Accel./Decel. NVF5 has 4 groups Accel./Decel. time,you can switch them by using digital inputs.For example:Configure DI1 and DI2 as switch terminals to consist 2 binary digits(1means DI setting is effective,0 means DI setting is ineffective) S Curve Accel./Decel. NVF5 has 2 groups S curve Accel./Decel. mode,you can select by setting parameter F1.12: S curve Accel./Decel.1:When the target frequency is fixed, the output frequency increases or decreases according to the S curve. It can be used in places requiring slow start or stop, such as conveyor belts, etc. S curve Accel./Decel.2:When the target frequency is dynamically changed in real time, the output frequency will increase or decrease in real time according to the S curve. It is suitable for occasions with high comfort and fast real-time response. Setting Code Name Default Description Range F5.01 DI1 Function Selection 28 0 ~ 63 28:Accel. Time Selection Terminal1 F5.02 DI2 Function Selection 29 0 ~ 63 29:Accel. Time Selection Terminal 2 K2 K1 Accel./Decel. Time Curve 0 0 Group1:F0.14、F0.15 0 1 Group2:F8.04、F8.05 1 0 Group3:F8.06、F8.07 1 1 Group4:F8.08、F8.09 Code Name F0.14 Accel. Time 1 F0.15 Decel.Time 1 F8.04 Accel. Time 2 F8.05 Decel.Time 2 F8.06 Accel. Time 3 Default Depend on Series Depend on Series Depend on Series Depend on Series Depend Setting Range Description (0.0 ~ 6500.0)s - (0.0 ~ 6500.0)s - (0.0 ~ 6500.0)s - (0.0 ~ 6500.0)s - (0.0 ~ 6500.0)s - - 61 - NVF5 Series User Manual Chapter 6 Parameter Function Description F8.07 Decel.Time 3 F8.08 Accel. Time 4 F8.09 Decel.Time 4 on Series Depend on Series Depend on Series Depend on Series (0.0 ~ 6500.0)s - (0.0 ~ 6500.0)s - (0.0 ~ 6500.0)s - F1.12 Accel./Decel. Mode Selection 0 0 ~ 2 0:Linear Acceleration 1:S Curve Acceleration1 2:S Curve Acceleration2 F1.13 S-curve Scale of Starting Time 30.0% (0.0 ~ 100.0)% - F1.14 S-curve Scale Stopping Time 30.0% (0.0 ~ 100.0)% - of 6.4 Motor Auto Tuning Motor auto tuning is a process which the inverter analyse motor parameters . The auto tuning methods include static auto tuning and rotate auto tuning . Code Name Default Setting Range Description 0:No Operation F2.22 Motor Auto Tuning 0 ~ 2 0 1:Static Tune 2:Rotate Tune F2.00 Motor Type 0 ~ 2 0 0:AC Induction Motor 1:Reserve 2:Reserve F2.01 F2.02 F2.03 F2.04 F2.05 Motor NP Power Motor NP Voltage Motor NP Current Motor NP Frequency Motor Poles Depend on motor type Depend on motor type (0.1 ~ 1000.0)kW - 0 ~ Inverter Rated Voltage - Depend on motor type Depend on motor type Depend on motor type (0.01~ 1000.00)A - 0.01 ~ F0.07 - 2 ~ 24 - - 62 - NVF5 Series User Manual F2.06 Motor NP RPM Chapter 6 Parameter Function Description 1430 rpm (0 ~ 60000)rpm - (0.001~65.535)Ω ( Inverter Power F2.07 Motor Stator Impedance Depend on motor type <=55kW) (0.0001~6.5535)Ω - ( Inverter Power >55kW) (0.001~65.535)Ω ( Inverter Power F2.08 Motor Rotor Resistor Depend on motor type <=55kW) (0.0001~6.5535)Ω - ( Inverter Power >55kW) (0.0~655.35)mH ( Inverter Power F2.09 Motor Leakage Inductance Depend on motor type <=55kW) (0.001~65.535)mH - ( Inverter Power >55kW) (0.1~6553.5)mH ( Inverter Power <= F2.10 Motor Mutual inductance Depend on motor type 55kW) (0.01~655.35)mH - ( Inverter Power > 55kW) 0.01A ~ F2.03 ( Inverter Power F2.11 Motor no-load current <=55kW) Depend on motor type 0.1A ~ F2.03 - ( Inverter Power >55kW) ● Motor Static Auto Tuning:It is suitable for occasions where motor and load are - 63 - NVF5 Series User Manual Chapter 6 Parameter Function Description difficult to separate and do not allow rotate auto tuning operation; 1.Correctly input motor nameplate data:F2.00 ~ F2.06; 2. Modify parameter F2.22 to 1,press Run key to start inverter; 3. When the keypad displays“-TUN-”,auto tuning complete; ● Motor Rotate Auto Tuning:It is suitable for occasions where motor and load are convenient to separate. 4. Correctly input motor nameplate data:F2.00 ~ F2.06; 5. Modify parameter F2.22 to 2,then press Run key to start inverter; 6. When the keypad displays“-TUN-”,auto tuning complete; ! Attention 1.In the process of motor auto tuning, motor parameters must be input correctly according to the motor nameplate, otherwise it may lead to inaccurate motor parameters auto tuning. 2 . In the process of motor auto tuning, the tuning process can be terminated by pressing STOP key, but the auto tuning of motor may be incomplete. 3.In the process of motor auto tuning, if there is an abnormal, the auto tuning fault (E. tE) will be reported. At this time, the power should be cut off to eliminate the possible faults, and then re-tune the motor. 6.5 V/F Parameters 6.5.1 Linear V/F、Multi-Point Code Name V/F、 Reduced Torque V/F Curve Default Setting Range Description 0:Linear V/F curve F4.00 V/F Curves 0 ~ 5 0 1 : 2 power reduced torque V/F curve 2 : 1.7 power reduced torque V/F curve 3 : 1.2 power reduced torque V/F curve 4:Multi-point V/F curve (See F4.03~F4.08) 5:V/F separation curve F4.01 Torque Boost Depend on Series 0.0% (0.0~30.0)% - 64 - (See F4.12~F4.17) 0.0% Automatically 30.0% Motor Rated Voltage NVF5 Series User Manual F4.02 F4.03 F4.04 F4.05 F4.06 F4.07 F4.08 Torque Boost Cut-off Point Multi-point VF Frequency Point 3 Multi-point VF Voltage Point 3 Multi-point VF Frequency Point 2 Multi-point VF Voltage Point 2 Multi-point VF Frequency Point 1 Multi-point VF Voltage Point 1 Chapter 6 Parameter Function Description 50.00Hz 0.00Hz ~F0.07 - 0.00Hz F4.05 ~ F2.04 - 0.0% (0.0 ~ 100.0)% - 0.00Hz F4.07 ~ F4.03 - 0.0% (0.0 ~ 100.0)% - 0.00Hz 0.00 Hz~F4.05 - 0.0% (0.0 ~ 100.0)% - ● General Constant Torque V/F curve:Under the rated frequency, the output voltage changes linearly with the output frequency, which is suitable for general mechanical machines such as large inertia fans, punches, centrifuges, pumps and so on. Output Vol. V Max. Output Vol. Torque boost Output freq. f Torque boost cut-off freq. Normal Running Freq. Figure 6-5-1 General Constant Torque Linear V/F Curve ● Custom Multi-Point V/F Curve:range of frequency setting 0.00Hz ~Motor Rated Frequency,range of voltage setting Voltage , the setting of Multi-Point characteristics of the motor. 0.0% ~ 100% Corresponding 0V ~Motor Rated V/F curve is normally decided by the load - 65 - NVF5 Series User Manual Chapter 6 Parameter Function Description Output Vol. V (f1,V1) multi-point VF curve point 1 Max. Output Vol. (f2,V2) multi-point VF curve point 2 V3 (f3,V3) multi-point VF curve point 3 V2 V1 Output freq. f 0 f1 f2 f3 Normal running freq. Figure 6-5-2 Custom Multi-Point V/F Curve ● Reduced Torque V/F Curve:Under the rated frequency, the relationship between the output voltage and the output frequency varies according to the 2nd power, 1.7th power and 1.2th power curves,this V/F curve is suitable for the load of fans and pumps. Output Vol. V Max. Output Vol. Linear Type 1.2th power V/F curve 1.7th power V/F curve 2.0th power V/F curve Square Type Output freq. f Normal Running Freq. Figure 6-5-3 Reduced Torque V/F Curve 6.5.2 V/F Seperation Curve Setting Code F4.12 Name VF Separation Output Voltage Channel Default Setting Range 0 ~ 3 0 Description 0 : Keypad Setting 1:AI1 2:AI2 3:Reserve Note:100% Corresponding Motor Rated - 66 - NVF5 Series User Manual Chapter 6 Parameter Function Description Voltage F4.13 VF Separation Voltage Digital Given (0.0 ~ 100.0) 100% motor 0.0% % rated voltage VF Separation Voltage F4.14 0.5s (0.0 ~ 10.0)s Rising Time VF Separation Voltage F4.15 0.5s (0.0 ~ 10.0)s Dropping Time VF Separation Max. F4.17~100.0% F4.16 100.0% Output Voltage VF Separation Min. F4.17 0.0% 0.0% ~ F4.16 Output Voltage The acceleration time of V/F separation voltage refers to the time required for the output voltage to accelerate from 0 to the rated voltage of the motor, the deceleration time of V/F separation voltage refers to the time required for the out voltage to decelerate from motor rated voltage to 0 . Output Vol. V VF separation Max. output Vol. V setting VF separation Min. output Vol. Time t VF separation Vol. increase time VF separation Vol. decrease time Figure 6-5-4 V/F Separation Curve Setting 6.6 Vector Control Parameters Vector control regulator is divided into speed control regulator and torque control regulator:Speed control mode is that the whole control takes the stable speed as the core to ensure that the running speed is consistent with the speed reference, and the maximum load capacity is limited by the torque limit;torque control mode is the whole control to stabilize the torque as the core to ensure that the actual output torque and torque reference consistent, and the output frequency is limited by speed limit. 6.6.1 Vector Control Parameter Setting Code F3.00 Name Speed/Torque Selection Default 0 - 67 - Setting Range 0 ~ 1 Description 0 : Speed Regulation NVF5 Series User Manual Chapter 6 Parameter Function Description 1 : Torque Regulation F3.01 F3.02 F3.03 F3.04 F3.05 F3.06 F3.07 F3.08 F3.09 F3.10 ● Speed Loop Kp 1 ( Low Speed ASR1-P) Speed Loop Ki Time 1(Low Speed ASR1-I) Switch Frequency1 Speed Loop Kp 2 ( Low Speed ASR2-P) Speed Loop Ki Time 2(Low Speed ASR2-I) Switch Frequency 2 Slip Compensation Rate in Vector Control Mode Speed Loop Filter Time Torque Upper Limit Value of the Speed Loop Braking Torque Upper Limit Value of the Speed Loo 30 1 ~ 100 - 0.50s (0.01 ~ 10.00) s - 5.00Hz 0 Hz ~ F3.06 - 20 1 ~ 100 - 1.00s (0.01 ~ 10.00) s - 10.00Hz F3.03 ~ F0.07 - 100% ( 50 ~ 200 ) % - 0.000s (0.000~0.100)s - 180.0% (0.0 ~ 300.0) % - 180.0% (0.0 ~ 300.0) % - Speed Loop PI Switch The speed loop PI parameters are divided into two groups: low speed and high speed, when the running frequency is smaller than F3.03-Switch Frequency1,speed loop PI regulated parameters are F3.01 and F3.02,when the running frequency is greater than F3.06-Switch Frequency2 ,speed loop PI regulated parameters are F3.04 and F3.05. The speed loop dynamic response characteristics of vector control can be adjusted by setting the proportion and integration time of the speed regulator. Increasing proportional gain and reducing integration time can speed up the dynamic response of speed loop. However, if the gain is too large or the integration time is too small, the system will oscillate. - 68 - NVF5 Series User Manual Chapter 6 Parameter Function Description Figure 6-6-1 Speed Loop PI Parameter Switch ● Speed loop slip compensation coefficient This parameter can adjust the accuracy of motor speed stability. When the frequency of the motor is lower than the output frequency of the inverter, the parameter can be increased. The adjustment of this parameter will affect the inverter output current of the same load,when the load capacity is weaker in the low speed, this parameter can be appropriately increased. 6.6.2 Vector Torque Control Mode Setting Code Name Default Setting Range Description 0:Integral Keypad 1:AI1 2:AI2 F3.19 Torque Reference Selection 3:Reserve 0 0 ~ 7 4:HDI High Speed Pulse Reference 5:Reserve6:MIN (AI1, AI2) 7:MAX(AI1, AI2) F3.20 F3.21 F3.22 F3.23 F3.24 Integral Keypad Torque Setting Speed→Torque Switch Point Speed/Torque Swith Delay Torque Reference Filter Time Torque Control 0.0% (-300.0 ~ +300.0) % 100.0% (0.0 ~ 300.0)% 0ms (0 ~ 1000)ms 0s (0 ~ 65535)s 0.10s (0.00 ~ 650.00)s - 69 - 100% Initial Torque Setting NVF5 Series User Manual F3.25 F3.26 F3.27 ● Chapter 6 Parameter Function Description Accel. Time Torque Control Decel. Tim Forward Speed Limit in Torque Mode Reverse Speed Limit in Torque Mode 0.10s (0.00 ~ 650.00)s 100.0% (0.0~100.0)% 100.0% (0.0~100.0)% Speed Regulator、Torque Regulator Mode Selection Speed / Torque Mode is switched by parameter F3.00 ,also it can be switched by setting DI1 ~ DI and HDI terminals(DI function 38). ● Torque Control Reference Torque Control Reference is set by parameter F3.19. When the torque reference is given byAI1、AI2、HDI,the final torque reference is: AI output percentage of analog curve AI(pulse of HDI curve) × motor rated torque. AI analog curve、pulse of HDI curve:refer to 6.2.3 Analog Main Frequency Setting (AI1、AI2 setting) 、 6.2.4 Pulse Main Frequency Setting; When the torque reference is positive,the inverter run forward,when the torque reference is negtative,the inverter run reverse. ● Speed→Torque switch point In order to avoid the system sudden skip in the start-up process, the inverter firstly complete the start process in the speed mode, and switches to the torque control mode when reaching the switching point; This method can effectively solve the problems of insufficient starting torque and sudden skip of starting torque in torque mode. ● Torque control Accel./Decel. time Torque control Accel. Time F3.24 means acceleration time of torque reference from 0 to rated torque of motor,torque control Decel. Time F3.25 means deceleration time of torque reference from rated torque of motor to 0. ● Forward/Reverse speed limit value in torque control mode Used to set up the positive or reverse maximum operating frequency of the inverter under the torque control mode. In torque control mode,If the load torque is less than the output torque of the motor, the speed of the motor will rise continuously. In order to prevent the mechanical system from flying accidents, it is necessary to limit the maximum speed of the motor. 6.6.3 Current Loop in Vector Control Mode Code Name Default Setting Range Description F3.11 Flux Regulation Kp 2000 0 ~ 60000 - F3.12 Flux Regulation Ki 1300 0 ~ 60000 - - 70 - NVF5 Series User Manual Chapter 6 Parameter Function Description F3.13 Torque Regulation Kp 2000 0 ~ 60000 - F3.14 Torque Regulation Ki 1300 0 ~ 60000 - The integral regulator of the current loop does not use integral time as dimension, but directly sets integral gain. If the PI gain of the current loop is too large, the system may oscillate. Therefore, when the current oscillates or the torque fluctuates greatly, the Proportional gain or the Integral gain can be reduced manually. 6.7 OverCurrent Stall Protection If the current exceeds 150% action current of overcurrent stall (1.5 times of motor rated current) during the running process, the overcurrent stall will take effect and the output frequency will begin to decrease, until the current returns below the overcurrent stall point, the frequency will start to accelerate up to the target frequency, and the actual acceleration time will be increased automatically. The greater the overcurrent stall gain, the stronger the overcurrent stall, the faster the output frequency drops. Figure 6-7-1 Overcurrent Stall Action Digram Code FE.07 FE.08 Name Overcurrent Stall Gain Overcurrent Stall Protection Current Default Setting Range 20 0 ~ 100 150% (100 ~ 200)% Description 0:Prohibit - 6.8 OverVoltage Stall Depress If the DC Bus voltage exceeds the over-voltage stall protection voltage FE.06, the over-voltage stall will take effect in the operation of the inverter, adjusting the output frequency, the actual deceleration time will be automatically increased to avoid trip. - 71 - NVF5 Series User Manual Chapter 6 Parameter Function Description Output Vol. Over voltage stall point Time Output Freq. Time Figure 6-8-1 OverVoltage Stall Action Diagram Code Name FE.04 Overvoltage Protection Selection Default Setting Range Description 0:Ineffective FE.05 FE.06 Stall Overvoltage Stall Gain Overvoltage Stall Protection Voltage 1:Effective 0 ~ 2 0 0 130% 2 : Effective Decel.Mode 0 ~ 100 0:Prohibit (120 ~ 150)% - in 6.9 Protective Function 6.9.1 Power On Start Protection Code F8.31 Name Start Protection Selection Default 1 Setting Range 0 ~ 1 Description 0:No Applicable 1:Start Protection By setting parameter F8.31(Start Protection)=1 to execute the inverter start protection: If the running command is valid when the inverter is powered on (for example, the running terminal is closed before the inverter is powered on), the inverter does not respond, it must first cancel the running command, the running command is valid again, the inverter then responds. - 72 - NVF5 Series User Manual Chapter 6 Parameter Function Description 6.9.2 Motor Overload Protection Code Name Default Setting Range FE.00 Motor Overload Protection Selection 1 0 ~ 1 FE.01 Motor Overvoload Protection Gain 1.00 0.20 ~ 10.00 FE.02 Motor Overload Alarm Enable 0 0 ~ 1 80% (20 ~ 200)% Early Motor Overload Early FE.03 Alarm Level ● Motor Overload Protection Gain Description 0:Ineffective 1:Effective 0:Ineffective 1:Effective - In order to effectively protect the motor under different loads, the overload protection gain FE.01 should be set according to the current output overload capacity. The overload protection of the motor is an inverse time curve. Current 80% 100% 150% Motor overload protection Gain 120% 10 minutes Time Figure 6-9-1 Motor Overlaod Inverse Time Curve When the overload protection gain FE.01 is set to 100%, the inverse time limit characteristic of motor overload protection is defaulted to: motor overload fault will occur after running continuously for 10 minutes under the condition of 150% motor rated current; motor overload fault will occur after running continuously for 80 minutes under the condition of 110% motor rated current. ● Motor Overload Early Alarm Motor overload early alarm function is used to output warning signal to control system through DO before motor overload fault protection. The early alarm coefficient is used to determine the level of early alarm before motor overload protection, and the larger the value, the smaller the early alarm amount. When the cumulative output current of the inverter is greater than the overload time (the cumulative value of the inverse time curve of motor overload protection) × the overload alarm level FE.03 of the motor, the DO will output the effective signal of motor - 73 - NVF5 Series User Manual Chapter 6 Parameter Function Description overload early alarm. When the early alarm level of motor overload FE.03 is set to 100%, the alarm advance is 0. At this time, the early alarm and overload protection occur simultaneously. 6.9.3 Phase Loss Protection Code Name Default FE.24 Input Phase Loss Detection Selection FE.25 Output Phase Loss Detection Selection 1 1 Setting Range Description 0 ~ 2 0 : Input Phase Loss Hardware Detection 1 : Input Phase Loss Software Detection 2 : No Input Phase Loss Hardware/Software Detection 0 ~ 1 0:No Output Phase Loss Software Detection 1 : Output Phase Loss Software Detection 1) Input Phase Loss Setting If one phase is missing in the three-phase AC power supply of the inverter, the inverter prompts whether to input the phase loss protection action. The inverter input phase loss protection needs to be adapted to the motor (the same power level as the inverter) with a load of more than 20% rated torque when selecting software testing, which can prompt the input phase loss protection action. 2) Output Phase Loss Setting Choosing if the inverter prompts output the phase loss protection action when any phase is missing in U, V, W three-phase when the inverter is running with a motor. 6.9.4 Load Loss Protection FE.17=1Load Loss Protection is effective,when inverter output current is less than Load Loss Detection Level- FE.18,and the duration is more than Load Loss Detection Time-FE.19 ,Load Loss Protectio will be effective. If the load loss keep running is selected, when the load is recovered, the inverter will automatically restore to the setting frequency. Code Name Default Setting Range Description FE.17 FE.18 Load Loss Protection Selection Load Loss Detection Level 1 0 ~ 1 10.0% ( 0.0 ~ 100.0)% - 74 - 0:Ineffective 1:Effective 100% equals motor rated current NVF5 Series User Manual FE.19 Load Loss Detection Time Chapter 6 Parameter Function Description (0.0 ~ 60.0)s 1.0s - 6.9.5 Fault Reset Fault reset provides 2 method:Manual reset、Auto rest(Restricted by auto reset time) 1. Moudle Fault、Overcurrent Fault etc:Auto reset is prohibited,only manual reset; 2. Under Voltage Fault:Reset automatically When DC Bus Voltage is recovered,, and the number of automatic reset is not reach; 3. Short Circuit to Grounding Fault:Can not be automatic reset or manual reset,only be effective after re- power up the Inverter. When the Atuo Fault Rreset is used, if the inverter is in running mode at the moment before the fault occurs, the inverter will reset the fault ! Attention automatically and the inverter will keep running in the condition of auto reset time no reach. Code FE.26 FE.27 FE.28 Name Automaticlly Fault Times Automaticlly Fault Inerval Reset Reset Fault Do Action When Automaticlly Reset Fault Default Setting Range 0 0 ~ 20 1.0s (0.1 ~ 100.0)s 0 ~ 1 0 Description 0 : Fault lockout prohibited 1 : Fault lockout permit 6.9.6 Fault Protection Action Selection When Inverter faulted, the action of the Inverter can be determined by the function of fault protection action selection. The inverter can be selected as follows: coas stop after fault, ramp deceleration stop after fault, and keep running after fault. Code Name Default Setting Range Description Ones Place : Motor Overlaod E.OL1 0:Coast Stop FE.38 Protection Selection 1 in Fault Mode 0x0000 0x0000~0x2222 1:Stop per Stop Mode 2:Keep Running Tens Place:Input Phase Loss - 75 - NVF5 Series User Manual Chapter 6 Parameter Function Description E.SPI(Same as ones place) Hundreds Place: Output Phase Loss E.SPO (Same as ones place) Thousands Place : External Fault E.EF(Same as ones place) Ones Place : Comm. Abnormal E.CE 0:Coast Stop 1:Stop per Stop Mode 2:Keep Running FE.39 Protection Selection 2 in Fault Mode 0x0000 0x0000~0x2222 Tens Place : Reserve Hundreds Place: EEprom Abnormal E.EEP 0:Coast Stop 1:Stop per Stop Mode Thousands Place:Reserve Ones Place : Load Loss E.LL 0:Coast Stop FE.40 Protection Selection 3 in Fault Mode 0x0000 - 76 - 0x0000~0x2222 1 : Ramp Decel. Stop 2 : Keep running skip to 7% of motor rated frequency when load NVF5 Series User Manual Chapter 6 Parameter Function Description loss,recover to setting frequency when load recover Tens Place:PID Feedback Loss in Running Mode-E.FbL 0:Coast Stop 1:Stop per Stop Mode 2:Keep Running Hundreds Place: Excessive Speed Deviation- E.dEv ( Same as tens place) Thousands Plac: Motor Over Speed-E.OS ( Same as tens place) FE.41 FE.42 Protection Selection 4 in Fault Mode Protection Selection 5 in Fault Mode 0x0000 0x0000~0x2222 Reserve 0x0000 0x0000~0x2222 Reserve FE.43 Continuing Running Frequency Slection when Faulted 0 0 ~ 4 0:Running in current frequency 1 : Running in setting frequency 2 : Running in upper limit frequency 3 : Running in lower limit frequency 4 : Running in abnormal backup frequency FE.44 Abnormal Reserve Frequency Setting 10.0% (0.0~ 100.0)% ( 0.0~100.0 ) % - 77 - NVF5 Series User Manual Chapter 6 Parameter Function Description ( Corresponding the Max. Frequency) 6.10 Monitoring Function 6.10.1 Monitoring Parameters Customers can directly monitor the parameters of inverter running state and standby state through the integral keypad, and can select the display state parameters by the keypad by setting parameters. The setting of state display parameters are in hexadecimal. Each of the bit is independent. The values of bits, ten bits, hundred bits and thousand bits should be set separately. At this point, the binary value should be determined first, and then the binary number is converted to hexadecimal number. The following figure shows the correspondence between LED and display parameters with parameter F7.05 .Please refer to 4.4.5。 Thousand Bits Bit12:Torque ref. value Bit13: Simple PLC current step No. Bit14: Speed reference Bit15: Reserved Hundred Bits Tens Bits Bit04: Output current Bit05: Running speed Bit06: Output power Bit07: Output torque Bit08: PID ref. Bit09: PID feedback Bit10: DI status Bit11: DO status Ones Bit Bit00: Output Freq. Bit01: Setting Freq. Bit02: DC Bus Voltage Bit03: Output Voltage 1、 There is no parameter F7.05、F7.06 and F7.07 in Simple Parameter Menu Mode,If you want to change Status Display Parameters,you should select Engineering Parameter Menu Mode firstly,then changing Status Parameter Value,Refer to Chapter 4 ! Attention 2、 Custom Parameter Menu mode is user-defined parameter set,if there are parametersF7.05、F7.06 and F7.07,you can change directly;if there are not,you can switch parameter mode to Engineering Parameter Menu and change the status parameter value. Refer to Chapter 4 6.10.2 Fd Inverter Status Display Group(Read only) Refer to Appendix Parameter List. 6.11 I/O Terminal Parameter Setting - 78 - NVF5 Series User Manual Chapter 6 Parameter Function Description 6.11.1 Digital Input Setting(DI) NVF5 series has 5 mutifunctional Digital inputs,and HDI terminal can be used for High Speed Pulse input,Terminal setting are as below Code Name Default Setting Range F5.01 DI1 Setting 1 0 ~ 63 F5.02 DI 2 Setting 4 0 ~ 63 F5.03 DI 3 Setting 9 0 ~ 63 F5.04 DI 4 Setting 12 0 ~ 63 F5.05 0 0 ~ 63 0x0000 0x0000 ~ 0x001F F5.07 HDI Setting Digital Input effective status setting DI filter time 0.010s (0.000 ~ 1.000)s F5.10 DI 1 Delay Time 0.000s (0.000 ~ 60.000)s F5.11 DI 2 Delay Time 0.000s (0.000 ~ 60.000)s F5.12 DI 3 Delay Time 0.000s (0.000 ~ 60.000)s F5.13 DI 4 Delay Time 0.000s (0.000 ~ 60.000)s F5.14 HDI Delay Time 0.000s (0.000 ~ 60.000)s F5.06 DI Terminal Function Description: Values Function 0 No Applicable 1 2 3 Farward-FWD Reverse-REV Jog Forward 4 Jog Reverse 5 Three Wire Control 6 Clear Fault 7 External Fault Input 8 Reserve 9 Running Pause Description See below table Description The terminals that are not used can be set to "No Applicable" to prevent misoperation. Forward and Reverse operation set by external digital inputs Program to jog running mode,Jogging frequency、 jog Accel. Time set in parameter F8.00 ~ F8.02 Program to three wire control mode,refer to “6.1 Start command setting”description Program to clear fault.Same as STOP key of integral keypad,using this function can realize remote fault clear Program to External Fault Input signal,easy to monitor external device.After inverter receive external fault signal,display“E.EF”-external device fault -When inverter is in decel. Stop mode, DI is ON,all parameter setting(such as simple PLC - 79 - NVF5 Series User Manual Chapter 6 Parameter Function Description parameters、PID parameters)are restored,DI is off,inverter recovers to the memory state before. 10 Ramp Stop 11 DC Deceleration 12 13 Coast Stop Terminal Accel. UP 14 Terminal DOWN 15 16 17 18 19 20 21 22 24 25 26 27 28 29 34 Brake Decel. Switch to Keypad Command Swith to Digital Input Command Switch to Comm.Command Main Frequency Resouce Swich to Digital Given Main Frequency Resouce Swich to AI1 Main Frequency Resouce Swich to AI2 Reserve Main Frequency Resouce Swich to HDI Preset Speed Terminal 1 Preset Speed Terminal 2 Preset Speed Terminal 3 Preset Speed Terminal 4 Accel./Decel Time Selection Terminal 1 Accel./Decel Time Selection Terminal 2 Forward Disable Stop command is effective to all running mode, When it is ON,the Stop Mode is set according to parameterF1.05 Program DI terminal to realize DC Injection Brake,and realize motor emergency stop and precise positioning.DC brake frequency 、 DC brake waiting time,DC brake current are set in parameters F1.06~F1.09 Set to coast stop,same as parameter F1.05 When frequency source is sent to Digital Given,DI terminal can be used on Accel. And Decel. frequency , Regulation Rate is set by parameterF0.12 UP/DN For selecting different Digital Input Command.Program command chennel switch between Integral keypad、Terminal、Comm. When effective, the main frequency reference is switched to Digital Given 、 AI1 、 AI2 or HDI reference. Program 4 DI to preset speed, and realize max. 15 preset speed. Program DI to 4 kinds of Accel./Decel. Time selection. Disable forward running - 80 - NVF5 Series User Manual 35 Chapter 6 Parameter Function Description Reverse Disable 36 Accel./Decel. Disable 37 UP/DN Reset to 0 38 Reserve 39 PLC Pause 40 PLC Disable 42 PLC Stop Clear PLC Reset 43 PID Integration Pause 44 PID Disable 45 PID Invert 46 PID Parameter Switch 41 Memory 47 48 Reserve DC Brake 49 Frequency Setting Effective Terminal 50 51 Reserve Current RunningTime Clear Disable reverse running Maintain current output frequency(Except Stop command) When the main frequency is set by the integral keypad, the DI terminal selection function can clear the frequency value changed by the Up/Down keys, and let the frequency reference restore to parameter F0.05 setting. -PLC function pause, and inverter maintains current Output Frequency PLC disable,if the frequency source is Simple PLC reference,the system will switch to parameter FA.46 setting PLC Stop and Memory clear Recover inverter to Simple PLC initial status PID Integration function pause, but the proportional adjustment and differential regulation are still effective. PID is disable,if frequency source is close loop PID reference,switch to parameter F9.29 setting PID function is opposite to Parameter F9.15 setting When PID Switch Selection( F9.20) set to 1 (Switch by DI) ,When DI is ineffective,using PID parameters F9.03 ~ F9.05 ; When DI is effective,using PID parameters F9.17 ~ F9.19。 -Inverter switch to DC brake mode directly. If DI terminal is On, allow modification frequency.If DI terminal is Off, prohibit modification frequency. -Inverter current running time is cleared to 0 6.11.2 Digital Output Terminal Function(DO) NVF5 series has 1 standard Digital Output terminal,1 multifunctional Relay Output terminal, terminal configuration is as below. Code Name Default Setting Range Description F6.00 HDO Output Type 0 0 ~ 1 F6.01 HDO Output Selection 1 0 ~ 63 - 81 - See Below Table NVF5 Series User Manual F6.02 F6.03 F6.04 F6.05 F6.06 Relay Output Selection Reserve Output Terminal Effective Status Setting(HDO、RO) HDO Output Delay Time HDO Output Setting Selection Chapter 6 Parameter Function Description 16 0 ~ 63 -- -- 0x0000 0x0000 ~ 0x0003 0.0s (0.0 ~ 3600.0)s 0.0s (0.0 ~ 3600.0)s DO Terminal Function Description: Values Function Description The terminals that are not used can be set to 0 No Applicable "No Applicable" to prevent misoperation. 1 In Running Mode Inverter is in Running mode, DO is effective. Frequency Level 2 Refer to F6.14、F6.15 description Detection Reach-FDT1 Frequency Level 3 Refer to F6.16、F6.17 description Detection Reach -FDT2 Inverter Overload 4 Inverter is in Overlaod status, DO is effective. Pre-Alarm Under Voltage Status DC Bus voltage is lower than Under Voltage 5 Output Limit, DO is effective.LED indicates P.oFF。 Inverter External Fault occurs and trip 6 External Fault Stop fault“E.EF”时,DO is effective. Setting Frequency≥Upper Limit Frequency,and Reach Upper Limit the running frequency reach the Upper Limit 7 Frequency Frequency,DO is effective. Setting Frequency≤Lower Limit Frequency,and Reach Lower Limit the running frequency reach the Lower Limit 8 Frequency Frequency,DO is effective. Inverter runs and the output frequency is 0, DO 9 Zero Speed Running is effective.Inverter is in Stop Mode,DO is ineffective. 10 ~ 11 Reserve -Simple PLC Step 12 Simple PLC Step Complete, DO is effective. Complete Indication 13 PLC Recycle Complete Simple PLC recycle completer,DO is effective. If the output signal is effective, it means that the inverter is fault-free, the DC Bus Voltage is 15 Inverter Ready normal, the Disable Terminal of is ineffective, and inverter can startst. 16 Fault Output Inverter Fault, DO is effective. 17 ~ 18 Reserve -- 82 - NVF5 Series User Manual Chapter 6 Parameter Function Description 20 In Torque Limiting Process Speed Direction 22 Frequency Reach 19 23 24 Reserve In Load Loss Progress 25 Zero Current Status Torque Command is in torque limiting progress, DO is effective. Indicate motor running direction The frequency of the inverter is within a certain range of target frequency.(Target frequency ±F6.13 Value×Max. Frequency) ,DO is effective. -Inverter is in load loss status, DO is effective. Inverter Output Current is in the range of Zero Current and the duration exceeds Zero Current Delay Time(F8.21),DO is effective;Zero Current Detection Range =0 ~ F8.20×F2.03 ( Motor Rated Current). Inverter Output Current is in the range of F8.24-Current Reach Detection Value 1,DO is 26 Current Reach1 effective ; Current Detection Range = (F8.24-F8.25)×F2.03(Motor Rated Current)~ (F8.24+F8.25)×F2.03。 Inverter Output Current is in the range of F8.26-Current Reach Detection Value 2,DO is 27 Current Reach 2 effective ; Current Detection Range = (F8.26-F8.27)×F2.03(Motor Rated Current)~ 28 IGBT Temperature Reach 29 Output Current Over Limit (F8.26+F8.27)×F2.03。 Inverter heatsink temperature Fd.34 reaches the setting temperature F8.28,Output effective. The output current of the inverter exceeds the F8.22-Output Current Over Limit and the duration exceeds the Detection Delay Time of the Output Current Over Limit(F8.23).,DO is effective ; Ouput Curent Over Limit Value = 30 Reserve 31 Motor Pre-alarm 32 ~ 33 34 Overload Reserve Timer Reach the time programmed F8.22 ×F2.03(Motor Rated Current) -Judging according to Motor Overload Early Alarm Level FE.03, Before motor overload protection action.When exceeding pre-alarm threshold,output is effective. -When Timer function F8.32 is effective,After the operation time of the inverter reaches the set - 83 - NVF5 Series User Manual Chapter 6 Parameter Function Description time, the output is effective.,Timer set by F8.33 35 36 AI1 〉 AI2 Reserve 37 Current Reach Running When AI1 〉 AI2 ,Output effective -When accumulate running time is exceed F8.34- Current Running Reach Time ,Output effective. Time 6.11.3 Analog Input Function(AI) NVF5 Series has 2 Analog Input terminals -AI1、AI2,with -10V ~ +10V、4mA ~ 20mA,AI2 can select V or mA signal by Dip switch on the PCB board.AI mode,See Parameter“6.2.3 Analog Main Frequency Setting”. 6.11.4 Analog、Pulse Output Function(AO、HDO) NVF5 Series has 1 AO,1 High Speed Pulse Output(HDO). Code Name Default Setting Range F6.00 F6.08 F6.09 HDO Output Type AO1 Output Setting Selection HDO Output Setting Selection 0 0 ~ 1 0 0 ~ 36 0 0 ~ 36 ( -100.0 Description ~ AO1 Zero Bias Correction Factor 0.0% F6.10 F6.11 AO1 Gain 1.00 -10.0. ~ 10.00 F6.12 HDO Max. Output Pulse Frequency 10.00kHz (0.01 ~ 100.00) kHz AO、HDO Values setting See Table Below 100.0)% Terminal Function Description: Function Description 0 No Applicable No Applicable 1 Running Frequency 0~Max. Output Frequency 2 0~Max. Output Frequency 3 Setting Frequency Ramp Reference Frequency 4 Output RPM 0~Max. RPM 5 Output Current1 0~2 times Inverter Rated Current 6 Output Current 2 0~2 times Motor Rated Current 7 Output Torque(Absolute) 0~3 times Motor Rated Torque 8 Output Power 0~2 2 times Motor Rated Power 9 Output Voltage 0~Max. Output Frequency 0~1.2 times Inverter Rated Voltage - 84 - NVF5 Series User Manual Chapter 6 Parameter Function Description 10 DC Bus Voltage (0.0~1000.0)V 11 AI1 (0 ~ 10)V 12 AI2 (0 ~ 10)V 14 Pulse Input (0.01 ~ 100.00)kHz 18 Output Current (0 ~ 1000)A 19 Output Voltage (0 ~ 1000)V 20 Output Torque(+/-) -2 times Motor Rated Current ~ + 2 times Motor Rated Torque 6.12 Ride Through Function The Ride Through function enables the system to run continuously during short time power failure. When a power failure occurs, inverter keeps in the Regenerative status, the DC Bus Voltage is maintained in FE.16,avoid inverter stop due to short time input voltage cut off to cause Undervoltage Fault. Figure 6-12-1 Ride Through Function Code Name Default Setting Range Description 0:Ineffective FE.13 Instantaneous power Off Action Selection 0 0 ~ 2 1:Decel. 2:Decel. Stop 100% equals Standard DC Bus Voltage FE.14 Judgement Voltage of Instantaneous Action 90.0% (80.0 ~ 100.0) % FE.15 Judgement Time of Instantaneous Power Failure Voltage Rise 0.50s (0.00 ~ 100.00) s - 85 - NVF5 Series User Manual FE.16 Judgement Voltage of Instantaneous Power Failure Chapter 6 Parameter Function Description 80.0% (60.0 ~ 100.0) % 100% equals Standard DC Bus Voltage ● Deceleration Operation Mode:When the power line recovers, the Output Frequency of the inverter will be restored to the target frequency according to the accel. Time. ● Deceleration Stop Mode:When the power line recovers, the inverter continues to slow down to 0Hz then stop, and the inverter will not start until the inverter start again. 6.13 Jogging Jogging function is used on low speed equipment tesing for a short time. When in Jogging mode,the starting mode is fixed as a direct start mode F1.00=0,stopping mode is fixed as a ramps decel. Stop mode F1.05=0。 Note: There is no Jogging key on the Integral Keypad. To achieve this function, digital input (DI)should be selected. Code Name Default Setting Range Description F5.01 DI1 Function 1 F5.02 DI2 Function 4 F5.03 DI3 Function 9 F5.04 DI4 Function 12 F5.05 HDI Function 0 F8.00 Jog Frequency 5.00Hz 0.10 ~ F0.07 - F8.01 Jog Accel. Time 20.0s (0.0 ~ 6500.0)s - F8.02 Jog Decel. Time 20.0s (0.0 ~ 6500.0)s - 0 ~ 63 Figure 6-13-1 Jogging - 86 - 3:Jog Forward 4:Jog Reverse NVF5 Series User Manual Chapter 6 Parameter Function Description 6.14 Skip Frequency By setting the Skip Frequency, inverter can avoid the mechanical resonance point of the load.NVF5 can be set three Skip Frequency,if all Skip Frequency are set to 0,Skip Frequency function is disable Code Name Default Setting Range Description F8.10 Skip Frequency1 0.00Hz 0.00 Hz ~ F0.07 - F8.11 Skip Frequency 1 range 0.00Hz 0.00 Hz ~ F0.07 - F8.12 Skip Frequency 2 0.00Hz 0.00 Hz ~ F0.07 - F8.13 Skip Frequency 2 range 0.00Hz 0.00 Hz ~ F0.07 - F8.14 Skip Frequency 3 0.00Hz 0.00 Hz ~ F0.07 - F8.15 Skip Frequency 3 range 0.00Hz 0.00 Hz ~ F0.07 - Setting Freq. after regulation Skip Freq.3 Skip Freq.3 range Skip Freq.2 range Skip Freq.2 Skip Freq.1 Skip Freq.1 range Setting Freq. Figure 6-14-1 Skip Frequency 6.15 Forward and Reverse Switch In some cases, the motor Forward and Reverse switching needs to be delayed for a period of time, so the dead time of the Forward and Reverse switching can meet the requirement. Code Name Default Setting Range Description F1.10 Forward/Reverse Deadband Time F1.11 Forward/Reverse Switch Mode 0.0s (0.0 ~ 300.0)s 0 ~ 1 0 - 87 - 0 : Switch at Min. Frequency F0.09 1 : Switch at Start FrequencyF1.01 NVF5 Series User Manual Chapter 6 Parameter Function Description Freq. Hz Time t Forward/Reverse switch deadband time Figure 6-15-1 Forward and Reverse Switch 6.16 Regenerative Braking When the motor decelerates, if the load is too large and the decal. time is too short, the DC Bus voltage of the inverter may rise to the overvoltage level. At this time, the Brake Resistor should be connected,and the Regen. Brake should be switched on,then the Overvoltage Fault can be avoided . Code Name Default Setting Range Description F8.16 Brke Unit Action Voltage 720V(440V 440V Series :( 650 ~ Series) 750)V 360V ( 230 230V Series :( 320 ~ VSeries) 380)V - 0:Disable F8.17 Regen. Brake. Selection 0 0 ~ 1 F8.18 Regen. Brake Using Rate 80.0% ( 0.0 ~ 100.0)% 1:Enable - 6.17 Frequency Detection Output(FDT) It is used to set the detection value of the output frequency and the lag value of the digital output action. The lag value is only effective in the deceleration process, and the detection in the acceleration process is useless. Code Name Default Setting Range Description F6.14 FDT1 Level F6.15 FDT1 Lag F6.16 FDT2 Level F6.17 FDT2 Lag 50.00Hz 5.0% 25.00Hz 5.0% 0.00 Hz ~ F0.07 - ( 0.0 ~ 100.0)% 100% Corresponding Max. Oupput Frequency 0.00 Hz ~ F0.07 - ( 0.0 ~ 100.0)% 100% Corresponding Max. Output Frequency - 88 - NVF5 Series User Manual Chapter 6 Parameter Function Description Output Freq. FDT1 Level FDT1 Lag Time Y Time Figure 6-17-1 Frequency Detection 6.18 Output Current Zero Point Detection For setting Zero point detection value of output current. Code Name Default Setting Range F8.20 F8.21 Zero point detection value of output current Detection Delay Time Description 5.0% ( 0.0 ~ 300.0)% - 0.10s (0.00 ~ 600.00)s - Figure 6-18-1 Output Current Zero Point Detection Diagram 6.19 Running Timer When inverter start, timer run from 0,See Fd.49 to check timer remaining time . Code Name Default Setting Range F8.32 Timer Function Selection 0 0 ~ 1 - 89 - Description 0:Ineffective 1:Effective NVF5 Series User Manual F8.33 Chapter 6 Parameter Function Description Timer Running Timer (0.0 ~ 6500.0)min 0.0min - 6.20 Start At Power Up Enable/disable inverter automatically start on power up with Commands and the Auto Restart delay time. Code Name Default Setting Range Auto Restart F8.35 Function 0 0 ~ 1 Selection Auto Restart F8.36 0.0s ( 0.0 ~ 10.0)s Delay Time different Start Description 0:Ineffective 1:Effective - 6.21 Sleep Wake Mode Sleep function is mainly used in pump water supply, air supply control fields requiring automatic sleep,this function can make inverter output 0 Hz when reaching user setting preset sleep leve which realize energy saving. Sleep function needs to be combined with PID function.See process diagram 6-9-6. If the sleep function is switched on (F8.37 set to 1,F9.28(Close loop run mode) set to 1(run when stop) ) ,and the system is in running mode,When the output frequency is detected less than or equal to the sleep frequency(F8.38) and the duration reaches the sleep delay time(F8.39), inverter enters the sleep mode automatically(Inverter run in0Hz) ; When PID feedback(Fd .29)is less than PID reference(Fd .28) ,and the deviation is more than wake leve(F8.40) ,and the duration reaches the wake delay time(F8.41) ,inverter enters the wake mode automatically,and the system leave sleep mode automatically and inverter run again. Hz Setting Freq. Sleeping Freq. 0 Feedback t Sleeping delay Ref. Ref.-Wake offset Wake delay Figure 6-21-1 Sleep and Wake - 90 - t NVF5 Series User Manual Chapter 7 Troubleshooting Chapter 7 Troubleshooting 7.1 Diagnostic 7.1.1 Diagnostic process The flow chart of the fault diagnosis is shown below Start Power off immediately If serious failure appears after power up, such as no display, abnormal sound etc. NO Check Fault code refer to chapter 7.2. Can solve or not? NO Asking for Chint technical support YES Check abnormal handing refer to chapter 7.3. Can solve or not? NO YES Fault reset End Figure 7-1-1 Fault Diagnosis Flow Chart 7.1.2 Fault description and Trouble shooting If a fault appreas,Please see for an explanation of the fault code and check by youself firstly before asking for help from Chint or Chint channels.When you need support,please contact Chint or Chint channels. Code Fault Type Fault reason 1、 Low grid voltage E.OC1 Inverter Accel. running overcurrent Action Check the input power supply 2、Directly and quickly start rotating motor Start inverter when motor stop 3、Accel. Time too short Increase accel. time 4、Incorrect Motor Nameplate Motor auto tuning 5、Too small inverter power Enlarge inverter power rate - 91 - NVF5 Series User Manual Chapter 7 Troubleshooting 6、 Unsuitable V / F curve 1、 Low grid voltage E.OC2 E.OC3 E.OV1 E.OV2 Inverter Decel. running overcurrent Inverter constant speed running overcurrent Inverter Accel. running overvoltage Inverter Decel. running overvoltage 2、 Decel. Time too short Adjust V/F cruve or adjust manual torque boost Check the input power supply Increase decel. time 3、Potential Energy Load or Big Add Regen. Brake Components Inertial Load 4、 Too small inverter power Enlarge inverter power rate 1、 Accel. Time too short Increase accel. time 2、Load change frequently or abnormal load Check load 3、 Low grid voltage Check the input power supply 4、 Too small inverter power Enlarge inverter power rate 1、Motor short circuit to ground Check motor cable Check the input power 2、 Abnormal input voltage supply 3、 Motor quick start again at high speed Start inverter when motor stop 4、 Accel. Time too short Increase accel. time 1、 Motor short circuit to ground Check motor cable 2、 Potential Energy Load or Big Add Regen. Brake Components Inertial Load Increase decel. time Increase decel. time 1、 Motor short circuit to ground Check motor cable E.OV3 E.SPI E.SPO E.FO Inverter constant speed running overvoltage Input Lose Phase Output Lose Phase 2、 Incorrect setting of Parameter ASR in vector control Refer to Parameter Group F3 about how to set ASR 3、 Accel. Time too short Increase accel. time 4、Abnormal Input Power Supply Check Input Power Supply 5、 Abnormal fluctuation of input Install Input AC Reactor voltage Add Regen. Brake 6、 Big Inertial Load Components Checking R S T Wiring R.S.T lose phase Check Input Voltage Checking U V W Wiring U.V.W lose phase Check Motor Cable Power Module 1、 The output three-phase with Re-wire, confirm - 92 - the NVF5 Series User Manual Protection Chapter 7 Troubleshooting interphase short circuit or ground short circuit motor insulation 2、 Inverter instantaneous overcurrent See overcurrent handling 3、 Fan duct blockage or fan damage Clear the fan duct or replace the fan 4、High ambient temperature Lower ambient temperature 5、 Loose I/O wiring or plug Check wiring and re-wire 6、 Current waveform anomaly Checking wiring due to output lose-phase and other reasons` 7、 Aux. power supply damage, drive voltage undervoltage Asking for Chint technical support 8、 IGBT Module Damage 9、Control Board Abnormal E.OH1 Heat Sink Overheat 1、 High ambient temperature Lower ambient temperature 2、 Fan duct blockage Clear the fan duct 3、 Fan damage Replace the fan 4、IGBT abnormal Asking for Chint technical 5、 Temperature checking circuit support error 1、 High ambient temperature E.OH2 Rectifier Bridge Overheat Lower ambient temperature 2、 Fan duct blockage Clear the fan duct 3、 Fan damage Replace the fan 4、 Temperature checking circuit Asking for Chint technical support error E.OL1 Motor Overload 1、Incorrect Motor Overload Ratio Input correct motor overload ratio 2、Motor Stall or load change frequently Check motor load 3、Long time low speed ruuning Select Frequency conversion motor with excessive load 4、Low grid voltage Check grid voltage 5、 Unsuitable V / F curve Adjust V/F cruve or adjust - 93 - NVF5 Series User Manual Chapter 7 Troubleshooting manual torque boost 1、 Incorrect Motor Nameplate E.OL2 Inverter Overload Motor auto tuning 2、Excessive load Enlarge inverter power rate 3、Excessive DC Brake Reduce DC brake current, increase brake time 4、 Accel. Time too short Increase accel. time 5、 Low grid voltage Check grid voltage 6、 Unsuitable V / F curve Adjust V/F cruve or adjust manual torque boost E.OL3 Buffer Power Supply Failure 1、DC Bus Voltage fluctuates Asking for Chint technical around undervoltage threshold support E.EF External Fault External Fault Emergency Stop Terminal Effective EEPROM Read-Write Fault Control Parameter Read-Write Error E.EEP E.CE E.ItE 1、 Host computer problem Serial Interface Check Comm. wiring communication 2、Comm. Cable problem error Set correct comm. 3、Comm. Parameters problem parameters Current detection circuit abnomaly 1、 Loose control board wiring Check and rewire or plug 2、 Aux. power supply damage 3、 Hall Element Damage 4、 Amplification circuit abnomaly E.tE E.StG Check external device connecting with external fault terminal STOP key Reset Asking for Chint technical support Check host computer wiring Auto Tuning Problem Motor short circuit to Asking for Chint technical support 1、Set Wrong Motor Data Set correct motor data 2、 Reverse Auto Tuning is prohibited in reverse running Disable Reverse 3、 Poor contact of motor connecting cable Check motor cable 4、Auto Tuning Overtime Check Parameter F0.08 (Frequency Max.) whether is samller than rated frequency Motor short circuit to ground Check motor cable - 94 - NVF5 Series User Manual Chapter 7 Troubleshooting ground Load Loss Fault Inverter Current is Smaller than the value of Parameter FE.18 E.FbL PID Feedback Loss Fault Inverter PID Feedback is Smaller than the value of Parameter F9.26 E.OT 1、 Loose connection of motor Motor temperature sensor Overheat Fault 2、Motor Overheat E.LL Check whether load loss or parameter FE.17、FE.18、 FE.19 parameter setting Check PID feedback signal or parameters setting of F9.26、F9.27 Check the wiring of the motor temperature sensor Increase carrier frequency or Improve motor overheat 7.2 Abnormal Operation and Solution Phenomenon Condition of occurrence Possible reason Solution When stop or running condition,first Integral Keypad does not respond Parameters Can Not be Modified Integral Integral Keypad Lock keypad keys do not respond Integral Keypad Failure Parameter can not be Not modified in modified in Running Mode Running Mode Parameter F7.03 set to Part of 1or 2 Parameters Not Display Parameter, can Modified not be Modified Press PRG/S but useless, Parameter display”0000” Inverter automatically Inverter Accidentally shuts down, Stop In and the running indicator light Running off Mode Inverter run in User Password be Set pressPRG/Sand hold,also press▼to unlock Inverter power off then power on Asking for Chint technical support Modifie when stop mode Change Parameter F7.03 to 0 Parameters User can not modify Input correct user password Asking for Chint technical support Fault or Alarm Happened Find the fault cause, reset the fault Power Supply Shut Dowen Check Power Supply Command Setting Switch Command Terminals Logic Reverse Fault reset - 95 - Check command parameter setting Check Parameter F5.06 setting Check “fault automatically NVF5 Series User Manual Chapter 7 Troubleshooting zero speed, and automatically the running indicator light External interrupt off 0 Frequency Setting Start frequency is higher than the setting frequency Skip frequency setting problem Enable“Forward Running Prohibit”when forward running mode Enable“Reverse Running Prohibit”when reverse running mode Coast to stop terminal effective Inverter can not Run Prohibit terminal effective run when press run key, External Stop terminal Inverter Run effective and the Prohibit running Three Wire Mode,Run is indicator light not activated is off Fault or Alarm Input terminal logic setting fault Due to the thyristor or contactor is not closed, Thyristor or DC bus voltage Fault P.oFF Contactor will be reduced when the appears when Disconnects inverter is running with a inverter power and the large load, the inverter on Inverter load is will display P.oFF fault, large but no longer display E.SHt fault - 96 - reset” setting and fault cause Check external interrupt settings and fault source Check frequency setting Check start frequency Check skip frequency setting Check I/O parameter setting Check I/O parameter setting Check coast stop terminal Check “run Prohibit” terminal Check external Stop terminal Set three wire mode run terminal Trouble shooting Check Parameter F5.06 Run the inverter after thyristor or contactor is fully closed NVF5 Series User Manual Chapter 8 Maintenance Chapter 8 Maintenance 8.1 Maintenance Instructions Due to the influence of temperature, humidity, dust and vibration in the environment, internal component aging and wear of the inverter and many other reasons will lead to the potential faults; therefore, it is necessary to carry out routine and periodic care and maintenance for the inverter. The system maintenance should pay attention: 1 Products must be periodic maintained, inspected, or replaced by qualified personnel, Failure to comply may result in a risk of electric shock! 2 Leave the metal objects in the machine is strictly forbidden, otherwise there will be a danger of fire! 3 Please ensure power off when carrying out maintenance or replacement of parts , otherwise there is a risk of electric shock! 4 The maintenance operation should be carried out after power off for 5 minutes, and the DC bus voltage below 25V, otherwise there is a risk of electric shock! 5 When maintaining, inspecting, or replacing parts, try not to touch the components, otherwise there is a danger of electrostatic damage to the components! 6 All pluggable components must be inserted and drew out in the case of power off! 8.2 Maintenance Items 8.2.1 In daily check, check whether there is an abnormality in principle running: 1. Whether the motor is running as programming; 2. Whether the environment of industrial field is abnormal; 3. Whether the cooling system is abnormal; 4. Whether there is abnormal vibration noise; 5. Whether overheating or discoloration appear; 6. Measure the inverter input voltage during running with a multimeter. 8.2.2 Regular Inspection For safety reason When the qualified personnel execute inverter regular check, the main power supply must be cutted off, the operation panel is no display, the main circuit power indicator is off 10 minutes later and DC bus voltage is less than 25 V checked with a multimeter for avoiding the capacitor residual voltage of the inverter injuries person. 1. Cooling system:Please clean the air filter and check whether the cooling fan is normal. 2. Screws and screw bolts:Because of the influence of vibration and temperature change, fixed parts such as screws and screw bolts may be loose, check whether they are reliable and tighten, please tighten them according to the required torque. 3. Check whether conductor and an insulator is corrosion and damaged. 4. Measuring insulation resistance. - 97 - NVF5 Series User Manual Chapter 8 Maintenance 5. Check whether the DC Bus filter capacitors discolor, Peculiar smell, bubbling, leakage, etc. 8.3 Routine Maintenance The inverter must run in the standard environment. If some unexpected situations occur during operation, the user should follow the instructions in the table below to do routine maintenance job. The good method to extend the life of the inverter is to maintain a good running environment, record the daily operation data, and detect the exception as early as possible. Table 8.1 Routine Maintenance Table Checking Essentials Inspection Criteria Object Content Period Method 1.(-10~+45)℃, 1.Temperature, 1.Thermometer, (45~50)℃dreating humidity Any hygrometer use Enviroment 2.Dust, water 2 Visual 2.No water leakage . time and dripping inspection imprint 3.Gas 3.Smell 3.No bad smell Inverter 1.Vibration,Heat 2.Noise Any time 2.Auditory sense 1.Stable vibration,reasonable fan temperature 2.No abnormal sound 1 . Enclosure Touch 1.Heat Any 1.Hand Touch 1.No abnormal heat 2.Noise time 2.Auditory 2.Uniform noise Motor 1.Within the range of 1.Output Current 1.Ammeter Any 2.Within the range of Status 2.Output Voltage time 2.Voltmeter ratings 3.Thermometer 3.Temperature Rise less than 35 K 3.Internal temperature ratings 8.4 Regular Maintenance According to the using environment, the user can conduct a regular inspection for the inverter every three months or six months.。 General inspection contents: 1.Whether screws of the I/O terminal are loose, tighten with a screwdriver; - 98 - NVF5 Series User Manual Chapter 8 Maintenance 2.Whether the power terminals are in poor contact, whether copper bus bar connections are with overheating signs; 3.Whether the power cables, control cables are damaged, especially the casing in contact with the metal surface is with cut marks; 4.Whether the insulation binders for the power cables have fallen off; 5.Comprehensively clean dust on the circuit board and air duct, using a vacuum cleaner is recommended; 6.For inverter insulation testing,all input and output power terminals(R、S、T and U、 V、W)must be connected with short wires then tested to the ground. Testing the insulation of the single terminal to the ground is forbidden. Otherwise, it is dangerous to damage the inverter. Please use 500V megoh meter; 7.When testing motor insulation, the input terminals U, V, W of the motor must be removed from the inverter and tested motor separately. Otherwise, the inverter will be damaged. ! Attention 1. The voltage withstand test has been finished before leaving the factory; the users no longer have to conduct the test again, otherwise the improper test could damage the device. 2. Replacing the original components in the inverter with those different models and electrical parameters may result in damage to the inverter. 8.5 Spare Parts Replacement Wearing parts of the inverter mainly include cooling fan and bus capacitor ; the life of them are closely related to operational environment and maintenance. The following table shows the general service life. Table 8.2 Parts Service Life Name Fan Bus Capacitor Relay Service Life (30~40) thousand hours (40~50) thousand hours About 100,000 times Users can determine the replacement period according to the running time. 1.Cooling Fan Possible damaged reason: Bearing wearing, leaf aging. Discriminant criteria: Whether the fan blades have cracks, whether there is abnormal vibration sound at startup. 2.Filtering Electrolytic Capacitor Possible damaged reason: High ambient temperature, frequent load changing resulting in ripple current increase, electrolyte aging. - 99 - NVF5 Series User Manual Chapter 8 Maintenance Discriminant criteria: Whether there is liquid leakage, whether the safety valve has projected, measurement of the electrostatic capacitance and insulation resistance. 3.Relay Possible damaged reason: Corrosion, frequent action.。 Discriminant criteria: Opening and closing failure. 8.6 Storage After purchasing the inverter, attention must be paid to the following for temporary and long-term storag: 1.Avoid storing in the hot, humid environment with much dust, metal powder; ensure good ventilation; 2.The inverters which have been stored for more than 2 years must been done precharge experiment. When energized, the voltage regulator is used to slowly increase the voltage to the rated value for nearly five hours without load. - 100 - NVF5 Series User Manual Communication Instructions Appendix A RS485-MODBUS Appendix A RS485-MODBUS Communication Instructions A.1 Networking Mode NVF5 inverter provides RS485 communication interface and adopts the international standard Modbus communication protocol for Master-Slave communication. Users can achieve centralized control (set the control command and running frequency of inverter, modification of the related parameters, monitoring of inverter status and fault information etc.) through PC/PLC, host computer monitoring software etc., to adapt to the specific application requirements. As shown in figure A-1-1, the networking modes of NVF5 (as the slave station) include single master/ multiple slaves mode and single master/ single slave mode. Host (PC) Host (PLC) Host (PC) RS232 RS232 Adapter RS232/RS485 Host (PLC) RS485 Adapter RS232/RS485 RS485 RS485 Inverter Inverter Inverter Inverter ... Inverter Inverter Inverter Figure A-1-1 Networking Mode Diagram A.2 Interface Mode RS485 interface: Asynchronous, half-duplex. Default: 1-8-N-2 (Bit 1-start bit; bit 8-data bit, no check, bit 2-stop bit, 9600bps, RTU, slave address: 0x01. For parameter setting, see description of Parameter List Group Fb . A.3 Communication Mode 1.Inverter communication protocol is Modbus protocol, and supports RTU and ASCII protocols. 2.The inverter is the slave and adopts master-slave point-to-point communication. When the master send commands using the Broadcast mode, the slave will not respond. 3 . In the case of multi-machine communication or long-distance, connecting Termination resistors of (100 to 120) ohm on the positive and negative terminals of the signal line of master station communication which can improve the communication immunity. 4.The inverter only provides one RS485 interface. If the communication port for peripheral equipment is RS232, RS232/RS485 conversion equipment should be added. - 101 - NVF5 Series User Manual Communication Instructions Appendix A RS485-MODBUS A.4 Protocol Format Modbus protocol supports both RTU and ASCII modes. The corresponding frame format is shown below. RTU Mode Modbus data frame Start (at least 3.5 characters free) Slave address Command code Data Check code End (at least 3.5 characters free) ASCII mode Modbus data frame Start (0x3A) Slave address Command code Data End Check code (0x0D,frame tail bytes) Figure A-4-1 Modbus Protocol Format Modbus adopts “Big Endian” encoded mode,and sends the upper byte and then the lower byte. A.4.1 RTU Mode In RTU mode, the bigger one between the function code and Modbus internal convention value is taken for the free time between frames. The minimum free time between frames internally agreed by Modbus is as follows: free time of frame head and tail is not less than 3.5-byte time to define the frame. Data check adopts CRC-16; the whole information participates in the check; upper and lower bytes of the checksum should be sent after exchange. Refer to the examples following the reference protocol for the specific CRC check. Note, at least 3.5-character Bus free time should be kept among frames; Bus free among frames does not need to accumulate the start and end free. The following examples show how to read the parameters of the internal register 0x0101(F1.01)of slave 5 in RTU mode. Request frame: Slave Address Command Code 0x05 0x03 Data Register Read Bytes Address 0x00 0x05 0x00 0x01 Check Code 0x95 0x8F Request frame: Slave Address Command Code Data Response Bytes 0x05 0x03 0x02 The check code is CRC check value. A.4.2 ASCII Mode - 102 - Register Content 0x01 0XF4 Check Code 0x49 0x93 NVF5 Series User Manual Appendix A RS485-MODBUS Communication Instructions In ASCII mode, the frame head is"0x3A", the default frame tail is“0x0D, 0x0A”, and the frame tail can be configured by users. In this mode, besides the frame head and tail, the other data bytes are all sent in ASCII code; upper 4-bit byte is sent first, followed by lower 4-bit byte. Data in ASCII mode is 7-bit bytes long. For “A”~“F”, their ASCII codes in capital are used. At this time, the data adopts LRC check, and the check covers the information from the slave address to data. Checksum is equal to the complement of sum (carry bits are abandoned) of all characters participating in the data check. The following examples are used to write 4000 (0xFA0) to the internal register 0201 (A2.01) of slave 5 in ASCII mode. Request frame: Data Slave Slave Command Check Frame Head Address Code Register Address Written Content Code Tail Character : 0 5 0 6 0 2 0 1 0 F A 0 4 3 CR LF ASCII 3A 30 35 30 36 30 32 30 31 30 46 41 30 34 33 0D 0A the check code is LRC checksum; its value is equal to the complement of (05+06+02+01+0x0F+0xA0). Response frame: Frame Slave Command Head Address Code Character : 0 5 0 6 Data Check Register Written Code Address Content 0 2 0 1 0 F A 0 4 3 Frame Tail CR LF ASCII 3A 30 35 30 36 30 32 30 31 30 46 41 30 34 33 0D 0A The inverter can set different response delay through the function codes to adapt to the specific application needs of various master stations. For RTU model, the actual response delay is not less than 3.5 characters; In ASCII mode, the actual response delay is not less than 1ms. A.5 Protocol Application A.5.1 Modbus Command Code The main function of Modbus is to read/write the parameters of inverter; different command codes determine different operation requests. Inverter Modbus protocol supports the operation in the table below. Table A.1 ModbusCommand Code and Description Command Description Code Read inverter parameters, including function code parameters, 0x03 command parameters and status parameters. Read inverter parameter attribute value. 0x04 Rewrite single 16-bit bytes inverter function code parameters or 0x06 command parameters. 0x10 Rewrite multiple inverter function codes or command parameters.。 A.5.2 Address mapping rule for function parameter of inverter - 103 - NVF5 Series User Manual Appendix A RS485-MODBUS Communication Instructions Group number mapping of the inverter function parameter is the upper bytes of Modbus register address (0~F corresponding values are 0x00~0x0F); Group Index (parameter number in the group) mapping is the lower bytes of Modbus register address (00~99 corresponding values are 0x00~0x63). When data is only required to be stored in RAM (i.e.,data not stored on power-down), the highest position of the address is “1”. For example:The corresponding register address of Parameter“F5.27”is“0x051B”: 1)Corresponding address is “0x851B”when data only be stored to RAM. 2 ) Corresponding address is “0x051B”when data only be stored to EEPROM(Data stored on power-down). A.5.3 Obtain the parameter attribute of the inverter function code Parameter attribute of the inverter function code can be obtained by 0x04 command code. Attribute definition format is shown in Table A.2.。 Table A.2 Data format definition when reading parameter attribute Data Byte No. Explanation Maximum value (upper byte) 1 Maximum value (lower byte) 2 Minimum value (upper byte) 3 Minimum value (lower byte) 4 Current value (upper byte) 5 Current value (lower byte) 6 Parameter attribute value (upper byte); refer to Table A.3 7 Parameter attribute value (lower byte); refer to Table A.3 8 Table A.3 Definitions of parameter attribute value (bit) Bit Definition 15~14bit: Display Type 13~11bit: Modify Attribute 10~8bit: Data Bit Value Decimal Value 00 0 Decimal 01 10 1 2 000 0 001 010 1 2 011 3 100 4 101 5 000 0 Hexadecimal display Binary display Writable and readable at any time Modifiable in the stop state Read-only parameter Writable and readable with an enterprise password Readable with an enterprise password Writable and readable with an user password 8-bit unsigned bit data type - 104 - Explanation NVF5 Series User Manual Communication Instructions Type 001 010 011 100 101 000 001 7~5bit: 010 Magnification 011 100 101 00000 00001 00010 00011 00100 00101 00110 00111 01000 01001 01010 01011 01100 4~0bit: Unit 01101 01110 01111 10000 10001 10010 10011 10100 10101 10110 10111 11000 11001 Appendix A RS485-MODBUS 1 2 3 4 5 0 1 2 3 4 5 0 1 2 3 4 5 6 7 8 9 10 11 12 13 14 15 16 17 18 19 20 21 22 23 24 25 16-bit unsigned bit data type 32-bit unsigned bit data type 8-bit signed bit data type 16-bit signed bit data type 32-bit signed bit data type No magnification factor 1X magnification 2X magnification 3X magnification 4X magnification 5X magnification No unit Voltage Current Power kW Frequency Hz Frequency kHz Torque Nm Speed rpm Time second s Time millisecond ms Time microsecond us Time minute Min Time hour Hr percentage Weight kg Resistor resistance Inductance value Temperature Pressure value Mp Length meter m Centimeter cm Millimeter mm Capacity kVA Line speed m/min Mp/s Frequency change rate Hz/s A.6 Control Command, State Information and Fault Information Modbus master station can start and stop inverter, by setting the running frequency through the control command. It can check parameter status information (such as: running frequency, output current, output torque, etc.) through the corresponding command, also can monitor the fault information of the inverter . Table A.4 Command Parameter Description - 105 - NVF5 Series User Manual Communication Instructions Description Address Appendix A RS485-MODBUS Explanation Power Down Saving Read-write property No W / R 0x00:No command 0x01:Forward running 0x02:Reverse running Communication Command(F0.01 = 2Communication Command) 0x03:Run stop 0x3200 0x04:Forward jog 0x05:Reverse jog 0x06:Jog stop 0x07:Free stop 0x08:Fault reset bit00:Run / Stop (0 Stop, 1 Run) bit01:Reverse / Forward (0 forward, 1 reverse) bit02:Zero-speed operation(1 effective) bit03:Accel (1 effective) bit04:Decel(1 effective) bit05:Operation at constant speed (1 effective) Status 0x3300 bit06:Pre-Flux (1 effective) bit07 : effective) Tuning (1 bit08:Overcurrent limited (1 effective) 0x09:DC overvoltage limited (1 effective) bit10:Torque limited (1 effective) bit11:Speed limited (1 effective) - 106 - NVF5 Series User Manual Communication Instructions Description Address Appendix A RS485-MODBUS Explanation Power Down Saving Read-write property / R / R / R bit12 : Inverter fault (1 effective) bit13:Speed control (1 effective) bit14:Torque control (1 effective) Parameters Address of Inverter Status Display Parameters Address of Inverter Stop Fault 0x3400 0x3401 0x3402 0x3403 0x3404 0x3405 0x3406 0x3407 0x3408 0x3409 0x340A 0x340B 0x340C 0x340D 0x340E 0x340F 0x3410 0x3411 0x3412 0x3500 0x3501 0x3502 0x3503 0x3504 0x3505 0x3506 0x3507 0x3508 0x3509 0x350A 0x350B 0x3600 bit15:Undervoltage (0 undervoltage) Output Frequency Setting Frequency DC Bus Voltage Output Voltage Output Current Running Speed Output Power Output Torque PID Reference PID Feedback DI Status DO Status Torque Reference AI1 Value AI2 Value Reserve HDI Frequency PLC Current Speed Speed Reference Frequency Reference DC Bus Voltage DI Status DO Status PID Reference PID Feedback Torque Reference AI1 Value AI2 Value Reserve HDI Frequency Speed Reference Fault information is consistent with the fault type number in the - 107 - NVF5 Series User Manual Communication Instructions Description Address Appendix A RS485-MODBUS Explanation Power Down Saving Read-write property function code. Information feedback to the host computer is the dexadecimal data instead of fault code. A.7 Parameter Management Modbus master station can obtain the parameter group quantity and group number from the CPU through the corresponding command, as well as the internal parameter number . The communication function code is provided as “0x03”, and the communication address is defined in Table A.5. Table A.5 Description of Parameter Management Communication Function Address Data Explanation Comments Description Description Group number value Paramter group Obtain the group of the parameters number value 0x4200 number contained in the contained in the system inverter Obtain Group 1 Group number value 0x4201 number value of Group 1 Obtain Group 2 Group number value 0x4202 Group number number value of Group 2 value is consistent Obtain Group 1 Group number value 0x4203 with the value number value of Group 3 obtained by …… …… …… 0x4200 Obtain Group Group number value Max number 0x42xx(xx =Max) of Group Max value Obtain the Obtain the number of number of parameters 0x4300 parameters in Group in Group 1 1 parameters Obtain the Group number number of Obtain the number of value is consistent parameters 0x4301 parameters in Group with the value in Group 2 2 obtained by parameters 0x4200 Obtain the Obtain the number of number of parameters 0x4302 parameters in Group in Group 3 3 parameters - 108 - NVF5 Series User Manual Communication Instructions …… …… Obtain the number of 0x43xx parameters (xx= Max-1) in Group Max parameters Appendix A RS485-MODBUS …… Obtain the number of parameters in Group Max A.8 Network Wiring A.8.1 Topology structure RS-485-Modbus repeater is not configured. There is a trunk cable which is directly connected with all devices (daisy-chained) or connected through short branch cable. Trunk cable, also known as Bus, may be very long. The termination resistor must be connected at the each end of the network cable. Also the repeater can be used among multiple RS-485 Modbus. And each slave address in the network is unique, which is the basis for guaranteeing Modbus serial communications. A.8.2 Length End-to-end length of the trunk cable must be limited. Maximum length is related to Baud rate, load quantity on the cable (specification, capacitance, or characteristic impedance) and daisy chain and network configuration (2-wire or 4-wire system). Branches must be short and cannot exceed 20m. If multi-port splitter with n branches, the maximum length of each branch must be restricted to 40m divided by n. A.8.3 Grounding Mode “Network Common” circuit (common end of the signal and optional power supply) must be directly connected to PE ground. It’s better that the whole Bus is grounded in a single point. Usually, this point is optional on the master or its splitter. A.8.4 Cable Modbus cable on the serial link must be shielded. At each end of the cable, shield must be connected to the PE ground. If the connector is used in this end, the connector housing should be connected to the cable shielding layer. RS485-Modbus must use a pair of lines and the third line (for common end). For RS485-Modbus, cable of diameter wide enough must be selected to allow the use of maximum length (1000m). AWG24 can meet the needs of Modbus data transmission.。 A.9 Definition of Communication Exception Code When the corresponding error message is detected in the communication process, the lower machine (i.e., CPU ) will be position “1” of the function code, and feedback corresponding error code (exception code), to recognize the current error for the host computer. The corresponding definitions are shown in Table A.6. Table A.6 Definition of Communication Exception Code No. Error Code Description 0 0x00 No error information 1 0x01 Illegal function number 2 0x02 Illegal data address 3 0x03 Illegal data value - 109 - NVF5 Series User Manual Communication Instructions Appendix A RS485-MODBUS 4 0x04 Slave equipment fault 5 0x05 Confirm 6 0x06 Slave equipment busy 7 0x08 Memory parity error 8 0x0A Gateway path is not available 9 0x0B Gateway target device failed to respond 10 0x10 CRC check code error 11 0x11 Parameters read only 12 0x12 Data value out of range 13 0x13 EEPROM error 14 0x14 Readable and writable with an user password 15 0x15 Readable and writable with an enterprise password 16 0x16 Reciprocal error in multi-functional DI terminals (Multi-functional DI terminal setpoint cannot be repeated) 17 0x17 Illegal control command 18 0x18 Odd-even check error 19 0x19 Not modified in the running state 20 0x1A Data frame error 21 0x1B Data overflow error 22 0x1C Break error - 110 - NVF5 Series User Manual Appendix B Parameter list Appendix B Parameter list Items Description Function Code Name Parameter Description Parameter Group and Parameter No Full Name of Parameter Parameter Function Descriptions Unit: Unit Name Unit Name Unit V Voltage A Current ℃ rpm Speed Ω Hz Hertz kHz KiloHer tz mH Unit % Mili Henry Percenta ge Name Centigr ade Ohm kW Kilowatt ms Mili Second s Second min Minute H Hour kh KiloHo ur Baud / NA Rate Parameters Factory Default Seeting bps Default ○ Change ◎ ● Parameter Change Properties(Changeable or Not/Change Condition) Parameters are changeable in Stop or Running status Parameters are changeable in Ready status and Inchangeable in Running status. Parameters are actual detection value and inchangeable; (Inverter has checked the modification attributes of each parameter,which helps user avoid misoperation) 2、“Parameter decimal” Most of them are decimal(DEC),If the parameter starts with "0x", it is represented as Hexadecimal.(Such as 0x0000),When editting parameters , the range of partial bits can be Hexadecimal.(0~F)。 3、“Default Value” It is represented when resetting parameters to factory default, the value of the parameter is refreshed; but the actual detection value or record value will not be refreshed. 4、For better protecting parameters setting, inverter provides password protection function.See 4.3 Keypad Password Setting. - 111 - NVF5 Series User Manual Code Name Appendix B Parameter list Setting Range F0 Basic Program Group Default Change 2 ◎ 0 ○ 0 ○ 0 ○ 0x0000 ○ 5.00Hz ○ 0 ○ 0:Sensorless Vector Control F0.00 Motor Control Mode 1:Reserve 2:V/F Mode 0:Integral Keypad F0.01 Command Source 1:Digital Terminal 2:Communication 3:Remote Panel 0:Digital Given 1:AI1 2:AI2 3:Reserve F0.02 Main Frequency Reference 4 : High Speed Pulse HDI Reference 5:Preset Speed Reference 6:Simple PLC Reference 7:Close Loop PID Reference 8:Reserve 9:Potentiometer Reference Auxiliary F0.03 Frequency Source Option Same as F0.02(Main Frequency Reference) Ones Place:Frequency Source Selection 0:Main Frequency Ref. 1:Computing Result F0.04 Main Aux. Frequency Source Computing Tens Place : Main Aux. Frequency Source Computing 0:Main + Aux. 1:Mian – Aux. 2:MAX(the bigger one of both) 3:MIN(the smaller one of both) F0.05 Digital Given F0.09 ~ F0.08 0:Default Direction F0.06 Direction Setting 1:Reverse Enable 2:Reverse Disable F0.07 F0.08 Max. Output Frequency Maximum Frequency F0.08 ~ 600.00Hz 50.00 Hz F0.09 ~ F0.07 50.00 Hz - 112 - ◎ ○ NVF5 Series User Manual Code Name F0.09 Minimum Frequency Basic Operating Frequency F0.10 Appendix B Parameter list Setting Range 0.00Hz ~ F0.08 0.00Hz ~ F0.07 F0.11 Max. Output Voltage (0 ~ 480)V F0.12 Integral Keypad (UP/DN)Regulation Rate (0.01 ~ 99.99)Hz/s F0.13 (UP/DN) Control Ones Place : After Speed Setting by Integral Keypad(UP/DN) 0:Frequency Setting non Storage When Power Off 1 : Frequency Setting Storage When Power Off Tens Place : After Speed Setting by Integral Keypad(UP/DN) 0 : Frequency Miantain When Stop 1 : Frequency Restor to Initial When Stop Hundreds Place:After Speed Setting by Digital Terminals(UP/DN) 0:Frequency Setting non Storage When Power Off 1 : Frequency Setting Storage When Power Off Thousands Place:After Speed Setting by Digital Terminals(UP/DN) 0 : Frequency Miantain When Stop 1 : Frequency Restor to Initial When Stop F0.14 Accelerate Time 1 (0.0 ~ 6500.0)s F0.15 Decelerate Time 1 (0.0 ~ 6500.0)s F0.16 Carrier Frequency (0.5 ~ 16.0)kHz F0.17 PWM Frequency Adjust Automatically 0:No F0.18 Reserve 0 ~ 3 Automatic Regulating 0:No Effect F0.19 Regulation Voltage 1:Yes 1:Always Effective - 113 - Default Change 50.00 Hz ○ ○ Depend on Series ● 1.00 Hz/s ○ 0x0000 ○ 0.00 Hz Depend on Series Depend on Series Depend on Series ○ ○ ○ 1 ○ 0 ◎ 2 ○ NVF5 Series User Manual Code Appendix B Parameter list Name Setting Range Default Change 0 ◎ 0 ○ 0.00Hz ○ 0.0s ◎ 0.0% ◎ 0.0s ◎ 0 ○ 0.00Hz ○ 2:No effect in Decel. Mode 0:No Effect 1:Fault Log Clear 2:Set to Factory Default(Except Motor NP Parameters and Parameter F7.11) 3 : Reset Custom Parameter Group to Factory Default(Except Motor NP Parameters and Parameter F7.11) F0.20 Parameter Default Factory 4:All Parameter Reset to Factory Default 5:Back Up Parameters 6:Using Back Up Parameters 7:Saving Back Up Parameters Note:Only when you are using backup parameters,backup parameter are able to be saved.Otherwise when power the off then re-power inverter,except the updated parameters other parameters are always initial value. F1 Start and Stop Control Group F1.00 F1.01 F1.02 F1.03 Start Mode Selection Direct starting frequency Starting frequency Holding time (0.00 ~ 10.00)Hz (0.0 ~ 100.0)s DC braking current ( 0.0 ~ 100.0 ) % ( Rated Before starting Current) DC brakin time F1.04 0 : Start from the starting frequency 1 : First brake and then start from the starting frequency 2 : Speed tracking (including direction discrimination) and then start Before starting (0.0 ~ 100.0)s 0:Decel. Ramp Stop F1.05 Stop Mode F1.06 DC braking 1:Coast Stop 2 : Ramp Stop+DC Injection Brake 0.00Hz ~ F0.07 - 114 - NVF5 Series User Manual Code Appendix B Parameter list Name Setting Range Default Change 0.0s ○ 0.0% ○ Starting frequency F1.07 F1.08 DC braking (0.0 ~ 100.0)s wait time DC braking ( 0.0 ~ 100.0 ) % ( Rated current DC braking time Current) (0.00 ~ 100.0)s 0.0s F1.10 Forward/Reverse Deadband Time (0.0 ~ 300.0)s 0.0s ○ ○ F1.11 Forward/Reverse Switch Mode 0 : Operating frequency lower limit(F0.09) switching 1 : Starting frequency(F1.01) switching 0 ○ F1.12 Accel. / Decel. Mode Selection 0 ◎ F1.09 0:Ramp Accel./Decel. 1:S curve Accel./Decel. 1 2:S curve Accel./Decel. 2 F1.13 F1.14 S-curve Scale Starting Time S-curve Scale Stopping Time of (0.0 ~ 100.0)% 30.0% ◎ of (0.0 ~ 100.0)% 30.0% ◎ 0 ◎ Depend on motor type Depend on motor type Depend on motor type Depend on motor type Depend on motor type ◎ 1430 ◎ Depend on motor type ◎ Depend on motor type ◎ Depend on motor type ◎ F2 Motor Parameter Group 0:AC Induction Motor F2.00 Motor Type 1:Reserve 2:Reserve F2.01 Motor NP Power (0.1 ~ 1000.0)kW F2.02 Motor NP Voltage 0V ~ Inverter Rated Voltage F2.03 Motor NP Current (0.01~ 1000.00)A F2.04 Motor NP Frequency 0.01Hz ~ Max. Frequency F0.07 F2.05 Motor Poles 2 ~ 24 F2.06 Motor NP RPM (0 ~ 60000)rpm Output ◎ ◎ ◎ ◎ (0.001 ~ 65.535)Ω(Inverter F2.07 Motor Impedance Stator Power <= 55kW) (0.0001 ~ 6.5535)Ω(Inverter Power > 55kW) (0.001 ~ 65.535)Ω(Inverter F2.08 Motor Rotor Resistor F2.09 Motor Inductance Power <= 55kW) (0.0001 ~ 6.5535)Ω(Inverter Power > 55kW) Leakage (0.01 ~ 655.35)mH(Inverter Power <= 55kW) - 115 - NVF5 Series User Manual Code Appendix B Parameter list Name Setting Range Default Change Depend on motor type ◎ Depend on motor type ◎ 0 ◎ 0 ◎ 30 ○ 0.50s ○ 5.00Hz ○ 20 ○ 1.00s ○ 10.00Hz ○ ( 50 ~ 200 ) % 100% ○ (0.000~0.100)s 0.000s ○ ( 0.0 ~ 300.0 ) % 180.0% ○ ( 0.0 ~ 300.0 )% 180.0% ○ (0.001 ~ 65.535)mH(Inverter Power > 55kW) (0.1 ~ 6553.5)mH(Inverter F2.10 Motor Mutual Power <= 55kW) inductance (0.01 ~ 655.35)mH(Inverter Power > 55kW) 0.01A ~ F2.03(Inverter Power F2.11 Motor no-load <= 55kW) current 0.1A ~ F2.03(Inverter Power > 55kW) 0:No Operation F2.22 Motor Auto Tuning 1:Static Tune 2:Rotate Tune F3 Motor Vector Control Group F3.00 F3.01 F3.02 F3.03 F3.04 F3.05 F3.06 Speed/Torque Selection 0:Speed Regulation 1:Torque Regulation Speed Loop Kp 1 ( Low Speed 1 ~ 100 ASR1-P) Speed Loop Ki Time 1 ( 0.01 ~ 10.00 ) s (Low Speed ASR1-I) Switch Frequency1 Speed Loop Kp 2 ( Low Speed 0 ~ F3.06 1 ~ 100 ASR2-P) Speed Loop Ki Time 2 ( 0.01 ~ 10.00 ) s (Low Speed ASR2-I) Switch Frequency 2 F3.03 ~ Max. Frequency F0.07 Output F3.11 Slip Compensation Rate in Vector Control Mode Speed Loop Filter Time Torque Upper Limit Value of the Speed Loop Braking Torque Upper Limit Value of the Speed Loo Flux Regulation Kp 0 ~ 60000 2000 F3.12 Flux Regulation Ki 0 ~ 60000 1300 F3.13 Torque Regulation Kp 0 ~ 60000 2000 F3.07 F3.08 F3.09 F3.10 - 116 - ○ ○ ○ NVF5 Series User Manual Code F3.14 Appendix B Parameter list Name Torque Regulation Ki Setting Range Default Change 1300 ○ 0 ◎ 0.0% ○ 100.0% ○ 0sm ○ 0s ○ (0.00 ~ 650.00)s 0.10s ○ (0.00 ~ 650.00)s 0.10s ○ (0.0~100.0)% 100.0% ○ (0.0~100.0)% 100.0% ○ 0 ◎ Depend on machine type ◎ 50.00Hz ◎ 0.00Hz ◎ 0 ~ 60000 0:Integral Keypad 1:AI1 2:AI2 F3.19 Torque Selection Reference 3:Reserve 4 : HDI High Reference 5:Reserve Speed Pulse 6:MIN(AI1,AI2) 7:Max(AI1,AI2) F3.20 Integral Keypad Torque Setting (-300.0 ~ +300.0)% F3.21 Speed→Torque Switch Point Torque Setting) F3.22 F3.23 F3.24 F3.25 F3.26 F3.27 Speed/Torque Swith Delay Torque Reference Filter Time Torque Control Accel. Time Torque Control Decel. Tim Forward Speed Limit in Torque Mode Reverse Speed Limit in Torque Mode ( 0.0 ~ 300.0 ) % (Initial ( 0 ~ 1000 )ms (0 ~ 65535)s F4 VF Control Group 0:Linear V/F curve F4.00 V/F Curves 1:2 power reduced torque V/F curve 2:1.7 power reduced torque V/F curve 3:1.2 power reduced torque V/F curve 4 : Multi-point V/F curve ( See F4.03~F4.08) 5 : V/F separation curve( See F4.12~F4.17) 0.0%(Automatically) F4.01 Torque Boost (0.1 ~ 30.0)%(Motor Rated Voltage) F4.02 F4.03 Torque Boost Cut-off Point Multi-point VF Frequency Point 3 0.00Hz ~ frequency F0.07 F4.05 ~ F2.04 - 117 - Max. output NVF5 Series User Manual Code F4.04 F4.05 F4.06 F4.07 F4.08 F4.09 F4.10 F4.11 Appendix B Parameter list Name Setting Range Multi-point VF Voltage Point 3 Multi-point VF Frequency Point 2 Multi-point VF Voltage Point 2 Multi-point VF Frequency Point 1 Multi-point VF Voltage Point 1 VF Slip Compensation Gain VF Excessive Flux Gain Oscillation Suppression Gain VF Default Change 0.0% ◎ 0.00Hz ◎ 0.0% ◎ 0.00Hz ◎ ( 0.0 ~ 100.0)% 0.0% ◎ (0.0 ~ 200.0)% 100.0% ○ 0 ~ 200 64 ○ 0 ~ 100 Depend on machine type ○ 0 ○ ( 0.0 ~ 100.0 ) % 0.0% ○ ( 0.0 ~ 10.0 ) s 0.5s ○ ( 0.0 ~ 10.0 ) s 0.5s ○ 100.0% ○ 0% ○ 0 ◎ ( 0.0 ~ 100.0)% F4.07 ~ F4.03 ( 0.0 ~ 100.0)% 0.00 ~ F4.05 0:Keypad Setting 1:AI1 F4.12 VF Separation Output Voltage Channel 2:AI2 3:Reserve Note:100% Corresponding Motor Rated Voltage F4.13 F4.14 F4.15 F4.16 F4.17 VF Separation Voltage Digital Given VF Separation Voltage Rising Time VF Separation Voltage Dropping Time VF Separation Max. Output Voltage VF Separation Min. Output Voltage F4.17 ~ 100.0% 0.0% ~ F4.16 F5 Digital Input Terminal Group 0:HDI-High Speed Pulse Input Type (Set F5.15~F5.18 ) F5.00 HDI Input Selection F5.01 DI1 Setting 0 ~ 63 1 F5.02 DI2 Setting 0:No Applicable 2 F5.03 DI3 Setting 1:Run Forward-FWD 9 F5.04 DI4 Setting 2:Run Reverse-REV 12 ◎ ◎ ◎ ◎ 0 ◎ 1:Common DI(Same as DI1~ DI4) 3:Jog FWD 4:Jog REV F5.05 HDI Setting 5:Three Wire Control 6:Clear Fault 7:External Fault Input - 118 - NVF5 Series User Manual Code Name Appendix B Parameter list Setting Range 8:Reserve 9:Running Pause 10: Ramp Stop 11:DC Brake Deceleration 12:Coast Stop 13:Terminal Accel. UP 14:Terminal Decel. DOWN 15:Switch to Keypad Command 16 : Swith to Digital Input Command 17:Switch to Comm.Command 18 : Main Frequency Resouce Swich to Digital Given 19 : Main Frequency Resouce Swich to AI1 20 : Main Frequency Resouce Swich to AI2 21:Reserve 22 : Main Frequency Resouce Swich to HDI 23:Reserve 24:Preset Speed Terminal 1 25:Preset Speed Terminal 2 26:Preset Speed Terminal 3 27:Preset Speed Terminal 4 28:Accel./Decel Time Selection Terminal 1 29:Accel./Decel Time Selection Terminal 2 30~33:Reserve 34:Forward Disable 35:Reverse Disable 36: Accel./Decel. Disable 37:UP/DN Reset to 0 38:Reserve 39:PLC Pause 40:PLC Disable 41:PLC Stop Memory Clear 42:PLC Reset 43:PID Integration Pause 44:PID Disable - 119 - Default Change NVF5 Series User Manual Code Name Appendix B Parameter list Setting Range Default Change 0x0000 ○ 0.010s ○ 0 ◎ 45:PID Invert 46:PID Parameter Switch 47:Reserve 48:DC Brake 49:Frequency Setting Effective Terminal 50:Reserve 51:Current RunningTime Clear 52~63:Reserve Range:0x0000 ~ 0x001F Binary Setting: 0:Normal Logic F5.06 DI Terminal Effective Status Setting(DI1~ DI4、HDI) 1:Invert Ones Place: BIT0~BIT3:DI1~DI4 Tens Place: BIT0: HDI BIT1~BIT3:Reserve F5.07 DI Terminal Filter Time (0.000 ~ 1.000)s 0:Two Wire Mode1 F5.08 Terminal Mode Command 1:Two Wire Mode2 2:Three Wire Mode1 3:Three Wire Mode2 F5.10 DI1 Delay Time (0.000 ~ 60.000)s 1.000 Hz/s 0.000s F5.11 DI2 Delay Time (0.000 ~ 60.000)s 0.000s F5.12 DI3 Delay Time (0.000 ~ 60.000)s 0.000s F5.13 DI4 Delay Time (0.000 ~ 60.000)s 0.000s F5.14 HDI Delay Time (0.000 ~ 60.000)s 0.000s ◎ ○ ○ ○ ○ ○ F5.15 HDI Min. Input Pulse Note:Only effective for HDI in High Speed Pulse Input 0.0kHz ○ F5.16 HDI Min. Input Pulse Setting (-100.0~100.0)% 0.0% ◎ F5.17 HDI Max. Input Pulse Note:Only effective for HDI in High Speed Pulse Input 100.0 kHz ◎ HDI Max. Input Pulse Setting Pulse Reference Filter (-100.0 ~ +100.0)% 100.0% ◎ ○ F5.09 Terminal UP/DN Rate (0.001~65.535)Hz/s 0.0 kHz ~ F5.17 F5.15 ~ 100.0kHz F5.18 F5.19 (0.00 ~ 10.00)s - 120 - 0.05s NVF5 Series User Manual Code Appendix B Parameter list Name Setting Range Default F5.20 Time Reserve -- F5.21 AI1 Filter (0.00 ~ 10.00)s 0.05s F5.22 AI2 Filter Reserve (0.00 ~ 10.00)s -- 0.05s F5.23 Change -- ○ ○ ○ ○ 0x0000 ○ 0.00V ~ F5.27 0.00V ○ (-100.0 ~ +100.0)% 0.0% ○ F5.25 ~ +11.00V 10.00V ○ (-100.0 ~ +100.0)% 100.0% ○ 0.00 ~ F5.31 0.00V ○ Same as F5.26 0.0% ○ F5.29 ~ +11.00V 10.00V ○ Same as F5.26 100.0% ○ -10.00V ~ F5.35 -10.00V ○ (-100.0 ~ +100.0)% -100.0% ○ F5.33~ +11.00V 10.00V ○ (-100.0 ~ +100.0)% 100.0% ○ -10.0V~ F5.39 0.00V ○ (-100.0 ~ +100.0)% 0.0% ○ -- Range:0x0000~0x0333 Ones Place : AI1 Selection 0:Curve1 Curve 1:Curve 2 2:Curve 3 3:Curve 4 F5.24 Curve Selection Tens Place : AI2 Selection 0:Curve1 Curve 1:Curve2 2:Curve 3 3:Curve 4 Hundreds Place:Reserve Thousandd Place:Reserve F5.25 F5.26 F5.27 F5.28 F5.29 F5.30 F5.31 F5.32 F5.33 F5.34 F5.35 F5.36 F5.37 F5.38 Curve 1 Min. Reference Curve 1 Min. Reference Setting Curve 1 Max. Reference Curve 1 Max. Reference Setting Curve 2 Min. Reference Curve 2 Min. Reference Setting Curve 2 Max. Reference Curve 2 Max. Reference Setting Curve 3 Min. Reference Curve 3 Min. Reference Setting Curve 3 Max. Reference Curve 3 Max. Reference Setting Curve 4 Min. Reference Curve 4 Min. Reference Setting - 121 - NVF5 Series User Manual Code F5.39 F5.40 F5.41 F5.42 F5.43 F5.44 Appendix B Parameter list Name Setting Range Curve 4 Break Point 1 Reference Curve 4 Break Point 1 Setting Curve 4 Break Point 2 Reference Curve 4 Break Point 2 Setting Curve 4 Max. Reference Curve 4 Max. Reference Setting Default Change F5.37 ~ F5.41 3.00V ○ (-100.0 ~ +100.0)% 30.0% ○ F5.39 ~ F5.43 6.00V ○ (-100.0 ~ +100.0)% 60.0% ○ F5.41 ~ +11.00V 10.00V ○ (-100.0 ~ +100.0)% 100.0% ○ 0x0000 ○ 0 ○ 0x0000 ~ 0x0111 0:Limit to Min. Reference Setting 1:Limit to 0.0% F5.45 AI/HDI Lower Selection Limit Ones Place : AI1 Lower Limit Selection Tens Place : AI2 Lower Limit Selection Hundreds Place : HDI Lower Limit Selection Thousands Place:Reserve F6 Digital Output Terminal Group F6.00 HDO Output Type F6.01 HDO Output Selection Relay Output Selection 0 : Collector Open-Circuit High Speed Pulse Output 1:Collector Open-Circuit Output (F6.01 Setting) F6.02 0 ~ 63 1 0:No Output 16 ○ ○ -- ○ 1:In Running Mode 2 : Frequency Level Detection Reach-FDT1 3 : Frequency Level Detection Reach -FDT2 4:Inverter Overload Pre-Alarm 5:Under Voltage Status Output 6:External Fault Stop F6.03 Reserve 7:Reach Upper Limit Frequency 8:Reach Lower Limit Frequency 9:Zero Speed Running 10~11:Reserve 12:Simple PLC Step Complete Indication 13:PLC Recycle Complete 14:Reserve - 122 - NVF5 Series User Manual Code Appendix B Parameter list Name Setting Range Default Change 0x0000 ○ (0.0 ~ 3600.0)s 0.0s ○ (0.0 ~ 3600.0)s 0.0s -- 0.0s 15:Inverter Ready 16:Fault Output 17~18:Reserve 19:In Torque Limiting Process 20:Speed Direction 21:PFC 22:Frequency Reach 23:Reserve 24:In Load Loss Progress 25:Zero Current Status 26:Current Reach1 27:Current Reach 2 28:Temperature Reach 29:Output Current Over Limit 30:Reserve 31:Motor Overload Pre-alarm 32:Reserve 33:Reserve 34 : Timer Reach the time programmed 35:AI1>AI2 36:Reserve 37:Current Running Time Reach 38~63:Reserve Range:0x0000~0x0003 Binary Setting: F6.04 Output Terminal Effective Status Setting(HDO、RO) 0:Effective in on mode 1:Effective in off mode Tens Place: BIT0~BIT1: HDO、RO Tens Place:Reserve F6.05 F6.06 F6.07 F6.08 F6.09 HDO Output Delay Time Relay Output Delay Time Reserve AO1 Output Setting Selection HDO Output Setting Selection 0 ~ 36 0 ○ ○ ○ 0 ○ 0:No Applicable 1:Running Frequency(0~Max. Output Frequency) - 123 - NVF5 Series User Manual Code Appendix B Parameter list Name Setting Range Default Change 2:Setting Frequency(0~ Max. Output Frequency) 3:Ramp Reference Frequency ( After Accel./Decel. )( 0~ Max. Output Frequency) 4:Output RPM(0~ Max. Output Frequency) 5:Output Current1(0~2 times Inverter Rated Current) 6:Output Current 2(0~2 times Inverter Rated Current) 7:Output Torque(Absolute) (0~3 times Motor Rated Torque) 8:Output Power(0~2 times Motor Rated Power) 9:Output Voltage(0~1.2 times Inverter Rated Voltage) 10:DC Bus Voltage(0~1000.0V) 11:AI1 12:AI2 13:Reserve 14:PILSE Pulse Input(0~100) kHz 15:Reserve 16:Reserve 17:Reserve 18 : Output Current (Corresponding(0-1000)A) 19 : Ouput Voltage (Corresponding(0-1000)V) 20:Output Torque ( (-200.0 ~ +200.0 ) % Motor Rated Torque) 21 ~ 36:Reserve F6.10 F6.11 F6.12 F6.13 AO1 Zero Bias Correction Factor AO1 Gain HDO Max. Output Pulse Frequency Frequency Reach (-100.0 ~ 100.0)% 0.0% -10.0 ~ +10.00 1.00 (0.01 ~ 100.00)kHz (0.0 ~ 100.0)% - 124 - 10.00kHz 5.0% ○ ○ ○ ○ NVF5 Series User Manual Appendix B Parameter list Code Name F6.14 ( FAR ) Detection Width FDT1 Level Setting Range Default Change 0.00 Hz ~ F0.07 50.00Hz F6.15 FDT1 Lagging (0.0 ~ 100.0)% 5.0% F6.16 FDT2 Level 0.00 Hz ~ F0.07 25.00Hz F6.17 FDT2 Lagging (0.0 ~ 100.0)% 5.0% ○ ○ ○ ○ 0000 ○ 0 ○ -- -- 0 ◎ -- ○ 0x0017 ○ F7 Keypad Function Group F7.00 0000:No Password User Password Others:Passwrod Protection 0:No Lock 1:Lock All 2:Reserve F7.01 Keypad Lock Function 3:Lock All Except PRG/S key (SHIFT Function) F7.02 4:Lock All Except RUN、STOP Key -- Reserve F7.03 Parameters Protection Setting F7.04 Reserve 0:All Parameters Permit to be changed 1:Forbit change except Digital Given ( F0.05 ) and this parameter 2 : Forbit change except this parameter -Range:0x0007~0xFFFF(3FFF) Bit00 : Output Frequency ( Hz light) Bit01 : Setting Frequency ( Hz Flash) Bit02:DC Bus Voltage(V Light) Bit03:Output Voltage(V Light) F7.05 Running Selection1 Status Bit04:Output Current(A Light) Bit05:Running RPM(rpm Light) Bit06:Output Power(%Light) Bit07:Output Torque(%Light) Bit08:PID Reference(%Flash) Bit09:PID Feedback(%Light) Bit10:DI Terminal Status Bit11:DO Terminal Status - 125 - NVF5 Series User Manual Code Appendix B Parameter list Name Setting Range Default Change 0x0000 ○ 0x0003 ○ 1 ○ Bit12:Torque Reference Value (%Light) Bit13:PLC Current Step No. Bit14:Reference RPM Bit15:Reserve Range:0x0000~0x000F Bit00:AI1 Value(V Light) F7.06 Running Selection2 Status Bit01:AI2 Value(V Light) Bit02: Reserve Bit03 : High Speed Pulse-HDI Frequency Bit04~Bit15:Reserve Range:0x0003~0x0FFF Bit00:Reference Frequency(Hz light , frequency flash slowly) Bit01:DC Bus Voltage(V Light) Bit02:DI Terminal Status Bit03:DO Terminal Status Bit04:PID Reference(% Flash) F7.07 Stopping Status Parameter Data Bit05:PID Feedback(% Light) Bit06 : Torque Reference ( % Light) Bit07:AI1 Value(V Light) Bit08:AI2 Value(V Light) Bit09:Reserve Bit10:HDI Frequency Bit11:PLC Current Step No. Bit12:Setting RPM Bit13~Bit15:Reserve F7.08 STOP Key Function Selection 0:Only Effective to Keypad F7.09 Speed Display Gain 0.01%~100.00% F7.10 Reserve -- 1:Effective for All Mode 100.00% -- ○ 1 ○ 0.0% ○ 1:Simple Menu Mode F7.11 Parameter Mode Menu 2:Custom Menu Mode 3:Engineering Menu Mode F7.12 Keypad Potentiometer Min. Corresponding Max. Frequency 0.0%~F7.13 - 126 - NVF5 Series User Manual Code F7.13 Appendix B Parameter list Name Setting Range Percentage Keypad Potentiometer Max. Corresponding Max. Frequency Percentage (0.0~100.0)% Default Change 100.0% ○ 5.00Hz ○ F8 Enhanced Parameter Group F8.00 Jog Frequency 0.10 Hz ~ Max. Frequency F0.07 F8.01 Jog Accel. Time (0.0 ~ 6500.0)s 20.0s F8.02 Jog Decel. Time (0.0 ~ 6500.0)s 20.0s F8.03 Reserve -- 0.0s F8.04 Accel. Time 2 (0.0 ~ 6500.0)s 10.0s F8.05 Decel. Time 2 (0.0 ~ 6500.0)s 10.0s F8.06 Accel. Time 3 (0.0 ~ 6500.0)s 10.0s F8.07 Decel. Time 3 (0.0 ~ 6500.0)s 10.0s F8.08 Accel. Time 4 (0.0 ~ 6500.0)s 10.0s F8.09 Decel. Time 4 (0.0 ~ 6500.0)s 10.0s ○ ○ ○ ○ ○ ○ ○ ○ ○ F8.10 Skip Frequency1 0.00 Hz ~ Frequency F0.07 0.00Hz ○ F8.11 Skip Frequency Range 0.00Hz ○ F8.12 Skip Frequency 2 0.00Hz ○ F8.13 Skip Frequency Range 0.00Hz ○ F8.14 Skip Frequency 3 0.00Hz ○ F8.15 Skip Frequency Range 0.00Hz ○ ○ 1 2 3 Output Max. Output 0.00 Hz Frequency ~ Max. Output 0.00 Hz Frequency ~ Max. Output 0.00 Hz Frequency ~ Max. Output 0.00 Hz Frequency ~ Max. Output 0.00 Hz Frequency ~ Max. Output F8.16 Brke Unit Voltage Action 720V (380V (650 ~ 800)V(380V Series) Series) 360V (320 ~ 380)V(230V Series) (230V Series) F8.17 Regen. Selection Brake. 0:No Action F8.18 F8.19 F8.20 F8.21 F8.22 Regen. Brake Using Rate Zero Frequency Running Threshold Zero Current Detection Value Zero Current Detection Delay Time Output Current Over Limit Value 0 ○ (0.0 ~ 100.0)% 80.0% ○ (0.00 ~ 300.00)Hz 0.50Hz ○ (0.0 ~ 300.0 ) % 5.0% ○ (0.00 ~ 600.00)s 0.10s ○ 200.0% ○ 1:Action (0.0~300.0)% - 127 - NVF5 Series User Manual Code F8.23 F8.24 F8.25 F8.26 F8.27 F8.28 Appendix B Parameter list Name Setting Range Output Current Over Limit Detection Delay Time Current Reach Detection Value 1 Current Reach Detection Value 1 Level Current Reach Detection Value 2 Current Reach Detection Value 2 Level Power Moudle Temperature Reach F8.29 Cooling Fan Automaticlly Control F8.30 Droop Control F8.31 Start Selection F8.32 Timer Function F8.33 Timer Running Timer Current Running Reach Time F8.34 Default Change 0.00s ○ (0.0~300.0)% 100.0% ○ (0.0~300.0)% 0.0% ○ (0.0~300.0)% 100.0% ○ (0.0~300.0)% 0.0% ○ (0~100)℃ 75℃ ○ 0 ◎ 0.00Hz ○ 1 ○ 0 ○ (0.00~600.00)s 0:Running in Auto Mode 1:Fan Running in Power ( 0.00 ~ 10.00 ) Hz( 0.00Hz Ineffective) Protection 0:No Applicable 1:Start Protection 0:Ineffective 1:Effective (0.0 ~ 6500.0)min 0.0min (0.0 ~ 6500.0)min 0.0min ○ ○ 0 ○ 0.0s ○ 0 ○ 0:Ineffective F8.35 Auto Restart Function F8.36 Auto Restart Time F8.37 Sleep-Wake Function F8.38 Sleep Frequency 0.00 Hz ~ F0.07 F8.39 Sleep Dealy 0.0s ~ 6500.0s 0.0s F8.40 Wake Level (0.0 ~ 100.0)% 0.0% F8.41 Wake Delay (0.0 ~ 6500.0)s 0.0s ○ ○ ○ ○ 1 ◎ Delay 1:Effective (0.0 ~ 10.0)s 0:Ineffective 1:Effective 0.00Hz F9 Process PID Control Group 0:Digital Given 1:AI1 2:AI2 F9.00 PID Selection Reference 3:Reserve 4:HDI 5:Reserve 6:Preset Speed - 128 - NVF5 Series User Manual Code Appendix B Parameter list Name Setting Range Default Change 1 ◎ 0:AI1 1:AI2 2:Reserve 3:AI1+AI2 F9.01 Feedback Selection 4:AI1-AI2 5:MIN(AI1,AI2) 6:MAX(AI1,AI2) 7: HDI 8:Reserve F9.03 Reference Given Setting KP F9.04 Ki 0.01 ~ 10.00 2.00 F9.05 Kd 0.000 ~ 10.000 0.000 F9.06 (0.01 ~ 50.00)s 0.50s (0.00 ~ 650.00)s 0.00s F9.08 Sampling Period Reference Change Time Feedback Filter Time (0.00 ~ 60.00)s 0.00s F9.09 PID Output Filter Time (0.00 ~ 60.00)s 0.00s F9.10 Offset Limit (0.0 ~ 100.0)% 0.0% F9.11 Differential limiting The Max. Positive Offset between the Two Outputs The Max. Negative Offset between the Two Outputs (0.00 ~ 100.00)% 0.10% ○ ○ ○ ○ ○ ○ ○ ○ ○ ○ (0.00 ~ 100.00)% 1.00% ○ (0.00 ~ 100.00)% 1.00% ○ 0 ○ 0 ◎ 0x0000 ○ 20.0 ○ F9.02 F9.07 F9.12 F9.13 Digital F9.14 Close Loop Output Invert Selection F9.15 Close Loop Adjust F9.16 Integral Adjustment Selection F9.17 Kp2 ( 0.0 ~ 100.0)% 0.0 ~ 100.0 0 : Close Loop Output is Negative,Inverter Run in Lower Limit Frequency 1 : Close Loop Output is Negative,Inverter Run Reverse 0:Positive Direction 1:Negative Direction 0x0000~0x0011 0:Ineffective 50.0% 20.0 1:Effective Ones Place:When Frequency Reach Upper/Lower Limit,Integral Stop Tens Place:When Frequency Reach Upper/Lower Limit,Integral Continue 0.0 ~ 100.0 - 129 - NVF5 Series User Manual Code Appendix B Parameter list Name Setting Range Default Change F9.18 Ki2 0.01 ~ 10.00 2.00 F9.19 Kd2 0 ~ 10.000 0.000 ○ ○ F9.20 Parameter Selection 0 ○ 0:Ineffective Switch F9.21 Switch Offset 1 F9.22 Switch Offset 2 Close Loop Preset Value Preset Value Holding Time Reference Feedback Level Feedback Loss Detection Value Feedback Loss Detection Time F9.23 F9.24 F9.25 F9.26 F9.27 F9.28 Close Loop Calculation Mode 1:DI Switch 2:Switch Automaticlly Based On Offset 0.0% ~ F9.22 20.0% F9.21 ~ 100.0 % 80.0% (0.0 ~ 100.0)% 0.0% ○ ○ ○ (0.00 ~ 650.00)s 0.00s ◎ 0 ~ 65535 1000 ◎ (0.0 ~ 100.0)% 0.0% ◎ 0.0 ○ 0 ○ 0 ○ (0.0 ~ 20.0)s 0:No calculate when stop 1:Calculate when stop 0:Digital Given F9.29 Close Loop BackupsChannel Selection 1:AI1 2:AI2 3:Reserve 4:HDI FA Simple PLC and Multi-Preset Speed Control Group Range:0x0000 ~ 0x0112 Ones Place : PLC Running Mode 0:Single Cycle then stop 1 : Single Cycel then holding the end valu 2:Continuous cycle Tens Place:Store when Stop FA.00 Simple PLC Running Mode Selection 0:No Store 1 : Store stop step and frequency Hundreds Place:Store when power off 0:No Store 1 : Store stop step and frequency Thousands Place:Step Time Unit Selection - 130 - 0x0000 ◎ NVF5 Series User Manual Code Name Appendix B Parameter list Setting Range Default Change 0x0000 ○ 0:Second 1:Minute Range : 0x0000 ~ 0x0315 Ones Place:Frequency Source 0:Multi-Step Frequency 1:AI1 2:AI2 3:Reserve 4:HDI 5:PID Output FA.01 Step 1 Setting Tens Place:Running Direction 0:Forward 1:Reserve Hundreds Place:Accel./Decel. Time 0:Accel./Decel. Time 1 1:Accel./Decel. Time 2 2:Accel./Decel. Time 3 3:Accel./Decel. Time 4 0.0 ~ 6500.0 FA.02 Step 1 Running Time FA.03 Step 2 Setting FA.04 Step 2 Running Time 0.0 ~ 6500.0 20.0 FA.05 Step 3 Setting Same as FA.01 0x0000 FA.06 Step 3 Running Time 0.0 ~ 6500.0 20.0 FA.07 Step 4 Setting Same as FA.01 0x0000 FA.08 Step 4 Running Time 0.0 ~ 6500.0 20.0 FA.09 Step 5 Setting Same as FA.01 0x0000 FA.10 Step 5 Running Time 0.0 ~ 6500.0 20.0 FA.11 Step 6 Setting Same as FA.01 0x0000 FA.12 Step 6 Running Time 0.0 ~ 6500.0 20.0 FA.13 Step 7 Setting Same as FA.01 0x0000 FA.14 Step 7 Running Time 0.0 ~ 6500.0 20.0 FA.15 Step 8 Setting Same as FA.01 0x0000 FA.16 Step 8 Running Time 0.0 ~ 6500.0 20.0 FA.17 Step 9 Setting Same as FA.01 0x0000 FA.18 Step 9 Running Time 0.0 ~ 6500.0 20.0 FA.19 Step 10 Setting Same as FA.01 0x0000 FA.20 Step 10 Running Time 0.0 ~ 6500.0 20.0 FA.21 Step 11 Setting Same as FA.01 0x0000 Same as FA.01 - 131 - 20.0 0x0000 ○ ○ ○ ○ ○ ○ ○ ○ ○ ○ ○ ○ ○ ○ ○ ○ ○ ○ ○ ○ NVF5 Series User Manual Appendix B Parameter list Code Name FA.22 Step 11 Running Time 0.0 ~ 6500.0 Setting Range Default 20.0 Change FA.23 Step 12 Setting Same as FA.01 0x0000 FA.24 Step 12 Running Time 0.0 ~ 6500.0 20.0 FA.25 Step 13 Setting Same as FA.01 0x0000 FA.26 Step 13 Running Time 0.0 ~ 6500.0 20.0 FA.27 Step 14 Setting Same as FA.01 0x0000 FA.28 Step 14 Running Time 0.0 ~ 6500.0 20.0 FA.29 Step 15 Setting Same as FA.01 0x0000 FA.30 Step 15 Running Time 0.0 ~ 6500.0 20.0 FA.31 Preset Speed 1 (-100.0 ~ 100.0)% 0.0% FA.32 Preset Speed 2 (-100.0 ~ 100.0)% 0.0% FA.33 Preset Speed 3 (-100.0 ~ 100.0)% 0.0% FA.34 Preset Speed 4 (-100.0 ~ 100.0)% 0.0% FA.35 Preset Speed5 (-100.0 ~ 100.0)% 0.0% FA.36 Preset Speed 6 (-100.0 ~ 100.0)% 0.0% FA.37 Preset Speed 7 (-100.0 ~ 100.0)% 0.0% FA.38 Preset Speed 8 (-100.0 ~ 100.0)% 0.0% FA.39 Preset Speed 9 (-100.0 ~ 100.0)% 0.0% FA.40 Preset Speed 10 (-100.0 ~ 100.0)% 0.0% FA.41 Preset Speed 11 (-100.0 ~ 100.0)% 0.0% FA.42 Preset Speed 12 (-100.0 ~ 100.0)% 0.0% FA.43 Preset Speed 13 (-100.0 ~ 100.0)% 0.0% FA.44 Preset Speed 14 (-100.0 ~ 100.0)% 0.0% FA.45 Preset Speed 15 (-100.0 ~ 100.0)% 0.0% ○ ○ ○ ○ ○ ○ ○ ○ ○ ○ ○ ○ ○ ○ ○ ○ ○ ○ ○ ○ ○ ○ ○ ○ 0 ○ 10 ○ 3 ○ 0:Digital Given 1:AI1 FA.46 PLC Back Up Channel Selection 2:AI2 3:Reserve 4:HDI Fb Serial Communication Group Fb.00 Local Drive Address Node 1~247 0:2400bps 1:4800bps Fb.01 Baud Rate Setting 2:9600bps 3:19200bps 4:38400bps 5:57600bps - 132 - NVF5 Series User Manual Code Appendix B Parameter list Name Setting Range Default Change 0 ○ 0.005s ○ 0.0s ○ 1 ○ 0 ○ -- ○ (0.00 ~ +600.00)Hz 0.00Hz ● (0.00 ~ +600.00)Hz 0.00Hz (0.00 ~ +600.00)Hz 0.00Hz 6:115200bps 0:No Check(8-N-2)for RTU 1:Odd Check(8-O-1)for RTU 2:Even Check(8-E-1)for RTU 3:No Check(7-N-2)for RTU 4:Odd Check(7-O-1)for RTU Fb.02 Data Bit Checking 5:Even Check(7-E-1)for RTU 6:No Check(8-N-2)for ASCII 7:Odd Check(8-O-1)for ASCII 8:Even Check(8-E-1)for ASCII 9:No Check(7-N-2)for ASCII 10:Odd Check(7-O-1)for ASCII 11:Even Check(7-E-1)for ASCII Fb.03 Fb.04 Comm. Respond Delay Time Comm. Overtime Fault Time (0.000 ~ 0.200)s (0.1 ~ 100.0)s 0:Alarm and Coast Stop 1:No Alarm and Keep Running Fb.05 Transmit Operation Fault 2 : No Alarm and Stop per Programmed Stop Mode (Only in Comm. Mode) 3 : No Alarm and Stop per Programmed Stop Mode(In All Mode) 0 : Write Operation Respond ( Inverter responds to the commands written by the host computer) Fb.06 Comm. Selection Operation FC FC.00 1:Write Operation No Respond ( Inverter only responds to the commands read by the host computer for improving communication efficiency by this way) Extentive Optional Card Group:Reserve Reserve -- Fd Inverter Status Display Group Fd .00 Fd.01 Fd .02 Main Frequency Reference Aux. Frequency Reference Frequency Setting - 133 - ● ● NVF5 Series User Manual Code Name Appendix B Parameter list Setting Range Fd .03 Frequency Setting(After Accel./Decel.) Fd .04 Torque Reference Fd .05 Output Frequency (0.00 ~ +600.00)Hz Fd .06 Output Voltage (0 ~ 480)V Fd .07 Output Current Fd .08 Running RPM (0.00 ~ 600.00)Hz (-300.0 ~ +300.0)%(Motor Rated Torque) ( 0.0 ~ 3000.0 ) A (Corresponding 0.0~3.0)Ie) (0 ~ 60000)rpm (-300.0 ~ +300.0)%(Motor Default Change 0.00Hz ● 0.0% ● 0V ● ● 0.0A ● 0rpm ● 0.0% ● 0.0% ● 0.00Hz Fd .09 Output Torque Fd .10 ASR Controller Output Fd .11 Torque Current (-300.0 ~ +300.0)% 0.0% Fd.12 Flux Current (0 ~ 100.0)% 0.0% ● ● Fd .13 Motor Power 0.0% ● (-300.00 ~ +300.00)Hz 0.00Hz ● (-300.00 ~ +300.00)Hz 0.00Hz Fd .14 Fd .15 Fd .16 Motor Estimate Frequency Motor Actual Frequency DC Bus Voltage Rated Torque) (-300.0 ~ +300.0)%(Motor Rated Torque) (0.0 ~ 200.0)%(Motor Rated Power) (0 ~ 800)V Range:0x0000~0xFFFF Bit0:Run/Stop 0 ● ● 0x0000 ● Bit1:Reverse/Forward Bit2:Zero Speed Running Bit3:Accelerating Bit4:Decelerating Bit5:Constant Speed Running Bit6:Pre-flux Fd .17 Inverter Status Bit7:Auto Tuning Bit8:Overcurrent Stall Bit9:DC Overvoltage Stall Bit10:Torque Limit Bit11:Frequency Limit Bit12:Fault Bit13:Ready Bit14:Reserve Bit15:UnderVoltage/Normal - 134 - NVF5 Series User Manual Code Appendix B Parameter list Name Setting Range Default Change 0x0000 ● 0x0000 ● Range:0x0000~0xFFFF 0:Off; 1:On Ones Place: Fd .18 DI Terminal Status BIT0~BIT3:DI1~DI4 Tens Place: BIT0:HDI BIT1~BIT3:Reserve Range:0x0000~0xFFFF 0:Off; 1:On Fd .19 DO Terminal Status Ones Place: BIT0~BIT2:HDO、RO Tens Place:Reserve -- ● ● ● ● ● ● 0.0% ● -- ● 0.0% ● 0.0% ● 0.0% ● 0.0% ● Fd .20 AI1 Input Voltage (-10.00 ~ +11.00)V 0.00V Fd .21 AI2 Input Voltage (-10.00 ~ +11.00)V 0.00V Fd .22 Reserve -- Fd .23 AI1 Percentage (-100.00 ~ 110.00)% 0.00% 0.00% -- Fd .24 AI2 Percentage (-100.00 ~ 110.00)% Fd .25 Reserve -- Fd .26 AO1 Output Fd .27 Reserve Fd .28 Process Close Loop Reference Fd .29 Process Close Loop Feedback Fd.30 Process Close Loop Error Fd .31 Process Close Loop Output Fd .32 HDI Frequency (0.1 ~ 100.0)kHz Fd .33 PLC Current Step 0 ~ 15 Fd .34 Heatsink Temperature Rectifier Bridge Temperature Elapsed Running Time Running Time Accumulation (0.0 ~ 200.0)℃ Fd .35 Fd .36 Fd .37 ( 0.0 ~ 100.0 ) % (Corresponding Full Scale) -( -100.0 ~ 100.0 ) % (Corresponding Full Scale) ( -100.0 ~ 100.0 ) % (Corresponding Full Scale) ( -100.0 ~ 100.0 ) % (Corresponding Full Scale) ( -100.0 ~ 100.0 ) % (Corresponding Full Scale) 0℃ ● ● ● ● 0 ~ Max.65535 Hours 0 ● 0 ~ Max.65535Hours 0 ● (1~200)℃ - 135 - 0.0 kHz 0 0.0℃ NVF5 Series User Manual Appendix B Parameter list Code Name Fd .38 Fan Running Elapsed Time Fd .39 Rated Capacity Fd .40 Rated Voltage Fd .41 Rated Current Setting Range Default Change 0 ● Set By Factory ● Set By Factory ● Series) Set By Factory ● 0x0500 0 ~ Max.65535Hours (0 ~ 999.9)kVA(Depend On Series) (0 ~ 999) V (Depend On Series) (0 ~ 999.9)A(Depend On ● ● ● ● Fd.42 Serial Type Range:0x0000~0xFFFF Fd .43 Software Version 0.00 ~ 99.99 Fd .44 Fd.47 Customized Version Source Code Compilation Year Source Code Compilation Date Setting RPM (0 ~ 60000)rpm 0 Fd .48 Current Running Time (1 ~ 65535)min 0 Fd .49 Rest Running Time (0 ~ 65535)H 0 0.1 ~ 20.0 0 ● ● ● ● ● 0.0% ● 0.0% ● Fd .45 Fd .46 0 ~ 99.99 1.00 2014 ~ 2099 2017 101 ~ 1231 101 Fd .50 Power Factor Angle Fd .51 VF Separated Target Voltage Fd .52 VF Separated Output Voltage Fd .53 Inverter GP Type 0~3 Fd .54 Motor Temperature (1~200)℃ FE 1.00 (0.0 ~ 100.0)%(Motor Rated Voltage) (0.0 ~ 100.0)%(Motor Rated Voltage) 0℃ ● ● 1 ○ 1.00 ○ 0 ○ 80% ○ 0 ○ 0 Protection and Early Alarm Group FE.00 Motor Overload Protection Selection 0:Ineffective FE.01 Motor Overvoload Protection Gain 0.20 ~ 10.00 FE.02 Motor Overload Early Alarm Enable 0:Ineffective FE.03 Motor Overload Early Alarm Level (20 ~ 200)% 1:Effective 1:Effective 0:Ineffective FE.04 Overvoltage Stall Protection Selection 1:Effective 2:Effective in Decel.Mode FE.05 0 ~ 100(0:Prohibit) (120 ~ 150)% FE.07 Overvoltage Stall Gain Overvoltage Stall Protection Voltage Overcurrent Stall Gain FE.08 Overcurrent (100 ~ 200)% FE.06 Stall 0 ~ 100(0:Prohibit) - 136 - 0 130% 20 150% ○ ○ ○ ○ NVF5 Series User Manual Code Appendix B Parameter list Name Setting Range Default Change 1 ○ 0 ○ Protection Current FE.09 Ground Short Circuit Protection Selection FE.13 Instantaneous power Off Action Selection 0:Ineffective 1:Effective 0:Ineffective 1:Deceleration 2:Decel. Stop FE.14 FE.15 FE.16 FE.17 FE.18 FE.19 Judgement Voltage of Instantaneous Action Judgement Time of Instantaneous Power Failure Voltage Rise Judgement Voltage of Instantaneous Power Failure (80.0 ~ 100.0)% 90.0% ○ (0.00 ~ 100.00)s 0.50s ○ 80.0% ○ Load Loss Protection Selection 0:Ineffective 1 ○ Load Loss Detection Level Load Loss Detection Time ( 0.0 ~ 100.0)% 10.0% ○ 1.0s ○ 20.0% ○ 1.0s ○ 20.0% ○ 5.0s ○ 1 ◎ FE.20 OverSpeed Detection Value FE.21 OverSpeed Detection Time FE.22 FE.23 Detection Value of Excessive Speed Deviation Detec When Excessive Speed Deviation (60.0 ~ 100.0)%(Standard DC Bus Voltage) 1:Effective (0.0 ~ 60.0)s (0.0 ~ 50.0)%(Max. Output Frequency) ( 0.0 ~ 60.0 ) s ( 0.0s No Detection) (0.0 ~ 50.0)%(Max. Output Frequency) ( 0.0 ~ 60.0 ) s ( 0.0s No Detection) FE.24 Input Phase Loss Detection Selection 0:Input Phase Loss Hardware Detection 1 : Input Phase Loss Software Detection 2 : No Input Phase Loss Hardware/Software Detection FE.25 Output Phase Loss Detection Selection 0 : No Output Phase Loss Software Detection 1:Output Phase Loss Software Detection 1 ◎ Reset 0 ~ 20 0 ○ Reset (0.1 ~ 100.0)s 1.0s ○ When Reset 0:Fault lockout prohibited 0 ○ 0 ● FE.26 FE.27 FE.28 FE.29 Automaticlly Fault Times Automaticlly Fault Inerval Fault Do Action Automaticlly Fault Fault Log 1 1:Fault lockout permit 0~55 - 137 - NVF5 Series User Manual Code Name Appendix B Parameter list Setting Range 0:No fault- No 1:Accel. Overcurrent-E.OC1 2:Decel. Overcurrent-E.OC2 3 : Constant Speed Overcurrent-E.OC3 4:Accel. Overvoltage-E.OU1 5:Decel. Overvoltage-E.OU2 6:Constant Speed OvervoltageE.OU3 7:Reserve 8:Input Phase Loss-E.SPI 9:Output Phase Loss-E.SPO 10:IGBT Protection-E.FO 11:Heatsink Over Temperature-E.OH1 12 : Rectifier Over Temperature-E.OH2 13:Inverter Overload-E.OL2 14:Motor Overload-E.OL1 15:External Fault-E.EF 16:EEprom abnormal-E.EEP 17:Comm. Abnormal-E.CE 18:Contactor Abnormal-E.SHt 19 : Current Abnormal-E.ItE 20:Reserve Detection 21:Reserve 22:Reserve 23:Reserve 24:Motor Tuning Abnorma-E.tE 25:Reserve 26:Reserve 27:Reserve 28:Reserve 29:Reserve 30:Reserve 31:Under Voltage E.Uv 32 : Buffer Power Supply Overload-E.OL3 33 : Motor to Ground Short Circuit-E.StG - 138 - Default Change NVF5 Series User Manual Code Appendix B Parameter list Name Setting Range Default Change 34 : Rapid Current Limit Overtime-E.CbC 35 : Inverter Hardware Overcurrent Abnormal-E.Inv 36:Load Loss-E.LL 37 : PID Feedback Loss in Running Mode-E.FbL 38 : Motor Over Temperature-E.OT 39:Reserve 40:Reserve 41: Excessive Speed Deviation-E.dEv 42:Motor Over Speed-E.OS 43 ~ 55:Reserve FE.30 Third Time(Latest) Fault Frequency (0.00 ~ 655.35)Hz 0.00Hz ● FE.31 Third Time(Latest) Fault Current (0.00 ~ 655.35)A 0.00A ● Third Time(Latest) Fault DC Bus Voltage Inverter Status of The Third Time (Latest)Fault DI Terminal Status of The Third Time (Latest)Fault DO Terminal Status of The Third Time (Latest)Fault (0.00 ~ 655.35)V 0.00V ● 0 ~ 65535 0 ● 0 ~ 9999 0 ● 0 ~ 9999 0 ● FE.32 FE.33 FE.34 FE.35 FE.36 Fault Log2 0 ~ 55 0 FE.37 Fault Log 3 0 ~ 55 0x0000 ~ 0x2222 0 ● ● 0x0000 ○ Ones Place : Motor Overload E.OL1 0:Coast Stop 1:Stop per Stop Mode FE.38 Protection Selection1 in Fault Mode 2:Keep Running Tens Place : Input Phase Loss-E.SPI ( Same as ones place) Hundreds Place: Output Phase Loss-E.SPO ( Same as ones place) - 139 - NVF5 Series User Manual Code Name Appendix B Parameter list Setting Range Thousands Default Change 0x0000 ○ 0x0000 ○ 0x0000 ○ 0x0000 ○ Place : External Fault-E.EF ( Same as ones place) 0x0000 ~ 0x2222 Ones Place:Comm. Abnormal -E.CE 0:Coast Stop 1:Stop per Stop Mode FE.39 Protection Selection2 in Fault Mode 2:Keep Running Tens Place:Reserve Hundreds Place : EEprom Abnormal-E.EEP 0:Coast Stop 1:Stop per Stop Mode Thousands Place:Reserve 0x0000 ~ 0x2222 Ones Place:Load Loss-E.LL 0:Coast Stop 1:Decel. Stop 2 : Keep Running by Skipping to 7% Motor Rated Frequency,Recover to setting frequency when load recover Tens Place:PID Feedback Loss FE.40 Protection Selection3 in Fault Mode in Running Mode-E.FbL 0:Coast Stop 1:Stop per Stop Mode 2:Keep Running Hundreds Place : Excessive Speed Deviation- E.dEv(Same as tens place) Thousands Plac : Motor Over Speed-E.OS ( Same as tens place) 0x0000 ~ 0x2222 Ones Place:Reserve FE.41 Protection Selection4 in Fault Mode Tens Place:Reserve Hundreds Place:Reserve Thousands Plac:Reserve 0x0000 ~ 0x2222 FE.42 Protection Selection5 in Fault Mode Ones Place:Reserve Tens Place:Reserve Hundreds Place:Reserve - 140 - NVF5 Series User Manual Code Appendix B Parameter list Name Setting Range Default Change 0 ○ 10.0% ○ Thousands Plac:Reserve 0~4 0:Current Frequency FE.43 Continuing Running Frequency Slection when Faulted 1:Setting Frequency 2:Upper Limit Frequency 3:Lower Limit Frequency 4:Abnormal Reserve Frequency FE.44 Abnormal reserve frequency setting (0.0 ~ 100.0)%(Corresponding Max.) - 141 - NVF5 Series User Manual Appendix C Accessiories Appendix C Accessiories Name Description For meeting IP22 protection level use,please refer to the installation guideline Top protective cover Catalog No. NVF5-FH - 142 - NVF5 Series User Manual Quality Commitment Quality Commitment This product quality commitment regulations as follows: 1.Guarantee range:The inverter itself. 2.Guarantee time:Starting from the date of the Purchase, 12 months or starting from the manufacture date,18 months.Whichever occurs earlier. 3.If the following causes of failure, even during the warranty period, maintenance will be charged: 1)Problems caused by incorrect operation or maintenance by unqualified personnel without permission. 2)Problems caused by using the inverter without executing the compliance. 3)The damage caused by break or error storage (such as watered) after buying. 4)Problems caused by using under the enviroment that does not meet the requirements of this manual. 5)Problems caused by incorrect wiring. 6)problems caused by earthquake, fire, thunderstruck, abnormal voltage, or other force majeure. 4.In the following cases, the manufacturer has the right not to provide repair service: 1)Barcode and nameplate of the manufacture can not be indentified; 2)User doesn’t arrange the payment according to the purchase and sale contract; 3)When the manufacturer or it’s parter provide the post sales service for the customers,customers concealed the improper using during the installation, wiring, operation, maintenance, or other processes. 5.The company has the right to authorize it’s parter for the post sales service.The service fee calculate according to the actual cost. If there are any agreement, with the principle of the priority of agreement. 6.Chint sales region office, Chint qualified channels of China can provide post sales services for inverter products. - 143 -
|
|
Related Devices:
|
Types of Manuals:
The main types of CHINT NVF5 Series instructions:
- User guide — rules of useing and characteristics
- Service manual — repair, diagnostics, maintenance
- Operation manual — description of the main functions of equipment
Inverter Instructions by CHINT:
-
York 36
by johnson controlsEUKC 12, 18, 24, 36, 42, 60 FSUnidades interiores tipo conductos con ventilador centrífugoInstrucciones de Instalación …………………………………………………………………………………………………………… 7-9Indoor units ducted type with centrifugal fanInstalla …
36 Air Conditioner, 32
-
ABB ACS355 series
ABB general machinery drivesQuick installation guideACS355 drivesEnglish . . . . . . . . . . . . . . . . . . . . . . . . . 3Dansk . . . . . . . . . . . . . . . . . . . . . . . . . . 9Deutsch. . . . . . . . . . . . . . . . . . . . . . . . 15Español. . . . . . . . . . . . . . . . . . . . . . . . 21Français . . . . . …
ACS355 series DC Drives, 82
-
Pramac GSW
MANUALE USO E MANUTENZIONEUSE AND MAINTENANCE MANUALMANUAL DE USO Y MANTENIMIENTOMANTENIMIENTOMANTENIMIENTOMANTENIMIENTOMANTENIMIENTOMANTENIMIENTOMANTENIMIENTOMANTENIMIENTOMANUEL D’UTILISATIONET DE MAINTENANCEMAINTENANCEMAINTENANCEMAINTENANCEMAINTENANCEMAINTENANCEMAINTENANCEMAINTENANCEMANUAL DE UTILIZAÇÃO E E E M …
GSW Inverter, 57
-
Axpert Max 7200
维修手册 专案名称: Axpert Max 7200-48 专案编号: P1911061 修订版次: 00 PAGE V-RDP-004-73 A Axpert Max 7200 Service manual …
Max 7200 Inverter, 29
-
Winco WL18000VE-03/A
WL18000VE-03/AGENERATORINSTALLATION & OPERATORS MANUALCOPY YOUR MODEL AND SERIAL NUMBER HERENo other WINCO generator has the same serial number as yours. If you should ever need to contact us concerning this unit, it will help us to respond to your needs faster.MODEL ________________________________________________ …
WL18000VE-03/A Inverter, 16
-
Mitsubishi Electric PLA-RP.BA Series
TECHNICAL DATA BOOKCONTENTS1. REFERENCE SERVICE MANUAL·············································22. SPECIFICATIONS ······································································33. OUTLINES AND …
PLA-RP.BA Series Air Conditioner, 94
Габаритные и установочные размеры (ШхВхГ), мм
118x187x173
Функция передачи данных
Да
Все характеристики
![]()
АВР-Электро
![]()
Амперкин

Крэзисервис (Минск)
![]()
НТП Индустриальные Системы
![]()
Октант
![]()
СПК Электрик
![]()
Русский Свет (Тверь)
![]()
Smart-Shop.pro
![]()
TESLI (Москва)
![]()
TESLI (Санкт-Петербург)

Элевел
![]()
Электро-Профи
![]()
ЭТК БОРТЕК

GEMINI Electro
![]()
Русский Свет (Тула)
![]()
Русский Свет (Самара)
![]()
Русский Свет (Новосибирск)
![]()
Русский Свет (Ростов-на-Дону)
![]()
Русский Свет (Екатеринбург)

Крэзисервис (Брест)

Электрозип

АйДи Электро

АО «Промэлектро»

ООО Электрохолдинг (Краснодар)

Гермес
![]()
ПЛАТАН
![]()
Русский Свет (Москва)

МИНИМАКС

ПРАКТИК