-
Contents
-
Table of Contents
-
Troubleshooting
-
Bookmarks
Quick Links
Related Manuals for D-Link DAP-1160
Summary of Contents for D-Link DAP-1160
-
Page 2: Table Of Contents
Filter … 28 Tools … 29 Administrator Settings … 29 System Settings … 29 Update Firmware … 30 Status … 31 D-Link DAP-1160 User Manual Table of Contents Device Info … 31 Log … 32 Stats … 33 Client Info … 32 Wireless …
-
Page 3
Networking Basics … 53 Check your IP address … 53 Statically Assign an IP address … 54 Technical Specifications… 55 D-Link DAP-1160 User Manual… -
Page 4: Product Overview
• Manual on CD • Quick Installation Guide • Ethernet Cable Note: Using a power supply with a different voltage rating than the one included with the DAP-1160 will cause damage and void the warranty for this product. • Computers with Windows Adapter •…
-
Page 5: Introduction
WISP Repeater With its D-Link’s Click ‘n Connect Wizard, the DAP-1160 Access Point ensures that you will be up and running on a wireless network in just a matter of minutes. The DAP-1160 also includes an embedded DHCP server that can automatically assign IP addresses to wireless network clients.
-
Page 6: Features
• Easy to install and use – With D-Link’s Click ‘n Connect Wizard, you can set up your wireless network in minutes. It configures your DAP-1160’s operation mode, makes it easy to add new wireless devices onto the network, and helps you create a simple wireless network for your home and office.
-
Page 7: Hardware Overview
RESET: Pressing the Reset Button restores the access point to its original factory default settings. D-Link DAP-1160 User Manual Hardware Overview Connections LAN Ports(1-2): Connect Ethernet devices such as computers,switches,and hubs. LAN1 and LAN2 are hub ports. Power: Receptor for…
-
Page 8: Leds
Power: Solid green light indicates connection to a power source Link/Act: Blinking green light indicates wireless activity;solid green light indicates connection D-Link DAP-1160 User Manual Hardware Overview LEDs MAC Ctrl: Solid green when MAC control is enabled WEP/WPA: Solid green…
-
Page 9: Configuration
Type in the IP address of the DAP-1160.(192.168.0.50). Note: If you have changed the default IP address assigned to the DAP-1160, make sure to enter the correct IP address. Type admin in the User Name field Leave the Password blank…
-
Page 10
Section — Configuration After logging in the Setup > Wizard page will be displayed: D-Link DAP-1160 User Manual… -
Page 11: Setup Wizard
Section — Configuration Setup Wizard A Setup Wizard is available to quickly and easily configure access point wireless security settings. Click Launch Setup Wizard. D-Link DAP-1160 User Manual…
-
Page 12
The wizard welcome screen will appear. Click Next to continue. Create a new password and then click Next to continue. Enter your wireless network name (SSID). Auto Channel Scan is enabled by default. Uncheck the option to select a channel. Click Next to continue. D-Link DAP-1160 User Manual… -
Page 13
• Good — WEP Encryption • None — No Security Click Next to continue. If you selected Good (WEP) security, select a Key Type, Key Size, and enter a Wireless Security Password: Click Next to continue. D-Link DAP-1160 User Manual… -
Page 14
Click Next to continue. At the Setup Complete screen, if you selected Good security, the following screen will show your WEP key. This key should be used by wireless clients connecting to the wireless network: Click Save. D-Link DAP-1160 User Manual… -
Page 15
Click Save. If you selected Best security, the following screen will show your Pre-Shared Key. This key should be used by wireless clients connecting to the wireless network: Click Save. D-Link DAP-1160 User Manual… -
Page 16: Wireless
Section — Configuration Wireless The Wireless page is used to configure the wireless settings for the access point. Wireless security settings are also configured on this page. D-Link DAP-1160 User Manual…
-
Page 17: Wireless Settings
Channel Scan: Enable Hidden Select Enable if you do not want the SSID to be broadcast by the DAP-1160. This prevents the SSID from being seen Wireless: by Site Survey utilities, so any wireless clients will have to be pre-configured with the SSID of the DAP-1160 in order to…
-
Page 18: Access Point
Section — Configuration Access Point D-Link DAP-1160 User Manual…
-
Page 19: Access Point Settings
Channel scan: Enable Hidden Select Enable if you do not want the SSID to be broadcast by the DAP-1160. This prevents the SSID from being seen Wireless: by Site Survey utilities, so any wireless clients will have to be pre-configured with the SSID of the DAP-1160 in order to connect to it.
-
Page 20
The channel used will be displayed. Wireless Channel: The channel will follow the root AP. Enable Auto This option is unavailable in AP Client Channel scan: mode. Enable Hidden This option is unavailable in AP client mode. Wireless: D-Link DAP-1160 User Manual AP Client Settings… -
Page 21
Select WPA-PSK, WPA2-PSK to secure your network using a password and dynamic key changes (No RADIUS server WPA-PSK/WPA2- required). PSK: Note: Bridge Mode is not completely specified in WiFi or IEEE standards. It can works with other DAP-1160..Communication with other access points is not guaranteed. D-Link DAP-1160 User Manual Bridge Settings… -
Page 22
DAP-1160. This prevents the SSID from being seen by Site Survey utilities, so any wireless clients will have to be pre-configured with the SSID of the DAP-1160 in order to connect to it. Enable Auto This option is unavailable in Bridge mode. -
Page 23
Select WPA-PSK, WPA2-PSK to secure your network using a password and dynamic key changes (No RADIUS server WPA-PSK/WPA2- required). PSK: Note: Bridge mode is not completely specified in WiFi or IEEE standards. It can works with other DAP-1160.Communication with other access points is not guaranteed. Wireless Network The Wireless Network Name is a unique name Name (Repeater that identifies a network. -
Page 24: Lan
The LAN, or Local Area Network, is your private, internal network. This page allows you to configure the IP settings of the LAN interface for the DAP-1160. The IP address can be changed to your current network IP range. This IP address cannot be seen from the Internet.
-
Page 25: Lan Settings
Section — Configuration LAN Settings The DAP-1160 is set to Static by default. Select LAN Connection this option if you do not have a DHCP server on Type: your network, or if you wish to assign a static IP address to the DAP-1160.
-
Page 26
Enable DHCP Disabled is the default setting. Server: If you want to use the DAP-1160 as a DHCP server, to automatically assign dynamic IP addresses on the network, you will select Enabled. DHCP IP Address If you have enabled the DHCP server function, enter the starting and Ending point of the IP address range for your Range: network. -
Page 27: Advanced
Long Preamble is the default setting. (High traffic networks should use the shorter preamble type.) The preamble defines the length of the CRC block (Cyclic Redundancy Check is a common technique for detecting data transmission errors) used in communication between the access point and the wireless network adapters. D-Link DAP-1160 User Manual Advanced Performance…
-
Page 28: Filter
Use MAC Filters to allow or deny wireless clients, by their MAC addresses, from accessing the DAP-1160. You can manually add a MAC address or select the MAC address from the list of clients that are currently connected to the AP (Connected PCs).
-
Page 29: Tools
You may also reset the DAP-1160 back to factory settings by clicking on Restore. Make sure to save the unit’s settings Restore: before clicking on Restore. You will lose your current settings when you click Restore.
-
Page 30: Update Firmware
You can upgrade the firmware of the DAP-1160 at this page. When you click Click here to check… in this window you will be connnected to D-Link’s website, where you can download the latest firmware update. After you have completed the firmware download to your hard drive, click Browse to browse your local hard drive and locate the firmware to be used for the update.
-
Page 31: Status
Section — Configuration Status Device Info This screen displays the current firmware version, and the current wireless and Ethernet settings of the DAP-1160. D-Link DAP-1160 User Manual…
-
Page 32: Log
Section — Configuration View Log The DAP-1160 keeps a running log of events and activities occurring on the AP. If the device is rebooted, the logs are automatically cleared. You may save the log files under Log Setting. First Page — The first page of the log.
-
Page 33: Stats
Section — Configuration Stats Traffic Statistics The DAP-1160 keeps statistics of traffic that passes through it. You are able to view the amount of packets that pass through the Ethernet and wireless portions of the network. The traffic counter will reset if the device is rebooted.
-
Page 34: Support
Section — Configuration Support The Support page contains an index of links to help topics for each function of the DAP-1160. D-Link DAP-1160 User Manual…
-
Page 35: Wireless Security
This section will show you the different levels of security you can use to protect your data from intruders. The DAP-1160 offers the following types of security: • WPA-Personal (Pre-Shared Key) • WPA2-Personal (Pre-Shared Key 2) • WPA2-Auto-Personal • WEP (Wired Equivalent Privacy) WEP stands for Wired Equivalent Privacy.
-
Page 36: Configure Wep
WEP Encryption. 5. Next to Key Type, select either Hex or ASCII. Hex (recommended) — Letters A-F and numbers 0-9 are valid. ASCII — All numbers and letters are valid. D-Link DAP-1160 User Manual Configure WEP…
-
Page 37
7. Click Save Settings to save your settings. If you are configuring the access point with a wireless adapter, you will lose connectivity until you enable WEP on your adapter and enter the same WEP key as you did on the access point. D-Link DAP-1160 User Manual… -
Page 38: What Is Wpa
WPA/WPA2 incorporates user authentication through the Extensible Authentication Protocol (EAP). EAP is built on a more secure public key encryption system to ensure that only authorized network users can access the network. D-Link DAP-1160 User Manual What is WPA?
-
Page 39: Configure Wpa-Psk
7. Click Save Settings to save your settings. If you are configuring the access point with a wireless adapter, you will lose connectivity until you enable WPA-Personal, WPA2-Personal, or WPA2-Auto-Personal on your adapter and enter the same passphrase as you did on the access point. D-Link DAP-1160 User Manual Configure WPA-Personal…
-
Page 40: Configure Wpa (Radius)
6. Next to Port, enter the port you are using with your RADIUS server. 1812 is the default port. 7. Next to Shared Secret, enter the security key. 8. Click Apply Settings to save your settings. D-Link DAP-1160 User Manual…
-
Page 41: Connect To A Wireless Network
Click on a network (displayed using the SSID) and click the Connect button. If you get a good signal but cannot access the Internet, check you TCP/IP settings for your wireless adapter. Refer to the Networking Basics section in this manual for more information. D-Link DAP-1160 User Manual…
-
Page 42: Configure Wep
® on the wireless computer icon in your system tray (lower-right corner of screen). Select View Available Wireless Networks. 2. Highlight the wireless network (SSID) you would like to connect to and click Connect. D-Link DAP-1160 User Manual Configure WEP…
-
Page 43
It may take 20-30 seconds to connect to the wireless network. If the connection fails, please verify that the WEP settings are correct. The WEP key must be exactly the same as on the wireless access point. D-Link DAP-1160 User Manual… -
Page 44: Configure Wpa-Psk
® on the wireless computer icon in your system tray (lower-right corner of screen). Select View Available Wireless Networks. 2. Highlight the wireless network (SSID) you would like to connect to and click Connect. D-Link DAP-1160 User Manual Configure WPA-Personal…
-
Page 45
It may take 20-30 seconds to connect to the wireless network. If the connection fails, please verify that the WPA-Personal settings are correct. The WPA-Personal passphrase must be exactly the same as on the wireless access point. D-Link DAP-1160 User Manual… -
Page 46: Troubleshooting
1. Why can’t I access the web-based configuration utility? When entering the IP address of the D-Link access point (192.168.0.50 for example), you are not connecting to a website on the Internet or have to be connected to the Internet. The device has the utility built-in to a ROM chip in the device itself.
-
Page 47
• Close your web browser (if open) and open it. • Access the web management. Open your web browser and enter the IP address of your D-Link access point in the address bar. This should open the login page for your the web management. -
Page 48: Wireless Basics
Strictly adhering to the IEEE standard, the D-Link wireless family of products will allow you to securely access the data you want, when and where you want it. You will be able to enjoy the freedom that wireless networking delivers.
-
Page 49: What Is Wireless
Why D-Link Wireless? D-Link is the worldwide leader and award winning designer, developer, and manufacturer of networking products. D-Link delivers the performance you need at a price you can afford. D-Link has all the products you need to build your network.
-
Page 50
• Stay on top of everything at home as you would at office • Remotely access your office network from home • Share Internet connection and printer with multiple computers • No need to dedicate office space D-Link DAP-1160 User Manual… -
Page 51: Tips
The wireless connection in public places is usually called “hotspots”. Using a D-Link Cardbus Adapter with your laptop, you can access the hotspot to connect to Internet from remote locations like Airports, Hotels, Coffee Shops, Libraries, Restaurants, and Convention Centers.
-
Page 52: Wireless Modes
An Infrastructure network contains an Access Point or wireless router. All the wireless devices, or clients, will connect to the wireless router or access point. An Ad-Hoc network contains only clients, such as laptops with wireless cardbus adapters. All the adapters must be in Ad-Hoc mode to communicate. D-Link DAP-1160 User Manual Wireless Modes…
-
Page 53: Networking Basics
DHCP request on newly installed adapters. If you are connecting to a wireless network at a hotspot (e.g. hotel, coffee shop, airport), please contact an employee or administrator to verify their wireless network settings. D-Link DAP-1160 User Manual…
-
Page 54: Statically Assign An Ip Address
Set Primary DNS the same as the LAN IP address of your router (192.168.0.1). The Secondary DNS is not needed or you may enter a DNS server from your ISP. Step 5 Click OK twice to save your settings. D-Link DAP-1160 User Manual…
-
Page 55: Technical Specifications
— AP Client — Bridge — Bridge with AP — Repeater — WISP Client Router — WISP Repeater D-Link DAP-1160 User Manual ANTENNA 2dBi Gain detachable omni-directional antenna with RP-SMA connector RECEIVE SENSITIVITY +For 802.11b, at 8% PER: — 11Mbps: -80dBm — 5.5Mbps: -84dBm…
-
Page 56
Environmental factors will adversely affect wireless signal range, maximum throughput based on 802.11g devices. D-Link DAP-1160 User Manual 144 (W) x 109 (D) x 30 (H) mm (5.67 x 4.29 x 1.18 inches) WEIGHT 229grams (0.5lb) -
Page 57: Federal Communication Commission Interference Statement
This device complies with RSS-210 of the Industry Canada Rules. Operation is subject to the following two conditions: (1) This device may not cause harmful interference, and (2) this device must accept any interference received, including interference that may cause undesired operation. D-Link DAP-1160 User Manual…
-
Page 58
Industry Canada. The required antenna impedance is 50 ohms. The Class [B] digital apparatus meets all requirements of the Canadian Interference-Causing Equipment Regulation. Cet appareil numerique de la class [B] respecte toutes les exigences du Reglement sur le materiel brouilleur du Canada. D-Link DAP-1160 User Manual… -
Page 59
Version 1.0 Feb. 1, 2007…
SEVEN OPERATION MODES
Can be flexibly configured to operate
as an Access Point, AP Client, Bridge,
Bridge with AP, Repeater, WISP Client
Router or WISP Repeater
TWO INTEGRATED ETHERNET
PORTS
Two Ethernet ports for ready connection
to two computers, or to an Ethernet-
enabled device (e.g. a broadband
router) and a PC
TOTAL SECURITY
Complete set of security features including WEP
encryption and WPA/WPA2 to protect network
against outside intruders
WIRELESS G ACCESS POINT
CONNECT HOME AND SOHO TO A WIRELESS NETWORK
Create a wireless network for your home and office using the D-Link DAP-1160 is an 802.11g standard Wireless Access Point. Connect this Access Point to a
broadband modem and wirelessly share your Internet connection. Enjoy surfing the web, checking e-mail, and chatting with family and friends online.
PROTECT WIRELESS NETWORK AND DATA
The DAP-1160 provides 64/128-bit WEP encryption and WPA/WPA2 security to protect your network and wireless data. In addition, it also provides MAC
address filtering and the Disable SSID Broadcast function to limit outsiders’ access to your home and office network.
FLEXIBLY CONFIGURE YOUR AP FOR DIFFERENT APPLICATIONS
The DAP-1160 can be configured to operate as (1) an Access Point to act as a central hub for wireless users, (2) an AP Client to connect to another Access
Point, (3) a Bridge to joint two wireless workgroups together, (4) a Bridge with AP to act as wireless hub and a bridge at the same time, (5) a Repeater to
extend the wireless coverage to cover all “dead” spots, (6) a WISP Client Router to let wireless Internet service subscribers share Internet connection with
home/office Ethernet-enabled computers without the need for an extra router, or (7) a WISP Repeater to let WISP subscribers share Internet connection with
wireless computers without any extra router.
EASY TO INSTALL AND USE
With D-Link Click n’Connect, you can set up your wireless network in minutes. It configures your DAP-1160’s operation mode, makes it easy to add new
wireless devices onto the network, and helps you create a simple wireless network for your home and office.
DAP-1160
CREATE A WIRELESS NETWORK
![]()
Version 2.0 | 12/09/2013
User Manual
Wireless N 150 Bridge/Access Point
DAP-1160

Table of Contents
Table of Contents
|
Package Contents………………………………………………………………. |
4 |
|
System Requirements………………………………………………………… |
5 |
|
Introduction………………………………………………………………………… |
6 |
|
Features……………………………………………………………………………….. |
8 |
|
Hardware Overview……………………………………………………………. |
9 |
|
Connections…………………………………………………………………. |
9 |
|
LEDs……………………………………………………………………………… |
10 |
|
Installation……………………………………………………………… |
11 |
|
Operation Modes……………………………………………………………… |
11 |
|
Access Point Mode…………………………………………………….. |
12 |
|
Wireless Client Mode………………………………………………… |
13 |
|
Wireless Installation Considerations……………………………… |
14 |
|
Configuration…………………………………………………………. |
15 |
|
Web-based Configuration Utility……………………………………. |
15 |
|
Wireless Setup Wizard……………………………………………………… |
16 |
|
Access Point Mode…………………………………………………….. |
17 |
|
Wireless Client Mode………………………………………………… |
19 |
|
Manual Configuration……………………………………………………… |
21 |
|
Wireless Settings………………………………………………………… |
21 |
|
Access Point Mode………………………………………………… |
22 |
|
Wireless Client Mode…………………………………………….. |
24 |
|
LAN Settings……………………………………………………………….. |
25 |
|
Static IP……………………………………………………………………. |
26 |
|
DHCP Server…………………………………………………………… |
27 |
|
Advanced…………………………………………………………………………… |
28 |
|
Advanced Wireless…………………………………………………….. |
28 |
|
MAC Address Filter……………………………………………………………. |
29 |
|
Wi-Fi Protected Setup………………………………………………………. |
30 |
|
User Limits…………………………………………………………………………. |
31 |
|
Maintenance……………………………………………………………………… |
32 |
|
Admin………………………………………………………………………….. |
32 |
|
System…………………………………………………………………………. |
33 |
|
Language Pack…………………………………………………………… |
34 |
|
Firmware……………………………………………………………………… |
34 |
|
Time……………………………………………………………………………… |
35 |
|
System Check……………………………………………………………… |
36 |
|
Schedules……………………………………………………………………. |
37 |
|
Status………………………………………………………………………………….. |
38 |
|
Device Info………………………………………………………………….. |
38 |
|
Logs……………………………………………………………………………… |
39 |
|
Statistics………………………………………………………………………. |
40 |
|
Wireless……………………………………………………………………….. |
41 |
|
Help…………………………………………………………………………………….. |
42 |
|
Wireless Security…………………………………………………….. |
43 |
|
What is WPA?……………………………………………………………………… |
44 |
|
Configure WPA/WPA2 Personal………………………………………. |
45 |
|
Configure WPA/WPA2 Enterprise……………………………………. |
46 |
|
Connect to a Wireless Network………………………………… |
47 |
|
Using Windows® XP…………………………………………………………… |
47 |
|
Configure WPA-PSK………………………………………………………….. |
48 |
|
Using Windows Vista® ………………………………………………………. |
50 |
|
Configure WPA-PSK………………………………………………………….. |
52 |
|
D-Link DAP-1160 User Manual |
2 |

|
Table of Contents |
|
|
Using Windows® 7……………………………………………………………… |
53 |
|
Configure WPS……………………………………………………………. |
56 |
|
Troubleshooting……………………………………………………… |
60 |
|
Wireless Basics………………………………………………………… |
64 |
|
What is Wireless?………………………………………………………………. |
65 |
|
Tips……………………………………………………………………………………… |
67 |
|
Wireless Modes…………………………………………………………………. |
68 |
|
Networking Basics…………………………………………………… |
69 |
|
Check your IP address………………………………………………………. |
69 |
|
Statically Assign an IP address………………………………………… |
70 |
|
Technical Specifications…………………………………………… |
71 |
|
D-Link DAP-1160 User Manual |
3 |

Section 1 — Product Overview
Package Contents
DAP-1160 Wireless N 150 Bridge/Access Point
Ethernet Cable
Power Adapter
Note: Using a power supply with a different voltage rating than the one included with the DAP-1160 will cause damage and void the warranty for this product.
|
D-Link DAP-1160 User Manual |
4 |

Section 1 — Product Overview
System Requirements
|
• An Ethernet-based Network |
||
|
Network Requirements |
• IEEE 802.11n/g wireless clients (AP) |
|
|
• IEEE 802.11n/g wireless network (Client Mode) |
||
|
• 10/100 Ethernet |
||
|
Computer with the following: |
||
|
• Windows®, Macintosh, or Linux-based operating system |
||
|
• An installed Ethernet adapter |
||
|
Browser Requirements: |
||
|
Web-based Configuration |
• Internet Explorer 8 or later |
|
|
Utility Requirements |
• Firefox 12.0 or later |
|
|
• Safari 4 or later |
||
|
• Google Chrome 20.0 or later |
||
|
Windows® Users: Make sure you have the latest version of Java installed. |
||
|
Visit www.java.com to download the latest version. |
||
|
D-Link DAP-1160 User Manual |
5 |

Section 1 — Product Overview
Introduction
D-Link, an industry leader in networking, introduces the new D-Link DAP-1160 Wireless N 150 Bridge/Access Point. With the ability to transfer files with a maximum wireless signal rate of up to 150Mbps*, the DAP-1160 gives you faster wireless network access for your home or office.
The DAP-1160 can connect and interoperate with other 802.11n compatible wireless client devices. The DAP-1160 is also backwards compatible with 802.11b/g. It can be flexibly configured to operate in 2 different modes Access Point, Wireless Client. With its Setup Wizard, the DAP-1160 ensures that you will be up and running on a wireless network in just a matter of minutes.
The DAP-1160 features Wi-Fi Protected Access (WPA-PSK/WPA2-PSK) to provide an enhanced level of security for wireless data communications. The DAP-1160 also includes additional security features to keep your wireless connection safe from unauthorized access.
The DAP-1160 supports WPS on the AP, and wireless client operation modes,with each capable of being conveniently set up by using the PIN method or Push Button.
• Actual data throughput will vary. Network conditions and environmental factors, including volume of network traffic, building materials and construction, and network overhead, lower actual data throughput rate.
|
D-Link DAP-1160 User Manual |
6 |

Section 1 — Product Overview
TOTAL PERFORMANCE
Combines award winning access point features and Wireless N 150 technology to provide the best wireless performance.
TOTAL SECURITY
The most complete set of security features including WPA/WPA2 encryption to protect your network against outside intruders.
Connect home and soho to a wireless network
Create a wireless network for your home and office using the D-Link DAP-1160 as an 802.11n standard Wireless Access Point. Connect this Access Point to a broadband modem and let others wirelessly access your Internet connection. Enjoy surfing the web, checking e-mail, and chatting with family and friends online.
TOTAL NETWORK SECURITY
The DAP-1160 supports all of the latest wireless security features to prevent unauthorized access, be it from over the wireless network or from the Internet. Support for WPA and WPA2 standards ensure that you’ll be able to use the best possible encryption method, regardless of your client devices.
* Maximum wireless signal rate derived from IEEE Standard 802.11g and 802.11n specifications. Actual data throughput will vary. Network conditions and environmental factors, including volume of network traffic, building materials and construction, and network overhead, lower actual data throughput rate. Environmental conditions will adversely affect wireless signal range.
|
D-Link DAP-1160 User Manual |
7 |

Section 1 — Product Overview
Features
•FasterWireless Networking —The DAP-1160 provides up to 150Mbps* wireless connection with other 802.11n wireless clients. This capability allows users to participate in real-time activities online, such as video streaming, online gaming, and real-time audio.
•Compatible with IEEE802.11g Devices — The DAP-1160 is still fully compatible with the 802.11g standards, so it can connect with existing 802.11g PCI, USB, and Cardbus adapters.
•Advanced Firewall Features — TheWeb-based user interface displays advanced network management features including Content Filtering, which allows easily applied content filtering based on MAC Address.
•WPS PBC- (Wi-Fi Protected Setup Push Button Configuration) Push Button Configuration is a button that can be pressed to add the device to an existing network or to create a new network. A virtual button can be used on the utility while a physical button is placed on the side of the device.
This easy setup method allows you to form a secured wireless link between the DAP-1160 and another WPS enabled device. A PC is no longer needed to log into the Web-based interface.
•WPS PIN — (Wi-Fi Protected Setup Personal Identification Number ) A PIN is a unique number that can be used to add the access point to an existing network or to create a new network. The default PIN may be printed on the bottom of the access point. For extra security, a new PIN can be generated. You can restore the default PIN at any time. Only the Administrator (“admin” account) can change or reset the PIN.
•User-friendly Setup Wizard — Through its easy-to-use Web-based user interface, the DAP-1160 lets you control what information is accessible to those on the wireless network, whether from the Internet or from your company’s server. Configure your access point to your specific settings within minutes.
|
D-Link DAP-1160 User Manual |
8 |

Section 1 — Product Overview
Hardware Overview
Connections
|
1 |
2 |
3 |
4 |
|
|
1 WPS/Reset Button |
Press 1 second to start the WPS process. |
|||
|
Press and hold for 5 seconds is Reset Button to restore to its original factory default settings. |
2LAN Port Connect 10/100 Ethernet devices such as computers, switches, and hubs.
3Power Button Push the Power Button to switch power on/off.
4Power Receptor Receptor for the supplied power adapter.
|
D-Link DAP-1160 User Manual |
9 |
Section 1 — Product Overview
Hardware Overview
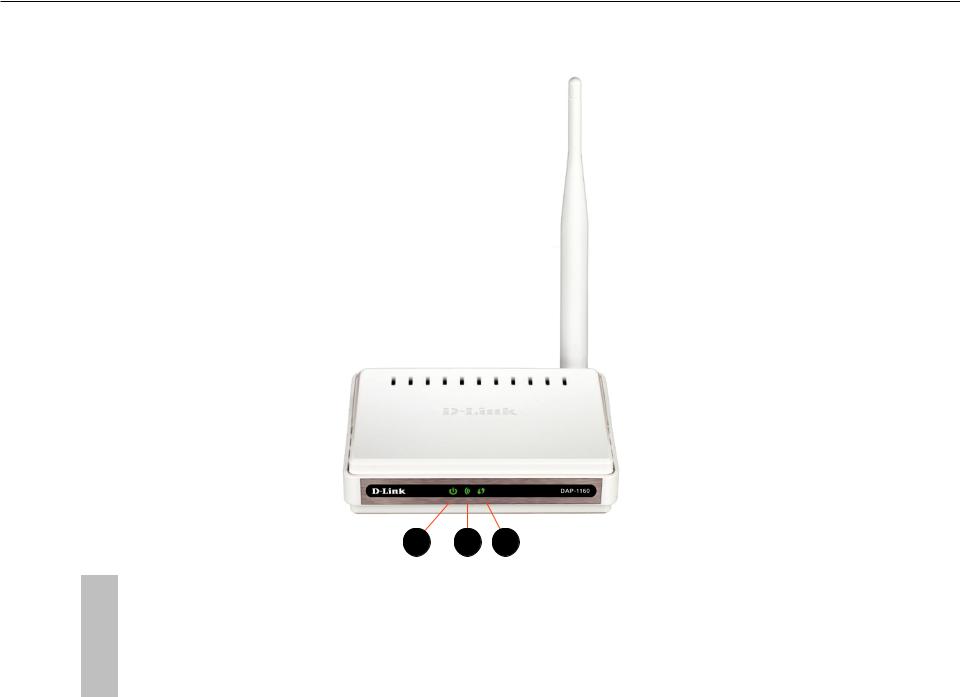
LEDs
|
1 |
2 |
3 |
||||
|
1 |
Power LED |
A solid green light indicates a proper connection to the power supply. |
||||
|
2 |
Wireless LED |
A solid green light indicates the wireless function is working. The light will be off during |
||||
|
device reboot or if the wireless radio is disabled. |
||||||
|
3 |
WPS LED |
A solid light indicates a successful WPS connection. A blinking light indicates the device is |
||||
|
trying to establish a connection. |
||||||
|
D-Link DAP-1160 User Manual |
10 |
![]()
Section 2 — Installation
Installation
Please configure the DAP-1160 with a computer connected directly to the AP. The next few pages will explain the different operational modes you can use.
Operation Modes
Depending on how you want to use your DAP-1160 will determine which mode you use. This section will help you figure out which setting works with your setup.
•Access Point Mode — page 12
•Wireless Client Mode — page 13
|
D-Link DAP-1160 User Manual |
11 |

Section 2 — Installation
Access Point Mode
In the Access Point mode, the DAP-1160 acts as a central connection point for any computer (client) that has a 802.11n or backward-compatible 802.11g wireless network interface and is within range of the AP. Clients must use the same SSID (wireless network name) and channel as the AP in order to connect. If wireless security is enabled on the AP, the client will need to enter a password to connect to the AP. In Access Point mode, multiple clients can connect to the AP at the same time.
 Computer
|
Internet |
Modem |
Router |
DAP-11603 0 |
|
(in Access Point Mode) |
 Computer
|
D-Link DAP-1160 User Manual |
12 |
Section 2 — Installation
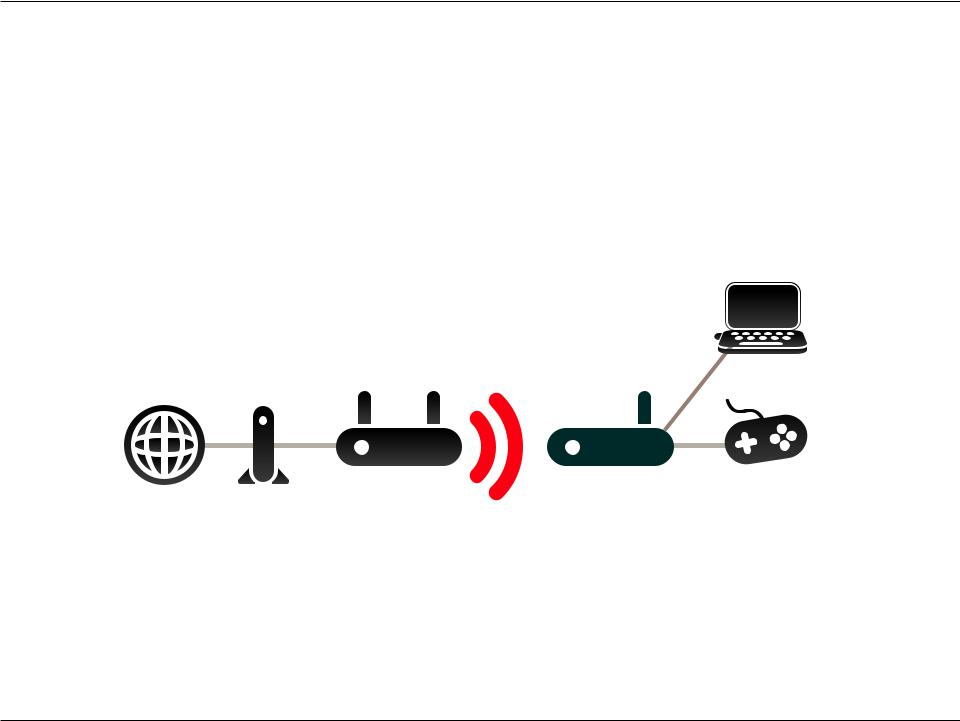
Wireless Client Mode
In the Wireless Client mode, the DAP-1160 acts as a wireless network adapter for your Ethernet-enabled device (such as a game console or a TV set-top box). Connect your Ethernet-enabled device to the AP using an Ethernet cable. The AP Client mode can support multiple wired clients.
Example: Connect a gaming console using an ethernet cable to the DAP-1160. The unit is set to Wireless Client mode which will wirelessly connect to a wireless router on your network.
Computer
Gaming Console
|
Internet |
Modem |
Router |
DAP-11603 |
|
(in Wireless Client Mode) |
|
D-Link DAP-1160 User Manual |
13 |

Section 2 — Installation
Wireless Installation Considerations
The D-Link wireless access point lets you access your network using a wireless connection from virtually anywhere within the operating range of your wireless network. Keep in mind, however, that the number, thickness and location of walls, ceilings, or other objects that the wireless signals must pass through, may limit the range. Typical ranges vary depending on the types of materials and background RF (radio frequency) noise in your home or business. The key to maximizing wireless range is to follow these basic guidelines:
1.Keep the number of walls and ceilings between the D-Link access point and other network devices to a minimum. Each wall or ceiling can reduce your adapter’s range from 3-90 feet (1-30 meters.) Position your devices so that the number of walls or ceilings is minimized.
2.Be aware of the direct line between network devices. A wall that is 1.5 feet thick (.5 meters), at a 45-degree angle appears to be almost 3 feet (1 meter) thick. At a 2-degree angle it looks over 42 feet (14 meters) thick! Position devices so that the signal will travel straight through a wall or ceiling (instead of at an angle) for better reception.
3.Building Materials make a difference. A solid metal door or aluminum studs may have a negative effect on range. Try to position access points, wireless access points, and computers so that the signal passes through drywall or open doorways. Materials and objects such as glass, steel, metal, walls with insulation, water (fish tanks), mirrors, file cabinets, brick, and concrete will degrade your wireless signal.
4.Keep your product away (at least 3-6 feet or 1-2 meters) from electrical devices or appliances that generate RF noise.
5.If you are using 2.4GHz cordless phones or X-10 (wireless products such as ceiling fans, lights, and home security systems), your wireless connection may degrade dramatically or drop completely. Make sure your 2.4GHz phone base is as far away from your wireless devices as possible. The base transmits a signal even if the phone is not in use.
|
D-Link DAP-1160 User Manual |
14 |

Section 3 — Configuration
Configuration
This section will show you how to configure your new D-Link wireless access point using the web-based configuration utility.
Web-based Configuration Utility
If you wish to change the default settings or optimize the performance of the DAP-1160, you may use the web-based configuration utility.
To access the configuration utility, open a web browser such as Internet Explorer and enter http://dlinkap or http://192.168.0.50 in the address field.
Select admin and then enter your password. Leave the password blank by default.
If you get a Page Cannot be Displayed error, please refer to the Troubleshooting section for assistance.
|
D-Link DAP-1160 User Manual |
15 |

Section 3 — Configuration
Wireless Setup Wizard
Click Launch Wireless Setup Wizard to configure your access point.
Click Next to continue.
|
D-Link DAP-1160 User Manual |
16 |

Section 3 — Configuration
Access Point Mode
This Wizard is designed to assist you in configuring your DAP-1160 as an access point.
Select Access Point from the drop-down menu. Then, click Next to continue.
Enter a name for your wireless network (SSID).
Enter your Wi-Fi Password. This Password must be entered on your wireless clients.
Click Next to continue.
|
D-Link DAP-1160 User Manual |
17 |
Section 3 — Configuration
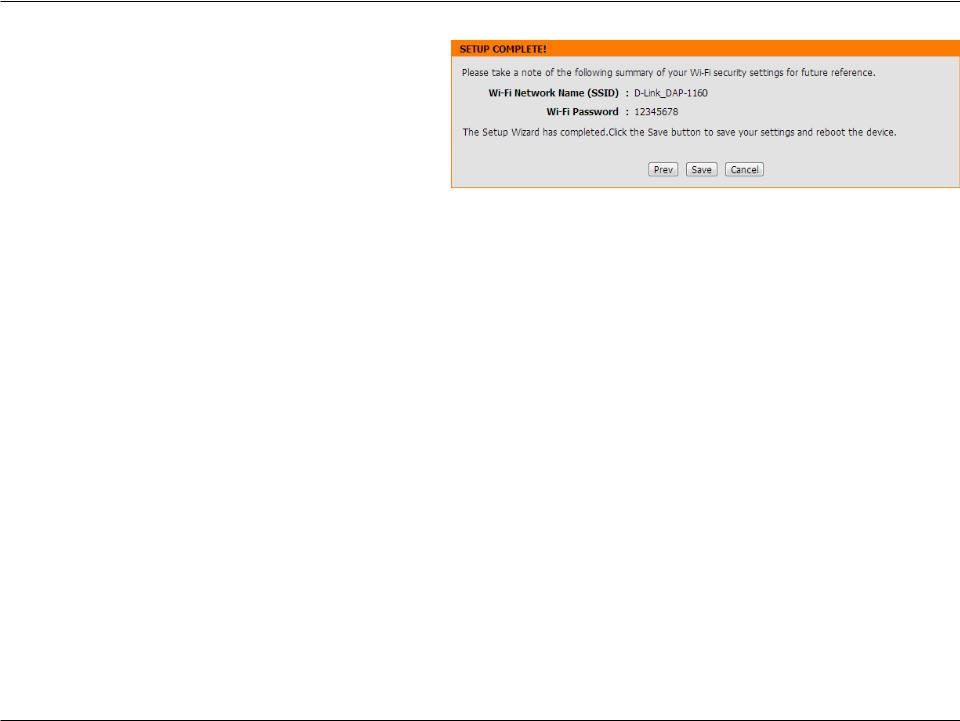
The following screen will show you your network key to enter on your wireless clients.
Click Save to finish the Setup Wizard.
|
D-Link DAP-1160 User Manual |
18 |
Section 3 — Configuration
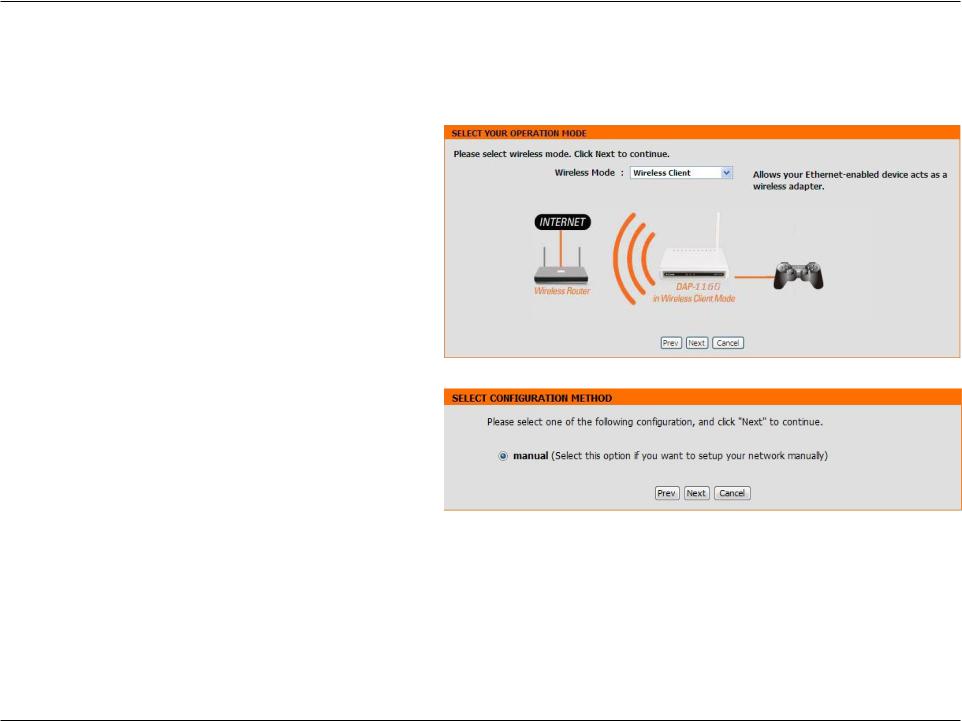
Wireless Client Mode
This Wizard is designed to assist you in configuring your DAP-1160 as a wireless client.
Select Wireless Client from the drop-down menu.
Select Manual configuration to setup your network manually.
Click Next to continue.
|
D-Link DAP-1160 User Manual |
19 |

Section 3 — Configuration
Find your access point from the list, click the radio button in the right column, and click Connect.
Enter the Wi-Fi password. Click Next to complete the Setup Wizard.
The Wi-Fi Setup Wizard is complete. Click Finish to reboot the device.
|
D-Link DAP-1160 User Manual |
20 |
![]()
Section 3 — Configuration
Manual Configuration
Wireless Settings
You may manually configure your DAP-1160 instead of running the setup wizard.
•Access Point Mode — page 22
•Wireless Client Mode — page 24
|
D-Link DAP-1160 User Manual |
21 |

Section 3 — Configuration
Access Point Mode
Enable Wireless: Check the box to enable the wireless function. If you do not want to use wireless, uncheck the box to disable all the wireless functions. You may also set up a specific time range (schedule). Select a schedule from the dropdown menu or click Add New to create a new schedule.
Wireless Mode: Select Access Point from the drop-down menu.
Wireless When you are browsing for available wireless networks, Network Name: this is the name that will appear in the list (unless Visibility Status is set to Invisible, see below). This name is also referred to as the SSID. For security purposes, it is highly recommended to change from the default
network name.
802.11 Mode: Select one of the following:
802.11n Only — Select if you are only using 802.11n wireless clients.
Mixed 802.11n and 802.11g — Select if you are using a mix of 802.11n and 11g wireless clients.
Mixed 802.11n, 802.11g and 802.11b — Select if you are using a mix of 802.11n, 11g, and 11b wireless clients.
Wireless Indicates the channel setting for the DAP-1160. The Channel can be changed to fit the channel setting for an existing wireless network Channel: or to customize the wireless network. If you enable Auto Channel Scan, this option will be grayed out.
Enable Auto The Auto Channel Scan setting can be selected to allow the DAP-1160 to choose the channel with the least amount of interference.
Channel Scan:
|
D-Link DAP-1160 User Manual |
22 |
 Loading…
Рейтинг
Оценка: 5Голосов: 3Комментарии: 17
Подключите блок питания к разъему питания на задней панели DAP-1160, а затем подсоедините блок питания к розетке. Светодиод “Power” (Питание) загорится. Подключите кабель одной стороной к Ethernet-порту, расположенному на задней панели DAP-1160, а другой стороной — к компьютеру, который будет использоваться для ее настройки. При правильном подключении к сети Ethernet загорится светодиод “Link” (соединение).
По умолчанию для DAP-1160 установлен IP-адрес 192.168.0.50 с маской подсети 255.255.255.0. Для того чтобы приступить к настройке точки доступа, необходимо назначить компьютеру статический IP-адрес из той же подсети, что и для DAP-1160 (например, IP-адрес 192.168.0.10 с маской подсети 255.255.255.0).
Запустите веб-браузер и наберите в адресной строке http://192.168.0.50, после чего нажмите (В свойствах используемого веб-браузера не должен быть включен режим использования прокси-сервера для локальных адресов.).
В окне регистрации пользователя наберите admin в поле для ввода имени, а поле для ввода пароля оставьте пустым (рис. 1). Щелкните на кнопке Log In.
Рис. 1. Окно регистрации пользователя для доступа к управлению устройством
После того как доступ к интерфейсу управления будет получен, раскроется начальное окно мастера установки Setup Wizard.
Перейдите во вкладку Setup и выберите раздел Wireless Setup. Раскроется окно Wireless Network (рис. 2).

Рис. 2. Окно Wireless Network
Принятые по умолчанию значения параметров настройки следующие:
• Wireless Mode (режим работы точки доступа) — Access Point;
• Wireless Network Name (имя беспроводной сети) — dlink;
• Wireless Channel (номер радиоканала) — 6.
Измените имя беспроводной сети на желаемое (например, MyWLAN).
Если в зоне радиопокрытия настраиваемой точки беспроводного доступа будут работать другие беспроводные сети, то для полного исключения взаимных радиопомех номер радиоканала точки доступа, которую вы настраиваете, должен отличаться от других беспроводных сетей не менее чем на 5 (в нашем примере выбран канал номер 1).
Секция Wireless Security Mode используется для включения и настройки безопасности беспроводной сети. Для обеспечения безопасной передачи данных в беспроводной сети рекомендуется изменить установки, принятые по умолчанию.
Устройство DAP-1160 поддерживает различные режимы обеспечения безопасности беспроводного соединения. В настоящий момент самым универсальным и надежным является режим WPA2-Auto Wireless Security. Для сетей, в которых не используется специализированный сервер аутентификации RADIUS, в списке PSK/EAP выберите значение Personal. После этого в поля Passphrase и Confirmed Passphrase введите пароль, который будет использоваться клиентами для установления соединения с беспроводной сетью. Остальные параметры можно оставить без изменения.
После задания значений всех параметров настройки щелкните в окне Wireless Network на кнопке Save Settings. Устройство “запомнит” выполненные настройки и перезагрузится с новыми значениями параметров настройки.
После того как вы с помощью браузера вновь получите доступ к веб-интерфейсу управления устройством, перейдите во вкладку Setup и выберите раздел LAN Setup. Раскроется окно Network Settings (рис. 3), в котором и выполняется настройка сетевого интерфейса точки доступа.

Рис. 3. Настройка сетевого интерфейса ТД
По умолчанию для устройства DAP-1160 установлен IP-адрес 192.168.0.50 с маской подсети 255.255.255.0. Эти настройки можно изменить, задав требуемые значения IP-адреса, маски подсети и адреса шлюза по умолчанию в соответствии с настройками вашей сети.
После ввода всех значений параметров настройки щелкните на кнопке Save Settings. Устройство “запомнит” вновь установленные параметры настройки и перезагрузится с новыми значениями параметров.
Обратите внимание, что если настройки сетевого интерфейса точки доступа были изменены, то для того, чтобы вновь получить доступ к ее интерфейсу управления, может понадобится переназначить компьютеру статический IP-адрес, выбрав его из той же подсети, что и новый IP-адрес этой точки доступа.
После того как вы вновь получите доступ к интерфейсу управления устройством, перейдите в браузере во вкладку Maintenance и выберите раздел Device Administration(рис. 4). Раскроется окно, в котором рекомендуется задать новый пароль доступа к интерфейсу управления устройством в полях New Password и Confirm Password.

Рис. 4. Ввод нового пароля доступа
После ввода пароля щелкните в окне Device Administration на кнопке Save Settings. Устройство запомнит проведенные настройки и перезагрузится с новыми значениями параметров доступа к интерфейсу управления. Соответственно потребуется ввод нового пароля на экране регистрации пользователя для доступа к управлению устройством.
Информацию о беспроводных клиентах, которые в данный момент подключены к точке беспроводного доступа, можно получить через программу управления на вкладке Maintenance в разделе Device Administration (рис. 5).

Рис. 5. Сведения о беспроводных клиентах, подключённых в данный момент к ТД
Если Вы нашли ошибку в тексте, то выделите ее мышкой и нажмите Ctrl + Enter или нажмите здесь.
Сообщение об ошибке
Ошибка:
Ваш комментарий (не обязательно):
Да
Отмена
Устройство:
D-Link DAP-1160
Размер: 1,74 MB
Добавлено: 2013-09-10
Количество страниц: 59
Как пользоваться?
Наша цель — обеспечить Вам самый быстрый доступ к руководству по эксплуатации устройства D-Link DAP-1160. Пользуясь просмотром онлайн Вы можете быстро просмотреть содержание и перейти на страницу, на которой найдете решение своей проблемы с D-Link DAP-1160.
Для Вашего удобства
Если просмотр руководства D-Link DAP-1160 непосредственно на этой странице для Вас неудобен, Вы можете воспользоваться двумя возможными решениями:
- Полноэкранный просмотр -, Чтобы удобно просматривать инструкцию (без скачивания на компьютер) Вы можете использовать режим полноэкранного просмотра. Чтобы запустить просмотр инструкции D-Link DAP-1160 на полном экране, используйте кнопку Полный экран.
- Скачивание на компьютер — Вы можете также скачать инструкцию D-Link DAP-1160 на свой компьютер и сохранить ее в своем архиве. Если ты все же не хотите занимать место на своем устройстве, Вы всегда можете скачать ее из ManualsBase.
D-Link DAP-1160 Руководство по эксплуатации — Online PDF
Ознакомьтесь с подробным руководством пользователя для замечательного творения D-Link, модель DAP-1160. Получите ценную информацию и инструкции, чтобы максимально использовать возможности вашего устройства и оптимизировать взаимодействие с пользователем. Раскройте весь потенциал своего устройства D-Link DAP-1160 с помощью этого подробного руководства пользователя, в котором содержатся пошаговые инструкции и советы экспертов, которые сделают работу с ним легкой и приятной.
Печатная версия
Многие предпочитают читать документы не на экране, а в печатной версии. Опция распечатки инструкции также предусмотрена и Вы можете воспользоваться ею нажав на ссылку, находящуюся выше — Печатать инструкцию. Вам не обязательно печатать всю инструкцию D-Link DAP-1160 а только некоторые страницы. Берегите бумагу.
Резюме
Ниже Вы найдете заявки которые находятся на очередных страницах инструкции для D-Link DAP-1160. Если Вы хотите быстро просмотреть содержимое страниц, которые находятся на очередных страницах инструкции, Вы воспользоваться ими.