-
Инструкции по эксплуатации
1

D-Link KVM-221/RU инструкция по эксплуатации
(5 страниц)
- Языки:Русский
-
Тип:
PDF -
Размер:
654.22 KB -
Описание:
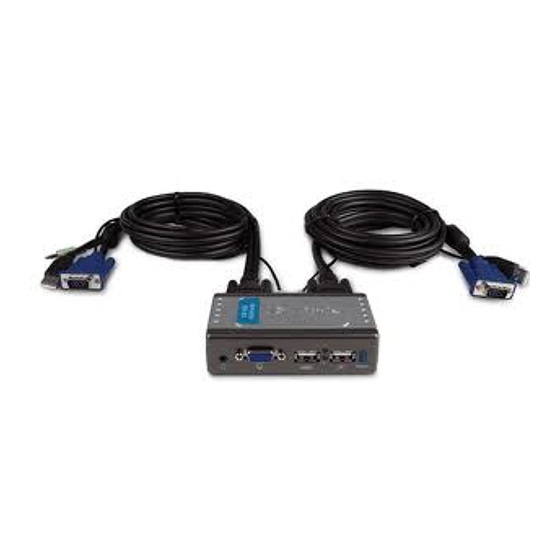
2-портовый KVM-переключатель с портами USB
Просмотр
На NoDevice можно скачать инструкцию по эксплуатации для D-Link KVM-221/RU. Руководство пользователя необходимо для ознакомления с правилами установки и эксплуатации D-Link KVM-221/RU. Инструкции по использованию помогут правильно настроить D-Link KVM-221/RU, исправить ошибки и выявить неполадки.
-
Contents
-
Table of Contents
-
Troubleshooting
-
Bookmarks
Quick Links
Wireless Internet Camera
Wireless G USB 2.0 Adapter
with 3G Mobile Video
Related Manuals for D-Link KVM-221 — KVM / Audio Switch
Summary of Contents for D-Link KVM-221 — KVM / Audio Switch
-
Page 1
Wireless Internet Camera Wireless G USB 2.0 Adapter with 3G Mobile Video… -
Page 2: System Requirements
• Speakers or Headphones • VGA or Better Monitor Package Contents D-Link KVM-221 2 Sets of KVM Cables KVM Switch Quick Install Guide If any of the above items are missing, please contact your reseller. D-Link KVM-1 Quick Install Guide…
-
Page 3: Hardware Overview
Mouse Port Keyboard Port Audio Jack KVM Cables Plug the cables from your keyboard, monitor, sound card, and mouse into the KVM switch, and plug the supplied cables from your KVM switch into your computers. D-Link KVM-1 Quick Install Guide…
-
Page 4
(Computer 1), and plug the cable from PC 2 into your second computer (Computer 2). Connect the audio and VGA cable to your first computer (Computer 1). Connect your audio or VGA cable to your second computer (Computer 2). D-Link KVM-1 Quick Install Guide… -
Page 5: Hardware Installation
Attach your headphone or speakers to the green audio jack located on the KVM-221. Attach your monitor’s 15-pin VGA connector to the blue VGA port located on the KVM-221. Attach your computer’s keyboard connector keyboard port located KVM-221. D-Link KVM-1 Quick Install Guide…
-
Page 6
USB mouse port located on the KVM-221. Note: Make sure that all your computers are turned OFF before installing the KVM-221 to avoid mouse and keyboard errors when booting up your computers. D-Link KVM-1 Quick Install Guide… -
Page 7
Plug the KVM-221’s KVM USB cable into an available USB port on the back of your computer case. Note: Repeat these steps to attach the cables connected from the PC 2 port of the KVM-221 to Computer D-Link KVM-1 Quick Install Guide… -
Page 8
Hardware Installation Power ON both of your attached computers after you have completed the KVM-221 installation. Once you’ve completed your KVM-221 installation, your connections may appear similar to the diagram below. D-Link KVM-1 Quick Install Guide… -
Page 9
Scroll Lock + Scroll Lock + M : Resets the mouse and keyboard. Scroll Lock + Scroll Lock + S : Auto-Scan Mode automatically switches between computers every 10 seconds (Monitor Only). Spacebar : Exits Auto Scan Mode. D-Link KVM-1 Quick Install Guide… -
Page 10: Troubleshooting
• Do not move the mouse or press any mouse buttons when switching from one PC to another. • Try resetting the mouse by unplugging it from the KVM-221 for about 3 seconds and then reconnect. D-Link KVM-1 Quick Install Guide…
-
Page 11
Check that the green coated audio cable is plugged into the correct audio jack (green colored). • Verify that the speaker works when plugged directly into the computer. • Try using a different set of speakers. D-Link KVM-1 Quick Install Guide… -
Page 12: Technical Support
Copyright ©00 D-Link Corporation/D-Link Systems, Inc. All rights reserved. D-Link, the D-Link logo are registered trademarks of D-Link Corporation or its subsidiaries in the United States and other countries. Other trademarks are the property of their respective owners. Product specifications, size and shape are subject to change without notice, and actual product appearance may differ from that depicted on the packaging.
This manual is also suitable for:
Kvm-221

EASILY SWITCH BETWEEN TWO COMPUTERS
2-PORT USB KVM SWITCH WITH AUDIO SUPPORT
Control two computers using a single monitor, keyboard, and mouse
Listen to music from one system while working on another
There are no drivers to install and nothing to configure
TWO SYSTEMS, ONE SOLUTION
Control two computers using one monitor, USB keyboard, and USB mouse with D-Link’s 2-Port USB KVM Switch with Audio Support (KVM-221). The KVM-221 allows users to effortlessly control two systems without having to buy additional computer peripherals. It is ideal for the home office where business files are kept on one computer and personal files on another. With the built-in audio support, you can also share a set of speakers between two computers. Listen to music on one computer while having quick access to resources on the second computer! You can even dedicate one computer as a music server.
MAXIMIZE YOUR DESK SPACE
Since the KVM-221 manages two computers using only one monitor, keyboard, and mouse, it frees up your desktop space, minimizing wires and extra devices that would be needed otherwise. In addition, the KVM-221 is compact in size, making it fit into virtually any workspace.
EASY INSTALLATION
The KVM-221 is easy to install and even easier to use. No drivers or software is required. It is a true plug and play device that will have you up and running quickly. Once connected, you can easily switch between the two computers with the front panel “select” button and keyboard hot keys.
Simple to install and easy to use, the 2-Port USB KVM Switch with Audio Support (KVM-221) is the ideal solution if you are looking for a dedicated music server, a professional working from home, or you’re simply looking to add another computer to your work station.
KVM-221
-
Инструкции по эксплуатации
1
D-Link KVM-221/RU инструкция по эксплуатации
(5 страниц)
- Языки:Русский
-
Тип:
PDF -
Размер:
654.22 KB -
Описание:
2-портовый KVM-переключатель с портами USB
Просмотр
На NoDevice можно скачать инструкцию по эксплуатации для D-Link KVM-221/RU. Руководство пользователя необходимо для ознакомления с правилами установки и эксплуатации D-Link KVM-221/RU. Инструкции по использованию помогут правильно настроить D-Link KVM-221/RU, исправить ошибки и выявить неполадки.
-
Contents
-
Table of Contents
-
Troubleshooting
-
Bookmarks
Quick Links
Wireless Internet Camera
Wireless G USB 2.0 Adapter
with 3G Mobile Video
Related Manuals for D-Link KVM-221 — KVM / Audio Switch
Summary of Contents for D-Link KVM-221 — KVM / Audio Switch
-
Page 1
Wireless Internet Camera Wireless G USB 2.0 Adapter with 3G Mobile Video… -
Page 2: System Requirements
• Speakers or Headphones • VGA or Better Monitor Package Contents D-Link KVM-221 2 Sets of KVM Cables KVM Switch Quick Install Guide If any of the above items are missing, please contact your reseller. D-Link KVM-1 Quick Install Guide…
-
Page 3: Hardware Overview
Mouse Port Keyboard Port Audio Jack KVM Cables Plug the cables from your keyboard, monitor, sound card, and mouse into the KVM switch, and plug the supplied cables from your KVM switch into your computers. D-Link KVM-1 Quick Install Guide…
-
Page 4
(Computer 1), and plug the cable from PC 2 into your second computer (Computer 2). Connect the audio and VGA cable to your first computer (Computer 1). Connect your audio or VGA cable to your second computer (Computer 2). D-Link KVM-1 Quick Install Guide… -
Page 5: Hardware Installation
Attach your headphone or speakers to the green audio jack located on the KVM-221. Attach your monitor’s 15-pin VGA connector to the blue VGA port located on the KVM-221. Attach your computer’s keyboard connector keyboard port located KVM-221. D-Link KVM-1 Quick Install Guide…
-
Page 6
USB mouse port located on the KVM-221. Note: Make sure that all your computers are turned OFF before installing the KVM-221 to avoid mouse and keyboard errors when booting up your computers. D-Link KVM-1 Quick Install Guide… -
Page 7
Plug the KVM-221’s KVM USB cable into an available USB port on the back of your computer case. Note: Repeat these steps to attach the cables connected from the PC 2 port of the KVM-221 to Computer D-Link KVM-1 Quick Install Guide… -
Page 8
Hardware Installation Power ON both of your attached computers after you have completed the KVM-221 installation. Once you’ve completed your KVM-221 installation, your connections may appear similar to the diagram below. D-Link KVM-1 Quick Install Guide… -
Page 9
Scroll Lock + Scroll Lock + M : Resets the mouse and keyboard. Scroll Lock + Scroll Lock + S : Auto-Scan Mode automatically switches between computers every 10 seconds (Monitor Only). Spacebar : Exits Auto Scan Mode. D-Link KVM-1 Quick Install Guide… -
Page 10: Troubleshooting
• Do not move the mouse or press any mouse buttons when switching from one PC to another. • Try resetting the mouse by unplugging it from the KVM-221 for about 3 seconds and then reconnect. D-Link KVM-1 Quick Install Guide…
-
Page 11
Check that the green coated audio cable is plugged into the correct audio jack (green colored). • Verify that the speaker works when plugged directly into the computer. • Try using a different set of speakers. D-Link KVM-1 Quick Install Guide… -
Page 12: Technical Support
Copyright ©00 D-Link Corporation/D-Link Systems, Inc. All rights reserved. D-Link, the D-Link logo are registered trademarks of D-Link Corporation or its subsidiaries in the United States and other countries. Other trademarks are the property of their respective owners. Product specifications, size and shape are subject to change without notice, and actual product appearance may differ from that depicted on the packaging.
This manual is also suitable for:
Kvm-221
KVM-221
УСТАНОВКА
установка устРойства
пожалуйста, следуйте изображенной ниже схеме подключения KVM-переключателя к
компьютерам. динамики не входят в комплект поставки и приобретаются отдельно.
За дополнительной информацией по установке и работоспособности обращайтесь к
руководству пользователя на установочном CD-диске, входящем в комплект поставки.
Внимание:
данный KVM-переключатель не будет обнаружен, если в настройках BIOS компьютера
отключена функция “power on” (включения питания). если компьютер отключен, то на
экране ничего не будет отображено.
пеРекЛЮЧенИе МеЖду коМпЬЮтеРаМИ
Удаленное переключение
нажмите кнопку удаленного управления для переключения между
компьютерами. Зеленый и оранжевый индикаторы указывают на
выбранный компьютер.
Переключение с помощью горячих клавиш (для компьютеров под управлением ОС
Microsoft Windows
®
)
нажмите дважды клавишу Scroll Lock для переключения между компьютерами, включая
звук.
нажмите дважды клавишу Caps Lock для переключения между компьютерами, но с
поддержкой звука с оригинального компьютера.
- Manuals
- Brands
- D-Link Manuals
- Switch
- KVM-221
Manuals and User Guides for D-Link KVM-221. We have 2 D-Link KVM-221 manuals available for free PDF download: Quick Installation Manual
D-Link KVM-221 Quick Installation Manual (12 pages)
Quick Installation Guide
Brand: D-Link
|
Category: Switch
|
Size: 2.09 MB
Table of Contents
Advertisement

D-Link KVM-221 Quick Installation Manual (6 pages)
2-Port USB KVM Switch
Brand: D-Link
|
Category: Kvm switches
|
Size: 0.2 MB
Table of Contents
Related Products
-
D-Link KVM-221 — KVM / Audio Switch
-
D-link KVM-121
-
D-Link KVM-450
-
D-Link KVM-440
-
D-Link KVM-222
-
D-Link KVM-410 — Single Port KVM Switch
-
D-Link 1000Base-X
-
D-Link 1008F — DES Switch
-
D-Link 1016R — DES Switch
-
D-Link 1016T — DGS Switch
D-Link Categories
![]()
Network Router
Wireless Router
![]()
Switch
Adapter
![]()
Security Camera
More D-Link Manuals
EASILY SWITCH BETWEEN TWO COMPUTERS
2-PORT USB KVM SWITCH WITH AUDIO SUPPORT
Control two computers using a single monitor, keyboard, and mouse
Listen to music from one system while working on another
There are no drivers to install and nothing to configure
TWO SYSTEMS, ONE SOLUTION
Control two computers using one monitor, USB keyboard, and USB mouse with D-Link’s 2-Port USB KVM Switch with Audio Support (KVM-221). The KVM-221 allows users to effortlessly control two systems without having to buy additional computer peripherals. It is ideal for the home office where business files are kept on one computer and personal files on another. With the built-in audio support, you can also share a set of speakers between two computers. Listen to music on one computer while having quick access to resources on the second computer! You can even dedicate one computer as a music server.
MAXIMIZE YOUR DESK SPACE
Since the KVM-221 manages two computers using only one monitor, keyboard, and mouse, it frees up your desktop space, minimizing wires and extra devices that would be needed otherwise. In addition, the KVM-221 is compact in size, making it fit into virtually any workspace.
EASY INSTALLATION
The KVM-221 is easy to install and even easier to use. No drivers or software is required. It is a true plug and play device that will have you up and running quickly. Once connected, you can easily switch between the two computers with the front panel “select” button and keyboard hot keys.
Simple to install and easy to use, the 2-Port USB KVM Switch with Audio Support (KVM-221) is the ideal solution if you are looking for a dedicated music server, a professional working from home, or you’re simply looking to add another computer to your work station.
KVM-221