- Manuals
- Brands
- iStorage Manuals
- Storage
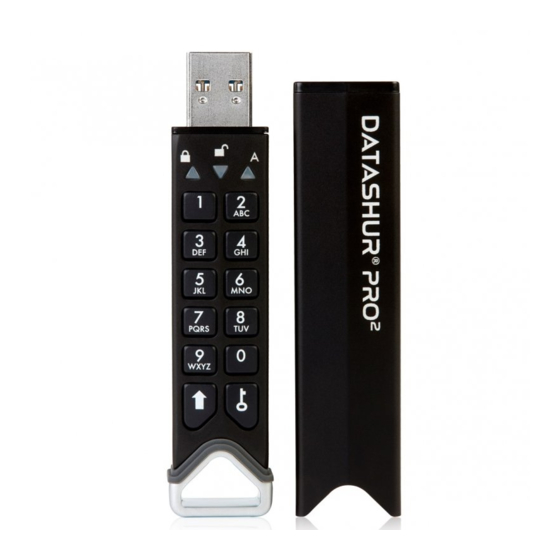
- datAshur Pro2
- User manual
-
Contents
-
Table of Contents
-
Bookmarks
Quick Links
Please make sure you remember your PIN (password), without it there
is no way to access the data on the drive.
If you are having difficulty using your datAshur PRO
please contact our support team by email —
2
support@istorage-uk.com or by phone on +44 (0) 20 8991 6260.
#1
www.istorage-uk.com
Related Manuals for iStorage datAshur Pro2
Summary of Contents for iStorage datAshur Pro2
-
Page 1
Please make sure you remember your PIN (password), without it there is no way to access the data on the drive. If you are having difficulty using your datAshur PRO please contact our support team by email — support@istorage-uk.com or by phone on +44 (0) 20 8991 6260. www.istorage-uk.com… -
Page 2
Copyright © iStorage, Inc 2019. All rights reserved. Windows is a registered trademark of Microsoft Corporation. All other trademarks and copyrights referred to are the property of their respective owners. Distribution of modified versions of this document is prohibited without the explicit permission of the copyright holder. -
Page 3: Table Of Contents
44. Hibernating, Suspending or Logging off from the Operating System ……………….. 39 45. How to check Firmware in Admin Mode ……………………….39 46. How to check Firmware in User Mode ……………………….40 47. Technical Support …………………………….41 48. Warranty and RMA information …………………………41 www.istorage-uk.com…
-
Page 4: Introduction
Please plug in the datAshur PRO to a powered USB port for 30-60 minutes to fully charge the battery. Thank you for purchasing the iStorage datAshur , an ultra-secure and easy to use, hardware encrypted USB 3.2 Gen 1 ®…
-
Page 5: Led Indicators And Their Actions
If the device is connected to a USB port, disconnect it. • If the device is not connected to a USB port, press and hold down the SHIFT ( ) button for a second until the LED turns solid and fades out to the Idle State (off). www.istorage-uk.com…
-
Page 6: First Time Use
• For “Password” press the following buttons: 7 (pqrs) 2 (abc) 7 (pqrs) 7 (pqrs) 9 (wxyz) 6 (mno) 7 (pqrs) 3 (def) • For “iStorage” press the following buttons: 4 (ghi) 7 (pqrs) 8 (tuv) 6 (mno) 7 (pqrs) 2 (abc) 4 (ghi) 3 (def) Using this method, long and easy to remember PINs can be configured.
-
Page 7: Unlocking Datashur Pro With The Admin Pin
LEDs blinking together, several times and then to a solid BLUE enter the Admin PIN and press the KEY ( ) button and changing to a blinking GREEN LED indicating again the drive has been successfully unlocked as Admin www.istorage-uk.com…
-
Page 8: To Enter Admin Mode
LED switches to a solid LED which then fades out to the Idle state. To access the drive contents (data), the datAshur PRO must first be in the idle state (all LEDs off) before an Admin/User PIN can be entered. www.istorage-uk.com…
-
Page 9: Changing The Admin Pin
• For “Password” press the following buttons: 7 (pqrs) 2 (abc) 7 (pqrs) 7 (pqrs) 9 (wxyz) 6 (mno) 7 (pqrs) 3 (def) • For “iStorage” press the following buttons: 4 (ghi) 7 (pqrs) 8 (tuv) 6 (mno) 7 (pqrs) 2 (abc) 4 (ghi) 3 (def) Using this method, long and easy to remember PINs can be configured.
-
Page 10: Setting A User Pin Policy
Blinking GREEN BLUE LEDs will change to a solid GREEN LED and finally to a solid BLUE 3. Press the SHIFT ( ) button once LED indicating the User PIN Policy has been successfully set. www.istorage-uk.com…
-
Page 11: How To Delete The User Pin Policy
LED switches to a solid LED which then fades out to the Idle state. To access the drive contents (data), the datAshur PRO must first be in the idle state (all LEDs off) before an Admin/User PIN can be entered. www.istorage-uk.com…
-
Page 12: How To Check The User Pin Policy
LED switches to a solid LED which then fades out to the Idle state. To access the drive contents (data), the datAshur PRO must first be in the idle state (all LEDs off) before an Admin/User PIN can be entered. www.istorage-uk.com…
-
Page 13: Adding A New User Pin In Admin Mode
LED switches to a solid LED which then fades out to the Idle state. To access the drive contents (data), the datAshur PRO must first be in the idle state (all LEDs off) before an Admin/User PIN can be entered. www.istorage-uk.com…
-
Page 14: Changing The User Pin In Admin Mode
) + 3 buttons Blinking LED will change to a solid 2. Press and hold down both LED and then to a solid BLUE LED indicating SHIFT ( ) + 3 buttons again the User PIN has been successfully deleted www.istorage-uk.com…
-
Page 15: How To Unlock Datashur Pro
Important: Changing the User PIN must comply with the ‘User PIN Policy’ if one has been configured as described in section 8, which imposes a minimum PIN length and whether a ‘Special Character’ has been used. The administrator can refer to section 10 to check the user PIN restrictions. www.istorage-uk.com…
-
Page 16: Creating A One-Time User Recovery Pin
) + 4 buttons Blinking LED will become solid 2. Press and hold down both then switch to a solid BLUE LED indicating that the One-Time User Recovery PIN has been SHIFT ( ) + 4 buttons again successfully deleted www.istorage-uk.com…
-
Page 17: Activating Recovery Mode And Creating New User Pin
Important: The creation of a new User PIN must comply with the ‘User PIN Policy’ if one has been configured as described in section 8, which imposes a minimum PIN length and whether a special character has been used. Refer to section 10 to check the user PIN restrictions. www.istorage-uk.com…
-
Page 18: Set User Read-Only In Admin Mode
1. In Admin mode, press and hold down both “7 + 9” Solid BLUE LED will change to blinking GREEN buttons. BLUE LEDs GREEN BLUE LEDs change to a solid GREEN LED then to a solid BLUE 2. Press KEY ( ) button indicating the drive is configured as Read/Write www.istorage-uk.com…
-
Page 19: Set Global Read-Only In Admin Mode
1. In Admin mode, press and hold down both “5 + 9” Solid BLUE LED will change to blinking GREEN buttons. BLUE LEDs GREEN BLUE LEDs change to a solid GREEN LED then to a solid BLUE 2. Press KEY ( ) button indicating the drive is configured as Read/Write www.istorage-uk.com…
-
Page 20: How To Configure A Self-Destruct Pin
LED switches to a solid LED which then fades out to the Idle state. To access the drive contents (data), the datAshur PRO must first be in the idle state (all LEDs off) before an Admin/User PIN can be entered. www.istorage-uk.com…
-
Page 21: How To Delete The Self-Destruct Pin
GREEN BLUE LEDs alternating 2. Enter the Self-Destruct PIN and press the on and off for a few seconds and finally shifts KEY ( ) button to a solid GREEN LED indicating the datAshur has successfully self-destructed www.istorage-uk.com…
-
Page 22: How To Configure An Admin Pin After A Brute Force Attack Or Reset
In its default state, the datAshur PRO Unattended Auto Lock time-out feature is turned off. The Unattended Auto Lock can be set to activate between 5 — 99 minutes. www.istorage-uk.com…
-
Page 23: Turn Off The Unattended Auto-Lock Clock
LED switches to a solid LED which then fades out to the Idle state. To access the drive contents (data), the datAshur PRO must first be in the idle state (all LEDs off) before an Admin/User PIN can be entered. www.istorage-uk.com…
-
Page 24: How To Check The Unattended Auto-Lock Clock
1. In User mode, press and hold down both “7 + 6” Solid GREEN LED will change to blinking buttons. (7=Read + 6=Only) GREEN BLUE LEDs GREEN BLUE LEDs will change to a solid GREEN LED indicating the drive is configured 2. Press KEY ( ) button as Read-Only www.istorage-uk.com…
-
Page 25: Enable Read/Write In User Mode
• The Recovery PIN, the Admin PIN and all data remain intact and accessible. • The Recovery PIN is deleted. Recovery PIN • The Admin PIN and all data remain intact and accessible. • The datAshur PRO will reset. All PINs and data are deleted and lost Admin PIN forever. www.istorage-uk.com…
-
Page 26: How To Set The User Pin Brute Force Limitation
LED switches to a solid LED which then fades out to the Idle state. To access the drive contents (data), the datAshur PRO must first be in the idle state (all LEDs off) before an Admin/User PIN can be entered. www.istorage-uk.com…
-
Page 27: How To Check The User Pin Brute Force Limitation
LED switches to a solid LED which then fades out to the Idle state. To access the drive contents (data), the datAshur PRO must first be in the idle state (all LEDs off) before an Admin/User PIN can be entered. www.istorage-uk.com…
-
Page 28: How To Perform A Complete Reset
The default setting of the datAshur PRO is configured as non-bootable. iStorage datAshur PRO USB drives are equipped with a bootable feature to accommodate power cycling during a host boot process. When booting from the datAshur PRO…
-
Page 29: How To Disable The Datashur Pro Bootable Feature
NOT configured as Bootable, the following happens; a. All LED’s (RED, GREEN & BLUE) become solid for 1 second. b. All LEDs are off c. All LED’s (RED, GREEN & BLUE) become solid for 1 second. d. LEDs return to solid BLUE www.istorage-uk.com…
-
Page 30: How To Configure The Drive As Removable Or Local Disk
(all LEDs off) before an Admin/User PIN can be entered. 39. How to configure the Drive as Removable or Local Disk iStorage datAshur PRO USB drives can be configured as either “Removable Disk” or “Local Disk” whilst the default setting of the datAshur PRO is configured as a Removable Disk.
-
Page 31: How To Check Whether The Drive Is Removable Or Local Disk
LED switches to a solid LED which then fades out to the Idle state. To access the drive contents (data), the datAshur PRO must first be in the idle state (all LEDs off) before an Admin/User PIN can be entered. www.istorage-uk.com…
-
Page 32: Formatting The Datashur Pro For Windows
2. With the datAshur PRO in standby state (RED LED), press the KEY ( ) button once and enter New Admin PIN to unlock (blinking GREEN LED). 3. Attach the datAshur PRO to the computer. 4. Click on ‘Format Disk’ 5. Click ‘Start’. www.istorage-uk.com…
-
Page 33
6. Click ‘OK’. 7. Wait until the formatting process is complete. The datAshur PRO will be recognised and it is available for use. www.istorage-uk.com… -
Page 34: Datashur Pro Setup For Mac Os
1. Select datAshur PRO from the list of drives and volumes. Each drive in the list will display its capacity, manufacturer, and product name, such as ‘iStorage datAshur PRO Media’ or 232.9 datAshur PRO 2. Click the ‘Erase’ button (figure 1).
-
Page 35
Mac supports. The recommended format type is ‘Mac OS Extended (Journaled).’ The scheme format dropdown menu lists the available schemes to use (figure 4). figure 3 figure 4 5. Click the ‘Erase’ button. Disk Utility will unmount the volume from the desktop, erase it, and then remount it on the desktop. www.istorage-uk.com… -
Page 36: Datashur Pro Setup For Linux (Ubuntu 18.04 Lts)
EXT4 or other filesystem: 1. Open ‘Show Application’ and type ‘Disks’ in the search box. Click on the ‘Disks’ utility when displayed. 2. Select the datAshur PRO under ‘Devices’. Click on the gears icon and choose ‘Format Partition’ www.istorage-uk.com…
-
Page 37
3. Configure a Volume Name and then select type of formatting you wish to use. EXT4 – compatible with Linux NTFS – Windows Only FAT – compatible with all Operating Systems And then press ‘Next’ and then ‘FORMAT’ 4. After the format process is finished, click to mount the drive to Ubuntu. www.istorage-uk.com… -
Page 38
Linux (Ubuntu 18.04 LTS) It is strongly recommended to right click your drive icon and then click ‘Safely Remove’ in the OS to eject (lock) your datAshur PRO , especially after data has been copied or deleted from the drive. www.istorage-uk.com… -
Page 39: Hibernating, Suspending Or Logging Off From The Operating System
LED will blink twice (2) and the GREEN LED will blink three (3) times. Once the sequence has ended the RED, GREEN & BLUE LED’s will blink together once and then return to Admin mode, a solid BLUE LED. www.istorage-uk.com…
-
Page 40: How To Check Firmware In User Mode
LED will blink twice (2) and the GREEN LED will blink three (3) times. Once the sequence has ended the RED, GREEN & BLUE LED’s will blink together once and then return to the User mode, a solid GREEN LED. www.istorage-uk.com…
-
Page 41: Technical Support
DAMAGED OR RENDERED DEFECTIVE: 1. AS A RESULT OF ACCIDENT, MISUSE, NEGLECT, ABUSE OR FAILURE AND/OR INABILITY TO FOLLOW THE WRITTEN INSTRUCTIONS PROVIDED IN THIS INSTRUCTION GUIDE: 2. BY THE USE OF PARTS NOT MANUFACTURED OR SOLD BY ISTORAGE; 3. BY MODIFICATION OF THE PRODUCT; OR 4. AS A RESULT OF SERVICE, ALTERNATION OR REPAIR BY ANYONE OTHER THAN ISTORAGE AND SHALL BE VOID.
-
Page 42
© iStorage, 2019. All rights reserved. iStorage Limited, iStorage House, 13 Alperton Lane Perivale, Middlesex. UB6 8DH, England Tel: +44 (0) 20 8991 6260 | Fax: +44 (0) 20 8991 6277 e-mail: info@istorage-uk.com | web: www.istorage-uk.com www.istorage-uk.com…
Для работы проектов iXBT.com нужны файлы cookie и сервисы аналитики.
Продолжая посещать сайты проектов вы соглашаетесь с нашей
Политикой в отношении файлов cookie
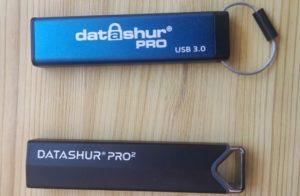
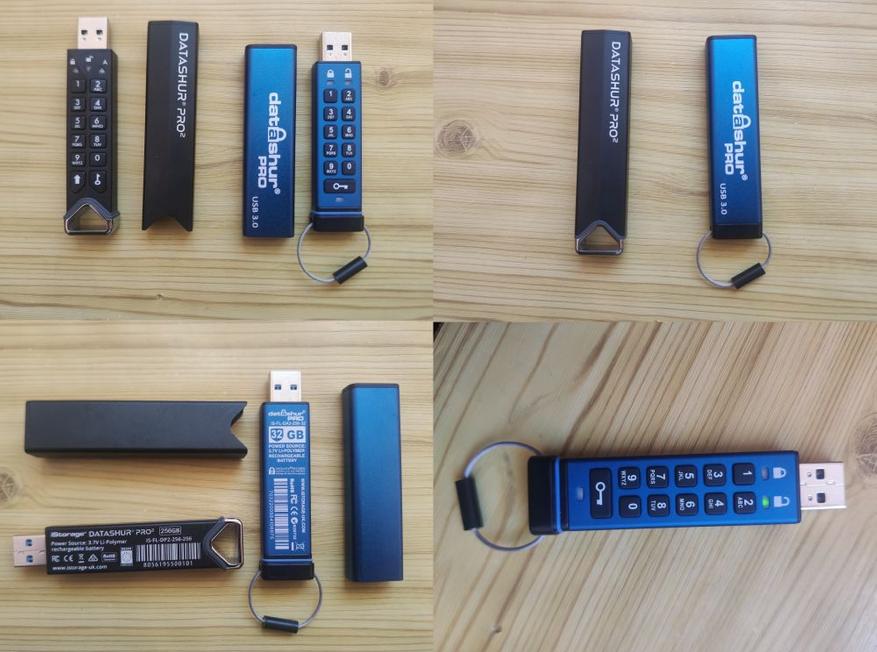
Вашему вниманию мини-обзор и тест шифрованной флешки iStorage datAshur PRO из 1-го поколения VS усовершенствованная модель datAshur PRO 2.
Компания iStorage является одним из крупных разработчиков устройств с защищенной памятью, она выпускает флешки и внешние диски SSD и HDD. Что касается защиты, то она обеспечивается программными способами шифрования, они также используются для защиты от бутфорса путем подбора паролей. Устройства также сложно взломать механическими способами, так как они имеют неразборную конструкцию. Это не все, чем могут похвастаться девайсы данного бренда, они также имеют защиту IP57/68 и защищены от социальной инженерии методом поиска часто юзабельных кнопок с высокими показателями износа, это обеспечивается нанесением особой краски на кнопки. Что касается внутренней начинки, то там имеются разноуровневые пароли доступа и возможность юзать флешку в качестве загрузочной для того, чтобы перенести всю операционную систему со всеми данными в случае вынужденной работы на чужом устройстве. Об этом подробно рассказывалось в обзоре флешки с шифрованием iStorage datAshur PRO2.

В данном обзоре будут сравниваться два поколения и, помимо обновленного девайса будет более ранняя версия — iStorage datAshur PRO USB 3.0. Также существует модель без приставки «Pro» с USB 2.0, но там печалька — само шифрование информации существенно уменьшает скорость ее обработки, а в 2020 году низкая скорость формата 2.0 выглядит довольно грустно. Единственный выход — юзать устройство с небольшими размерами дынных и малой емкости, ведь одни владеют секретными данными, измеряющимися в гигабайтах, а другие все сохраняют в блокнотовском доке, который надо держать «за семью замками».
Системы защиты от механических повреждений у iStorage datAshur PRO немного слабее, учитывая то, что вид у него брутальнее, с тросиком из металла для переноски — здесь имеется ввиду IP57, что предусматривает защиту от случайных падений и воздействия воды. Старшая модель может похвастаться работой с любым устройством, у которого есть USB-порт, это может быть как станок ЧПУ, так и кассовая система, портативный принтер или OTG. В datAshur PRO несколько меньше совместимость с различными операционками и не так много сертификатов защиты.
Сертификаты NATO Restricted level Certified, NLNCSA 2, FIPS 140-2 3. Операционки, которые поддерживаются: Виндовс, Макинтош, Линукс, Андроид, Хром, Vmware и Citrix.
Что касается рабочего алгоритма, то он неизменный:
— перед использованием нужно поставить девайс на полчаса на зарядку, чтобы аккум имел стабильный заряд;
— при подключении нажимаем кнопку разблокирования и вводим PIN-код админа 11223344;
— после этого следует установить свой PIN в целях безопасности (кстати, система не допустит использование одинаковых знаков и последовательных цифр).
Затем необходимо в соответствии с инструкциями к флешке (или по их русскоязычной версии на сайте офпредставителей, линк будет ниже) настроить под свои личные требования. В старшей версии есть возможность поставить, к примеру, помимо read-only, специальный пароль, вводя который можно удалить пароли доступа, после чего увидеть содержимое устройства невозможно никак. Обе модели позволяют установить PIN доступа уровня юзера и, если он окажется нерадивым, вечно теряющим или забывающим свой код, — дополнительно перестраховаться доступом админского уровня и с возможностью открыть даже флешку, которая заблокирована неверным вводом PIN-кода пользователя.
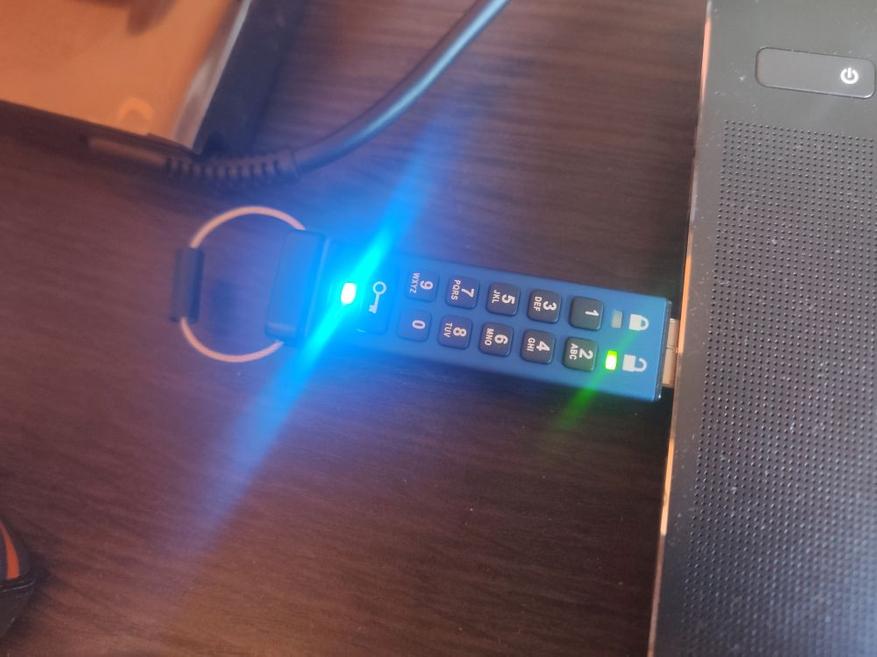
Вот такой это вид имеет в USB, в устройстве iStorage datAshur PRO как-то назойливо выглядит светодиод активности. К слову, встроенный аккум, помимо функций защиты с контролированием доступа и толковой отсечкой при попытках введения неверного PIN-кода, выполняет еще и довольно комфортную пользовательскую функцию. Необязательно флешку вставлять в порт, чтобы ввести код доступа, устройство можно привести в активность и в руках, ввести необходимые данные, а уже потом приконнектить к USB системника или ноутбука.
Какая еще между ними разница? А такая, что технический прогресс не стоит на месте, и USB 3.2 на больших объемах данных выглядит поинтереснее 3.0. Также здесь необходимо учитывать свои требования и стандартные задачи, ведь, используя вордовские доки по несколько мегабайт, разница будет несущественной, а если вы работаете с объемами в сотни гигабайт, то это просто выброшенные деньги на ветер. В принципе, как и в случае с файлами по 50-100 МБ, особо эта разница не почувствуется. Другой разговор использовать массивы данных объемом в десятки-сотни гиг с их регулярной ротацией, в таком случае лучше отдать предпочтение более новой модели флешки с шифрованием iStorage datAshur PRO2, и получить хороший прирост по скорости.

Дальше будет видеообзор флешки с шифрованием iStorage datAshur PRO, там обратите внимание на немаловажный момент для юзера — тайминг по вводу PIN-кода.
Вспоминается, был у меня когда-то подобный китайский девайс с таймингом в 1-1,5 секунды, что очень бесило. Особенно, когда вводится верный набор знаков, а доступ к файлам не предоставляется. Начинается паника, и приходишь к понимаю того, что проц здесь слабый, и необходимо вводить код с паузами для того, чтобы символы могли быть корректно обработаны. У iStorage такие приколы отсутствуют, здесь можно вводить пин без перерывов между нажатиями.
Вот ссылка на официальную компанию, которая представляет iStorage, и где можно купить iStorage datAshur PRO USB 3.0, получив гарантию на 3 года — https://datawaysecurity.com.ua/shifrovannye-fleshki/istorage-datashur-pro/
Если вам понравился мой стиль написания, много обзоров самых разномастных вещей из разных уголков Интернета можно найти в моем блоге — Обзор покупок из Интернета
-
Page 1
Please make sure you remember your PIN (password), without it there is no way to access the data on the drive. If you are having difficulty using your datAshur PRO please contact our support team by email — support@istorage-uk.com or by phone on +44 (0) 20 8991 6260. www.istorage-uk.com… -
Page 2
Copyright © iStorage, Inc 2019. All rights reserved. Windows is a registered trademark of Microsoft Corporation. All other trademarks and copyrights referred to are the property of their respective owners. Distribution of modified versions of this document is prohibited without the explicit permission of the copyright holder. -
Page 3: Table Of Contents
44. Hibernating, Suspending or Logging off from the Operating System ……………….. 39 45. How to check Firmware in Admin Mode ……………………….39 46. How to check Firmware in User Mode ……………………….40 47. Technical Support …………………………….41 48. Warranty and RMA information …………………………41 www.istorage-uk.com…
-
Page 4: Introduction
Please plug in the datAshur PRO to a powered USB port for 30-60 minutes to fully charge the battery. Thank you for purchasing the iStorage datAshur , an ultra-secure and easy to use, hardware encrypted USB 3.2 Gen 1 ®…
-
Page 5: Led Indicators And Their Actions
If the device is connected to a USB port, disconnect it. • If the device is not connected to a USB port, press and hold down the SHIFT ( ) button for a second until the LED turns solid and fades out to the Idle State (off). www.istorage-uk.com…
-
Page 6: First Time Use
• For “Password” press the following buttons: 7 (pqrs) 2 (abc) 7 (pqrs) 7 (pqrs) 9 (wxyz) 6 (mno) 7 (pqrs) 3 (def) • For “iStorage” press the following buttons: 4 (ghi) 7 (pqrs) 8 (tuv) 6 (mno) 7 (pqrs) 2 (abc) 4 (ghi) 3 (def) Using this method, long and easy to remember PINs can be configured.
-
Page 7: Unlocking Datashur Pro With The Admin Pin
LEDs blinking together, several times and then to a solid BLUE enter the Admin PIN and press the KEY ( ) button and changing to a blinking GREEN LED indicating again the drive has been successfully unlocked as Admin www.istorage-uk.com…
-
Page 8: To Enter Admin Mode
LED switches to a solid LED which then fades out to the Idle state. To access the drive contents (data), the datAshur PRO must first be in the idle state (all LEDs off) before an Admin/User PIN can be entered. www.istorage-uk.com…
-
Page 9: Changing The Admin Pin
• For “Password” press the following buttons: 7 (pqrs) 2 (abc) 7 (pqrs) 7 (pqrs) 9 (wxyz) 6 (mno) 7 (pqrs) 3 (def) • For “iStorage” press the following buttons: 4 (ghi) 7 (pqrs) 8 (tuv) 6 (mno) 7 (pqrs) 2 (abc) 4 (ghi) 3 (def) Using this method, long and easy to remember PINs can be configured.
-
Page 10: Setting A User Pin Policy
Blinking GREEN BLUE LEDs will change to a solid GREEN LED and finally to a solid BLUE 3. Press the SHIFT ( ) button once LED indicating the User PIN Policy has been successfully set. www.istorage-uk.com…
-
Page 11: How To Delete The User Pin Policy
LED switches to a solid LED which then fades out to the Idle state. To access the drive contents (data), the datAshur PRO must first be in the idle state (all LEDs off) before an Admin/User PIN can be entered. www.istorage-uk.com…
-
Page 12: How To Check The User Pin Policy
LED switches to a solid LED which then fades out to the Idle state. To access the drive contents (data), the datAshur PRO must first be in the idle state (all LEDs off) before an Admin/User PIN can be entered. www.istorage-uk.com…
-
Page 13: Adding A New User Pin In Admin Mode
LED switches to a solid LED which then fades out to the Idle state. To access the drive contents (data), the datAshur PRO must first be in the idle state (all LEDs off) before an Admin/User PIN can be entered. www.istorage-uk.com…
-
Page 14: Changing The User Pin In Admin Mode
) + 3 buttons Blinking LED will change to a solid 2. Press and hold down both LED and then to a solid BLUE LED indicating SHIFT ( ) + 3 buttons again the User PIN has been successfully deleted www.istorage-uk.com…
-
Page 15: How To Unlock Datashur Pro
Important: Changing the User PIN must comply with the ‘User PIN Policy’ if one has been configured as described in section 8, which imposes a minimum PIN length and whether a ‘Special Character’ has been used. The administrator can refer to section 10 to check the user PIN restrictions. www.istorage-uk.com…
-
Page 16: Creating A One-Time User Recovery Pin
) + 4 buttons Blinking LED will become solid 2. Press and hold down both then switch to a solid BLUE LED indicating that the One-Time User Recovery PIN has been SHIFT ( ) + 4 buttons again successfully deleted www.istorage-uk.com…
-
Page 17: Activating Recovery Mode And Creating New User Pin
Important: The creation of a new User PIN must comply with the ‘User PIN Policy’ if one has been configured as described in section 8, which imposes a minimum PIN length and whether a special character has been used. Refer to section 10 to check the user PIN restrictions. www.istorage-uk.com…
-
Page 18: Set User Read-Only In Admin Mode
1. In Admin mode, press and hold down both “7 + 9” Solid BLUE LED will change to blinking GREEN buttons. BLUE LEDs GREEN BLUE LEDs change to a solid GREEN LED then to a solid BLUE 2. Press KEY ( ) button indicating the drive is configured as Read/Write www.istorage-uk.com…
-
Page 19: Set Global Read-Only In Admin Mode
1. In Admin mode, press and hold down both “5 + 9” Solid BLUE LED will change to blinking GREEN buttons. BLUE LEDs GREEN BLUE LEDs change to a solid GREEN LED then to a solid BLUE 2. Press KEY ( ) button indicating the drive is configured as Read/Write www.istorage-uk.com…
-
Page 20: How To Configure A Self-Destruct Pin
LED switches to a solid LED which then fades out to the Idle state. To access the drive contents (data), the datAshur PRO must first be in the idle state (all LEDs off) before an Admin/User PIN can be entered. www.istorage-uk.com…
-
Page 21: How To Delete The Self-Destruct Pin
GREEN BLUE LEDs alternating 2. Enter the Self-Destruct PIN and press the on and off for a few seconds and finally shifts KEY ( ) button to a solid GREEN LED indicating the datAshur has successfully self-destructed www.istorage-uk.com…
-
Page 22: How To Configure An Admin Pin After A Brute Force Attack Or Reset
In its default state, the datAshur PRO Unattended Auto Lock time-out feature is turned off. The Unattended Auto Lock can be set to activate between 5 — 99 minutes. www.istorage-uk.com…
-
Page 23: Turn Off The Unattended Auto-Lock Clock
LED switches to a solid LED which then fades out to the Idle state. To access the drive contents (data), the datAshur PRO must first be in the idle state (all LEDs off) before an Admin/User PIN can be entered. www.istorage-uk.com…
-
Page 24: How To Check The Unattended Auto-Lock Clock
1. In User mode, press and hold down both “7 + 6” Solid GREEN LED will change to blinking buttons. (7=Read + 6=Only) GREEN BLUE LEDs GREEN BLUE LEDs will change to a solid GREEN LED indicating the drive is configured 2. Press KEY ( ) button as Read-Only www.istorage-uk.com…
-
Page 25: Enable Read/Write In User Mode
• The Recovery PIN, the Admin PIN and all data remain intact and accessible. • The Recovery PIN is deleted. Recovery PIN • The Admin PIN and all data remain intact and accessible. • The datAshur PRO will reset. All PINs and data are deleted and lost Admin PIN forever. www.istorage-uk.com…
-
Page 26: How To Set The User Pin Brute Force Limitation
LED switches to a solid LED which then fades out to the Idle state. To access the drive contents (data), the datAshur PRO must first be in the idle state (all LEDs off) before an Admin/User PIN can be entered. www.istorage-uk.com…
-
Page 27: How To Check The User Pin Brute Force Limitation
LED switches to a solid LED which then fades out to the Idle state. To access the drive contents (data), the datAshur PRO must first be in the idle state (all LEDs off) before an Admin/User PIN can be entered. www.istorage-uk.com…
-
Page 28: How To Perform A Complete Reset
The default setting of the datAshur PRO is configured as non-bootable. iStorage datAshur PRO USB drives are equipped with a bootable feature to accommodate power cycling during a host boot process. When booting from the datAshur PRO…
-
Page 29: How To Disable The Datashur Pro Bootable Feature
NOT configured as Bootable, the following happens; a. All LED’s (RED, GREEN & BLUE) become solid for 1 second. b. All LEDs are off c. All LED’s (RED, GREEN & BLUE) become solid for 1 second. d. LEDs return to solid BLUE www.istorage-uk.com…
-
Page 30: How To Configure The Drive As Removable Or Local Disk
(all LEDs off) before an Admin/User PIN can be entered. 39. How to configure the Drive as Removable or Local Disk iStorage datAshur PRO USB drives can be configured as either “Removable Disk” or “Local Disk” whilst the default setting of the datAshur PRO is configured as a Removable Disk.
-
Page 31: How To Check Whether The Drive Is Removable Or Local Disk
LED switches to a solid LED which then fades out to the Idle state. To access the drive contents (data), the datAshur PRO must first be in the idle state (all LEDs off) before an Admin/User PIN can be entered. www.istorage-uk.com…
-
Page 32: Formatting The Datashur Pro For Windows
2. With the datAshur PRO in standby state (RED LED), press the KEY ( ) button once and enter New Admin PIN to unlock (blinking GREEN LED). 3. Attach the datAshur PRO to the computer. 4. Click on ‘Format Disk’ 5. Click ‘Start’. www.istorage-uk.com…
-
Page 33
6. Click ‘OK’. 7. Wait until the formatting process is complete. The datAshur PRO will be recognised and it is available for use. www.istorage-uk.com… -
Page 34: Datashur Pro Setup For Mac Os
1. Select datAshur PRO from the list of drives and volumes. Each drive in the list will display its capacity, manufacturer, and product name, such as ‘iStorage datAshur PRO Media’ or 232.9 datAshur PRO 2. Click the ‘Erase’ button (figure 1).
-
Page 35
Mac supports. The recommended format type is ‘Mac OS Extended (Journaled).’ The scheme format dropdown menu lists the available schemes to use (figure 4). figure 3 figure 4 5. Click the ‘Erase’ button. Disk Utility will unmount the volume from the desktop, erase it, and then remount it on the desktop. www.istorage-uk.com… -
Page 36: Datashur Pro Setup For Linux (Ubuntu 18.04 Lts)
EXT4 or other filesystem: 1. Open ‘Show Application’ and type ‘Disks’ in the search box. Click on the ‘Disks’ utility when displayed. 2. Select the datAshur PRO under ‘Devices’. Click on the gears icon and choose ‘Format Partition’ www.istorage-uk.com…
-
Page 37
3. Configure a Volume Name and then select type of formatting you wish to use. EXT4 – compatible with Linux NTFS – Windows Only FAT – compatible with all Operating Systems And then press ‘Next’ and then ‘FORMAT’ 4. After the format process is finished, click to mount the drive to Ubuntu. www.istorage-uk.com… -
Page 38
Linux (Ubuntu 18.04 LTS) It is strongly recommended to right click your drive icon and then click ‘Safely Remove’ in the OS to eject (lock) your datAshur PRO , especially after data has been copied or deleted from the drive. www.istorage-uk.com… -
Page 39: Hibernating, Suspending Or Logging Off From The Operating System
LED will blink twice (2) and the GREEN LED will blink three (3) times. Once the sequence has ended the RED, GREEN & BLUE LED’s will blink together once and then return to Admin mode, a solid BLUE LED. www.istorage-uk.com…
-
Page 40: How To Check Firmware In User Mode
LED will blink twice (2) and the GREEN LED will blink three (3) times. Once the sequence has ended the RED, GREEN & BLUE LED’s will blink together once and then return to the User mode, a solid GREEN LED. www.istorage-uk.com…
-
Page 41: Technical Support
DAMAGED OR RENDERED DEFECTIVE: 1. AS A RESULT OF ACCIDENT, MISUSE, NEGLECT, ABUSE OR FAILURE AND/OR INABILITY TO FOLLOW THE WRITTEN INSTRUCTIONS PROVIDED IN THIS INSTRUCTION GUIDE: 2. BY THE USE OF PARTS NOT MANUFACTURED OR SOLD BY ISTORAGE; 3. BY MODIFICATION OF THE PRODUCT; OR 4. AS A RESULT OF SERVICE, ALTERNATION OR REPAIR BY ANYONE OTHER THAN ISTORAGE AND SHALL BE VOID.
-
Page 42
© iStorage, 2019. All rights reserved. iStorage Limited, iStorage House, 13 Alperton Lane Perivale, Middlesex. UB6 8DH, England Tel: +44 (0) 20 8991 6260 | Fax: +44 (0) 20 8991 6277 e-mail: info@istorage-uk.com | web: www.istorage-uk.com www.istorage-uk.com…

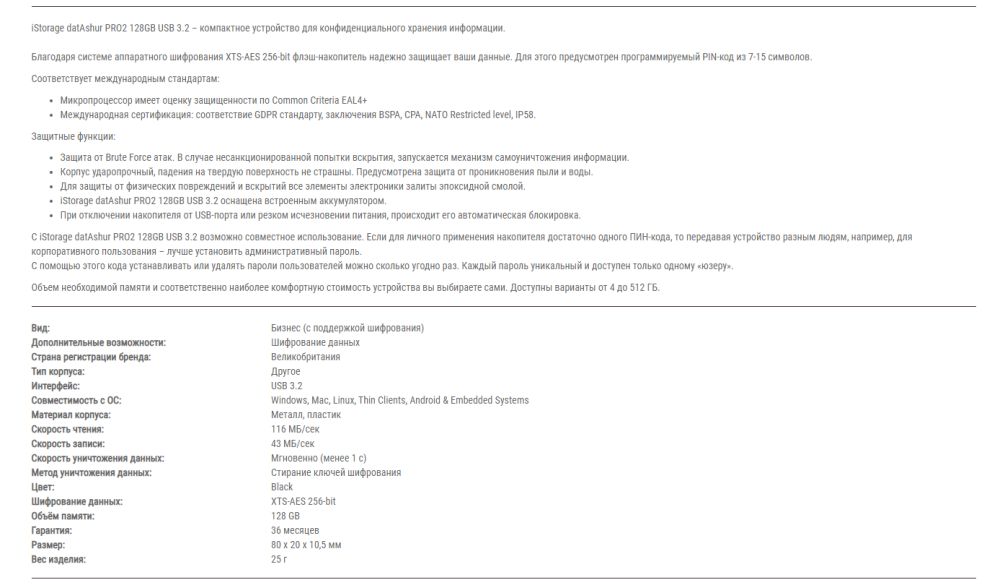
Небольшой обзор флешки iStorage datAshur PRO2 – девайс для желающих защитить свои данные на юсб носителе и не допустить их перехода в чужие руки. Защита от доступа через пароль на клавиатуре, защита от бутфорса, защита от механических повреждений стальным корпусом и защита от сурового взлома благодаря системе аппаратного шифрования XTS-AES 256-bit.
Благодаря моему хобби по написанию обзоров порой ко мне в руки попадают крайне специфичные и даже узкоспециализированные вещи. iStorage datAshur PRO2 не рассчитана на широкую аудиторию и простой пользователь в первую очередь увидит здесь небольшого объема флешку (хотя это опционально и от 4 гб до 512 гб), с посредственной скоростью и с крайне, очень крайне диковатым ценником на нее. Но есть и другая сторона вопроса – если ценность данных на флешке значительно превышает цену самой флешки и есть категорическое желание защитить их даже от технически подкованного негодяя – то iStorage datAshur PRO2 это умеет.
Достаточно редкая ситуация, когда iStorage является брендом Великобритании, а не какой то азиатской страны.
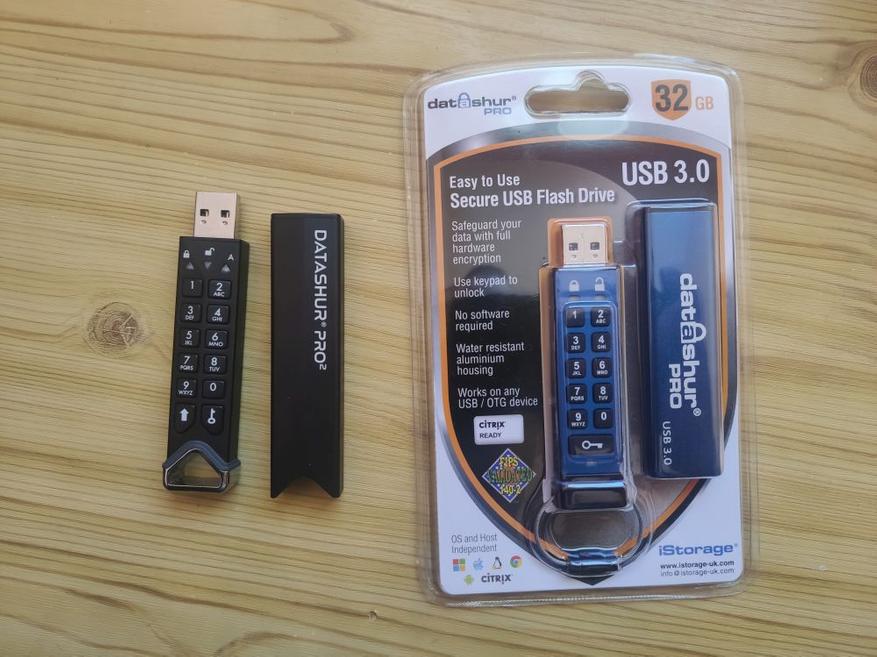
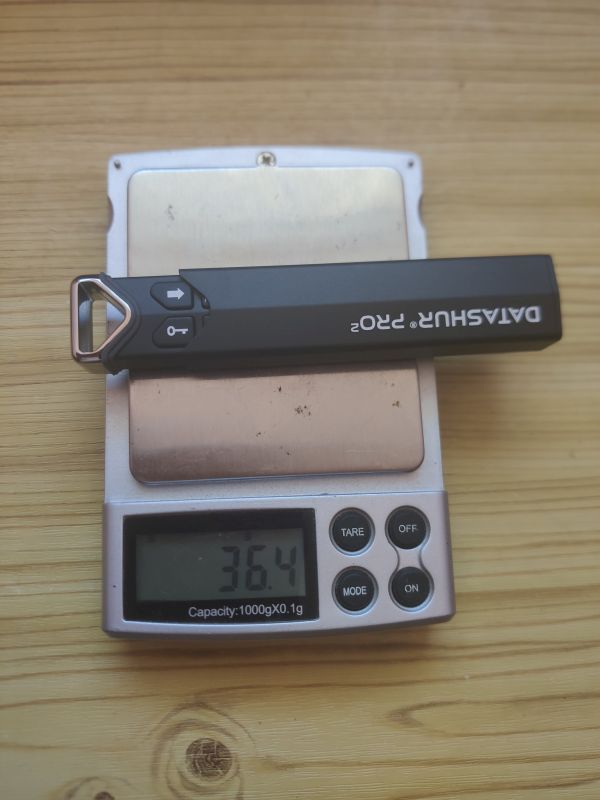
Ко мне на обзор приехала флешка с емкостью в 128 гб и стоимость ее составляет порядка 220 долларов на амазоне – https://www.amazon.com/iStorage-datAshur-PRO2-Secure-Encrypted/dp/B07VK824MW/ref=sr_1_4?keywords=iStorage+datAshur+PRO2+128GB+USB+3.2&qid=1568285628&s=electronics&sr=1-4 или же порядка 300 долларов у меня в стране у официальных дистрибьюторов iStorage https://lockers.com.ua/ru/fleshka-s-shifrovaniem-istorage-datashur-pro2-128gb-usb-3-2/
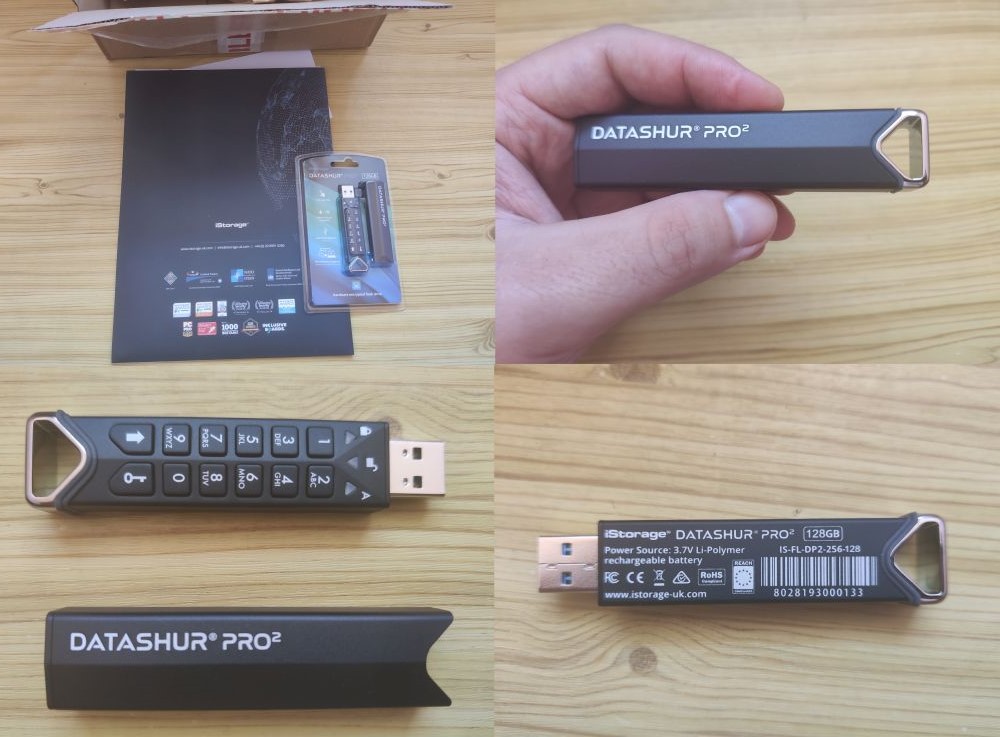
Внешняя скоба крепления из магнитящегося металла, корпус флешки из металла (стыки залиты эпоксидным клеем и это плюсик к вандалоустачивости и параллельно плюсик к влагостойкости), внешняя защита также из металла. Внешний колпачок помимо органичной роли защиты порта также играет роль защиты клавиатуры по время транспортировки. Ведь помним о защите от бутфорса и при попытке вводить неверные пароли, флешка сначала заблокирует пользовательский пин-код, а после 10 неудачных попыток ввести админский пароль – она просто удалит данные, питаясь от аккумулятора внутри.
Отдельно стоит упомянуть заверения о защите от неравномерного износа краски на клавишах iStorage datAshur PRO2, при частом вводе однотипного пароля – специальная краска.
Внутри блистера также находится первичная инструкция для подключения к пк. Сначала задается пароль администратора и после этого уже можно подключать к пк и дальше играться с настройками. Пароль админа также программно ограничен от выбора слишком простой или однообразной комбинации.
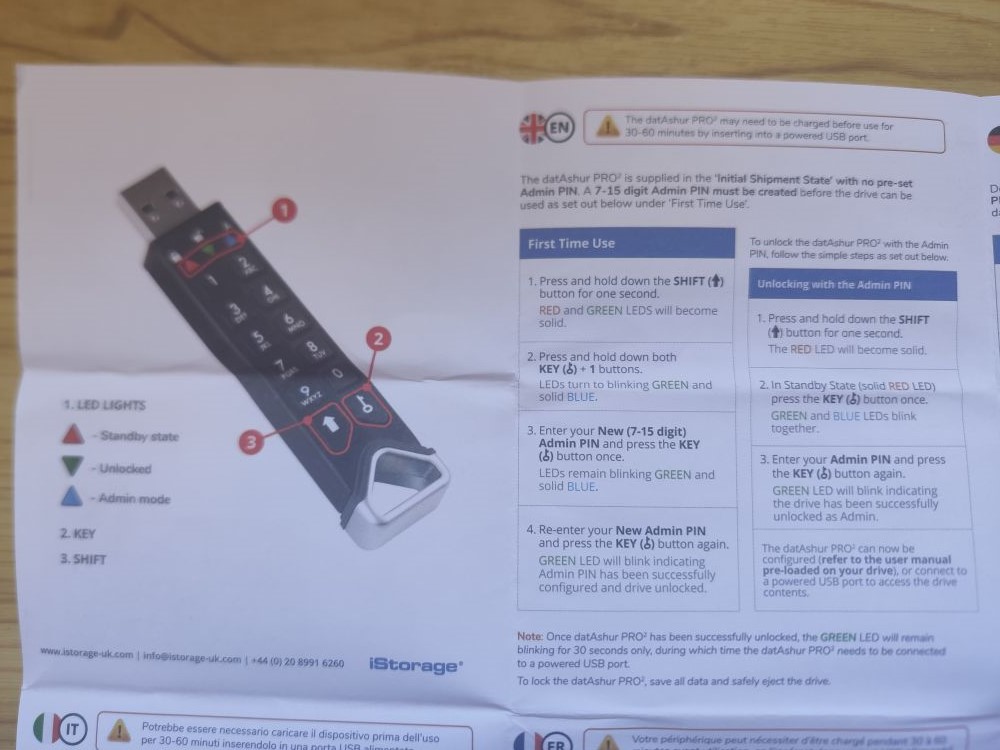
Внутри находится детальная инструкция к iStorage datAshur PRO2 и прочитав внимательно ее можно пойти значительно дальше:
– задать количество знаков для выбора пользовательского пароля – передавая в руки сотруднику и дабы иметь уверенность, что человек не поставит пароль 1234 или 0000;
– задать количество вводов ошибочного пин-кода до блокировки флешки – от 1 и до 10 раз (я так полагаю в зависимости от собственной внимательности и важности данных внутри).


Кстати, не обязательно воткнуть флешку iStorage datAshur PRO2 где то внизу в системный блок и потом согнувшись под столом вводить пароль – здесь же аккумулятор и можно ввести пароль, разблокировать устройство и потом воткнуть в юсб.

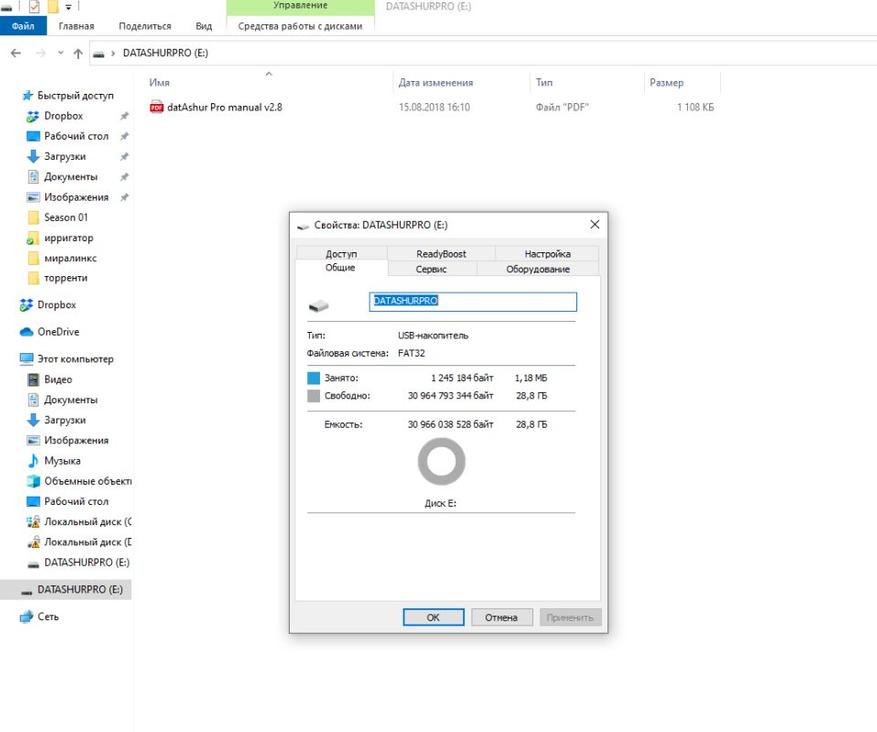
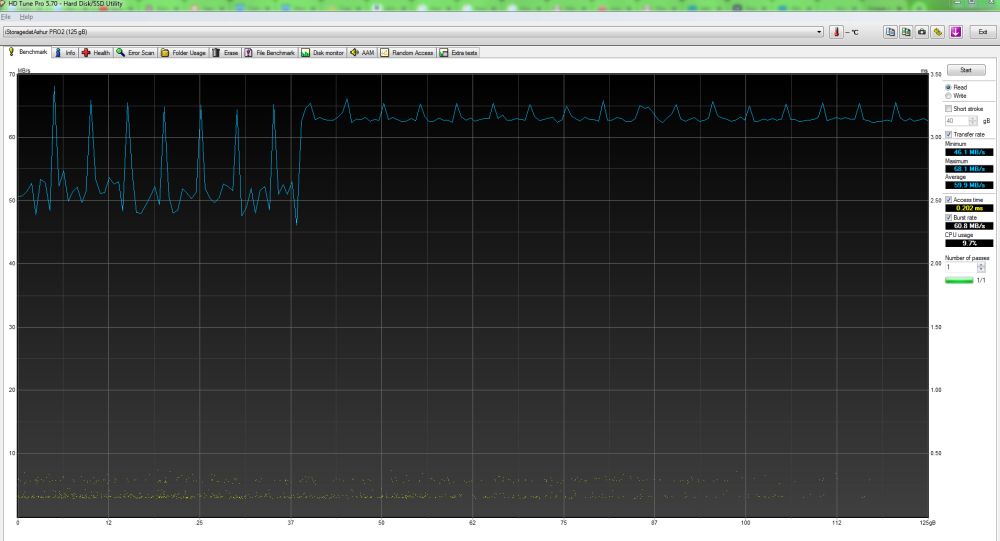
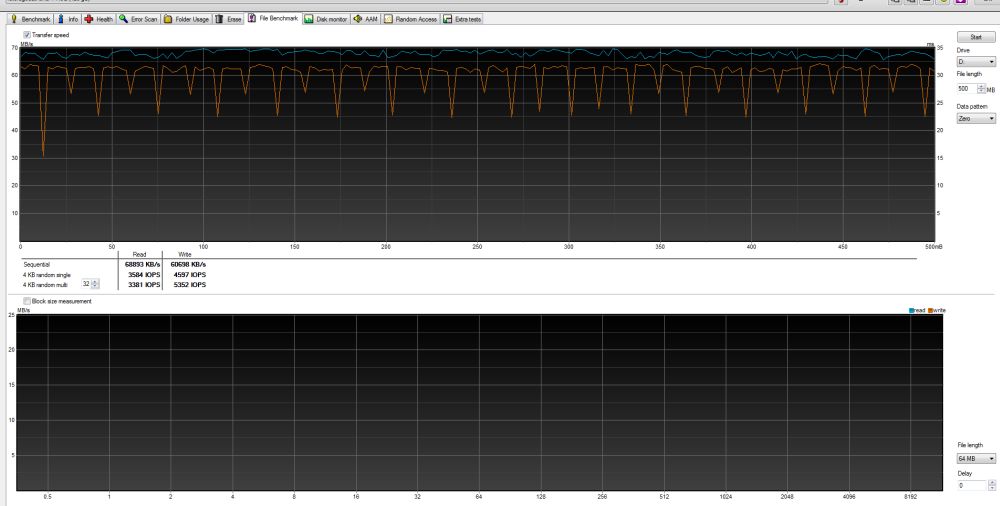
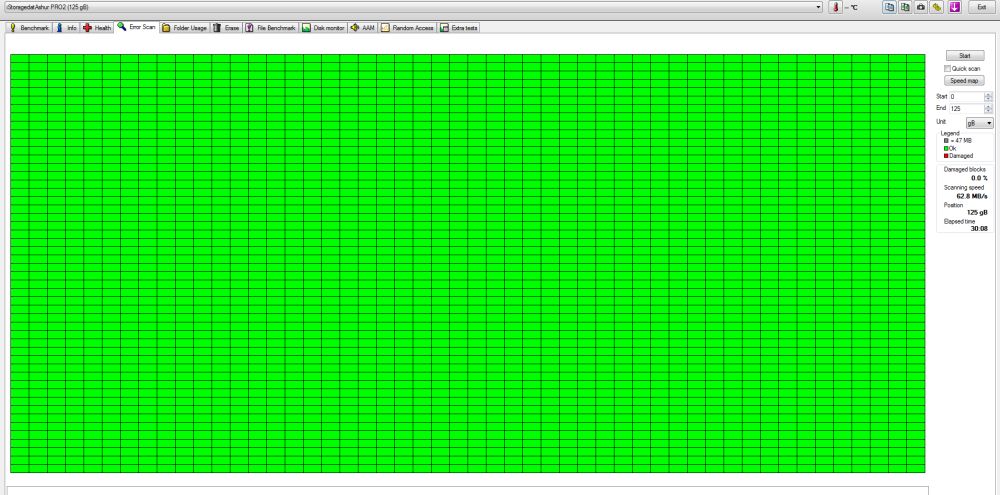
Дальше было некоторое тестирование спецификаций. Как видим, в качестве серьезных данный у меня выступает сезон Фарго (все хотел его посмотреть да недосуг) и также видим, что скорость при передаче больших массивов данных – откровенно посредственная.
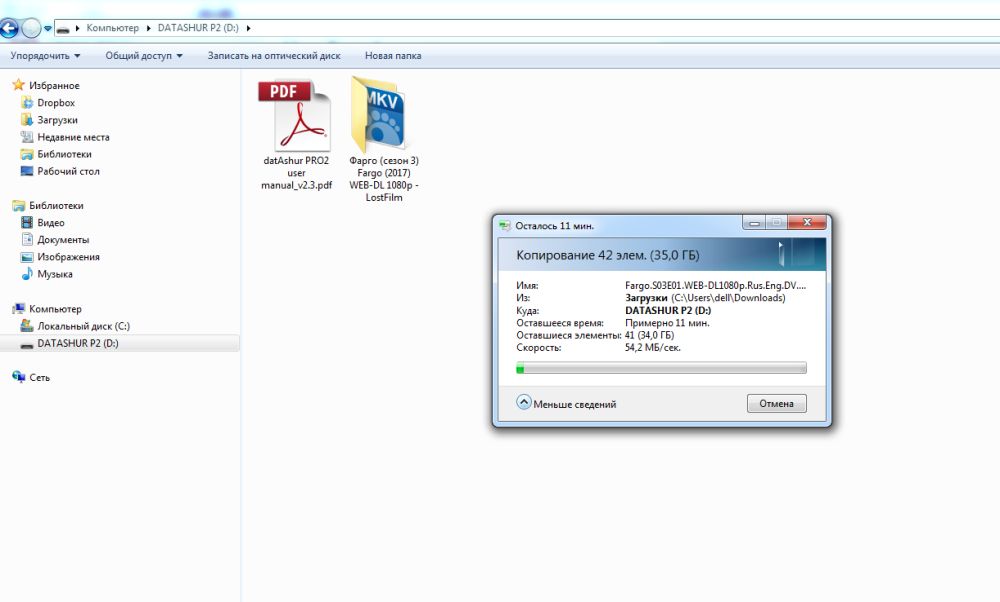
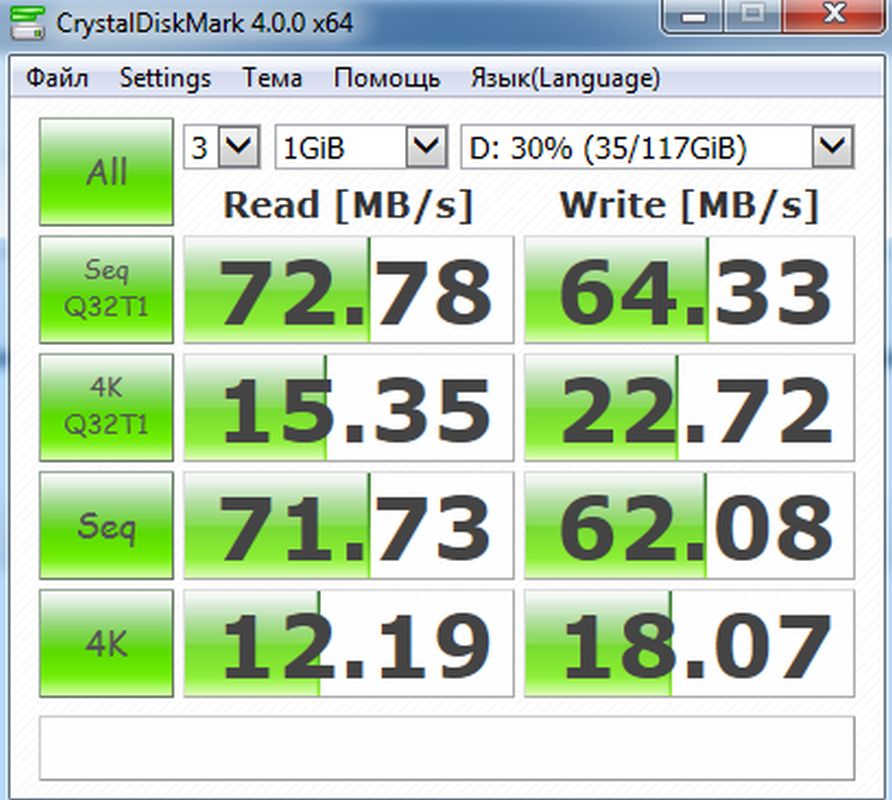
Ниже часть синтетического тестирования – скорость передачи данных с флешкой iStorage datAshur PRO2 и проверка состояния памяти. Никаких проблем не было, равно как и рекордной скорости передачи данных.

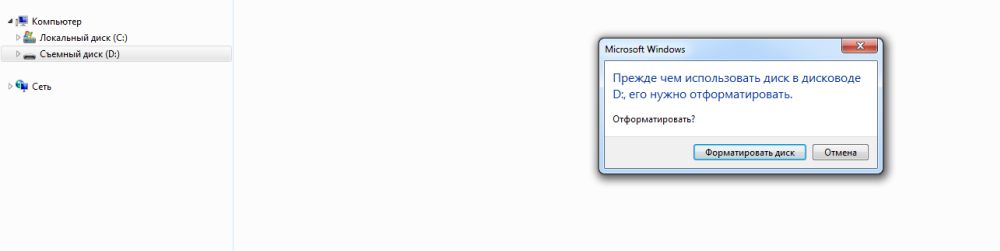
Опробовал также поведение при попытке забутфорсить – это техника “взлома” доступа путем банальной попытки подобрать нужную комбинацию. На удачу или используя популярные комбинации, пытаясь подобрать какой то возможный вариант. И техника защиты сработала, доступа к данным уже нет и не будет больше.
Ниже небольшой видео обзор флешки с шифрованием iStorage datAshur PRO2 и примерами работы
А в качестве выводов отмечу органичное – это девайс больше для корпоративного использования или серьезно обеспокоенных сохранностью своих данных граждан. Если просто туда-сюда мультимеда файлы перекачивать, то в первую очередь видится весьма даже крупный ценник iStorage datAshur PRO2, а если разговор о серьезных данных и необходимости содержать их в безопасности, то в первую очередь будут заметны разные степени защиты данных и приличная реализация.

-
Page 1
Please make sure you remember your PIN (password), without it there is no way to access the data on the drive. If you are having difficulty using your datAshur PRO please contact our support team by email — support@istorage-uk.com or by phone on +44 (0) 20 8991 6260. www.istorage-uk.com… -
Page 2
Copyright © iStorage, Inc 2019. All rights reserved. Windows is a registered trademark of Microsoft Corporation. All other trademarks and copyrights referred to are the property of their respective owners. Distribution of modified versions of this document is prohibited without the explicit permission of the copyright holder. -
Page 3: Table Of Contents
44. Hibernating, Suspending or Logging off from the Operating System ……………….. 39 45. How to check Firmware in Admin Mode ……………………….39 46. How to check Firmware in User Mode ……………………….40 47. Technical Support …………………………….41 48. Warranty and RMA information …………………………41 www.istorage-uk.com…
-
Page 4: Introduction
Please plug in the datAshur PRO to a powered USB port for 30-60 minutes to fully charge the battery. Thank you for purchasing the iStorage datAshur , an ultra-secure and easy to use, hardware encrypted USB 3.2 Gen 1 ®…
-
Page 5: Led Indicators And Their Actions
If the device is connected to a USB port, disconnect it. • If the device is not connected to a USB port, press and hold down the SHIFT ( ) button for a second until the LED turns solid and fades out to the Idle State (off). www.istorage-uk.com…
-
Page 6: First Time Use
• For “Password” press the following buttons: 7 (pqrs) 2 (abc) 7 (pqrs) 7 (pqrs) 9 (wxyz) 6 (mno) 7 (pqrs) 3 (def) • For “iStorage” press the following buttons: 4 (ghi) 7 (pqrs) 8 (tuv) 6 (mno) 7 (pqrs) 2 (abc) 4 (ghi) 3 (def) Using this method, long and easy to remember PINs can be configured.
-
Page 7: Unlocking Datashur Pro With The Admin Pin
LEDs blinking together, several times and then to a solid BLUE enter the Admin PIN and press the KEY ( ) button and changing to a blinking GREEN LED indicating again the drive has been successfully unlocked as Admin www.istorage-uk.com…
-
Page 8: To Enter Admin Mode
LED switches to a solid LED which then fades out to the Idle state. To access the drive contents (data), the datAshur PRO must first be in the idle state (all LEDs off) before an Admin/User PIN can be entered. www.istorage-uk.com…
-
Page 9: Changing The Admin Pin
• For “Password” press the following buttons: 7 (pqrs) 2 (abc) 7 (pqrs) 7 (pqrs) 9 (wxyz) 6 (mno) 7 (pqrs) 3 (def) • For “iStorage” press the following buttons: 4 (ghi) 7 (pqrs) 8 (tuv) 6 (mno) 7 (pqrs) 2 (abc) 4 (ghi) 3 (def) Using this method, long and easy to remember PINs can be configured.
-
Page 10: Setting A User Pin Policy
Blinking GREEN BLUE LEDs will change to a solid GREEN LED and finally to a solid BLUE 3. Press the SHIFT ( ) button once LED indicating the User PIN Policy has been successfully set. www.istorage-uk.com…
-
Page 11: How To Delete The User Pin Policy
LED switches to a solid LED which then fades out to the Idle state. To access the drive contents (data), the datAshur PRO must first be in the idle state (all LEDs off) before an Admin/User PIN can be entered. www.istorage-uk.com…
-
Page 12: How To Check The User Pin Policy
LED switches to a solid LED which then fades out to the Idle state. To access the drive contents (data), the datAshur PRO must first be in the idle state (all LEDs off) before an Admin/User PIN can be entered. www.istorage-uk.com…
-
Page 13: Adding A New User Pin In Admin Mode
LED switches to a solid LED which then fades out to the Idle state. To access the drive contents (data), the datAshur PRO must first be in the idle state (all LEDs off) before an Admin/User PIN can be entered. www.istorage-uk.com…
-
Page 14: Changing The User Pin In Admin Mode
) + 3 buttons Blinking LED will change to a solid 2. Press and hold down both LED and then to a solid BLUE LED indicating SHIFT ( ) + 3 buttons again the User PIN has been successfully deleted www.istorage-uk.com…
-
Page 15: How To Unlock Datashur Pro
Important: Changing the User PIN must comply with the ‘User PIN Policy’ if one has been configured as described in section 8, which imposes a minimum PIN length and whether a ‘Special Character’ has been used. The administrator can refer to section 10 to check the user PIN restrictions. www.istorage-uk.com…
-
Page 16: Creating A One-Time User Recovery Pin
) + 4 buttons Blinking LED will become solid 2. Press and hold down both then switch to a solid BLUE LED indicating that the One-Time User Recovery PIN has been SHIFT ( ) + 4 buttons again successfully deleted www.istorage-uk.com…
-
Page 17: Activating Recovery Mode And Creating New User Pin
Important: The creation of a new User PIN must comply with the ‘User PIN Policy’ if one has been configured as described in section 8, which imposes a minimum PIN length and whether a special character has been used. Refer to section 10 to check the user PIN restrictions. www.istorage-uk.com…
-
Page 18: Set User Read-Only In Admin Mode
1. In Admin mode, press and hold down both “7 + 9” Solid BLUE LED will change to blinking GREEN buttons. BLUE LEDs GREEN BLUE LEDs change to a solid GREEN LED then to a solid BLUE 2. Press KEY ( ) button indicating the drive is configured as Read/Write www.istorage-uk.com…
-
Page 19: Set Global Read-Only In Admin Mode
1. In Admin mode, press and hold down both “5 + 9” Solid BLUE LED will change to blinking GREEN buttons. BLUE LEDs GREEN BLUE LEDs change to a solid GREEN LED then to a solid BLUE 2. Press KEY ( ) button indicating the drive is configured as Read/Write www.istorage-uk.com…
-
Page 20: How To Configure A Self-Destruct Pin
LED switches to a solid LED which then fades out to the Idle state. To access the drive contents (data), the datAshur PRO must first be in the idle state (all LEDs off) before an Admin/User PIN can be entered. www.istorage-uk.com…
-
Page 21: How To Delete The Self-Destruct Pin
GREEN BLUE LEDs alternating 2. Enter the Self-Destruct PIN and press the on and off for a few seconds and finally shifts KEY ( ) button to a solid GREEN LED indicating the datAshur has successfully self-destructed www.istorage-uk.com…
-
Page 22: How To Configure An Admin Pin After A Brute Force Attack Or Reset
In its default state, the datAshur PRO Unattended Auto Lock time-out feature is turned off. The Unattended Auto Lock can be set to activate between 5 — 99 minutes. www.istorage-uk.com…
-
Page 23: Turn Off The Unattended Auto-Lock Clock
LED switches to a solid LED which then fades out to the Idle state. To access the drive contents (data), the datAshur PRO must first be in the idle state (all LEDs off) before an Admin/User PIN can be entered. www.istorage-uk.com…
-
Page 24: How To Check The Unattended Auto-Lock Clock
1. In User mode, press and hold down both “7 + 6” Solid GREEN LED will change to blinking buttons. (7=Read + 6=Only) GREEN BLUE LEDs GREEN BLUE LEDs will change to a solid GREEN LED indicating the drive is configured 2. Press KEY ( ) button as Read-Only www.istorage-uk.com…
-
Page 25: Enable Read/Write In User Mode
• The Recovery PIN, the Admin PIN and all data remain intact and accessible. • The Recovery PIN is deleted. Recovery PIN • The Admin PIN and all data remain intact and accessible. • The datAshur PRO will reset. All PINs and data are deleted and lost Admin PIN forever. www.istorage-uk.com…
-
Page 26: How To Set The User Pin Brute Force Limitation
LED switches to a solid LED which then fades out to the Idle state. To access the drive contents (data), the datAshur PRO must first be in the idle state (all LEDs off) before an Admin/User PIN can be entered. www.istorage-uk.com…
-
Page 27: How To Check The User Pin Brute Force Limitation
LED switches to a solid LED which then fades out to the Idle state. To access the drive contents (data), the datAshur PRO must first be in the idle state (all LEDs off) before an Admin/User PIN can be entered. www.istorage-uk.com…
-
Page 28: How To Perform A Complete Reset
The default setting of the datAshur PRO is configured as non-bootable. iStorage datAshur PRO USB drives are equipped with a bootable feature to accommodate power cycling during a host boot process. When booting from the datAshur PRO…
-
Page 29: How To Disable The Datashur Pro Bootable Feature
NOT configured as Bootable, the following happens; a. All LED’s (RED, GREEN & BLUE) become solid for 1 second. b. All LEDs are off c. All LED’s (RED, GREEN & BLUE) become solid for 1 second. d. LEDs return to solid BLUE www.istorage-uk.com…
-
Page 30: How To Configure The Drive As Removable Or Local Disk
(all LEDs off) before an Admin/User PIN can be entered. 39. How to configure the Drive as Removable or Local Disk iStorage datAshur PRO USB drives can be configured as either “Removable Disk” or “Local Disk” whilst the default setting of the datAshur PRO is configured as a Removable Disk.
-
Page 31: How To Check Whether The Drive Is Removable Or Local Disk
LED switches to a solid LED which then fades out to the Idle state. To access the drive contents (data), the datAshur PRO must first be in the idle state (all LEDs off) before an Admin/User PIN can be entered. www.istorage-uk.com…
-
Page 32: Formatting The Datashur Pro For Windows
2. With the datAshur PRO in standby state (RED LED), press the KEY ( ) button once and enter New Admin PIN to unlock (blinking GREEN LED). 3. Attach the datAshur PRO to the computer. 4. Click on ‘Format Disk’ 5. Click ‘Start’. www.istorage-uk.com…
-
Page 33
6. Click ‘OK’. 7. Wait until the formatting process is complete. The datAshur PRO will be recognised and it is available for use. www.istorage-uk.com… -
Page 34: Datashur Pro Setup For Mac Os
1. Select datAshur PRO from the list of drives and volumes. Each drive in the list will display its capacity, manufacturer, and product name, such as ‘iStorage datAshur PRO Media’ or 232.9 datAshur PRO 2. Click the ‘Erase’ button (figure 1).
-
Page 35
Mac supports. The recommended format type is ‘Mac OS Extended (Journaled).’ The scheme format dropdown menu lists the available schemes to use (figure 4). figure 3 figure 4 5. Click the ‘Erase’ button. Disk Utility will unmount the volume from the desktop, erase it, and then remount it on the desktop. www.istorage-uk.com… -
Page 36: Datashur Pro Setup For Linux (Ubuntu 18.04 Lts)
EXT4 or other filesystem: 1. Open ‘Show Application’ and type ‘Disks’ in the search box. Click on the ‘Disks’ utility when displayed. 2. Select the datAshur PRO under ‘Devices’. Click on the gears icon and choose ‘Format Partition’ www.istorage-uk.com…
-
Page 37
3. Configure a Volume Name and then select type of formatting you wish to use. EXT4 – compatible with Linux NTFS – Windows Only FAT – compatible with all Operating Systems And then press ‘Next’ and then ‘FORMAT’ 4. After the format process is finished, click to mount the drive to Ubuntu. www.istorage-uk.com… -
Page 38
Linux (Ubuntu 18.04 LTS) It is strongly recommended to right click your drive icon and then click ‘Safely Remove’ in the OS to eject (lock) your datAshur PRO , especially after data has been copied or deleted from the drive. www.istorage-uk.com… -
Page 39: Hibernating, Suspending Or Logging Off From The Operating System
LED will blink twice (2) and the GREEN LED will blink three (3) times. Once the sequence has ended the RED, GREEN & BLUE LED’s will blink together once and then return to Admin mode, a solid BLUE LED. www.istorage-uk.com…
-
Page 40: How To Check Firmware In User Mode
LED will blink twice (2) and the GREEN LED will blink three (3) times. Once the sequence has ended the RED, GREEN & BLUE LED’s will blink together once and then return to the User mode, a solid GREEN LED. www.istorage-uk.com…
-
Page 41: Technical Support
DAMAGED OR RENDERED DEFECTIVE: 1. AS A RESULT OF ACCIDENT, MISUSE, NEGLECT, ABUSE OR FAILURE AND/OR INABILITY TO FOLLOW THE WRITTEN INSTRUCTIONS PROVIDED IN THIS INSTRUCTION GUIDE: 2. BY THE USE OF PARTS NOT MANUFACTURED OR SOLD BY ISTORAGE; 3. BY MODIFICATION OF THE PRODUCT; OR 4. AS A RESULT OF SERVICE, ALTERNATION OR REPAIR BY ANYONE OTHER THAN ISTORAGE AND SHALL BE VOID.
-
Page 42
© iStorage, 2019. All rights reserved. iStorage Limited, iStorage House, 13 Alperton Lane Perivale, Middlesex. UB6 8DH, England Tel: +44 (0) 20 8991 6260 | Fax: +44 (0) 20 8991 6277 e-mail: info@istorage-uk.com | web: www.istorage-uk.com www.istorage-uk.com…