-
Contents
-
Table of Contents
-
Bookmarks
Quick Links
LCD S830 Manual Control
Panel
User Manual
The Latest Version 2018
Summary of Contents for EBIKELING LCD S830
-
Page 1
LCD S830 Manual Control Panel User Manual The Latest Version 2018… -
Page 2
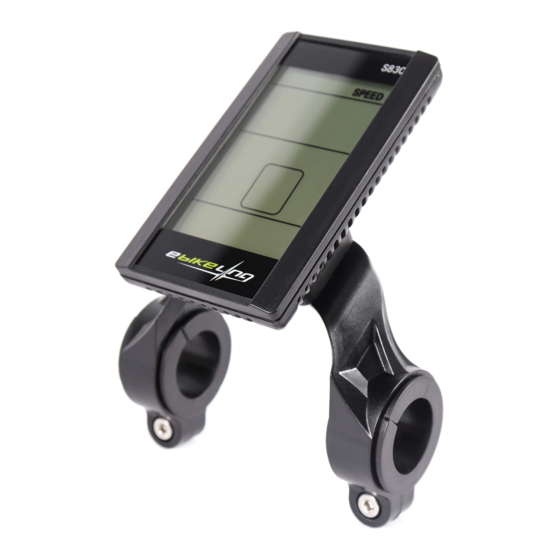
1. Exterior Parameters Casing Material: ABS Display Material: High Hardness Acrylic (the same hardness value as tempered glass). Converter Ring φ 22.2mm 2. Single Supporter 2. Operating Voltage and Connections a. Operating Voltage: DC36v/48V Compatible (set by the control panel). b. -
Page 3
3. Functions a. Display Speed Display, Motor Power Ratio Display, Battery Level Display, Error Indication, Total Mileage, Single Mileage, Single Running Time Light Signal b. Control and Settings Power Switch, 6km/h Inching Control, Wheel Diameter Setting, Top Speed Setting, Time Setting for Auto-Hibernation, Backlight Brightness Setting, Voltage Level Setting c. -
Page 4
3.3 Multi-Functions Display Total Mileage: ODO Single Mileage: TRIP Single Running Time: Time Current Voltage VOL Operating Current: CUR DST: Unspecified 3.4 Vehicle Power PAS Lever 5 Levers Pedal Assist System 3. 5 Speed Display Maximum Speed: MAX Average Speed: AVG Measuring Unit: MPH or KM/H The panel will calculate the actual travelling speed based on the wheel diameter and signal data (number of magnet steel is needed for Hall motors). -
Page 5
3.7 Settings P00: it is Reset all parameter Function: Change the value as 10, then short press the “M” key, the screen will Display all segment, then all parameter will reset to the original value P01: Backlight Brightness (1: darkest; 3: brightest) P02: Mileage Unit (0: KM;… -
Page 6
4. Keys Arrangement of keys on the panel: Introduction of Keys Key operations involve short press, long press and long press of combination keys. Short press is used for short/frequent operations as: 1. Short press the UP or Down Button to change assist power/speed during riding. -
Page 7
Long press or Press Throttle to exit the cruise mode when the vehicle is in cruise mode. Long press to turn on/off backlight 4. Turn on/off the LCD Panel When the display panel is operating, long press and it will be turn off, oth- erwise it will be turned on.
Водонепроницаемый ЖК-дисплей eBikeling S830

Внешние параметры
Материал корпуса: АБС
Материал дисплея: Акрил высокой твердости (такое же значение твердости, как у закаленного стекла).


Один сторонник

Рабочий объемtagе и соединения
а. Рабочий объемtage: DC24V/36V/48V/52V/72V (устанавливается на панели управления).
б. Соединения: водонепроницаемый разъем Julet.
функции
а. дисплей
Отображение скорости, Отображение соотношения мощности двигателя, Отображение уровня заряда батареи, Индикация ошибок, Общий пробег, Один пробег, Один световой сигнал времени работы
б. Управление и настройки
Переключатель питания, 6 км/ч медленного управления, настройка диаметра колеса, настройка максимальной скорости, настройка времени для автоматического перехода в спящий режим, настройка яркости подсветки, громкостьtage Настройка уровня
в. Протокол связи: UART
Отображение показаний (отображение в начале в течение 1 секунды)

Лайт
(дополнительная функция)

Уровень батареи

Многофункциональный дисплей
- Общий пробег: ОДО
- Один пробег: ПОЕЗДКА
- Одиночное время работы: время
- Текущий объемtagе: ТОМ
- Рабочий ток: CUR

Уровень мощности автомобиля PAS
- Доступны режимы 3/5/9 передач.
- По умолчанию это пять (5) передач.

Дисплей скорости
- Максимальная скорость: МАКС.
- Средняя скорость: СРЕДНЯЯ
- Единица измерения: мили в час или км/ч

Панель рассчитает фактическую скорость движения на основе диаметра колеса и данных сигнала (для двигателей Холла требуется количество магнитной стали).
Статус автомобиля
![]() Ускорение ходьбы до 6 км/ч
Ускорение ходьбы до 6 км/ч
Поездка с электроприводом
тормоз
Отказ мотора
 Круиз в реальном времени
Низкая батарея
Отказ контроллера
Отказ дроссельной заслонки
параметры
Чтобы перейти к параметрам, одновременно нажмите и удерживайте «стрелку вверх и вниз» в течение примерно 5 секунд в течение 8 секунд после включения комплекта.
P01: Яркость (1 — самая темная, 3 — самая яркая)
Р02: 0 – км, 1 – миля
P03: Voltage grades; 24V/36V/48V/52V/72V
P04: Время сна. 0 означает, что ЖК-экран никогда не выключится в режиме энергосбережения, другие цифры означают время сна (1-60 мин).
P05: оценки ПАС.
3: 3 уровня скорости как для газа, так и для PAS
5: 5 уровня скорости как для газа, так и для PAS
9: 9 уровня скорости как для газа, так и для PAS
P06: Размер колеса. Единица измерения: дюйм Точность: 0.1
Единица размера колеса, указанная в дюймах, должна быть установлена правильно.
P07: Диапазон: 1-100
Это 46 для двигателей с прямым приводом (1200 Вт и выше) и 01 для двигателей с редуктором (500–750 Вт).
P08: Speed Limit
Диапазон: 0-50 км/ч, 100 означает отсутствие ограничений
Лимит устанавливается в км и не может быть переключен на мил. Поэтому тщательно рассчитывайте его, когда устанавливаете лимит.
Статус связи (управляется контроллером): Скорость движения остается такой же, как и те, которые мы установили. Случайная ошибка: ±1 км/ч. (Ограничение скорости действует как для PAS, так и для дроссельной заслонки)
Примечание: Эти данные основаны на КМ. При изменении км на милю значение скорости на экране автоматически преобразуется в правильные мили, но если вы не измените настройку ограничения скорости с км на милю, оно будет отличаться от реального ограничения скорости в милях.
P09: Настройка нулевого и ненулевого запуска:
Нулевой пуск (0) мгновенно включает двигатель, а ненулевой пуск (1) дает некоторую задержку при дросселировании.
P10: Настройка режима вождения
0: Силовой привод — конкретная передача вспомогательного привода определяет значение вспомогательной мощности. В этом состоянии дроссельная заслонка не работает.
1: Электрический привод — автомобиль приводится в движение рулем. В этом состоянии силовая передача не работает.
2: Power Drive + Electric Drive — Электропривод не работает в состоянии нулевого пуска.
P12: Диапазон интенсивности вспомогательной мощности: 0-5
Более низкое значение обеспечивает небольшую помощь, когда вы начинаете крутить педали.
P13: Силовой магнит стальной номер.
Есть 3 вида: 5, 8 и 12. Точки на магнитном кольце. В нашей системе по умолчанию 12.
P14: Ограничение тока контроллера
Первоначальный ток 12А. Диапазон: 1-20А
Пожалуйста, проверьте ток, который может выдержать ваш контроллер и мотор-концентратор. Установите лимит соответственно.
PS: Последние версии дисплеев SW900 и S830 регулируют ток автоматически.
P16: Обнуление ODO: нажмите и удерживайте верхнюю клавишу в течение 5 секунд, и ODO обнуляется. Используйте эту опцию для сброса ODO.
Примечание. Когда вы устанавливаете P09 на 0, независимо от того, устанавливаете ли вы P10 на 0, 1 или 2, и дроссельная заслонка, и PAS могут запускать систему и работать.
Когда вы устанавливаете P09 как 1 и P10 как 0, только PAS может запустить систему.
Когда вы устанавливаете P09 как 1 и P10 как 1, дроссельная заслонка и PAS не будут работать.
Когда вы устанавливаете P09 как 1 и P10 как 2, только PAS может запустить систему, тогда дроссельная заслонка будет работать.
Ключи
Расположение клавиш на панели:

Введение ключей
Ключевые операции включают короткое нажатие, длительное нажатие и длительное нажатие комбинации клавиш.
Короткое нажатие используется для коротких/частых операций, таких как:
- Коротко нажмите кнопку «Вверх» или «Вниз», чтобы
 изменить вспомогательную мощность / скорость во время езды.
 - Короткое нажатие на кнопку «М»
 для переключения показаний в секции многофункционального дисплея.
Длительное нажатие на одну клавишу используется для переключения режима/включения/выключения состояния.
Длительное нажатие на комбинированные клавиши для установки параметров позволяет избежать ошибочных действий (короткое нажатие на комбинированные клавиши отключено, так как легко вызвать неправильную работу и трудно манипулировать).
Подробные инструкции
- Изменение силы помощи.
а. Короткое нажатие сила помощи +1.
б. Короткое нажатие вспомогательная сила -1.
 - Отображение скорости переключения
Длительное нажатие для переключения типа отображения скорости.
 - Включить / отключить круиз со скоростью 6 км / ч, установить круиз в реальном времени и включить / выключить свет.
Когда автомобиль припаркован, нажмите и удерживайтедля входа в круизный режим 6 км/ч.
Когда автомобиль движется, нажмите и удерживайтечтобы войти в режим круиза в реальном времени.
Длительное нажатие или включите дроссельную заслонку, чтобы выйти из круизного режима.
Длительное нажатиевключить/выключить подсветку. - Включить/выключить ЖК-дисплей
Когда панель дисплея работает, нажмите и удерживайтеи он будет выключен, иначе он будет включен. - Переключение отображаемых показаний в многофункциональной секции
Короткое нажатиедля переключения показаний, показанных в многофункциональном разделе. - Установить параметры
Длительное нажатие+ для входа в интерфейс настроек.
В интерфейсе настроек короткое нажатиеor для изменения значения параметра, который будет мигать после изменения. После выбора параметра, который необходимо установить,
- Короткое нажатие для переключения на следующий параметр, при этом ранее установленное значение будет сохранено.
- Нажмите + для выхода из настройки и сохранения параметров.
- Без этой операции система автоматически выйдет и сохранит измененные параметры через 10 секунд.
Примечание: Из-за обновления продукта приобретенный вами продукт может немного отличаться от описаний в этом руководстве пользователя, это не повлияет на нормальное использование.
- Короткое нажатие
Документы / Ресурсы
Требуется руководство для вашей Twitter S830 Велокомпьютер? Ниже вы можете просмотреть и загрузить бесплатно руководство в формате PDF. Кроме того, приведены часто задаваемые вопросы, рейтинг изделия и отзывы пользователей, что позволит оптимально использовать ваше изделие. Если это не то руководство, которое вы искали, – свяжитесь с нами.
Ваше устройство неисправно, и в руководстве отсутствует решение? Перейдите в Repair Café для получения бесплатных ремонтных услуг.
Руководство

Рейтинг
Сообщите нам, что вы думаете о Twitter S830 Велокомпьютер, оставив оценку продукта. Хотите поделиться вашими впечатлениями от данного изделия или задать вопрос? Вы можете оставить комментарий в нижней части страницы.
Довольны ли вы данным изделием Twitter?
Да Нет
Будьте первым, кто оценит это изделие
0 голоса
Часто задаваемые вопросы
Наша служба поддержки выполняет поиск полезной информации по изделиям и отвечает на часто задаваемые вопросы. Если вы заметили неточность в наших часто задаваемых вопросах, сообщите нам об этом с помощью нашей контактной формы.
Зачем нужно указывать размер колеса? Проверенный
Для расчета пробега велокомпьютер использует количество оборотов колеса. Пробег равен количеству оборотов, умноженному на размер колеса.
Это было полезно (3998)
Аккумулятор в моем устройстве окислился, могу ли я его безопасно использовать? Проверенный
Ja, устройство все еще можно безопасно использовать. Во-первых снимаем оксидизд АКБ. Никогда не используйте для этого голые руки. Затем протрите батарейный отсек ватным тампоном, смоченным уксусом или лимонным соком. Дайте ему высохнуть и вставьте новые батарейки.
Это было полезно (675)
Сколько миль в одном километре? Проверенный
1 километр равен 0,621 мили. 10 километров равны 6,21 мили. 1 миля равна 1,609 километра. 10 миль равны 16,09 километра.
Это было полезно (670)
Menu Operation
Hold the M button pressed for 5-6 seconds to turn the LCD Display On and Off.
Press and hold the UP and DOWN arrows at the same time for about 5-6 seconds to enter configuration menu. Parameter P01 will show up on the screen below in the speed section. Parameter value will be present the odometer section.
Use Up and DOWN arrows to change value.
Short press M button to navigate between parameters (P01-P16).
Press and hold the UP and DOWN arrows at the same time for about 5-6 seconds to exit configuration menu
After 10 seconds of inactivity, configuration will automatically be saved and exited.
Parameters
P01 Back light Brightness
1-3, Higher is brighter.
Brightness of the display in low light (night).
P02 Unit of Measurement
0 for Kilometers, 1 for Miles
Sets the displayed unit of measurement for odometer and speed.
P03 Battery/Controller Voltage
24/36/48/52/60/72 volts.
Sets battery voltage. This should match the output of your battery. Used to calibrate battery level indicator.
P04 Inactivity Timeout
0-60 minutes, 0 disables inactivity timeout.
Automatically sets display/controller to sleep after a given time of inactivity.
P05 PAS Levels
0 or 1
0 = 3 Levels, 1 = 5 Levels
Sets of the number of Pedal Assist System (PAS) levels available. More levels = finer control over amount of assistance given by the motor.
P06 Wheel Size
Diameter In Inches, Precision 0.1
Sets the wheel size of the bicycle in inches. Correct wheel size is required for accurate speed and odometer function.
P07 Motor Speed Magnet Type
0-100
Set to 47 for direct drive motor, 100 for geared motors. Some brands may require 86 instead of 100 for their geared motors.
P08 Speed Limiter
0-100 km/h, 100 for unlimited
Shuts off motor when the speed exceeds above set limit. This parameter’s value is always in km/h, so a mph limit must first be converted to km/h first!
P09 Throttle Response
0 for instant throttle, 1 for delayed throttle
Sets whether pressing throttle and motor beginning to spin is instant, or whether there is a delay between the actions.
P10 Throttle Mode
0 = PAS Only, 1 = Throttle Only, 2 = Both PAS and Throttle
Sets which sensors are used for throttle control.
P11 PAS Sensitivity
1-24, Higher = more sensitive
Sets how sensitive PAS is to movement of the pedals.
P12 PAS Start Strength
0-5, Higher = more assistance
Amount of assistance given when you start pedaling.
P13 PAS Magnet Type
5, 8, 12. Determined by magnets (dots) on PAS ring.
Sets PAS ring magnet type as determined by the number of magnets on the ring.
P14 Controller Current Limit
1-20 Amps, some versions of sw900/controller allow higher values.
Sets the current (amp) limit of your controller. Setting this value to something higher than your controller or motor can handle may cause damage!
P15 Not Implemented
This parameter is unused
P16 Odometer (ODO) Reset
Press and hold UP button for 5 seconds to reset ODO counter to zero. Some controllers may not support this feature.
Subscribe to our emails
Be the first to know about new collections and exclusive offers.

2000w kit basic Instructions
Scroll down all the way for the controller wiring diagram.
important — the torque arm that comes with your kit is of the upmost importance, install it or we guarantee you’ll regret it eventually if not immediately.
torque arm installation tutorial (skip to 18:10) : https://youtu.be/Ex0UbXV7wvg
1. Take the wheel out of the box, screw the freewheel onto the wheel. Install your inner-tube and tire onto the wheel (new or from your old rear wheel). Remove your wheel’s old brake disc and transfer it to the new wheel. inflate your tire to higher than your bike would usually run on (because of the extra weight).
After removing your old rear wheel from the frame, get the frame upside down on the floor.
Temporarily take off your brake callipers (part attached to the frame near the wheel, not your brake levers).
Carefully and patiently (maybe even with the help of someone else) put your new wheel onto the frame, making sure to not damage the cable. Use the spacers already on the wheel to appropriately position the wheel so that no part of the wheel that spins is rubbing against your frame. There’s also a few more spacers inside the kit if needed, but most people won’t. Take your time with this process, for some it will be a 30 second task but some also may get frustrated, take it slow.
Then after the wheel is in place and tightened, re-install the brake callipers you took off previously. You may realise that the spacing for the callipers is off, in this case you’ll need to add or remove spacers onto the wheel’s dropout to get the positioning right, so it’s good to pay attention to the spacing required by the brakes when positioning the wheel the first time around.
After the wheel and brake clippers are installed and you are happy with their position, secure the motor’s wire to the frame with zip-ties, making sure that the wire is not touching the disc or any moving part of the wheel and isn’t in danger of doing so in the future.
INSTALL YOUR TORQUE ARM, please.
torque arm installation tutorial (skip to 18:10) : https://youtu.be/Ex0UbXV7wvg
2. Install everything that goes on your handle bar (display, throttle, brake levers or brake sensors if you have bought hydraulic brake sensors)
hydraulic brake sensor tutorial : https://youtu.be/IvDURsQJA64
3. place controller in either the provided free controller bag. Bring the connectors out of the controller bag’s hole on one side. Now, wire everything together. Ignore the two single blue wires and small two wire white connector (the two blue wires are for limiting the power off the controller to 250W, so make sure you leave those two disconnected from each other, the other connector is a headlight connector if you wish to have a headlight for your bike in the future) also ignore the PAS connector if you aren’t planning on installing a pedal assist sensor.
if you are going to install a pedal assist (PAS) sensor, here is a youtube tutorial.
D12 PAS tutorial : https://youtu.be/vFYyvEu9WR8
connect all the wiring (except for battery) and make sure to double check everything. Connectors only connect one way and so you can’t get any connections wrong, but make sure there aren’t any loose connections or broken wires. Avoid bending wires too much.
4. Install the battery’s base plate onto the frame. Then connector the wire from the base plate to your controller (while the battery is still disconnected from the whole bike).
5. Switch off your battery from the small switch on the battery itself, put the battery on the bike and lock it. Now you can turn the battery on. This is done because if the battery was on when you were putting it on and locking it, it could have caused sparking at the controller or battery terminals. So we always recommend switching off the battery whenever you are taking it off or putting it on the bike.
After the battery is on the frame and switched on, press and hold the middle button of the display’s controller to switch the bike on. For the first time, you’ll have to set up the display/controller’s settings. These are things like wheel diameter, voltage and measurement unit. The manual for the display’s settings and error codes are below.
After setting those, you’re ready to go. Put the bike into power level 1,2,3,4 or 5 by using the up and down arrows of the displays control and you can move off. keeping the bike on power level 0 when you are stationary is a good idea to prevent accidental acceleration (because its not impossible to accidentally twist the throttle).
Enjoy!
SETTINGS
P01: Display Brightness (1: darkest; 3: brightest)
P02: Mileage Unit (0: KM; 1: MILE)
P03: Voltage: 24V /36V / 48V / 52V (set to 52 if you have a 2000w kit)
P04: Hibernation Time — After how many minutes of idleness the screen should automatically shut down. (0 = never)
P05: «Gear/Power» Levels – 0 = 3 Modes: 1 = 5 Modes
P06: Wheel Diameter (Unit: inch) Precision: 0.1
P07: Motor Magnet Number: 1-100 (Set to 46 if you have a 2000w kit)
P08: Speed Limit (km/h) — Highest parameter indicates no speed limit.
P09: Zero / Non-zero Start Setting:
0: Zero Start — Throttle works from a standstill
1: Non-zero Start — Bike must be moving for throttle input to work
P10: Drive Mode Setting
0: PAS Drive – Only pedal assist will be taken as input. In this status the throttle input does not work.
1: Throttle Drive – The vehicle is driven by the throttle. In this status the PAS (pedal assist) input does not work.
2: PAS + Throttle – Both pedal assist and throttle are taken as input. (if in «zero start» throttle input will not work from a standstill.
P11: PAS sensitivity — Range: 1-24 (24 is softest setting using least power)
P12: PAS Intensity Range: 0-5
P13: PAS Magnet Number — number of magnets on your pedal assist sensor.
P14: Current draw limit — Set to about 40 if you are using the 2000w kit
P16: Odometer reset : Long press the upper key for 5 seconds and ODO will reset to zero.
| S830 Error Codes. | |
|---|---|
| 1 | Save. |
| 2 | Brakes are active (Not an error, just an indication of when brakes are active) |
| 3 | PAS issues (at specific mode). |
| 4 | 6 km/h cruising. (Not an error, only supported on certain controllers) |
| 5 | Real-time cruising. (Not an error, only supported on certain controllers) |
| 6 | Battery voltage is low. |
| 7 | Motor issues. (Check hall sensor/ motor wires) |
| 8 | Throttle issues. |
| 9 | Controller issues. |
| 10 | Communication receiving issues. (Between controller and display) |
| 11 | Communication transmitting issues. (Between controller and display) |
| 12 | BMS communication issues. |
| 13 | Headlight issues. |

