Код: 31465
Извините, товара сейчас нет в наличии

Бесплатная доставка
по Красноярску
Извините, товара сейчас нет в наличии
Услуги:
Новости интернет-магазина «Лаукар»:
Дополнительная информация в категории Духовой шкаф:
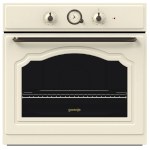
В интернет-магазине бытовой техники «Лаукар» Вы можете скачать инструкцию к товару Духовой шкаф Gorenje BO 73 CLI совершенно бесплатно.
Все инструкции, представленные на сайте интернет-магазина бытовой техники «Лаукар», предоставляются производителем товара.
Перед началом использования товара рекомендуем Вам ознакомиться с инструкцией по применению.
Для того чтобы скачать инструкцию, Вам необходимо нажать на ссылку «скачать инструкцию», расположенную ниже, а в случае, если ссылки нет,
Вы можете попробовать обратиться к данной странице позднее,
возможно специалисты интернет-магазина бытовой техники «Лаукар» еще не успели загрузить для скачивания инструкцию к товару:
Духовой шкаф Gorenje BO 73 CLI.

Фирма-производитель оставляет за собой право на внесение изменений в конструкцию, дизайн и комплектацию товара: Духовой шкаф Gorenje BO 73 CLI. Пожалуйста, сверяйте информацию о товаре с информацией на
официальном сайте компании производителя.
Бесплатная доставка
По Москве и большинству городов России
Подробнее
Бесплатное подключение
Профессионально установим технику на готовые коммуникации
Подробнее
Бесплатное хранение
До 365 дней — купите сегодня, а получите когда удобно
Подробнее
Простой возврат и обмен
Что-то не так? Обменяем товар или вернем деньги
Подробнее
- Manuals
- Brands
- Gorenje Manuals
- Oven
- Classico BO73CLI
- Instructions for use manual
-
Contents
-
Table of Contents
-
Bookmarks
Quick Links
Instructions for Use
GB IE MT
Related Manuals for Gorenje Classico BO73CLI
Summary of Contents for Gorenje Classico BO73CLI
-
Page 1
Instructions for Use GB IE MT… -
Page 3
ELECTRIC OVEN Dear customer! We sincerely thank you for your purchase. We believe you will soon fi nd ample evidence that you can really rely on our products. To make the use of the appliance easier, we attach these comprehensive instruction manual. The instructions should aid you in getting familiar with your new appliance. -
Page 4: Table Of Contents
TABLE IMPORTANT — READ BEFORE USING THE APPLIANCE ……….5 Safety percautions ……………………5 Warnings……………………….6 Appliance purpose ……………………6 APPLIANCE DESCRIPTION ………………..7 Cooling fan ……………………….8 Control lamps ……………………..8 Program timer ……………………..8 THE OVEN ……………………. 9 Before using the oven for the fi rst time …………….9 Important warnings ……………………9 Electronic program timer ………………….
-
Page 5: Important — Read Before Using The Appliance
IMPORTANT — READ BEFORE USING THE APPLIANCE Safety percautions • This appliance can be used by children aged from 8 years and above and persons with reduced physical, sensory or metal capabilities or lack of experience and knowledge if they have been given supervision or instruction concerning use of the appliance in a safe way and understand the hazards involved.
-
Page 6: Warnings
Warnings • The appliance may only be connected to the power mains by an authorized service technician or expert. • Tampering with the appliance or non-professional repair thereof may result in risk of severe injury or damage to the product. Any repairs may only be carried out by an authorized service technician or expert.
-
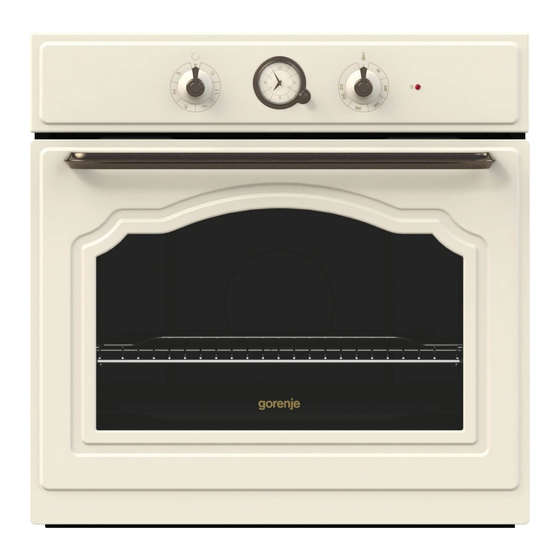
Page 7: Appliance Description
APPLIANCE DESCRIPTION The fi gure represents one of the appliance models. Since a group of appliances to which these instructions apply, have diff erent features, the instruction manual may describe functions and equipment that may not be available in your appliance. Control panel 2.
-
Page 8: Cooling Fan
(only with some models) Cooling fan The appliance features a built-in cooling fan which cools the appliance housing and control panel. Control lamps Red lamp The red lamp is lit when heaters in the oven are operating; when the selected temperature is reached, the lamp goes off .
-
Page 9: The Oven
THE OVEN Before using the oven • Remove all accessories from the oven and clean them with for the fi rst time warm water and a conventional detergent. Do not use abrasive cleaning aids. • When the oven is heated up for the fi rst time, a specifi c odor of a “new appliance”…
-
Page 10: Electronic Program Timer
ELECTRONIC PROGRAM TIMER A Function selection knob 1 Oven delayed start 2 End oven operation 3 Minute minder 4 Time display 5 Clock • Select the time settings by consecutively pressing the (A) knob. Selected symbol will fl ash on the display. Rotate the (A) knob to set the function and press to confi…
-
Page 11: Oven Operation With Program Timer Settings
• In order for the oven to operate, press the (A) knob and hold it for two seconds. Time display will stop fl ashing. • The oven can be used without restrictions if no timer settings are made. Oven operation with Program timer can be used to program oven operation in program timer settings two ways:…
-
Page 12: Setting The Minute Minder
and confi rm it by pressing the (A) knob. The symbol for the end of operation will start to fl ash (2). • Set the stop time: Rotate the (A) knob to set the stop time and confi rm it by pressing the (A) knob. •…
-
Page 13: Operating The Oven
Operating the oven The oven is operated by the on/off and operation mode selection knob and the temperature setting knob / dial. Note: When using the operation mode Large grill or Grill , set the temperature selection knob to the position indicated as appropriate for these two operation modes.
-
Page 14: The Oven May Be Operated In The Following Modes
The oven may be Oven lighting operated in the With some models, there are two interior lighting lamps: following modes one on the upper part of the back wall, and the other, additional lamp on middle of the right side wall. Oven lighting can be selected independently, without selecting another function.
-
Page 15
Hot air and lower heater With this operation mode, the lower heater and the hot air fan operate simultaneously. This is particularly convenient for making pizza. Also ideal for moist or heavy pastry, fruit cakes made of leavened dough, short pastry, or cheesecakes. -
Page 16: Shelf Levels (Depending On The Model)
Lower heater / Aqua Clean The heat is only radiated by the heater installed in the bottom of the oven. Select this operation mode when you wish to bake / cook the bottom side of the dish more thoroughly (e.g. for moist pastry with fruit fi lling). Set the temperature with the temperature selection knob / dial.
-
Page 17: Telescopic Pull-Out Guides (Depending On The Model)
Telescopic pull-out Telescopic (pull-out or, retractable) guides are installed guides (depending on for the second, third, and fourth level. They are installed the model) on the left and right side wall of the oven interior at three levels. Pull-out levels consist of (depending on the model): — three guides that can be pulled out partially, — one guide that can be pulled out completely and two that can be pulled out partially, or…
-
Page 18: Food Preparation
FOOD PREPARATION Baking pastry • For baking pastry, use the . mode of operation. (Oven operation with the selected mode, or system, depends on the appliance model). • When baking pastry, always remove the fat fi lter. Instructions • When baking pastry, always observe the instructions on the shelf / guide level, temperature, and cooking time indicated in the pastry baking table.
-
Page 19
baking in several baking trays simultaneously – on two or even three levels, baking time for each tray can e diff erent. You may have to remove one of the trays sooner (normally, this would be the uppermost tray. • If possible, prepare bite-size pastry, such as cupcakes, in the same thickness and height. -
Page 20
Pastry baking table for combined upper and lower heater or hot air operating mode — when cooking on one level only Type of pastry Guide Temperature Guide Temperature Cooking (from the (°C) (from the (°C) time bottom) bottom) (minutes) Sweet pastry Marble cake, ring cake 160-170 150-160… -
Page 21
Settings table for baking pastry with hot air and lower heater Type of pastry Guide (from the Temperature (°C) Cooking time bottom) (minutes) Cheesecake (750g cheese) — 150-160 65-80 short pastry Pizza * — leavened dough 15-20 200-210 Quiche Loraine — short crust 180-200 35-40 dough… -
Page 22
Pastry baking table for upper and lower heater with fan operating mode Type of pastry Guide Temperature (°C) Cooking time (from the bottom) (minutes) Sweet pastry Marble cake, ring cake 150-160 50-60 Rectangle-shaped cake 150-160 55-65 Cake made in cake tin 150-160 45-55 Cake tin cheesecake… -
Page 23: Cooking / Roasting Meat
Cooking / roasting • To cook meat, use the operating modes meat • Data printed in bold represent the most appropriate operation mode for a particular type of meat. • When cooking meat, the use of the fat fi lter is recommended (depending on the model).
-
Page 24
Meat cooking table for upper/lower heater combination or with hot air — when cooking on one level only Type of meat Weight Guide Tempera- Guide Tempera- Cooking (from ture (°C) (from bot- ture (°C) time bottom) tom) (min.) Beef Beef roast 1000 190-210 180-190… -
Page 25: Grilling And Browning
Grilling and browning • When grilling meat, you should be particularly careful. The high temperatures and infra heater heat the grid and other parts of the oven to very high degrees; use protective kitchen gloves and special meat tongs. • Hot fat may squirt out of pierced meat (e.g. from sausages).
-
Page 26
Spit roasting (only with some models) • The rotating roast spit set consists of a rotating spit with a detachable handle and two forks with screws for fi xing the meat chunk. • When using the roast spit, fi rst insert the special support frame into the third guide from the bottom. -
Page 27
Cooking table — Large grill Type of food Weight Guide level Temperature Temperature Cooking time (from bot- (°C) (°C) (min) tom) Meat and sausages 4 beef loin chops, rare 180g/pc 14-16 Level 4 beef loin chops, medium “ 16-20 4 beef loin chops, well done “… -
Page 28: Preservation
Cooking table — grill Food type Weight (g) Guide level Temperature Temperature Cooking time (from bot- (°C) (°C) (min.) tom) Meat and sausages 2 beef loin stakes, well done 180g/pc 18-21 Level 2 cutlets 20-22 2 pork neck steaks 180g/pc 18-22 4 grill sausages 100g/pc…
-
Page 29: Defrosting
Preservation table Food to be preserved Quantity After Standing time appearance of (in the oven T=170-180°C, until bubbles (min) boiling / bubbling (min.) Fruit Strawberries 6×1 liter approx. 40-55 turn off Stone fruit 6×1 liter approx. 40-55 turn off Apple puree 6×1 liter approx.
-
Page 30: Cleaning And Maintenance
CLEANING AND MAINTENANCE Do not use a steam cleaner or a high-pressure steam cleaner to clean the appliance. Before you start cleaning the appliance, disconnect it from the power mains and let it cool down. Appliance housing front Clean the surfaces with liquid non-abrasive detergents intended for smooth surfaces, and a soft cloth.
-
Page 31: Cleaning
Cleaning Oven • The oven can be cleaned in conventional manner (with detergents, oven spray), but only when there is vey dirty and when the stains are particularly stubborn. • For regular cleaning of your oven (after each use), the following procedure is recommended: rotate the operation mode selection knob to the position .
-
Page 32: Maintenance (Depending On The Model)
Cleaning the oven interior ceiling (only with some models) • To facilitate cleaning of the oven interior upper wall, some appliances feature a foldable upper infra heater. • Before lowering the heater, the cooker must be disconnected from the power mains by removing the fuse or tripping the main switch.
-
Page 33
Removing wire guide racks To facilitate cleaning of the oven interior side walls, the wire guide rack can be removed. • Hold the guide rack by its lower end and rotate it inwards; then, remove them from the holes on the upper side. •… -
Page 34: Replacing Appliance Parts
REMOVING AND REPLACING THE OVEN DOOR WITH A SINGLE-AXIS HINGE (depending on the model) a) Conventional closing b) Soft closing system (GentleClose) – the system absorbs the shock from door closing. It allows simple, quiet, and smooth closing. A gentle push (to a 15° angle relative to the closed door position) is enough for the door to close automatically and softly.
-
Page 35
Attention Always make sure the hinge attachment clips are fi rmly seated in their supports when installing the door. If this is not the case, the main hinge that is operated by a strong spring may be released any time while installing or removing the door. -
Page 36: Special Warnings And Error Reporting
SPECIAL WARNINGS AND ERROR REPORTING During the warranty period, any repairs may only be performed by service technicians authorized by the appliance manufacturer. Before starting the repair, the appliance must be disconnected from the power mains by removing the fuse or by removing the mains cord from the wall outlet. Unauthorized tampering and repairs may cause the risk of electric shock and short circuit;…
-
Page 37
Program timer • There was a power supply failure, or your cooker was just display is blinking connected to the power mains. All set times have been deleted. • Set the time of day to enable operation of the appliance. •… -
Page 38: Instructions For Installation And
INSTRUCTIONS FOR INSTALLATION AND CONNECTION Important warnings • The appliance may only be connected by a qualifi ed expert. • The appliance should be fi tted with a device that disconnects it from all poles of the home network (an omnipolar switch), with at least 3 mm of distance between the contacts in open position.
-
Page 39: Electrical Connection
Electrical connection The appliance may only be connected to the power mains by an authorized service technician or a registered electrician! Incorrect connection may result in damage to or destruction of respective parts of the appliance; in such cases, the warranty is void.
-
Page 40
thus, the appliance can be connected before it is pushed to the wall. • The length of the power cord should be adjusted in such way that in case of pulling load on the cable, the ground wire is strained later than the voltage wires. Procedure •… -
Page 41: Technical Characteristics
G Compliance indications / symbols WE RESERVE THE RIGHT TO MAKE ANY CHANGES THAT DO NOT AFFECT THE FUNCTIONALITY OF THE APPLIANCE. Instructions for use of the appliance can also be found on our website at www.gorenje.com / < http://www.gorenje.com />…
-
Page 44
Cooking w ith passion. en (04-17)