Teka HE-720, HE-735 — Oven Manual
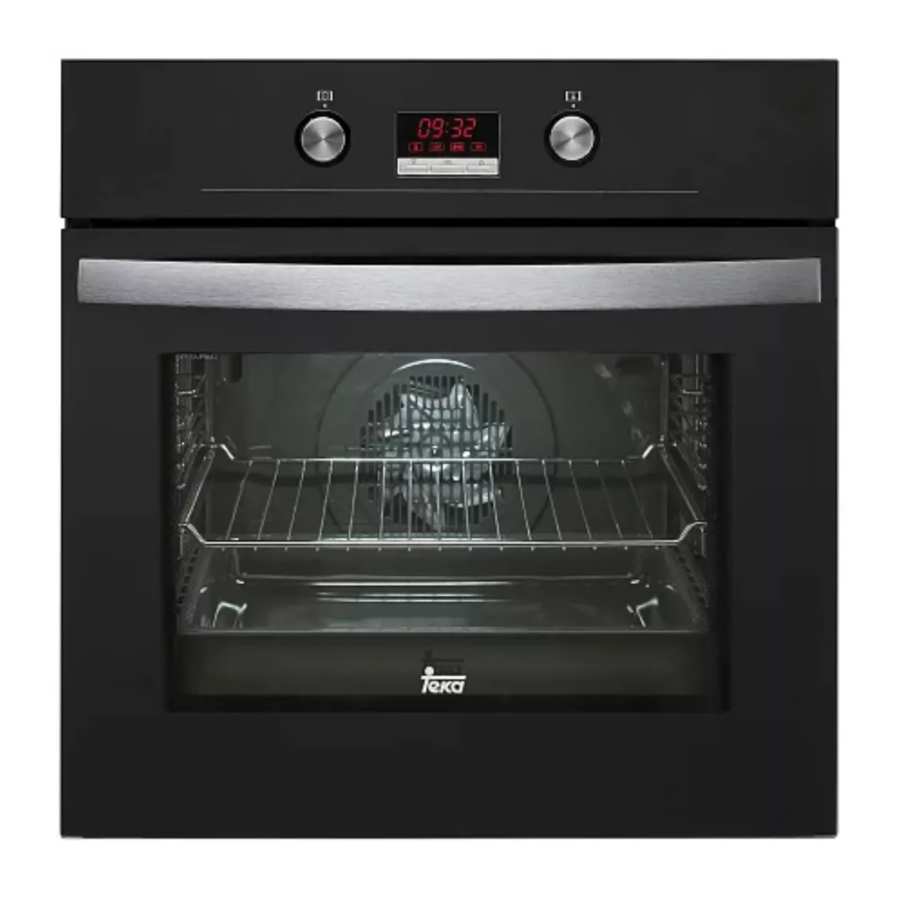
Overview

- Control Panel
- Oven Seal
- Grill element
- Chrome Support + Telescopic Guide
- Grid
- Cake Tray
- Roasting Tray
- Hinge
- Door
- Air Outlet
- Fixing to Unit
- Grill Screen
- Smoke Outlet
- Light
- Rear Panel
- Fan
Control Panel

- Control knobs for the hob.
- Cooker indicator light. It indicates that one or more of the electric hotplates are on.
- Function selector.
- Electronic clock.
- Temperature selector.
Oven Functions

Switch off oven

Conventional
It is used for sponges and cakes where the heat received must be uniform to achieve a spongy texture.
![]()
Conventional with fan
Appropriate for roasts and cakes. The fan spreads the heat uniformly inside the oven.
![]()
Grill
For preparing dishes with superficial roasting. It allows the outer layer to be browned without affecting the inside of the food. Ideal for flat food, such as steaks, ribs, fish, toast.
![]()
MaxiGrill
Allows greater surfaces to be prepared, than with the grill, together with higher power reducing the time required for browning of the food.
![]()
MaxiGrill with fan
Allows uniform roasting at the same time as surface browning. Ideal for grills. Special for large volume pieces, such as poultry, game etc. It is recommended to put the item on a rack with a tray beneath to collect the stock and juices.
While using the Grill, MaxiGrill or MaxiGrill with fan, the door must be kept closed.
![]()
Turbo
The fan distributes the heat produced by an element located at the rear of the oven. Due to the uniform heat distribution, it allows roasting and baking to take place at two heights at the same time.
This cooking mode allows defrosting of food. To do this, set the temperature selector to ![]() position.
position.
![]()
Lower element
Heats only from beneath. Suitable for heating dishes and raising pastry and similar.
![]()
Lower element with fan
It distributes the heat from the lower part of the oven and is ideal for cakes with jam or fruit filling, which only require heating from beneath. Pre-heating is always necessary.
![]()
Grill and Lower element
Special for roasts. It can be used for any piece, whatever its size.
Note
The pilot light remains on in any cooking function.
Use of the Oven

Setting the time on the Electronic Clock
When the oven is connected to the power supply, the indication 00:00 flash on the display. Press ![]() or
or ![]() to set the time on the clock. The clock beeps twice to confirm the selected time.
to set the time on the clock. The clock beeps twice to confirm the selected time.
If you wish to modify the time, press ![]() or
or ![]() until the current time flash on the screen. Press
until the current time flash on the screen. Press ![]() .Then press
.Then press ![]() or
or ![]() to modify he time. The clock beeps twice to confirm the modification.
to modify he time. The clock beeps twice to confirm the modification.
Manual Operation
The oven is ready to be used when the clock has been set. Select a cooking function and a temperature.
When you begin cooking, symbol  lights up to indicate that the oven is heating the contents; the symbol goes out when the selected temperature is reached.
Set the controls to ![]() to turn the oven off.
to turn the oven off.
Functions of the Electronic Clock
Alarm:
Creates an alarm signal when the period of time finishes; the oven does not need to be in use in order to use this function.
Cooking Time:
To cook for a selected length of time; the oven turns itself off automatically when the time finishes.
End Cooking Time:
To cook until a set time; the oven turns itself off automatically when the time finishes.
Cooking time and End Cooking Time:
To cook for a selected length of time and end at a set time. When this function is set, the oven comes on automatically at the time required in order to cook for the set length of time (Cooking time) and end automatically at the indicated time (End Cooking Time)
Programming the Alarm
- Press
 until symbol
  lights up. Press
  .
. - Set the period of time after which you wish the alarm to sound by pressing
 or .
or . - The clock beeps twice, the current time is displayed and symbol lights up permanently to indicate that the alarm has been set.
- When the set period of time comes to an end, the alarm sounds and symbol starts to flash.
- Press any button to stop the alarm; symbol goes out.
You can consult the remaining time at any moment by pressing ![]() or
or ![]() until symbol
until symbol ![]() flashes and then pressing
flashes and then pressing ![]() . You can also modify the set time at this point by pressing
. You can also modify the set time at this point by pressing ![]() or
or ![]() . The clock beeps twice to confirm the change.
. The clock beeps twice to confirm the change.
If you wish the remaining time to be displayed until the end of the set period of time, press ![]() or
or ![]() until symbol
until symbol ![]() flashes and then press
flashes and then press ![]() and keep it pressed in. Symbol
and keep it pressed in. Symbol ![]() flashes. Keep
flashes. Keep ![]() pressed in again to return to the real time.
pressed in again to return to the real time.
Setting the Cooking Time
- Press or until symbol
 lights up. Press
  .
. - Select the period of time you wish to cook for by pressing or .
- The clock beeps twice, the current time is displayed and symbol lights up permanently to indicate that the oven will turn itself off automatically.
- Select a cooking function and temperature.
- When the cooking time comes to an end, the oven turns itself off, the alarm sounds and symbol flashes.
- Press any button to stop the alarm and turn the oven back on again.
- Set the controls to
 to turn the oven off.
You can consult the remaining cooking time at any moment by pressing ![]() or
or ![]() until symbol
until symbol ![]() flashes and then pressing
flashes and then pressing ![]() . You can also modify the set time at this point by pressing
. You can also modify the set time at this point by pressing ![]() or
or ![]() . The clock beeps twice to confirm the change.
. The clock beeps twice to confirm the change.
If you wish the remaining time to be displayed until the end of the set period of time, press ![]() or
or ![]() until symbol
until symbol ![]() flashes and then press
flashes and then press ![]() and keep it pressed in. Symbol
and keep it pressed in. Symbol ![]() flashes. Keep
flashes. Keep ![]() pressed in again to return to the real time.
pressed in again to return to the real time.
Setting the End Cooking Time
- Press or until symbol
 lights up. Press .
 - Select the time you wish the cooking process to finish at by pressing
 or .
or . - The clock beeps twice, the current time is displayed and symbol lights up permanently to indicate that the oven will turn itself off automatically.
- Select a cooking function and temperature.
- When the set time is reached, the oven turns itself off, the alarm sounds and symbol flashes.
- Press any button to stop the alarm and turn the oven back on again.
- Set the controls to to turn the oven off.
You can consult the end cooking time at any moment by pressing ![]() or
or ![]() until symbol
until symbol ![]() flashes and then pressing
flashes and then pressing ![]() . You can also modify the end cooking time at this point by pressing
. You can also modify the end cooking time at this point by pressing ![]() or
or ![]() . The clock beeps twice to confirm the change.
. The clock beeps twice to confirm the change.
This function can be used even when you are already using the oven. To do this, follow the instructions indicated above except point number 4.
Setting the Cooking Time and the End Cooking Time
- Press or until symbol lights up. Press .
- Select the period of time you wish to cook for by pressing or .
- The clock beeps twice, the current time is displayed and symbol lights up permanently.
- Press or until symbol lights up. Press .
- Select the time you wish the cooking process to finish at by pressing or .
- The clock beeps twice, the current time is displayed and symbol lights up permanently.
- Select a cooking function and temperature.
- The oven remains off with symbols and lit up. Your oven is set.
- When the time to start cooking is reached, the oven starts up and cooks for the set period of time.
- When the set end cooking time is reached, the oven turns itself off, the alarm sounds and symbols and flash.
- Press any button to stop the alarm and turn the oven back on again.
- Set the controls to to turn the oven off.
You can modify the end cooking time by pressing ![]() or
or ![]() until symbol
until symbol ![]() lights up and then pressing
lights up and then pressing ![]() . You can now modify the end cooking time by pressing
. You can now modify the end cooking time by pressing ![]() or
or ![]() . The clock beeps twice to confirm the change.
. The clock beeps twice to confirm the change.
In the event of a power cut, all the electronic clock settings are deleted and the indication 00:00 flashes on the display. It is necessary to set the time and programme the clock again.
Changing the oven light bulb
Make sure the oven is unplugged before changing the bulb.
The replacement bulb must be resistant to temperatures up to 300 ºC. You can order one from Technical Service.

Documents / Resources
Download manual
Here you can download full pdf version of manual, it may contain additional safety instructions, warranty information, FCC rules, etc.
Download Teka HE-720, HE-735 — Oven Manual
-
Инструкции
-
Духовые шкафы
- Teka

Инструкция к Teka HSB 610 BLACK
PDF, 2.17 Мб
Схема встраивания
JPG, 86.01 Кб
Схема с размерами
JPG, 55.54 Кб

Инструкция к Teka IOVEN SS INOX
PDF, 695.24 Кб
Схема встраивания
JPG, 67.98 Кб

Инструкция к Teka HSB 630 WHITE
PDF, 2.17 Мб
Схема встраивания
JPG, 86.01 Кб

Инструкция к Teka HBB 735 STAINLESS STEEL
PDF, 17.58 Мб
Схема встраивания
JPG, 32 Кб

Схема встраивания с размерами
JPG, 62.4 Кб

Инструкция к Teka HLB 8510 P NIGHT RIVER BLACK
PDF, 4.28 Мб
Руководство по установке
PDF, 2.59 Мб
Схема встраивания с размерами
JPG, 67.78 Кб
Кулинарная книга
PDF, 1.08 Мб

Схема встраивания с размерами
JPG, 86.01 Кб

Инструкция к Teka HLB 8600 LONDON BRICK
PDF, 3.55 Мб
Схема встраивания с размерами
JPG, 68.56 Кб
Книга рецептов
PDF, 1.08 Мб
Энергетический лейбл
JPG, 135.04 Кб

Схема встраивания с размерами
JPG, 86.01 Кб

Инструкция к Teka HCB 6515 SS
PDF, 1.86 Мб
Схема встраивания с размерами
JPG, 68.68 Кб

Схема встраивания с размерами
JPG, 86.01 Кб

Инструкция к Teka HCB 6535 WHITE
PDF, 4.75 Мб
Схема встраивания с размерами
JPG, 135.82 Кб
Энергетический лейбл
JPG, 200.16 Кб

Инструкция к Teka HCB 6535 SS
PDF, 4.75 Мб
Схема встраивания с размерами
JPG, 57.6 Кб
Энергетический лейбл
JPG, 200.16 Кб

Инструкция к Teka HBB 720 WH
PDF, 3.33 Мб
Руководство по установке
PDF, 17.58 Мб
Схема встраивания с размерами
JPG, 68.51 Кб
Кулинарная книга
PDF, 1.08 Мб

Инструкция к Teka HLB 8600 WHITE MARBLE
PDF, 1.63 Мб
Кулинарная книга
PDF, 1.08 Мб
Схема встраивания с размерами
JPG, 69.2 Кб
Энергетический лейбл
JPG, 135.04 Кб

Инструкция к Teka HLC 8400 STEAM GREY
PDF, 1.2 Мб
Кулинарная книга
PDF, 1.08 Мб
Схема встраивания с размерами
JPG, 53.97 Кб
Энергетический лейбл
JPG, 134.96 Кб

Conventional with fan
Appropriate for roasts and cakes. The fan spreads the heat uniformly inside the oven.
![]()
Grill
For preparing dishes with superficial roasting. It allows the outer layer to be browned without affecting the inside of the food. Ideal for flat food, such as steaks, ribs, fish, toast.
![]()
MaxiGrill
Allows greater surfaces to be prepared, than with the grill, together with higher power reducing the time required for browning of the food.
![]()
MaxiGrill with fan
Allows uniform roasting at the same time as surface browning. Ideal for grills. Special for large volume pieces, such as poultry, game etc. It is recommended to put the item on a rack with a tray beneath to collect the stock and juices.
While using the Grill, MaxiGrill or MaxiGrill with fan, the door must be kept closed.
![]()
Turbo
The fan distributes the heat produced by an element located at the rear of the oven. Due to the uniform heat distribution, it allows roasting and baking to take place at two heights at the same time.
This cooking mode allows defrosting of food. To do this, set the temperature selector to ![]() position.
position.
![]()
Lower element
Heats only from beneath. Suitable for heating dishes and raising pastry and similar.
![]()
Lower element with fan
It distributes the heat from the lower part of the oven and is ideal for cakes with jam or fruit filling, which only require heating from beneath. Pre-heating is always necessary.
![]()
Grill and Lower element
Special for roasts. It can be used for any piece, whatever its size.
Note
The pilot light remains on in any cooking function.
Use of the Oven
Setting the time on the Electronic Clock
When the oven is connected to the power supply, the indication 00:00 flash on the display. Press ![]() or
or ![]() to set the time on the clock. The clock beeps twice to confirm the selected time.
to set the time on the clock. The clock beeps twice to confirm the selected time.
If you wish to modify the time, press ![]() or
or ![]() until the current time flash on the screen. Press
until the current time flash on the screen. Press ![]() .Then press
.Then press ![]() or
or ![]() to modify he time. The clock beeps twice to confirm the modification.
to modify he time. The clock beeps twice to confirm the modification.
Manual Operation
The oven is ready to be used when the clock has been set. Select a cooking function and a temperature.
When you begin cooking, symbol lights up to indicate that the oven is heating the contents; the symbol goes out when the selected temperature is reached.
Set the controls to ![]() to turn the oven off.
to turn the oven off.
Functions of the Electronic Clock
Alarm:
Creates an alarm signal when the period of time finishes; the oven does not need to be in use in order to use this function.
Cooking Time:
To cook for a selected length of time; the oven turns itself off automatically when the time finishes.
End Cooking Time:
To cook until a set time; the oven turns itself off automatically when the time finishes.
Cooking time and End Cooking Time:
To cook for a selected length of time and end at a set time. When this function is set, the oven comes on automatically at the time required in order to cook for the set length of time (Cooking time) and end automatically at the indicated time (End Cooking Time)
Programming the Alarm
- Press until symbol lights up. Press .
- Set the period of time after which you wish the alarm to sound by pressing or .
- The clock beeps twice, the current time is displayed and symbol lights up permanently to indicate that the alarm has been set.
- When the set period of time comes to an end, the alarm sounds and symbol starts to flash.
- Press any button to stop the alarm; symbol goes out.
You can consult the remaining time at any moment by pressing ![]() or
or ![]() until symbol
until symbol ![]() flashes and then pressing
flashes and then pressing ![]() . You can also modify the set time at this point by pressing
. You can also modify the set time at this point by pressing ![]() or
or ![]() . The clock beeps twice to confirm the change.
. The clock beeps twice to confirm the change.
If you wish the remaining time to be displayed until the end of the set period of time, press ![]() or
or ![]() until symbol
until symbol ![]() flashes and then press
flashes and then press ![]() and keep it pressed in. Symbol
and keep it pressed in. Symbol ![]() flashes. Keep
flashes. Keep ![]() pressed in again to return to the real time.
pressed in again to return to the real time.
Setting the Cooking Time
- Press or until symbol lights up. Press .
- Select the period of time you wish to cook for by pressing or .
- The clock beeps twice, the current time is displayed and symbol lights up permanently to indicate that the oven will turn itself off automatically.
- Select a cooking function and temperature.
- When the cooking time comes to an end, the oven turns itself off, the alarm sounds and symbol flashes.
- Press any button to stop the alarm and turn the oven back on again.
- Set the controls to to turn the oven off.
You can consult the remaining cooking time at any moment by pressing ![]() or
or ![]() until symbol
until symbol ![]() flashes and then pressing
flashes and then pressing ![]() . You can also modify the set time at this point by pressing
. You can also modify the set time at this point by pressing ![]() or
or ![]() . The clock beeps twice to confirm the change.
. The clock beeps twice to confirm the change.
If you wish the remaining time to be displayed until the end of the set period of time, press ![]() or
or ![]() until symbol
until symbol ![]() flashes and then press
flashes and then press ![]() and keep it pressed in. Symbol
and keep it pressed in. Symbol ![]() flashes. Keep
flashes. Keep ![]() pressed in again to return to the real time.
pressed in again to return to the real time.
Setting the End Cooking Time
- Press or until symbol lights up. Press .
- Select the time you wish the cooking process to finish at by pressing or .
- The clock beeps twice, the current time is displayed and symbol lights up permanently to indicate that the oven will turn itself off automatically.
- Select a cooking function and temperature.
- When the set time is reached, the oven turns itself off, the alarm sounds and symbol flashes.
- Press any button to stop the alarm and turn the oven back on again.
- Set the controls to to turn the oven off.
You can consult the end cooking time at any moment by pressing ![]() or
or ![]() until symbol
until symbol ![]() flashes and then pressing
flashes and then pressing ![]() . You can also modify the end cooking time at this point by pressing
. You can also modify the end cooking time at this point by pressing ![]() or
or ![]() . The clock beeps twice to confirm the change.
. The clock beeps twice to confirm the change.
This function can be used even when you are already using the oven. To do this, follow the instructions indicated above except point number 4.
Setting the Cooking Time and the End Cooking Time
- Press or until symbol lights up. Press .
- Select the period of time you wish to cook for by pressing or .
- The clock beeps twice, the current time is displayed and symbol lights up permanently.
- Press or until symbol lights up. Press .
- Select the time you wish the cooking process to finish at by pressing or .
- The clock beeps twice, the current time is displayed and symbol lights up permanently.
- Select a cooking function and temperature.
- The oven remains off with symbols and lit up. Your oven is set.
- When the time to start cooking is reached, the oven starts up and cooks for the set period of time.
- When the set end cooking time is reached, the oven turns itself off, the alarm sounds and symbols and flash.
- Press any button to stop the alarm and turn the oven back on again.
- Set the controls to to turn the oven off.
You can modify the end cooking time by pressing ![]() or
or ![]() until symbol
until symbol ![]() lights up and then pressing
lights up and then pressing ![]() . You can now modify the end cooking time by pressing
. You can now modify the end cooking time by pressing ![]() or
or ![]() . The clock beeps twice to confirm the change.
. The clock beeps twice to confirm the change.
In the event of a power cut, all the electronic clock settings are deleted and the indication 00:00 flashes on the display. It is necessary to set the time and programme the clock again.
Changing the oven light bulb
Make sure the oven is unplugged before changing the bulb.
The replacement bulb must be resistant to temperatures up to 300 ºC. You can order one from Technical Service.
Documents / Resources
Download manual
Here you can download full pdf version of manual, it may contain additional safety instructions, warranty information, FCC rules, etc.
Download Teka HE-720, HE-735 — Oven Manual
-
Инструкции
-
Духовые шкафы
- Teka
Инструкция к Teka HSB 610 BLACK
PDF, 2.17 Мб
Схема встраивания
JPG, 86.01 Кб
Схема с размерами
JPG, 55.54 Кб
Инструкция к Teka IOVEN SS INOX
PDF, 695.24 Кб
Схема встраивания
JPG, 67.98 Кб
Инструкция к Teka HSB 630 WHITE
PDF, 2.17 Мб
Схема встраивания
JPG, 86.01 Кб
Инструкция к Teka HBB 735 STAINLESS STEEL
PDF, 17.58 Мб
Схема встраивания
JPG, 32 Кб
Схема встраивания с размерами
JPG, 62.4 Кб
Инструкция к Teka HLB 8510 P NIGHT RIVER BLACK
PDF, 4.28 Мб
Руководство по установке
PDF, 2.59 Мб
Схема встраивания с размерами
JPG, 67.78 Кб
Кулинарная книга
PDF, 1.08 Мб
Схема встраивания с размерами
JPG, 86.01 Кб
Инструкция к Teka HLB 8600 LONDON BRICK
PDF, 3.55 Мб
Схема встраивания с размерами
JPG, 68.56 Кб
Книга рецептов
PDF, 1.08 Мб
Энергетический лейбл
JPG, 135.04 Кб
Схема встраивания с размерами
JPG, 86.01 Кб
Инструкция к Teka HCB 6515 SS
PDF, 1.86 Мб
Схема встраивания с размерами
JPG, 68.68 Кб
Схема встраивания с размерами
JPG, 86.01 Кб
Инструкция к Teka HCB 6535 WHITE
PDF, 4.75 Мб
Схема встраивания с размерами
JPG, 135.82 Кб
Энергетический лейбл
JPG, 200.16 Кб
Инструкция к Teka HCB 6535 SS
PDF, 4.75 Мб
Схема встраивания с размерами
JPG, 57.6 Кб
Энергетический лейбл
JPG, 200.16 Кб
Инструкция к Teka HBB 720 WH
PDF, 3.33 Мб
Руководство по установке
PDF, 17.58 Мб
Схема встраивания с размерами
JPG, 68.51 Кб
Кулинарная книга
PDF, 1.08 Мб
Инструкция к Teka HLB 8600 WHITE MARBLE
PDF, 1.63 Мб
Кулинарная книга
PDF, 1.08 Мб
Схема встраивания с размерами
JPG, 69.2 Кб
Энергетический лейбл
JPG, 135.04 Кб
Инструкция к Teka HLC 8400 STEAM GREY
PDF, 1.2 Мб
Кулинарная книга
PDF, 1.08 Мб
Схема встраивания с размерами
JPG, 53.97 Кб
Энергетический лейбл
JPG, 134.96 Кб
18
Отключение духовки
Обычная
Используется для бисквитов и тортов
для которых необходима равномерная
подача тепла для того чтобы ониполу-
чились воздушными.
Обычная с турбиной
Рекомендуется для жаркого ипирожен-
ных. Вентилятор равномерно распреде-
ляет тепло внутридуховки, таким обра-
зом укорачивается время, понижается
температура готовки.
Гриль и Под
Специально для запекания. Может
быть использована для кусков любого
размера.
МаксиГриль
Позволяет запекание больших поверх-
ностей, чем прифункцииГриль; имеет
большую мощность запекания, золоти-
стая корочка появляется быстрее.
Гриль
Гратен иповерхностное запекани
е.
Позволяет достичь золотистой корочки
без
влияния
на
внутреннюю
часть
блюда. Рекомендуется для плоских
блюд таких как бифштекс, ребрышки,
рыба, тосты.
Внимание
Во время использования функции Гриль
или МаксиГриль дверца должна быть
закрыта.
Под
Тепло
поступает
только
снизу.
Рекомендуется для подогрева блюд или
подъема теста для кондитерских изде-
лие и пр.
Пицца
Специально для приготовления пиццы,
пирожков, пироженных или бисквитов с
фруктовой начинкой.
Турбо
Турбина распределяет тепло поступаю-
щее от спирали установленной в задней
панелидуховки
.
Благодаря равномер-
ноститемпературы можно готови
ть на
обоих уровнях одновременно.
Разморозка
Эта функция предназначена для посте-
пенной
разморозки
продуктов.
Особенно продуктов предназначенных
к употреблению без разогрева, напри-
мер кремы, пасты, торты и т.д.
Функция чистки
TEKA HYDROCLEAN
®
После проведения этого цикла чистки,
жир и загрязняющие остатки на стенках
духовкимогут быть легко удалены при
помощивлажной губки.
Примечание
Лампа остается включенной прилюбой
функции
готовки
за
исключением
чистки.
Функции духовки

52
Отключение духового шкафа
Конвекторный режим
Используется для приготовления бисквитов
и тортов, для которых получаемое тепло
должно быть однородным чтобы выпечка
получалась с мягкой, пышной структурой.
Конвекторный режим с Турбиной
Применяется для запекания и кондитерской
выпечки.
Вентилятор
однородно
распределяет тепло по всей духовке,
укорачивая время и понижая температуру
приготовления.
Гриль
Поверхностное запекание. Обеспечивает
получение золотистой корочки и не влияет
на внутренние части блюда. Применяется
для плоских продуктов, например, таких как
бифштекс, ребрышки, рыба, тосты.
МаксиГриль
Позволяет
запекание
на
больших
поверхностях чем в режиме Гриль, большая
мощность запекания, более быстрое
формирование золотистой корочки.
МаксиГриль с Турбиной
Обеспечивает равномерное запекание и
одновременное зажаривание поверхности.
Идеален для блюд, приготовляемых на
решетке. Также применяется для продуктов
больших размеров, таких как птица, дичь,
и т.д. Рекомендуется устанавливать под
решеткой гриля противень для сбора жира
и сока
Внимание
Во время использования в режимах Гриль,
МаксиГриль или МаксиГриль с Турбиной
дверца духовки должна быть закрыта.
Турбо
Турбина распределяет жар исходящий от
резистора, расположенного в задней части
духового шкафа. Благодаря однородности
распределения возможно приготовление
пищи одновременно на двух уровнях.
Пицца
Особый режим для приготовления пиццы,
пирогов и тортов или бисквитов с фруктовой
начинкой.
Подовая Печь
Тепло распространяется от нижней части.
Применим для разогрева блюд или подхода
теста.
Гриль и Подовая Печь
Особый режим для запекания. Может
применятся для любого продукта вне
зависимости от его размера.
Разморозка
Эта функция осуществляется при помощи
системы подачи горячего воздуха на двух
уровнях. Уровень LO – для рыбы, выпечки
и хлеба. Уровень HI – (с более высокой
температурой внутри духовки) для мяса
вцелом.
Примечание:
Лампочка остается включенной при любой
функции приготовления.
Функции Духового Шкафа
- Techno Pride. Бытовая техника
- Документация
- Духовые шкафы
- Teka
Teka
- Все бренды
- AEG
- Asko
- Bauknecht
- Beko
- Bertazzoni
- Bosch
- Candy
- Cata
- Darina
- De Dietrich
- DeLonghi
- Electrolux
- Franke
- GEFEST
- Gorenje
- Gorenje Plus
- Graude
- Hyundai
- Jacky`s
- Kaiser
- KitchenAid
- Korting
- Krona
- Kuppersberg
- Kuppersbusch
- Maunfeld
- Midea
- Miele
- Monsher
- Neff
- Pando
- Schaub Lorenz
- Siemens
- Simfer
- Smeg
- Teka
- Vestfrost
- Weissgauff
- Zanussi
- Zigmund & Shtain
Духовые шкафы
- Все категории
- Холодильники
- Стиральные машины
- Посудомоечные машины
- Варочные панели
- Духовые шкафы
- Вытяжки
- Микроволновые печи
- Смесители
- Измельчители
Инструкция для духового шкафа Teka AIRFRY HLB 8416 NIGHT RIVER BLACK 4,42 мб.
Инструкция для духового шкафа Teka AIRFRY HSB 646 SS 3,44 мб.
Инструкция для духового шкафа Teka MAESTROPIZZA HLB 8510 P NIGHT RIVER BLACK 4,28 мб.
Инструкция для духового шкафа Teka MCL 32 BIS WHITE 0,80 мб.
Инструкция для духового шкафа Teka MCS 32 BIH 2,02 мб.
Инструкция для духового шкафа Teka STEAKMASTER BLACK-SS 9,43 мб.
Инструкция для духового шкафа Teka STEAKMASTER NIGHT RIVER BLACK 9,43 мб.
Схема для духового шкафа Teka AIRFRY HLB 8416 NIGHT RIVER BLACK 0,59 мб.
Схема для духового шкафа Teka AIRFRY HSB 646 SS 0,59 мб.
Схема для духового шкафа Teka HS 720 BLACK 0,07 мб.
Схема для духового шкафа Teka HS 720 WHITE 0,07 мб.
Схема для духового шкафа Teka HS 735 STAINLESS STEEL 0,05 мб.
Схема для духового шкафа Teka MAESTROPIZZA HLB 8510 P NIGHT RIVER BLACK 0,59 мб.
Схема для духового шкафа Teka MCL 32 BIS WHITE 0,05 мб.
Схема для духового шкафа Teka MCS 32 BIH 0,06 мб.
Схема для духового шкафа Teka STEAKMASTER BLACK-SS 0,59 мб.
Схема для духового шкафа Teka STEAKMASTER NIGHT RIVER BLACK 0,59 мб.
Бесплатная доставка
Большинство товаров доставляем бесплатно по России
Бесплатная установка
Отмеченные товары устанавливаем бесплатно на готовые коммуникации
Простой возврат или обмен
Защищаем интересы покупателей, соблюдаем законодательство РФ
Фирменная гарантия
Фирменная гарантия производителей. Официальный дилер большинства брендов
Акции и скидки
Участвуем во всех официальных акциях