Если вы когда-либо вешали на стену полку, вешалку или другой тяжелый предмет, вы знакомы с гвоздиками. Шпильки являются костями стены — они поддерживают раму, гипсокартон и любые установленные светильники.
Найти шпильки не сложно, но вам нужен инструмент, который называется искатель шпильки. Эти устройства работают, обнаруживая металлические гвозди или изменения плотности. Этот пошаговый учебник покажет вам, как использовать искатель гвоздика, чтобы вы могли тратить меньше времени на подготовку и больше времени на оформление.
Понять анатомию стен и потолков

Увеличение изображения
Что вам нужно
- Искатель гвоздика
- батареи
- Карандаш
- Измерительная лента
Шаг 1: Включите
Вставьте батарейки в искатель. Поместите искатель шпильки на один конец стены, которую вы проверяете на наличие шпилек, затем включите инструмент. Убедитесь, что искатель шипа откалиброван в соответствии с указаниями производителя.
Как построить (и повесить) плавающие полки
Шаг 2: начать движение

Медленно двигайтесь горизонтально вдоль стены. Загорается свет, чтобы указать, когда искатель нашел шпильку. На этом этапе перемещайте искатель вперед и назад, чтобы найти внешние края шпильки — вы хотите точно знать, насколько широка каждая шпилька, чтобы вы могли работать с этими параметрами.
Шаг 3: Марк Шпильки
Отметьте начальную и конечную точки каждого стержня карандашом. Продолжайте двигаться горизонтально вдоль стены, пока не найдете все шпильки в стене.
Если вы хотите повесить тяжелый предмет на стену, вам нужно прикрепить его к стойке, расположенной за гипсокартоном. Легкие предметы можно повесить в любом месте на стене, используя анкеры для гипсокартона. А вот для полок, шкафов, большие зеркала, или что-нибудь тяжелое или хрупкое, безопаснее всего продолжать застежку через гипсокартон и вставьте его в основную деревянную стойку.
Что такое Stud и Stud Finder?
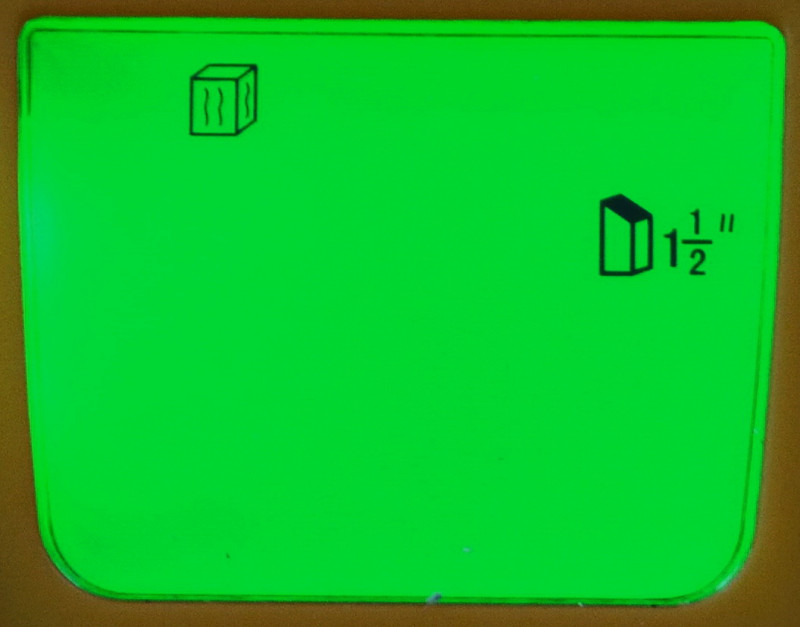
А настенная гвоздь представляет собой вертикальный блок размером два на четыре, расположенный за внутренним гипсокартоном или штукатуркой. Шпильку устанавливают на краю так, чтобы ее ширина по направлению к комнате составляла 1 1/2 дюйма. Поиск стоек — это устройство, которое определяет положение стойки, не проникая в стену.
Но сначала вам нужно найти шпилька. Три категории искатели шпильки может помочь: электронное, магнитное и телефонное.
Электронные поисковые системы
Как они работают
Электронные устройства для поиска стоек — это устройства с батарейным питанием, которые находят стойки, определяя изменения плотности стены. Нажатие кнопки на устройстве создает магнитное поле. Это поле отправляет на устройство обратную связь при изменении плотности, например при переходе от полой области к области с выступом. Устройство горит или издает звуковой сигнал.
Край шпилька искатели сигнализируют, когда устройство касается левого или правого края шпильки. Центральные или цельные искатели шипа создают несколько магнитных полей, которые захватывают всю ширину шипа и за его пределами.
Стоимость кромкоискателей составляет от 15 до 20 долларов, а для цельнометаллических шипов — от 20 до 30 долларов.
Плюсы и минусы
Электронные поисковые системы предлагают одно сильное преимущество перед магнитными поисковыми устройствами: они обнаруживают, что шпилька сам по себе, а не металлический крепеж. Это полезно для длинных промежутков между металлическими застежками.
Кроме того, для поиска магнитных шпилек требуется много широких движений, к тому же вы должны перемещать их вверх и вниз. С электронными устройствами вам нужно подметать только по прямой горизонтальной линии.
С помощью устройств для обнаружения кромочных шипов может быть сложно двигаться достаточно медленно — а затем мгновенно останавливаться — в тот момент, когда устройство подает сигнал. Затем нужно повторить развертку с противоположной стороны.
Электронные средства поиска по центру шпильки помогают определить истинную ширину шпильки, но только с шагом. При перемещении устройства магнитное поле передается от одного датчика к соседнему. Набор сигнальных огней не обновится, пока устройство не переместится достаточно далеко.
Плюсы
-
Найдите шпильку, а не застежку
-
Точность до 1 1/2 дюйма в глубину
-
Нужно только провести горизонтально по стене
Минусы
-
Может сигнализировать о ложных срабатываниях
-
Устройство необходимо перемещать медленно
-
Требуют сделать отметку на стене
Магнитные поисковые устройства
Как они работают
Магнитные поисковые устройства полагаются на наличие металлические застежки найти шпильку за гипсокартоном. Если гипсокартон прикреплен к шпильке, причина в том, что должен быть винт или гвоздь, которые удерживают их вместе. Найдите застежку, и вы нашли шпильку.
Редкоземельные или неодимовые магниты являются ключевым компонентом этих устройств для поиска гвоздей. До того, как были разработаны магниты из редкоземельных элементов, использовались более слабые магниты, которые должны были располагаться непосредственно на застежке. Магниты из редкоземельных металлов могут обнаруживать крепежные детали даже при приближении к ним.
Стоимость магнитных искателей шипа менее 10 долларов.
Плюсы и минусы
Магнитные поисковые устройства недорогие, надежные и не требуют использования батареек. Магнитные поисковые устройства оставляют маркеры на стене и остаются на стене, пока вы их не удалите. Если оставить несколько магнитных маркеров для поиска шпилек, идущих вертикально вдоль шпильки, можно получить точную картину местоположения шпильки.
Но легко забыть, что магнитные средства поиска шипов не находят шипы; они находят металл. Таким образом, можно получить ложные срабатывания, такие как металлические трубы или защитные металлические гвозди.
Крепеж гипсокартона на концах листов гипсокартона забивается у края гипсокартон, расположив их немного не по центру шпильки как с левой, так и с правой стороны. Таким образом, при использовании магнитных устройств для поиска стержней вам нужно усреднить несколько маркеров, чтобы найти центральную линию.
Плюсы
-
Недорого
-
Батарейки не требуются
-
Надежный
-
Оставайтесь на стене как маркеры
Минусы
-
Найдите крепеж, а не шпильки
-
Не располагайте центр шпилек
-
Требуется несколько сложных разверток
-
Ограничено поверхностными креплениями
Stud Finders на вашем телефоне или приложения Stud Finder
Как они работают
Поисковые устройства для вашего телефона состоят из двух основных физических компонентов: сканирующего устройства, шнуров и смартфона. Вы предоставляете смартфон.
Подключив сканер к телефону, вы проводите его по стене. Когда сканер проходит над шпилькой, на вашем экране появляется изображение шпильки.
Телефонные средства поиска шпильки показывают упрощенное изображение шпильки, а не саму шпильку.
Подсказка
Некоторые поисковые системы, предназначенные только для приложений, не поставляются со сканирующими устройствами и утверждают, что в качестве сканирующего устройства используют сам ваш телефон. Эти приложения ненадежны и могут даже поставляться в комплекте с вредоносным ПО или вредоносным ПО.
Плюсы и минусы
Поисковые устройства для вашего телефона позволяют легко найти шпильку, потому что вы видите то, что кажется шпилькой. Нет необходимости переводить мигалки или звуковые сигналы в физические объекты. Многие телефонные поисковые системы могут также обнаруживать трубы, провода и другие посторонние предметы.
Поисковые устройства для вашего телефона могут быть дорогостоящим вложением в инструмент, который вы можете использовать нечасто: они обычно стоят от 75 до 125 долларов.
Плюсы
-
Визуальное представление скрытых шпилек
-
Найдите предметы, кроме шпилек: трубы, провода.
-
Глубокое сканирование
Минусы
-
Дорогой
-
Требуется телефон и приложение
-
Не совместим со всеми телефонами
Как использовать поисковик шпильки
Сначала найдите общее расположение стержня
Со всеми искателями шпильки сначала определите общую область шпильки, прежде чем выполнять точную настройку местоположения с помощью устройства.
- Шпильки всегда располагаются в углах комнаты, а также у окон и дверей.
- Следующая ближайшая стойка будет в пределах 16 дюймов от угла комнаты.
- Соседние стойки будут расположены на расстоянии 16 дюймов друг от друга при измерении от центра к центру.
- Некоторый интерьер ненесущий стены (например, шкафы) могут иметь стойки, расположенные на расстоянии 24 дюймов.
Как использовать электронный поиск шпильки
-
Калибровка средства поиска шпильки
Откалибруйте искатель гвоздей, сначала приложив его к стене в любом месте. Далее нажимаем кнопку, пока устройство не загорится.
-
Развернуться к шпильке
Медленно переместите искатель шпильки по горизонтали к шпильке.
-
Марк Стад
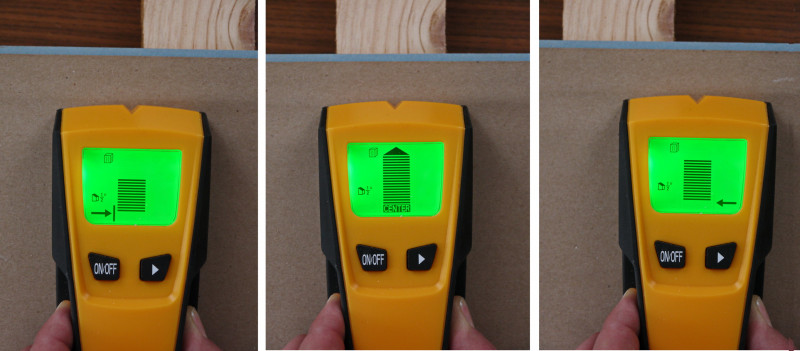
- В случае обнаружения края шпильки устройство загорится и подаст звуковой сигнал, когда достигнет края шпильки. Отметьте это место светлым карандашом на стене или на полоске малярная лента.
- Для поиска центральной стойки продолжайте перемещать устройство по области стойки, пока устройство не зарегистрирует полную ширину стойки.
-
Развернуть с другого направления
Только для крайних шипов: поднимите устройство примерно на 6 дюймов за место шипа. Прижмите устройство к стене, затем нажмите кнопку. Снова медленно вернитесь к шпильке.
-
Отметить Стада снова
Когда прибор зарегистрирует край стойки, отметьте место на стене.
Поиск и устранение неисправностей в электронных приборах поиска шпилек
- Электронные средства поиска шпильки работают тихо до обнаружения шпильки. Убедитесь, что он включен, проведя по известной шпильке.
- Материалы кроме гипсокартон (камень, бетон, плитка или штукатурка) могут нарушить показания прибора. Если искатель не работает с этими другими материалами, ограничьтесь гипсокартоном.
- Если искатель шпильки не дает показаний, возможно, он не откалиброван. Не все электронные устройства поиска головок нуждаются в калибровке, но некоторые из них это необходимо.
Как использовать магнитные искатели шпилек
-
Развернуть возле шпильки
Прижмите магнитный датчик стойки к стене возле предполагаемого участка стойки. Поднимите вверх в форме буквы S.
-
Держатель оттягивающего магнита
Когда вы почувствуете, что держатель зафиксировался на стене, остановитесь. Освободите держатель, поместив магнитный маркер на стену.
-
Депозит дополнительные магниты
Повторите предыдущие шаги с двумя или тремя магнитами на той же стойке.
-
Найдите осевую линию магнитов
Вертикальная центральная линия между всеми магнитами должна быть центром стержня. Держите алюминиевую или деревянную линейку над магнитами и наметьте карандашом центральную линию.
Поиск и устранение неисправностей магнитных искателей шпилек
- Если ваша застежка не касается шпильки, возможно, вы неправильно оценили осевую линию магнитов. Проведите лазерный нивелир по центру всех магнитов, чтобы получить точные показания.
- Другой способ, которым магниты дают неверные результаты, — это если все они оказываются на одной стороне шпильки. Переставьте магниты так, чтобы одни находились слева от шпильки, а другие — справа.
Как использовать поисковые системы для вашего телефона
-
Подключите сканер к телефону
Используйте прилагаемый шнур для подключения к аудио- или USB-порту вашего телефона, а другой конец подсоедините к сканирующему устройству.
-
Скачать приложение
Загрузите приложение и синхронизируйте свой телефон со сканирующим устройством.
-
Присоединить телефон
Зафиксируйте заднюю часть телефона на сканирующем устройстве.
-
Выберите тип стены
Некоторые поисковые системы на базе телефона просят вас выбрать тип сканируемой стены, например гипсокартон, дерево или бетон.
-
Откалибровать
Нажмите кнопку калибровки на телефоне. Перемещайте сканер по стене большими кругами.
-
Сканировать и пометить стену
Нажмите кнопку сканирования, затем медленно переместите сканирующее устройство по стене. Когда вы видите объект, остановите сканер. Отметьте стену карандашом.
Устранение неполадок с телефонными поисковыми системами
- Если сканирующее устройство неправильно работает с вашим телефоном, убедитесь, что ваш телефон совместим. Некоторые сканеры работают с телефонами Android, но не с iPhone.
- Если телефон совместим со сканером и по-прежнему не работает, убедитесь, что на вашем телефоне установлена последняя версия программного обеспечения.
- Если появляются неправильные изображения, возможно, вам придется вернуться и повторно выбрать категорию материалов.
Всем привет! Здесь уже были обзоры устройств такого типа. Так что, пожалуй, дополню эту нишу еще одним приборчиком.
Основная задача девайса — обнаружить в стене (потолке и т.д.) проводку, арматуру, деревянные брусья и подобные элементы перед, допустим, сверлением, штроблением или же другими манипуляциями. Для того, чтобы не попасть или же наоборот, чтобы попасть именно в эти элементы.
Упаковка бюджетная, чехла для хранения нету
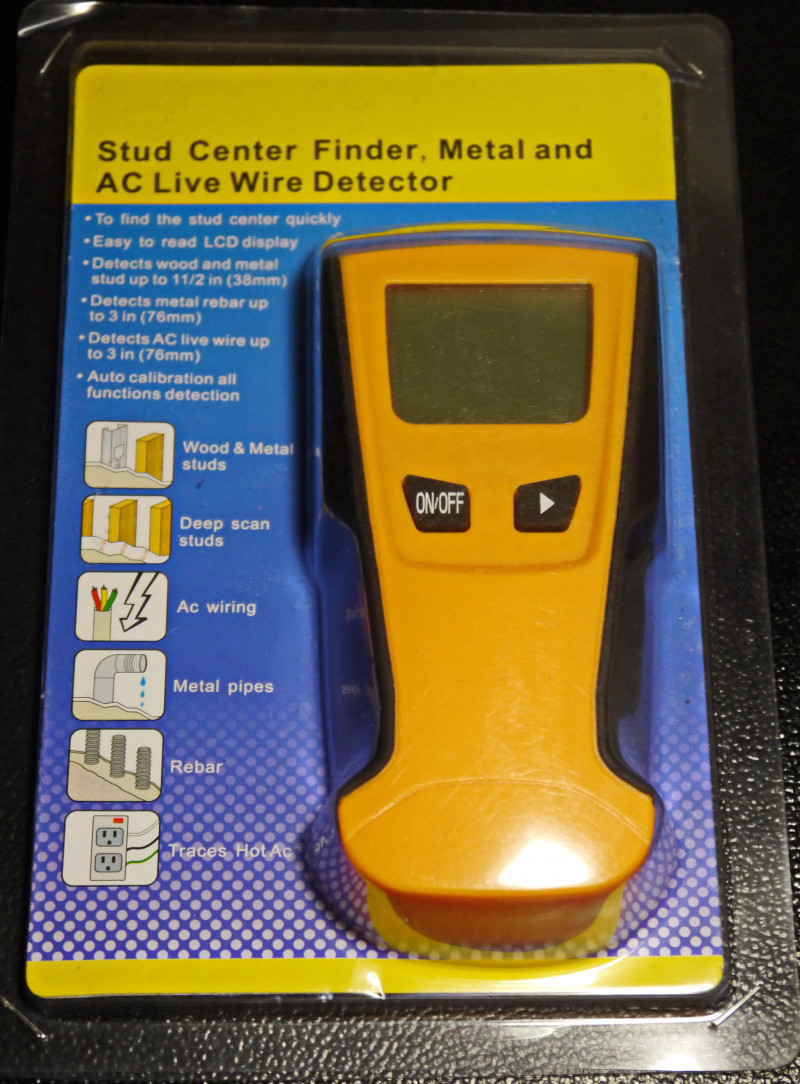
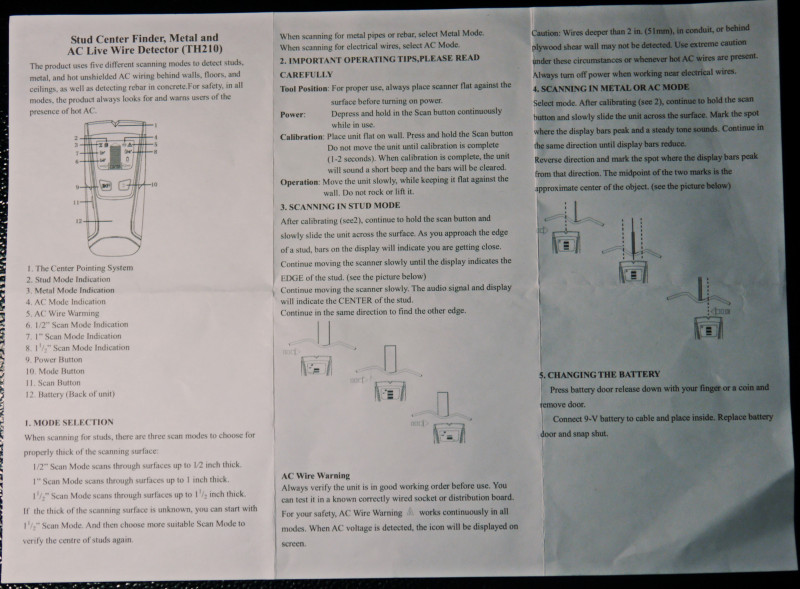
На картонной подложке краткое описание функций прибора, в ней же припрятана инструкция
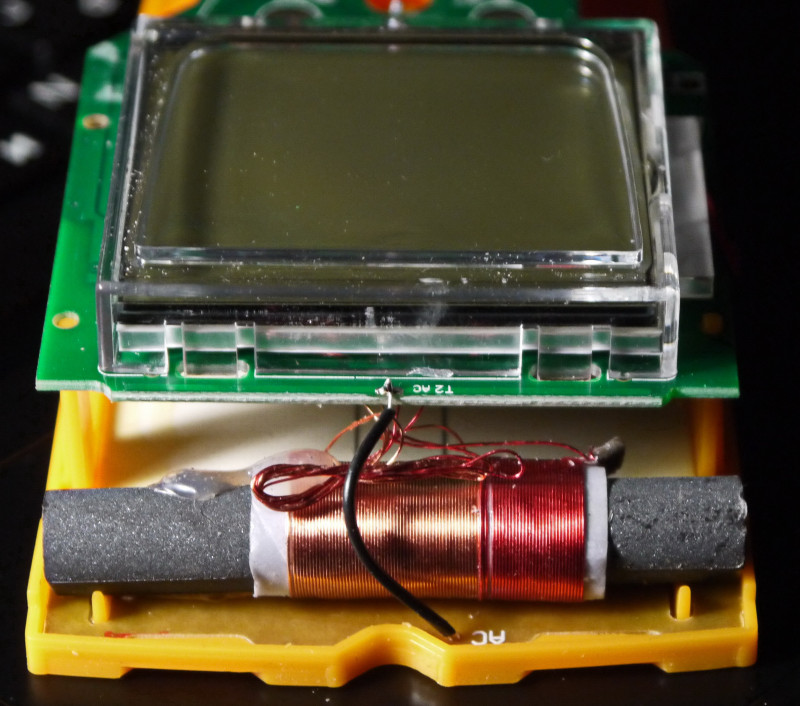
Корпус устройства полностью из пластика, по бокам имеются резиновые накладки
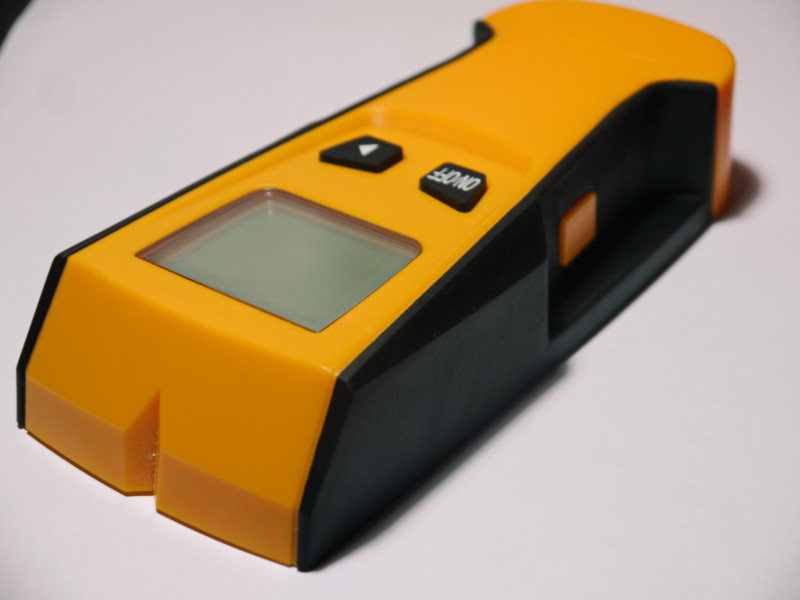
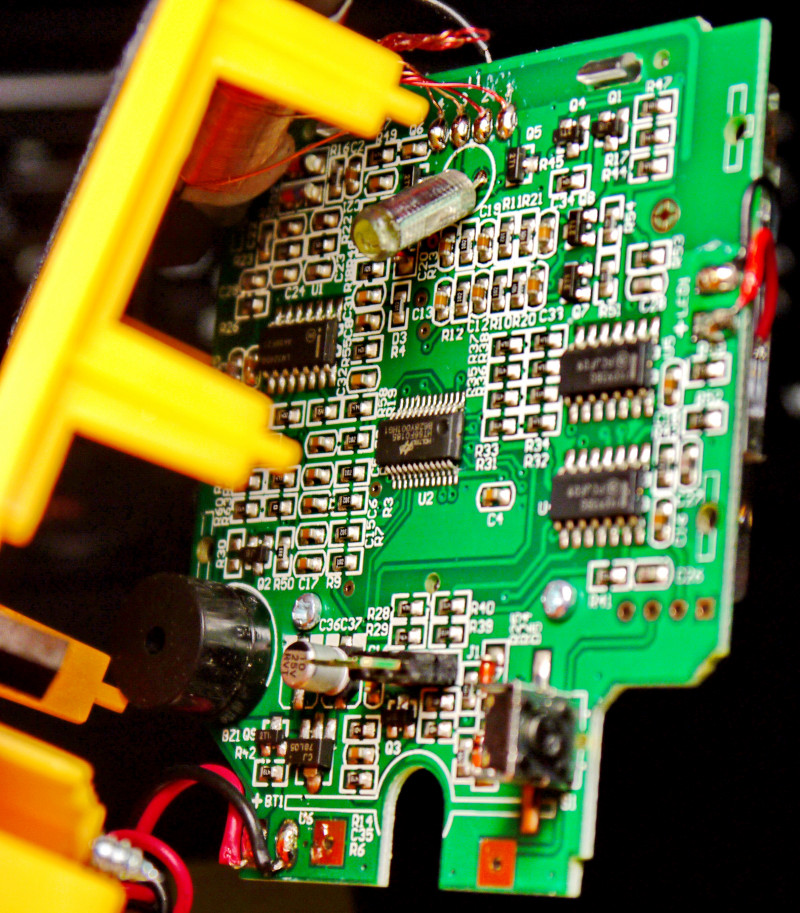
Для работы с девайсом имеется три кнопки. Кнопка включения/отключения, кнопка выбора режимов работы, кнопка запуска сканирования. В верхней части корпуса находится углубление, которое указывает на центр искомого элемента. В более дорогих приборах для этого имеется светодиод. Питание этой штуковины осуществляется батарейкой типа 6F22 (крона).
Детектор имеет три режима сканирования.
1. Обнаружение деревянных или металлических элементов стены, на глубине до 38мм.
2. Режим сканирования металла. Обнаружение не только ферросодержащих металлов но и меди и алюминия на глубине до 76 мм.
3. Обнаружение проводки под напряжением.
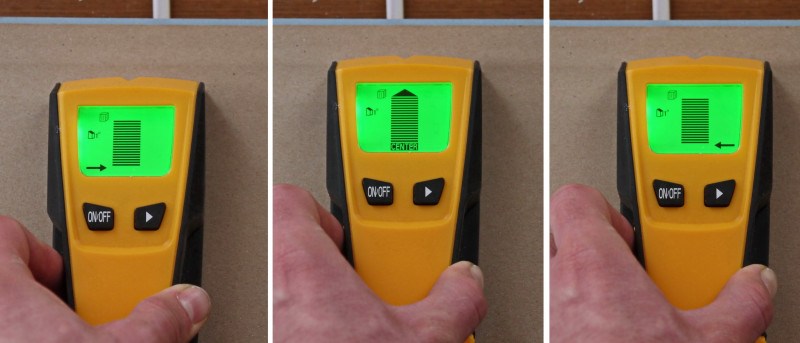
Первый режим сканирования разделен еще на три, по глубине сканирования: до 1/2 дюйма; до 1 дюйма и до 1 1/2 дюйма. Переключения между режимами осуществляется поочередным нажатием кнопки Mode. Памяти последнего используемого режима нету. При включении, по умолчанию, прибор находится в первом режиме (забегая на перед — самом функциональном). Каждому режиму соответствует своя пиктограмма на дисплее. Ниже фото их отображения в порядке соответствующем описанию.

Как видно дисплей имеет приятную зеленую подсветку.
Есть еще одна пиктограмма предупреждающая о близком нахождении проводов под напряжением.
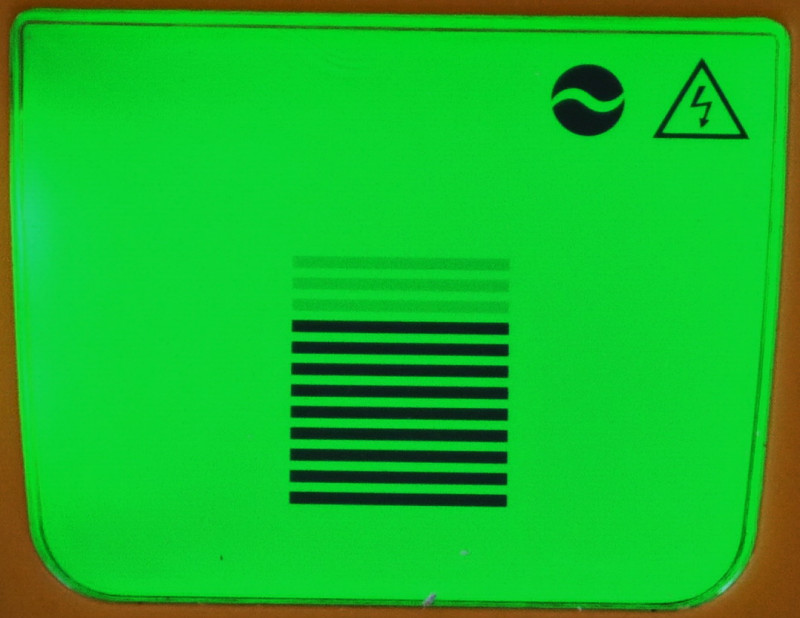
Она отображается во всех режимах, то есть, поиск проводки можно производить в любом из имеющихся режимов.
Для запуска сканирования необходимо приложить детектор к исследуемой поверхности и нажать и удерживать кнопку Scan, расположенную с боку на левой стороне корпуса. Прибор произведет калибровку. Нахождение его в этот момент желательно на том участке стены, где заведомо известно отсутствие проводки или других искомых элементов. В противном случае прибор исключит их из поиска и не будет на них реагировать. Поэтому для более точных результатов лучше производить калибровку в нескольких местах. То есть откалибровали, поискали, сделали отметки и по новой, но с калибровкой в другом месте.
При поиске, на дисплее, отображается шкала приближенности к элементу, чем ближе тем больше делений появляется на ней, вплоть до полного заполнения при обнаружении центра элемента, этот момент сопровождается звуковым сигналом.
Наиболее удобным является первый режим сканирования. При обнаружении скрытого элемента, помимо основной шкалы, появляются дополнительные стрелочки, указывающие направление, в котором необходимо смещать прибор. На изображении деревянный брусок за листом гипсокартона. Интересен факт, что прибор может определить тот же брусок за листом OSB. То есть, при калибровке на ориентированно стружечной плите, девайс продолжает искать деревянные элементы.
В этом же режиме можно искать и проводку.
Точность обнаружения на уровне. Единственное, что важно при этом знать — корректность показаний при различной глубине закладки элементов. После произведенных мной замеров, наиболее корректными и стабильно точными оказались показания на максимальной глубине до 25 мм. На большей глубине прибор может находить различные конструкционные элементы стен, но с намного меньшей точностью. Глубоко замурованная проводка ему уже не доступна. В большинстве случаев дальности действия устройства достаточно, поскольку, во многих железобетонных изделиях толщина защитного слоя бетона составляет те же 20-25мм, а гипсокартонные системы в основном состоят из одного слоя гипсокатртона.
Что же касается остальных двух режимов (поиск металла и поиск проводки), если кратко — они не нужны. Со всем этим справляется первый режим. Да, поиск металла работает на большей глубине, но не всегда точно, что может сыграть злую шутку. При поиске проводки под напряжением, он указывает на достаточно широкую область. Приходиться снова калибровать на краю этой области, для уменьшения чувствительности, и повторно производить поиск. Так же эти режимы лишены индикации стрелками, как в первой. Так что, на мой взляд, они больше маркетинг. Если не обращать на это внимание, то с уверенностью можно сказать, что прибор выполняет свои функции, правда с меньшей глубиной сканирования относительно заявленной. Как он работает можно посмотреть в этом ролике:
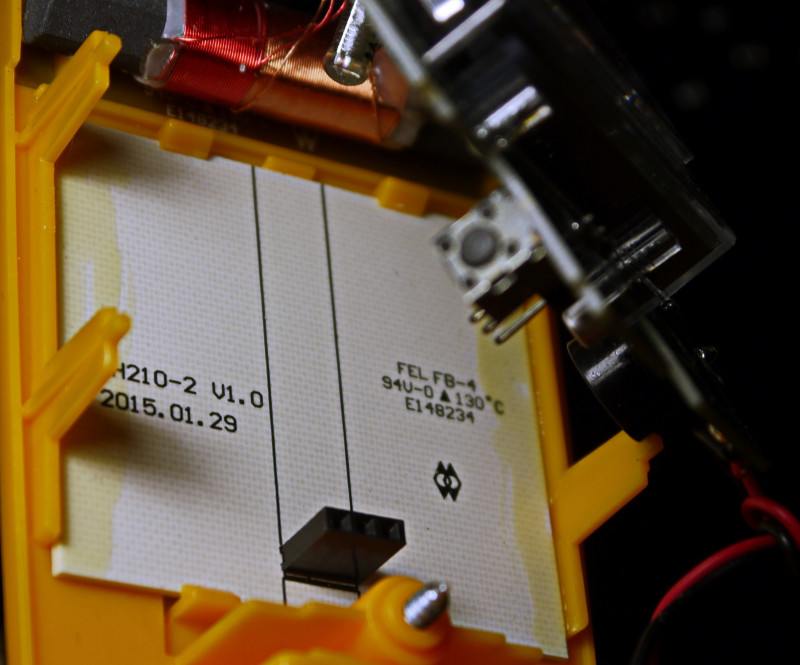
В конце хотел показать начинку устройства

На этом все. Всем спасибо за внимание. Надеюсь обзор был полезен.
Товар для написания обзора предоставлен магазином. Обзор опубликован в соответствии с п.18 Правил сайта.
TriScanner
Stud & Metal Locator with AC Warning
The Zircon TriScanner
®
Pro SL
scanner detects wood or metal
studs, metal pipes, and hot
Metal Sensor
electrical wires in interior walls,
floors, and ceilings, as well as
AC LED
rebar in concrete. It features
the SpotLite
®
Pointing System,
Stud Scan
three different scanning modes
Mode LED
plus continuous hot electrical
wire detection.
Stud DeepScan
Mode LED
Metal Scan
Mode LED
On/Off Button
(Side of unit)
LIMITED 1 YEAR WARRANTY
Zircon Corporation, («Zircon») warrants this product to be free from defects
in materials and workmanship for one year from the date of purchase. Any
in-warranty defective product returned to Zircon*, freight prepaid with proof
of purchase date and $5.00 to cover postage and handling, will be repaired or
replaced at Zircon’s option. This warranty is limited to the electronic circuitry
and original case of the product and specifically excludes damage caused by
abuse, unreasonable use or neglect. This warranty is in lieu of all other
warranties, express or implied, and no other representations or claims of any
nature shall bind or obligate Zircon. Any implied warranties applicable to this
product are limited to the one year period following its purchase.
IN NO EVENT WILL ZIRCON BE LIABLE FOR ANY SPECIAL, INCIDENTAL OR
CONSEQUENTIAL DAMAGES RESULTING FROM POSSESSION, USE OR
MALFUNCTION OF THIS PRODUCT.
In accordance with government regulations, you are advised that:
(i) some states do not allow limitations on how long an implied warranty lasts
and/or the exclusion or limitation of incidental or consequential damages, so
the above limitations and/or exclusions may not apply to you, and further (ii)
SCANNING IN METAL MODE
Metal can be detected up to 1
1
⁄
in. (38 mm) deep
2
in walls and up to 3 in. (77 mm) deep in concrete.
While holding in On/Off
12
button, slowly move unit
on surface, to locate targets.
Reverse directions to locate other
edge of target. Lights will indicate
metal in the same way as in find-
ing studs. When tone sounds,
LEDs light up, and SpotLite comes on, you are close
to metal. Mark this spot to help ensure that you’re
not nailing into a pipe.
CONTINUOUS AC VOLTAGE
DETECTION
The TriScanner Pro SL detects from 90 to 250 V
13
at 50 to 60 Hz AC in a HOT unshielded
electrical wire that is within 1
1
⁄
in. (38 mm) of
2
wall surface. The voltage detection feature works
continuously in all modes. The sensor is located in the
center of the back of the unit.
Caution: The TriScanner Pro SL will not detect hot
wires inside metal pipe or metal conduit, behind
metallic wall covering, or behind some plywood or
other dense materials. Use extra caution in these
construction situations. Always turn the power
off when nailing, cutting, or drilling near
electrical wires.
VERIFYING IF THE UNIT WORKS
Turn unit on in the air.
14
If the LEDs light when
you bring your hand up to the
back, then the unit is working
properly.
The AC LED should
15
light with an electrical
cord an inch or two away.
®
Pro SL
®
SpotLite
Pointing System
®
TRISCANNER
PRO SL
this warranty gives you specific legal rights and you may also have other
rights which vary from state to state.
Return product freight prepaid with proof of purchase date (dated sales
receipt) and $5.00 to cover postage and handling, to:
Zircon Corporation
*Attn: Returns Department
2390 Boswell Road, Suite 300
Chula Vista, CA 91914-3510 USA
Be sure to include your name and return address. Out of warranty service and
repair, where proof of purchase is not provided, shall be returned with repairs
charged C.O.D. Allow 4 to 6 weeks for delivery.
Customer Service, 1-800-245-9265 or 1-408-866-8600
Monday–Friday, 8 a.m. to 5 p.m. PST
E-mail: customer.service@zircon.com
U.S. Patent #4464622, 5352974, 5619128, 6023159, 6249113, 6259241,
D419546, D419149, D419545, D427166, and D419544
Canada Patent #1106932 • G.B. Patent #2117909B, 2159630B
©2002 Zircon Corporation • P/N 58756 • Rev B 11/02
OPERATING CAUTIONS
Depending on the proximity of electrical wiring
16
or pipes to the wall surface, the scanner may
detect them in the same manner as studs. Caution
should always be used when nailing, cutting, or
drilling in walls, floors, and ceilings that may contain
these items.
To avoid surprises, remember that studs or joists are
normally spaced 16 in. (406 mm) or 24 in. (610 mm)
apart and are 1
1
⁄
in. (38 mm) in width. Anything
2
closer together or a different width may not be a
stud, joist, or firebreak. Always turn off the power
when working near electrical wires.
WORKING WITH DIFFERENT MATERIALS
Wallpaper: TriScanner Pro SL functions normally on
walls covered with wallpaper or fabric, unless the
materials are metallic foil, contain metallic fibers, or
are still wet after application.
Textured Ceilings: When scanning on an uneven
surface, place thin cardboard on ceiling and scan over
the cardboard. Calibrate with cardboard in place.
Note: TriScanner Pro SL cannot scan through
carpeting and pad or, in most cases, lath and plaster.
If you are having difficulty scanning through any of
these or other materials, use the Metal mode to
locate nails in the stud or joist. Try to locate several
nails to get a better idea of how the stud is oriented.
FCC Part 15 Class B Registration Warning
This equipment has been tested and found to comply with the
limits for a Class B digital device, pursuant to Part 15 of FCC
Rules. These limits are designed to provide reasonable protection
against harmful interference when the equipment is operated in
a residential installation. This equipment generates, uses, and
can radiate radio frequency energy and, if not installed and used
in accordance with the instructions, may cause harmful interfer-
ence to radio communications. However, there is no guarantee
that interference will not occur in a particular installation. If this
equipment does cause harmful interference to radio or television
reception, which can be determined by turning the equipment
off and on, the user is encouraged to try to correct the interfer-
ence by one or more of the following measures:
(1) Reorient or relocate the receiving antenna.
(2) Increase the separation between the equipment and receiver.
(3) Connect the equipment into an outlet on a circuit, different
from that which the receiver is connected (if applicable).
(4) Consult the dealer or an experienced radio/TV technician
for help.
INSTALLING THE BATTERY
Press battery door release with a coin and
1
remove door.
Stud Edge
Groove
Connect battery to cable and place inside
2
battery compartment. Replace battery door
LED Sensing
and snap shut. Battery will last approximately two
Display
years under normal conditions.
®
TruCal
LED
TURNING THE POWER ON/OFF
ON: Press and hold ON/OFF button on the left
3
side. OFF: Release ON/OFF button.
Mode Selector
Switch
Note: the Triscanner Pro SL will automatically turn
off after 15 minutes of continuous use (in case
battery button is accidently held down in a toolbox.)
Battery Door
(Back of unit)
SELECTING MODE: STUD SCAN,
STUD DEEPSCAN
®
Use Stud Scan mode for depths to about
(19 mm) and Stud DeepScan for depths up to
1
1
⁄
in. (38 mm) or double layers.
2
Slide the Mode selector switch until you reach
4
desired scanning mode. The mode can be
selected with the unit on or off.
CALIBRATING IN STUD SCAN OR
STUD DEEPSCAN MODES
Keep unit flat against wall
during calibration or scanning.
5
Position the TriScanner
Pro SL flat against the
wall. Select mode. Press and
hold On/Off button.
HELPFUL HINTS
Situation
Over-the-Stud Indicator.
• Scan began over a stud.
(Flashing lights)
• Unit not flat against wall.
• Unit tilted or lifted during
Working in DeepScan
• You may have calibrated over
mode and can’t detect
studs.
• You may be holding the unit
Detects other objects
• Electrical wiring and metal/
besides studs in stud
Scan and DeepScan
modes.
You suspect electrical
• If wires are shielded behind
wires, but do not
detect any.
• The wires may not be HOT.
• Wires may be too deep to
Area of voltage
• Static charge may develop on
detection is too large.
Red LEDs light but center
• Wall is particularly thick
pair of green LEDs don’t.
Difficulty detecting
• Unit calibrated over metal.
metal.
• Metal targets are too deep.
Image of metal stud
• Metal has greater density
appears wider than
actual size.
Red LEDs do not light up
• Battery voltage is low.
as you test the unit with
your free hand moving
toward the back of the
TriScanner Pro SL.
Questions? Check our Web site at www.zircon.com and click «Product Support.»
Mode LED and TruCal
6
quickly and then stay lit. TriScanner Pro SL
automatically calibrates in less than one second.
SCANNING IN STUD SCAN OR STUD
DEEPSCAN MODES
Slowly slide unit
7
horizontally across wall,
9 VOLT
BATTERY
left or right.
When center pair of
8
green LEDs light,
steady tone sounds, and the
SpotLite
®
Pointing System
shines, you have found the
stud edge. Mark this spot.
Continue holding
9
On/Off button in and
scan beyond marked spot until
the center green and 3 pairs
of red LEDs go out.
, OR METAL SCAN
Without releasing On/Off
10
3
⁄
in.
4
button, slide unit in reverse
direction to locate the other edge
of stud. Mark this second spot.
Middle of stud is centered
between the two marks.
CALIBRATING IN METAL MODE
Select Metal mode. Press
11
and hold ON/OFF button.
Calibrate TriScanner Pro SL in air,
away from metal objects. Position
unit flat against wall.
Probable Causes
• Turn unit off, move over a few inches, and start again.
• Hold unit with thumb and index finger no higher than
handgrips.
scan. (All these factors affect
• On rough surfaces, place a piece of paper on wall,
proper calibration.)
scanning through it to help slide unit more smoothly.
• In Stud Scan or DeepScan modes, hold unit parallel to
and move perpendicular to object you’re trying to locate.
• Move TriScanner Pro SL over a few inches and recalibrate.
a stud. (The error condition is
disabled in DeepScan mode
because it is twice as
sensitive as Stud Scan.)
• Hold the TriScanner Pro SL so that the two Velcro™ strips
like a TV remote, aiming it at
on the back make contact with the wall.
the wall.
• Switch to Metal mode, where combined with continuous
plastic pipes may be near or
AC detection, pipes and electrical wiring should be
touching back surface of
detected adequately.
wall.
• Use CAUTION when nailing, cutting, or drilling in walls,
metallic wall coverings, or in
floors, and ceilings that may contain wiring.
metal conduit, TriScanner Pro
• Use extra caution if the area has plywood, thick wood
SL will not be able to find
backing behind drywall, or thicker than normal walls.
them.
• Remember that studs or joists are normally spaced
16 in. (406 mm) or 24 in. (610 mm) apart and are 1
(38 mm) wide.
sense.
• If a switch controls an outlet, make sure it is ON for detection.
• To narrow detection, turn unit off and on again at the edge
drywall, spreading voltage
of where wire was detected and scan again.
detection as much as 12 in.
• Place free hand flat against wall near tool to discharge
(305 mm) from each side.
static.
• Interpret pair of red LEDs closest to center as stud edge.
or dense.
• Switch to DeepScan to locate the stud.
• Always calibrate in the air for best sensitivity and to avoid
calibrating over metal.
• Scan in both horizontal and vertical directions. Sometimes
metal sensitivity is greater when metal object is parallel to
sensor, which is along top of unit.
• To narrow image, scan and mark first indications and then
than wood and is sensed
calibrate TriScanner Pro SL over either of the first two marks.
farther from edge.
Scan again and mark the new, narrowed detection points.
Repeat if necessary.
• Replace battery to maintain sensitivity.
®
LED will flash
Solutions
1
⁄
in.
2

REV A 12STHT77407
S300
8
1
77407
Stanley Stud Sensor 300
The Stud Sensor 300 uses electronic signals to locate the center of studs, joists
or live AC wires through drywall or other common building materials. Once
the center of a stud has been detected in one pass across the surface, the
Stud Sensor 300 gives a visual display and sounds an audible tone. A marking
channel allows you to easily note the stud center and edges on the wall.
The Stud Sensor 300 will not detect objects in concrete, mortar, block or brick
work, carpeting, foil faced materials, metallic surfaces or ceramic tiles. The
Stud Sensor 300 is not designed to locate non-ferrous or plastic objects such
as pipes.
Note: Read all instructions prior to operating the Stud Sensor 300 and DO NOT
remove any labels from the tool.
WARNING:
Protect Your Eyes, Wear Safety Goggles.
Usage
Detecting Wood / Metal Studs
2
Hold the Stud Sensor 300 fl at
against the surface, making fi rm
contact.
3
Press in and hold the activation
button. A series of tones will sound.
Note: The unit cannot be moved before
calibration is complete.
6
/
7
When it detects the stud
center, the “Center” icon will appear on
the LCD and an audible tone will sound.
Use the marking channel located at the
top of the unit to mark the stud center.
OPERATING INSTRUCTIONS
Battery
1
Open door on back of unit and connect a 9 volt battery
(not included) to clip. Put battery back into case and close
back battery door.
Note: Recommend to replace a new 9 volt battery
when low battery — “Low Battery” will appear on the
LCD.
10
If all segments of the LCD fl ash on and off when
the activation button is pressed, move the Stud Sensor
300 to a different location and try again. Releasing the
activation button will turn off the sensor.
Note: While calibrating, the Stud Sensor 300 must not
be placed directly over a stud, dense material such as
metal, or over a wet or newly painted area, or it will not
properly calibrate.
8
Slide the Stud Sensor 300 slowly across the surface in a straight line.
As it detects a stud, the unit will display the relative position of the stud
on the screen.
• Marking Channel
• Live Wire Warning LED
• LCD Display
• Activation Button
• METAL SCAN Mode
• Stud Location Graphic
• Self-Calibration Complete
• Depth Detection Mode
4
When the unit is calibrated the
“Ready” icon will appear on the LCD.
5
Keep holding the activation button
during all of the following procedures.
Note: Once the Activation button is
released, the unit shuts off.
• STUD or METAL / AC Mode Selection
• Live Wire Detected
• STUD Mode
• Low Battery Indicator
• AC TRACKING Mode