
24-pin Dot Matrix Printer
All rights reserved. No part of this publication may be reproduced, stored in a retrieval
system, or transmitted in any form or by any means, electronic, mechanical, photocopying,
recording, or otherwise, without the prior written permission of SEIKO EPSON
CORPORATION. The information contained herein is designed only for use with this EPSON
printer. EPSON is not responsible for any use of this information as applied to other printers.
Neither SEIKO EPSON CORPORATION nor its affiliates shall be liable to the purchaser of
this product or third parties for damages, losses, costs, or expenses incurred by the purchaser
or third parties as a result of: accident, misuse, or abuse of this product or unauthorized
modifications, repairs, or alterations to this product, or (excluding the U.S.) failure to strictly
comply with SEIKO EPSON CORPORATION’s operating and maintenance instructions.
SEIKO EPSON CORPORATION shall not be liable for any damages or problems arising from
the use of any options or any consumable products other than those designated as Original
EPSON Products or EPSON Approved Products by SEIKO EPSON CORPORATION.
EPSON and EPSON ESC/P are registered trademarks and EPSON ESC/P2 is a trademark
of SEIKO EPSON CORPORATION.
Microsoft, Windows, and Windows NT are registered trademarks of Microsoft Corporation.
IBM is a registered trademark of International Business Machines Corporation.
General Notice: Other product names used herein are for identification purposes only and
may be trademarks of their respective owners. EPSON disclaims any and all rights in those
marks.
Copyright © 2002 by SEIKO EPSON CORPORATION, Nagano, Japan.
®
Reference Guide
-
Страница 1
24-pin Dot Matrix Printer All rights reserved. No part of this publi cation ma y be reproduced, stored i n a retri eval system, or transmitted in any form or by any means, electronic, mecha nical, photocopyi ng, reco rding , or other wise, w ithout the prio r written permiss ion of SEIKO EP SON CORP ORATI ON. The in format ion conta ined he rein is[…]
-
Страница 2
[…]
-
Страница 3
iii Content s Chapter 1 Paper Handling Selecting a Paper Source . . . . . . . . . . . . . . . . . . . . . . . . . . . . . . . . . . . . . 2 Paper source and paper t ypes. . . . . . . . . . . . . . . . . . . . . . . . . . . . 2 Setting the paper release l ever . . . . . . . . . . . . . . . . . . . . . . . . . . . 3 Adjusting the Paper-Thic kness Lev[…]
-
Страница 4
iv Using EPSON Status Monito r 3 . . . . . . . . . . . . . . . . . . . . . . . . . . . . . 34 Setting up EPSON Stat us Monitor 3 . . . . . . . . . . . . . . . . . . . . . 35 Accessing EPSON Status Mo nitor 3 . . . . . . . . . . . . . . . . . . . . . 36 Chapter 3 Control Pane l Buttons and Lights . . . . . . . . . . . . . . . . . . . . . . . . . . .[…]
-
Страница 5
v Appendi x A Product In form atio n Safety Instructi ons . . . . . . . . . . . . . . . . . . . . . . . . . . . . . . . . . . . . . . . . 124 Warnings, cautions, an d notes . . . . . . . . . . . . . . . . . . . . . . . . . 124 Hot parts caution sy mbol . . . . . . . . . . . . . . . . . . . . . . . . . . . . . 124 Important sa fety instruct ions . .[…]
-
Страница 6
vi[…]
-
Страница 7
Paper Ha ndling 1 1 1 1 1 1 1 1 1 1 1 1 1 Chapter 1 Paper Handling Selecting a Paper Source . . . . . . . . . . . . . . . . . . . . . . . . . . . . . . . . . . . . . 2 Paper source and paper t ypes. . . . . . . . . . . . . . . . . . . . . . . . . . . . 2 Setting the paper release l ever . . . . . . . . . . . . . . . . . . . . . . . . . . . 3 Adjust[…]
-
Страница 8
2 Pape r Handling Selecting a Paper Source Your printer can print on single sheets, cont inuous paper, multipar t forms, and labels. c Caution: Do not use paper th at is folded, creased, curled, torn, stain ed, or stamped. Always use new, clean pap er that meets the paper specifications. See “Paper” on page 133 for more detailed informati on. Y[…]
-
Страница 9
Paper Ha ndling 3 1 1 1 1 1 1 1 1 1 1 1 1 Setting the paper rele ase lever Set the paper release leve r to select the pa per-feedi ng method you wan t the pr inter to use. Th e pape r rele ase lev er has two po sition s: for tract or feeding and for single-sheet feeding, as explained belo w. Adjusting the Paper-Thickness Lever You can get the best […]
-
Страница 10
4 Pape r Handling The higher t he number you set the paper-t hickness lever to , the wider the space between the pl aten and pr int head. If your printout appears faint or characte rs seem skippe d or missing, th is settin g may be t oo high. On t he other h and, if t he settin g is too low, your pri ntout may appear smudged, the pa per may not fee[…]
-
Страница 11
Paper Ha ndling 5 1 1 1 1 1 1 1 1 1 1 1 1 Loading Continuous Paper Your print er can pri nt on continuous paper fro m 101.6 to 254 mm (4.0 to 10.0 in ches) wide. See “ Continuo us paper ” o n p a g e 1 3 4 f o r detailed cont inuous p aper specific ations. You can load conti nuous paper fr om the tracto r unit. Positioning the continuous pap er[…]
-
Страница 12
6 Pape r Handling Loading continuous paper with the tractor When using contin uou s paper , it is a go od ide a to se t the Au to tear-off function in the default- setting mode to on . For more info rmation, see “ About Your Printer ’ s Default Settings ” on page 41. 1. Make sure t hat the pape r relea se leve r is se t to the trac tor feedin[…]
-
Страница 13
Paper Ha ndling 7 1 1 1 1 1 1 1 1 1 1 1 1 3. Faci ng the back of the print er, rel ease the sprocket l ock levers by pushi ng the m up. 4. Pos ition the lef t sprocket so that the sprocket pi ns are to the left of th e arrow mar k (0 posi tion) on the back of t he printer. Then push down the l ock lever to l ock the sprock et in plac e. Note: Print[…]
-
Страница 14
8 Pape r Handling 6. Sl ide the cente r paper s upport to th e middle of the two sprockets. 7. Op en the spro cket covers o f the both spr ockets. 8. Fi t the fi rst two h oles of the c ontinuo us paper over the sprocket pins on both sides. Be sure to positi on your paper supply so that the printable side faces up. sprocket cover[…]
-
Страница 15
Paper Ha ndling 9 1 1 1 1 1 1 1 1 1 1 1 1 c Caution: Make sure the first sheet of your continuous paper has a clean, straight edge so that it can feed smoothly into the printer. 9. Close the sprock et covers. 10. Slide the right sprocket to remove any s lack in the paper. Then push down the sprocket lock lever to l ock the sprocket i n place. Note:[…]
-
Страница 16
10 Paper Handling Note: ❏ Always make sure there is at least one more sheet than required; continuous paper may not feed properly if i t is not fed through the sprockets. ❏ Do not pull the loaded paper out of the tractor unit while the printer is on. Doin g so may ca use paper jams or prin ter malfunctio ns, also the top-of-form position setti […]
-
Страница 17
Paper Ha ndling 11 1 1 1 1 1 1 1 1 1 1 1 1 1. When print ing is finished, the printer advances the perf orati on of the final pr inted p age to th e tear -off posi tion. Tear off a ll printed pag es using the tear-o ff edge of the print er cover. Note: If yo ur pa per ’ s perforation is not properly aligned with the tear-off edge, you can adjust […]
-
Страница 18
12 Paper Handling Loading Single Sheets Your pr inter can pr int on si ngle sheet s of paper from 90 to 257 mm (3.5 to 10. 1 inches) wide. See “ Single sheets ” on page 134 for deta iled sing le-she et pap er speci ficati ons. Note: If you load long paper (for example, legal size paper), leave enough space at the back of the printer so that the[…]
-
Страница 19
Paper Ha ndling 13 1 1 1 1 1 1 1 1 1 1 1 1 4. Sli de the edge guide until i t rests agai nst the gui de mark. 5. While a ligning the left si de of a sheet of paper with t he edge guide, in sert it into the print er unt il it meet s resist ance. Be s ure to load pa per prin table sid e up and t he top of t he paper fi rst. Afte r a fe w seco nds, th[…]
-
Страница 20
14 Paper Handling ❏ If you need to adjust the position of the paper after it is loaded, see “ Adjusting t he top-of-form position ” on page 20 and follow the instructions. ❏ Do n ot pull out paper that is not ejected completely after pressing the Lo ad/Ejec t button. Do ing so may cau se paper jams or p rinter malfunctions, also th e top-of[…]
-
Страница 21
Paper Ha ndling 15 1 1 1 1 1 1 1 1 1 1 1 1 You can load singl e-sheet multipart for ms from the paper guid e. For instru ctions, see “ Loading Single Sheets ” o n p a g e 1 2 . Y o u c a n load conti nuous mult ipart f orms in t he same way as yo u load ordinary cont inuous pa per. For i nstructions, see “ Loading Continuous Pap er ” on pag[…]
-
Страница 22
16 Paper Handling To tear off and eject labels When using conti nuous forms, always tear off and eject lab els as desc ribed belo w. c Caution: Never feed labels backward using the Load/Ej ect button. La bel s can easily peel off their backing and jam the printer. 1. At the back of your pr inter, tear off t he last la bel fo rm that has entered the[…]
-
Страница 23
Paper Ha ndling 17 1 1 1 1 1 1 1 1 1 1 1 1 Switching Between Continuous Paper and Single Sheets You can easily swi tch between cont inuous paper and single sheets with out r emovi ng the c onti nuous pape r from th e trac tor. Switching to single sheets Follow these steps to switch from continuous paper to single sheets: 1. When the Auto te ar-off […]
-
Страница 24
18 Paper Handling Switching to continu ous paper Follow these steps to switch from single sheets to continuous paper : 1. If n ecessary, press the Load/ Eject button to ejec t the las t printed single sheet. 2. Mak e sure cont inuous paper is loaded in the printer as desc ribed in “ Loadin g co ntinuo us pap er wi th th e tra ctor ” on page 6. […]
-
Страница 25
Paper Ha ndling 19 1 1 1 1 1 1 1 1 1 1 1 1 Using the Micro Adjust Function The Micro Adjust function all ows you to move the paper forward or b ackward in 0.1 41 mm (1/180-inc h) increments so that you can m ake preci se adjust ments to the top-of -form and tear-off pos itions. Adjusting the tear-off position If your paper per foration i s not a li[…]
-
Страница 26
20 Paper Handling Note: The printer has a minimum and a maximum tear-off position. If you try to adjust the tear-off position beyond these limits, the printer beeps and stops moving the paper. 4. Tea r off the p rinted pages. 5. Pr ess the Pau se button to exi t the Micro Adjust mode. When you resume prin ting, the p rinter au tomatica lly feeds th[…]
-
Страница 27
Paper Ha ndling 21 1 1 1 1 1 1 1 1 1 1 1 1 4. Hol d down the Pause button for about three seconds . The Pause light st arts fla shing and the p rinter ent ers the Mi cro Adjust mode. 5. Press t he LF/FF D button to move the top-of-fo rm positi on down on t he page, o r press t he Load/E ject U butto n to move the top-of -form position u p on the pa[…]
-
Страница 28
22 Paper Handling[…]
-
Страница 29
Printer Software 23 2 2 2 2 2 2 2 2 2 2 2 2 Chapter 2 Printer Software About Your Print er Software . . . . . . . . . . . . . . . . . . . . . . . . . . . . . . . . 24 Using the Pri nter Driver wi th Windows Me, 98, and 95 . . . . . . . . . 24 Accessing the pr inter driver from Windows a pplications . . . 25 Accessing the print er driver from the St[…]
-
Страница 30
24 Printer Soft ware About Your Printer Software The EPSON p rinte r softw are tha t come s with your printer includes th e printe r driver softwar e and EPSON Statu s Monitor 3. The printer driv er is soft ware that al lows your compu ter to control the pr inter. You need to install the print er driver so your Windows software a pplications ca n t[…]
-
Страница 31
Printer Software 25 2 2 2 2 2 2 2 2 2 2 2 2 ❏ When y ou access the printer dr iver from the Sta rt menu, the prin ter dr iver sett ings y ou mak e appl y to al l your applicat ions. S ee “ Accessi ng the printe r driver fr om the Start men u ” on pag e 26 for more inf ormation. See “ Chan ging the p rinter drive r sett ings ” on page 27 t[…]
-
Страница 32
26 Printer Soft ware 2 . M a k e s u r e t h a t y o u r p r i n t e r i s s e l e c t e d a n d t h e n c l i c k Printer , Setup , Pr operties , or Options . (You may need to cl ick a combination of t hese buttons.) The Pro perties window appears, an d you see t he Paper, Graphics, a nd Device Options menu. These menus contai n the print er drive[…]
-
Страница 33
Printer Software 27 2 2 2 2 2 2 2 2 2 2 2 2 4. To view a menu, click t he corresponding tab at the top of the window. See “ Changing t he print er driver se ttings ” on page 27 to chang e the settin gs. Changing the printer driver settings You can change the pri nter dri ver setting s from the pr inter ’ s Propertie s dialog box. F or an over[…]
-
Страница 34
28 Printer Soft ware Using the Printer Driver with Windows XP, 2000 and NT 4.0 You can access the p rinter driver from your Win dows applica tions or from the Sta rt menu. ❏ Wh en you access the pri nter driver from a Windows applica tion, any s ettings you make app ly only to the applica tion you ar e using. See “ Access ing th e prin ter dri […]
-
Страница 35
Printer Software 29 2 2 2 2 2 2 2 2 2 2 2 2 1. Select Print Setup or Print f r o m t h e F i l e m e n u o f y o u r a p p l i c a t i o n software. The Print or Print Setup dialog box appears. 2. Make sure that your pri nter is selected and then rig ht-clic k you r print er icon an d select Pri nting Prefer ences (Wi ndows XP or 2000) o r clic k P[…]
-
Страница 36
30 Printer Soft ware 3. To view a me nu, clic k the corr espondi ng tab a t the top of the window. Se e “ Chan ging the p rinter driv er set tings ” on page 32 to change the settings. Accessi ng the printer driv er from the Start menu Follow th ese steps to access t he printer driver from the Start menu: Note: The screen shots used in this proc[…]
-
Страница 37
Printer Software 31 2 2 2 2 2 2 2 2 2 2 2 2 2. Rig ht-clic k you r prin ter ic on, an d clic k Printing Preference s (for Windows XP or 200 0), Document Defaults (for Windows NT 4.0). The Printi ng Preferences d ialog box or the Document Proper ties dialog b ox, which contains t he Layout and Paper/Q uality menu s (Windows XP or 2000) or the P age […]
-
Страница 38
32 Printer Soft ware 3. To view a me nu, clic k the corr espondi ng tab a t the top of the window. Se e “ Chan ging the p rinter driv er set tings ” on page 32 to change the settings. Changing the printer driver settings Your print er driver has two menus fr om which you can change the pri nter driv er setting s: Layout menu and Pa per/Q uality[…]
-
Страница 39
Printer Software 33 2 2 2 2 2 2 2 2 2 2 2 2 Printer Driver Settings Overview The following ta bles show the Windows pr inter dr iver settings. Note that not eve ry setting is availab le in all versions of Windows . Printer settings Settings Explanations Paper size Select the size of the pa per you want to use. If you do not see your pa per size, u […]
-
Страница 40
34 Printer Soft ware Monitoring settings Using EPSON Status Monitor 3 EPSO N Sta tus Mon itor 3 that co mes with your print er is ava ilable for Windo ws Me, 98, 95, XP, 2000 or NT 4.0. It allows you to monitor you r printer ’ s status, alerts you when printer err ors occur, and pro vides troubleshoot ing instru ctions when neede d. EPSON Stat us[…]
-
Страница 41
Printer Software 35 2 2 2 2 2 2 2 2 2 2 2 2 Note: If you install the driver using Add Printer in the Printers folder, or using the “ Poi nt and Pr int ” method, EPSON St atus Monitor 3 may not function properly. If you wan t to use EPSON Status M onitor 3, reinstall the driver as described in the Setup Sheet. Befo re usin g EPSO N Statu s Moni […]
-
Страница 42
36 Printer Soft ware 3. The followi ng settings are av ailabl e: Note: Click Default to revert all items to the default settings. Accessing EPSON Status Monitor 3 Do one of t he following to access EPSON Status Monit or 3: ❏ Dou ble-cl ick the p rinter-sh aped shortc ut ico n on th e taskbar. To add a shortcut icon to the t askbar, go to the Ut i[…]
-
Страница 43
Control Panel 37 3 3 3 3 3 3 3 3 3 3 3 3 Chapter 3 Cont rol Pa nel Buttons and Lights . . . . . . . . . . . . . . . . . . . . . . . . . . . . . . . . . . . . . . . . 38 Selecting a Font . . . . . . . . . . . . . . . . . . . . . . . . . . . . . . . . . . . . . . . . . . . 40 About Your Print er ’ s Default Sett ings . . . . . . . . . . . . . . . .[…]
-
Страница 44
38 Contr ol Pa nel Buttons and Lights 1 LF/FF button ❏ F eeds paper line by line when pressed shortly. ❏ Eject s a single sheet or advances continuous paper to the next t op-of-form position whe n held down for a few seconds. 2 Micr o Adjust When you hold down the Pause button for thr ee seconds, the printer ente rs the Micro Adj ust mode. In t[…]
-
Страница 45
Control Panel 39 3 3 3 3 3 3 3 3 3 3 3 3 4 Pause button ❏ Stops printing temporarily, and resumes printing when pressed again. ❏ Whe n held down for thr ee seconds, enters the Micro Adjust mode. When pressed again, exits the Micro Adjus t mode. Pause light ❏ On whe n the pri nter is paused. ❏ Fl ashes when the pri nter is in t he Micro Adju[…]
-
Страница 46
40 Contr ol Pa nel Selecting a Font You can selec t the print er ’ s fonts, pitch, and size by using the defa ult- sett ing mo de. Se e “ Changing de fault settings ” o n p a g e 4 7 for inst ructions on how to chang e the defau lt setting s. Note: ❏ The available pitch or size depends on the font you select. See the tabl e be low f or m or[…]
-
Страница 47
Control Panel 41 3 3 3 3 3 3 3 3 3 3 3 3 About Your Printer’s Default Settings The default sett ings co ntrol m any printe r functi ons. W hil e you can often s et the se func tions throug h you r softw are o r printe r driver, you may sometimes need to chang e a default setting from the printer ’ s control pa nel using the d efault-setting mod[…]
-
Страница 48
42 Contr ol Pa nel * For LQ-630 only ** For LQ-630S Only *** T his set ting is availab le o nly in IB M PPD S emu lation mode. **** The op tions a vailab le for th is s etting v ary d ependin g on the co untry. Baud ra te** 19200 BPS , 9600BPS, 4800BPS, 2400BPS, 1200BPS, 600BPS, 300BPS Parity* * None , O dd, E ven, I gnor e Data l ength* * 8bit , 7[…]
-
Страница 49
Control Panel 43 3 3 3 3 3 3 3 3 3 3 3 3 Page length for tractor This sett ing allows y ou to set the page len gth (i n inches) for the con tinu ous p aper l oade d on th e tract or. Skip over perf oration This fe ature is avai lable on ly whe n cont inuous p aper is select ed as the pap er source . When you tur n on this feature, t he printer prov[…]
-
Страница 50
44 Contr ol Pa nel 0 slash Select the z ero chara cter with a slash ( ) (thi s featu re is on) or without a slash (0) (thi s feature is off). The slash allows you to easily disti nguish betwee n the upp ercase letter “ O ” and a zero. High speed draf t When high speed draft i s on, th e pri nter pr ints up to 300 cps (characters p er second) at[…]
-
Страница 51
Control Panel 45 3 3 3 3 3 3 3 3 3 3 3 3 Baud rate (F or LQ-630S only) Use this opt ion to s et the data transfer rate (ba ud) for t he serial i n t e r f a c e . T h e b a u d r a t e i s m e a s u r e d i n b i t s p e r s e c o n d ( b p s ) . S e e your computer manua l and software documentation for the proper s etting. Parity (For LQ-630S onl[…]
-
Страница 52
46 Contr ol Pa nel Char acter tabl e You can selec t from among 13 t o 36 standard cha racter tabl es, depending on the countr y of purchase. See “ Default -setting mode ” on page 41 f or more infor mation. Intern ational c haracter set for italic ta ble You can s elect a mong several inter national c harac ter sets for t he italic cha racter t[…]
-
Страница 53
Control Panel 47 3 3 3 3 3 3 3 3 3 3 3 3 Changing default se ttings Follow these steps to enter the default-se tting mode and change the printer ’ s default settings: Note: ❏ To print the language selection and default-setting mode instructions, you need five sheets of A4 or letter size single-sheet paper or five pages of continuous paper that […]
-
Страница 54
48 Contr ol Pa nel 5. Pr ess the Load/ Eject button t o print the d efault-s ettin g mode instru ctions ( four pages ) in the language you selected . The printe d ins truc tions list th e set tings you c an cha nge, descri be how to change them , and show you how the con trol panel light s help you make s ettings. Use these i nstructi ons to cha ng[…]
-
Страница 55
Control Panel 49 3 3 3 3 3 3 3 3 3 3 3 3 Lock-Out Mode You can res trict the use o f butt ons on the cont rol panel by using the lock-out mode. In the basic sett ing, you can only use the Pause and Load/ Eject but tons, when the lock-out mode is on. Turning on or off th e lock-o ut mode You can turn on or off the lock-ou t mode easily by using butt[…]
-
Страница 56
50 Contr ol Pa nel Follow th ese steps to chang e the lock-out mode setting: 1. When u sing cont inuous paper , mak e sure p aper is loade d and the print er is tu rned off. c Caution: Whenever you turn off the printer, wait at least five seconds before turning it back on; otherwise, you may damage the printer. 2. Tu rn on the prin ter while hold i[…]
-
Страница 57
Troubleshooting 51 4 4 4 4 4 4 4 4 4 4 4 4 Chapter 4 Troubleshooting Using the Error Indicators . . . . . . . . . . . . . . . . . . . . . . . . . . . . . . . . . . 52 Problems and Soluti ons . . . . . . . . . . . . . . . . . . . . . . . . . . . . . . . . . . . . 53 Power supply problems. . . . . . . . . . . . . . . . . . . . . . . . . . . . . . . .[…]
-
Страница 58
52 Troubleshooting Using the Error Indicators You ca n iden tify ma ny com mon pri nter pro blems using the ligh ts on th e cont rol pa nel. If your p rinte r stops wor king an d one or more contr ol panel light s are on or fla shing or the printe r beeps, use the follo wing table to diagnose and fix t he problem. If you can not fix yo ur prin ter […]
-
Страница 59
Troubleshooting 53 4 4 4 4 4 4 4 4 4 4 4 4 n = on, o = off, f = flas hing ••• = short series of beeps ( three beeps), ••••• = long series of be eps (five beeps) Problems and Solutions Most prob lems you may enco unter whi le operat ing your printe r have simple sol utions. Use the infor mation in this section to fin d the source of […]
-
Страница 60
54 Troubleshooting Power supply problems The control pane l lights c ome on briefly but t hen go off a nd stay off. Cause What to do The printer ’ s voltage rating does not match th e voltage of your electrical outlet. Check the printer and the outlet volt age rati ngs . If the volt ages do not match, unplug the print er immediat ely and cont act[…]
-
Страница 61
Troubleshooting 55 4 4 4 4 4 4 4 4 4 4 4 4 Paper loading or feeding problems Single sheets The printer does not load single-she et paper or does not feed it properly. Caus e What t o do Continuous paper is in the paper path. Press th e Load /Eject button to remove the continuous paper. Set th e paper release lever to the single-sheet feeding positi[…]
-
Страница 62
56 Troubleshooting The paper is old or creased. Use only new, clean sheets of pa per. Note: If paper is jam med in the paper path, see “ Clea ring a Pap er Jam ” on page 71. The paper-thickn ess lever is set incorrectly. Set the paper-thickness lever to match the thickness of your paper. See “ Adjusting the Paper-Thickness Lever ” on page 3[…]
-
Страница 63
Troubleshooting 57 4 4 4 4 4 4 4 4 4 4 4 4 Continuo us paper The printer does not load c ontinuous paper or does not fe ed it properly. Cause What to do The paper source is set to single-sheet feeding. Set the paper release lever to the tractor feeding position . See “ Setting the paper release lever ” on page 3 for m ore informa tion. The pape[…]
-
Страница 64
58 Troubleshooting The paper supply is too far away from th e printer. Make sure that your paper supply is within 1 m eter (3 feet) of the prin ter. The holes on the sides of the paper are misaligned. Check that the holes on the sides of the paper are align ed with each oth er. Also make sure the s procket units are locked and their covers are clos[…]
-
Страница 65
Troubleshooting 59 4 4 4 4 4 4 4 4 4 4 4 4 The paper size setting in your application or th e printer driver may not match the size of the paper you are using. Check the paper size setting i n your application or th e printer driver. The printer ’ s page length setting for the tractor may n ot match the size of the continuous paper you are using.[…]
-
Страница 66
60 Troubleshooting Printing position problems Wrong top-of-form position Your printing appears too high or l ow on the page. Cause What to do The paper size setting in yo ur appl icat ion s oftwa re or pr inte r driver does no t match the size of the paper you are using . Check the paper size settin g in your application or printer driver. The prin[…]
-
Страница 67
Troubleshooting 61 4 4 4 4 4 4 4 4 4 4 4 4 Wrong tear-off position The printer prints on ( or too far away from) the perforation of your co ntinuous paper. Cause What to do The tear-off positio n setting is incorrect. Adjust the tear-off pos ition using the Micro Adjust function. See “ Adjus ting the tear-off positi on ” on page 1 9 for more in[…]
-
Страница 68
62 Troubleshooting Printing or printo ut quality problems The Pause light is off but t he printer doe s not print. Cause What to do The interface cable is not plugged in securely. Check that both ends of the cable between the printer and the computer are plugged in securely. If the cable is connected correctly, run a self test as described in “ P[…]
-
Страница 69
Troubleshooting 63 4 4 4 4 4 4 4 4 4 4 4 4 The printer sounds like i t is print ing, but nothi ng prints. Cause What to do The ribbon cartridge is not installed properly. Reinstall the ribbon cartridge as described in “ Replacing the ribbon cartridge ” on page 1 18. The ribbon is worn out. Replace the ribbon cartridge as described in “ Replac[…]
-
Страница 70
64 Troubleshooting There is too m uch slack in the ribbon or the ribbon h as come loose . Remove any sl ack in the ribbon by turning th e ribbon-tightenin g knob, or replace the ribbon cartridge as described in “ Replacing the ribbon cartridge ” on page 118. Lines of dots are missing i n the printout as shown below. Cause What to do The ribbon […]
-
Страница 71
Troubleshooting 65 4 4 4 4 4 4 4 4 4 4 4 4 Inco rrect char acte rs are prin ted. Cause What to do Your printer and the compu ter may not be com municating correctly. Make sure that you use the correct interface cable an d that the communications protocol is correct. Refer to the Setup Sheet and your computer documentation. If you installed th e opt[…]
-
Страница 72
66 Troubleshooting Printing st arts too high or too low on the page . Cause What to do The paper size sett ings in your appl icat ion so ftwa re do not match the size of the paper loaded in the printer. Change the paper size setti ngs in your appl icat ion s oftwa re o r prin ter dr iver to match the size of the paper you are using. The top margin […]
-
Страница 73
Troubleshooting 67 4 4 4 4 4 4 4 4 4 4 4 4 All the t ext is pri nted on the same l ine. Cause What to do No line feed command is sent at the end of each line of text. Turn on the auto li ne feed option in the default-settings mode, so that the printer automatica lly adds a line feed code to each carr iage return. See “ Changing defau lt settings […]
-
Страница 74
68 Troubleshooting Correcting USB Problems If you are ha ving difficulty using your pri nter with a USB connection, r ead the infor mation in th is section. M a k e s u r e t h a t y o u r c o m p u t e r i s a W i n d o w s M e , 9 8 , X P , o r 2 0 0 0 pre-in stalled model Your computer must be a Windows M e, 98, XP, or 2000 pre-inst alled model.[…]
-
Страница 75
Troubleshooting 69 4 4 4 4 4 4 4 4 4 4 4 4 Make sure th at EPSON USB Pr inter Devices ap pears on the Device Manage r menu (for Windows Me and 98 only) If you canceled the plug-a nd-play driver installat ion before the procedure was complet e, either the USB printer device dr iver or the printe r drive r may be in corre ctly i nstalle d. Follow the[…]
-
Страница 76
70 Troubleshooting If USB Prin ter appears under Other devices , the USB pr inter devic e driv er is n ot inst alled correc tly. If EPSON LQ-630 appe ars, t he prin ter drive r is no t insta lled co rrec tly. If neit her USB Printer nor EPSON LQ-630 appears under Other devic es , click Refresh or u nplug the USB cable fr om the print er, then plu g[…]
-
Страница 77
Troubleshooting 71 4 4 4 4 4 4 4 4 4 4 4 4 Printer does not work correctly with the USB cable If your printe r does not work correctly with t he USB cab le, try one or m ore of these s oluti ons: ❏ Make sure that the cable y ou are u sing is a standard, shielded USB cable. ❏ If you are usin g a USB hub, conne ct the print er to the fi rst tier […]
-
Страница 78
72 Troubleshooting 3. If continu ous pap er is j ammed in the pr inter, te ar of f the fre sh supply at the back of t he printer . 4. Op en the pap er bail and remove the paper. Remove any rem aining piec es of p aper . If the paper is stuck where the printer ejects it, gently pull the paper out of th e printer. 5. Clo se the pap er bail a nd print[…]
-
Страница 79
Troubleshooting 73 4 4 4 4 4 4 4 4 4 4 4 4 2. Whi le holdin g down the Pause b utton, tu rn on the printer . The printer enter s the bidirect ional adju stment mode. When usi ng con tinuo us pap er, th e pri nter pr ints the ins tructi on sheet and the first set of alignment patterns. 3. Whe n using sin gle-she et pape r, load pa per in th e printe[…]
-
Страница 80
74 Troubleshooting 1. When u sing c ontinu ous pa per, m ake sur e paper is loaded , and t he pa per rel ease l ever is set to the c orrec t pos ition . Then turn off t he printer . c Caution: Whenever you turn off the printer, wait at least five seconds before turning it back on; otherwise you may damage the printer. 2. To ru n the test u sing t h[…]
-
Страница 81
Troubleshooting 75 4 4 4 4 4 4 4 4 4 4 4 4 Printing Hex Dump If you are an experienced user or a prog rammer, print a hexadecimal dump to isolate communicat ion problems between the printer and yo ur software progr am. In hex dump mode, the printer p rints a ll data i t receive s from th e computer as hexadecimal valu es. Follow these steps t o pri[…]
-
Страница 82
76 Troubleshooting Contacting Customer Support If your EPSON pr oduct is n ot oper ating pr operly and you cannot solve the probl em using the tro ubleshooting info rmation in you r product documentat ion, contact custom er support services for assistance. If customer support for your area is not listed below, con tact t he de aler w her e you p ur[…]
-
Страница 83
Troubleshooting 77 4 4 4 4 4 4 4 4 4 4 4 4 Germ any EPS ON Deut schla nd GmbH Service & Sup port 0180-5234 110 Monday to Friday: 9 a .m. to 9 p.m. Saturday to Su nday: 10 a.m. to 4 a .m. Publ ic ho lidays : 10 a. m. to 4 p.m. (0,12 E p er minute) www.epson.de/suppo rt/ France Suppor t Tech nique EPSON France, “ Cyprus ” on page 109 “ Luxe[…]
-
Страница 84
78 Troubleshooting 0 892 899 99 9 (0,34 E/mi nute) Ouvert du lundi a u samedi de 9h 00 à 20h00 sa ns interrupt ion http://www.epson. fr/support/sel fhelp/french.htm pour acc é der à l’ AIDE EN LIGNE . http://www.epson. fr/support/servi ces/index.shtml pour acc é der aux SERVICES du support technique. Centres de mainten ance AJACCIO CIM Le […]
-
Страница 85
Troubleshooting 79 4 4 4 4 4 4 4 4 4 4 4 4 BORDEAU X FMA Parc d’a ctivit é s Chemin Long All é e Jam es W att — Immeu ble Spa ce 3 33700 MERIGNAC T é l : 05.56.34.85 .16 Fax : 0 5.56.47.63.18 BORDEAU X MAINTRO NIC 11/19 rue Edmond Besse Immeub le Riv e Gauche 33300 BORDEAUX T é l : 05.57.10.67 .67 Fax : 0 5.56.69.98.10 BOURGES ( td) BEGELE[…]
-
Страница 86
80 Troubleshooting DIJON FMA 60, rue du 14 Juillet Parc des G rands Cru s 21300 CHENOVE T é l : 03.80.51.17.17 Fax : 03.80.51.23. 00 GRENOBLE (td) FMA 2 rue Mayencin 38400 ST MARTIN D’H ERES T é l : 04.38.37.01.19 Fax : 04.76.44.78. 92 GRENOBLE MAINTRON IC Les Akhesades B â t B. Rue Ir è ne Joli ot C urie 38320 EYBENS T é l : 04.76.25.87.[…]
-
Страница 87
Troubleshooting 81 4 4 4 4 4 4 4 4 4 4 4 4 LILLE MAINTRO NIC Synergie Pa rk 9, avenue Pierre et Marie Curie 59260 LEZENNES T é l : 03.20.19.04 .10 Fax : 0 3.20.19.04.19 LIMOGES MAINTRO NIC 43 rue Cruveilher 87000 LIMOGES T é l : 05.55.10.36 .75 Fax : 0 5.55.77.44.00 LYON FMA 136, chemin Moul in Carron 69130 ECULLY T é l : 04.78.35.38 .65 Fax : 0[…]
-
Страница 88
82 Troubleshooting METZ FMA 104 rue de P ont à Mou ss on 57950 MONTIGNY LES METZ T é l : 03 87 66 92 00 Fax : 03 87 66 18 22 METZ MAINTRON IC TECHNOPOLE 2000 6, ru e Thom as Ed ison 57070 METZ T é l : 03.87.76.98.30 Fax : 03.87.76.31. 15 MONTPELLI ER MAINTRON IC Parc Atel iers Techn ologiques 2, ave nue Einst ein 34000 MONTPELLIER T é l : 04.67[…]
-
Страница 89
Troubleshooting 83 4 4 4 4 4 4 4 4 4 4 4 4 NICE FMA 329, avenue des PUGETS B â t A. 2 — Le R é al 06700 ST LAURENT DU VAR T é l : 04.93.14.01 .70 Fax : 0 4.93.14.01.73 NICE MAINTRO NIC Les terriers Nord Immeubl e Les Spor ades 500, all é e des Terriers 06600 ANTIBES T é l : 04.92.91.90 .90 Fax : 0 4.93.33.98.63 NIORT MAINTRO NIC 49 rue du Fief[…]
-
Страница 90
84 Troubleshooting PARIS 14 è me FMA 63, rue de Ge rgovie 75014 PARIS T é l : 01.45.45.57.65 Fax : 01.45.39.48. 86 PARIS EST (td) BEGELEC 3, al l é e Jean Image 77200 TORCY T é l : 01.60.06.02.02 Fax : 01.60.06.02. 60 PARIS NORD FMA 30, av. du vieux Che min de St Denis 92390 VILLENEUVE LA GARENNE T é l : 01.40.85.98.08 Fax : 01.47.92.00. 85 PA[…]
-
Страница 91
Troubleshooting 85 4 4 4 4 4 4 4 4 4 4 4 4 RENNES MAINTRO NIC Parc d ’ affaires d e la Bret è che B â t 2 35760 RENNES ST GREG OIRE T é l : 02.99.23.62 .23 Fax : 0 2.99.23.62.20 ROUEN BEGELEC Technopole des Bocquets Immeub le le Dul ong 75 All é e Pau l Lange vin 76230 BOIS GUILLAUME T é l : 02 35 12 41 66 Fax : 02 35 12 41 67 STRASBOU RG FM[…]
-
Страница 92
86 Troubleshooting Spain EPSON I BÉRIC A, S.A . Avda. Roma 1 8-26, 0829 0 Cerdanyola, B arcelona, Esp a ñ a Tel.: 34.93. 5821500 Fax: 34.9 3.5821555 CENTRO DE ATENCI Ó N AL CLI ENTE Tel.: 902 40 41 42 Fax: 93 5 82 15 16 E-mail: soporte@epson.es www.epson.es www.epson.es/support/ SERVICIOS OFICI ALES DE ASISTE NCIA T É CNICA EPSON TOURS BEGELEC […]
-
Страница 93
Troubleshooting 87 4 4 4 4 4 4 4 4 4 4 4 4 ALBACETE ALBACETE DEPARTAMENT O T É CNICO INFO RM Á TI CO S.A.L. 967/ 50.69. 10 967/50.6 9.09 C/ F RANCISCO PIZARRO , 13 BAJOS 02004 ALICANTE ALICANTE RPEI 96/ 510.20.53 96/511.4 1.80 C/ ED UARDO LANGUCHA, 17 BAJOS 03006 ALMERIA ALMERIA MASTER KIT S.A. 950/ 62.13. 77 950/62.1 3.72 CAMINO LA GOLE TA, 2 ª[…]
-
Страница 94
88 Troubleshooting C Á CERE S C Á CERES PAITRON C Á CERE S 902/ 21.4 0.21 927/21.39.9 9 C/ G ABINO MUR IEL , 1 10001 PTO.SANTA.M ª .C Á DIZ ELSE INFORM Á TI CA, S.L. 902/ 19.7 5.63 956/56.05.1 2 AV. RIO SAN PEDRO , 59, URB. VALDELAGMANA 11500 JEREZ C Á DIZ NEW SE RVICE , S.L. 956/ 18.3 8.38 956/18.55.8 5 C/ A STA, 18 11404 LAS PALMAS CANARIA[…]
-
Страница 95
Troubleshooting 89 4 4 4 4 4 4 4 4 4 4 4 4 LUGO LUGO LABEL MICROHARD, S.L. 982/ 20.37. 15 982/20.3 7.15 C/. ESCULTOR ASOREI, 1, B JOS. 27004 MADRID MADRID GRUPO PENTA, S.A. 91/ 543.73.03 91/543.5 3.04 C/ BLASCO DE GARA Y, 63 28015 MADRID MADRID MICROMA, S.A. 91/ 304.68.00 91/327.3 9.72 C/ STA. LEO NOR, 61 28037 MADRID MADRID S ETECMAN, S.L. 91/ 571[…]
-
Страница 96
90 Troubleshooting United Kingdom EPSON (UK) Ltd. Campus 100, Maylands Ave nue, Hemel Hempstead , Hertfordshi re HP2 7TJ United Kingdom Tel.: +44 (0) 1442 26114 4 Fax: +44 (0) 1422 2272 27 www.epson.co.uk Stylus Pro ducts Wa rranty & Sup port 0870 5 13 3 640 Scanner Product s Warranty & Support 0870 2 41 3 453 Sales VALENCIA VALENCIA GINSA […]
-
Страница 97
Troubleshooting 91 4 4 4 4 4 4 4 4 4 4 4 4 0800 220 546 Republic of Ireland Stylus Product s Warranty & Support 01 679 9016 Other Produ cts War ranty & Support 01 679 9015 Sales 1 800 409 132 www.epson.co.uk Italy EPSON Ital ia S. p.a. Via M. V ig an ò de Vizzi , 93/95 20092 Cinisel lo Balsamo ( MI) Tel. 02. 660.321 Fax. 02.612.36. 22 Assi[…]
-
Страница 98
92 Troubleshooting ELENCO CENTRI ASSIST ENZA AUTORIZZATI EPSON AEM SERVI CE S. R.L. Via Verole ngo, 20 00167 ROMA Tel : 06-660 18020 Fax : 06-66018052 ELEC TRON IC ASSISTANCE C ENTRE Via Baz zini, 17 20131 MILANO Tel : 02-7063140 7 Fax : 02-7063 1301 QUAIZ S.N.C. Via S an Pa olo, 5 /h Loc. Badia a S etti mo 50018 SCANDICCI (FI) Tel : 055-720561 Fax[…]
-
Страница 99
Troubleshooting 93 4 4 4 4 4 4 4 4 4 4 4 4 COMPUTER ASSISTANCE S .A.S. 1a Trave rsa Via de l Gallit ello 85100 POTENZA Tel: 0 971-489973 Fax: 0971-476892 INFORMAINT S.N.C. Filiale d i Olbia Via Monte Pasubio, 22 07026 OLBIA Tel: 0789-237 86 Fax: 0789-203891 S.T.E. S.N.C. di Ciarrocchi A.& C. Via Setti mo Torinese, 5 65016 MONTESILVANO (PE) Tel […]
-
Страница 100
94 Troubleshooting Portugal EPSON Po rtugal, S.A. Rua Gre g ó rio Lo pes Lote 1514 Rest elo COMPUTER SERVI CE 2 S.N.C. Via V.Guin dani, 10 26100 CREMONA Tel/Fax : 0372- 435861 MEDIEL S.N.C. filiale di Catania Via No vara, 9 95125 CATANIA (CT) Tel : 095-716912 5 Fax : 095-716 0889 TEC NO STAF F S.R .L. Via Vivaldi, 19 00199 ROMA Tel : 06-8606173 Fa[…]
-
Страница 101
Troubleshooting 95 4 4 4 4 4 4 4 4 4 4 4 4 1400 — 197 Lisboa Tel.: 21 303 54 00 Fax: 21 303 54 90 Servi ç o de Apoio a Cli entes 707 222 000 www.epson.pt Austr ia EPS ON Deut schla nd GmbH Service & Sup port 0810-2001 13 Monday to Friday: 9 a .m. to 9 p.m. Saturday to Su nday: 10 a.m. to 4 a .m. Publ ic ho lidays : 10 a. m. to 4 p.m. (0,7 E pe[…]
-
Страница 102
96 Troubleshooting Public holi days: 10 a.m. to 4 p. m. www.epson.nl/support / Belgium EPSON Deu tschland Gmb H Service & Support 070-2220 82 Monday to Friday: 9 a.m. t o 9 p.m. Saturday to Sunday: 10 a.m. to 4 a.m. Public holi days: 10 a.m. to 4 p. m. (9 a.m. to 6 p.m.: 0,173 5 E per minute, rem aining time : 0,08 68 E pe r minu te) www.epson.[…]
-
Страница 103
Troubleshooting 97 4 4 4 4 4 4 4 4 4 4 4 4 0800 523 010 Sales (09) 8171 00 83 www.epson.fi Croatia RECR O d. d. Trg Sport ova 11 10000 Zagr eb Tel.: 00385 1 3091090 Fax: 00385 1 30 91095 Email: se rvis@recr o.hr www.epson@recro.hr Macedo nia DIGIT COMPUTER ENGINEERING 3 Makedons ka briga da b.b upravna zg rada R. Konka r — 91000 Skopj e Tel.: 00389[…]
-
Страница 104
98 Troubleshooting REMA COMPUTERS Str. Ko zara , 64-B-1 1- 1000 Skopj e Tel. : 003 89 91 118 15 9 opp ure 00389 91 11 3 637 Fax: 0038 9 91 214 338 E-mail: slatanas@unet.com.mk oppure www.rema@unet.com.mk Slovenia REPRO LJ UBLJANA d. o.o. Smartinska 10 6 1000 Ljubl jana Tel.: 00386 1 5853417 Fax: 0038 6 1 54001 30 E-mai l: bo jan.zab nikar@re pro.s […]
-
Страница 105
Troubleshooting 99 4 4 4 4 4 4 4 4 4 4 4 4 Publ ic ho lidays : 10 a. m. to 4 p.m. (9 a.m. to 6 p.m.: 0, 1435 E p er minute, remaining ti me: 0,0716 E p er minute ) http://www.epson.de/eng/su pport/ Switzerland EPS ON Deut schla nd GmbH Service & Sup port 0848-4488 20 Monday to Friday: 9 a .m. to 9 p.m. Saturday to Su nday: 10 a.m. to 4 a .m. Pu[…]
-
Страница 106
100 T roubleshoo ting Slovac Repub lic EPSON Deu tschland Gmb H Service & Support ++421 02 52625 241 Monday to Friday: 8 .30 a.m. to 5 p.m. http://www.epson. sk/support/ Czek. Republic EPSON Deu tschland Gmb H Service & Support 00420-80 0142052 Monday to Friday: 9 a.m. to 5.30 p. m www.epson.cz/suppo rt/ Norway Warranty & Support 800 1 […]
-
Страница 107
Troubleshooting 101 4 4 4 4 4 4 4 4 4 4 4 4 Sales 08 519 92 082 www.epson.se Yugoslavia BS PPROCESOR d.o .o. Hazdi Nik ole Ziv kovica 2 Beogra d-F.R . Tel.: 00381 1 1 328 44 88 Fax: 00381 11 3 28 18 70 E-ma il: vule @bspro cesor.c om; www.goran@bsprocesor.c om www.gorangali c@sezampro.yu Gree ce POULI ADIS AS SOCIA TES CO RP. 142, Sygrou Av enue 17[…]
-
Страница 108
102 T roubleshoo ting Turkey ROMAR PAZARLAM A SANAYI VE TICARE T A.S. Rihtim Cad. Ta hir Han No. 201 Karak ö y 80030 Ist anbul Tel. : 009 0 212 252 08 09 ( ext:2 05) Fax: 0090 212 252 08 0 4 E-mail: zoze noglu@romar.com.tr PROSE R ELEKTRONI K SANAYI VE TICARET LIMITE DN SIRKETI In ö n ü Caddesi, Teknik Han, No 72 Kat 3 , G ü m ü ssuy ü Ist an[…]
-
Страница 109
Troubleshooting 103 4 4 4 4 4 4 4 4 4 4 4 4 ISTANBUL Bilgisayar Hastanes i In ö n ü Cad. No:72 T eknik Ha n Kat:3 8009 0 G ü m ü ssuyu-Taksim/I stanbul Tel : 0 212 2 52 17 67 Fax : 0 212 244 54 79 E-Mail : epson@bilgi sayarhast anesi.com Datapro Alemdag cad. Bayir Sok. No:5/3 Kisikli/Ist anbul Tel : 0 216 4 61 77 75 Fax : 0 216 344 77 35 E-M ai[…]
-
Страница 110
104 T roubleshoo ting E-Mail : eps on@da tapro.c om.tr Bilgisayar Ha stanesi Toros Cd. Dokto rlar Sitesi Asma Kat No:39 Seyhan/Adan a Tel : 0 322 459 87 27 Fax : 0 32 2 459 87 28 E-Ma il : ad ana@ bhtem silci lik.n et ANKARA Bilgisayar Ha stanesi Akay Caddesi No: 22/22 Kavakli dere / Ankara Tel : 0 312 417 16 40 Fax : 0 31 2 417 50 88 E-Mail : a nk[…]
-
Страница 111
Troubleshooting 105 4 4 4 4 4 4 4 4 4 4 4 4 E-Mail : romar@rom ar.com.t r ANTALYA Bilgisayar Hastanes i Y.Ulusoy Bu lvari-86.So k. No:24/33 Ant alya Tel: 0 242 24 8 50 10 Fax: 0 242 248 50 09 E-Mail : antalya@b htemsilci lik.net Roma r Burh anett in On at Cad. Zerdale lik Ma h. Ekin ciler s itesi A blok N.120/A Antaly a Tel : 0 242 3 12 95 45 Fax :[…]
-
Страница 112
106 T roubleshoo ting Tel: 0 224 2 25 29 47 Fax : 0 22 4 225 29 48 E-Mail : eps on@da tapro.c om.tr DENIZLI Bilgisayar Ha stanesi Murat d ede mahell esi, 357 . sokak No 8/b Denizli4 Ç esme mevkii Tel : 0 258 241 97 41 Fax : 0 25 8 242 1148 E-Mail : denizli @bhtemsil cilik.net DIYARBAKIR Bilgisayar Ha stanesi Ekincil er Cad. Az c Plaza K:3 N o:7 Di[…]
-
Страница 113
Troubleshooting 107 4 4 4 4 4 4 4 4 4 4 4 4 GAZIANTEP Roma r Gazi Muhtar pasa Bu lvari Buhar a Is Merk ezi 1 Kat N. 48 Gaziantep Tel : 0 342 2 15 06 31 Fax : 0 342 215 06 32 E-Mail : romarga ntep@roma r.com.tr IZMIR Bilgisayar Hastanes i 1372 Sok. No:24 K:3 D:4 -5-6 Ç ankaya / Izmir Tel: 0 232 44 5 80 79 Fax: 0 232 445 80 79 E-Mail : izmir2@b htem[…]
-
Страница 114
108 T roubleshoo ting Tel : 0 232 463 39 74 Fax: 0 23 2 463 39 75 E-Mail : romar@r omar.com.tr KOCAELI Bilgisayar Ha stanesi G ü zeller Mahel lesi, Bagdat Caddesi No 1 95 Gebze/Kocaeli Tel : 0 262 643 65 66 Fax : 0 26 2 643 65 67 E-Mail : kocaeli@b htemsilci lik.net KONYA Bilgisayar Ha stanesi Nisantasi M ah. Tamer Sk. Bu lus Sit. C Bl ok 9/A 4206[…]
-
Страница 115
Troubleshooting 109 4 4 4 4 4 4 4 4 4 4 4 4 E-Mail : mersin@b htemsilc ilik .net SAMSUN Bilgisayar Hastanesi Ç iftlik Mah Sefa Sok. Aya zoglu Apt. 17/1 Sa msun Tel : 0 362 2 31 77 12 Fax : 0 362 234 46 74 E-M ail : samsu n@bhte msilcil ik.net TEKIR DAG Bilgisayar Hastanesi Omurtak Cad. Ist. Kismi Pek soy Apt. No:58 /8 Ç orlu/Tekirdag Tel : 0 282 […]
-
Страница 116
110 T roubleshoo ting Stavrou Avenue Marlen Cart Off ice 1 01- 102 Stov olo s 2035 Nicosi a Tel.: 00357 2 368000 Fax: 0035 7 2 51825 0 E-ma il: ya nnis.k @infote l.com. cy; george.p@infotel .com.cy Pouliadis Associated Cyprus Lt d 75, Limassol Avenue 2121 Nicosi a Tel. +357 2 490209 Fax +357 2 490240 Poland EPSON Deu tschland Gmb H Service & Su[…]
-
Страница 117
Troubleshooting 111 4 4 4 4 4 4 4 4 4 4 4 4 Bulgaria EPS ON Deut schla nd GmbH Service & Sup port www.epson.bg/support / Romania EPS ON Deut schla nd GmbH Service & Sup port +40 212305384 115 Monday to Friday: 8.30 a.m. t o 5.30 p.m. www.epson.ro/suppo rt/ Estonia EPS ON Deut schla nd GmbH Service & Sup port +372 6 718 166 Monday to Fri[…]
-
Страница 118
112 T roubleshoo ting http://www.epson. lv/support / Lithuania EPSON Deu tschland Gmb H Service & Support 8-37-40008 8 Monday to Friday: 8 .30 a.m. to 5.30 p.m. http://www.epson. lt/supp ort/ Israel Warranty & Support 04 8 560 380 www.epson.com Middle East Warranty & Support + 971 (0) 4 3 52 44 88 or 3 51 77 77 www.epson.com Email Warra[…]
-
Страница 119
Troubleshooting 113 4 4 4 4 4 4 4 4 4 4 4 4 For details of EPSON Ex press centres and Service Repair centres http://www.epson.co.za/sup port/index.htm Sales (011) 262 92 00 or 0800 0 0 5956 www.epson.co.za/ Bosnia Herzgovina RECO S d.o .o. Vilsonovo seta liste 10 71000 Saraj evo Tel.: 00387 3 3 657 389 Fax: 00387 33 6 59 461 E-ma il: re cos@b ih.ne[…]
-
Страница 120
114 T roubleshoo ting Brazil EPSON DO BR ASIL LTDA. Av. Tucunar é , 720 Tambor é Barue ri, S ã o Paulo, SP 0646 0-020 Tel.: (55 11) 7296 -6100 Fax: ( 55 11) 7295- 5624 www.epson.com.br Chile EPSON CH ILE, S.A. La Co ncep ci ó n 322 Provide ncia, Sant iago Tel.: (56 2) 236-2453 Fax: (56 2) 236-65 24 www.epson.cl Colombia EPSON C OLOMBI A, LTDA .[…]
-
Страница 121
Troubleshooting 115 4 4 4 4 4 4 4 4 4 4 4 4 Costa Rica EPSON COST A RICA , S. A Embajada Americana, 2 00 Sur y 300 O este San Jos é , Costa Rica Tel.: (50 6) 296-6222 Fax: (50 6) 29 6-6046 www.epsoncr.com Mex ico EPSON M É XICO, S.A. de C.V. Av. Sonora #15 0 M é xico, 06100, DF Tel.: (52 5) 211-1736 Fax: (52 5) 53 3-1177 www.epson.com.mx Peru EP[…]
-
Страница 122
116 T roubleshoo ting Venezuela EPSON VENEZUELA, S.A. Calle 4 con Ca lle 11-1 La Urbina Sur Cara cas, Venezuela Tel.: (58 2) 240-1111 Fax: (58 2) 240-11 28 www.epson.com.ve USA (Lat in Ameri ca) EPSON LATIN AM ERICA 6303 Blue Lagoon D r., Ste. 390 Miami, FL 33126 Tel.: (1 305) 265-0092 Fax: (1 305 ) 265-0 097 USA EPSON AM ERICA, INC 3840 Kil roy Ai[…]
-
Страница 123
Options and Consumables 117 5 5 5 5 5 5 5 5 5 5 5 5 Chapter 5 Options and Consumables Ribbon Cartridge . . . . . . . . . . . . . . . . . . . . . . . . . . . . . . . . . . . . . . . . . 118 Genuine EPSON ribbon ca rtridge . . . . . . . . . . . . . . . . . . . . . . 118 Replacing the ribbon cartri dge . . . . . . . . . . . . . . . . . . . . . . . . .[…]
-
Страница 124
118 Options and Consumables Ribbon Cartridge Genuine EPSON ribb on cartridge When printi ng beco mes fain t, you need to replac e the ribb on cartridge. Genuine EPSON r ibbon cartr idges are desig ned and man ufact ured to wor k prop erly w ith your E PSON prin ter. They ensure proper operation and long li fe of the prin t head and oth er pri nter […]
-
Страница 125
Options and Consumables 119 5 5 5 5 5 5 5 5 5 5 5 5 3. Pul l the pa per bail forward . 4. Flip the paper bail to wards yo u. Note: When it is difficu lt to open the paper bail because of the position of the print head, close the printer cover. Then, turn on the printer and the print head moves to the right automatically. After that, turn the printe[…]
-
Страница 126
120 Options and Consumables 6. Hold both ends o f the cart ridge a nd pu ll it o ut o f the print er. 7. Rem ove the new ri bbon c artri dge fro m its p ackag e. 8. Hold both sid es of th e ribbo n guid e and pu ll it un til it is o ut of the cartri dge. c Caution: Do not tear off the clear film on the ribbon guide. Doing so may cause paper jams or[…]
-
Страница 127
Options and Consumables 121 5 5 5 5 5 5 5 5 5 5 5 5 9. Hold the ri bbon ca rtridg e and inser t it into the pr inter a s shown below; then press b oth side s of the ca rtridge firml y to fit th e plast ic ho oks in to the p rinter s lots. 10. Slide it into t he print hea d aligni ng it with the gro oves of the print head until it clicks in place. N[…]
-
Страница 128
122 Options and Consumables 12. Close the paper bai l and t he printer cover. Print Server You c an us e thi s pri nter a s a n etwork prin ter by ins talling a pr int server in t he printer ’ s i nterface port. See the Administrato r ’ s Manu al p acka ged w ith th is op tion fo r inst ructi ons on inst all ation and use. The followi ng Printe[…]
-
Страница 129
Product Information 123 A A A A A A A A A A A A Appendix A Product Information Safety Instructi ons . . . . . . . . . . . . . . . . . . . . . . . . . . . . . . . . . . . . . . . . 124 Warnings, cautions, an d notes . . . . . . . . . . . . . . . . . . . . . . . . . 124 Hot parts caution sy mbol . . . . . . . . . . . . . . . . . . . . . . . . . . . .[…]
-
Страница 130
124 Produc t Info rmat ion Safety Instructions Warnings, cautions, and note s w War ning s must be followed carefully to av oid bodily in jury. c Cautions must be observed to av oid damage to you r equipment. Notes contain important information and useful tips on the operation of your printer. Hot parts caution symbol Important safety instructio ns[…]
-
Страница 131
Product Information 125 A A A A A A A A A A A A ❏ Do not use a dama ged or fraye d power c ord. ❏ If you use an ex tension cord with the pr inter, m ake sure the total ampere ra ting of all devices plug ged into the extensi on cord does not exceed the cord ’ s ampere ra ting. Also, make sure the t otal ampere of all d evices p lugged in to th[…]
-
Страница 132
126 Produc t Info rmat ion E NERGY S TAR ® compliance The Internat ional E NERGY S TAR ® Offic e Equipment program is a voluntar y partnershi p with the computer and office equipment industry to pr omote the int roductio n of energ y-efficient personal computers, moni tors, printe rs, fax machine s, copiers, and scanners in an effor t to reduce a[…]
-
Страница 133
Product Information 127 A A A A A A A A A A A A If you have to fit a plug: As the colour s of the ma ins lead of t his appl iance may not ma tch colo ured markin gs u sed to i denti fy the te rmina ls in a plug, please proceed as fol lows: The green and yellow wire must be conne cted to the terminal in the plug whic h is marked wi th the lett er E […]
-
Страница 134
128 Produc t Info rmat ion Printer Parts ribbon cart ridge contr ol pane l power swi tch printer cover edge gui de print h ead paper bail paper gui de paper relea se lever paper-th ickness lever OFF center pa per support * sprockets* parallel /serial interface co nnector USB in terfac e connector * tracto r unit parts ** parallel for LQ-630 on ly a[…]
-
Страница 135
Product Information 129 A A A A A A A A A A A A Printer Specifications Mechanical Prin ting metho d: 24- pin im pact dot mat rix Printing sp eed: High speed draft 300 cps at 1 0 cpi 360 cps at 1 2 cpi Draft 225 cps at 1 0 cpi (33 7 cps at 15 c pi maximum) Lette r qual ity 79 c ps at 10 cp i Print ing directi on: Bi direct ional l ogic seek ing for […]
-
Страница 136
130 Produc t Info rmat ion Note: The paper-thickness lever position or an overheated print head may affect the print speed. Dimensions and weight (with paper g uide): Heigh t Width Depth Weight 185 mm (7.3 inches) 386 mm (15.2 inc hes) 306 mm (12.0 inc hes) Approx. 3.5 kg (7.7 lb) Ribb on: Black ribbon c artri dge S 015290 Ribbon l ife Approx. 2 mi[…]
-
Страница 137
Product Information 131 A A A A A A A A A A A A Electronic Interfac es: LQ-630 : One stand ard bidi rectional, 8-bi t, paral lel interf ace with IEEE 12 84 nibble mode support, one USB (ver 1 .1) inter face slot LQ-630S: One EIA- 232D serial interface, One USB (ver 1.1) int erface slo t Buffer: 32KB Built -in fonts: Bitmap fonts EPSON Draf t 10, 12[…]
-
Страница 138
132 Produc t Info rmat ion EPSON Sans Serif H10.5, 8 to 32 points, i n 2-poin t incre ment s Barcode fonts EAN-1 3, EAN-8, Interlea ved 2 of 5 , UPC-A, UPC-E, Code 39, Code 1 28, POSTNET Character t ables: Standard versi on One ital ic and 12 g raphics character t ables: Italic table, PC437 (US, Standard Europe), PC8 50 (M ultil ingual ), PC8 60 ( […]
-
Страница 139
Product Information 133 A A A A A A A A A A A A Electrical Note: Check the label on the back of the printer for the voltage of your printer. Environme ntal Paper Note: ❏ Use recycled paper and label only under normal temperature and humidity co nditio ns described b elow. ❏ Do not load paper that is curled, folded, or crumpled. 220 to 240 V Mod[…]
-
Страница 140
134 Produc t Info rmat ion Single sheets See also “ Mult ipart forms ” on page 136 for detai led inf ormation on the specif icatio n for sing le-sheet multip art for ms. * When using 4 inches or wider but les s than 9.4 inches wide mu ltipart forms joined by crimping (multipa rt forms with cut-pa per tab bindi ng), set the Multipa rt forms wit […]
-
Страница 141
Product Information 135 A A A A A A A A A A A A ❏ T he r atio of th e cut/ uncu t len gth a t th e perfo ratio n s hould be between 3:1 and 5:1. The perforation between pages must not extend all t he way to the edges of the paper. 1. cut area 2. uncut area 3. uncut par t of the edges of the p aper ❏ I f yo u use cont inuo us pa per w hose page […]
-
Страница 142
136 Produc t Info rmat ion * When using 4 inches or wider but les s than 9.4 inches wide mu ltipart forms joined by crimping (multipa rt forms with cut-pa per tab bindi ng), set the Multipa rt forms wit h cut-pa per tab bind ing in the default- settin g mode to on. Multipart forms The spe cificat ions fo r the di mension s of mu ltipar t forms are […]
-
Страница 143
Product Information 137 A A A A A A A A A A A A 1. 1 inch or less 2. 3 inches or less 3. printi ng side 4. 1 inch or less 5. 3 inches or less Note: When using 4 inches or wider but less than 9.4 inches wide multipart forms joined by crimping (multipart f orms with cut-paper tab binding) , set the Multipart forms with cut-paper tab binding in the de[…]
-
Страница 144
138 Produc t Info rmat ion ❏ The thickness of the fol ded part when extend ed should be 1 mm or less. ❏ The binding area shoul d be flat and have no creases. ❏ T he sprock et hole s should be a circ le or a no tched c ircle. ❏ The sprocket hole s of all sheets in t he form should be ali gned prope rly. ❏ The binding positio n should be ou[…]
-
Страница 145
Product Information 139 A A A A A A A A A A A A ❏ Always use labels whose ba cking sheet is entirely cover ed, and make sure t he cuts around the edges of the labels are perforated . 1. backing sheet 2. label shee t 3. severa l uncut area s on each s ide 4. label Labels (c ontinuous forms) ❏ Labels should be s ecurely at tached to the backing s[…]
-
Страница 146
140 Produc t Info rmat ion ❏ The labels should no t peel off thei r backing sheet under the conditi ons below. 1. label 2. 27 mm ❏ W hen us ing labe ls wh ose b acking sheet i s entir ely c overed , make sure the cu ts around th e edges of the label s are perfora ted. 1. backing sheet 2. labe l sheet 3. several uncut areas on ea ch side 4. labe[…]
-
Страница 147
Product Information 141 A A A A A A A A A A A A ❏ When using label s whose back ing sheet is not cover ed with the label m ateria l, see the illu strati on be low. 1. label 2. backing sheet 3. corner rad ius is more than 2.5 mm 4. label Backing sheet Width Length/p age 101.6 to 25 4 mm (4 to 10 inches) 101.6 to 55 8.8 mm (4 to 22 inches) Label s […]
-
Страница 148
142 Produc t Info rmat ion Printable area Single sheets (inclu ding single-sheet multipart forms) Continuous pape r (including continu ous multipart forms) A 4 .2 mm (0.1 7 inc h) or mor e B The mini mum l eft an d ri ght ma rgin s ar e 3.0 mm (0. 12 inch) each. The maximum printable width is 203. 2 mm (8.0 inche s). For si ngle sheet s wid er th a[…]
-
Страница 149
Product Information 143 A A A A A A A A A A A A Labels (s ingle-sheet) Labels (c ontinuous forms) Standards and Approvals Europe an model: A 3 mm (0.118 i nch) or more A 6.35 mm (0.25 inch) or more B 1.2 mm (0.0472 inch) or more C 3 mm (0.118 inch) or more Low V oltage Dire ctive 73/23/EEC EN 60950 EMC D irect ive 89 /33 6/EEC EN 550 22 Cl ass B EN[…]
-
Страница 150
144 Produc t Info rmat ion Command Lists EPSON ESC/ P 2 contro l codes Selec ting E PSON ESC /P 2 print er in your softwar e allo ws yo u to use the mo st advanced font and graphic s. For more i nformation about the commands, contact EPSO N customer services. Se e “ Contacting Cust omer Support ” on p age 76 for detai ls. General ope ration: ES[…]
-
Страница 151
Product Information 145 A A A A A A A A A A A A IBM PPDS E mulation Control Codes This print er emulat es the IBM Propr inter wit h the foll owing commands. General operati on: NUL, DC3, ESC j, BEL , CAN, DC1, ESC Q, ESC [ K, ESC U, ESC [ F Paper feeding : FF, LF, ESC 5, ESC A, ES C A (AGM*), ESC 0, ESC 1, ESC 2, ESC 3, ESC 3 (AGM*), CR, ESC ] Page[…]
-
Страница 152
146 Produc t Info rmat ion Cleaning the Printer To keep you r printer ope rating at its best, you shou ld clean it thoroughl y several t imes a year. Follow th ese steps to clea n the pri nter: 1. Turn off the prin ter and rem ove any pa per loaded i n the prin ter as w ell a s the pa per gui de. 2. Use a s of t brush to careful ly brush away al l […]
-
Страница 153
Product Information 147 A A A A A A A A A A A A Transporting the Printer If you need to transpo rt your printer some distance, careful ly repack it using the original box and packing mate rials. Follow these st eps to repac k the printer in its ori ginal packing mat eri al s: w Warni ng: If you have just used the printer, the print head may be hot;[…]
-
Страница 154
148 Produc t Info rmat ion[…]
-
Страница 155
Glossary 149 Glossary ASCII American Standard Co de for Information Interchange. A standardized coding system for assigning nu merical codes to letters and symbols. auto line feed When this feature is sel ected in the default-setting mode, each c arriage-return (CR) code is automatically followed by a line- feed (LF) code. bidirectional printing Pr[…]
-
Страница 156
150 Gl ossary dot ma trix A method of printing in which each letter or sym bol is formed by a pattern (matri x) of ind ividu al d ots. draft The print mode used by your printer when you select Draft as the font. The Draft font uses less dots per character for faster printing. See also high spe ed dra ft . driver See print er driver . ESC/P Abbrevia[…]
-
Страница 157
Glossary 151 letter quality (LQ) The print mode used by your printer when a f ont other than Draft is selected. Print ing w ith l ett er-qu alit y font s pr ovide s be tter read abil ity a nd ap pear ance at a reduced print speed. See also draf t and high sp eed draft . line feed (LF) A control code and control pa nel button that advances the paper[…]
-
Страница 158
152 Gl ossary unidirectional printing Prin tin g in wh ic h the p rint head p rin ts in o ne d irec tion o nly . Unid irec tio nal prin ting is us eful f or pr inting grap hics beca use it a llow s prec ise v ertic al alignment. You can select unidirectiona l printing in the printe r ’ s default-setting mode. See also bidir ectional pri nting .[…]
-
Страница 159
Index 153 Index Numerics 0 slas h, 44 A A.G .M. ( IBM ), 45 Aligning vertic al lines, 7 3 Auto C R (carr iage re turn), 45 Auto I/F (inte rface) wait time, 4 4 Auto line fe ed, 43 Auto tear-off, 10, 43 B Bidirecti onal printing (Bi-D), 43 Button LF/FF, 3 8 Load/E ject, 38 Micro Adjust, 38 Pause, 38 Buzzer (beeper) setting, 4 6 C Chara cter tab le, […]
-
Страница 160
154 In dex top-of-form position, 20 Multipart form s continuous, 14 singl e-sheet, 14 Multipa rt form s with c ut-paper tab binding , 46 P Packet mode, 45 Page l ength f or tracto r, 43 Paper jam clearing , 71 Paper re lease lever , 3 Paper sourc e selectin g, 2 Paper-th ickness l ever, 3 Parallel I/F (i nterface) bidire ctional mode, 44 Parallel i[…]
 Модель: Принтер Epson LQ-630 Flatbed
Год выпуска: 2002
Язык: русский
Формат: html
Размер: 780,1 Kb
Описание:
EPSON LQ-630 — компактный, доступный по цене и исключительно надежный новый 24 -х игольчатый матричный принтер EPSON. Предназначен для быстрой и качественной печати на специальных бумажных носителях различных размеров. Обладая высокой скоростью печати 360 символов в секунду, надежностью, гибкостью и высоким качеством печати, LQ-630 является идеальным решением для любого бизнеса, включая банки, магазины, гостиницы, страховые компании, ЗАГСы, почтовые отделения, билетные кассы (аэропортов, железные дороги), государственные организации, а также для различных промышленных, транспортных, торговых и сервисных компаний.
Содержание
- Работа с бумагой.
- Выбор податчика бумаги.
- Регулировка рычага толщины бумаги.
- Загрузка бумажной ленты.
- Загрузка отдельных листов.
- Загрузка специальной бумаги.
- Переключение между печатью на бумажной ленте и на отдельных листах.
- Использование функции Micro Adjust (Микронастройка).
- Программное обеспечение принтера.
- О программном обеспечении вашего принтера.
- Работа с драйвером принтера в Windows Me, 98 и 95.
- Работа с драйвером принтера в Windows XP, 2000 и NT 4.0.
- Обзор параметров драйвера принтера.
- Работа с EPSON Status Monitor 3.
- Панель управления.
- Кнопки и световые индикаторы.
- Выбор шрифта.
- Cтандартные параметры принтера.
- Режим блокировки.
- Поиск и устранение неисправностей.
- Использование индикации об ошибках.
- Проблемы и решения.
- Устранение проблем, связанных с подключением через USB.
- Устранение застрявшей бумаги.
- Выравнивание вертикальных линий в распечатке.
- Распечатка внутреннего теста.
- Печать в шестнадцатеричном коде.
- Обращение в службу поддержки покупателя.
- Дополнительные принадлежности и расходные материалы.
- Картридж с красящей лентой.
- Сервер печати.
- Информация об изделии.
- Инструкции по технике безопасности.
- Детали принтера.
- Характеристики принтера.
- Стандарты и рекомендации.
- Списки команд.
- Чистка принтера.
- Транспортировка принтера.
Скачать: disk.yandex.ru | mega.nz
![]()
NPD5202-00 RU
Руководство пользователя
Авторское право
Авторское право
Настоящая публикация не может полностью или частично воспроизводиться, сохраняться в поисковой системе либо передаваться в любом виде или с помощью любых электронных, механических, фотокопировальных или иных средств без предварительного письменного разрешения корпорации Seiko Epson. В отношении использования содержащейся здесь информации патентные обязательства не применяются. Не допускается никакой ответственности за повреждения, произошедшие в результате использования приведенной в настоящем документе информации. Сведения, представленные здесь, предназначены только для использования с изделиями компании Epson. Компания Epson не несет ответственности за использование этой информации при использовании других изделий.
Ни компания Seiko Epson Corporation, ни ее дочерние предприятия не несут ответственности перед покупателем данного изделия или третьими сторонами за убытки, потери, затраты или расходы, понесенные покупателем или третьими сторонами в результате несчастных случаев, неправильного использования и нарушения условий эксплуатации данного изделия, а также модификации, ремонта или изменения данного изделия или (за исключением США) несоблюдения инструкций по эксплуатации и техническому обслуживанию, выпущенных компанией Seiko Epson Corporation.
Ни компания Seiko Epson Corporation, ни ее дочерние предприятия не несут ответственности за повреждения или неисправности, произошедшие в результате использования каких-либо функций или продуктов, за исключением помеченных знаками Original Epson Products (Оригинальные продукты компании Epson) или Epson Approved Products (Продукты, сертифицированные компанией Epson).
Компания Seiko Epson Corporation не несет ответственности за повреждения в результате электромагнитных помех из-за использования интерфейсных кабелей, не помеченных знаком Epson Approved Products.
© 2014 Seiko Epson Corporation. All rights reserved.
Содержание данного руководства и технических спецификаций продукта может быть изменено без предварительного уведомления.
2
Руководство пользователя
Товарные знаки
Товарные знаки
EPSON®является зарегистрированным товарным знаком, EPSON EXCEED YOUR VISION и EXCEED YOUR VISION являются товарными знаками Seiko Epson Corporation.
PRINT Image Matching™ и логотип PRINT Image Matching являются товарными знаками Seiko Epson Corporation.
Copyright © 2001 Seiko Epson Corporation. All rights reserved.
EPSON Scan software is based in part on the work of the Independent JPEG Group.
libtiff
Copyright © 1988-1997 Sam Leffler Copyright © 1991-1997 Silicon Graphics, Inc.
Permission to use, copy, modify, distribute, and sell this software and its documentation for any purpose is hereby granted without fee, provided that (i) the above copyright notices and this permission notice appear in all copies of the software and related documentation, and (ii) the names of Sam Leffler and Silicon Graphics may not be used in any advertising or publicity relating to the software without the specific, prior written permission of Sam Leffler and Silicon Graphics.
THE SOFTWARE IS PROVIDED «AS-IS» AND WITHOUT WARRANTY OF ANY KIND, EXPRESS, IMPLIED OR OTHERWISE, INCLUDING WITHOUT LIMITATION, ANY WARRANTY OF MERCHANTABILITY OR FITNESS FOR A PARTICULAR PURPOSE.
IN NO EVENT SHALL SAM LEFFLER OR SILICON GRAPHICS BE LIABLE FOR ANY SPECIAL, INCIDENTAL, INDIRECT OR CONSEQUENTIAL DAMAGES OF ANY KIND, OR ANY DAMAGES WHATSOEVER RESULTING FROM LOSS OF USE, DATA OR PROFITS, WHETHER OR NOT ADVISED OF THE POSSIBILITY OF DAMAGE, AND ON ANY THEORY OF LIABILITY, ARISING OUT OF OR IN CONNECTION WITH THE USE OR PERFORMANCE OF THIS SOFTWARE.
Microsoft®, Windows®, and Windows Vista®are registered trademarks of Microsoft Corporation.
Apple, Macintosh, Mac OS, OS X, are trademarks of Apple Inc., registered in the U.S. and other countries.
Adobe, Adobe Reader, Acrobat, and Photoshop are trademarks of Adobe systems Incorporated, which may be registered in certain jurisdictions.
Intel®is a registered trademark of Intel Corporation.
Общее уведомление: прочие названия продуктов упоминаются в документе только в целях идентификации и могут являться товарными знаками соответствующих владельцев. Компания Epson отрицает любые права на владение данными знаками.
3

Руководство пользователя
Содержание
Содержание
Авторское право
Товарные знаки
Об этом руководстве
Инструкции к руководству. . . . . . . . . . . . . . . . . . 7
Символы и обозначения. . . . . . . . . . . . . . . . . . . . 7
Описания, используемые в данном руководстве. . . . . . . . . . . . . . . . . . . . . . . . . . . . . . 7
Обозначение операционных систем. . . . . . . . . . . 8
Важные инструкции
Инструкции по технике безопасности. . . . . . . . . .9
Справочные данные и предупреждения при эксплуатации принтера. . . . . . . . . . . . . . . . . . . . . 9
Советы и предупреждения по настройке и использованию принтера. . . . . . . . . . . . . . . . .10
Основные сведения о принтере
Названия деталей и их функции. . . . . . . . . . . . . 12
Кнопки. . . . . . . . . . . . . . . . . . . . . . . . . . . . . . . . .14
Загрузка бумаги
Меры предосторожности при работе с бумагой. 16
Имеющаяся бумага и характеристики. . . . . . . . . 17
Список типов бумаги. . . . . . . . . . . . . . . . . . . . 18
Загрузка бумаги в Подача бумаг задне част. . . . . 18
Размещение оригиналов на Стекло сканера
Печать
Печать с компьютера. . . . . . . . . . . . . . . . . . . . . . 23
Основные сведения о печати — Windows. . . . .23 Основные сведения о печати – Mac OS X. . . . .24 Двухсторонняя печать — (только для Windows). . . . . . . . . . . . . . . . . . . . . . . . . . . . . 27 Печать нескольких страниц на одном листе. . 28 Печать под размер бумаги. . . . . . . . . . . . . . . . 29 Совместная печать нескольких файлов
(только для Windows). . . . . . . . . . . . . . . . . . . .31
Печать с увеличением и создание плакатов (только для Windows). . . . . . . . . . . . . . . . . . . .32 Печать с использованием дополнительных возможностей. . . . . . . . . . . . . . . . . . . . . . . . . 38 Печать фотографий с помощью Epson Easy Photo Print. . . . . . . . . . . . . . . . . . . . . . . . . . . . 40
Отмена печати. . . . . . . . . . . . . . . . . . . . . . . . . . . 41
Отмена печати – кнопка принтера. . . . . . . . . .41 Отмена печати – Windows. . . . . . . . . . . . . . . . 41 Отмена печати – Mac OS X. . . . . . . . . . . . . . . .41
Копирование
Основные сведения о копировании. . . . . . . . . . . 42
Печать нескольких копий. . . . . . . . . . . . . . . . . . 42
Сканирование
Сканирование из панели управления. . . . . . . . . 43
Сканирование с компьютера. . . . . . . . . . . . . . . . 43
Основные сведения о сканировании. . . . . . . . 43 Сканирование с помощью расширенных функций. . . . . . . . . . . . . . . . . . . . . . . . . . . . . .46
Дозаправка чернил
Проверка уровня чернил — контейнер. . . . . . . . 49
Коды бутылок с чернилами. . . . . . . . . . . . . . . . . 49
Меры предосторожности при работе с чернильными бутылками. . . . . . . . . . . . . . . . . . .50
Перезаправка контейнеров для чернил. . . . . . . . 51
Улучшение качества печати и сканирования
Проверка и прочистка печатающей головки. . . . 55
Проверка и прочистка печатающей головки — Кнопки принтера. . . . . . . . . . . . . . 55 Проверка и прочистка печатающей
головки – Windows. . . . . . . . . . . . . . . . . . . . . . 56 Проверка и прочистка печатающей
головки – Mac OS X. . . . . . . . . . . . . . . . . . . . . 57
Замена чернил внутри чернильных трубок. . . . . 57
Замена чернил внутри чернильных трубок
— Windows. . . . . . . . . . . . . . . . . . . . . . . . . . . . 57 Замена чернил внутри чернильных трубок
— Mac OS X. . . . . . . . . . . . . . . . . . . . . . . . . . . 58
Калибровка печатающей головки. . . . . . . . . . . . 58
4

Руководство пользователя
Содержание
Калибровка печатающей головки – Windows. .58 Калибровка печатающей головки –
Mac OS X. . . . . . . . . . . . . . . . . . . . . . . . . . . . . 58
Очистка бумагопроводящего тракта. . . . . . . . . . 59
Очистка Стекло сканера. . . . . . . . . . . . . . . . . . . 59
Информация о приложении
Необходимые приложения. . . . . . . . . . . . . . . . . 61
Драйвер принтера Windows. . . . . . . . . . . . . . . 61 Драйвер принтера в Mac OS X. . . . . . . . . . . . . 64 EPSON Scan (Драйвер сканера). . . . . . . . . . . . 67 Epson Event Manager. . . . . . . . . . . . . . . . . . . . .68 Epson Easy Photo Print. . . . . . . . . . . . . . . . . . . 68 E-Web Print (только для Windows). . . . . . . . . . 68 EPSON Sof tware Updater. . . . . . . . . . . . . . . . . .69
Удаление приложений. . . . . . . . . . . . . . . . . . . . . 69
Удаление приложений – Windows. . . . . . . . . . 69 Удаление приложений — Mac OS X. . . . . . . . . 70
Установка приложений. . . . . . . . . . . . . . . . . . . . 71
Обновление приложений и встроенного ПО. . . .71
Устранение неполадок
Проверка состояния принтера. . . . . . . . . . . . . . .72
Проверка индикаторов ошибок на принтере. .72 Проверка состояния принтера — Windows. . . 73 Проверка состояния принтера – Mac OS X. . . 73
Удаление застрявшей бумаги. . . . . . . . . . . . . . . . 74
Извлечение застрявшей бумаги из Подача бумаг задне част. . . . . . . . . . . . . . . . . . . . . . . .74 Извлечение застрявшей бумаги из внутренних частей принтера. . . . . . . . . . . . . . 74
Неправильно подается бумага. . . . . . . . . . . . . . . 76
Неполадки с питанием и панелью управления. . .76
Питание не включается. . . . . . . . . . . . . . . . . . 76 Питание не выключается. . . . . . . . . . . . . . . . . 77
Принтер не печатает. . . . . . . . . . . . . . . . . . . . . . 77
Проблемы отпечатков. . . . . . . . . . . . . . . . . . . . . 78
Низкое качество печати. . . . . . . . . . . . . . . . . .78 Низкое качество копирования. . . . . . . . . . . . .79 На копируемом изображении появляется изображение обратной стороны оригинала. . .79 У распечатки неправильное положение, размер или поля. . . . . . . . . . . . . . . . . . . . . . . .79
Потертости и размытие на бумаге. . . . . . . . . . 80 Символы напечатаны неправильно или с искажением. . . . . . . . . . . . . . . . . . . . . . . . . . . 80 Напечатанное изображение перевернуто. . . . 81 Устранить проблему печати не удалось. . . . . . 81
Другие проблемы печати. . . . . . . . . . . . . . . . . . . 81
Печать выполняется слишком медленно. . . . . 81 При непрерывной печати скорость печати значительно замедляется.. . . . . . . . . . . . . . . . 82
Невозможно запустить сканирование. . . . . . . . . 82
Невозможно начать сканирование с использованием панели управления. . . . . . . . 83
Проблемы со сканируемым изображением. . . . . 83
Низкое качество сканирования. . . . . . . . . . . . 83 Размытые знаки. . . . . . . . . . . . . . . . . . . . . . . . 83 Изображение обратной стороны оригинала появляется на сканируемом
изображении. . . . . . . . . . . . . . . . . . . . . . . . . . 84 На отсканированном изображении появляется муар (штриховка). . . . . . . . . . . . . 84 Неправильная область сканирования или
направление. . . . . . . . . . . . . . . . . . . . . . . . . . . 84 Устранить проблему отсканированного изображения не удалось. . . . . . . . . . . . . . . . . 85
Другие проблемы сканирования. . . . . . . . . . . . . 85
Сканирование невозможно в
Автоматический режим в EPSON Scan. . . . . . 85 Просмотр эскизов не работает должным образом. . . . . . . . . . . . . . . . . . . . . . . . . . . . . . 85 Сканирование выполняется слишком медленно. . . . . . . . . . . . . . . . . . . . . . . . . . . . . 85 Сканирование в формат PDF/Multi-TIFF приостанавливается. . . . . . . . . . . . . . . . . . . . .85
Другие проблемы. . . . . . . . . . . . . . . . . . . . . . . . . 86
Незначительные удары тока при касании к принтеру. . . . . . . . . . . . . . . . . . . . . . . . . . . . . 86 Громкий шум при работе. . . . . . . . . . . . . . . . . 86 Брандмауэр блокирует приложение
(только Windows). . . . . . . . . . . . . . . . . . . . . . . 86
Приложение
Технические характеристики. . . . . . . . . . . . . . . . 87
Характеристики принтера. . . . . . . . . . . . . . . . 87 Характеристики сканера. . . . . . . . . . . . . . . . . 88 Характеристики интерфейса. . . . . . . . . . . . . . 88 Размеры. . . . . . . . . . . . . . . . . . . . . . . . . . . . . . 89 Электрические характеристики. . . . . . . . . . . . 89 Требования к условиям окружающей среды. . 89 Системные требования. . . . . . . . . . . . . . . . . . 90
Нормативная информация. . . . . . . . . . . . . . . . . 90
Стандарты и аттестации для европейской модели. . . . . . . . . . . . . . . . . . . . . . . . . . . . . . . 90 Запрет на копирование. . . . . . . . . . . . . . . . . . 90
Проверка общего числа страниц, пропускаемых через принтер. . . . . . . . . . . . . . . .91
5

Руководство пользователя
Содержание
Проверка общего числа страниц, пропускаемых через принтер — панель управления. . . . . . . . . . . . . . . . . . . . . . . . . . . .91 Проверка общего количества страниц, поданных через принтер — Windows. . . . . . . . 91 Проверка общего количества страниц, поданных через принтер — Mac OS X. . . . . . . 91
Энергосбережение. . . . . . . . . . . . . . . . . . . . . . . . 92
Энергосбережение — Windows. . . . . . . . . . . . 92 Энергосбережение — Mac OS X. . . . . . . . . . . . 92
Транспортировка принтера. . . . . . . . . . . . . . . . . 92
Помощь. . . . . . . . . . . . . . . . . . . . . . . . . . . . . . . . 95
Веб-сайт технической поддержки. . . . . . . . . . 95 Обращение в службу технической
поддержки Epson. . . . . . . . . . . . . . . . . . . . . . . 95
6

Руководство пользователя
Об этом руководстве
Об этом руководстве
Инструкции к руководству
На веб-сайте службы поддержки Epson доступны последние версии следующих руководств.
http://www.epson.eu/Support (Европа)
http://support.epson.net/ (за пределами Европы)
Установка (бумажное руководство)
Содержит информацию о настройке принтера, установке программного обеспечения, основном использовании принтера, устранении неполадок и т. д.
Руководство пользователя (руководство в формате PDF)
Данное руководство. Содержит общую информацию, инструкции по использованию принтера и устранению неполадок.
Кроме руководств выше см. справку, включенную в различные приложения Epson.
Символы и обозначения
!Предостережение:
Инструкции, которые необходимо тщательно соблюдать во избежание телесных повреждений.
cВажно:
Инструкции, которые необходимо соблюдать во избежание повреждения оборудования.
Примечание:
Предоставляет дополнительную и справочную информацию.
& Соответствующая информация
Ссылки на связанные разделы.
Описания, используемые в данном руководстве
Снимки экранов драйвера принтера и EPSON Scan (драйвера сканера) относятся к системам Windows 8.1 или Mac OS X v10.9.x. Содержание, отображающееся на экранах, различается в зависимости от модели и ситуации.
Иллюстрации принтера, используемые в данном руководстве используются только в качестве примера. Несмотря на то, что могут существовать небольшие отличия между моделями, способы их эксплуатации совпадают.
7

Руководство пользователя
Об этом руководстве
Обозначение операционных систем
Windows
В данном руководстве такие термины, как Windows 8.1, Windows 8, Windows 7, Windows Vista и Windows XP, используются по отношению к следующим операционным системам. Кроме того, термин Windows используется по отношению ко всем версиям.
Операционная система Microsoft® Windows® 8.1
Операционная система Microsoft® Windows® 8
Операционная система Microsoft® Windows® 7
Операционная система Microsoft® Windows Vista®
Операционная система Microsoft® Windows® XP
Операционная система Microsoft® Windows® XP Professional x64
Mac OS X
В данном руководстве термин Mac OS X v10.9.x используется по отношению к OS X Mavericks, а термин Mac OS X v10.8.x — к OS X Mountain Lion. Кроме того, термин Mac OS X используется по отношению к Mac OS X v10.9.x, Mac OS X v10.8.x, Mac OS X v10.7.x, Mac OS X v10.6.8.
8

Руководство пользователя
Важные инструкции
Важные инструкции
Инструкции по технике безопасности
Прочтите эти инструкции и следуйте им для обеспечения безопасного использования принтера. Храните это руководство для дальнейшего использования. Также следуйте всем предупреждениям и инструкциям, указанным на принтере.
Необходимо использовать только тот шнур питания, который поставлялся вместе с принтером; использовать этот шнур с другим оборудованием запрещено. Использование других шнуров питания с данным принтером или использование предоставляемого шнура питания с другим оборудованием может привести к возникновению пожара или поражению электрическим током.
Необходимо убедиться, что шнур питания переменного тока соответствует действующим местным стандартам безопасности.
Запрещается самому разбирать, модифицировать или пытаться починить шнур питания, вилку, принтер, сканер или дополнительное оборудование за исключением случаев, специально описанных в руководствах для принтера.
При следующих условиях необходимо отключить принтер от питания и обратиться к обслуживающему персоналу:
шнур питания или вилка повреждены, в принтер попала жидкость, принтер ронялся, или поврежден корпус, принтер плохо работает или демонстрирует отчетливые изменения в работе. Запрещается делать в настройках изменения, которые не описаны в инструкции по эксплуатации.
Необходимо устанавливать принтер недалеко от сетевой розетки так, чтобы вилку можно было легко вынуть из розетки.
Запрещается устанавливать или хранить принтер вне помещений, около источников грязи или пыли, воды и тепла, а также в местах, подверженных воздействию ударных нагрузок, вибраций, высоких температур и влажности.
Необходимо предотвращать попадание в принтер воды и не касаться его влажными руками.
При обращении с картриджами, крышками картриджей, открытыми емкостями с чернилами и крышками емкостей будьте осторожны и не касайтесь чернил.
При попадании чернил на кожу тщательно промойте ее водой с мылом.
При попадании чернил в глаза немедленно промойте их водой. Если после этого сохранятся неприятные ощущения или ухудшится зрение, немедленно обратитесь к врачу.
Если чернила попали вам в рот, немедленно обратитесь к врачу.
Не наклоняйте и не трясите емкость с чернилами после снятия наклейки, так как это может вызвать утечку чернил.
Храните емкости с чернилами и картриджи в недоступном для детей месте. Не позволяйте детям пить из емкостей с чернилами и крышек емкостей или брать их.
Справочные данные и предупреждения при эксплуатации принтера
Во избежание повреждения принтера или другого имущества необходимо прочитать приведенные далее инструкции и следовать им. Данное руководство необходимо сохранять для дальнейшего пользования.
9
Руководство пользователя
Важные инструкции
Советы и предупреждения по настройке и использованию принтера
Запрещается блокировать или накрывать воздухозаборники и отверстия принтера.
Следует использовать только тот тип источника питания, который указан на этикетке принтера.
Необходимо избегать использования розеток, находящихся в одной сети с фотокопировальными аппаратами или системами кондиционирования воздуха, которые постоянно включаются и отключаются.
Необходимо избегать использования электрических розеток, контролируемых настенными выключателями или автоматическими таймерами.
Всю компьютерную систему необходимо держать на удалении от потенциальных источников электромагнитных помех, например, акустических систем или баз радиотелефонов.
Шнуры питания необходимо помещать в местах, защищенных от трения, порезов, износа, изгибания и запутывания. Запрещается ставить на шнур питания какие-либо предметы, наступать или наезжать на него чем-либо. Необходимо обращать особое внимание на то, чтобы шнур питания не был перекручен на обоих концах, как у входа, так и выхода.
При использовании удлинителя необходимо убедиться, что общая нагрузка всех подключенных устройств не превышает разрешенного номинального тока удлинителя. Также необходимо следить за тем, чтобы общий номинальный ток подключенных к розетке устройств не превышал разрешенного номинального тока розетки.
Если принтер планируется использовать в Германии, то электросеть здания должна быть защищена 10или 16-амперными автоматическими выключателями, защищающими принтер от коротких замыканий
иизбыточного тока.
При подключении принтера к компьютеру или другому устройству необходимо убедиться в правильной ориентировке разъемов кабеля. У каждого разъема всего один правильный вариант подключения. Подключение разъема неправильной стороной может привести к повреждениям обоих устройств, соединенных этим кабелем.
Необходимо установить принтер на плоской устойчивой поверхности, площадь которой во всех направлениях больше площади основания устройства. Если устройство установлено под наклоном, оно будет работать неправильно.
Во время хранения или перевозки не наклоняйте принтер, не помещайте вертикально и не переворачивайте его, поскольку это может спровоцировать вытекание чернил.
Над принтером необходимо оставить достаточно места для того, чтобы была возможность полностью поднять крышку сканера.
Оставляйте перед устройством достаточно свободного пространства для выброса бумаги.
Следует избегать мест, в которых происходят частные смены температуры и влажности. Также не следует подвергать принтер воздействию прямых солнечных лучей, яркого света и источников тепла.
Запрещается вставлять посторонние предметы в отверстия и слоты принтера.
Во время печати запрещается трогать руками внутренние поверхности принтера.
Запрещается прикасаться к белому плоскому кабелю и чернильным трубкам внутри принтера.
Запрещается использовать аэрозольные изделия, содержащие огнеопасные газы, в принтере или рядом с ним. Это может привести к возникновению пожара.
Не перемещайте печатающую головку вручную, поскольку это может повредить принтер.
При закрытии сканера необходимо быть особенно осторожным, чтобы не прищемить пальцы.
Запрещается сильно надавливать на стекло сканера при размещении оригиналов.
10
Руководство пользователя
Важные инструкции
Если какие-либо чернильные емкости не заполнены по нижнюю линию, заправьте емкость чернилами при первой же возможности. Использование принтера при опускании уровня чернил ниже нижней линии контейнеров может привести к повреждению принтера.
Выключать принтер необходимо только с помощью кнопки P. Запрещается отключать принтер от сети или выключать питание розетки до того, как перестанет мигать индикатор P.
Перед транспортировкой принтера необходимо убедиться, что печатающая головка находится в начальном (крайнем правом) положении.
Если принтер не будет долго использоваться, необходимо отключить шнур питания от розетки.
11
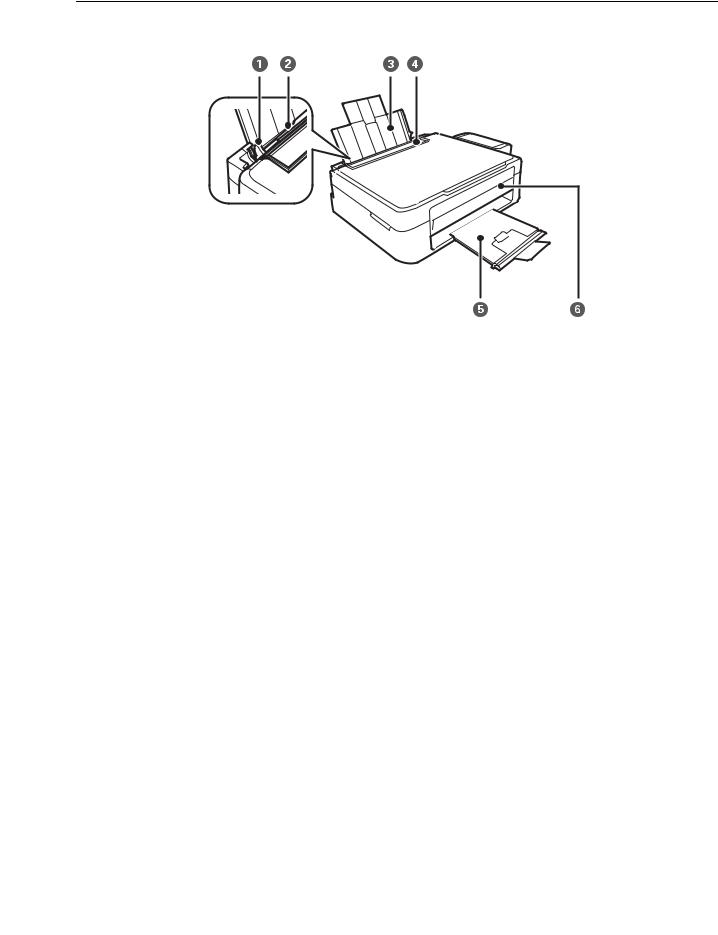
Руководство пользователя
Основные сведения о принтере
Основные сведения о принтере
Названия деталей и их функции
|
A |
Направляющие |
Подают бумагу в принтер. Необходимо передвинуть |
|
боковые направляющие к краям бумаги. |
||
|
B |
Подача бумаги сзади |
Загружает бумагу. |
|
C |
Подставка для бумаги |
Поддерживает загруженную бумагу. |
|
D |
Защита механизма подачи |
Защищает принтер от попадания инородных частиц. |
|
Защита всегда должна быть закрыта. |
||
|
E |
Приемный лоток |
Принимает выдаваемые листы бумаги. Перед |
|
печатью поднимите ограничитель во избежание |
||
|
выпадания выталкиваемой бумаги из лотка. |
||
|
F |
Панель управления |
Служит для управления принтером. |
12

Руководство пользователя
Основные сведения о принтере
|
A |
Сканер |
Сканирует размещенные оригиналы. Открывать |
|
только при удалении застрявшей бумаги. |
||
|
B |
Контейнер для чернил |
Подает чернила в печатающую головку. |
|
C |
Блок контейнеров для чернил |
Содержит контейнеры для чернил. |
|
D |
Резервуары для чернил (контейнеры для чернил) |
Подает чернила в трубки. |
|
E |
Печатающая головка |
Служит для нанесения чернил на поверхность |
|
бумаги. |
||
|
A |
Крышка сканера |
Блокирует проникновение внешних источников |
|
света во время сканирования. |
||
|
B |
Стекло сканера |
Разместите оригиналы. |
13

Руководство пользователя
Основные сведения о принтере
|
A |
Вход питания переменного тока |
Подключает шнур питания. |
|||||
|
B |
USB-порт |
Подключает кабель USB. |
|||||
Кнопки
|
A |
Служит для включения и выключения принтера. |
||||
|
Не выключайте, пока индикатор питания мигает (принтер работает или обрабатывает |
|||||
|
данные). |
|||||
|
Отключайте шнур питания, когда индикатор питания погаснет. |
|||||
|
B |
Запускает черно-белое копирование на простой бумаге размера А4. |
||||
|
C |
Запускает цветное копирование на простой бумаге размера А4. |
||||
|
D |
Служит для остановки текущей операции. |
||||
|
Удерживайте эту кнопку нажатой в течение трех секунд, пока не замигает кнопка P |
|||||
|
запуска очистки печатающей головки. |
|||||
|
E |
Включается или мигает, когда заканчивается бумага или происходит замятие бумаги. |
||||
14
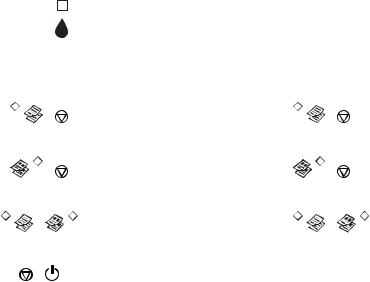
Руководство пользователя
Основные сведения о принтере
|
F |
Указывает состояние исходной заправки системы подачи чернил. |
|
Дополнительные функции доступны с помощью различных комбинаций кнопок.
|
+ |
Нажмите одновременно кнопки |
и для запуска монохромного копирования в |
||||||
|
черновом режиме. |
||||||||
|
+ |
Нажмите одновременно кнопки |
и для запуска цветного копирования в |
||||||
|
черновом режиме. |
||||||||
|
+ |
Нажмите одновременно кнопки |
и |
для запуска программы на компьютере, |
|||||
|
подключенном через USB, и сканирования в файл PDF. |
||||||||
|
+ |
Включите принтер, удерживая нажатой кнопку y для печати шаблона проверки дюз. |
|||||||
Соответствующая информация
& «Проверка индикаторов ошибок на принтере» на стр. 72
15
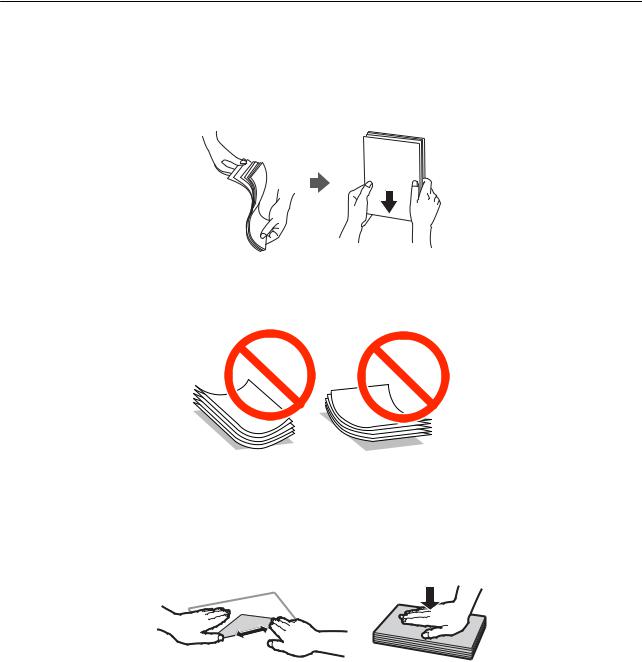
Руководство пользователя
Загрузка бумаги
Загрузка бумаги
Меры предосторожности при работе с бумагой
Прочтите инструкции, поставляемые вместе с бумагой.
Продуйте и выровняйте края бумаги перед загрузкой. Не продувайте и не сворачивайте фотобумагу. Это может повредить печатную сторону.
Если бумага свернута, то перед загрузкой расправьте ее или слегка сверните в другом направлении. Печать на свернутой бумаге может вызвать замятие бумаги или размытие на отпечатках.
Не используйте волнистую, рваную, согнутую, сырую, слишком тонкую или слишком толстую бумагу, а также бумагу с приклеенными к ней стикерами. Использование такой бумаги может вызвать замятие бумаги или размытие на отпечатках.
Продуйте и выровняйте края конвертов перед загрузкой. Если сложенные конверты раздуваются, нажмите на них, чтобы расправить перед загрузкой.
Не используйте свернутые и сложенные конверты. Использование таких конвертов может вызвать замятие бумаги или размытие на отпечатках.
Запрещено использовать конверты с клейкой поверхностью на клапане и конверты с прозрачным окошком для адреса.
Избегайте использовать слишком тонкие конверты, так как они могут свернуться во время печати.
Соответствующая информация
& «Характеристики принтера» на стр. 87
16

Руководство пользователя
Загрузка бумаги
Имеющаяся бумага и характеристики
Компания Epson рекомендует использовать оригинальную бумагу Epson для гарантированного получения высококачественных отпечатков.
Оригинальная бумага Epson
|
Название носителя |
Размер |
Вместимость (в |
Двухсторонняя |
|
листах) |
печать вручную |
||
|
Epson Bright White Ink Jet Paper |
A4 |
40*1 |
|
|
Epson Premium Glossy Photo Paper*2 |
A4, 13 × 18 см (5 × 7″), размер |
10 |
— |
|
16:9 (Д х Ш) (102 × 181 мм), |
|||
|
10 × 15 см (4 × 6″) |
|||
|
Epson Matte Paper-Heavyweight*2 |
A4 |
20 |
— |
|
Epson Photo Quality Ink Jet Paper*2 |
A4 |
40 |
— |
*1 Для двухсторонней печати вручную можно загрузить до 15 листов бумаги, у которых на одной стороне уже имеется распечатка.
*2 Доступна только печать с компьютера.
Примечание:
Доступность бумаги зависит от местоположения. Последние сведения о доступной бумаге в своем регионе можно получить в службе поддержки Epson.
Бумага, имеющаяся в продаже
|
Название носителя |
Размер |
Вместимость (в |
Двухсторонняя |
|
листах) |
печать вручную |
||
|
Простая бумага |
Letter*1, A4, B5*1, A5*1, A6*1 |
До линии, |
|
|
отмеченной |
|||
|
символом |
|||
|
треугольника на |
|||
|
боковой |
|||
|
направляющей*2 |
|||
|
Legal*1, Задано |
1 |
||
|
пользователем*1 |
|||
|
Envelope*1 |
Envelope № 10, Envelope DL, |
5 |
— |
|
Envelope C6 |
|||
*1 Доступна только печать с компьютера.
*2 Для двухсторонней печати вручную можно загрузить до 15 листов бумаги, у которых на одной стороне уже имеется распечатка.
Соответствующая информация
& «Веб-сайт технической поддержки» на стр. 95
17
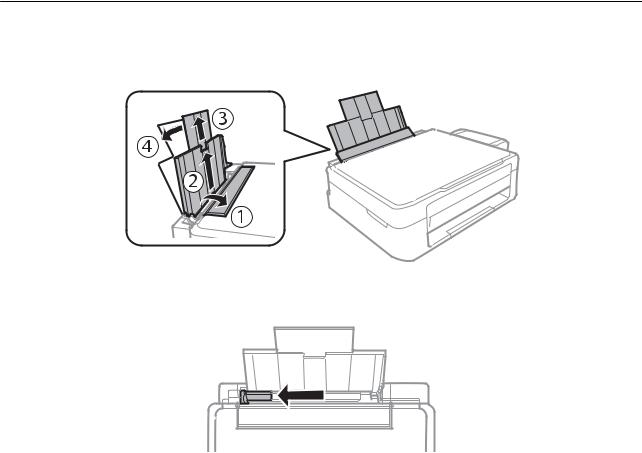
Руководство пользователя
Загрузка бумаги
Список типов бумаги
Для получения оптимальных результатов печати необходимо выбрать тип бумаги, подходящий для данной бумаги.
|
Название носителя |
Тип носителя |
|
Epson Bright White Ink Jet Paper* |
Простая бумага |
|
Epson Premium Glossy Photo Paper* |
Epson Premium Glossy |
|
Epson Matte Paper-Heavyweight* |
Epson Matte |
|
Epson Photo Quality Ink Jet Paper* |
Epson Matte |
|
Простая бумага* |
Простая бумага |
|
Конверт |
Конверты |
* Эти типы бумаги совместимы со стандартами EXIF PRINT и PRINT Image Matching при печати с драйвера принтера. Дополнительные сведения см. в документации, поставляемой вместе с цифровыми камерами, совместимыми со стандартами EXIF PRINT и PRINT Image Matching.
Загрузка бумаги в Подача бумаг задне част
1.Откройте защиту механизма подачи, вытяните подставку для бумаги и опрокиньте ее назад.
2.Передвиньте боковую направляющую влево.
18
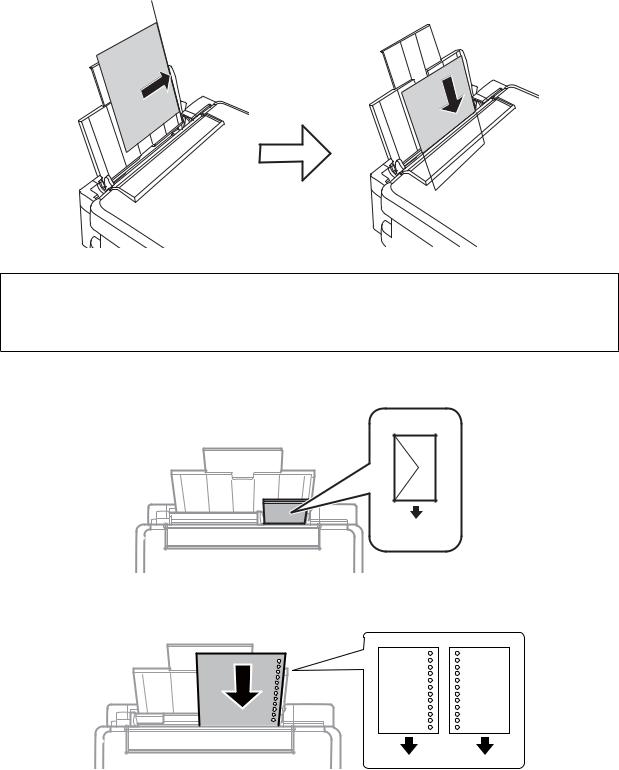
Руководство пользователя
Загрузка бумаги
3.Загрузите бумагу вертикально вдоль правой стороны подача бумаги сзади печатной стороной вверх.
cВажно:
Запрещается превышать максимальное загружаемое количество листов, указанное для данной бумаги. Запрещается загружать простую бумагу выше значка треугольника на направляющей.
Конверты
Перфорированная бумага
Примечание:
Загрузите один лист бумаги без отверстий для переплета в верхней или нижней части.
Отрегулируйте положение печати для выбранного файла, чтобы предотвратить печать поверх отверстий.
19

Руководство пользователя
Загрузка бумаги
4.Передвиньте направляющую к краю бумаги, а затем закройте защиту механизма подачи.
5.Выдвиньте приемный лоток.
Примечание:
Положите оставшуюся бумагу в упаковку. Если оставить ее в принтере, она может свернуться или качество печати может снизиться.
Соответствующая информация
&«Меры предосторожности при работе с бумагой» на стр. 16
&«Имеющаяся бумага и характеристики» на стр. 17
20
![]()
Руководство пользователя
Размещение оригиналов на Стекло сканера
Размещение оригиналов на Стекло сканера
cВажно:
При размещении таких объемных оригиналов, как книги, обеспечьте защиту стекло сканера от прямого попадания внешних источников освещения.
1.Поднимите крышку сканера.
2.Сотрите пыль и пятна с стекло сканера.
3.Поместите оригинал лицевой стороной вниз и пододвиньте его до угловой отметки.
Примечание:
Область в пределах 1,5 мм от краев стекло сканера не сканируется.
21
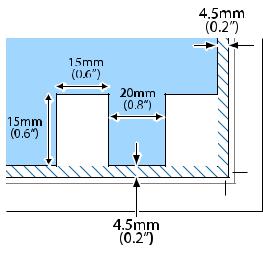
Руководство пользователя
Размещение оригиналов на Стекло сканера
Если сканирование осуществляется с использованием режима Автоматический режим или просмотра эскизов EPSON Scan, разместите оригинал в 4,5 мм от горизонтального и вертикального краев стекло сканера.
Примечание:
Разместите несколько фотографий минимум в 20 мм друг от друга.
Фотографии должны быть больше размера 15 х 15 мм.
4.Аккуратно закройте крышку сканера.
Примечание:
После сканирования или копирования извлеките оригиналы. Если оригиналы останутся на стекло сканера в течение длительного времени, они могут прилипнуть к его поверхности.
22

Руководство пользователя
Печать
Печать
Печать с компьютера
Основные сведения о печати — Windows
Примечание:
Объяснение элементов настройки см. в интерактивной справке. Нажмите правой кнопкой мыши на один из элементов, а затем выберите Справка.
Эксплуатация отличается в зависимости от приложения. Подробности см. в справке приложения.
1.Загрузите бумагу в принтер.
2.Выберите файл для печати.
3.Выберите Печать или Настройка печати в меню Файл.
4.Выберите свой принтер.
5.Для доступа к окну драйвера принтера выберите Параметры или Свойства.
23
Руководство пользователя
Печать
6.Задайте следующие параметры.
Размер документа: выберите размер бумаги, загруженной в принтер.
Без полей: выберите печать без полей вокруг изображения.
При печати без полей данные печати немного увеличиваются до размера бумаги, поэтому по краям бумаги не печатаются поля. Щелкните Настройки, чтобы выбрать степень увеличения.
Ориентация: выберите ориентацию страницы, заданную в приложении.
Тип бумаги: выберите тип загруженной бумаги.
Цветной: выберите Оттенки серого, если требуется печатать в черно-белом режиме или в оттенках серого.
Примечание:
При печати на конвертах выберите Альбомная в качестве параметра Ориентация.
7.Щелкните OK, чтобы закрыть окно драйвера принтера.
8.Нажмите Печать.
Соответствующая информация
&«Имеющаяся бумага и характеристики» на стр. 17
&«Загрузка бумаги в Подача бумаг задне част» на стр. 18
&«Руководство к драйверу принтера Windows» на стр. 62
&«Список типов бумаги» на стр. 18
Основные сведения о печати – Mac OS X
Примечание:
Действия различаются в зависимости от приложения. Подробности см. в справке приложения.
1.Загрузите бумагу в принтер.
2.Выберите файл для печати.
24
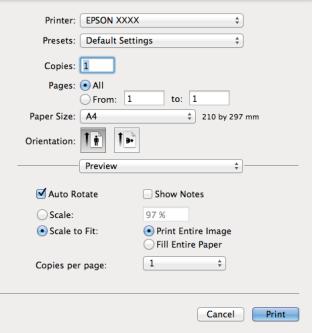
Руководство пользователя
Печать
3.Выберите Печать из меню Файл или другую команду для доступа к диалоговому окну печати. При необходимости расширить окно печати нажмите Показать подробности или d.
4.Задайте следующие параметры:
Принтер: выберите свой принтер.
Предварительные установки: Выберите при необходимости использования зарегистрированных параметров.
Размер бумаги: Выберите размер бумаги, загруженной в принтер. При печати без полей выберите размер бумаги «без полей».
Ориентация: выберите ориентацию страницы, заданную в приложении.
Примечание:
При печати конвертов выберите альбомную ориентацию
25

Руководство пользователя
Печать
5.В раскрывающемся меню выберите Настройки печати.
Примечание:
В системах Mac OS X v10.8.x или более поздней версии, если меню Настройки печати не открывается, драйвер принтера Epson установлен неправильно.
Выберите System Preferences из меню  > Принтеры и сканеры (или Печать и сканирование, Печать и факс), удалите принтер и добавьте его снова. Чтобы добавить принтер, см. следующие параметры.
http://epson.sn
6.Задайте следующие параметры:
Тип носителя: выберите тип загруженной бумаги.
Увеличение: Доступен при выборе размера бумаги для печати без полей.
При печати без полей печатные данные становятся несколько больше размера бумаги, так что поля по краям бумаги отсутствуют. Выберите степень увеличения.
Оттенки серого: выберите для печати в черном или оттенках серого.
7.Нажмите Печать.
Соответствующая информация
&«Имеющаяся бумага и характеристики» на стр. 17
&«Загрузка бумаги в Подача бумаг задне част» на стр. 18
&«Руководство к драйверу принтера Mac OS X» на стр. 65
&«Список типов бумаги» на стр. 18
26

Руководство пользователя
Печать
Двухсторонняя печать — (только для Windows)
Драйвер принтера печатает, автоматически разделяя четные и нечетные страницы. Когда принтер закончит печать нечетных страниц, переверните бумагу, следуя инструкциям, для печати четных страниц. Можно также напечатать буклет, который получается, если сложить распечатку вдвое.
Примечание:
При печати без полей эта функция недоступна.
Если не использовать бумагу, подходящую для двухсторонней печати, качество печати может снизиться и может возникнуть замятие бумаги.
В зависимости от бумаги и данных, чернила могут протекать на другую сторону бумаги.
Если утилита EPSON Status Monitor 3 отключена, войдите в драйвер принтера, нажмите Расширенные параметры на вкладке Сервис, после чего выберите Включить EPSON Status Monitor 3.
Двухсторонняя печать может быть недоступна, когда доступ к принтеру осуществлен через сеть или принтер совместно используется.
1.Загрузите бумагу в принтер.
2.Выберите файл для печати.
3.Войдите в окно драйвера принтера.
4.Выберите Ручной (Переплет по длинному краю) или Ручной (Переплет по короткому краю) для пункта Двусторонняя печать на вкладке Главное.
5.Нажмите Настройки, настройте соответствующие параметры и нажмите OK.
Примечание:
Чтобы напечатать буклет, выберите Буклет.
6.При необходимости можно настроить другие элементы на вкладках Главное и Дополнительные настройки, после чего нажать OK.
7.Нажмите Печать.
После завершения печати с одной стороны на экране компьютера появится всплывающее окно. Выполняйте инструкции, отображаемые на экране.
27
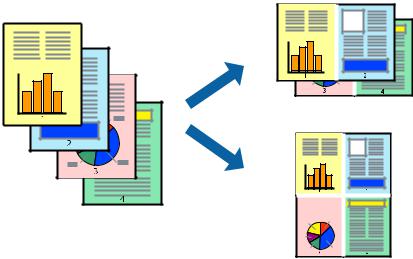
Руководство пользователя
Печать
Соответствующая информация
&«Имеющаяся бумага и характеристики» на стр. 17
&«Загрузка бумаги в Подача бумаг задне част» на стр. 18
&«Основные сведения о печати — Windows» на стр. 23
Печать нескольких страниц на одном листе
На одном листе можно напечатать две или четыре страницы.
Печать нескольких страниц на одном листе – Windows
Примечание:
При печати без полей эта функция недоступна.
1.Загрузите бумагу в принтер.
2.Выберите файл для печати.
3.Войдите в окно драйвера принтера.
4.Выберите Разворот или 4 на 1 в настройке Многостраничность на вкладке Главное.
5.Нажмите Порядок печати, внесите соответствующие настройки, после чего нажмите OK для закрытия окна.
6.При необходимости можно настроить другие элементы на вкладках Главное и Дополнительные настройки, после чего нажать OK.
7.Нажмите Печать.
Соответствующая информация
&«Загрузка бумаги в Подача бумаг задне част» на стр. 18
&«Основные сведения о печати — Windows» на стр. 23
28

Руководство пользователя
Печать
Печать нескольких страниц на одном листе – Mac OS X
1.Загрузите бумагу в принтер.
2.Выберите файл для печати.
3.Перейдите к диалоговому окну печати.
4.В раскрывающемся меню выберите Макет.
5.Установите количество страниц в Страниц на листе, Направление макета (порядок страниц), и
Граница.
6.По мере необходимости настройте другие элементы.
7.Нажмите Печать.
Соответствующая информация
&«Загрузка бумаги в Подача бумаг задне част» на стр. 18
&«Основные сведения о печати – Mac OS X» на стр. 24
Печать под размер бумаги
Можно настроить печать под размер загруженной в принтер бумаги
Печать под размер бумаги – Windows
Примечание:
При печати без полей эта функция недоступна.
1.Загрузите бумагу в принтер.
2.Выберите файл для печати.
3.Войдите в окно драйвера принтера.
4.Настройте следующие параметры на вкладке Дополнительные настройки.
Размер документа: выберите размер бумаги, заданный в приложении.
29
Руководство пользователя
Печать
Бумага на выходе: Выберите размер бумаги, загруженной в принтер.
Уместить на странице выбирается автоматически.
Примечание:
Если необходимо напечатать уменьшенное изображение в центре страницы, выберите В центре.
5.При необходимости можно настроить другие элементы на вкладках Главное и Дополнительные настройки, после чего нажать OK.
6.Нажмите Печать.
Соответствующая информация
&«Загрузка бумаги в Подача бумаг задне част» на стр. 18
&«Основные сведения о печати — Windows» на стр. 23
Печать под размер бумаги – Mac OS X
1.Загрузите бумагу в принтер.
2.Выберите файл для печати.
3.Перейдите к диалоговому окну печати.
4.Выберите размер бумаги, заданный в приложении, в качестве параметра Размер бумаги.
5.В раскрывающемся меню выберите Подготовка бумаги к печати.
6.Выберите Под размер бумаги.
7.Выберите размер бумаги, загруженной в принтер, в качестве параметра Назначенный размер бумаги.
8.По мере необходимости настройте другие элементы.
9.Нажмите Печать.
Соответствующая информация
&«Загрузка бумаги в Подача бумаг задне част» на стр. 18
&«Основные сведения о печати – Mac OS X» на стр. 24
30
 Loading…