-
Contents
-
Table of Contents
-
Bookmarks
Quick Links
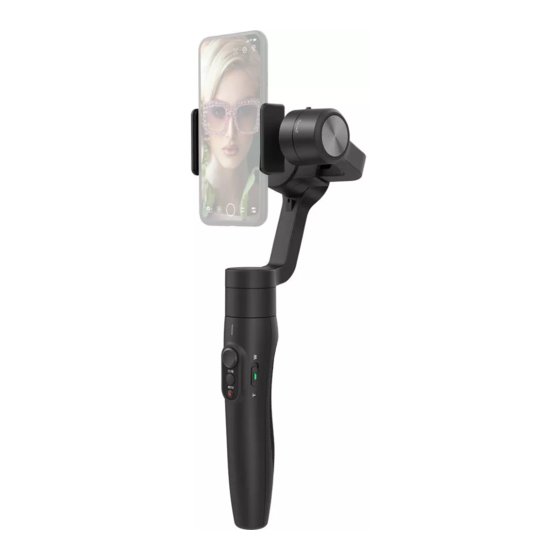
3-Axis Stabilized Handheld Gimbal
for Smartphone
Instructions
EN V 1.0
Related Manuals for FeiYu Tech Vimble 2S
Summary of Contents for FeiYu Tech Vimble 2S
-
Page 1
3-Axis Stabilized Handheld Gimbal for Smartphone Instructions EN V 1.0… -
Page 2: Table Of Contents
Catalogue 1. Overview 2. Start to Use 2.1 Charging 2.2 Positioning Lock 2.3 Smartphone Installation 2.4 Balancing 2.5 Power ON / OFF 3. Function Operation 3.1 Function / Modes Introduction 3.2 Joystick 3.3 Function Button Operation 3.4 Shutter Button Operation 3.5 Focus Button Operation 3.6 Trigger Button Operation 3.7 Light Indicator Explanation…
-
Page 3
Vimble 2S is a three-axis handheld gimbal suitable for mobile phones with joystick, Bluetooth shutter, position lock, extendable bar, etc. The gimbal can stabilize the smartphone intelligently. The gimbal supports landscape and portrait shooting, which can also control phone shooting. Connect with Feiyu ON App to achieve… -
Page 4: Overview
1. Overview *This product does not include the smartphone Micro USB Port for Smartphone Charging Tilt Axis Cross Arm Roll Axis Tilt Axis Lock Smartphone Holder Vertical Arm Pan Axis Function Button Micro USB Port Roll Axis Lock Handle (Built-in battery) Extendable Bar Extendable Range 0~183mm…
-
Page 5: Start To Use
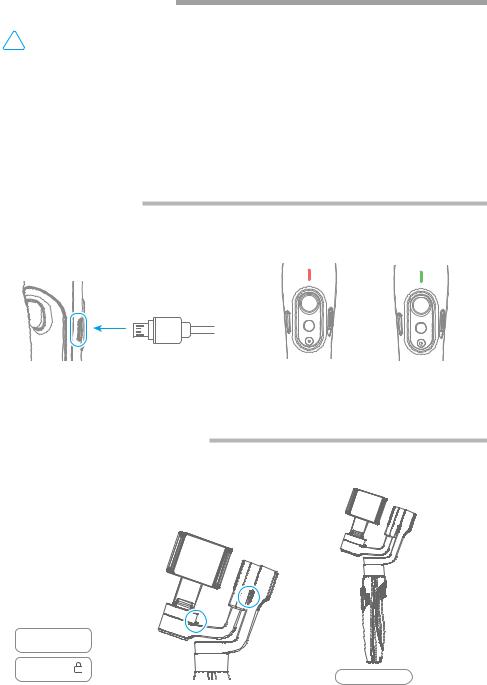
2. Start to Use TIPS (1) Please fully charge the battery before powering on the gimbal for the first time. (2) If the power is too low, the red light will flash three times every five seconds that indicating you should charge it immediately. (3) When not in use, power off…
-
Page 6: Smartphone Installation
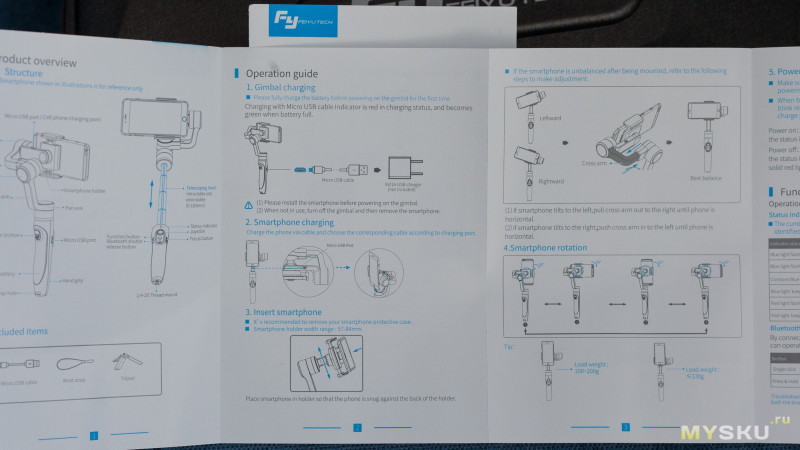
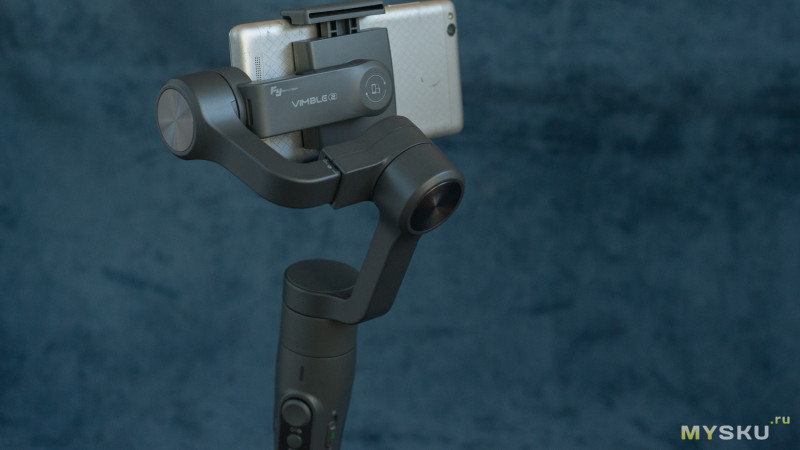
2.3 Smartphone Installation Place smartphone in holder so that the phone is snug against the back of the holder. It’s recommended to remove your smartphone protective case. Smartphone holder width range : 57-84mm. 2.4 Balancing (Balancing before power on) If the smartphone tilts to left or right after installed the smartphone, please slide the cross arm to the opposite direction which the smartphone tilts to to balance.
-
Page 7: Power On / Off
2.5 Power ON / OFF Make sure unlock the roll and pan lock before powering on the gimbal. Power ON Long press the function button and release it when you hear the tone. (Green light will change to blue) Long press the function button and release it when you hear the tone. Power OFF (The red light will turn off)…
-
Page 8: Joystick
Lock the tilt Follow and position rotate Follow and Follow and Lock the pan rotate rotate position Pan Mode Lock Mode Follow Mode Default mode 3.2 Joystick Upward Move to left Move to right Downward 3.3 Function Button Operation Function Function button Pan Mode…
-
Page 9: Shutter Button Operation
(1)Power on the gimbal, open smartphone bluetooth. (2)Choose below Bluetooth connection way: a. Choose Vimble 2S Bluetooth to connect like FY_Vimble2S_xx. b. Open Feiyu ON app, logon or register via tips to connect. (3)After Bluetooth connecting successful, the shutter button is activated.
-
Page 10: Focus Button Operation
3.5 Focus Button Operation Focus Button Function Sliding up-down Adjust focus (Adjust field-of-view) Used with Feiyu ON App 3.6 Trigger Button Operation Trigger Function Button Enter follow mode Long press (Release trigger button enter into previous mode) Double tap Reset The button’s operation function can be modified on App, after connecting Feiyu ON App succeeded.
-
Page 11: Trigger Button Operation
3.8 Trigger Button Operation Manually move camera to desired position,and hold for half a second, new tilt position is automatically saved. 3.9 Landscape and Portrait Shot Switching Payload in Press buttons to switch portrait mode Effected only when tilt axis on right side. Hold the gimbal horizontally, press and hold the trigger button, and then single tag function button to switch between landscape and portrait mode.
-
Page 12: Gimbal Initialization
3.10 Gimbal Initialization Initialize gimbal when: Smartphone fails to remain level. Gimbal has no been used for a long period of time. Gimbal is used in extreme temperature variations. STEP Click the function button five times. The motors will stop working. Status indicatorturns solid blue.
-
Page 13: Smartphone Charging
3.11 Smartphone Charging Charge the smartphone via cable and choose the corresponding cable according to charging port. Micro USB Port Cables www.feiyu-tech.cn…
-
Page 14: Connect And Use Feiyu On App
4. Connect and Use Feiyu ON App 4.1 Download the App Feiyu ON Timer Photo/Video Zooming Path time-lapse photography Overlapping Light tracking Object tracking Face locking photography images Ultra-wide angle Free panoramic Filter Beauty panorama Firmware ..Video editing Slow motion upgrade Scan the QR code to download the app, or search for «Feiyu ON»…
-
Page 15: Shooting / Control Interface
4.3 Shooting / control interface Shooting interface Control interface Face/object Setting — Advanced tracking Upgrade settings Back Tutorial Remote Control Album Gimbal information FY_PocketV_xx Reset Virtual Joystick Switch between Camera setting photo/ recording mode Choose photo Shutter Switch between Lock mode Panning mode modes front and rear camera…
-
Page 16: Specifications
5. Specifications 118 mm 110.5mm Max. Tilting Range 320° Max. Tilting Range 320° Max. Panning Range 320° Operation Time 12 Hours Weight 272g (Not including the smartphone) Payload 210g (After balanced) Adapter smartphones iPhone and Android phones (Width range 57-84mm) www.feiyu-tech.cn…
-
Page 17
Disclaimer Thanks for using Feiyu Gimbal. The information in this document affects your safety and your legal rights and responsibilities. Read the entire document carefully to ensure proper configuration before use, Failure to read and follow instructions and warnings in this document may result in serious injury to yourself or others, or damage to your products or damage to other objects in the vicinity. -
Page 18
Official Social Media Website Facebook Youtube Twitter Instagram Facebook: www.facebook.com/feiyutech YouTube Channel: www.youtube.com/c/Feiyu-tech Twitter: www.twitter.com/feiyutech Instagram: www.instagram.com/FeiyuTech YouTube Channel: www.youtube.com/c/Feiyu-tech Online Store: store.feiyu-tech.com… -
Page 19
Guilin Feiyu Technology Incorporated Company For more information, please visit our official website www.feiyu-tech.com E-mail: service@feiyu-tech.com Tel: +86 773 2320865 Due to software and hardware improvements, your actual product might differ from the descriptions and pictures in this user manual. You can get the latest user manual from the official website.
Table of Contents for FeiYu Tech Vimble 2S:
-
Disclaimer Thanks for using Feiyu Gimbal. The information in this document affects your safety and your legal rights and responsibilities. Read the entire document carefully to ensure proper configuration before use, Failure to read and follow instructions and warnings in this document may result in serious injury to yourself or others, or damage to your products or damage to other objects in the vicin
-
Guilin Feiyu Technology Incorporated Company For more information, please visit our official website E-mail: [email protected] Tel: +86 773 2320865 www.feiyu-tech.com Due to software and hardware improvements, your actual product might differ from the descriptions and pictures in this user manual. You can get the latest user manual from the official website.
-
13 www.feiyu-tech.cn 5. Specifications iPhone and Android phones (Width range 57-84mm) 210g Adapter smartphones Weight Payload 272g Operation Time 12 Hours Max. Tilting Range 320° Max. Tilting Range 320° Max. Panning Range 320° 317mm 110.5mm 118 mm (Not including the smartphone) (After balanced)
-
12 www.feiyu-tech.cn Upgrade the firmware through the App. Upgrade type introductions: (1) Click the icon (2) Select upgrade type. (3) Follow the prompts to upgrade the firmware. Keyboard firmware update: Repair / update or newly add button/touch screen/interaction functions, update more compatibility cameras which can be controlled through WIFI, repair few bugs about camera control through WIFI, and etc. Bluetooth firmware update: Repa
-
ON / OFF Roll Axis Lock Tilt Axis Lock Focus Button Function Button Extendable Range 0~183mm Shutter Button Extendable Bar Status Indicator Joystick Roll Axis Tilt Axis Cross Arm Vertical Arm Wrist Strap Hole Handle Micro USB Port Micro USB Port for Smartphone Charging Smartphone Holder Pan Axis 1/4 inch Thread Hole (Built-in battery) Function Button 1. Overview 01 www.feiyu-tech.cn TripodMicro-USB Cable *This product does not include the smartphone Wrist Strap Micro to Micro cable Micro to Lig
-
Official Social Media Website Facebook Youtube Twitter Instagram Facebook: www.facebook.com/feiyutech YouTube Channel: www.youtube.com/c/Feiyu-tech Twitter: www.twitter.com/feiyutech Instagram: www.instagram.com/FeiyuTech YouTube Channel: www.youtube.com/c/Feiyu-tech Online Store: store.feiyu-tech.com
-
Catalogue 1. Overview 1 2 2 2 3 4 4 5 5 2. Start to Use 3. Function Operation 3.1 Function / Modes Introduction 3.2 Joystick 3.3 Function Button Operation 2.1 Charging 2.2 Positioning Lock 2.3 Smartphone Installation 11 11 11 4. Connect and Use Feiyu ON App 5.1 Download the App 5.2 Connect the App 12 12 5.3 Shooting / control interface 5.4 Firmware Upgrade 13 5. Specifications 3.4 Shutter Button Operation 3.5
-
04 www.feiyu-tech.cn Make sure unlock the roll and pan lock before powering on the gimbal. Long press the function button and release it when you hear the tone. Long press the function button and release it when you hear the tone. Power OFF Power ON 2.5 Power ON / OFF 3.1 Function / Modes Introduction 3. Function Operation Function Button (Green light will change to blue) (The red light will turn off) Pan Mode(Default mode) Lock Mode Follow Mode The roll di
-
02 www.feiyu-tech.cn 2.1. Charging 2.2. Positioning Lock Charge completeCharging Connect the USB cable to charge. The indicator light is red when charging, and green when fully charged. Stored Status Each of the tilt axis and roll axis has positioning lock for storage purposes. Be sure to unlock them before using the gimbal. ! (1) Please fully charge the battery before powering on the gimbal for the first time. (2) If the power is too low, the red light will flash three times every five seconds that indicating you should charge it immed
-
07 www.feiyu-tech.cn Trigger Button Function Long press Double tap Reset Enter follow mode (Release trigger button enter into previous mode) Sliding up-down (Adjust field-of-view) Adjust focus Focus Button Function * * The button’s operation function can be modified on App, after connecting Feiyu ON App succeeded. 3.5 Focus Button Operation 3.6 Trigger Button Operation Used with Feiyu ON App 3.7 Light Indicator Explanation Indicator Mode / Status Pan Mode Follow Mode Lock Mode / Initialization Initialization failure / Malfunction Indicator status
-
05 www.feiyu-tech.cn Follow and rotate Follow and rotate Lock the pan position Lock the tilt position Pan Mode Default mode Follow and rotate Follow ModeLock Mode 3.3 Function Button Operation 3.2 Joystick Single tap (Click once) (Click again) Pan Mode Lock Mode Function button Function Double tap Follow Mode Triple tap Quintuple tap All Follow Mode Long press Power ON / OFF * * Gimbal Initialization ( Single click the function button to wake up ) * The button&a
-
09 www.feiyu-tech.cn Function Button Status Indicator Initialize gimbal when: Smartphone fails to remain level. Gimbal has no been used for a long period of time. Gimbal is used in extreme temperature variations. (1) (2) 2 STEP 3.10 Gimbal Initialization Click the function button five times. The motors will stop working. Status indicatorturns solid blue. Place the gimbal on a flat, horizontal surface. The gimbal will automatically initialize after a few seconds detecting no movement. The blue light will flash three times to indica
-
06 www.feiyu-tech.cn 3.4 Shutter Button Operation The gimbal can control the photography after only Bluetooth is connected with smartphone. Bluetooth connection Connect Smartphone (1)Power on the gimbal, open smartphone bluetooth. (2)Choose below Bluetooth connection way: a. Choose Vimble 2S Bluetooth to connect like FY_Vimble2S_xx. b. Open Feiyu ON app, logon or register via tips to connect. (3)After Bluetooth
-
2.3 Smartphone Installation 2.4 Balancing 03 www.feiyu-tech.cn Place smartphone in holder so that the phone is snug against the back of the holder. It’s recommended to remove your smartphone protective case. Smartphone holder width range : 57-84mm. Balanced Status Leftward Rightward Cross arm If the smartphone tilts to left or right after installed the smartphone, please slide the cross arm to th
Questions, Opinions and Exploitation Impressions:
You can ask a question, express your opinion or share our experience of FeiYu Tech Vimble 2S device using right now.
![]()
3-Axis Stabilized Handheld Gimbal
for Smartphone
Instructions
EN V1.0

 Catalogue
1.Overview
2.StarttoUse
2.1Charging
2.2Positioning Lock
2.3Smartphone Installation
2.4Balancing
2.5Power ON / OFF
3.FunctionOperation
3.1Function / Modes Introduction
3.2Joystick
3.3Function Button Operation
3.4Shutter Button Operation
3.5Focus Button Operation
3.6Trigger Button Operation
3.7Light Indicator Explanation
3.8Trigger Button Operation
3.9Landscape and Portrait Shot Switching
3.10Gimbal Initialization
3.11Smartphone Charging
4.ConnectandUseFeiyuONApp
5.1Download the App
5.2Connect the App
5.3Shooting / control interface
5.4Firmware Upgrade
1
2
2
2
3
3
4
4
4
5
5
6
7
7
7
8
8
9
10
11
11
11
12
12

Vimble2Sisathree-axishandheldgimbalsuitableformobilephoneswithjoystick, Bluetooth shutter, position lock, extendable bar, etc. The gimbal can stabilize the smartphone intelligently. The gimbal supports landscape and portrait shooting, which can also control phone shooting. Connect with Feiyu ON App to achieve movefunctions
Suggestion
Vimble2S includesbelowinformation,pleasereadtheinformationbeforeusing thegimbal
1.Quickstartguide
2.Onlineinstruction
3.Tutorial
ThetutorialvideoscanbewatchedatFeiyuTecho cialwebsite orscantheQRcodeasbelow:http://www.feiyu-tech.com/play/
Download the Feiyu ON App
ScantheQRcodetodownloadtheapp,orsearchfor»FeiyuON»intheAppStoreor
GooglePlay.
*RequiresiOS9.0orabove, Android6.0orabove.
|
AppStore |
Googleplay |
|
AndroidVersion |

1. Overview
*Thisproductdoesnotincludethesmartphone
MicroUSBPort forSmartphone Charging
TiltAxis  CrossArm
|
Roll Axis |
TiltAxis Lock |
|
Smartphone Holder |
VerticalArm 
|
Pan Axis |
||
|
FunctionButton |
MicroUSBPort |
|
|
Handle |
Roll AxisLock |
|
|
(Built-inbattery) |
||
|
Extendable Bar |
||
|
ExtendableRange |
||
|
WristStrap Hole |
0~183mm |
|
|
1/4inch |
StatusIndicator |
|
|
ThreadHole |
||
|
FunctionButton |
Joystick |
|
|
Focus Button |
||
|
ON / OFF |
||
|
ShutterButton |
Accessories
|
Micro-USBCable |
Tripod |
WristStrap |
www.feiyu-tech.cn 01
2. Start to Use
! TIPS
(1)Pleasefullychargethebatterybeforepoweringonthegimbalforthefirsttime.
(2)Ifthepoweristoolow,theredlightwillflashthreetimeseveryfivesecondsthat indicatingyoushouldchargeitimmediately.
(3)Whennotinuse,powero thegimbal.
(4)Unlockthethreeaxisclampbeforepoweringonthegimbal.
2.1.Charging
ConnecttheUSBcableto charge. Theindicator lightisredwhencharging,and green when fullycharged.
2.2. Positioning Lock
Eachof thetiltaxisandrollaxis has positioning lockfor storage purposes.
Be sure to unlock them before using the gimbal.
Unlock 
|
Lock |
StoredStatus |
02 |
|
www.feiyu-tech.cn |

www.feiyu-tech.cn 03
 Loading…
You can only view or download manuals with
Sign Up and get 5 for free
Upload your files to the site. You get 1 for each file you add
Get 1 for every time someone downloads your manual
Buy as many as you need
Vimble 2S is a three-axis handheld gimbal suitable for mobile phones with joystick,
Bluetooth shutter, position lock, extendable bar, etc. The gimbal can stabilize the
smartphone intelligently. The gimbal supports landscape and portrait shooting,
which can also control phone shooting. Connect with Feiyu ON App to achieve
move functions
Suggestion
Vimble 2S includes below information, please read the information before using
the gimbal
1. Quick start guide
2. Online instruction
3. Tutorial
The tutorial videos can be watched at FeiyuTech official website
or scan the QR code as below: http://www.feiyu-tech.com/play/
Download the Feiyu ON App
Scan the QR code to download the app, or search for «Feiyu ON» in the App Store or
Google Play.
* Requires iOS 9.0 or above, Android 6.0 or above.
iOS Version
Android Version
App Store
Google play
Год назад предыдущая модель стабилизатора от Феи стала весьма популярной в силу своей цены (а ТТ провел где-то 3 волны распродаж, каждый раз понижая ценник, чтобы окучить и тех кто был готов платить 140 баксов в начале и 99 в конце). И вот не так давно вышла новая модель, функционал которой дополнился привычной выдвижной селфи-палкой и следящим фокусом!.. Несмотря на то что пара новостей о распродаже уже на муське появилась, обзоров этой модели еще не было. Пора эту ситуацию исправить, ведь с большой вероятностью тут есть среди читателей те, кому модель интересна, но в отсутствии детальной информации жаба придерживает вожжи.
Для начала спецуха и красивые картинки:
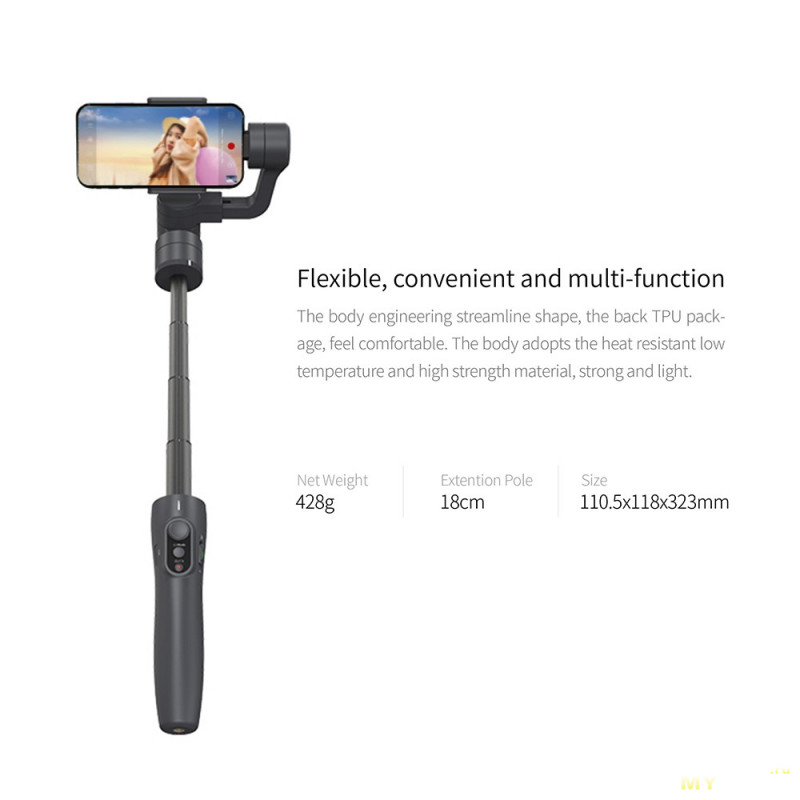
- Extension Freely for Fantastic Filming: Newly added 18cm long extension bar gives more enjoyment when taking selfies and taking group photo. It gives smartphone wider frame and the beautiful scenery can be framed in easily.
- Connect the gimbal with Vicool App, and continuously click the function button for three times, the smartphone camera lens will shift from back and front quickly.
- Innovative smart phone mount. Quickly change shooting direction from horizontal to vertical. Easily adapt itself in different shooting scenes. Have better using experience when taking selfies and being in live show.
- Bluetooth Shutter Button; Two Solutions to Control the Smartphone from Vimble 2: The operation of bluetooth shutter button is fully upgraded. Through blue tooth connection between smart phone and Vimble 2, Vimble 2 can control the smart phone camera by the shutter button. And Vicool App allows more fantastic operations.
- Newly Refining Smartphone Photography—1. Face Tracking: Slightly point the screen to lock face and you will be still the leading role in the camera. 2. Object Tracking: Fingers slightly scratch the scree to lock the focus, And it can achieve intelligent following with deep simulation to ensure the focus not to be out of the frame.
- Time-lapse photography in the quiescent state.
- Built-in Zoom slider in handle, easier in operation but more professional in production.
- Intelligent APP meets panoramic photography and fast cutting.
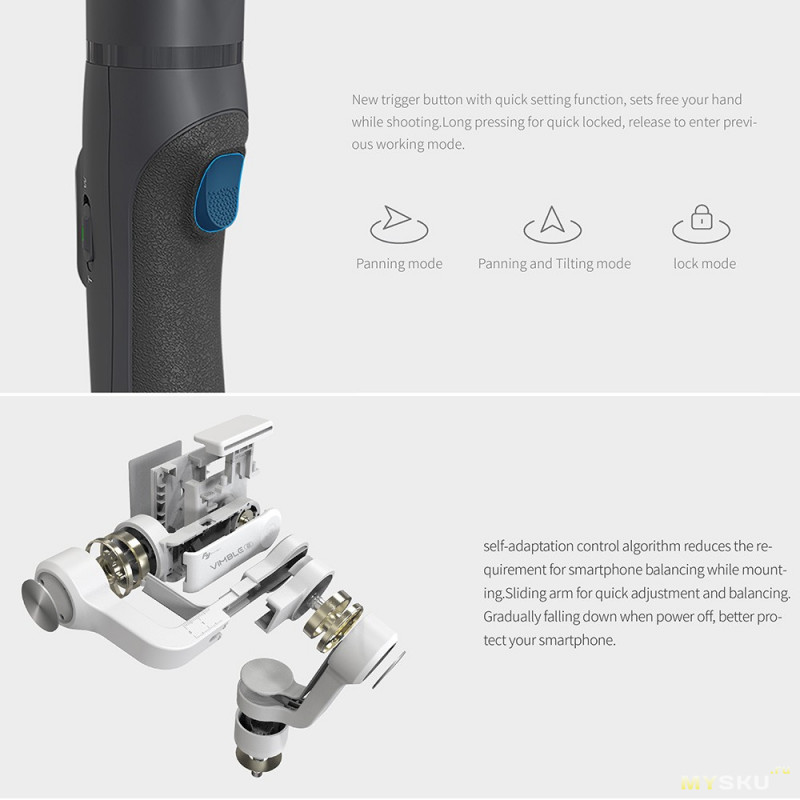
- Working Modes: Panning mode, following mode and lock mode. New trigger button with quick setting function, sets free your hand while shooting. Long pressing for quick locked, release to enter previous working mode.
- Long-lasting Working Time: 5-hour runtime for Vimble 2, if including the dormancy it can work 10 hours. Built-in Micro USB port, allow you to charge gimbal by power bank, shoot as long as you want.
- Self-adaptation Control: Self-adaptation control algorithm reduces the requirement for smartphone balancing while mounting. Sliding arm for quick adjustment and balancing. Gradually falling down when power off, better protect your smartphone.
- Fashion Colors: Innovative outline, light unibody, multicolor and fashion appearance.
- Flexible, Convenient and Multi-function: The body engineering streamline shape, the back TPU package, feel comfortable. The body adopts the heat resistant low temperature and high strength material, strong and light.
спецификация
Brand: FeiyuTech
Model: Vimble 2
Color: Space gray, Salura pink, Snow white (Optional)
Height of Fixture: 57~84mm
Maximum Payload: Landscape mode: 210g; Portrait mode: 200g
Compatible Smartphones: For iPhone series / HUAWEI P9 / Mi 5 / MEIZU MX6 / SAMSUNG S7 / S7 or other Android phones with the similar dimensions
Tilting Angle: 320°
Rolling Angle: 320°
Panning Angle: 320°
Firmware Upgrade: Yes
Vertical Shooting: Yes
APP: Yes, Vicool APP
Telescoping Hand: Yes, Retractable and extendable: 0~18cm
Compatible Accessories: Yes, 1/4 inch screw hole in the bottom
Balance Adjustment: Yes
Bluetooth Shutter: Yes
Adjust Focus: Yes
Manual Lock: Yes
Splash-Proof: Yes
Function & Modes: Pan mode(Default mode); Follow mode; Lock mode; Reset; Motion control mode(Both the panning and tilting directions can be rotated); Switching camera lens; Initialization
Usage Time: 5 hours
Battery: Built-in battery 1pc, 7.4V / 9.62Wh, Battery could be charged by power bank with a USB cable when using it.
Charging Time: ≥2 hours, Recommending using 5V/2A adapter for charging battery (quick charger is banned from charging).
Material in the Main Body: PC/PA6 and other materials which are of high-strength
Item Size: 11.8 * 11.05 * 32.3cm / 4.6 * 4.4 * 12.7in
Item Weight: 428g / 15.1oz
Package Size: 35 * 17.3 * 6.3cm / 13.8 * 6.8 * 2.5in
Package Weight: 922g / 32.5oz
УПАКОВКА И ВНЕШНИЙ ВИД
Ситуация с упаковкой двоякая. Упаковка состоит из внешней картонки и внутренней пластиковой ракушки чехла. За счет того зазора между ними картонка изрядно помялась. Будь там привычная пластиковая или картонная подложка, которая бы плотно заходила во внешнюю картону, проблемы бы не было. Ну а коли есть свободное пространство, то при малейшем давлении все сминается.
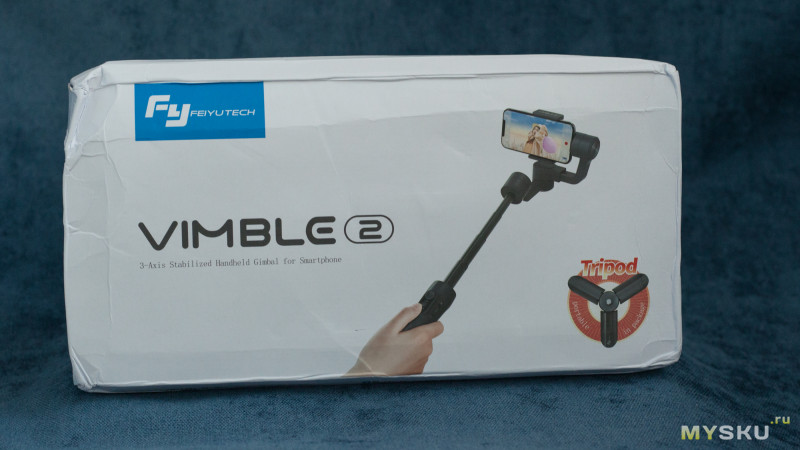
Это я к тому что если собираетесь покупать для перепродажи или подарка — имейте в виду что картону придется расправлять.
И это минус.
Плюс же, жирнейший плюс, в том что после того как картона отправляется в мусорку, владельцу стедикама остается кошернейший пластиковый чехол. Теперь нет нужды каждый раз аккуратно укладывать стедик чтобы там ничего не переломилось.
Чехол хорошо выглядит и хорошо сделан.
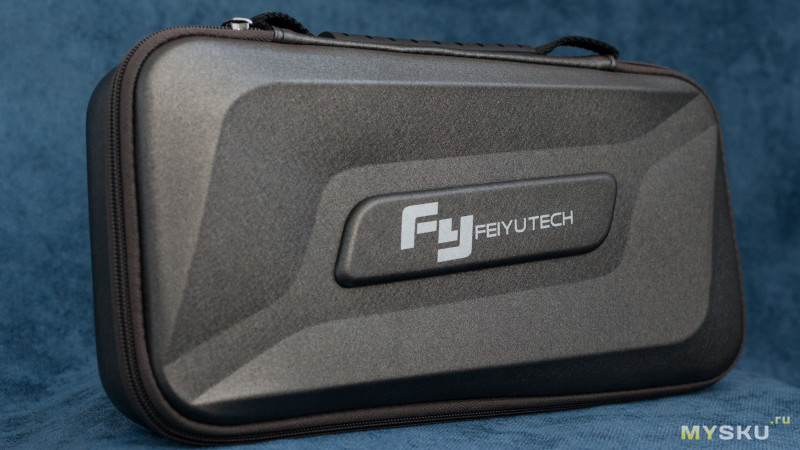
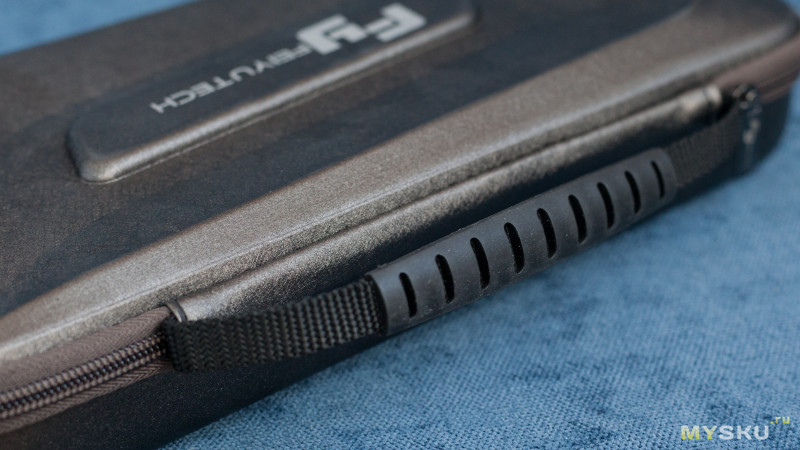
Ручка удобная.
 \
\
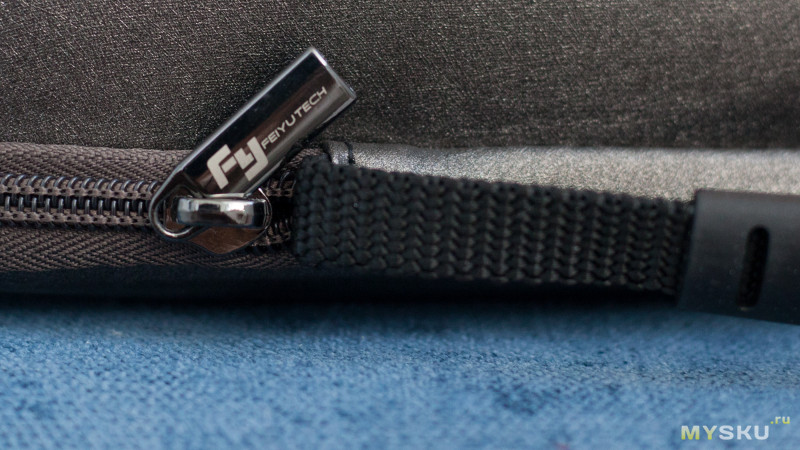
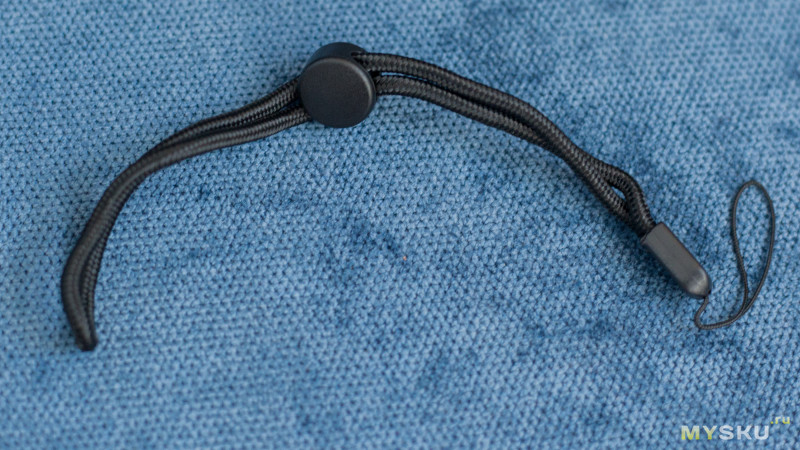
Внимание к деталям проявилось даже в брелоке бегунка, который забрендировали. В общем, с позиций транспортировки и хранения уже конечным пользователем это ощутимое преимущество.
Внутри все точно также хорошо, как и снаружи.
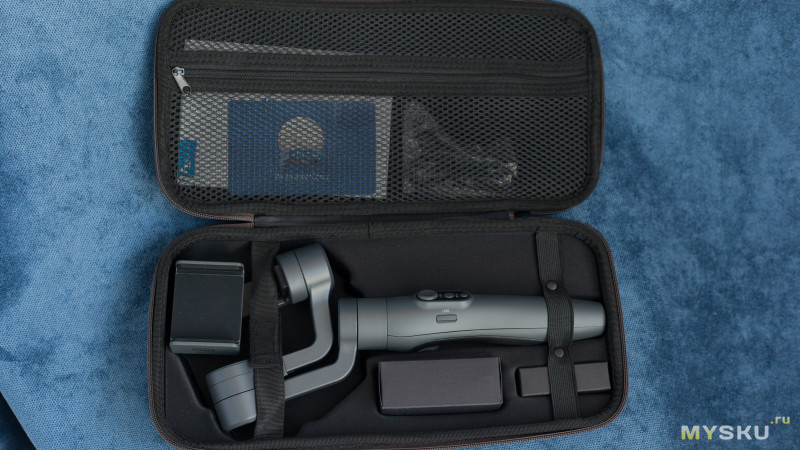
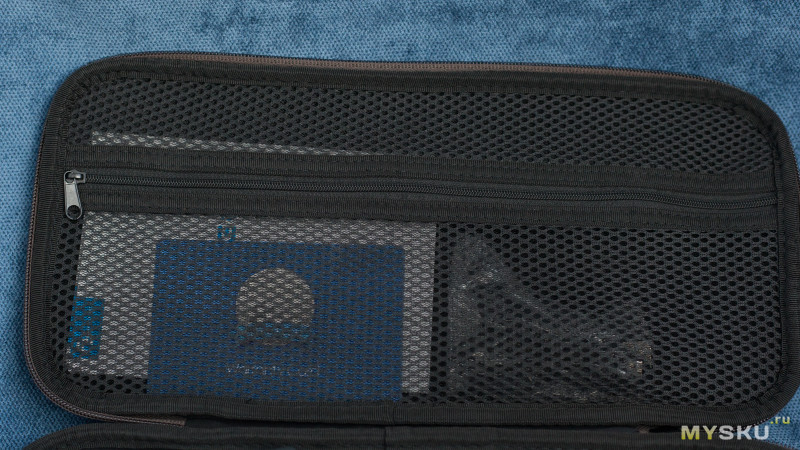
Крышка чехла забрана сеткой для хранения всяких мелочей, сходу там идут гарантийка-инструкция и кабель зарядки.
Чехол отлит с соотвествующим стедику и остальным комплектухам посадочным местам. Лично на меня это все произвело крайне положительное впечатление. Знаете вот, бывает в боевиках показывают как достает какой-то злочинец чехол, открывает его и там внутри в поролоне лежат запчасти от снайперской винтовки. Вот такое же впечатление у меня оставил этот чехол. Все аккуратно, хорошо пошито и в целом оставляет впечатления комплекта, ценник которого находится даааалеко выше 99$.
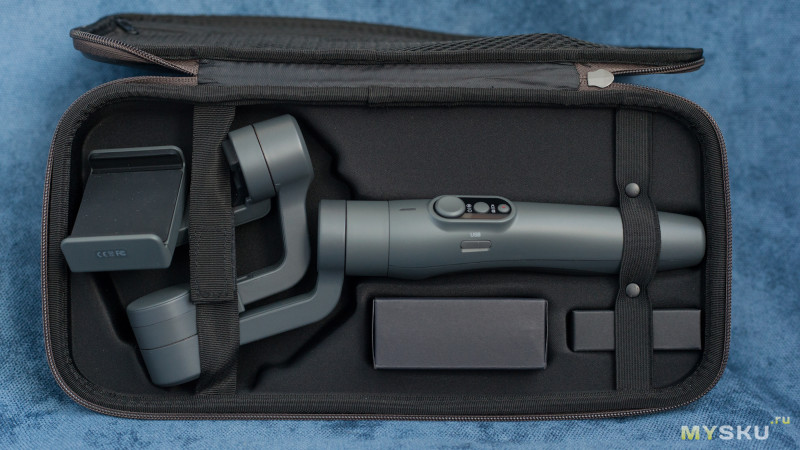
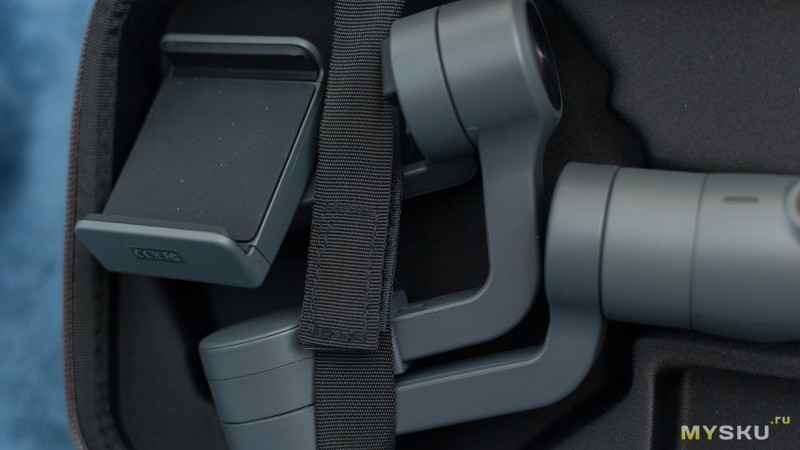

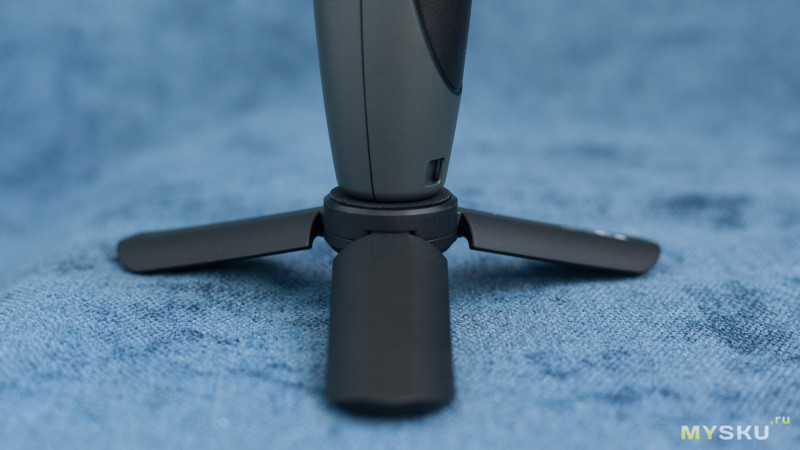
Собственно, комплект кроме упомянутого выше содержимого сетки и самого стедика дополняется еще небольшой треногой-штативом и простеньким темляком.
Ножки у штатив проклеены снизу каким-то резинками, чтобы не скользили.
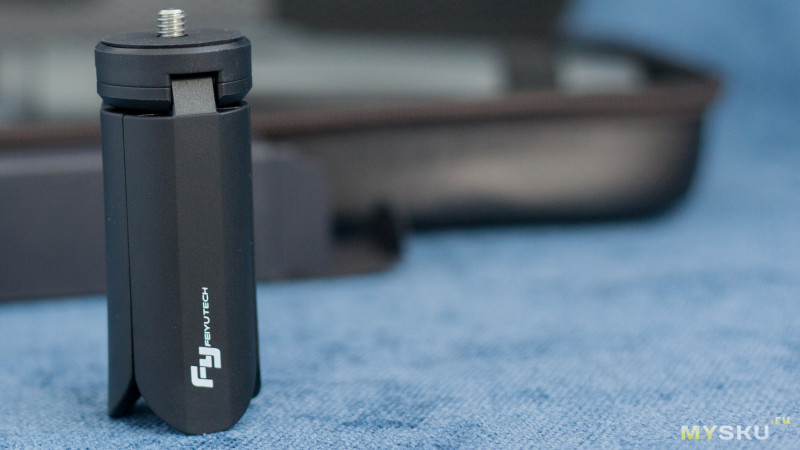

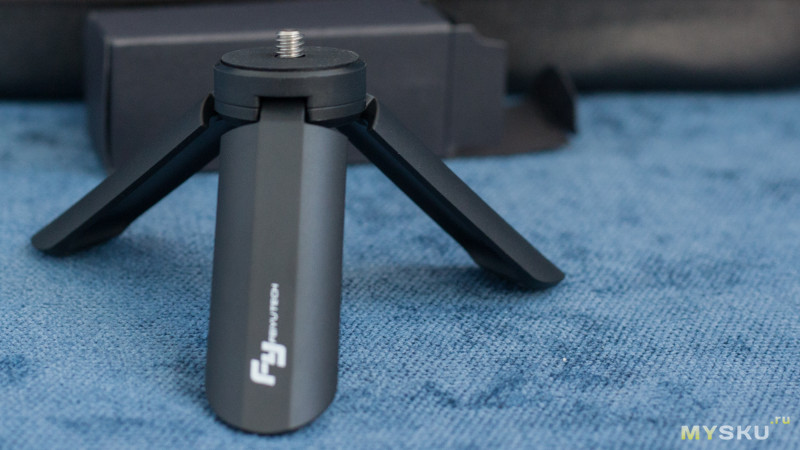
Вот и сам стедик, аккурат на штативе, под который, понятное дело, в нижнем торце нарезана обычная штативная резьба. Тут, к слову, неплохо видно небольшое отверстие под темляк.

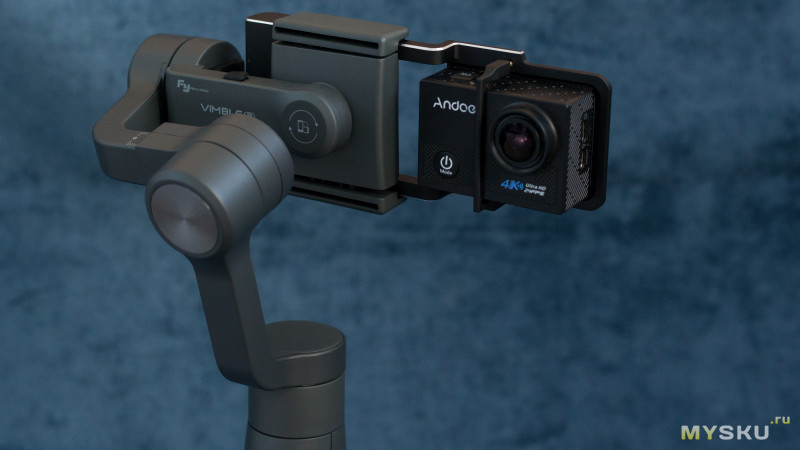
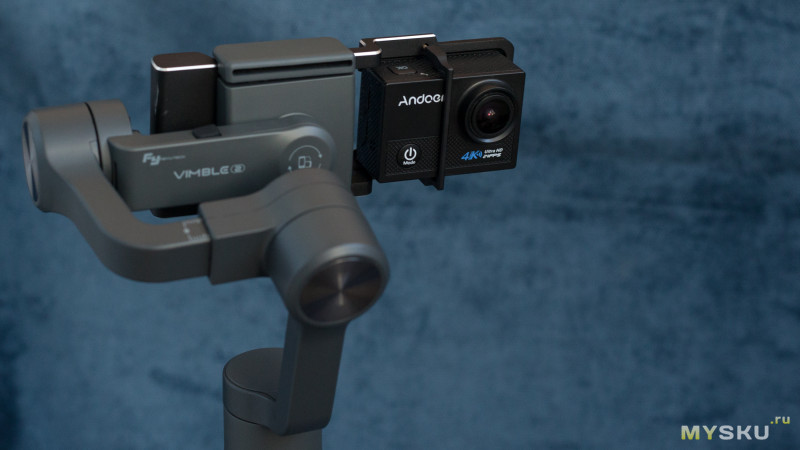
Тут, к слову, используется адаптер для экшн-камеры из моего прошлого обзора.
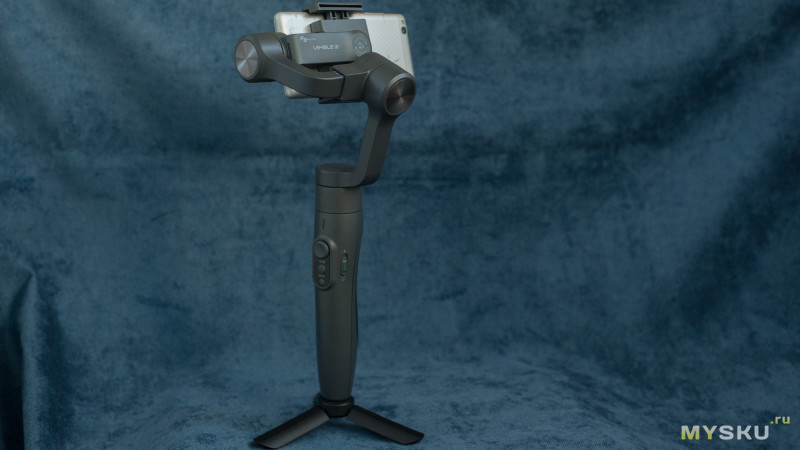
Выглядит стедик неплохо. Каких-то люфтов, задиров, косяков в покраске и вообще видимых (и слышимых) дефектов изготовления пока не выявил.
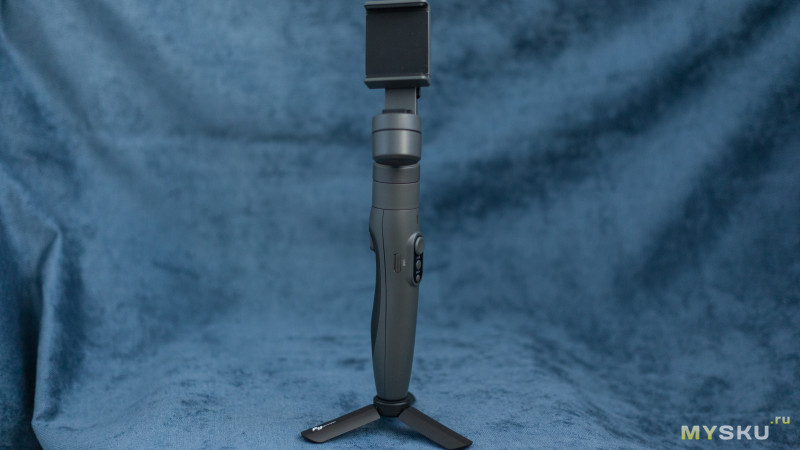
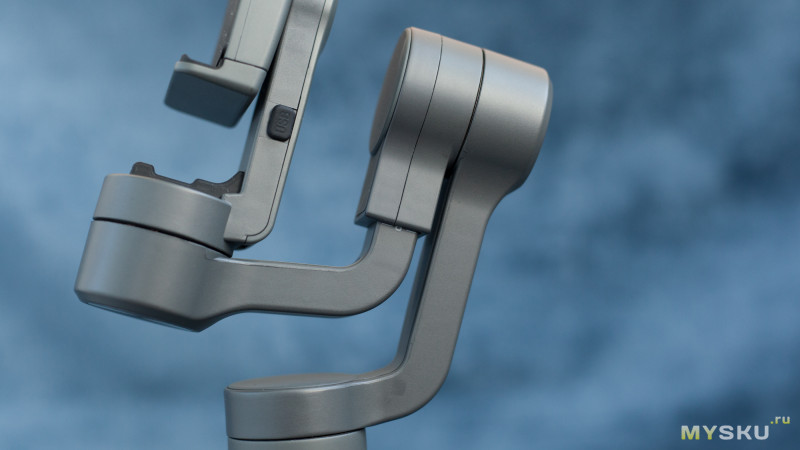
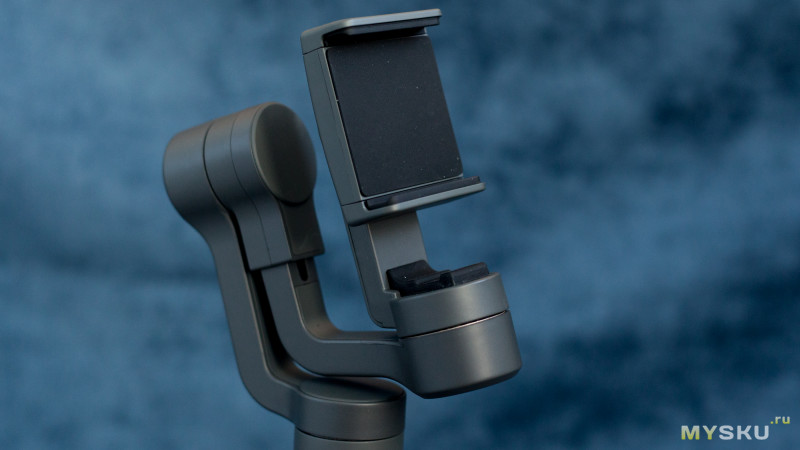
Как и предыдущая модель, рукоятка у этого эргономичная, а не просто трубка с аккумами внутри. Сидит в руках стедик удобно.
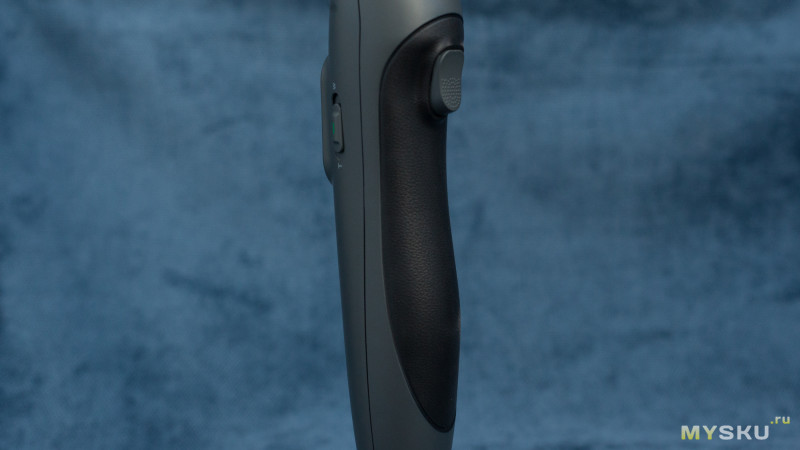
Кнопок тут изрядно, но сложности с ними нет (подробнее ниже).
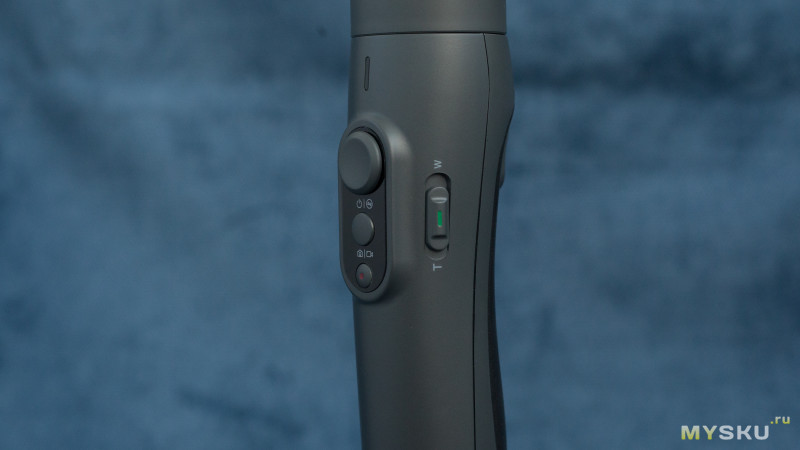
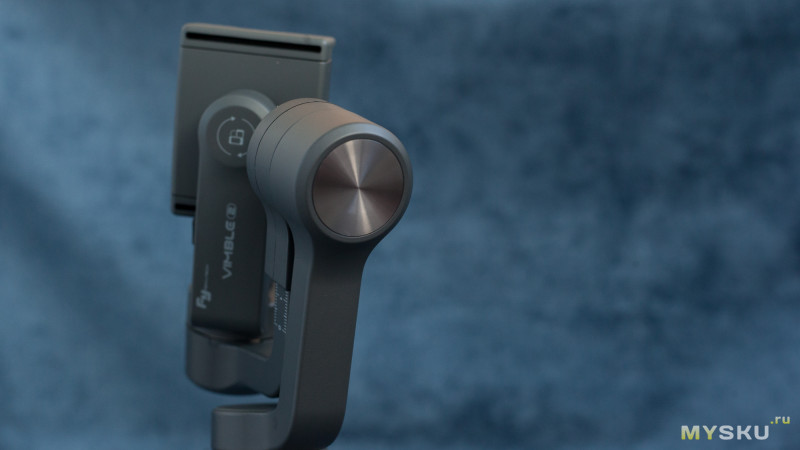
вот сверху вниз:
1) большая — джойстик, который поворачивает стабилизируемое устройство (смартфон или камеру)
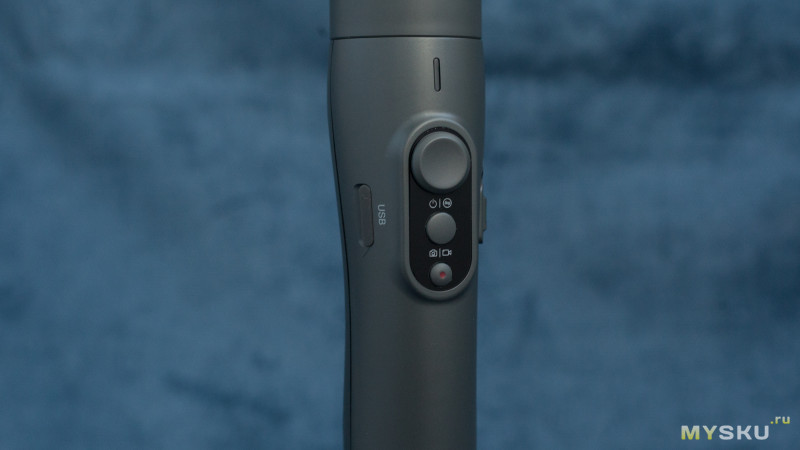
2) кнопка выбора режимов стабилизации
3) кнопка включения
4) кнопка фотографирования\старта записи видео
сбоку ползунок зуммирования и с обратной стороны находится курок, которой фиксирует камеру\смартфон в одном положении, т.е. можно крутить ручку куда угодно, объектив будет смотреть в одну точку.
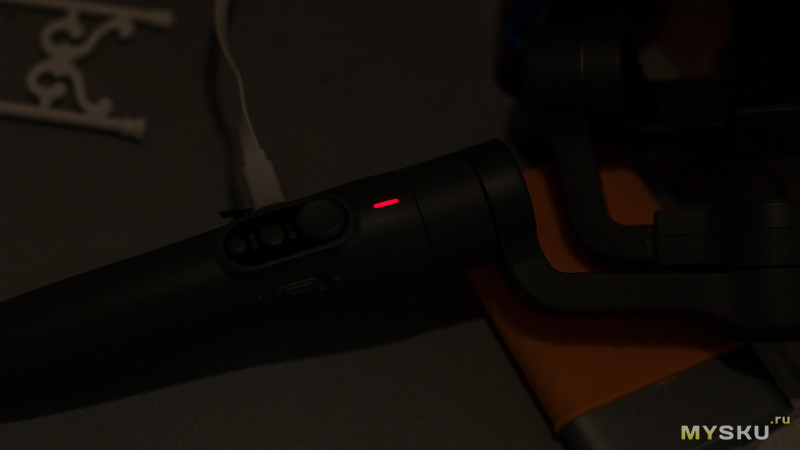
Над кнопками располагается небольшой сине-красный индикатор.
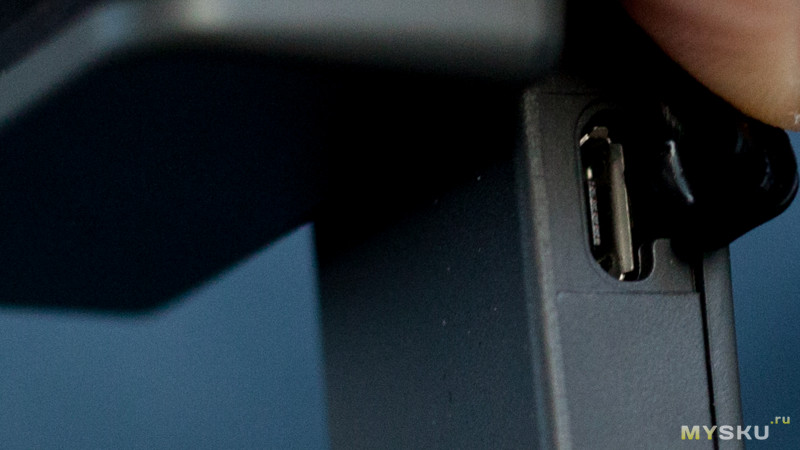
Такс… в середине сбоку находится разъем зарядки, тут стандартный usb. Ток зарядки удивил, доходя до 1.5А.
Удалось влить (по заверениям usb-тестера) порядка 2400mah.
Что касается продолжительности работы — во включенном состоянии стедик простоял на столе, держа горизонтально экшн-камеру на протяжении часов 3-4.
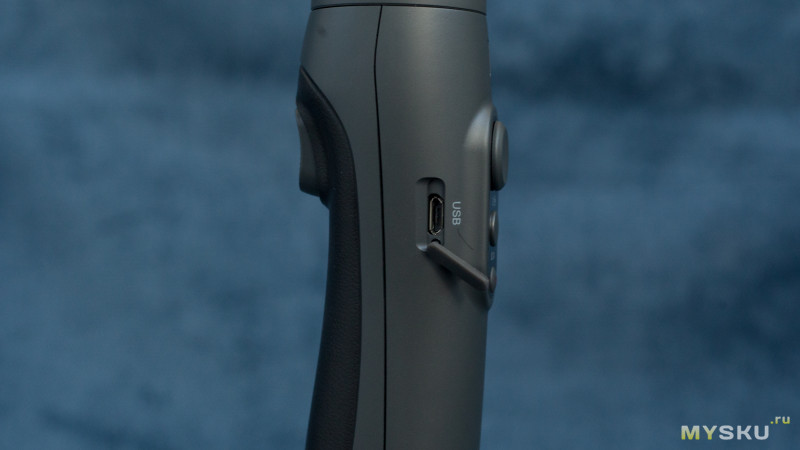
Еще один разъем зарядки находится сверху, возле крепления. И тут все странно — разъем-то micro-usb. Предполагается что можно вставить телефон и заряжать его. Вот только для этого потребуется невиданный мной до того кабель с двумя одинаковыми micro-usb… выяснилось, тут нужен соответствующий переходник, только вот эта копеечная фитюлька идет как optional accessoir. скотство трясти деньги за такую вещь, без которой, кстати, и не прошить стедик.
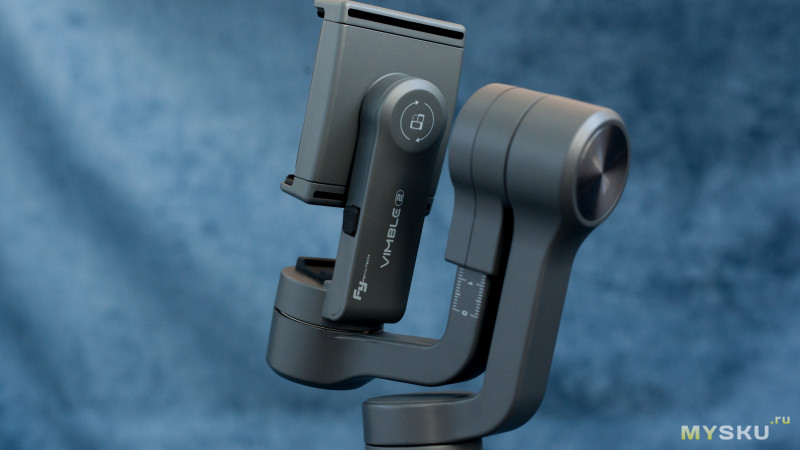
Так, что дальше. Для балансировки камеры есть где-то 15мм ход крепления. В принципе, мне хватило этого хода и для Xiaomi redmi3 и для экшн-камеры. Скажу прямо, ход не особо плавный, надо приноровиться. И иногда проще на какие-то миллиметры подвинуть телефон или камеру, чем ловить их на подвижной штанге.
Вот на нулевой отметке
и вот в выдвинутом состоении.
Что касается самих губок крепления, то их ход 57-84мм. нагрузка в 210г в вертикальном и 200 горизонтальном режиме. Это вполне нормальный вес, адаптер+ экшнкамера весят 177г (из них 117г адаптер).
Ну и последнее, о чем стоит упомянуть в этом разделе — функция селфи-палки, в выдвинутом состоянии длина увеличивается на 18см. Я исключительно далек от этого новомодного увлечения (сталина на них нет), но мне кажется что 18см это как-то для селфи маловато. На виденных мной картинках были полуметровые фиговины с насаженными смартфонами. Для моего же использования выдвижная палка показала себя чертовски хорошо для съемок с небольшой высоты.
Собственно, это все. Как и писал выше, стедик отлично выглядит, удобно сидит в руке и комплектуется шикарным и удобным чехлом.
Явных косяков не вижу. Если бы не косяк с неизбежно помятой упаковкой, то он в чехле выглядит гораздо лучше vimble C.
УПРАВЛЕНИЕ
Традиционно — 2 варианта, с приложением и без. Последнее в большей степени ориентировано на экшн-камеры. Хотя и тут есть нюанс — можно закрепить экшн камеру, поставить например ее на штатив и зайти в настройках приложения в симулятор управления, и вращать камеру оттуда. Это в большей степени необходимо для таймлапса. Заодно там же можно задать остальные параметры сьемки в этом режиме.
Начну с общего для обоих вариантов, без приложения.
Пройдусь по кнопкам сверху вниз
— 4х-позиционный джойстик работает как во всех стедиках, поворачивает камеру влева-вправо\вверх-вниз.
— следующая кнопка: вкл\выкл и она же смена режимов стабилизации.
вкл\выкл по долгому нажатию
переключение режимов стабилизации
смена режимов стабилизации:
а) одно нажатие:
pan mode (режим панорамирования), где блокируется ось вверх-вниз. т. е когда вы наклоняете стедик, камера всегда смотрит только вперед, поворачивается только влево-вправо. это режим по умолчанию.
lock mode, где текущее направление камеры блокируется. куда бы вы не двигали ручку — камеру будет смотреть в одном и том же направлении (в пределах технических возможностей). В этом режиме можно вручную настроить положение камеры.
б) два нажатия переводит стедик в режим follow mode, где камера медленно и стабилизированно поворачивается вслед за рукояткой, границы стабилизации тут 30 градусов по каждой из осей. т.е. можно отклонятся в этих пределах и камера будет сохранять положение, при пересечении этой границы камера будет поворачиваться в нужном направлении.
в) три нажатия работают при наличии подключения к приложению, переключая камеры на телефоне
г) четыре нажатия активируют режим слежения (опять-таки нужно приложение и смарт). \ режим сьемок time laps
для последнего надо установить стедик на штативе, выставить первоначальное положение камеры, нажать на функциональную кнопку 1 раз в качестве подтверждения выбора. опять-таки вручную выставить конечную позицию камеру и снова нажать функциональную кнопку для подтверждения выбора.
д) пять нажатий — инициализация стедика, в рамках которой можно настроить стабилизацию. актуально если устройство криво стабилизирует или долгое время не использовалось. необходимо вставить смарт и положить на ровную поверхность. индикатор моргнет 3 раза, это будет значить что повторная инициализация прошла успешно. типичная функция для стедико.
курок сзади при нажатии переводит стедик в режим lock mode, возвращаясь в предыдущий режим при отпускании. двухкратное нажатие сбрасывает стабилизацию и надо снова выбирать необходимый режим функциональной кнопкой под двойстиком.
вот крайне наглядное видео.
последняя кнопка — фото по однократному нажатию, запись видео по 2х сек удержанию кнопки.
РАБОТА С ПРИЛОЖЕНИЕМ.
qr-ссылка на приложение находится в инструкции.
вот ссылка на страницу download на официальном сайте
соединение простое — включаем блютус на смарте, спариваем его со стедиком. Запускаем приложение, там откроется поиск сети и появится название стедика. тыкаем по нему и все работает.
опять-таки нагляднейше, нагляднейше управление с приложения разобрано на видео ниже.
на самом деле, тут что-то писать просто излишне, настолько эти 3 минуты показывают все.
разве что добавлю вот что:
1) настройка усилия моторов менее детальная в сравнении с vimble С.
2) в целом настройка параметров с помощью ползунка зуммирования удобна. но относительно — слишком уж быстро сменяются цифры.
выглядит это так — на экране выбирается необходимый параметр (iso, фокус, бб…) и движением ползунка меняем его. на самом деле очень удобно.
3) обновить прошивку можно и из настроек, что отчасти сводит на нет негатив от отсутствия адаптера для mini-usb. у меня шла самая свежая прошивка.
ВАЖНО при работе в режиме слежения за объектом приложение вылетает. в режиме слежения за лицом работает корректно, фокусируется и поворачивает стедик вслед за лицом.
также у меня категорически отказывается работать панорама, не склеивает ни черта.
В целом, сравнивая настройки этой модели и предшественника, вижу ощутимый прогресс в удобстве.
Ну и что касается самого главного, примеров видео, прошу смотреть мой видеообзор ниже. Большая часть — это повторение сказанного выше, так что смело перематывайте в конец на часть, где я следую за дочкой. Следую очень-очень быстрым шагом, зачастую вообще поскакивая боком — картинка совершенно ровная. За счет штанги удалось снимать с уровня дочкиного роста, что в иной ситуации было бы проблематично.
ОБЩИЕ ВПЕЧАТЛЕНИЯ
За свои деньги считаю что это весьма удачное совершенствование предыдущей модели. Снимать на самом деле удобно.
Из минусов отмечу только то что пожлобились положить копеечный адаптер. В принципе это выливается только в невозможность заряжать смарт от стедика. С учетом того что обещают там 500mah — потеря невеликая для смарта и достаточно ощутимая для экшн камеры (у последней, правда, можно сменить акк). Да и штанга балансировки довольно туго ходит.
Во всем остальном стедик произвел на меня самое благоприятное впечатление. Повторюсь, убежден что за свои деньги это реально удачная модель. 89$ (с учетом пойнтов и прочих экономий можно и до 80 довести) это в высшей степени доступная цена за 3х осевой стаб.
Кто-то писал что выходит новая модель, поэтому на эту такая низкая цена. Ну так оно и к лучшему
купон — VIMB84.
Если каким-то чудом кто-то уже успел получить этот стаб с предыдущих распродаж (во что я верю мало) прошу поделиться впечатлениями.
Товар для написания обзора предоставлен магазином. Обзор опубликован в соответствии с п.18 Правил сайта.