перейти к содержанию
Концентратор смарт-устройств FIBARO Home Center 2

ИНСТРУКЦИЯ ПО
- Открутить левую боковую панель

- Снимаем боковую панель

- Подсоедините провода, как показано на рисунке ниже

- Подключить домашний центр 2
Подключите кабель питания к сети, а сетевой кабель к разъему LAN на маршрутизаторе (для Home Center 2 требуется внешний маршрутизатор). - Запустить домашний центр 2
Запустите Home Center 2 с помощью кнопки POWER и подождите прибл. 2 минуты для запуска устройства. О правильном подключении сигнализируют диоды 1, 2, 3 (см. глоссарий ниже).
- Войдите в домашний центр 2
Перейдите на сайт www.fibaro.com/support, затем загрузите и установите FIBARO Finder, предназначенный для вашей операционной системы. Запустите FIBARO Finder и нажмите «Обновить». Появится список Home Center 2, доступных в вашей локальной сети. Выберите Home Center 2, узнав его по серийному номеру (номер указан на табличке внизу корпуса) и нажмите «Подключить». После успешного подключения в браузере появится страница авторизации.
Выберите свой язык, затем войдите в систему с учетными данными по умолчанию:
Вход: Администратор
Пароль: Администратор
Скачать мобильное приложение

Светодиодные индикаторы
Кнопки на задней панели
Упрощенная декларация соответствия ЕС
Настоящим Fibar Group SA заявляет, что устройство соответствует Директивам 2014/53/ЕС и 2011/65/ЕС, 2015/863. Полный текст декларации о соответствии ЕС доступен по следующему адресу в Интернете: www.manuals.fibaro.com
Соответствие директиве WEEE
Устройство, помеченное этим символом, нельзя выбрасывать вместе с бытовыми отходами. Его необходимо сдать в соответствующий пункт приема отходов электрического и электронного оборудования.
|
Технические данные |
|
|
Источник питания: |
12 В постоянного тока (входит в комплект) |
| Сетевой интерфейс: | 10/100/1000 Base-T (гигабитный) Ethernet (RJ-45) |
| Радиопротокол: | Z-Wave |
| Радиочастота: | 868.42/868.40 МГц ЕС; 908.42/908.40 МГц США |
| 919.82/919.80 МГц Гонконг | |
| 921.42/921.40 МГц АНЗ | |
| 869.02/869.00 МГц Россия | |
| Максимальная мощность передачи: | 0dBm |
| Диапазон: | до 30m |
| (в зависимости от конструкции здания) | |
| Рабочая Температура: | 10-40 ° C |
| Размеры (Ш х Г х В): | 225 x 185 х 44 мм |
| Соответствие директивам ЕС: | КРАСНЫЙ 2014/53 / ЕС |
| RoHS 2015/863; RoHS 2011/65/ЕС |
Условия гарантии
- FIBAR GROUP SA с местонахождением в Высокоготово, ул. Serdeczna 3, 62-081 Wysogotowo, внесен в Реестр предпринимателей Национального судебного реестра, который ведет Районный суд Познань-Нове Място и Вильда в Познани, VIII Коммерческий отдел Национального судебного реестра (KRS) под номером: 553265, NIP 7811858097, REGON: 301595664, акционерный капитал 1,182,100 XNUMX XNUMX злотых оплачен полностью, другая контактная информация доступна на: www.fibaro.com (далее «Производитель») гарантирует, что проданное устройство (далее: «Устройство» не содержит материалов и производственные дефекты.
- Производитель несет ответственность за неисправность Устройства в результате физических дефектов, присущих Устройству, которые приводят к несовместимости его работы со спецификациями в течение периода:
- 24 месяца с момента покупки потребителем,
- 12 месяцев с даты покупки бизнес-клиентом (потребитель и бизнес-клиент далее совместно именуются «Клиент»).
- Производитель обязуется бесплатно устранять любые дефекты, выявленные в течение гарантийного срока, путем ремонта или замены (по собственному усмотрению Производителя) дефектных компонентов Устройства новыми или восстановленными компонентами. Производитель оставляет за собой право заменить все Устройство на новое или регенерированное. Производитель не возвращает деньги, уплаченные за устройство.
- В особых случаях Производитель может заменить Устройство другим устройством, наиболее близким по техническим характеристикам.
- Только владелец действующего гарантийного документа имеет право предъявлять претензии по гарантии.
- Прежде чем подавать жалобу, Производитель рекомендует воспользоваться телефонной или онлайн-поддержкой, доступной по адресу https://www.fibaro.com/support/.
- Чтобы подать жалобу, Клиент должен связаться с Производителем по адресу электронной почты, указанному на странице https://www.fibaro.com/support/.
- После того, как жалоба была должным образом filed, Клиент получит контактную информацию Авторизованной гарантийной службы («AGS»). Клиент должен связаться и доставить Устройство в AGS. При получении Устройства производитель сообщает Покупателю номер разрешения на возврат товара (RMA).
- Дефекты должны быть устранены в течение 30 дней с даты доставки Устройства в AGS. Гарантийный срок продлевается на время, в течение которого Устройство находилось на хранении у AGS.
- Неисправное устройство должно быть предоставлено Заказчиком в комплекте с стандартным оборудованием и документами, подтверждающими его приобретение.
- Стоимость транспортировки Устройства по территории Республики Польша несет Производитель. Расходы на транспортировку Устройства из других стран оплачивает Заказчик. В случае необоснованных жалоб AGS может взимать с Клиента расходы, связанные с делом.
- AGS не принимает претензии, если:
- Устройство было неправильно использовано или инструкция не соблюдалась,
- Устройство было предоставлено Заказчиком в неполном виде, без комплектующих и заводской таблички,
- было установлено, что неисправность была вызвана другими причинами, а не дефектом материала или изготовления Устройства.
- гарантийный документ недействителен или нет подтверждения покупки,
- Гарантия не распространяется на:
- механические повреждения (трещины, изломы, порезы, ссадины, физические деформации, вызванные ударами, падением или падением устройства или другого предмета, неправильное использование или несоблюдение инструкции по эксплуатации);
- повреждения, вызванные внешними причинами, например: наводнение, ураган, пожар, молния, стихийные бедствия, землетрясения, война, гражданские беспорядки, форс-мажор, непредвиденные происшествия, кража, повреждение водой, утечка жидкости, разлив батареи, погодные условия, солнечный свет, песок, влажность, высокая или низкая температура, загрязнение воздуха;
- повреждения, вызванные неисправностью программного обеспечения, атакой компьютерного вируса или невыполнением обновления программного обеспечения в соответствии с рекомендациями Производителя;
- повреждения, вызванные: скачками напряжения в сети и/или телекоммуникационной сети, неправильным подключением к сети способом, не соответствующим инструкции по эксплуатации, или подключением других устройств, не рекомендованных Производителем.
- повреждения, вызванные эксплуатацией или хранением устройства в крайне неблагоприятных условиях, т.е. при высокой влажности, запыленности, слишком низкой (заморозке) или слишком высокой температуре окружающей среды. Подробные допустимые условия эксплуатации Устройства определены в руководстве по эксплуатации;
- повреждения, вызванные использованием аксессуаров, не рекомендованных производителем
- повреждения, вызванные неисправностью электроустановки Заказчика, в том числе использованием неправильных предохранителей;
- ущерб, вызванный непроведением Заказчиком мероприятий по техническому обслуживанию и ремонту, определенных в руководстве по эксплуатации;
- повреждения, возникшие в результате использования поддельных запасных частей или аксессуаров, неподходящих для данной модели, ремонта и внесения изменений неуполномоченными лицами;
- дефекты, вызванные неисправным устройством или принадлежностями.
- Гарантия не распространяется на естественный износ Устройства и его компонентов, перечисленных в руководстве по эксплуатации и в технической документации, поскольку такие элементы имеют определенный срок службы.
- Гарантия на устройство не исключает, не ограничивает или не приостанавливает гарантийные права Заказчика.
- Производитель не несет ответственности за материальный ущерб, причиненный неисправным устройством. Гарант не несет ответственности за косвенные, случайные, особые, побочные или штрафные убытки, а также за любые убытки, включая, среди прочего, упущенную выгоду, сбережения, данные, потерю выгоды, претензии третьих лиц и любые другие убытки, возникающие в результате или связанные с использованием Устройства.
Юридические уведомления
Вся информация, включая, помимо прочего, информацию о возможностях, функциях и/или других технических характеристиках продукта, может быть изменена без предварительного уведомления. FIBARO оставляет за собой все права пересматривать или обновлять свои продукты, программное обеспечение или документацию без каких-либо обязательств по уведомлению каких-либо физических или юридических лиц.
Fibaro и логотип Fibar Group являются товарными знаками Fibar Group SA. Все остальные бренды и названия продуктов, упомянутые в настоящем документе, являются товарными знаками соответствующих владельцев. На продукт распространяется одна или несколько заявок на патенты, найденные по адресу http://sipcollc.com/patent-list/ и http://intusiq.com/patent-list/.
Документы / Ресурсы
Рекомендации
Quick start guide
Back To Top
Declarations
Declarations of conformity:
FGHC2.pdf
Back To Top
Description and features
Description
Home Center 2 is the hub unit of high computing power, used to control the FIBARO system.
- Work of FIBARO control unit is protected by advanced data backup and recovery system.
- Using the user-friendly configuration interface of Home Center 2, you can create advanced, pre-defined scenes.
- HC2 can manage user rights and supports VoIP functionality and video intercoms.
- Home Center 2 gives users ability to write scripts in LUA, which extends the functionality of the system.
Back To Top
Features
- Simple, user-friendly interface.
- Supports protected mode (Z-Wave network security mode) with AES-128 encryption.
- Remote access via web browser or smartphone (Android and iOS apps).
- Supports Magic, Block and LUA scenes.
- Compatibile with Google Assistant and Amazon Alexa.
- Works with LUA and string-based virtual devices.
- Compatibile with VoIP.
- Can work as a stand-alone controller or a slave and also as a master controller.
- Function of a geolocalization.
Back To Top
Technical data
| Processor | Intel Atom Dual Core (1.6 GHz) |
| Case | Cast Alloy |
| Operating memory | 1 GB DDR RAM |
| Hard drive | 2 GB SLC and 4GB MLC Recovery Disc |
| Power supply: | 9-12 VDC (Power Supply included) |
| Network interface: | 10/100/1000 Base-T (Gigabit) Ethernet via RJ45 connector |
| Operating temperature: | 10 – 40°C |
| EU standards compliance: | RED 2014/53/EU RoHS 2011/65/EU |
| Radio protocol | Z-Wave |
| Radio frequency: | 868.4, 868.42 or 869.8 MHz EU; 908.4, 908.42 or 916.0 MHz US; 921.4, 921.42 or 919.8 MHz ANZ; 869.0 or 869.02 MHz RU; |
| Radio transmit power: | up to 1 dBm (EIRP) |
| Range: | up to 50m (164 ft) outdoors up to 30m (98 ft) indoors (Depending on terrain and building structure) |
| Dimensions: | 225 x 185 x 44mm |
Back To Top
Home Center Lite and Home Center 2
|
Home Center 2 |
Home Center Lite |
|
| |
|
|
| Hardware: | ||
| Dimensions | 225 x 185 x 44mm | 90 x 90 x 33mm |
| Case | Cast Alloy | Plastic |
| Processor | Intel Atom (1.6 GHz) | ARM Cortex-A8 (720 Mhz) |
| USB | 4 | – |
| VGA | 1 | – |
| Software: | ||
| Remote access | YES | YES |
| Magic scenes | YES | YES |
| Block scenes | YES | YES |
| LUA scenes | YES | NO |
| LUA virtual devices | YES | NO |
| String-based virtual devices | YES | YES |
| Satel alarm integration | YES | NO |
| Amazon Alexa integration | YES | YES |
| Google Assistant integration | YES | YES |
| VoIP | YES | NO |
| Working as a stand-alone controller or a slave | YES | YES |
| Working as a master controller | YES | NO |
FIBARO Home Center 2 is designed for commercial or larger premises where you may need to link multiple units together in a network for controlling in a wide area.
Home Center 2 compared to Home Center Lite is more advanced controller. Home Center 2 apart from functionalities included in Home Center Lite ensures additional usable possibilities:
- Compatibility with Amazon Alexa and Google Assistant
- LUA Programming – LUA is a programming (scripting) language commonly used in home automation controllers to enable users to create more complex control scenes than supported by the controller’s Scene editor.
- LUA based virtual devices – to create virtual device and program each button in LUA language individually
- VOIP Communication
- SATEL alarm system integration
- Non-limited number of plugins
Home Center 2 can work as a Master and perfectly meets requirements designed for this purpose.
Back To Top
Installation
Setting up and connection
1. Unscrew the left side panel.

2. Take the side panel off.

3. Connect the LAN cable and the power supply.
4. Connect the power supply to the mains, and the LAN cable to LAN socket in your router (Home Center 2 requires an outside router).

5. Start HC2 with a POWER button and wait approx. 2 minutes for the device to start.

6. Download and install FIBARO Finder designed for your operating system.
Windows ![]()
Mac OS X ![]()
7. Start the FIBARO Finder and click “Refresh”, choose the one you wish to connect and click “Connect“.
8. After successful connection you will access HC2 Login Panel.
See full version of installation manual in Quick Start Guide.
Back To Top
First launch
1. After successful connection you will access HC2 Login Panel.
2. Choose your language version, enter login and password. (default credentials are admin/admin)
3. Click Log in – now you can operate your home automation system.

Back To Top
Interface
Main Screen (Your House)

The main screen (Your House) of FIBARO Home Center contains 8 panels:
- Top bar – shows current status of devices
- Command window – displays a list of actions performed by the main controller
- Menu – the main navigation bar
- Search tool –find the device
- Filters – sidebar menu to see only a specified type of components
- The House – sidebar menu to select the specified room or section
- Main section – list of devices grouped into sections and rooms
- Right sidebar – easy access to core functions of the system
Back To Top
Rooms
The Rooms section is designed to manage your house divided into sections and rooms.
You can easily add, rename, change the order of the rooms, assign them to each of section or add new sections.

Description:
- Room window.
- Room name.
- Temperature.
- Humidity level.
- Door/Window opening status.
- Motion detection status.
- Room icon.
- Turn on/off the lights button.
- Open/Close the blinds button.
- Arm/Disarm the alarm button.
- Electric power consumption.
- Energy consumption.
Back To Top
Adding Z-Wave devices
Adding new device to your system is a fast and simple process.
1) Press the “Add or remove device” button in the “Devices” section.


2) Press the “Add” button to put the main controller into learning mode. The duration of the learning mode can be adjusted here by changing the value (30 seconds by default).
3) Home Center is waiting for adding the device.

4) Put your Z-Wave device into the adding mode according to its manual.
5) Home Center will start the inclusion process and device configuration.
If process have not started even after few tries, try deleting the device according to “Deleting a Z-Wave device” article.

6) Successful inclusion and configuration will be confirmed by “Device configuration finished” message.
Back To Top
Adding IP cameras
There are two ways of integrating cameras with Fibaro:
- installing the relevant plugin
- adding all the details manually
Adding a camera using a Plugin
The Home Center has over 130 available plugins for different cameras. For this example we will be using an Axis IP Dome camera.
1) Click on the Plugins tab at the top and then Available on the left hand bar.

2) Once we have located a suitable plugin, click Install which takes us into the details of the Plugin.
In this article we will install Axis IP Camera.
3) Click Free to download and install the plugin.
4) After we have selected the Plugin, downloaded and installed it, an Add button will appear underneath the description.
5) Click on the Advanced tab and fill in the IP Address, username and password.

Other fields will be filled automatically.
6) Click the blue save button on the right hand side. The camera will be added to the system.
Adding a camera manually
1) To add an IP camera manually, click on the Devices tab and then Add or remove device on the left hand side.

2) As all the general settings are also available on the Advanced tab, click Advanced now.
3) Name the camera and give it a room.
4) Using the drop down box for Camera Model we will check to see if ours is there. If it is, clicking on it will automatically fill in some paths in the fields below.
5) Enter the username and password associated with the camera (normally found using the software included with the camera).
6) Fill out the Camera Configuration: the IP address and stream feeds. All this information should be within the cameras documentation.

7) Click the blue save button on the right hand side. The camera will be added to the system.
Back To Top
Adding virtual devices
Virtual devices are designed to control complex devices such as air conditioning units and home appliances via local remote (LAN network). The Fibaro System makes it possible to import existing or create new virtual devices to be controlled by the Home Center interface.
Importing virtual devices:
1) Open Devices section.
2) Click Add or remove device button located on the left hand side.
3) Use Import virtual device panel to import .vfib file from your hard drive.
4) Fill in the IP Address and TCP Port.

5) Use save icon to save the device configuration.
Back To Top
Deleting Z-Wave devices
Deleting the device will remove it from the Z-Wave network and from the controller’s memory. The device will be restored to its default settings during this process.
1) Press the “Add or remove device” button in the “Devices” section.
2) Press the “Delete” button to put the main controller into learning mode. The duration of the learning mode can be adjusted here by changing the value (30 seconds by default).

3) Home Center is waiting for deleting the device.

4) Put your Z-Wave device into the exclusion mode according to its manual (triple clicking the B-button, TMP button or S1 switch in case of FIBARO System devices).
5) Home Center will start the process of exclusion and removing from controller’s memory.
6) Successful removal will be confirmed by “Removing devices finished” message.
Back To Top
General Settings
General Settings tab lets the user administrate the device. Here you can simply control the device, merge it into groups, change its name and assign it to the right room.
You can also change the icon of the device, check the battery’s level and check version of the product.
Master/slave tree
In this section you can see the structure of the device – which endpoints (slave sub-devices) are available under the main device (master).

Back To Top
Advanced device settings
Home Center 2 Configuration interface allows users to modify whole range of advanced settings for every device.
In order to configure a device:
1) Click wrench icon to open device options.
.
2) Select the “Advanced” tab.
3) Advanced configuration will be shown under device information. There are multiple sections of the window.
General advanced settings with information about the Z-Wave chip, ability to hide the device in the interface or disable it, polling settings and few other:

Reconfiguration and soft reconfiguration of the device, reloading parameters and device’s template to download:

You can also set associations between devices.
Association (linking devices) – allows for direct transfer of control commands between Z-Wave network devices. Main controller does not take part in such communication. Using this mechanism, devices may communicate with each other even when the main controller is disabled or damaged e.g. in a fire.

Z-Wave advanced parameters for this device:
Advanced parameters – allows for customize device’s operation to user’s needs. The settings are available in the FIBARO interface as simple options that may be chosen by selecting the appropriate box.

Back To Top
Scenes
Scenes can integrate multiple devices included in your system. Scenes may be initiated by weather condition, a series of intuitive timers or various sensor/module state. You can also trigger a scene directly from the interface of the controller.
There are three ways to create a scene in Home Center 2 interface:
- Magic Scenes – based on one trigger, one action scheme (if trigger appears, then action occurs). The two large boxes at the top show “if” and “then”. The first box is called the trigger. If the event described in that trigger occurs, then your chosen action in the second box will occur.
- Block Scenes are more powerful than magic scenes and still easy to build. Using number of available customizable blocks (triggers) complex scenes can be visually created.There are five different trigger types: weather, variable, timers, devices and GPS -in five different colors which you can connect in many ways.
- Lua Scenes are most advanced scenes, which are based on the Lua programming language and require basic programming skills. The Lua scripting language was originally designed for extending the functionality of existing applications, but it is often used as a standalone language. It is very similar to Pascal. Lua scenes can be very complex and with basic programming skills you can control your home automation at the fullest.
How to add a scene?
1) Click on the “Scenes” tab.

2) Select “Add scene” tab (located in the left toolbar).

3) Choose the type of scene you want to create and click Add.

Back To Top
Consumption
Consumption section of HC2 configuration interface allows for monitoring power consumption and temperature readings from every device connected to the HC2 capable of doing so.
Main screen displays gauges with current energy and temperature measures. You can also check summary value of energy consumption in the span of an hour, day, week and month and average value of temperature in last hour, day, week and month. Left hand side panel allows choosing which rooms are taken into the account.

Back To Top
Energy panel
Energy panel shows complex information about current and statistical electric energy consumption.

First switch allows choosing between rooms and devices view.
Second switch allows choosing between summary and comparison view.
Third switch allows choosing between displaying consumption in kWh or as cost of energy.
Depending on the chosen criteria you can show summary and comparison view of average consumption in the chosen span of time.
Settings
In the “Settings” tab you can set currency and cost of one kWh of energy in this currency to allow proper energy cost display.
Back To Top
Temperature panel
Temperature panel shows complex information about current and statistical temperature.

Two slide switches allow to set the form of displayed measurements:
First switch (from left) allows choosing between rooms and devices view.
Second switch allows choosing between summary and comparison view.
Depending on the chosen criteria you can show view of average temperature in the chosen span of time.
Back To Top
Plugins
Plugins allow user to easily integrate other devices, which are not equipped with Z-Wave communication, eg. Smart TV, weather station, alarm or video entry system. This way you can control them using your smartphone or tablet, also using the remote access feature. Plugins are divided into five categories:

- Cameras: over 130 devices made by different manufacturers
- Climate: Carrier Furnace, Netatmo, WS Davis Vantage ,Weather plugins
- Multimedia: Denon AVR, Heos Denon, LG Blu-ray, LG Smart TV, Logitech Harmony, NC+ Mediabox, NuVo, Onkyo AVR, Philips Blu-ray, Pioneer AVR, Russound, Samsung Smart TV, Sonos Speaker, Sony Blu-ray, Sony TV, XBMC Remote Control
- Security: DSC Alarm, EnvisaLink Alarm, Helios Basic, Helios Gold, IP Bell, Mobotix, Modular Alarm, Satel Alarm
- Other: Philips Hue, Planika Fireplace, Wake on LAN
Back To Top
Panels
SMS Panel lets you manage your house via text messages when you have no internet access.
Functionality is available only in Poland.

Alarm Panel gives the opportunity to create an alarm with the Z-Wave sensors we already have installed in our home.

Heating Panel allows you to schedule heating programs at predetermined times. After the zones have been created and rooms are added to it, all linked devices responsible for maintaining the desired temperature will work in accordance with schedule.

AC Panel allows you to schedule cooling programs at predetermined times. After the zones have been created and rooms are added to it, all linked devices responsible for maintaining the desired temperature will work in accordance with schedule.

Humidity Panel allows you to schedule humifying programs at predetermined times. After the zones have been created and rooms are added to it, all linked devices responsible for maintaining the desired humidity will work in accordance with schedule.

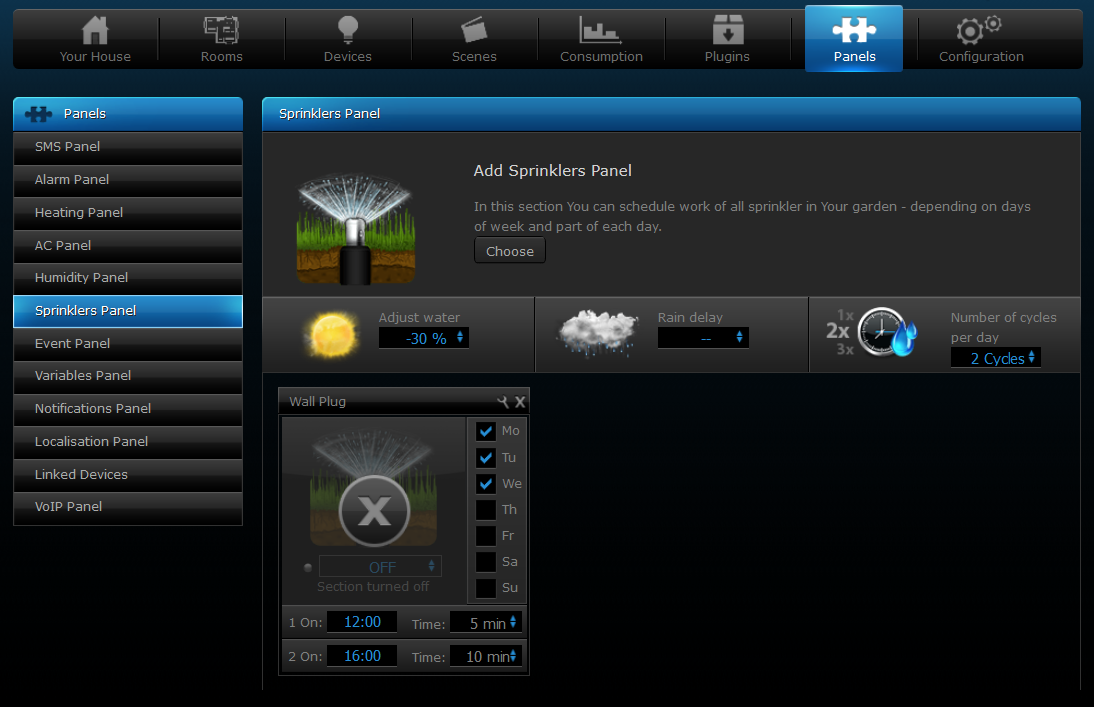
Sprinklers Panel is designed to control sprinkler Relay Switches modules. It allows you to create sprinkling schedule or control sprinklers manually.
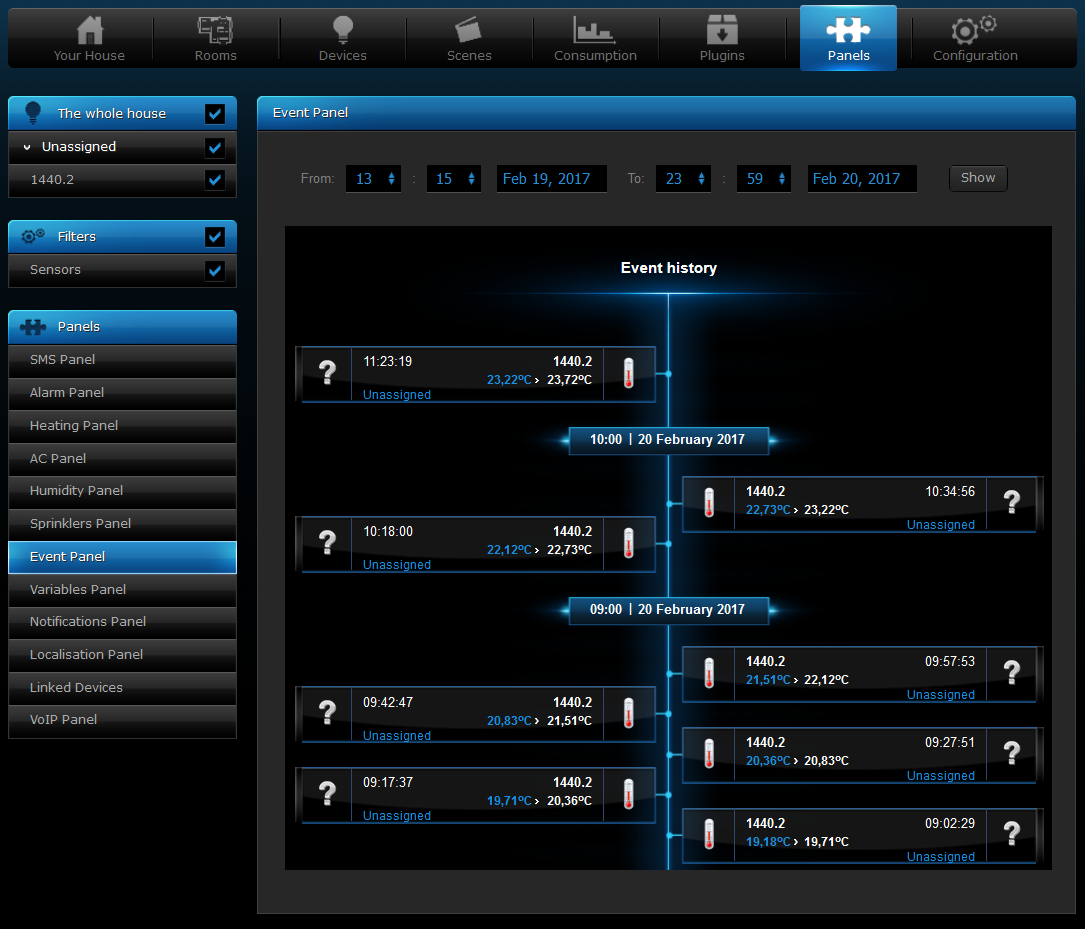
Events Panel is a register of all of the activities taking place in a FIBARO System. The panel lets the user monitor changes in status of all devices and filter them depending on the device type, location or the time of occuring.
Variables Panel allows you to add, change and check status of global variables that can be used in your scenes. You can use variables that can contain numerical values or predefined variables that can have few states of any kind.

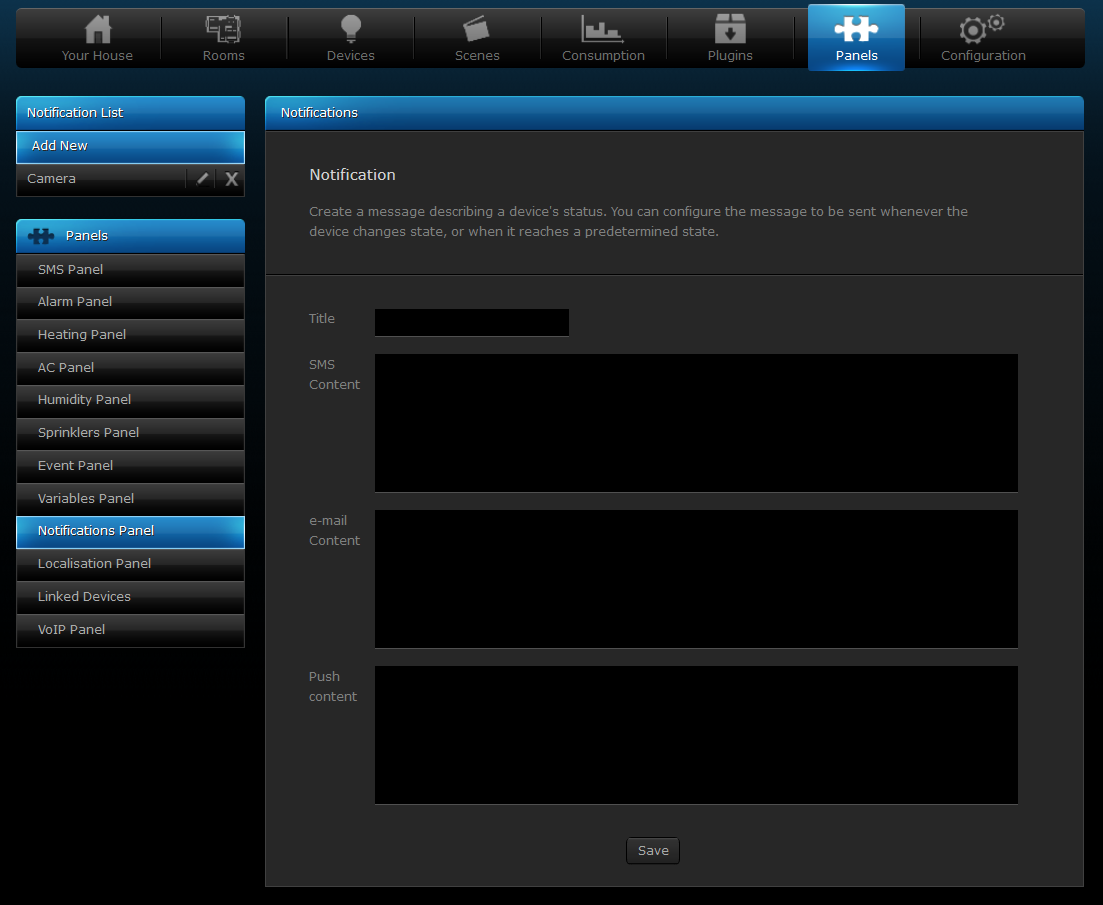
Notifications Panel gives the ability to create messages to be used for informing the user of certain events taking place in the house.
Localization Panel uses user defined GPS points to activate GPS scenes. There are two ways of defining GPS points: choosing on a map, or entering certain GPS coordinates.

Linked Devices combine several devices into one device. Using this function results in controlling the group of related devices as if they were one single device. The group will be presented in the HC2 interface as a single device.

VoIP panel allows to add and configure VoIP clients.

Back To Top
Configuration
General Information window of Configuration section of Home Center 2 provides basic information about your HC gateway, lets you choose main sensors, restart and change language of the interface.
Basic information about the Home Center 2 include: serial number, MAC address, current software version, time and date last system backup file was created and server status.
The Access Control window allows you to manage the accounts of the users of your Home Center 2. It allows you to grant/block access to the devices, scenes and system settings. From the Access Control it is also possible to grant/block access using the hotel mode for a given mobile application or set a period for reporting GPS locations from a certain mobile device. Also, the Access Control gives an option to define mobile devices which will receive Push Notifications.

In the Backup window of the Backup & Recovery section the backup files are created and list of them is displayed. Backup file is a copy of a file containing the information’s about all devices added to the system and all of their settings, users individual settings and the HC2 operating system.

Diagnostic panel allows to monitor Home Center 2 resources usage, like CPU, RAM memory and storage memory. Z-Wave tab of Diagnostic panel displays if all your Z-Wave devices are configured properly.
Remote Gateways allow to create large network of home automation.

LAN Settings window allows for configuring local network settings HC2 is connected into.

Location window includes time, date and format settings. Additionally, it is possible to enter the longitude and latitude or city used for monitoring weather conditions (also used in scenes).

Z-Wave network – in this window the Z-Wave network settings and parameters are displayed. It is recommended to change this settings only by advanced users.

Back To Top
FIBARO Home Center mobile app
FIBARO Home Center mobile app – FAQ
You can download the app from the App Store (iOS) or Google Play (Android).


The old application will be available till the end of 2020. After that, the only available and supported app for mobile devices will be the FIBARO Home Center app.
The FIBARO Home Center app supports Home Center Lite, Home Center 2, and Home Center 3 gateways with firmware version 4.530 or higher.
It is required for seamless switching between remote and local access. Make sure not to use the same login for two Home Center accounts!
For application to work properly, the Home Center gateway must be configured.
For the Home Center to be configured properly, perform Wizard procedure in Home Center Configuration Interface. Following step are mandatory for full configuration:
- Update the gateway to the newest firmware.
- Configure the FIBARO alarm:
- Enable or disable it.
- Set the user PIN.
- Set location of the gateway.
- Set name of the gateway.
- Add at least one room to the gateway.
- Add at least one device to the gateway.
- Connect the gateway to FIBARO ID and Remote Access.
You can also contact one of our certified installers (see https://www.fibaro.com/en/where-to-buy).
Please contact us directly or via forum.fibaro.com and tell us about it. User feedback is important to us and we update the app with new features and fixes regularly.
Yes, the Home Center app offers location-based automations and its support has been recently optimized.
It is very easy and you can do it using Block Scenes. Follow this short step-by-step guide in case you need assistance.
The Home Center gateway can notify you about almost anything. The best scene to receive a push notification is to set up a block scene, in which you will choose the trigger and text of this notification.
The order is based on your Home Center configuration. If you want to change the order, change it using the browser interface.
Check if any of the devices/rooms are hidden or if you have necessary permissions. If you still can’t see devices or rooms, contact FIBARO Support.
Back To Top
Support
Troubleshooting
Try one of the following solutions:
- Check if your FIBARO Home Center is connected to FIBARO ID account.
+ Login to FIBARO ID account, then go to Remote Access and check if your gateway is on the list.
+ If it’s not on the list, add your gateway to Remote Access. (Add New Home Center button)
+ If you’re seeing “This Home Center is already added to another FIBARO ID account” go to the I cannot add my Home Center to Remote Access.
Try one of the following solutions:
- Check if your FIBARO Home Center is connected to another FIBARO ID account.
+ Delete it from FIBARO ID account, if possible.
+ If you don’t know to which FIBARO ID account it is linked to, or cannot access it, contact our Support Team.
Try one of the following solutions:
-
- Certain functionalities are not available through remote access for security reasons.
+ Log in to your system in local access.
Try one of the following solutions:
-
- Your FIBARO Home Center can be offline.
+ Try to reconnect your FIBARO Home Center.
-
- There are problems with the DNS system.
+ Complete the DNS data in the Home Center interface (Configuration =>LAN Settings) and restart the gateway.
-
- The Remote Access is turned off.
+ Turn on the Remote Access option. Sign up to the FIBARO ID account and add your FIBARO Home Center to Remote Access.
Try the following solution:
-
- Probably 22nd port being blocked on the router.
+ Complete the DNS data in the Home Center interface (Configuration => LAN Settings) and restart the gateway.
It may be due to the fact that your Home Center has static IP. The controller in this state has the following parameters:
- Default settings for static IP
IP Address: 192.168.81.1
Subnet Mask: 255.255.255.0
Gateway Address: 192.168.81.1
To read more about static and dynamic (DHCP) IP assigning, check our article:
How to change the Home Center IP address to static or dynamic?
No, Home Center can work without it since the firmware version 4.510.
If your Home Center has firmware 4.510 or newer you don’t have to.
Back To Top
Содержание
- Распаковка
- Первое включение
- Добавление розетки
- Плагины
Распаковка
Для моей задачи был приобретен контроллер Z-Wave Fibaro Home Center 2. На момент написания статьи это самый крутой контроллер Z-Wave из выпускаемых, стоит 54 тысячи рублей.


Выглядит довольно неплохо. У него, в отличие от пластикового Home Center Lite, алюминиевый корпус, и он сам более крупный. Сначала я даже не понял, где у него все подключения, прошлось открыть инструкцию (одна страница А4) и понять, что нужно отвинтить левую стенку.

Стали видны разъём питания (в комплекте адаптер в розетку 12 вольт 4 ампера), разъём Ethernet, 4 USB (в один из них вставлена флешка с символом «красный крест», для аварийного восстановления и бэкапа) и два аудио-разъёма для микрофона и динамика (это для голосового управления системой).
Первое включение
Антенна на устройстве — это антенна для сети Z-Wave, а не Wi-Fi. Wi-Fi у Home Center нет. Включаем устройство в розетку, оно начинает мигать лампочками. Согласно инструкции, скачиваем из раздела Support сайта fibaro.com утилиту Fibaro Finder. Она есть для Windows и Mac. Сначала программа ничего не нашла, но я заметил, что горит светодиод, который по инструкции означает «Software Update in Progress» и решил подождать. Видимо, контроллер сам подключился к интернету и начал обновляться. Я оказался прав — через 5 минут лампочки помигали и зажглись только «Питание», «Подключение к сети» и «Подключение к интернет». Упрамая программа Fibaro Finder так и не обнаружила контроллер в сети.

Но контроллер же в сети, судя по лампочке! Я запустил утилиту поиска всех устройств в локалке, нашёл новый IP адрес и зашёл через браузер на контроллер.

Тут уже есть русский язык, значит, не обманули. По умолчанию логин и пароль admin.
Вижу главный экран Fibaro. Пока всё красиво. Не знаю, погоду в каком городе он показывает мне в правом верхнем углу, но это градусов на двадцать выше, ем у меня за окном.

Написано, что доступно обновление до версии 4.120. Раз доступно, то буду обновляться, почему нет. Обновлялся и загружался контроллер минут 7-8. Затем при входе выдал окно «мастера настройки»

Предложено сразу сказать мобильное приложение. В App Store нашлись Fibaro fir iPhone, Fibaro for iPad и Fibaro Intercom (приложение для связи между комнатами). Пока оно скачивается, смотрю интерфейс. При каждом переключении на другое окно браузер грузит страницу, наверное, секунд 10, это неприятно.
Использование процессора 1%, использование памяти RAM 26%, память системы забита на 41%, память для бэкапов забита на 23% (интересно, что там столько занимает).
В настройках LAN стоит DHCP, удаленный доступ разрешен по умолчанию. Быстро пробежался по настройкам, выставим часовой пояс и место (сразу погода стала правильно отображаться). Начнём с добавления комнат. В вкладке Rooms добавил две секции: 1 этаж и 2 этаж, потом добавил несколько комнат на каждом этаже. После нажатия кнопки «Добавить» страница каждый раз перезагружается целиком, приходится ждать.

Добавление розетки
Дальше имеет смысл добавить устройства. Захожу в Devices, там пока только одно устройство — Погода с текущим прогнозом из интернета. Я могу связать данные погоды с любыми другими устройствами и сделать какую-то удобную логику. Нажимаю «Добавить устройство» и вижу окно, где предлагается добавить устройство, удалить устройство, добавить IP камеру или добавить виртуальное устройство. Виртуальное устройство — это как раз что-то типа прогноза погоды. Или механизм управления техникой по HTTP. То есть, не физическое устройство, а алгоритм.

Я взял для простоты розетку Z-Wave Socket, воткнул в обычную розетку, нажал Add и через 10 секунд устройство нашлось и предложило выбрать, как его воспринимать.

Я не нашёл обогреватель и выбрал Other Device. Для устройства Home Center 2 предлагает задать иконку. К сожалению, иконок на выбор очень мало. Но можно добавить свою, с прозрачным фоном размером 128*128.

Теперь я могу задать настройки для своей розетки:
- Ассоциация с комнатой
- Интервал опроса. Розетка умеет считать идущий через нее ток, интервал опроса означает, как часто розетка посылает данные на контроллер.
- Галочка «измерять потребляемую мощность» и кнопка сброса статистики
- Галочка «enabled device»
- Галочка «сохранение логов работы»
- Настройка возможности управления розетой с кнопки на ней. Можно запретить для защиты от детей.
- Возможность оповещения через email, смс или push-уведомления о включении и выключении
- Команды включения и выключения голосом (в Home Center 2 есть голосовое управление!)
- Задание ассоциаций. Например, включение по датчику движения.
- Параметры светодиода на розетке: выключен, отображать состояние, включен
- Автовыключение после ххх секунд
- Сохранять ли состояние после отключения и включения питания. Либо да, либо выключена.
На самом деле, параметров больше, это основные.
Плагины
Что мне сразу понравилось в контроллере, это плагины. Их количество. Home Center 2 поддерживает безумное количество плагинов.

Особенно мне понравилось управление мультимедиа: Denon, Онкио, Sonos, LG, Philips, Sony, Samsung, Pioneer, Russound. Мы сможем управлять всей этой техникой с приложения Fibaro и включать управление в общие сценарии. Это очень здорово.
Ещё из интересных плагинов:
- Wake on Lan (включение компьютера)
- Несколько прогнозов погоды
- Netatmo — датчик климата
- Огромное количество IP видеокамер
- Охранная сигнализация Satel
![]()

-
Contents
-
Table of Contents
-
Bookmarks
Quick Links
Related Manuals for FIBARO Home Center 2
Summary of Contents for FIBARO Home Center 2
-
Page 2
For more information, visit our website: http://manuals.fibaro.com/home-center-2 Menu english…………..3 español…………..15 polski……………..6 português………….18 deutsch…………..9 русский…………..21 français…………..12… -
Page 3: Led Indicators
To start using FIBARO System Home Center 2, please connect the device to power and LAN sockets, as shown below. 1. Unscrew left side panel 5. Start Home Center 2 Start Home Center 2 with a POWER button and wait approx.
-
Page 4: Back Panel Buttons
This product is designed for indoor IP: 192.168.81.1* use only. Do not use outside! *Note: after setting static IP Home Center 2 will loose the router connection. Simplified EU declaration of conformity WEEE Directive Compliance Hereby, Fibar Group S.A. declares that…
-
Page 5: Guarantee Terms And Conditions
• damages caused by Customer’s failure to provide contact the Manufacturer via the email address given maintenance and servicing activities defined in the at https://www.fibaro.com/support/. operating manual; After the complaint has been properly filed, the • damages resulting from the use of spurious spare…
-
Page 6
7. Ściągnij aplikację mobilną UWAGA! Nie włączaj centrali bez pendrive RECOVERY. 4. Podłącz centralę Podłącz centralę (Home Center 2) do sieci elektrycznej oraz podłącz przewód sieciowy do gniazda LAN w swoim routerze. Diody sygnalizacyjne POWER [świeci] — Zasilanie [włączone]… -
Page 7: Uproszczona Deklaracja Zgodności Ue
EU. Pełny tekst deklaracji zgodności UE odpadami komunalnymi. Obowiązkiem jest dostępny pod następującym adresem użytkownika jest dostarczenie zużytego internetowym: www.manuals.fibaro.com urządzenia wyznaczonego punktu recyklingu. Dane techniczne Zasilanie: 12V DC (w zestawie) Interfejs sieciowy: 10/100/1000 Base-T (Gigabit) Ethernet (RJ-45) Protokół…
-
Page 8: Warunki Gwarancji
1.182.100 zł, Gwarancja jakości nie obejmuje: wpłacony w całości, pozostałe dane kontaktowe • uszkodzeń mechanicznych (pęknięcia, złamania, dostępne są pod adresem: www.fibaro.com (dalej: przecięcia, przetarcia, fizyczne odkształcenia „Producent”) udziela gwarancji, że sprzedawane spowodowane uderzeniem, upadkiem bądź zrzuceniem urządzenie („Urządzenie”) wolne jest od wad materiału na Urządzenie innego przedmiotu lub eksploatacją…
-
Page 9
Vor Inbetriebnahme des Home Center 2 schließen Sie das Gerät an das Strom- und LAN-Netz an, wie unten beschrieben. 1. Schrauben Sie die linke Seitenwand ab. 5. Starten Sie das Home Center 2 Starten Sie Home Center 2 mit einem Netzschalter und warten Sie ca. -
Page 10: Vereinfachte Eu-Konformitätserklärung
Z-Wave-Geräte), • drücken und halten, um statische IP zu setzen: 192.168.81.1* *HINWEIS: Nach dem Einstellen der statischen IP-Adresse verliert das Home Center 2 die Vereinfachte EU-konformitätserklärung Verbindung zum Router. Hiermit erklärt Fibar Group S.A., dass sich WEEE-Richtlinie das Gerät Radiolan in Übereinstimmung it den grundlegenden Anforderungen und den übrigen einschlägigen Bestimmungen…
-
Page 11
Hersteller nicht empfohlen wird; Um eine Reklamation zu erheben, soll der Kunde mit • Beschädigungen infolge fehlerhafter Hilfe der auf der Seite https://www.fibaro.com/support/ Strominstallation des Nutzers, darunter vom Einsatz nicht genannten E-Mail-Adresse mit dem Hersteller Kontakt geeigneter Sicherungen; aufnehmen. . -
Page 12
Pour commencer à utiliser le Home Center 2 de Fibaro, merci de brancher l’appareil à une prise électrique et à un cable réseau, comme montré ci dessous. 1. Dévissez le panneau gauche 5. Démarrez le Home Center 2 Démarrez le Home Center 2 grâce au bouton POWER et patientez environ 2 min le temps qu’il démarre. -
Page 13: Données Techniques
2014/53/EU. applicable pour le recyclage des déchets Le texte complet de la déclaration UE de d’équipements électriques et électroniques. conformité est disponible à l’adresse internet suivante: www.manuals.fibaro.com Données techniques Alimentation: 12V DC (inclus) Interface réseau: 10/100/1000 Base-T (Gigabit) Ethernet (RJ-45)
-
Page 14: Conditions De Garantie
• des dommages mécaniques (fissures, fractures, social de 1 182 100 PLN entièrement libéré, d’autres coupures, écorchures, déformation physique due à coordonnées sont disponibles au site www.fibaro.com l’impact, la chute ou causée en laissant tomber sur (ci-après le „Fabricant”) garantit que l’appareil vendu (l’…
-
Page 15: Indicadores Led
Para comenzar a usar el Fibaro Home Center 2, por favor conecte el dispositivo a los enchufes de LAN y de alimentación. 1. Desatornille el panel del lado izquierdo 5. Encienda el Home Center 2 Encienda el Home Center 2 mediante el botón de…
-
Page 16: Declaración Ue De Conformidad Simplificada
¡No lo • presione y mantenga pulsado para fijar utilice en exteriores! la IP estática: 192.168.81.1* *Nota: tras fijar la IP estática al Home Center 2, perderá la conexión al router. Declaración UE de conformidad Conformidad con simplificada la directiva RAEE Por medio de la presente Fibar Group S.A.
-
Page 17: Condiciones De Garantía
Dispositivo, datos de contacto están disponibles en la página web: • del documento de garantía inválido o falta de www.fibaro.com (en adelante „Fabricante”) otorga la justificante de compra. garantía para el dispositivo vendido („Dispositivo”) y La Garantía de calidad no cubre:…
-
Page 18
Para começar a utilizar o Fibaro Home Center 2, por favor ligue o dispositivo às tomadas de alimentação e de rede como indicado em baixo. 1. Retire os parafusos do painel 5. Arranque o Home Center 2 esquerdo Ligue o Home Center 2 no botão de “Power” e espere aprox. -
Page 19: Dados Técnicos
Não use no exterior! • prima continuamente para definir o ip estático: 192.168.81.1* *Note: depois de definido o IP estático, o Home Center 2 irá perder comunicação com o Router. Declaração UE de Conformidade conformidade simplificada da Diretiva WEEE…
-
Page 20: Termos De Garantia
Garantia de qualidade não se aplica a: na sua totalidade, outros dados de contato disponível • danos estéticos (riscos, quebras, cortes, esfregos, sob: www.fibaro.com garante o Aparelho vendido deformações físicas que sejam resultados de impacto, („Aparelho”) está livre dos defeitos de material ou de queda ou lançamento dum outro objeto em cima do…
-
Page 21
Для того чтобы начать использование контроллерa системы модель: Fibaro Home Center 2, пожалуйста, подключите устройство к электрическому току и розетке LAN, как показано ниже. 1. Отвинтить левую боковую 5. Запуск Home Center 2 панель Запустить Home Center 2 с кнопки включения… -
Page 22: Техническая Информация
на Нажмите и удерживайте, чтобы • улице! установить IP: 192.168.81.1* *Заметить: после установки статического IP-Home Center 2 потеряет подключение маршрутизатора. Упрощенная декларация Соответствие соответствия ЕС директиве WEEE Fibar Group S.A. настоящим заявляет, Устройство, помеченное этим символом, не что устройство соответствует Директиве…
-
Page 23: Условия Гарантии
PLN 1.182.100 оплаченный полностью, остальная на Устройство другого предмета или эксплуатация, контактная информация доступна по адресу: www. несоответствующая предназначению Устройства, fibaro.com (далее „Производитель”) гарантирует, определенному в руководстве по эксплуатации); что продаваемое устройство (далее: „Устройство”) • повреждения, возникшие в результате внешних…
-
Page 24
Fibar Group S.A. Lotnicza 1 Street 60-421 Poznan POLAND www.fibaro.com 105445210101…
Это руководство показывает, как управлять системами отопления Z-Wave с помощью контроллера Fibaro Home Center 2.
Цель проекта
Целью данного проекта является использование ‘Heating Panel’ (Панель отопления) в Home Center 2 (HC2) для управления бойлерной системой отопления:
- Включение отопления, когда температура в помещении ниже заданного значения термостата
- Выключение отопления, когда температура в помещении выше заданного значения термостата
- Автоматическое изменение заданной температуры термостата в зависимости от времени суток — утро, день, вечер и ночь
- Настройка термостата для управления отоплением с использованием контроллера HC2, в соответствии с заданным графиком
Примечание — просто установите температуру на термостате, например, 21 ° С, если вы хотите, чтобы в помещении был 21 ° С.
Компоненты
Для этого проекта использованы устройства система домашней автоматизации Z-Wave:
- Secure Wall Thermostat (SRT 321) — отслеживает температуру в помещении и если нужно, включает отопление
- Secure Receiver (SSR 303) — (одноканальное реле) — управление котлом или другими источниками тепла
- Fibaro Home Center 2 (HC2) — центральный контроллер Z-Wave запускает график управления системой отопления
Secure Wall Thermostat и Secure Boiler Receiver были выбраны, поскольку они легко устанавливаются и могут быть ассоциированы напрямую. Также могут быть использованы другие термостаты и реле. Контроллер Fibaro Home Center 2 (HC2) задействован для конфигурации и настройки. Дальше используется его ‘Heating Panel’ (Панель отопления) для управления расписанием отопления и изменением настроек температуры термостата в определенное время в течении дня.
Установка времени и температуры
В традиционных системах отопление включается только в определенный период и значение температуры, установленное на термостате, не меняется. В HC2 использование ‘Heating Panel’ (Панели отопления) позволяет менять настройки термостата в течении дня. Преимуществом этого является то, что вы можете установить температуру на каждое время суток, вместо того, чтобы включать или выключать отопление.
Схема выбора времени и температуры показана на рис.1
Рисунок 1 – Режим отопления и температурные показатели
Создадим этот график в HC ‘Heating Panel’ (Панель отопления), и он будет устанавливать значение температуры термостата в заданное время в течении суток.
Настройка Home Center 2 и Heating Panel (Панель отопления)
Для реализации этой системы отопления важно настроить HC2 следующим образом:
- Ассоциируйте Secure SRT321 Thermostat напрямую с Secure Receiver
- Установите Secure Thermostat как комнатный термостат
- Создайте расписание в HC2 ‘Heating Panel’ (Панель отопления)
- Выберите комнату, для которой будет действовать график отопления HC2
Ассоциирование Secure Thermostat с Secure Receiver
- В HC2 перейдите на вкладку ‘Devices’ (Устройства) и нажмите значок ‘Гаечный ключ’ в Secure Thermostat
- На вкладке ‘Advanced’ (Дополнительно) ассоциируйте его с Secure Receiver в Group ID 2
Установка Secure Thermostat в качестве комнатного термостата
Прежде чем использовать термостат для управления отоплением, нужно выделить комнату в HC2, и установить его в качестве комнатного термостата:
- Перейдите на вкладку ‘Rooms’ (комнаты)
- Нажмите значок ‘Гаечный ключ’ в комнате где расположен термостат
- На новом экране выберите Secure Thermostat в качестве основного термостата для комнаты
- В данном примере комната называется ‘Heating’ и термостат ‘Secure Thermostat’
- Нажмите на синий значок Save (сохранить) с правой стороны
Создание графика отопления
График отопления будет создан и управляться с HC2 ‘Heating Panel’ (Панель отопления):
- Перейдите на вкладку ‘Panels’ (Панели)
- Выберите ‘Heating Panel’ (Панель отопления) в левой боковой панели
- Добавьте зону отопления и назовите ее
- В новой панели зоны отопления установите время и температуру
- Нажмите на синий значок Save (сохранить) с правой стороны
- На вкладке Heating Panels, нажмите значок ‘карандаш'(редактировать) для новой зоны отопления
- В открывшемся окне выберите комнату на которую распространяется график отопления — в данном примере это ‘Heating’
- Нажмите синюю кнопку ‘Add’ (добавить)
- Нажмите на синий значок Save (сохранить) с правой стороны
Теперь вы полностью управляете вашей отопительной системой с помощью Fibaro Home Center 2 и напрямую с термостата.
Оригинальная статья на vesternet.com
Авторство материалов подтверждено в Google и Yandex.