- Manuals
- Brands
- Hague Quality Water Manuals
- Water Dispenser
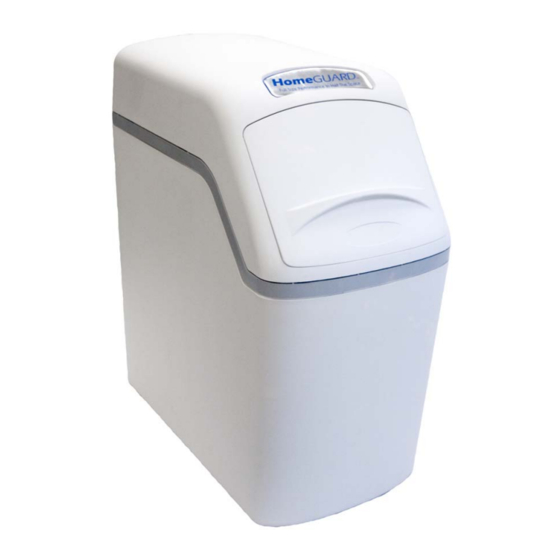
- HomeGuard 400
- Owners and installation manual
-
Contents
-
Table of Contents
-
Troubleshooting
-
Bookmarks
Quick Links
O
‘
M
I
G
O
‘
M
I
G
W
N
E
R
S
A
N
U
A
L
A
N
D
N
S
T
A
L
L
A
T
I
O
N
U
I
D
E
W
N
E
R
S
A
N
U
A
L
A
N
D
N
S
T
A
L
L
A
T
I
O
N
U
I
D
E
V
1
.
1
V
1
.
1
E
R
S
I
O
N
E
R
S
I
O
N
Related Manuals for Hague Quality Water HomeGuard 400
Summary of Contents for Hague Quality Water HomeGuard 400
-
Page 1
’ ’… -
Page 2
10 Year Limited Warranty To Whom Warranty Is Extended This warranty does not cover damage to a part or parts of the system from causes such as fire, accidents, freezing, or This warranty is issued to the original owner at the original unreasonable use, abuse, or neglect by the owner. -
Page 3: Table Of Contents
Contents OWNER INFORMATION……………………….4 General Information ……………………….4 Getting Maximum Efficiency From the Appliance……………….5 Efficiency Statements………………………..5 Five-Button Controller ……………………….6 Customer Settings……………………….8 INSTALLATION AND MAINTENANCE INFORMATION ………………9 Checklist Before Installation………………………9 Precautions …………………………10 Installation Steps and Start-Up Procedures ………………..11 Bypass Valve ………………………….16 Optional Plumbing Procedures……………………16 Setting and Using the Controller ……………………18 Service Settings ……………………….19 Assembly and Parts ………………………..22…
-
Page 4: Owner Information
WNER NFORMATION General Information Congratulations on choosing a superior Hague water treatment appliance! Soon you and your family will be enjoying clean, clear water. Use this guide to attain the maximum benefit from your appliance. As an owner, you may find the first few pages to be the most helpful in solving your needs.
-
Page 5: Getting Maximum Efficiency From The Appliance
Getting Maximum Efficiency From the Appliance To achieve the maximum benefit and performance The appliance may be disinfected with 5.25% from this appliance, familiarize yourself with this sodium hypochlorite, which is the active manual and the appliance. ingredient in household chlorine bleach. To disinfect the appliance, add 0.5 fluid ounces of The salt level should always be at least 1/3 full.
-
Page 6: Five-Button Controller
Five-Button Controller This appliance features a five-button controller with an LCD display. The controller can be used to view the appliance’s status, perform regenerations, and change settings. An independent Hague dealer LCD Display should set the Service Settings during installation of the appliance.
-
Page 7
Five-Button Controller, Cont. Controller Part Function Buttons, Cont. The Change, Select, Display, and Scroll Back buttons are used when changing Customer Settings and Service Settings. Select The Select button is used to move the cursor when setting parameters. Press and release the Select button to move the cursor one digit to the right of the parameter to be changed. -
Page 8: Customer Settings
Customer Settings Service Settings must be set before Customer Settings; Service Settings should be set during installation of the appliance. To set Customer Settings, press and hold the Display button for about five seconds while “Customer Setting” displays. Release the button when “Set Time” displays. If the setting displayed is correct, press Display to move to the next setting.
-
Page 9: Installation And Maintenance Information
NSTALLATION AND AINTENANCE NFORMATION Checklist Before Installation Refer to this checklist before installation. Water Quality—If the water supply contains sand, sulfur, bacteria, iron bacteria, tannins, algae, oil, acid, or other unusual substances, consider pre-treating the water to remove these contaminants before the water supply enters the appliance, unless the appliance is represented as being capable of treating these contaminants in its specifications.
-
Page 10: Precautions
Checklist Before Installation, Cont. Drain—Drain the appliance to an appropriate drain, such as a floor drain or washer drain that will comply with all local and state plumbing codes. To prevent back-siphoning, provide an adequate air gap or a siphon break. See Installation Steps and Start-Up Procedures.
-
Page 11: Installation Steps And Start-Up Procedures
Installation Steps and Start-Up Procedures Prepare the Placement Area Step 1 Make sure the placement area is clean. Turn off the electricity and water supply to the water heater. For gas water heaters, turn the gas cock to “Pilot.” Examine the inlet plumbing to ensure that the pipe is not plugged with lime, iron, or any other substance.
-
Page 12: Turn Off Water Supply
Installation Steps and Start-Up Procedures, Cont. Turn Off Water Supply tep 2 Turn off the water supply. Open the hot and cold water taps to depressurize the lines. Connect Water Lines tep 3 Note: See Optional Plumbing Procedures for information on copper fittings and joining plastic pipe. Remove the valve cover.
-
Page 13
Installation Steps and Start-Up Procedures, Cont. Connect Gravity Overflow Connection tep 4 The overflow line drains away excess water should the tank fill with too much water or the appliance malfunction. Check that the overflow elbow is in the down position. -
Page 14
Installation Steps and Start-Up Procedures, Cont. Check for Leaks tep 7 Close all faucets. Check all lines and connections for leaks. If leaks are found: 1. Turn off the main water supply. 2. Open a cold water faucet to depressurize the lines. -
Page 15: Complete The Installation
Installation Steps and Start-Up Procedures, Cont. Fill the Brine Cabinet With Salt Step 11 If the grid plate is not sitting on its supports at the bottom of the brine cabinet, carefully reposition it. Fill the brine cabinet with salt. (See Figure 11.) Use clean, white pellet or solar salt.
-
Page 16: Bypass Valve
Bypass Valve The bypass valve can isolate the appliance should the appliance malfunction or leak. It can also permit the use of untreated water for watering plants, shrubs, or lawns. The bypass is located on the main control valve. See Figure 12. To engage the bypass, turn the knob to the Bypass position.
-
Page 17
Optional Plumbing Procedures, Cont. Plastic (PVC/CPVC) Pipe Joining Procedure To ensure reliable joint integrity when using solvent cement for PVC/CPVC plumbing, follow these recommendations: Cutting—The pipe must be cut square to allow for the proper interfacing of the pipe end and the fitting socket bottom. -
Page 18: Setting And Using The Controller
Setting and Using the Controller The controller must be set up correctly for the appliance to perform properly. Note: Ensure that the bottom of the controller is firmly locked onto the four tabs on the top of the drive end cap assembly.
-
Page 19: Service Settings
Service Settings To program Service settings on the controller, press and hold the Select and Display buttons while “Service Settings” is displayed until “Set Language Eng” is displayed. Programming Service Settings is similar to programming Customer Settings (see Customer Settings for programming details). The values that can be set are listed below.
-
Page 20
Service Settings, Cont. Display Meaning Possible Values Comments Brine/Rinse 30.0 Number of minutes the 00.0 to 99.9 Set to the nearest tenth of a minute brine and slow rinse cycle lasts Backwash 2 05.0 Number of minutes the 00.0 to 99.9 Set to the nearest tenth of a minute second backwash cycle lasts… -
Page 21
Service Settings, Cont. Mode 1 (Timer Mode) and Mode 2 (Meter Delayed Mode) Setting Chart This section provides guidance for using different service settings to achieve the desired capacity. Mode 1 and 2 Regeneration Frequency As required 96 hour regeneration (if iron present—yes) —… -
Page 22: Assembly And Parts
Assembly and Parts Cabinet and Cover Assemblies Figure 14: Cabinet and Cover Assemblies Figure 15: Controller Tab Lock Detail Part # Description Quantity 55300 Valve Cover Assembly 93245 Transformer 115V 54550 Computer Control Assembly 56004 Cabinet 56006 Support Panel HomeGuard Owner’s Manual 9/29/2009 ®…
-
Page 23: Cabinet And Assemblies
Assembly and Parts, Cont. Cabinet and Assemblies Figure 16: Cabinet and Assemblies Part # Description Quantity 93809 Screw 93870 Screw 90614-2.4 Drain End Cap 93808 O-Ring V185 Drain Fitting, 1/2″ (12.7 mm) 93842 Drain Hose, 8′ (2.4 m) 93838 O-Ring 54512 Bypass Assembly, (3/4″…
-
Page 24
Assembly and Parts, Cont. Injector Assembly Figure 17: Injector Assembly Part # Description Quantity 93810 Injector Screen 93223 Injector Throat 93220 Injector Seal (Thick) 93221 Injector Nozzle 93232 Top Injector Seal (Thin) 93222 Injector Cap 90807 Screw 93501 Entire Assembly (all of the above parts) HomeGuard Owner’s Manual 9/29/2009… -
Page 25
Assembly and Parts, Cont. Injector Assembly Cont. 93223 Injector In conjunction with the Injector Nozzle, Part # 93221, it creates the vacuum that draws the brine Throat solution from the brine cabinet. The center hole should be clear of debris, round and undamaged. The Throat should be pressed flush into the opening in the valve. -
Page 26
Assembly and Parts, Cont. Drive End Cap Assembly Figure 18: Drive End Cap Assembly Part # Description Quantity 90802 Screw, self-tapping 90217 Drive Motor 93891 1/4″ Hex Nut 93238 Drive Gear 90809 Screw, self-tapping 93219 Piston Slide Cam Cover 93217 Piston Slide Cam 93583 Drive End Cap… -
Page 27
Assembly and Parts, Cont. Drive End Cap Assembly Cont. 90217 The Motor is held in place by two 1/2-inch self-tapping screws. The screws should be “snug.” The brass pinion gear on the Motor should engage the plastic Drive Gear. The wires should be securely Drive Motor fastened to the Control. -
Page 28
Assembly and Parts, Cont. Bypass Assembly Figure 19: Bypass Assembly Part # Description Quantity 54512 Bypass Assembly 93860 Turbine Sensor Assembly 90809 Sensor Cap Screw 54320 Plastic Turbine Axle 90522 Turbine Assembly 93838 O-Ring 54512 Entire Assembly (all of the above parts) HomeGuard Owner’s Manual 9/29/2009… -
Page 29
Assembly and Parts, Cont. Brine Valve Housing Assembly Concave side Static O-Ring Figure 20: Brine Valve Housing Assembly Part # Description Quantity 53511 Piston Assembly (includes O-Ring & Spring) 90821 O-Ring 53510 Housing 90843 0.5 gpm Flow Control 93805 O-Ring 93243 Housing End Cap 90818… -
Page 30
Assembly and Parts, Cont. Drain End Cap Assembly Figure 21: Drain End Cap Assembly Part # Description Quantity 93808 O-Ring 90268 Drain End Cap H2086-2.4 Drain Line Flow Control 90267 Retainer 90614-2.4 Entire Assembly (all the above parts) 90268 Drain End Cap The Drain End Cap (90268) seals the left opening on the Main Valve Body. -
Page 31
Assembly and Parts, Cont. Safety Shutoff Assembly Figure 22: Safety Shutoff Assembly Part # Description Quantity 54226 Safety Shutoff 56018 Float 56200 Air Check 56024 Entire Assembly (all of the above parts) HomeGuard Owner’s Manual 9/29/2009 ®… -
Page 32
Assembly and Parts, Cont. Safety Shutoff Valve Elbow Installation 3/8″ Plastic Gripper 3/8″ Nut 3/8″ Retainer Sleeve 3/8″ Plastic Insert Safety Shutoff Valve 3/8″ Poly Tube Hex Nut Wrist Pin 1/2″ Retainer Sleeve 1/2″ Plastic Gripper 1/2″ Nut Air Check/Draw Tube Figure 23: Safety Shutoff Valve Elbow Installation Part # Description… -
Page 33: Troubleshooting
Troubleshooting Problem Possible Cause Solution No soft water after No salt in brine cabinet Add salt regeneration Sediment in brine cabinet has plugged the Remove the brine line and flush clean brine line and air check/draw tube Remove the air check/draw tube and flush with clean water.
-
Page 34
Troubleshooting, Cont. Problem Possible Cause Solution Appliance stays in Controller not attached properly Make sure the controller is pushed all the way regeneration onto the drive end cap Defective magnet disk Replace magnet disk Foreign object in valve body Remove foreign object(s) from the valve body Broken valve assembly. -
Page 35: Water Conditioner Specifications
Water Conditioner Specifications Max Compensated Hardness gpg (mg/L) 35 (600) Minimum pH (standard units) Maximum Ferrous Iron Chlorostat (2.0 lb) Media type and amounts Self Cleaning Filter Media.(1.5 lb) Super Fine Mesh Resin 0.4 cu. ft (0.01 cu. m) *Salt usage (used per regeneration) / Capacity 1 lb / 4,900 grains *Salt usage (used per regeneration) / Capacity 2 lb / 8,600 grains…
-
Page 36
Barium/Radium reduction occurs as long as the appliance is softening the water. Test product water hardness every 12 months to check for proper functioning. 2009 Hague Quality Water, Int’l 4343 South Hamilton Road, Groveport, OH 43125 Phone: 614-836-2115 • Fax: 614-836-9876 LITHO USA ©2009…
Строительные технологии
МЕНЮ
Обновлено: 19.09.2023


Читайте также:
- что такое обваловка котлована
- яндекс услуги стяжка пола
- пятно на фасаде дома
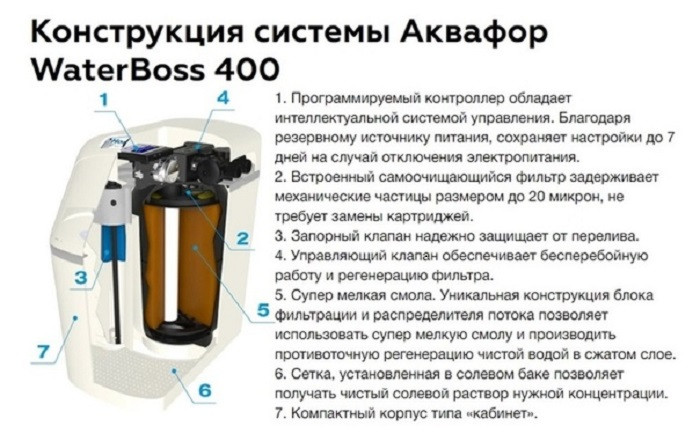
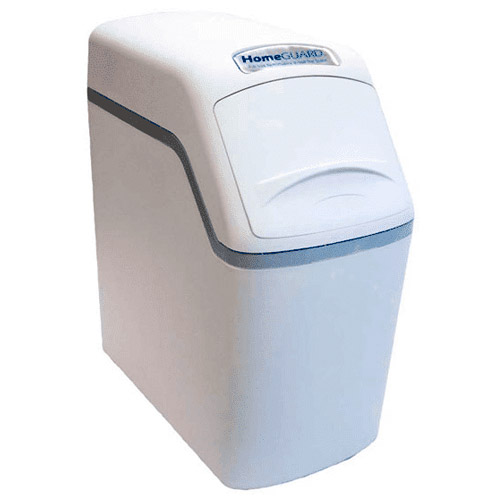
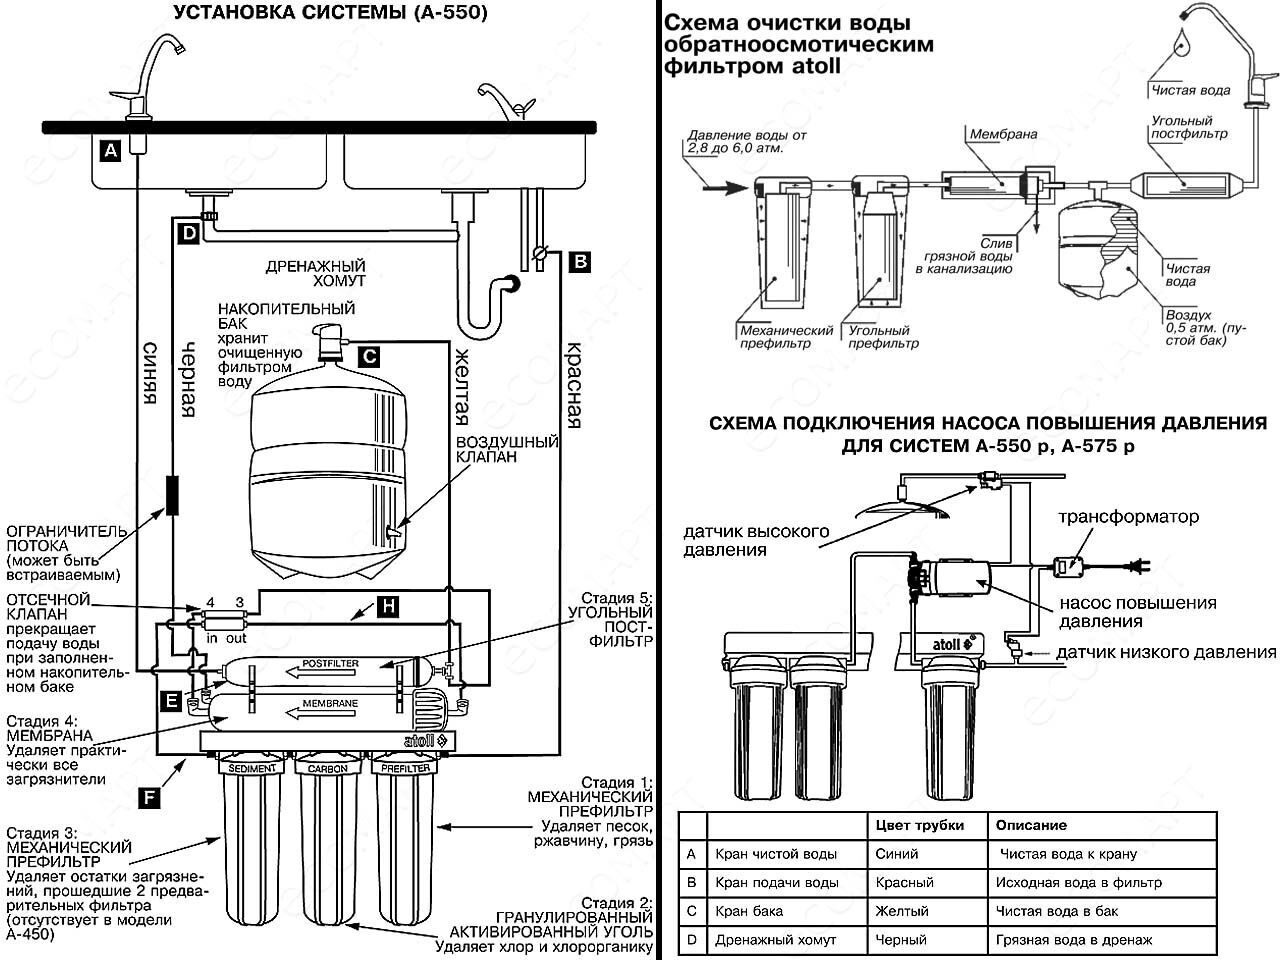
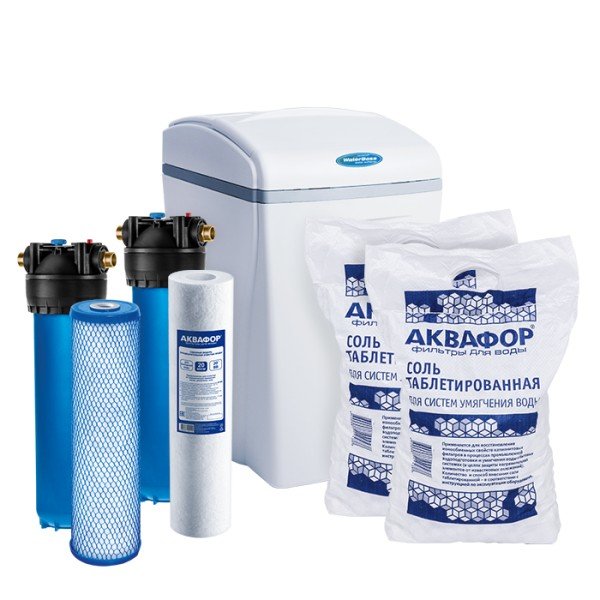
Waterboss 400 Homeguard — купить фильтр Аквафор
Высококачественное устройство подготовки воды. Устраняет ионы жесткости (кальция и магния), железо и марганец из воды. Купить фильтр Аквафор Waterboss 400 Homeguard с доставкой, обезжелезиватель и умягчитель для воды. Доступен самовывоз или приобретение в наших магазинах без предварительного заказа. Подходит для очистки воды поступающей из муниципальных и локальных водопроводных сетей (артезианских скважин, колодцев и др.).
- →
- →
Купить фильтр Waterboss 400 Homeguard — Оригинал Аквафор
Купить фильтр Waterboss 400 – это гарантированный способ обеспечить свою семью качественной и здоровой водой. Этот высокотехнологичный водоочиститель позволяет удалять из воды различные загрязнения, соли жесткости и марганец. Установка Ватербосс 400 позволяет увеличить срок службы ваших бытовых приборов, таких как стиральные машины и посудомоечные машины, а также предотвращает образование накипи.
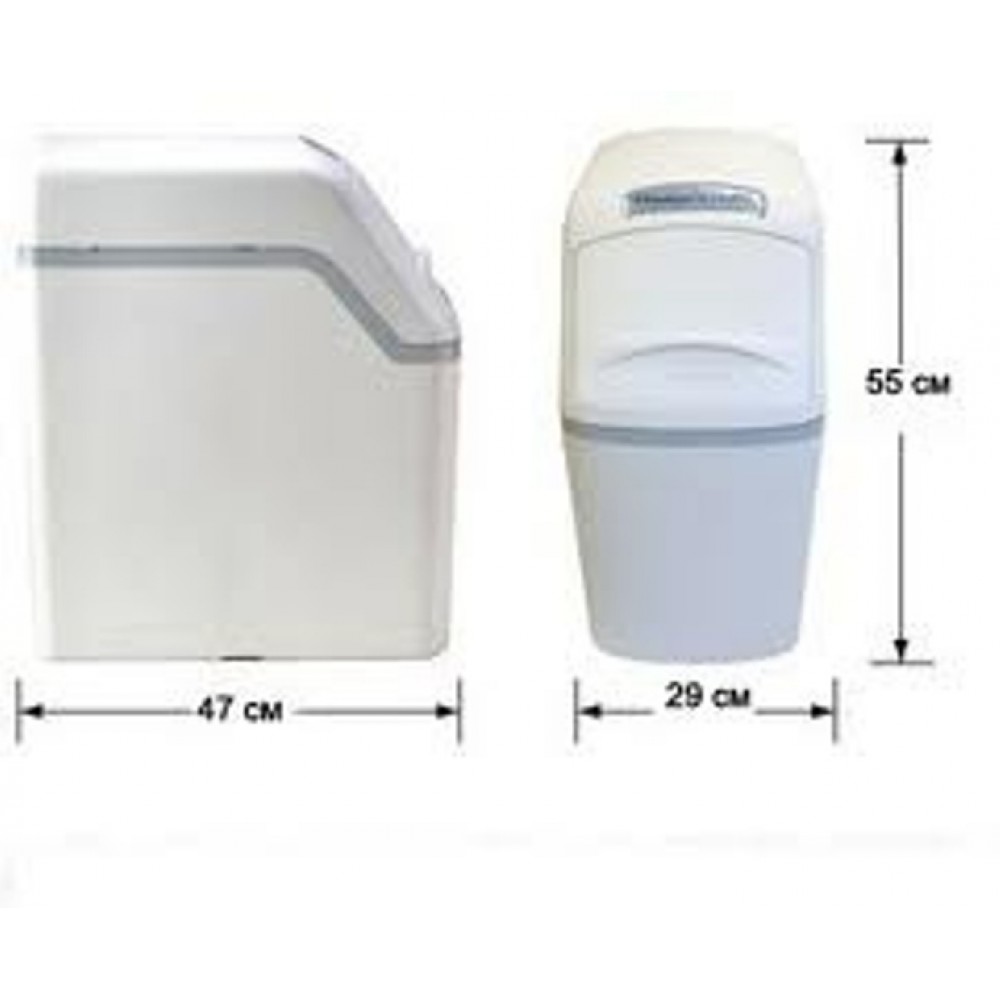
Компактный умягчитель воды с рабочей производительностью 1,2 кубометра в час. Способен убрать из воды двухвалентное железо при его концентрации не более 3 мг/л при общей жесткости до 12 мг-экв/л.
Заказать или купить фильтр Aquaphor Waterboss 400 Homeguard оригинал от АКВАФОР вы можете как в нашей официальной сети розничных магазинов, так и дистанционно в отделе продаж по указанным ниже контактам. Перед посещением магазина уточняйте наличие системы у менеджера по телефону.
Доступны все виды оплат — по ссылке онлайн или наличными. Доставляем на объект и устанавливаем. Помогаем в выборе необходимой модели, ориентируясь, в том числе на исходный анализ воды — для этого достаточно оформить заявку на консультацию.
Цена Аквафор Waterboss 400
Товар закончился, рассмотрите аналоги
Уважаемые клиенты приносим извинения за неудобства, но к сожалению данный товар закончился. Можете рассмотреть аналоги, либо обратится к менеджеру за бесплатной консультацией, он поможет подобрать нужную модель.
При решении купить Waterboss 400, вы выбираете устройство, которое сэкономит ваше время и деньги, обеспечивая комфортное использование воды. Удобный и компактный дизайн позволяет легко интегрировать его в любой интерьер, а интуитивно понятное управление облегчит процесс обслуживания и замены картриджей.
Умягчитель и обезжелезиватель для воды — Waterboss 400 с доставкой
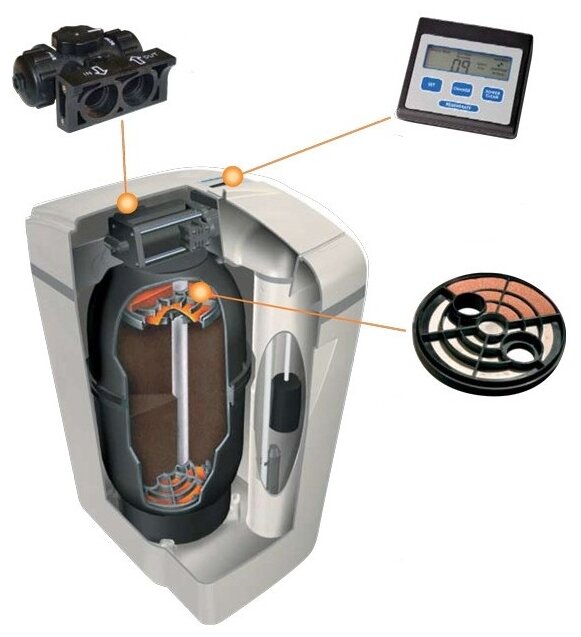
Умягчитель и обезжелезиватель для воды Waterboss 400 Homeguard поставляется с завода с уникальным серийным номером и гарантией от производителя. Система очистки использует для регенерации ресурса таблетированную соль. Промывка и обратный выход в рабочий режим происходит автоматически.
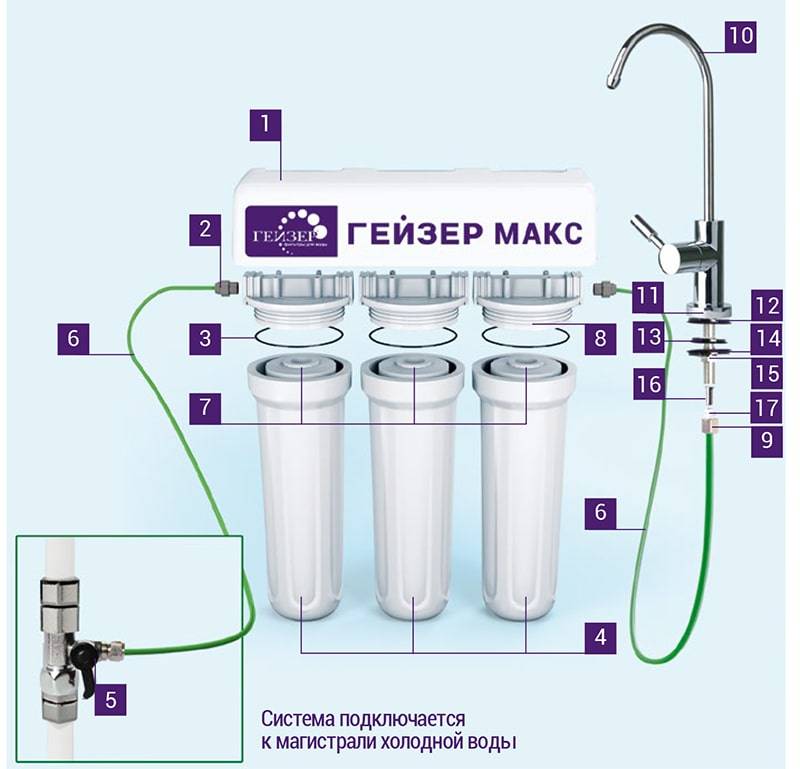
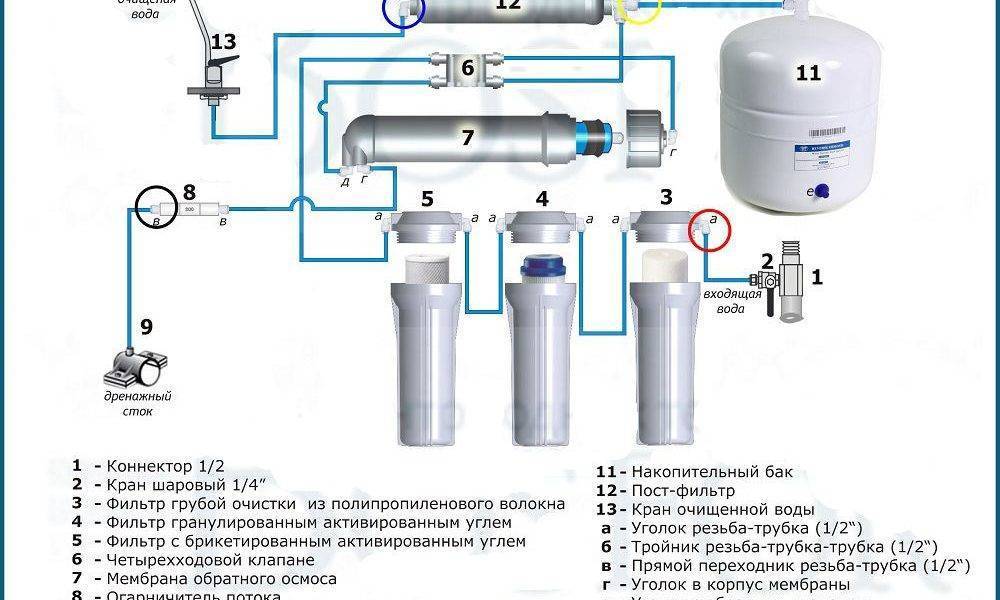
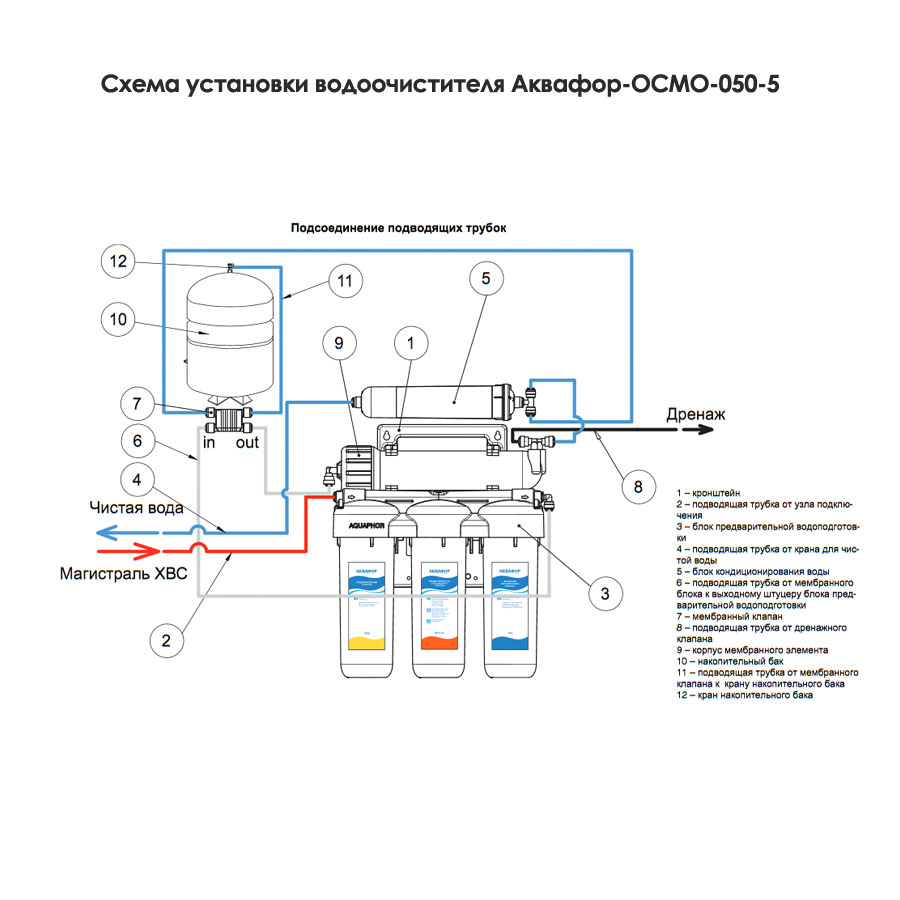
Вы можете дополнить схему очистки установив к умягчителю: предфильтры для защиты Waterboss от попадания в него механических загрязнителей и угольного постфильтра для улучшения органолептических свойств воды. Для получения небольших количеств питьевой воды на кухне установите под мойку обратноосмотические фильтры с отдельным краном серий ОСМО или DWM. Аквафор Waterboss 400 Homehuard — магистральная система очистки с высокой скоростью фильтрации.
![]()
-
Умягчитель произведен компанией Hague Quality Water International (США) по заказу АКВАФОР. Все используемые при изготовлении данной модели материалы безопасны для Вас, вашей семьи и окружающей среды.
-
Надежность системы подтверждается сертификатом NSF International (стандарт NSF/ANSI Standard 44 на снижение содержания бария, радия 226/228 и снижение жесткости).
-
Допущен к ввозу на территорию РФ в качестве реализации как фильтр для умягчения (снижения жесткости) воды при условии соблюдения санитарных норм и правил пользования. Проверен на соответствие техническому регламенту ТР ТС 010/2011.
Покупка Waterboss — это верное решение!
Заказать Аквафор Waterboss 400 Homeguard
8 (495) 414 17 48 (доб. 305)
sales@aquaphor.email
3.0
Rated 3 out of 5
3 out of 5 stars (based on 1 review)
Your overall rating
HOME GUARD HGNVK-68006 (01) PDF MANUAL
Click here to download HOME GUARD HGNVK-68006 (01) PDF MANUAL
HOME GUARD HGNVK-68006 (01) PDF MANUAL
FREE ENGLISH PDF
OPERATING INSTRUCTIONS
USER GUIDE – USER MANUAL
OWNER GUIDE – OWNER MANUAL
REFERENCE GUIDE – REFERENCE MANUAL
INSTRUCTION GUIDE – INSTRUCTION MANUAL
Your overall rating
- YouTube
HOME GUARD HGNVK-68006 (01) PDF MANUAL
HOME GUARD HGNVK-68006 (01) PDF MANUAL
- Manuals
- Brands
- Hague Quality Water Manuals
- Water Dispenser
- HomeGuard 400