Правила эксплуатации зеркального фотоаппарата Кэнон
Фотоаппарат – это достаточно сложное устройство, которое требует определенных знаний по эксплуатации. Тем, кто раньше уже пользовался любой фотокамерой, будет значительно проще освоить новую технику. Но люди, которые держат устройство в руках впервые, могут столкнуться с рядом сложностей. Ниже будет подробно рассказано о том, как пользоваться зеркальным фотоаппаратом Canon с момента первого включения и до подключения дополнительных аксессуаров.
Сборка устройства
Любой зеркальный фотоаппарат находится в заводской упаковке в разобранном виде. Если говорить точно, то тушка, объектив и аккумулятор лежат отдельно. В первую очередь следует снять защитную крышку с объектива и самого фотоаппарата. После этого объектив надевается на устройство. Чтобы это сделать, на объективе нужно найти белую точку и совместись ее с белой точкой на тушке. После этого объектив поворачивается по часовой стрелке до щелчка.
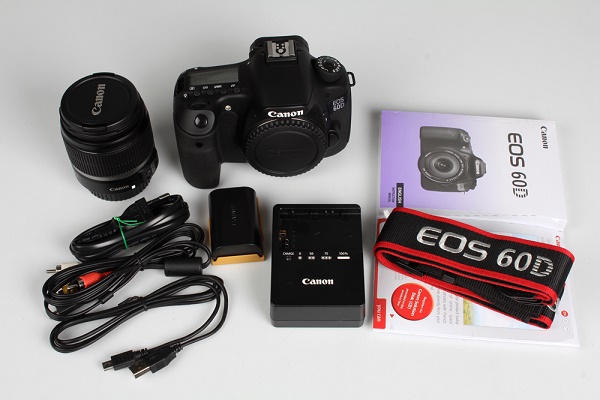
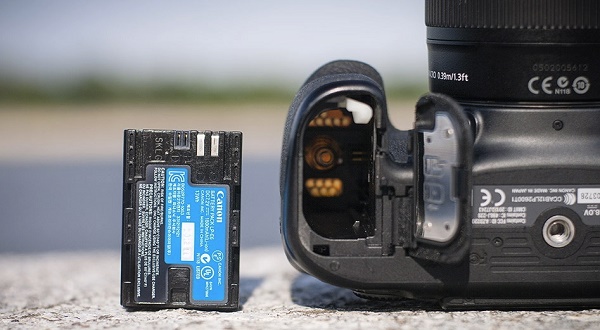
Второй этап – установка аккумулятора. Сделать это тоже достаточно легко. Отсек для аккумулятора находится на дне фотоаппарата и открывается специальной защелкой. Ее нужно потянуть вниз, и крышка отсека откинется. Аккумулятор помещается в фотоаппарат стороной с контактами. Вообще перепутать здесь невозможно, так как другой стороной он просто не влезет.
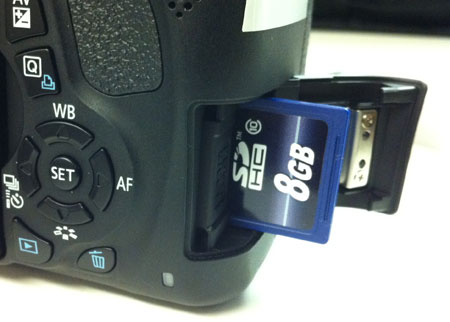
Разъем под карту памяти чаще всего скрывается под крышкой отсека аккумулятора, но у некоторых моделей он может быть расположен с правой стороны. Карта памяти вставляется стороной тоже контактами вперед.
Чаще всего фотоаппарат в коробке будет в разряженном виде, или аккумулятор будет иметь небольшой процент заряда. Перед началом эксплуатации лучше всего его полностью зарядить, чтобы он не сел во время первой настройки. Зарядка в большинстве случае осуществляется не путем подключения всего устройства к сети, а с помощью отдельного зарядного устройства для аккумулятора. Батарею следует извлечь и вставить в зарядку. В процессе будет гореть красная лампа, которая после окончания зарядки загорится зеленым. В редких моделях доступна функция зарядки через USB кабель. Современные батареи не требуют заряжать и сажать их полностью. У них нет эффекта памяти, как это было в старых типах аккумуляторов, поэтому батарея не боится частичной зарядки и разрядки.
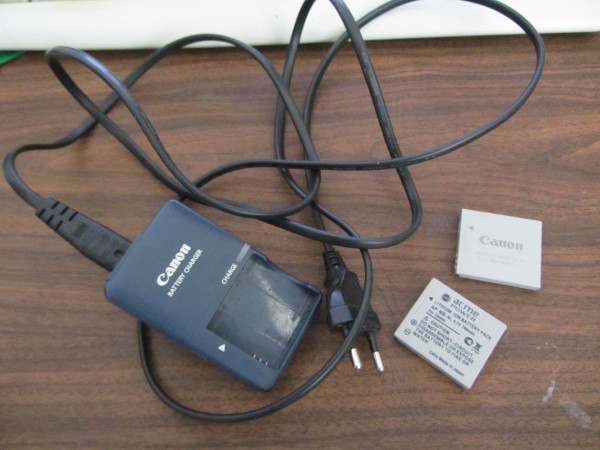
Совет! Чтобы зарядить фотоаппарат Canon, стоит использовать оригинальные зарядные устройства. Только так можно продлить срок службы аккумулятора и не испортить его раньше времени.
Первое включение
После того, как аккумулятор заряжен и одет объектив, самое время включить фотоаппарат. Перед началом его использования потребуется первоначальная настройка, во время которой осуществляется выставление даты, часового пояса, языка и других системных параметров. По сути, первоначальная настройка фотоаппарата Canon не требует особых знаний или дополнительных инструкций. Устройство выдает на дисплее информацию, и пользователю нужно просто действовать согласно предложенным действиям.
После того, как первое включение будет закончено, фотоаппарат в большинстве случае попросит отформатировать карту памяти. Если карта новая, то такая необходимость появится точно. Сделать это можно тремя способами:
- с помощью ноутбука или компьютера;
- при непосредственном запросе фотоаппарата;
- через настройки.
Первый вариант подробно рассматривать смысла нет, так как он не самый лучший. Дело в том, что любая техника форматирует носитель под себя, и иногда случается ситуация, что отформатированная в ноутбуке карта памяти не читается фотоаппаратом. По этой причине делать это лучше всего с помощью той техники, в которой карта будет использоваться.
В том случае, когда карта новая, и фотоаппарат не понимает, как с ней работать, он просто напишет на дисплее, что нужно отформатировать носитель, и предложит сделать это прямо сейчас. В таком случае пользователю нужно просто согласиться.
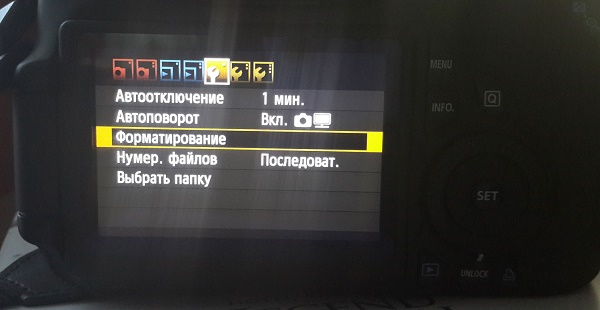
Если карта использовалась ранее или ее просто нужно почистить, то форматирование можно провести с помощью специальной опции в настройках. Для этого на самом устройстве следует нажать кнопку «Menu», после этого выбрать пункт с нарисованным ключом. В этом пункте меню можно менять все системные настройки, например, выставить заново дату, и в том числе отформатировать карту памяти.
Совет! Устройство предложит два типа форматирования: быстрое и обычное. Первый вариант подойдет для новых карт, второй для ранее использованных или тех, которые выдавали ошибки.
Режимы фотоаппарата
Любой фотоаппарат независимо от класса имеет разные режимы съемки. Часть из них автоматические, а вторая половина потребует настроить тот или иной параметр под конкретные условия съемки.
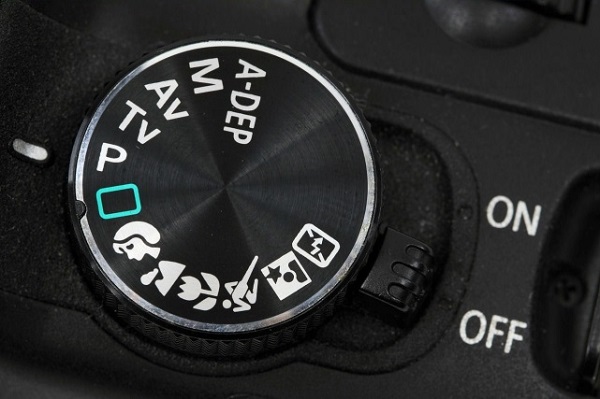
Все режимы фотоаппарата Canon можно увидеть на колесике прокрутки режимов — оно расположено сверху. Выбор режимов осуществляется его вращением. Белая короткая черта отмечает, какой режим выбран, соответственно, для выбора другого нужно прокрутить колесико до нужного варианта. Количество режимов может меняться в зависимости от модели. При этом уменьшиться или увеличиться они могут только за счет автоматических программ съемки. Полуавтоматические режимы неизменны — их всегда четыре.
К автоматическим режимам относятся макросъемка (цветок на колесе), спортивный режим (бегущий человек), портретная съемка (лицо человека), автомат (зеленый пустой прямоугольник) и другие. В этих режимах от пользователя требуется только навести камеру на объект и после фокусировки, которая также осуществляется автоматически, нажать на кнопку затвора.
Полуавтоматические режимы обозначены буквами M, Av, Tv, P. При работе с ними от фотографа потребуется определенное знание и понимание работы с диафрагмой и выдержкой. Однако и снимки здесь получатся более интересными.
Режим Р
Режим P или программный не отличается глобально от автоматики, но дает возможность пользователя регулировать диафрагму в ограниченных пределах. Также здесь есть возможность регулировать баланс белого.
Большинство опытных фотографов считают, что программный режим совершенно бесполезен. Производителя отмечают, что он поможет начинающим пользователям перейти от автоматики к ручным настройкам.
Режим Av
Av – приоритет диафрагмы. В данном случае пользователь сам выставляет размер диафрагмы, чтобы поэкспериментировать с количеством пропускаемого света и конечным изображением. Исходя из размера диафрагмы, камера сама выбирает время выдержки и делает снимок. С помощью данного режима можно влиять на глубину резкости.
Совет! При использовании не рекомендуется выставлять максимальные и минимальные значения диафрагмы, так как существенно повышается вероятность появления артефактов на фото.
С помощью данного режима можно настроить резкость и сделать размытый фон. Чтобы сделать предметы на фото более четкими, нужно выставить меньшее значение диафрагмы, если нужно размыть задний план и сфокусировать на главных объектах, то для выдержки выбирается большое значение.
Стоит понимать, что настройка диафрагмы зависит от объектива, который подключен к камере. Именно поэтому при смене оптики нужно выбрать не только объектив, но и задать под него новые параметры съемки. Еще один нюанс – на разных камерах один и тот же объектив может потребовать новых настроек.
Режим Tv
Tv – приоритет выдержки. В этом режиме пользователь выбирает время, которое диафрагма будет пропускать свет, соответственно сам размер диафрагмы выбирается автоматически. Использование такой функции незаменимо при съемке спортивных мероприятий или движущихся объектов. Также разное время выдержки может дать интересные эффекты, например, фото с проводкой. Режим понравится тем, кто любит фотографировать любое движение, независимо человек это, животное или природное явление.
Режим М
M – ручной режим. С его помощью пользователь получает доступ к одновременной настройке диафрагмы и выдержки. Подходит для тех, кто точно знает, что делает, и чего хочет добиться. Режим особенно хорошо ночью, когда камера из-за темноты не понимает какую диафрагму и выдержку ей следует выставлять. Пользователь может сам выбрать параметры, которые ему нужны. В таком режим чаще всего работают профессионалы. Начинающие пользователю просто не разберутся, как влияет тот или иной параметр на фото.
Системные настройки
Фотокамеры Canon имеют широкий диапазон настроек. Это может касаться непосредственно процесса съемки, а также настроек камеры, например, формата, в котором будет сохраняться снимок, его размера и др. В системных настройках можно поставить таймер, синхронизировать вспышку или отформатировать карту памяти.
Качество и размер фото
Чтобы выставить конкретные настройки фотографии, необходимо нажать кнопку «menu» и выбрать пункт с нарисованным фотоаппаратом. Именно здесь доступны все настройки связанные с фото.

В зависимости от модели пункт, в котором можно выбрать качество фотографии, будет называться по-разному. Чаще всего название говорит само за себя: «качество». В камере Canon варианты обозначены буквами L, M, S1, S2, S3, RAW и RAW+L. Все буквенные варианты (L,M,S) сохраняются в формате JPEG и между собой подразумевают ухудшение качества от L к S3. Меняется не только качество фото, но и его размер, а также то, сколько он занимает на карте памяти. Очевидно, что лучше всего в данном случае выбрать вариант L.
Форматы RAW и RAW+L – это максимальное качество фото и его размер. Снимки сохраняются в RAW и занимают много места. Фото в данном формате напоминают электронный негатив, который несет информацию о фото, но не само изображение. Снимки в этом формате требуют обязательной обработки на ПК.
Преимущество формата заключается в том, что в нем можно получить более гибкие варианты обработки снимка в профессиональном редакторе на компьютере. Минус – занимают много места и не открываются без специальной программы.
Фокусировка изображения
Фокусировка изображения в фотоаппарате может быть ручной или автоматической. В первом случае пользователь все делает самостоятельно с мощью поворотных колец на объективе. Во втором случае работает автоматика. Чтобы переключиться с одного объекта на другой, следует нажать переключатель на объективе AF-MF. Режим AF в свою очередь делится еще на два варианта.
- AF-S – фокусировка по кадрам. Ее смысл в том, что камера фокусируется на выбранном объекте при легком нажатии на кнопку затвора. Лучше всего он подходит для съемки неподвижных объектов. Чтобы настроить фокус на новый объект, необходимо отпустить кнопку и заново навести фотоаппарат на предмет съемки.
- AF-C – непрерывная фокусировка. Ее смысл в том, что при нажатии на кнопку камера продолжает следить за объектом, даже если он перемещается. Очевидно, что удобнее использовать такой тип автофокуса при съемке спортивных событий.
Немаловажный момент – выбор точки фокусировки. Современные камеры предлагают от 9 до 50 точек. При этом есть главный объект, на котором осуществляется фокус, остальные точки фокусируются по другим предметам. Когда фотограф смотрит в видоискатель, он видит несколько точек, активная выделена красным цветом. Чтобы сделать активной точку фокусировки, которая совмещена с объектом, нужно использовать маленькое колесико на камере или кнопки навигации. На первый взгляд может показаться, что гораздо проще сместить камеру и таким образом совместить точки. Но есть нюанс: при изменении положения камеры меняется экспозиция, то есть вся задумка может быть испорчена. Используя клавиши навигации, пользователь может сделать несколько снимков одного объекта, но при этом фокусироваться каждый раз на новой точке.
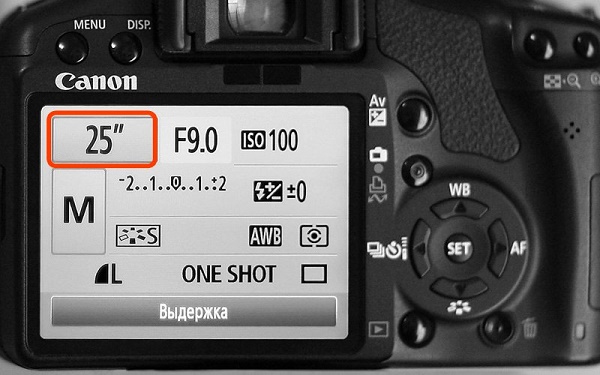
Работа с выдержкой
Выдержка фотоаппарата – это параметр, который измеряется в секундах, а точнее долях секунды. Физический смысл выдержки заключается в том, что это время, за которое свет проходит сквозь диафрагму и попадает на матрицу. Очевидно, что чем больше времени свет попадает на матрицу, тем светлее получится снимок. Это важно при съемке в условиях плохого освещения, но есть и обратная сторона медали. Большое количество света может сделать снимок засвеченным и дать размытие в кадре. Чтобы получить эффект смазывания, следует поставить выдержку более длинную, если требуется резкость, то время выставляется минимальное. Регулировать выдержку можно в ручном режиме или приоритете выдержки.
Что такое баланс белого
Баланс белого – это корректность отображения цветов на снимке. Как известно, цветовой спектр может иметь более холодные или теплые значения.
Примером может служить фотография человека. При нормальном балансе белого кожа лица будет естественной. Если спектр скатывается к теплу, то кожа будет желтить, если к холодной части, то все фото будет отдавать синевой.
Очевидно, что в зависимости от освещения спектр может меняться, и фото будет иметь неестественные цвета. Солнечные лучи или лампа накаливания имеют теплые тона, а вот лампа дневного освещения делает изображение «холодным». И вот именно в таких ситуациях требуется регулировка баланса белого света.
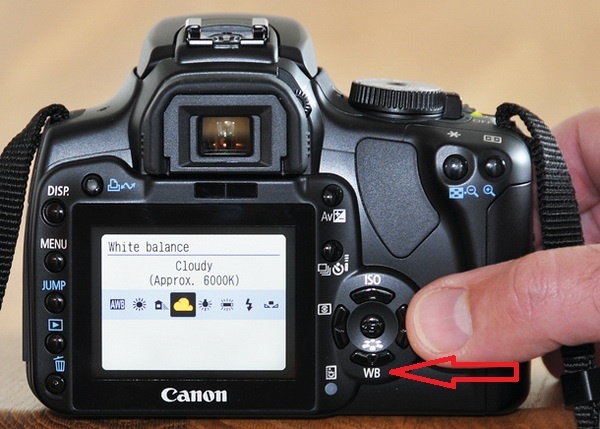
Все камеры Canon имеют специальную кнопку WB, которая открывает меню настройки баланса белого цвета. Здесь есть вариант выбрать уже предустановленные режимы, которые обозначены схематичными рисунками. Например, солнце означает оптимальные настройки для съемки на улице в дневное время. Аналогичным образом выбираются автонастройки для других ситуаций.
Однако камера дает возможность не только использовать предустановленные варианты, но и осуществить регулировку самостоятельно. Этот процесс аналогичен использованию светофильтров и не подойдет любителям. Для этого необходимо нажать кнопку «menu», выбрать пункт с нарисованной камерой и там найти строку «Сдвиг ББ». Далее на дисплее открывается экран коррекции, который поделен на четыре части двумя прямыми. Каждая из них обозначена буквами:
- A — янтарь,
- M — пурпур,
- G — зеленый цвет.
Сдвиг курсора (на экране отображается, как черный квадрат) приводит к усилению одного из этих цветов или их комбинации.
Как выставить дату на фото
Иногда бывают ситуации, когда требуется, чтобы на фотографии отображалась дата и время снимка. В современных зеркальных фотоаппаратах такой функции уже нет, так как в целом дата портит фотографию, и при особой необходимости ее можно поместить на фото при распечатке снимков. Программа печати извлекает дату и время из информации о фотографии и помещает в угол. В более простых устройствах, например, компактных фотоаппаратах, данная функция есть. Выставить дату можно в меню настроек фотографии. Следует найти пункт «Отображать дату и время на фото». При этом предварительно пользователь сможет настроить формат даты и времени.
Фото с таймером
Сделать селфи на зеркальном фотоаппарате достаточно сложно. Именно для этого производители предусмотрели таймер, который выставляется на несколько секунд и делает снимок по истечению этого времени. Для использования функции фотоаппарат необходимо предварительно надежно установить, в идеале на штатив, выбрать экспозицию, проверить, чтобы все попало в кадр, и после этого выбрать таймер и время срабатывания с помощью специальной кнопки на корпусе. Кнопка отмечена значком часов. Благодаря тому, что устройство издает звуковой сигнал после каждой секунды, можно точно знать через, сколько сработает затвор и успеть занять свое место.

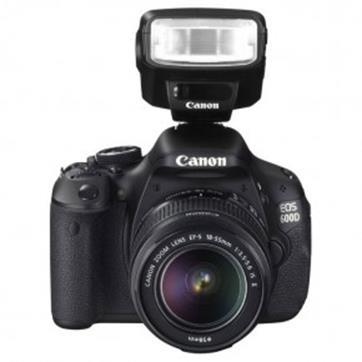
Использование вспышки
Вспышки для фотоаппарата бывают двух типов – встроенная и внешняя. Первая встроена непосредственно в тушку камеры и открывается при необходимости. В автоматическом режиме процесс регулируется самой камерой, в ручном режиме включить вспышку можно с помощью специальной кнопки (молния), которая расположена обычно рядом с самой вспышкой.
Как работает вспышка
Основной момент, который следует знать о работе вспышки – это ее мощность. Очевидно, что светить с одной мощностью она не может, так как уровень освещения может быть разный. По этой причине вспышка работает в три этапа:
- определение уровня освещения;
- экспонирование кадра;
- снимок.
Иными словами, вспышка срабатывает очень быстро три раза подряд. При этом снимок делается на третью вспышку, и около 10% людей имеют высокую чувствительность к свету и замечают первые две вспышки. Таким образом, на фото такие люди получаются с закрытыми или полузакрытыми глазами. Процесс определения и экспонирования называется TTL. Профессиональные фотографы знают, что TTL можно отключить, и тогда мощность приходится подбирать вручную. Это достаточно сложно, но более удобно, и в данном случае можно выбрать оптимальную мощность вспышки.
Особенности внешней вспышки
Внешняя вспышка имеет ряд преимуществ перед встроенной.
- Она более мощная, может быть направлена под углом или сверху, что делает освещение и тени более естественными.
- Еще одно достоинство – дальность действия. Стандартная вспышка может осветить объект в пределах 4-5 метров перед собой.
- Внешняя вспышка обеспечивает более гибкую настройку освещения.
Совет! При настройке вспышки необходимо выставить значение выдержки. Учитывая, что в момент снимка света на объект поступать будет больше, выдержка большая не нужна, кроме случаев, когда это делается для получения необычного эффекта. По мнению опытных фотографов, оптимальное время выдержки при съемке со вспышкой – 1/200-1/250.
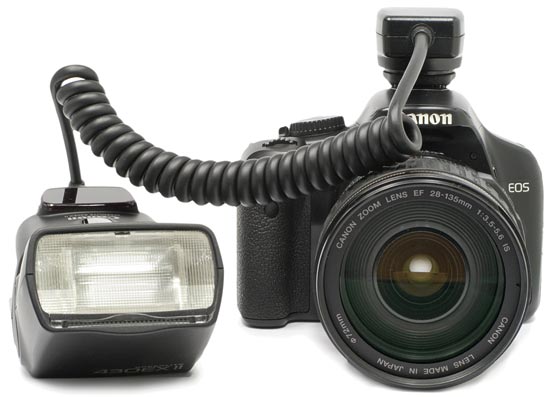
Есть два варианта внешней вспышки – беспроводная и проводная. Второй вариант подключается непосредственно к камере через специальный разъем для подключения. Выглядит он как металлическое гнездо на верхней части фотоаппарата. Нередко он закрыт пластиковой заглушкой. Подключить вспышку можно с помощью специального кабеля, который позволит немного отдалить вспышку от камеры. Длина кабеля у компании Canon составляет 60 см. Беспроводной вариант самый удобный, так как фотографу не мешают шнуры. В данном случае в паз для вспышки вставляется специальный передатчик, который отправляет на вспышку сигнал о том, что нужно сработать. На этом передатчике находятся все кнопки управления мощностью.
Что такое синхронизация
В настоящее время синхронизация вспышки потеряла свою актуальность, так как весь процесс является автоматическим. Задача пользователя — просто сделать внешнюю вспышку зависимой от основной. Перед тем, как подключить внешнюю вспышку к фотоаппарату Canon, пользователю нужно в настойках фотоаппарата выставить «главной» его штатную вспышку. Для этого следует несколько секунд подержать кнопку «zoom», далее с помощью колесика прокрутки нужно выбрать надпись «master» и подтвердить выбор нажатием на центральную кнопку. На вспышке нужно аналогичным образом выбрать «slave». Теперь она подчиняется основной и реагирует на ее импульсы.
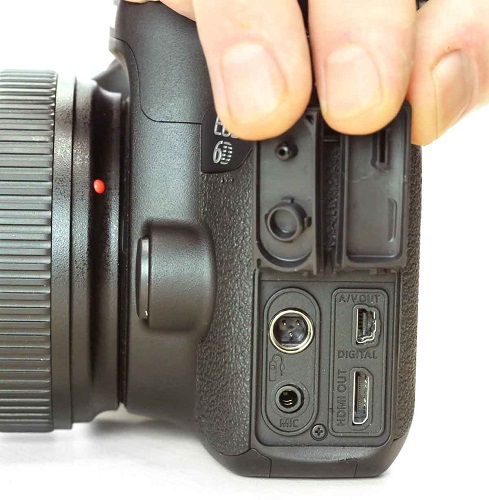
Подключение микрофона
Для профессиональной съемки на видео праздника обязательно потребуется внешний микрофон. Большинство современных зеркальных фотоаппаратов имеют целый набор необходимых разъемов. Здесь есть аудио-видеовыход, разъем для микрофона, mini-HDM и другие. Соответственно, подключить микрофон к фотоаппарату Canon можно через разъем с надписью «mic». Все настройки в камере сводятся только к тому, чтобы выбрать, в каком варианте нужно писать звук – моно или стерео. Этот пункт находится в меню настроек в разделе видео.
Как проверить пробег фотоаппарата
Пробег фотоаппаратов – это количество срабатываний затвора, что в свою очередь дает понять степень изношенности аппарата.
Для бюджетных устройств нормальным параметром является 15 тысяч кадров, после этого в любой момент можно ждать поломки, хотя это и не значит, что она случится в 100% случаев. У моделей дорогого и среднего сегмента данный параметр достигает 150 и даже 200 тысяч.
Долгое время узнать пробег фотоаппарата Canon можно было только посредством разбора тушки. Очевидно, что способ не самый простой и опасный, ведь разобрать легко, а сделать, как было — не очень. В настоящее время появились более простые способы посмотреть пробег, а именно воспользоваться компьютерными программами.
Информацию о пробеге можно увидеть либо зашитыми в фотографию, либо непосредственно в тушке устройства. Следует сразу отметить, что фирма Canon предпочитает не вставлять такую информацию в фотографии. Есть ограниченное число моделей, которые зашивают данные в фотоаппарат. Таким образом, поможет только проверка самого устройства. Лучшими вариантами в настоящее время являются программы EOSMSG и EOSInfo. Программы распространяются бесплатно и для их использования достаточно только установить их на ПК. После этого камера Canon подключается с помощью USB кабеля. В некоторых случаях ноутбук может не увидеть камеру, тогда потребуется установка драйверов или специальной программы, которая помимо подключения обеспечивает управление фотоаппаратом Canon с компьютера. После подключения фотокамеры к ПК и запуска программы в открывшемся окне нужно найти пункт ShutterCount (ShutCount), который и показывает количество срабатываний затвора.
Некоторые камеры не имеют возможности проверить этот параметр в домашних условиях. В таком случае лучшим решением будет обращение в сервисный центр, чтобы диагностика показала состояние устройства. Так стоит поступить, если планируется приобрести камеру с рук, а никакой информации о предыдущей ее эксплуатации нет. Сервисный центр сможет дать ответ, насколько камера хорошо сохранилась, и сколько еще сможет прослужить.
Зеркальные фотоаппараты – это хрупкие устройства, которые могут выйти из строя по самым разным причинам. Чтобы избежать поломки, нужно аккуратно относиться к фотоаппарату и оптике, использовать защитный чехол, чистить поверхности линзы, а также при раздельном хранении оптики и тушки закрывать места соединения специальной крышкой.
- Попадание влаги. Влага является очень опасным веществом для фотоаппарата. Устройству не обязательно попадать под дождь или намокать, чтобы испортиться. Его длительное нахождение во влажном помещении может привести к окислению внутренних деталей и поломке. Если возникли опасения, что произошло что-то подобное, то следует положить устройство в теплое и сухое место, а потом отнести в мастерскую.
- Механические повреждения. Удары и падения не способствуют нормальной работе зеркальной камеры. Самыми хрупкими элементами в ней является зеркало, которое легко может разбиться, а также объектив, в котором может выйти из строя система фокусировки. Если камера не может навести фокус, то в результате удара произошла поломка в объективе. При этом в ремонт нести лучше всего все устройство.
- Попадание частиц пыли. Частые неисправности фотоаппарата Canon связаны с попаданием песка и пыли внутрь камеры. Это может привести к полной поломке, но гораздо чаще к посторонним шумам во время работы объектива (фокусировки) или его блокировке. В данном случае поможет только чистка фотоаппарата, и лучшим решением станет обращение в профессиональный сервисный центр.
- Несоблюдение теплового режима. Любая камера имеет диапазон рабочих температур. При их несоблюдении устройство вполне может выйти из строя из-за сгорания того или иного механизма. Самостоятельно такую проблему решить невозможно.
- Устройство выдает ошибки. Надпись «busy» может появиться при использовании карты памяти с низкой скоростью, в случае, если внешняя вспышка не успела зарядиться от тушки. В целом перевести эту надпись можно, как «занято»: камера намекает, что какой-то процесс еще не завершен, и нужно немного подождать. Если камера не видит карту памяти или отказывается сохранять на нее данные, то следует провести форматирование или посмотреть, не стоит ли на карте блокировка.
Продлить срок службы камеры очень просто. В первую очередь необходимо приобрести чехол, который позволит защитить устройство от ударов и падений.
Совет! Не стоит перевозить камеру и объектив в собранном виде. Лучше всего на момент транспортировки разбирать фотоаппарат.
Если камера долго не используется, то батарею лучше вытащить и периодически ее разряжать и заряжать. Камеру следует хранить в теплом и сухом месте, а также избегать попадания на нее пыли или песка. Для чистки устройства нужно использовать только специальные наборы, которые позволяют бережно удалить пыль и мусор с объектива и прочих узлов техники.

Зеркальная камера – это серьезное устройство, которое требует к себе такого же подхода. Нельзя просто купить камеру и начать снимать. Чтобы понять, как ей пользоваться, разобраться с функциями и настройками, продлить срок службы, не нужно спешить на дорогостоящие курсы. Для начала вполне хватит знакомства с инструкцией, где подробно расписано, что и как можно делать с фотоаппаратом.
Здесь можно скачать инструкции по эксплуатации и руководства пользователя к фотоаппаратам Canon.
Canon PowerShot G9 X — руководство пользователя камеры
Модель: Фотоаппарат Canon PowerShot G9 X Год выпуска: 2015 Количество страниц: 210 Язык: русский Формат: pdf Размер: 14,1 Mb Описание: Профессиональное качество в изящном исполнении. Canon PowerShot G9 X — тонкая и изящная камера, которая позволяет вам […]
Canon PowerShot G5 X — руководство пользователя камеры
Модель: Фотоаппарат Canon PowerShot G5 X Год выпуска: 2015 Количество страниц: 217 Язык: русский Формат: pdf Размер: 15,7 Mb Описание: Профессиональное качество, максимальный контроль над процессом съемки и несравненное удобство в работе — именно […]
Canon IXUS 160, IXUS 162, IXUS 165, IXUS 170, IXUS 172 — руководство пользователя камеры
Модель: Фотоаппараты Canon IXUS 160, Canon IXUS 162, Canon IXUS 165, Canon IXUS 170, Canon IXUS 172 Год выпуска: 2015 Количество страниц: 117 Язык: русский Формат: pdf Размер: 5,7 Mb Описание: Canon IXUS 160 — стильная универсальная камера IXUS 20 МП с функцией Smart Auto достаточно […]
Canon PowerShot SX710 HS — инструкция по эксплуатации
Модель: Фотокамера Canon PowerShot SX710 HS Год выпуска: 2015 Количество страниц: 177 Язык: русский Формат: pdf Размер: 13,6 Mb Описание: Фотоаппарат Canon PowerShot SX710 HS — это компактная камера с мощным суперзумом, позволяющим запечатлеть все яркие […]
Canon PowerShot SX610 HS — инструкция по эксплуатации
Модель: Фотокамера Canon PowerShot SX610 HS Год выпуска: 2015 Количество страниц: 162 Язык: русский Формат: pdf Размер: 8,5 Mb Описание: Фотоаппарат Canon PowerShot SX610 HS — это компактная камера с мощным суперзумом, позволяющим запечатлеть все яркие […]
Canon PowerShot SX530 HS — инструкция по эксплуатации
Модель: Фотокамера Canon PowerShot SX530 HS Год выпуска: 2015 Количество страниц: 169 Язык: русский Формат: pdf Размер: 10,4 Mb Описание: Фотоаппарат Canon PowerShot SX530 HS — это компактная камера с мощным суперзумом, позволяющим запечатлеть все яркие […]
Canon PowerShot SX410 IS, PowerShot SX412 IS — инструкция по эксплуатации
Модель: Фотокамеры Canon PowerShot SX410 IS, Canon PowerShot SX412 IS Год выпуска: 2015 Количество страниц: 118 Язык: русский Формат: pdf Размер: 4,8 Mb Описание: Простая и удобная в использовании семейная компактная камера Canon PowerShot SX410 IS с зумом 40x обеспечивает […]
Canon PowerShot N100 — инструкция по эксплуатации
Модель: Фотокамера Canon PowerShot N100 Год выпуска: 2014 Количество страниц: 211 Язык: русский Формат: pdf Размер: 7,5 Mb Описание: Благодаря инновационной конструкции с дополнительной камерой, расположенной с обратной стороны, отличному качеству […]
Canon PowerShot N2 — инструкция по эксплуатации
Модель: Фотокамера Canon PowerShot N2 Год выпуска: 2014 Количество страниц: 140 Язык: русский Формат: pdf Размер: 8,1 Mb Описание: Создавайте и делитесь сюжетами из вашей жизни, снятыми с разных ракурсов на камеру Canon PowerShot N2. Творческие функции, […]
Canon PowerShot G3 X — инструкция по эксплуатации
Модель: Фотокамера Canon PowerShot G3 X Год выпуска: 2015 Количество страниц: 219 Язык: русский Формат: pdf Размер: 15,9 Mb Описание: С камерой Canon PowerShot G3 X, оснащенной универсальным объективом с 25x зумом и первоклассным датчиком изображения типа 1.0, вы […]
Canon PowerShot A480 — инструкция по эксплуатации
Модель: Фотокамера Canon PowerShot A480 Год выпуска: 2009 Количество страниц: 127 Язык: русский Формат: pdf Размер: 10,7 Mb Описание: Canon PowerShot A480 — цифровая фотокамера с разрешением 10 мегапикселя, имеющая компактный корпус и доступная в нескольких […]
Canon IXUS 275 HS — инструкция по эксплуатации
Модель: Фотокамера Canon IXUS 275 HS Год выпуска: 2015 Количество страниц: 162 Язык: русский Формат: pdf Размер: 8,1 Mb Описание: Компактный фотоаппарат Canon IXUS 275 HS — это ультратонкая камера с поддержкой беспроводных подключений, предназначенная […]
Canon EOS M3 — инструкция по эксплуатации
Модель: Фотокамера Canon EOS M3 Год выпуска: 2015 Количество страниц: 201 Язык: русский Формат: pdf Размер: 11,1 Mb Описание: Высокая мощность и компактный дизайн. Творческий подход и удобство использования. Камера Canon EOS M3 — это высокая […]
Canon EOS 5DS, EOS 5DS R — инструкция по эксплуатации
Модель: Фотокамеры Canon EOS 5DS, EOS 5DS R Год выпуска: 2015 Количество страниц: 534 Язык: русский Формат: pdf Размер: 19.2 Mb Описание: Canon EOS 5DS, EOS 5DS R — это цифровая однообъективная зеркальная камера, оснащенная полноразмерным (прибл. 36,0 x 24,0 мм) […]
Canon EOS-1V — инструкция по эксплуатации
Модель: Фотокамера Canon EOS-1V Количество страниц: 139 Язык: русский Формат: pdf Размер: 3,9 Mb Описание: Профессиональная зеркальная фотокамера Canon EOS-1V пришла на смену модели EOS-1N, которая отлично зарекомендовала себя в течении долгих лет […]
Canon EOS-1N — инструкция по эксплуатации
Модель: Фотокамера Canon EOS-1N Количество страниц: 111 Язык: русский Формат: pdf Размер: 2,1 Mb Описание: Тысячи профессиональных фотографов всего мира являются преданными поклонниками модели EOS-1 — универсального, высокоточного аппарата, […]
Canon Digital IXUS 300, PowerShot A10, PowerShot A20 — инструкция по эксплуатации
Модель: Фотокамеры Canon Digital IXUS 300, Canon PowerShot A10, Canon PowerShot A20 Количество страниц: 17 Язык: русский Формат: pdf Размер: 2,7 Mb Описание: Основой конструкции камеры Digital IXUS 300 является 3-кратный зум-объектив и матрица с 2,1 млн. пикселов, что […]
Canon EOS 5000, EOS 5000QD — инструкция по эксплуатации
Модель: Пленочные фотокамеры Canon EOS 5000, Canon EOS 5000QD Количество страниц: 63 Язык: русский Формат: pdf Размер: 1,2 Mb Описание: Canon EOS 5000 — легкая и компактная однообъективная зеркальная фотокамера. Широкая рабочая зона […]
Canon EOS 3000V — инструкция по эксплуатации
Модель: Пленочная фотокамера Canon EOS 3000V Год выпуска: 2003 Количество страниц: 13 Язык: русский Формат: pdf Размер: 1,3 Mb Описание: Canon EOS 3000V — малоформатный однообъективный зеркальный фотоаппарат с автофокусом, рассчитанный на […]
Canon EOS 3000N — инструкция по эксплуатации
Модель: Пленочная фотокамера Canon EOS 3000N Год выпуска: 2001 Количество страниц: 84 Язык: русский Формат: pdf Размер: 2,7 Mb Описание: Canon EOS 3000N — малоформатный однообъективный зеркальный фотоаппарат с автофокусом, рассчитанный на […]
Canon EOS 3000 — инструкция по эксплуатации
Модель: Пленочная фотокамера Canon EOS 3000 Количество страниц: 72 Язык: русский Формат: pdf Размер: 1,4 Mb Описание: Canon EOS 3000 является очень компактным автофокусным однообъективным зеркальным фотоаппаратом. Его можно использовать для съемки […]
Canon EOS 300V — инструкция по эксплуатации
Модель: Пленочная фотокамера Canon EOS 300V Количество страниц: 60 Язык: русский Формат: pdf Размер: 1,2 Mb Описание: Новый фотоаппарат Canon EOS 300V обращает на себя внимание, в первую очередь, внешним видом. Полностью серебристый корпус с […]
Canon EOS 300, EOS 300QD — инструкция по эксплуатации
Модель: Пленочные фотокамеры Canon EOS 300, Canon EOS 300QD Год выпуска: 1999 Количество страниц: 75 Язык: русский Формат: pdf Размер: 2,5 Mb Описание: Canon EOS 300 является очень компактным автофокусным однообъективным зеркальным фотоаппаратом. Его можно […]
Canon EOS 100 — инструкция по эксплуатации
Модель: Пленочная фотокамера Canon EOS 100 Год выпуска: 1991 Количество страниц: 80 Язык: русский Формат: pdf Размер: 2,2 Mb Описание: Фотоаппарат Canon EOS 100 является однообъективной зеркальной камерой с автофокусировкой и набором со временных […]
Canon EOS 50, EOS 50E — инструкция по эксплуатации
Модель: Пленочные фотокамеры Canon EOS 50, Canon EOS 50E Год выпуска: 1995 Количество страниц: 101 Язык: русский Формат: pdf Размер: 3,0 Mb Описание: Фотоаппарат для тех, кто знает, чего хочет. Автофокусировка по полю из 3 точек. 6-зонный оценочный замер. […]
Canon EOS 33 — инструкция по эксплуатации
Модель: Пленочная фотокамера Canon EOS 33 Количество страниц: 104 Язык: русский Формат: pdf Размер: 2,4 Mb Описание: Canon EOS 33 представляет собой автофокусную однообъективную зеркальную камеру с семью фокусировочными точками. Широкий набор […]
Canon EOS 30V, EOS 33V — инструкция по эксплуатации
Модель: Пленочные фотокамеры Canon EOS 30V, Canon EOS 33V Год выпуска: 2004 Количество страниц: 100 Язык: русский Формат: pdf Размер: 6,5 Mb Описание: Canon EOS 30V представляет собой автофокусную однообъективную зеркальную камеру с управляемой глазом […]
Canon EOS 5 — инструкция по эксплуатации
Модель: Пленочная фотокамера Canon EOS 5 Год выпуска: 1992 Количество страниц: 81 Язык: русский Формат: pdf Размер: 2,1 Mb Описание: Canon EOS 5 — малоформатный однообъективный зеркальный фотоаппарат с автофокусом и автоматическим управлением […]
Canon EOS-3 — инструкция по эксплуатации
Модель: Пленочная фотокамера Canon EOS-3 Год выпуска: 1998 Количество страниц: 146 Язык: русский Формат: pdf Размер: 2,8 Mb Описание: Canon EOS-3 — профессиональный малоформатный однообъективный зеркальный фотоаппарат семейства Canon EOS, впервые […]
Canon PowerShot SX700 HS — руководство пользователя
Модель: Компактная фотокамера Canon PowerShot SX700 HS Год выпуска: 2014 Количество страниц: 196 Язык: русский Формат: pdf Размер: 8,8 Mb Описание: Компактный фотоаппарат Canon PowerShot SX700 HS – верный спутник в путешествиях и экспедициях, благодаря малому […]
Canon PowerShot SX600 HS — руководство пользователя
Модель: Компактная фотокамера Canon PowerShot SX600 HS Год выпуска: 2014 Количество страниц: 162 Язык: русский Формат: pdf Размер: 6,1 Mb Описание: Компактный фотоаппарат Canon PowerShot SX600 HS обеспечит результат высочайшего качества благодаря хорошему […]
Canon PowerShot SX520 HS — руководство пользователя
Модель: Компактная фотокамера Canon PowerShot SX400 IS Год выпуска: 2014 Количество страниц: 139 Язык: русский Формат: pdf Размер: 8,2 Mb Описание: Компактный цифровой фотоаппарат Canon PowerShot SX520 HS – это универсальная камера на разные случаи жизни, […]
Canon PowerShot SX400 IS — руководство пользователя
Модель: Компактная фотокамера Canon PowerShot SX400 IS Год выпуска: 2014 Количество страниц: 120 Язык: русский Формат: pdf Размер: 6,0 Mb Описание: Фотоаппарат Canon PowerShot SX400 IS – это компактная и производительная камера с 30-кратным зумом и невероятным […]
Canon PowerShot SX60 HS — руководство пользователя
Модель: Компактная фотокамера Canon PowerShot SX60 HS Год выпуска: 2014 Количество страниц: 203 Язык: русский Формат: pdf Размер: 12,0 Mb Описание: Цифровой фотоаппарат Canon PowerShot SX60 HS обеспечивает высокую детализацию при съемке удаленных объектов и […]
Canon PowerShot S200 — руководство пользователя
Модель: Компактная фотокамера Canon PowerShot S200 Год выпуска: 2014 Количество страниц: 182 Язык: русский Формат: pdf Размер: 8,0 Mb Описание: Компактная камера Canon PowerShot S200 оснащена матрицей 10,1 мегапикселей при размере 1/1,7”. 24-мм 5-кратный зум […]
Canon PowerShot N — руководство пользователя
Модель: Компактная фотокамера Canon PowerShot N Год выпуска: 2013 Количество страниц: 134 Язык: русский Формат: pdf Размер: 5,0 Mb Описание: Компактный фотоаппарат Canon PowerShot N, несмотря на свои довольно скромные размеры, дает пользователю серьезные […]
Canon PowerShot G7 X — руководство пользователя
Модель: Компактная фотокамера Canon PowerShot G7 X Год выпуска: 2014 Количество страниц: 202 Язык: русский Формат: pdf Размер: 14,3 Mb Описание: Canon Powershot G7 X — компактная профессиональная камера, которая легко может поместиться в кармане. Она […]
Canon PowerShot G1 X Mark II — руководство пользователя
Модель: Компактная фотокамера Canon PowerShot G1 X Mark II Год выпуска: 2014 Количество страниц: 237 Язык: русский Формат: pdf Размер: 10,0 Mb Описание: Благодаря большому датчику изображения и быстрому зум-объективу f/2 камера Canon PowerShot G1 X Mark II обладает […]
Canon PowerShot D30 — руководство пользователя
Модель: Компактная фотокамера Canon PowerShot D30 Год выпуска: 2014 Количество страниц: 152 Язык: русский Формат: pdf Размер: 7,2 Mb Описание: Компактный фотоаппарат Canon PowerShot D30 это не просто стильный аксессуар, но и надежный спутник для любителей […]
Canon IXUS 265 HS — руководство пользователя
Модель: Компактная фотокамера Canon IXUS 265 HS Год выпуска: 2014 Количество страниц: 161 Язык: русский Формат: pdf Размер: 6,3 Mb Описание: Очень стильный компактный фотоаппарат Canon IXUS 265 HS понравится своим ярким современным обликом, сочетающимся […]
Canon IXUS 157, IXUS 155, IXUS 150, IXUS 147, IXUS 145 — руководство пользователя
Модель: Компактные фотокамеры Canon IXUS 157, Canon IXUS 155, Canon IXUS 150, Canon IXUS 147, Canon IXUS 145 Год выпуска: 2014 Количество страниц: 118 Язык: русский Формат: pdf Размер: 4,4 Mb Описание: Со стильной фотокамерой Canon IXUS 157 вы не упустите ни единой детали, как бы […]
Canon EOS D30 — инструкция по эксплуатации
Модель: Зеркальная фотокамера Canon EOS D30 Год выпуска: 2000 Количество страниц: 74 Язык: русский Формат: pdf Размер: 2,6 Mb Описание: Canon EOS D30 — высококачественная, высокоточная, цифровая однообъективная камера с сенсором CMOS, с общим […]
Canon EOS 1200D — инструкция по эксплуатации
Модель: Зеркальная фотокамера Canon EOS 1200D Год выпуска: 2014 Количество страниц: 342 Язык: русский Формат: pdf Размер: 13,3 Mb Описание: Canon EOS 1200D — это высокотехнологичная цифровая однообъективная зеркальная камера, оснащенная датчиком […]
Canon EOS 70D — инструкция по эксплуатации
Модель: Зеркальная фотокамера Canon EOS 70D Год выпуска: 2013 Количество страниц: 468 Язык: русский Формат: pdf Размер: 16,2 Mb Описание: Canon EOS 70D — это высокотехнологичная цифровая однообъективная зеркальная камера, оснащенная датчиком CMOS […]
Canon EOS 7D Mark II — инструкция по эксплуатации
Модель: Зеркальная фотокамера Canon EOS 7D Mark II Год выпуска: 2014 Количество страниц: 550 Язык: русский Формат: pdf Размер: 18,4 Mb Описание: Canon EOS 7D Mark II — это цифровая однообъективная зеркальная камера, оснащенная датчиком изображения CMOS […]
Canon EOS-1Ds Mark II — инструкция по эксплуатации
Модель: Зеркальная фотокамера Canon EOS-1Ds Mark II Год выпуска: 2004 Количество страниц: 180 Язык: русский Формат: pdf Размер: 2,5 Mb Описание: Камера Canon EOS-1Ds Mark II — это цифровая однообъективная зеркальная автофокусная камера с большой (36 х 24 мм) […]
Canon EOS-1D Mark II — инструкция по эксплуатации
Модель: Зеркальная фотокамера Canon EOS-1D Mark II Год выпуска: 2004 Количество страниц: 180 Язык: русский Формат: pdf Размер: 10,3 Mb Описание: Камера Canon EOS-1D Mark II — это цифровая однообъективная зеркальная автофокусная камера с большой […]
Canon EOS 760D — инструкция по эксплуатации
Модель: Зеркальная фотокамера Canon EOS 760D Год выпуска: 2015 Количество страниц: 430 Язык: русский Формат: pdf Размер: 18,6 Mb Описание: Canon EOS 760D — добейтесь новых высот в мире фотосъемки с датчиком изображения 24,2 МП, настраиваемой 19-точечной […]
Canon EOS 750D — инструкция по эксплуатации
Модель: Зеркальная фотокамера Canon EOS 750D Год выпуска: 2015 Количество страниц: 416 Язык: русский Формат: pdf Размер: 16,7 Mb Описание: Canon EOS 750D — с легкостью повысьте качество своих фотографий благодаря последним технологиям в цифровых […]
Canon PowerShot SX510 HS — руководство пользователя
Модель: Компактная фотокамера Canon PowerShot SX510 HS Год выпуска: 2013 Количество страниц: 167 Язык: русский Формат: pdf Размер: 8,2 Mb Описание: Портативная полупрофессиональная мини-камера с 30-кратным зумом Canon PowerShot SX510 HS оборудована системой HS, […]
1
2
3
…
5
»
-
Contents
-
Table of Contents
-
Troubleshooting
-
Bookmarks
Quick Links
ENGLISH
Camera User Guide
Please read the Read This First section (page 5).
Please also read the Software Starter Guide and the
Direct Print User Guide.
Related Manuals for Canon PC1057
Summary of Contents for Canon PC1057
-
Page 1
ENGLISH Camera User Guide Please read the Read This First section (page 5). Please also read the Software Starter Guide and the Direct Print User Guide. -
Page 2
Use of genuine Canon accessories is recommended. This product is designed to perform optimally when used with genuine Canon accessories. Canon shall not be liable for any damage to this product and/or accidents such as fire, etc., caused by the malfunction of non-genuine Canon accessories (e.g., a leakage and/or explosion of a battery pack). -
Page 3: Video Format
• Canon reserves the right to change the specifications of the hardware and software described herein at any time without prior notice. • No part of this guide may be reproduced, transmitted, transcribed, stored in a retrieval system, or translated into any language in any form, by any means, without the prior written permission of Canon.
-
Page 4
About this Camera User Guide Symbols Used : This mark denotes issues that may affect the camera’s operation. : This mark denotes additional topics that complement the basic operating procedures. Question? Look Here First. What settings are available under each function? Will my settings remain in effect even after I’ve turned the camera off? Functions Available in Each Shooting Mode (p. -
Page 5
Thumb Index Introduces you to all of the camera components, and explains how to load batteries and use the shutter button, among other basic functions. Describes shooting with the camera, from each shooting mode to using the camera’s various shooting features. Explains how to review recorded images or select playback settings, how to protect images or erase them, and how to edit movies. -
Page 6: Table Of Contents
Table of Contents : Functions and operations tables. These pages are shaded on the right edges to make them easy to find. Read This First ……..5 Components Guide .
-
Page 7
Night Scene Mode ……67 Shooting Panoramic Images (Stitch Assist) ..68 Movie Mode . -
Page 8
Editing Movies……..128 Rotating Images in the Display ….. . .130 Attaching Sound Memos to Images . -
Page 9: Read This First
Please note that Canon, its subsidiaries and affiliates, and its distributors are not liable for any consequential damages arising from any malfunction of a camera or accessory, including CompactFlash™…
-
Page 10
There is a risk of high voltage electrical shock. Please take the first opportunity to consult your camera distributor or a Canon Customer Support Help Desk. Stop operating the equipment immediately if it emits smoke or noxious fumes. -
Page 11
Continued use of the equipment may result in fire or electrical shock. Please consult your camera distributor or the closest Canon Customer Support Help Desk. Do not use substances containing alcohol, benzene, thinners or other flammable substances to clean or maintain the equipment. -
Page 12
Do not attempt to disassemble, alter or apply heat to the batteries. There is serious risk of injury due to an explosion. Immediately flush with water any area of the body, including the eyes and mouth, or clothing, that comes into contact with the inner contents of a battery. -
Page 13
Cautions Avoid using, placing or storing the equipment in places subject to strong sunlight or high temperatures, such as the dashboard or trunk (boot) of a car. Exposure to intense sunlight and heat may cause the batteries to leak, overheat or explode, resulting in fire, burns or other injuries. -
Page 14
Preventing Malfunctions Avoid Strong Magnetic Fields Never place the camera in close proximity to electric motors or other equipment generating strong electromagnetic fields. Exposure to strong magnetic fields may cause malfunctions or corrupt image data. Avoid Condensation Related Problems Moving the equipment rapidly between hot and cold temperatures may cause condensation (water droplets) to form on its external and internal surfaces. -
Page 15: Components Guide
Components Guide Front View Remote Sensor (p. 169) Strap Mount (p. 24) Self-timer Lamp (p. 77) Lens Ring Release Button (p. 174, 179) AF Sensor Display Panel (p. 16) Hot Shoe (p. 171) Microphone (p. 131) Strap Mount (p. 24) Speaker Built-in Flash (p.
-
Page 16: Back/Bottom View
• PictBridge Compliant Printers: Interface Cable IFC-400PCU (supplied with the camera) PictBridge Compliant Non-Canon Printers: Interface Cable IFC-400PCU (supplied with the camera) Please refer to the System Map or the Direct Print User Guide supplied with the camera for direct print compatible printer information.
-
Page 17: Controls
Controls (Flash)/ (Zoom in) Button (p. 62, 123) Zoom Ring (p. 39) (Macro)/ (Index) Button (p. 73, 124) Back Mode Dial (p. 14) (Monitor Selector) FUNC. (Function)/JUMP Button (p. 43, 125) Button (p. 32) SET/ Omni Selector ( / Frame Selector) ) (p.
-
Page 18: Mode Dial
Mode Dial Use the mode dial to switch between the shooting modes. Image Zone Auto Creative Zone : Auto (p. 53) The camera automatically selects settings. Image Zone The camera automatically selects settings according to the image composition type. : Portrait (p. 66) : Landscape (p.
-
Page 19: Main Dial
Main Dial The main dial is used for selecting certain menus and for displaying images. You can easily and swiftly select, confirm and switch menus. Turning the Main Dial Turn Clicking the Main Dial Click In Shooting Mode Selects aperture value and shutter speed (p.
-
Page 20: Display Panel
Display Panel The display panel shows the camera settings, the remaining image capacity, movie shooting time, battery charge and other information. In Shooting mode (p. 29), you can turn on the backlight of the display panel for six seconds by pressing the the backlight within six seconds, press the Icons Evaluative Metering/Spot Metering/…
-
Page 21
Photo Effect Self-Timer/Wireless Controller Remaining Image Capacity/Message Code/Error Code/ Interval Shooting Remaining Shots White Balance Settings Bracket Flash Exposure Compensation/Flash Output Adjustment Exposure Compensation Level/AEB Level/Flash Exposure Compensation Level * Goes off in Super Macro mode. The Super Macro mode icon appears on the LCD monitor (or in the viewfinder). -
Page 22: Preparing The Camera
Preparing the Camera Charging the Battery Pack Use the following procedures to charge the battery pack the first time and subsequently when the “Change the battery pack” message displays on the LCD monitor (or in the viewfinder) or the low battery icon ( ) and Lb ( Panel.
-
Page 23
It takes approximately 90 minutes to bring a fully discharged battery pack to a fully charged state (based on Canon’s testing standard). Charging times will vary according to the surrounding humidity and battery pack charge state. -
Page 24
Charging the Battery Pack (continued) When using Battery Pack BP-511A or BP-514, you can distinguish between the discharged battery pack and fully charged battery pack by changing the direction of the battery cover (Fig. C and D). Recharge the battery fully before using it again. Fig. -
Page 25: Installing The Battery Pack/Cf Card
Installing the Battery Pack/CF card Install Battery Pack BP-511A (supplied) and the CF card (supplied) into the camera as follows. Use the Compact Power Adapter CA-560 (sold separately) to power the camera for extended periods (p. 182). Charge the battery pack before using it for the first time (p. 18). Indicator Check that the power is off (p.
-
Page 26
Installing the Battery Pack/CF card (continued) Insert the CF card. The label side of the CF card should face the battery compartment. Push the card in until the CF card eject button fully extends. To remove the CF card, push the CF card eject button and pull the card out. -
Page 27
CF Card Handling Precautions CF cards are high-precision electronic devices. Do not bend, force, or subject them to shocks or vibration. Do not attempt to disassemble or alter a CF card. Moving a CF card rapidly between temperature extremes may cause condensation to form in the card, leading to potential malfunctions. -
Page 28: Attaching The Neck Strap
Attaching the Neck Strap Attach the strap as illustrated on the left. Pull the strap tight in the buckle so that it does not slip. Perform the same steps on the other side of the camera (p. 11). Avoid waving the camera about or catching it on other items when suspending it from the strap.
-
Page 29: Attaching The Lens Hood
Attaching the Lens Hood When shooting backlit scenes without a flash with the lens set to a wide angle, you should attach the lens hood to prevent light outside the scene from coming into the lens. Be sure to turn off the camera before you attach the lens hood.
-
Page 30: Setting The Date/Time
Setting the Date/Time The Set Date/Time menu will appear the first time the camera power is turned on or whenever the date lithium battery charge is low. Start from Step 5 to set the date and time. Turn on the camera (p. 29). Press the MENU button.
-
Page 31
The Date/Time cannot be inserted in the actual image even if the Date/Time have been set. For printing images with the date on them, refer to the Direct Print User Guide or Software Starter Guide. Replacing the Date Battery (p. 184) -
Page 32: Setting The Language
Setting the Language Use this feature to select the language used in the menus and messages. Turn on the camera (p. 29). Press the MENU button. The [ (Rec.)] or [ appears. Press the arrow on the omni selector to select the [ menu.
-
Page 33: Basic Functions
Basic Functions Turning the Power On/Off The power/mode indicator remains lit while the power of the camera is on. The power/mode indicator indicates the state of the camera as follows. Orange: Shooting mode Green : Playback mode/Printer Yellow : Computer connection mode* * For printer connection mode information, see the Power/Mode Indicator Mode Lever…
-
Page 34: Turning The Power Off
Turning the Power On/Off (continued) Powering the Camera in Playback Mode Release button Turning the Power Off Be careful not to touch the lens when shooting. Please also refrain from forcing the lens with fingers or other objects. It could lead to malfunctions or damage the camera.
-
Page 35: Switching Between Shooting And Playback
Turning on the camera without the start-up sound and image Press and hold the button, then turn on the power. You can also turn the camera on with the LCD monitor closed. Power Saving Function This camera is equipped with a power saving function. When this function is turned on and it activates, restore power by turning the mode lever toward Shooting Mode: Powers down approximately 3 minutes after the…
-
Page 36: Using The Lcd Monitor/Viewfinder
Using the LCD Monitor/Viewfinder Switching between the LCD Monitor and Viewfinder You can switch between the LCD monitor and viewfinder both in Shooting mode and Playback mode. When the LCD Monitor is Closed The viewfinder turns on. When the LCD Monitor is Open The LCD monitor turns on.
-
Page 37: Using The Viewfinder
The LCD monitor can also be positioned as below. In Playback mode, images do not appear reversed. Also, icons and messages always show properly. Using the Viewfinder If the surroundings are too bright (for example, when you are shooting outdoors) and images on the LCD monitor are not clear, use the viewfinder for shooting.
-
Page 38: Checking The Information On The Lcd Monitor/Viewfinder
Checking the information on the LCD Monitor/Viewfinder Each time you press the INFO. button the LCD monitor (or the viewfinder) cycles to the next information mode. Both the LCD monitor and the viewfinder have a field of vision of 100% of the actual shooting image. Shooting Mode Each time you press the INFO.
-
Page 39
Information Displayed on the LCD Monitor/ Viewfinder The LCD monitor displays information in Shooting or Playback mode, such as the camera settings, remaining image capacity and shooting date/time. Shooting Mode The information appears for approximately 6 seconds when you operate the camera (such as making a change in shooting settings) even if the LCD monitor/viewfinder is set to No Information. -
Page 40
Checking the information on the LCD Monitor/Viewfinder (continued) The following displays in information view. AF Frame Spot Metering Frame Shutter Speed 7.0x 8.8x 11x 14x 18x 22x MF (Manual Focus) Indicator Shots Remaining or Remaining Movie Time (sec.) Aperture Value Exposure Compensation White Balance (WB) Drive Mode… -
Page 41: Playback Mode
(Red) * Zoom powers reflect the combined optical and digital zoom effects. These figures appear when the digital zoom is activated. (“7.0x” is the telephoto-end setting of the optical zoom.) • The icons in the shaded boxes ( information view is turned off. •…
-
Page 42
Checking the information on the LCD Monitor/Viewfinder (continued) In detailed display mode, the following information also appears. Adobe RGB 50 100 200 400 • In addition to the above, the shutter speed, aperture setting, movie length, histogram and overexposure warning appear. The following information may also appear with some image files. -
Page 43: Using The Zoom (Focal Length)
About the Histogram The histogram is a graph that allows you to judge the brightness of the recorded image. The greater the bias toward the left in the graph, the darker the image. The greater the bias toward to the right, the brighter the image.
-
Page 44
Using the Zoom (Focal Length) (continued) Zooming Rapidly To zoom in or out rapidly, turn the mode lever to the zoom ring in either the zoom in or zoom out direction. The swift zooming continues while you hold the mode lever. To reverse the zooming direction, turn the Wide zoom ring a little in the opposite direction… -
Page 45: Pressing The Shutter Button
Pressing the Shutter Button The shutter button features a two-stage action. Pressing halfway automatically sets the exposure and focus. AF Frame The AF frame displays in green and the beep Ready for shooting sounds twice. The AF frame displays in yellow and a beep sounds. Focusing difficulty In this case, use the focus lock, or manually focus, to shoot (p.
-
Page 46
Pressing the Shutter Button (continued) appears or the AF frame displays in yellow while you press halfway, you can still press fully to take the shot. Images are first saved into the camera’s internal memory before being recorded onto the CF card, allowing the next images to be taken immediately as long as sufficient space is available in the internal memory. -
Page 47: Selecting Menus And Settings
Selecting Menus and Settings Selecting Settings by Pressing the FUNC. Button (Only in Shooting Mode) FUNC. Select a function item using ISO Speed [ ] (p. 99) Photo Effect [ Bracket [ Flash Exposure Compensation (p. 107) Flash Output (p. 108) FUNC.
-
Page 48
Selecting Menus and Settings (continued) Selecting Settings by Pressing the MENU Button (Shooting) Mode Rec. Menu (p. 46) (When Shooting mode is MENU MENU (Playback) Mode Play Menu (p. 48) MENU… -
Page 49
Press the MENU button. Press the arrow on the omni selector to switch between menu tabs. Press the arrow on the omni selector to select a menu item, then press the contents. Press the MENU button. In Step 2, you can also use the FUNC./JUMP button, button. -
Page 50
Selecting Menus and Settings (continued) Displayed menu items will vary according to the shooting mode and setting contents (p. 202). You can apply a desired image and sound to [ My Camera menu. For details, see Registering the My Camera Settings (p. -
Page 51
Menu Item Sets the duration before the self-timer releases the shutter once the shutter button Self-timer is pressed. 10 sec. Sets the duration before the self-timer releases the shutter once the remote Wireless Delay control shutter button is pressed. 0 sec./2 sec. Sets the option of [Spot AE Point] (one of the light metering modes), Center (the AE point is fixed to the center) or AF Point (the… -
Page 52
Selecting Menus and Settings (continued) Menu Item Adjusts the camera most appropriately when separately sold Tele-converter TC- DC58A or Close-up Lens 500D is attached Converter to the camera. None Sets the duration images display on the LCD monitor (or in the viewfinder) after the Review shutter button is released. -
Page 53
Menu Item Sets the images that will be printed on a direct print compatible printer or at a photo Print Order lab service, the number of copies and other parameters. Specifies images before downloading to a Transfer Order computer. (Set up) Menu Menu Item Set [On] to mute the start-up sound, operation sound, selftimer sound and… -
Page 54
Selecting Menus and Settings (continued) Menu Item Sets the brightness level of the LCD monitor. LCD Brightness Sets whether or not the camera automatically powers down after a specified Auto Power period of time elapses without camera Down operation. Sets the length of time before the LCD monitor (or viewfinder) goes off when no Display Off camera operation is performed. -
Page 55
(My Camera) Menu You can select the theme, start-up image and sound, shutter sound, operation sound and selftimer sound used on this camera. These are called My Camera settings. You can also customize the [ and [ ] options for each item with images from the CF card and newly recorded sounds or by using the supplied software. -
Page 56: Resetting The Settings To Default
Resetting the Settings to Default You can reset the menu and button operation settings to default. Turn on the camera. You can turn on the camera in either Shooting or Playback mode. Press the MENU button for longer than 5 seconds. The message “Reset settings to default?”…
-
Page 57: Shooting — Letting The Camera Select Settings
Shooting – Letting the Camera Select Settings See Functions Available in Each Shooting Mode (p. 202) at the end of this manual to find out which settings can be changed in which shooting modes. Auto Mode In this mode, all you have to do is press the shutter button and let the camera do everything else.
-
Page 58: Reviewing An Image Right After Shooting
Reviewing an Image Right after Shooting (continued) Press the shutter button all the way (p. 41). You will hear the sound of the shutter when the shutter activates. The picture appears for two seconds on the LCD monitor (or in the viewfinder).
-
Page 59
Switching between the LCD Monitor and Viewfinder While the Image is Displayed You can switch between the LCD monitor and viewfinder by pressing the button. Using this feature, you can shoot an image using the viewfinder and automatically let the camera display the image on the LCD monitor (or vice versa). -
Page 60
Reviewing an Image Right after Shooting (continued) Right after shooting, press the FUNC. button while the image is displayed on the LCD monitor. Select [OK] using the arrow on the omni selector and press the SET button. The image is recorded in the RAW format. -
Page 61: Changing The Resolution And Compression
Changing the Resolution and Compression Mode Dial You can change the resolution and compression (excluding movies) settings to suit the purpose of the image you are about to shoot. To record the CCD output without compression, select the RAW file format (p.
-
Page 62
Changing the Resolution and Compression (continued) Movies can be shot with the following resolution. Resolution 640 x 480 pixels 320 x 240 pixels 160 x 120 pixels Press the FUNC. button. Select * (Compression) or L* (Resolution) using the arrow on the omni selector. * The current setting is displayed. -
Page 63
See Image File Sizes (Estimated) (p. 192). See CF Cards and Estimated Capacities (Recordable Images) (p. 191). The resolution and compression settings are affected by the shooting mode selection as follows (only the resolution in mode). e.g. 1 : When the shooting mode is changed from the resolution and compression will restore the values set in M mode. -
Page 64: Changing The File Format
The resolution (3264 x 2448) and compression settings cannot be adjusted for these images. * As measured by Canon’s testing standard. ** The bundled software can be used to open or adjust the parameters of images recorded in the RAW file format. Please consult the Software…
-
Page 65
Press the FUNC. button. Select L* (LCD monitor/Viewfinder) using the (Display Panel) arrow on the omni selector. * The current setting is displayed. Select RAW (LCD monitor/Viewfinder) using the main dial or the selector. You can shoot the image right after selecting settings by pressing the shutter button. -
Page 66: Using The Built-In Flash
Using the Built-In Flash Mode Dial Use the flash according to the guidelines below. (In Movie mode, the flash cannot be used.) Auto with red-eye reduction Auto Flash on with red- eye reduction Flash on Flash off * No icon appears on the display panel. •…
-
Page 67
Shoot the image. The flash will fire if the built-in flash pops up automatically (Flash Pop-up function) and viewfinder) when the shutter button is pressed halfway. Shooting procedures are the same as for the The flash fires with automatic adjustments when [Flash Adjust] is set to [Auto] in the Rec. -
Page 68: Setting The Slow Synchro
Using the Built-In Flash (continued) Setting the Red-eye Reduction Function Mode Dial The red-eye reduction lamp fires when the flash is used in dark areas. This reduces light reflecting back from the eyes and making them appear red. In the [ (Rec.)] menu, set [Red-eye] to [On].
-
Page 69
Using the Built-In Flash with the Flash Pop-up Function Off Mode Dial In the [ (Rec.)] menu, set [Flash Pop-up] to [Off]. When you wish to fire the flash, pop up the built-in flash by pressing the appears on the display panel and LCD monitor (or in the viewfinder) and the flash fires when the shutter button is pressed fully. -
Page 70: Portrait Mode
Portrait Mode Use this mode when you want the subject to appear sharp and the background to blur. Turn the mode dial Shooting procedures are the same as for the mode (p. 53). See page 202 for settings that can be changed in this mode. To best achieve the effect of the background gradually fading, compose the image so that the upper half of the subject’s body fills most of the viewfinder or LCD monitor.
-
Page 71: Night Scene Mode
Night Scene Mode Use this mode to capture human subjects against the backdrop of an evening sky or night scene. The people are illuminated with light from the flash while the backdrop is captured at a slow shutter speed so that both appear correctly exposed. Turn the mode dial Shooting procedures are the same as for the…
-
Page 72: Shooting Panoramic Images (Stitch Assist)
Shooting Panoramic Images (Stitch Assist) Use this mode to shoot a series of overlapping frames for merging (stitching) into a large panoramic image using a computer. Horizontal 2 x 2 Please use the bundled PhotoStitch program to merge the images on a computer. Framing a Subject PhotoStitch detects the overlapping portions of adjoining images and merges them.
-
Page 73
Compose each frame so that it overlaps 30 to 50% of the adjoining image. Try to keep the vertical misalignment to within 10% of the image height. Do not include moving items in the overlap. Do not try to stitch images that include both distant and close subjects. -
Page 74
Shooting Panoramic Images (Stitch Assist) (continued) Shoot the first image. The exposure and white balance settings are set and locked with the first image. Compose and shoot the second image so that it overlaps the first. Minor discrepancies in the overlap can be corrected with the software. -
Page 75: Movie Mode
The clip will end automatically after this time elapses or when the CF card becomes full. * Using the following CF cards: • Supplied FC-64MH CF Card • Separately sold Canon FC-256MH or FC-512MSH CF Card (not sold in some regions) setting and 3 minutes at the…
-
Page 76
QuickTime 3.0 or higher is required to play back movie files (AVI/ Motion JPEG) on a computer. (QuickTime (for Windows) is bundled on the supplied Digital Camera Solution Disk. On the Macintosh platform, QuickTime 3.0 or later is generally bundled… -
Page 77: Macro Mode
Macro Mode Mode Dial Use the macro mode to shoot close-ups of subjects when the distance from the tip of the lens to the subject is in the following range (varies according to the zoom position): Zoom Position (35mm film equivalent) Distance to the subject Wide angle end –…
-
Page 78
Macro Mode (continued) In macro mode, the correct image brightness sometimes cannot be obtained with flash photography. Please set the ND filter to [On] and use the separately sold Macro Ring Lite MR-14EX or the Macro Twin Lite MT-24EX for flash photography in the macro mode. -
Page 79: Super Macro Mode
Super Macro Mode Mode Dial Compared with normal Macro mode, you can get even closer to the subject and focus on the subject closer to the lens. The background can also be shot with different effects. You can shoot subjects in Super Macro mode when the distance from the tip of the lens to the subject is in the following range: 3 to 30 cm (1.2 in.
-
Page 80
Super Macro Mode (continued) Shoot the image. Shooting procedures are the same as for the During Super Macro mode, only the optical zoom operates even when the digital zoom is set to On. The zoom bar appearing during zoom operation indicates the following movable zoom range in Super Macro mode: 42 to 90 mm (35mm film equivalent). -
Page 81: Self-Timer
Self-Timer You can take pictures with the self-timer in any shooting mode. Press the button. Press the button until on the display panel and appears on the LCD monitor (or in the viewfinder). You can cancel the self-timer by pressing button again.
-
Page 82: Digital Zoom
Digital Zoom Mode Dial With the combined optical and digital zoom functions, images can be zoomed as follows: 8.8x, 11x, 14x, 18x and 22x. In the [ (Rec.)] menu, select [Digital Zoom]. See Selecting Menus and Settings (p. 44). Select [On] and press the MENU button.
-
Page 83: Continuous Shooting
When [ ] is selected: Approx. 1.0 frames per second* When [ ] is selected:Approx. 2.5 frames per second* * Large/Fine (These figures reflect Canon’s testing standard. The actual figures will vary according to the shooting conditions and settings.) mode. appears.
-
Page 84
Continuous Shooting (continued) The interval between frames lengthens somewhat when the internal memory becomes full. The built-in flash can be used, but the interval between images will lengthen to accommodate the flash recharge time. The flash will not fire with an externally mounted flash. Selecting a Continuous Shooting Mode In the [ (Rec.)] menu, select… -
Page 85: Shooting — Selecting Particular Effects
Shooting – Selecting Particular Effects Camera settings such as shutter speed and aperture value can be freely changed for shooting. See Functions Available in Each Shooting Mode (p. 202) at the end of this manual to find out which settings can be changed in which shooting modes.
-
Page 86: Setting The Shutter Speed
Program AE (continued) See page 202 for settings that can be changed in this mode. If a correct exposure cannot be obtained, the shutter speed and aperture value show in red on the LCD monitor (or in the viewfinder). Use the following methods to obtain the correct exposure and make them show in white.
-
Page 87: Shutter Speed
Turn the main dial and select a shutter speed. Shoot the image. The correct exposure has been set if the shutter speed and aperture value show in white on the LCD monitor (or in the viewfinder). If the aperture value is shown in red on the LCD monitor (or in the viewfinder), the image is underexposed (insufficient light) or overexposed (too much light).
-
Page 88
Setting the Shutter Speed (continued) See page 202 for settings that can be changed in this mode. Please note that camera shake becomes a factor at slow shutter speeds. If the camera shake warning monitor (or in the viewfinder), secure the camera to a tripod before shooting. -
Page 89: Setting The Aperture
Setting the Aperture When you set the aperture in the aperture-priority AE mode, the camera automatically selects a shutter speed to match the brightness. Selecting a lower aperture value (opening the aperture) allows you to blur the background and create a beautiful portrait. A higher aperture value (closing it) brings the entire range from foreground to background into focus.
-
Page 90: Safety Shift
Setting the Aperture (continued) Depending on the zoom position, certain aperture values may not be available. See page 202 for settings that can be changed in this mode. Please note that camera shake becomes a factor at slow shutter speeds. If the camera shake warning monitor (or in the viewfinder), secure the camera to a tripod before shooting.
-
Page 91: Manually Setting The Shutter Speed And Aperture
Manually Setting the Shutter Speed and Aperture You can manually set the shutter speed and aperture to achieve a particular effect. This is convenient for shooting fireworks and other images where it is difficult to set the correct exposure automatically. Turn the mode dial to M.
-
Page 92
Manually Setting the Shutter Speed and Aperture (continued) See page 202 for settings that can be changed in this mode. For the correlation between aperture value and shutter speed, see page 84. If you wish to change the exposure, adjust the shutter speed or the aperture using the main dial. -
Page 93: Selecting An Af Frame
Selecting an AF Frame Mode Dial The AF frame indicates the area of the composition on which the camera focuses and can be set manually to the desired area. This is convenient for focusing accurately on an off-center subject to obtain the composition you desire.
-
Page 94: Switching Between Light Metering Modes
Switching between Light Metering Modes Mode Dial Evaluative Metering is the default light metering mode. This can be switched to another metering mode. Evaluative Metering Center-Weighted Averaging Center Spot AE Point AF Point Appropriate for standard shooting conditions, including backlit scenes. The camera divides images into several zones for light metering.
-
Page 95
Press the button to select the metering mode. Each press of the the metering mode as follows. (Evaluative Metering) (Spot AE Point) The icon of the currently selected light metering mode appears on the display panel and LCD monitor (or in the viewfinder). -
Page 96: Adjusting The Exposure
Adjusting the Exposure Mode Dial Adjust the exposure compensation setting to avoid making the subject too dark when it is backlit or shot against a bright background. Press on the omni selector). The exposure compensation bar appears on the display panel and LCD monitor (or in the viewfinder).
-
Page 97: Adjusting The Tone (White Balance)
Adjusting the Tone (White Balance) Mode Dial When the white balance mode is set to match the light source, the camera reproduces colors more accurately. AWB ( Auto Daylight Cloudy Tungsten Fluorescent Fluorescent Flash Custom1 Custom2 The icons in parentheses are the ones on the display panel. (Shown only when there is a difference between the display panel icon and LCD monitor/ viewfinder icon.) Press WB (…
-
Page 98: Setting A Custom White Balance
Adjusting the Tone (White Balance) (continued) Select the desired setting using the main dial or the on the omni selector. Please see below regarding the custom setting. You can shoot the image right after selecting settings by pressing the shutter button.
-
Page 99
Select (Custom1) or (Custom2) using the main dial or arrow on the omni selector. Aim the camera at the white paper or cloth, or gray card and press the SET button. Aim the camera so that the white paper or cloth, or gray card, completely fills the frame on the LCD monitor (or viewfinder) before pressing the SET button. -
Page 100: Changing The Photo Effect
Changing the Photo Effect Mode Dial You can shoot with different photo effects. ) Photo Effect Off Vivid Neutral Low Sharpening Sepia Custom Effect The icons in parentheses are the ones on the display panel. Press the FUNC. button and select (LCD monitor/Viewfinder) (Display Panel)
-
Page 101
In this screen, select the item you wish to set using the selector and set it using the on the omni selector. Contrast Select from – (Weak), 0 (Neutral) and + (Strong). This function allows you to adjust the degree of brightness. Sharpness Select from –… -
Page 102: Shooting In Adobe Rgb Color Space
Shooting in Adobe RGB Color Space Mode Dial This camera can record still images in Adobe RGB color space. Standard Normally select this option. Adobe RGB* Select this option when: — Doing commercial printing in the Adobe RGB environment — Using software, monitors and printers compliant with Exif 2.21 * Use of this function is not recommended if you do not have image processing and Adobe RGB technical knowledge.
-
Page 103: Changing The Iso Speed
Changing the ISO Speed Mode Dial Raise the ISO speed to prevent camera shake when shooting in dark places, when you want to shoot without the flash or with a faster shutter speed. Press the FUNC. button and select (LCD monitor/Viewfinder) (Display Panel) arrow on the omni selector.
-
Page 104: Auto Exposure Bracketing (Aeb Mode)
Auto Exposure Bracketing (AEB Mode) Mode Dial In this mode, the camera automatically changes the exposure within a set range to take three shots after you press the shutter button once. You can adjust AEB settings in 1/3EV steps within the range of –2EV to +2EV of the standard exposure setting.
-
Page 105
Expand or contract the range using the main dial or the arrow on the omni selector. to expand the range and contract it. The camera returns to the Step 2 screen if you press the SET button. You can shoot the image right after selecting settings by pressing the shutter button. -
Page 106: Focus Bracketing (Focus-Bkt Mode)
Focus Bracketing (Focus-BKT Mode) Mode Dial You can shoot three images while the focus changes automatically when shooting with the manual focus (p. 114). Three ranges -small, medium or large- can be selected. Images are shot with the focus position changing in the following order: selected position, further away and closer.
-
Page 107
Expand or contract the range using the main dial or the arrow on the omni selector. to expand the range and contract it. The camera returns to the Step 2 screen if you press the SET button. You can shoot the image right after selecting settings by pressing the shutter button. -
Page 108: Locking The Exposure Setting (Ae Lock)
Locking the Exposure Setting (AE Lock) Mode Dial You can set the exposure and focus separately. This is effective when the contrast is too strong between the subject and background or when a subject is backlit. Focus the AF frame or the spot metering frame on the subject on which you wish to lock the exposure setting and press the shutter button halfway.
-
Page 109
The automatically selected combinations of shutter speeds and aperture values can be freely changed without altering the exposure with the following procedure. 1. Turn the mode dial to P, Tv or Av. 2. Focus on the subject on which you wish to lock the exposure. •… -
Page 110: Locking The Flash Exposure Setting (Fe Lock)
Locking the Flash Exposure Setting (FE Lock) Mode Dial You can obtain the correct exposure with flash photography regardless of the location of your subject in the composition. Press the (Flash) button and set the flash to fire (p. 62). If you are using an externally mounted flash, please refer to its manual for setting instructions.
-
Page 111: Switching Between Flash Adjustment Settings
Switching between Flash Adjustment Settings Mode Dial The built-in flash and the externally mounted flash* fire with automatic flash adjustments (except in the M mode), but it is possible to set them so that they fire without any adjustments. * Speedlite 220EX/380EX/420EX/550EX, Macro Ring Lite MR-14EX, Macro Twin Lite MT-24EX Select [Flash Adjust] from the [ See Selecting Menus and Settings (p.
-
Page 112
Switching between Flash Adjustment Settings (continued) Press the FUNC. button or click the main dial. To cancel the compensation, return the setting to Compensating the Flash Output In M mode or when [Flash Adjust] is set to [Manual], the flash output can be controlled in three steps, starting from FULL, when shooting. -
Page 113: Switching The Timing At Which The Flash Fires
Switching the Timing at which the Flash Fires Mode Dial The flash fires right after the shutter opens, regardless of the 1st-curtain shutter speed. Usually, the 1st-curtain is used when shooting. The flash fires right before the shutter closes, regardless of the shutter speed.
-
Page 114: Shooting Images At Set Intervals (Intervalometer)
Shooting Images at Set Intervals (Intervalometer) Mode Dial You can shoot images at a set interval. This function can be used for fixed-point observation of plants and blooming flowers. The shooting interval time can be set from 1 to 60 minutes and 2 to 100 images can be shot.
-
Page 115
Press the arrow on the omni selector, then select the number of shots using the on the omni selector. If you press the omni selector continuously, the number of shots increases in units of 5 shots at a time. The maximum number of shots* is determined according to the CF card’s remaining capacity. -
Page 116: Shooting Problem Subjects For The Autofocus
Shooting Problem Subjects for the Autofocus The autofocus may not work well on the following types of subjects. • Subjects with extremely low contrast to the surroundings • Subjects mixing close and far objects • Subjects with extremely bright objects at the center of the composition •…
-
Page 117: Shooting With Af Lock
Shooting with AF Lock Mode Dial Press the shutter button halfway to lock the focus. Keep it pressed and press the MF button. icon appears on the LCD monitor (or in the viewfinder). The focus setting will lock even if the shutter button and the MF button are released.
-
Page 118: Shooting In Manual Focus Mode
Shooting Problem Subjects for the Autofocus (continued) Shooting in Manual Focus Mode Mode Dial The focus can be manually set. Press and hold the MF button, then turn the zoom ring to focus on the subject. icon and the MF indicator will appear on the LCD monitor (or in the viewfinder).
-
Page 119
Using the Manual Focus in Combination with the Auto Focus Mode Dial The camera automatically searches for a more suitable focusing point from the current manually focused location. Focus the camera with the manual focus, then press the SET button. The camera focuses automatically to a more accurate focusing point near the current focusing point. -
Page 120: Switching Between Focus Settings
Switching between Focus Settings Mode Dial You can switch between focus settings to shoot. Continuous Single In the [ (Rec.)] menu, select [AF Mode]. See Selecting Menus and Settings (p. 44). Select [Continuous] or [Single] and press the MENU button. Saving Custom Settings You can save frequently used shooting modes and various shooting settings to the C (custom) mode.
-
Page 121
Settings that can be saved to the • Shooting Mode (P, Tv, Av and • Rec. menu settings • Manual Focus location Turn the mode dial to P, Tv, Av or M. Set the setting contents you wish to save. Select [Save settings] from the (Rec.)] menu. -
Page 122: Using The Nd Filter
Using the ND Filter Mode Dial The brightness can be decreased by setting the ND filter on. This allows you to select a smaller aperture value and a slower shutter speed than usual. Select [ND Filter] in the [ See Selecting Menus and Settings (p. 44). Select [On] and press the MENU button.
-
Page 123: Setting The Auto Rotate Function
Setting the Auto Rotate Function Mode Dial This camera is equipped with an Intelligent Orientation sensor that detects the orientation of an image shot with the camera on end and automatically rotates it to the correct viewing orientation in the display.
-
Page 124: Resetting The File Numbers
Images are assigned file numbers from 0001 to 9900, and folders are assigned folder numbers from 100 to 998 (folder numbers cannot contain 99 in the last two digits). DCIM CANON CANON CANON CANON Folder numbers cannot contain 99 in the last two digits.
-
Page 125
Folder File Capacity Each folder usually contains up to 100 images. However, since images shot in Continuous mode or Stitch Assist mode are always saved into the same folder, a folder may contain more than 100 images. The number of images may also exceed 100 if a folder contains images copied from a computer or images shot with other cameras. -
Page 126: Playback
Playback Displaying Images Individually You can view the recorded images on the LCD monitor (or in the viewfinder). Move between images turning the main dial or using the arrow on the omni selector. to move to the previous image to move to the next. Holding moves more rapidly between images, but the images will not appear as clearly.
-
Page 127: Magnifying Images
Magnifying Images Images can be magnified up to approximately 10 times while in single image playback. While in single image playback, press the button or turn the zoom ring toward telephoto. Press the omni selector to move the magnified area around the image.
-
Page 128: Viewing Nine Images At A Time (Index Playback)
Viewing Nine Images at a Time (Index Playback) Up to nine images can be viewed at once in index playback. While in single image playback, press the button. Nine images appear at once (index playback). Change the image selection by turning the main dial or using the selector.
-
Page 129: Jump Jumping Between Images
JUMP Jumping Between Images The display can be advanced or set back 9 images in either single image playback or index playback. Press the JUMP button while in single image playback (p. 122) or index playback (p. 124). The jump bar appears. The displayed image(s) change.
-
Page 130: Viewing Movies
Viewing Movies You can play back movies shot in Turn the mode lever to Movies cannot be viewed in index playback. Select a movie by turning the main dial or using the arrow on the omni selector. A movie displays with the instruction on it.
-
Page 131
Fast Forwarding/Rewinding Select one of the following operations using the the omni selector and press the SET button. (Exit) : Return to single image playback (First Frame) : First Frame (Previous Frame) : Previous Frame (Rewinds if the SET button is held down) (Next Frame) : Next Frame (Fast-forwards if the SET button… -
Page 132: Editing Movies
Editing Movies You can delete unwanted portions from the first or second half of a movie clip. Select the movie you wish to edit and press the SET button. See Viewing Movies (p. 126). Select (Edit) using the arrow on the omni selector and press the SET button.
-
Page 133
Select (Save) using the arrow on the omni selector and press the SET button. When is selected, the edited movie is not saved and the camera reverts to the movie editing panel. Select [Overwrite] or [New File] using the omni selector and press the SET button. -
Page 134: Rotating Images In The Display
Rotating Images in the Display Images can be rotated 90° and 270° clockwise on the LCD monitor (or in the viewfinder). Original Select [Rotate] from the [ (Play)] menu. See Selecting Menus and Settings (p. 44). Select an image you want to rotate by turning the main dial or by using the omni selector and press the SET…
-
Page 135: Attaching Sound Memos To Images
Images can be magnified when rotated (p. 123). Images taken vertically with the auto rotate function (p. 119) set to [On] will automatically be rotated to the vertical position when viewed on the LCD monitor (or in the viewfinder). Attaching Sound Memos to Images In playback mode (including single image playback, index playback, magnified playback and the review immediately after shooting in Shooting mode) you can attach sound memos (up to 60 seconds) to…
-
Page 136
Attaching Sound Memos to Images (continued) Erasing the Sound Memos Select in Step 2 on the previous page. You cannot attach sound memos to movies. You cannot record or playback sound notes for images that already have an incompatible sound file attached. If you attempt to record or play such images, the “Incompatible WAVE format”… -
Page 137: Automated Playback (Slide Show)
Automated Playback (Slide Show) Slide show image settings are based on DPOF standards (p. 147). Starting a Slide Show All images or a selection of images on a CF card can be displayed one-by-one in an automated slide show. All Images Plays all the images on the CF card in order Slide Show 1 –…
-
Page 138: Selecting Images For Slide Shows
Automated Playback (Slide Show) (continued) When the slide show is over, press the MENU button. The slide show menu appears again. Press the MENU button again to close the menu. Movie images play for the length of time that they were recorded regardless of the time set in the slide show settings.
-
Page 139
Index Playback Press the button to switch to index playback (3 images). Select an image using the main dial or arrow on the omni selector and mark or remove marks from images using the arrow on the omni selector. The selection number and a check mark appears at the bottom of selected images. -
Page 140: Adjusting The Play Time And Repeat Settings
Automated Playback (Slide Show) (continued) Adjusting the Play Time and Repeat Settings You can change the play time for all the images in a show and have the show repeat itself continuously. Sets the duration that each image in a slide show is displayed. Play Time The options are any one of 3 –…
-
Page 141: Protecting Images
Protecting Images You can protect important images from accidental erasure. In the [ (Play)] menu, select [Protect] and press the SET button. See Selecting Menus and Settings (p. 44). Select an image you want to protect and press the SET button. icon appears on protected images.
-
Page 142: Erasing
Erasing Erasing Images Individually Please note that erased images cannot be recovered. Exercise caution before erasing a file. Select the image you wish to erase and press the button. Select [Erase] using the arrow on the omni selector and press the SET button. To cancel instead of erasing, select [Cancel] and press the SET button.
-
Page 143: Formatting A Cf Card
If the camera does not work properly, the inserted CF card may be malfunctioning. Reformatting the CF card may solve the problem. When a non-Canon brand CF card is malfunctioning, reformatting it may solve the problem. CF cards formatted in another camera, computer or peripheral device may not operate correctly.
-
Page 144: Print Order
Print Settings), and then take the CF card to a participating photo lab to have them printed out later. This camera complies with the industry standard PictBridge, therefore, you can connect the camera to non-Canon PictBridge compliant printers and print images. * Digital Print Order Format This manual explains the DPOF print settings.
-
Page 145
Refer to the System Map supplied with your camera for direct print compatible printer (CP series or Bubble Jet printers) information. Direct Print Compatible Printing Connect the camera to the printer Set various print settings (except DPOF print settings) Print For details, see the Direct Print User Guide. -
Page 146: Print Settings (Dpof Print Settings)
Print Settings (DPOF Print Settings) You can select images on a CF card for printing and specify the number of print copies in advance using the camera. This is extremely convenient for sending the images to a photo developing service or for printing on a direct print function compatible printer. Refer to the Direct Print User Guide for instructions on how to select print settings from the printer.
-
Page 147
When the print type (p. 144) is set to [Index], select an image using the main dial or the arrow on the omni selector and mark or remove marks from images using the omni selector. A check mark appears on the marked image. -
Page 148: Setting The Print Style
Print Settings (DPOF Print Settings) (continued) Setting the Print Style Always select a print style after having selected the image you wish to print. The following print settings can be selected. Standard Print Index Type Both Date File No. In the [ (Play)] menu, select [Print Order] and press the SET button.
-
Page 149
Press the omni selector to select a setting. Print Type Select [Standard], [Index] or [Both]. Date Select [On] or [Off]. File No. Select [On] or [Off]. Press the MENU button. The set up menu will close and the Print Order menu will reappear. When [Print Type] is set to [Index], the [Date] and [File No.] cannot be set to [On] at the same time. -
Page 150: Resetting The Print Settings
Print Settings (DPOF Print Settings) (continued) Resetting the Print Settings The print settings can all be removed at once. The print type is reset to [Standard] and the date and file number options are set to [Off]. In the [ (Play)] menu, select [Print Order] and press the SET button.
-
Page 151: Image Transmission Settings (Dpof Transfer Order)
Image Transmission Settings (DPOF Transfer Order) You can use the camera to specify settings for images before downloading to a computer. Refer to the Software Starter Guide for instructions on how to transfer images to your computer. You cannot use this function to transfer several images at once on Mac OS X computers.
-
Page 152
Selecting Images for Transferring (continued) Select images for transferring. Single Images Select an image using the main dial or arrow on the omni selector and mark or remove marks from images using the arrow on the omni selector. A check mark appears on the marked image. -
Page 153: Downloading Images To A Computer
Connecting the Camera to a Computer Via the USB Cable IMPORTANT You must install the software and driver bundled on the supplied Canon Digital Camera Solution Disk onto your computer if you are using any of the following operation systems: Windows 98 (including Second Edition)/Windows 2000/ Windows Me/Mac OS 9.0 –…
-
Page 154
Connecting the Camera to a Computer Via the USB Cable (continued) Connect the supplied interface cable to the computer’s USB port and the camera’s DIGITAL terminal. You do not need to turn off the computer or camera when making a USB connection. Please refer to your computer manual for information regarding the location of the USB port. -
Page 155
(JPEG format only) without installing the software bundled on the Canon Digital Camera Solution Disk. This is useful for downloading images to a computer in which the software is not installed. -
Page 156: Downloading Directly From A Cf Card
Downloading Directly from a CF Card Double-click the icon of the drive with the CF card. Copy images from the card into a folder of your choice on the hard disk. The images are stored in the [xxxCANON] folders located under the [DCIM] folder (where xxx is a three-digit number from 100 to 998) (p.
-
Page 157: Viewing Images On A Tv Set
Viewing Images on a TV Set A video-compatible television connected via the supplied AV cable AVC-DC300 can be used to view images as you shoot or replay them. Turn off the camera (p. 30). Also turn the television off. Yellow To the Video Plug In Jack…
-
Page 158: Customizing The Camera (My Camera Settings)
Customizing the Camera (My Camera Settings) My Camera allows you to customize the start-up image and start-up, shutter, operation and self-timer sounds. Each menu item has three choices. e.g. Start-up image The [ ] option features science fiction related images and sounds. The [ ] option features animals.
-
Page 159
Press the MENU button. Pressing the MENU button closes the menu and makes the settings take effect. In Shooting mode, the menu can be closed by pressing the shutter button halfway. (In Playback mode, the menu closes when the shutter button is pressed halfway and the camera switches to shooting mode.) If you select [Theme] in Step 3, you can select a consistent theme for each of the My Camera Settings. -
Page 160: Registering The My Camera Settings
Registering the My Camera Settings Images recorded onto the CF card and newly recorded sounds can be added as My Camera settings to the [ You can also use the supplied software to upload your computer’s images and sounds to the camera. The following menu items can be saved to the camera.
-
Page 161
Select the image you wish to register using the arrow or on the omni selector. Press the SET button. Select [ arrow on the omni selector, then press the SET button. Recording starts. Recording stops when the set amount of time has passed. Start-up Sound: 1 second Operation Sound: 0.3 second Selftimer Sound: 2 seconds… -
Page 162
Registering the My Camera Settings (continued) File Format of My Camera Settings My Camera settings should conform to the below file formats. However, CF card images shot with this camera can be registered as My Camera settings regardless of the below formats. Start-up Image •… -
Page 163: List Of Error/Message Codes
List of Error/Message Codes The following error and message codes may appear on the display panel. Error Codes : The camera has experienced a problem. Turn off the (XX: number) power, wait a second, and then try shooting or playing back.
-
Page 164: List Of Messages
List of Messages The following messages may appear on the LCD monitor (or in the viewfinder). For messages which may appear when a printer is connected, refer to the Direct Print User Guide. Resetting: Resetting all the camera and menu settings to default Busy…
-
Page 165
Cannot magnify!: You attempted to magnify an image that was photographed with another camera, recorded in a different format, or edited on a computer. Cannot rotate: You attempted to rotate an image that was photographed with another camera, recorded in a different format, or edited on a computer. -
Page 166: Troubleshooting
Troubleshooting Problem Camera will not Power is not turned on operate CF card/battery cover opened Insufficient battery voltage panel) Poor contact between camera and battery terminals Camera will not Camera is in playback or record computer/printer connection mode Flash is charging (Blinking monitor/in viewfinder) CF card full…
-
Page 167
See Formatting a CF Card (p. 139). If reformatting doesn’t work, the CF card logic circuits may be damaged. Contact the nearest Canon Customer Support Help Desk. Computer images can be added to the camera using the bundled software program ZoomBrowser EX or ImageBrowser. -
Page 168
Troubleshooting (continued) Problem Battery pack will not Poor contact between charge battery pack and battery charger Image is blurred or Camera moved out of focus Subject out of focal range Subject is hard to focus Cause Solution Clean the battery terminals with a clean dry cloth. -
Page 169
Problem Subject in recorded Insufficient light for image is too dark shooting Subject dark in comparison to the background Subject too far for flash to reach The ND filter is On. Cause Solution Set the built-in flash to on. Use a high-output externally mounted flash. -
Page 170
Troubleshooting (continued) Problem Subject in recorded Subject too close causing image is too bright flash to be too bright Subject bright in comparison to the background Light shining directly on subject or reflected off subject into camera Flash set to On A vertical bar of light Subject too bright (red, purple) appears… -
Page 171
Problem White dots or white Light from the flash has asterisks appear on reflected off dust particles the image or insects in the air. This occurs more frequently in the following conditions: • When shooting at the wide angle end. •… -
Page 172: Appendix
Appendix Using the Wireless Controller Installing the Battery Install the date battery (CR2025) into the Wireless Controller WL- DC100 before use. Be particularly careful to keep the date batteries out of the reach of children. Seek medical assistance immediately if a child swallows a battery since corrosive battery fluids could damage the stomach or intestinal wall.
-
Page 173
Shooting/Playback The wireless controller can be used to shoot or play back. The wireless controller can be operated from an approximate distance of up to 5 m (16.4 ft.) from the front remote sensor (2) and approximately 1 m (3.3 ft.) from the side remote sensor (1). Remote Sensors Transmitter Shooting… -
Page 174
Using the Wireless Controller (continued) Playback appears on the display panel. Display the previous image Play back the movie images Display images in sets of nine (index playback). The operable range of the wireless controller will shorten under the following circumstances. •… -
Page 175: Using An Externally Mounted Flash (Sold Separately)
Please check the manual for your flash. * Certain functions noted in the manuals for the Canon Speedlite 220EX, 380EX, 420EX, 550EX, the Macro Ring Lite MR-14EX and Macro Twin Lite MT-24EX cannot be performed when mounted on this camera. Please read this guide before using one of these flashes on the camera.
-
Page 176
To shoot with the flash, you are recommended to set the white balance to the Other Canon Flashes Since other flashes fire at full strength, set the shutter speed and aperture accordingly. Set the shutter speed to 1/125 second or slower, and set the aperture to a value appropriate to the flash’s… -
Page 177
Press the shutter button halfway. The flash is charged when its pilot lamp lights up. Press the shutter button all the way to shoot the image. The externally mounted flash will not fire in continuous shooting. The Bracket mode cannot be used for flash photography. If the flash fires, only one image gets recorded. -
Page 178
Using an Externally Mounted Flash (Sold Separately) (continued) How to Mount Macro Ring Lite MR-14EX and Macro Twin Lite MT-24EX The separately sold Conversion Lens Adapter LA-DC58C is required to mount Macro Ring Lite MR-14EX or Macro Twin Lite MT-24EX on the camera. -
Page 179
Release buttons Release buttons Flash Heads Attach the conversion lens adapter so that its lens’ and turn it in the direction of the arrow until meets If you plan to attach Close-up Lens 500D (p. 178), do it after you attach this adapter. -
Page 180
Using an Externally Mounted Flash (Sold Separately) (continued) Press the button to set the camera to Macro mode and set [ND Filter] to [On]. Macro mode (p. 73) ND filter (p. 118) When Macro Ring Lite MR-14EX or Macro Twin Lite MT-24EX is mounted on the camera using Conversion Lens Adapter LA- DC58C with its two parts joined, shooting in wide angle could cause dark shadows on the image. -
Page 181: Using The Tele-Converter (Sold Separately)/Close-Up Lens (Sold Separately)
Using the Tele-converter (Sold Separately)/ Close-up Lens (Sold Separately) The separately sold Conversion Lens Adapter LA-DC58C is required to use the separately sold Tele-converter TC-DC58A and Close-up Lens 500D (58 mm) with the camera. Conversion Lens Adapter LA- DC58C is a combination of rear and front parts, however, use them as a single, joined unit.
-
Page 182
Using the Tele-converter (Sold Separately)/Close-up Lens (Sold Separately) (continued) Tele-converter TC-DC58A This 58 mm-threaded diameter magnifying conversion lens is for taking telephoto shots. The lens changes the focal length of the camera body’s lens by a factor of 1.5x. Use the tele-converter lens with the focal length set to the maximum telephoto setting. -
Page 183
Mounting the Lenses Ring Ring Release Button Mount the lens by turning it in the direction of the arrow. Tele-converter TC-DC58A Turn off the camera. Then press and hold the ring release button and remove the outer ring of the lens. -
Page 184
Using the Tele-converter (Sold Separately)/Close-up Lens (Sold Separately) (continued) Setting the Camera Lens to the Most Appropriate Position Turn the mode lever to MENU button. The [ (Rec.)] menu appears. Select [Converter] using the arrow on the omni selector, then select the name of the mounted lens using the arrow on the omni selector. -
Page 185
The distance shown with the MF indicator (p. 114, 115) does not change even if you change the [Converter] setting from [None]. The camera does not enter Macro mode when [Converter] is set to any setting other than [None]. If the camera is currently in Macro mode, Macro mode will be canceled when [Converter] is set to another setting than [None]. -
Page 186: Using A Compact Power Adapter (Sold Separately)
Using a Compact Power Adapter (Sold Separately) You should use the separately sold Compact Power Adapter CA- 560 when using the camera for long periods of continuous use or for connecting to a computer or printer. Compact Power Adapter CA-560 DC IN terminal Attach the power cord to the compact power adapter and plug it into a power outlet.
-
Page 187: Using A Battery Charger (Sold Separately) And Car Battery Cable (Sold Separately)
Using a Battery Charger (Sold Separately) and Car Battery Cable (Sold Separately) Battery Charger CG-570 Car Battery Cable CB-570 Combined use of Battery Charger CG-570 (sold separately) and Car Battery Cable CB-570 (sold separately) lets you charge battery packs (up to 2 at the same time) from a car’s cigarette lighter socket. It is also possible to charge up to 2 battery packs at the same time from a power outlet if you connect Compact Power Adapter CA-560 (sold separately) or Compact Power Adapter CA-570 (sold…
-
Page 188: Replacing The Date Battery
Replacing the Date Battery If the Set Date/Time menu appears when you turn on the camera power, the date battery charge is low and the date and time settings have been lost. Please replace the battery with a generic CR2016 lithium coin battery with the following procedures.
-
Page 189: Camera Care And Maintenance
Never use synthetic cleansers on the camera body or lens. If dirt remains, contact the nearest Canon Customer Support Help Desk as listed on the separate Canon Customer Support leaflet.
-
Page 190: Specifications
Specifications All data is based on Canon’s testing standard. Subject to change without notice. Camera Effective Pixels Image Sensor Lens Digital Zoom Viewfinder LCD Monitor AF System Shooting Normal AF: Distance (from the front Macro AF: of the lens) Super Macro AF:…
-
Page 191
(When sensitivity is set to ISO 100 equivalent.) Sync-terminals on accessory shoe Use of the following external flashes is recommended: Canon Speedlite 220EX, 380EX, 420EX, 550EX, Macro Ring Lite MR-14EX and Macro Twin Lite MT-24EX. Slow synchro and 1st-curtain/2nd-curtain flash are available. -
Page 192
Single (histogram displayable), Index (9 thumbnail images), Magnified (approx. 10x (max.) in LCD monitor/viewfinder), Sound memos (up to 60 sec.) or Slide show. Canon Direct Print/Bubble Jet Direct/ PictBridge compatible 12 languages available for menus and messages (English, German, French, Dutch,… -
Page 193
Operating Humidity Dimensions Weight: *¹ This digital camera supports Exif 2.21 (also called “Exif Print”). Exif Print is a standard for enhancing the communication between digital cameras and printers. By connecting to an Exif Print-compliant printer, the camera’s image data at the time of shooting is used and optimized, yielding extremely high quality prints. -
Page 194
Battery Pack BP-511A Approx. 420 images (Fully charged) • The data above reflects standard Canon testing conditions.The actual figures will vary according to the shooting conditions and settings. • Movie data is excluded. • At low temperatures, the battery pack performance may diminish and the low battery icon appear very rapidly. -
Page 195
• The display panel can only display 3 digits. (Any value exceeding “1000” will appear as “999”.) • These figures reflect standard shooting conditions established by Canon. Actual totals may vary according to the subject, shooting conditions and shooting mode. • The following are the approximate maximum recording times for… -
Page 196
Image File Sizes (Estimated) Resolution (3264 x 2448 pixels) (2272 x 1704 pixels) (1600 x 1200 pixels) (1024 x 768 pixels) (640 x 480 pixels) (3264 x 2448 pixels) (640 x 480 pixels) Movie (320 x 240 pixels) (160 x 120 pixels) Battery Charger CG-580* Input voltage: Rated output:… -
Page 197
Battery Pack BP-511A Type: Nominal voltage: Nominal capacity: Charge cycles: Operating temperatures: Dimensions: Weight: Wireless Controller WL-DC100 Power supply: Operating temperatures: Dimensions: Weight: CompactFlash™ Card Card slot type: Dimensions: Weight: Compact Power Adapter CA-560 (Sold Separately) Input voltage: Rated output: Operating temperatures: Dimensions: Weight:… -
Page 198
Tele-converter TC-DC58A (Sold Separately) Magnification: Focal length: Lens configuration: Focusing range (from tip of lens): Thread diameter: Dimensions: Weight: Close-up Lens 500D (58 mm) (Sold Separately) Focal length: Focusing range (from tip of lens): Thread diameter: Dimensions: Weight: Approx. 1.5x Infinity 5 elements in 3 groups 2.2 m –… -
Page 199: Index
Index Adobe RGB … . . 98 AEB Mode … . . 100 AE Lock ….104 AF Frame .
-
Page 200
FE Lock ….106 File Format … 55, 60 File Number ..37, 50, 120 Reset . -
Page 201
Operation Sound . . 49, 51, 154 Overexposure Warning ..39 Photo Effect … . . 96 Playback ….122 Auto Playback (Slide Show) . -
Page 202
Tele-converter ..177 Telephoto ….39 Terminal Cover ..12, 19 Transfer Order (Image Transmission Settings) . -
Page 203
MEMO… -
Page 204
MEMO… -
Page 205: Fcc Notice
• Consult the dealer or an experienced radio/TV technician for help. The cables with the ferrite core provided with the digital camera must be used with this equipment in order to comply with Class B limits in subpart B of Part 15 on FCC rules.
-
Page 206: Functions Available In Each Shooting Mode
Functions Available in Each Shooting Mode This chart shows the functions available in each shooting mode. You can shoot with the settings saved in the C Large Medium 1 Resolution Medium 2 Medium 3 Small Movie Resolution Movie Movie Superfine Compression Fine Normal…
-
Page 207
Weighted – – – – – Light Meter- Averaging ing System Spot Metering – – – – – Center – – – – – AF Point – – – – – AE Lock/FE Lock – – – – – – –…