
Данное руководство не может быть воспроизведено в любой форме
целиком или частично (за исключением краткого цитирования в
статьях или обзорах) без письменного разрешения компании NIKON.
AMA14497
Отпечатано в России
CT2A01(1D)
6MM2541D-01
ЦИФРОВАЯ ФОТОКАМЕРА
Подробное руководство пользователя
Раздел: Бытовая, кухонная техника, электроника и оборудование
Тип: Фотоаппарат
Характеристики, спецификации
Общее число пикселов:
16.44 млн
Число эффективных пикселов:
16.1 млн
Максимальное разрешение:
4608 x 3456
Чувствительность:
80 — 1600 ISO, Auto ISO
Баланс белого:
автоматический
Вспышка:
встроенная, подавление эффекта красных глаз
Стабилизатор изображения (фотосъемка):
оптический, подвижный элемент в объективе
Время работы таймера:
2, 10 c
Формат кадра (фотосъемка):
4:3, 16:9
Фокусное расстояние:
23 — 598 мм
Функция «Оптический Zoom»:
26x
Использование экрана в качестве видоискателя:
есть
Жидко кристалический экран:
921000 точек, 3 дюйма
Ручная настройка выдержки и диафрагмы:
нет
Экспо коррекция:
+/- 2 EV с шагом 1/3 ступени
Подсветка автофокуса:
есть
Минимальное расстояние съемки:
0.01 м
Тип карт памяти:
SD, SDHC, SDXC
Объём встроенной памяти:
50 Мб
Интерфейсы:
USB 2.0, видео, HDMI, аудио
Формат аккумуляторов:
AA-совмеcтимый
Количество аккумуляторов:
4
Емкость аккумулятора:
450 фотографий
Запись видео роликов:
есть
Максимальное разрешение видеороликов:
1280×720
Функция «Цифровой Zoom»:
4x
Вес устройства:
430 г, с элементами питания
Инструкция к Фотоаппарату Nikon COOLPIX L810
ЦИФРОВАЯ ФОТОКАМЕРА
Подробное руководство пользователя
Данное руководство не может быть воспроизведено в любой форме
целиком или частично (за исключением краткого цитирования в
статьях или обзорах) без письменного разрешения компании NIKON.
AMA14497
Отпечатано в России
CT2A01(1D)
6MM2541D-01

Сведения о товарных знаках
• Microsoft, Windows и Windows Vista являются зарегистрированными товарными знаками или
товарными знаками Корпорация Microsoft в США и/или других странах.
• Macintosh, Mac OS и QuickTime являются товарными знаками Apple Inc.,
зарегистрированными в США и других странах.
•
Adobe и Acrobat являются зарегистрированными товарными знаками Adobe Systems Inc.
• Логотипы SDXC, SDHC и SD являются товарными знаками компании SD-3C, LLC.
• PictBridge является товарным знаком.
• HDMI, логотип и High-Definition Multimedia Interface являются товарными
знаками HDMI Licensing LLC.
• Все другие торговые наименования, приводимые в настоящем руководстве и в другой
документации, которая поставляется вместе с изделиями компании Nikon, являются
товарными знаками или зарегистрированными товарными знаками соответствующих
владельцев.
AVC Patent Portfolio License
Данный продукт имеет лицензию AVC Patent Portfolio License для личного и некоммерческого
использования клиентом в целях (i) кодирования видео в соответствии со стандартом AVC
(«видеосодержимое AVC») и/или (ii) декодирования видеосодержимого AVC, закодированного
клиентом в рамках личной и некоммерческой деятельности и/или полученного от поставщика
видеосодержимого, имеющего лицензию на предоставление видеосодержимого AVC. Эта
лицензия не распространяется на любое другое использование, а также не подразумевается
для такого использования. Дополнительную информацию можно получить от MPEG LA, L.L.C.
См. веб-сайт
http://www.mpegla.com
.

Введение
Основные элементы фотокамеры
Основы съемки и просмотра
Функции съемки
Функции просмотра
Запись и просмотр видеороликов
Общие настройки фотокамеры
Раздел справочной информации
Технические примечания и алфавитный
указатель
i
Введение
Прочтите это в первую очередь
Благодарим вас за приобретение цифровой фотокамеры Nikon COOLPIX L810. Прежде чем
начать пользоваться фотокамерой, ознакомьтесь с содержанием раздела «Меры
предосторожности» (A viii) и с информацией, содержащейся в этом руководстве. После
прочтения этого руководства держите его под рукой и обращайтесь к нему для ознакомления
Введение
с преимуществами новой камеры.
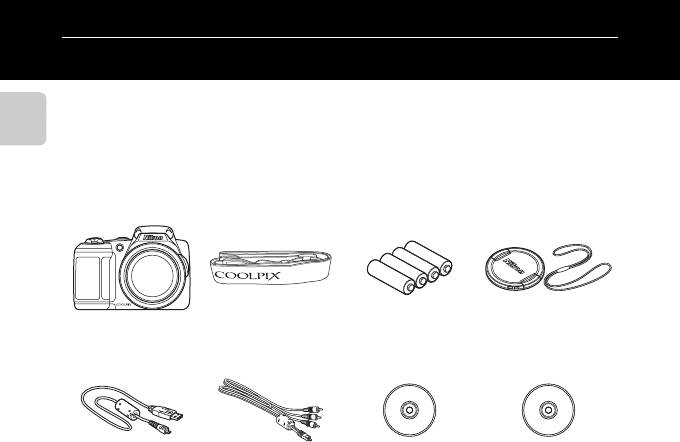
Проверка комплектации фотокамеры
В случае отсутствия каких-либо комплектующих следует обращаться по месту приобретения
фотокамеры.
Цифровая фотокамера
Ремень фотокамеры Щелочные батареи
Крышка объектива
COOLPIX L810
LR6/L40, типоразмер
LC-CP25 (со шнурком)
AA (×4)*
Кабель USB UC-E16 Аудио-/видеокабель
ViewNX 2 Installer CD
Reference Manual CD
EG-CP16
(Установочный
(Компакт-диск с
компакт-диск с ПО
подробным руководством
ViewNX 2)
пользователя)
• Гарантия
* Батареи, входящие в комплект поставки, предназначены только для пробного использования.
• Карта памяти не входит в комплектацию фотокамеры.
ii

Об этом руководстве
Чтобы сразу начать пользоваться фотокамерой, см. раздел «Основы съемки и просмотра»
(A 9).
Введение
Чтобы узнать о частях фотокамеры, а также об информации, отображаемой на мониторе, см.
раздел «Основные элементы фотокамеры» (A 1).
iii

Дополнительная информация
• Символы и условные обозначения
Для облегчения поиска информации в этом руководстве используются следующие символы
и условные обозначения.
Введение
Значок Описание
Этим символом обозначаются меры предосторожности и сведения, с которыми
B
необходимо ознакомиться до использования фотокамеры.
Этим символом обозначаются примечания и сведения, с которыми необходимо
C
ознакомиться до использования фотокамеры.
Этими символами обозначаются страницы, содержащие соответствующие сведения.
A/E/F
E
: «Раздел справочной информации»,
F
: «Технические примечания и
алфавитный указатель».
• В настоящем руководстве карты памяти SD, SDHC и SDXC собирательно именуются «картами
памяти».
• Настройка, устанавливаемая при покупке, называется «настройкой по умолчанию».
• Названия пунктов меню, отображаемых на мониторе фотокамеры, а также названия кнопок
и сообщения, отображаемые на мониторе компьютера, выделяются жирным шрифтом.
• В этом руководстве примеры отображения на мониторе могут не включать изображения,
чтобы индикация на мониторе была более понятной.
• В этом руководстве иллюстрации и информация, отображаемая на мониторе, могут
отличаться от фактического отображения.
iv

Информация и меры предосторожности
Концепция «постоянного совершенствования»
Введение
В рамках развиваемой компанией Nikon концепции «постоянного совершенствования»
пользователям предоставляется регулярно обновляемая информация о поддержке выпущенных
изделий и учебные материалы на следующих веб-сайтах:
• Для пользователей в США: http://www.nikonusa.com/
• Для пользователей в Европе и Африке: http://www.europe-nikon.com/support/
• Для пользователей в странах Азии, Океании и Ближнего Востока: http://www.nikon-asia.com/
Посетите один из этих веб-сайтов для получения последних сведений об изделиях, советов, ответов на
часто задаваемые вопросы и общих рекомендаций по фотосъемке и обработке цифровых
изображений. Дополнительные сведения можно получить у региональных представителей компании
Nikon. Контактные сведения можно узнать, посетив указанный ниже веб-сайт.
http://imaging.nikon.com/
Используйте только фирменные электронные принадлежности Nikon
Фотокамеры Nikon COOLPIX отвечают самым современным стандартам и имеют сложную электронную
схему. Только фирменные электронные принадлежности Nikon (включая зарядные устройства,
батареи и сетевые блоки питания), прошедшие специальную сертификацию Nikon для использования
с цифровой фотокамерой Nikon, разработаны и проверены на соответствие эксплуатационным
требованиям и требованиям безопасности этой электронной схемы.
ИСПОЛЬЗОВАНИЕ ЭЛЕКТРОННЫХ ПРИНАДЛЕЖНОСТЕЙ ДРУГИХ ПРОИЗВОДИТЕЛЕЙ (НЕ NIKON)
МОЖЕТ ПРИВЕСТИ К ПОВРЕЖДЕНИЮ ФОТОКАМЕРЫ И АННУЛИРОВАНИЮ ГАРАНТИИ
NIKON.
Для получения сведений о фирменных принадлежностях Nikon обратитесь к местному официальному
торговому представителю компании Nikon.
Перед съемкой важных событий
Перед съемкой важных событий, например свадьбы, или перед тем как взять фотокамеру в
путешествие, сделайте пробный снимок, чтобы убедиться в правильности работы фотокамеры.
Компания Nikon не несет ответственности за убытки или упущенную выгоду, возникшие в результате
неправильной работы изделия.
v

О руководствах
•
Никакая часть руководств, включенных в комплект поставки данного продукта, не может быть
воспроизведена, передана, переписана, сохранена в системе резервного копирования или переведена на
Введение
любой язык в любой форме любыми средствами без предварительного письменного разрешения Nikon.
• Компания Nikon сохраняет за собой право изменять любые характеристики аппаратного и
программного обеспечения, описанного в данных руководствах, в любое время и без
предварительного уведомления.
• Компания Nikon не несет ответственности за какой бы то ни было ущерб, вызванный применением
данного изделия.
•
Были приложены все усилия для того, чтобы обеспечить точность и полноту приведенной в руководствах
информации. Компания Nikon будет благодарна за любую информацию о замеченных ошибках и
упущениях, переданную в ближайшее представительство компании (адрес сообщается отдельно).
Уведомление о запрещении копирования или воспроизведения
Необходимо помнить, что даже простое обладание материалом, скопированным или
воспроизведенным цифровым способом с помощью сканера, цифровой фотокамеры или другого
устройства, может преследоваться по закону.
• Материалы, копирование или воспроизведение которых запрещено законом
Не копируйте и не воспроизводите денежные банкноты, монеты, ценные бумаги, государственные
ценные бумаги и ценные бумаги органов местного самоуправления, даже если такие копии и
репродукции отмечены штампом «образец». Запрещено копирование и воспроизведение денежных
банкнот, монет и ценных бумаг других государств. Запрещено копирование и воспроизведение
негашеных почтовых марок и почтовых открыток, выпущенных государством, без письменного
разрешения государственных органов.
Запрещено копирование и воспроизведение печатей государственных учреждений и документов,
заверенных в соответствии с законодательством.
• Предупреждения относительно копирования и воспроизведения
Копии и репродукции ценных бумаг, выпущенных частными компаниями (акции, векселя, чеки,
подарочные сертификаты и т. д.), сезонных билетов или купонов помечаются предупреждениями
согласно требованиям государственных органов, кроме минимального числа копий, необходимого
для использования компанией в деловых целях. Не копируйте и не воспроизводите государственные
паспорта; лицензии, выпущенные государственными учреждениями и частными компаниями;
удостоверения личности и такие документы, как пропуска или талоны на питание.
vi

• Уведомления о соблюдении авторских прав
Копирование или воспроизведение книг, музыкальных произведений, произведений живописи,
гравюр, печатной продукции, географических карт, чертежей, фильмов и фотографий с
зарегистрированным авторским правом охраняется государственным и международным
Введение
законодательством об авторском праве. Не используйте изделие для изготовления незаконных копий,
нарушающих законодательство об авторском праве.
Утилизация устройств хранения данных
Обратите внимание на то, что при удалении изображений или форматировании устройств хранения
данных, таких как карты памяти или внутренняя память фотокамеры, исходные данные изображений
уничтожаются не полностью. В некоторых случаях файлы, удаленные с отслуживших свой срок
устройств хранения данных, можно восстановить с помощью имеющихся в продаже программных
средств. Ответственность за обеспечение конфиденциальности любой подобной информации лежит
исключительно на пользователе.
Прежде чем избавиться от неиспользуемых устройств хранения данных или передать право
собственности на них другому лицу, следует стереть всю информацию с помощью имеющегося в
продаже специального программного обеспечения или отформатировать устройство, а затем
заполнить его изображениями, не содержащими личной информации (например, видами ясного
неба). Не забудьте также заменить изображения, выбранные для функции Выбрать снимок
параметра Экран приветствия (A 88). При физическом уничтожении устройств хранения данных
соблюдайте меры предосторожности, чтобы не нанести ущерба здоровью или имуществу.
vii

Меры предосторожности
Перед началом работы с устройством внимательно изучите следующие меры безопасности
во избежание получения травм и повреждения изделия Nikon. Всем лицам, использующим
данное изделие, следует ознакомиться с инструкциями по безопасности.
Введение
Данным символом отмечены предупреждения и сведения, с которыми необходимо
ознакомиться до начала работы с изделием Nikon во избежание травм.
ПРЕДУПРЕЖДЕНИЯ
В случае неисправности
отключите сетевой блок питания и/или
выключите фотокамеру
извлеките батареи и доставьте изделие для
проверки в ближайший авторизованный
При появлении дыма или необычного
сервисный центр Nikon.
запаха, исходящего из фотокамеры или
блока питания, отсоедините блок питания
Не пользуйтесь фото-камерой
от сети и немедленно извлеките батареи,
или сетевым
блоком питания
стараясь не допустить ожогов.
при наличии
в воздухе
Продолжение работы с устройством может
легковоспла-меняющихся газов
привести к получению травм. После
извлечения батареи или отключения
Не работайте с электронным
источника питания доставьте изделие для
оборудованием и с фотокамерой
проверки в ближайший авторизованный
при наличии в воздухе
сервисный центр компании Nikon.
легковоспламеняющихся газов: это
может привести к взрыву или пожару.
Не разбирайте фотокамеру
Прикосновение к внутренним частям
фотокамеры или сетевого блока питания
может привести к получению травм. Ремонт
должен производиться только
квалифицированными специалистами. В
случае повреждения корпуса фотокамеры
или сетевого блока питания в результате
падения или другого происшествия
viii

Меры предосторожности при
Соблюдайте меры
обращении с ремнем
предосторожности при
фотокамеры
обращении с батареями
Введение
Запрещается надевать ремень фотокамеры
Неправильное обращение с батареями
на шею младенца или ребенка.
может привести к их протеканию или
взрыву. При обращении с батареями
Храните в недоступном для
для данного изделия соблюдайте
детей месте
следующие меры предосторожности.
Примите особые меры
• Перед заменой батарей выключите
предосторожности во избежание
изделие. Если используется сетевой
попадания батарей и других
блок питания, убедитесь, что он
небольших предметов детям в рот.
отключен от сети.
Избегайте длительного
• Используйте только батареи,
контакта с включенной
рекомендованные для данного
изделия (A 11). Не используйте
фотокамерой, зарядным
старые и новые батареи
устройством или сетевым
одновременно, а также батареи
блоком питания
разных производителей или типов.
Детали этих устройств нагреваются, и их
длительный контакт с кожей может
привести к низкотемпературным ожогам.
ix

• Заряжая никель-металлгидридные
• Не допускайте воздействия пламени
аккумуляторные батареи Nikon
или высоких температур на батареи.
EN-MH2, пользуйтесь только
• Не погружайте батареи в воду и не
Введение
рекомендованным зарядным
допускайте попадания на них воды.
устройством и устанавливайте в
• Не перевозите и не храните батареи
него четыре батареи за один раз.
вместе с металлическими
При замене поставляемых батарей
предметами, например
на батареи EN-MH2-B2
украшениями или шпильками.
(дополнительно) приобретите два
• Из полностью разряженных батарей
комплекта (в общей сложности
может вытекать жидкость. Во
четыре батареи).
избежание повреждения изделия
• Аккумуляторные батареи EN-MH2
извлекайте из него разряженные
предназначены для использования
батареи.
только с цифровыми фотокамерами
• Немедленно прекратите
Nikon и совместимы с моделями
использовать батарею, если вы
COOLPIX L810.
заметили в ней какие-либо
изменения, например смену окраски
• Не закорачивайте и не разбирайте
или деформацию.
батареи. Не удаляйте и не
• В случае попадания жидкости,
вскрывайте изоляцию или корпус
вытекшей из поврежденной батареи,
батарей.
на одежду или кожу немедленно
смойте ее большим количеством
воды.
x

Во время эксплуатации
• Берегите шнур питания от
зарядного устройства
повреждений, не вносите в него
конструктивные изменения, не
(поставляется отдельно)
перегибайте его и не тяните за него
Введение
соблюдайте следующие меры
с силой, не ставьте на него тяжелые
предосторожности:
предметы, не подвергайте его
• Не допускайте попадания воды на
воздействию высоких температур
устройство. Несоблюдение
этого
или открытого огня. В случае
требования может привест
и
повреждения изоляции сетевого
к возгоранию или поражению
шнура и оголения проводов
электрическим током.
отнесите его для проверки в
• Пыль на металлических частях
авторизованный сервисный центр
сетевой вилки или вокруг них
Nikon. Несоблюдение этого
необходимо удалять с помощью сухой
требования может привести к
ткани. Продолжение работы
возгоранию или поражению
с устройством может привести к
электрическим током.
возгоранию.
• Не прикасайтесь к сетевой вилке
• Не пользуйтесь сетевым шнуром и
или к зарядному устройству
не находитесь рядом с зарядным
мокрыми руками. Несоблюдение
устройством во время грозы.
этого требования может привести
Несоблюдение этого требования
к поражению электрическим током.
может привести к поражению
• Не используйте
электрическим током.
спреобразователями напряжения
или преобразователями
постоянного тока. Несоблюдение
этого требования может привести
к повреждению изделия, а также к
его перегреву или возгоранию.
xi

Используйте только
Компакт-диски
соответствующие кабели
Компакт-диск, поставляемый с этим
При подключении кабелей к входным и
устройством, не должен
Введение
выходным разъемам и гнездам используйте
воспроизводиться на оборудовании,
только специальные кабели Nikon,
предназначенном для проигрывания
поставляемые вместе с фотокамерой или
звуковых компакт-дисков.
продаваемые отдельно.
Воспроизведение компакт-дисков с
данными на аудиопроигрывателе
Соблюдайте осторожность при
может привести к нарушениям слуха
обращении с подвижными
или повреждению оборудования.
частями фотокамеры
Соблюдайте осторожность
Будьте внимательны. Следите за тем, чтобы
при использовании вспышки
ваши пальцы и другие предметы не были
зажаты крышкой объектива или другими
Использование вспышки на близком
подвижными частями фотокамеры.
расстоянии от глаз объекта съемки
может вызвать временное ухудшение
зрения. Особую осторожность следует
соблюдать при фотографировании
детей: в этом случае вспышка должна
находиться на расстоянии не менее 1 м
от объекта съемки.
xii

Не используйте вспышку, когда
Во время эксплуатации в
ее излучатель соприкасается с
самолете или больнице
телом человека или каким-либо
следует выключать питание
предметом
Введение
Отключайте питание во время взлета или
Несоблюдение этой меры предосторожности
посадки. Следуйте инструкциям
может привести к ожогам или пожару.
больничного персонала при использовании
камеры в больнице. Испускаемые ей
Избегайте контакта с
электромагнитные волны могут привести к
жидкокристаллическим
нарушениям работы электронных систем
веществом
самолета или оборудования больницы.
Если монитор разбился, необходимо
предпринять срочные меры во избежание
травм осколками стекла и предупредить
попадание жидкокристаллического
вещества на кожу, в глаза и в рот.
xiii

Объемные изображения
Не следует долгое время непрерывно
просматривать записанные с помощью этой
Введение
фотокамеры объемные изображения на
экране телевизора, монитора или другого
видеоустройства. Поскольку у детей зрение
находится в стадии формирования, то
прежде чем разрешить просмотр ребенку,
советуем проконсультироваться с
педиатром или офтальмологом и следовать
их рекомендациям.
Продолжительный просмотр объемных
изображений может привести к
перенапряжению глаз, вызвать тошноту или
другие неприятные ощущения. При
возникновении подобных симптомов
обратитесь к офтальмологу.
xiv

Примечания
Символ для раздельной
Этот символ на батарее
утилизации, применяемый
указывает на то, что данная
батарея подлежит
в европейских странах
раздельной утилизации.
Введение
Данный символ означает, что
Следующие замечания касаются только
изделие должно
пользователей в европейских странах:
утилизироваться отдельно.
• Все батареи, независимо от того,
Следующие замечания
промаркированы ли они этим
касаются только
символом или нет, подлежат
пользователей в европейских странах.
раздельной утилизации в
• Данное изделие предназначено для
соответствующих пунктах сбора.
раздельной утилизации
Не выбрасывайте их вместе с
в соответствующих пунктах
бытовыми отходами.
утилизации. Не выбрасывайте
• Подробные сведения можно
изделие вместе с бытовым мусором.
получить у продавца или в местной
• Подробные сведения можно
организации, ответственной за
получить у продавца или в местной
вторичную переработку отходов.
организации, ответственной за
вторичную переработку отходов.
xv

Оглавление
Шаг 3. Фокусировка и съемка………..………….... 26
Введение …………………………………………………….. ii
Спусковая кнопка затвора……………………………… 27
Прочтите это в первую очередь………….……….. ii
Шаг 4. Просмотр изображений……………….….. 29
Проверка комплектации фотокамеры ………… ii
Шаг 5. Удаление изображений.…………..………. 31
Введение
Об этом руководстве………………………………….……….. iii
Информация и меры предосторожности ….. v
Функции съемки……………………………………… 33
Меры предосторожности …………….……….……. viii
G Простой авто режим …………………….……….... 34
ПРЕДУПРЕЖДЕНИЯ ……………………………..……………… viii
Изменение настроек режима G (Простой
Примечания …………….………..………….………….…….. xv
авто режим)…….……………………..……………………………… 34
Сюжетный режим (съемка в соответствии с
Основные элементы фотокамеры………… 1
сюжетами)…..………….………..………….………..…………. 35
Корпус фотокамеры …………………………..………….… 2
Изменение настроек сюжетного
Прикрепление ремня фотокамеры и крышки
режима……………………….……………………………………………. 36
объектива ………………………………….…………………….……….. 4
Описание каждого сюжета…………………………….. 36
Подъем и опускание вспышки……………………….. 5
Режим интеллектуального портрета (съемка
Монитор…………….………..………….………..………….…….. 6
улыбающихся лиц)……………………….………….…….. 44
Режим съемки………………………….…………………….……….. 6
Изменение настроек режима
Режим просмотра………..……………………..………………… 8
интеллектуального портрета……………………….. 45
Параметры, доступные в меню
Основы съемки и просмотра…………………. 9
интеллектуального портрета……………………….. 46
Подготовка 1. Установка батарей…………….... 10
Использование функции смягчения тона
Применимые батареи……………………………………..… 11
кожи……………….……………………..………………………………….. 47
Подготовка 2. Установка карты памяти……. 13
Режим A (Авто) ………………….………..………….…….. 48
Внутренняя память и карты памяти…….……… 14
Изменение настроек режима A (авто)…… 48
Рекомендованные карты памяти…………………. 15
Параметры, доступные в меню
Подготовка 3. Установка языка дисплея, даты
автоматической съемки…..……………………..………. 49
и времени………………………..………….………..…………. 16
Функции, устанавливаемые с помощью
Шаг 1. Включение фотокамеры и выбор
мультиселектора ……….………….………..………….….. 50
режима съемки …..………….………….………..…………. 20
Доступные функции…………………………………………… 50
Включение и выключение фотокамеры……. 22
Использование
Шаг 2. Компоновка кадра……………..………….….. 23
вспышки (режимы вспышки)…………………………. 51
Использование зума…………………………………..……… 24
Использование автоспуска……………….…………… 55
Использование режима макросъемки…….. 57
Регулировка яркости (Поправка
экспозиции)…………………………………….…………………….. 59
Настройки по умолчанию………………………………. 60
xvi

Изменение размера изображения (Режим
изображения) …………………………….…………..………. 62
Раздел справочной информации…… E1
Настройки режима изображения (размер и
Использование съемки панорамы………… E2
качество изображения)………………………………….… 62
Съемка 3D изображений …………………..…….. E5
Введение
Функции, одновременное использование
Редактирование фотографий……………..….. E8
которых невозможно.……….…………..………….….. 64
Функции редактирования……………..…………… E8
Фокусировка ……….………….………..………….……….... 65
I D-Lighting: повышение яркости и
Использование системы
контраста ……………..……………………………………….... E10
распознавания лиц………………………..…………………… 65
e Смягчение тона кожи: смягчение тона
Блокировка фокусировки……………………………….. 66
кожи……………….……………………..…………………………… E11
g Уменьшить снимок: уменьшение размера
Функции просмотра………………………………. 67
изображения ……………………………………………….... E12
Увеличение при просмотре.………….………..….. 68
a кадрирование: создание кадрированной
Отображение уменьшенного изображения,
копии………………….………………………………………..……. E13
отображение календаря ……….………….……….... 69
Редактирование видеороликов………….. E15
Функции, доступные в режиме просмотра
Подключение фотокамеры к телевизору (просмотр
(Меню просмотра)………………..………….………….... 70
изображений на экране телевизора)
…………... E17
Подключение фотокамеры к телевизору,
Подключение фотокамеры к принтеру
компьютеру или принтеру ……………….……….... 71
(прямая печать)..………….………..………….…….. E19
Использование ViewNX 2………..…………..………. 73
Подключение фотокамеры к
Установка ViewNX 2………………………………..………….. 73
принтеру……………….……………………………………….... E20
Передача изображений на компьютер…….. 76
Печать отдельных изображений………….. E22
Просмотр снимков………………..………………..………….. 78
Печать нескольких изображений……….. E24
Меню интеллектуального портрета…… E27
Запись и просмотр видеороликов…….. 79
Смягчение тона кожи………………………………… E27
Запись видеороликов…………………………..………. 80
Таймер улыбки……………………..…………………….... E28
Изменение настроек записи видеороликов
Отслеж. моргания ……………………………..………… E28
(меню видео)……..……………………..………………..………….. 83
Просмотр видеороликов ……………….………….... 84
Общие настройки фотокамеры………….. 87
Меню настройки ….…………..……….…………..………. 88
xvii

Меню съемки (для режима A (авто))…. E29
Предуп. о закр. глаз ………………………………….... E62
Баланс белого (регулировка оттенка)
…. E29
Загрузка Eye-Fi……………..……………………..………… E64
Непрерывная съемка……………….……………….. E32
Сброс всех знач…………………………….……………… E65
Чувствительность ………..……………………..………. E33
Тип батарей……………………….…………………………… E68
Введение
Параметры цвета……………………………………..….. E34
Версия прошивки……….………………..……………… E68
Меню просмотра..………….………..………….…… E35
Имена файлов и папок……………..………….... E69
a Задание печати (создание задания
Дополнительные принадлежности ……. E70
печати DPOF)…………………………………….…………… E35
Сообщения об ошибках ……………..……….... E71
b Показ слайдов……………………….……………….. E38
d Защита …………………………………………………..….. E39
Технические примечания и алфавитный
f Повернуть снимок ……………………………….. E41
указатель……………………………………………….. F1
h
Копирование (Копирование с карты памяти во
Уход за изделием…….………….………..………….…. F2
внутреннюю память фотокамеры и наоборот)
…. E42
Фотокамера…………………………………….…………………. F2
Меню видео……………..………..………….………..… E44
Батареи……………..………………………………………..……….. F4
Параметры видео………………………………………… E44
Карты памяти………………………………………………..…… F6
Режим автофокуса………………………………………. E45
Чистка и хранение …………………..……….………… F7
Подавл. шумов от ветра…………..……………….. E45
Чистка………………..……………………..……………………..…… F7
Меню настройки ….…………..……….………..…… E46
Хранение………………………..………………..…………………. F7
Экран приветствия ………….……………………..….. E46
Поиск и устранение неисправностей……. F8
Часовой пояс и дата…………………………………… E47
Технические характеристики………………… F16
Настройка монитора….……………………..………. E51
Поддерживаемые стандарты………………….. F20
Печать даты (впечатывание даты и
Алфавитный указатель …………….…………..…. F 21
времени)……………………………………………..…………… E53
Подавл. вибраций……………………………………….. E54
Обнаруж. движения……………………………………. E55
АФ-помощь………..……………………..………………..….. E56
Настройка звука………………………….……………….. E57
Авто выкл.…………………………………………..…………… E58
Форматир. памяти/
Форматир. карточки ………………………………….. E59
Язык/Language……..……………………..……………….. E60
Настройки ТВ……………………………………………..….. E61
xviii

Основные элементы
фотокамеры
Основные элементы фотокамеры
В этой главе описываются основные элементы фотокамеры, а также разъясняется значение
информации, отображаемой на мониторе.
Корпус фотокамеры …………….……….……….……..…. 2
Прикрепление ремня фотокамеры и крышки объектива…………….4
Подъем и опускание вспышки……………….……….…………………………………..5
Монитор……..……….……….……..……….……..……….….. 6
Режим съемки………..………………….………………….………………….……………………..6
Режим просмотра…….………………….…………………………………….……………………8
Чтобы сразу начать пользоваться фотокамерой, см. раздел «Основы съемки и
просмотра» (A 9).
1
Основные элементы фотокамеры
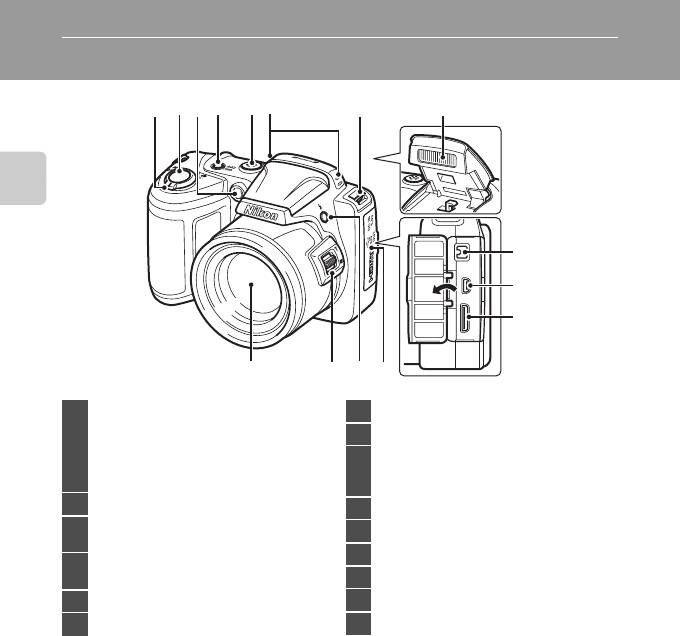
Корпус фотокамеры
4321
765
8
Основные элементы фотокамеры
9
10
11
15
1314
12
Рычажок зуммирования ………………………………..24
7 Проушина для ремня фотокамеры…………….4
f : широкий……………..……………………..……………24
8 Вспышка………………….………………………………………..5, 51
g : теле…….………………………………………..……………24
1
h :
просмотр уменьшенных изображений
….69
Входной разъем постоянного тока (предназначен
i : увеличение при просмотре………….68
9
для сетевого блока питания, приобретаемого
j : справка ……………….…………………………………..35
дополнительно в компании Nikon)
…….12, E70
2 Спусковая кнопка затвора…………………..……….26
10
USB -разъем и выходной аудио-/видеоразъем
…..71
Индикатор автоспуска……………………………………55
3
11 Разъем HDMI mini (Тип C)……………………………..71
Вспомогательная подсветка АФ………………..88
12 Крышка разъема…………..……………………..……………71
Выключатель питания/индикатор
4
включения питания………………………………………….20
13 Кнопка m (открытие вспышки)………………5, 51
5 Громкоговоритель ……………………………..……………84
14 Боковой рычажок зуммирования…………….24
6 Встроенный микрофон (стерео)…………….….80
15 Объектив
2
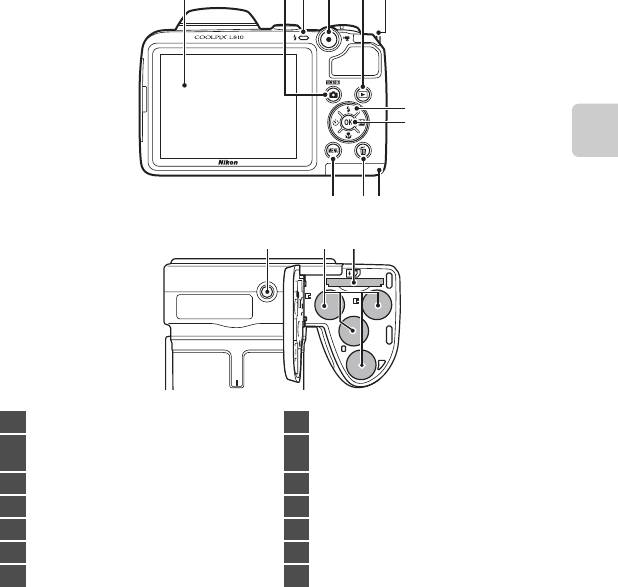
1
432
5
6
7
8
Основные элементы фотокамеры
10 911
12 13 14
1 Монитор…………………..……………………..……………………… 6
8 Кнопка k (сделать выбор)
Кнопка A (режим съемки)
Крышка батарейного отсека/
2
9
……………………………………………………………...34, 35, 44, 48
гнезда для карты памяти ……………………….10, 13
3 Индикатор вспышки…………………………………….….52
10 Кнопка l (удалить)……………………………………..…..31
4 Кнопка b (e видеосъемка)……………..……….80
11 Кнопка d………………..……………46, 49, 70, 83, 88
5 Кнопка c (просмотр)……………………………………29
12 Штативное гнездо ……………………………………..F18
6 Проушина для ремня фотокамеры……………. 4
13 Батарейный отсек…………………………………………….10
7 Мультиселектор
14 Гнездо карты памяти ………………………………….…..13
3
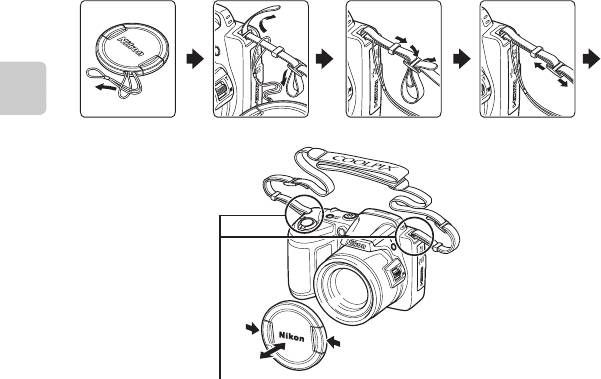
Прикрепление ремня фотокамеры и крышки объектива
Прикрепите крышку объектива к ремню фотокамеры, а затем прикрепите ремень к
фотокамере.
Основные элементы фотокамеры
Прикрепите их в двух местах.
B Крышка объектива
• Перед съемкой снимите крышку объектива.
• Когда съемка не выполняется (например, если питание выключено, или при переносе фотокамеры)
прикрепите крышку объектива к фотокамере для защиты объектива.
4
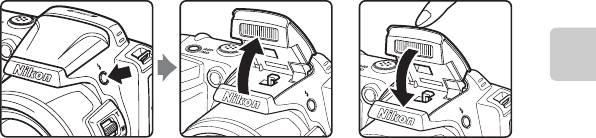
Подъем и опускание вспышки
Нажмите кнопку m (открытие вспышки), чтобы поднять вспышку.
• Использование вспышки (режимы вспышки) ➝ A 51
• Осторожно нажимая на вспышку, опустите ее до полной фиксации, если вспышка не
используется.
Основные элементы фотокамеры
5
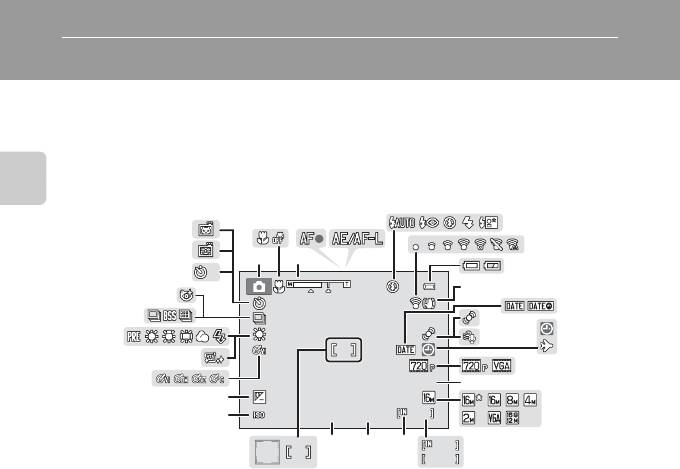
Монитор
•
Информация, отображаемая на мониторе при съемке и просмотре, изменяется в зависимости от
настроек фотокамеры и выполняемой операции.
По умолчанию информация отображается при включении фотокамеры и во время работы с
фотокамерой, а затем отключается через несколько секунд (
Настройка монитора
(
A
88) >
Информация о фото
>
Авто
).
Режим съемки
Основные элементы фотокамеры
6
9 9 9
999
F 3.1
F3.1
+1.0
+1.0
1 / 2 5 0
1/250
1 6 0 0
1600
2 9 m 0 s
29m 0s
10
10
10
10
9 9 9
999
9 9 9 9
2
4
5
6
33
7
32
1 3
8
31
9
30
10
29
11
13
28
12
14
27
15
26
16
25
17
24
2021
19 18
9999
2223

1 Режим съемки……………………………….34, 35, 44, 48
Число оставшихся кадров
18
(фотографий)………………….……………………..……………21
2 Режим макросъемки………………………….……………57
19 Индикатор внутренней памяти………..……….21
3 Индикатор зума………………………………………….24, 57
20 Значение диафрагмы ……………………………………..27
4 Индикатор фокусировки …………………………..….26
21 Выдержка….……………………..………………..…………………27
5 Индикатор AE/AF-L……………………………..………E3
22 Зона фокусировки…………………………………….23, 26
6 Режим вспышки………………………………………..……….51
Зона фокусировки (распознавание лиц,
7 Индикатор Eye-Fi…………..……………………..……………89
23
распознавание домашних питомцев)
…….. 23, 26
8 Индикатор уровня заряда батареи………….21
24 Чувствительность………………………….…………………49
9 Символ подавления вибраций…………………..88
Основные элементы фотокамеры
25 Величина коррекции экспозиции……………59
10 Печать даты……………………..……………………..……………88
26 Параметры цвета ………………………………..……………49
11 Значок обнаружения движения………………..88
27 Смягчение тона кожи …………………………………….46
12 Подавл. шумов от ветра………………………..……….83
28 Режим баланса белого…………………………………..49
13
Индикатор «Дата не установлена»
……19, 88, E71
29 Режим непрерывной съемки………..……………49
14 Индикатор пункта назначения…………………..88
30 Значок отслеживания моргания……………….46
15 Параметры видео……………………….…………………….83
31 Индикатор автоспуска…………………………………..55
16 Длина видеоролика……………………………………..….82
32 Таймер улыбки…………………..………………………………46
17 Режим изображения ……………………………………….62
33 Автосп. для пор. пит……………………..…………………42
7
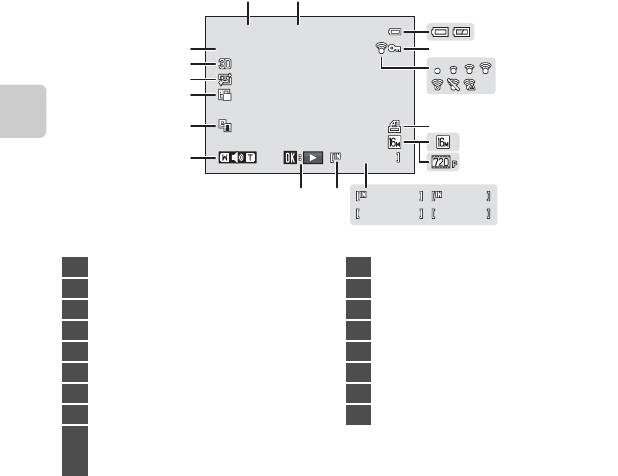
Режим просмотра
Основные элементы фотокамеры
8
1 m 0 s
1m 0s
9 9 9 / 9 9 9
999/ 999
1 m 0 s
1m 0s
9 9 9 9 / 9 9 9 9
9999/9999
9 9 9 9 . JP G
9999. JPG
9 9 9 / 99 9
999/ 999
1 5 / 0 5 / 2 0 1 2 1 2 : 0 0
1 2
15/05/2012 12:00
3
17
4
16
5
15
14
13
6
7
12
8
11
10
9
ba
1 Дата записи………………………………………..………………..16
10 Индикатор внутренней памяти………..……….29
2 Время записи………………….……………………..……………16
11 Индикатор просмотра видеоролика ……..84
3 Индикатор уровня заряда батареи………….21
12 Индикатор громкости……………………………………85
4 Значок защиты………………………………………………..….70
13 Значок D-Lighting……………………..……………………..70
5 Индикатор Eye-Fi…………..……………………..……………89
14 Значок уменьшенного снимка…………………..70
6 Значок задания печати………………………….……….70
15 Значок смягчения тона кожи……………………..70
7 Режим изображения ……………………………………….62
16 Индикатор 3D изображения……………………….43
8 Параметры видео……………………….…………………….83
17 Номер и тип файла …………………………………..E69
(a) Номер текущего снимка/
9
общее число снимков……………….……………29
(b) Длина видеоролика………………………..……….84
Оглавление
Аннотация для Фотоаппарата Nikon COOLPIX L810 в формате PDF
Топ 10 инструкций
Другие инструкции
Данная лицензия не предназначена для продажи этого Руководства и Вы не становитесь владельцем этого Руководства после приобретения любого продукта, загрузки и/или использования. Nikon сохраняет за собой право владения данным Руководством и, следовательно, всеми копиями и все соответствующие права, относящиеся к интеллектуальной собственности, и сохраняет за собой все права, которые явно не предоставлены Вам в рамках данного Соглашения. Данное Соглашение представляет собой полное и эксклюзивное соглашение, устное и письменное, между Вами и Nikon.
1. РУКОВОДСТВО
Руководство предназначено для клиентов, которые приобрели наши продукты. Мы можем не иметь возможности ответить на запрос физических лиц, которые не приобрели наши продукты. Пожалуйста, имейте в виду, что данное руководство и контактная информация, указанные здесь, могут быть изменены без уведомления.
Данное Руководство защищено Законом об авторском праве Японии и международными законами об авторском праве и международными договорами. Вам необходимо воспроизвести на каждой копии уведомление об авторском праве Nikon и любую другую информацию о праве собственности, которые присутствовали на оригинале.
2. ОГРАНИЧЕНИЯ
Кроме случаев, когда в данном Соглашении указано иное, нельзя делать или передавать копии данного Руководства другим или передавать в электронной форме Руководство с одного компьютера на другой по сети. НЕЛЬЗЯ ИЗМЕНЯТЬ ИЛИ УДАЛЯТЬ ЛЮБЫЕ УВЕДОМЛЕНИЯ ОБ АВТОРСКОМ ПРАВЕ, ТОРГОВОЙ МАРКЕ ИЛИ ДРУГИЕ ЗАЩИТНЫЕ УВЕДОМЛЕНИЯ, СОДЕРЖАЩИЕСЯ В ДАННОМ РУКОВОДСТВЕ. НЕЛЬЗЯ ПРИСВАИВАТЬ ИЛИ ИНЫМ ОБРАЗОМ ИЗБАВЛЯТЬСЯ, МОДИФИЦИРОВАТЬ, НАСТРАИВАТЬ, ПЕРЕВОДИТЬ, АРЕНДОВАТЬ, БРАТЬ В НАЕМ, ЗАНИМАТЬ, ПЕРЕПРОДАВАТЬ, РАСПРОСТРАНЯТЬ, ПЕРЕДАВАТЬ ПО СЕТИ ИЛИ СОЗДАВАТЬ ИЛИ ИМЕТЬ СОЗДАННЫЕ ПРОИЗВОДСТВЕННЫЕ РАБОТЫ, ОСНОВАННЫЕ НА ДАННОМ РУКОВОДСТВЕ ИЛИ ЛЮБОЙ ЧАСТИ ТАКОВОГО.
3. ОГРАНИЧЕННАЯ ГАРАНТИЯ И ОТКАЗ
В НАИБОЛЬШЕЙ СТЕПЕНИ, РАЗРЕШЕННОЙ В СИЛУ ДЕЙСТВУЮЩЕГО ЗАКОНОДАТЕЛЬСТВА, ДАННОЕ РУКОВОДСТВО ПРЕДОСТАВЛЕНО НА ОСНОВЕ ПРИНЦИПА «КАК ЕСТЬ», БЕЗ ГАРАНТИИ В ЛЮБОЙ ФОРМЕ, И КОМПАНИЯ NIKON, ЕЕ СОТРУДНИКИ, РАСПРОСТРАНИТЕЛИ, ДИЛЕРЫ И АГЕНТЫ ПРЯМО НЕ ПРИЗНАЮТ ЛЮБУЮ ГАРАНТИЮ В ЛЮБОЙ ФОРМЕ, ВЫРАЖЕННУЮ ИЛИ ПОДРАЗУМЕВАЕМУЮ, ВКЛЮЧАЯ, НО НЕ ОГРАНИЧИВАЯСЬ, ЛЮБОЙ ПОДРАЗУМЕВАЕМОЙ ГАРАНТИЕЙ ПРИГОДНОСТИ ДЛЯ ТОРГОВЛИ, ПРИГОДНОСТИ ДЛЯ ОПРЕДЕЛЕННОГО НАЗНАЧЕНИЯ ИЛИ ОТСУТСТВИЯ НАРУШЕНИЙ. В НАИБОЛЬШЕЙ СТЕПЕНИ, РАЗРЕШЕННОЙ В СИЛУ ДЕЙСТВУЮЩЕГО ЗАКОНОДАТЕЛЬСТВА, КОМПАНИЯ NIKON, ЕЕ СОТРУДНИКИ, РАСПРОСТРАНИТЕЛИ, ДИЛЕРЫ И АГЕНТЫ НЕ ГАРАНТИРУЮТ ИСПОЛНЕНИЕ ИЛИ РЕЗУЛЬТАТЫ, КОТОРЫЕ ВЫ МОЖЕТЕ ПОЛУЧИТЬ ИЗ ДАННОГО РУКОВОДСТВА, ИЛИ ЧТО ДАННОЕ РУКОВОДСТВО БУДЕТ СООТВЕТСТВОВАТЬ ВАШИМ ТРЕБОВАНИЯМ ИЛИ ЧТО РАБОТА РУКОВОДСТВА БУДЕТ БЕСПЕРЕБОЙНОЙ, БЕЗОШИБОЧНОЙ ИЛИ НЕ БУДЕТ СОДЕРЖАТЬ ВИРУСОВ. В НАИБОЛЬШЕЙ СТЕПЕНИ, РАЗРЕШЕННОЙ В СИЛУ ДЕЙСТВУЮЩЕГО ЗАКОНОДАТЕЛЬСТВА, НИ КОМПАНИЯ NIKON, НИ ЕЕ СОТРУДНИКИ, РАСПРОСТРАНИТЕЛИ, ДИЛЕРЫ И АГЕНТЫ НЕ ДОЛЖНЫ НЕСТИ ПЕРЕД ВАМИ ОТВЕТСТВЕННОСТЬ ЗА ЛЮБЫЕ КОСВЕННЫЕ, ПОСЛЕДУЮЩИЕ ИЛИ НЕПРЕДНАМЕРЕННЫЕ УБЫТКИ, ПОТЕРИ ИЛИ ИЗДЕРЖКИ ЛЮБОГО ТИПА, БУДЬ ТО ПОТЕРЯ ПРИБЫЛИ, ПЕРЕРЫВ В ДЕЯТЕЛЬНОСТИ ИЛИ ИНЫМ СПОСОБОМ ВОЗНИКАЮЩИЙ ИЛИ ЯВЛЯЮЩИЙСЯ СЛЕДСТВИЕМ ДАННОГО РУКОВОДСТВА, ВЫЗВАННЫЙ КАКИМ-ЛИБО СПОСОБОМ, ДАЖЕ ЕСЛИ КОМПАНИЯ NIKON, ЕЕ СОТРУДНИКИ, РАСПРОСТРАНИТЕЛИ, ДИЛЕРЫ ИЛИ АГЕНТЫ УВЕДОМЛЕНЫ О ВОЗМОЖНОСТИ ВОЗНИКНОВЕНИЯ ТАКИХ УБЫТКОВ, ПОТЕРЬ ИЛИ ИЗДЕРЖЕК. ЭТОТ ОТКАЗ СОСТАВЛЯЕТ СУЩЕСТВЕННУЮ ЧАСТЬ ДАННОГО СОГЛАШЕНИЯ, И НЕИСПОЛЬЗОВАНИЕ ДАННОГО РУКОВОДСТВА УПОЛНОМОЧЕНО, КРОМЕ СЛУЧАЕВ В РАМКАХ ДАННОГО ОТКАЗА.
4. ОБЩИЕ СВЕДЕНИЯ
Данное соглашение регулируется и должно истолковываться в соответствии с законами Японии независимо от его принципов коллизионного права. В случае возникновения спора в рамках или в связи с данным соглашением Вы, таким образом, даете согласие на персональную юрисдикцию Японии и отказываетесь от любого возражения, что такая дискуссия вызывает затруднение. Далее Вы соглашаетесь на получение судебных извещений в любом действии, возникающем из данного Соглашения по обычной почте или другими коммерчески оправданными способами доставки расписки в получении. Если любое положение данного Соглашения должно быть определено недействительным по какой-либо причине, то оставшиеся положения не должны быть признаны недействительными и должны остаться в силе без изменений. Данное Соглашение устанавливает в дальнейшем целое соглашение и понимание между Вами и компанией Nikon, и замещает собой и заменяет любые другие соглашения, относящиеся к сути дела данного Соглашения. Неуспех любой стороны в настаивании на строгом исполнении любого правила или положения данного соглашения, или выполнение любой опции, права или защиты прав, содержащихся в данном документе, не должны толковаться в качестве отказа от любого применения такого правила, положения, опции, права или защиты прав в будущем, и такое правило, положение, опция, право или защита прав должны продолжиться и сохранить полную юридическую силу и действие. Заголовки разделов данного Соглашения вставлены только для удобства и не должны составлять часть данного документа или влиять каким-либо образом на значение или толкование данного Соглашения. Кроме случаев, когда иначе явно указано в данном документе, положения раздела 3 и раздела 4 вместе с любыми положениями, которые с помощью своих прямо выраженных условий относятся к периодам после прекращения срока действия данного Соглашения, должны оставаться в силе после прекращения действия данного Соглашения по какой-либо причине.
Руководства для продуктов Nikon/ 2018/02/15/ Вер. 2.0.0
-
Contents
-
Table of Contents
-
Troubleshooting
-
Bookmarks
Quick Links
DIGITAL CAMERA
User’s Manual
Related Manuals for Nikon COOLPIX L810
Summary of Contents for Nikon COOLPIX L810
-
Page 1
DIGITAL CAMERA User’s Manual… -
Page 2: Trademark Information
HDMI Licensing LLC. • All other trade names mentioned in this manual or the other documentation provided with your Nikon product are trademarks or registered trademarks of their respective holders. AVC Patent Portfolio License This product is licensed under the AVC Patent Portfolio License for the personal and noncommercial use of a consumer to (i) encode video in compliance with the AVC standard (“AVC video”) and/or (ii) decode AVC video that was encoded by a consumer engaged in a…
-
Page 3
Introduction Parts of the Camera The Basics of Shooting and Playback Shooting Features Playback Features Recording and Playing Back Movies General Camera Setup Technical Notes and Index… -
Page 4: Read This First
Introduction Read This First Thank you for purchasing the Nikon COOLPIX L810 digital camera. Before using the camera, please read the information in “For Your Safety” (A viii) and familiarize yourself with the information provided in this manual. After reading, please keep this manual handy and refer to it to enhance your enjoyment of your new camera.
-
Page 5: About This Manual
“Parts of the Camera” (A 1). About the Included “Reference Manual CD” A PDF version of the COOLPIX L810 Reference Manual can be found on the included CD. Refer to it for more detailed information. Viewing the “Reference Manual CD”…
-
Page 6
Other Information • Symbols and Conventions To make it easier to find the information you need, the following symbols and conventions are used in this manual: Icon This icon indicates cautions and information that should be read before using the camera. This icon indicates notes and information that should be read before using the camera. -
Page 7: Information And Precautions
Before taking pictures on important occasions (such as at weddings or before taking the camera on a trip), take a test shot to ensure that the camera is functioning normally. Nikon will not be held liable for damages or lost profits that may result from product malfunction.
-
Page 8
• Nikon will not be held liable for any damages resulting from the use of this product. • While every effort was made to ensure that the information in these manuals is accurate and complete, we would appreciate it were you to bring any errors or omissions to the attention of the Nikon representative in your area (address provided separately). -
Page 9
• Comply with copyright notices The copying or reproduction of copyrighted creative works such as books, music, paintings, woodcut prints, maps, drawings, movies, and photographs is governed by national and international copyright laws. Do not use this product for the purpose of making illegal copies or to infringe copyright laws. -
Page 10: For Your Safety
For Your Safety To prevent damage to your Nikon product or injury to yourself or to others, read the following safety precautions in their entirety before using this equipment. Keep these safety instructions where all those who use the product will read them.
-
Page 11
When replacing the batteries with EN-MH2-B2 batteries (available separately), purchase two sets (total of four batteries). • The EN-MH2 rechargeable batteries are for use with Nikon digital cameras only, and are compatible with COOLPIX L810. • Insert batteries in the correct orientation. -
Page 12
Should the insulation be damaged and the wires become exposed, take it to a Nikon- authorized service representative for inspection. Failure to observe these precautions could result in fire or electric shock. -
Page 13
Use appropriate cables When connecting cables to the input and output jacks, use only the cables provided or sold by Nikon for the purpose, to maintain compliance with product regulations. Handle moving parts with care Be careful that your fingers or other objects are not pinched by the lens cover or other moving parts. -
Page 14
3D Images Do not continuously view 3D images recorded with this device for extended periods, whether on a television, monitor, or other display. In the case of children whose visual systems are still maturing, consult a pediatrician or ophthalmologist prior to use and follow their instructions. -
Page 15: Notices
CAUTIONS Modifications The FCC requires the user to be notified that any changes or modifications made to this device that are not expressly approved by Nikon Corporation may void the user’s authority to operate the equipment. xiii…
-
Page 16
Interface Cables Use the interface cables sold or provided by Nikon for your equipment. Using other interface cables may exceed the limits of Class B Part 15 of the FCC rules. Notice for customers in the State of California WARNING… -
Page 17
Symbol for Separate Collection in European Countries This symbol indicates that this product is to be collected separately. The following apply only to users in European countries: • This product is designated for separate collection at an appropriate collection point. Do not dispose of as household waste. -
Page 18: Table Of Contents
Table of Contents Introduction … ii Read This First … ii Confirming the Package Contents… ii About This Manual … iii Information and Precautions… v For Your Safety … viii WARNINGS … viii Notices… xiii Parts of the Camera … 1 The Camera Body…
-
Page 19
Changing the Image Size (Image Mode)… 62 Image Mode Settings (Image Size and Quality) … 62 Features That Cannot Be Used Simultaneously … 64 Focusing… 65 Using Face Detection … 65 Focus Lock… 66 Playback Features… 67 Playback Zoom … 68 Thumbnail Display, Calendar Display… -
Page 20
The Shooting Menu (for A (Auto) Mode)… E29 White Balance (Adjusting Hue) … E29 Continuous Shooting … E32 ISO Sensitivity … E33 Color Options … E34 The Playback Menu … E35 a Print Order (Creating a DPOF Print Order)… E35 b Slide Show … -
Page 21: Parts Of The Camera
Parts of the Camera This chapter describes the parts of the camera and explains information that is displayed in the monitor. The Camera Body…2 Attaching the Camera Strap and Lens Cap…4 Raising and Lowering the Flash …5 The Monitor…6 Shooting Mode …6 Playback Mode …8 If you want to start using the camera right away, see “The Basics of Shooting and Playback”…
-
Page 22: The Camera Body
Built-in microphone (stereo) … 80 Eyelet for camera strap…4 Flash …5, 51 DC input connector (for AC adapter available separately from Nikon)… 12, E70 USB connector and audio/video output …71 HDMI mini connector (Type C)…71 Connector cover…71 m (flash pop-up) button…5, 51 Side zoom control …24…
-
Page 23
Monitor … 6 A (shooting mode) button …34, 35, 44, 48 Flash lamp… 52 b (e movie-record) button… 80 c (playback) button… 29 Eyelet for camera strap … 4 Multi selector 10 9 13 14 k (apply selection) button Battery-chamber/ memory card slot cover…10, 13 l (delete) button…31 d button … -
Page 24: Attaching The Camera Strap And Lens Cap
Attaching the Camera Strap and Lens Cap Attach the lens cap to the camera strap, and then attach the strap to the camera. Attach them at two places. Lens Cap • Remove the lens cap before you take a picture. •…
-
Page 25: Raising And Lowering The Flash
Raising and Lowering the Flash Press the m (flash pop-up) button to raise the flash. • Using the Flash (Flash Modes) ➝ A 51 • Push the flash down gently to lower the flash until it clicks into place when not in use.
-
Page 26: The Monitor
The Monitor • The information that is displayed in the monitor during shooting and playback changes depending on the camera’s settings and state of use. By default, information is displayed when the camera is turned on and when you operate the camera, and turns off after a few seconds (Monitor settings (A 88) >…
-
Page 27
Shooting mode…34, 35, 44, 48 Macro mode … 57 Zoom indicator … 24, 57 Focus indicator… 26 AE/AF-L indicator… E3 Flash mode… 51 Eye-Fi indicator … 89 Battery level indicator… 21 Vibration reduction icon … 88 Print date … 88 Motion detection icon … -
Page 28: Playback Mode
Playback Mode 1 5 / 0 5 / 2 0 1 2 1 2 : 0 0 1 5 / 0 5 / 2 0 1 2 1 2 : 0 0 9 9 9 9 . J P G 9 9 9 9 .
-
Page 29: The Basics Of Shooting And Playback
The Basics of Shooting and Playback Preparation Preparation 1 Insert the Batteries …10 Preparation 2 Insert a Memory Card…13 Preparation 3 Set the Display Language, Date, and Time…16 Shooting Step 1 Turn the Camera On and Select Shooting Mode…20 Step 2 Frame a Picture …23 Step 3 Focus and Shoot…26 Playback Step 4 Play Back Images …29…
-
Page 30: Preparation 1 Insert The Batteries
The Basics of Shooting and Playback Preparation 1 Insert the Batteries Open the battery-chamber/memory card slot cover. • Before opening the battery-chamber/memory card slot cover, hold the camera upside down to prevent the batteries from falling out. Insert the batteries. •…
-
Page 31: Applicable Batteries
Applicable Batteries • Four LR6/L40 (AA-size) alkaline batteries (batteries included) • Four FR6/L91 (AA-size) lithium batteries • Four EN-MH2 rechargeable Ni-MH (nickel metal hydride) batteries * EN-MH1 rechargeable Ni-MH batteries cannot be used. Removing the Batteries • Turn the camera off and be sure that the power-on lamp and the monitor have turned off before opening the battery-chamber/memory card slot cover.
-
Page 32
Notes About EN-MH2 Rechargeable Batteries When using EN-MH2 batteries with the COOLPIX L810, charge the batteries four at a time using Battery Charger MH-73 (A 89, E70). Alkaline Batteries Performance of alkaline batteries may vary greatly depending on the manufacturer. Choose a reliable brand. -
Page 33: Preparation 2 Insert A Memory Card
Preparation 2 Insert a Memory Card Turn off the camera and open the battery- chamber/memory card slot cover. • When the camera turns off, the power-on lamp and the display turn off. • Before opening the battery-chamber/memory card slot cover, hold the camera upside down to prevent the batteries from falling out.
-
Page 34: Internal Memory And Memory Cards
Formatting a Memory Card • The first time you insert a memory card that has been used in another device into this camera, be sure to format it with this camera. • All data stored on a memory card is permanently deleted when the card is formatted. Copy any data on the card that you wish to keep to a computer before formatting.
-
Page 35: Approved Memory Cards
Approved Memory Cards The following Secure Digital (SD) memory cards have been tested and approved for use in this camera. • Memory cards with an SD Speed Class rating of 6 or faster are recommended for recording movies. When using a memory card with a lower Speed Class rating, movie recording may stop unexpectedly.
-
Page 36: Preparation 3 Set The Display Language, Date, And Time
Preparation 3 Set the Display Language, Date, and Time When the camera is turned on for the first time, the language-selection screen and the date and time setting screen for the camera clock are displayed. Press the power switch to turn on the camera. •…
-
Page 37
Press J or K to select your home time zone and press the k button. • Press H to enable daylight saving time. When the daylight saving time function is enabled, W is displayed at the top of the monitor. Press I to disable the daylight saving time function. -
Page 38
Make sure that the lens cap has been removed, then press the A button. • The lens extends and the shooting-mode selection screen is displayed. When Easy auto mode is displayed, press the k button. • The camera enters the shooting mode and you can take pictures in Easy auto mode (A 20). -
Page 39
Changing the Language Setting and the Date and Time Setting • You can change these settings using the Language (E60) and Time zone and date (E47) settings in the z setup menu (A 88). • You can enable and disable daylight saving time by selecting the z setup menu > Time zone and date (E47) >… -
Page 40: Step 1 Turn The Camera On And Select Shooting Mode
Step 1 Turn the Camera On and Select Shooting Mode Remove the lens cap and press the power switch to turn on the camera. • The lens extends and the monitor turns on. • Press the m (flash pop-up) button to raise the flash (A 5). Press the A button.
-
Page 41
Check the battery level indicator and the number of exposures remaining. Battery Level Indicator Display Battery level high. Battery level low. Prepare to replace the batteries. Battery Cannot take pictures. exhausted. Replace the batteries. Number of Exposures Remaining The number of pictures that can be taken is displayed. •… -
Page 42: Turning The Camera On And Off
Turning the Camera On and Off • Remove the lens cap and turn the camera on. • When the camera is turned on, the power-on lamp (green) will light and then the monitor will turn on (the power-on lamp turns off when the monitor turns on). •…
-
Page 43: Step 2 Frame A Picture
Step 2 Frame a Picture Hold the camera steady. • Keep fingers, hair, the camera strap, and other objects away from the lens, flash, AF assist-illuminator, and microphone. Frame the picture. • When the camera determines the scene mode, the shooting mode icon will change (A 34).
-
Page 44: Using The Zoom
Easy Auto Mode • Depending upon shooting conditions, the camera may not select the desired scene mode. In this case, select another shooting mode (A 34, 35, 44, and 48). • When the digital zoom is in effect, the scene mode changes to U. When Using a Tripod •…
-
Page 45: Digital Zoom
Digital Zoom When the camera is zoomed in to the maximum optical zoom position, rotating and holding the zoom control or the side zoom control toward g triggers digital zoom. Digital zoom can magnify the subject up to about 4× beyond the maximum magnification of the optical zoom.
-
Page 46: Step 3 Focus And Shoot
Step 3 Focus and Shoot Press the shutter-release button halfway (A 27). • When a face is detected: The camera focuses on the face framed by the double border. When the subject is in focus, the double border glows green. •…
-
Page 47: The Shutter-Release Button
The Shutter-release Button To set focus and exposure (shutter speed and aperture value), press the shutter-release button halfway, stopping when you feel Press halfway resistance. Focus and exposure remain locked while the shutter- release button is pressed halfway. While pressing the shutter-release button halfway, press the shutter-release button the rest of the way down to release the shutter and take a picture.
-
Page 48
Autofocus The camera may not focus as expected in the following situations. In some rare cases, the subject may not be in focus despite the fact that the focus area or the focus indicator glows green: • Subject is very dark •… -
Page 49: Step 4 Play Back Images
Step 4 Play Back Images Press the c (playback) button. • The camera switches to playback mode and the last image saved is displayed in full-frame playback mode. Use the multi selector to select an image to display. • Display the previous image: H or J •…
-
Page 50: More Information
Viewing Images • Images may be displayed briefly at low resolution while being read from the memory card or internal memory. • When you play back images in which the face of a person (A 65) or pet (A 42) was detected at the time of shooting, depending on the orientation of the detected face, the images are automatically rotated for playback display.
-
Page 51: Step 5 Delete Images
Step 5 Delete Images Press the l button to delete the image currently displayed in the monitor. Press the multi selector H or I to select the desired deletion method and press the k button. • Current image: Only the current image is deleted. •…
-
Page 52
Operating the Erase Selected Images Screen Press the multi selector J or K to select an image to be deleted, and then press H to display y. • To undo the selection, press I to remove y. • Rotate the zoom control (A 2) to g (i) to switch back to full-frame playback or f (h) to display thumbnails. -
Page 53: Shooting Features
Shooting Features This chapter describes the camera’s shooting modes and the features that are available when using each shooting mode. You can select shooting modes and adjust settings according to the shooting conditions and the kind of images you want to capture. G (Easy Auto) Mode…
-
Page 54: G (Easy Auto) Mode
Shooting Features G (Easy Auto) Mode The camera automatically selects the optimum scene mode when you frame a picture. Enter shooting mode M A (shooting mode) button M G (easy auto) mode M k button Automatic Scene Selection The camera automatically selects one of the following scenes when you point the camera at a subject: •…
-
Page 55: Scene Mode (Shooting Suited To Scenes)
Scene Mode (Shooting Suited to Scenes) When one of the following scenes is selected, camera settings are automatically optimized for the selected scene. Enter shooting mode M A (shooting mode) button M b (second icon from the top*) M K M H, I, J, K M select a scene M k button * The icon of the last scene selected is displayed.
-
Page 56: Changing Scene Mode Settings
Changing Scene Mode Settings • Depending on the scene, the multi selector H (X), I (p), J (n), and K (o) can be used to set the corresponding features. ➝ “Features That Can Be Set Using the Multi Selector” (A 50), “Default Settings” (A 60) •…
-
Page 57: Night Portrait O
d Sports Use this mode when shooting sporting events. The camera captures a series of still images that allow you to clearly see detailed movements in a moving subject. • The camera focuses on the area in the center of the frame. •…
-
Page 58
Z Beach Captures the brightness of such subjects as beaches or sunlit expanses of water. • The camera focuses on the area in the center of the frame. z Snow Captures the brightness of sunlit snow. • The camera focuses on the area in the center of the frame. h Sunset Preserves the deep hues seen in sunsets and sunrises. -
Page 59
j Night landscape Slow shutter speeds are used to capture stunning night landscapes. • The focus area or focus indicator (A 7) always glows green when the shutter-release button is pressed halfway. k Close-up Use this mode to photograph flowers, insects, and other small objects at close range. -
Page 60
l Museum Use indoors where flash photography is prohibited (for example, in museums and art galleries) or in other settings in which you do not want to use the flash. • The camera focuses on the area in the center of the frame. •… -
Page 61
U Panorama assist Use this setting to capture a series of images that will be connected using a computer to form a panorama image (E2). • Press the multi selector H, I, J, or K to select the direction that you will move the camera in when capturing images, and press the k button. -
Page 62
O Pet portrait Use this mode when taking pictures of dogs or cats. When the camera detects the face of a dog or cat, the camera focuses on that face. Once the camera has focused, by default it automatically releases the shutter (pet portrait auto release). •… -
Page 63
s 3D photography Use this mode for taking 3D images viewable in three dimensions on a 3D-compatible TV or monitor. The camera takes one picture for each eye to simulate a three-dimensional image. Images taken in this mode are saved at an image size of n (1920 × 1080). •… -
Page 64: Smart Portrait Mode (Capturing Smiling Faces)
Smart Portrait Mode (Capturing Smiling Faces) When the camera detects a smiling face, you can take a picture automatically without pressing the shutter-release button (smile timer). You can use the skin softening option to smooth the skin tones in human faces. Enter shooting mode M A (shooting mode) button M F Smart portrait mode M k button Frame the picture.
-
Page 65: Changing Smart Portrait Mode Settings
Notes About Smart Portrait Mode • Digital zoom cannot be used. • Under some shooting conditions, the camera may be unable to detect faces or detect smiles. • “Notes About Face Detection” ➝ A 65 Auto Off in Smile Timer Mode When Smile timer is set to On, the auto off function (A 88) is activated and the camera turns off when either of the situations indicated below persists and no other operations are performed.
-
Page 66: Menu
Options Available in the Smart Portrait Menu When using F smart portrait mode, the following settings can be changed. Enter smart portrait mode (A 44) M d button M F tab Option Allows you to select the combination of image size and image quality Image mode used when saving images (A 62).
-
Page 67: Using Skin Softening
Using Skin Softening When the shutter is released in one of the following shooting modes, the camera detects one or more human faces (up to three), and processes the image to soften facial skin tones. • Portrait (A 36) or Night portrait (A 37) in G (easy auto) mode •…
-
Page 68: A (Auto) Mode
A (Auto) Mode Used for general shooting. Settings can be adjusted in the shooting menu (A 49) to suit the shooting conditions and the type of shot you want to capture. Enter shooting mode M A (shooting mode) button M A (auto) mode M k button •…
-
Page 69: Menu
Options Available in the Auto Shooting Menu When using A (auto) mode, the following settings can be changed. Enter A (auto) mode (A 48) M d button M A tab Option Allows you to select the combination of image size and image Image mode quality used when saving images (A 62).
-
Page 70: Features That Can Be Set Using The Multi Selector
Features That Can Be Set Using the Multi Selector When shooting, the multi selector H, I, J, and K can be used to set the following features. n (self-timer), pet portrait auto release Available Features The features that are available vary with the shooting mode, as shown below. •…
-
Page 71: Flash
Using the Flash (Flash Modes) In dark locations or when the subject is backlit, you can take pictures with flash by raising the flash. You can set the flash mode. Press the m (flash pop-up) button. • The flash pops up. •…
-
Page 72
Press the multi selector H or I to select the desired mode and press the k button. • Available Flash Modes ➝ A 53 • If a setting is not applied by pressing the k button within a few seconds, the selection will be canceled. •… -
Page 73: Available Flash Modes
Available Flash Modes Auto The flash fires automatically when lighting is dim. Auto with red-eye reduction Reduce red-eye in portraits caused by the flash (A 54). The flash will not fire. • We recommend using a tripod to stabilize the camera when shooting in dark surroundings.
-
Page 74
The Flash Mode Setting • The setting varies with the shooting mode. ➝ “Available Features” (A 50) ➝ “Default Settings” (A 60) • Some settings cannot be used with other functions (A 64). • The flash mode setting applied in A (auto) mode is saved in the camera’s memory even after the camera is turned off. -
Page 75: Using The Self-Timer
Using the Self-timer The camera’s self-timer can release the shutter about ten seconds after you press the shutter- release button. The self-timer is useful when you want to be in the picture you are taking, or when you want to avoid the effects of camera shake that occur when you press the shutter-release button. When using the self-timer, use of a tripod is recommended.
-
Page 76
Press the shutter-release button the rest of the way down. • The self-timer starts, and the number of seconds remaining before the shutter is released is displayed in the monitor. The self-timer lamp flashes while the timer is counting down. About one second before the shutter is released, the lamp stops flashing and glows steadily. -
Page 77: Using Macro Mode
Using Macro Mode When using macro mode, the camera can focus on objects as close as about 1 cm (0.4 in.) from the lens. This feature is useful when taking close-up pictures of flowers and other small subjects. Press the multi selector I (p macro mode). Press the multi selector H or I to select ON and press the k button.
-
Page 78
Notes About Using the Flash The flash may be unable to light the entire subject at distances of less than 50 cm (1 ft 8 in.). Autofocus When shooting still images in macro mode, the camera focuses continuously until the shutter- release button is pressed halfway to lock the focus. -
Page 79: Adjusting Brightness (Exposure Compensation)
Adjusting Brightness (Exposure Compensation) You can adjust overall image brightness. Press the multi selector K (o exposure compensation). Press the multi selector H or I to select a compensation value. • To make the image brighter, apply positive (+) exposure compensation.
-
Page 80: Default Settings
Default Settings Default settings for each shooting mode are described below. G (easy auto) (A 34) F (smart portrait) (A 44) U A (auto) (A 48) Scene b (A 36) c (A 36) d (A 37) e (A 37) f (A 37) Z (A 38) z (A 38) h (A 38)
-
Page 81
O (A 42) s (A 43) Setting is used when the flash is raised. You can select U (auto) or W (off). When U (auto) is selected, the camera automatically selects the flash mode appropriate for the scene it has selected. The setting cannot be changed. -
Page 82: Changing The Image Size (Image Mode)
Changing the Image Size (Image Mode) Enter shooting mode M d button M Shooting menu M Image mode M k button You can use the Image mode setting in the shooting menu to select the combination of image size and compression ratio that is used when saving images. Select the image mode best suited to the manner in which images will be used and the capacity of the internal memory or memory card.
-
Page 83
Number of Images That Can Be Saved The following table lists the approximate number of images that can be saved in the internal memory and on a 4 GB memory card. Note that due to JPEG compression, the number of images that can be saved varies greatly depending on the composition of the image. -
Page 84: Features That Cannot Be Used Simultaneously
Features That Cannot Be Used Simultaneously Some shooting settings cannot be used with other functions. Restricted function Continuous (A 49) Flash mode Blink proof (A 46) Self-timer Smile timer (A 46) Digital zoom Continuous (A 49) Image mode Continuous (A 49) Color options White balance (A 49)
-
Page 85: Focusing
Focusing Using Face Detection In the following shooting modes, the camera uses face detection to automatically focus on human faces. If the camera detects more than one face, a double border is displayed around the face that the camera will focus on, and single borders are displayed around the other faces.
-
Page 86: Focus Lock
Focus Lock When the camera focuses on an object in the center of the frame, you can use focus lock to focus on an off-center subject. Use the following procedure when taking pictures using A (auto) mode. Aim the camera so that the subject is in the center of the frame. Press the shutter-release button halfway.
-
Page 87: Playback Features
Playback Features This chapter describes the features that are available when playing back images. 1 5 / 0 5 / 2 0 1 2 1 5 : 3 0 1 5 / 0 5 / 2 0 1 2 1 5 : 3 0 0 0 0 4 .
-
Page 88: Playback Zoom
Playback Features Playback Zoom Rotating the zoom control to g (i) in full-frame playback mode (A 29) zooms in on the center of the image displayed in the monitor. 1 5 / 0 5 / 2 0 1 2 1 5 : 3 0 1 5 / 0 5 / 2 0 1 2 1 5 : 3 0 0 0 0 4 .
-
Page 89: Thumbnail Display, Calendar Display
Thumbnail Display, Calendar Display Rotating the zoom control to f (h) in full-frame playback mode (A 29) displays images in “contact sheets” of thumbnail images. 1 5 / 0 5 / 2 0 1 2 1 5 : 3 0 1 5 / 0 5 / 2 0 1 2 1 5 : 3 0 0 0 0 1 .
-
Page 90: Features Available In Playback Mode (Playback Menu)
Features Available in Playback Mode (Playback Menu) When viewing images in full-frame playback mode or thumbnail playback mode, you can configure the following functions by pressing the d button (A 3) to display the menu. Option Allows you to create copies with enhanced brightness and 1, 2 I D-Lighting contrast, brightening dark portions of an image.
-
Page 91: Usb Connector And Audio/Video Output
Connecting the Camera to a TV, Computer, or Printer You can enhance your enjoyment of images and movies by connecting the camera to a TV, computer, or printer. • Before connecting the camera to an external device, make sure the remaining battery level is sufficient and turn the camera off.
-
Page 92
Viewing images on a TV You can view the camera’s images and movies on a TV. Connection method: Connect the video and audio plugs of the included Audio Video Cable EG-CP16 to the TV’s input jacks. Alternatively, connect a commercially available HDMI cable (Type C) to the TV’s HDMI input jack. Viewing and organizing images on a computer If you transfer images to a computer, you can perform simple retouching and manage image data in addition to playing back images and movies. -
Page 93: Using Viewnx 2
Using ViewNX 2 ViewNX 2 is an all-in-one software package which enables you to transfer, view, edit and share images. Install ViewNX 2 using the ViewNX 2 Installer CD-ROM. ViewNX 2™ Your Imaging Toolbox Installing ViewNX 2 • An Internet connection is required. Compatible Operating Systems Windows •…
-
Page 94
Mac OS • Mac OS X (version 10.5.8, 10.6.8, 10.7.2) Refer to the Nikon website for the latest information on operating system compatibility. Start the computer and insert the ViewNX 2 Installer CD-ROM into the CD-ROM drive. • Mac OS: When the ViewNX 2 window is displayed, double-click the Welcome icon. -
Page 95
The following software is installed: • ViewNX 2 (consisting of the three modules below) — Nikon Transfer 2: For transferring images to the computer — ViewNX 2: For viewing, editing, and printing transferred images — Nikon Movie Editor: For basic editing of transferred movies •… -
Page 96: Transferring Images To The Computer
Nikon Transfer 2 and click OK. 2 Double-click Import File. If the memory card contains a large number of images, it may take a while for Nikon Transfer 2 to start. Wait until Nikon Transfer 2 starts. Connecting the USB Cable…
-
Page 97: Transfer Images To The Computer
Transfer images to the computer. • Confirm that the name of the connected camera or removable disk is displayed as the “Source” on the “Options” title bar of Nikon Transfer 2 (1). • Click Start Transfer (2). • At default settings, all the images on the memory card will be copied to the computer.
-
Page 98: Viewing Images
Viewing Images Start ViewNX 2. • Images are displayed in ViewNX 2 when transfer is complete. • Consult online help for more information on using ViewNX 2. Starting ViewNX 2 Manually • Windows: Double-click the ViewNX 2 shortcut icon on the desktop. •…
-
Page 99: Recording And Playing Back Movies
Recording and Playing Back Movies You can record movies by simply pressing the b (e movie-record) button. 2 9 m 0 s 2 9 m 0 s 9 7 0 9 7 0 Recording Movies … 80 Changing Movie Recording Settings (the Movie Menu)… 83 Playing Back Movies…
-
Page 100: Recording Movies
Recording and Playing Back Movies Recording Movies You can record movies by simply pressing the b (e movie-record) button. Display the shooting screen. • The icon for the selected movie option is displayed. The default setting is n HD 720p (1280×720) (A 83). Lower the flash (A 5) •…
-
Page 101
Press the b (e movie-record) button again to end recording. Notes About Saving Data After taking pictures or recording a movie, the number of exposures remaining or the remaining recording time flashes while images or movies are being saved. Do not open the battery- chamber/memory card slot cover while images or movies are being saved. -
Page 102
Movie Options and Maximum Movie Length Movie options (A 83) n HD 720p (1280×720) (default setting) m VGA (640×480) All figures are approximate. The maximum movie length may vary depending on the make of the memory card, even among memory cards of the same capacity. * The maximum size for a single movie is 4 GB, and the maximum movie length for a single movie is 29 minutes, even when there is sufficient free space on the memory card. -
Page 103: Changing Movie Recording Settings (The Movie Menu)
Changing Movie Recording Settings (the Movie Menu) Enter shooting mode M d button M D tab M k button The following settings can be changed. Option The following movie types are available: n HD 720p Movie options (1280×720) and m VGA (640×480). When A Single AF (default setting) is selected, focus is locked when movie recording begins.
-
Page 104: Playing Back Movies
Playing Back Movies Press the c button to enter playback mode. Movies are indicated by the movie options icon (A 83). Press the k button to play back movies. Deleting Movies To delete a movie, select the desired movie in full-frame playback mode (A 29) or thumbnail playback mode (A 69) and press the l button (A 31).
-
Page 105
Adjusting Volume Rotate the zoom control to g or f (A 2) during playback. Notes About Playing Back Movies The COOLPIX L810 is not able to play back movies recorded with another make or model of digital camera. Description Volume indicator… -
Page 107: General Camera Setup
General Camera Setup This chapter describes the various settings that can be adjusted in the z setup menu. 2 9 m 0 s 2 9 m 0 s 9 7 0 9 7 0 For further details about each setting, refer to “The Setup Menu” in the Reference Section (E46).
-
Page 108: The Setup Menu
General Camera Setup The Setup Menu Press the d button M z (setup) tab M k button The following settings can be changed in the setup menu by selecting the z tab. Option Allows you to select whether or not a welcome screen is Welcome screen displayed when the camera is turned on.
-
Page 109: Format Memory/Format Card
Option Format memory/ Allows you to format the internal memory or the memory card. Format card Language Allows you to change the camera’s display language. TV settings Allows you to adjust TV-connection settings. Allows you to set whether or not closed eyes are detected when Blink warning taking pictures of people using face detection.
-
Page 111: Technical Notes And Index
Technical Notes and Index Caring for the Product…F2 The Camera…F2 Batteries …F4 Memory Cards …F6 Cleaning and Storage…F7 Cleaning…F7 Storage …F7 Troubleshooting…F8 Specifications…F16 Supported Standards… F20 Index …F21…
-
Page 112: Caring For The Product
Technical Notes and Index Caring for the Product The Camera To ensure safe and continued enjoyment of your Nikon camera, observe the following precautions and the precautions noted in “For Your Safety” (A viii-xv) when using or storing your camera.
-
Page 113
• Images in the monitor may be difficult to see under bright lighting. • The monitor is lit by an LED backlight. Should the monitor begin to dim or flicker, contact your Nikon-authorized service representative. Notes About Smear White or colored streaks may be visible when bright subjects are framed in the monitor. This phenomenon, known as “smear,”… -
Page 114: Batteries
• Do not mix batteries with different amounts of charge remaining, or batteries of a different make or model. • When using EN-MH2 batteries with the COOLPIX L810, charge the batteries four at a time using Battery Charger MH-73. Use only Battery Charger MH-73 to charge EN-MH2 batteries.
-
Page 115
Notes About Rechargeable Ni-MH Batteries • If you repeatedly charge rechargeable Ni-MH batteries while they still have some charge remaining, the message Battery exhausted. may be displayed prematurely when using the batteries. This is due to the “memory effect,” in which the amount of charge the batteries can hold decreases temporarily. -
Page 116: Memory Cards
Memory Cards • Use only Secure Digital memory cards. Approved memory cards ➝ A 15 • Observe the precautions noted in the documentation included with your memory card. • Do not affix labels or stickers to the memory card. • Do not format the memory card using a computer. •…
-
Page 117: Cleaning And Storage
Cleaning and Storage Cleaning Do not use alcohol, thinner, or other volatile chemicals. When cleaning the lens, avoid touching it directly with your fingers. Remove dust or lint with a blower. To remove fingerprints, oil, or other grime that cannot be removed with a blower, wipe the lens with a soft, dry cloth or an eyeglass cleaning cloth, using Lens a gentle spiral motion that starts in the center and moves toward the edges.
-
Page 118: Troubleshooting
Troubleshooting If the camera fails to function as expected, check the list of common problems below before consulting your retailer or Nikon-authorized service representative. Power, Display, Settings Issues Problem Camera turns off without warning. Monitor is blank. Monitor is hard to read.
-
Page 119
Problem • If camera clock has not been set, “Date not set” Date and time of recording are not correct. • Check camera clock regularly against more No indicators displayed in Hide info is selected for Photo info. monitor. Select Show info. Print date not available. -
Page 120
Turn the camera off, remove and replace the batteries, then turn the camera on again. In the event of continued malfunction, contact your retailer or Nikon-authorized service representative. Note that disconnecting the power source as described above may result in the loss of any data not saved to internal memory or the memory card at the time the problem occurred. -
Page 121
Problem • Subject is too close. Try shooting using easy auto • The intended subject is one with which autofocus Camera cannot focus. • Set AF assist in the setup menu to Auto. • Turn camera off and then on again. •… -
Page 122
Problem Digital zoom cannot be used. Image mode not available. No sound when shutter is released. AF-assist illuminator does not light. Images appear smeared. Colors are unnatural. Randomly spaced bright pixels (“noise”) appear in image. Cause/Solution • Digital zoom cannot be used in the following situations. -
Page 123
Problem • The flash is lowered or the flash mode is set to W (off). • Flash window is blocked. • Subject is beyond flash range. Images are too dark • Adjust exposure compensation. (underexposed). • Increase ISO sensitivity. • Subject is backlit. Select Backlighting scene mode, or Images are too bright Adjust exposure compensation. -
Page 124
• File or folder was overwritten or renamed by computer or other make of camera. • The COOLPIX L810 is not able to play back movies recorded with another make or model of digital camera. • Playback zoom cannot be used with movies, small pictures, or images that have been cropped to a size of 320 ×… -
Page 125
• Confirm system requirements. connected. • Computer is not set to start Nikon Transfer 2 • Memory card contains no images. Replace the Images to be printed are not • Remove the memory card to print images from the displayed. -
Page 126: Specifications
Specifications Nikon COOLPIX L810 Digital Camera Type Effective pixels Image sensor Lens Focal length f/-number Construction Digital zoom Vibration reduction Autofocus (AF) Focus range (from lens) Focus-area selection Monitor Frame coverage (shooting mode) Frame coverage (playback mode) Compact digital camera 16.1 million…
-
Page 127
Storage Media Internal memory (approx. 50 MB), SD/SDHC/SDXC memory card File system DCF, Exif 2.3, DPOF, and MPF compliant Still pictures: JPEG File formats 3D images: MPO Movies: MOV (Video: H.264/MPEG-4 AVC, Audio: LPCM stereo) • 16M (High) [4608 × 3456P] •… -
Page 128
Built-in flash Range (ISO sensitivity: Auto) Flash control Interface Data transfer protocol Video output HDMI output I/O terminal Supported languages Power sources Battery life Tripod socket Dimensions (W × H × D) Weight [W]: Approx. 0.5 to 5.0 m (1 ft 8 in. to 16 ft) [T]: Approx. -
Page 129
FR6/L91 (AA-size) Energizer(R) Ultimate Lithium batteries. The included batteries are for trial use only. Specifications • Nikon will not be held liable for any errors this manual may contain. • The appearance of this product and its specifications are subject to change without notice. -
Page 130: Supported Standards
Supported Standards • DCF: Design Rule for Camera File System is a standard widely used in the digital camera industry to ensure compatibility among different makes of camera. • DPOF: Digital Print Order Format is an industry-wide standard that allows images to be printed from print orders saved on memory cards.
-
Page 131: Index
Index Refer to the Reference Manual CD for pages indicated with E. Symbols R … E3 g (Tele) … 24 f (Wide) … 24 i Playback zoom … 68 h Image thumbnail display … 69 G Easy auto mode… 34 b Scene mode…
-
Page 132: Eyelet For Camera Strap 4
Beach Z… 38 Best shot selector… 40, E32 Black and white copy n… 40 Black-and-white … 49, E34 Blink proof… 46, E28 Blink warning… 89, E62 Brightness … E51 BSS… 40, E32 Built-in microphone … 2 Button sound… E57 Calendar display … 69 Close-up k …
-
Page 133: Multi Selector
Multi-shot 16… E32 Museum l… 40 Night landscape j … 39 Night portrait e… 37 Nikon Transfer 2 … 73, 75, 77 Number of exposures remaining… 21, 63 Optical zoom … 24 Optional accessories … E70 Panorama assist U… 41, E2 Panorama Maker 6…
-
Page 134: Power Switch/Power-On Lamp
Playback … 29, 84 Playback button… 3 Playback menu … 70, E35 Playback mode … 29 Playback zoom… 68 Portrait b … 36 Power… 20, 22 Power switch … 20, 22 Power switch/power-on lamp… 2 Power-on lamp… 20, 22 Preset manual … E30 Pressing halfway…
-
Page 135: Wind Noise Reduction
Time difference … E50 Time zone … 17, E47, E50 Time zone and date… 16, 88, E47 Tripod socket … 3, F18 TV … 72, E17 TV settings … 89, E61 USB cable … 71, 76, E21, E70 USB connector and audio/video output …
-
Page 136
No reproduction in any form of this manual, in whole or in part (except for brief quotation in critical articles or reviews), may be made without written authorization from NIKON CORPORATION. Printed in Hong Kong CT2A01(11) 6MM25811-01 2012…
This manual is also suitable for:
26294
Посмотреть инструкция для Nikon Coolpix L810 бесплатно. Руководство относится к категории фотокамеры, 5 человек(а) дали ему среднюю оценку 8.5. Руководство доступно на следующих языках: русский. У вас есть вопрос о Nikon Coolpix L810 или вам нужна помощь? Задайте свой вопрос здесь
Не можете найти ответ на свой вопрос в руководстве? Вы можете найти ответ на свой вопрос ниже, в разделе часто задаваемых вопросов о Nikon Coolpix L810.
Инструкция Nikon Coolpix L810 доступно в русский?
Да, руководствоNikon Coolpix L810 доступно врусский .
Не нашли свой вопрос? Задайте свой вопрос здесь