Nikon D3500 Digital Camera Manual

- Read this manual thoroughly before using the camera.
- To ensure proper use of the camera, be sure to read «For Your Safety».
- After reading this manual, keep it in a readily accessible place for future reference.
Camera Manuals
The following manuals are available for your Nikon camera:
❚❚ The User’s Manual
The User’s Manual (this manual) describes basic shooting and playback.
❚❚ Online Manuals
More detailed instructions are available on the Nikon website.
Nikon User Support
Contact a Nikon representative for technical assistance with the operation of your Nikon product or products. For information on the Nikon representatives in your area, visit http://www.nikon-asia.com/support.
Package Contents
- D3500 camera
- DK-25 rubber eyecup (comes attached to camera)
- AN-DC3 strap
- User’s Manual (this booklet)
- Warranty
- BF-1B body cap
- EN-EL14a rechargeable Li-ion battery (with terminal cover)
- MH-24 battery charger (plug adapter supplied in countries or regions where required; shape depends on country of sale)
Memory cards are sold separately. Purchasers of lens kits should confirm that the package contains a lens (manuals for the lens may also be provided).
For Your Safety
To prevent damage to property or injury to yourself or to others, read «For Your Safety» in its entirety before using this product.
Keep these safety instructions where all those who use this product will read them.
Failure to observe the precautions marked with this icon carries a high risk of death or severe injury.
Failure to observe the precautions marked with this icon could result in death or severe injury.
Failure to observe the precautions marked with this icon could result in injury or property damage.
- Do not use while walking or operating a vehicle.
Failure to observe this precaution could result in accidents or other injury. - Do not disassemble or modify this product. Do not touch internal parts that become exposed as the result of a fall or other accident.
Failure to observe these precautions could result in electric shock or other injury. - Should you notice any abnormalities such as the product producing smoke, heat, or unusual odors, immediately disconnect the battery or power source.
Continued operation could result in fire, burns or other injury. - Keep dry. Do not handle with wet hands. Do not handle the plug with wet hands.
Failure to observe these precautions could result in fire or electric shock. - Do not let your skin remain in prolonged contact with this product while it is on or plugged in.
Failure to observe this precaution could result in low-temperature burns. - Do not use this product in the presence of flammable dust or gas such as propane, gasoline or aerosols.
Failure to observe this precaution could result in explosion or fire. - Do not directly view the sun or other bright light source through the lens or camera.
Failure to observe this precaution could result in visual impairment. - Do not aim the flash or AF-assist illuminator at the operator of a motor vehicle.
Failure to observe this precaution could result in accidents. - Keep this product out of reach of children.
Failure to observe this precaution could result in injury or product malfunction. In addition, note that small parts constitute a choking hazard. Should a child swallow any part of this product, seek immediate medical attention. - Do not entangle, wrap or twist the straps around your neck.
Failure to observe this precaution could result in accidents. - Do not use batteries, chargers, or AC adapters not specifically designated for use with this product. When using batteries, chargers, and AC adapters designated for use with this product, do not:
- Damage, modify, forcibly tug or bend the cords or cables, place them under heavy objects, or expose them to heat or flame.
- Use travel converters or adapters designed to convert from one voltage to another or with DC-to-AC inverters.
Failure to observe these precautions could result in fire or electric shock.
- Do not handle the plug when charging the product or using the AC adapter during thunderstorms.
Failure to observe this precaution could result in electric shock. - Do not handle with bare hands in locations exposed to extremely high or low temperatures.
Failure to observe this precaution could result in burns, or frostbite.
- Do not leave the lens pointed at the sun or other strong light sources.
Light focused by the lens could cause fire or damage to product’s internal parts. When shooting backlit subjects, keep the sun well out of the frame. Sunlight focused into the camera when the sun is close to the frame could cause fire. - Turn this product offwhen its use is prohibited. Disable wireless features when the use of wireless equipment is prohibited.
The radio-frequency emissions produced by this product could interfere with equipment onboard aircraft or in hospitals or other medical facilities. - Remove the battery and disconnect the AC adapter if this product will not be used for an extended period.
Failure to observe this precaution could result in fire or product malfunction. - Do not fire the flash in contact with or in close proximity to the skin or objects.
Failure to observe this precaution could result in burns or fire. - Do not leave the product where it will be exposed to extremely high temperatures, for an extended period such as in an enclosed automobile or in direct sunlight.
Failure to observe this precaution could result in fire or product malfunction. - Do not transport cameras or lenses with tripods or similar accessories attached.
Failure to observe this precaution could result in injury or product malfunction.
(Batteries)
- Do not mishandle batteries.
Failure to observe the following precautions could result in the batteries leaking, overheating, rupturing, or catching fire:- Use only rechargeable batteries approved for use in this product.
- Do not expose batteries to flame or excessive heat.
- Do not disassemble.
- Do not short-circuit the terminals by touching them to necklaces, hairpins, or other metal objects.
- Do not expose batteries or the products in which they are inserted to powerful physical shocks.
- Charge only as indicated.
Failure to observe this precaution could result in the batteries leaking, overheating, rupturing, or catching fire. - If battery liquid comes into contact with the eyes, rinse with plenty of clean water and seek immediate medical attention.
Delaying action could result in eye injuries.
(Batteries)
- Keep batteries out of reach of children.
Should a child swallow a battery, seek immediate medical attention. - Do not immerse batteries in water or expose to rain.
Failure to observe this precaution could result in fire or product malfunction. Immediately dry the product with a towel or similar object should it become wet. - Discontinue use immediately should you notice any changes in the batteries, such as discoloration or deformation. Cease charging EN-EL14a rechargeable batteries if they do not charge in the specified period of time.
Failure to observe these precautions could result in the batteries leaking, overheating, rupturing, or catching fire. - When batteries are no longer needed, insulate the terminals with tape.
Overheating, rupture, or fire may result should metal objects come into contact with the terminals. - If battery liquid comes into contact with a person’s skin or clothing, immediately rinse the affected area with plenty of clean water.
Failure to observe this precaution could result in skin irritation.
Notices
- No part of the manuals included with this product may be reproduced, transmitted, transcribed, stored in a retrieval system, or translated into any language in any form, by any means, without Nikon’s prior written permission.
- Nikon reserves the right to change the appearance and specifications of the hardware and software described in these manuals at any time and without prior notice.
- Nikon will not be held liable for any damages resulting from the use of this product.
- While every effort has been made to ensure that the information in these manuals is accurate and complete, we would appreciate it were you to bring any errors or omissions to the attention of the Nikon representative in your area (address provided separately).
Notice for Customers in Canada
CAN ICES-3 B / NMB-3 B
Notices for Customers in Europe
RISK OF EXPLOSION IF BATTERY IS REPLACED BY AN INCORRECT TYPE. DISPOSE OF USED BATTERIES ACCORDING TO THE INSTRUCTIONS.
 This symbol indicates that electrical and electronic equipment is to be collected separately.
The following apply only to users in European countries:
- This product is designated for separate collection at an appropriate collection point. Do not dispose of as household waste.
- Separate collection and recycling helps conserve natural resources and prevent negative consequences for human health and the environment that might result from incorrect disposal.
- For more information, contact the retailer or the local authorities in charge of waste management.
 This symbol on the battery indicates that the battery is to be collected separately.
The following apply only to users in European countries:
- All batteries, whether marked with this symbol or not, are designated for separate collection at an appropriate collection point. Do not dispose of as household waste.
- For more information, contact the retailer or the local authorities in charge of waste management.
Notices for Customers in the U.S.A.
The Battery Charger
IMPORTANT SAFETY INSTRUCTIONS—SAVE THESE INSTRUCTIONS
TO REDUCE THE RISK OF FIRE OR ELECTRIC SHOCK, CAREFULLY FOLLOW THESE INSTRUCTIONS
For connection to a supply not in the U.S.A., use an attachment plug adapter of the proper configuration for the power outlet if needed. This power unit is intended to be correctly oriented in a vertical or floor mount position.
Federal Communications Commission (FCC) Radio Frequency Interference Statement
This equipment has been tested and found to comply with the limits for a Class B digital device, pursuant to Part 15 of the FCC rules. These limits are designed to provide reasonable protection against harmful interference in a residential installation. This equipment generates, uses, and can radiate radio frequency energy and, if not installed and used in accordance with the instructions, may cause harmful interference to radio communications. However, there is no guarantee that interference will not occur in a particular installation. If this equipment does cause harmful interference to radio or television reception, which can be determined by turning the equipment offand on, the user is encouraged to try to correct the interference by one or more of the following measures:
- Reorient or relocate the receiving antenna.
- Increase the separation between the equipment and receiver.
- Connect the equipment into an outlet on a circuit different from that to which the receiver is connected.
- Consult the dealer or an experienced radio/television technician for help.
CAUTIONS
Modifications
The FCC requires the user be notified that any changes or modifications made to this device that are not expressly approved by Nikon Corporation may void the user’s authority to operate the equipment.
Interface Cables
Use the interface cables sold or provided by Nikon for your equipment. Using other interface cables may exceed the limits of Class B Part 15 of the FCC rules.
Notice for Customers in the State of California
Handling the cord on this product may expose you to lead, a chemical known to the State of California to cause birth defects or other reproductive harm. Wash hands after handling.
Nikon Inc., 1300 Walt Whitman Road, Melville, New York 11747-3064, U.S.A. Tel.: 631-547-4200
Notice Concerning Prohibition of Copying or Reproduction
Note that simply being in possession of material that has been digitally copied or reproduced by means of a scanner, digital camera, or other device may be punishable by law.
- Items prohibited by law from being copied or reproduced
Do not copy or reproduce paper money, coins, securities, government bonds, or local government bonds, even if such copies or reproductions are stamped «Sample.»
The copying or reproduction of paper money, coins, or securities which are circulated in a foreign country is prohibited.
Unless the prior permission of the government has been obtained, the copying or reproduction of unused postage stamps or post cards issued by the government is prohibited.
The copying or reproduction of stamps issued by the government and of certified documents stipulated by law is prohibited. - Cautions on certain copies and reproductions
The government has issued cautions on copies or reproductions of securities issued by private companies (shares, bills, checks, gift certificates, etc.), commuter passes, or coupon tickets, except when a minimum of necessary copies are to be provided for business use by a company. Also, do not copy or reproduce passports issued by the government, licenses issued by public agencies and private groups, ID cards, and tickets, such as passes and meal coupons. - Comply with copyright notices
Under copyright law, photographs or recordings of copyrighted works made with the camera cannot be used without the permission of the copyright holder. Exceptions apply to personal use, but note that even personal use may be restricted in the case of photographs or recordings of exhibits or live performances.
Disposing of Data Storage Devices
Please note that deleting images or formatting memory cards or other data storage devices does not completely erase the original image data. Deleted files can sometimes be recovered from discarded storage devices using commercially available software, potentially resulting in the malicious use of personal image data. Ensuring the privacy of such data is the user’s responsibility.
Before discarding a data storage device or transferring ownership to another person, erase all data using commercial deletion software, or format the device and then completely refill it with images containing no private information (for example, pictures of empty sky). Care should be taken to avoid injury when physically destroying data storage devices. Be sure to also replace any pictures selected for preset manual white balance.
Before discarding the camera or transferring ownership to another person, you should also use the Reset all settings option in the camera setup menu to delete network settings and other personal information.
AVC Patent Portfolio License
THIS PRODUCT IS LICENSED UNDER THE AVC PATENT PORTFOLIO LICENSE FOR THE PERSONAL AND NON-COMMERCIAL USE OF A CONSUMER TO (i) ENCODE VIDEO IN COMPLIANCE WITH THE AVC STANDARD («AVC VIDEO») AND/OR (ii) DECODE AVC VIDEO THAT WAS ENCODED BY A CONSUMER ENGAGED IN A PERSONAL AND NON-COMMERCIAL ACTIVITY AND/OR WAS OBTAINED FROM A VIDEO PROVIDER LICENSED TO PROVIDE AVC VIDEO. NO LICENSE IS GRANTED OR SHALL BE IMPLIED FOR ANY OTHER USE. ADDITIONAL INFORMATION MAY BE OBTAINED FROM MPEG LA, L.L.C. SEE http://www.mpegla.com
Use Only Nikon Brand Electronic Accessories
Nikon cameras are designed to the highest standards and include complex electronic circuitry. Only Nikon brand electronic accessories (including chargers, batteries, AC adapters, and flash accessories) certified by Nikon specifically for use with this Nikon digital camera are engineered and proven to operate within the operational and safety requirements of this electronic circuitry. The use of non-Nikon electronic accessories could damage the camera and may void your Nikon warranty. The use of third-party rechargeable Li-ion batteries not bearing the Nikon holographic seal shown at right could interfere with normal operation of the camera or result in the batteries overheating, igniting, rupturing, or leaking.
For more information about Nikon brand accessories, contact a local authorized Nikon dealer.
 Use Only Nikon Brand Accessories
Only Nikon brand accessories certified by Nikon specifically for use with your Nikon digital camera are engineered and proven to operate within its operational and safety requirements. THE USE OF NON-NIKON ACCESSORIES COULD DAMAGE YOUR CAMERA AND MAY VOID YOUR NIKON WARRANTY.
 Before Taking Important Pictures
Before taking pictures on important occasions (such as at weddings or before taking the camera on a trip), take a test shot to ensure that the camera is functioning normally. Nikon will not be held liable for damages or lost profits that may result from product malfunction.
 Life-Long Learning
As part of Nikon’s «Life-Long Learning» commitment to ongoing product support and education, continually-updated information is available on-line at the following sites:
- For users in the U.S.A.: http://www.nikonusa.com/
- For users in Europe and Africa: http://www.europe-nikon.com/support/
- For users in Asia, Oceania, and the Middle East: http://www.nikon-asia.com/
Visit these sites to keep up-to-date with the latest product information, tips, answers to frequently-asked questions (FAQs), and general advice on digital imaging and photography. Additional information may be available from the Nikon representative in your area. See the following URL for contact information: http://imaging.nikon.com/
Bluetooth
This product is controlled by the United States Export Administration Regulations (EAR). The permission of the United States government is not required for export to countries other than the following, which as of this writing are subject to embargo or special controls: Cuba, Iran, North Korea, Sudan, and Syria (list subject to change).
The use of wireless devices may be prohibited in some countries or regions. Contact a Nikonauthorized service representative before using the wireless features of this product outside the country of purchase.
Notice for Customers in the U.S.A. and Canada
This device complies with part 15 of FCC Rules and Innovation, Science and Economic Development Canada’s licence-exempt RSSs. Operation is subject to the following two conditions: (1) this device may not cause harmful interference, and (2) this device must accept any interference received, including interference that may cause undesired operation.
FCC WARNING
The FCC requires the user to be notified that any changes or modifications made to this device that are not expressly approved by Nikon Corporation may void the user’s authority to operate the equipment.
FCC Radio Frequency Interference Statement
Note: This equipment has been tested and found to comply with the limits for a Class B digital device, pursuant to part 15 of the FCC Rules. These limits are designed to provide reasonable protection against harmful interference in a residential installation. This equipment generates, uses and can radiate radio frequency energy and, if not installed and used in accordance with the instructions, may cause harmful interference to radio communications. However, there is no guarantee that interference will not occur in a particular installation. If this equipment does cause harmful interference to radio or television reception, which can be determined by turning the equipment offand on, the user is encouraged to try to correct the interference by one or more of the following measures:
- Reorient or relocate the receiving antenna.
- Increase the separation between the equipment and receiver.
- Connect the equipment into an outlet on a circuit different from that to which the receiver is connected.
- Consult the dealer or an experienced radio/TV technician for help.
Co-location
This transmitter must not be co-located or operated in conjunction with any other antenna or transmitter.
Nikon Inc., 1300 Walt Whitman Road, Melville, New York 11747-3064, U.S.A.
Tel.: 631-547-4200
FCC/ISED RF Exposure Statement
The available scientific evidence does not show that any health problems are associated with using low power wireless devices. There is no proof, however, that these low power wireless devices are absolutely safe. Low power Wireless devices emit low levels of radio frequency energy (RF) in the microwave range while being used. Whereas high levels of RF can produce health effects (by heating tissue), exposure of low-level RF that does not produce heating effects causes no known adverse health effects. Many studies of lowlevel RF exposures have not found any biological effects. Some studies have suggested that some biological effects might occur, but such findings have not been confirmed by additional research. This product has been tested and found to comply with FCC/ISED radiation exposure limits set forth for an uncontrolled environment and meets the FCC radio frequency (RF) Exposure Guidelines and RSS-102 of the ISED radio frequency (RF) Exposure rules. Please refer to the SAR test report that was uploaded to FCC website.
Notices for Customers in Europe Hereby, Nikon Corporation declares that the radio equipment type D3500 is in compliance with Directive 2014/53/EU.
The full text of the EU declaration of conformity is available at the following internet address: http://imaging.nikon.com/support/pdf/DoC_N1718.pdf.
Notice for Customers in Singapore
Trade Name:
Model: D3500
This device complies with radio-frequency regulations. The content of certification labels not affixed to the device is given below.
Complies with IMDA Standards DA103423
Security
Although one of the benefits of this product is that it allows others to freely connect for the wireless exchange of data anywhere within its range, the following may occur if security is not enabled:
- Data theft: Malicious third-parties may intercept wireless transmissions to steal user IDs, passwords, and other personal information.
- Unauthorized access: Unauthorized users may gain access to the network and alter data or perform other malicious actions. Note that due to the design of wireless networks, specialized attacks may allow unauthorized access even when security is enabled.
- Unsecured networks: Connecting to open networks may result in unauthorized access. Use secure networks only.
The Camera Body
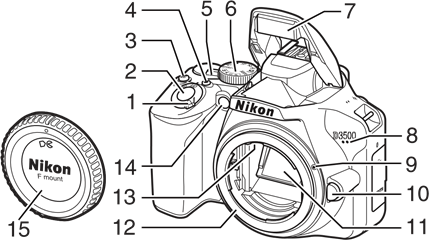
- Power switch
- Shutter-release button
 /
/ button
 - Movie-record button
- Live view switch
- Mode dial
- Built-in flash
- Microphone (monaural)
- Mounting mark
- Lens release button
- Mirror
- Lens mount
- CPU contacts
- AF-assist illuminator
Self-timer lamp
Red-eye reduction lamp - Body cap
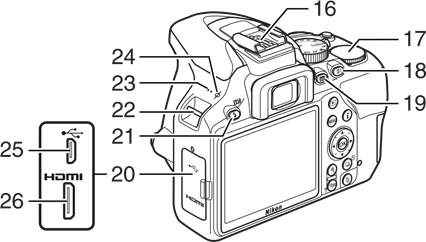
- Accessory shoe (for optional flash units)
- Command dial
 /
/ button
  (information) button
 - Connector cover
 /
/ button
 - Eyelets for camera strap
- Speaker
- Focal plane mark (
 )
) - USB connector
- HDMI connector
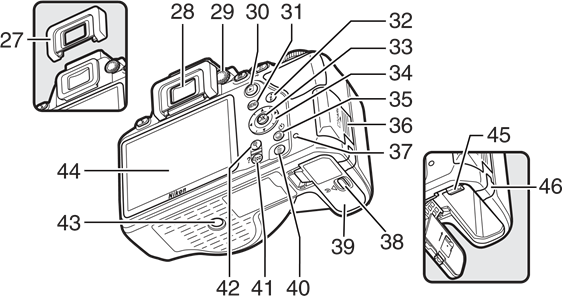
- Rubber eyecup (comes attached to camera)
- Viewfinder eyepiece
- Diopter adjustment control
 button
  button
  button
  (OK) button
 - Multi selector
 /
/ button
 - Memory card slot cover
- Memory card access lamp
- Battery-chamber cover latch
- Battery-chamber cover
 button
  /
/ button
  button
 - Tripod socket
- Monitor
- Battery latch
- Power connector cover for optional power connector
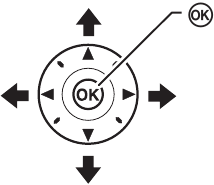
 The Multi Selector
In this manual, operations using the multi selector are represented by  ,
,  ,
,  , and
, and  icons.
 GUIDE Mode
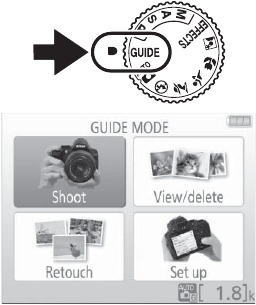
When the mode dial is rotated to  , you can shoot, view, retouch, and delete photographs and set up the camera using a convenient on-screen guide. See the online camera manual for more information.
Assembly & Operation
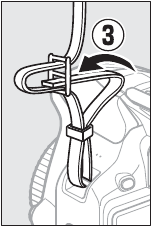
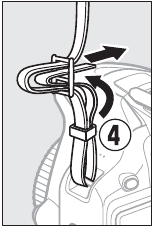
Attach the Camera Strap
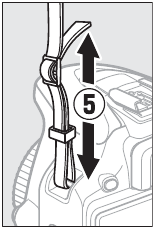
A strap is supplied with the camera; additional straps are available separately. Attach the strap securely to the two camera eyelets.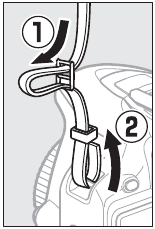



Charge the Battery
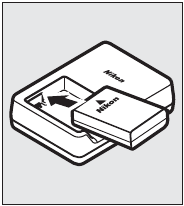

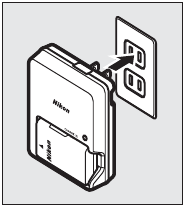
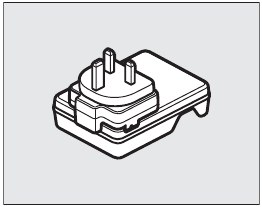
In some countries or regions, charger may be supplied with adapter connected.
The CHARGE lamp will flash while the battery charges.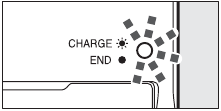
Battery charging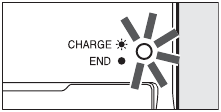
Charging complete
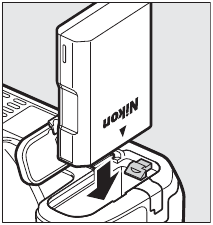
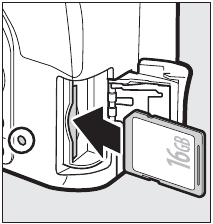
Insert the Battery and a Memory Card
Attach a Lens
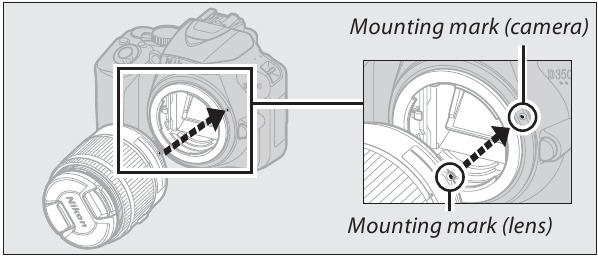
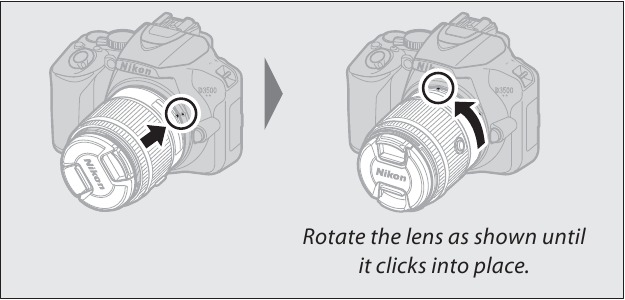
 Removing Lenses
To remove the lens, turn the camera offand press and hold the lens-release button on the front of the camera while rotating the lens in the direction opposite that shown above.
 Lenses with Retractable Lens Barrel Buttons
Before using the camera, unlock and extend the lens. Keeping the retractable lens barrel button pressed (1), rotate the zoom ring as shown (2).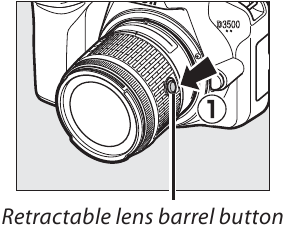
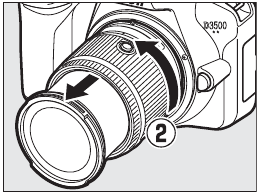
Pictures cannot be taken when the lens is retracted; if an error message is displayed as a result of the camera having been turned on with the lens retracted, rotate the zoom ring until the message is no longer displayed.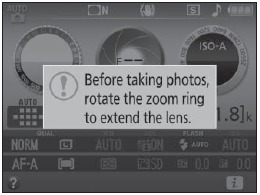
Camera Setup
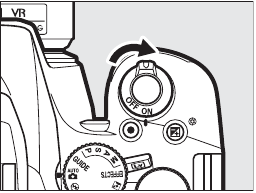
- Turn the camera on.
A language-selection dialog will be displayed; press and
and  to highlight a language and press
  to select. The languages available vary with the country or region of sale.
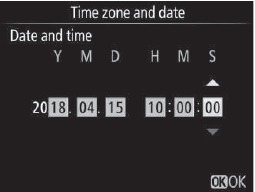
- Set the camera clock.
After setting time zone, date format, and daylight saving time options, use the multi selector and button to set the camera clock.
Focus the Viewfinder
After removing the lens cap, rotate the diopter adjustment control until points are in sharp focus. When operating the control with your eye to the viewfinder, be careful not to put your fingers or fingernails in your eye.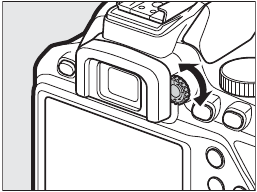
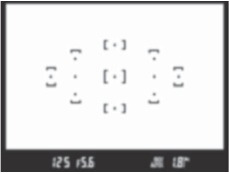
Viewfinder not in focus
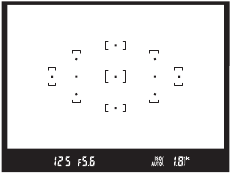
Viewfinder in focus
«Point-and-Shoot» Modes
- Rotate the mode dial to
 or
or  .
.
- Frame the photograph.

- Press the shutter-release button halfway to focus.

- Smoothly press the shutter-release button the rest of the way down to take the photograph.

Recording Movies
- Rotate the live view switch.
The view through the lens will be displayed in the monitor.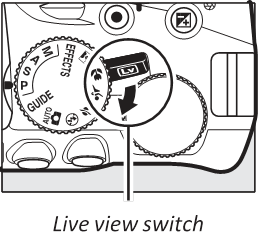
- Press the shutter-release button halfway to focus.
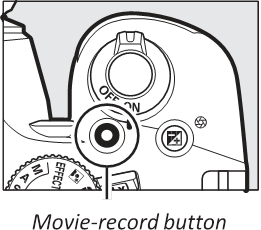
- Press the movie-record button to start recording.
A recording indicator and the time available are displayed in the monitor.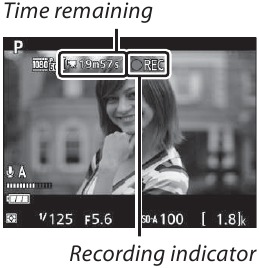
- Press the movie-record button again to end recording.
- Rotate the live view switch to exit live view.
Viewing Photographs
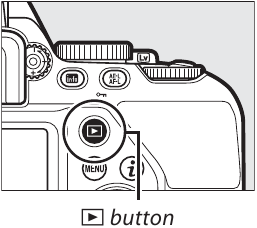
Pressing  displays a picture in the monitor. Movies are indicated by a
  icon. Press
  to start playback.
Deleting Unwanted Photographs
Note that photographs cannot be recovered once deleted.
Most shooting, playback, and setup options can be accessed from the camera menus. To view the menus, press the  button.
Tabs
Choose from the following menus: Playback
 Shooting
 Setup
Setup Retouch
 Recent Settings
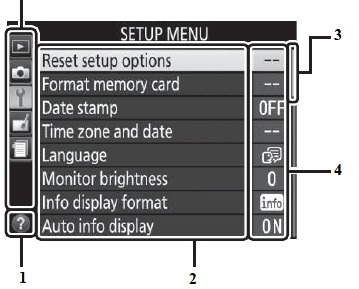
- Help icon
If the help icon is displayed, you can press the (
( ) button to view help for the currently selected item.
 - Menu options
Options in current menu. - Slider shows position in current menu.
- Current settings are shown by icons.
Connecting to Smart Devices with SnapBridge
Instal the SnapBridge app to your smart device to download pictures from the camera or control the camera remotely. For more information, see the online camera manual.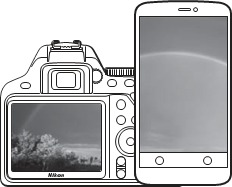
Readying the Smart Device
Before connecting, ready your smart device by installing the SnapBridge app and enabling Bluetooth.
- Search for «snapbridge» on the Apple App Store® (iOS) or Google Play™ (Android™) and install the SnapBridge app.
Information on supported operating systems is available from the download site. This camera is not compatible with the SnapBridge 360/170 app.


- Enable Bluetooth on the smart device. Note that the actual connection to the camera will be made using the SnapBridge app; do not attempt to connect using the Settings app on your device.
Pairing and Connecting
Before pairing, confirm that there is space available on the camera memory card. To prevent unexpected interruptions, you should also check that the camera battery is fully charged.
- Highlight Connect to smart device in the setup menu and press
 .
. - Follow the instructions displayed on the camera and in the SnapBridge app, to complete setup.
See SnapBridge online help for detailed setup information (additional information is also available in the online camera manual). For information on SnapBridge online help, visit:
https://nikonimglib.com/snbr/onlinehelp/en/index.html
Caring for the Camera
❚❚ Storage
When the camera will not be used for an extended period, turn the camera offand remove the battery. Do not store in locations that:
- are poorly ventilated or subject to humidities of over 60%
- are next to equipment that produces strong electromagnetic fields, such as televisions or radios
- are exposed to temperatures above 50°C (122°F) or below –10°C (14°F)
❚❚ Cleaning
Camera Body
Use a blower to remove dust and lint, then wipe gently with a soft, dry cloth. After using the camera at the beach or seaside, wipe offsand or salt with a cloth lightly dampened in distilled water and dry thoroughly.
Dust or other foreign matter inside the camera may cause damage not covered under warranty.
Lens, Mirror, and Viewfinder
These glass elements are easily damaged. Remove dust and lint with a blower. If using an aerosol blower, keep the can vertical to prevent the discharge of liquid. To remove fingerprints and other stains, apply a small amount of lens cleaner to a soft cloth and clean with care.
Monitor
Remove dust and lint with a blower. When removing fingerprints and other stains, wipe the surface lightly with a soft cloth or chamois leather. Do not apply pressure, as this could result in damage or malfunction.
* Do not use alcohol, thinner, or other volatile chemicals.
Troubleshooting
❚❚ Battery/Display
The camera is on but does not respond: Wait for recording to end. If the problem persists, turn the camera off. If the camera does not turn off, remove and reinsert the battery.
Viewfinder is out of focus: Focus the viewfinder using the diopter adjustment control.
❚❚ Shooting (All Modes)
Shutter-release disabled:
- Memory card is locked, full, or not inserted.
- Camera is not in focus.
Photos are out of focus: The camera may be unable to focus on subjects that are low in contrast, dominated by regular geometric patterns, or dwarfed by objects in the background, or that include objects at different distances from the camera, areas of sharply contrasting brightness, or many fine details.
❚❚ Playback
Cannot view pictures recorded with other cameras: Pictures recorded with other makes of camera may not be display correctly.
Some pictures are not displayed during playback: Select All for Playback folder.
Cannot delete picture: Memory card is locked.
Specifications
❚❚ Nikon D3500 Digital Camera
| Type | |
| Type | Single-lens reflex digital camera |
| Lens mount | Nikon F mount (with AF contacts) |
| Effective angle of view | Nikon DX format; focal length equivalent to approx. 1.5× that of lenses with FX format angle of view |
| Effective pixels | |
| Effective pixels | 24.2 million |
| Image sensor | |
| Image sensor | 23.5 × 15.6 mm CMOS sensor |
| Total pixels | 24.78 million |
| Dust-reduction System | Image Dust Offreference data (Capture NX-D software required) |
| Storage | |
| Image size (pixels) |
|
| File format |
|
| Picture Control System | Standard, Neutral, Vivid, Monochrome, Portrait, Landscape, Flat; selected Picture Control can be modified |
| Media | SD (Secure Digital) and UHS-I compliant SDHC and SDXC memory cards |
| File system | DCF 2.0, Exif 2.3, PictBridge |
| Viewfinder | |
| Viewfinder | Eye-level pentamirror single-lens reflex viewfinder |
| Frame coverage | Approx. 95% horizontal and 95% vertical |
| Magnification | Approx. 0.85× (50 mm f/1.4 lens at infinity, –1.0 m–1) |
| Eyepoint | 18 mm (–1.0 m–1; from center surface of viewfinder eyepiece lens) |
| Diopter adjustment | –1.7 – +0.5 m–1 |
| Focusing screen | Type B BriteView Clear Matte Mark VII screen |
| Reflex mirror | Quick return |
| Lens aperture | Instant return, electronically controlled |
| Lens | |
| Autofocus support | Autofocus is available with AF-P and type E and G AF-S lenses. |
| Shutter | |
| Type | Electronically-controlled vertical-travel focal-plane shutter |
| Speed | 1/4000 – 30 s in steps of 1/3 EV; Bulb; Time |
| Flash sync speed | X = 1/200 s; synchronizes with shutter at 1/200 s or slower |
| Release | |
| Release mode |  (single frame), (single frame),  (continuous), (continuous),  (quiet shutter release), (quiet shutter release),  (self-timer) (self-timer) |
| Frame advance rate | Up to 5 fps Note: Frame rates assume manual focus, manual or shutter-priority auto exposure, a shutter speed of 1/250 s or faster, and other settings at default values. |
| Self-timer | 2 s, 5 s, 10 s, 20 s; 1 – 9 exposures |
| Exposure | |
| Metering mode | TTL exposure metering using 420-pixel RGB sensor |
| Metering method |
|
| Range (ISO 100, f/1.4 lens, 20°C/68°F) |
|
| Exposure meter coupling | CPU |
| Mode | Auto modes ( auto; auto;  auto, flash off); programmed auto with flexible program (P); shutter-priority auto (S); aperture-priority auto (A); manual (M); scene modes ( auto, flash off); programmed auto with flexible program (P); shutter-priority auto (S); aperture-priority auto (A); manual (M); scene modes ( portrait; portrait;  sports; sports;  close up; close up;  night portrait); special effects modes ( night portrait); special effects modes ( night vision; night vision;  super vivid; super vivid;  pop; pop;  photo illustration; photo illustration;  toy camera effect; toy camera effect;  miniature effect; miniature effect;  selective color; selective color;  silhouette; silhouette;  high key; high key;  low key) low key) |
| Exposure compensation | Can be adjusted by –5 – +5 EV in increments of 1/3 EV in P, S, A, M, scene, and  modes modes |
| Exposure lock | Luminosity locked at detected value with  ( ( ) button ) button |
| ISO sensitivity (Recommended Exposure Index) | ISO 100 – 25600 in steps of 1 EV. Auto ISO sensitivity control available |
| Active D-Lighting | On, off |
| Focus | |
| Autofocus | Nikon Multi-CAM 1000 autofocus sensor module with TTL phase detection, 11 focus points (including one cross-type sensor), and AF-assist illuminator (range approx. 0.5 – 3 m/1 ft 8 in. – 9 ft 10 in.) |
| Detection range | –1 – +19 EV (ISO 100, 20°C/68°F) |
| Lens servo |
|
| Focus point | Can be selected from 11 focus points |
| AF-area mode | Single-point AF, dynamic-area AF, auto-area AF, 3D-tracking (11 points) |
| Focus lock | Focus can be locked by pressing shutter-release button halfway (single-servo AF) or by pressing  ( ( ) button ) button |
| Flash | |
| Built-in flash |  , ,  , ,  , ,  , ,  , ,  , ,  , ,  : Auto flash with auto pop-up P, S, A, M: Manual pop-up with button release : Auto flash with auto pop-up P, S, A, M: Manual pop-up with button release |
| Guide Number | Approx. 7/22, 8/26 with manual flash (m/ft, ISO 100, 20°C/68°F) |
| Flash control | TTL: i-TTL flash control using 420-pixel RGB sensor is available with built-in flash; i-TTL balanced fill-flash for digital SLR is used with matrix and center-weighted metering, standard i-TTL flash for digital SLR with spot metering |
| Flash mode | Auto, auto with red-eye reduction, auto slow sync, auto slow sync with red-eye reduction, fill-flash, red-eye reduction, slow sync, slow sync with red-eye reduction, rear-curtain with slow sync, rear-curtain sync, off |
| Flash compensation | Can be adjusted by –3 – +1 EV in increments of 1/3 EV in P, S, A, M, and scene modes |
| Flash-ready indicator | Lights when built-in flash or optional flash unit is fully charged; flashes after flash is fired at full output |
| Accessory shoe | ISO 518 hot-shoe with sync and data contacts and safety lock |
| Nikon Creative Lighting System (CLS) | i-TTL flash control, optical Advanced Wireless Lighting, Color Information Communication, AF-assist for multiarea AF |
| Sync terminal | AS-15 sync terminal adapter (available separately) |
| White balance | |
| White balance | Auto, incandescent, fluorescent (7 types), direct sunlight, flash, cloudy, shade, preset manual, all except preset manual with fine-tuning |
| Live view | |
| Lens servo |
|
| AF-area mode | Face-priority AF, wide-area AF, normal-area AF, subjecttracking AF |
| Autofocus | Contrast-detect AF anywhere in frame (camera selects focus point automatically when face-priority AF or subject-tracking AF is selected) |
| Automatic scene selection | Available in  and and  modes modes |
| Movie | |
| Metering | TTL exposure metering using main image sensor |
| Metering method | Matrix |
| Frame size (pixels) and frame rate |
Actual frame rates for 60p, 50p, 30p, 25p, and 24p are 59.94, 50, 29.97, 25, and 23.976 fps respectively; options support both ★ high and normal image quality |
| File format | MOV |
| Video compression | H.264/MPEG-4 Advanced Video Coding |
| Audio recording format | Linear PCM |
| Audio recording device | Built-in monaural microphone; sensitivity adjustable |
| ISO sensitivity | ISO 100 – 25600 |
| Monitor | |
| Monitor | 7.5-cm (3-in.), approx. 921k-dot (VGA) TFT LCD with 170 ° viewing angle, approx. 100% frame coverage, and brightness adjustment |
| Playback | |
| Playback | Full-frame and thumbnail (4, 9, or 72 images or calendar) playback with playback zoom, playback zoom cropping, playback face zoom, movie playback, photo and/or movie slide shows, histogram display, highlights, photo information, location data display, auto image rotation, picture rating, and image comment (up to 36 characters) |
| Interface | |
| USB | Hi-Speed USB with Micro-USB connector; connection to built-in USB port is recommended |
| HDMI output | Type C HDMI connector |
| Bluetooth | |
| Communication protocols | Bluetooth Specification Version 4.1 |
| Operating frequency |
|
| Maximum output power | 1.2 dBm (EIRP) |
| Range (line of sight) | Approximately 10 m (32 ft) without interference; range may vary with signal strength and presence or absence of obstacles |
| Power source | |
| Battery | One EN-EL14a rechargeable Li-ion battery |
| AC adapter | EH-5c/EH-5b AC adapter; requires EP-5A power connector (available separately) |
| Tripod socket | |
| Tripod socket | 1/4 in. (ISO 1222) |
| Dimensions/weight | |
| Dimensions (W × H × D) | Approx. 124 × 97 × 69.5 mm (4.9 × 3.9 × 2.8 in.) |
| Weight | Approx. 415 g (14.7 oz) with battery and memory card but without body cap; approx. 365 g/12.9 oz (camera body only) |
| Operating environment | |
| Temperature | 0°C – 40°C (+32°F – 104°F) |
| Humidity | 85% or less (no condensation) |
❚❚ MH-24 Battery Charger
| Rated input | AC 100 – 240 V, 50/60 Hz, 0.2 A maximum |
| Rated output | DC 8.4 V/0.9 A |
| Supported batteries | Nikon EN-EL14a rechargeable Li-ion batteries |
| Charging time | Approx. 1 hour and 50 minutes at an ambient temperature of 25°C (77°F) when no charge remains |
| Operating temperature | 0°C – 40°C (+32°F – 104°F) |
| Dimensions (W × H × D) | Approx. 70 × 26 × 97 mm (2.8 × 1.0 × 3.8 in.), excluding plug adapter |
| Weight | Approx. 96 g (3.4 oz), excluding plug adapter |
The symbols on this product represent the following:  AC,
AC,  DC,
DC,  Class II equipment (The construction of the product is doubleinsulated.)
❚❚ EN-EL14a Rechargeable Li-ion Battery
| Type | Rechargeable lithium-ion battery |
| Rated capacity | 7.2 V/1230 mAh |
| Operating temperature | 0°C – 40°C (+32°F – 104°F) |
| Dimensions (W × H × D) | Approx. 38 × 53 × 14 mm (1.5 × 2.1 × 0.6 in.) |
| Weight | Approx. 49 g (1.7 oz), excluding terminal cover |
Recycle rechargeable batteries in accord with local regulations, being sure to first insulate the terminals with tape.
 Battery Life
The movie footage or number of shots that can be recorded with fullycharged batteries varies with the condition of the battery, temperature, the interval between shots, and the length of time menus are displayed. Sample figures for EN-EL14a (1230 mAh) batteries are given below.
- Photographs, single-frame release mode (CIPA standard): Approximately 1550 shots
- Movies: Approximately 75 minutes at 1080/60p
❚❚ Lenses
This section provides lens specifications for purchasers of lens kits. Note that some of the lenses below may not be available in all countries or regions.
AF-P DX NIKKOR 18–55mm f/3.5–5.6G VR Lenses
| Type | Type G AF-P DX lens with built-in CPU and F mount |
| Focal length | 18 – 55 mm |
| Maximum aperture | f/3.5 – 5.6 |
| Lens construction | 12 elements in 9 groups (2 aspherical lens elements) |
| Angle of view | 76° – 28° 50´ |
| Focal length scale | Graduated in millimeters (18, 24, 35, 45, 55) |
| Distance information | Output to camera |
| Zoom | Manual zoom using independent zoom ring |
| Focusing | Autofocus controlled by stepping motor; separate focus ring for manual focus |
| Vibration reduction | Lens shift using voice coil motors (VCMs) |
| Minimum focus distance | 0.25 m (0.9 ft) from focal plane at all zoom positions |
| Diaphragm blades | 7 (rounded diaphragm opening) |
| Diaphragm | Fully automatic |
| Aperture range |
The minimum aperture displayed may vary depending on the size of the exposure increment selected with the camera. |
| Metering | Full aperture |
| Filter-attachment size | 55 mm (P = 0.75 mm) |
| Dimensions | Approx. 64.5 mm maximum diameter × 62.5 mm (distance from camera lens mount flange when lens is retracted) |
| Weight | Approx. 205 g (7.3 oz) |
AF-P DX NIKKOR 70–300mm f/4.5–6.3G ED VR and AF-P DX NIKKOR 70–300mm f/4.5–6.3G ED Lenses
| Type | Type G AF-P DX lens with built-in CPU and F mount |
| Focal length | 70 – 300 mm |
| Maximum aperture | f/4.5 – 6.3 |
| Lens construction | 14 elements in 10 groups (including 1 ED lens element) |
| Angle of view | 22° 50´ – 5° 20´ |
| Focal length scale | Graduated in millimeters (70, 100, 135, 200, 300) |
| Distance information | Output to camera |
| Zoom | Manual zoom using independent zoom ring |
| Focusing | Autofocus controlled by stepping motor; separate focus ring for manual focus |
| Vibration reduction (AF-P DX NIKKOR 70–300mm f/4.5–6.3G ED VR only) | Lens shift using voice coil motors (VCMs) |
| Minimum focus distance | 1.1 m (3.7 ft) from focal plane at all zoom positions |
| Diaphragm blades | 7 (rounded diaphragm opening) |
| Diaphragm | Fully automatic |
| Aperture range |
The minimum aperture displayed may vary depending on the size of the exposure increment selected with the camera. |
| Metering | Full aperture |
| Filter-attachment size | 58 mm (P = 0.75 mm) |
| Dimensions | Approx. 72 mm maximum diameter × 125 mm (distance from camera lens mount flange) |
| Weight |
|
- Unless otherwise stated, all measurements are performed in conformity with Camera and Imaging Products Association (CIPA) standards or guidelines.
- All figures are for a camera with a fully-charged battery.
- The sample images displayed on the camera and the images and illustrations in the manual are for expository purposes only.
- Nikon reserves the right to change the appearance and specifications of the hardware and software described in this manual at any time and without prior notice. Nikon will not be held liable for damages that may result from any mistakes that this manual may contain.
❚❚ Trademark Information
IOS is a trademark or registered trademark of Cisco Systems, Inc., in the United States and/or other countries and is used under license. Windows is either a registered trademark or a trademark of Microsoft Corporation in the United States and/ or other countries. Mac, macOS, OS X, Apple®, App Store®, the Apple logos, iPhone®, iPad®, and iPod touch® are trademarks of Apple Inc. registered in the U.S. and/or other countries. Android is a trademark of Google Inc. The Android robot is reproduced or modified from work created and shared by Google and used according to terms described in the Creative Commons 3.0 Attribution License. PictBridge logo is a trademark. The SD, SDHC, and SDXC logos are trademarks of the SD-3C, LLC. HDMI, the HDMI logo and High-Definition Multimedia Interface are trademarks or registered trademarks of HDMI Licensing LLC.

The Bluetooth® word mark and logos are registered trademarks owned by Bluetooth SIG, Inc. and any use of such marks by Nikon Corporation is under license.
All other trade names mentioned in this manual or the other documentation provided with your Nikon product are trademarks or registered trademarks of their respective holders.
«Made for iPod,» «Made for iPhone,» and «Made for iPad» mean that an electronic accessory has been designed to connect specifically to iPod, iPhone, or iPad, respectively, and has been certified by the developer to meet Apple performance standards. Apple is not responsible for the operation of this device or its compliance with safety and regulatory standards. Please note that the use of this accessory with iPod, iPhone, or iPad may affect wireless performance.
❚❚ Conformity Marking
The standards with which the camera complies can be viewed using the Conformity marking option in the setup menu.
❚❚ FreeType License (FreeType2)
Portions of this software are copyright
© 2012 The FreeType Project (http://www.freetype.org). All rights reserved.
❚❚ MIT License (HarfBuzz)
Portions of this software are copyright
© 2018 The HarfBuzz Project
(http://www.freedesktop.org/wiki/Software/HarfBuzz). All rights reserved.
No reproduction in any form of this manual, in whole or in part (except for brief quotation in critical articles or reviews), may be made without written authorization from NIKON CORPORATION.

© 2018 Nikon Corporation
Videos
ikon D3500 User’s Guide Video | Tutorial for Beginners
Nikon D3500 in 2023 | Review Video
Documents / Resources
References
Download manual
Here you can download full pdf version of manual, it may contain additional safety instructions, warranty information, FCC rules, etc.
Download Nikon D3500 Digital Camera Manual
Перейти к контенту

Русские электронные инструкции по эксплуатации
Постоянно обновляемый большой каталог документации по эксплуатации и использованию современных устройств и оборудования на русском языке. Бесплатное скачивание файлов.
Поиск:
Главная
♥ В закладки
Просмотр инструкции в pdf


 This symbol indicates that electrical and electronic equipment is to be collected separately.
The following apply only to users in European countries:
- This product is designated for separate collection at an appropriate collection point. Do not dispose of as household waste.
- Separate collection and recycling helps conserve natural resources and prevent negative consequences for human health and the environment that might result from incorrect disposal.
- For more information, contact the retailer or the local authorities in charge of waste management.
 This symbol on the battery indicates that the battery is to be collected separately.
The following apply only to users in European countries:
- All batteries, whether marked with this symbol or not, are designated for separate collection at an appropriate collection point. Do not dispose of as household waste.
- For more information, contact the retailer or the local authorities in charge of waste management.
Notices for Customers in the U.S.A.
The Battery Charger
IMPORTANT SAFETY INSTRUCTIONS—SAVE THESE INSTRUCTIONS
TO REDUCE THE RISK OF FIRE OR ELECTRIC SHOCK, CAREFULLY FOLLOW THESE INSTRUCTIONS
For connection to a supply not in the U.S.A., use an attachment plug adapter of the proper configuration for the power outlet if needed. This power unit is intended to be correctly oriented in a vertical or floor mount position.
Federal Communications Commission (FCC) Radio Frequency Interference Statement
This equipment has been tested and found to comply with the limits for a Class B digital device, pursuant to Part 15 of the FCC rules. These limits are designed to provide reasonable protection against harmful interference in a residential installation. This equipment generates, uses, and can radiate radio frequency energy and, if not installed and used in accordance with the instructions, may cause harmful interference to radio communications. However, there is no guarantee that interference will not occur in a particular installation. If this equipment does cause harmful interference to radio or television reception, which can be determined by turning the equipment offand on, the user is encouraged to try to correct the interference by one or more of the following measures:
- Reorient or relocate the receiving antenna.
- Increase the separation between the equipment and receiver.
- Connect the equipment into an outlet on a circuit different from that to which the receiver is connected.
- Consult the dealer or an experienced radio/television technician for help.
CAUTIONS
Modifications
The FCC requires the user be notified that any changes or modifications made to this device that are not expressly approved by Nikon Corporation may void the user’s authority to operate the equipment.
Interface Cables
Use the interface cables sold or provided by Nikon for your equipment. Using other interface cables may exceed the limits of Class B Part 15 of the FCC rules.
Notice for Customers in the State of California
Handling the cord on this product may expose you to lead, a chemical known to the State of California to cause birth defects or other reproductive harm. Wash hands after handling.
Nikon Inc., 1300 Walt Whitman Road, Melville, New York 11747-3064, U.S.A. Tel.: 631-547-4200
Notice Concerning Prohibition of Copying or Reproduction
Note that simply being in possession of material that has been digitally copied or reproduced by means of a scanner, digital camera, or other device may be punishable by law.
- Items prohibited by law from being copied or reproduced
Do not copy or reproduce paper money, coins, securities, government bonds, or local government bonds, even if such copies or reproductions are stamped «Sample.»
The copying or reproduction of paper money, coins, or securities which are circulated in a foreign country is prohibited.
Unless the prior permission of the government has been obtained, the copying or reproduction of unused postage stamps or post cards issued by the government is prohibited.
The copying or reproduction of stamps issued by the government and of certified documents stipulated by law is prohibited. - Cautions on certain copies and reproductions
The government has issued cautions on copies or reproductions of securities issued by private companies (shares, bills, checks, gift certificates, etc.), commuter passes, or coupon tickets, except when a minimum of necessary copies are to be provided for business use by a company. Also, do not copy or reproduce passports issued by the government, licenses issued by public agencies and private groups, ID cards, and tickets, such as passes and meal coupons. - Comply with copyright notices
Under copyright law, photographs or recordings of copyrighted works made with the camera cannot be used without the permission of the copyright holder. Exceptions apply to personal use, but note that even personal use may be restricted in the case of photographs or recordings of exhibits or live performances.
Disposing of Data Storage Devices
Please note that deleting images or formatting memory cards or other data storage devices does not completely erase the original image data. Deleted files can sometimes be recovered from discarded storage devices using commercially available software, potentially resulting in the malicious use of personal image data. Ensuring the privacy of such data is the user’s responsibility.
Before discarding a data storage device or transferring ownership to another person, erase all data using commercial deletion software, or format the device and then completely refill it with images containing no private information (for example, pictures of empty sky). Care should be taken to avoid injury when physically destroying data storage devices. Be sure to also replace any pictures selected for preset manual white balance.
Before discarding the camera or transferring ownership to another person, you should also use the Reset all settings option in the camera setup menu to delete network settings and other personal information.
AVC Patent Portfolio License
THIS PRODUCT IS LICENSED UNDER THE AVC PATENT PORTFOLIO LICENSE FOR THE PERSONAL AND NON-COMMERCIAL USE OF A CONSUMER TO (i) ENCODE VIDEO IN COMPLIANCE WITH THE AVC STANDARD («AVC VIDEO») AND/OR (ii) DECODE AVC VIDEO THAT WAS ENCODED BY A CONSUMER ENGAGED IN A PERSONAL AND NON-COMMERCIAL ACTIVITY AND/OR WAS OBTAINED FROM A VIDEO PROVIDER LICENSED TO PROVIDE AVC VIDEO. NO LICENSE IS GRANTED OR SHALL BE IMPLIED FOR ANY OTHER USE. ADDITIONAL INFORMATION MAY BE OBTAINED FROM MPEG LA, L.L.C. SEE http://www.mpegla.com
Use Only Nikon Brand Electronic Accessories
Nikon cameras are designed to the highest standards and include complex electronic circuitry. Only Nikon brand electronic accessories (including chargers, batteries, AC adapters, and flash accessories) certified by Nikon specifically for use with this Nikon digital camera are engineered and proven to operate within the operational and safety requirements of this electronic circuitry. The use of non-Nikon electronic accessories could damage the camera and may void your Nikon warranty. The use of third-party rechargeable Li-ion batteries not bearing the Nikon holographic seal shown at right could interfere with normal operation of the camera or result in the batteries overheating, igniting, rupturing, or leaking.
For more information about Nikon brand accessories, contact a local authorized Nikon dealer.
 Use Only Nikon Brand Accessories
Only Nikon brand accessories certified by Nikon specifically for use with your Nikon digital camera are engineered and proven to operate within its operational and safety requirements. THE USE OF NON-NIKON ACCESSORIES COULD DAMAGE YOUR CAMERA AND MAY VOID YOUR NIKON WARRANTY.
 Before Taking Important Pictures
Before taking pictures on important occasions (such as at weddings or before taking the camera on a trip), take a test shot to ensure that the camera is functioning normally. Nikon will not be held liable for damages or lost profits that may result from product malfunction.
 Life-Long Learning
As part of Nikon’s «Life-Long Learning» commitment to ongoing product support and education, continually-updated information is available on-line at the following sites:
- For users in the U.S.A.: http://www.nikonusa.com/
- For users in Europe and Africa: http://www.europe-nikon.com/support/
- For users in Asia, Oceania, and the Middle East: http://www.nikon-asia.com/
Visit these sites to keep up-to-date with the latest product information, tips, answers to frequently-asked questions (FAQs), and general advice on digital imaging and photography. Additional information may be available from the Nikon representative in your area. See the following URL for contact information: http://imaging.nikon.com/
Bluetooth
This product is controlled by the United States Export Administration Regulations (EAR). The permission of the United States government is not required for export to countries other than the following, which as of this writing are subject to embargo or special controls: Cuba, Iran, North Korea, Sudan, and Syria (list subject to change).
The use of wireless devices may be prohibited in some countries or regions. Contact a Nikonauthorized service representative before using the wireless features of this product outside the country of purchase.
Notice for Customers in the U.S.A. and Canada
This device complies with part 15 of FCC Rules and Innovation, Science and Economic Development Canada’s licence-exempt RSSs. Operation is subject to the following two conditions: (1) this device may not cause harmful interference, and (2) this device must accept any interference received, including interference that may cause undesired operation.
FCC WARNING
The FCC requires the user to be notified that any changes or modifications made to this device that are not expressly approved by Nikon Corporation may void the user’s authority to operate the equipment.
FCC Radio Frequency Interference Statement
Note: This equipment has been tested and found to comply with the limits for a Class B digital device, pursuant to part 15 of the FCC Rules. These limits are designed to provide reasonable protection against harmful interference in a residential installation. This equipment generates, uses and can radiate radio frequency energy and, if not installed and used in accordance with the instructions, may cause harmful interference to radio communications. However, there is no guarantee that interference will not occur in a particular installation. If this equipment does cause harmful interference to radio or television reception, which can be determined by turning the equipment offand on, the user is encouraged to try to correct the interference by one or more of the following measures:
- Reorient or relocate the receiving antenna.
- Increase the separation between the equipment and receiver.
- Connect the equipment into an outlet on a circuit different from that to which the receiver is connected.
- Consult the dealer or an experienced radio/TV technician for help.
Co-location
This transmitter must not be co-located or operated in conjunction with any other antenna or transmitter.
Nikon Inc., 1300 Walt Whitman Road, Melville, New York 11747-3064, U.S.A.
Tel.: 631-547-4200
FCC/ISED RF Exposure Statement
The available scientific evidence does not show that any health problems are associated with using low power wireless devices. There is no proof, however, that these low power wireless devices are absolutely safe. Low power Wireless devices emit low levels of radio frequency energy (RF) in the microwave range while being used. Whereas high levels of RF can produce health effects (by heating tissue), exposure of low-level RF that does not produce heating effects causes no known adverse health effects. Many studies of lowlevel RF exposures have not found any biological effects. Some studies have suggested that some biological effects might occur, but such findings have not been confirmed by additional research. This product has been tested and found to comply with FCC/ISED radiation exposure limits set forth for an uncontrolled environment and meets the FCC radio frequency (RF) Exposure Guidelines and RSS-102 of the ISED radio frequency (RF) Exposure rules. Please refer to the SAR test report that was uploaded to FCC website.
Notices for Customers in Europe Hereby, Nikon Corporation declares that the radio equipment type D3500 is in compliance with Directive 2014/53/EU.
The full text of the EU declaration of conformity is available at the following internet address: http://imaging.nikon.com/support/pdf/DoC_N1718.pdf.
Notice for Customers in Singapore
Trade Name:
Model: D3500
This device complies with radio-frequency regulations. The content of certification labels not affixed to the device is given below.
Complies with IMDA Standards DA103423
Security
Although one of the benefits of this product is that it allows others to freely connect for the wireless exchange of data anywhere within its range, the following may occur if security is not enabled:
- Data theft: Malicious third-parties may intercept wireless transmissions to steal user IDs, passwords, and other personal information.
- Unauthorized access: Unauthorized users may gain access to the network and alter data or perform other malicious actions. Note that due to the design of wireless networks, specialized attacks may allow unauthorized access even when security is enabled.
- Unsecured networks: Connecting to open networks may result in unauthorized access. Use secure networks only.
The Camera Body

- Power switch
- Shutter-release button
 /
/ button
 - Movie-record button
- Live view switch
- Mode dial
- Built-in flash
- Microphone (monaural)
- Mounting mark
- Lens release button
- Mirror
- Lens mount
- CPU contacts
- AF-assist illuminator
Self-timer lamp
Red-eye reduction lamp - Body cap

- Accessory shoe (for optional flash units)
- Command dial
 /
/ button
  (information) button
 - Connector cover
 /
/ button
 - Eyelets for camera strap
- Speaker
- Focal plane mark (
 )
) - USB connector
- HDMI connector

- Rubber eyecup (comes attached to camera)
- Viewfinder eyepiece
- Diopter adjustment control
 button
  button
  button
  (OK) button
 - Multi selector
 /
/ button
 - Memory card slot cover
- Memory card access lamp
- Battery-chamber cover latch
- Battery-chamber cover
 button
  /
/ button
  button
 - Tripod socket
- Monitor
- Battery latch
- Power connector cover for optional power connector
 The Multi Selector
In this manual, operations using the multi selector are represented by  ,
,  ,
,  , and
, and  icons.

 GUIDE Mode
When the mode dial is rotated to  , you can shoot, view, retouch, and delete photographs and set up the camera using a convenient on-screen guide. See the online camera manual for more information.
Assembly & Operation
Attach the Camera Strap
A strap is supplied with the camera; additional straps are available separately. Attach the strap securely to the two camera eyelets.


Charge the Battery


In some countries or regions, charger may be supplied with adapter connected.
The CHARGE lamp will flash while the battery charges.
Battery charging
Charging complete
Insert the Battery and a Memory Card


Attach a Lens


 Removing Lenses
To remove the lens, turn the camera offand press and hold the lens-release button on the front of the camera while rotating the lens in the direction opposite that shown above.
 Lenses with Retractable Lens Barrel Buttons
Before using the camera, unlock and extend the lens. Keeping the retractable lens barrel button pressed (1), rotate the zoom ring as shown (2).

Pictures cannot be taken when the lens is retracted; if an error message is displayed as a result of the camera having been turned on with the lens retracted, rotate the zoom ring until the message is no longer displayed.
Camera Setup
- Turn the camera on.
A language-selection dialog will be displayed; press and
and  to highlight a language and press
  to select. The languages available vary with the country or region of sale.
- Set the camera clock.
After setting time zone, date format, and daylight saving time options, use the multi selector and button to set the camera clock.
Focus the Viewfinder
After removing the lens cap, rotate the diopter adjustment control until points are in sharp focus. When operating the control with your eye to the viewfinder, be careful not to put your fingers or fingernails in your eye.

Viewfinder not in focus

Viewfinder in focus
«Point-and-Shoot» Modes
- Rotate the mode dial to
 or
or  .
.
- Frame the photograph.

- Press the shutter-release button halfway to focus.

- Smoothly press the shutter-release button the rest of the way down to take the photograph.

Recording Movies
- Rotate the live view switch.
The view through the lens will be displayed in the monitor.
- Press the shutter-release button halfway to focus.
- Press the movie-record button to start recording.

A recording indicator and the time available are displayed in the monitor.
- Press the movie-record button again to end recording.
- Rotate the live view switch to exit live view.
Viewing Photographs
Pressing  displays a picture in the monitor. Movies are indicated by a
  icon. Press
  to start playback.
Deleting Unwanted Photographs
Note that photographs cannot be recovered once deleted.
Most shooting, playback, and setup options can be accessed from the camera menus. To view the menus, press the  button.
Tabs
Choose from the following menus: Playback
 Shooting
 Setup
Setup Retouch
 Recent Settings
- Help icon
If the help icon is displayed, you can press the (
( ) button to view help for the currently selected item.
 - Menu options
Options in current menu. - Slider shows position in current menu.
- Current settings are shown by icons.
Connecting to Smart Devices with SnapBridge
Instal the SnapBridge app to your smart device to download pictures from the camera or control the camera remotely. For more information, see the online camera manual.
Readying the Smart Device
Before connecting, ready your smart device by installing the SnapBridge app and enabling Bluetooth.
- Search for «snapbridge» on the Apple App Store® (iOS) or Google Play™ (Android™) and install the SnapBridge app.
Information on supported operating systems is available from the download site. This camera is not compatible with the SnapBridge 360/170 app.


- Enable Bluetooth on the smart device. Note that the actual connection to the camera will be made using the SnapBridge app; do not attempt to connect using the Settings app on your device.
Pairing and Connecting
Before pairing, confirm that there is space available on the camera memory card. To prevent unexpected interruptions, you should also check that the camera battery is fully charged.
- Highlight Connect to smart device in the setup menu and press
 .
. - Follow the instructions displayed on the camera and in the SnapBridge app, to complete setup.
See SnapBridge online help for detailed setup information (additional information is also available in the online camera manual). For information on SnapBridge online help, visit:
https://nikonimglib.com/snbr/onlinehelp/en/index.html
Caring for the Camera
❚❚ Storage
When the camera will not be used for an extended period, turn the camera offand remove the battery. Do not store in locations that:
- are poorly ventilated or subject to humidities of over 60%
- are next to equipment that produces strong electromagnetic fields, such as televisions or radios
- are exposed to temperatures above 50°C (122°F) or below –10°C (14°F)
❚❚ Cleaning
Camera Body
Use a blower to remove dust and lint, then wipe gently with a soft, dry cloth. After using the camera at the beach or seaside, wipe offsand or salt with a cloth lightly dampened in distilled water and dry thoroughly.
Dust or other foreign matter inside the camera may cause damage not covered under warranty.
Lens, Mirror, and Viewfinder
These glass elements are easily damaged. Remove dust and lint with a blower. If using an aerosol blower, keep the can vertical to prevent the discharge of liquid. To remove fingerprints and other stains, apply a small amount of lens cleaner to a soft cloth and clean with care.
Monitor
Remove dust and lint with a blower. When removing fingerprints and other stains, wipe the surface lightly with a soft cloth or chamois leather. Do not apply pressure, as this could result in damage or malfunction.
* Do not use alcohol, thinner, or other volatile chemicals.
Troubleshooting
❚❚ Battery/Display
The camera is on but does not respond: Wait for recording to end. If the problem persists, turn the camera off. If the camera does not turn off, remove and reinsert the battery.
Viewfinder is out of focus: Focus the viewfinder using the diopter adjustment control.
❚❚ Shooting (All Modes)
Shutter-release disabled:
- Memory card is locked, full, or not inserted.
- Camera is not in focus.
Photos are out of focus: The camera may be unable to focus on subjects that are low in contrast, dominated by regular geometric patterns, or dwarfed by objects in the background, or that include objects at different distances from the camera, areas of sharply contrasting brightness, or many fine details.
❚❚ Playback
Cannot view pictures recorded with other cameras: Pictures recorded with other makes of camera may not be display correctly.
Some pictures are not displayed during playback: Select All for Playback folder.
Cannot delete picture: Memory card is locked.
Specifications
❚❚ Nikon D3500 Digital Camera
| Type | |
| Type | Single-lens reflex digital camera |
| Lens mount | Nikon F mount (with AF contacts) |
| Effective angle of view | Nikon DX format; focal length equivalent to approx. 1.5× that of lenses with FX format angle of view |
| Effective pixels | |
| Effective pixels | 24.2 million |
| Image sensor | |
| Image sensor | 23.5 × 15.6 mm CMOS sensor |
| Total pixels | 24.78 million |
| Dust-reduction System | Image Dust Offreference data (Capture NX-D software required) |
| Storage | |
| Image size (pixels) |
|
| File format |
|
| Picture Control System | Standard, Neutral, Vivid, Monochrome, Portrait, Landscape, Flat; selected Picture Control can be modified |
| Media | SD (Secure Digital) and UHS-I compliant SDHC and SDXC memory cards |
| File system | DCF 2.0, Exif 2.3, PictBridge |
| Viewfinder | |
| Viewfinder | Eye-level pentamirror single-lens reflex viewfinder |
| Frame coverage | Approx. 95% horizontal and 95% vertical |
| Magnification | Approx. 0.85× (50 mm f/1.4 lens at infinity, –1.0 m–1) |
| Eyepoint | 18 mm (–1.0 m–1; from center surface of viewfinder eyepiece lens) |
| Diopter adjustment | –1.7 – +0.5 m–1 |
| Focusing screen | Type B BriteView Clear Matte Mark VII screen |
| Reflex mirror | Quick return |
| Lens aperture | Instant return, electronically controlled |
| Lens | |
| Autofocus support | Autofocus is available with AF-P and type E and G AF-S lenses. |
| Shutter | |
| Type | Electronically-controlled vertical-travel focal-plane shutter |
| Speed | 1/4000 – 30 s in steps of 1/3 EV; Bulb; Time |
| Flash sync speed | X = 1/200 s; synchronizes with shutter at 1/200 s or slower |
| Release | |
| Release mode |  (single frame), (single frame),  (continuous), (continuous),  (quiet shutter release), (quiet shutter release),  (self-timer) (self-timer) |
| Frame advance rate | Up to 5 fps Note: Frame rates assume manual focus, manual or shutter-priority auto exposure, a shutter speed of 1/250 s or faster, and other settings at default values. |
| Self-timer | 2 s, 5 s, 10 s, 20 s; 1 – 9 exposures |
| Exposure | |
| Metering mode | TTL exposure metering using 420-pixel RGB sensor |
| Metering method |
|
| Range (ISO 100, f/1.4 lens, 20°C/68°F) |
|
| Exposure meter coupling | CPU |
| Mode | Auto modes ( auto; auto;  auto, flash off); programmed auto with flexible program (P); shutter-priority auto (S); aperture-priority auto (A); manual (M); scene modes ( auto, flash off); programmed auto with flexible program (P); shutter-priority auto (S); aperture-priority auto (A); manual (M); scene modes ( portrait; portrait;  sports; sports;  close up; close up;  night portrait); special effects modes ( night portrait); special effects modes ( night vision; night vision;  super vivid; super vivid;  pop; pop;  photo illustration; photo illustration;  toy camera effect; toy camera effect;  miniature effect; miniature effect;  selective color; selective color;  silhouette; silhouette;  high key; high key;  low key) low key) |
| Exposure compensation | Can be adjusted by –5 – +5 EV in increments of 1/3 EV in P, S, A, M, scene, and  modes modes |
| Exposure lock | Luminosity locked at detected value with  ( ( ) button ) button |
| ISO sensitivity (Recommended Exposure Index) | ISO 100 – 25600 in steps of 1 EV. Auto ISO sensitivity control available |
| Active D-Lighting | On, off |
| Focus | |
| Autofocus | Nikon Multi-CAM 1000 autofocus sensor module with TTL phase detection, 11 focus points (including one cross-type sensor), and AF-assist illuminator (range approx. 0.5 – 3 m/1 ft 8 in. – 9 ft 10 in.) |
| Detection range | –1 – +19 EV (ISO 100, 20°C/68°F) |
| Lens servo |
|
| Focus point | Can be selected from 11 focus points |
| AF-area mode | Single-point AF, dynamic-area AF, auto-area AF, 3D-tracking (11 points) |
| Focus lock | Focus can be locked by pressing shutter-release button halfway (single-servo AF) or by pressing  ( ( ) button ) button |
| Flash | |
| Built-in flash |  , ,  , ,  , ,  , ,  , ,  , ,  , ,  : Auto flash with auto pop-up P, S, A, M: Manual pop-up with button release : Auto flash with auto pop-up P, S, A, M: Manual pop-up with button release |
| Guide Number | Approx. 7/22, 8/26 with manual flash (m/ft, ISO 100, 20°C/68°F) |
| Flash control | TTL: i-TTL flash control using 420-pixel RGB sensor is available with built-in flash; i-TTL balanced fill-flash for digital SLR is used with matrix and center-weighted metering, standard i-TTL flash for digital SLR with spot metering |
| Flash mode | Auto, auto with red-eye reduction, auto slow sync, auto slow sync with red-eye reduction, fill-flash, red-eye reduction, slow sync, slow sync with red-eye reduction, rear-curtain with slow sync, rear-curtain sync, off |
| Flash compensation | Can be adjusted by –3 – +1 EV in increments of 1/3 EV in P, S, A, M, and scene modes |
| Flash-ready indicator | Lights when built-in flash or optional flash unit is fully charged; flashes after flash is fired at full output |
| Accessory shoe | ISO 518 hot-shoe with sync and data contacts and safety lock |
| Nikon Creative Lighting System (CLS) | i-TTL flash control, optical Advanced Wireless Lighting, Color Information Communication, AF-assist for multiarea AF |
| Sync terminal | AS-15 sync terminal adapter (available separately) |
| White balance | |
| White balance | Auto, incandescent, fluorescent (7 types), direct sunlight, flash, cloudy, shade, preset manual, all except preset manual with fine-tuning |
| Live view | |
| Lens servo |
|
| AF-area mode | Face-priority AF, wide-area AF, normal-area AF, subjecttracking AF |
| Autofocus | Contrast-detect AF anywhere in frame (camera selects focus point automatically when face-priority AF or subject-tracking AF is selected) |
| Automatic scene selection | Available in  and and  modes modes |
| Movie | |
| Metering | TTL exposure metering using main image sensor |
| Metering method | Matrix |
| Frame size (pixels) and frame rate |
Actual frame rates for 60p, 50p, 30p, 25p, and 24p are 59.94, 50, 29.97, 25, and 23.976 fps respectively; options support both ★ high and normal image quality |
| File format | MOV |
| Video compression | H.264/MPEG-4 Advanced Video Coding |
| Audio recording format | Linear PCM |
| Audio recording device | Built-in monaural microphone; sensitivity adjustable |
| ISO sensitivity | ISO 100 – 25600 |
| Monitor | |
| Monitor | 7.5-cm (3-in.), approx. 921k-dot (VGA) TFT LCD with 170 ° viewing angle, approx. 100% frame coverage, and brightness adjustment |
| Playback | |
| Playback | Full-frame and thumbnail (4, 9, or 72 images or calendar) playback with playback zoom, playback zoom cropping, playback face zoom, movie playback, photo and/or movie slide shows, histogram display, highlights, photo information, location data display, auto image rotation, picture rating, and image comment (up to 36 characters) |
| Interface | |
| USB | Hi-Speed USB with Micro-USB connector; connection to built-in USB port is recommended |
| HDMI output | Type C HDMI connector |
| Bluetooth | |
| Communication protocols | Bluetooth Specification Version 4.1 |
| Operating frequency |
|
| Maximum output power | 1.2 dBm (EIRP) |
| Range (line of sight) | Approximately 10 m (32 ft) without interference; range may vary with signal strength and presence or absence of obstacles |
| Power source | |
| Battery | One EN-EL14a rechargeable Li-ion battery |
| AC adapter | EH-5c/EH-5b AC adapter; requires EP-5A power connector (available separately) |
| Tripod socket | |
| Tripod socket | 1/4 in. (ISO 1222) |
| Dimensions/weight | |
| Dimensions (W × H × D) | Approx. 124 × 97 × 69.5 mm (4.9 × 3.9 × 2.8 in.) |
| Weight | Approx. 415 g (14.7 oz) with battery and memory card but without body cap; approx. 365 g/12.9 oz (camera body only) |
| Operating environment | |
| Temperature | 0°C – 40°C (+32°F – 104°F) |
| Humidity | 85% or less (no condensation) |
❚❚ MH-24 Battery Charger
| Rated input | AC 100 – 240 V, 50/60 Hz, 0.2 A maximum |
| Rated output | DC 8.4 V/0.9 A |
| Supported batteries | Nikon EN-EL14a rechargeable Li-ion batteries |
| Charging time | Approx. 1 hour and 50 minutes at an ambient temperature of 25°C (77°F) when no charge remains |
| Operating temperature | 0°C – 40°C (+32°F – 104°F) |
| Dimensions (W × H × D) | Approx. 70 × 26 × 97 mm (2.8 × 1.0 × 3.8 in.), excluding plug adapter |
| Weight | Approx. 96 g (3.4 oz), excluding plug adapter |
The symbols on this product represent the following:  AC,
AC,  DC,
DC,  Class II equipment (The construction of the product is doubleinsulated.)
❚❚ EN-EL14a Rechargeable Li-ion Battery
| Type | Rechargeable lithium-ion battery |
| Rated capacity | 7.2 V/1230 mAh |
| Operating temperature | 0°C – 40°C (+32°F – 104°F) |
| Dimensions (W × H × D) | Approx. 38 × 53 × 14 mm (1.5 × 2.1 × 0.6 in.) |
| Weight | Approx. 49 g (1.7 oz), excluding terminal cover |
Recycle rechargeable batteries in accord with local regulations, being sure to first insulate the terminals with tape.
 Battery Life
The movie footage or number of shots that can be recorded with fullycharged batteries varies with the condition of the battery, temperature, the interval between shots, and the length of time menus are displayed. Sample figures for EN-EL14a (1230 mAh) batteries are given below.
- Photographs, single-frame release mode (CIPA standard): Approximately 1550 shots
- Movies: Approximately 75 minutes at 1080/60p
❚❚ Lenses
This section provides lens specifications for purchasers of lens kits. Note that some of the lenses below may not be available in all countries or regions.
AF-P DX NIKKOR 18–55mm f/3.5–5.6G VR Lenses
| Type | Type G AF-P DX lens with built-in CPU and F mount |
| Focal length | 18 – 55 mm |
| Maximum aperture | f/3.5 – 5.6 |
| Lens construction | 12 elements in 9 groups (2 aspherical lens elements) |
| Angle of view | 76° – 28° 50´ |
| Focal length scale | Graduated in millimeters (18, 24, 35, 45, 55) |
| Distance information | Output to camera |
| Zoom | Manual zoom using independent zoom ring |
| Focusing | Autofocus controlled by stepping motor; separate focus ring for manual focus |
| Vibration reduction | Lens shift using voice coil motors (VCMs) |
| Minimum focus distance | 0.25 m (0.9 ft) from focal plane at all zoom positions |
| Diaphragm blades | 7 (rounded diaphragm opening) |
| Diaphragm | Fully automatic |
| Aperture range |
The minimum aperture displayed may vary depending on the size of the exposure increment selected with the camera. |
| Metering | Full aperture |
| Filter-attachment size | 55 mm (P = 0.75 mm) |
| Dimensions | Approx. 64.5 mm maximum diameter × 62.5 mm (distance from camera lens mount flange when lens is retracted) |
| Weight | Approx. 205 g (7.3 oz) |
AF-P DX NIKKOR 70–300mm f/4.5–6.3G ED VR and AF-P DX NIKKOR 70–300mm f/4.5–6.3G ED Lenses
| Type | Type G AF-P DX lens with built-in CPU and F mount |
| Focal length | 70 – 300 mm |
| Maximum aperture | f/4.5 – 6.3 |
| Lens construction | 14 elements in 10 groups (including 1 ED lens element) |
| Angle of view | 22° 50´ – 5° 20´ |
| Focal length scale | Graduated in millimeters (70, 100, 135, 200, 300) |
| Distance information | Output to camera |
| Zoom | Manual zoom using independent zoom ring |
| Focusing | Autofocus controlled by stepping motor; separate focus ring for manual focus |
| Vibration reduction (AF-P DX NIKKOR 70–300mm f/4.5–6.3G ED VR only) | Lens shift using voice coil motors (VCMs) |
| Minimum focus distance | 1.1 m (3.7 ft) from focal plane at all zoom positions |
| Diaphragm blades | 7 (rounded diaphragm opening) |
| Diaphragm | Fully automatic |
| Aperture range |
The minimum aperture displayed may vary depending on the size of the exposure increment selected with the camera. |
| Metering | Full aperture |
| Filter-attachment size | 58 mm (P = 0.75 mm) |
| Dimensions | Approx. 72 mm maximum diameter × 125 mm (distance from camera lens mount flange) |
| Weight |
|
- Unless otherwise stated, all measurements are performed in conformity with Camera and Imaging Products Association (CIPA) standards or guidelines.
- All figures are for a camera with a fully-charged battery.
- The sample images displayed on the camera and the images and illustrations in the manual are for expository purposes only.
- Nikon reserves the right to change the appearance and specifications of the hardware and software described in this manual at any time and without prior notice. Nikon will not be held liable for damages that may result from any mistakes that this manual may contain.
❚❚ Trademark Information
IOS is a trademark or registered trademark of Cisco Systems, Inc., in the United States and/or other countries and is used under license. Windows is either a registered trademark or a trademark of Microsoft Corporation in the United States and/ or other countries. Mac, macOS, OS X, Apple®, App Store®, the Apple logos, iPhone®, iPad®, and iPod touch® are trademarks of Apple Inc. registered in the U.S. and/or other countries. Android is a trademark of Google Inc. The Android robot is reproduced or modified from work created and shared by Google and used according to terms described in the Creative Commons 3.0 Attribution License. PictBridge logo is a trademark. The SD, SDHC, and SDXC logos are trademarks of the SD-3C, LLC. HDMI, the HDMI logo and High-Definition Multimedia Interface are trademarks or registered trademarks of HDMI Licensing LLC.

The Bluetooth® word mark and logos are registered trademarks owned by Bluetooth SIG, Inc. and any use of such marks by Nikon Corporation is under license.
All other trade names mentioned in this manual or the other documentation provided with your Nikon product are trademarks or registered trademarks of their respective holders.
«Made for iPod,» «Made for iPhone,» and «Made for iPad» mean that an electronic accessory has been designed to connect specifically to iPod, iPhone, or iPad, respectively, and has been certified by the developer to meet Apple performance standards. Apple is not responsible for the operation of this device or its compliance with safety and regulatory standards. Please note that the use of this accessory with iPod, iPhone, or iPad may affect wireless performance.
❚❚ Conformity Marking
The standards with which the camera complies can be viewed using the Conformity marking option in the setup menu.
❚❚ FreeType License (FreeType2)
Portions of this software are copyright
© 2012 The FreeType Project (http://www.freetype.org). All rights reserved.
❚❚ MIT License (HarfBuzz)
Portions of this software are copyright
© 2018 The HarfBuzz Project
(http://www.freedesktop.org/wiki/Software/HarfBuzz). All rights reserved.
No reproduction in any form of this manual, in whole or in part (except for brief quotation in critical articles or reviews), may be made without written authorization from NIKON CORPORATION.

© 2018 Nikon Corporation
Videos
ikon D3500 User’s Guide Video | Tutorial for Beginners
Nikon D3500 in 2023 | Review Video
Documents / Resources
References
Download manual
Here you can download full pdf version of manual, it may contain additional safety instructions, warranty information, FCC rules, etc.
Download Nikon D3500 Digital Camera Manual
Перейти к контенту

Русские электронные инструкции по эксплуатации
Постоянно обновляемый большой каталог документации по эксплуатации и использованию современных устройств и оборудования на русском языке. Бесплатное скачивание файлов.
Поиск:
Главная
♥ В закладки
Просмотр инструкции в pdf


Инструкция по эксплуатации фотоаппарата зеркального Nikon D3500 18-55 P VR Kit Black.
Скачать инструкцию к фотоаппарату зеркальному Nikon D3500 18-55 P VR Kit Black (943,87 КБ)

Инструкции по эксплуатации фотоаппаратов зеркальных Nikon
« Инструкция к фотоаппарату зеркальному Nikon D500 + 16-80 DX f 2-8-4E ED VR
» Инструкция к фотоаппарату зеркальному Nikon D3300 Kit 18-55 VR II Black
Вам также может быть интересно

Инструкция к фотоаппарату зеркальному Nikon D3500 + AF-S 18-140 VR

Инструкция к фотоаппарату зеркальному Nikon D500 Body

Инструкция к фотоаппарату зеркальному Nikon D3200 kit 18-55VRII Black

Инструкция к фотоаппарату зеркальному Nikon D7200 Body

Инструкция к фотоаппарату зеркальному Nikon D3300 + 18-105 VR Black KIT

Инструкция к фотоаппарату зеркальному Nikon D5100 Kit 18-105VR Black

Инструкция к фотоаппарату зеркальному Nikon D750 + 24-120mm Kit Black

Инструкция к фотоаппарату зеркальному Nikon D3300 Kit 18-55 VR II Black
Добавить комментарий
Имя *
Email *
Сайт
Комментарий


Сохранить моё имя, email и адрес сайта в этом браузере для последующих моих комментариев.
- Добавить инструкцию
- Заказать инструкцию
- Политика конфиденциальности

DIGITAL CAMERA
Reference Manual
En
Camera Manuals
The following manuals are available for your Nikon camera.
The Reference Manual (PDF)
Read the Reference Manual (this manual) for detailed information on using the camera and connecting it with other devices.
Online Manuals (HTML)
The Reference Manual is also available in html format and can be viewed in a web browser at the website below. http://onlinemanual.nikonimglib.com/d3500/en/
The User’s Manual
The User’s Manual supplied with the camera contains information taken from the Reference Manual describing basic shooting and playback as well as selected camera features.
A The Nikon Download Center
In addition to the Reference Manual, you can also visit the Nikon download center to download product manuals, firmware updates, and software.
http://downloadcenter.nikonimglib.com/
D3500 Model Name: N1718

To get the most from your camera, please be sure to read all instructions thoroughly and keep them where they will be read by all who use the product.
Symbols and Conventions
To make it easier to find the information you need, the following symbols and conventions are used:
D This icon marks cautions; information that should be read before use to prevent damage to the camera.
A This icon marks notes; information that should be read before using the camera.
0 This icon marks references to other pages in this manual.
Menu items, options, and messages displayed in the camera monitor are shown in bold.
Camera Settings
The explanations in this manual assume that default settings are used.
AFor Your Safety
Before using the camera for the first time, read the safety instructions in “For Your Safety” (0 x).
i

Table of Contents |
|
|
For Your Safety…………………………………………………………………… |
x |
|
Notices…………………………………………………………………………….. |
xiv |
|
Bluetooth …………………………………………………………………………………. |
xix |
|
Introduction |
1 |
|
Getting to Know the Camera……………………………………………… |
1 |
|
The Camera Body ………………………………………………………………………. |
1 |
|
The Viewfinder …………………………………………………………………………… |
4 |
|
The Mode Dial ……………………………………………………………………………. |
5 |
|
The R(Info) Button…………………………………………………………………… |
6 |
|
The PButton …………………………………………………………………………….. |
11 |
|
First Steps |
12 |
|
Attach the Camera Strap ………………………………………………………… |
12 |
|
Charge the Battery…………………………………………………………………… |
12 |
|
Insert the Battery and a Memory Card………………………………….. |
13 |
|
Attach a Lens ……………………………………………………………………………. |
15 |
|
Camera Setup …………………………………………………………………………… |
18 |
|
Focus the Viewfinder ………………………………………………………………. |
20 |
|
Tutorial |
21 |
|
Camera Menus: An Overview …………………………………………… |
21 |
|
Using Camera Menus………………………………………………………………. |
22 |
|
The Battery Level and Number of Exposures Remaining … |
25 |
|
Basic Photography and Playback |
26 |
|
“Point-and-Shoot” Modes (iand j)………………………………. |
26 |
|
Basic Playback………………………………………………………………….. |
34 |
|
Deleting Unwanted Photographs…………………………………………. |
35 |
ii

|
Guide Mode |
36 |
|
The Guide…………………………………………………………………………. |
36 |
|
Guide Mode Menus…………………………………………………………………. |
37 |
|
Using the Guide……………………………………………………………………….. |
40 |
|
Matching Settings to the Subject or Situation |
|
|
(Scene Mode) |
42 |
|
kPortrait …………………………………………………………………………… |
42 |
|
mSports……………………………………………………………………………… |
43 |
|
nClose up…………………………………………………………………………. |
43 |
|
oNight Portrait………………………………………………………………… |
43 |
|
Special Effects |
44 |
|
%Night Vision…………………………………………………………………… |
45 |
|
SSuper Vivid…………………………………………………………………….. |
45 |
|
TPop ………………………………………………………………………………… |
45 |
|
UPhoto Illustration………………………………………………………….. |
46 |
|
‘Toy Camera Effect ………………………………………………………… |
46 |
|
(Miniature Effect ……………………………………………………………. |
46 |
|
3Selective Color ……………………………………………………………… |
47 |
|
1Silhouette………………………………………………………………………. |
47 |
|
2High Key ………………………………………………………………………… |
47 |
|
3Low Key………………………………………………………………………….. |
48 |
|
Options Available in Live View ……………………………………………… |
49 |
|
More on Photography |
55 |
|
Choosing a Release Mode………………………………………………… |
55 |
|
Continuous Shooting (Burst Mode)…………………………………. |
56 |
|
Quiet Shutter Release………………………………………………………. |
58 |
|
Self-Timer Mode ………………………………………………………………. |
59 |
iii

|
Focus………………………………………………………………………………… |
62 |
|
Focus Mode………………………………………………………………………………. |
62 |
|
AF-Area Mode…………………………………………………………………………… |
67 |
|
Focus Lock ………………………………………………………………………………… |
72 |
|
Manual Focus……………………………………………………………………………. |
74 |
|
Image Quality and Size…………………………………………………….. |
77 |
|
Image Quality …………………………………………………………………………… |
77 |
|
Image Size…………………………………………………………………………………. |
79 |
|
Using the Built-in Flash ……………………………………………………. |
80 |
|
Auto Pop-up Modes ………………………………………………………………… |
80 |
|
Manual Pop-up Modes……………………………………………………………. |
82 |
|
ISO Sensitivity ………………………………………………………………….. |
86 |
|
P, S, A, and M Modes |
88 |
|
Shutter Speed and Aperture ……………………………………………. |
88 |
|
Mode P (Programmed Auto)………………………………………………….. |
89 |
|
Mode S (Shutter-Priority Auto)………………………………………………. |
91 |
|
Mode A (Aperture-Priority Auto)…………………………………………… |
93 |
|
Mode M (Manual)…………………………………………………………………….. |
95 |
|
Long Time-Exposures (M Mode Only) ………………………………….. |
97 |
|
Exposure………………………………………………………………………… |
100 |
|
Metering…………………………………………………………………………………. |
100 |
|
Autoexposure Lock……………………………………………………………….. |
102 |
|
Exposure Compensation ……………………………………………………… |
104 |
|
Flash Compensation …………………………………………………………….. |
106 |
|
Preserving Detail in Highlights and Shadows……………….. |
108 |
|
Active D-Lighting ………………………………………………………………….. |
108 |
|
White Balance………………………………………………………………… |
110 |
|
Fine-Tuning White Balance …………………………………………………. |
114 |
|
Preset Manual………………………………………………………………………… |
116 |
|
Picture Controls …………………………………………………………….. |
122 |
|
Selecting a Picture Control ………………………………………………….. |
122 |
|
Modifying Picture Controls………………………………………………….. |
124 |
iv

|
Recording and Viewing Movies |
127 |
|
Recording Movies ………………………………………………………….. |
127 |
|
The PButton…………………………………………………………………………… |
130 |
|
Movie Settings ……………………………………………………………………….. |
131 |
|
Viewing Movies ……………………………………………………………… |
133 |
|
Editing Movies ……………………………………………………………….. |
135 |
|
Trimming Movies…………………………………………………………………… |
135 |
|
Saving Selected Frames ……………………………………………………….. |
139 |
|
More on Playback |
141 |
|
Viewing Images ……………………………………………………………… |
141 |
|
Full-Frame Playback………………………………………………………………. |
141 |
|
Playback Modes …………………………………………………………………….. |
141 |
|
The PButton…………………………………………………………………………… |
143 |
|
Photo Information …………………………………………………………. |
144 |
|
Taking a Closer Look: Playback Zoom……………………………. |
153 |
|
Protecting Photographs from Deletion…………………………. |
156 |
|
Rating Pictures……………………………………………………………….. |
157 |
|
Rating Individual Pictures…………………………………………………….. |
157 |
|
Rating Multiple Pictures ……………………………………………………….. |
158 |
|
Selecting Photos for Upload ………………………………………….. |
159 |
|
Selecting Individual Photos …………………………………………………. |
159 |
|
Selecting Multiple Photos ……………………………………………………. |
160 |
|
Deleting Photographs……………………………………………………. |
161 |
|
During Playback …………………………………………………………………….. |
161 |
|
The Playback Menu……………………………………………………………….. |
162 |
|
Slide Shows ……………………………………………………………………. |
164 |
|
Slide Show Options……………………………………………………………….. |
165 |
v

|
Connections |
166 |
|
Connecting Using SnapBridge………………………………………. |
166 |
|
What SnapBridge Can Do for You ………………………………………. |
166 |
|
Preparing for Pairing…………………………………………………………….. |
167 |
|
Android Devices ……………………………………………………………………. |
168 |
|
iOS Devices…………………………………………………………………………….. |
173 |
|
Installing ViewNX-i………………………………………………………… |
179 |
|
Copying Pictures to the Computer ……………………………….. |
180 |
|
Printing Photographs ……………………………………………………. |
183 |
|
Connecting the Printer…………………………………………………………. |
183 |
|
Printing Pictures One at a Time…………………………………………… |
184 |
|
Printing Multiple Pictures…………………………………………………….. |
185 |
|
Viewing Pictures on TV………………………………………………….. |
186 |
|
Camera Menus |
188 |
|
DThe Playback Menu: Managing Images ………………………….. |
188 |
|
Playback Menu Options……………………………………………………….. |
188 |
|
Playback Folder ………………………………………………………………. |
189 |
|
Playback Display Options ……………………………………………… |
189 |
|
Image Review………………………………………………………………….. |
190 |
|
Auto Image Rotation ……………………………………………………… |
190 |
|
Rotate Tall………………………………………………………………………… |
191 |
|
CThe Shooting Menu: Shooting Options…………………………… |
192 |
|
Shooting Menu Options ………………………………………………………. |
192 |
|
Reset Shooting Menu…………………………………………………….. |
194 |
|
ISO Sensitivity Settings ………………………………………………….. |
194 |
|
Color Space ……………………………………………………………………… |
196 |
|
Noise Reduction ……………………………………………………………… |
197 |
|
Vignette Control……………………………………………………………… |
197 |
|
Auto Distortion Control…………………………………………………. |
198 |
|
Built-in AF-assist Illuminator…………………………………………. |
198 |
|
Flash Cntrl for Built-in Flash/Optional Flash ………………. |
199 |
|
Optical VR ………………………………………………………………………… |
200 |
vi
|
BThe Setup Menu: Camera Setup……………………………………….. |
201 |
|
Setup Menu Options …………………………………………………………….. |
201 |
|
Reset Setup Options……………………………………………………….. |
203 |
|
Format Memory Card……………………………………………………… |
203 |
|
Date Stamp………………………………………………………………………. |
204 |
|
Time Zone and Date……………………………………………………….. |
207 |
|
Language …………………………………………………………………………. |
207 |
|
Monitor Brightness…………………………………………………………. |
207 |
|
Info Display Format ………………………………………………………… |
208 |
|
Auto Info Display…………………………………………………………….. |
208 |
|
Auto off Timers………………………………………………………………… |
209 |
|
Self-Timer…………………………………………………………………………. |
210 |
|
Image Dust Off Ref Photo………………………………………………. |
211 |
|
Image Comment……………………………………………………………… |
213 |
|
Copyright Information …………………………………………………… |
214 |
|
Beep ………………………………………………………………………………….. |
215 |
|
Flicker Reduction…………………………………………………………….. |
215 |
|
Buttons……………………………………………………………………………… |
216 |
|
Rangefinder……………………………………………………………………… |
217 |
|
Manual Focus Ring in AF Mode…………………………………….. |
218 |
|
File Number Sequence…………………………………………………… |
219 |
|
Storage Folder…………………………………………………………………. |
220 |
|
File Naming ……………………………………………………………………… |
222 |
|
Location Data ………………………………………………………………….. |
222 |
|
Airplane Mode…………………………………………………………………. |
223 |
|
Send to Smart Device (Auto)…………………………………………. |
223 |
|
Bluetooth …………………………………………………………………………. |
223 |
|
Eye-Fi Upload…………………………………………………………………… |
224 |
|
Conformity Marking ……………………………………………………….. |
225 |
|
Slot Empty Release Lock………………………………………………… |
226 |
|
Reset All Settings…………………………………………………………….. |
226 |
|
Firmware Version ……………………………………………………………. |
226 |
vii

|
NThe Retouch Menu: Creating Retouched Copies…………………. |
227 |
|
Retouch Menu Options………………………………………………………… |
227 |
|
Creating Retouched Copies…………………………………………………. |
228 |
|
NEF (RAW) Processing……………………………………………………. |
230 |
|
Trim…………………………………………………………………………………… |
232 |
|
Resize ……………………………………………………………………………….. |
233 |
|
D-Lighting ……………………………………………………………………….. |
235 |
|
Quick Retouch…………………………………………………………………. |
236 |
|
Red-Eye Correction ………………………………………………………… |
236 |
|
Straighten………………………………………………………………………… |
237 |
|
Distortion Control…………………………………………………………… |
237 |
|
Perspective Control………………………………………………………… |
238 |
|
Fisheye……………………………………………………………………………… |
238 |
|
Filter Effects …………………………………………………………………….. |
239 |
|
Monochrome…………………………………………………………………… |
240 |
|
Image Overlay…………………………………………………………………. |
241 |
|
Color Outline …………………………………………………………………… |
243 |
|
Photo Illustration ……………………………………………………………. |
244 |
|
Color Sketch…………………………………………………………………….. |
244 |
|
Miniature Effect ………………………………………………………………. |
245 |
|
Selective Color ………………………………………………………………… |
246 |
|
Painting ……………………………………………………………………………. |
248 |
|
Side-by-side Comparison………………………………………………. |
249 |
|
mRecent Settings …………………………………………………………. |
251 |
|
Troubleshooting |
252 |
|
Problems and Solutions ………………………………………………… |
253 |
|
Battery/Display………………………………………………………………………. |
253 |
|
Shooting (All Modes) ……………………………………………………………. |
254 |
|
Shooting (P, S, A, M) ……………………………………………………………… |
258 |
|
Playback………………………………………………………………………………….. |
259 |
|
Bluetooth ……………………………………………………………………………….. |
260 |
|
Miscellaneous………………………………………………………………………… |
260 |
|
Error Messages………………………………………………………………. |
261 |
viii

|
Technical Notes |
266 |
|
Compatible Lenses…………………………………………………………. |
266 |
|
Compatible CPU Lenses ……………………………………………………….. |
266 |
|
Compatible Non-CPU Lenses ………………………………………………. |
268 |
|
Compatible Flash Units………………………………………………….. |
276 |
|
CLS-Compatible Flash Units ………………………………………………… |
276 |
|
Other Flash Units …………………………………………………………………… |
278 |
|
Other Accessories…………………………………………………………… |
281 |
|
Attaching a Power Connector and AC Adapter………………… |
285 |
|
Caring for the Camera ……………………………………………………. |
287 |
|
Storage ……………………………………………………………………………………. |
287 |
|
Cleaning………………………………………………………………………………….. |
287 |
|
Image Sensor Cleaning…………………………………………………………. |
288 |
|
Caring for the Camera and Battery: Cautions………………… |
291 |
|
Available Settings ………………………………………………………….. |
296 |
|
Specifications…………………………………………………………………. |
297 |
|
Memory Card Capacity…………………………………………………… |
308 |
|
Battery Life …………………………………………………………………….. |
309 |
|
Kit Lenses |
311 |
|
AF-P DX NIKKOR 18–55mm f/3.5–5.6G VR Lenses …………. |
311 |
|
AF-P DX NIKKOR 70–300mm f/4.5–6.3G ED VR and |
|
|
AF-P DX NIKKOR 70–300mm f/4.5–6.3G ED Lenses ….. |
317 |
|
Index………………………………………………………………………………. |
324 |
ix

For Your Safety
To prevent damage to property or injury to yourself or to others, read “For Your Safety” in its entirety before using this product.
Keep these safety instructions where all those who use this product will read them.
 DANGER: Failure to observe the precautions marked with this icon carries a high risk of death or severe injury.
 WARNING: Failure to observe the precautions marked with this icon could result in death or severe injury.
 CAUTION: Failure to observe the precautions marked with this icon could result in injury or property damage.
 WARNING
•Do not use while walking or operating a vehicle.
Failure to observe this precaution could result in accidents or other injury.
•Do not disassemble or modify this product. Do not touch internal parts that become exposed as the result of a fall or other accident.
Failure to observe these precautions could result in electric shock or other injury.
•Should you notice any abnormalities such as the product producing smoke, heat, or unusual odors, immediately disconnect the battery or power source.
Continued operation could result in fire, burns or other injury.
•Keep dry. Do not handle with wet hands. Do not handle the plug with wet hands.
Failure to observe these precautions could result in fire or electric shock.
•Do not let your skin remain in prolonged contact with this product while it is on or plugged in.
Failure to observe this precaution could result in low-temperature burns.
•Do not use this product in the presence of flammable dust or gas such as propane, gasoline or aerosols.
Failure to observe this precaution could result in explosion or fire.
x

•Do not directly view the sun or other bright light source through the lens or camera.
Failure to observe this precaution could result in visual impairment.
•Do not aim the flash or AF-assist illuminator at the operator of a motor vehicle.
Failure to observe this precaution could result in accidents.
•Keep this product out of reach of children.
Failure to observe this precaution could result in injury or product malfunction. In addition, note that small parts constitute a choking hazard. Should a child swallow any part of this product, seek immediate medical attention.
•Do not entangle, wrap or twist the straps around your neck.
Failure to observe this precaution could result in accidents.
•Do not use batteries, chargers, or AC adapters not specifically designated for use with this product. When using batteries, chargers, and AC adapters designated for use with this product, do not:
—Damage, modify, forcibly tug or bend the cords or cables, place them under heavy objects, or expose them to heat or flame.
—Use travel converters or adapters designed to convert from one voltage to another or with DC-to-AC inverters.
Failure to observe these precautions could result in fire or electric shock.
•Do not handle the plug when charging the product or using the AC adapter during thunderstorms.
Failure to observe this precaution could result in electric shock.
•Do not handle with bare hands in locations exposed to extremely high or low temperatures.
Failure to observe this precaution could result in burns, or frostbite.
 CAUTION
•Do not leave the lens pointed at the sun or other strong light sources.
Light focused by the lens could cause fire or damage to product’s internal parts. When shooting backlit subjects, keep the sun well out of the frame. Sunlight focused into the camera when the sun is close to the frame could cause fire.
xi

•Turn this product off when its use is prohibited. Disable wireless features when the use of wireless equipment is prohibited.
The radio-frequency emissions produced by this product could interfere with equipment onboard aircraft or in hospitals or other medical facilities.
•Remove the battery and disconnect the AC adapter if this product will not be used for an extended period.
Failure to observe this precaution could result in fire or product malfunction.
•Do not fire the flash in contact with or in close proximity to the skin or objects.
Failure to observe this precaution could result in burns or fire.
•Do not leave the product where it will be exposed to extremely high temperatures, for an extended period such as in an enclosed automobile or in direct sunlight.
Failure to observe this precaution could result in fire or product malfunction.
•Do not transport cameras or lenses with tripods or similar accessories attached.
Failure to observe this precaution could result in injury or product malfunction.
 DANGER (Batteries)
•Do not mishandle batteries.
Failure to observe the following precautions could result in the batteries leaking, overheating, rupturing, or catching fire:
—Use only rechargeable batteries approved for use in this product.
—Do not expose batteries to flame or excessive heat.
—Do not disassemble.
—Do not short-circuit the terminals by touching them to necklaces, hairpins, or other metal objects.
—Do not expose batteries or the products in which they are inserted to powerful physical shocks.
xii

•Charge only as indicated.
Failure to observe this precaution could result in the batteries leaking, overheating, rupturing, or catching fire.
•If battery liquid comes into contact with the eyes, rinse with plenty of clean water and seek immediate medical attention.
Delaying action could result in eye injuries.
 WARNING (Batteries)
•Keep batteries out of reach of children.
Should a child swallow a battery, seek immediate medical attention.
•Do not immerse batteries in water or expose to rain.
Failure to observe this precaution could result in fire or product malfunction. Immediately dry the product with a towel or similar object should it become wet.
•Discontinue use immediately should you notice any changes in the batteries, such as discoloration or deformation. Cease charging EN-EL14a rechargeable batteries if they do not charge in the specified period of time.
Failure to observe these precautions could result in the batteries leaking, overheating, rupturing, or catching fire.
•When batteries are no longer needed, insulate the terminals with tape.
Overheating, rupture, or fire may result should metal objects come into contact with the terminals.
•If battery liquid comes into contact with a person’s skin or clothing, immediately rinse the affected area with plenty of clean water.
Failure to observe this precaution could result in skin irritation.
xiii

Notices
•No part of the manuals included with this product may be reproduced, transmitted, transcribed, stored in a retrieval system, or translated into any language in any form, by any means, without Nikon’s prior written permission.
•Nikon reserves the right to change the appearance and specifications of the hardware and software described in these manuals at any time and without prior notice.
Notice for Customers in Canada
CAN ICES-3 B / NMB-3 B
Notices for Customers in Europe
•Nikon will not be held liable for any damages resulting from the use of this product.
•While every effort has been made to ensure that the information in these manuals is accurate and complete, we would appreciate it were you to bring any errors or omissions to the attention of the Nikon representative in your area (address provided separately).
CAUTION: RISK OF EXPLOSION IF BATTERY IS REPLACED BY AN INCORRECT TYPE. DISPOSE OF USED BATTERIES ACCORDING TO THE INSTRUCTIONS.
This symbol indicates that electrical and electronic equipment is to be collected separately.
The following apply only  to users in European countries:
•This product is designated for separate collection at an appropriate collection point. Do not dispose of as household waste.
•Separate collection and recycling helps conserve natural resources and prevent negative consequences for human health and the environment that might result from incorrect disposal.
•For more information, contact the retailer or the local authorities in charge of waste management.
This symbol on the battery indicates that the battery is to be collected separately.
The following apply only to users in European countries:
•All batteries, whether marked with this symbol or not, are designated for separate collection at an appropriate collection point. Do not dispose of as household waste.
•For more information, contact the retailer or the local authorities in charge of waste management.
xiv

Notices for Customers in the U.S.A.
The Battery Charger
IMPORTANT SAFETY INSTRUCTIONS—SAVE THESE INSTRUCTIONS
DANGER—TO REDUCE THE RISK OF FIRE OR ELECTRIC SHOCK, CAREFULLY FOLLOW THESE INSTRUCTIONS
For connection to a supply not in the U.S.A., use an attachment plug adapter of the proper configuration for the power outlet if needed. This power unit is intended to be correctly oriented in a vertical or floor mount position.
Federal Communications Commission (FCC) Radio Frequency Interference Statement
This equipment has been tested and found to comply with the limits for a Class B digital device, pursuant to Part 15 of the FCC rules. These limits are designed to provide reasonable protection against harmful interference in a residential installation. This equipment generates, uses, and can radiate radio frequency energy and, if not installed and used in accordance with the instructions, may cause harmful interference to radio communications. However, there is no guarantee that interference will not occur in a particular installation. If this equipment does cause harmful interference to radio or television reception, which can be determined by turning the equipment off and on, the user is encouraged to try to correct the interference by one or more of the following measures:
•Reorient or relocate the receiving antenna.
•Increase the separation between the equipment and receiver.
•Connect the equipment into an outlet on a circuit different from that to which the receiver is connected.
•Consult the dealer or an experienced radio/television technician for help.
CAUTIONS
Modifications
The FCC requires the user be notified that any changes or modifications made to this device that are not expressly approved by Nikon Corporation may void the user’s authority to operate the equipment.
Interface Cables
Use the interface cables sold or provided by Nikon for your equipment. Using other interface cables may exceed the limits of Class B Part 15 of the FCC rules.
Nikon Inc., 1300 Walt Whitman Road,
Melville, New York 11747-3064, U.S.A.
Tel.: 631-547-4200
xv
Notice Concerning Prohibition of Copying or Reproduction
Note that simply being in possession of material that has been digitally copied or reproduced by means of a scanner, digital camera, or other device may be punishable by law.
•Items prohibited by law from being copied or reproduced
Do not copy or reproduce paper money, coins, securities, government bonds, or local government bonds, even if such copies or reproductions are stamped “Sample.”
The copying or reproduction of paper money, coins, or securities which are circulated in a foreign country is prohibited.
Unless the prior permission of the government has been obtained, the copying or reproduction of unused postage stamps or post cards issued by the government is prohibited.
The copying or reproduction of stamps issued by the government and of certified documents stipulated by law is prohibited.
•Cautions on certain copies and reproductions
The government has issued cautions on copies or reproductions of securities issued by private companies (shares, bills, checks, gift certificates, etc.), commuter passes, or coupon tickets, except when a minimum of necessary copies are to be provided for business use by a company. Also, do not copy or reproduce passports issued by the government, licenses issued by public agencies and private groups, ID cards, and tickets, such as passes and meal coupons.
•Comply with copyright notices
Under copyright law, photographs or recordings of copyrighted works made with the camera cannot be used without the permission of the copyright holder. Exceptions apply to personal use, but note that even personal use may be restricted in the case of photographs or recordings of exhibits or live performances.
xvi

MPEG LA, L.L.C. SEE http://www.mpegla.com
Disposing of Data Storage Devices
Please note that deleting images or formatting memory cards or other data storage devices does not completely erase the original image data. Deleted files can sometimes be recovered from discarded storage devices using commercially available software, potentially resulting in the malicious use of personal image data. Ensuring the privacy of such data is the user’s responsibility.
Before discarding a data storage device or transferring ownership to another person, erase all data using commercial deletion software, or format the device and then completely refill it with images containing no private information (for example, pictures of empty sky). Care should be taken to avoid injury when physically destroying data storage devices. Be sure to also replace any pictures selected for preset manual white balance.
Before discarding the camera or transferring ownership to another person, you should also use the Reset all settings option in the camera setup menu to delete network settings and other personal information.
AVC Patent Portfolio License
THIS PRODUCT IS LICENSED UNDER THE AVC PATENT PORTFOLIO LICENSE FOR THE PERSONAL AND NON—COMMERCIAL USE OF A CONSUMER TO (i) ENCODE VIDEO IN COMPLIANCE WITH THE AVC STANDARD (“AVC VIDEO”) AND/OR (ii) DECODE AVC VIDEO THAT WAS ENCODED BY A CONSUMER ENGAGED IN A PERSONAL AND NON—COMMERCIAL ACTIVITY AND/OR WAS OBTAINED FROM A VIDEO PROVIDER LICENSED TO PROVIDE AVC VIDEO. NO LICENSE IS GRANTED OR SHALL BE IMPLIED FOR ANY OTHER USE. ADDITIONAL INFORMATION MAY BE OBTAINED FROM
Use Only Nikon Brand Electronic Accessories
Nikon cameras are designed to the highest standards and include complex electronic circuitry. Only Nikon brand electronic accessories (including chargers, batteries, AC adapters, and flash accessories) certified by Nikon specifically for use with this Nikon digital camera are engineered and proven to operate within the operational and safety requirements of this electronic circuitry.
The use of non-Nikon electronic accessories could damage
the camera and may void your Nikon warranty. The use of third-party rechargeable Li-ion batteries not bearing the Nikon holographic seal shown at right could interfere with
normal operation of the camera or result in the batteries overheating, igniting, rupturing, or leaking.
For more information about Nikon brand accessories, contact a local authorized Nikon dealer.
xvii

D Use Only Nikon Brand Accessories
Only Nikon brand accessories certified by Nikon specifically for use with your Nikon digital camera are engineered and proven to operate within its operational and safety requirements. THE USE OF NON-NIKON ACCESSORIES COULD DAMAGE YOUR CAMERA AND MAY VOID YOUR NIKON WARRANTY.
A Before Taking Important Pictures
Before taking pictures on important occasions (such as at weddings or before taking the camera on a trip), take a test shot to ensure that the camera is functioning normally. Nikon will not be held liable for damages or lost profits that may result from product malfunction.
A Life-Long Learning
As part of Nikon’s “Life-Long Learning” commitment to ongoing product support and education, continually-updated information is available online at the following sites:
•For users in the U.S.A.: http://www.nikonusa.com/
•For users in Europe and Africa: http://www.europe-nikon.com/support/
•For users in Asia, Oceania, and the Middle East: http://www.nikon-asia.com/
Visit these sites to keep up-to-date with the latest product information, tips, answers to frequently-asked questions (FAQs), and general advice on digital imaging and photography. Additional information may be available from the Nikon representative in your area. See the following URL for contact information: http://imaging.nikon.com/
xviii
Bluetooth
This product is controlled by the United States Export Administration Regulations (EAR). The permission of the United States government is not required for export to countries other than the following, which as of this writing are subject to embargo or special controls: Cuba, Iran, North Korea, Sudan, and Syria (list subject to change).
The use of wireless devices may be prohibited in some countries or regions. Contact a Nikon-authorized service representative before using the wireless features of this product outside the country of purchase.
Notice for Customers in the U.S.A. and Canada
This device complies with part 15 of FCC Rules and Innovation, Science and Economic Development Canada’s licence-exempt RSSs. Operation is subject to the following two conditions: (1) this device may not cause harmful interference, and (2) this device must accept any interference received, including interference that may cause undesired operation.
FCC WARNING
The FCC requires the user to be notified that any changes or modifications made to this device that are not expressly approved by Nikon Corporation may void the user’s authority to operate the equipment.
FCC Radio Frequency Interference Statement
Note: This equipment has been tested and found to comply with the limits for a Class B digital device, pursuant to part 15 of the FCC Rules. These limits are designed to provide reasonable protection against harmful interference in a residential installation. This equipment generates, uses and can radiate radio frequency energy and, if not installed and used in accordance with the instructions, may cause harmful interference to radio communications. However, there is no guarantee that interference will not occur in a particular installation. If this equipment does cause harmful interference to radio or television reception, which can be determined by turning the equipment off and on, the user is encouraged to try to correct the interference by one or more of the following measures:
•Reorient or relocate the receiving antenna.
•Increase the separation between the equipment and receiver.
•Connect the equipment into an outlet on a circuit different from that to which the receiver is connected.
•Consult the dealer or an experienced radio/TV technician for help.
Co-location
This transmitter must not be co-located or operated in conjunction with any other antenna or transmitter.
Nikon Inc., 1300 Walt Whitman Road, Melville, New York 11747-3064, U.S.A. Tel.: 631-547-4200
xix

FCC/ISED RF Exposure Statement
The available scientific evidence does not show that any health problems are associated with using low power wireless devices. There is no proof, however, that these low power wireless devices are absolutely safe. Low power Wireless devices emit low levels of radio frequency energy (RF) in the microwave range while being used. Whereas high levels of RF can produce health effects (by heating tissue), exposure of low-level RF that does not produce heating effects causes no known adverse health effects. Many studies of low-level RF exposures have not found any biological effects. Some studies have suggested that some biological effects might occur, but such findings have not been confirmed by additional research. This product has been tested and found to comply with FCC/ISED radiation exposure limits set forth for an uncontrolled environment and meets the FCC radio frequency (RF) Exposure Guidelines and RSS-102 of the ISED radio frequency (RF) Exposure rules. Please refer to the SAR test report that was uploaded to FCC website.
Notices for Customers in Europe
Hereby, Nikon Corporation declares that the radio equipment type D3500 is in compliance with Directive 2014/53/EU.
The full text of the EU declaration of conformity is available at the following internet address: http://imaging.nikon.com/support/pdf/DoC_N1718.pdf.
Notice for Customers in Singapore
Trade Name:


Model: D3500
This device complies with radio-frequency regulations. The content of certification labels not affixed to the device is given below.
Complies with
IMDA Standards
DA103423
xx
Security
Although one of the benefits of this product is that it allows others to freely connect for the wireless exchange of data anywhere within its range, the following may occur if security is not enabled:
•Data theft: Malicious third-parties may intercept wireless transmissions to steal user IDs, passwords, and other personal information.
•Unauthorized access: Unauthorized users may gain access to the network and alter data or perform other malicious actions. Note that due to the design of wireless networks, specialized attacks may allow unauthorized access even when security is enabled.
•Unsecured networks: Connecting to open networks may result in unauthorized access. Use secure networks only.
xxi
xxii

Introduction
Getting to Know the Camera
Take a few moments to familiarize yourself with camera controls and displays. You may find it helpful to bookmark this section and refer to it as you read through the rest of the manual.
The Camera Body
|
4 |
5 |
6 |
7 |
|
|
3 |
||||
|
2 |
||||
|
1 |
||||
|
8 |
||||
|
14 |
9 |
|||
|
13 |
10 |
|||
|
15 |
12 |
11 |
|
1 |
…………………………….Power switch |
18 |
9 |
………………………..Mounting mark |
15 |
||
|
2 |
Shutter-release button |
…………….. |
30 |
10 |
Lens release button…………………. |
16 |
|
|
3 |
E/Nbutton…………….. |
95, 104, 106 |
11 |
Mirror……………………………………… |
288 |
||
|
4 |
Movie-record button …………….. |
127 |
12 |
Lens mount ………………………… |
15, 76 |
||
|
5 |
Live view switch ………………. |
26, 127 |
13 |
CPU contacts |
|||
|
6 |
Mode dial……………………………………. |
5 |
14 |
AF-assist illuminator ……….. |
66, 198 |
||
|
7 |
Built-in flash …………………………….. |
80 |
Self-timer lamp ……………………….. |
59 |
|||
|
8 |
Microphone (monaural) |
131 |
Red-eye reduction lamp ……. |
81, 83 |
|||
|
15 |
Body cap |
15, 281 |
|||||
Introduction 1

|
16 |
||
|
24 |
17 |
|
|
18 |
||
|
23 |
||
|
19 |
||
|
22 |
||
|
25 |
21 |
|
|
20 |
||
|
26 |
|
16 |
Accessory shoe (for optional flash |
|
|
units) …………………………….. |
276, 281 |
|
|
17 |
Command dial |
|
|
18 |
A/Lbutton …..72, 102, 156, 216 |
|
|
19 |
R(information) button……………. |
6, 8 |
|
20 |
Connector cover |
|
|
21 |
M/ Ybutton……………… |
80, 82, 106 |
|
22 |
Eyelets for camera strap |
…………..12 |
|
23 |
Speaker |
|
|
24 |
Focal plane mark (E)………………. |
76 |
|
25 |
USB connector ………………. |
180, 183 |
|
26 |
HDMI connector ……………………. |
186 |
D Close the Connector Cover
Close the connector cover when the connectors are not in use. Foreign matter in the connectors can interfere with data transfer.
D The Speaker
Do not place the speaker in close proximity to magnetic devices. Failure to observe this precaution could affect the data recorded on the magnetic devices.
2Introduction

|
28 |
29 30 31 |
32 |
|
|
27 |
|||
|
33 |
|||
|
34 |
|||
|
35 |
|||
|
36 |
45 |
||
|
37 |
|||
|
44 |
|||
|
46 |
|||
|
43 |
39 |
38 |
|
|
42 41 40 |
|
27 |
Rubber eyecup (comes attached to |
38 |
||
|
camera) …………………………………… |
61 |
|||
|
28 |
Viewfinder eyepiece………. |
4, 20, 61 |
39 |
|
|
29 |
Diopter adjustment control |
……. 20 |
40 |
|
|
30 |
Kbutton…………………………. |
34, 141 |
41 |
|
|
31 |
Gbutton……………………… |
21, 188 |
42 |
|
|
32 |
Pbutton…………………… |
11, 130, 143 |
43 |
|
|
33 |
J(OK) button…………………………. |
22 |
44 |
|
|
34 |
Multi selector…………………………… |
22 |
45 |
|
|
35 |
I/Ebutton………….. |
55, 56, 58, 59 |
46 |
|
|
36 |
Memory card slot cover……… |
13, 14 |
||
|
37 |
……….Memory card access lamp |
14 |
||
|
Battery-chamber cover latch |
||
|
…………………………………………… |
13, 14 |
|
|
Battery-chamber cover ……… |
13, 14 |
|
|
Obutton ………………………….. |
35, 161 |
|
|
W/Qbutton…………….. |
22, 142, 153 |
|
|
Xbutton………………………………… |
153 |
|
|
Tripod socket |
||
|
Monitor …………… |
6, 26, 34, 127, 141 |
|
|
Battery latch……………………….. |
13, 14 |
|
|
Power connector cover for |
||
|
optional power connector …… |
285 |
Introduction 3

The Viewfinder
|
1 |
Focus points……………. |
20, 26, 67, 69 |
|
|
2 |
Focus indicator…………………… |
26, 75 |
|
|
3 |
Autoexposure (AE) lock indicator |
||
|
………………………………………………. |
102 |
||
|
4 |
Shutter speed ………………. |
88, 91, 95 |
|
|
5 |
Aperture (f-number)……. |
88, 93, 95 |
|
|
6 |
Special effects mode indicator |
…44 |
|
|
7 |
Low battery warning ……………….. |
25 |
|
|
8 |
Number of exposures remaining |
||
|
…………………………………………………. |
25 |
||
|
Number of shots remaining before |
|||
|
memory buffer fills …………………. |
57 |
||
|
White balance recording indicator |
|||
|
………………………………………………. |
116 |
||
|
Exposure compensation value |
|||
|
………………………………………………. |
104 |
||
|
Flash compensation value…….. |
106 |
||
|
ISO sensitivity …………………… |
86, 194 |
9“k” (appears when memory remains for over 1000 exposures)
|
…………………………………………………. |
25 |
|
|
10 |
Flash-ready indicator……………….. |
32 |
|
11 |
Flexible program indicator………. |
90 |
|
12 |
Exposure indicator …………………… |
96 |
|
Exposure compensation display |
||
|
………………………………………………. |
104 |
|
|
Electronic rangefinder…………… |
217 |
|
|
13 |
Flash compensation indicator |
|
|
………………………………………………. |
106 |
|
|
14 |
Exposure compensation indicator |
|
|
………………………………………………. |
104 |
|
|
15 |
Auto ISO sensitivity indicator |
|
|
………………………………………………. |
195 |
|
|
16 |
Warning indicator………………….. |
261 |
Note: Display shown with all indicators lit for illustrative purposes.
4Introduction

The Mode Dial
The camera offers a choice of the following shooting modes and gmode:
|
1 P, S, A, and M modes: |
|
|
P—Programmed auto………. |
89 |
|
S—Shutter-priority auto…… |
91 |
|
A—Aperture-priority auto |
|
|
………………………………………… |
93 |
|
M—Manual……………………….. |
95 |
|
Special Effects Modes………………. |
44 |
|
3 Scene Modes |
|
|
kPortrait……………………………. |
42 |
|
mSports ……………………………… |
43 |
|
nClose up………………………….. |
43 |
|
oNight portrait …………………. |
43 |
|
gMode ……………………………… |
36 |
|
5 Auto modes: |
|
|
iAuto………………………………. |
26 |
|
jAuto (flash off)………………. |
26 |
Introduction 5

The R(Info) Button
Press the Rbutton to view the information display or cycle through display options.
Viewfinder Photography
To view shutter speed, aperture, the number of exposures remaining, AF-area mode, and other shooting information in the monitor, press the Rbutton.
Rbutton
1Shooting mode
iauto/
|
jauto (flash off)………………… |
26 |
|
|
Scene modes ………………………. |
42 |
|
|
Special effects mode ………….. |
44 |
|
|
P, S, A, and M modes……………. |
88 |
|
|
2 |
Eye-Fi connection indicator ….. |
224 |
|
3 |
Bluetooth connection |
|
|
indicator ……………………………….. |
223 |
|
|
Airplane mode ………………………. |
223 |
|
4 |
Vignette control indicator |
…….. 197 |
|
5 |
Date stamp indicator…………….. |
204 |
|
6 |
Vibration reduction indicator |
|
|
…………………………………………. |
17, 200 |
|
|
7 |
Flash control indicator ………….. |
199 |
|
Flash compensation indicator for |
||
|
optional flash units………………. |
279 |
|
|
8 |
Release mode…………………………… |
55 |
|
9 |
“Beep” indicator…………………….. |
215 |
6Introduction

|
10 |
Aperture (f-number) |
16 |
||
|
…………………………………….. |
88, 93, 95 |
|||
|
Aperture display ………………… |
93, 95 |
|||
|
11 |
Shutter speed ………………. |
88, 91, 95 |
||
|
Shutter-speed display………… |
91, 95 |
17 |
||
|
12 |
Autoexposure (AE) lock indicator |
|||
|
………………………………………………. |
102 |
|||
|
13 |
AF-area mode indicator ………….. |
67 |
18 |
|
|
Focus point………………………………. |
69 |
|||
|
14 |
Battery indicator ……………………… |
25 |
19 |
|
|
15 |
ISO sensitivity ………………….. |
86, 194 |
||
|
ISO sensitivity display ……… |
86, 196 |
|||
|
Auto ISO sensitivity indicator |
||||
|
………………………………………………. |
195 |
|||
|
Number of exposures remaining |
|
|
………………………………………………… |
25 |
|
White balance recording indicator |
|
|
………………………………………………. |
116 |
|
“k” (appears when memory |
|
|
remains for over 1000 exposures) |
|
|
………………………………………………… |
25 |
|
Exposure indicator ………………….. |
96 |
|
Exposure compensation indicator |
|
|
………………………………………………. |
104 |
|
Help icon………………………………… |
261 |
Note: Display shown with all indicators lit for illustrative purposes.
A Turning the Monitor Off
To clear shooting information from the monitor, press the Rbutton or press the shutter-release button halfway. The monitor will turn off automatically if no operations are performed for about 8 seconds. For information on choosing how long the monitor remains on before turning off automatically, see Auto off timers (0 209).
Introduction 7

Live View and Movie Mode
To start live view, rotate the live view switch during viewfinder photography (0 26). You can then press the Rbutton to cycle through display options as shown below.
Rbutton
|
Show photo indicators |
Show movie indicators |
|||
|
(0127, 130) * |
||||
|
Framing grid* |
Hide indicators* |
*A crop showing the area recorded is displayed during movie recording; circled areas indicate the edges of the movie frame crop (the area outside the movie frame crop is grayed out when movie indicators are displayed).
8Introduction

The Live View Display
|
Item |
Description |
|
|
q Shooting mode |
The mode currently selected with the mode dial |
|
|
(0 26, 42, 44, 88). |
||
|
w |
Manual movie |
Displayed when On is selected for Manual movie |
|
settings indicator |
settings in mode M (0 131). |
|
|
The amount of time remaining before live view |
||
|
e Time remaining |
ends automatically. Displayed if shooting will end |
|
|
in 30 s or less (0 10). |
||
|
Wind noise |
Displayed when On is selected for Movie settings |
|
|
r |
> Wind noise reduction in the shooting menu |
|
|
reduction |
(0 131). |
|
|
t |
Microphone |
Microphone sensitivity for movie recording |
|
sensitivity |
(0 131). |
|
|
Sound level for audio recording. Displayed in red if |
||
|
y Sound level |
level is too high; adjust microphone sensitivity |
|
|
accordingly (0 131). |
||
|
u Movie frame size |
The frame size of movies recorded in movie mode |
|
|
(0 131). |
||
|
i Focus mode |
The current focus mode (0 62). |
|
|
o AF-area mode |
The current AF-area mode (0 67). |
Introduction 9

|
Item |
Description |
|
|
!0Time remaining |
The recording time remaining in movie mode |
|
|
(movie mode) |
(0 128). |
|
|
!1“No movie” icon |
Indicates that movies cannot be recorded. |
|
|
!2Focus point |
The current focus point. The display varies with the |
|
|
option selected for AF-area mode (0 67). |
||
|
!3Exposure |
Indicates whether the photograph would be |
|
|
underor over-exposed at current settings (mode |
||
|
indicator |
M only; 0 96). |
|
Note: Display shown with all indicators lit for illustrative purposes.
D The Count Down Display
A count down will be displayed 30 s before live view ends automatically (0 9); the timer turns red 5 s before the auto off timer expires (0 209) or if live view is about to end to protect the internal circuits. Depending on shooting conditions, the timer may appear immediately when live view is selected. Movie recording will end automatically when the timer expires, regardless of the amount of recording time available.
10 Introduction

The PButton
To change the settings at the bottom of the information display, press the P button, then highlight items using the multi selector and press Jto view options for the highlighted item. You can also change settings by pressing the P button during live view.
•Image quality (077)
•Image size (0 79)
•White balance (0110)
•Active D-Lighting (0 108)
•Flash mode (081, 83)
•ISO sensitivity (0 86)
•Focus mode (062)
•AF-area mode (067)
•Metering (0100)
•Set Picture Control (0122)
•Flash compensation (0106)
•Exposure compensation (0104)
Pbutton
Viewfinder photography
Live view
Introduction 11

First Steps
Attach the Camera Strap
A strap is supplied with the camera; additional straps are available separately. Attach the strap securely to the two camera eyelets.
Charge the Battery
If a plug adapter is supplied, raise the wall plug and connect the plug adapter as shown below at left, making sure the plug is fully inserted. Insert the battery and plug the charger in. An exhausted battery will fully charge in about an hour and 50 minutes.
In some countries or regions, charger may be supplied with adapter connected.
The CHARGE lamp will flash while the battery charges.
|
Battery charging |
Charging complete |
D The Battery and Charger
Read and follow the warnings and cautions in “For Your Safety” (0x) and “Caring for the Camera and Battery: Cautions” (0291).
12 First Steps

Insert the Battery and a Memory Card
Before inserting or removing the battery or memory cards, confirm that power switch is in the OFF position. Insert the battery as shown, using the battery to keep the orange battery latch pressed to one side. The latch locks the battery in place when the battery is fully inserted.
Battery latch
Holding the memory card in the orientation shown, slide it in until it clicks into place.
First Steps 13

Removing the Battery and Memory Cards
Removing the Battery
To remove the battery, turn the camera off and open the battery-chamber cover. Press the battery latch in the direction shown by the arrow to release the battery and then remove the battery by hand.
Removing Memory Cards
After confirming that the memory card access lamp is off, turn the camera off, open the memory card slot cover, and press the card in to eject it (q). The card can then be removed by hand (w).
D Memory Cards
•Memory cards may be hot after use. Observe due caution when removing memory cards from the camera.
•Do not remove memory cards from the camera, turn the camera off, or remove or disconnect the power source during formatting or while data are being recorded, deleted, or copied to a computer. Failure to observe these precautions could result in loss of data or in damage to the camera or card.
•Do not touch the card terminals with your fingers or metal objects.
•Do not bend, drop, or subject to strong physical shocks.
•Do not apply force to the card casing. Failure to observe this precaution could damage the card.
•Do not expose to water, heat, high levels of humidity, or direct sunlight.
•Do not format memory cards in a computer.
14 First Steps

Attach a Lens
Be careful to prevent dust from entering the camera when the lens or body cap is removed. The lens generally used in this manual for illustrative purposes is an AF-P DX NIKKOR 18–55mm f/3.5–5.6G VR.
|
Remove the camera |
|
body cap |
|
Remove the rear |
|
lens cap |
|
Mounting mark (camera) |
|
|
Align the mounting |
Mounting mark (lens) |
|
marks |
Rotate the lens as shown until it clicks into place.
Be sure to remove the lens cap before taking pictures.
First Steps 15

A Lenses with Retractable Lens Barrel Buttons
Before using the camera, unlock and extend the lens. Keeping the retractable lens barrel button pressed (q), rotate the zoom ring as shown (w).
Retractable lens barrel button
Pictures cannot be taken when the lens is retracted; if an error message is displayed as a result of the camera having been turned on with the lens retracted, rotate the zoom ring until the message is no longer displayed.
A Detaching the Lens
Be sure the camera is off when removing or exchanging lenses. To remove the lens, press and hold the lens release button (q) while turning the lens clockwise (w). After removing the lens, replace the lens caps and camera body cap.
16 First Steps

A Vibration Reduction (VR)
Vibration reduction can be enabled by selecting On for Optical VR in the shooting menu (0 200), if the lens supports this option, or by sliding the lens vibration reduction switch to ON, if the lens is equipped with a vibration reduction switch. A vibration reduction indicator appears in the information display when vibration reduction is on.
A Retracting Lenses with Retractable Lens Barrel Buttons
To retract the lens when the camera is not in use, hold the retractable lens barrel button (q) and rotate the zoom ring to the “L” (lock) position as shown (w). Retract the lens before removing it from the camera, and be
careful not to press the retractable lens barrel button when attaching or removing
the lens.
First Steps 17

Camera Setup
Choose a language and set the camera clock.
1 Turn the camera on.
When the camera is turned on for the first time after purchase, a languageselection dialog will be
displayed. The languages
available vary with the country or region in which the camera was originally purchased.
Use the multi selector and Jbutton to navigate the menus.
Press 1and 3to highlight a language and press Jto select. The language can be changed at any time using the Language option in the setup menu.
18 First Steps

2Set the camera clock.
Use the multi selector and Jbutton to set the camera clock.
|
Select time zone |
Select date format |
|
e |
r |
|
Select daylight saving time |
Set time and date (note that the |
|
option |
camera uses a 24-hour clock) |
The clock can be adjusted at any time using the Time zone and date > Date and time option in the setup menu.
A The Clock Battery
The camera clock is powered by an independent, rechargeable power source, which is charged as necessary when the main battery is installed. Three days of charging will power the clock for about a month. If a message warning that the clock is not set is displayed when the camera is turned on, the clock battery is exhausted and the clock has been reset. Set the clock to the correct time and date.
First Steps 19

Focus the Viewfinder
After removing the lens cap, rotate the diopter adjustment control until the focus points are in sharp focus. When operating the control with your eye to the viewfinder, be careful not to put your fingers or fingernails in your eye.
Focus points
|
Viewfinder not in focus |
Viewfinder in focus |
The camera is now ready for use. Proceed to ““Point-and-Shoot” Modes (iand j)”(0 26) for information on taking photographs.
20 First Steps

Tutorial
Camera Menus: An Overview
Most shooting, playback, and setup options can be accessed from the camera menus. To view the menus, press the G button.
|
Gbutton |
|
|
Tabs |
|
|
Choose from the following menus: |
|
|
• D: Playback (0 188) |
• N: Retouch (0 227) |
|
• C: Shooting (0 192) |
• m: Recent settings (0 251) |
|
• B: Setup (0 201) |
|
|
Slider shows position in current |
|
|
menu. |
|
|
Current settings are shown by |
|
|
icons. |
|
|
Menu options |
|
|
Options in current menu. |
|
|
Help icon (022) |
Tutorial 21

Using Camera Menus
The multi selector and Jbutton are used to navigate the camera menus.
|
1: Move cursor up |
|
|
Jbutton: select |
|
|
highlighted item |
|
|
4: Cancel and return to |
2: Select highlighted item |
|
previous menu |
or display sub-menu |
3: Move cursor down
A The d(Help) Icon
If a dicon is displayed at the bottom left corner of the monitor, a description of the currently selected option or menu can be displayed by pressing the W(Q) button. Press 1 or 3 to scroll through the display. Press W (Q) again to return to the menus.
W(Q) button
22 Tutorial

Navigating the Menus
Follow the steps below to navigate the menus.
1 Display the menus.
Press the Gbutton to display the menus.
Gbutton
2 Highlight the icon for the current menu.
Press 4 to highlight the icon for the current menu.
3Select a menu.
Press 1or 3 to select the desired menu.
4 Position the cursor in the selected menu.
Press 2 to position the cursor in the selected menu.
Tutorial 23

5Highlight a menu item.
Press 1or 3to highlight a menu item.
6Display options.
Press 2to display options for the selected menu item.
7Highlight an option.
Press 1 or 3 to highlight an option.
8Select the highlighted item.
Press Jto select the highlighted
item. To exit without making a selection, press the Gbutton.
Note the following:
•Menu items that are displayed in gray are not currently available.
•While pressing 2generally has the same effect as pressing J,
there are some cases in which selection can only be made by pressing J.
•To exit the menus and return to shooting mode, press the shutter-release button halfway (0 30).
24 Tutorial

The Battery Level and Number of
Exposures Remaining
Press the Rbutton and check the battery level and number of exposures remaining in the information display.
Battery level
|
Rbutton |
Number of exposures |
|
remaining |
Battery Level
If the battery is low, a warning will also be displayed in the viewfinder. If the information display does not appear when the Rbutton is pressed, the battery is exhausted and needs to be recharged.
|
Information |
Viewfinder |
Description |
|
|
display |
|||
|
L |
— |
Battery fully charged. |
|
|
K |
— |
Battery partially discharged. |
|
|
H |
d |
Low battery. Ready fully-charged spare |
|
|
battery or prepare to charge battery. |
|||
|
H |
d |
Battery exhausted. Charge battery. |
|
|
(flashes) |
(flashes) |
Number of Exposures Remaining
Values over 1000 are shown in thousands, indicated by the letter “k”.
Tutorial 25

Basic Photography and Playback
“Point-and-Shoot” Modes (iand j)
This section describes how to take photographs in iand jmodes. iand jare automatic “point-and-shoot” modes in which the majority of settings are controlled by the camera in response to shooting conditions; the only difference between the two is that the flash will not fire in jmode.
1 Rotate the mode dial to i Mode dial or j. 
Photographs can be framed in the viewfinder or in the monitor (live view). To start live view, rotate the live view switch.
Live view switch
Framing pictures in the viewfinder
Framing pictures in the monitor (live view)
26 Basic Photography and Playback
 Loading…
Loading…
• Внимательно прочтите данное руководство, прежде чем начать работать с фотокамерой.
• Для обеспечения надлежащего использования фотокамеры ознакомьтесь с информацией в
разделе «Для Вашей безопасности» (на обороте).
• После прочтения данного руководства храните его в легкодоступном месте для дальнейшего
использования.
Данное руководство не может быть воспроизведено в любой форме целиком или частично (за
исключением краткого цитирования в статьях или обзорах) без письменного разрешения компании NIKON.
Дата изготовления:
Содержание упаковки
❏ Фотокамера D3500
❏ Резиновый наглазник DK-25
(прилагается к фотокамере)
❏ Защитная крышка BF-1B
❏ Литий-ионная аккумуляторная
батарея EN-EL14a (с защитной
крышкой)
❏ Ремень AN-DC3
❏ Руководство пользователя
(данный лист)
❏ Гарантийный талон (смотрите
слева)
❏ Зарядное устройство MH-24 (сетевой переходник поставляется
в странах или регионах, где это необходимо; форма зависит от
страны продажи)
Карты памяти продаются отдельно. При покупке комплектов
объектива убедитесь, что в объектив находится в упаковке (также
могут поставляться руководства для объектива).
A
Корпус фотокамеры
13
12
15
7
8
10
11
9
2
3
4
1
14
5 6
18
17
19
24
23
22
21
20
16
26
25
27
44
43
45
46
36
37
38
39
32
28
33
34
35
40
42 41
30 31
29
1 Выключатель питания
2 Спусковая кнопка затвора
3 Кнопка E/N
4 Кнопка видеосъемки
5 Переключатель live view
6 Диск выбора режимов
7 Встроенная вспышка
8 Микрофон (монофонический)
9 Метка крепления
10 Кнопка отсоединения объектива
11 Зеркало
12 Байонет объектива
13 Контакты микропроцессора
14 Вспомогательная подсветка АФ
Индикатор автоспуска
Лампа подавления эффекта
красных глаз
15 Защитная крышка
16 Башмак для принадлежностей
(для дополнительных вспышек)
17 Диск управления
18 Кнопка A/L
19 Кнопка R (информация)
20 Крышка разъема
21 Кнопка M/Y
22 Проушины для ремня фотокамеры
23 Динамик
24 Метка фокальной плоскости (E)
25 Разъем USB
26 HDMI разъем
27 Резиновый наглазник
(поставляется прикрепленным к
фотокамере)
28 Окуляр видоискателя
29 Регулятор диоптрийной настройки
30 Кнопка K
31 Кнопка G
32 Кнопка P
33 Кнопка J (OK)
34 Мультиселектор
35 Кнопка s/E
36 Крышка гнезда для карты памяти
37 Индикатор доступа к карте памяти
38 Защелка крышки батарейного
отсека
39 Крышка батарейного отсека
40 Кнопка O
41 Кнопка W/Q
42 Кнопка X
43 Штативное гнездо
44 Монитор
45 Защелка батареи
46 Крышка разъема питания для
дополнительного разъема
питания
A Мультиселектор
В данном руководстве операции с использованием мультиселектора
представлены символами
1, 3, 4 и 2.
J
•
1: Нажмите мультиселектор вверх
•
3: Нажмите мультиселектор вниз
•
4: Нажмите мультиселектор влево
•
2: Нажмите мультиселектор вправо
• Кнопка
J: выбор выделенного пункта
A Режим g
Когда диск выбора режимов приведен
в положение
g, можно снимать,
просматривать, обрабатывать и удалять
фотографии, а также настраивать
фотокамеру с помощью удобного экранного
руководства. Дополнительную информацию
см. в интерактивном руководстве по
эксплуатации фотокамеры.
B
Краткое руководство
Присоедините ремень фотокамеры
В комплекте с фотокамерой поставляется один ремень;
дополнительные ремни приобретаются отдельно. Надежно
прикрепите ремень к двум проушинам фотокамеры.
Зарядите батарею
В некоторых странах или
регионах зарядное устройство
может поставляться с
подключенным переходником.
Во время зарядки батареи будет мигать индикатор CHARGE.
Батарея заряжается
Зарядка закончена
Вставьте батарею и карту памяти
Присоедините объектив
Метка крепления (фотокамера)
Метка крепления (объектив)
Поверните объектив, как
показано на рисунке, до щелчка.
A Объективы с кнопками выдвижения/втягивания на корпусе объектива
Прежде чем приступить к использованию фотокамеры, снимите
блокировку и выдвиньте объектив. Удерживая нажатой кнопку
выдвижения/втягивания на корпусе объектива (q), поверните кольцо
зуммирования, как показано на рисунке (w).
Кнопка выдвижения/
втягивания на корпусе
объектива
Съемка будет невозможна при втянутом
объективе; если отображается сообщение об
ошибке в результате включения фотокамеры
при втянутом объективе, поворачивайте
кольцо зуммирования до тех пор, пока
сообщение не исчезнет.
A Снятие объективов
Чтобы снять объектив, выключите фотокамеру, затем нажмите и
удерживайте кнопку отсоединения объектива на передней части
корпуса фотокамеры во время вращения объектива в направлении,
противоположном показанному на рисунке выше.
Настройка фотокамеры
1
Включите фотокамеру.
Появится диалоговое окно выбора
языка; нажмите
1 и 3, чтобы выделить
язык и нажмите
J, чтобы его выбрать.
Доступные языки зависят от страны
или региона продажи.
2
Установите часы фотокамеры.
После установки параметров
часового пояса, формата даты и
летнего времени, воспользуйтесь
мультиселектором и кнопкой
J, чтобы
установить часы фотокамеры.
Сфокусируйте видоискатель
После снятия крышки объектива
поворачивайте регулятор диоптрийной
настройки до тех пор, пока точки
фокусировки не будут резко
сфокусированы. При использовании
регулятора, когда глаз находится у
видоискателя, будьте осторожны, чтобы
случайно не попасть в глаз пальцем или
ногтем.
Видоискатель не
сфокусирован
Видоискатель
сфокусирован
C
Фотосъемка «Наведи и снимай»
Режимы (
i и j)
1
Поверните диск выбора режимов в
положение
i или j.
2
Наведите фотографию.
3
Нажмите спусковую кнопку затвора
наполовину, чтобы выполнить
фокусировку.
4
Плавно нажмите спусковую кнопку затвора
до конца, чтобы сделать фотографию.
D
Запись видеороликов
1
Поверните переключатель live view.
Изображение, видимое через
объектив, отобразится на мониторе
фотокамеры.
Переключатель live view
2
Нажмите спусковую кнопку затвора наполовину, чтобы
выполнить фокусировку.
3
Нажмите кнопку видеосъемки, чтобы
начать запись.
Кнопка видеосъемки
На мониторе отображается индикатор
записи и оставшееся время записи.
Оставшееся время
Индикатор записи
4
Снова нажмите кнопку видеосъемки, чтобы закончить запись.
5
Чтобы выйти из режима live view, поверните переключатель
live view.
E
Просмотр фотографий
При нажатии
K снимок отображается на
мониторе.
Видеоролики обозначаются символом
1.
Нажмите
J, чтобы начать просмотр.
Кнопка
K
F
Удаление ненужных фотографий
Имейте в виду, что восстановить
удаленные фотографии невозможно.
• Нажмите кнопку
O. Отобразится диалоговое
окно подтверждения; снова нажмите
кнопку
O, чтобы удалить изображение и
вернуться в режим просмотра.
• Чтобы выйти без удаления снимка,
нажмите
K.
Кнопка
O
G
Меню фотокамеры
К большинству параметров съемки, просмотра и настройки можно
получить доступ из меню фотокамеры. Для просмотра меню
нажмите кнопку
G.
Выберите одно из следующих меню:
D Просмотр
N Обработка
C Съемка
m Недавние Настройки
B Настройка
Закладки
Параметры текущего меню.
Если отображается значок Справка, нажмите кнопку
W (Q)
для просмотра справки для выбранного на данный момент
элемента.
Параметры меню
Символ справки
Текущие настройки показаны
символами.
Ползунок показывает
расположение в текущем меню.
H
Подключение к смарт-устройству с
помощью SnapBridge
Установите приложение SnapBridge на Вашем смарт-устройстве
для загрузки снимков с фотокамеры или для удаленного
управления фотокамерой. Дополнительную информацию см. в
интерактивном руководстве по эксплуатации фотокамеры.
Подготовка смарт-устройства
Перед подключением необходимо подготовить смарт-устройство,
установив приложение SnapBridge и включив Bluetooth.
1
Введите «snapbridge» в поле поиска Apple
App Store® (iOS) или Google Play™ (Android™) и
установите приложение SnapBridge.
Информация о поддерживаемых операционных системах
доступна на сайте загрузки. Эта фотокамера несовместима с
приложением SnapBridge 360/170.
2
Включите функцию Bluetooth на смарт-устройстве. Обратите
внимание, что фактическое соединение с фотокамерой
будет выполнено с помощью приложения SnapBridge;
не пытайтесь подключиться с помощью приложения
«Настройки» на Вашем устройстве.
Сопряжение и подключение
Перед сопряжением убедитесь, что на карте памяти фотокамеры
есть свободное место. Для предотвращения обрывов соединения
следует также убедиться, что батарея фотокамеры полностью
заряжена.
1
Выделите Подключ. к смарт-устройству в меню настройки и
нажмите
2.
2
Выполните настройку, следуя инструкциям, отображаемым
на дисплее фотокамеры и в приложении SnapBridge.
Подробную информацию о настройке см.
в интерактивной справке по SnapBridge
(дополнительная информация также доступна
в интерактивном руководстве по эксплуатации
фотокамеры). Информацию об интерактивной
справке по SnapBridge можно найти на веб-
странице:
https://nikonimglib.com/snbr/onlinehelp/ru/index.html
Уход за фотокамерой
❚❚ Хранение
Если фотокамера не будет использоваться в течение длительного времени,
выключите фотокамеру и извлеките батарею. Не храните батарею в местах,
которые:
• плохо проветриваются или имеют уровень влажности более 60%
• находятся рядом с оборудованием, создающим сильные
электромагнитные поля, таким как телевизор или радиоприемник
• подвергаются воздействию температуры выше 50 °C или ниже –10 °C
❚❚ Чистка
Корпус фотокамеры
Удалите пыль и пух с помощью груши, после чего протрите мягкой
сухой тканью. После использования фотокамеры на пляже или морском
берегу удалите песок и соль с помощью ткани, слегка смоченной
дистиллированной водой, и тщательно высушите.
Важно: Действие гарантийного талона не распространяется на
повреждения, вызванные проникновением пыли или других инородных
частиц внутрь фотокамеры.
Объектив, зеркало и видоискатель
Элементы, изготовленные из стекла, легко повредить. Удалите пыль и пух
с помощью груши. Если Вы используете аэрозольный баллон, держите его
вертикально, чтобы предотвратить вытекание жидкости. Для удаления
отпечатков пальцев и прочих пятен смочите мягкую ткань небольшим
количеством средства для чистки объективов и осторожно очистите
поверхность.
Монитор
Удалите пыль и пух с помощью груши. При удалении отпечатков пальцев
и прочих пятен слегка протрите поверхность мягкой тканью или замшей.
Не надавливайте на экран, так как это может привести к поломке или
неправильной работе.
* Не используйте для чистки спирт, растворитель и другие летучие химикаты.
Поиск и устранение неисправностей
❚❚ Батарея/дисплей
Фотокамера включена, но не реагирует: Подождите, пока закончится запись.
Если проблема не устраняется, выключите фотокамеру. Если фотокамера
не выключается, выньте и снова вставьте батарею.
Изображение в видоискателе не в фокусе: Сфокусируйте видоискатель,
используя регулятор диоптрийной настройки.
❚❚ Съемка (все режимы)
Заблокирован спуск затвора:
• Карта памяти заблокирована, заполнена или не вставлена.
• Фотокамера не сфокусирована.
Снимки не сфокусированы: Фотокамера может не фокусироваться на
объектах, если они недостаточно контрастны, окружены повторяющимися
геометрическими узорами или слишком малы по сравнению с объектами
на фоне, а также если в сюжете присутствуют объекты, расположенные на
различных расстояниях от фотокамеры, ярко контрастные области или
множество мелких деталей.
❚❚ Просмотр
Невозможно просматривать снимки, сделанные другими фотокамерами: Снимки,
сделанные другими фотокамерами, могут отображаться неправильно.
Во время просмотра некоторые снимки не отображаются: Выберите Все для Папка
просмотра.
Невозможно удалить снимок: Карта памяти заблокирована.
Технические характеристики
❚❚ Цифровая фотокамера Nikon D3500
Тип
Тип
Цифровая зеркальная фотокамера
Байонет объектива
Байонет F Nikon (с контактами АФ)
Эффективный угол
зрения
Формат DX Nikon; фокусное расстояние равно примерно
1,5× фокусному расстоянию объективов с углом зрения
формата FX
Эффективное число пикселей
Эффективное число
пикселей
24,2 млн.
Матрица
Матрица
23,5 × 15,6 мм КМОП-матрица
Общее число пикселей 24,78 млн.
Система уменьшения
количества пыли
Справочные данные для удаления пыли (необходимо
программное обеспечение Capture NX-D)
Хранение
Размер изображения
(в пикселях)
• 6 000 × 4 000 (Большой: 24,0 М)
• 4 496 × 3 000 (Средний: 13,5 М)
• 2 992 × 2 000 (Маленький: 6,0 М)
Формат файлов
• NEF (RAW): 12-разр., сжатый
• JPEG: JPEG-совместимый со сжатием высокого качества
(примерно 1 : 4), нормального качества (примерно 1 : 
или низкого качества (примерно 1 : 16)
• NEF (RAW) + JPEG: Одна фотография, записанная в двух
форматах: NEF (RAW) и JPEG
Продолжение на обороте
D3500 Model Name: N1718
Поддержка пользователей Nikon
Посетите следующий сайт, чтобы
зарегистрировать фотокамеру и
получать последнюю информацию
об изделии. Здесь можно найти
ответы на часто задаваемые вопросы
и обратиться к нам для получения
технической поддержки.
http://www.europe-nikon.com/support
ЦИФРОВАЯ ФОТОКАМЕРА
Ru
AMA16874
Отпечатано в Европе
SB8H01(1D)/
6MB4451D-01
Руководство пользователя (с гарантийным талоном)
Nikon D3500
Условия гарантии — Гарантия обслуживания европейского представительства Nikon
Уважаемый покупатель!
Благодарим Вас за то, что Вы выбрали продукт компании Nikon. Если Вашему
продукту потребуется гарантийное обслуживание, Вам следует обратиться к
дилеру, у которого Вы приобрели данный продукт, или членам европейской сети
авторизованного обслуживания, в пределах территории продаж Nikon Европы
B.V. (например, Европа/Россия/другие). См. подробную информацию по адресу:
http://www.europe-nikon.com/support
Во избежание возможных неудобств мы рекомендуем вам внимательно
ознакомиться с руководством пользователя до обращения к дилеру или любому
члену нашей сети авторизованного обслуживания.
В отношении вашего оборудования Nikon предоставляется гарантия отсутствия
дефектов производства в течение одного года от даты первоначального
приобретения. Если в течение гарантийного срока в продукте обнаружатся
дефекты или неисправности, возникшие по причине ненадлежащего качества
материалов или изготовления, члены нашей европейской сети авторизованного
обслуживания бесплатно отремонтируют продукт на условиях, оговариваемых
ниже. Компания Nikon сохраняет за собой право принимать решение о замене или
ремонте продукта (по своему усмотрению).
1. Чтобы получить право на гарантийное обслуживание, необходлмо представить
дефектный продукт, а также заполненный гарантийный талон и счет или
чек, выданный при покупке, с указанием даты покупки, вида продукта и
дилера. Компания Nikon сохраняет за собой право отказать в бесплатном
гарантийном обслуживании, если документы, указанные выше, не могут быть
предоставлены или информация, указанная в таких документах, является
неполной или неразборчивой.
2. Данная гарантия не распространяется на следующие случаи:
• необходимое обслуживание и ремонт или замена частей в результате
естественного износа;
• модификация продукта для его использования в целях, отличных от
указанных в руководстве пользователя, выполненная без предварительного
письменного согласия компании Nikon;
• транспортные затраты и все транспортные риски, прямо или косвенно
связанные с гарантией на продукт;
• любой ущерб, понесенный в результате модификации или корректировки
продукта, которые были осуществлены без предварительного письменного
согласия компании Nikon с целью соблюдения действующих местных
или национальных технических стандартов любой страны, кроме тех, для
которых продукт был разработан и (или) произведен.
3. Гарантия не применяется в случае:
• повреждения, вызванного ненадлежащим использованием, включая
(но не ограничиваясь перечисленным) использование продукта не по
назначению или в нарушение инструкций по правильному использованию
и надлежащему обслуживанию, а также установку или использование
продукта в нарушение действующих стандартов безопасности страны, в
которой используется продукт;
• повреждения, вызванного несчастным случаем, включая (но не
ограничиваясь перечисленным) воздействие молнии, воды или огня,
ненадлежащее использование или небрежность;
• изменения, повреждения, нечитаемости или удаления маркировки модели
или серийного номера продукта;
• повреждения в результате ремонта или корректировки, выполненных
неавторизованными сервиснымм организациями или лицами;
• повреждения, вызванного дефектами системы, в составе которой иси с
которой используется продукт.
4. Данная гарантия обслуживания не влияет на законные права покупателя в
соответствии с ирименимым действующим национальным законодательством,
а также права пользователя в отношении дилера, возникающие на основании
договора купли-продажи.
Примечание: Обзор всех авторизованных сервисных центров Nikon можно
просмотреть в интерактивном режиме, щелкнув по ссылке
(URL = http://www.europe-nikon.com/service/).
Руководства по эксплуатации фотокамеры
Для Вашей фотокамеры Nikon доступны следующие
руководства:
❚❚ Руководство пользователя
Руководство пользователя (данное руководство) содержит
описание основных операций съемки и просмотра.
❚❚ Интерактивные руководства
Более подробные инструкции доступны на веб-
сайте Nikon.
http://onlinemanual.nikonimglib.com/d3500/ru/
oнлайн-руководство nikon D3500
SAMPLE
