-
Contents
-
Table of Contents
-
Bookmarks
Quick Links

AF-S DX NIKKOR
18-55mm f/3.5-5.6 VR
VR
|
P. 2 |
Jp |
|
|
User’s Manual |
||
|
Pg. 12 |
En |
|
|
Benutzerhandbuch |
||
|
S. 24 |
De |
|
|
Manuel d’utilisation |
||
|
P. 32 |
Fr |
|
|
Manual del usuario |
||
|
Pág. 40 |
Es |
|
|
Användarhandbok |
||
|
S. 48 |
Sv |
|
|
Pykoводство пользoвaтеля |
||
|
CTP. 56 |
Ru |
|
|
Gebruikshandleiding |
||
|
P. 64 |
Nl |
|
|
Manuale d’uso |
||
|
Pag. 72 |
It |
|
|
80 |
Sc |
|
|
92 |
Tc |
|
|
100 |
Kr |

2


カメラの電池を抜いて、販売店またはニコンサー

依頼を
いこと
使用禁止


Jp
ります。
があります。
ことがあります。
3
1P. 5
2P. 5
4P. 6
7P. 5
8CPU P. 8
9A-M P. 6
0P. 7
B 

 C
C  D
D
4
DX DXD300 D90DX 35mm 1.5
VR 1 OFF3.0 2 D
3 7CIPA
|
FX FX |
7 |
|
|
DX |
4 C |
|
|
Jp |
||
|
DX |
||
OFFAFA-M 9
|
AF MF |
HB-45 1 B |
|
|
2 2 |
||
|
1 |
||
|
2 |
5

ムリング4
Jp A
AF-A AF-S AF-CA-M 9 A
33
A-M 9 M3 AFM
|
A-M |
|||
|
AF |
M |
||
|
9 |
|||
|
A |
|||
(P. 10
6

VR
3.0 CIPAFX FXDX DX
10 ON0
30 OFF
OFF
を再度ON
0 OFF
JpON
AF D2 D300AF
7

がレンズのフード1
1
0.6m
|
Jp |
|||
D810 D800 D750
D700 D610 D600 D7200
D7100 D7000 D5500
D5300 D5200 D5100
D5000 D3300 D3200
D3100 D3000 D300
D200 D100 D90 D80
D70 D60 D50
D40
D100/D70 20mm18mm
CPU 8
リーナーを少量湿らせ、レンズの中心から外周へ渦巻 状に、拭きムラ、拭き残りのないように注意して拭い てください。
NC 1
ド1
1
8
52mm LC-52
52mm
CL-0815
HB-45
PK
K
BR-4
SX-1
ます。アクセサリーの使用説明書をご確認ください。
|
F CPU G |
||
|
AF-S DX |
||
|
DX |
||
|
18mm―55mm |
||
|
1 3.5―5.6 |
||
|
8 11 1 |
||
|
76°―28°50′ |
||
|
18 24 35 45 55mm |
||
|
Jp |
||
|
VCM |
||
|
0.28 m |
||
|
7 |
||
|
18mm f/3.5―22 |
||
|
55mm f/5.6―36 |
||
|
52 mm P=0.75 mm |
||
|
73 mm ×79.5 mm |
||
|
265 g |
9
10

Jp
11
Notes on Safety Operations
 CAUTION
|
Do not disassemble |
||
|
Touching the internal parts of the camera or lens |
||
|
could result in injury. Repairs should be |
||
|
performed only by qualified technicians. Should |
||
|
the camera or lens break open as the result of a |
||
|
fall or other accident, take the product to a Nikon- |
||
|
authorized service representative for inspection |
||
|
after unplugging the product and/or removing |
||
|
the battery. |
||
|
En |
||
|
Turn off immediately in the event of |
||
|
malfunction |
||
|
Should you notice smoke or an unusual smell |
||
|
coming from the camera or lens, remove the |
||
|
battery immediately, taking care to avoid burns. |
||
|
Continued operation could result in injury. |
||
|
After removing or disconnecting the power |
||
|
source, take the product to a Nikon-authorized |
||
|
service representative for inspection. |
Do not use the camera or lens in the presence of flammable gas
Operating electronic equipment in the presence of flammable gas could result in an explosion or fire.
Do not look at the sun through the lens or viewfinder
Viewing the sun or other strong light sources through the lens or viewfinder could cause permanent visual impairment.
Keep out of reach of children
Particular care should be taken to prevent infants from putting the batteries or other small parts into their mouths.
12

Observe the following precautions when handling the camera and lens
•Keep the camera and lens unit dry. Failure to do so could result in fire or electric shock.
•Do not handle or touch the camera or lens unit with wet hands. Failure to do so could result in electric shock.
•When shooting with back-lighting, do not point the lens at the sun or allow sunlight to pass
directly down the lens as this may cause the camera to overheat and possibly cause a fire.
• When the lens will not be used for an extended En period of time, attach both front and rear lens
caps and store the lens away from direct sunlight. Failure to do so could result in a fire, as the lens may focus sunlight onto a flammable object.
13
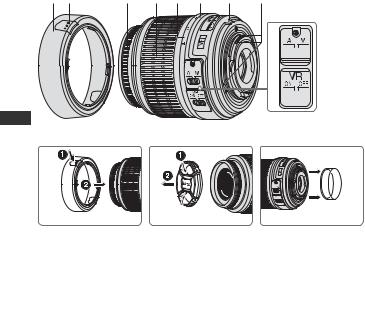
|
Nomenclature |
||||||
|
1 2 |
3 |
4 |
5 |
6 |
7 |
8 |
9

0

B 

 C
C  D
D
*Optional
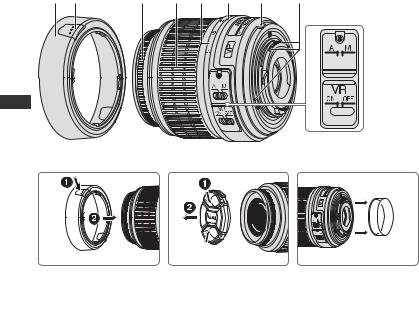
( ) : reference page 1Lens hood* (P. 16) 2Lens hood attachment
button (P. 16) 3Focus ring 4Zoom ring (P. 16) 5Focal length scale 6Focal length index
7Mounting index (P. 15)
8CPU contacts (P. 19)
9A-M mode switch (P. 16)
0Vibration reduction ON/ OFF switch (P. 17)
14
Thank you for purchasing the AF-S DX NIKKOR 18-55mm f/3.5-5.6G VR lens. DX Nikkor lenses are specially designed for use with Nikon digital-SLR (Nikon DX format) cameras, such as the D300 and D90. When mounted on Nikon DX format cameras, the lens picture angle is equivalent to approximately 1.5× the focal length in 35mm format. Before using this lens, please read these instructions and refer to your camera’s User’s Manual.
Major features
•By enabling vibration reduction (VR), slower shutter speeds (3.0 stops*) can be used, thus increasing the range of usable shutter speeds and zoom positions, particularly when handholding the camera. (*The effects of VR on shutter speed are measured according to Camera and Imaging Products Association (CIPA) standards; FX-format lenses are measured using FX-format digital cameras, DX-format lenses using DX-format cameras. Zoom lenses are measured at maximum zoom.)
•This lens employs a Silent Wave Motor to drive the focusing mechanism, making
autofocusing smooth, silent and almost instantaneous. The A-M mode switch 9is provided for simple selection of autofocus
(A) or manual focus (M) operation.
•More accurate exposure control is possible because subject distance information is transferred from the lens to the camera body.
•The use of one aspherical lens element ensures sharp pictures virtually free of color
|
fringing. Also, the seven-bladed diaphragm |
||
|
En |
||
|
produces a nearly-circular aperture, a feature |
||
|
which causes out-of-focus areas of the |
||
|
picture to become soft and unobtrusive. |
Mounting the lens
1Turn the camera off.
2Remove the rear lens cap (Fig. D).
3Align the mounting index 7on the lens with the mounting mark on the camera body, and rotate the lens counterclockwise until it clicks into place. Be sure that the lens is in the correct position when the mounting index 7is on the top of the lens.
15

4Remove the front lens cap. (Fig. C)
Removing the lens
Turn the camera off before removing the lens. Press and hold the lens-release button on the
camera while turning the lens clockwise.
Using the Lens Hood HB-45 1* (Fig. B)
*Optional.
Attaching the hood
Lightly squeeze the lens hood attachment buttons 2when attaching the lens hood 1. To store the lens hood 1, attach it in the reverse
En position.
Removing the hood
Lightly squeeze the lens hood attachment buttons 2when removing the lens hood 1.
Focusing, zooming, and depth of field
Before focusing,
rotate the zoom ring 4to adjust the focal length until the desired composition is framed in the viewfinder.
If your camera has a depth-of-field preview (stopdown) button or lever, depth of field can be previewed through the camera viewfinder.
Focusing (Fig. A) Autofocus mode
Set the camera focus mode to AF-A, AF-S or AF-C and set the A-M mode switch 9on the lens to A. Press the shutter-release button halfway to focus and completely to shoot.
Do not attempt to rotate the focus ring 3while autofocus is operating.
16

Manual focus mode
Set the A-M mode switch 9on the lens to M. Rotate the focus ring 3manually to focus. Shooting is possible when camera focus mode is set to either AF or M.
|
Lens A-M mode |
Camera focus mode |
||
|
switch 9 |
AF |
M |
|
|
A |
Autofocus |
— |
|
|
M |
Manual |
focus |
|
|
(focus assist is available) |
|||
For more information on camera focus modes, refer to your camera’s User’s Manual.
Getting good results with autofocus
Refer to “Notes on using wideor super wideangle AF Nikkor lenses” (P. 22).
|
Vibration reduction mode (VR) |
||
|
By enabling vibration reduction (VR), slower |
||
|
shutter speeds (3.0 stops*) can be used. Panning |
||
|
is also supported. (*The effects of VR on shutter |
||
|
speed are measured according to Camera and |
||
|
Imaging Products Association (CIPA) standards; |
||
|
FX-format lenses are measured using FX-format |
||
|
digital cameras, DX-format lenses using DX- |
||
|
format cameras. Zoom lenses are measured at |
||
|
maximum zoom.) |
||
|
Turning vibration reduction on and off |
||
|
1 Set the vibration reduction ON/OFF switch |
En |
|
|
0to ON. |
||
|
Note: Be sure to set the switch 0so that |
||
|
the indicator is precisely aligned with ON. |
2Camera shake is reduced when the shutter-release button is pressed halfway. Autofocus and manual focusing, as well as precise framing of the subject, are simplified because camera shake visible through the viewfinder is also reduced.
3To disable vibration reduction, set the vibration reduction ON/OFF switch 0to
OFF.
17

Notes on using vibration reduction
•After pressing the shutter-release button halfway, wait until the image in the viewfinder stabilizes before pressing the shutter-release button the rest of the way down.
•If the camera is panned in a wide arc, compensation for camera shake in the panning direction is not performed. For example, when panning the camera in a horizontal direction, vertical camera shake is reduced. This stabilizes the image whilst allowing the desired panning effect to be realized.
En • Due to the characteristics of the vibration reduction mechanism, the image in the viewfinder may be blurred after the shutter is released. This is not a malfunction.
•Do not turn the camera off or remove the lens from the camera while vibration reduction is operating. Failure to observe this note could result in the lens sounding and feeling as if an internal component is loose or broken when it is shaken. This is not a malfunction. Turn the camera on again to correct this.
•With cameras featuring a built-in flash, vibration reduction does not function while the built-in flash is charging.
•When the camera is mounted on a tripod, set the vibration reduction ON/OFF switch 0to OFF. However, it is recommended that the switch be set to ON when using the camera on an unsecured tripod head or with monopod.
•With autofocus cameras such as D2-series and D300 models, featuring an AF-ON button, vibration reduction does not function when the AF-ON button is pressed.
Setting the aperture
Use the camera to adjust the aperture setting.
Variable maximum apertures
Zooming the lens from 18mm to 55mm decreases the maximum aperture by 11/3 stop. However, the camera will compensate for any change in aperture by adjusting the shutter speed so as to maintain the correct exposure value.
18

Flash photography using cameras with a built-in flash
Vignetting is the darkening of the corners around the image that occurs when the light emitted by the flash is obstructed by the lens hood 1, or lens barrel, depending on the focal length or shooting distance.
•To prevent vignetting, do not use the lens hood 1.
•The built-in flash cannot be used over distances of less than 0.6 m (2.0 ft.).
|
Digital-SLR cameras |
Supported focal length/ |
|
|
shooting distance |
||
|
D810, D800-series, D750, |
||
|
D700, D610, D600, |
||
|
D7200, D7100, D7000, |
||
|
D5500, D5300, D5200, |
No vignetting occurs |
|
|
D5100, D5000, D3300, |
||
|
at any focal length |
||
|
D3200, D3100, D3000, |
||
|
D300-series, D200, D100, |
||
|
D90, D80, D70-series, |
||
|
D60, D50, D40-series |
•The built-in flash on the D100 and D70 is compatible with focal lengths of 20mm or greater. Vignetting occurs at a focal length of 18mm.
•For the latest information on vignetting with this lens, see the camera manual.
Lens care
•Be careful not to allow the CPU contacts 8to become dirty or damaged.
•Clean lens surfaces with a blower brush. To remove dirt and smudges, use a soft, clean
cotton cloth or lens tissue moistened with ethanol (alcohol) or lens cleaner. Wipe in a circular motion from the center to the outer
edge, taking care not to leave traces or touch En other parts of the lens.
•Never use thinner or benzene to clean the lens, as this could cause damage, result in a fire, or cause health problems.
•NC filters are available to protect the front lens element. The lens hood 1also helps to protect the front of the lens.
•When storing the lens in its flexible lens pouch,
attach both the front and rear lens caps. The lens can also be stored with the lens hood 1 attached in the reverse position.
19

•When the lens is mounted on a camera, do not
pick up or hold the camera and lens by the lens hood 1.
•When the lens will not be used for an extended period of time, store it in a cool, dry place to prevent mold. Be sure to store the lens away from direct sunlight or chemicals such as camphor or naphthalene.
•Do not get water on the lens or drop it in water as this will cause it to rust and malfunction.
En • Reinforced plastic is used for certain parts of the lens. To avoid damage, never leave the lens in an excessively hot place.
Standard accessories
• 52-mm Snap-on Front Lens Cap LC-52
Optional accessories
•52-mm screw-on filters
•Rear Lens Cap
•Flexible Lens Pouch CL-0815
•Lens Hood HB-45
Incompatible accessories
• Teleconverters (all models)
•Auto Ring BR-4 and all models of Auto Extension Ring PK, K Ring and Bellows focusing attachment.
•Attachment Ring SX-1
Other accessories may not be suitable for use with this lens. For details, refer to the documentation provided with accessories.
20
Specifications
|
Type of lens |
G-type AF-S DX Zoom-NIKKOR |
|
lens with built-in CPU and Nikon |
|
|
bayonet mount (specially |
|
|
designed for use with Nikon |
|
|
digital-SLR—Nikon DX format— |
|
|
cameras) |
|
|
Focal length |
18mm–55mm |
|
Maximum |
f/3.5–5.6 |
|
aperture |
|
|
Lens |
11 elements in 8 groups (1 |
|
construction |
aspherical lens element) |
|
Picture angle |
76º–28º50’ |
|
Focal length |
18, 24, 35, 45, 55mm |
|
scale |
|
|
Distance |
Output to camera body |
|
information |
|
|
Zoom control |
Manually via separate zoom ring |
|
Focusing |
Autofocus using a Silent Wave |
|
Motor; manually via separate |
|
|
focus ring |
|
|
Vibration |
Lens-shift method using voice |
|
reduction |
coil motors (VCMs) |
|
Closest focus |
0.28 m (0.9 ft.) from focal plane at |
|
distance |
all zoom positions |
|
No. of |
7 pcs. (rounded) |
|
diaphragm |
|
|
blades |
|
|
Diaphragm |
Fully automatic |
Aperture range f/3.5 to f/22 (at 18mm), f/5.6 to f/ 36 (at 55mm)
Exposure Via full-aperture method measurement
|
Attachment |
52 mm (P = 0.75 mm) |
||
|
En |
|||
|
size |
|||
|
Approximately 73 mm (dia.) × |
|||
|
Dimensions |
|||
|
79.5 mm (extension from the |
|||
|
camera’s lens-mount flange) |
|||
|
Weight |
Approximately 265 g (9.3 oz) |
Specifications and designs are subject to change without notice or obligation on the part of the manufacturer.
21
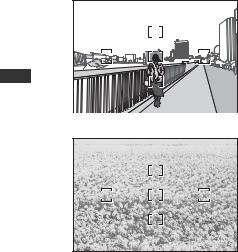
Notes on using wideor super wide-angle AF Nikkor lenses
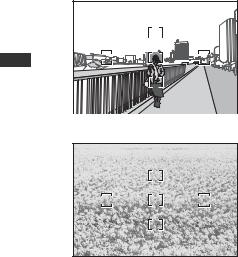
In the following situations, autofocus may not perform as expected when shooting with wideor super wide-angle AF Nikkor lenses.
|
E |
A person standing in front of a |
1. When the main subject in the focus |
|
|
brackets is relatively small |
|||
|
distant background |
|||
|
When a person standing in front of a distant |
|||
|
background is positioned within the focus |
|||
|
brackets, as shown in Fig. E, the background |
|||
|
may be in focus, while the subject is out of |
|||
|
focus. |
|||
|
En |
2. |
When the main subject is a finely |
|
|
patterned subject or scene |
|||
|
When the subject is finely patterned or of low |
|||
|
F |
A field filled with flowers |
contrast, such as a field filled with flowers, as |
|
|
shown in Fig. F, focus may be difficult to |
|||
|
acquire using autofocus. |
|||
|
Responses to these types of |
|||
|
situations |
|||
|
(1) |
Focus on a different subject located at the |
||
|
same distance from the camera, apply focus |
|||
|
lock, recompose, and shoot. |
22

(2)Set the camera’s focus mode to manual focus and focus manually on the subject.
Refer to “Getting Good Results with Autofocus” in the camera’s User’s Manual.
En
23

Hinweise für sicheren Betrieb
 ACHTUNG
Keinesfalls zerlegen.
Beim Berühren der Innenteile von Kamera oder Objektiv droht Verletzungsgefahr. Überlassen Sie Reparaturen unbedingt ausschließlich qualifizierten Technikern. Kommt es durch einen heftigen Stoß (z.B. Fall auf den Boden) zu einem Bruch von Kamera oder Objektiv, so trennen Sie zunächst das Produkt vom Stromnetz bzw. entnehmen die Batterie(n) und geben es dann an eine autorisierte Nikon-Servicestelle zur Überprüfung ab.
Bei einer Störung sofort die Stromversorgung ausschalten.
Bei Entwicklung von Rauch oder ungewöhnlichem Geruch durch Kamera oder Objektiv entnehmen Sie sofort die
De Batterie(n); dabei vorsichtig vorgehen, denn es besteht Verbrennungsgefahr. Bei einem Weiterbetrieb unter diesen Umständen droht Verletzungsgefahr.
Nach dem Abtrennen von der Stromversorgung geben Sie das Gerät an eine autorisierte Nikon-Servicestelle zur Überprüfung ab.
Kamera oder Objektiv keinesfalls bei Vorhandensein von brennbarem Gas einsetzen.
Wird elektronisches Gerät bei brennbarem Gas betrieben, so droht u. U. Explosionsoder Brandgefahr.
Keinesfalls durch Objektiv oder Sucher in die Sonne blicken.
Beim Betrachten der Sonne oder anderer starker Lichtquellen durch Objektiv oder Sucher droht eine permanente Schädigung des Sehvermögens.
Dem Zugriff von Kindern entziehen.
Es ist unbedingt dafür zu sorgen, dass Kleinkinder keine Batterien oder andere Kleinteile in den Mund nehmen können.
Beim Umgang mit Kamera und Objektiv unbedingt die folgenden Vorsichtmaßnahmen beachten:
•Schützen Sie die Kamera und das Objektiv vor Feuchtigkeit. Andernfalls droht Brandoder Stromschlaggefahr.
•Handhaben oder berühren Sie die Kamera bzw. das Objektiv keinesfalls mit nassen Händen. Andernfalls droht Stromschlaggefahr.
•Bei Gegenlichtaufnahmen nicht das Objektiv gegen die Sonne richten oder das Sonnenlicht direkt durch das Objektiv eintreten lassen. Dies könnte eine Überhitzung der Kamera verursachen und ein Brand könnte die Folge sein.
•Vor einem längeren Nichtgebrauch des Objektivs bringen Sie den vorderen und hinteren Deckel an und bewahren das Objektiv geschützt vor direkter Sonnenlichteinwirkung auf. Andernfalls droht Brandgefahr wegen möglicher Fokussierung von Sonnenlicht durch das Objektiv auf brennbare Gegenstände.
24
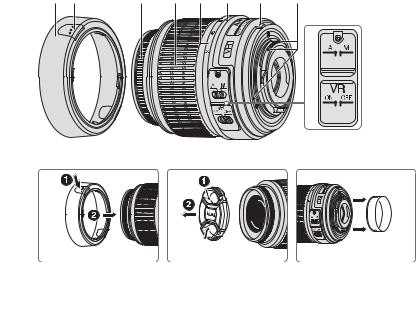
Bezeichnung der Bauteile
( ): Seite mit weiteren Erläuterungen
1Gegenlichtblende* (S. 26)
2GegenlichtblendeMontagetaste (S. 26)
3Entfernungseinstellring
4Zoomring (S. 27)
5Brennweitenskala
6Markierung der Brennweitenskala
7Markierung für die Arretierung (S. 26)
8CPU-Kontakte (S. 29)
|
9 A-M-Umschalter (S. 27) |
De |
|
0 Bildstabilisatorschalter |
|
|
ON/OFF (S. 28) |
25

Wir danken Ihnen für das Vertrauen, das Sie Nikon mit dem Kauf des AF-S DX NIKKOR 18-55 mm 1:3,5-5,6G VR entgegenbringen. DX-NIKKOR-Objektive sind speziell für die Verwendung mit digitalen Nikon-Spiegelreflexkameras mit DX-Bildformat konstruiert, wie etwa die D300 und die D90. Der Bildwinkel des Objektivs entspricht bei Verwendung an einer DX-Format-Kamera dem eines Objektivs mit der ca. 1,5-fachen Brennweite an einer Kleinbildkamera. Machen Sie sich bitte vor dem Einsatz dieses Objektivs mit dem Inhalt dieser Bedienungsanleitung und dem Benutzerhandbuch Ihrer Kamera vertraut.
Hauptmerkmale
• Bei eingeschaltetem Bildstabilisator (VR) können längere Belichtungszeiten (3,0 Stufen*) verwendet werden. Auf diese Weise kann mit längeren Belichtungszeiten fotografiert werden, insbesondere bei Freihandaufnahmen mit längeren Brennweiten. (*Die Wirkung des Bildstabilisators (VR) auf die Belichtungszeit wird gemäß CIPA-Standards ermittelt (Camera and Imaging Products Association); FX-Objektive werden an FX-Format-Kameras gemessen, DX-Objektive an DX-Format-Kameras. Zoomobjektive werden bei der
De längsten Brennweiteneinstellung gemessen.)
•Der Fokussiermechanismus des Objektivs wird von einem Silent Wave Motor angetrieben, so dass die Fokussierung per Autofokus stufenlos, geräuscharm und
praktisch verzögerungsfrei erfolgt. Mit dem A-M- Umschalter 9lässt sich mühelos zwischen Autofokus
(A) und manueller Fokussierung (M) wechseln.
•Die Präzision der Belichtungssteuerung ist besonders hoch, da die Motiventfernungsdaten vom Objektiv an die Kamera übertragen werden.
•Die Verwendung eines asphärischen Objektivs gewährleistet scharfe Bilder ohne Farbrand. Auch die Irisblende mit sieben Lamellen erzeugt eine fast kreisrunde Blendenöffnung. Mit dieser Eigenschaft erscheinen Bereiche außerhalb des Fokus weich und unauffällig.
Anbringen des Objektivs
1 Schalten Sie die Stromversorgung der Kamera aus. 2 Nehmen Sie den hinteren Objektivdeckel ab (Abb. D). 3 Richten Sie die Markierung für die Arretierung 7am
Objektiv und die Markierung für die Arretierung am Kameragehäuse aneinander aus und drehen Sie das Objektiv gegen den Uhrzeigersinn, bis es mit einem Klicken einrastet. Stellen Sie sicher, dass sich das Objektiv in der korrekten Position befindet, wenn sich die Markierung für die Arretierung 7oben auf dem Objektiv befindet.
4 Nehmen Sie den vorderen Objektivdeckel ab (Abb. C).
Abnehmen des Objektivs
Vor dem Abnehmen des Objektivs muss die Kamera unbedingt ausgeschaltet werden. Halten Sie die Objektiventriegelung
gedrückt und drehen Sie das Objektiv im Uhrzeigersinn.
Verwendung der Gegenlichtblende HB-45 1* (Abb. B)
*Sonderzubehör.
Anbringen der Gegenlichtblende
Drücken Sie zum Anbringen der Gegenlichtblende 1leicht auf die Gegenlichtblende-Montagetasten 2. Zum Verstauen bringen Sie
die Gegenlichtblende 1in der umgekehrten Position an.
Abnehmen der Gegenlichtblende
Drücken Sie zum Abnehmen der Gegenlichtblende 1 leicht auf die Gegenlichtblende-Montagetasten 2.
26
Fokussierung, Zoom und Tiefenschärfe
Stellen Sie vor der
Fokussierung mit dem Zoomring 4die
Brennweite so ein, dass Sie im Sucher den gewünschten Bildausschnitt sehen.
Bei Kameras, die mit einer Abblendtaste ausgestattet sind, kann die Tiefenschärfe vor dem Auslösen im Sucher beurteilt werden.
Fokussierung (Abb. A)
Autofokus-Modus
Stellen Sie den Kamera-Fokusmodus auf AF-A, AF-S oder AF-C ein und den A-M-Umschalter 9am Objektiv auf A. Tippen Sie den Auslöser an, um zu fokussieren und drücken Sie dann zur Aufnahme den Auslöser ganz.
Versuchen Sie nicht während des Autofokus den Entfernungseinstellring 3zu drehen.
Manuelle Fokussierung
Stellen Sie den A-M-Umschalter 9am Objektiv auf M. Drehen Sie den Entfernungseinstellring 3zum Fokussieren mit der Hand. Aufnahmen sind möglich, wenn der Kamera-Fokusmodus auf AF oder M eingestellt ist.
|
A-M-Umschalter am |
Kamera-Fokusmodus |
||||
|
Objektiv 9 |
AF |
M |
|||
|
A |
Autofokus |
— |
|||
|
M |
Manueller Fokus |
||||
|
(Fokussierhilfe vorhanden) |
|||||
|
Weitere Informationen zum Kamera-Fokusmodus |
|||||
|
De |
|||||
|
finden Sie im Benutzerhandbuch Ihrer Kamera. |
|||||
Gute Ergebnisse mit dem Autofokus
Schlagen Sie bitte unter »Hinweise zum Gebrauch von Weitwinkelund Superweitwinkel-AF-NIKKOR- Objektiven« (S. 31) nach.
27

Bildstabilisator (VR)
Bei eingeschaltetem Bildstabilisator (VR) können längere Belichtungszeiten (3,0 Stufen*) verwendet werden. Auch Schwenks sind möglich. (*Die Wirkung des Bildstabilisators (VR) auf die Belichtungszeit wird gemäß CIPA-Standards ermittelt (Camera and Imaging Products Association); FX-Objektive werden an FX-Format-Kameras gemessen, DX-Objektive an DX-Format-Kameras. Zoomobjektive werden bei der längsten Brennweiteneinstellung gemessen.)
Einund Ausschalten des Bildstabilisators
1 Stellen Sie den Bildstabilisator-Schalter ON/OFF 0auf ON. Hinweis: Stellen Sie den Schalter 0so ein, dass die Markierung genau an ON ausgerichtet ist.
2 Beim Antippen des Auslösers werden Vibrationen der Kamera nun reduziert. Auch die im Sucher sichtbaren Vibrationen der Kamera werden reduziert, was die
De automatische oder manuelle Fokussierung sowie die exakte Auswahl des Bildausschnitts erleichtert.
3 Um den Bildstabilisator auszuschalten, stellen Sie den Bildstabilisator-Schalter ON/OFF 0auf OFF.
Hinweise zum Bildstabilisator
•Tippen Sie den Auslöser an, warten Sie, bis sich das Bild im Sucher stabilisiert hat, und drücken Sie erst dann den Auslöser ganz nach unten.
•Wenn Sie die Kamera bei einem Schwenk in einem weiten Bogen bewegen, so werden Kameravibrationen in Richtung dieser Bewegung nicht ausgeglichen. Wenn Sie z.B. die Kamera horizontal schwenken, werden Kameravibrationen in vertikaler Richtung reduziert. Dies stabilisiert das Bild und dabei wird der gewünschte Schwenkeffekt erzielt.
•Aufgrund der Eigenschaften des Bildstabilisierungsmechanismus erscheint das Bild im Sucher nach dem Auslösen unter Umständen verschwommen. Dies ist jedoch keine Fehlfunktion.
•Schalten Sie die Kamera nicht aus und nehmen Sie auch nicht das Objektiv von der Kamera ab, solange der Bildstabilisator arbeitet. Andernfalls kann beim Schütteln des Objektivs ein Geräusch zu hören sein, als seien innere Bauteile lose oder gebrochen. Dies ist jedoch keine Fehlfunktion. Schalten Sie die Kamera wieder ein, um das Problem zu beheben.
•Bei Kameras mit integriertem Blitzgerät funktioniert der Bildstabilisator nicht, solange das integrierte Blitzgerät geladen wird.
•Bei Verwendung eines Stativs wird die Verwendung des
Bildstabilisators nicht empfohlen. Stellen Sie den Bildstabilisatorschalter 0in diesem Fall auf »OFF«. Ausnahme:
Bei Verwendung eines Einbeinstativs oder nicht arretierten Stativkopfs sollte der Bildstabilsator aktiviert werden (»ON«).
•Bei Autofokus-Kameras, wie beispielsweise den Modellen der D2-und D300-Serie, die mit einer AF-ON-Taste ausgestattet sind, bewirkt das Drücken der AF-ON-Taste keine Aktivierung des Bildstabilisators.
Blendeneinstellung
Stellen Sie die Blende an der Kamera ein.
Variable Lichtstärke
Beim Verstellen der Brennweite von 18 mm bis auf 55 mm nimmt die Lichtstärke um 11/3 Blendenstufen ab.
Die Kamera kompensiert jedoch jede Blendenänderung durch Anpassen der Belichtungszeit, damit der korrekte Belichtungswert beibehalten wird.
28

Integriertes Blitzgerät und Abschattung
Abschattung tritt auf, wenn die Gegenlichtblende 1 oder – je nach Brennweite und Entfernung – der Objektivtubus einen sichtbaren Schatten ins Motiv wirft.
•Verwenden Sie keine Gegenlichtblende 1, da diese einen Schatten ins Motiv werfen konnte.
•Das integrierte Blitzgerät kann nicht für Entfernungen von unter 0,6 m eingesetzt werden.
|
Digital-SLR-Kameras |
Nutzbare Brennweite/ |
|
|
Entfernung zum Motiv |
||
|
D810, D800-Serie, D750, D700, |
||
|
D610, D600, D7200, D7100, |
||
|
D7000, D5500, D5300, D5200, |
Keine Vignettierung, |
|
|
D5100, D5000, D3300, D3200, |
unabhängig von der |
|
|
D3100, D3000, D300-Serie, |
Brennweite |
|
|
D200, D100, D90, D80, D70- |
||
|
Serie, D60, D50, D40-Serie |
•Die integrierten Blitzgeräte der Serie D100 und D70 eignet sich für Brennweiten ab 20 mm. Bei einer Brennweite von 18 mm werden die Bildecken nicht ausreichend ausgeleuchtet.
•Aktuelle Angaben zur Verschattung mit diesem Objektiv finden Sie im Kamerahandbuch.
Pflege des Objektivs
•Halten Sie die CPU-Kontakte 8stets sauber und schützen Sie sie vor Beschädigung.
•Säubern Sie die Linsenobeflächen mit einem Blasepinsel. Staub und Flecken entfernen Sie mit einem sauberen, weichen Baumwolltuch oder Optik-Reinigungspapier, das Sie mit Ethanol (Alkohol) oder Optikreinigungsflüssigkeit anfeuchten. Wischen Sie in kreisförmigen Bewegungen von der Mitte nach außen, ohne dass Wischspuren zurückbleiben oder Sie andere Teile des Objektivs berühren.
•Verwenden Sie keinesfalls Verdünner oder Benzin zur Reinigung des Objektivs, da dieses zu Beschädigungen führen, ein Feuer auslösen oder Gesundheitsschäden verursachen könnte.
•Zum Schutz der Frontlinse kann ein Klarglasfilter (NC) verwendet werden. Die Gegenlichtblende 1wirkt als zusätzlicher
•Beim Verstauen des Objektivs in seinem flexiblen müssen der
vordere und der hintere Deckel. Das Objektiv lässt sich auch dann verstauen, wenn die Gegenlichtblende 1in der umgekehrten Position angebracht ist.
•Halten oder heben Sie das Objektiv oder die Kamera nicht an der angesetzten Gegenlichblende 1.
•Bei längerer Nichtbenutzung sollte das Objektiv an einem kühlen, trockenen Ort aufbewahrt werden, um Schimmelbildung zu vermeiden. Halten Sie das Objektiv von direkter Sonneneinstrahlung oder Chemikalien wie Kampfer oder Naphthalin fern.
•Halten Sie das Objektiv von Wasser fern, das zur Korrosion und zu Betriebsstörungen führen kann.
•Einige Teile des Objektivs bestehen aus verstärktem Kunststoff. Lassen Sie das Objektiv deshalb nie an übermäßig heißen Orten liegen!
29

Serienmäßiges Zubehör
• Vorderer Objektivdeckel LC-52 mit Schnappverschluss (52 mm)
Sonderzubehör
• 52-mm-Schraubfilter
• Hinterer Objektivdeckel
• Objektivbeutel CL-0815
• Gegenlichtblende HB-45
Nicht geeignetes Zubehör
• Telekonverter (alle Modelle)
• Auto-Ring BR-4 und alle Modelle von AutoZwischenring PK, K-Ring und Balgenvorsatz.
|
• Anschlussring SX-1 |
||
|
De |
Auch anderes Zubehör ist möglicherweise für dieses |
|
|
Objektiv nicht geeignet. Einzelheiten entnehmen Sie |
||
|
bitte der Dokumentation zu dem jeweiligen Zubehör. |
Technische Daten
|
Objektivtyp |
AF-S DX Zoom-NIKKOR-Objektiv Typ G mit |
|
integrierter CPU und Nikon-Bajonettfassung |
|
|
(speziell ausgelegt für den Gebrauch mit |
|
|
Nikon-Spiegelreflexkameras (DX-Format)) |
|
|
Brennweite |
18-55 mm |
|
Maximale |
3,5-5,6 |
|
Blendenöffnung |
|
|
Objektivaufbau |
11 Linsen in 8 Gruppen |
|
(1 asphärisches Linsenelement) |
|
Bildwinkel |
76° bis 28°50´ |
|
Brennweitenskala |
18, 24, 35, 45, 55 mm |
|
Entfernungsdaten |
Werden an Kameras übertragen |
|
Zoomen |
Manuell über separaten Zoomring |
|
Fokussierung |
Autofokus mittels Silent Wave Motor; |
|
manuell über separaten |
|
|
Entfernungseinstellring |
|
|
Bildstabilisator |
Optischer Bildstabilisator mit |
|
beweglicher Linsengruppe; Antrieb |
|
|
durch Schwingspulenmotoren |
Naheinstellgrenze 0,28 m von der Sensorebene gemessen, bei allen Zoompositionen
|
Blende |
Irisblende mit 7 gerundeten |
|
Lamellen |
|
|
Blendenart |
Vollautomatisch |
|
Blendenbereich |
3,5 bis 22 (bei 18 mm), 5,6 bis 36 |
|
(bei 55 mm) |
Belichtungsmessung Offenblendenmessung Filtergewinde 52 mm (P = 0,75 mm) Abmessungen ca. 73 mm (Durchm.) × 79,5 mm
(Länge ab Bajonettauflage)
Änderungen und Irrtümer vorbehalten.
30

Hinweise zum Gebrauch von Weitwinkelund Superweitwinkel-AF-NIKKOR-Objektiven
In den folgenden Fällen funktioniert der Autofokus bei der Aufnahme von Bildern mit AF-NIKKOR-Weitwinkel- und — Superweitwinkelobjektiven u. U. nicht erwartungsgemäß.
EEine Person vor einem weit entfernten Hintergrund
1.Das Hauptmotivelement ist zu klein für das AF-Messfeld
Wenn das Hauptmotiv nur einen geringen Teil des aktiven Fokusmessfelds abdeckt, wie an den Fokusmessfeld-Markierungen in Abb. E zu sehen, stellt die Kamera unter Umständen auf den Hintergrund, nicht jedoch das Hauptmotiv scharf.
2.Das Motiv weist eine Struktur aus zahlreichen kleinen Elementen auf
Bei Motiven mit kleinteiliger Strukturierung oder geringem Kontrast, zum Beispiel einer Blumenwiese De wie in Abb. F zu sehen, ist eine Fokussierung per Autofokus u. U. schwierig.
Lösungsmöglichkeiten für solche Fälle
(1)Fokussieren Sie zunächst auf ein anderes Motiv im selben Abstand von der Kamera, nutzen Sie den Autofokusmesswertspeicher, wählen den gewünschten Bildausschnitt und machen Sie so die Aufnahme.
(2)Aktivieren Sie die manuelle Fokussierung und
stellen Sie von Hand auf das Motiv scharf. Näheres zu diesem Thema finden Sie außerdem unter »Gute Ergebnisse mit dem Autofokus« in der
Benutzerhandbuch zur Kamera.
31

Remarques concernant une utilisation en toute sécurité
 ATTENTION
Ne pas démonter
Le fait de toucher aux pièces internes de l’appareil ou de l’objectif pourrait entraîner des blessures. Les réparations doivent être effectuées par des techniciens qualifiés. Si l’appareil ou l’objectif est cassé suite à une chute ou un autre accident, apportez le produit dans un centre de service agréé Nikon pour le faire vérifier après avoir débranché le produit et retiré les piles.
En cas de dysfonctionnement, éteignez l’appareil immédiatement
Si vous remarquez de la fumée ou une odeur inhabituelle se dégageant de l’appareil photo ou de l’objectif, retirez immédiatement les piles, en prenant soin de ne pas vous brûler.
Fr Continuer d’utiliser son matériel peut entraîner des blessures. Après avoir retiré ou débranché la source d’alimentation, confiez le produit à un centre de service agréé Nikon pour le faire vérifier.
N’utilisez pas l’appareil photo ou l’objectif en présence de gaz inflammable
L’utilisation de matériel électronique en présence de gaz inflammable risquerait de provoquer une explosion ou un incendie.
Ne regardez pas le soleil dans l’objectif ou le viseur
Regarder le soleil ou toute autre source lumineuse violente dans l’objectif ou le viseur peut provoquer de graves lésions oculaires irréversibles.
Tenir hors de portée des enfants
Faites extrêmement attention à ce que les enfants ne mettent pas à la bouche les piles ou d’autres petites pièces.
Observez les précautions suivantes lorsque vous manipulez l’appareil et l’objectif
•Maintenez l’appareil photo et l’objectif au sec. Le nonrespect de cette précaution peut provoquer un incendie ou une électrocution.
•Ne manipulez pas et ne touchez pas l’appareil photo ou l’objectif avec les mains humides. Le non-respect de cette précaution peut provoquer une électrocution.
•Lors d’une prise de vue à contre-jour, ne dirigez pas l’objectif vers le soleil et évitez que les rayons du soleil pénètrent dans l’objectif ; l’appareil photo pourrait chauffer à l’excès, ce qui risquerait de provoquer un incendie.
•Lorsque vous n’utilisez pas l’objectif pendant une période prolongée, fixez les bouchons avant et arrière, et rangez l’objectif à l’abri de la lumière directe du soleil. Le non-respect de cette précaution peut provoquer un incendie, car l’objectif peut concentrer la lumière du soleil sur un objet inflammable.
32

|
Nomenclature |
||||||
|
1 2 |
3 |
4 |
5 |
6 |
7 |
8 |
9

0

A
( ) : page de référence
1Parasoleil* (P. 34)
2Bouton de fixation du parasoleil (P. 34)
3Bague de mise au point
4Bague de zoom (P. 35)
5Echelle des focales
6Repère des focales
7Repère de montage (P. 34)
8Contacts CPU (P. 37)
9Commutateur de mode A-M
(P. 35)
0 Commutateur ON/OFF de Fr réduction de vibration (P. 36)
33

Nous vous remercions d’avoir choisi l’objectif AF-S DX NIKKOR 18-55mm f/3,5-5,6G VR. Les objectifs DX Nikkor sont spécialement conçus pour les reflex numériques Nikon (format Nikon), notamment ceux des séries D300 et D90. Une fois monté sur des appareils photo au format Nikon DX, l’angle de champ de l’objectif est environ égal à 1,5× la focale en format 24 × 36 mm. Avant d’utiliser cet objectif, veuillez lire ces instructions et vous reporter au Manuel d’utilisation de l’appareil photo.
Principales caractéristiques
•Lorsque vous activez la réduction de vibration (VR), il est possible de prendre des photos à des vitesses d’obturation réduites (3,0 valeurs*). Vous augmentez ainsi la plage des vitesses d’obturation et des positions de zoom disponibles, notamment lorsque vous tenez l’appareil photo en main. (*Les effets de la fonction VR sur la vitesse d’obturation sont mesurés selon les normes de la CIPA (Camera and Imaging Products Association) ; les mesures des objectifs de format FX sont effectuées avec des appareils photo numériques de
|
format FX, celles des objectifs de format DX avec des appareils |
|
|
photo de format DX. Les zooms sont réglés sur leur focale |
|
|
Fr |
maximale lorsque les mesures sont effectuées.) |
•Cet objectif utilise un moteur silencieux SWM pour entraîner le mécanisme de mise au point, permettant un autofocus
régulier, silencieux et presque instantané. Le commutateur de mode A-M 9sert à sélectionner facilement les modes autofocus (A) et mise au point manuelle (M).
•Un contrôle d’exposition plus précis est possible, parce que l’information de distance au sujet est transférée de l’objectif au boîtier.
•L’utilisation d’un éléments d’objectif asphérique garantit des images nettes pratiquement exemptes d’aberration chromatique. En outre le diaphragme à sept lamelles offre une ouverture pratiquement circulaire, ce qui atténue et rend pratiquement imperceptibles les zones de l’image qui sont floues.
Fixation de l’objectif
1 Éteignez l’appareil photo.
2 Ôtez le bouchon d’objectif arrière (Fig. D).
3 Alignez le repère de montage 7de l’objectif sur le repère de montage du boîtier et tournez l’objectif dans le sens inverse des aiguilles d’une montre jusqu’au déclic de mise en place. Assurez-vous que l’objectif est correctement positionné lorsque le repère de montage 7se trouve au-dessus de l’objectif.
4Ôtez le bouchon d’objectif avant. (Fig. C)
Retrait de l’objectif
Mettez l’appareil photo hors tension avant de retirer l’objectif. Maintenez enfoncée la commande de déverrouillage de l’objectif située sur l’appareil photo tout en faisant pivoter l’objectif dans le sens des aiguilles d’une montre.
Utilisation du parasoleil HB-45 1* (Fig. B)
*Optionnel.
Fixation du parasoleil
Pincez légèrement le bouton de fixation du parasoleil 2lorsque vous le fixez 1. Pour ranger l’objectif, fixez
le parasoleil 1à l’envers.
Démontage du parasoleil
Pincez légèrement le bouton de fixation du parasoleil 2lorsque vous le retirez 1.
34
 Loading…
 Loading…
 Модель: Фотообъектив Nikon AF-S DX Nikkor 18-55mm f/3.5-5.6G VR
Количество страниц: 104
Язык: Jp, En, De, Fr, Es, Sv, Ru, Nl, It, Cz, Sk, Ck, Ch, Kr
Формат: pdf
Размер: 3.1 Mb
Описание:
Популярный зум-объектив с высококачественной оптикой, предназначенный для использования с зеркальными фотокамерами Nikon формата DX. Возможность трехкратного зуммирования обеспечивает превосходную съемку в любой ситуации. Объектив Nikon AF-S DX Nikkor 18-55mm f/3.5-5.6G VR оснащен бесшумным ультразвуковым мотором (SWM), который является эксклюзивной разработкой Nikon и обеспечивает бесшумную автофокусировку.
Содержание
- Примечания по безопасности использования.
- Обозначения на иллюстрации.
- Основные возможности.
- Установка объектива.
- Снятие объектива.
- Использование бленды объектива HB-45.
- Установка бленды.
- Снятие бленды.
- Фокусировка, увеличение и глубина резкости.
- Фокусировка.
- Режим автофокусировки.
- Ручной режим фокусировки.
- Получение хороших результатов съемки с использованием автофокусировки.
- Режим подавления вибраций (VR).
- Установка переключателя подавления вибраций в положение включения и выключения.
- Примечания по использованию подавления вибраций.
- Установка диафрагмы.
- Изменение максимального значения диафрагмы.
- Съемка фотографий с использованием фотоаппаратов со встроенной вспышкой.
- Уход за объективом.
- Стандартные принадлежности.
- Дополнительные принадлежности.
- Несовместимые принадлежности.
- Технические характеристики.
- Примечания по использованию широкоугольных объективов AF Nikkor.
- 1. Если главный объект съемки, находящийся в рамках фокуса, относительно малого размера на изображении.
- 2. Если основной объект съемки является ярким, узорчатым объектом или экспозицией.
- Способы действий в подобных ситуациях.
Скачать: disk.yandex.ru | mega.co.nz
- Инструкции и руководства
- Бренды
- Nikon
- AF-S Nikkor 18-55 mm f/ 3.5-5.6 G VR DX Lens
- Инструкции По Обслуживанию

使用説明書
P. 2-11
Jp
User’s Manual
PP. 12-19
En
Benutzerhandbuch
S. 20-27
De
Manuel de l’utilisateur
P. 28-35
Fr
Manual del Usuario
PP. 36-43
Es
Anvädarhandbok
S. 44-51
Se
Pykoводство пользoвaтеля
СТР
. 52-59
Ru
Gebruikshandleiding
P. 60-67
Nl
Manuale d’uso
PP. 68-75
It
P. 76-85
Ck
P. 86-93
Ch
P. 94-103
Kr
AF-S DX NIKKOR
18-105mm f/3.5-5.6 ED VR

237
Объектив AF-S DX NIKKOR 18–55 мм f/3,5–5,6G VR
Для наглядности в настоящем руководстве представлен объектив AF-S DX NIKKOR
18–55 мм f/3,5–5,6G VR.
Объектив AF-S DX NIKKOR 18–55 мм f/3,5–5,6G VR предназначен исключительно для
использования с цифровыми фотокамерами Nikon формата DX. С данным объективом
при изменении зума может измениться максимальная диафрагма на величину до 1
1
/
3
EV.
Однако фотокамера автоматически учитывает это при установке экспозиции, и после
настройки зума не требуется никаких изменений настроек фотокамеры.
D
Уход за объективом
• Не допускайте загрязнения контактов микропроцессора.
• Пользуйтесь грушей для удаления пыли и пуха с поверхности объектива. Для удаления пятен и
отпечатков пальцев нанесите небольшое количество этанола или жидкости для чистки
объективов на мягкую чистую хлопчатобумажную ткань или салфетку для чистки объективов и
протрите объектив круговыми движениями от центра к краям, соблюдая осторожность, не
оставляя разводов и не касаясь стекла пальцами.
• Для чистки объектива не используйте органические растворители, такие как растворитель для
краски или бензин.
• Для защиты линзы объектива можно пользоваться блендами объектива или фильтрами NC.
• Закройте переднюю и заднюю крышки перед тем, как положить объектив в мягкий футляр.
• При установленной на объективе бленде не поднимайте и не держите объектив или
фотокамеру только за бленду.
• Если объектив не будет использоваться в течение длительного времени, храните его в
прохладном, сухом месте, чтобы предотвратить образование плесени и коррозии. Не храните
его под прямым солнечным светом, вместе с нафталиновыми или камфорными средствами от
моли.
• Не допускайте попадания воды на объектив. Коррозия внутреннего механизма может нанести
изделию неисправимые повреждения.
• Не оставляйте объектив в местах с повышенной температурой, так как это может повредить
или деформировать части, сделанные из усиленной пластмассы.
Шкала фокусного расстояния
Метка фокусного расстояния
Переключатель режимов A-M (
0 15, 40)
Переключатель подавления вибраций (
0 238)
Метка крепления
Задняя защитная крышка
Крышка объектива
Кольцо фокусировки (
0 40, 100)
Контакты микропроцессора
(
0 200)
Кольцо зуммирования (
0 23)
