
VQT4K77
M0712KZ0
Инструкция по эксплуатации для
улучшения характеристик
Цифровая фотокамера
Модель №.
DMC-LZ20
Перед использованием прочтите, пожалуйста, эту инструкцию
полностью.
ENGLISH
Basic Operating
Instructions
Digital Camera
DMC-LZ20
Model No.
Please read these instructions carefully
before using this product, and save this
manual for future use.
More detailed instructions on the operation of this
camera are contained in «Operating Instructions
for advanced features (PDF format)» in the
supplied CD-ROM. Install it on your PC to read it.
Web Site: http://www.panasonic-europe.com
EU
Pursuant to at the directive 2004/108/EC, article 9(2)
Panasonic Testing Centre
Panasonic Marketing Europe GmbH
Winsbergring 15, 22525 Hamburg, Germany
Web Site: http://panasonic.net
© Panasonic Corporation 2012
VQT4K50-1
E
M0712KZ1082
Dear Customer,
We would like to take this opportunity to thank you for purchasing this Panasonic
Digital Camera. Please read these Operating Instructions carefully and keep them
handy for future reference. Please note that the actual controls and components,
menu items, etc. of your Digital Camera may look somewhat different from those
shown in the illustrations in these Operating Instructions.
Carefully observe copyright laws.
• Recording of pre-recorded tapes or discs or other published or broadcast
material for purposes other than your own private use may infringe copyright
laws. Even for the purpose of private use, recording of certain material may be
restricted.
Information for Your Safety
WARNING:
To reduce the risk of fire, electric shock or product damage,
• Do not expose this unit to rain, moisture, dripping or splashing.
• Use only the recommended accessories.
• Do not remove covers.
• Do not repair this unit by yourself. Refer servicing to qualified
service personnel.
■
About the batteries
CAUTION
• Danger of explosion if battery is incorrectly replaced. Replace only
with the type recommended by the manufacturer.
• When disposing the batteries, please contact your local authorities
or dealer and ask for the correct method of disposal.
• Do not heat or expose to flame.
• Do not leave the battery(ies) in a car exposed to direct sunlight for a
long period of time with doors and windows closed.
■
Cautions for use
• Do not use any other AV cables except the supplied one.
• Do not use any other USB connection cables except the supplied one.
Keep this unit as far away as possible from electromagnetic equipment (such
as microwave ovens, TVs, video games etc.).
• If you use this unit on top of or near a TV, the pictures and/or sound on this unit
may be disrupted by electromagnetic wave radiation.
• Do not use this unit near cell phones because doing so may result in noise
adversely affecting the pictures and/or sound.
• Recorded data may be damaged, or pictures may be distorted, by strong
magnetic fields created by speakers or large motors.
• Electromagnetic wave radiation generated by microprocessors may adversely
affect this unit, disturbing the pictures and/or sound.
• If this unit is adversely affected by electromagnetic equipment and stops
functioning properly, turn this unit off and remove the battery. Then reinsert the
battery and turn this unit on.
Do not use this unit near radio transmitters or high-voltage lines.
• If you record near radio transmitters or high-voltage lines, the recorded pictures
and/or sound may be adversely affected.
■
For the United Kingdom and Ireland customers
(Sales and Support Information)
Customer Communications Centre
• For customers within the UK: 0844 844 3899
• For customers within Ireland: 01 289 8333
• For further support on your product, please visit our website:
www.panasonic.co.uk
Direct Sales at Panasonic UK
• Order accessory and consumable items for your product with ease and
confidence by phoning our Customer Communications Centre
Monday–Thursday 9:00 a.m.–5:30 p.m.,
Friday 9:30 a.m.–5:30 p.m. (Excluding public holidays)
• Or go on line through our Internet Accessory ordering application at
www.pas-europe.com.
• Most major credit and debit cards accepted.
• All enquiries transactions and distribution facilities are provided directly by
Panasonic UK.
• It couldn’t be simpler!
• Also available through our Internet is direct shopping for a wide range of finished
products. Take a browse on our website for further details.
Information for Users on Collection and Disposal of Old
Equipment and used Batteries
These symbols on the products, packaging, and/or
accompanying documents mean that used electrical and
electronic products and batteries should not be mixed with
general household waste.
For proper treatment, recovery and recycling of old
products and used batteries, please take them to
applicable collection points, in accordance with your
national legislation and the Directives 2002/96/EC and
2006/66/EC.
By disposing of these products and batteries correctly,
you will help to save valuable resources and prevent
any potential negative effects on human health and
the environment which could otherwise arise from
inappropriate waste handling.
For more information about collection and recycling of
old products and batteries, please contact your local
municipality, your waste disposal service or the point of
sale where you purchased the items.
Penalties may be applicable for incorrect disposal of this
waste, in accordance with national legislation.
For business users in the European Union
If you wish to discard electrical and electronic equipment,
please contact your dealer or supplier for further
information.
[Information on Disposal in other Countries outside
the European Union]
These symbols are only valid in the European Union. If
you wish to discard these items, please contact your local
authorities or dealer and ask for the correct method of
disposal.
Note for the battery symbol (bottom two symbol
examples):
This symbol might be used in combination with a chemical
symbol. In this case it complies with the requirement set
by the Directive for the chemical involved.
Cd
Standard accessories
Check that all the accessories are supplied before using the camera.
Batteries
Shoulder strap
• LR6/AA
VFC4903
Alkaline batteries
Lens Cap/
USB connection
Lens Cap String
cable
VYQ8058
K1HY08YY0030
CD-ROM *
AV cable
VFF1056
K1HY08YY0029
• Consult the dealer or your nearest Service Centre if you lose
the supplied accessories. (You can purchase the accessories
separately.)
• Please dispose of all packaging appropriately.
• Keep small parts in a safe place out of the reach of children.
*
The software compatible with your PC will be installed.
– PHOTOfunSTUDIO (Windows XP/Vista/7)
– LoiLoScope 30 day full trial version (Windows XP/Vista/7)
(This will only install a shortcut to the trial version download site.)
Inserting the card (optional)/the batteries
Open the card/battery door
Insert the batteries or card
• Make sure that their orientation is correct.
■
Usable batteries
• LR6/AA Alkaline batteries
• HR6/AA Rechargeable Ni-MH (nickel metal hydride) batteries
●
Do not use batteries other than those listed above.
■
Recording capacity guidelines
Fully-charged Panasonic
Supplied batteries or
Ni-MH batteries
optional Panasonic
(optional, when the battery
alkaline batteries
capacity is 1900 mAh)
Number of recordable
Approx. 380 pictures
Approx. 540 pictures
pictures
Recording time
Approx. 190 min.
Approx. 270 min.
Playback time
Approx. 430 min.
Approx. 560 min.
Please note that the performance of alkaline batteries significantly
decreases in low temperature conditions.
●
Recording conditions by CIPA standard
●
Keep the Memory Card out of reach of children to prevent swallowing.
Specifications
Specifications are subject to change without notice.
Power Source
DC 6 V
LR6/AA Alkaline batteries (4)
DC 4.8 V HR6/AA Rechargeable Ni-MH
(nickel metal hydride) batteries (4)
Power
When recording: 1.6 W
Consumption
When playing back: 1.0 W
Camera
16,100,000 pixels
effective pixels
Lens
Optical 21× zoom
f=4.5 mm to 94.5 mm
(35 mm film camera equivalent: 25 mm to 525 mm)/
F3.1 (Max. Wide) to F5.8 (Max. Tele)
Image Stabiliser Optical method
LCD monitor
3.0″ TFT LCD (4:3) (Approx. 460,800 dots)
(field of view ratio about 100%)
Flash
Flash range: (ISO AUTO) Approx. 0.6 m (2.0 feet)
to 6.8 m (22 feet) (Max. Wide)
Microphone/
Monaural
Speaker
Operating environment of PHOTOfunSTUDIO 8.2 LE
Windows XP
Windows Vista
Windows 7
OS
(32 bit) SP3
(32 bit) SP2
(32 bit/64 bit) and SP1
CPU
Pentium III 500 MHz or higher Pentium III 800 MHz or higher
Pentium III 1 GHz or higher
1 GB or more (32 bit)
RAM
512 MB or more
2 GB or more (64 bit)
• Free hard disk space: 450 MB or more for installing software
■
Optional Accessories
• SDXC Memory Card
[Class 10] 64 GB RP-SDU64GE1K
• SDHC Memory Card
[Class 10] 32 GB RP-SDA32GE1K/
8 GB RP-SDA08GE1K/
RP-SDU32GE1K/
RP-SDU08GE1K/
RP-SDRA32GEK
RP-SDRA08GEK
16 GB RP-SDA16GE1K/
4 GB RP-SDU04GE1K/
RP-SDU16GE1K/
RP-SDRA04GEK
RP-SDRA16GEK
[Class 4] 16 GB RP-SDNA16GEK
8 GB RP-SDNA08GEK
4 GB RP-SDNA04GEK
• SD Memory Card
[Class 4]
2 GB RP-SDNA02GEK
• Some optional accessories may not be available in some countries.
Names and Functions of Main Parts
The clock is not set when the camera is shipped. Set the date and
time before using the camera.
■
Taking pictures
1. Power button
Use this to turn the camera
on and off.
2. Shutter button
Use this to focus and record
We recommend using the
pictures.
supplied shoulder strap to
avoid dropping the camera.
to focus
to record
3. Mode dial
2
1 3
4
Use this to select the recording
mode.
4. Flash
5. Zoom lever
6. Microphone
7. Speaker
• Do not cover the speaker with
your fingers.
5
7 12
■
Viewing your pictures
6
8. Playback button
Press the Playback button
Press
to select the picture
• Press [ ] to delete the
displayed picture.
9. Cursor button
10. [DISP.] button
11. [Q.MENU] / [ ] (Delete) /
[ ] (Cancel) button
12. [AV OUT/DIGITAL] socket
8
9 10 11
Recording
Built-in Memory (Approx. 100 MB) /
media
SD Memory Card / SDHC Memory Card /
SDXC Memory Card
Recording file
JPEG (still picture)
format
QuickTime Motion JPEG (motion pictures with audio)
Interface
Digital
USB 2.0 (High Speed)
Data from the PC can not be written to the camera
using the USB connection cable.
Analogue video NTSC / PAL Composite (Switched by menu)
Audio
Audio line output (Monaural)
Terminal
AV OUT/DIGITAL: Dedicated jack (8 pin)
Dimensions
Approx. 119.1 mm (W) × 76.5 mm (H) × 79.8 mm (D)
[4.69″ (W) × 3.02″ (H) × 3.14″ (D)]
(excluding the projection part)
Mass
With card and batteries: Approx. 499 (1.1 lb)
Excluding card and batteries: Approx. 390 (0.86 lb)
Operating
0 °C to 40 °C (32 °F to 104 °F)
temperature
(Operating humidity: 10%RH to 80%RH)
Owner’s Manual for advanced features
Digital Camera
Model No. DMC-LZ20
Before connecting, operating or adjusting this product, please read the instructions completely.
Register online at www.panasonic.com/register
(U.S. customers only)

|
Contents |
|
|
Before use |
|
|
Before use…………………………………………………………………………………………………………. |
6 |
|
Standard Accessories………………………………………………………………………………………… |
8 |
|
Names and Functions of Main Parts……………………………………………………………………. |
9 |
|
Cursor button …………………………………………………………………………………………………………………… |
11 |
|
Attaching the lens cap/shoulder strap………………………………………………………………. |
12 |
|
Attaching the lens cap ………………………………………………………………………………………………………. |
12 |
|
Attaching the shoulder strap ………………………………………………………………………………………………. |
13 |
|
Preparations |
|
|
About the batteries…………………………………………………………………………………………… |
14 |
|
Inserting and removing the batteries ………………………………………………………………… |
15 |
|
Remaining battery…………………………………………………………………………………………………………….. |
17 |
|
Guidelines for number of recordable pictures and operating time ……………………………………………. |
17 |
|
Inserting and removing the card (optional) ……………………………………………………….. |
19 |
|
About built-in memory/cards…………………………………………………………………………….. |
21 |
|
Picture save destination (cards and built-in memory)…………………………………………………………….. |
21 |
|
Recording capacity guidelines (pictures/recording time)…………………………………………………………. |
22 |
|
Setting the clock………………………………………………………………………………………………. |
23 |
|
To change time setting………………………………………………………………………………………………………. |
24 |

|
Contents |
|
|
Basics |
|
|
Sequence of operations……………………………………………………………………………………. |
25 |
|
Taking pictures with your own settings [Program AE] Mode……………………………… |
28 |
|
Adjusting focus ……………………………………………………………………………………………….. |
29 |
|
Taking pictures with automatic settings [Intelligent Auto] Mode ……………………….. |
30 |
|
About flash………………………………………………………………………………………………………………………. |
30 |
|
Automatic Scene Detection………………………………………………………………………………………………… |
31 |
|
[AF Tracking]……………………………………………………………………………………………………………………. |
32 |
|
[Intelligent Auto] Mode restrictions………………………………………………………………………………………. |
33 |
|
Taking motion pictures [Motion Picture] Mode …………………………………………………. |
34 |
|
Viewing your pictures [Normal Play]………………………………………………………………… |
36 |
|
Zooming in and viewing “Playback Zoom”……………………………………………………………………………. |
37 |
|
Viewing a list of pictures “Multi Playback”…………………………………………………………………………….. |
37 |
|
Viewing pictures by their recording date “Calendar Playback”…………………………………………………. |
38 |
|
Viewing motion pictures…………………………………………………………………………………………………….. |
39 |
|
Deleting pictures ……………………………………………………………………………………………… |
40 |
|
To delete multiple (up to 50)/To delete all pictures…………………………………………………………………. |
41 |
|
Setting the menu ……………………………………………………………………………………………… |
42 |
|
Menu type ……………………………………………………………………………………………………………………….. |
43 |
|
Using Quick menu…………………………………………………………………………………………………………….. |
44 |
|
Using the [Setup] menu……………………………………………………………………………………. |
45 |
|
[Battery]…………………………………………………………………………………………………………………………… |
45 |
|
[Clock Set]……………………………………………………………………………………………………………………….. |
45 |
|
[Beep]……………………………………………………………………………………………………………………………… |
45 |
|
[Volume]………………………………………………………………………………………………………………………….. |
45 |
|
[LCD Display]…………………………………………………………………………………………………………………… |
45 |
|
[LCD Mode]……………………………………………………………………………………………………………………… |
46 |
|
[Histogram]………………………………………………………………………………………………………………………. |
47 |
|
[Economy]……………………………………………………………………………………………………………………….. |
47 |
|
[Auto Review]…………………………………………………………………………………………………………………… |
48 |
|
[Reset]…………………………………………………………………………………………………………………………….. |
48 |
|
[Output] …………………………………………………………………………………………………………………………… |
48 |
|
[Version Disp.]………………………………………………………………………………………………………………….. |
49 |
|
[Format]…………………………………………………………………………………………………………………………… |
49 |
|
[Language]………………………………………………………………………………………………………………………. |
49 |

|
Contents |
|
|
Application (Record) |
|
|
Changing recording information display…………………………………………………………… |
50 |
|
Using Zoom……………………………………………………………………………………………………… |
51 |
|
Zoom types and use………………………………………………………………………………………………………….. |
52 |
|
Taking pictures with flash…………………………………………………………………………………. |
53 |
|
Taking close-up pictures ………………………………………………………………………………….. |
57 |
|
Focus range…………………………………………………………………………………………………………………….. |
58 |
|
[Macro Zoom]…………………………………………………………………………………………………………………… |
59 |
|
Taking pictures with self-timer………………………………………………………………………….. |
60 |
|
Taking pictures with Exposure Compensation…………………………………………………… |
61 |
|
[Auto Bracket]…………………………………………………………………………………………………………………… |
62 |
|
Determine aperture and shutter speed and record [Manual Exposure] Mode …….. |
63 |
|
Taking pictures of people [Portrait] Mode…………………………………………………………. |
64 |
|
Taking pictures of scenery [Scenery] Mode ……………………………………………………… |
65 |
|
Taking pictures of sporting events [Sports] Mode…………………………………………….. |
66 |
|
Taking pictures according to the scene [Scene Mode]………………………………………. |
67 |
|
[Panorama Shot]………………………………………………………………………………………………………………. |
68 |
|
[Night Portrait]………………………………………………………………………………………………………………….. |
70 |
|
[Night Scenery]…………………………………………………………………………………………………………………. |
70 |
|
[Food]……………………………………………………………………………………………………………………………… |
71 |
|
[Baby]……………………………………………………………………………………………………………………………… |
71 |
|
[Sunset]…………………………………………………………………………………………………………………………… |
72 |
|
[High Sens.]……………………………………………………………………………………………………………………… |
72 |
|
Using the [Rec] menu……………………………………………………………………………………….. |
73 |
|
[Picture Size]……………………………………………………………………………………………………………………. |
73 |
|
[Quality]…………………………………………………………………………………………………………………………… |
74 |
|
[Rec Quality] ……………………………………………………………………………………………………………………. |
74 |
|
[Sensitivity]………………………………………………………………………………………………………………………. |
75 |
|
[White Balance]………………………………………………………………………………………………………………… |
76 |
|
[AF Mode]………………………………………………………………………………………………………………………… |
78 |
|
[Continuous AF]………………………………………………………………………………………………………………… |
79 |
|
[i.Exposure]……………………………………………………………………………………………………………………… |
79 |
|
[Digital Zoom]…………………………………………………………………………………………………………………… |
79 |
|
[Burst]……………………………………………………………………………………………………………………………… |
80 |
|
[Color Mode]…………………………………………………………………………………………………………………….. |
81 |
|
[AF Assist Lamp]………………………………………………………………………………………………………………. |
81 |
|
[Red-Eye Removal]…………………………………………………………………………………………………………… |
82 |
|
[Stabilizer] ……………………………………………………………………………………………………………………….. |
82 |
|
[Date Stamp]……………………………………………………………………………………………………………………. |
83 |
|
[Clock Set]……………………………………………………………………………………………………………………….. |
83 |

|
Contents |
|
|
Application (View) |
|
|
Different playback methods [Playback Mode] |
…………………………………………………… 84 |
|
[Slide Show]…………………………………………………………………………………………………………………….. |
85 |
|
[Category Selection]………………………………………………………………………………………………………….. |
86 |
|
[Calendar]………………………………………………………………………………………………………………………… |
86 |
|
Using the [Playback] menu……………………………………………………………………………….. |
87 |
|
[Resize]…………………………………………………………………………………………………………………………… |
87 |
|
[Cropping]………………………………………………………………………………………………………………………… |
89 |
|
[Protect]…………………………………………………………………………………………………………………………… |
90 |
|
[Copy]……………………………………………………………………………………………………………………………… |
91 |
|
Connecting with other devices |
|
|
Viewing on TV screen ………………………………………………………………………………………. |
92 |
|
Using with your PC…………………………………………………………………………………………… |
94 |
|
Using the supplied software……………………………………………………………………………………………….. |
95 |
|
Installing supplied software (PHOTOfunSTUDIO)…………………………………………………………………. |
96 |
|
Copying still pictures and motion pictures…………………………………………………………………………….. |
97 |
|
Printing……………………………………………………………………………………………………………. |
99 |
|
Printing multiple pictures………………………………………………………………………………………………….. |
100 |
|
Making print settings on the camera………………………………………………………………………………….. |
101 |
|
Print with date and text…………………………………………………………………………………………………….. |
102 |
|
Others |
|
|
List of LCD monitor displays…………………………………………………………………………… |
103 |
|
Message displays…………………………………………………………………………………………… |
105 |
|
Q&A Troubleshooting ……………………………………………………………………………………. |
107 |
|
Usage cautions and notes……………………………………………………………………………….. |
113 |
|
Specifications…………………………………………………………………………………………………. |
118 |
■How to read this document
●Recording mode icons
Recording mode: 


|
Available recording modes |
Unavailable recording modes |
 Before use
■Camera handling
Keep the camera away from excessive vibration, force, or pressure.
●Avoid using the camera under the following conditions, which may damage the lens, LCD monitor, or camera body. This may also cause the camera to malfunction or prevent recording.
• Dropping or hitting the camera against a hard surface
• Pushing with excessive force on the lens or LCD monitor
• When carrying or using the playback feature, ensure that the lens is in the stored position, with lens cap on.
The camera is not dust resistant, splash resistant, or waterproof.
Avoid using the camera in places with excessive dust or sand, or where water can come into contact with the camera.
●Avoid using the camera under the following conditions, which present a risk that sand, water, or foreign material may enter the camera through the lens or openings around buttons. Be especially careful, because these conditions may damage the camera and such damage may not be repairable.
•In extremely dusty or sandy places
•In the rain or by the shore, where the camera may be exposed to water
■Condensation (When the lens or the LCD monitor is fogged up)
●Condensation may occur when the camera is exposed to sudden changes of temperature or humidity. Avoid these conditions, which may make the lens or LCD monitor dirty,
cause mold, or damage the camera.
●If condensation does occur, turn off the camera and wait about two hours before using it. Once the camera adjusts to the surrounding temperature, the fogging will clear naturally.

Before use
■Always take a test shot first
Before important events when you will use the camera (at weddings, for example), always take a test shot to make sure that pictures and sound record correctly.
■No compensation for missed shots
We cannot compensate for missed shots if technical problems with the camera or card prevent recording.
■Carefully observe copyright laws
Unauthorized use of recordings which contain works with copyright for purposes other than personal use is prohibited under copyright law. Recording of certain material may be restricted even for the purpose of personal use.
■Also refer to “Usage cautions and notes” (→113)

 Standard Accessories
Check that all the accessories are supplied before using the camera.
●The accessories and their shape may differ depending on the country or area where the camera was purchased.
For details on the accessories, refer to Basic Owner’s Manual.
●LR6/AA alkaline batteries or HR6/AA rechargeable Ni-MH (nickel metal hydride) batteries is indicated as battery (or batteries) in the text.
●SD Memory Card, SDHC Memory Card and SDXC Memory Card are indicated as card in the text.
●Please dispose of all packaging appropriately.
●Keep small parts in a safe place out of the reach of children.
■Optional accessories
•Cards are optional. You can record or play back pictures on the built-in memory when you are not using a card.
•If any accessories are lost, customers should contact Panasonic’s parts department at 1-800-833-9626 for further information about obtaining replacement parts.

 Names and Functions of Main Parts
|
1 |
1 |
Self-timer indicator (→60) / |
|
|
AF Assist Lamp (→26, 81) |
|||
|
2 |
2 |
Flash (→26, 53) |
|
|
3 |
Lens |
||
3
|
4 |
5 |
4 |
LCD monitor (→50, 103, 104) |
|
5 |
[EXPOSURE] button (→63) |
||
|
Operate this when setting the shutter |
|||
|
speed or aperture value (only in the |
|||
|
mode). |
|||
|
6 |
Playback button (→27, 36, 84) |
||
|
6 |
Use this to switch to playback mode. |
77 Cursor button (→11)
8 [DISP.] button (→50) Use this to change display.
9 [Q.MENU] / [ ] / [
] / [ ] button
In the recording mode:
Quick menu is displayed. (→44) 8 9 In the playback mode:
Pictures are deleted. (→40) During menu operations: Previous screen is restored. (→42)
●The illustrations and screens in this manual may differ from the actual product.

|
Names and Functions of Main Parts |
|||
|
10 |
11 |
10 |
Flash open button (→53) |
|
11 |
Shoulder strap eyelet (→13) |
||
|
12 |
Lens barrel |
||
|
13 |
Speaker (→45) |
||
|
14 |
[AV OUT/DIGITAL] socket |
12 13 14
[AV OUT/DIGITAL] socket
(→92, 97, 99)
●Some methods of holding the camera may block the speaker, making it difficult to hear the beep, etc.

|
Names and Functions of Main Parts |
|||
|
15 |
16 17 |
15 |
Microphone (→26, 34) |
|
16 |
Mode dial (→25) |
||
|
Use this to select the recording |
|||
|
mode. |
|||
|
18 |
17 |
Zoom lever (→51) |
|
|
Operate this when zooming in on a |
|||
|
distant subject to record it larger. |
|||
|
18 |
Shutter button (→26, 28, 34) |
||
|
Use this to focus and record still and |
|||
|
motion pictures. |
|||
|
19 |
Power button (→23, 25) |
||
|
19 |
Use this to turn the camera on and |
||
|
off. |
|||
|
20 |
21 |
||
|
20 |
Tripod Mount (→117) |
||
|
Do not attach to a tripod with a |
|||
|
5.5 mm (0.22”) or longer screw. |
|||
|
Doing so may damage this unit. |
|||
|
21 |
Release lever (→15, 19) |
||
|
22 |
Card/Battery door (→15, 19) |
22
Cursor button
|
[MENU/SET] |
Up cursor button ( ) |
|
Use this to display the menus, enter |
• Exposure Compensation, Auto |
|
the settings, etc. (→42) |
Bracket etc. (→61) |
|
Left cursor button ( ) |
Right cursor button ( ) |
|
• Self-timer (→60) |
• Flash (→54) |
|
Down cursor button ( ) |
|
|
• Macro Mode etc. (→57) |
●In this manual, the button that is used is indicated by


 .
.
 Attaching the lens cap/shoulder strap
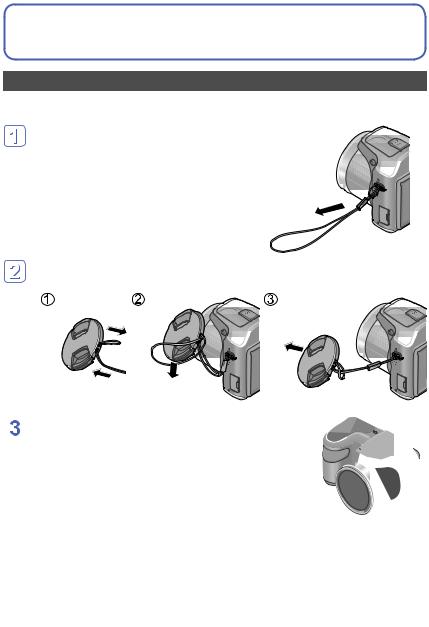
Attaching the lens cap
When you turn the camera off or carry the camera, attach the lens cap (supplied) to protect the surface of the lens.
Pass the lens cap string through
the shoulder strap eyelet on the camera body
• Attach the lens cap string before attaching the shoulder strap.
• Pass the shorter loop of the string through the eyelet.
Pass the lens cap string through the lens cap eyelet
• Pass the lens cap through the loop of the string and tighten it.
 Attach the lens cap
●Do not hang or swing around this unit.
●Make sure to detach the lens cap when turning on the power. ●Be careful not to lose the lens cap.
●Be careful that the lens cap string does not become entangled with the shoulder strap.
Attaching the lens cap/shoulder strap
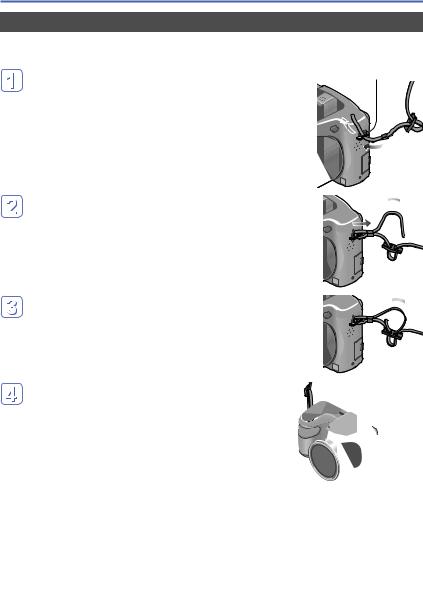
Attaching the shoulder strap
We recommend attaching the shoulder strap (supplied) when using the camera to prevent it from dropping.
Pass the shoulder strap through the shoulder strap eyelet on the camera body
Shoulder strap eyelet
• Attach the shoulder strap so that the “LUMIX” Logo is on the outside.
Pass the end of the shoulder strap through the ring in the direction of the arrow and then pass it through the stopper
Pass the end of the shoulder strap through the hole on the other side of the stopper
Pull the other side of the shoulder strap and then check that it is secure
• Perform steps  to
to  and then attach the other side of the shoulder strap.
●Be sure to follow the steps and attach the shoulder strap correctly. ●Check that the shoulder strap is firmly attached to the camera. ●Use the shoulder strap around your shoulder.
•Do not wrap the strap around the neck. It may result in injury or accident. ●Do not leave the shoulder strap where an infant can reach it.
•It may result in an accident by mistakenly wrapping around the neck.

 About the batteries
■About batteries that you can use with this unit
LR6/AA alkaline batteries or optional HR6/AA rechargeable Ni-MH (nickel metal hydride) batteries can be used with this unit.
●EVOLTA (EVOIA) batteries (Panasonic battery) can also be used.
●The following batteries cannot be used.
•Manganese batteries
•Lithium batteries
•Nickel batteries
•Ni-Cd batteries
•Oxyride batteries
●If these batteries are used, the following problems may occur:
•Battery leakage
•Incorrect display of remaining battery power
•Failure to turn on camera
•Damage to data written to built-in memory or card
•Other troubles
●Never use batteries such as those indicated below.
•Batteries with all or part of their covering peeled off
•Batteries with flat  poles
poles
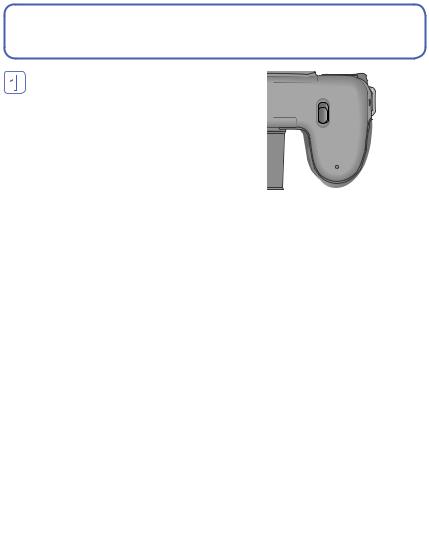
 Inserting and removing the batteries
Move the release lever to the [OPEN] position ( ) and slide the card/battery door in the direction (
 ) to open it
Insert the batteries all the way with correct orientation of  and
and  poles
poles
Close the card/battery door and slide the door in until you hear a locking sound
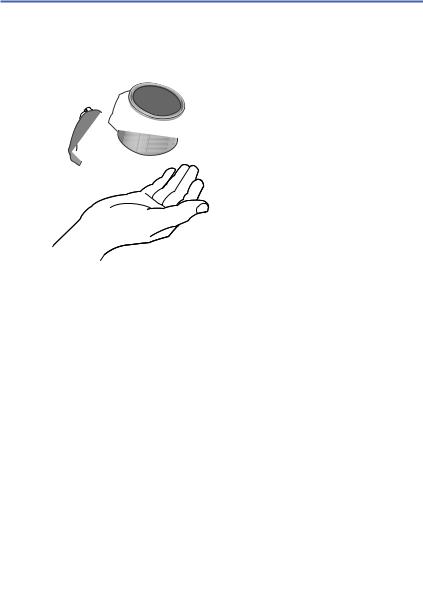
Inserting and removing the batteries
Turn off the camera.
■To remove batteries
Tilt the camera and catch the batteries in your hand. Be careful not to drop them.
●To remove the batteries, turn the camera off and wait until the LUMIX indicator on the LCD monitor goes off. (Failure to wait may cause the camera to malfunction and may damage the card or recorded data.)
●Be sure to remove the batteries if you are not using the camera for a long period of time. Batteries may be hot immediately after use. Turn off the camera and wait until the battery temperature lowers before removing them.
●The clock settings may reset if batteries are removed from the camera for 120 hours or more.
●Always use all new batteries of the same type and brand when replacing batteries. ●The unusable battery should be discarded in accordance with battery recycling laws.
Call the RBRC hotline at 1-800-822-8837 for information.
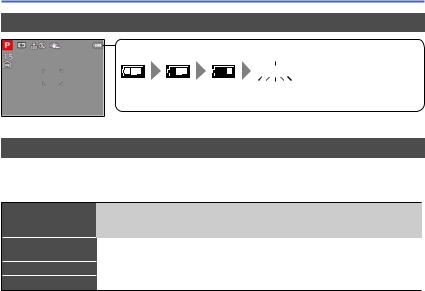
Inserting and removing the batteries
Remaining battery
Remaining battery


 (flashes red)
If the battery mark flashes red, replace the batteries with new ones.
Guidelines for number of recordable pictures and operating time
The number of recordable pictures or available operating time may vary according to surrounding environment and usage conditions. Figures may be reduced if flash, zoom, or other functions are used frequently, or in colder climates.
Number of recordable pictures
Recording time
Playback time
|
Supplied batteries or optional |
Fully-charged Panasonic Ni-MH |
|
|
batteries (optional, when the |
||
|
Panasonic alkaline batteries |
||
|
battery capacity is 1900 mAh) |
||
|
Approx. 380 pictures |
Approx. 540 pictures |
|
|
Approx. 190 min |
Approx. 270 min |
|
|
Approx. 430 min |
Approx. 560 min |
|
●Recording conditions by CIPA standard
•CIPA is an abbreviation of [Camera & Imaging Products Association].
•[Program AE] Mode
•Temperature: 23 °C (73.4 °F)/Humidity: 50%RH when LCD monitor is on.
•Using a Panasonic SD Memory Card (32 MB).
•Using the supplied batteries.
•Starting recording 30 seconds after the camera is turned on (when the Optical Image Stabilizer function is set to [ON]).
•Recording once every 30 seconds with full flash every second recording.
•Rotating the zoom lever from max. Tele to max. Wide or vice versa in every recording.
•Turning the camera off every 10 recordings and leaving it until the temperature of the batteries decreases.
Number reduced if intervals are longer (e.g. to approx. one quarter for 2-minute intervals under the above conditions).

Inserting and removing the batteries
Please note that the performance of alkaline batteries significantly decreases in low temperature conditions.
(When the temperature is 0 °C (32 °F))
Number of recordable pictures
Recording time
Playback time
|
Supplied batteries or optional |
Fully-charged Panasonic Ni-MH |
|
|
batteries (optional, when the |
||
|
Panasonic alkaline batteries |
||
|
battery capacity is 1900 mAh) |
||
|
Approx. 120 pictures |
Approx. 500 pictures |
|
|
Approx. 60 min |
Approx. 250 min |
|
|
Approx. 340 min |
Approx. 540 min |
●The number of recordable pictures, recording time, and playback time vary, depending on the storage and operating conditions of the batteries and the brand and type of batteries.
●We recommend using [Economy] (→47) or turning off the camera frequently between recording sessions to save battery power. If you will be using the camera for long periods of time, the use of rechargeable Ni-MH batteries is recommended. If the available battery power is significantly reduced even when fully charged Ni-MH batteries are used, the batteries have reached the end of their life. Please purchase new batteries.
●Do not use a damaged or dented battery (especially connectors), e.g. by dropping
(can cause faults).

Inserting and removing the card (optional)
Turn off the camera.
Move the release lever to the [OPEN] position ( ) and slide the card/battery door in the direction (
 ) to open it
Insert the card all the way
• Push in until it clicks.
Card (Check orientation)
•Do not touch the terminals on the back of the card.
Close the card/battery door and slide the door inward until it locks firmly
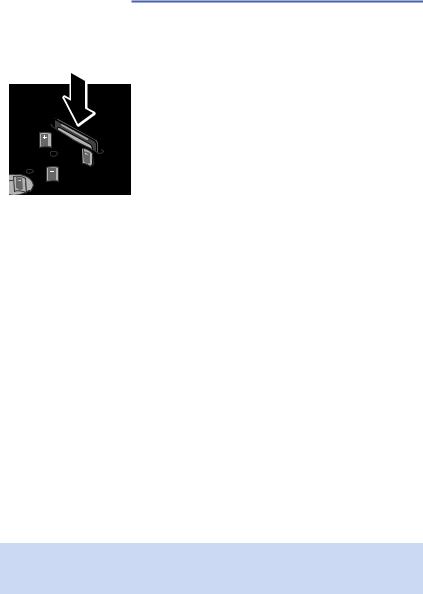
Inserting and removing the card (optional)
Turn off the camera.
■To remove card
Press the center of the card.
●Keep the Memory Card out of reach of children to prevent swallowing.
●To remove the card, turn the camera off and wait until the LUMIX indicator on the LCD monitor goes off. (Failure to wait may cause the camera to malfunction and may damage the card or recorded data.)
 About built-in memory/cards
Picture save destination (cards and built-in memory)
Pictures will be saved to a card if one is inserted, or to the built-in memory  if not.
■Built-in memory (approx. 100 MB)
●Pictures may be copied between cards and the built-in memory. (→91)
●The access time for the built-in memory may be longer than the access time for a card.
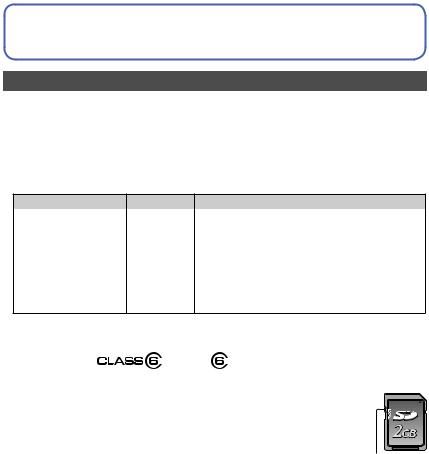
■Compatible memory cards (optional)
The following SD standard-based cards (Panasonic brand recommended)
|
Type of Card |
Capacity |
Notes |
|||
|
SD Memory Cards |
8 |
MB – 2 GB |
• Using a card of SD speed “Class 6”*or above is |
||
|
SDHC Memory Cards |
4 |
GB – 32 |
GB |
recommended for recording motion pictures. |
|
|
• Can be used with devices compatible with the |
|||||
|
SDXC Memory Cards |
48 GB, 64 |
GB |
|||
|
respective formats. |
•Before using SDXC Memory Cards, check that your computer and other devices support this type of card. http://panasonic.net/avc/sdcard/information/sdxc.html
•Only the cards listed on the left with the given capacities are supported.
*SD speed class refers to a specification for sustained write speeds. Confirm the SD speed by checking the card label or other card related materials.
(Example)
|
●While the camera is accessing the card or built-in memory (for an |
||
|
operation such as picture writing, reading, deletion or formatting), |
||
|
do not turn off the camera or remove the batteries/card. Do not |
||
|
subject the camera to vibrations, impact, or static electricity. Should |
||
|
any of these cause camera operation to be terminated, attempt to |
||
|
perform the operation again. |
Switch |
|
|
●Please reformat the card with this camera if it has already been |
||
|
formatted with a computer or another device. (→49) |
||
|
●If the write-protect switch is set to “LOCK”, the card cannot be used |
||
|
to record or delete pictures, and it cannot be formatted. |
||
|
●It is recommended that you copy important pictures to your |
||
|
computer (as electromagnetic waves, static electricity, or faults may |
||
|
cause data to be damaged). |
||
|
●Latest information: |
||
|
http://panasonic.jp/support/global/cs/dsc/ |
||
|
(This site is available in English only.) |

About built-in memory/cards
Recording capacity guidelines (pictures/recording time)
The number of pictures you can take and the recording time vary in proportion to card capacity (and depending on recording conditions and type of card).
Estimated remaining pictures or recording time capacity
 Displayed when no card is inserted (pictures will be saved to built-in memory)
■Recording picture capacity (still pictures)
|
[Picture Size] |
Built-in memory |
2 GB |
32 GB |
64 GB |
||||
|
16M |
15 |
340 |
5600 |
10980 |
||||
|
5M |
40 |
860 |
13950 |
27460 |
||||
|
0.3M |
355 |
6130 |
99120 |
164830 |
||||
•When the number of recordable pictures exceeds 99,999, “+99999” is displayed.
■Recording time capacity (motion pictures)
|
[Rec Quality] |
Built-in memory |
2 GB |
32 GB |
64 GB |
|
HD |
– |
08m20s |
02h17m |
04h34m |
|
VGA |
– |
22m00s |
05h58m |
11h55m |
|
QVGA |
03m30s |
01h03m |
17h09m |
34h14m |
([h], [m] and [s] indicate “hour”, “minute” and “second”.)
•Motion pictures can be recorded continuously up to 2 GB.
The maximum available recording time for up to 2 GB only is displayed on the screen.
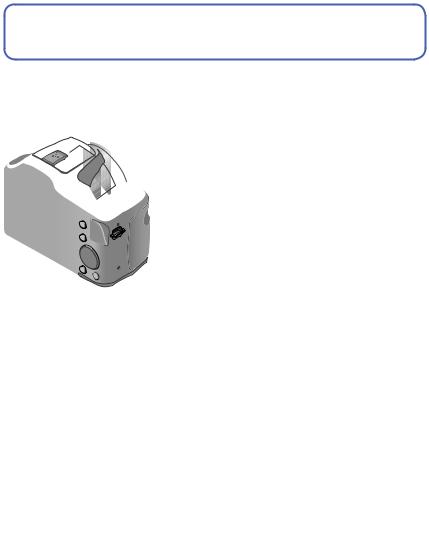
 Setting the clock
The clock is not set when the camera is shipped.
• Make sure to detach the lens cap when turning on the power.
Press the Power button
The power is turned on.
If the language select screen is not displayed, proceed to step  .
.
Cursor button / [MENU/SET]
Press [MENU/SET] while the message is displayed
Press
 to select the language, and press [MENU/SET]
 Press [MENU/SET]
Press
 to select the items (year, month, day, hour, minute, display order or time display format), and press
 to set
• To cancel → Press [ ] button.
 Press [MENU/SET] to set Press [MENU/SET]
•To return to the previous screen, press [ ] button.
Setting the clock
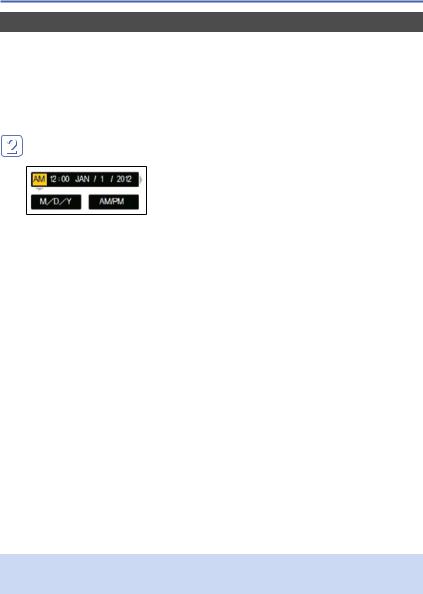
To change time setting
When resetting date and time, select [Clock Set] from the [Setup] menu or [Rec] menu.
•If approximately 2 hours have elapsed after installing the batteries with sufficient power in the camera, the clock settings will be retained for about 120 hours even if the batteries are removed.
 Select [Clock Set] from the [Setup] menu or [Rec] menu (→42)
Press
 to select the items (year, month, day, hour, minute, display order or time display format), and press
 to set
• To cancel → Press [ ] button.
 Press [MENU/SET] to set
●If the clock is not set, the correct date cannot be printed.
●If the clock is set, the correct date can be printed even if the date is not displayed on the screen of the camera.
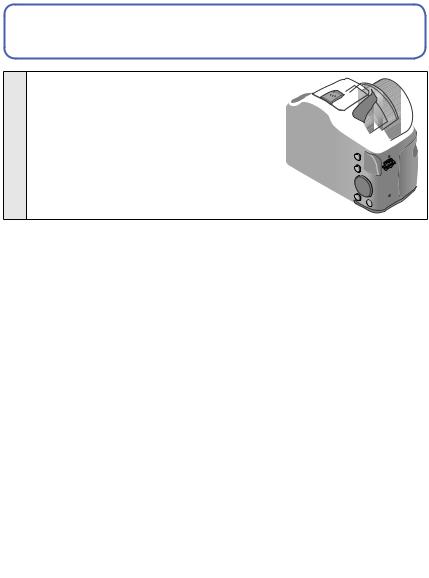
 Sequence of operations
Make sure to detach the lens cap when turning on the power.
Press the Power button
|
Set to the desired recording mode |
||
|
Align the mode dial correctly to |
→ |
|
|
the mode that you want to use. |
||
|
[Intelligent Auto] Mode |
Take pictures with automatic settings. (→30) |
|
|
2 |
[Program AE] Mode |
Take pictures with your own settings. (→28) |
|
[Manual Exposure] Mode |
Determine aperture and shutter speed, |
|
|
then take pictures. (→63) |
||
|
[Scene Mode] |
Take pictures according to scene. (→67) |
|
|
[Sports] Mode |
Take pictures of sporting events, etc. (→66) |
|
|
[Scenery] Mode |
Take pictures of scenery. (→65) |
|
|
[Portrait] Mode |
Take pictures of people. (→64) |
|
|
[Motion Picture] Mode |
Take motion pictures. (→34) |
(Continued on the next page)

Sequence of operations
Aim the camera and shoot
Shutter button
Microphone
■Taking still pictures
 Press the shutter button halfway to focus
  Press and hold the shutter button to take the picture
■Recording motion pictures (→34)
 Set mode dial to
 Press the shutter button to start recording, and press it again to end
Mode dial
3
■Holding the camera
•To avoid camera shake, hold it with both hands keeping your arms close to your
|
Flash (→53) |
body while standing with your feet slightly |
|
|
AF Assist Lamp |
apart. |
|
|
• Do not touch the lens. |
||
|
• Do not hold the lens barrel as you take |
||
|
pictures. There is a risk that your finger will |
||
|
be trapped as the lens retracts. |
||
|
• Do not block the flash or the lamp. Do not |
||
|
look at it from close range. |
•Make sure that the camera does not move at the moment the shutter button is pressed.
●We recommend attaching the shoulder strap (supplied) when using the camera to prevent it from dropping. (→13)
(Continued on the next page)

Sequence of operations
Press the Playback button
4
Playback button
|
View pictures (→36, 69) |
• Press |
to select a picture |
|
5 |
• Press |
to play back motion pictures |
|
or panorama pictures |
Turn off the power (Press the Power button)
6
■To turn the power on in Playback Mode
Press and hold the playback button.
• Pictures on the card or built-in memory are displayed.
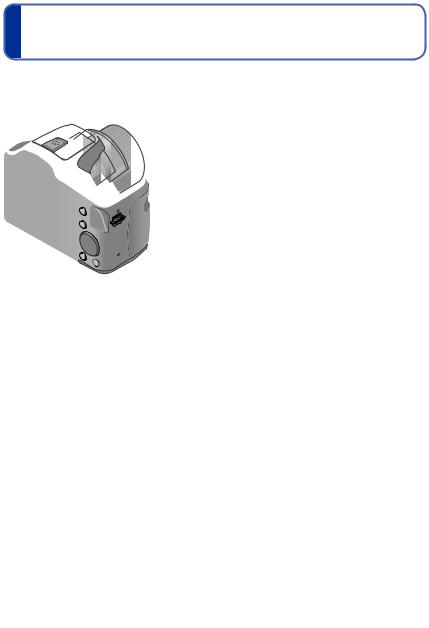
Taking pictures with your own settings
[Program AE] Mode
Recording mode: 


Using the [Rec] menu to change settings and set up your own recording environment.
 Set to
  ([Program AE] Mode)
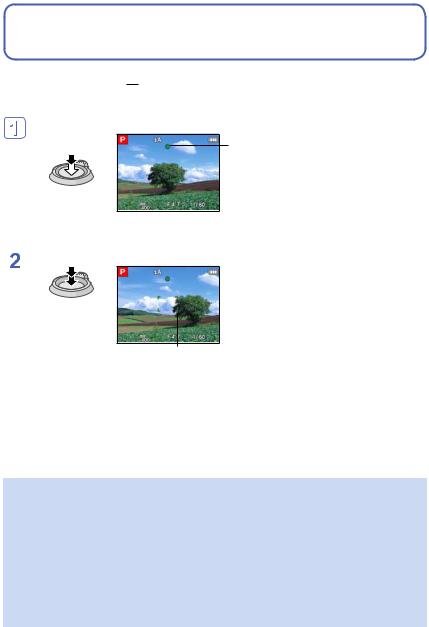
 Take a picture
|
Press halfway |
Press fully |
|
(press lightly to focus) |
(press the button all the |
|
way to record) |
Focus display
(When focus is aligned: illuminated
When focus is not aligned: flashing)
●If a warning is displayed about jitter, use [Stabilizer], a tripod, or [Selftimer].
●If aperture and shutter speed are shown in red, you do not have appropriate exposure. You should either use the flash or change [Sensitivity] settings.
 Jitter alert display
|
Aperture value |
||
|
Shutter speed |
||
|
— 28 — |
VQT4K59 |
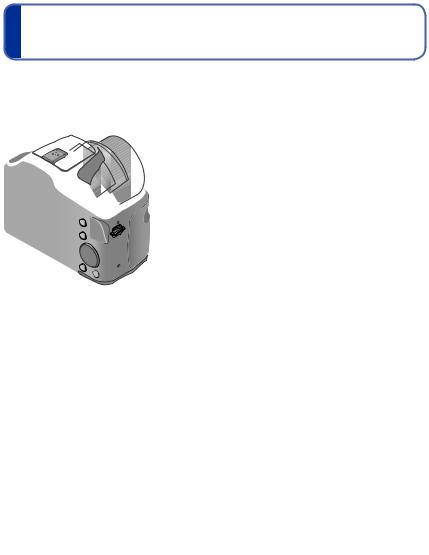
 Adjusting focus
When [AF Mode] is set to 

 (1-area-focusing), focus on the AF area in the center of the picture. If a subject you want to record is not in the center, follow the steps below.
Adjust focus according to subject
Align the AF area with the subject
Hold down halfway
Focus display
(When focus is aligned: illuminated When focus is not aligned: flashing)
 AF area
(When focus is aligned: green When focus is not aligned: red)
 Return to desired composition
Press fully
AF area
●Subjects/environments which may make focusing difficult:
•Fast-moving or extremely bright objects, or objects with no color contrast.
•Taking pictures through glass or near objects emitting light. In dark, or with significant jitter.
•When too close to object or when taking pictures of both distant and close objects together in the same picture.
●The focus display flashes and beep sounds when focus is not aligned. Use the focus range displayed in red as a reference. (→58)
Even if the focus display is lit, the camera may be unable to bring the subject into focus if it is out of range.
●The AF area display may be larger depending on recording conditions such as dark locations or zoom ratio.
Taking pictures with automatic settings
[Intelligent Auto] Mode
Recording mode: 


Optimum settings are made automatically from information such as “face”, “movement”, “brightness”, and “distance” just by pointing the camera at the subject, meaning that clear pictures can be taken without the need to make settings manually.
 Set to
  ([Intelligent Auto] Mode)
 Take a picture
|
Press halfway |
Press fully |
|
(press lightly to focus) |
(press the button all the |
|
way to record) |
About flash
|
Press [ |
] to open the flash (→53). |
|||||||||||
|
●When |
is selected, the optimum flash ( |
, |
, |
, |
) is selected automatically |
|||||||
|
depending on conditions. (→56) |
||||||||||||
|
●When |
or |
is selected, the red-eye reduction function is activated. |
||||||||||
|
●When |
or |
is selected, the shutter speed is reduced. |
||||||||||

Taking pictures with automatic settings [Intelligent Auto] Mode
Automatic Scene Detection
Camera reads scene when pointed at subject, and makes optimum settings automatically.
Recognizes people
Recognizes landscapes
Recognizes night scenes and people in them (Only when  is selected)*
Recognizes night scenes* Recognizes close-ups Recognizes sunsets
Reads subject movement to avoid blurring when scene The icon of scene detected  does not correspond to any of the above.
*We recommend using a tripod and the self-timer.
●Depending on recording conditions, different scene types may be determined for the same subject.
●If desired scene type is not selected, we recommend manually selecting the appropriate scene mode.
●When  or
or 
 is detected, Face Detection is activated, and the focus and exposure are adjusted for the recognized faces.
■About Backlight Compensation
Backlight is a condition where a light shines from behind a subject. When there is a backlight, the subject appears darker and the camera will automatically attempt to correct it by increasing the brightness of the picture. Backlight compensation is automatically activated in [Intelligent Auto] mode.

Taking pictures with automatic settings [Intelligent Auto] Mode
[AF Tracking]
This function enables the camera to continue to focus on the subject and adjust the exposure of the subject even when the subject is moving.
Press to set AF Mode to [AF Tracking]
• To cancel AF Tracking → Press again.
Align the AF Tracking frame with the subject, and then press  to lock
• To cancel AF Lock → Press .
.
AF Tracking frame
AF Lock successful: Yellow
AF Lock failed: Red
●The optimal scene for the AF locked subject is automatically identified.
●Under certain recording conditions, such as when the subject is small or when it is dark, [AF Tracking] may not operate correctly.

Taking pictures with automatic settings [Intelligent Auto] Mode
[Intelligent Auto] Mode restrictions
Only the menu items which are displayed in the [Intelligent Auto] Mode can be set.
The settings selected in the [Program AE] or other modes will reflect on the menu items in the [Setup] menu that are not displayed.
●The settings for the following items are different from other recording modes: [Picture Size] and [Burst] on the [Rec] menu
●The settings for the following functions are fixed: [Rec] menu
•[Sensitivity]: [AUTO]
•[AF Mode]:
 [Face Detection]*
•[Red-Eye Removal]: [ON]
•[White Balance]: [AWB]
•[i.Exposure]: [ON]
•[AF Assist Lamp]: [ON]
•[Stabilizer]: [ON]
* (9-area-focusing) when face cannot be recognized
●The following functions cannot be used: [Exposure], [Digital Zoom], [Auto Bracket]

Taking motion pictures [Motion Picture] Mode
Recording mode: 


You can record motion pictures with audio (monaural).
Set to  ([Motion Picture] Mode)
Microphone

 Start recording
|
Press halfway |
Press fully |
|
(press lightly to focus) |
(press the button all the |
|
way to record) |
Remaining recording time (approx.)
Elapsed recording time
●Immediately release the shutter button after pressing it all the way.
●The zoom will remain as it is at the beginning of recording.
 End recording
Press fully
|
(Continued on the next page) |
|
|
— 34 — |
VQT4K59 |

Taking motion pictures [Motion Picture] Mode
●When recording motion pictures, we recommend using batteries with sufficient power. ●The available recording time displayed on the screen may not decrease regularly. ●If data is repeatedly recorded and deleted, the total available recording time on the SD card may be reduced. To restore the original capacity, use the camera to format the SD card. Be sure to save all important data to your computer or other media before formatting, as all data saved to the card will be erased.
●In [AF Mode],  (9-area-focusing) is fixed. ●The flash is set to
  [Forced Flash Off]. (→53)
●For certain memory cards, recording may end while in progress. (→108) ●Depending on the environment when recording motion pictures, the screen may turn black for an instant or noise may be recorded because of static electricity, electromagnetic waves, etc.
●This unit automatically adjusts the aperture during motion picture recording. At such times, the sound may break up. This is not a malfunction.

 Viewing your pictures [Normal Play]
When a card is in the camera, pictures are played back from the card. Without a card, pictures are played back from the built-in memory.
Press the Playback button
• Press again to enter the recording mode.
Use the
 cursor button to select a picture that you want to play back
• Hold down to quickly scroll forwards/ backwards.
 View pictures
Folder/File number
Picture number/Total pictures
•Press the shutter button to switch to recording mode.
●It may not be possible to view pictures on this camera that were previously edited on a computer.
●After pressing the Playback button and switching it into the playback mode, the lens barrel will be retracted after approx. 15 seconds.
●This camera is compliant with the unified DCF (Design rule for Camera File system) standard formulated by the Japan Electronics and Information Technology Industries Association (JEITA), and with Exif (Exchangeable image file format). Files that are not
DCF-compliant cannot be played back.
 Loading…
|
|
Related Devices:
|
Types of Manuals:
The main types of Panasonic DMC-LZ20 instructions:
- User guide — rules of useing and characteristics
- Service manual — repair, diagnostics, maintenance
- Operation manual — description of the main functions of equipment
Camcorder, Digital Camera Instructions by Panasonic:
-
HuddleCamHD HC3X-BK-G2
• 3X Optical Zoom• USB 2.0• RS-232• 1920 x 1080• 81° Field of View• Up to 30fps• 64 Presets• IR RemoteHuddleCamHDHuddleCam HD 3X Gen2 Conferencing CameraFeaturesSpecificationsDATA SHEETWhat’s in the Box3X Zoom USB 2.0 Camera12V/2.0A DC Power AdapterMounts: Tripod Mount USB 2.0 Data Cable (3m), Seria …
HC3X-BK-G2 Digital Camera, 12
-
Linksys WVC54G — Wireless-G Internet Video Camera Network
A Division of Cisco Systems, Inc.®Model No.Quick InstallationModel No.WirelessWVC54GInternet Video CameraWireless-G12A Attach the antenna.B Connect the included Ethernet network cable to your router, switch, or computer.C Connect the other end of the cable to the Ethernet port on the Camera.D Connect the included powe …
WVC54G — Wireless-G Internet Video Camera Network Webcam, 2
-
Kodak DC4800 — 3.1MP Digital Camera
DC4800_UGcover.fh (Converted)-1 6/13/00 4:03 PM Page 1 CompositeC M Y CM MY CY CMY KUser’s Guide CoverMechanicalTITLEDESCVENDOR JOB #FILEMODIFIEDMKTVERSIONDC4800 Digital Camera——-DC4800 User’s Guide Cover3/28/00PRINTING COLORS / 4 color process + 1 spot (Pantone 123C)BlackMagentaYellowCyanKodak Yellow (PMS 123C …
DC4800 — 3.1MP Digital Camera Digital Camera, 124
-
YI Technologies YI 360 VR
!YI!360!VR!Camera!User!Manual!Disclaimer!………………………………………………………………………………………………………………………….!2!Copyright!Notice!………………………………………………………………………………………………………… …
YI 360 VR Digital Camera, 26
-
Panasonic AW-HS50N
For instructions on how to operate this Compact Live Switcher and how to establish its settings, refer to the “Operations and Settings” manual (PDF file) which can be found on the CD-ROM supplied with the camera.Before operating this product, please read the instructions carefully and save this manual for future us …
AW-HS50N Switch, 72
-
Olympus TG-860
Thank you for purchasing an Olympus digital camera. Before you start to use your new camera, please read these instructions carefully to enjoy optimum performance and a longer service life. Keep this manual in a safe place for future reference. We recommend that you take test shots to get accustomed to your camera bef …
TG-860 Digital Camera, 124
