-
Contents
-
Table of Contents
-
Bookmarks
Quick Links
I
M
NSTRUCTION
ANUAL
1M23N24105
Digital Proportional
R/C System
R
Related Manuals for FUTABA 4PL-2.4GHZ
Summary of Contents for FUTABA 4PL-2.4GHZ
-
Page 1
NSTRUCTION ANUAL 1M23N24105 Digital Proportional R/C System… -
Page 2
Thank you for purchasing a Futaba 4PL-2.4GHz system. Before using your 4PL-2.4GHz system, read this manual carefully in order to use your R/C set safely. After reading this manual, store it in a safe place. Application, Export, and Modification 1. This product may be used for models only. It is not intended for use in any application other than the control of models for hobby and recreational purposes. -
Page 3
• No part of this manual may be reproduced in any form without prior permission. • The contents of this manual are subject to change without prior notice. • This manual has been carefully written. Please write to Futaba if you feel that any corrections or clarifica- tions should be made. -
Page 4: Table Of Contents
Table Of Contents For Your Safety As Well As That Of Others ……8 Explanation of Symbols …………..8 2.4GHz System Precautions …………8 High Speed Mode Precautions ………….8 Operation Precautions …………..9 Ni-MH/Ni-Cd Battery Handling Precautions ……10 Storage And Disposal Precautions ………..11 Other Precautions ……………11 Before Using …………..12 Features ………………12 Set Contents …………….14…
-
Page 5
Function Map …………..32 For Your Safety Operation Of Screen …………..32 As Well As Function List …………….35 That Of Others Characters Selection …………..36 Before Functions …………….38 Using Model/Receiver Type/Servo Response Mode «MODEL RX» …38 Model/Receiver Mode Menu Display ……..38 Model Selection «SEL» …………39 Model memory call Model Copy «COPY»… -
Page 6
Throttle Off (Engine Cut) «THOFF» ………81 Engine cut off by switch ESC Link Function «MC LINK» ………..82 Special function, Futaba ESC (MC950CR, MC851C, MC602C, MC402CR, etc.) Timer Function «TIMER» …………86 Up, Fuel down, or lap timer Lap List «LAP LIST» …………..92 Lap timer data check System Functions «SYSTEM»… -
Page 7
Reference …………….99 Ratings ………………99 Warning Displays …………..100 For Your Safety Optional Parts …………….102 As Well As When requesting repair …………102 That Of Others Before Using Installation Initial Set-Up Function Functions Reference… -
Page 8: For Your Safety As Well As That Of Others
Under other conditions, the set will not operate, or the specified performance will not be displayed even if it operates. In addition, it may cause servo trouble. Futaba will not be responsible for damage, etc. caused by combination with the products of other companies.
-
Page 9: Operation Precautions
Operation Precautions Warning Do not operate outdoors on rainy days, run through puddles of water or use when visibility is limited. Should any type of moisture (water or snow) enter any component of the system, erratic operation and loss of control may occur.
-
Page 10: Ni-Mh/Ni-Cd Battery Handling Precautions
Caution (Fail safe function) Before running (cruising), check the fail safe function. Check Method; Before starting the engine, check the fail safe function as follows: 1) Turn on the transmitter and receiver power switches. 2) Wait at least one minute, then turn off the transmitter power switch. (The transmitter automatically transfers the fail safe data to the receiver every minute.) 3) Check if the fail safe function moves the servos to the preset position when reception fails.
-
Page 11: Storage And Disposal Precautions
Always use only genuine Futaba transmitters, receivers, servos, ESCs (electronic speed con- trols), NiMH/NiCd batteries and other optional accessories. Futaba will not be responsible for problems caused by the use of other than genuine Futaba parts. Use the parts speci- fied in the instruction manual and catalog.
-
Page 12: Before Using
Before Using Features -2.4GHzSS (Spread Spectrum) radio communication system Frequency channel setting is unnecessary: Channel shifting takes place within the 2.4GHz band automatically. This system minimizes the interference from other 2.4GHz systems. -Model memory for 40 models Model names can use up to 10 letters, numbers, and symbols, so that logical names may be used.
-
Page 13
-ESC-Link function (MC-LINK) This is a dedicated function which allows setting of the contents of the Link software which makes possible Futaba speed controller (ESC), MC950CR, MC850C, MC851C, MC602C, MC402CR, etc. variable frequency and other data changes by T4PL. -Trigger position can be changed The position of the throttle trigger can be moved forward and backward. -
Page 14: Set Contents
Always use only genuine Futaba transmitters, receivers, servos, ESCs (electronic speed con- trols), NiMH, NiCd, Li-ion batteries and other optional accessories. Futaba will not be responsible for problems caused by the use of other than Futaba genuine parts. Use the parts speci- fied in the instruction manual and catalog.
-
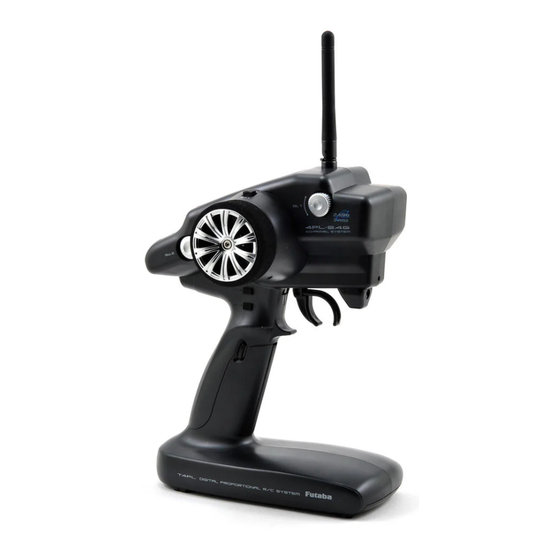
Page 15: Transmittert4Pl
Transmitter T4PL Nomenclature Antenna LCD screen Digital Trim1 (DT1) (default steering trim) Power&Display switch Digital Dial 1 (DL1) (default CH4) Steering wheel Edit buttons Digital Trim 2 (DT2) Slide switch (SW2.SLD) (default throttle trim) (default CH3) Push switch (SW1.PSH) Digital Trim 3 (DT3) (default dual rate) Digital Trim 4 (DT4) Grip Handle…
-
Page 16: Battery Replacement Method
Battery Replacement Method (4 AA Size Batteries) Load the four batteries in accordance with the Battery cover polarity markings on the battery holder. Battery Replacement Method Remove the battery cover from the transmit- ter by sliding it in the direction of the arrow in the figure.
-
Page 17: When Using The Optional Battery
T h e H T 5 F 1 7 0 0 B i s 5 — c e l l s , s o , w h e n c h a rg i n g t h e HT5F1700B battery with Futaba CR-2000 charger, you have to use the RX output side.
-
Page 18: Power & Display Switch
Warning Never plug it into an outlet of other than the indicated voltage. Plugging the charger into the wrong outlet could result in an explosion or fire. Do not insert and remove the charger when your hands are wet. It may cause an electric shock. Always use the special charger or a quick charger for digital proportional R/C sets to charge a digital proportional R/C set Ni-MH battery.
-
Page 19: Display When Power Switch Is Turned On
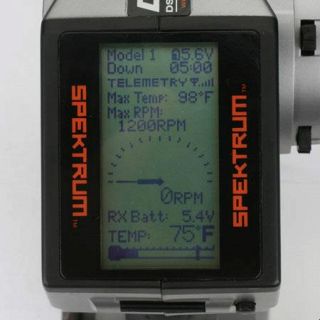
Display when power switch is turned on Power switch turned on Beep confirmation sound is generated and the HOME screen shown below appears. When the servo response mode is Battery voltage display high speed, «HIGH» is displayed. Nothing is displayed in the normal mode.
-
Page 20: Digital Trim Operation
Digital Trim Operation (Initial settings: DT1: Steering trim, DT2: Throttle trim,) Operating by the lever: Push the lever to the left or right (up or down) The current posi- tion is displayed on the LCD screen. Steering trim display Throttle trim display any farther.
-
Page 21: Mechanical Atl Adjustment
Mechanical ATL Adjustment Make this adjustment when you want to decrease the stroke of the brake (back) side of the throttle trigger for operation feel. Adjustment Using a 2.5mm hex wrench, adjust the trigger brake (reverse) stroke. (The screw moves the throttle trigger stopper.) narrower.
-
Page 22: Trigger Slide Adjustment
Trigger Slide Adjustment The throttle trigger position can be moved forward and backward. Adjustment Using a 2.5mm hex wrench, loosen the trigger slide mounting screw by turning it slightly counterclockwise. Adjust so that the bottom Trigger slide Using a 2.5mm hex wrench, turn the trig- mark does not exceed mounting screw the top marking line.
-
Page 23: Receiver Terminology
Precaution: If there are many Futaba S-FHSS/FHSS systems turned on in close proximity to the R2104GF, your receiver might not link to your transmitter. In this case, even if the receiver’s LED stays solid green, un- fortunately the receiver might have established a link to one of other transmitters. This is very dangerous if you do not notice this situation.
-
Page 24: Receiver Installation
Under other conditions, the set will not operate, or the specified performance will not be displayed even if it operates. In addition, it may cause trouble with servos and other equipment. Futaba will not be responsible for damage, etc. caused by combination with the products of other companies.
-
Page 25: Installation
Installation Receiver and Servo Connections Connect the receiver and servos as shown below. Connect and install the receiver and servos in accordance with «Installation Safety Precautions» on the next page. The figure shown below is an example. The method of connecting the motor controller to the motor and battery depends on the motor controller used.
-
Page 26: Installation Safety Precautions
Installation Safety Precautions Warning Receiver (receiver antenna) Do not cut or bundle the receiver antenna wire. Do not bundle the receiver antenna wire together with the motor controller lead wire. Keep the receiver antenna wire at least 1cm away from motor, battery, and other wiring carrying heavy current. Install the receiver antenna holder as closely as possible to the receiver.
-
Page 27
Warning Connector Connections Be sure the receiver, servo, battery and connectors are fully and firmly connected. If vibration from the model causes a connector to work loose while the model is in operation, you may lose control . Servo Installation When you install the servos, always use the rubber grommets provided in servo hardware bags. -
Page 28
Warning Electronic Speed Control Install the heat sinks where they will not come in contact with aluminum, carbon fiber or other parts that conduct electricity. If the FET Amp (Electronic speed control) heat sinks touch other materials that conduct electricity a short circuit could occur. -
Page 29: Initial Set-Up
Initial Set-Up Preparations (Transmitter) Before setting the Transmitter functions, check and set items 1 to 4 below. (Display when power switch turned on) When the power switch is turned on, the currently selected model number is displayed. Check if this number is the model number you want to set-up. To change the model number, use the Model Select function (See page 39).
-
Page 30
2. Servo Response Mode Check When the RX type is set to S-FHSS 2.4GHz (SFH), the servo response mode can be set to the high speed mode (HIGH). However, check if the servos used are compatible. When using digital servos (including BLS Series brushless servos), either HIGH or NORM «… -
Page 31
— Steering dual rate (DT3) check At initial set-up, steering dual rate (D/R) is assigned to the DT3 Steering dual rate lever, at the grip of the transmitter. Operate the DT3 and check if the D/R value displayed on the screen changes. After checking D/R, set the steering dual rate to 100%. -
Page 32: Function Map
Function Map Operation of screen In this instruction manual, Edit Buttons are represented by the symbols shown below. Calling the menu screen The item indicated by the reverse displayed cursor is selected. The cursor is moved up and down with the (UP) and (DN) buttons. A screen with the ▼…
-
Page 33
When the (CT) button is pressed at all the screens, an item preceded by an * is displayed to its setup screen. For example, when *STEERING is selected at the MENU screen and the (CT) button is pressed, that item is displayed to the steering related setup screen and REV (servo reverse), SUBTR (sub trim), EPA (end point adjuster), and other functions can be set. -
Page 34
(HOME screen) (MENU screen) (MODEL RX screen) (ADVANCE screen) (TIMER screen) (SYSTEM screen) -
Page 35: Function List
Function list Page Function Description of function abbreviation Model memory call/ Model memory copy/ Model memory reset MODEL RX P-38 Servo response mode and receiver type selection Servo operation reversing P-44 SUBTR Servo center position fine adjustment P-45 End point adjustment P-46 Fail safe, battery fail safe P-49…
-
Page 36: Characters Selection
Characters selection Edit Buttons In this instruction manual, Edit Buttons are represented by the symbols shown at left. Edit Buttons Basic menu Japanese Katakana character display On the system menu, the basic menu screen shown below can be displayed in Japanese katakana characters.
-
Page 37
Menu level selection A menu screen divided into steering system and throttle system can be selected from the following two types at each model memory. — LEVEL 1: Displays the basic steering and throttle functions. — LEVEL 2: Displays all the steering and throttle functions. Select MENU On the HOME screen, se- The reverse dis-… -
Page 38: Functions
Function Model / Receiver Type / Servo Response Mode «MODEL RX» Forty model data (data for 40 R/C cars) can be saved in the T4PL transmitter. This menu selects the model, copies data between models, sets the menu which sets the model name, and sets the mode of the receiver used.
-
Page 39: Model Selection «Sel
Model Selection «SEL» Forty model data (model data for 40 R/C cars) can be saved in the 4PL transmitter and used when the relevant model data is called. Using the model select function — Display the MODEL RX menu by referring to P38. (Selection of model select) Move the cursor to MODE by (UP) or (DN) Move the cursor to MODE and…
-
Page 40: Model Copy «Copy
Model Copy «COPY» The contents of the currently selected model data can be copied to another model. Using the model copy function — Display the MODEL RX menu by referring to P38. (Selection of model select) Move the cursor to MODE by (UP) or (DN) Move the cursor to MODE and button and select «COPY»…
-
Page 41: Model Reset «Reset
Model Reset «RESET» This function resets and initializes the contents of the currently selected model data. However, the adjuster function (ADJUSTER), system setting (SYSTEM), and type of receiver mode (TYPE)/servo response (RESP) are not initialized. Using the model reset function — Display the MODEL RX menu by referring to P38.
-
Page 42: Receiver Mode «Rx Mode
Receiver Mode «RX MODE» The T4PL transmitter has an FHSS 2.4GHz system transmit mode and an in- creased response S-FHSS 2.4GHz system transmit mode. The R2104GF supplied with the T4PL set can be used by both the S-FHSS (SFH) and FHSS(FH) type by automatic recognition.
-
Page 43: Model Name «Mdl Name
Model name «MDL NAME» A model name (up to 10 characters) can be registered for each model. Letters, symbols, and numbers can be used. Select Model name MODEL NAME Model name input screen display The model name input screen can be dis- played by referring to P38 and displaying the MODEL RX menu and selecting MDL NAME by (UP) or (DN) button on the MOD-…
-
Page 44: Servo Reverse «Rev
Servo Reverse «REV» (All channel) This function reverses the direction of operation of the servos related to transmitter steering, throttle, and channel 3 /4 operation. However, when the position set by trim or subtrim shifts from the center, the center becomes the opposite side. Channel menu display Display to each channel menu by the following method: Select MENU…
-
Page 45: Subtrim «Subtr
Subtrim «SUBTR» (All channel) Use this function to adjust the neutral position of the steering, throttle, channel 3 and channel 4 servos. 90deg *Subtrim adjusts the entire range of the servo in the set direction. Use to adjust the neutral position Refer to P44 and display the channel menus to be set.
-
Page 46: End Point Adjuster «Epa
End Point Adjuster «EPA» (All channel) Use this when performing left and right end point adjustments, throttle high side/ brake side operation amount adjustment, channel 3 and channel 4 servo up side/ down side operation amount adjustment during linkage. — Correct the maximum steering angle for left and right steering angles when there is a difference in the turning radius due to the characteristics, etc.
-
Page 47
Refer to P44 and display the channel menus to be set. Channel menu screens Move the cursor to *STEERING by (UP) or (DN) button and press the (CT) button. Move the cursor to *THROTTLE by (UP) or (DN) button and press the (CT) button. -
Page 48
Throttle (EPA) adjustment (Preparation) — Display the THROTTLE 1 menus to be set. — Before setting the throttle end point adjustment(EPA), set the throttle ATL lever (initial setup: DT4) to the maximum throttle angle position 100%. — Select the setting item «EPA-F» by (UP) or (DN) button. (HOME screen) Adjust button Throttle (forward side) adjustment… -
Page 49: Fail Safe/Battery Fail Safe Function «F/S
Fail Safe/Battery Fail Safe Function «F/S» (All channel) Fail Safe Mode (F/S) This function moves each servo to a preset position when the receiver cannot receive the signals from the transmitter for some reason. -When the condition set at «FH» is Rx type (P42), fail safe (F/S) can be set only for throttle (TH). Other channels are set to the normal mode.
-
Page 50
Fail safe mode selection (Preparation) F/S mode OFF, HOLD, F/S — Refer to P44 and display the channel menus to be set. For F/S mode selection steering and throttle, display the STEERING 2 screen and — Select with the (+) or (-) but- THROTTLE 2 screen by (UP) or (DN) button. -
Page 51: Steering Exp «Str Exp
Steering EXP «STR EXP» (Steering system) This function is used to change the sensitivity of the steering servo around the neutral position. It has no effect on the maximum servo travel. Quick Mild (Positive side) (Negative side) Racers Tip When the setting is not determined, or the characteristics of the model are unknown, start with 0%.
-
Page 52: Throttle Exp «Thr Exp
Throttle EXP «THR EXP» (Throttle system) This function makes the throttle high side and brake side direction servo operation quicker or milder. It has no effect on the servo maximum operation amount. Advice When the course conditions are good and the surface has good grip, set each curve to the + side (quick side).
-
Page 53
Adjustment method for EXP curve (Preparation) — On the THROTTLE1 screen, display the THROTTLE2 screen by (UP) or (DN) button and make the following adjustments: For graph screen display, adjustment is also possible on the graph screen by referring to the throttle menu map of the preceding figure. -
Page 54: Steering Speed «Speed
Steering Speed «SPEED» (Steering system) Quick steering operation will cause momentary understeering, loss of speed, or spinning. This function is effective in such cases. Spin Smooth cornering Understeering Without «SPEED» With «SPEED» Operation — This function limits the maximum speed of the steering servo. (Delay function) — T he st e e r i ng s p e e d whe n the steering wheel is operated (TURN direction) and returned…
-
Page 55
Steering Speed adjustment (Preparation) — On the STEERING 1 screen, display the STEERING 2 screen by (UP) or (DN) button and make the following adjustments: Adjustment range «TURN» direction adjustment 1~100% (each direction) Select the setting item «TURN» by (UP) or At 100%, there is no delay. -
Page 56: Throttle Speed «Speed
Throttle Speed «SPEED» (Throttle system) Sudden throttle trigger operation on a slippery road only causes the wheels to spin and the ve- With «SPEED»: Quick start without skidding hicle cannot accelerate smoothly. Setting the throttle speed function reduces wasteful battery consumption while at the same time permitting smooth, enjoyable operation.
-
Page 57: Throttle Acceleration «Accfw/Accbk
Throttle Acceleration «ACCFW / ACCBK» (Throttle system) The servo will jump to the input position at its maximum possible speed. Unlike expo- nential, which adjusts the whole throttle movement into a curve, throttle acceleration simply «jumps» away from neutral and then leaves the remaining response linear. Operation — Operation near the throt- 100%…
-
Page 58
Throttle acceleration adjustment (Preparation) — On the THROTTLE 1 screen, display the THROTTLE 2 screen by (UP) or (DN) button and make the following adjustments: Forward acceleration amount (ACCFW) (Forward acceleration amount adjustment) 0~100 Select the setting item «ACCFW» by (UP) or (DN) button and Initial value: 0 use the (+) and (-) buttons to adjust the acceleration amount. -
Page 59: Displaying Other Functions Of Each Channel Menu
Displaying other functions of each channel menu (All channel) In addition to the steering, throttle, CH3/4 REV, EPA, SUBTR, EXP, ACC, SPEED, F/S and other settings displayed before this page, TRIMD/R, ATL, and CH3/4 POSI can be checked and adjusted on each channel menu screen. When the TRIM D/R, ATL, and CH3/4 POSI functions are not assigned to trim/ dial, they can be set on this screen.
-
Page 60: Function Select Trim Dial «Trim Dial
Function Select Trim Dial «TRIM DIAL» Selection of the function to be performed by digital trim (DT1, DT2, DT3, DT4) and dial (DL1) and step amount adjustment and operation direction reversal can be performed by this function. — The functions that can be assigned to dial and digital trim are listed on the next page. — The step amount can be adjusted.
-
Page 61
Relationship between set value Set table functions (DL1, DT1/DT2/DT3) and step amount Abbreviation used on setup Function name, etc (Setting range: 1~10, 20, 30, 40, 50, screen 100, 2P) Dual rate function -Steering trim/throttle trim ATL function When set to the minimum «1», the total EXP-ST Steering EXP trim operating width is 200 clicks. -
Page 62: Function Select Switch «Switch
Function Select Switch «SWITCH» Selection of the function to be performed by push switch (SW1.PSH, PS2.SLD) and operation system setting can be performed by this function. — The functions that can be assigned to each switch are listed on the next page. — SW1.PSH alternate operation (operation which switches between ON and OFF each time the switch is pressed) is possible.
-
Page 63
SW2. SLD SW1. PSH Set table functions (SW1. PSH) Abbreviation used on setup screen Function name, etc NT-BRK Neutral brake function ON/OFF A.B.S function ON/OFF IDLE Idle up function ON/OFF PRGMIX Program mixing function ON/OFF TH-OFF Throttle off (engine cut) function ON/OFF channel 3 channel 4… -
Page 64: Advance Menu «Advance
Advance Menu «ADVANCE» The brake mixing, 4WS mixing, ABS, neutral brake, and other special functions are set with the ADVANCE menu. (UP) or (DN) button Select MENU (HOME screen) (MENU screen) (ADVANCE screen) Advance function Program mixing function A.B.S function Brake mixing function 4WS mixing function Dual ESC function…
-
Page 65
Refer to the function trim dial and function switch described on P60 to P63. MC link [MC LINK] This is a special function which allows Futaba motor controller (MC) data changes to be set by the T4PL transmitter (MC950CR, MC851C, MC602C, MC02R, etc.). -
Page 66: Programmable Mixing «Prog Mix
Programmable Mix «PROG MIX» (All channels) This function allows you to apply mixing between the steering, throttle, channel 3 and channel 4. Additional Functions -When the steering or throttle channel is the master channel (channel that applies mix- ing), trim data can be added. (Trim mode) — The mixing mode selection.
-
Page 67
Channel selection (MST) (Master channel) STR, THR, CH3, CH4 Select setup item «MST» by (UP) or (DN) button, and select Initial value :STR the master channel by pressing the (+) or (-) button. Channel selection (SLV) (Slave channel) STR, THR, CH3, CH4 Select setup item «SLV»… -
Page 68: A.b.s. Function «A.b.s
A.B.S. Function «A.B.S» (Throttle system) When the brakes are applied while cornering with a 4 Wheel Drive or other type of ve- hicle, understeer may occur. The generation of understeer can be eliminated and corners can be smoothly cleared by using this function. Operation — When the brakes are applied, the throttle servo will pulse intermittently.
-
Page 69
— DELY : Delay Sets the delay from brake operation to ABS operation. When set to 0%, the ABS func- tion is activated without any delay. At 50%, the ABS function is activated after a delay of approximately 1 second and at 100%, the ABS function is activated after a delay of approximately 2 seconds. -
Page 70
(Cycle speed adjustment) CYCL Select setting item «CYCL» by Cycle speed (CYCL) 1 ~ 30 (UP) or (DN) button. Use the (+) Initial value: 10 or (-) button to adjust the pulse speed (cycle). CYCL (Cycle) — The smaller the set value, the faster the pulse speed. Trigger point (TG.P) (Trigger point setup) TG.P… -
Page 71
Fail Safe Unit When the T4PL is used with the Futaba fail safe unit (FSU-1), it will operate as de- scribed below. However, FSU-1 cannot be used at the high speed mode. — When the FSU-1 is connected to the throttle channel, and the A.B.S. function has been activated, the FSU-1 LED will flash each time the servo operates. -
Page 72: Brake Mixing «Brake
Brake Mixing «BRAKE» (Throttle, 3rd /4th channel system) This function is used when the front and rear brakes must be adjusted independently such as a 1/5 scale GP car. This mixing uses the 2nd CH for the rear brakes and the 3rd or 4th CH for the front brakes, or controls the front brakes with the 3rd CH and 4th CH servos, or controls the 2nd CH by independent throttle and controls the rear and front brakes with the 3rd CH and 4th CH.
-
Page 73
Brake mixing adjustment Adjustment buttons (Brake mixing function ON/OFF) — Use the (+) and (-) buttons to Using the (UP) or (DN) button, select «MODE» of <CH3> for make adjustments. CH3 brake and «MODE» of <CH4> for CH 4 brake. Press the (+) or (-) key and set the function to the «ACT»… -
Page 74: 4Ws Mixing «4Ws Mix
4WS Mixes «4WS MIX» (Steering, 3rd channel system) This function can be used with crawlers and other 4WS type vehicles. It is mixing which uses the 1st CH to control the front side steering and the 3rd CH to control the rear side steering.
-
Page 75
4WS mixing adjustment (Preparation) Since this function is used by switching the type of 4WS with a switch, the switch used by the function select switch func- tion (page 62) is set. Setup buttons (4WS type selection) — Use the (+) and (-) buttons to Operate the (UP) or (DN) button, and select the setting item make adjustments. -
Page 76: Dual Esc Mixing «Dual Esc
Dual ESC mixing «DUAL ESC» (Throttle system) This function is mixing used with crawlers and other 4WD type vehicles and uses the 2nd CH to control the front motor controller and the 4th CH to control the rear motor controller. Front drive only, rear drive only, or both front and rear drive can be selected using any programmed DT (digital trim) button.
-
Page 77
Adjustment buttons The programmed DT button is used to select the drive type — Use the (+) and (-) buttons to as shown in the figure below. make adjustments. — Return to the initial value by pressing the (+) and (-) buttons (Rear side travel adjustment) simultaneously (approx. -
Page 78: Throttle Mode «Thr Mode
Throttle Mode «THR MODE» (Throttle system) This menu has the following 4 functions: — Servo neutral mode, which sets the throttle neutral ratio to 7:3 or 5:5 — Idle up, which raises the idling speed when starting the engine to improve engine start- ing performance of a gasoline car (boat) — Neutral brake, which applies the brakes at the neutral position of the throttle trigger — Throttle off (engine cut), which stops the engine of a boat, etc.
-
Page 79: Idle-Up «Idlup
MC950CR, MC851C, MC602C, MC402CR, and other Futaba MC (Motor Controllers) will not enter the operation mode if the neutral position is not confirmed.
-
Page 80: Neutral Brake «Ntbrk
However, when using the MC950CR, MC851C, MC602C, MC402CR, or other Futaba MC (Motor Controller), confirm that the MC is in the neutral position and the set is in the operation mode before setting the neutral brake function switch to ON, the same as the idle up function (P79).
-
Page 81: Throttle Off (Engine Cut) «Thoff
Throttle off (engine cut) «THOFF» This is a function select switch function. The throttle off function ON/OFF switch must be set. The engine cut function stops the engine of a boat, etc. by operating the throttle servo to the slow side by switch regardless of the position of the throttle trigger and the setting of other functions (reverse function setting is effective).
-
Page 82: Esc Link Function «Mc Link
ESC Link Function «MC LINK» This is a special function which lets you set the contents of the Link software which performs Futaba speed controller (ESC), MC950CR, MC851C, MC602C, MC402CR, etc. variable frequency and other data changes at the T4PL transmit- ter.
-
Page 83
-Select the setting item «MODE» by (UP) or (DN) button, and select «READ» by (+) or (-) button. -Select the setting item «EXEC» by (UP) or (DN) button, and press the (+) and (-) buttons simultaneously for 1 second or longer. -«COMPLETE!»… -
Page 84
ESC function setup Setup item selection Select the setting item by (UP) or (DN) button. — Select by by (UP) or (DN) but- Set the value by (+) and (-) button. ton. The currently set item is Adjustment buttons displayed here. — Use the (+) and (-) buttons to make adjustments. -
Page 85
LBP-(LOW BATTERY VOLT) 2.5V~6V DBA-(DEAD BAND) ±2μs~±50μs 2.5V~7.5V for MC950CR Same as Link software Dead Band. This sets the range (neutral point range) over which the Same as Link software Low Bat Protection ESC does not respond to transmitter throttle operation. This setting cuts off the output to the motor when the The larger the set value, the wider this range. -
Page 86: Timer Function «Timer
Timer Function «TIMER» Use the timer by selecting one of the three timers UP TIMER, DOWN TIMER, and LAP TIMER. Select the timer display (UP TIMER) (HOME screen) (DOWN TIMER) (LAP TIMER) UP TIMER function Up timer function — This function can be used to count the time between start and stop, etc. — The timer repeatedly starts and stops each time the switch is pressed and accumulates the time between each start and stop.
-
Page 87
FUEL DOWN TIMER function Fuel down timer function — This function is primarily used to check the refueling time of a gaso- line car. (The remaining time is displayed.) — Each time the switch is pressed, the timer is restarted and the set time is reset. -
Page 88
Timer screen Timer selection First, select the type of timer at the «TYPE» item. The setup screen varies depending on the type of timer. This figure shows the UP TIMER setup screen. Lap list Time display The lap memor y Minute display (m) d a t a c a n b e Second display (s) -
Page 89
Using the up timer Adjustment buttons (Preparation) — Use the (+) and (-) buttons to Select the setting item «TYPE» by (UP) or (DN) button. make adjustments. — Press the (+) and (-) buttons Press the (+) or (-) button and select «UP». simultaneously (approx. -
Page 90
Using the fuel down timer Adjustment buttons (Preparation) — Use the (+) and (-) buttons to Select the setting item «TYPE» by (UP) or (DN) button. make adjustments. — Press the (+) and (-) buttons Press the (+) or (-) button and select «DOWN». simultaneously (approx. -
Page 91
Adjustment buttons Using the Lap timer — Use the (+) and (-) buttons to (Preparation) make adjustments. — Press the (+) and (-) buttons Select the setting item «TYPE» by (UP) or (DN) button. simultaneously (approx. 1 sec) Press the (+) or (-) button and select «LAP». to return to the HOME screen. -
Page 92: Lap List «Lap List
Lap List «LAP LIST» The lap list is displayed when checking the lap memory data (lap times) memorized by lap timer (P91) operation. — After the lap timer starts, the lap times are memorized sequentially each time the switch is operated. — If the timer is stopped after the set ALRM time has elapsed, the final lap time is mem- orized and the total time after the last lap is automatically written.
-
Page 93: System Functions «System
Therefore, always set the battery type to match the power source used. Always set the battery type to «N5/L2» especially when using a Futaba rechargeable type battery. If the set is used at «DRY4» setting, the time from low battery alarm to system stopping will become extremely short.
-
Page 94
Select MENU (HOME screen) (MENU screen) (SYSTEM menu screen) Setup items CONTRA :Contrast BK-LHT :Backlighting mode LHT-TM :Backlighting time BATT :Battery type BUZZER :Buzzer tone OPE-TM :Power off forgotten alarm MENU :Menu screen character *ADJUSTER :Correction of wheel and trigger (SYSTEM menu screen) Adjustment buttons — Use the (+) and (-) buttons to… -
Page 95
Select the setting item «BATT» by (UP) or (DN) DRY4, N5/L2 button, and select the mode by pressing the (+) or (-) button. «N5/L2» :Futaba rechargeable type battery «DRY4» :Dry cell battery (alkaline battery recommended) 4 batteries Voltage display When BATT is set to dr y cell… -
Page 96
(Changing the power off forgotten alarm setting) Select the setting item «OPE-TM» by (UP) or The power off forgotten alarm (DN) button, and use the (+) and (-) buttons to (OPE-TM) 10m, OFF select the power off forgotten alarm mode. «10m»… -
Page 97: Adjuster «Adjuster
If an adjustment point is not within a fixed range, correction is not performed and the correction data is not updated. When the correction data is not updated even though cor- rection was performed again, please contact a Futaba Radio Control Customer Center. Adjuster «ADJUSTER»…
-
Page 98
If an adjustment point is not within a fixed range, correction is not performed and the correction data is not updated. When PUSH +/- is not displayed even though correction was performed again, please contact a Futaba Radio Control Customer Center. When ending setting, return to the ADJUSTER screen by pressing the (CT) button. -
Page 99: Reference
Under other conditions, the set will not operate, or the specified performance will not be displayed even if it operates. In addition, it may cause servo trouble. Futaba will not be responsible for damage, etc. caused by combination with the products of other companies.
-
Page 100: Warning Displays
Always set the battery type to «N5/L2» especially when using a Futaba rechargeable type battery. If the set is used at «DRY4» setting, the time from low battery alarm to system stopping will become ex-…
-
Page 101
High voltage alarm LCD screen: If a battery exceeding 8V is used with the T4PL, an au- dible alarm will sound and «BATTERY HIGH VOLT- AGE» will be displayed on the LCD screen. Immediately remove the battery because it may cause the T4PL to malfunction. -
Page 102: Optional Parts
Optional Parts The following parts are available as 4PL options. Purchase them to match your applica- tion. For other optional parts, refer to our catalog. Transmitter Battery When purchasing a transmitter battery use the following: Part name HT5F1700B (6V/1700mAh) Ni-MH battery FT2F2100B (6.4V/2100mAh) Li-Fe battery Please do not use the transmitter batteries HT5F1700B and FT2F2100B as the receiver’s battery.
-
Page 103
FEDERAL COMMUNICATIONS COMMISSION INTERFERENCE STATEMENT (for U.S.A.) This equipment has been tested and found to comply with the limits for a Class B digital device, pursuant to Part 15 of the FCC Rules. These limits are designed to provide rea- sonable protection against harmful interference in a residential installation. -
Page 104
While this manual has been carefully written, there may be inadvertent errors or omissions. Please contact our service center if you feel that any corrections or clarifications should be made. FUTABA CORPORATION Phone: +81 475 32 6982, Facsimile: +81 475 32 6983…
This manual is also suitable for:
4pl-2.4g
Не могу найти инструкцию.Помогите
manuals.hobbico.com/fut/4pl-2_4ghz-manual.pdf
Спасибо,но она на английском.
Впрочем,нашёл уже на русском.
Спасибо,но она на английском.
Впрочем,нашёл уже на русском.
Подскажи где найти на русском.
Подскажи где найти на русском.
vk.com/doc42689562_437183051
vk.com/doc42689562_437183051
Большое спасибо
4-х канальная аппаратура Futaba 4PL FASST (с приемником) 2.4G — FU4PLR2104GFID: 39201
ID: 39201Артикул: FU4PLR2104GF
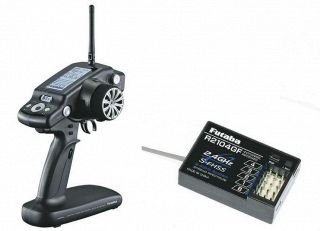
Модель Futaba 4PL-R2104GF-F24P1DX
Компьютерная 4-х канальная система радиоуправления Futaba 4PL 2.4Ghz с технологией передачи данных на частоте 2.4Ghz. В аппаратуре предусмотрены миксы для краулеров и моделей 5 масштаба! Благодаря применению технологии передачи данных на частоте 2.4Ghz. Передатчик использует всего 4 батарейки типа АА!
Комплектация:
- Передатчик управления Futaba 4PL S-FHSS/FHSS 2.4G
- Приёмник Futaba R2104GF S-FHSS 2.4
Необходимо докупить:
- 4 батарейки типа АА.
- ХарактеристикиХар-ки
- Доставка
- Оплата
- Отзывы (0)
- Вопросы (0)
| Рабочая частота: | 2.4G |
| Количество каналов: | 4 |
| Бренд (комплектующие): | Futaba |
Магазин RC-TODAY.RU осуществляет доставку заказов как собственной курьерской службой, так и различными транспортными компаниями.
Доставка по Москве
Самовывоз из магазина RC-TODAY.RU —БЕСПЛАТНО
Мы находимся:г. Москва, 6-й монетчиковский пер., д. 8с1 (3 минуты пешком от метро Павелецкая)
Время работы: Ежедневно с 09:00 до 21:00
Сделайте заказ любым удобным для Вас способом, наш менеджер свяжется с Вами для согласования даты и времени Вашего приезда.
Как только заказ будет скомплектован, мы Вам позвоним и отправим смс-уведомление.
В пределах МКАД, при заказе от 7000 рублей —Бесплатно, при оплате на сайте
В пределах МКАД, при заказе до 7000 рублей —300 руб.
Если вы находитесь за МКАД, то цена доставки зависит от адреса и рассчитывается в корзине.
Срок доставки — 1-2 дня. В рабочие дни минимальный интервал доставки — 3 часа, в выходные и праздничные дни — 8 часов.
Если Вы находитесь за МКАД, то срок доставки — 1-2 дня, а минимальный интервал доставки — 8 часов.
Просим учесть, что крупногабаритные товары мы доставляем только до подъезда. Подъём до квартиры осуществляется за отдельную плату.
Доставка по России
СДЭК
cdek.ru
Оплата заказа возможна наложенным платежом. Срок доставки 2-14 рабочих дней, в зависимости от удалённости города.
EMS-Почта России
pochta.ru/emspost
Оплата заказа возможна наложенным платежом. Срок доставки 5-14 рабочих дней, в зависимости от удалённости города.
Почта России
pochta.ru
Отправка заказа только по полной предоплате. Срок доставки 1-10 рабочих дней, в зависимости от удалённости города.
Деловые линии, Байкал сервис, ПЭК и любые другие ТК
Если Вы знаете транспортную компанию в своём городе, которая устраивает Вас больше, чем предложенные нами, просто сообщите нам об этом, и мы отправим Ваш заказ через неё. Если указанная Вами транспортная компания не предоставляет возможности оплаты заказа при получении, необходимо сделать предоплату за заказ в полном объёме. Доставка, как правило, оплачивается при получении заказа. Сроки доставки зависят от ТК и удалённости региона. При этом забор транспортной компанией с нашего склада оплачивается клиентом вне зависимости от стоимости заказа.
Стоимость доставки зависит от веса и цены товара и рассчитывается оператором при подтверждении заказа.
Самовывоз из пунктов выдачи
Практически в каждом городе у нас есть пункт выдачи заказов от наших партнёров. Уточнить адреса и контакты пункта выдачи Вы можете любым удобным для Вас способом: по телефону, в онлайн чате, а также при оформлении заказа в корзине.
Оплата наличными
Оплата производится наличными средствами курьеру при получении заказа. Если для Вас это самый удобный вариант оплаты, просто выберите «Оплата при доставке» при оформлении заказа или, если Вы оформляете заказ по телефону, сообщите об этом менеджеру. Эта опция доступна не только для жителей Москвы и Санкт-Петербурга, но и для жителей остальных регионов России. Оплачивайте свои заказы по факту получения. Ваш комфорт – наш приоритет.
Оплата через сайт
Вы можете оплатить свой заказ непосредственно при оформлении заказа. Для этого нужно выбрать способ оплаты «Картами Visa, MasterСard» или «WebMoney, Яндекс.Деньги, QIWI». После этого Вы автоматически перейдете на сайт платежной системы и сможете произвести оплату любым удобным для Вас способом. Если вы оформляете заказ по телефону, попросите менеджера отправить Вам ссылку на оплату заказа онлайн на Вашу электронную почту. Перейдя по этой ссылке, Вы попадете на сайт платежной системы, где сможете оплатить заказ.
Оплата банковским переводом
При оформлении заказа выбираете тип оплаты «Банковский перевод». В форме заказа необходимо заполнить электронную почту – на нее мы отправим Вам ссылку на счет с нашими реквизитами. Если вы оформляете заказ по телефону, попросите менеджера прислать Вам счет на оплату. Оплатить счет Вы можете в любом банке. Пожалуйста, указывайте в комментарии к платежу номер Вашего заказа!
Покупка в кредит
На нашем сайте есть возможность покупки в кредит! Теперь это совсем не сложно — всего 5 шагов и в течение 2-х минут Вам сообщат решение по онлайн кредиту. Или закажите заказ звонка и вам во всем поможет менеджер банка! Кредит от 5000 до 300 000 тысяч рублей. Процентная ставка от 19 до 26%. Все условия кредитования вы можете узнать во вкладке КупитьВкредит.
Хит продаж

Батарейки типа АА Energizer Plus повышенной емкости
Объявления
- Начало
- » Мануалы
- » Мануалы для автомодельной аппаратуры(Rus)(Eng)
#1 Авг. 20, 2012 16:24:41
Мануалы для автомодельной аппаратуры(Rus)(Eng)
HK-310 3 Channel 2.4ghz FHSS
клуб [rcstv.ru]
Чтоб мудро жизнь прожить, знать надобно не мало,
Два важных правила запомни для начала:
Ты лучше голодай, чем что попало есть,
И лучше будь один, чем вместе с кем попало.
Омар Хайям.
Офлайн
- Пожаловаться
- | Ответить
#2 Авг. 20, 2012 16:44:55
Мануалы для автомодельной аппаратуры(Rus)(Eng)
FLYSKY 2.4Ghz 3-Channel LCD Transmitter and Receiver Set FS-GT3B

клуб [rcstv.ru]
Чтоб мудро жизнь прожить, знать надобно не мало,
Два важных правила запомни для начала:
Ты лучше голодай, чем что попало есть,
И лучше будь один, чем вместе с кем попало.
Омар Хайям.
Отредактировано ANDREY (Янв. 23, 2014 17:20:50)
Офлайн
- Пожаловаться
- | Ответить
#3 Авг. 20, 2012 17:36:47
Мануалы для автомодельной аппаратуры(Rus)(Eng)
Futaba 3PM-X 3-Channel 2.4GHz FASST
клуб [rcstv.ru]
Чтоб мудро жизнь прожить, знать надобно не мало,
Два важных правила запомни для начала:
Ты лучше голодай, чем что попало есть,
И лучше будь один, чем вместе с кем попало.
Омар Хайям.
Офлайн
- Пожаловаться
- | Ответить
#4 Авг. 20, 2012 18:00:08
Мануалы для автомодельной аппаратуры(Rus)(Eng)
Spektrum DX3R DSM2 3CH

клуб [rcstv.ru]
Чтоб мудро жизнь прожить, знать надобно не мало,
Два важных правила запомни для начала:
Ты лучше голодай, чем что попало есть,
И лучше будь один, чем вместе с кем попало.
Омар Хайям.
Офлайн
- Пожаловаться
- | Ответить
#5 Дек. 1, 2012 12:58:53
Мануалы для автомодельной аппаратуры(Rus)(Eng)
Futaba 4PK-2.4GHz
клуб [rcstv.ru]
Чтоб мудро жизнь прожить, знать надобно не мало,
Два важных правила запомни для начала:
Ты лучше голодай, чем что попало есть,
И лучше будь один, чем вместе с кем попало.
Омар Хайям.
Офлайн
- Пожаловаться
- | Ответить
#6 Авг. 15, 2013 01:10:20
Мануалы для автомодельной аппаратуры(Rus)(Eng)
Spektrum DX3s DSM2 3CH с телеметрией.

клуб [rcstv.ru]
Чтоб мудро жизнь прожить, знать надобно не мало,
Два важных правила запомни для начала:
Ты лучше голодай, чем что попало есть,
И лучше будь один, чем вместе с кем попало.
Омар Хайям.
Офлайн
- Пожаловаться
- | Ответить
#7 Янв. 23, 2014 17:53:14
Мануалы для автомодельной аппаратуры(Rus)(Eng)
Futaba 4PLS 4-Channel 2.4GHz S-FHSS Telemetry Radio
клуб [rcstv.ru]
Чтоб мудро жизнь прожить, знать надобно не мало,
Два важных правила запомни для начала:
Ты лучше голодай, чем что попало есть,
И лучше будь один, чем вместе с кем попало.
Омар Хайям.
Офлайн
- Пожаловаться
- | Ответить
#8 Янв. 23, 2014 18:02:03
Мануалы для автомодельной аппаратуры(Rus)(Eng)
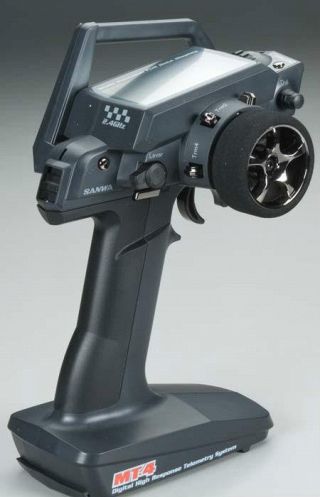
Airtronics MT-4 Pistol 2.4 w/Telemetry
клуб [rcstv.ru]
Чтоб мудро жизнь прожить, знать надобно не мало,
Два важных правила запомни для начала:
Ты лучше голодай, чем что попало есть,
И лучше будь один, чем вместе с кем попало.
Омар Хайям.
Офлайн
- Пожаловаться
- | Ответить
#9 Янв. 23, 2014 18:05:41
Мануалы для автомодельной аппаратуры(Rus)(Eng)
Hitec Aggressor SRX Pro 3Ch 2.4GHz

клуб [rcstv.ru]
Чтоб мудро жизнь прожить, знать надобно не мало,
Два важных правила запомни для начала:
Ты лучше голодай, чем что попало есть,
И лучше будь один, чем вместе с кем попало.
Омар Хайям.
Офлайн
- Пожаловаться
- | Ответить
|
10 898 торговых марок |
Diplodocs позволяет скачать несколько типов инструкций для наилучшего использования изделий FUTABA. |

|
Поиск торговой марки Расширенный поиск Вам требуется помощь по использованию изделия?
Где моя инструкция?
Все инструкции по категориям |
Вы можете скачать с сайта Diplodocs инструкцию FUTABA в формате PDF.Введите модель изделия FUTABA…
|
 Новые инструкции для FUTABA
| Часто задаваемые вопросы | Свяжитесь с командой Diplodocs | Недавно искали… Последние поступления |
Карта сайта | |||||||||
|
Торговые марки на букву A B C D E F G H I J K L M N O P Q R S T U V W X Y Z # |
Copyright © 2005 — 2012 — Diplodocs —
Все права защищены.
Торговые марки принадлежат их соответствующим владельцам.