В данном материале постараемся объяснить общий принцип настройки времени в G-Shock-ах на примере конкретных популярных моделей [которых очень много на рынке], подробно разобрать последовательность действий. Логика работы в целом повторяется от модели к модели, вам лишь важно разобраться в базовых процессах настройки. Имейте ввиду, настройка стрелок и электронного времени совершенно разная. Цифровым дисплеем легче оперировать, а вот для стрелок нужно чуть ли не запоминание последовательности действий. В рамках статьи будет описан процесс настройки времени для: GA-100, GA-110, GA-120, G-2900, GA-1000.
Если же ваши часы не попали в данный список, все равно можете ознакомиться с настройкой, либо перейти к полному список инструкций для G-Shock-ов.
Выберите одну из серий
[tabs slidertype=”top tabs”] [tabcontainer] [tabtext]GA-100[/tabtext] [tabtext]GA-110[/tabtext] [tabtext]GA-120[/tabtext][tabtext]G-2900[/tabtext][tabtext]GA-1000[/tabtext] [/tabcontainer] [tabcontent] [tab]
Рассмотрим настройку времени для серии GA-100

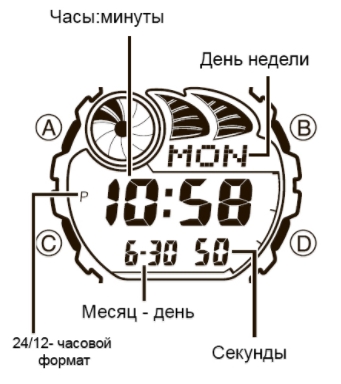
Для начала нужно убедиться, что часы находятся в режиме текущего времени. В этом режиме на дисплее отображается время [или дата] и день недели, а индикатор режима часов указывает на Time [не у всех часов есть такой индикатор]. Примерно так выглядит режим текущего времени:

Далее нам нужно перейти в режим настройки времени.
- Зажмите кнопку “A” [в левом верхнем углу] примерно на 3 секунды. На цифровом дисплее начнет мигать код города, для которого настроено текущее время.
- Нажимайте кнопку “C” для перехода к нужному параметру настройки в следующей. последовательности:
- Если вы выбрали для коррекции секунды (изображение секунд мигает), нажмите кнопку “D” для сброса значения счетчика секунд в 00. Если вы нажмете кнопку “D” при значении счетчика секунд между 30 и 59, то значение счетчика установится в 00 и 1 прибавится к счетчику минут, если значение счетчика секунд будет между 00 и 29, то изменение счетчика минут не произойдет.
- Для изменения значений минут и т.д., используйте кнопку “D” для увеличения и кнопку “ В” для уменьшения значений.
- После окончания установок нажмите кнопку “ А” для возврата в Режим Текущего Времени.
- Удерживание кнопок в нажатом состоянии позволяет изменять значения с большей скоростью.
- День недели устанавливается автоматически в соответствии с датой.
- Вы можете установить значение времени в диапазоне от 2000г. до 2099г.
Бывают ситуации, когда аналоговое время не совпадает с цифровым, т.е. стрелки и цифры показывают разное время. Это может произойти по нескольким причинам: сильно магнитное воздействие на часы или удар и т.п. В таком случае нужно вручную откорректировать положение стрелок.
- В Режиме Текущего Времени нажимайте и удерживайте кнопку “D” до появления индикатора “H-SET” в верхнем левом дисплее и индикатора “Sub” в правом верхнем дисплее.
- Проверьте положение стрелки скорости – она должна указывать на значение 50, то есть находиться в положении 12-ти часов. Если этого не происходит, нажмите кнопку “D” для перемещения стрелки в нужное положение.

- После этого нажмите кнопку “С”.
- Проверьте положение стрелок часов и минут – они должны находиться в положении 12-ти часов. Если этого не происходит, нажимайте кнопки “D” и “В”для перемещения стрелок в нужное положение.
- После этого нажмите кнопку “А” для возврата к дисплею текущего времени.
- Часовая и минутная стрелки при этом должны перейти в положения значения текущего времени, а стрелка скорости – в положение 0.
- Нажатие кнопки “С” на данном этапе вернет Вас к установкам пункта 2.
[/tab] [tab]
Рассмотрим настройку времени для серии GA-110

Сперва нужно перевести часы в режим текущего времени. В этом режиме на дисплее отображается время [или дата] и день недели, а индикатор режима часов указывает на Time [не у всех часов есть такой индикатор]. Так выглядит режим текущего времени у GA-110:

- Зажмите кнопку “ А” [около 3 секунд] в Режиме Текущего Времени. Изображение кода города начнет мигать.
- Нажимайте кнопку “ С” для перехода из разряда в разряд в следующей последовательности:

- Если вы выбрали для коррекции секунды (изображение секунд мигает), нажмите кнопку “D” для сброса значения счетчика секунд в 00. Если вы нажмете кнопку “D” при значении счетчика секунд между 30 и 59, то значение счетчика установится в 00 и 1 прибавится к счетчику минут, если значение счетчика секунд будет между 00 и 29, то изменение счетчика минут не произойдет.
- Для изменения значений минут и т.д., используйте кнопку “D” для увеличения и кнопку “ В” для уменьшения значений.
- Удерживание кнопок в нажатом состоянии позволяет изменять значения с большей скоростью.
- День недели устанавливается автоматически в соответствии с датой.
- Вы можете установить значение времени в диапазоне от 2000г. до 2099г.
- По окончании установок нажмите кнопку “ А” для возврата в Режим Текущего Времени.
- Если вы не будете нажимать кнопки в течение некоторого времени, то часы автоматически перейдут в Режим Текущего Времени.
В случае отклонения стрелочного времени от цифрового [от магнитного воздействия или сильного удара] нужно произвести следующие действия:
- В Режиме Текущего Времени нажимайте и удерживайте кнопку “D” до появления индикатора “H-SET” в верхнем левом дисплее и индикатора “Sub” в правом верхнем дисплее.
- Проверьте положение стрелки скорости – она должна указывать на значение 50, то есть находиться в положении 12-ти часов. Если этого не происходит, нажмите кнопку “D” для перемещения стрелки в нужное положение.

- После этого нажмите кнопку “С”.
- Проверьте положение стрелок часов и минут – они должны находиться в положении 12-ти часов. Если этого не происходит, нажимайте кнопки “D” и “В”для перемещения стрелок в нужное положение.
- После этого нажмите кнопку “А” для возврата к дисплею текущего времени.
-
- Часовая и минутная стрелки при этом должны перейти в положения значения текущего времени, а стрелка скорости – в положение 0.
- Нажатие кнопки “С” на данном этапе вернет Вас к установкам пункта 2.
[/tab] [tab]
Рассмотрим настройку времени для серии GA-120

Переведите часы в режим текущего времени [он как правило по умолчанию]. На дисплее отображается время [или дата] и день недели, а индикатор режима часов указывает на Time [не у всех часов есть такой индикатор]. Вот так это выглядит:

Далее нам нужно перейти в режим настройки времени.
- Зажмите кнопку “ А” [около 3 секунд] в Режиме Текущего Времени. Изображение кода города начнет мигать.
- Нажимайте кнопку “ С” для перехода из разряда в разряд в следующей последовательности:

- Если вы выбрали для коррекции секунды (изображение секунд мигает), нажмите кнопку “D” для сброса значения счетчика секунд в 00. Если вы нажмете кнопку “D” при значении счетчика секунд между 30 и 59, то значение счетчика установится в 00 и 1 прибавится к счетчику минут, если значение счетчика секунд будет между 00 и 29, то изменение счетчика минут не произойдет.
- Для изменения значений минут и т.д., используйте кнопку “D” для увеличения и кнопку “ В” для уменьшения значений.
- Удерживание кнопок в нажатом состоянии позволяет изменять значения с большей скоростью.
- День недели устанавливается автоматически в соответствии с датой.
- Вы можете установить значение времени в диапазоне от 2000г. до 2099г.
- По окончании установок нажмите кнопку “ А” для возврата в Режим Текущего Времени.
-
- Если вы не будете нажимать кнопки в течение некоторого времени, то часы автоматически перейдут в Режим Текущего Времени.
При сильном ударе или воздействии магнитного поля на часы, стрелочное время может не совпадать с цифровым. Для этого производитель предусмотрел возможность ручной корректировки стрелок:
- В Режиме Текущего Времени нажимайте и удерживайте кнопку “D” до появления индикатора “H-SET” в верхнем левом дисплее и индикатора “Sub” в правом верхнем дисплее.
- Проверьте положение стрелки скорости – она должна указывать на значение 50, то есть находиться в положении 12-ти часов. Если этого не происходит, нажмите кнопку “D” для перемещения стрелки в нужное положение.

- После этого нажмите кнопку “С”.
- Проверьте положение стрелок часов и минут – они должны находиться в положении 12-ти часов. Если этого не происходит, нажимайте кнопки “D” и “В”для перемещения стрелок в нужное положение.
- После этого нажмите кнопку “А” для возврата к дисплею текущего времени.
- Часовая и минутная стрелки при этом должны перейти в положения значения текущего времени, а стрелка скорости – в положение 0.
- Нажатие кнопки “С” на данном этапе вернет Вас к установкам пункта 2.
[/tab] [tab]
Рассмотрим настройку времени для серии G-2900

Сначала нужно перевести часы в режим текущего времени. В этом случае на циферблате отображается текущее время и дата. Так выглядит режим текущего времени в G-Shock G-2900:
- Нажмите и удержите кнопку “ А” в Режиме Текущего времени, до тех пор, пока значение секунд не замигает на дисплее, что означает переход к режиму установки.
- Нажмите кнопку “ С” для перехода мигающего значения из разряда в разряд в следующей последовательности:

- Когда разряд, который Вы хотите изменить, находится в мигающем состоянии, используйте кнопки «D» и « В» для увеличения или уменьшения значения.
- Установив желаемые значения для всех параметров, нажмите кнопку “ А”, чтобы вернуться к показу текущего времени.
- Выбранная в Режиме Текущего времени 12- или 24-часовая система измерения времени распространяется также на все остальные режимы.
- При использовании 12-часового формата слева от значения часа в диапазоне от полудня до 11:59 вечера появляется индикатор Р. От полуночи до 11:59 утра на экране находится индикатор А.
- При использовании 24-часового формата время отображается в диапазоне от 0:00 до 23:59 без индикатора.
- День недели устанавливается автоматически в соответствии с датой.
[/tab] [tab]
Рассмотрим настройку времени для серии GA-1000

Перед настройкой убедитесь, что часы находятся в режиме текущего времени — на экране отображается текущее время и дата, а стрелка режимов указывает на Time. Так выглядит режим текущего времени у GA-1100:

- В Режиме Текущего Времени зажмите и удерживайте кнопку “ А” до то появления мигающей индикации “ADJ”. Отпустите кнопку, после этого на дисплее появляется индикация “SET”, что означает начало установок.

- Нажимайте кнопку “D” для перехода от установки к установке в следующей последовательности:

- Если вы выбрали для коррекции секунды (изображение секунд мигает), нажмите кнопку “ Е” для сброса значения счетчика секунд в 00. Если вы нажмете кнопку “ Е” при значении счетчика секунд между 30 и 59, то значение счетчика установится в 00 и 1 прибавится к счетчику минут, если значение счетчика секунд будет между 00 и 29, то изменение счетчика минут не произойдет.
- Для изменения значений минут и т.д. используйте кнопку “ Е” для увеличения и кнопку “ В” для уменьшения выбранного значения.
- Для выбора кода города используйте кнопки “ Е” и “ В”.
- Для включения (ON)/выключения (OFF) летнего времени нажимайте кнопку “Е”.
- Для переключения 12/24 часового формата представления времени нажимайте кнопку “ Е”. При выбранном 12-ти часовом формате представления времени индикатор “ Р” обозначает значение времени после полудня.
- По окончании установок нажмите кнопку “ А”.
Сильный удар или воздействие магнитного поля могут сбить стрелки, и аналоговое время не будет совпадать с цифровым. В таком случае нужно вручную откорректировать положение стрелок:

- В Режиме Текущего Времени нажимайте и удерживайте кнопку “ А” до появления индикации “H-SET” в верхнем дисплее. Секундная стрелка при этом переместится в положение 12:00 часов. После нажатия кнопки “ А” на дисплее часов сначала появится индикатор “ADJ”, будьте внимательны и не отпускайте кнопку “ А” до появления индикации “HSET”.
- Для выбора стрелок при корректировке используйте кнопку “D”: секундная стрелка – часовая стрелка – минутная стрелка – стрелка дисплея режимов. При этом соответствующая стрелка будет переходить в положение 12-ти часов, а на нижнем дисплее часов будут появляться следующие значения: 00 при выборе секундной стрелки, 0:00 часовой и минутной стрелки, Sub стрелки дисплея режимов
- Если стрелка не переходит в положение 12-ти часов, перейдите к 3 пункту.
- Для корректировки положения стрелок используйте кнопки “ Е” и “ В”. Удерживание кнопки в нажатом состоянии позволяет изменять значение с большей скоростью.
- По окончании установок нажмите кнопку “ А”.
[/tab] [tab]
[/tab] [/tabcontent] [/tabs]
Мы рассмотрели настройку времени только для самых популярных серий часов G-Shock. Если у вас другая модель, тогда инструкцию для нее вы можете найти по номеру модуля часов G-Shock:
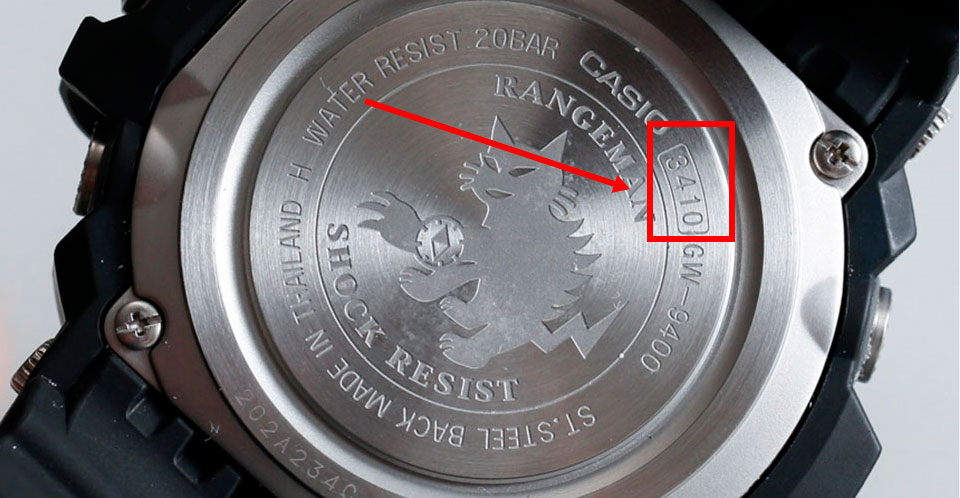
*номер модуля расположен на задней крышке часов — как правило 4 цифры (легче всего искать с помощью поиска CTRL + F на клавиатуре)
1545 — DW-5600
2548 — G-2900
3031 — G-9000
3088 — G-9100
3095 — G-7700
3095 — G-7710
3147 — GW-9200
3150 — GW-9010
3151 — GLX-5600
3159 — GW-M5610
3159 — GW-5000
3159 — GW-5510
3178 — GLS-5600
3179 — GW-6900
3184 — GWF-1000
3193 — GW-7900
3194 — G-7900
3194 — GLX-6900
3195 — GW-2310
3217 — GW-9110
3221 — GX-56
3222 — GWX-5600
3230 — DW-6900
3230 — DW-6901
3232 — DW-9052
3255 — GDF-100
3261 — G-9300
3261 — GW-9300
3263 — GD-100
3266 — GF-8250
3267 — GD-200
3269 — GR-8900
3279 — GWX-8900
3285 — G-8900
3295 — GLX-150
3400 — GD-110
3402 — GD-X6900
3402 — GLS-100
3403 — GD-350
3405 — GW-M500
3410 — GW-9400
3417 — GB-6900
3418 — GB-X6900
3419 — GB-5600
3420 — GD-X6930E
3422 — GLS-8900
3427 — GD-120
3434 — GD-400
3436 — GMD-S6900
3445 — GWF-D1000
3450 — GLS-6900
4778 — AW-590
4778 — AW-591
5081 — GA-100
5087 — GW-4000
5121 — GW-3000
5146 — GA-110
5158 — G-100
5173 — GW-3500
5229 — GA-120
5229 — GA-200
5229 — GA-201
5230 — AWG-M100
5230 — AWG-M510
5240 — GW-A1000
5255 — GA-150
5259 — GA-300
5277 — GAC-100
5302 — GA-1000
5311 — GW-A1100
5357 — GA-310
5369 — MTG-S1000
5371 — GWN-1000
5398 — GA-400
5410 — GPW-1000
5411 — MRG-G1000
5413 — GBA-400
5425 — GMA-S110
5441 — GA-1100
5443 — GN-1000
5444 — GST-W100
5444 — GST-W110
5444 — GAW-100
5445 — GST-S100
5445 — GST-S110
5445 — GAS-100
5455 — MTG-G1000
5463 — GWG-1000
5475 — GST-210
5475 — GST-200
5476 — GG-1000
5477 — GWN-Q1000
5478 — GA-500
5485 — GAX-100
5502 — GPW-2000
5513 — GST-B100
5515 — GST-W120
5515 — GST-W130
5518 — GMA-S120
5522 — GA-700
5522 — GA-710
5524 — GST-W300
5524 — GST-W310
5531 — MRG-G2000
5535 — GA-800
5540 — GMA-S130
Все равно не нашли инструкцию и не знаете как настроить точное время? Тогда вам нужно посмотреть на наш главный каталог инструкций. Вероятно, у вас не G-Shock, а другое модельное направление (либо мы еще не успели обновить информацию).
На чтение 4 мин Опубликовано 26.08.2023 Обновлено 26.08.2023
Часы G Shock Resist 20 Bar Casio – популярная модель среди любителей активного образа жизни. Они известны своей прочностью и надежностью. Но с такими мощными и функциональными часами может быть немного сложно разобраться, особенно если вы впервые их покупаете. В этой подробной инструкции мы расскажем вам, как настроить часы G Shock Resist 20 Bar Casio и использовать все их возможности.
Перед началом настройки важно убедиться, что вы полностью зарядили часы G Shock Resist 20 Bar Casio. Подключите часы к источнику питания с помощью USB-кабеля и дайте им зарядиться до полной емкости. Это позволит избежать возможных проблем во время настройки.
Когда у вас есть полностью заряженные часы, можно приступать к настройке. Настройка часов G Shock Resist 20 Bar Casio происходит с помощью кнопок, которые находятся на самом корпусе. Сначала нажмите на кнопку «Mode», чтобы перейти в режим настройки. Затем, используя кнопки «Up» и «Down», выберите нужный параметр для настройки, например, часы или дату.
- Для настройки времени нажмите кнопку «Mode», чтобы выбрать режим настройки времени. Затем используйте кнопки «Up» и «Down», чтобы выбрать нужное время. Нажмите кнопку «Mode» еще раз, чтобы сохранить настройку.
- Для настройки даты нажмите кнопку «Mode» до выбора режима настройки даты. Затем используйте кнопки «Up» и «Down», чтобы выбрать нужную дату. Нажмите кнопку «Mode» еще раз, чтобы сохранить настройку.
- Для настройки будильника нажмите кнопку «Mode», чтобы перейти в режим настройки будильника. Затем используйте кнопки «Up» и «Down», чтобы выбрать нужное время и частоту звучания. Нажмите кнопку «Mode» еще раз, чтобы сохранить настройку будильника.
После того, как вы закончили настройку всех нужных параметров, нажмите кнопку «Mode» для выхода из режима настройки. Теперь ваши часы G Shock Resist 20 Bar Casio готовы к использованию. Не забудьте проверить все настройки, чтобы убедиться, что они работают правильно.
G Shock Resist 20 Bar Casio – это мощные и стильные часы, которые помогут вам оставаться во времени и контролировать свою активность. Надеемся, что эта подробная инструкция помогла вам разобраться в настройке этих часов и наслаждаться ими каждый день.
Шаг 1: Откройте коробку и изучите комплектацию
Прежде чем приступить к настройке часов G Shock Resist 20 Bar Casio, вам необходимо открыть коробку и изучить комплектацию. В комплекте с часами должны быть следующие предметы:
- Часы G Shock Resist 20 Bar Casio
- Инструкция по эксплуатации
- Гарантийный талон
- Упаковка и документы
Часы G Shock Resist 20 Bar Casio являются главным предметом в комплекте. Они имеют ударопрочный корпус и водостойкость до 20 бар, что делает их идеальными для активного образа жизни и занятия спортом.
Инструкция по эксплуатации содержит подробную информацию о настройке, использовании и уходе за часами. Рекомендуется внимательно ознакомиться с инструкцией перед началом настройки, чтобы избежать возможных ошибок.
Гарантийный талон является документом подтверждающим гарантийные обязательства производителя. Чтобы воспользоваться гарантией в случае неисправности часов, вам необходимо сохранить гарантийный талон и чек об оплате.
Упаковка и документы следует также хранить в случае необходимости обращения по гарантии или возврата товара.
Шаг 2: Установите время и дату на часах
После успешной настройки пользовательских настроек, можно приступить к установке времени и даты на часах G Shock Resist 20 Bar Casio. Этот шаг позволит вам использовать часы в соответствии с вашими нуждами и обеспечит их точность в отображении текущего времени.
Чтобы установить время и дату на часах, выполните следующие действия:
- Нажмите кнопку Mode на часах несколько раз, чтобы перейти в режим установки времени и даты.
- Когда на дисплее появится указание на установку времени, нажмите и удерживайте кнопку Adjust.
- Часы начнут мигать. Используйте кнопки Forward и Backward для выбора нужного значения часа.
- Нажмите кнопку Mode, чтобы перейти к установке минут. Снова используйте кнопки Forward и Backward для изменения значений.
- Перейдите к установке даты с помощью кнопок Forward и Backward.
- Нажмите кнопку Mode, чтобы переключиться на установку года, и снова используйте кнопки Forward и Backward для изменения значений.
- Повторите пункт 6 для установки месяца и дня недели.
- Нажмите кнопку Adjust, чтобы завершить процесс установки времени и даты.
Поздравляю! Теперь вы успешно установили время и дату на часах G Shock Resist 20 Bar Casio. Все настройки будут автоматически сохранены, и часы будут показывать текущее время с высокой точностью. Продолжайте использовать и наслаждаться функциональностью ваших часов!
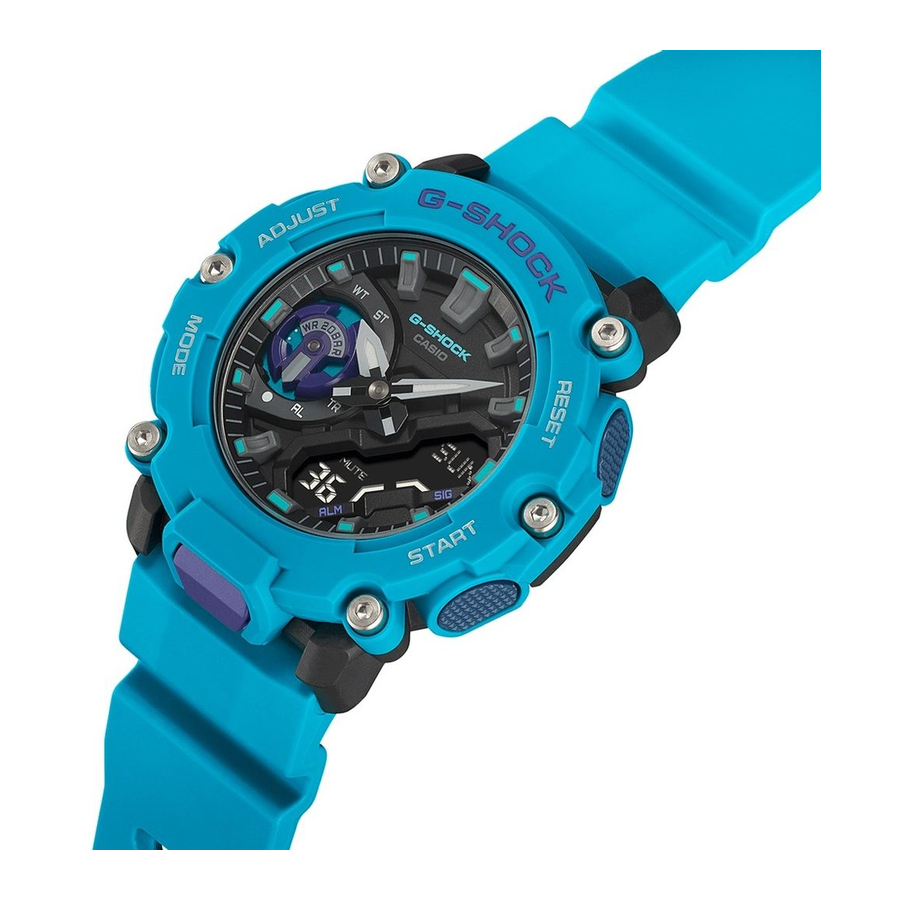
CASIO G-SHOCK GA-2200 — Analog-Digatal Watch Manual
Precautions
Operating Precautions
- Water Resistance
- The information below applies to watches with WATER RESIST or WATER RESISTANT marked on the back cover.
Water Resistance Under Daily Use
| Marking on watch front or on back cover | No BAR mark |
Example of Daily Use
| Hand washing, rain | Yes |
| Water-related work, swimming | No |
| Windsurfing | No |
| Skin diving | No |
Enhanced Water Resistance Under Daily Use
5 Atmospheres
| Marking on watch front or on back cover | 5BAR |
Example of Daily Use
| Hand washing, rain | Yes |
| Water-related work, swimming | Yes |
| Windsurfing | No |
| Skin diving | No |
10 Atmospheres
| Marking on watch front or on back cover | 10BAR |
Example of Daily Use
| Hand washing, rain | Yes |
| Water-related work, swimming | Yes |
| Windsurfing | Yes |
| Skin diving | Yes |
20 Atmospheres
| Marking on watch front or on back cover | 20BAR |
Example of Daily Use
| Hand washing, rain | Yes |
| Water-related work, swimming | Yes |
| Windsurfing | Yes |
| Skin diving | Yes |
- Do not use your watch for scuba diving or other types of diving that requires air tanks.
- Watches that do not have WATER RESIST or WATER RESISTANT marked on the back cover are not protected against the effects of sweat. Avoid using such a watch under conditions where it will be exposed to large amounts of sweat or moisture, or to direct splashing with water.
- Even if a watch is water resistant, note the usage precautions described below. Such types of use reduce water resistance performance and can cause fogging of the glass.
- Do not operate the crown or buttons while your watch is submersed in water or wet. ー Avoid wearing your watch while in the bath.
- Do not wear your watch while in a heated swimming pool, sauna, or any other high temperature/high humidity environment.
- Do not wear your watch while washing your hands or face, while doing housework, or while performing any other task that involves soaps or detergents.
- After submersion in seawater, use plain water to rinse all salt and dirt from your watch.
- To maintain water resistance, have the gaskets of your watch replaced periodically (about once every two or three years).
- A trained technician will inspect your watch for proper water resistance whenever you have its battery replaced. Battery replacement requires the use of special tools. Always request battery replacement from your original retailer or from an authorized CASIO service center.
- Some water-resistant watches come with fashionable leather bands. Avoid swimming, washing, or any other activity that causes direct exposure of a leather band to water.
- The inside surface of the watch glass may fog when the watch is exposed to a sudden drop in temperature. No problem is indicated if the fogging clears up relatively quickly. Sudden and extreme temperature changes (such as coming into an air conditioned room in the summer and standing close to an air conditioner outlet, or leaving a heated room in the winter and allowing your watch to come into contact with snow) can cause it to take longer for glass fogging to clear up. If glass fogging does not clear up or if you notice moisture inside of the glass, immediately stop using your watch and take it to your original retailer or to an authorized CASIO service center.
- Your water-resistant watch has been tested in accordance with International Organization for Standardization regulations.
- Band
- Tightening the band too tightly can cause you to sweat and make it difficult for air to pass under the band, which can lead to skin irritation. Do not fasten the band too tightly. There should be enough room between the band and your wrist so you can insert your finger.
- Deterioration, rust, and other conditions can cause the band to break or come off of your watch, which in turn can cause band pins to fly out of position or to fall out. This creates the risk of your watch falling from your wrist and becoming lost, and also creates the risk of personal injury. Always take good care of your band and keep it clean.
- Immediately stop using a band if you even notice any of the following: loss of band flexibility, band cracks, band discoloration, band looseness, band connecting pin flying or falling out, or any other abnormality. Take your watch to your original retailer or to a CASIO service center for inspection and repair (for which you will be charged) or to have the band replaced (for which you will be charged).
- Temperature
- Never leave your watch on the dashboard of a car, near a heater, or in any other location that is subject to very high temperatures. Do not leave your watch where it will be exposed to very low temperatures. Temperature extremes can cause your watch to lose or gain time, to stop, or otherwise malfunction.
- Leaving your watch in an area hotter than +60°C (140°F) for long periods can lead to problems with its LCD. The LCD may become difficult to read at temperatures lower than 0°C (32°F) and greater than +40°C (104°F).
- Impact
- Your watch is designed to withstand impact incurred during normal daily use and during light activity such as playing catch, tennis, etc. Dropping your watch or otherwise subjecting it to strong impact, however, can lead to malfunction. Note that watches with shock-resistant designs (G-SHOCK, BABY-G, G-MS) can be worn while operating a chain saw or engaging in other activities that generate strong vibration, or while engaging in strenuous sports activities (motocross, etc.)
- Magnetism
- The hands of analog and combination (analog-digital) watches are moved by a motor that uses magnetic force. When such a watch is close to a device (audio speakers, magnetic necklace, cell phone, etc.) that emits strong magnetism, the magnetism can cause timekeeping to slow down, speed up, or stop, resulting in the incorrect time being displayed.
- Very strong magnetism (from medical equipment, etc.) should be avoided because it can cause malfunction of your watch and damage to electronic components.
- Electrostatic Charge
- Exposure to very strong electrostatic charge can cause your watch to display the wrong time. Very strong electrostatic charge even can damage electronic components.
- Electrostatic charge can cause the display to go blank momentarily or cause a rainbow effect on the display.
- Chemicals
- Do not allow your watch to come into contact with thinner, gasoline, solvents, oils, or fats, or with any cleaners, adhesives, paints, medicines, or cosmetics that contain such ingredients. Doing so can cause discoloration of or damage to the resin case, resin band, leather, and other parts.
- Storage
- If you do not plan to use your watch for a long time, thoroughly wipe it free of all dirt, sweat, and moisture, and store it in a cool, dry place.
- Resin Components
- Allowing your watch to remain in contact with other items or storing it together with other items for long periods while it is wet can cause color on resin components to transfer to the other items, or the color of the other items to transfer to the resin components of your watch. Be sure to dry off your watch thoroughly before storing it and make sure it is not in contact with other items.
- Leaving your watch where it is exposed to direct sunlight (ultraviolet rays) for long periods or failure to clean dirt from your watch for long periods can cause it to become discolored.
- Friction caused by certain conditions (strong external force, sustained rubbing, impact, etc.) can cause discoloration of painted components.
- If there are printed figures on the band, strong rubbing of the printed area can cause discoloration.
- Leaving your watch wet for long periods can cause fluorescent color to fade. Wipe the watch dry as soon as possible after it becomes wet.
- Semi-transparent resin parts can become discolored due to sweat and dirt, and if exposed to high temperatures and humidity for long periods.
- Daily use and long-term storage of your watch can lead to deterioration, breaking, or bending of resin components. The extent of such damage depends on usage conditions and storage conditions.
- Leather Band
- Allowing your watch to remain in contact with other items or storing it together with other items for long periods while it is wet can cause the color of the leather band to transfer to the other items or the color of the other items to transfer to the leather band. Be sure to dry off your watch thoroughly with a soft cloth before storing it and make sure it is not in contact with other items.
- Leaving a leather band where it is exposed to direct sunlight (ultraviolet rays) for long periods or failure to clean dirt from a leather band for long periods can cause it to become discolored.
Exposing a leather band to rubbing or dirt can cause color transfer and discoloration. - Metal Components
- Failure to clean dirt from metal components can lead to formation of rust, even if components are stainless steel or plated. If metal components exposed to sweat or water, wipe thoroughly with a soft, absorbent cloth and then place the watch in a well-ventilated location to dry.
- Use a soft toothbrush or similar tool to scrub the metal with a weak solution of water and a mild neutral detergent, or with soapy water. Next, rinse with water to remove all remaining detergent and then wipe dry with a soft absorbent cloth. When washing metal components, wrap the watch case with kitchen plastic wrap so it does not come into contact with the detergent or soap.
- Bacteria and Odor Resistant Band
- The bacteria and odor resistant band protects against odor generated by the formation of bacteria from sweat, which ensures comfort and hygiene. In order to ensure maximum bacteria and odor resistance, keep the band clean. Use an absorbent soft cloth to thoroughly wipe the band clean of dirt, sweat, and moisture. A bacteria and odor resistant band suppresses the formation of organisms and bacteria. It does not protect against rash due to allergic reaction, etc.
- Liquid Crystal Display
- Display figures may be difficult to read when viewed from an angle.
Note that CASIO Computer Co., Ltd. assumes no responsibility for any damage or loss suffered by you or any third party arising through the use of your watch or its malfunction.
User Maintenance
- Caring for Your Watch
Remember that you wear your watch next to your skin, just like a piece of clothing. To ensure your watch performs at the level for which it is designed, keep it clean by frequently wiping with a soft cloth to keep your watch and band free of dirt, sweat, water and other foreign matter.
- Whenever your watch is exposed to sea water or mud, rinse it off with clean fresh water.
- For a metal band or a resin band with metal parts, use a soft toothbrush or similar tool to scrub the band with a weak solution of water and a mild neutral detergent, or with soapy water. Next, rinse with water to remove all remaining detergent and then wipe dry with a soft absorbent cloth. When washing the band, wrap the watch case with kitchen plastic wrap so it does not come into contact with the detergent or soap.
- For a resin band, wash with water and then wipe dry with a soft cloth. Note that sometimes a smudge like pattern may appear on the surface of a resin band. This will not have any effect on your skin or clothing. Wipe with a cloth to remove the smudge pattern.
- Clean water and sweat from a leather band by wiping with a soft cloth.
- Not operating a watch crown, buttons, or rotary bezel could lead to later problems with their operation. Periodically rotate the crown and rotary bezel, and press buttons to maintain proper operation.
- Dangers of Poor Watch Care
Rust
- Though the metal steel used for your watch is highly rust-resistant, rust can form if your watch is not cleaned after it becomes dirty.
— Dirt on your watch can make it impossible for oxygen to come into contact with the metal, which can lead to breakdown of the oxidization layer on the metal surface and the formation of rust.
- Rust can cause sharp areas on metal components and can cause band pins to fly out of position or to fall out. If you ever notice any abnormality immediately stop using your watch and take it to your original retailer or to an authorized CASIO service center.
- Even if the surface of the metal appears clean, sweat and rust in crevasses can soil the sleeves of clothing, cause skin irritation, and even interfere with watch performance.
Premature Wear
- Leaving sweat or water on a resin band or bezel, or storing your watch an area subject to high moisture can lead to premature wear, cuts, and breaks.
Skin Irritation
- Individuals with sensitive skin or in poor physical condition may experience skin irritation when wearing a watch. Such individuals should keep their leather band or resin band particularly clean. Should you ever experience a rash or other skin irritation, immediately remove your watch and contact a skin care professional.
Battery Replacement
- Leave battery replacement up to your original retailer or authorized CASIO service center.
- Have the batteries replaced only with the type specified in the «Specifications». Use of a different battery type can cause malfunction.
- When replacing the batteries, also request a check for proper water resistance.
- Ornamental resin components may become worn, cracked, or bent over time when subjected to normal daily use. Note that if cracking or any other abnormality indicating possible damage is noticed in a watch submitted for battery replacement, your watch will be returned with an explanation of the abnormality, without the requested servicing being performed.
- Initial Batteries
- The batteries that come loaded in your watch when you purchase it are used for function and performance testing at the factory.
- Test batteries may go dead quicker than the normally rated battery life noted in the «Specifications». Note that you will be charged for replacement of these batteries, even if replacement is required within your watch’s warranty period.
- Low Battery Power
- Low battery power is indicated by large timekeeping error, by dim display contents, or by a blank display.
- Operation while battery power is low can result in malfunction. Replace the batteries as soon as possible.
Before Getting Started…
This section provides an overview of the watch and introduces convenient ways it can be used.
Watch Features
- World Time
You can display the current time in any one of 48 cities around the globe, as well as for UTC (Coordinated Universal Time).
- Alarm
An alarm sounds whenever a time specified by you is reached.
- Stopwatch
The stopwatch measures elapsed time in units of 1/100 second for the first hour, and in one-second units thereafter, for up to 24 hours.
- Timer
Countdown from a start time specified by you. An alarm sounds when the countdown reaches zero.
Note
- The illustrations included in this operation guide have been created to facilitate explanation. An illustration may differ somewhat from the item it represents.
General Guide

- Hour hand
- Minute hand
- Mode hand indicates the current mode.
- LCD
A button
Holding down this button for at least two seconds in the Timekeeping Mode displays the setting screen.
Pressing this button while any setting screen is displayed exits the setting screen.
B button
Pressing this button while any setting screen is displayed will change the setting.
C button
Each press cycles between watch modes.
In any mode, hold down this button for at least three seconds to return to the Timekeeping Mode.
D button
Pressing this button in the Timekeeping Mode cycles between displays.
Pressing this button while any setting screen is displayed will change the setting.
L button
Press to turn on illumination.
Pressing this button twice in succession shifts the hands for easy reading of the digital display area.
Watch Face and Display Indicators

- Displayed while the button operation tone is disabled.
- Displayed while the watch is indicating summer time.
- In the World Time Mode, the mode hand points to [WT].
- In the Stopwatch Mode, the mode hand points to [ST].
- In the Timer Mode, the mode hand points to [TR].
- In the Alarm Mode, the mode hand points to [AL].
- Displayed during p.m. times while 12-hour timekeeping is being used.
- Displayed while a Stopwatch Mode split time measurement operation is in progress.
- Flashes while the watch’s hands are shifted for easier reading.
- Displayed while the hourly time signal is enabled.
- Displayed while an alarm is turned on.
Navigating Between Modes
Each press of (C) cycles between watch modes.
- In any mode, hold down (C) for at least three seconds to return to the Timekeeping Mode.

Cycling Between Timekeeping Mode Digital Display Contents
Each press of (D) in the Timekeeping Mode cycles the display information as shown below.

- Pressing (B) displays the World Time city code and then the current time in that city.
Shifting Hands to Read the Digital Display
Hand shift moves the hands out of the way for easy viewing of display information.
- Press (L) twice in succession.
- This will shift the analog hands to allow easy viewing of display information.

- To return the hands to their normal timekeeping positions, press (L) twice in succession again, or press (C) to change to another mode.
Note
- If you leave the watch with its hands shifted and do not perform any operation for about one hour, the hands will resume normal timekeeping automatically.
Viewing the Face in the Dark
The watch has an LED light that you can turn on for reading in the dark.
- Turning On Illumination
Press (L) to turn on illumination.

- Illumination will turn off automatically if an alarm starts to sound.
- Illumination is disabled while the hands are moving at high speed.
- The light may flicker when it turns on or off.
- Specifying the Illumination Duration
You can select either 1.5 seconds or three seconds as the illumination duration.
- Enter the Timekeeping Mode.
- Hold down (A) for at least two seconds until the name of the currently selected Home City is displayed.
- This is the setting mode. The hands automatically shift out of the way for easy viewing of the display and other indicators.

- Press (C) 10 times to display [LIGHT].

- Use (B) and (D) to select an illumination duration.
[1]: 1.5-second illumination
[3]: 3-second illumination

- Press (A) to exit the setting screen.
Time Adjustment
Use the procedures in this section to adjust the date and time settings.

Adjusting the Current Time Setting
Use the procedures below to adjust the current date and time settings, and to select a Home City.
- Setting a Home City
Use the procedure in this section to select a city to use as your Home City. If you are in an area that observes summer time, you can also configure a summer time setting.
- Enter the Timekeeping Mode.
- Hold down (A) for at least two seconds. Release the button when the name of the currently selected Home City appears on the display.
- This is the setting mode. The hands automatically shift out of the way for easy viewing of the display and other indicators.

- Use (B) and (D) to change the Home City setting.
- Holding down (B) or (D) scrolls through settings at high speed.
- For details refer to the information below.
- Press (C).
- Press (B) or (D) to change the summer time setting.
- [OFF]
The watch always indicates standard time. - [ON]
The watch always indicates summer time.

- Press (A) to complete the setting operation.
Note
- While the setting is being configured, the watch will exit the setting operation automatically after about two or three minutes of non-operation.
- Setting the Time/Date
- Enter the Timekeeping Mode.
- Hold down (A) for at least two seconds. Release the button when the name of the currently selected Home City appears on the display.
- This is the setting mode. The hands automatically shift out of the way for easy viewing of the display and other indicators.
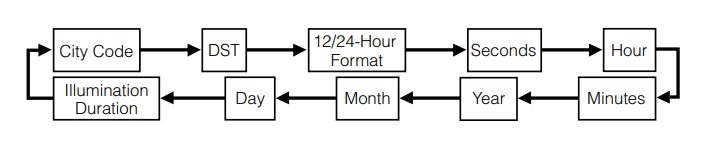
- Keep pressing (C) until the setting you want to change is flashing.
- Each press of (C) moves the flashing to the next setting in the sequence shown below.
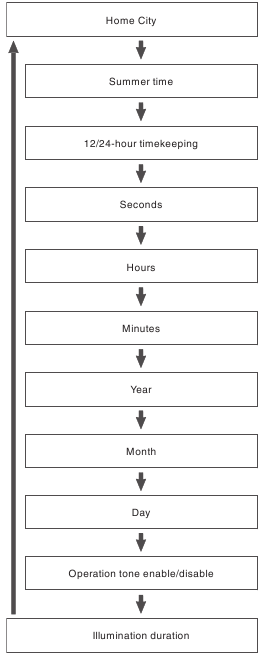
- Configure the date and time settings.
- To reset the seconds to 00: Press (D). 1 is added to the minutes when the current count is between 30 and 59 seconds.
- For all the other settings, use (B) and (D) to change the flashing setting. Holding down (B) or (D) scrolls through settings at high speed.
- Repeat steps 3 and 4 to select time and date settings.
- Press (A) to complete the setting operation.
Note
- While the setting is being configured, the watch will exit the setting operation automatically after about two or three minutes of non-operation.
- Switching between 12-hour and 24hour Timekeeping
You can specify either 12-hour format or 24hour format for the time display.
- Enter the Timekeeping Mode.
- Hold down (A) for at least two seconds. Release the button when the name of the currently selected Home City appears on the display.
- This is the setting mode. The hands automatically shift out of the way for easy viewing of the display and other indicators.
- Press (C) twice.
This causes [12H] or [24H] to flash on the display.

- Press (B) or (D) to select [12H] (12-hour timekeeping) or [24H] (24-hour timekeeping).

- Press (A) to complete the setting operation.
Note
- While the setting is being configured, the watch will exit the setting operation automatically after about two or three minutes of non-operation.
World Time
World Time lets you look up the current time in any one of 48 cities around the globe, and UTC (Coordinated Universal Time).

Checking World Time
- Enter the World Time Mode.
After the currently selected World Time City name appears, the watch will display the current time in that city.
- While in World Time Mode, you can display the World Time City by pressing (A).

World Time City Setting
Use the procedure in this section to select a World Time city. If you are in an area that observes summer time, you can also configure a summer time setting.
- Enter the World Time Mode.
- Use (B) and (D) to display the city you want to specify as a World Time City.
- Holding down (B) or (D) scrolls through settings at high speed.

- To change the summer time setting, hold down (A) for at least two seconds.
- Each time you hold down (A) for at least two seconds, the setting will toggle between summer time and standard time.
- [DST] appears whenever the display current time is summer time.

Note
- While the setting is being configured, the watch will exit the setting operation automatically after about two or three minutes of non-operation.
- While [UTC] is selected as the city, you will not be able to change or check the summer time setting.
- The summer time setting you configure is applied to the currently selected city only. It does not affect other cities.
Swapping Your Home Time and World Time
- Enter the Timekeeping Mode.
- Hold down (B) for at least three seconds.
This causes [SWAP] to flash on the display. Next, your Home City Time and World Time will swap with each other.
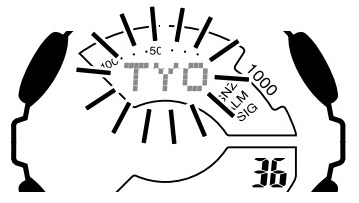
Example: To swap your Home City
(TYO:TOKYO) and World Time City
(NYC:NEW YORK)

Alarm
The watch will beep when an alarm time is reached. You can set up to five different alarms. The hourly time signal causes the watch to beep every hour on the hour.

Configuring Alarm Settings
- Enter the Alarm Mode.
- Use (B) and (D) to select the alarm ([AL1] to [AL5]) whose setting you want to change.

- Hold down (A) for at least two seconds. Release the button when the hours digits start to flash.
- This is the setting mode. The hands automatically shift out of the way for easy viewing of the display and other indicators.
- While the setting is being configured, the watch will exit the setting operation automatically after about two or three minutes of non-operation.

- Use (B) and (D) to change the hour setting.
- Holding down (B) or (D) scrolls through settings at high speed.
- If you are using 12-hour timekeeping, [P] indicates p.m.

- Press (C).
This causes the minutes digits to flash.

- Use (B) and (D) to set the minute setting.
- Press (A) to exit the setting screen.
- [ALM] is shown on the display while an alarm is set.

- To stop the alarm
Pressing any button while the beeper is sounding stops it.
Note
- A beeper sounds for 10 seconds when an alarm time is reached.
- The watch will automatically return from the Alarm Mode to the Timekeeping Mode if you do not perform any operation for about two or three minutes.
Enabling the Hourly Time Signal
- Enter the Alarm Mode.
- Press (B) or (D) to display the hourly time signal screen ([SIG]).

- Press (A) to toggle the hourly time signal between enabled (on) and disabled (off).
- [SIG] is displayed while the hourly time signal is enabled.

Turning Off an Alarm or the Hourly Time Signal
To stop an alarm or the hourly time signal from sounding, perform the steps below to turn it off.
- To have an alarm or hourly time signal sound again, turn it back on.
Note
- Indicators are displayed while any of the alarms or the hourly time signal is turned on.
- The applicable indicators are not displayed while all of the alarms are turned off and/or the hourly time signal is turned off.

- Enter the Alarm Mode.
- Use (B) and (D) to scroll through the alarm
- ([AL1] to [AL5]) and hourly time signal ([SIG]) screens until the one you want to turn off is displayed.

- Press (A) to turn off the displayed alarm or the hourly time signal.
- Each press of (A) toggles between ON and OFF.
- Turning off all of the alarms and the hourly time signal causes [ALM] and [SIG] to disappear from the display.

Note
- If [ALM] remains on the display, it means that at least one alarm is still turned on. To turn off all of the alarms, repeat steps 2 and 3 until the [ALM] indicator is no longer displayed.
Stopwatch
The stopwatch measures elapsed time in 1/100-second units for the first hour, and in 1second units after that for up to 24 hours.

Measuring Elapsed Time
- Enter the Stopwatch Mode.
- Use the operations below to measure elapsed time.

- Elapsed time is shown in 1/100-second units for the first hour of the measurement. After the first hour, elapsed time is shown in one-second units.

- Press (B) to reset the stopwatch to all zeros.
Measuring a Split Time
- Enter the Stopwatch Mode.
- Use the operations below to measure elapsed time.
- Pressing (B) displays the elapsed time from the start of a race up to the point when you pressed the button (split time).

- Elapsed time is shown in 1/100-second units for the first hour of the measurement. After the first hour, elapsed time is shown in one-second units.

- Press (B) to reset the stopwatch to all zeros.
Timing the First and Second Place Finishers
- Enter the Stopwatch Mode.
- Use the operations below to measure elapsed time.

*1 Displays the time of the first finisher.
*2 Displays the time of the second finisher.
- Elapsed time is shown in 1/100-second units for the first hour of the measurement. After the first hour, elapsed time is shown in one-second units.

- Press (B) to reset the stopwatch to all zeros.
Timer
The timer counts down from a start time specified by you. A beeper sounds when the end of the countdown is reached.

Setting the Countdown Start Time
The countdown start time can be set in 1second units up to 24 hours.
- If a timer countdown operation is in progress, reset the timer to its current start time before performing this operation.
- Enter the Timer Mode.
- Hold down (A) for at least two seconds. Release the button when the hour setting starts to flash.
This causes the hours digit to flash.
- This is the setting mode. The hands automatically shift out of the way for easy viewing of the display and other indicators.

- Use (B) and (D) to change the timer hours setting.
- Holding down (B) or (D) scrolls through settings at high speed.
- Press (C).
This causes the minutes digits to flash.

- Use (B) and (D) to change the minutes setting.
- Press (C).
This causes the seconds digits to flash.

- Use (B) and (D) to change the seconds setting.
- Press (A) to complete the setting operation.
Note
- Setting a start time of [0:00 00] will perform a countdown of 24 hours.
- While the setting is being configured, the watch will exit the setting operation automatically after about two or three minutes of non-operation.
Using the Timer
- Enter the Timer Mode.

- Use the operations below to perform a timer operation.

- A beeper will sound for 10 seconds to let you know when the end of a countdown is reached.
- You can reset a paused countdown to its start time, by pressing (B).
- Press any button to stop the tone.
Hand Alignment Adjustment
Strong magnetism or impact can cause the time indicated by the analog hands to become different from the time on the digital display. If this happens, adjust hand alignment.
Adjusting Hand Alignment
- Enter the Timekeeping Mode.
- Hold down (A) for at least five seconds. Release the button when [SUB] starts to flash.
This enables adjustment of mode hand alignment.

- If the mode hand is not aligned with 6 o’clock, use (B) and (D) to align it.
- Holding down (B) or (D) scrolls through settings at high speed.
- Press (C).
This enables adjustment of the hour and minute hands.

- If the hour and minute hands are not at 12 o’clock, use (B) and (D) to align them.
- Press (A) to complete the setting operation.
Other Settings
This section explains other watch settings you can configure.
Enabling the Button Operation Tone
Use the procedure below to enable or disable the tone that sounds when you press a button.
- Enter the Timekeeping Mode.
- Hold down (A) for at least two seconds. Release the button when the name of the currently selected Home City appears on the display.
- This is the setting mode. The hands automatically shift out of the way for easy viewing of the display and other indicators.

- Press (C) nine times.
This causes [KEY♪] or [MUTE] to flash on the display.

- Use (B) and (D) to select [KEY♪] or [MUTE].
[KEY♪]: Operation tone enabled.
[MUTE]: Operation tone muted.

- Press (A) to exit the setting screen.
Note
- While the setting is being configured, the watch will exit the setting operation automatically after about two or three minutes of non-operation.
- Note that alarm and timer tones will still sound even while the operation tone is muted.
Other Information
This section provides non-operational information you also need to know. Refer to this information as required.
City table


- The information in the above table is current as of July 2020.
- Time zones may change and UTC differentials may become different from those shown in the table above.
Specification
Accuracy at normal temperature:
±15 seconds a month
Timekeeping:
Analog
Hour, minute (moves every 20 seconds)
Digital
Hour, minute, second, month, day, day of the week
a.m./p.m.(P)/24-hour timekeeping
Full Auto Calendar (2000 to 2099) Summer Time
World Time:
48 cities (31 time zones) and Coordinated
Universal Time (UTC)
Summer time
Home Time swapping
Stopwatch:
Measurement unit
1/100 seconds (first hour)
1 second (after first hour)
Measuring capacity: 23:59’59» (24 hours)
Measurement Functions:
Elapsed time, cumulative time, split times, 1st and 2nd place finisher times
Timer:
Measuring unit: 1 second
Measuring range: 24 hours
Time setting unit: 1 second
Time setting range: 1 second to 24 hours 10-second beeper when the end of the countdown is reached
Alarm:
Time alarms
Number of alarms 5
Setting units
Hours, minutes
Alarm tone duration: 10 seconds
Hourly time signal: Beep every hour on the hour
Double LED light:
Face LED light: Super Illuminator, afterglow, selectable illumination duration (approximately 1.5 seconds or 3 seconds)
LCD LED backlight: Super Illuminator, afterglow, selectable illumination duration (approximately 1.5 seconds or 3 seconds)
Other:
Operation tone ON/ OFF; hand shift
Power Supply:
SR726W x 2
Battery life: Approximately 3 years
Conditions:
Alarm: Once (10 seconds)/day
Illumination: Once (1.5 seconds)/day
Specifications are subject to change without notice.
Troubleshooting
Indicators and Current Time
Q1 I don’t know what mode the watch is in
You can determine the current mode by checking the mode hand position. Use (C) to navigate between modes.

Q2 Why is the current time indicated by the watch is off by a certain amount of time (nine hours, three hours and 15 minutes, etc.)?
The city setting is not correct. Select the correct setting.
Q3 The current time indicated by the watch is off by one hour or 30 minutes.
The summer time setting is not correct. Select the correct setting.
Q4 The time indicated by the hands is different from the digital time.
Strong magnetism or impact can cause the hands to go out of alignment. Adjust hand alignment.
World Time
Q1 The time for a World Time City is not correct.
The summer time setting (standard time/ summer time) is wrong.
Alarm
Q1. The alarm does not sound.
Is the alarm setting turned on? If it isn’t, turn it on so it will sound.
Other
Q1 I can’t find the information I need here.
Visit the website below. https://world.casio.com/support/

Documents / Resources
References
 Support | CASIO
Download manual
Here you can download full pdf version of manual, it may contain additional safety instructions, warranty information, FCC rules, etc.
Download CASIO G-SHOCK GA-2200 — Analog-Digatal Watch Manual
24.08.2021
Новые G-Shock в индустриальном стиле – GA-2200
Casio GA-2200 — продолжение развития 2000-ой линейки GA.
G-Shock GA-2200 — это новая модель с легким корпусом, усиленным углеродным …
20.04.2021
GSW-H1000 – первые смарт-часы G-Shock от Casio
После долгих ожиданий Casio выпустила умные часы G-Shock с Wear OS от Google.
GSW-H1000 — это первые умные часы G-Shock, которые …
03.04.2021
G-Shock GST-B400 – самые тонкие G-Steel
Casio анонсировала выпуск модели GST-B400.
Часы имеют самый тонкий профиль (12,9 мм) из всех представленных моделей в линейке G-Steel. …
15.09.2020
Первые Gravitymaster c квадро-сенсором Quad Sensor – G-Shock GR-B200
CASIO представила новую авиационную модель линейки Master of G.
G-Shock GR-B200 обладают характерным внешний видом, вдохновленным ручкой …
Даже нам, экспертам часового бизнеса, не верится, что прошло уже более 35-ти лет с тех пор, как коллекция G-Shock начала свое триумфальное шествие по Миру. А то, что за эти годы было произведено и выпущено уже ни много ни мало 100 млн. часов этой поистине легендарной коллекции от компании CASIO, красноречиво говорит о дейстительно глобальных масштабах этого явления. Ведь можно смело утверждать, что сегодня имя «G-Shock» стало не просто именем нарицательным, а еще и синонимом такого понятия, как «неубиваемые часы».

В то же время, несмотря на такую бешеную популярность этих многофункциональных девайсов, вопросов по их настройке с годами вовсе не убавилось, а с неуклонным увеличением их пестрого семейства еще и понемногу прибавляется. Естественно, что количество оригинальных заводских «Инструкций по эксплуатации часов CASIO» тоже выросло в разы за эти годы. А Интернет уже давно завален поисковыми запросами: «как настроить время на G-Shock», «как выставить время на G-Shock», «инструкция к часам CASIO G-Shock», «настроить G-Shock» и т.д. и т.п. Но пока еще факт остается фактом, что появляются эти инструкции сначала на английском, немецком и других наиболее распространённых в мире языках, а уж потом, спустя некоторое время, переводятся на русский и украинский. Чтобы как-то исправить эту ситуацию в лучшую сторону, мы посчитали, что пришло время прямо здесь и прямо сейчас предоставить Вам самые общие и наиболее важные инструкции, как настроить Ваши часы CASIO.
О кнопочной системе управления часами CASIO
Нет ничего удивительного в том, что, разрабатывая свои самые первые часы, инженеры CASIO старались создать такую систему управления часами, которая будет проста, удобна и понятна большинству пользователей. А учитывая тот факт, что первые модели часов CASIO были с жидкокристаллическими дисплеями, то выбор был сделан в пользу кнопочного управления как наиболее эргономичного и надёжного. И этот тип управления в часах CASIO G-Shock до сих пор не теряет своей актуальности, несмотря на нынешнее засилье всевозможных сенсорно-тактильных технологий. Ведь благодаря достаточно крупным кнопкам этими часами можно управлять даже в перчатках (в холодную или зимнюю пору, например).
Итак, управление часами осуществляется тремя, четырьмя, а иногда даже пятью или шестью кнопками, которые чаще всего располагаются попарно на левой и правой боковинах корпуса, а также на нижней части его лицевой стороны. Начнем описание данной системы управления часами с общих принципов их работы и некоторых ее особенностей.
Конструкционно кнопки в часах G-Shock чаще всего могут быть двух типов: выступающие и «приутопленные».
При нажатии на них возможны такие реакции:
- вхождение в настройки;
- переключение между режимами;
- вкл/выкл функций;
- изменение вводимых значений;
- сброс данных до нулевых значений.
Соответственно, варианты самих нажатий могут быть следующие:
- на одну кнопку – однократное; многократное; с удержанием;
- на несколько кнопок – однократное; многократное; последовательное; одновременное с удержанием.
На варианте нажатие «с удержанием» хотелось бы в первую очередь акцентировать ваше внимание, так как именно он наиболее характерен для манипуляций с кнопкой «Настройка» (ADJUST) в большинстве моделей часов CASIO.
Хотите ли Вы произвести общую настройку часов (установить текущее время, часовой пояс, значение календаря т.д.), или же осуществить настройку в какой-либо из функций (будильник, таймер, секундомер и т.д.), Вы должны нажать эту кнопку и некоторое время удерживать ее в нажатом положении, пока не зазвучит подтверждающий звуковой сигнал. Продолжительность нажатия может составлять от 2 – 3 и до 5 – 7 секунд. Подтверждением входа в режим настройки, кроме звукового сигнала, станут для Вас также мигающее символы каких-либо значений на дисплее часов (часового пояса, часов, текущих секунд и т.д.). Иногда в моделях с радиоконтролем приходится произвести нажатие «с удержанием» дважды – последовательно одно за другим. Посему – нажимаем, считаем и ждем!
Вне всякого сомнения, что таким простым и достаточно надежным способом инженеры CASIO решили предотвратить случайные вхождения в режим настройки разными некомпетентными пользователями (детьми, родителями, друзьями и т.д.).
Настройка времени на G-Shock
А теперь на примере одной из популярных моделей G-Shock GA-110 (модуль 5146) с четырьмя торцевыми кнопками мы расскажем, как настроить время на часах G-Shock.
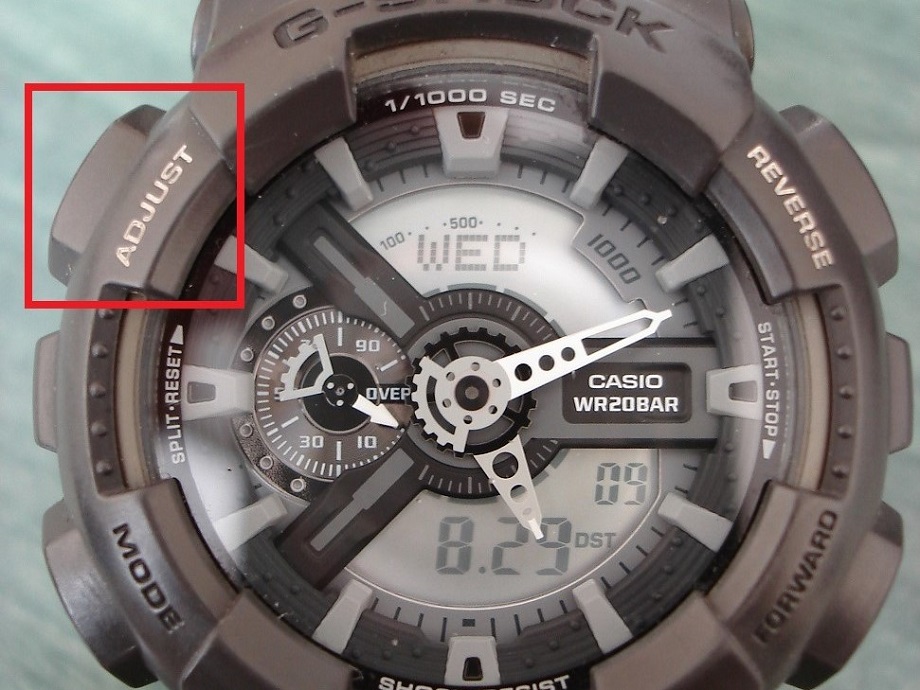
Итак, если смотреть на часы со стороны дисплея, то по левой стороне расположены кнопки: «Настройка» (ADJUST) – в верхней части, и «Режим» (MODE) – в нижней части.
Соответственно, справа находятся кнопки: «Назад» (REVERSE) – в верхней части, и «Вперед» (FORWARD) – в нижней части.
Для начала общий настройки часов вы должны убедиться, что находитесь в Режиме Текущего времени (см. верхний рисунок). На дисплее отображаются данные: день недели, число, месяц и текущие секунды или день недели, часы, минуты и секунды. Если вы видите на дисплее другую информацию, то последовательными нажатиями на кнопку «Режим» (MODE) перейдите в Режим Текущего Времени.
- Для входа в режим общей настройки необходимо нажать и удерживать нажатой кнопку «Настройка» (ADJUST), пока не прозвучит короткий звуковой сигнал, и не начнет мигать значение часового пояса. Если у вас это получилось – наши Вам поздравления – Вы вошли в режим настройка часов CASIO G-Shock! Далее, нажимая на кнопку «Назад» (REVERSE) или кнопку «Вперед» (FORWARD), выберете необходимый вам часовой пояс. Для Украины это Афины (ATH) или Каир (CAI).
- Нажимаем на кнопку «Режим» (MODE) и попадаем в выбор стандартного или летнего (DST) времени. Нажимая на кнопку «Вперед» (FORWARD), мы его включаем или выключаем (ON/OFF). Вследствие чего к текущему времени автоматически прибавляется или от него отнимается 1 час.
- Нажимаем на кнопку «Режим» (MODE) и попадаем в выбор отображения цифрового времени в «12-часовом» или «24-часовом» формате. Нажимая на кнопку «Вперед» (FORWARD), выбираем значение «12H» или «24H».
- Нажимаем на кнопку «Режим» (MODE) и попадаем в коррекцию секунд текущего времени. Нажимая на кнопку «Вперед» (FORWARD), мы сбрасываем их значение к нулевым показателям, руководствуясь надежным источником сигналов точного времени.
- Еще раз нажимаем на кнопку «Режим» (MODE) и попадаем в выбор значения часов текущего времени. Далее, нажимая на кнопку «Назад» (REVERSE) или кнопку «Вперед» (FORWARD), выбираем необходимое значение часов.
- Нажимаем на кнопку «Режим» (MODE) и попадаем в выбор значения минут текущего времени. Далее, нажимая на кнопку «Назад» (REVERSE) или кнопку «Вперед» (FORWARD), выбираем необходимое значение минут.
- Нажимаем на кнопку «Режим» (MODE) и попадаем в выбор значения текущего года. Далее при необходимости изменить это значение нажимаем на кнопку «Назад» (REVERSE) или кнопку «Вперед» (FORWARD) для выбора соответствующего года.
- Нажимаем на кнопку «Режим» (MODE) и попадаем в выбор значения текущего месяца. Далее, нажимая на кнопку «Назад» (REVERSE) или кнопку «Вперед» (FORWARD), выбираем необходимое значение месяца (повторяем, что делаем это при необходимости внести изменения).
- Нажимаем на кнопку «Режим» (MODE) и попадаем в выбор значения числа. Далее, нажимая на кнопку «Назад» (REVERSE) или кнопку «Вперед» (FORWARD), выбираем необходимое значение числа (повторяем, что делаем это при необходимости внести изменения).
- И наконец, нажав на кнопку «Режим» (MODE), мы попадаем в выбор продолжительности свечения светодиодной подсветки (LT) часов. Далее, нажимая на кнопку «Вперед» (FORWARD), выбираем необходимое значение LT1 или LT2, то бишь, 1,5 сек или 3 сек свечения подсветки. Кстати, эта одна из важнейших функций, изначально встроенных в часы CASIO G-Shock, уже давно заслуживает на отдельную статью, посвященную особенностям ее конструкции и эксплуатации. Еще раз нажав на кнопку «Режим» (MODE), мы снова попадаем в выбор часового пояса, а это значит, что мы совершили полный круг общей настройки часов.
- Теперь, нажав на кнопку «Настройка» (ADJUST), мы выходим из режима настройки часов. Стрелки часов при этом самостоятельно (автоматически) перейдут в положение, соответствующее только что установленному текущему времени.
Кстати, если Вам не требуется производить полную настройку часов, то, нажав на кнопку «Настройка» (ADJUST), вы можете выйти из режима настройки часов на любом из вышеперечисленных этапов.
Искренне будем надеяться, что теперь вопрос «Как настроить часы G-Shock?» для Вас, уважаемый читатель, стал не столь сложным, как это было ранее и Вы с еще большей радостью и пользой будете долгие годы «юзать» ваши любимые часы CASIO. Используйте по максимуму богатую функциональность ваших часов в вашей повседневной жизни и не ограничивайтесь лишь минимальными возможностями той или иной модели. В случае же любых затруднений, возникших у Вас с настройкой часов G-Shock как, впрочем, и любых других моделей часов CASIO, мы рекомендуем Вам обратиться в ближайший магазин ТС ДЕКА и воспользоваться помощью наших продавцов-консультантов. Также, можно обратиться и в Сервисный центр ДЕКА, где квалифицированные мастера настроят Вам любую из моделей часов, приобретенных как через Интернет-магазин ДЕКА, так и в любом другом нашем магазине.