Ссылка: ibamy.ru/torrent-file-Y29nNE1KQjZWTUpMb3lWS2ljbkFsQmJMWXhza2FFdFAzWE1IMzRwVS9URTNCSXVqV0NwenRIdnA1RUFuOEVZWEFUQVNXSzVDMHhNY0lKekRvUmYyQzVMYnJoa0RQSGJQd3A5OEV4UmdjUG5WYVhSZWUwRFd1Z1A4MngyRnNlKzEyUlpOaVFtSExMd3ViOGJ5UzlKVFRvcDViVHREYkU2TXBSalhxZnNHMktuM0ZjS1BrbGRobEVrWEh1ak1aRjg1.torrent
Дизель генератор jcb g45qx — цена оптовая. Описание товара дизель-генераторы jcb отвечают требованиям гостов, международным стандартам uni en iso 9001:2000, а также имеют соответствующие сертификаты подтверждающее их качество. Закрытые дизель-генераторы используются в том случае, когда есть ограничения по уровню шума, либо же на открытой местности. Специальный кожух дизель-генератора дает возможность использовать электростанции в любых погодных условиях. В дизельных электростанциях установлены двигатели ведущих мировых производителей, а также собственную разработку компании jcb —двигатель dieselmax. Дизель-генераторы могут работать круглосуточно и не нуждаются в остановке для профилактических проверок. Технические характеристики: основной режим:41 ква / 33 квт резервный режим:45 ква / 36 квт двигатель:yanmar число цилиндров:равно четырем объем двигателя:3,5 литра подача воздуха:естественным притоком объем топливного бака:66 литра компания электромотор киев. Дизель-генератор jcb технические характеристики. Подключение jcb atp1 к jcb cp1 через шину локальной сети контроллеров can обеспечивает возможность использования функций контроля и отображения на дисплее информации о состоянии. Дизельные электростанции jcb предлагаются сегодня в линейке необходимые требования и условия эксплуатации дизель-генераторных установок на конкретных объектах, предлагая генераторы jcb мощностью до 3000 ква. Дизельные электростанции рекомендации по монтажу. Настоящее руководство по эксплуатации и техоб-служиванию составлено в качестве помощи опера-тору при эксплуатации и техобслуживании дизель-генераторной. дизельные электростанции предназначены для запуска настоящее руководство по эксплуатации и техобслуживанию. Как и jcb, компания является лидером на рынке производства дизельных двигателей. Добавьте накопленные компанией jcb опыт и знания в области планирования, производства и эксплуатации всего, от одиночных генераторов до целых электростанций, и вы получите. Инструкция к генераторной установке. дизель-генератор разработан как составное устройство для обеспечения отличной и надежной работы. Закрытые дизельные генераторы — отправлено в модельный ряд: закрытые дизельные генераторы. 16 фев 2019 инструкция по запуску дизельной электростанции 200квт. Шкаф управления на базе контроллера comap.
Руководство по эксплуатации экскаватора-погрузчика JCB 4CX, JCB 5CX
Скачать инструкцию: генератор дизельный jcb g8qx. Руководство пользователя генератор. Дизель-генераторы jcb технические характеристики инструкция генераторы и дизельные двигатели volvo penta. Четырёхцилиндровый двигатель с прямым впрыском топлива. Эксклюзивная система фиксации крутящего момента позволяет оператору сократить время, а также существенно экономить расход топлива. дизельные электростанции предназначены для запуска настоящее руководство по эксплуатации и техобслуживанию. Дизельные электростанции jcb предлагаются сегодня в линейке необходимые требования и условия эксплуатации дизель-генераторных установок на конкретных объектах, предлагая генераторы jcb мощностью до 3000 ква. Инструкция к генераторной установке. дизель-генератор разработан как составное устройство для обеспечения отличной и надежной работы. Дизель-генераторы jcb технические характеристики инструкция генераторы и дизельные двигатели volvo penta. Дизели тмз 520 д руководство по эксплуатации 048 110 000 рэ suliqabo [03/25] дизель генератор jcb g65qx инструкция по эксплуатации руководства. Инструкция по обслуживанию дизельных электростанций — инструкция по эксплуатации на русском языке; дополнительные опции генератора jcb g 65 qx: автомат ввода резерва (авр) режим работы генератора.
руководство по эксплуатации дизель генератор jcb
16 фев 2019 инструкция по запуску дизельной электростанции 200квт. Шкаф управления на базе контроллера comap. Дизель-генератор jcb технические характеристики. Панель jcb atp1 может взаимодействовать с генератором через двухжильные пусковые беспотенциальные контакторы или через шину локальной сети контроллеров can, соединяющей cp1 и atp1 (не совместимо. Ооо скат дв руководство пользователя дизельной генераторной установки skat дизель-генератор jcb технические характеристики. Дизель-генератор jcb технические характеристики. Система jcb ks1, управление которой производится вручную при помощи ключа зажигания, представляет собой компактную и прочную конструкцию с аналоговым дисплеем и светодиодной сигнализацией. Скачать инструкцию: генератор дизельный jcb g8qx. Руководство пользователя генератор. Наша компания более 17 лет обеспечивает своевременное и качественное сервисное обслуживание и ремонт дизельных генераторов jcb в москве. Инструкция по эксплуатации дизель- генераторной установки. Дизель-генератор разработан как составное устройство для обеспечения отличной и надежной работы. Основные элементы показаны на структурной схеме типовой генераторной установки, хотя для различных. Дгу powerlink с дизельными двигателями powerlink, cummins, perkins. Необходимо тщательно контролировать процесс эксплуатации дизель- генератора в течение 50 часов после первого запуска или после капитального ремонта. Ооо скат дв руководство пользователя дизельной генераторной установки skat дизель-генератор jcb технические характеристики.
JCB Mobile Platform G60RX, G65QX, G80RX, G90QX, G100RX, G115QX, G130RX, G140QX Wiring Diagram
Size: 1.58 MB
Fomat: PDF
Language: English
Brand: JCB
Type of machine: Mobile Platform G60RX, G65QX, G80RX, G90QX, G100RX, G115QX, G130RX, G140QX
Type of document: Wiring Diagram
Model: 9806-6650
Page of number: 22
US $8
Tags:
Description
JCB Mobile Platform G60RX, G65QX, G80RX, G90QX, G100RX, G115QX, G130RX, G140QX Wiring Diagram
Size: 1.58 MB
Fomat: PDF
Language: English
Brand: JCB
Type of machine: Mobile Platform G60RX, G65QX, G80RX, G90QX, G100RX, G115QX, G130RX, G140QX
Type of document: Wiring Diagram
Model: 9806-6650
Page of number: 22
This is Complete Operator’s Manual for JCB GENERATOR SET – G60RX, G65X, G65QX, G80RX, G90X, G90QX, G100RX, G115X, G115QX.
Your machine has been designed and built to the highest standards of quality. It conforms to all current safety regulations. However, the risk of accidents can never be completely excluded. That is why it is essential to observe elementary safety rules and precautions.
Please read this manual carefully, paying particular attention to the instructions concerning safety, operation and maintenance so as to avoid the risk of injury while operating or servicing the machine. Reading operating manual will help you and others avoid personal injury or damage to the machine. The information provided in this manual will provide the operator with the safest and most efficient way to use the machine. Knowing how to operate the machine safely and correctly will enable you to train others to operate the machine.
Use this JCB GENERATOR SET – G60RX, G65X, G65QX, G80RX, G90X, G90QX, G100RX, G115X, G115QX operator’s manual as a guide, Your machine will remain a reliable working tool provided it is kept in good working condition and serviced properly.
Models Covered:
– G60RX
– G65X
– G65QX
– G80RX
– G90X
– G90QX
– G100RX
– G115X
– G115QX
Serial Number 1650000 to 1699999
Manual Covers:
Introduction
Installation
Routine Maintenance
CP1 and CP2 Digital Control Panels
ATP1 Digital Control Panel (option)
Alternator
Engine – General Information
Engine – Identifying the Engine
Engine – Fluids, Lubricants and Capacities
Engine – Routine Maintenance
Engine – Fault Finding
Engine – Technical Data and Specifications
Connection and Wiring Diagrams
Warranty
*****
====================
**Total Pages: 150
**File Format: PDF
**Language: English
**Requirements: Adobe PDF Reader & WinZip
**Compatible: All Versions of Windows & Mac, Linux OS, Iphone, Ipad, Android etc…
NO waiting! You will have instant access to your download! All pages are printable, No shipping fee, No waiting nervously for the postal delivery, you can start doing your repairs right away!
We will always try to get the full satisfaction of our customers. Even after you have purchased this manual, we will pay full attention to any issues, regardless of the nature of the situation.
THE DOWNLOAD LINK WILL ALSO BE SENT TO YOUR E-MAIL.
So please make sure your email address is correct. Don’t Forget to Check Spam / Junk if can’t find the new message in your email inbox immediately.
Any questions please contact: admin@servicemanualperfect.com
Thanks for visiting!
- Manuals
- Brands
- jcb Manuals
- Portable Generator
- G20
- Operator’s manual
-
Contents
-
Table of Contents
-
Bookmarks
Quick Links
OPERATOR’S MANUAL
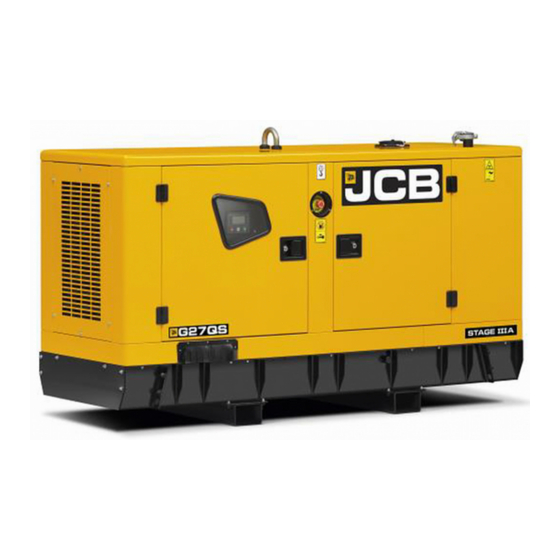
G20, G20QS, G20S, G27, G27QS, G27S, G33, G33QS, G33S,
G34QS, G40, G40QS, G40S, G41QS, G45, G45QS, G45S
EN — 9831/0650 ISSUE 3 — 11/2017
THIS MANUAL SHOULD ALWAYS STAY WITH THE MACHINE
Related Manuals for jcb G20
Summary of Contents for jcb G20
-
Page 1
OPERATOR’S MANUAL GENERATOR G20, G20QS, G20S, G27, G27QS, G27S, G33, G33QS, G33S, G34QS, G40, G40QS, G40S, G41QS, G45, G45QS, G45S EN — 9831/0650 ISSUE 3 — 11/2017 THIS MANUAL SHOULD ALWAYS STAY WITH THE MACHINE… -
Page 2
Operator’s Manual. You must understand and follow the instructions in the Operator’s Manual. If you do not understand anything, ask your employer or JCB dealer to explain it. OPERATOR’S Do not operate the machine without an Operator’s… -
Page 3
Notes: 9831/0650-3… -
Page 4
Table of Contents Contents Page No. Acronyms Glossary ……………………….Introduction About this Manual Model and Serial Number ……………………1 Using the Manual ……………………..1 Left-Hand Side, Right-Hand Side ………………….1 Cross References ……………………..2 Safety Safety — Yours and Others ……………………3 Safety Warnings ………………………. -
Page 5
Table of Contents Fluids and Lubricants ……………………. 84 Maintenance Schedules General …………………………88 How to Use the Maintenance Schedules ………………. 88 Maintenance Intervals ……………………. 88 Pre-start Cold Checks, Service Points and Fluid Levels …………..88 Engine General …………………………. 91 Oil ………………………….. 91 Drive Belt ………………………. -
Page 6
Table of Contents Acronyms Glossary Controller Area Network Crankcase Ventilation Engine Control Module Electronic Control Unit FEAD Front End Accessory Drive High Pressure Valve Liquid Crystal Display Light Emitting Diode Product Identification Number Revolutions Per Minute Society of Automotive Engineers Universal Serial Bus 9831/0650-3… -
Page 7
Notes: 9831/0650-3… -
Page 8
Particular attention must be given to all the safety aspects of operating and maintaining the machine. If there is anything you are not sure about, ask your JCB dealer or employer. Do not guess, you or others could be killed or seriously injured. -
Page 9
Introduction About this Manual Cross References In this manual, cross references are made by presenting the subject title in blue (electronic copy only). The number of the page upon which the subject begins is indicated within the brackets. For example: Refer to: Cross References (Page 2). -
Page 10
If you do not fully understand the warning messages, ask your employer or JCB dealer to explain them. Safety is not just a matter of responding to the warnings. All the time you are working on or with the machine you must be thinking of what hazards there might be and how to avoid them. -
Page 11
Allow the unit to cool before completing any maintenance. Keep tools and objects away from the impeller when the unit is operating. • Use only JCB recommended parts. These parts have been designed to give the engine its optimum performance. Using spurious parts may affect the integrity of the engine. 9831/0650-3… -
Page 12
Product Compliance Your JCB product was designed to comply with the laws and regulations applicable at the time of its manufacture for the market in which it was first sold. In many markets, laws and regulations exist that require the owner to maintain the product at a level of compliance relevant to the product when first produced. -
Page 13
About the Product Description Description Main Component Locations Figure 2. A Access door for the control panel B Access door for engine and radiator C Access panel for exhaust muffler D Access door for alternator E Access door for battery F Forklift pockets 9831/0650-3… -
Page 14
About the Product Description Figure 3. A Fuel tank B Control panel C Emergency stop D Fuel filter/water separator E Fuel tank filler neck F Engine oil filter G Water separator H Exhaust silencer J Radiator cap K Radiator L Inlet manifold M Automatic voltage regulator N Battery P Data plate… -
Page 15
About the Product Description Figure 4. A Rocker cover B Lifting eye C Fuel injectors D Radiator cap E Radiator F Oil filler cap G High pressure pump H ECU (Electronic Control Unit) J Fuel filter/water separator K Oil filter 9831/0650-3… -
Page 16
About the Product Description Figure 5. A Oil filter cap B Air filter C Oil pressure sensor D Starter motor assembly E Fly wheel housing F Oil drain plug (sump) G Oil sump H Alternator 9831/0650-3… -
Page 17
About the Product Product and Component Identification Product and Component Identification General The data plate details the model designation, rating, fuel type, weight, year of manufacture, output rating and other generating set specific information. The data plate is normally located on the right hand side of the alternator terminal box (looking at the alternator end of the generator). -
Page 18
About the Product Product and Component Identification Figure 8. A Engine data label 9831/0650-3… -
Page 19
Keep all of the safety labels clean and readable. Replace a lost or damaged safety label. Make sure the replacement parts include the safety labels where necessary. Each safety label has a part number printed on it, use this number to order a new safety label from your JCB dealer. 9831/0650-3… -
Page 20
About the Product Safety Labels Safety Label Identification Figure 9. 817/70021-2 817 /7003 2 817 /7000 5 817/70032-2 9831/0650-3… -
Page 21
About the Product Safety Labels Table 1. Safety Labels Item Part No. Description Qty. 335/D7133 Hot surfaces. Remove the ignition key and refer to the operator’s manual and service manual. 817/70021 Noise warning. Wear ear protection. 335/D7145 Risk of electrocution. Read the operator’s manual before you operate the machine. -
Page 22
1.5m around the unit. This is for guidance only. For more detailed information contact your JCB dealer. It is also important to note that placing the unit close to solid surfaces e.g. concrete walls may cause an increase in noise and cooling problems. -
Page 23
About the Product Installation and Removal Figure 10. A Distance from wall = 1,500mm B Air inlet C Air outlet Indoor installations Generator Set Room For the correct installation of a generator set in closed premises, the size of the room must allow: •… -
Page 24
About the Product Installation and Removal Recommended Room Dimensions Figure 11. Static Soundproof Generator Set — Side View A Generator set B Access door C Concrete base D Exhaust and hot air outlet duct E Generator length + 200mm 9831/0650-3… -
Page 25
About the Product Installation and Removal Figure 12. Static Soundproof Generator Set — Plan View A Generator set B Air inlet grill C Exhaust and hot air outlet duct D Cable Conduit E Access door F Concrete base G Generator length + 200mm H Generator width + 200mm 9831/0650-3… -
Page 26
About the Product Installation and Removal Figure 13. Canopy Delete Set — Side View A Access door B Exhaust pipe C Exhaust silencer D Hot air outlet ducts E Control panel F Concrete base G Generator set H Generator length + 200mm J Alternator The above figure shows a typical exhaust mounting arrangement. -
Page 27
About the Product Installation and Removal Figure 14. Open Generator Set- Side View A Control panel B Concrete base C Generator set D Generator over all length 9831/0650-3… -
Page 28
About the Product Installation and Removal Figure 15. Open Generator Set — Plan View A Access door B Air inlet grille C Control panel D Generator set E Hot air outlet duct F Concrete base G Cable conduit H Cable exit J Generator length + 200mm K Generator width + 200mm Basic Elements to be Considered… -
Page 29
Operating Generators in Extreme Cold Climates When the JCB Generator is operated in extreme cold climates, care must be taken to prevent the operating temperature of the engine decreasing below a level that will result in the incorrect operation of the engine components. -
Page 30
About the Product Installation and Removal Cold Start For a temperature range between 0°C (32.0°F) to -15°C (59.0°F), the standard QS canopy generator will enable the engine to crank at sufficient speed for cold starting with the standard 10w-40 engine oil. At this temperature, the grid heater is not required on the engine. -
Page 31
About the Product Installation and Removal 3. Use of incorrect fuel will cause the fuel to wax/thicken. This will block filter elements and increase wear in the fuel injection pump and injection systems. At extremely low temperatures trace heating may also be required to prevent the fuel from thickening and waxing. -
Page 32
On a busy site, use a signalman. Before doing any job not covered in this manual, find out the correct procedure. Your local JCB distributor will be glad to advise you. -
Page 33
Operation Operating Safety Regulations Obey all laws, worksite and local regulations which affect you and your machine. Hot Components Touching hot surfaces can burn skin. The engine and machine components will be hot after the unit has been running. Allow the engine and components to cool before servicing the unit. Alcohol and Drugs It is extremely dangerous to operate machinery when under the influence of alcohol or drugs. -
Page 34
Operation Battery Isolator Battery Isolator General The battery isolator switch is used to disconnect the battery from the machine electrics. The switch must be turned to the off position if any maintenance work is to be performed on the machine. Some machine systems perform shut down cycles after the engine stops. -
Page 35
• Ensure that the alternator windings and assembly are not damp, or dirty. Failure to do so could result in damage to the alternator windings. If windings are observed to be damp/dirty contact your JCB Dealer. • With the exception of emergency power generators, the engine should be warmed up with a reduced load before applying the full load. -
Page 36
Operation Instruments Instruments Instrument Panel Introduction Figure 18. A Digital controller B Emergency stop button C Digital controller on/off switch D Main power supply MCCB E Earth leakage relay Operation 1. Turn on the digital controller switch. 2. Wait for few seconds, to allow the controller to power up and display to stabilise. 3. -
Page 37
Operation Instruments 11. Turn on the main power supply MCCB. 12. The generator can now be loaded. 13. If the earth leakage relay trips at this point consult the site electrical installation engineer. 14. To stop the generator, remove any electrical loads. 15. -
Page 38
Operation Instruments Figure 20. Control Push-Buttons Table 3. This button places the module into its STOP/RESET mode. This will clear any alarm conditions for which the triggering criteria have been removed. If the engine is running and the module is put into STOP mode, the module will automatically instruct the generator to unload (`Close Generator’ and `Delayed Load Output 1, 2, 3 &… -
Page 39
Operation Instruments This button will start the engine and run off load. To place the generator on load, digital inputs are required to be assigned to perform this function. If the engine is running off-load in MANUAL/START mode button and a RE- MOTE START SIGNAL becomes present, the module will automatically in- struct the changeover device to place the generator on load (`Close Gener- ator’ and `Delayed Load Output 1, 2, 3 &… -
Page 40
Operation Instruments Icons Description Flexible sender instrumentation screen Appears when the event log is being displayed Current time held in the unit The current value of the scheduler run time and duration ECU (Electronic Control Unit) diagnostic trouble codes Oil filter maintenance timers Air filter maintenance timers Fuel filter maintenance timers Active Configuration… -
Page 41
Operation Instruments Mode Icon An icon is displayed in the Mode Icon section to indicate the mode the controller is currently in. Table 7. Icons Description Appears when the engine is at rest and the unit is in stop mode. Appears when the engine is at rest and the unit is in auto mode. -
Page 42
Operation Instruments Icons Description Appears when the mains supply is available and the mains breaker is open. Appears when the mains supply is available and the mains breaker is closed. Backlight The LED backlight is on if the unit has sufficient voltage while the unit is turned on, unless the unit is cranking for which the backlight is turned off. -
Page 43
Operation Instruments Warning Alarm Icons Warnings are non-critical alarm conditions and do not affect the operation of the generator system, they serve to draw the operators attention to an undesirable condition. By default, warning alarms are self-resetting when the fault condition is removed. However enabling `all warnings are latched’ will cause warning alarms to latch until reset manually. -
Page 44
Operation Instruments Icon Fault Description Generator Over Frequency The generator output frequency has risen above the pre-set pre- alarm setting. CAN ECU Fault The engine ECU has detected an alarm. CAN (Controller Area Network) Da- The module is configured for CAN ta Fail operation and does not detect data on the engine CAN data link. -
Page 45
Operation Instruments Icon Fault Description Low Fuel Level The level detected by the fuel lev- el sensor is below the low fuel level pre-set alarm setting. High Fuel Level The level detected by the fuel level sensor is above the high fuel level pre-set alarm setting. -
Page 46
Operation Instruments Icon Fault Description Over Speed The engine speed has risen above the over speed pre alarm setting. Charge Failure The auxiliary charge alternator voltage is low as measured from the W/L terminal. Low Fuel Level The level detected by the fuel lev- el sensor is below the low fuel level pre-set alarm setting. -
Page 47
Operation Instruments Icon Fault Description Oil Filter Maintenance Alarm Maintenance due for oil filter. Air Filter Maintenance Alarm Maintenance due for air filter. Fuel Filter Maintenance Alarm Maintenance due for fuel filter. Viewing The Instrument Pages Navigation Menu To enter the navigation menu, press both the UP and DOWN buttons simultaneously. Figure 22. -
Page 48
Operation Instruments Navigation Menu Icons Table 12. Icon Description Generator and mains voltage instrumentation Generator instrumentation Mains instrumentation Current and load instrumentation Engine instrumentation Module information Engine DTCs (Diagnostic Trouble Codes) if active Event Log General Navigation It is possible to scroll through the display to view different pages of information by repeatedly operating the up or down navigation buttons, and so on until the last page is reached. -
Page 49
Operation Instruments Home This is the page that is displayed when no other page has been selected and is automatically displayed after a period of inactivity (Page Delay Timer) of the module facia buttons. It also contains the voltage reading of the generator and mains that is measured from the module’s voltage inputs. -
Page 50
Operation Instruments Load These pages contain electrical values of the load, measured or derived from the module’s voltage and current inputs. The power values displayed depend on which supply is on load. • Generator Current (A)Mains Current (A)Load ph-N (kW)Total Load (kW)Load ph-N (kVA)Total Load (kVA)Load ph-N (kVAr)Total Load (kVAr)Power Factor ph-NPower Factor AverageAccumulated Load (kWh, kVAh, kVArh) Figure 28. -
Page 51
Operation Instruments Figure 30. 13:30:00 M T W T F S 3 Wk 2:45:00 A Icon to indicate that the scheduler is B Day and week of scheduled run currently displayed C Start time of scheduled run D Duration of scheduled run Engine DTC (ECU Alarms) If the DSE module is connected to an ECU, this page contains active Diagnostic Trouble Codes (DTC) only if the engine ECU generating a fault code. -
Page 52
Operation Instruments Table 13. icon Fault DTC Description Check Engine Fault The engine ECU has detected a fault not recognised by the DSE module, contact engine manufac- turer for support. Low Oil Pressure The engine ECU has detected that the engine oil pressure has fallen below its configured low oil pres- sure alarm level. -
Page 53
Operation Instruments Figure 32. 23 h 56 m A Icon to indicate that the event log is currently B The engine hours at which the event occurred display C Current operating state of the module D Icon to indicate the electrical trip or shutdown alarm that has been recorded E Number of event displayed out Operation… -
Page 54
Operation Instruments Stopping The Engine Select STOP/RESET mode. The generator is stopped. Figure 34. B Stop/reset mode button Stop/Reset Mode If a digital input configured to panel lock is active, changing module modes will not be possible. Viewing the instruments and event logs are not affected by panel lock. STOP/RESET mode is activated by pressing the STOP/ RESET mode button. -
Page 55
Operation Instruments • Activation of an auxiliary input that has been configured to remote startActivation of the inbuilt exercise scheduler. Starting Sequence To allow for `false’ start requests, the start delay timer begins. Should all start requests be removed during the start delay timer, the unit returns to a stand-by state. If a start request is still present at the end of the start delay timer, the fuel relay is energised and the engine is cranked. -
Page 56
Operation Instruments If the unit has been configured for CAN, compatible ECU’s receives the start command via CAN. If the engine fails to fire during this cranking attempt then the starter motor is disengaged for the crank rest duration after which the next start attempt is made. Should this sequence continue beyond the set number of attempts, the start sequence is terminated and the display shows Fail to Start. -
Page 57
Operation Instruments Figure 35. When activated, the maintenance alarm can be either a warning (set continues to run) or shutdown (running the set is not possible). Resetting the maintenance alarm is normally actioned by the site service engineer after performing the required maintenance. -
Page 58
Operation Instruments Figure 37. Scheduler The controller contains an inbuilt exercise run scheduler, capable of automatically starting and stopping the set. Up to 8 scheduled start/stop sequences can be configured to repeat on a 7-day or 28-day cycle. Scheduled runs may be on load or off load depending upon module configuration. Example Figure 38. -
Page 59
Operation Instruments Depending upon configuration by the system designer, an external input can be used to inhibit a scheduled run. If the engine is running OFF LOAD in AUTO mode and a scheduled run configured to `On Load’ begins, the set is placed ON LOAD for the duration of the schedule. -
Page 60
Operation Instruments The PIN number is automatically reset when the editor is exited (manually or automatically) to ensure security. Commissioning Before the system is started, it is recommended that the following checks are made: 1. The unit is adequately cooled and all the wiring to the module is of a standard and rating compatible with the system. -
Page 61
Operation Operating Environment Operating Environment General Power De-rating Figure 40. Power de-rating depending on operating air temperature above 25 degrees Celsius X Power de-rating (%) Y Air temperature (Celsius) Figure 41. Power de-rating depending on operating altitude higher than 100m above sea level. 1500 3000 1000… -
Page 62
Operation Operating Environment Figure 42. Power de-rating depending on operating fuel temperature at injection pump inlet X Power de-rating (%) Y Fuel temperature (Celsius) Derate Table The generator output is affected by temperature and altitude. The following derate should be applied to take this into account. -
Page 63
Operation Operating Environment Altitude Ambient Temperature 2,000 2,500 3,000 3,500 4,000 4,500 5,000 Table 16. Altitude Ambient Temperature 35°C 40°C 45°C 50°C 55°C 60°C (95.0°F) (103.9°F) (112.9°F) (121.9°F) (130.9°F) (139.9°F) Sea Level 500 M 1,000 1,500 2,000 2,500 3,000 3,500 4,000 4,500 5,000… -
Page 64
Attachments Working with Attachments Attachments Working with Attachments Attachments for your Machine Bunding Tank Figure 43. A Alternator mounting plate B Fuel bunding tank C Engine mounting plate D Bunding tank base frame E Generator AVM 9831/0650-3… -
Page 65
Attachments Working with Attachments Fork Pockets Figure 44. A Fork pocket 9831/0650-3… -
Page 66
Attachments Working with Attachments Transportation Bracket Figure 45. A Transportation bracket B Bolts Transportation brackets is a temporary installation and must be removed after transportation. Loosen the bolts to remove all the four transportation bracket from the generator base. Refer to Figure 45. Oil Drain Valve/Pump Assembly Figure 46. -
Page 67
Attachments Working with Attachments Figure 47. A Drain pump mounting bracket B Drain pump C Hose D Drain valve 9831/0650-3… -
Page 68
Attachments Working with Attachments Oil Pressure Sensor Figure 48. A Bonded seal B Pressure transducer 9831/0650-3… -
Page 69
Attachments Working with Attachments Water Jacket Heater Figure 49. A Block heater thermostat 9831/0650-3… -
Page 70
Attachments Working with Attachments Battery Isolator Figure 50. For G20QS Only A Isolator switch B Cable (Battery negative to isolator) C Battery isolator mounting bracket D Cable (Isolator to starter motor) Figure 51. A Isolator switch B Battery isolator mounting bracket C Cable (Isolator to starter motor) D Cable (Battery negative to isolator) 9831/0650-3… -
Page 71
Attachments Working with Attachments 3 Way Fuel Valve (WFV) Figure 52. A Return line (Engine return to 3WFV) B Forward line (3WFV to lift pump inlet) C 3 way fuel valve D Return line (3WFV outlet to fuel tank) E Forward line (Fuel tank suction to 3WFV) Always refer to the direction label for the selection of internal /external tank. -
Page 72
Attachments Working with Attachments Canopy Delete Z0 Figure 54. Typical Generator A Electrical installation B Skid installation D Fuel system installation 9831/0650-3… -
Page 73
Attachments Working with Attachments CE Hot Guards Figure 55. Typical Hot Guard Plate A Mounting bracket B CE hot guard 9831/0650-3… -
Page 74
Attachments Working with Attachments ATP Panel ATP panel installation differ according to ampere requirements. Figure 56. A Control panel box B Monitoring relay C MCB stopper D Mechanical Interlock E Indicator LED (yellow) F Indicator LED (red) G Power busbar terminal H AC contactor J Voltage surge suppressor K PVC duct… -
Page 75
Attachments Working with Attachments Door Stop Arrangement Figure 58. A Position 1 B Position 2 C Door retainer bracket D Door retainer link 9831/0650-3… -
Page 76
Attachments Working with Attachments Canopy Protection Kit Figure 59. A Canopy protection block 9831/0650-3… -
Page 77
Attachments Working with Attachments Open Set Dedicated Design Figure 60. For G20QS Only A KDI B Battery installation C Fuel system installation D Generator installation E Generator F Base frame 9831/0650-3… -
Page 78
Attachments Working with Attachments Figure 61. For G27QS Only A Electrical installation B Generator installation C Fuel system installation D G drive installation E Battery installation F Base frame 9831/0650-3… -
Page 79
Attachments Working with Attachments Figure 62. For G40QS Only A Electrical installation B Alternator C Battery installation D Fuel system installation E Generator installation F Base frame 9831/0650-3… -
Page 80
Attachments Working with Attachments Figure 63. For G45QS Only A KDI B Electrical installation C Base frame D Generator installation E G drive installation F Battery installation 9831/0650-3… -
Page 81
Attachments Working with Attachments Socket Box Figure 64. A Socket box 9831/0650-3… -
Page 82
Attachments Working with Attachments Lifting Frame Single Point Figure 65. A Lifting hook B Lifting frame 9831/0650-3… -
Page 83
Attachments Working with Attachments Four Point Lifting Kit Figure 66. A Lifting hook 9831/0650-3… -
Page 84
Attachments Working with Attachments Battery Charger 27- 45kVA Figure 67. A Lead acid battery charger B 230V AC, 16A 1P44 plug 9831/0650-3… -
Page 85
Attachments Working with Attachments 20kVA Figure 68. A Lead acid battery charger B 230V AC, 16A 1P44 plug 9831/0650-3… -
Page 86
Attachments Working with Attachments Figure 69. A Current transducer B Earth leakage relay C Din rail D MCB Stopper E Earth leakage bracket 9831/0650-3… -
Page 87
Notes: 9831/0650-3… -
Page 88
Preservation and Storage Cleaning Preservation and Storage Cleaning General 1. Stop the machine and allow it to cool for at least one hour. Do not attempt to clean any part of the machine while it is running. 2. Ensure all electrical loads are disconnected and the generator is made safe by disconnecting at the breaker, turning off the machine and activating the emergency stop switch. -
Page 89
Maintenance Introduction Maintenance Introduction General WARNING The engine has exposed rotating parts. Switch off the engine before working in the engine compartment. Do not use the machine with the engine cover open. WARNING The machine can auto-start You must isolate the engine start circuit before you start service or maintenance procedures. -
Page 90
Machine Modifications This machine is manufactured in compliance with prevailing legislative requirements. It must not be altered in any way which could affect or invalidate its compliance. For advice consult your JCB dealer. Repairs If your machine does not function correctly in any way, get it repaired straight away. Neglect of necessary repairs could result in an accident or affect your health. -
Page 91
If accidentally spilled on to skin, it must be washed off immediately. Protective clothing and eye protection must be worn when handling antifreeze. Hygiene JCB lubricants are not a health risk when used correctly for their intended purposes. However, excessive or prolonged skin contact can remove the natural fats from your skin, causing dryness and irritation. -
Page 92
Maintenance Maintenance Safety The collection and disposal of used oil must be in accordance with any local regulations. Never pour used engine oil into sewers, drains or on the ground. Handling CAUTION The temperature of the hydraulic oil will be high soon after stopping the machine. Wait until it cools before beginning maintenance. -
Page 93
Maintenance Maintenance Safety Battery electrolyte contains sulphuric acid. It can burn you if it touches your skin or eyes. Wear goggles. Handle the battery carefully to prevent spillage. Keep metallic items (watches, rings, zips etc) away from the battery terminals. Such items could short the terminals and burn you. Set all switches to off before disconnecting and connecting the battery. -
Page 94
When the battery reaches the end of its usual life it must be removed from the machine and recycled in an approved way in accordance with local environmental regulations. This service is usually operated by battery vendors. Machine users that cannot find a suitable battery recycling facility should contact their JCB dealer for assistance. -
Page 95
Maintenance Maintenance Schedules Maintenance Schedules General A poorly maintained machine is a hazard. Doing the regular maintenance and lubrication jobs listed in these schedules will help keep the machine in safe running order. Apart from the daily jobs, the schedules are based on machine running hours. Keep a regular check on the hour meter reading. -
Page 96
Maintenance Maintenance Schedules Component Task 1000 2000 5000 6000 Emergency stop switch- Check opera- tion Earth Leakage RCD Check opera- tion and MCB External Power Socket Check condi- tion Battery Terminals and Check voltage Control panel events Check history Bus bar cover safety Check opera- switch tion… -
Page 97
Maintenance Maintenance Schedules Component Task 1000 2000 5000 6000 Generator Alternator ca- Check condi- bles tion Generator Alternator Check tight- Terminals ness (1) If installed (2) Check seals and O-rings are in place, check covers close securely Replace if there is any sign of wear (3) In case of low use: 12 months (4) The period of time that must elapse before checking the filter element depends on the environment in which the engine operates. -
Page 98
Maintenance Engine Engine General Clean Notice: Clean the engine before you start engine maintenance. Obey the correct procedures. Contamination of the fuel system will cause damage and possible failure of the engine. Notice: The engine or certain components could be damaged by high pressure washing systems; special precautions must be taken if the engine is to be washed using a high pressure system. -
Page 99
Maintenance Engine 2. Wait for the oil to drain back into the engine sump before you take a reading. If not, a false low reading may be recorded which can cause the engine to be overfilled. 3. Get access to the engine. 4. -
Page 100
2. Let the engine cool. 3. Remove the FEAD (Front End Accessory Drive) belt cover. 4. Check the belt condition, if worn out or deteriorated contact your JCB dealer for any service requirements. 5. Check the belt tension. Figure 71. -
Page 101
To reconnect from a star to delta connection (for e.g. from 400V to 230V), modify the linking arrangements on the output terminal board. It is not necessary to adjust the voltage regulator. These alterations must be carried out by a suitably qualified and competent person. Consult you JCB dealer. Figure 73. Connecting Lugs 9831/0650-3… -
Page 102
Maintenance Engine Standard alternators are equipped with 12 cables to offer different voltages (e.g. 230/400/460/800V). The alternator must always be earthed by sufficiently rated cable, using one of the inside or outside terminals. For the electrical connections, use wires suitable for the power of the generator and connect them to the terminal board. -
Page 103
Maintenance Engine • Parameters: Volt, Stab, Amp and Hz can be set with trimmers (default) 50/60Hz through a jumper (default). All parameters can be programmed via software • Analogical remote control of output voltage is possible through external voltage (0 to 2, 5V DC) or with a 10 kohm linear potentiometer •… -
Page 104
Maintenance Engine L A.P.O M Alaram LED N 50/60 P Memory Q Serial communication interface R Vext S Sensing T Voltage output V Vmin W Power supply An error in connection may have serious consequences for the unit. Carefully check to make sure that all connections are precise and in accordance with the attached drawings, before turning on the power. -
Page 105
Maintenance Engine Figure 77. Regulator Setup Selection of the sensing scale takes place directly according to the connection on the power terminal board; additional settings can be made with 4 trimmers (VOLT, STAB, AMP and Hz) and 3 jumpers (50/60Hz, JP1 and JP2). -
Page 106
Maintenance Engine Alarms During normal operation and a duty cycle of 50%, an indicator light mounted on the board flashes every two seconds. It flashes differently in the event of intervention or alarm. Figure 78. A Stop B Amp and (Hz or O.S.) C Hz or O.S. -
Page 107
Maintenance Engine Regulators Figure 79. REG TYPE SO7- 2G V Voltage The generator output must be checked under no load conditions, with the correct setting of frequency. The voltage may be adjusted by +/- 5% of the nominal, by acting upon the voltage potentiometer on the electronic regulators. -
Page 108
Maintenance Engine When using the machine in single phase, or for voltages different from the one pre-set at the factory, recalibration of the AMP and STAB potentiometers could be necessary. Intervention of Protection Devices Causes Underspeed Protection Instantaneous Intervention • Speed reduced by 10% of nominal RPM (Revolutions Per Minute). -
Page 109
Maintenance Engine Maintenance operations can be divided into routine and extraordinary maintenance operations. In both cases, all operations must be authorised by the safety representative and they must be carried out when the machine is turned off and insulated from the electric installation or from the power mains. High qualified mechanical or electrical technicians must carry out maintenance operations and any fault search since all operations described hereunder could put personnel in serious danger. -
Page 110
Maintenance Air Filter Air Filter General Check (Condition) 1. Make the machine safe. 2. Get access to the air filter. 3. Check the system hoses for: 3.1. Condition. 3.2. Damage. 3.3. Security. 4. Replace the system hoses if necessary. Replace Do not attempt to wash or clean the elements, they must only be renewed. -
Page 111
Maintenance Air Filter Dust Valve Check (Condition) • Check the dust valve for rips/tears. • Check there are no obstructions. • Check that the dust valve is free of dirt and dust. • Check that the dust valve securely attached to the air filter housing. 9831/0650-3… -
Page 112
B Fuel lift pump Check (Leaks) 1. Make the machine safe. 2. Get access to the engine compartment (if applicable). 3. Check the engine compartment (if applicable), fuel lines and the area below for leaks. 4. If necessary, contact your JCB dealer. 9831/0650-3… -
Page 113
Maintenance Fuel System Engine Fuel Filter Replace 1. Make the machine safe. 2. Get access to the engine compartment 3. Remove the sensor housing. 4. Unscrew and remove the filter element. 5. Fit a new element. Lubricate the gasket of the new cartridge. Do not fill the new cartridge with fuel. 6. -
Page 114
Maintenance Fuel System Figure 86. A Tap B Bowl Figure 87. A Water separator B Maximum level (red line) C Drain plug 9831/0650-3… -
Page 115
Maintenance Cooling System Cooling System Coolant Check (Level) CAUTION The cooling system is pressurised when the coolant is hot. When you remove the cap, hot coolant can spray out and burn you. Make sure that the engine is cool before you work on the cooling system. 1. -
Page 116
Maintenance Cooling System 3. Get access to the radiator. 4. Check the condition of the coolant hoses. 5. Check the radiator and intercooler surfaces for signs of damage. 6. If necessary, contact your JCB dealer for any service requirements. 9831/0650-3… -
Page 117
Maintenance Electrical System Electrical System General Check (Condition) Batteries Batteries used in normal temperate climate applications should not need topping up. In certain conditions (such as prolonged operation in high ambient temperatures or if the alternator overcharges) the electrolyte level should be checked frequently and topped up as necessary. -
Page 118
Maintenance Electrical System Figure 88. 4. Apply a thin layer of petroleum jelly to the terminal posts. Connect The batteries leads will require connecting on initial installation. When connecting the single battery to the machine, always connect the positive terminal first followed by the negative terminal. -
Page 119
Maintenance Electrical System Figure 91. A Cover B Nut C Cable 1 D Handle E Cable 2 F Clamp 1. Make the machine safe. 2. Use the handles to put the battery into its compartment. 3. Connect the cable 1 and the cable 2. 4. -
Page 120
Maintenance Electrical System Battery Cable Installation Figure 92. A Rubber boot 1. Make sure to cover the battery connection with the rubber boot. 2. Lug should not bend, crack or stress during installation. 3. Make sure that lug should not touch to any conducting part. Disconnect CAUTION This component is heavy. -
Page 121
Maintenance Electrical System Figure 94. Twin Battery 12V Machines — Parallel Connection (Example) A Battery B Positive lead C Battery link lead D Negative lead Figure 95. 24 Volt Machines — Series Connection (Example) A Battery B Positive lead C Battery link lead D Negative lead 9831/0650-3… -
Page 122
Maintenance Electrical System Figure 96. A Cover B Nut C Cable 1 D Handle E Cable 2 F Clamp 1. Make the machine safe. 2. Get access to the battery or batteries (depending on the specification of your machine). 3. If installed, move the battery isolator switch to the off position and then remove the key. 4. -
Page 123
The control panel, remote communication (if installed) and other stand-by functions, provide some drain on the battery. JCB recommend that wherever possible an onboard battery charger is fitted. This charger will provide a maintenance charge to the system batteries allowing for optimum system performance whenever start-up signal is received. -
Page 124
Maintenance Electrical System Where it is not possible to have an onboard battery charger installed, JCB recommend a running cycle of 1– 2h twice weekly. This exercising of the Generator Set recuperates the battery utilizing the charging alternator, and allows the machine to maintain a healthy stand-by state. -
Page 125
Maintenance Electrical System 6. If the tests are unsatisfactory, refer to the fault diagnosis table. Table 20. Fault Diagnosis Battery Tester Readings Remedy Check Load 0–12.6V Less than 6V Renew battery 6–12.4V less than 9V and decreases steadi- Recharge and re-test. If tests are ly but remains in yellow zone still unsatisfactory renew battery Less than 10V… -
Page 126
Maintenance Fault-Finding Fault-Finding General The fault finding procedures are given in the form of flow charts. There are a number of charts, each one dedicated to a particular fault category. The charts are designed to identify possible causes by performing checks and where applicable, specific tests on the engine. -
Page 127
Maintenance Fault-Finding Air intake system blocked or restricted. Visually check the air intake for blockage or obstruc- tion — remove as required. Check the air filter ele- ments for signs of blocking — replace as required. Fuel is aerated. Check the fuel system for loose connections and possible air ingress points. -
Page 128
Maintenance Fault-Finding Fuel lift pump not operating correctly (fuel supply in- Check that the lift pump is operating and delivering adequate). fuel to the injection pump. Fuel is waxing due to extremely cold weather. Verify by inspecting the fuel filter. Clean the system and use acclimatised fuel. -
Page 129
Maintenance Fault-Finding Table 27. Engine — Poor Running at Idle Cause Remedy Coolant temperature sensor fault Check the electrical connection at the coolant sen- sor. Check the correct electrical wires for open or short circuits. test the coolant sensor. If engine will not reach operating temperature refer to the following table. -
Page 130
Maintenance Fault-Finding Fuel is contaminated or incorrect grade diesel fuel Stop the engine. used. Replace the fuel filters. Operate the engine with a temporary supply of the correct grade of clean fuel. Note: Dirty fuel will cause damage to the fuel injec- tion pump and injectors. -
Page 131
Maintenance Fault-Finding Fuel injection lines leaking. Inspect and correct as required leaks in the high pressure lines, fittings injector sealing washers, or delivery valves. WARNING: Fine jets of fluid at high pressure can penetrate the skin. Keep face and hands well clear of pressurised fluid and wear protective glasses. -
Page 132
Maintenance Fault-Finding One or more fuel injector worn or malfunctioning. Check the electrical connections at the injectors. Worn or malfunctioning high pressure fuel pump. Do all the necessary fault finding checks before re- moval of the high pressure fuel pump. Table 32. -
Page 133
Maintenance Fault-Finding Turbocharger wastegate faulty. (Turbocharged ma- Repair or replace wastegate. chines only). Turbocharger malfunction. Replace Turbocharger. Electrical sensor fault. Check the electrical connections at the sensors. One or more fuel injector worn or malfunctioning. Check the electrical connections at the injectors. Engine compression low in one or more cylinders. -
Page 134
Maintenance Fault-Finding WARNING: Fine jets of fluid at high pressure can penetrate the skin. Keep face and hands well clear of pressurised fluid and wear protective glasses. If fluid penetrates your skin, get medical help immediately. Intake air or exhaust leaks. Refer to Table 34. -
Page 135
Maintenance Fault-Finding Lubricating oil sludge excessive. Change oil and filter. Review oil and filter change period. If operating in ar- duous applications, change more frequently. Make sure the correct lubricating oil is being used. Fuel in the lubricating oil, engine operating too cold. Review the operation for excessive idling resulting in the engine running below normal temperature. -
Page 136
Maintenance Fault-Finding Lubricating oil cooler leak. Check/replace the oil cooler. Look for coolant in the oil. Cylinder head gasket leak. Check/replace the head gasket. Cylinder head cracked or porous. Check/replace the head. Cylinder block coolant passages leaking. Check/replace the cylinder block. Table 44. -
Page 137
Maintenance Fault-Finding Table 46. Coolant — Contaminated Cause Remedy Coolant rusty, operation without correct mixture of Drain and flush the cooling system. Fill with correct antifreeze and water. mixture of antifreeze and water. Review the coolant change interval. Refer to the Op- eration and Maintenance Manual. -
Page 138
Maintenance Fault-Finding Sensor connection faulty Check the condition of sensor to harness connection, make sure the seals are in place, check for signs of corrosion or con- tamination. Repair/replace as necessary. If no fault is found, proceed to Step 3. Sensor failure Check the sensor resistance (see relevant helpfile page). -
Page 139
Maintenance Fault-Finding If the electrical resistance is OK, replace the rail and HPV. If no fault is found proceed to step 4. HPV buzzing fault Perform the HPV buzz test. If the HPV is not buzzing replace the rail and HPV. If the HPV buzzes, raise Techweb Helpdesk call. -
Page 140
Maintenance Fault-Finding Injector connection fault Check the Individual Injector Corrections and injector connec- tions. If the problem with C3I or injector connection is evident, replace/repair as necessary. If no fault is found proceed to step 3. Engine Cylinder compression Run the compression test (automatic or manual), if any of the fault engine cylinder pressure is not in the limits, repair/replace as necessary. -
Page 141
Maintenance Fault-Finding Sensor failure Check the sensor resistance (see relevant helpfile page). If sensor is out of specification replace. If no faults is found, proceed to Step 4. Wiring fault Check the harness continuity and machine and engine earth contacts. Repair/ replace as necessary. If no fault found, raise Techweb Helpdesk call. -
Page 142
Maintenance Fault-Finding If no faults is found, proceed to Step 4. Sensor signals faulty Check the sensor signals. If scope available, display Cam and crank signals on the scope. Change the sensor as necessary. If no fault is found, proceed to Step 5. Sensor target wheel fault Check the Cam target wheel if damaged, replace with new camshaft. -
Page 143
Maintenance Fault-Finding Table 65. Open Circuit Injector Step Trouble Action/Remedy Pressure diagnostics fault Perform the injector buzz test, if the injector is faulty it will not produce a buzzing sound. In such instances raise Techweb Helpdesk call. If no fault is found proceed to step 2. Injector connection fault Check the resistance of injector. -
Page 144
Maintenance Fault-Finding Check the operating temperature is not above 70°C (157.9°F) Check the DC fuse Fail to Start is activated after pre-set number of at- Check the wiring of fuel solenoid. tempts to start Check the fuel Check the battery supply Check the battery supply is present on the fuel output of the module Check the speed-sensing signal is present on the… -
Page 145
Maintenance Fault-Finding Alarms Table 69. Symptom Possible Remedy Low oil pressure fault operates after engine has fired Check the engine oil pressure. Check the oil pressure switch/sensor and wiring. Check configured polarity (if applicable) is correct (i.e. normally open or normally closed) or that sensor is compatible with the module and is correctly config- ured. -
Page 146
Maintenance Fault-Finding Check that the CTs are wired correctly with regards to the direction of current flow (p1,p2 and s1,s2) and additionally ensure that CTs are connected to the correct phase (errors will occur if CT1 is connected to phase 2). Remember to consider the power factor (kW = kVA x powerfactor). -
Page 147
Notes: 9831/0650-3… -
Page 148
Technical Data Introduction Technical Data Introduction General Table 73. Model Gererator Set rating Engine Type Serial Number (Stand by) 20 kVA KDI 1903M From 2288985 to 2298985 G20S 20 kVA KDI 1903M From 2288985 to 2298985 G20QS 20 kVA KDI 1903M From 2288985 to 2298985 27 kVA KDI 2504M… -
Page 149
Technical Data Static Dimensions Static Dimensions Dimensions Table 74. Model Length (mm) Width (mm) Height (mm) Shipping Vol- ume (sea ready) (m3) 1,750mm 750mm 1,350mm 1.78m³ G20S 1,650mm 650mm 1,200mm 1.3m³ G20QS 1,750mm 790mm 1,350mm 1.88m³ 2,250mm 800mm 1,350mm 2.43m³ G27S 1,650mm 650mm… -
Page 150
Technical Data Noise Emissions Noise Emissions Noise Data Table 76. Description G20QS G27QS G33QS G34QS G40QS G41QS G45QS LpA (7m) 60 dB(A) 62 dB(A) 62 dB(A) 62 dB(A) 62 dB(A) 62 dB(A) 62 dB(A) 9831/0650-3… -
Page 151
10W-40 5-W40 Recommended Oils Table 78. Engine Oil Specification JCB Extreme Performance API CI — 4, CH — 4, CG — 4 ACEA E4 ACEA E5 ACEA E7 (1) High performance (Euro 1 — 2 — 3 Engines) heavy duty… -
Page 152
Technical Data Fluids, Lubricants and Capacities Fuel WARNING Do not use petrol in this machine. Do not mix petrol with the diesel fuel. In storage tanks the petrol will form flammable vapours. Notice: No warranty liability will be accepted for engine failures where unacceptable fuel grades (or their equivalent) have been used at any stage. -
Page 153
The correct concentration of antifreeze protects the engine against frost damage in winter and provides year round protection against corrosion. The protection provided by JCB High Performance Antifreeze and Inhibitor is shown below. Table 81. Concentration… -
Page 154
Technical Data Electrical System Electrical System General Table 82. Description G20/G20S/ G27/G27S/ G33/G33S/ G34QS G40/G40S/ G41QS G45/G45S/ G20QS G27QS G33QS G40QS G45QS Frequency Hz 50/60 50/60 50/60 50/60 50/60 50/60 50/60 Phases Rated Speed 1500/1800 1500/1800 1500/1800 1500/1800 1500/1800 1500/1800 1500/1800… -
Page 155
Technical Data Electrical System Schematic Circuit Figure 98. 335/F5093-3 (sheet 1 of 6) 9831/0650-3… -
Page 156
Technical Data Electrical System Figure 99. 335/F5093-3 (sheet 2 of 6) 9831/0650-3… -
Page 157
Technical Data Electrical System Figure 100. 335/F5093-3 (sheet 3 of 6) 9831/0650-3… -
Page 158
Technical Data Electrical System Figure 101. 335/F5093-3 (sheet 4 of 6) 9831/0650-3… -
Page 159
Technical Data Electrical System Figure 102. 335/F5093-3 (sheet 5 of 6) 9831/0650-3… -
Page 160
Technical Data Electrical System Figure 103. 335/F5093-3 (sheet 6 of 6) 9831/0650-3… -
Page 161
Technical Data Electrical System Figure 104. 336/E4738-B (sheet 1 of 7) 9831/0650-3… -
Page 162
Technical Data Electrical System Figure 105. 336/E4738-B (sheet 2 of 7) 9831/0650-3… -
Page 163
Technical Data Electrical System Figure 106. 336/E4738-B (sheet 3 of 7) 9831/0650-3… -
Page 164
Technical Data Electrical System Figure 107. 336/E4738-B (sheet 4 of 7) 9831/0650-3… -
Page 165
Technical Data Electrical System Figure 108. 336/E4738-B (sheet 5 of 7) 9831/0650-3… -
Page 166
Technical Data Electrical System Figure 109. 336/E4738-B (sheet 6 of 7) 9831/0650-3… -
Page 167
Technical Data Electrical System Figure 110. 336/E4738-B (sheet 7 of 7) 9831/0650-3… -
Page 168
Technical Data Electrical System Figure 111. 336/E5832-1 (sheet 1 of 7) 9831/0650-3… -
Page 169
Technical Data Electrical System Figure 112. 336/E5832-1 (sheet 2 of 7) 9831/0650-3… -
Page 170
Technical Data Electrical System Figure 113. 336/E5832-1 (sheet 3 of 7) 9831/0650-3… -
Page 171
Technical Data Electrical System Figure 114. 336/E5832-1 (sheet 4 of 7) 9831/0650-3… -
Page 172
Technical Data Electrical System Figure 115. 336/E5832-1 (sheet 5 of 7) 9831/0650-3… -
Page 173
Technical Data Electrical System Figure 116. 336/E5832-1 (sheet 6 of 7) 9831/0650-3… -
Page 174
Technical Data Electrical System Figure 117. 336/E5832-1 (sheet 7 of 7) 9831/0650-3… -
Page 175
Technical Data Engine Engine General Table 83. Description G20/G20S/ G27/G27S/ G33/G33S/ G34QS G40/G40S/ G41QS G45/G45S/ G20QS G27QS G33QS G40QS G45QS Output Rating 17.5 23.1 33.1 33.1 37.3 (PRP) kW @ 1500 RPM Output Rating 19.25 25.41 36.41 36.41 41.03 (Standby) kW @… -
Page 176
Technical Data Engine Description G20/G20S/ G27/G27S/ G33/G33S/ G34QS G40/G40S/ G41QS G45/G45S/ G20QS G27QS G33QS G40QS G45QS Starting System Starter Motor (kW) 9831/0650-3… -
Page 177
The following warranty terms and conditions are applicable, for further details please contact your JCB dealer: • – 18 months from date of despatch from JCB or 12 months from first date in service (whichever is earlier). • – Cross-hire, consequential damage and third party losses are not warrantable.
Factory Operators Manual For JCB Generator. Manual For Owners And Operators. It Contains Important Information And Instructions For Maintenance Description Of The Functions And Capabilities Of The System. Description Of Possible Faults / Problems And Their Solution.
Format: PDF
Language: English
Pages: 150
Number: 9811/4600 (june 2009)
Searchable: Yes
Wiring Diagrams: Yes
Model
JCB Generator
G60RX
G65X
G65QX
G80RX
G90X
G90QX
G100RX
G115X
G115QX
SN from 1650000 to 1699999
Contents
-INTRODUCTION
Machine Model and Serial Number
About This Manual
Component Identification
Important Information
Safety, Yours and Others
Checklists
-INSTALLATION
Unpacking
Site Installation
Outdoor Installations
Indoor installations
-ROUTINE MAINTENANCE
Service Requirements
Health and Safety
Service Schedules
Battery
Cooling System
Pre Start Checks
Checks After Running
Cleaning
-CP1 AND CP2 DIGITAL CONTROL PANELS
Introduction
Control Panel Front Views
Control Panel Push Buttons
Data LEDs
Starting and Stopping – Manual Mode
Starting and Stopping – Automatic Mode
Operational Modes
Alarms
Transfer Fuel Pump (Optional)
-ATP1 DIGITAL CONTROL PANEL (OPTION)
Introduction
Control Panel Front View
Control Panel Push Buttons
Data LEDs
Starting and Stopping – Manual Mode
Starting and Stopping – Automatic Mode
Operational Modes
Inputs and Outputs
Alarms
Electrical Characteristics
-ALTERNATOR
Introduction
Installation
Alternator Terminal Connections
Fault Finding
Service and Maintenance
Spares and After Sales Service
-ENGINE – GENERAL INFORMATION
Introduction
-ENGINE – IDENTIFYING THE ENGINE
Engine Identification Plate
Engine Component Identification
-ENGINE – FLUIDS, LUBRICANTS AND CAPACITIES
Engine Lubricating Oil
Fuel
-ENGINE – ROUTINE MAINTENANCE
Introduction
Cleaning the Engine
Engine Oil and Filter
Engine Cooling System
Engine Fuel System
Air Intake System
-ENGINE – FAULT FINDING
Introduction
A Charts – Engine
B Charts – Fuel
C Charts – Lubricating Oil
D Charts – Coolant
-ENGINE – TECHNICAL DATA AND SPECIFICATIONS
Basic Engine Data
-CONNECTION AND WIRING DIAGRAMS
Introduction
CP1 and CP2 Wiring Diagrams
ATP1 Wiring Diagrams
Socket Wiring – Rental Specification Only
-WARRANTY
Warranty Information
JCB Technical Service
What you get
You will receive PDF file with high-quality manual on your email immediately after the payment.