Мы больше не будем рекомендовать вам подобный контент.
Отмена
Мы больше не будем рекомендовать вам подобный контент.
Отмена
Мы больше не будем рекомендовать вам подобный контент.
Отмена
Мы больше не будем рекомендовать вам подобный контент.
Отмена
Мы больше не будем рекомендовать вам подобный контент.
Отмена
Мы больше не будем рекомендовать вам подобный контент.
Отмена
Мы больше не будем рекомендовать вам подобный контент.
Отмена
Мы больше не будем рекомендовать вам подобный контент.
Отмена
Мы больше не будем рекомендовать вам подобный контент.
Отмена
Мы больше не будем рекомендовать вам подобный контент.
Отмена
Мы больше не будем рекомендовать вам подобный контент.
Отмена
Мы больше не будем рекомендовать вам подобный контент.
Отмена
Мы больше не будем рекомендовать вам подобный контент.
Отмена
Мы больше не будем рекомендовать вам подобный контент.
Отмена
Мы больше не будем рекомендовать вам подобный контент.
Отмена
Мы больше не будем рекомендовать вам подобный контент.
Отмена
Мы больше не будем рекомендовать вам подобный контент.
Отмена
Мы больше не будем рекомендовать вам подобный контент.
Отмена
Мы больше не будем рекомендовать вам подобный контент.
Отмена
Мы больше не будем рекомендовать вам подобный контент.
Отмена
Мы больше не будем рекомендовать вам подобный контент.
Отмена
Мы больше не будем рекомендовать вам подобный контент.
Отмена
Мы больше не будем рекомендовать вам подобный контент.
Отмена
Мы больше не будем рекомендовать вам подобный контент.
Отмена

Preface
Please read this manual thoroughly before testing. It provides all information you need to use the product. Please only purchase test strips in your country. Use of test strips from different countries might get deviated test results under such circumstance. We hereafter call RightestTM GM100 Blood Glucose Monitoring System as GM100 BGMS, RightestTM GM100 Blood Glucose Meter as GM100 meter, and RightestTM GS100 Blood Glucose Test Strip as GS100 test strip for short. It is recommended to monitor blood glucose regularly. To prevent derived complications effectively, it is recommended to monitor blood glucose regularly. GM100 BGMS accurate and easy-to-use, is your reliable assistant for diabetes management.
GM100 BGMS was manufactured and supported by BionimeCorporation and its authorized representative. If you have any question or concern, please contact your localBionimeCustomerServiceoremailto rightest@bionime.com. We will provide best assistance and solutions for you.
Intended Use
GM100 BGMS is intended for in vitro (oustside the body) diagnostic use and self-testing only. Coding is not required. The testing result is calibrated to plasma equivalent with fresh capillary whole blood samples from the fingertip, palm or forearm. You may consult your healthcare professional for instructions how to use the system correctly. Our customer support staff is also available to assist you.
Package of Meter Kit

- GM100 Meter (with one CR2032 battery installed)
- GS100 Test Strips (0/10/25 pcs) *
- Control Solution *
- GM100 meter Instructions for Use
- GS100 Test Strips Package Insert *
- GD500 Lancing Device *
- Disposable Lancets (10pcs) *
- Instructions for the lancing device *
- Log Book
- Warranty Card + Emergency Card
- Carrying Case *
(Different packages have different bundled items. Some of packages might not include items.)
The RightestTM Meter

Test Strip Port
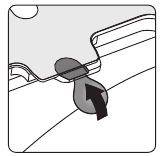
Insert test strip here until you hear a click.
Display Window
Show your test result, messages and relative information.
Main Button
For operating the meter, please check details in following sections.
Plastic Tape
Pull it off to activate meter. (If time and date of your meter has been set in advance, the plastic tape will be removed. Hence, please discard this step)
Battery Cover
Slide cover to change battery.
Precautions
GS100 Test Strips
GM100 meter is designed to use with GS100 test strip only. Please note that misuse of other test strips might cause unexpected damage or produce inaccurate test results.
Sample Entry
Apply a drop of blood or Control Solution here. The test request is only 1.4 µL of blood.
Hand Bar
Grip here to insert test strip into meter.
View Window
This window is yellow before applying blood sample. It gradually turns red when filled with blood.
Indication Symbol
Insert strip with indication symbol up and toward meter.
Electrode Contacts
Sensing signal output terminals.
PRECAUTION
- Re-cap the test strip vial immediately after removing a test strip.
- Do not reuse test strips.
- Do not use expired test strips.
- Record the date of opening a new test strip vial for the first time. Discard the vial of test strips after 3 months from opening.
- Store the test strips in a cool and dry location. Do not expose to direct sunlight or heat.
- For detailed information, please refer to the GS100 Test Strips Package Insert.
Battery Installation
Your meter comes with one CR2032, 3 volt, battery installed. One new battery will provide power to perform about 1,000 tests under normal use. Before using it, please pull off the plastic tape and press the main button to activate the meter (If time and date of your meter has been set in advance, the plastic tape will be removed. Hence, please discard this step).
- Turn the meter over. Press and push battery cover to open.
- Install the battery. Be sure to put battery in correct direction.

- Slide the battery cover back until it snaps into place.

- The meter performs a self-test and all symbols on the display will blink.
- Press any button to exit the self-test and enter Setting Mode.
- Set the time and date when the battery is replaced. See Setting the Date, Time and Unit section. Prior test results are still stored in the memory.
PRECAUTION
- Danger of explosion might happen if the battery is incorrectly replaced.
- Please follow the local regulation and discard a used battery properly.
Setting Up Your Meter-Setting the Date, Time, and Unit……
You can enter Setting Mode by below two ways.
- Reload battery
After removing the battery, please press the main button for several times until no signal on screen, then follow the battery installation steps to load battery. The meter will do self test. Press the main button to close the test and enter Setting Mode. - With Battery inserted
Press the main button first to turn on the meter. Then press and hold the main button for 5 seconds (the meter will be turned off during this period, please keep pressing) until you hear a beep, indicating you have successfully entered Setting Mode. The display screen will show setting data.
 NOTE
NOTE
- When you keep pressing the main button for 2 seconds, the display on screen will turn off. Please don’t care it. Keep pressing the main button till entering setting data.
- Quick press the main button allows you to change setting while hold it for 2 seconds will confirm the setting. However, if you press and hold the main button over 5 seconds it will escape from setting mode and return to time screen.
- Year setting
With the year format blinking, press the main button to adjust it. Then hold the same button for 2 seconds to confirm it. Meantime, it will shift to next digit for setting. Repeat the above action until the year setting is completed. Then it will move to month setting.
- Month setting
With the month blinking, press the main button until the current month appears. Then hold the same button for 2 seconds to confirm it and move to day setting.
- Day setting
With the day blinking, press the main button to adjust it. Then hold the same button for 2 seconds to confirm it. Meantime, it will shift to next digit for setting. Repeat the above action until the day setting is completed. Then it will move to time format setting.
- Time format
12/24H selection With the time format blinking, press the main button to adjust it. Then hold the same button for 2 seconds to confirm it and move to hours setting.
- Hour setting
With the hour blinking, press the main button until the current hour appears. Then hold the same button for 2 seconds to confirm it and move to minute setting.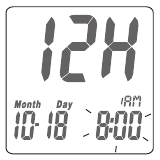
- Minute setting
With the minute blinking, press the main button to adjust it. Then hold the same button for 2 seconds to confirm it. Meantime, it will shift to next digit for setting. Repeat the above action until the minute setting is completed. Then it will move to measurement of unit setting.
- Ending setting
After confirming the setting, you’ll hear a sound of » beep «. All the settings are saved and completed and will return to time screen.
 NOTE
NOTE
- When you do not do any settings of meter for over 2 minutes, the meter will leave setting mode and power off automatically.
- Any time you would like to escape from the setting mode, please press and hold the main button for over 5 seconds. Meantime, all the current settings will be saved.
Turning on /off the Meter
- How to turn on the Power
- Press the main button
- Insert one piece of test strip
- Manual Power off
If you want to turn off the meter, please keep pressing the main button for 2 seconds. - Auto Power off
The meter will power off automatically if you don’t operate it over 2 minutes.
Performing a Blood Test

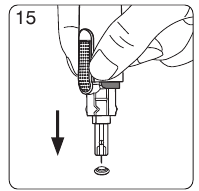
- Hold the adjustable cap in one hand and hold the hub in the other hand. Bend the cap towards the down side. When a gap appears between the cap and hub, pull them off in opposite directions.
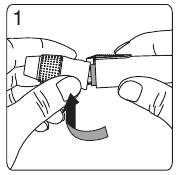
- Pull off the depth adjustable cap.
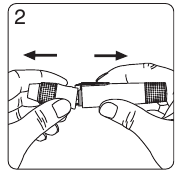
- Insert a new disposable lancet firmly into lancet carrier.
- Twist off and set aside the protective cover of the disposable lancet.
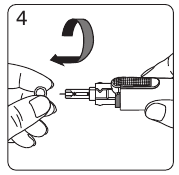
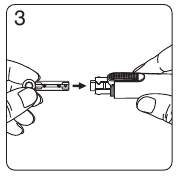
- Replace the depth adjustable cap.

- Choose a depth of penetration by rotating the top portion of the depth adjustable cap until the setting depth matches the window. Settings are based on skin type «
 » for soft or thin skin; «
 » for average skin; «
 » for thick or calloused skin.
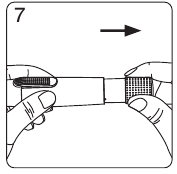
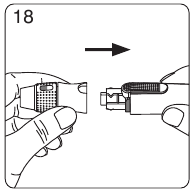
- Hold the hub in one hand and pull on the plunger in the other hand. The device will be cocked. Release the plunger, it will automatically move back to its original position near the hub.
- Wash your hands with warm soapy water and dry thoroughly.

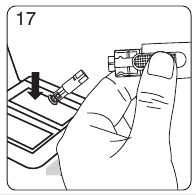
- Take one strip from the vial. Re-cap the vial cap immediately.
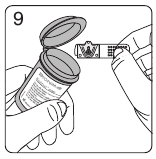
- Insert the strip into the strip port on meter with the indication symbol facing up.

- While the blood drop symbol flashing, you are ready to apply the blood sample.
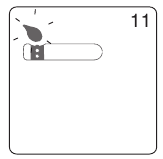
- Place the lancing device against the pad of your fingertip and press the release button. The best puncture sites are on the middle or ring fingers. Press the release button.

- Touch and hold the drop to the edge of sample entry until you hear a » beep » and the view window is totally filled with blood. If the view window is not totally filled with blood or the test does not start. Please discard the test strip and repeat the test with a new test strip.

- You will see the countdown mode on the screen. After 8 seconds, the test result appears.

- Pull off the depth adjustable cap. Without touching the used disposable lancet, stick the lancet tip into the protective cover.
- Hold the release button in one hand and pull on the plunger in the other hand will safely eject the used disposable lancet.

- Discard the used disposable lancet into an appropriate puncture-proof or biohazard container.
- Replace the depth adjustable cap after finishing the test.
PRECAUTION
Do not touch your blood drop to the sample entry on the strip until you see the « » appear. The meter is performing an internal test and will display «» and «
 » if you apply blood too soon. Then you will waste a test strip.
View window appearance
Make sure your blood sample covers the whole area of the View Window to get an accurate test result. Insufficient blood sample will cause inaccurate test result. Repeat the test with a new test strip.
PRECAUTION

- Check the expiration date printed on the package every time you use a test strip. Do not use expired test strips.
- Use each test strip immediately after removing from the vial.
- Do not reuse test strips.
- Do the test at least 30 minutes after moving into a different location with significant change in temperature.
- Place the blood drop only on the sample entry of the test strip.
- Please don’t drip or inject the blood sample directly by syringe to the entry port of test strip. Doing this might contaminate the meter or cause damage and is not recommended.
Blood glucose test results are shown on the meter as mg/dL or mmol/L, depending on which unit of measurement you have chosen. ( This meter * for some countries is fixed at mmol/L or mg/dL and is not able to be changed freely.) Consult your healthcare professional before making any changes to your diabetes medication program. If your blood glucose result is unusually high or low, or if you question your testing results, repeat the test with a new test strip. You can also run a Quality Control Test with to check your meter and test strip. If the test result still remains unusually high or low, contact your healthcare professional immediately. If you are experiencing symptoms that are not consistent with your blood glucose test results and you have made sure to follow all instructions of this manual, contact your healthcare professional immediately.
Recalling Test Result & Average
The GM100 meter is able to store 150 test results with time and date automatically. If your meter has stored 150 results, which is the maximum memory of the meter, the newest test result will replace the oldest one.
To recall your test memory, start with the meter without test strip inserted.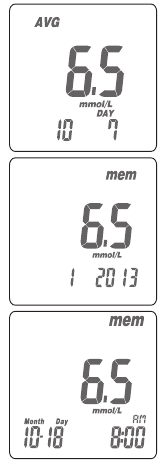
- Press the main button to switch to screen to memory function, you will see «AVG» symbol on the up left corner of the screen. The display sequence will be 1-day, 7-day, 14-day, 30-day, 90- day average, and then memory 1 reading, memory 2 reading,…until memory 150 reading which will show «MEM» on the up right corner of the screen.
- Under average screen, the number on the down right corner of the screen means how many days of readings have been calculated as the average while the number on the down left corner of the screen means how many readings have been counted in. Under memory screen, it will show the sequence number on the down left corner and then display date and time.
- Quick Searching: you could also quick press the main button twice, and then it will automatically display the average and memory by sequence. Anytime you want to stop it, you could just press the main button again. It will stop and display the reading right at the moment you press the main button. You could just apply the way above; especially when you find a particular reading you want to check with.
- Reading right after test: if you just finish the test and press the main button to review. The display sequence will be the latest reading, 1-day, 7-day, 14- day, 30-day, 90-day average, and the memory 2 reading until the oldest one (memory 150 reading).
The GM100 meter displays results between 0.6 and 33.3 mmol/L. If your test result is below 0.6 mmol/L, « » will appear on the screen. Please repeat your test again by a new test strip. If you still get » » result, you should immediately contact your healthcare professional.
If your test result is above the high end of the system’s detection range 33.3 mmol/L, « » will appear on the screen. Please repeat your test again by a new test strip. If you still get «
 » result, you should immediately contact your healthcare professional.
PRECAUTION
Quality Control Test
Please use Control Solution tested with GM100 BGMS under Control Solution Mode. If the test result is within the Control Solution Range printed on the strip vial label, the GM100 BGMS passes Quality Control Test. That means your GM100 BGMS is working correctly.
Entering Control Solution Mode
Insert the strip into the strip port on meter. While the blood drop symbol flashing, press and hold the main button for over 5 seconds. Then you will see « » symbol blinking on the screen indicating that you’ve successfully entered the Control Solution Mode. Control Solution Range
Control Solution Range
Example of Control Solution Range printed on your test strip vial label.
When should perform a Quality Control Test?
Before doing a blood glucose test with your meter for the first time.
When you open and start using a new test strip vial.
When your meter is dropped or splashed with liquids.
Whenever you think your test result does not consistent with the way you feel.
Whenever you want to check if your system is working properly or not. Whenever you want to practice testing and check correct procedure.
The possible reasons your Control Solution results are out of the range:
- Your Control Solution has expired or after 3 months since opened.
- Your test strip has expired.
- You leave the cap off the vial of test strips or Control Solution for a long time.
- You didn’t perform the test proce — Malfunction of the meter.
If Control Solution results are out of the range, your GM100 BGMS may not be working properly. Repeat the Quality Control Test. If your Control Solution results outside the range still exist, do not use the GM100 BGMS to test your blood glucose. And contact Bionime authorized representative or Customer Service.
PRECAUTION
Each time you open a new bottle of Control Solution, write the discard date on the label. Control Solution is good for 3 months after opening the bottle, or until the expiration date printed on the label, whichever comes first.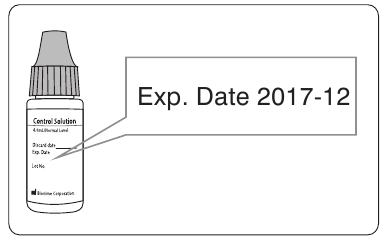
Performing a Quality Control Test
Use with Control Solution


PRECAUTION
Maintenance
Keep your meter and test strip free of dust, water or any other liquid. Store the meter in the carrying case when not in use. If meter is dropped or damaged, perform a Quality Control Test before doing a blood glucose test.
Cleaning Meter
Clean the outside of the meter with a damp cloth and mild soap/detergent. Keep the test strip port from getting wet.
Error Message and Trouble Shooting
Er1 — The inserted test strip has been used or damaged. Please use a new test strip from vial.
Er2 — Meter has malfunctioned. Do the Quality Control Test or reinstall the battery to see if the meter works properly.
Er3 — Signal transmission is disrupted, repeat the test. Above, if error screen still appears contact Bionime authorized representative or Customer Service.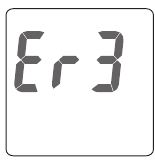
Battery Error

Temperature Error
In order to get accurate test result, perform testing between 10 ~40 ˚C (50 ~ 104 ˚F).
Sampling Error
Before « » appears. Please don’t apply the blood to the entry of the strip because the meter is still doing internal check. If you do so, the meter will show «
 » and ««. Please remove the test strip and insert a new one to do the test again.
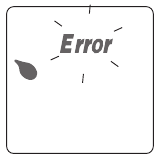
Meter Malfunction
If you find the meter can’t be switched on, please follow the steps below for quick inspection.
- Open the battery cover, take out the battery.
- Wait for 5 minutes and reload the new battery.
The meter should be work normally after finishing above steps. If not, please contact Bionime authorized representative or Customer Service.
Specification
| Measurement Technology | Oxidase Electrochemical Sensor |
| Sample | Capillary whole blood |
| Minimum Sample Volume | 1.4 microliters ( µL ) |
| Measuring Range | 0.6 — 33.3 mmol/L |
| Test Time | 8 seconds |
| Memory Capacity | 150 blood glucose test results with date and time |
| Power Saving | Turn off automatically after 2 minutes no use. Or press the « » button for 2 seconds. » button for 2 seconds. |
| Operating Temperature | 10 ~ 40 ˚C (50 ~ 104 ˚F) |
| Operating Relative Humidity | 10 — 90 % |
| Hematocrit | 35 — 48 % |
| Power Supply | One CR2032 battery |
| Battery Life | About 1,000 tests |
| Meter Dimension | 95.0 mm x 43.8 mm x 13.0 mm |
| Meter Weight | 43.0 g with batteries |
| Monitor Display Area | LCD display 38.0 mm x 29.0 mm |
| Meter Storage Conditions | -10 ~ 60 ˚C (14 ~ 140 ˚F) |
| Test Strip Storage Conditions | 4~30 ˚C(39~86 ˚F), < 90% relative humidity |
Limitations
- GM100 BGMS is not intended for serum or plasma test.
- Inaccurate test results may be obtained at high altitude more than about 10,000 feet ( 3,048 meters ) above sea level.
- Severe dehydration and excessive water loss may cause inaccurately low results.
- GM100 BGMS has not been validated for use on neonates.
- The glucose test may be interfered under abnormal concentration of
Ascorbic Acid ≧ 5 mg/dL ( 0.28 mmol/L )
Dopamine Hcl ≧ 2 mg/dL ( 0.11 mmol/L )
L-Dopa ≧ 3 mg/dL ( 0.15 mmol/L )
Tolazamide ≧ 15 mg/dL ( 0.48 mmol/L )
Cholesterol ≧ 500 mg/dL ( 12.93 mmol/L )
Glutathione reduced ≧ 60 mg/dL ( 1.95 mmol/L )
Hemoglobin ≧ 6,000 mg/dL ( 0.94 mmol/L )
Uric acid ≧ 9 mg/dL ( 0.54 mmol/L )
Customer Service
We sincerely like to provide complete, considerate services to our customers. Please review all the instructions to make sure you are performing the steps correctly. If you have any questions or problems of RightestTM GM100 products, please contact your local Bionime distributor. Or email to rightest@bionime.com.
Warranty
Bionime Corporation warrants that your GM100 Meter will be free from defects in materials and workmanship for five years from the date of purchase.
This warranty does not apply to the performance of a GM100 Meter that has been altered, misused, tampered with or abused in any way.
This warranty applies only to the original purchaser of the meter. Please complete and return the enclosed warranty card to Bionime authorized representative.
Different models have different specifications. Some of the models are not included with the warranty card.
Parts of Critical Component
Blood Glucose Meter, Test Strip, Control Solution and Lancing Device
Manufacturer: Bionime Corp.
Product complied with In Vitro Diagnostic Medical Device Directive 98/79/EC.
(CE 0197)
EU Rep: BIONIME GmbH; Tramstrasse 16, 9442 Berneck, Switzerland E-mail: info@bionime.ch
Disposable Sterile Lancets
Manufacturer: SteriLance Medical (SuZhou) Inc.
No.68 LiTangHe RD, XiangCheng, SuZhou, JiangSu 215133, P.R. China EC- Rep:
EMERGO EUROPE, Molenstraat 15, 2513 BH The Hague, The Netherlands
Product complied with Medical Device Directive 93/42/EEC ( CE0197 ).
 BIONIME CORPORATION
No. 100, Sec. 2, Daqing St., South Dist.,
Taichung City 40242, Taiwan
Tel: +886 4 23692388
Fax: +886 4 22617586
E-mail: info@bionime.com
http://www.bionime.com

Bionime GmbH
Tramstrasse 16
9442 Berneck
Switzerland
E-mail: info@bionime.ch


Here you can download full pdf version of manual, it may contain additional safety instructions, warranty information, FCC rules, etc.
Общая информация
Сайт Моя Аптека
является современной информационно-справочной платформой, которая помогает найти и сравнить цены на любые товары аптечного ассортимента в аптеках Украины. Это самый простой способ подобрать лекарства по самой низкой цене в ближайшей к Вам аптеке и сэкономить до 20-30%
на некоторых покупках.
Просматривайте актуальные цены и наличие необходимого товара в любой аптеке на карте в онлайн формате, бронируйте его всего в несколько шагов и забирайте в удобное время в указанной аптеке.
-
Как забронировать лекарства на сайте Моя Аптека?
Оформить резерв
на необходимый товар можно с помощью зеленой кнопки со значком корзинки «Забронировать» на странице товара, на карте или прямо из каталога. -
Можно ли получить скидку при резервировании?
Да! Наш сервис дает возможность экономить до 30% стоимости от фактической цены в аптеке
на те товары, на которые предусмотрена скидка.
Сумма скидки указывается при оформлении брони. -
Как оплатить и получить свой заказ?
Оплата и получение товара осуществляется только в аптеке по адресу, который был выбран при бронировании товара.
Моя Аптека
дает возможность каждому экономить деньги и время на покупке лекарств.
Сайт mypharmacy.com.ua не предоставляет услуг по доставке/отправке товаров
![]()
Экономьте до 30%
при бронировании товаров в аптеках.
Цена от 482.10
до 1057.10
грн
Наличие в
24 аптеках
Аптеки на карте
Основная информация
Производитель
Бренд
Категория
Область применения
диагностика
Форма выпуска
Диагностическое
Условия отпуска
безрецептурный
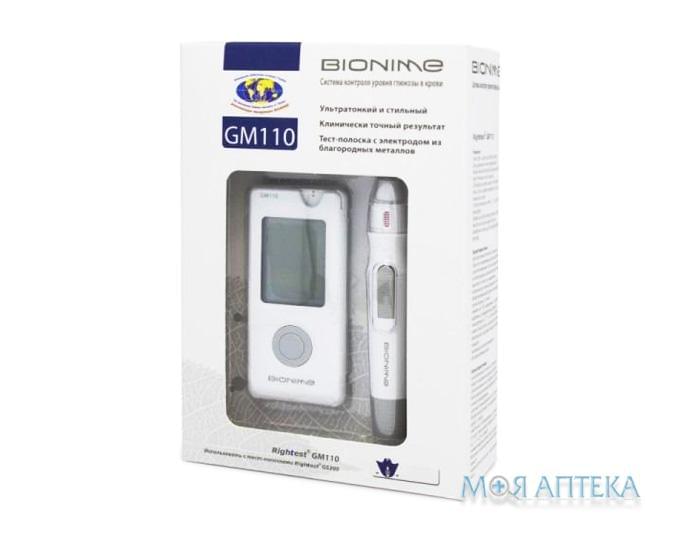
Инструкция для Глюкометр Rightest Bionime (Райтест Бионайм) GM 110
- Состав
- Регистрационные данные
Состав
Комплектація стартового набору:
- Глюкометр Rightest GM110 – 1шт
- Тест-смужки Rightest GS300 — 10шт
- Ланцети одноразові стерильні — 10шт
- Ланцетний пристрій – 1шт
- Насадка для забору крові з альтернативних місць – 1шт
- Батарейка CR2032 (встановлена в глюкометр) – 1шт
- Посібник користувача – 1шт
- Інструкція з використання тест-смужок – 1шт
- Інструкція з використання ланцетного пристрою – 1шт
- Щоденник обліку вимірювань – 1шт
- Гарантійний талон – 1шт
- Візитка для екстрених ситуацій – 1шт
- Компактний футляр для зберігання і транспортування -1 шт
(Комплектація може бути різною в залежності від приладу)
Опис
Глюкометр модель Bionime ТМ Rightest GM110 — точний і надійний прилад!
- Рекомендований для людей з діабетом I та II типу
- Точний та компактний глюкометр Bionime ТМ Rightest GM110 для надійних вимірювань
- Ультратонкий, легкий та стильний
- Просте управління однією кнопкою
- Великий дисплей з логічними підказками робить глюкометр Bionime ТМ Rightest GM110 простим у використанні
- Запатентована тест-смужка з електродами зі сплаву благородних металів забезпечує високу точність вимірювання
- Електрохімічний метод проведення аналізу на основі цільної капілярної крові
- Калібрування по плазмі крові
- Глюкометр Bionime ТМ Rightest GM110 оснащений пам’яттю на 150 вимірювань (із записом дати та часу) і визначенням середнього показника за 1,7, 14, 30 або 90 днів
- Мінімальна проба крові: 1,4мкл
- Точний результат за 8 секунд
- Гарантія на глюкометр Bionime ТМ Rightest GM110 — 5 років
- Безкоштовне сервісне обслуговування 10 років
- Використовувати з тест-смужками Bionime ТМ Rightest GS300
Технічні характеристики глюкометра Bionime ТМ Rightest GM 110
- Маса: 43г (з батарейкою)
- Розміри глюкометра: довжина 95мм, ширина 43,8мм, висота 12,8мм
- Дисплей: великий, з логічними підказками
- Джерело живлення: одна літієва батарея CR2032. Розрахована не менш, ніж на 1000 вимірювань
- Умови експлуатації: від 10 ° C до 40 ° C, при відносній вологості до 85% для глюкометра
- Умови зберігання: від -20 ° C до 60 ° C, при відносній вологості до 95% для глюкометра, від 4 ° C до 40 ° C, при відносній вологості до 95% для тест-смужок
- Одиниці виміру: Ммоль / л
- Діапазон вимірювань: від 0,6 до 33,3 Ммоль / л
Глюкометр «Бионайм-110» (Bionime Rightest GM-110) – это экспресс-анализатор, помогающий контролировать уровень глюкозы в крови. Подходит домашнего и медицинского использования.
Результаты теста эквивалентны анализам, проведенным в лабораторных условиях. Глюкометр может использоваться в медицинских учреждениях как замена лабораторных тестов.
Прибор был создан под руководством швейцарских инженеров, отличается высокой степенью надежности. Анализ проводится электрохимическим методом.
Комплектация
- Глюкометр с батарейкой.
- 10 тест-полосок.
- Прокалыватель.
- 10 одноразовых ланцетов.
- Ежедневник для учета результатов.
- Инструкция к глюкометру Bionime GM-110.
- Гарантийный талон.
- Кейс.
Технические характеристики Bionime GM-110
- Время анализа – 8 секунд.
- Память на результаты последних 150-ти измерений.
- Требуемое количество крови для теста – 1,4 микролитра.
- Рабочая температура от 10 до 40 градусов. Рабочая влажность воздуха от 10 до 90%.
- Одна батарейка рассчитана примерно на 1000 тестов.
- Температура хранения глюкометра от 10 до 60 градусов. Температура хранения полосок от 4 до 30 градусов.
- Измерение в диапазоне 0,6-33,3 ммоль/л.
Инструкция по применению глюкометра Бионайм 110
- Вставить одноразовый ланцет в устройство для прокалывания.
- Выбрать глубину проникновения в соответствии с типом кожи (мягкая, средней толщины, грубая). Оттянуть поршень для взведения механизма.
- Вымыть руки с мылом и обсушить их.
- Вставить тест-полоску.
- Включить глюкометр. Убедиться, что код на экране совпадает с кодом на упаковке тестовых полосок. На дисплее должен появиться значок в виде капли.
- Проколоть палец ланцетом. Дотронуться капелькой крови к тест-полоске. Она вберет в себя необходимое количество, после чего прибор издаст звуковой сигнал.
- Через 8 секунд будет показан результат.
Описание
Глюкометр Rightest GM 110 Бионайм предназначен только для диагностики іn-vіrto (для самоконтроля и профессионального использования). Результаты измерений, проведенных с помощью системы Rіghtest™, являются эквивалентными результатам анализа уровня глюкозы в плазме крови, полученным в лабораторных условиях. Для проведения анализа Вам нужна проба капиллярной крови. Настройка глюкометра Bionime GM 110 достаточно легкая, но если возникнут сложности, то наши менеджеры подскажут как пользоваться глюкометром.
Прибор работает с помощью тест-полосок Bionime GS300.
Внимание! Не забывайте проверять код, который указан на флаконе с тест-полосками с кодом который указан на дисплее глюкометра.
Особенности:
- Большой дисплей с логическими подсказками
- Ключевое преимущество: наилучшее соотношение – доказанная точность/цена системы контроля
- Оптимальный набор функций, простота в использовании
- Красивый дизайн: современный и стильный
- Запатентованная тест – полоска с электродами из сплава золота, обеспечивает высокую точность измерений.
- В ланцетном устройстве используется функция автоматического извлечения ланцета
- Гарантия бессрочная от производителя
- Подробная инструкция глюкометра
- Гарантия – 5 лет
Комплектация:
- глюкометр
- инструкция пользователя
- ланцетное устройство
- ланцеты – 10 шт.
- насадка для забора из альтернативных мест
- тест-полоски – 50 шт.
- батарейка CR 2032
- чехол для хранения
Технические характеристики:
- Измерение за 8 секунд
- Память на 150 измерений с датой, временем и определением среднего показателя за 1, 7, 14 или 30 дней
- Принцип анализа (технология измерения): оксидазный электрохимический сенсор
- Диапазон результатов: от 0,6 – 33,3 ммоль/л
- Гематокрит: от 30 до 55%
- Проба крови: капиллярная цельная кровь
- Количество крови для измерения – 1,4 микролитра
- Источник питания: батарейка типа CR2032
- Продолжительность работы эл. питания: приблизительно 1000 тестов
- Размеры: 95,0х43,8х12,8 мм.
- Масса: 43 г (включая батарейку)
Обмен и возврат товара надлежащего качества
Возврат товара осуществляется при условии, если он не был распакован или не нарушена заводская упаковка, не испорчен товарный вид, сохранена комплектация. Обмен товара надлежащего качества в случае, который описан выше, происходит только в течение 14 дней со дня покупки.
Процедура обмена совершается посредством служб доставки “Новая почта” или “Укрпочта”. Все затраты на транспортировку и доставку товара, который подлежит обмену несет покупатель. Полный возврат средств покупателю на его банковский счет или отправка товара с заменой осуществляется в день получения нами товара.
Согласно Дополнения №3 к постановлению Кабинета Министров Украины от 19 марта 1994 г. №172 “О реализации отдельных положений Закона Украины “О защите прав потребителей” товары медицинского назначения в частности, если они надлежащего качества, возврату и обмену не подлежат.
Обмен и возврат товара ненадлежащего качества
Обмен или ремонт товара ненадлежащего качества в гарантийном случае происходит посредством обращения к нам или в сервис-центр, контакты которого указаны на упаковке, в инструкции или на гарантийном талоне.
Процедура возврата совершается посредством служб доставки “Новая почта” или “Укрпочта”. Все затраты на транспортировку и доставку товара, который подлежит возврату или ремонту несет продавец. Полный возврат средств покупателю на его банковский счет или отправка товара с заменой осуществляется в день получения товара.
Для согласования всех условий обмена или возврата товара просьба обращаться к менеджеру интернет-магазина “Диабет-Контроль”.