
-
Contents
-
Table of Contents
-
Troubleshooting
-
Bookmarks
Quick Links
Related Manuals for Hanna Instruments Edge HI2002

Summary of Contents for Hanna Instruments Edge HI2002
-
Page 1
®… -
Page 2
If you need additional technical information, do not hesitate to e‑mail us at tech@hannainst.com or view our worldwide contact list at www.hannainst.com. All rights are reserved. Reproduction in whole or in part is prohibited without the written consent of the copyright owner, Hanna Instruments Inc., Woonsocket, Rhode Island, 02895, USA. -
Page 3: Table Of Contents
Included ……………………..Safety Measures ……………………. Description ……………………. Diagram ……………………..Product Diagram ………………….Probe Diagram ………………….Keypad Function ………………….Guide to Indicators ………………… Setup/Installation ………………….. Setting Up edge ………………..® pH Electrode & Probe Connections ………………General Setup ………………….Basic Mode …………………… Logging Function …………………..
-
Page 4: Included
Remove the instrument from the packing material and examine it carefully to make sure that no damage has occurred during shipping. If there is any damage, please contact your local Hanna Instruments Office. Each instrument edge (HI2002) is supplied with: ®…
-
Page 5: Description
® pH parameters using the Hanna Instruments edge digital sensors for pH. Each digital sensors has ® pH a unique serial number. Once connected to the meter, the sensor(s) are ready to measure their parameter along with temperature.
-
Page 6
Liquid Crystal Display (LCD) Standard USB host connection for data Capacitive Touch Keypad transfer to a USB thumb‑drive 3 mm jack input for edge digital ® pH probes Top mounted ON/OFF button Micro USB device connection for power or PC interface… -
Page 7: Probe Diagram
PROBE DIAGRAM Probe pH Electrode • Probes process signal directly for noise free measurements • Auto sensor recognition • Store calibration specific data from the last calibration • Are built with materials suitable for use in chemical analysis • Have integrated temperature measurement •…
-
Page 8: Keypad Function
KEYPAD FUNCTION 1. CAL/MODIFY ‑ Used to enter and exit calibration mode. In SETUP, used to initiate changes of a configuration settinng. 2. GLP/CFM ‑ Used to display GLP calibration information. In SETUP, used to confirm change made. In calibration, used to accept calibration points 3.
-
Page 9: Guide To Indicators
GUIDE TO INDICATORS Mode tags Third LCD line, message area Confirm tag 10. Labels USB connection status 11. Second LCD line, temperature pH electrode diagnostics measurement Probes symbol 12. Temperature units Battery symbol 13. Temp. Compensation status Arrow tags, displayed when they are 14.
-
Page 10: Setup/Installation
SETTING UP edge ® pH The main operating modes of edge are setup, calibration, measurement, data logging, and data ® pH export. Follow this general outline of steps to get you started. The following topics are expanded upon in the sections that follow in this manual. Familiarize yourself with the design features of this unique meter.
-
Page 11
Slide edge into the cradle while positioning the probe cable behind the cradle. Put the ® pH probe/sensor into the electrode holder and secure cable in clips. Connect the power adapter cable to the rear socket of the bench cradle. Connect the other end to the power adapter and plug into line power. -
Page 12
Connect the power adapter cable to the bottom socket of the wall cradle. Connect the other end to the power adapter and plug into line power. Connect the 3 mm probe jack to the socket located at the bottom of edge ®… -
Page 13: Electrode & Probe Connections
ELECTRODE & PROBE CONNECTIONS Connect the 3 mm probe jack to the probe input located on the bottom of edge . Make sure the ® pH probe is completely connected. If the probe is recognized, “CONNECTING” message is displayed along with sensor model. If the probe is not connected or not recognized, “NO PROBE”…
-
Page 14: General Setup
GENERAL SETUP The following General Setup options are displayed regardless of the sensor being used. These settings remain when switching to another probe type or when no probe is attached. Options are tabulated in the table below with choices and default values. Options are accessed by pressing SETUP/CLR key. Loop through the options by using the keys.
-
Page 15
Option Description Choices Default Basic mode Used to save battery life by automatically turning off when no key 5, 10, 30, Set Auto Off press is detected for time set and meter 10 MIN Available 60 Min or Off is not in active logging or calibration mode. -
Page 16: Basic Mode
BASIC MODE edge offers a basic operation mode that streamlines measurement configuration for pH ® pH measurements and is useful for many routine applications. Basic pH SETUP reduces parameter selection to the basic set. The meter limits calibration to 5 standard pH buffers: pH 6.86, 7.01, 4.01, 9.18 and 10.01 buffers.
-
Page 17: Logging Function
LOGGING FUNCTION Each time an Interval log is initiated, a new lot is created. The maximum number of Interval lots that may be stored is 100. If a 101 lot is attempted, “MAX LOTS” will be displayed. Some lots will need to be deleted.
-
Page 18
A complete set of GLP information including date, time, range selection, temperature reading, calibration information and probe serial number is stored with each log made. Interval Logging Select Interval and sampling period in the SETUP menu (Not available in Basic mode). To start Interval logging, press the LOG key while the instrument is in measurement mode. -
Page 19: Viewing Logged Data
Stability Logging Select Stability and choose measurement stability criteria in the SETUP menu. Only Stability Medium is available in Basic mode. To initiate the Stability log, press the LOG key while the instrument is in measurement. The “PLEASE WAIT” screen will be displayed briefly followed by a screen showing the stability tag, “LOG”…
-
Page 20
Press GLP/CFM key to enter inside lot information to view recorded data. Use the keys to toggle between different records. Use RANGE/ key to display GLP data including calibration information, date, time, etc. Press SETUP/CLR key then GLP/CFM key when deleting records or lots. Press RCL key to exit the logging type. -
Page 21
Select the Manual (Stability) lot and press SETUP/CLR key. The ”CLEAR” message will be displayed along with ”MANUAL” or “STABILITY” and “CFM” tag blinking on the LCD. Press the GLP/CFM key to confirm the deleting of the selected lot (MANUAL or STABILITY) or all records. -
Page 22: Pc & Storage Interface
PC & STORAGE INTERFACE Logged data on edge can be transferred from the meter to a USB flash drive by using the log ® pH recall function. The minimum requirement for the drive is USB 2.0. Select the pH record you wish to export and follow the simple steps below.
-
Page 23
Logged data on the edge can be transferred from the meter to a PC by following these simple ® pH directions. Suitable operating systems include Windows (XP minimum), OS X or Linux. Connect edge to the PC using the supplied micro USB cable. ®… -
Page 24: Operational Guide
BASIC VS STANDARD pH MODE The “Standard” pH operation includes up to a 5‑point buffer calibration, use of custom buffers, choice of displaying 0.001 pH resolution, use of the full diagnostic features of Calibration Check™ (that includes buffers used, probe condition, response time and messages indicating a contaminated buffer or pH sensor requiring maintenance during calibration).
-
Page 25: Ph Meter Configurations
pH METER CONFIGURATIONS edge’s pH meter operation is configured by using the SETUP/CLR key with a pH probe connected to the meter. The parameter‑specific options will be seen inserted into the menu. If Basic mode is “On”, the pH parameter list will not be displayed. See Basic mode for a description of this operation before choosing how to SETUP the meter.
-
Page 26: Ph Calibration
pH CALIBRATION Calibration in Standard Mode pH operation in standard mode offers full function of edge . This includes seven standard buffers ® pH and two custom ones. Five pH buffers may be used for calibration. The instrument should be recalibrated whenever: •…
-
Page 27
The custom buffers allow the user to calibrate in a buffer solution different from a standard one. Two custom buffers can be set in SETUP menu. See page 28 for more information about using custom buffers. The instrument will automatically skip custom buffers which are in a ±0.2 pH window of an already calibrated buffer. -
Page 28
When the reading is stable and close to the selected buffer, “CFM” tag will blink. Press GLP/CFM key to confirm calibration. Repeat procedure with additional pH buffers. A total of five pH buffers can be utilized. After confirming the last desired buffer calibration points, press CAL/MODIFY key (or if all five buffer values were calibrated) the instrument will automatically display “SAVING”… -
Page 29
First Calibration Point When performing a new calibration, or adding to an existing one, the user has a choice of how the first new calibration point will be treated in reference to the existing calibration point. This is selected in SETUP by the option FIRST CALIBRATION POINT. The two SETUP selectable options are “POINT” or “OFFSET”. -
Page 30
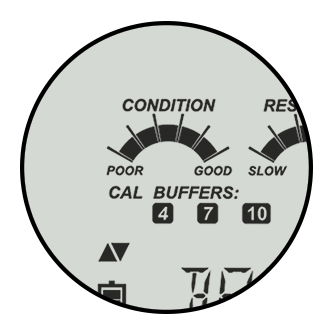
If the instrument is not calibrated the calibration history has been deleted, or it has been calibrated only at one point, the electrode condition and the electrode response gauges will be empty. For a continuous display of the electrode’s condition and response, daily calibration is necessary. This information can also be viewed in the GLP data. -
Page 31
The “ ” along with “STIR” tag will be displayed and “WAIT” will blink on the LCD until the reading is stable. When the reading is stable and close to the selected buffer, the “CFM” tag will blink. Press GLP/CFM key to confirm calibration. After confirming the first calibration point, the calibrated value will be displayed on the first LCD line and the second expected buffer value on the third LCD line. -
Page 32: Calibration Messages
If the value measured by the instrument is not close to the selected buffer, “WRONG BUFFER” will blink. Check if the correct buffer has been used, or clean the electrode by following the Cleaning Procedure. If necessary, change the buffer or the electrode. If the buffer temperature exceeds the temperature limits of the buffer, “WRONG BUFFER TEMPERATURE”…
-
Page 33
Wrong Buffer This message appears when the difference between the pH reading and the value of the selected buffer is too great. If this error message is displayed, check if you have selected the proper calibration buffer and have poured the desired buffer. Wrong Old Points Inconsistency “WRONG OLD POINTS INCONSISTENCY”… -
Page 34: Ph Glp Information
Bad Electrode “BAD ELECTRODE” appears if the cleaning procedure performed as a result of the above two messages is found to be unsuccessful. In this case it is advised to replace the electrode. Wrong Buffer Temperature “WRONG BUFFER TEMPERATURE” appears if the temperature of the buffer is outside the defined buffer temperature range.
-
Page 35
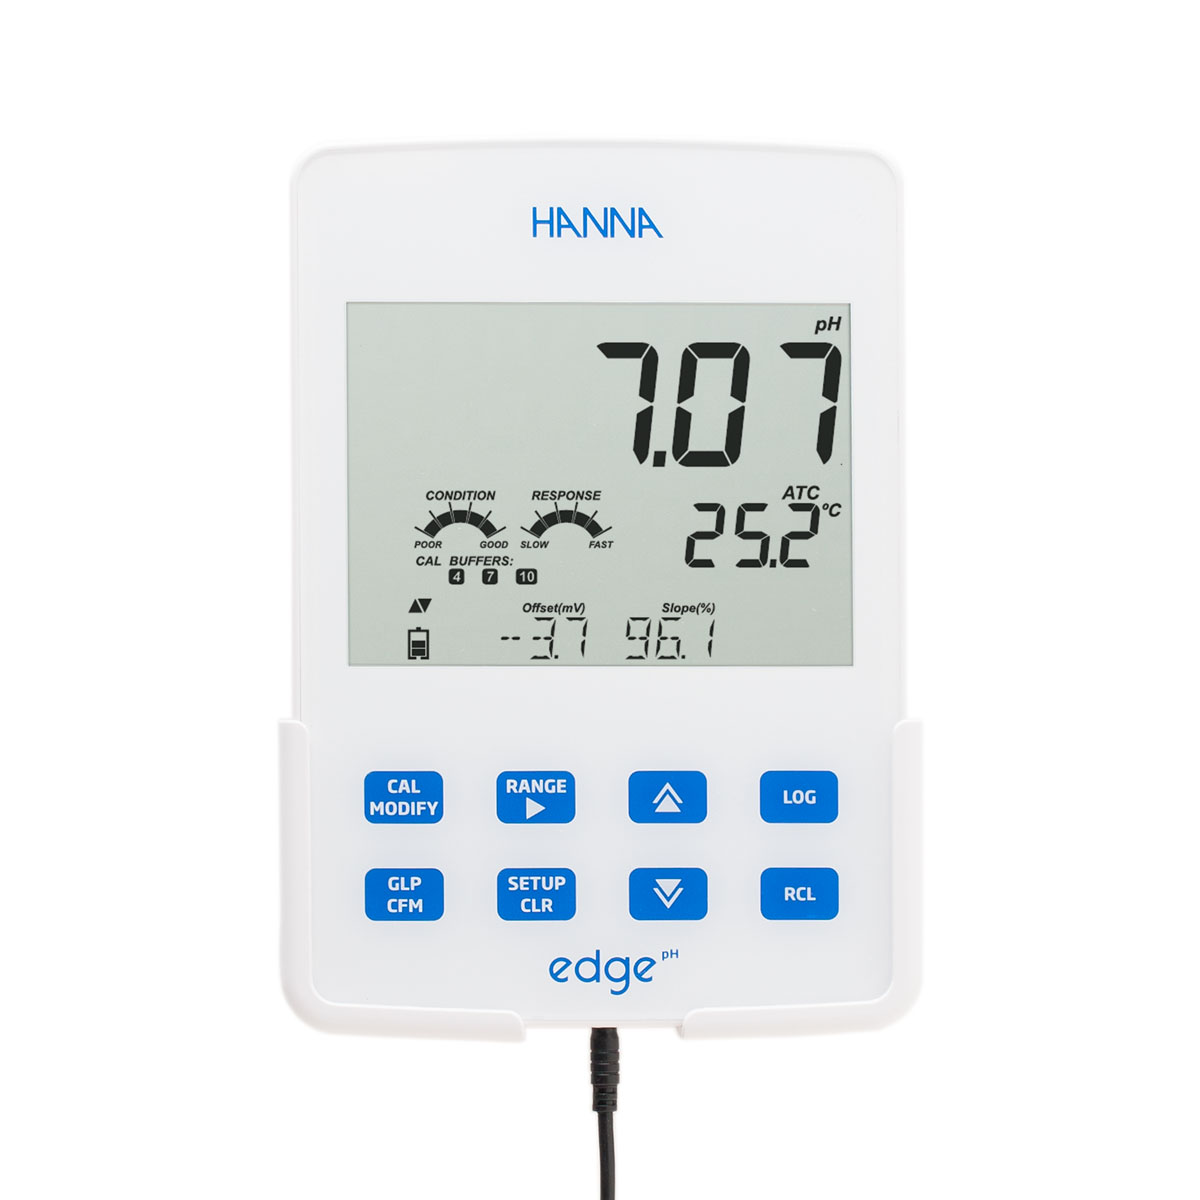
If calibration has not been performed, the instrument displays a blinking “NO CAL” message. After the calibration has been performed the instrument displays offset and slope. The GLP slope is the average of the calibration slopes; the percentage is referenced to the ideal slope value at 25 ºC. Additionally the condition and response indicators displayed are from the last calibration. -
Page 36: Ph Measurement
If a buffer is not from the last calibration, the buffer tag will be displayed blinking. In Standard Mode, Condition and Response gauges are visible on the day of calibration (See Electrode Condition And Electrode Response Time page 29). If configured in SETUP, a countdown message displays the number of days remaining until a new Calibration is due.
-
Page 37: Relative Mv Calibration
Error Messages During Measurement If the pH or temperature exceeds the limits of the sensor, the message “ELECTRODE OUT OF SPEC” will scroll on the third LCD line. The temperature will continue to be displayed. If temperature exceeds the meter specification of 120 ºC, then “120 ºC” will blink on the display. If interval logging, the message “OUT OF SPEC.”…
-
Page 38
Submerse the ORP electrode approximately 3 cm (1¼”) into the solution and stir gently. Press CAL/MODIFY key when the instrument is in RELATIVE mV measurement mode. The “CAL” tag will appear and the Absolute mV is displayed on the primary LCD line and “AbS” message on the secondary LCD line. -
Page 39: Relative Mv Glp Information
Press GLP/CFM key to confirm the relative mV value. The display will show “SAVING“ and returns to measurement mode. Note: The relative mV value can be changed only inside the relative mV offset window (± 2000 mV). RELATIVE mV GLP INFORMATION Good Laboratory Practice (GLP) refers to a quality control function used to ensure uniformity of sensor calibrations and measurements.
-
Page 40: Relative Mv Measurement
If disabled, “EXPIRATION WARNING DISABLED” is displayed. Or if enabled the number of days until the calibration alarm “CAL DUE” will be displayed. (i.e. “CAL EXPIRES IN 2 DAYS”) The number of days since the calibration expired. (i.e. “CAL EXPIRED 2 DAYS AGO”).
-
Page 41
The Relative mV value is displayed on the first LCD line and the temperature on the second LCD line. Using the keys, date, time, battery status and offset can be displayed on the third LCD line. If the reading is out of measurement range, the closest full scale value will be displayed blinking on the first LCD line. -
Page 42: Maintenance
pH PROBE MAINTENANCE…
-
Page 43
Remove the protective cap of the pH electrode. DO NOT BE ALARMED IF SALT DEPOSITS ARE PRESENT. This is normal with electrodes. They will disappear when rinsed with water. During transport, tiny bubbles of air may form inside the glass bulb affecting proper functioning of the electrode. -
Page 44
This interference is called alkaline error and causes the pH to be underestimated. Hanna Instruments’s glass formulations have the indicated characteristics. Sodium Ion error for various glass types at ambient temperature: Alkali Error with 0.1 mol /L Na… -
Page 45: Orp Probe Maintenance
ORP PROBE MAINTENANCE Remove the protective cap off the ORP electrode. Wash off any SALT DEPOSITS. This generally confirms the reference junction is free flowing. If the storage cap is dry, the reference junction may be dry also. Soak the electrode in HI70300 HI80300 storage solution for at least one hour.
-
Page 46
Storage Procedure To minimize clogging and ensure a quick response time, protect the ORP sensor by using the storage cap. Add a few drops of HI70300 storage solution to the cap to keep the reference junction wetted. Periodic Maintenance Inspect the sensor and cable. The cable used for connection to the edge must be intact and with no points of broken insulation. -
Page 47: Troubleshooting Guide
Check the keyboard or contact your local Hanna displays all LCD tags stuck. Instruments Office. permanently. Instrument was not CAL “Prod” message at factory calibrated or Contact your local Hanna Instruments Office for help. startup. lost factory calibration. 47 47…
-
Page 48: Specifications
pH, mV in pH, mV in ORP Temperature ‑2.00 to 16.00 pH ‑2.000 to 16.000 pH* Range ‑20.0 to 120.0 ºC ; ‑4.0 to 248.0 °F** ±1000.0 mV in pH ±2000.0 mV in ORP 0.01 pH 0.001 pH* Resolution 0.1 ºC; 0.1 ºF 0.1 mV in pH 0.1 mV in ORP ±0.01pH…
-
Page 49
Electrodes/Probes Triple ceramic, double junction, low temperature glass body, refillable pH HI10530 electrode with conical tip and temperature sensor Triple ceramic, double junction, high temperature glass body, refillable pH HI10430 electrode with temperature sensor HI11310 Glass body, double junction, refillable pH/temperature electrode Glass body, double junction, refillable pH/temperature electrode with HI11311 enhanced diagnostics… -
Page 50: Accessories
HI8009L pH 9.18 Buffer Solution in FDA approved bottle, 500 mL HI8010L pH 10.01 Buffer Solution in FDA approved bottle, 500 mL Electrode Storage Solutions HI70300L Storage Solution, 500 mL HI80300L Storage Solution in FDA approved bottle, 500 mL Electrode Cleaning Solutions HI70000P Electrode Rinse Sachets, 20 mL (25 pcs.) HI7061L…
-
Page 51
Technical Service department and then send it with shipping costs prepaid. When shipping any instrument, make sure it is properly packed for complete protection. Hanna Instruments reserves the right to modify the design, construction or appearance of its products without advance notice. -
Page 52
World Headquarters Hanna Instruments Inc. Highland Industrial Park 584 Park East Drive Woonsocket, RI 02895 USA www.hannainst.com Local Office Hanna Instruments USA 270 George Washington Highway Smithfield, RI 02917 Phone: 800.426.6287 Fax: 401.765.7575 e‑mail: tech@hannainst.com MANEDGEPH Printed in ROMANIA…
- Page 1
Instruction Manual Multiparameter Benchtop Meter… - Page 2
Hanna representative near you at www.hannainst.com. All rights are reserved. Reproduction in whole or in part is prohibited without the written consent of the copyright owner, Hanna Instruments Inc., Woonsocket, Rhode Island, 02895 , USA… -
Page 3: Table Of Contents
Product Diagram …………………………… 7-8 Probe Diagram …………………………….9 Keypad Function …………………………….10 Guide to Indicators …………………………..11 Setup/ Installation ………………… 12-26 Setting Up edge™ …………………………..12-14 Electrode & Probe Connections ……………………….14 General Setup …………………………….15-17 Basic Mode ………………………………17 Logging Function …………………………..18-21 Viewing Logged Data …………………………21-24 PC &…
-
Page 4: Included
Remove the instrument from the packing material and verify damage has not occurred during shipping. Remove protective film from meter. Notify your nearest Hanna Customer Service Center if damage is observed. Each instrument is supplied with: Edge meter Bench cradle Wall cradle Electrode holder…
-
Page 5: Safety Measures
Safety Before using this product, make sure that it is entirely suitable for your specific application and for the environment in which it is used. Measures Operation of this instrument may cause unacceptable interferences to other electronic equipment, thus requiring the operator to take all necessary steps to correct interferences.
-
Page 6: Description
Every feature and measurement detail is designed to give you an edge in measurement technology. edge™ is versatile in many ways. The slim meter and probe can be used remotely as a portable device (using its rechargeable battery) or used in its bench or wall cradles (that also power the meter) as a line-powered laboratory instrument.
-
Page 7: Diagram
Front View Liquid Crystal Display (LCD) Micro USB device connection Capacitive Touch Keypad for power or PC interface 3 mm jack input for edge™ Standard USB host connection digital probes for data transfer to a USB Top mounted ON/OFF button…
- Page 8
Product Diagram Side & Back View Top & Bottom View • Sleek, clean, intuitive design • Basic mode simplified • Internal clock and date operation • Adjustable resolution for pH • Simplified data transfer to a PC and EC measurements •… -
Page 9: Probe Diagram
Probe Diagram Probes pH Electrode EC Electrode DO Electrode • Process measurement signal directly for noise free determinations • Support auto sensor recognition • Store calibration specific data from the last calibration • Are built with materials suitable for use in chemical analysis •…
-
Page 10: Keypad Function
Keypad Function CAL/MODIFY — Used to enter — Used to scroll through and exit calibration mode. In SETUP SETUP menu. Used to change used to initiate modification of a selection when modifying configuration setting. parameter in SETUP. GLP/CFM — Used to display GLP RCL — Used to view log records calibration information.
-
Page 11: Guide To Indicators
Guide to Indicators Mode tags 3rd LCD line, message area Confirm tag 10. Labels USB connection status 11. 2nd LCD line, temperature pH electrode diagnostics measurement Probes symbol 12. Temperature units Battery symbol 13. Temperature status Arrow tags, displayed when 14.
-
Page 12: Setup/Installation
Decide how the meter will be used and set up the wall or bench cradle in a clean area near line power. Turn edge™ on using the ON/OFF button located on the top of the meter. Plug in the probe required for measurement.
- Page 13
Connect the power adapter cable to the bottom socket of the wall cradle. Connect the probe connector to the socket located at the bottom of edge™. Slide edge™ into the wall cradle. Verify the battery icon indicates charging when meter is powered. -
Page 14: Electrode & Probe Connections
Connect the micro USB connector into edge™ the USB socket on the cradle or into the micro USB socket of edge™. Plug the 5 Vdc adapter into the power supply socket. edge™ can be also powered by connecting with a USB cable directly to a PC.
-
Page 15: General Setup
Choices Default (EC and pH) *Only seen when cable Select to log connection data on edge™ Log on edge™ of Log on edge™ Available between micro or to export data export to PC USB and PC is to PC made.
- Page 16
General Basic mode* Parameter Description Choices Default (EC and pH) Setup Probe Specific Parameters are inserted here in SETUP list. Set Date Press MODIFY YYYY/MM/DD Set date Available key to Set current Date date, displayed in ISO format. Press CFM to save changes. -
Page 17: Basic Mode
Note: Parameters that are grayed out are seen under special conditions only. Basic Mode edge™ offers a basic operation mode that streamlines measurement configuration for pH and EC measurements and is useful for many routine applications. Basic pH SETUP reduces parameter selection to the basic set.
-
Page 18: Logging Function
Manual and Manual medium stability Log on demand are still functional. Logging Note: • If powering edge™ through the micro USB connector to a PC, a SETUP Function parameter will require the choice “LOG ON EDGE”. • 1000 log records can be stored into the Edge memory. This memory…
- Page 19
Logging Manual (log on demand) readings are logged each time LOG is pressed. All of the records are stored in a single Manual lot for the measurement type. New Function records made on different days are stored in the same Manual lot. Stability is a log on demand that is made each time LOG is pressed and the stability criterion is reached. - Page 20
Logging Pressing the LOG key again will stop the Interval logging session. The “LOG STOPPED“ message will Function be displayed for a few seconds. If a sensor failure occurs during interval logging, the message “OUT OF FREE SPACE” will alternate with logging information Manual Logging Select Manual in the SETUP menu. -
Page 21: Viewing Logged Data
The “LOG” tag will be displayed on all 4 screens. All log records stored on edge™ may be viewed on the meter by pressing the RCL key. The log records are grouped according to measurement (pH, EC, DO).
- Page 22
Viewing If no data was logged for the selected measurement range, the instrument displays the following Logged Data messages (ex. for pH range): No Manual Logs No Stability Logs Press CFM to enter inside lot information to view memorized records. Use the ARROW keys to toggle between different records. - Page 23
Viewing To delete individual records (Manual and Stability logs only), enter Manual (Stability) log by pressing CFM when Manual (Stability) is displayed. Use the Logged Data ARROW keys to select the record to be deleted and then press CLR. The instrument will display “CLEAR REC.“ and record number along with “CFM” tag blinking. - Page 24
Viewing Delete All All pH logs, (or all EC, all DO logs) may be deleted in a single clear. This function Logged Data will delete all MANUAL, STABILITY and INTERVAL logs for the measurement type selected. Press the RCL key. The pH, EC, or DO type will be blinking. -
Page 25: Pc & Storage Interface
PC & Storage Logged data on edge™ can be transferred from the meter to a USB flash drive by using the log recall function. The minimum requirement for the drive is USB Interface 1.1. Select the pH, EC or DO record you wish to export and follow the simple steps below.
-
Page 26: Setup/ Installation
PC & Storage Logged data on edge™ can be transferred from the meter to a PC by following these simple directions. The minimum operating system for the PC is Windows Interface Connect the edge™ to the PC using the supplied micro USB cable.
-
Page 27: Operational Guide
Basic vs For optimum pH measurements, follow these steps: Understand the benefits and features of Standard and Basic Operation. Standard Set up edge™ meter by configuring preferences. pH mode Calibration Measurement The “Standard” pH operation includes up to a 5-point buffer calibration, use of custom buffers, choice of displaying 0.001 pH resolution, use of the full…
- Page 28
Basic vs Major differences between Standard and Basic modes are tabulated below. Standard Standard Basic* pH mode 5 points including 2 custom Calibration 3 points buffers Cal Check™ Feature Basic error messages Sensor Check™ Feature Diagnostics GLP basic Error messages Manual Log on demand Manual Log on demand Log types… -
Page 29: Ph Meter Configurations
pH Meter pH meter operation is configured by using the SETUP key with a pH probe connected to the meter. The parameter-specific parameters will be seen Configuations inserted into the menu. If Basic mode is configured “On”, the pH parameter list will not be displayed.
-
Page 30: Ph Calibration
This includes seven standard buffers and two custom ones. Five pH buffers may Calibration be used for calibration. The instrument should be recalibrated whenever: • High accuracy and sensor verification are required.
- Page 31
The custom buffers allow the user to calibrate in a buffer solution different from a standard one. Two custom buffers can be set in SETUP menu. See page Calibration 30 for more information about using custom buffers. The instrument will automatically skip the buffer used during calibration and the buffers which are in a ±0.2 pH window, around one of the calibrated buffers. - Page 32
The “ ” along with “STIR” tag will be displayed and “WAIT” will blink on the LCD until the reading is stable. Calibration When the reading is stable and close to the selected buffer, “CFM” tag will blink. Press CFM to confirm calibration. Repeat procedure with additional pH buffers. - Page 33
Working With Custom Buffers If a custom buffer was set in SETUP menu, it can be selected during calibration Calibration by pressing the ARROW keys. The “C1” or “C2” tag will be on once selected. Press u if you want to modify the custom buffer value. - Page 34
INFORMATION. The choice is ON or OFF. Electrode Condition And Electrode Response Time edge™ pH Calibration Check™ feature will assess electrode condition and response time during each calibration and display it for the rest of the day. The condition gauge shows the electrode’s condition that is based on the offset and slope characteristics of the pH electrode at the time of calibration. - Page 35
This information can also be viewed in the GLP data. Junction Condition (HI 11311 And HI 12301 Only) edge™ pH Sensor Check™ feature will assess the health of the pH electrode’s reference junction during each calibration. The junction gauge may be viewed directly in GLP but will also blink a warning on the display if the junction is compromised (not 100%). - Page 36
Procedure Basic mode operation permits up to three-point buffer calibration. Calibration For accurate measurements, at least a two-point calibration is recommended. However, a single point calibration can also be used. The calibration buffers can be selected from the calibration buffer list that includes the standard buffers, pH 4.01, 6.86, 7.01, 9.18 and 10.01. - Page 37
The “ ” along with “STIR” tag will be displayed and “WAIT” will blink on the LCD until the reading is stable. When the reading is stable and close to the Calibration selected buffer, the “CFM” tag will blink. Press CFM to confirm calibration. The calibrated value is then displayed on the 1st LCD line and the third expected buffer value on the 3rd LCD line. -
Page 38: Ph Calibration
used, or clean the electrode by following the Cleaning Procedure (see page 76). If necessary, change the buffer or the electrode. Calibration • If the buffer temperature exceeds the temperature limits of the buffer, “WRONG BUFFER TEMPERATURE” will be displayed. •…
-
Page 39: Calibration Messages
Calibration The Calibration Check™ feature may flag diagnostic messages during a calibration. As electrode aging is normally a slow process, substantial changes Messages from previous calibrations are likely due to a temporary problem with the electrode or buffers that can be addressed easily. These messages are seen in Standard and Basic modes.
- Page 40
Calibration Clean Electrode This error message indicates poor electrode Messages performance (offset out of accepted window, or slope under the accepted lower limit). Often cleaning the sensor will improve the pH electrodes response. See pH Electrode Conditioning and Maintenance for details. -
Page 41: Ph Glp Information
Calibration Contaminated Buffer This warning message appears in order to alert that Messages the buffer could be contaminated. Refresh your buffer and continue the calibration procedure. pH GLP Good Laboratory Practice (GLP) refers to a quality control function used to ensure uniformity of sensor calibrations and measurements.
- Page 42
pH GLP The last calibration date (yyyy.mm.dd) together with the current reading. Information Note: For each custom buffer used in calibration, the “C1” and “C2” tags will be displayed. If only the second custom buffer is in calibration the tag will be “C1” and the value will be displayed. -
Page 43: Ph Measurement
pH GLP The probe serial number together with the current reading. Information If a buffer is not from the last calibration, the buffer tag will be displayed blinking. In Standard Mode, Condition, Response gauges are visible on the day of calibration (See Electrode Condition And Electrode Response Time page 34).
- Page 44
Rinse the pH sensor with water and a sample aliquot if possible. Submerse the electrode tip approximately 3 cm (1¼”) into the sample to be tested and Measurement stir sample gently. Allow time for the electrode to stabilize. The pH is displayed on the 1st LCD line and the temperature on the 2nd LCD line. - Page 45
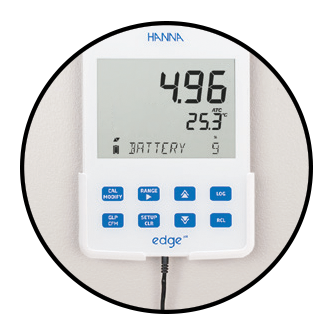
Range Specific Messages Displayed On Alphanumeric Line During Measurement (3 Lcd Line) Measurement All the messages described in GENERAL section (page 15) are displayed in pH range. Temperature Sensor Problem (if there is one) Cal Due or Offset and Slope Value Time Date Battery or Charge Status… -
Page 46: Basic Vs Standard Ec Mode
Take measurements using a EC probe. Measurements Available With The EC Probe The four-ring EC probe may be used for 3 different measurement applications with edge™. • It may be used for temperature compensated or absolute conductivity measurements (with units of μS/cm or mS/cm).
-
Page 47: Ec Meter Configuration
Basic vs Measurement data can be logged using Manual Log on Demand or Manual Log on Stability or Interval Logging. The measurement logs may be exported to a Standard thumb drive or PC. EC mode Standard Basic Measurement Conductivity, TDS, Salinity Conductivity, TDS Set up Parameters Fully selectable…
- Page 48
EC Meter Parameter Description Choices Default Basic mode Configuration T.Coef. (%/ºC) This parameter 0.0 to 6.00 (%/ 1.90 (%/ºC) Not available. is related to the ºC) Note: Setting Close for natural Automatically solution being to 0.00 is the waters or salt set to 1.90%/ºC. - Page 49
Parameter Description Choices Default Basic mode Configuration EC RANGE If AUTO is used, AUTO, AUTO Not available but the edge™ will 29.99 μS/cm, measurement automatically 299.9 μS/cm, autoranges as find the correct 2999 μS/cm, needed. conductivity 29.99 mS/cm, range and 200.0 mS/cm,… -
Page 50: Ec/Tds Calibration
EC Meter Parameter Description Choices Default Basic mode Configuration EC SALINITY Three PSU, NaCl%, g/L NaCl% Not available. SCALE measurement scales are available for salinity measurement in Seawater. (Practical Salinity Scale, Percent Scale and Natural Seawater Scale). EC Range (Not Available In Basic Mode) The EC and TDS measurements may be configured in SETUP as AUTO (meaning auto-ranging, the measurement automatically finds the correct conductivity or TDS unit and resolution), or it may be configured with a user-selected…
- Page 51
EC/TDS Every time you calibrate the instrument use fresh standard and perform electrode maintenance as required. It is recommended to chose a calibration CALIBRATION standard that is close to the sample. Preparation Pour small quantities of the standard solutions into a beaker. If possible, use a plastic beaker to minimize any EMC interferences. - Page 52
EC/TDS When the reading is stable and close to the selected standard, “CFM” tag will blink and the message CALIBRATION “SOLUTION STANDARD” will scroll. Press CFM to confirm calibration. The Instrument displays “SAVING”, stores the calibration values and returns to measurement mode. Operational Guide… - Page 53
EC/TDS The following table lists the temperature dependence of Hanna EC calibration standards. edge™ uses these values during calibration and their temperature CALIBRATION coefficients. HI7030 HI7031 HI7033 HI7034 HI7035 HI7039 ºC ºF HI8030 HI8031 HI8033 HI8034 HI8035 HI8039 (μS/cm) (μS/cm) (μS/cm) -
Page 54: Nacl Calibration
% NaCl PREPARATION Pour a small quantity of the calibration solution into a beaker. If possible, use CALIBRATION a plastic beaker to minimize any EMC interferences. Before pressing CAL verify in SETUP: • Basic mode is off • Salinity Scale is NaCl% Use the RANGE key to select the Salinity measurement.
-
Page 55: Ec/Tds Glp Information
% NaCl The Instrument displays “SAVING”, stores the calibration values and returns to measurement mode. CALIBRATION Note: If a new EC calibration is performed, the NaCl calibration is automatically cleared. A new NaCl calibration is required. Wrong Standard If the reading is too far from the expected value, the Calibration “WRONG STANDARD”…
- Page 56
EC/TDS To view the EC calibration data, press GLP when the instrument is in EC measurement mode. The instrument will display the calibration standard and the temperature of the calibrated standard. Use the ARROW keys to scroll Information through the calibration data displayed on the 3rd LCD line. The cell factor in cm determined from the calibration with the current reading. - Page 57
EC/TDS The last calibration time (hh:mm:ss) together with the current reading. Information The last calibration date (yyyy.mm.dd.) together with the current reading. Calibration Expiration status together with the current reading: If disabled, “EXPIRATION WARNING DISABLED” is displayed If enabled, the number of days until the calibration alarm “CAL DUE”… - Page 58
NaCl% measurement mode. Use the ARROW keys to scroll through the Information calibration data. The instrument will display the calibration temperature and solution. The edge™ will indicate: probe cell constant together with the current reading. The salinity coefficient determined from the calibration together with the current reading. - Page 59
EC/TDS Calibration Expiration status together with the current reading: If disabled, “EXPIRATION WARNING DISABLED” is Information displayed If enabled, the number of days until the calibration alarm “CAL DUE” will be displayed. Or if the number of days the calibration has expired ( I.E. - Page 60
EC/TDS The RANGE key will change measurement from conductivity to TDS to Salinity. Measurements Conductivity Measurements Connect the conductivity probe to the instrument and wait until probe parameters are loaded. The following message is then displayed on the LCD: “Probe Connected” Verify if the probe has been calibrated. -
Page 61: Ec/Tds Measurements
EC/TDS No Temperature Compensation (No TC): The temperature value is displayed, but not taken into account. When this option is selected, the “NoTC” tag will Measurements be displayed. The reading displayed on the primary LCD is the uncompensated EC or TDS value. Note: •…
-
Page 62: Salinity Measurements
Salinity Salinity Measurements (Not Available In Basic Mode) Press the RANGE key twice to switch from conductivity to the configured Measurements Salinity scale. Verify the desired scale is configured in SETUP. The meter supports three salinity scales: Practical Scale 1978, Percent Scale %, and Natural Sea Water 1966, [g/L].
- Page 63
Salinity — ratio of sample conductivity to standard conductivity at Temp =(T) CT(sample)-conductivity at T ºC; Measurements C(35,15)=42.914µS/cm — the corresponding of KCI solution containing a mass of 32.4356 g KCl/1 Kg solution — Temperature compensation polynomial = 0.008 = 0.0005 = -0.1692 = -0.0056 = 25.3851… -
Page 64: Salinity Measurements
Salinity Natural Sea Water Scale The Natural Sea Water Scale extends from 0 — 80.0 g/L. It determines salinity Measurements based upon a conductivity ratio of sample to “standard seawater” at 15 °C. Where R is the conductivity ratio and salinity is defined by the following equation: S = — 0.08996 + 28.2929729R + 12.80832R…
-
Page 65: Dissolved Oxygen Setup
Measurements Available Concentration measurements in water, and % oxygen saturated measurements are available using edge™ together with HI 764080 DO probe. Algorithms used for concentration measurements (units of ppm or mg/L) are based upon the oxygen solubility in air-saturated fresh water. Compensation for salinity and altitude are made by configuring SETUP parameters.
- Page 66
The cathode area should be free of bubbles. Setup 8. Connect the DO probe to the edge™ meter and turn meter on 9. Allow probe conditioning function to occur. Note: When not in use and during polarization, use the protective transparent cap. -
Page 67: Do Probe Diagram
DO Probe Diagram Strain Relief Probe Cap PEI Probe Body Temperature Sensor Threads for Membrane Cap Ag/AgCl Anode and Reference Glass Insulator Platinum Cathode O-Ring 10. Disposable Membrane Cap 11. Oxygen Permeable PTFE Membrane 12. Shipping Tube Operational Guide…
-
Page 68: Do Meter Configuration
DO Meter DO (Dissolved Oxygen) meter operation is configured using the SETUP key with a DO probe connected to the meter. The parameter-specific parameters Configuration will be seen inserted into the menu. There is no Basic mode for Dissolved Oxygen measurements. Parameter Description Choices…
- Page 69
Compensation for temperature-related solubility is done automatically using the built-in temperature sensor within the DO probe and algorithms in the edge meter. When water is measured at an altitude below sea level, oxygen solubility increases, but above sea level the oxygen solubility decreases. -
Page 70: Do Meter Configuration
DO Meter When water is fresh containing no sea water, the concentration of oxygen will be at a maximum. The solubility of the oxygen dissolved in water is decreased Configuration when water is brackish or seawater. The solubility of oxygen in water is decreased when measurements are made at elevations above sea level.
-
Page 71: Do Calibration
When the reading is stable and is within the limits, “CFM” tag starts blinking. Press CFM to confirm the Calibration 100.0 % DO calibration. Press CAL to leave calibration after the first point. The instrument will display “SAVING” message and it will return to measurement mode memorizing the slope calibration data.
-
Page 72: Do Calibration Messages
Calibration Messages If the reading is outside limits, “WRONG STANDARD“ Calibration message will be displayed. Messages If the temperature goes out of (0.0 — 50.0 ºC) range during calibration, the “WRONG STANDARD TEMPERATURE” message will be displayed and temperature value will blink. DO GLP GLP refers to a quality control function used to ensure uniformity of probe calibrations and measurements.
- Page 73
DO GLP The altitude and salinity setting at the moment of calibration together with the current reading. Information The time of the calibration together with the current reading. The date of the calibration together with the current reading Calibration Expiration status together with the current reading: If disabled, “EXPIRATION WARNING DISABLED”… - Page 74
DO GLP The probe serial number together with the current reading Information Make sure that the probe is polarized, calibrated and the protective cap has been removed. Measurements Rinse probe. Submerse the probe in the sample to be tested, make sure temperature probe is also immersed. -
Page 75: Do Measurements
any measurement. This can take several minutes. The greater the difference between the temperature at which the probe was stored and the temperature Measurements of the sample, the longer the time will be. Note: • If the temperature is displayed blinking, the temperature is out of range for the probe.
-
Page 76: Maintenance
pH Probe Maintenance Remove the protective cap of the pH electrode. DO NOT BE ALARMED IF SALT DEPOSITS ARE PRESENT. This is normal with electrodes. They will disappear when rinsed with water. During transport, tiny bubbles of air may form inside the glass bulb affecting proper functioning of the electrode.
- Page 77
pH Probe For refillable electrodes: If the filling solution (electrolyte) is more than 2½ cm (1”) below the fill hole, Maintenance add HI 7082 or HI 8082 3.5M KCl Electrolyte Solution for double junction. Unscrew the fill hole cover during measurements so the liquid junction maintains an outward flow of electrolyte. - Page 78
pH Probe Cleaning Procedure Use diagnostic messages to aid pH electrode troubleshooting. Several Maintenance cleaning solutions are available: General – Soak in Hanna HI 7061 or HI 8061 General Cleaning Solution for approximately ½ hour. Protein –Soak in Hanna HI 7073 or HI 8073 Protein Cleaning Solution for 15 minutes. -
Page 79: Ec Probe Maintenance
pH Probe Alkaline Error High concentrations of sodium ions interfere with readings in alkaline Maintenance solutions. The pH at which the interference starts to be significant depends upon the composition of the glass. This interference is called alkaline error and causes the pH to be underestimated. Hanna’s glass formulations have the indicated characteristics.
-
Page 80: Do Probe Maintenance
DO Probe The oxygen probe body is made of PEI. A temperature sensor provides temperature measurements of the sample. Maintenance Use the protective cap when the probe is not in use. To replace the membrane or refill with electrolyte, proceed as follows: Remove the protective shipping tube by gently twisting and pulling it off the body of the probe (see fig.
-
Page 81: Do Probe Maintenance
DO Probe The platinum cathode (DO Probe Diagram, page 67) should always be bright and untarnished. If it is tarnished or stained, the cathode should be cleaned. Maintenance You can use a clean lint-free cardboard or cloth. Rub the cathode very gently side to side 4-5 times.
-
Page 82: Troubleshooting Guide
Troubleshooting Symptoms Problems Solution Guide Clean the electrode and then soak Slow response/excessive Dirty pH electrode. the tip in HI 7061 or HI 8061 for 30 drift. minutes. pH: Clogged/dirty Clean the electrode. Refill with fresh junction. Low electrolyte solution (for refillable electrodes only). level (refillable Check cable and connectors.
- Page 83
Troubleshooting Symptoms Problems Solution Guide A) Verify the shipping cap has been removed. B) Make sure the sample pH is within If the display shows: Out of range in the mV specified range. “mV” and “-1000” or scale. C) Verify electrolyte level in pH sensor “1000”… -
Page 84: Specifications
Specifications Temperature -2.00 to 16.00 pH Range -2.000 to 16.000 pH* -20.0 to 120.0 ºC (-4.0 to 248.0 °F)** ±1000.0 mV 0.01 pH Resolution 0.001 pH* 0.1 ºC 0.1 mV ±0.01pH Accuracy ±0.002 pH* ±0.5 ºC @ 25 °C / 77 °F ±0.2 mV Automatic, up to 3 points (5 points*) calibration, 5 standard (7 pH Calibration…
- Page 85
Specifications Salinity 0.00 to 29.99 μS/ cm, 3.00 to 29.99 0.00 to 14.99 ppm μS/cm, 300. to (mg/L), 15.0 to 149.9 2999. μS/cm, ppm (mg/L), 150. to 0.0 to 400.0% NaCl 3.00 to 29.99 1499. ppm (mg/L), 1.50 **, 2.00 to 42.00 Range mS/cm, 30.0 to to 14.99 g/L, 15.0 to… - Page 86
Specifications Conductivity temperature 0.00 to 6.00% / ºC (for EC and TDS only). Default value is 1.90% / ºC coefficient TDS factor 0.40 to 0.80 (default value is 0.50) EC Probe HI 763100 Up to 1000 ** (400) records organized in: Manual log on demand (Max. 200 Log feature logs), Manual log on stability (Max. - Page 87
Specifications 0.00 to 45.00 ppm (mg/L) Range 0.0 to 300.0% -20.0 to 120.0 ºC (-4.0 to 248.0 °F)* 0.01 ppm (mg/L) Resolution 0.1% 0.1 °C Accuracy ±1.5% of reading or ±1 digit @ 25 °C / 77 °F ±0.5 ºC DO Calibration One or two points at 0% (HI 7040) and 100% (water saturated air) Altitude Compensation… -
Page 88: Accessories
Accessories Buffer Solutions HI 70004P pH 4.01 Buffer Sachets, 20 mL (25 pcs.) HI 70007P pH 7.01 Buffer Sachets, 20 mL (25 pcs.) HI 70010P pH 10.01 Buffer Sachets, 20 mL (25 pcs.) HI 7001L pH 1.68 Buffer Solution, 500 mL HI 7004L pH 4.01 Buffer Solution, 500 mL HI 7006L…
- Page 89
Accessories Conductivity Solutions HI 70030P 12880 μS/cm, 20 mL sachets (25 pcs.) HI 70031P 1413 μS/cm, 20 mL sachets (25 pcs.) HI 70039P 5000 μS/cm, 20 mL sachets (25 pcs.) HI 7030M 12880 μS/cm, 230 mL bottle HI 7031M 1413 μS/cm, 230 mL bottle HI 7033M 84 μS/cm, 230 mL bottle HI 7030M… -
Page 90: Accessories
HI 2000WC Wall cradle HI 2000BC Bench cradle Ordering Information HI 2020-01 edge™ instrument with US plug HI 2020-02 edge™ instrument with EU plug HI 11310 Glass body, double junction, pH/temperature electrode Glass body, double junction, pH/temperature electrode with enhanced…
-
Page 91: Warranty
Technical Service department and then send it with shipping costs prepaid. When shipping any instrument, make sure it is properly packed for complete protection. Hanna Instruments reserves the right to modify the design, construction or appearance of its products without advance notice. Warranty…
- Page 92
Notes Warranty… - Page 93
Notes Warranty… - Page 94
Notes Warranty… - Page 95
Notes Warranty… - Page 96
World Hanna Instruments Inc. Highland Industrial Park Headquarters 584 Park East Drive Woonsocket, RI 02895 www.Hannainst.com Local Office Hanna Instruments USA 270 George Washington Highway Smithfield, RI 02917 Phone: 800.426.6287 Fax: 401.765.7575 e-mail: tech@Hannainst.com…
Описание
Описание стационарного рН-метра HI2002-02:
Универсальный многопараметровый анализатор предназначен для использования в качестве портативного переносного устройства, настольного лабораторного инструмента, настенного стационарного измерителя. Модель HI2002-02 разработана на основе технологии edge. Она позволяет использовать прибор для измерения значений pH, проводимости, уровня растворенного кислорода и температуры при помощи подключаемого к анализатору цифрового pH-электрода, зонда EC с четырьмя кольцевыми электродами, полярографического зонда DO. Электроды и зонды, входящие в комплект поставки прибора, имеют встроенный датчик температуры.
Прибор оснащен большим жидкокристаллическим экраном, емкостной клавиатурой, разъемом для подключения зондов, разъемом микро USB для подключения источника питания или соединения с компьютером, стандартным USB-разъемом для подключения флешки. HI2002-02 pH-метр серии edge имеет встроенный календарь и часы, поддерживает регулировку разрешения измерений pH и EC, автоматически определяет измеряемые параметры. Способен сохранять работоспособность в течение 8 часов без подключения к стационарному источнику питания. Устройство оснащено перезаряжаемой батареей.
Умеет сохранять данные. Предлагает три способа записи данных: непрерывное протоколирование, ручное сохранение данных, регистрация точных, средних и быстрых параметров. Максимальное количество сохраняемых интервальных записей – не более 100. В ручном журнале или журнале стабильности пользователь сможет сохранить до 200 записей.
Область применения :
Анализатор применяют в лабораториях, на предприятиях пищевой, химической промышленности, других отраслях производства для определения параметров используемой в работе среды. Прибор используют для проверки питьевой, сточной воды, технических жидкостей на производстве, красок на водной основе, биологических образов.
Управление и индикация :
Панель управления состоит из нескольких кнопок, расположенных в два ряда. Вся информация об измерениях и показания встроенных индикаторов выводятся на широкий дисплей.
Технические характеристики:
| Параметр | Значение |
|---|---|
| Диапазон рН | От -2,000 до 16,000 рН (расширенный режим); от -2,00 до 16,00 pH (базовый режим) |
| Разрешение рН | 0,001 pH; 0,01 pH |
| Точность рН (при 25 ° C / 77 ° F) | ±0,01 pH; ±0,002 pH |
| Калибровка pH | По 5 точкам (стандартный режим) 1,68; 4,01 (3,00 *); 6,86; 7,01; 9,18; 10,01; 12,45 и два пользовательских буфера. По 3 точкам (базовый режим) 4,01; 6,86; 7,01; 9.18; 10.01 |
| Температурная компенсация рН | Автоматическая: от -5,0 до 100.0 C ** |
| Диапазон мВ | ± 1000,0 мВ; ± 2000,0 мВ |
| Разрешение мВ | 0,1 мВ |
| Точность мВ | ± 0,2 мВ (± 999,9 мВ); ± 1 мВ (± 2000 мВ) |
| Относительная калибровка мВ | Калибровка по одной точке |
| Диапазон температур | от -20,0 до 120,0 C; от -4,0 до 248,0 °F |
| Разрешающая способность по температуре | 0,1 °C; 0,1 °F |
| Точность температуры | ±0,5 °C; ±0,9 °F |
| Переключение °C / °F | Да |
| Диагностика рН электрода | Диагностика стеклянного корпуса и электрода сравнения (только HI 11311 и HI 12301), вне диапазона калибровки, состояние электрода, время отклика |
| GLP | Да |
| Журнал событий | До 1000*** записей, организованных в режимы: журнал событий по запросу (максимум 200 записей), журнал событий по стабильности (максимум 200 записей), журнал событий по времени *** (максимум 600 образцов; 100 лотов) |
| Входы | 1 микро-USB порт для зарядки и подключения к ПК, 1 USB порт для USB-накопителя |
| Условия эксплуатации | От 0 до 50 ° C, относительная влажность не более 95% без конденсации |
| Тип батареи/долговечность | Встроенная перезаряжаемая батарея, обеспечивающая до 8 часов непрерывной работы |
| Источник питания | Адаптер постоянного тока 5 В (входит в комплект) |
| Размеры | 202 x 140 x 12.7мм |
| Вес | 250 г |
| Информация для заказа | Комплект поставки edge® HI2002-02 включает в себя прибор со штативом, настенное крепление, USB кабель, заполняемый стеклянный рН электрод HI11310 со встроенным датчиком температуры, 2 пакетика каждого из буферных растворов рН 4,01; 7,01; 10,01, чистящего раствора и раствора для хранения электрода, адаптер питания постоянного тока 5 В и руководство по эксплуатации. |
| Примечания |
* Буфер рН 3,00 включается только при использовании специфических рН электродов и заменяет буфер рН 4,01 |
-

- Производители HANNA Instruments
- Код Товара: HI2002-02
Доступные варианты
Метрологическое обеспечение
")
+3900.00р.
Характеристики
- Диапазон мВ± 1000,0 мВ; ± 2000,0 мВ
- Диапазон рНОт -2,000 до 16,000 рН (расширенный режим); от -2,00 до 16,00 pH (базовый режим)
- Калибровка pHПо 5 точкам (стандартный режим) 1,68; 4,01 (3,00 *); 6,86; 7,01; 9,18; 10,01; 12,45 и два пользовательских буфера. По 3 точкам (базовый режим) 4,01; 6,86; 7,01; 9.18; 10.01
- Относительная калибровка мВКалибровка по одной точке
- Разрешение мВ0,1 мВ
- Разрешение рН0,001 pH; 0,01 pH
- Температурная компенсация рНАвтоматическая: от -5,0 до 100.0ºC **
- Точность мВ± 0,2 мВ (± 999,9 мВ); ± 1 мВ (± 2000 мВ)
- Точность рН (при 25 ° C / 77 ° F)±0,01 pH; ±0,002 pH
Описание
Hanna Instruments с гордостью представляет инновационный рН/ОВП метр edge®.
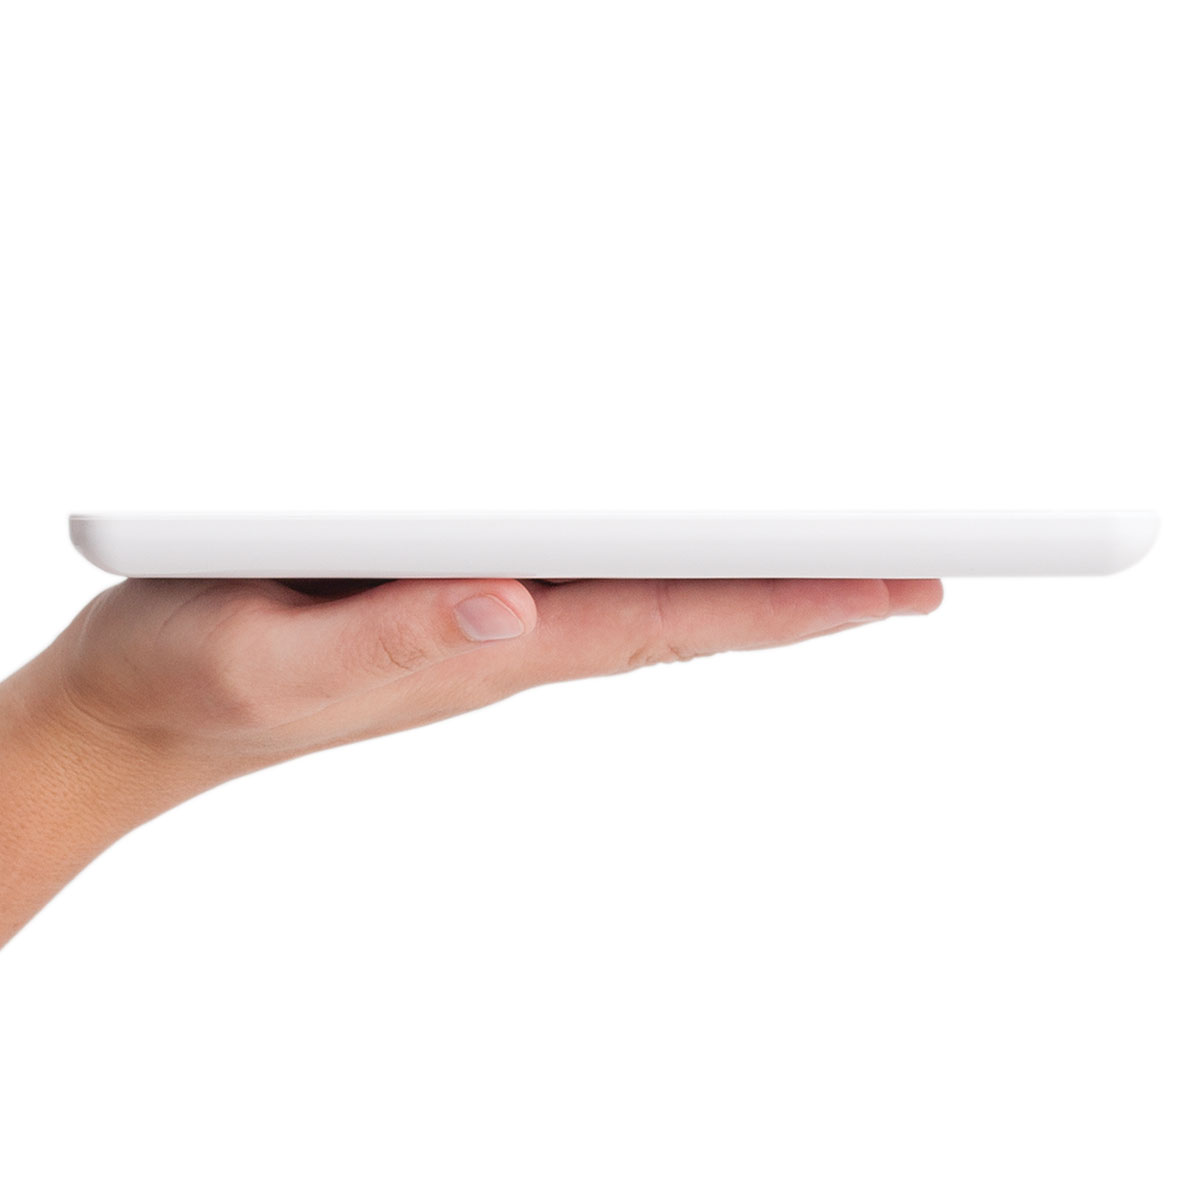
Еdge 2002-02 объединил в себе последние достижения в области рН-метрии и современного дизайна. Это высокоточный прибор со множеством полезных функций в сверхтонком корпусе, толщина которого всего 13 мм. В комплект поставки входит комбинированный электрод, решающий широкий спектр задач, стоящих перед современной лабораторией . Edge является невероятно простым и удобным в использовании прибором, способным с высокой точностью измерять рН и ОВП.

Прибор внесен в государственный реестр средств измерений

Расширенные возможности диагностики рН электродов
Прибор edge обладает возможностью самодиагностики рН электродов, обеспечивающей точность измерений. В диагностику входит функция проверки калибровки CAL Check, предупреждающая пользователей о возможных проблемах во время калибровки, и функция проверки целостности стеклянного корпуса и соединений датчика.
Емкостной сенсор
Прибор edge имеет емкостную сенсорную клавиатуру, что придаёт ему современный и практичный внешний вид. Клавиатура имеет быстрый отклик и обладает достаточной чувствительностью при работе в лабораторных перчатках. Поскольку клавиатура является частью экрана, на ней нет кнопок, которые могут загрязниться остатками образца.
Большой легко читаемый ЖК экран
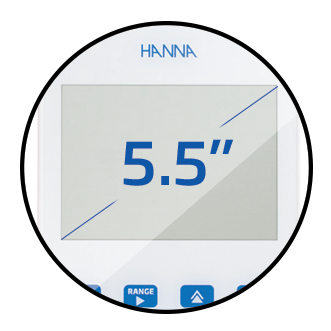
Прибор edge снабжён 5,5-дюймовым ЖК-дисплеем, на котором показания легко читаются с расстояния более 5 метров. Большой экран и широкий угол обзора (150°) обеспечиваются одним из удобных ЖК-дисплеев в отрасли.

Edge® рН/ОВП имеет большое количество функций, обеспечивающих точность измерений и удобство использования.
Цифровые рН электроды
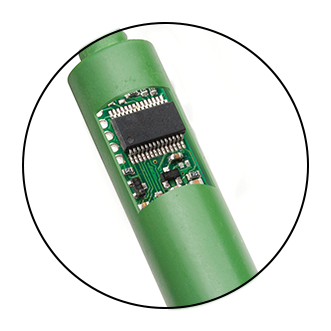
Высокотехнологичные рН электроды для edge имеют встроенный микрочип, в котором хранится информация о калибровке. Информация из микрочипа загружается в память прибора при подключении электрода. Поскольку информация о калибровке хранится в чипе рН электрода, а не в памяти прибора, то после замены электрода не требуется перекалибровывать прибор. Данная особенность позволяет существенно экономить время и растворы для калибровки при частой замене электродов.
Фунция CAL Check
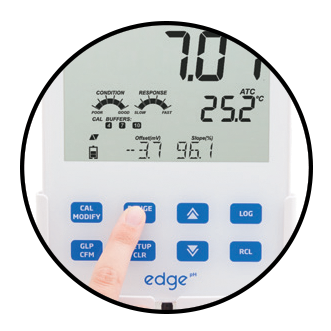
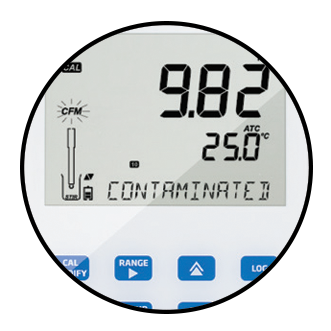
Функция проверки калибровки CAL Check анализирует поведение рН электродов в буферных растворах рН во время процесса калибровки и предупреждает пользователя о возможных проблемах. Индикаторы высвечивают надпись «загрязненный буфер» и «очистите электрод». После калибровки индикаторы состояния электрода и времени отклика отображаются на экране. Состояние рН электрода оценивается по характеристикам смещения и наклона.
Проверка электрода
При работе с электродами Hanna, оснащенными 3,5 мм разъёмом, прибор edge непрерывно контролирует сопротивление измерительных рН электродов в реальном времени с целью немедленного уведомления в случае возникновения неполадок. Во время калибровки функция проверки датчика также проверяет состояние диафрагмы. Кроме того, состояние диафрагмы сравнения оценивается и отображается на дисплее.
Edge® универсальный прибор! Его можно использовать и как портативный, и как настольный прибор.
Настенное крепление
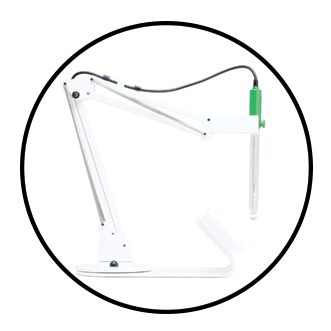
Используя каркас для настенного крепления (в комплекте), edge можно закрепить на стене, что позволяет освободить место на лабораторном столе. Каркас имеет встроенный разъем для питания edge и зарядки его аккумуляторов. Настенное крепление предназначено для экономии ценного настольного пространства.
Подставка и держатель электродов
Прибор edge комплектуется настольной подставкой со встроенным разъёмом питания edge, на которую крепится регулируемый поворотный штатив для электродов. Такая конструкция обеспечивает возможность зарядки и надёжной фиксации прибора при оптимальном угле обзора.
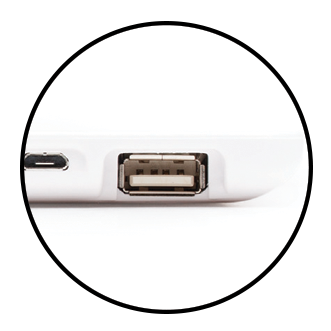
Edge® очень тонкий и весит всего 250 г. Время работы от батареи 8 часов. Прибор снабжён двумя разъёмами USB.
Два порта USB
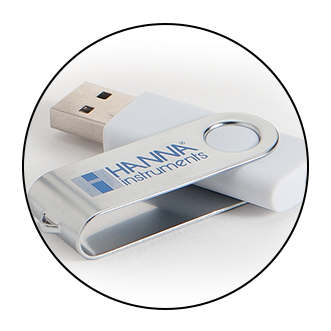
Прибор edge оборудован одним стандартным USB разъёмом для экспорта данных на USB-накопитель и ещё одним микро USB разъёмом для подключения к компьютеру с целью экспорта файлов, а также для зарядки прибора при отсутствии подставки или настенного крепления.
Журнал данных
Прибор edge позволяет хранить до 1000 записей журнала данных. Каждая из них включает показания, данные стандарта GLP, дату и время.
Два режима работы
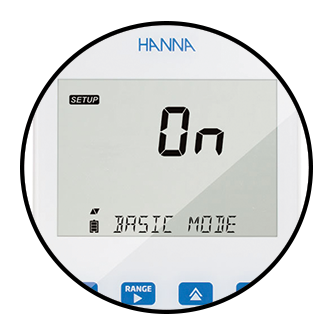
Прибор edge может использоваться в расширенном или базовом режимах эксплуатации. Расширенный режим предоставляет пользователю все имеющиеся возможности прибора, в то время как базовый режим сокращает количество функций до выполнения очень простых операций. Например, в расширенном режиме, edge предлагает калибровку по 5 точкам с использованием 2 пользовательских буферов, в то время как в основном режиме калибровка может быть выполнена только по 3 точкам и по 5 заранее запрограммированным значениям буферов.
Рекомендуемые товары
Диапазон мВ — ± 1000,0 мВ; ± 2000,0 мВ / Диапазон рН — От -2,000 до 16,000 рН (расширенный режим); от -2,00 до 16,00 pH (базовый режим) / Калибровка pH — По 5 точкам (стандартный режим) 1,68; 4,01 (3,00 *); 6,86; 7,01; 9,18; 10,01; 12,45 и два пользовательских буфера. По 3 точкам (базовый режим) 4,01; 6,86; 7,01; 9.18; 10.01 / Относительная калибровка мВ — Калибровка по одной точке / Разрешение мВ — 0,1 мВ
| Диапазон мВ | ± 1000,0 мВ; ± 2000,0 мВ |
| Диапазон рН | От -2,000 до 16,000 рН (расширенный режим); от -2,00 до 16,00 pH (базовый режим) |
| Калибровка pH | По 5 точкам (стандартный режим) 1,68; 4,01 (3,00 *); 6,86; 7,01; 9,18; 10,01; 12,45 и два пользовательских буфера. По 3 точкам (базовый режим) 4,01; 6,86; 7,01; 9.18; 10.01 |
| Относительная калибровка мВ | Калибровка по одной точке |
| Разрешение мВ | 0,1 мВ |
| Разрешение рН | 0,001 pH; 0,01 pH |
| Температурная компенсация рН | Автоматическая: от -5,0 до 100.0ºC ** |
| Точность мВ | ± 0,2 мВ (± 999,9 мВ); ± 1 мВ (± 2000 мВ) |
| Точность рН (при 25 ° C / 77 ° F) | ±0,01 pH; ±0,002 pH |
Для покупки товара в нашем интернет-магазине выберите понравившийся товар и добавьте его в корзину. Далее перейдите в Корзину и нажмите на «Оформить заказ» или «Быстрый заказ». Или воспользуйтесь формой «Оставьте заявку».
Когда оформляете быстрый заказ, напишите ФИО, телефон и e-mail. С Вами свяжется менеджер и уточнит условия заказа. По результатам разговора вам придет подтверждение оформления товара на почту.
Наличный расчет 
Оплата
принимается в российских рублях в нашем магазине или курьером при
заказе с доставкой. При получении товара обязательно проверьте его
комплектацию, наличие гарантийного талона и чека.
Безналичный расчет 
Для юридических лиц
единственная форма оплаты — перевод на расчетный счет. Данный способ
оплаты возможен при 100% предоплате, оплате 30/70 и постоплате.
После
подтверждения заказа на e-mail будет выслано уведомление и вложенный
счет на оплату со всеми реквизитами для осуществления перевода,
необходимыми подписями и печатью.
Как только денежные средства
поступят на наш расчетный счет, выбранные вами при создании Заказа
товары будут зарезервированы, и начнется его комплектация.
Оплата картой 

Вы можете совершить покупку с помощью банковской карты в нашем центре продаж или на данном сайте.
Оплата происходит через сервис Яндекс.Деньги с использованием Банковских карт следующих платежных систем:
Варианты доставки
- Доставка курьером до дверей по всей России
- Доставка до терминала транспортной компании в Вашем городе по всей России
- Самовывоз из нашего офиса — г. Санкт-Петербург, ул. Новолитовская, д.15А, оф. 333
Сроки доставки по России
Сроки доставки зависят от удаленности Вашего региона

Условия доставки:
Стоимость доставки включается в стоимость товара или оплачивается отдельно транспортной компании.
При получении товара Вам будут предоставлены товарная накладная или УПД и оригинал счёта.
Hanna Instruments с гордостью представляет инновационный рН/ОВП метр edge®. Еdge 2002-02 объединил в себе последние достижения в области рН-метрии и современного дизайна. Это высокоточный прибор со множеством полезных функций в сверхтонком корпусе, толщина которого всего 13 мм. В комплект поставки входит комбинированный электрод, решающий широкий спектр задач, стоящих перед современной лабораторией . Edge является невероятно простым и удобным в использовании прибором, способным с высокой точностью измерять рН и ОВП.
Расширенные возможности диагностики рН электродов
Прибор edge обладает возможностью самодиагностики рН электродов, обеспечивающей точность измерений. В диагностику входит функция проверки калибровки CAL Check, предупреждающая пользователей о возможных проблемах во время калибровки, и функция проверки целостности стеклянного корпуса и соединений датчика.
Емкостной сенсор
Прибор edge имеет емкостную сенсорную клавиатуру, что придаёт ему современный и практичный внешний вид. Клавиатура имеет быстрый отклик и обладает достаточной чувствительностью при работе в лабораторных перчатках. Поскольку клавиатура является частью экрана, на ней нет кнопок, которые могут загрязниться остатками образца.
Большой легко читаемый ЖК экран
Прибор edge снабжён 5,5-дюймовым ЖК-дисплеем, на котором показания легко читаются с расстояния более 5 метров. Большой экран и широкий угол обзора (150°) обеспечиваются одним из удобных ЖК-дисплеев в отрасли.
Edge® рН/ОВП имеет большое количество функций, обеспечивающих точность измерений и удобство использования.
Цифровые рН электроды
Высокотехнологичные рН электроды для edge имеют встроенный микрочип, в котором хранится информация о калибровке. Информация из микрочипа загружается в память прибора при подключении электрода. Поскольку информация о калибровке хранится в чипе рН электрода, а не в памяти прибора, то после замены электрода не требуется перекалибровывать прибор. Данная особенность позволяет существенно экономить время и растворы для калибровки при частой замене электродов.
Фунция CAL Check
Функция проверки калибровки CAL Check анализирует поведение рН электродов в буферных растворах рН во время процесса калибровки и предупреждает пользователя о возможных проблемах. Индикаторы высвечивают надпись «загрязненный буфер» и «очистите электрод». После калибровки индикаторы состояния электрода и времени отклика отображаются на экране. Состояние рН электрода оценивается по характеристикам смещения и наклона.
Проверка электрода
При работе с электродами Hanna, оснащенными 3,5 мм разъёмом, прибор edge непрерывно контролирует сопротивление измерительных рН электродов в реальном времени с целью немедленного уведомления в случае возникновения неполадок. Во время калибровки функция проверки датчика также проверяет состояние диафрагмы. Кроме того, состояние диафрагмы сравнения оценивается и отображается на дисплее.
Edge® универсальный прибор! Его можно использовать и как портативный, и как настольный прибор.
Настенное крепление
Используя каркас для настенного крепления (в комплекте), edge можно закрепить на стене, что позволяет освободить место на лабораторном столе. Каркас имеет встроенный разъем для питания edge и зарядки его аккумуляторов. Настенное крепление предназначено для экономии ценного настольного пространства.
Подставка и держатель электродов
Прибор edge комплектуется настольной подставкой со встроенным разъёмом питания edge, на которую крепится регулируемый поворотный штатив для электродов. Такая конструкция обеспечивает возможность зарядки и надёжной фиксации прибора при оптимальном угле обзора.
Edge® очень тонкий и весит всего 250 г. Время работы от батареи 8 часов. Прибор снабжён двумя разъёмами USB.
Два порта USB
Прибор edge оборудован одним стандартным USB разъёмом для экспорта данных на USB-накопитель и ещё одним микро USB разъёмом для подключения к компьютеру с целью экспорта файлов, а также для зарядки прибора при отсутствии подставки или настенного крепления.
Журнал данных
Прибор edge позволяет хранить до 1000 записей журнала данных. Каждая из них включает показания, данные стандарта GLP, дату и время.
Два режима работы
Прибор edge может использоваться в расширенном или базовом режимах эксплуатации. Расширенный режим предоставляет пользователю все имеющиеся возможности прибора, в то время как базовый режим сокращает количество функций до выполнения очень простых операций. Например, в расширенном режиме, edge предлагает калибровку по 5 точкам с использованием 2 пользовательских буферов, в то время как в основном режиме калибровка может быть выполнена только по 3 точкам и по 5 заранее запрограммированным значениям буферов.
| Бренд | HANNA Instruments |
| Диапазон измерения | от -2,000 до 16,000 рН (расширенный режим); от -2,00 до 16,00 pH (базовый режим) / ± 1000,0 мВ; ± 2000,0 мВ / от -20,0 до 120,0 º C |
| Госреестр | Внесен |
| Относительная влажность RH % | не более 95% без конденсации |
| Диапазон рабочих температур, С | 0 до 50 ° C |
| Вспомогательные функции | до 1000 записей (только для стандартного режима), организованных в режимы: по запросу (максимум 200 записей), по стабильности (максимум 200 записей), по времени (максимум 600 образцов; 100 лотов) |
| Вход/выход | 1 микро-USB порт для зарядки и подключения к ПК, 1 USB порт для USB-накопителя |
| Точность | (при 25 ° C ) ±0,01 pH; ±0,002 pH / ± 0,2 мВ (± 999,9 мВ); ± 1 мВ (± 2000 мВ) / ±0,5 °C |
| Температурная компенсация | автоматическая: от -5,0 до 100.0 ºC (температурные пределы будут снижены до фактических пределов электрода) |
| Калибровка | рН по 5 точкам (стандартный) 1,68/4,01 (3,00,включается только при использовании специфических электродов и заменяет 4,01); 6,86/7,01/9,18/10,01/12,45 и 2 пользовательских буфера; по 3 точкам (базовый) 4,01/6,86/7,01/9,18/10,01 / мВ по 1 точке |
| Разрешение | 0,001 pH; 0,01 pH / 0,1 мВ / 0,1 °C |
| Питание | встроенная перезаряжаемая батарея (до 8 часов непрерывной работы); адаптер постоянного тока 5 В |
| Комплектация | прибор со штативом, настенное крепление, USB кабель, заполняемый стеклянный рН электрод HI11310 с датчиком температуры, по 2 пакетика растворов рН 4,01; 7,01; 10,01, раствор для очистки, адаптер питания, руководство по эксплуатации |
| Габариты | 202 x 140 x 12.7 мм |
| Вес | 250 г |
| Гарантия | 12 месяцев |
Dear
Thank you for choosing a Hanna Instruments product.
Customer,
Please read this instruction manual carefully before using the instrument.
This manual will provide you with the necessary information for correct use of
the instrument, as well as a precise idea of its versatility.
If you need additional technical information, do not hesitate to e‑mail us at
tech@hannainst.com
www.hannainst.com.
All rights are reserved. Reproduction in whole or in part is prohibited without the written consent
of the copyright owner, Hanna Instruments Inc., Woonsocket, Rhode Island, 02895, USA.
or view our worldwide contact list at
-
Page 1
Instruction Manual Multiparameter Benchtop Meter… -
Page 2
Hanna representative near you at www.hannainst.com. All rights are reserved. Reproduction in whole or in part is prohibited without the written consent of the copyright owner, Hanna Instruments Inc., Woonsocket, Rhode Island, 02895 , USA… -
Page 3: Table Of Contents
Product Diagram …………………………… 7-8 Probe Diagram …………………………….9 Keypad Function …………………………….10 Guide to Indicators …………………………..11 Setup/ Installation ………………… 12-26 Setting Up edge™ …………………………..12-14 Electrode & Probe Connections ……………………….14 General Setup …………………………….15-17 Basic Mode ………………………………17 Logging Function …………………………..18-21 Viewing Logged Data …………………………21-24 PC &…
-
Page 4: Included
Remove the instrument from the packing material and verify damage has not occurred during shipping. Remove protective film from meter. Notify your nearest Hanna Customer Service Center if damage is observed. Each instrument is supplied with: Edge meter Bench cradle Wall cradle Electrode holder…
-
Page 5: Safety Measures
Safety Before using this product, make sure that it is entirely suitable for your specific application and for the environment in which it is used. Measures Operation of this instrument may cause unacceptable interferences to other electronic equipment, thus requiring the operator to take all necessary steps to correct interferences.
-
Page 6: Description
Every feature and measurement detail is designed to give you an edge in measurement technology. edge™ is versatile in many ways. The slim meter and probe can be used remotely as a portable device (using its rechargeable battery) or used in its bench or wall cradles (that also power the meter) as a line-powered laboratory instrument.
-
Page 7: Diagram
Front View Liquid Crystal Display (LCD) Micro USB device connection Capacitive Touch Keypad for power or PC interface 3 mm jack input for edge™ Standard USB host connection digital probes for data transfer to a USB Top mounted ON/OFF button…
-
Page 8
Product Diagram Side & Back View Top & Bottom View • Sleek, clean, intuitive design • Basic mode simplified • Internal clock and date operation • Adjustable resolution for pH • Simplified data transfer to a PC and EC measurements •… -
Page 9: Probe Diagram
Probe Diagram Probes pH Electrode EC Electrode DO Electrode • Process measurement signal directly for noise free determinations • Support auto sensor recognition • Store calibration specific data from the last calibration • Are built with materials suitable for use in chemical analysis •…
-
Page 10: Keypad Function
Keypad Function CAL/MODIFY — Used to enter — Used to scroll through and exit calibration mode. In SETUP SETUP menu. Used to change used to initiate modification of a selection when modifying configuration setting. parameter in SETUP. GLP/CFM — Used to display GLP RCL — Used to view log records calibration information.
-
Page 11: Guide To Indicators
Guide to Indicators Mode tags 3rd LCD line, message area Confirm tag 10. Labels USB connection status 11. 2nd LCD line, temperature pH electrode diagnostics measurement Probes symbol 12. Temperature units Battery symbol 13. Temperature status Arrow tags, displayed when 14.
-
Page 12: Setup/Installation
Decide how the meter will be used and set up the wall or bench cradle in a clean area near line power. Turn edge™ on using the ON/OFF button located on the top of the meter. Plug in the probe required for measurement.
-
Page 13
Connect the power adapter cable to the bottom socket of the wall cradle. Connect the probe connector to the socket located at the bottom of edge™. Slide edge™ into the wall cradle. Verify the battery icon indicates charging when meter is powered. -
Page 14: Electrode & Probe Connections
Connect the micro USB connector into edge™ the USB socket on the cradle or into the micro USB socket of edge™. Plug the 5 Vdc adapter into the power supply socket. edge™ can be also powered by connecting with a USB cable directly to a PC.
-
Page 15: General Setup
Choices Default (EC and pH) *Only seen when cable Select to log connection data on edge™ Log on edge™ of Log on edge™ Available between micro or to export data export to PC USB and PC is to PC made.
-
Page 16
General Basic mode* Parameter Description Choices Default (EC and pH) Setup Probe Specific Parameters are inserted here in SETUP list. Set Date Press MODIFY YYYY/MM/DD Set date Available key to Set current Date date, displayed in ISO format. Press CFM to save changes. -
Page 17: Basic Mode
Note: Parameters that are grayed out are seen under special conditions only. Basic Mode edge™ offers a basic operation mode that streamlines measurement configuration for pH and EC measurements and is useful for many routine applications. Basic pH SETUP reduces parameter selection to the basic set.
-
Page 18: Logging Function
Manual and Manual medium stability Log on demand are still functional. Logging Note: • If powering edge™ through the micro USB connector to a PC, a SETUP Function parameter will require the choice “LOG ON EDGE”. • 1000 log records can be stored into the Edge memory. This memory…
-
Page 19
Logging Manual (log on demand) readings are logged each time LOG is pressed. All of the records are stored in a single Manual lot for the measurement type. New Function records made on different days are stored in the same Manual lot. Stability is a log on demand that is made each time LOG is pressed and the stability criterion is reached. -
Page 20
Logging Pressing the LOG key again will stop the Interval logging session. The “LOG STOPPED“ message will Function be displayed for a few seconds. If a sensor failure occurs during interval logging, the message “OUT OF FREE SPACE” will alternate with logging information Manual Logging Select Manual in the SETUP menu. -
Page 21: Viewing Logged Data
The “LOG” tag will be displayed on all 4 screens. All log records stored on edge™ may be viewed on the meter by pressing the RCL key. The log records are grouped according to measurement (pH, EC, DO).
-
Page 22
Viewing If no data was logged for the selected measurement range, the instrument displays the following Logged Data messages (ex. for pH range): No Manual Logs No Stability Logs Press CFM to enter inside lot information to view memorized records. Use the ARROW keys to toggle between different records. -
Page 23
Viewing To delete individual records (Manual and Stability logs only), enter Manual (Stability) log by pressing CFM when Manual (Stability) is displayed. Use the Logged Data ARROW keys to select the record to be deleted and then press CLR. The instrument will display “CLEAR REC.“ and record number along with “CFM” tag blinking. -
Page 24
Viewing Delete All All pH logs, (or all EC, all DO logs) may be deleted in a single clear. This function Logged Data will delete all MANUAL, STABILITY and INTERVAL logs for the measurement type selected. Press the RCL key. The pH, EC, or DO type will be blinking. -
Page 25: Pc & Storage Interface
PC & Storage Logged data on edge™ can be transferred from the meter to a USB flash drive by using the log recall function. The minimum requirement for the drive is USB Interface 1.1. Select the pH, EC or DO record you wish to export and follow the simple steps below.
-
Page 26: Setup/ Installation
PC & Storage Logged data on edge™ can be transferred from the meter to a PC by following these simple directions. The minimum operating system for the PC is Windows Interface Connect the edge™ to the PC using the supplied micro USB cable.
-
Page 27: Operational Guide
Basic vs For optimum pH measurements, follow these steps: Understand the benefits and features of Standard and Basic Operation. Standard Set up edge™ meter by configuring preferences. pH mode Calibration Measurement The “Standard” pH operation includes up to a 5-point buffer calibration, use of custom buffers, choice of displaying 0.001 pH resolution, use of the full…
-
Page 28
Basic vs Major differences between Standard and Basic modes are tabulated below. Standard Standard Basic* pH mode 5 points including 2 custom Calibration 3 points buffers Cal Check™ Feature Basic error messages Sensor Check™ Feature Diagnostics GLP basic Error messages Manual Log on demand Manual Log on demand Log types… -
Page 29: Ph Meter Configurations
pH Meter pH meter operation is configured by using the SETUP key with a pH probe connected to the meter. The parameter-specific parameters will be seen Configuations inserted into the menu. If Basic mode is configured “On”, the pH parameter list will not be displayed.
-
Page 30: Ph Calibration
This includes seven standard buffers and two custom ones. Five pH buffers may Calibration be used for calibration. The instrument should be recalibrated whenever: • High accuracy and sensor verification are required.
-
Page 31
The custom buffers allow the user to calibrate in a buffer solution different from a standard one. Two custom buffers can be set in SETUP menu. See page Calibration 30 for more information about using custom buffers. The instrument will automatically skip the buffer used during calibration and the buffers which are in a ±0.2 pH window, around one of the calibrated buffers. -
Page 32
The “ ” along with “STIR” tag will be displayed and “WAIT” will blink on the LCD until the reading is stable. Calibration When the reading is stable and close to the selected buffer, “CFM” tag will blink. Press CFM to confirm calibration. Repeat procedure with additional pH buffers. -
Page 33
Working With Custom Buffers If a custom buffer was set in SETUP menu, it can be selected during calibration Calibration by pressing the ARROW keys. The “C1” or “C2” tag will be on once selected. Press u if you want to modify the custom buffer value. -
Page 34
INFORMATION. The choice is ON or OFF. Electrode Condition And Electrode Response Time edge™ pH Calibration Check™ feature will assess electrode condition and response time during each calibration and display it for the rest of the day. The condition gauge shows the electrode’s condition that is based on the offset and slope characteristics of the pH electrode at the time of calibration. -
Page 35
This information can also be viewed in the GLP data. Junction Condition (HI 11311 And HI 12301 Only) edge™ pH Sensor Check™ feature will assess the health of the pH electrode’s reference junction during each calibration. The junction gauge may be viewed directly in GLP but will also blink a warning on the display if the junction is compromised (not 100%). -
Page 36
Procedure Basic mode operation permits up to three-point buffer calibration. Calibration For accurate measurements, at least a two-point calibration is recommended. However, a single point calibration can also be used. The calibration buffers can be selected from the calibration buffer list that includes the standard buffers, pH 4.01, 6.86, 7.01, 9.18 and 10.01. -
Page 37
The “ ” along with “STIR” tag will be displayed and “WAIT” will blink on the LCD until the reading is stable. When the reading is stable and close to the Calibration selected buffer, the “CFM” tag will blink. Press CFM to confirm calibration. The calibrated value is then displayed on the 1st LCD line and the third expected buffer value on the 3rd LCD line. -
Page 38: Ph Calibration
used, or clean the electrode by following the Cleaning Procedure (see page 76). If necessary, change the buffer or the electrode. Calibration • If the buffer temperature exceeds the temperature limits of the buffer, “WRONG BUFFER TEMPERATURE” will be displayed. •…
-
Page 39: Calibration Messages
Calibration The Calibration Check™ feature may flag diagnostic messages during a calibration. As electrode aging is normally a slow process, substantial changes Messages from previous calibrations are likely due to a temporary problem with the electrode or buffers that can be addressed easily. These messages are seen in Standard and Basic modes.
-
Page 40
Calibration Clean Electrode This error message indicates poor electrode Messages performance (offset out of accepted window, or slope under the accepted lower limit). Often cleaning the sensor will improve the pH electrodes response. See pH Electrode Conditioning and Maintenance for details. -
Page 41: Ph Glp Information
Calibration Contaminated Buffer This warning message appears in order to alert that Messages the buffer could be contaminated. Refresh your buffer and continue the calibration procedure. pH GLP Good Laboratory Practice (GLP) refers to a quality control function used to ensure uniformity of sensor calibrations and measurements.
-
Page 42
pH GLP The last calibration date (yyyy.mm.dd) together with the current reading. Information Note: For each custom buffer used in calibration, the “C1” and “C2” tags will be displayed. If only the second custom buffer is in calibration the tag will be “C1” and the value will be displayed. -
Page 43: Ph Measurement
pH GLP The probe serial number together with the current reading. Information If a buffer is not from the last calibration, the buffer tag will be displayed blinking. In Standard Mode, Condition, Response gauges are visible on the day of calibration (See Electrode Condition And Electrode Response Time page 34).
-
Page 44
Rinse the pH sensor with water and a sample aliquot if possible. Submerse the electrode tip approximately 3 cm (1¼”) into the sample to be tested and Measurement stir sample gently. Allow time for the electrode to stabilize. The pH is displayed on the 1st LCD line and the temperature on the 2nd LCD line. -
Page 45
Range Specific Messages Displayed On Alphanumeric Line During Measurement (3 Lcd Line) Measurement All the messages described in GENERAL section (page 15) are displayed in pH range. Temperature Sensor Problem (if there is one) Cal Due or Offset and Slope Value Time Date Battery or Charge Status… -
Page 46: Basic Vs Standard Ec Mode
Take measurements using a EC probe. Measurements Available With The EC Probe The four-ring EC probe may be used for 3 different measurement applications with edge™. • It may be used for temperature compensated or absolute conductivity measurements (with units of μS/cm or mS/cm).
-
Page 47: Ec Meter Configuration
Basic vs Measurement data can be logged using Manual Log on Demand or Manual Log on Stability or Interval Logging. The measurement logs may be exported to a Standard thumb drive or PC. EC mode Standard Basic Measurement Conductivity, TDS, Salinity Conductivity, TDS Set up Parameters Fully selectable…
-
Page 48
EC Meter Parameter Description Choices Default Basic mode Configuration T.Coef. (%/ºC) This parameter 0.0 to 6.00 (%/ 1.90 (%/ºC) Not available. is related to the ºC) Note: Setting Close for natural Automatically solution being to 0.00 is the waters or salt set to 1.90%/ºC. -
Page 49
Parameter Description Choices Default Basic mode Configuration EC RANGE If AUTO is used, AUTO, AUTO Not available but the edge™ will 29.99 μS/cm, measurement automatically 299.9 μS/cm, autoranges as find the correct 2999 μS/cm, needed. conductivity 29.99 mS/cm, range and 200.0 mS/cm,… -
Page 50: Ec/Tds Calibration
EC Meter Parameter Description Choices Default Basic mode Configuration EC SALINITY Three PSU, NaCl%, g/L NaCl% Not available. SCALE measurement scales are available for salinity measurement in Seawater. (Practical Salinity Scale, Percent Scale and Natural Seawater Scale). EC Range (Not Available In Basic Mode) The EC and TDS measurements may be configured in SETUP as AUTO (meaning auto-ranging, the measurement automatically finds the correct conductivity or TDS unit and resolution), or it may be configured with a user-selected…
-
Page 51
EC/TDS Every time you calibrate the instrument use fresh standard and perform electrode maintenance as required. It is recommended to chose a calibration CALIBRATION standard that is close to the sample. Preparation Pour small quantities of the standard solutions into a beaker. If possible, use a plastic beaker to minimize any EMC interferences. -
Page 52
EC/TDS When the reading is stable and close to the selected standard, “CFM” tag will blink and the message CALIBRATION “SOLUTION STANDARD” will scroll. Press CFM to confirm calibration. The Instrument displays “SAVING”, stores the calibration values and returns to measurement mode. Operational Guide… -
Page 53
EC/TDS The following table lists the temperature dependence of Hanna EC calibration standards. edge™ uses these values during calibration and their temperature CALIBRATION coefficients. HI7030 HI7031 HI7033 HI7034 HI7035 HI7039 ºC ºF HI8030 HI8031 HI8033 HI8034 HI8035 HI8039 (μS/cm) (μS/cm) (μS/cm) -
Page 54: Nacl Calibration
% NaCl PREPARATION Pour a small quantity of the calibration solution into a beaker. If possible, use CALIBRATION a plastic beaker to minimize any EMC interferences. Before pressing CAL verify in SETUP: • Basic mode is off • Salinity Scale is NaCl% Use the RANGE key to select the Salinity measurement.
-
Page 55: Ec/Tds Glp Information
% NaCl The Instrument displays “SAVING”, stores the calibration values and returns to measurement mode. CALIBRATION Note: If a new EC calibration is performed, the NaCl calibration is automatically cleared. A new NaCl calibration is required. Wrong Standard If the reading is too far from the expected value, the Calibration “WRONG STANDARD”…
-
Page 56
EC/TDS To view the EC calibration data, press GLP when the instrument is in EC measurement mode. The instrument will display the calibration standard and the temperature of the calibrated standard. Use the ARROW keys to scroll Information through the calibration data displayed on the 3rd LCD line. The cell factor in cm determined from the calibration with the current reading. -
Page 57
EC/TDS The last calibration time (hh:mm:ss) together with the current reading. Information The last calibration date (yyyy.mm.dd.) together with the current reading. Calibration Expiration status together with the current reading: If disabled, “EXPIRATION WARNING DISABLED” is displayed If enabled, the number of days until the calibration alarm “CAL DUE”… -
Page 58
NaCl% measurement mode. Use the ARROW keys to scroll through the Information calibration data. The instrument will display the calibration temperature and solution. The edge™ will indicate: probe cell constant together with the current reading. The salinity coefficient determined from the calibration together with the current reading. -
Page 59
EC/TDS Calibration Expiration status together with the current reading: If disabled, “EXPIRATION WARNING DISABLED” is Information displayed If enabled, the number of days until the calibration alarm “CAL DUE” will be displayed. Or if the number of days the calibration has expired ( I.E. -
Page 60
EC/TDS The RANGE key will change measurement from conductivity to TDS to Salinity. Measurements Conductivity Measurements Connect the conductivity probe to the instrument and wait until probe parameters are loaded. The following message is then displayed on the LCD: “Probe Connected” Verify if the probe has been calibrated. -
Page 61: Ec/Tds Measurements
EC/TDS No Temperature Compensation (No TC): The temperature value is displayed, but not taken into account. When this option is selected, the “NoTC” tag will Measurements be displayed. The reading displayed on the primary LCD is the uncompensated EC or TDS value. Note: •…
-
Page 62: Salinity Measurements
Salinity Salinity Measurements (Not Available In Basic Mode) Press the RANGE key twice to switch from conductivity to the configured Measurements Salinity scale. Verify the desired scale is configured in SETUP. The meter supports three salinity scales: Practical Scale 1978, Percent Scale %, and Natural Sea Water 1966, [g/L].
-
Page 63
Salinity — ratio of sample conductivity to standard conductivity at Temp =(T) CT(sample)-conductivity at T ºC; Measurements C(35,15)=42.914µS/cm — the corresponding of KCI solution containing a mass of 32.4356 g KCl/1 Kg solution — Temperature compensation polynomial = 0.008 = 0.0005 = -0.1692 = -0.0056 = 25.3851… -
Page 64: Salinity Measurements
Salinity Natural Sea Water Scale The Natural Sea Water Scale extends from 0 — 80.0 g/L. It determines salinity Measurements based upon a conductivity ratio of sample to “standard seawater” at 15 °C. Where R is the conductivity ratio and salinity is defined by the following equation: S = — 0.08996 + 28.2929729R + 12.80832R…
-
Page 65: Dissolved Oxygen Setup
Measurements Available Concentration measurements in water, and % oxygen saturated measurements are available using edge™ together with HI 764080 DO probe. Algorithms used for concentration measurements (units of ppm or mg/L) are based upon the oxygen solubility in air-saturated fresh water. Compensation for salinity and altitude are made by configuring SETUP parameters.
-
Page 66
The cathode area should be free of bubbles. Setup 8. Connect the DO probe to the edge™ meter and turn meter on 9. Allow probe conditioning function to occur. Note: When not in use and during polarization, use the protective transparent cap. -
Page 67: Do Probe Diagram
DO Probe Diagram Strain Relief Probe Cap PEI Probe Body Temperature Sensor Threads for Membrane Cap Ag/AgCl Anode and Reference Glass Insulator Platinum Cathode O-Ring 10. Disposable Membrane Cap 11. Oxygen Permeable PTFE Membrane 12. Shipping Tube Operational Guide…
-
Page 68: Do Meter Configuration
DO Meter DO (Dissolved Oxygen) meter operation is configured using the SETUP key with a DO probe connected to the meter. The parameter-specific parameters Configuration will be seen inserted into the menu. There is no Basic mode for Dissolved Oxygen measurements. Parameter Description Choices…
-
Page 69
Compensation for temperature-related solubility is done automatically using the built-in temperature sensor within the DO probe and algorithms in the edge meter. When water is measured at an altitude below sea level, oxygen solubility increases, but above sea level the oxygen solubility decreases. -
Page 70: Do Meter Configuration
DO Meter When water is fresh containing no sea water, the concentration of oxygen will be at a maximum. The solubility of the oxygen dissolved in water is decreased Configuration when water is brackish or seawater. The solubility of oxygen in water is decreased when measurements are made at elevations above sea level.
-
Page 71: Do Calibration
When the reading is stable and is within the limits, “CFM” tag starts blinking. Press CFM to confirm the Calibration 100.0 % DO calibration. Press CAL to leave calibration after the first point. The instrument will display “SAVING” message and it will return to measurement mode memorizing the slope calibration data.
-
Page 72: Do Calibration Messages
Calibration Messages If the reading is outside limits, “WRONG STANDARD“ Calibration message will be displayed. Messages If the temperature goes out of (0.0 — 50.0 ºC) range during calibration, the “WRONG STANDARD TEMPERATURE” message will be displayed and temperature value will blink. DO GLP GLP refers to a quality control function used to ensure uniformity of probe calibrations and measurements.
-
Page 73
DO GLP The altitude and salinity setting at the moment of calibration together with the current reading. Information The time of the calibration together with the current reading. The date of the calibration together with the current reading Calibration Expiration status together with the current reading: If disabled, “EXPIRATION WARNING DISABLED”… -
Page 74
DO GLP The probe serial number together with the current reading Information Make sure that the probe is polarized, calibrated and the protective cap has been removed. Measurements Rinse probe. Submerse the probe in the sample to be tested, make sure temperature probe is also immersed. -
Page 75: Do Measurements
any measurement. This can take several minutes. The greater the difference between the temperature at which the probe was stored and the temperature Measurements of the sample, the longer the time will be. Note: • If the temperature is displayed blinking, the temperature is out of range for the probe.
-
Page 76: Maintenance
pH Probe Maintenance Remove the protective cap of the pH electrode. DO NOT BE ALARMED IF SALT DEPOSITS ARE PRESENT. This is normal with electrodes. They will disappear when rinsed with water. During transport, tiny bubbles of air may form inside the glass bulb affecting proper functioning of the electrode.
-
Page 77
pH Probe For refillable electrodes: If the filling solution (electrolyte) is more than 2½ cm (1”) below the fill hole, Maintenance add HI 7082 or HI 8082 3.5M KCl Electrolyte Solution for double junction. Unscrew the fill hole cover during measurements so the liquid junction maintains an outward flow of electrolyte. -
Page 78
pH Probe Cleaning Procedure Use diagnostic messages to aid pH electrode troubleshooting. Several Maintenance cleaning solutions are available: General – Soak in Hanna HI 7061 or HI 8061 General Cleaning Solution for approximately ½ hour. Protein –Soak in Hanna HI 7073 or HI 8073 Protein Cleaning Solution for 15 minutes. -
Page 79: Ec Probe Maintenance
pH Probe Alkaline Error High concentrations of sodium ions interfere with readings in alkaline Maintenance solutions. The pH at which the interference starts to be significant depends upon the composition of the glass. This interference is called alkaline error and causes the pH to be underestimated. Hanna’s glass formulations have the indicated characteristics.
-
Page 80: Do Probe Maintenance
DO Probe The oxygen probe body is made of PEI. A temperature sensor provides temperature measurements of the sample. Maintenance Use the protective cap when the probe is not in use. To replace the membrane or refill with electrolyte, proceed as follows: Remove the protective shipping tube by gently twisting and pulling it off the body of the probe (see fig.
-
Page 81: Do Probe Maintenance
DO Probe The platinum cathode (DO Probe Diagram, page 67) should always be bright and untarnished. If it is tarnished or stained, the cathode should be cleaned. Maintenance You can use a clean lint-free cardboard or cloth. Rub the cathode very gently side to side 4-5 times.
-
Page 82: Troubleshooting Guide
Troubleshooting Symptoms Problems Solution Guide Clean the electrode and then soak Slow response/excessive Dirty pH electrode. the tip in HI 7061 or HI 8061 for 30 drift. minutes. pH: Clogged/dirty Clean the electrode. Refill with fresh junction. Low electrolyte solution (for refillable electrodes only). level (refillable Check cable and connectors.
-
Page 83
Troubleshooting Symptoms Problems Solution Guide A) Verify the shipping cap has been removed. B) Make sure the sample pH is within If the display shows: Out of range in the mV specified range. “mV” and “-1000” or scale. C) Verify electrolyte level in pH sensor “1000”… -
Page 84: Specifications
Specifications Temperature -2.00 to 16.00 pH Range -2.000 to 16.000 pH* -20.0 to 120.0 ºC (-4.0 to 248.0 °F)** ±1000.0 mV 0.01 pH Resolution 0.001 pH* 0.1 ºC 0.1 mV ±0.01pH Accuracy ±0.002 pH* ±0.5 ºC @ 25 °C / 77 °F ±0.2 mV Automatic, up to 3 points (5 points*) calibration, 5 standard (7 pH Calibration…
-
Page 85
Specifications Salinity 0.00 to 29.99 μS/ cm, 3.00 to 29.99 0.00 to 14.99 ppm μS/cm, 300. to (mg/L), 15.0 to 149.9 2999. μS/cm, ppm (mg/L), 150. to 0.0 to 400.0% NaCl 3.00 to 29.99 1499. ppm (mg/L), 1.50 **, 2.00 to 42.00 Range mS/cm, 30.0 to to 14.99 g/L, 15.0 to… -
Page 86
Specifications Conductivity temperature 0.00 to 6.00% / ºC (for EC and TDS only). Default value is 1.90% / ºC coefficient TDS factor 0.40 to 0.80 (default value is 0.50) EC Probe HI 763100 Up to 1000 ** (400) records organized in: Manual log on demand (Max. 200 Log feature logs), Manual log on stability (Max. -
Page 87
Specifications 0.00 to 45.00 ppm (mg/L) Range 0.0 to 300.0% -20.0 to 120.0 ºC (-4.0 to 248.0 °F)* 0.01 ppm (mg/L) Resolution 0.1% 0.1 °C Accuracy ±1.5% of reading or ±1 digit @ 25 °C / 77 °F ±0.5 ºC DO Calibration One or two points at 0% (HI 7040) and 100% (water saturated air) Altitude Compensation… -
Page 88: Accessories
Accessories Buffer Solutions HI 70004P pH 4.01 Buffer Sachets, 20 mL (25 pcs.) HI 70007P pH 7.01 Buffer Sachets, 20 mL (25 pcs.) HI 70010P pH 10.01 Buffer Sachets, 20 mL (25 pcs.) HI 7001L pH 1.68 Buffer Solution, 500 mL HI 7004L pH 4.01 Buffer Solution, 500 mL HI 7006L…
-
Page 89
Accessories Conductivity Solutions HI 70030P 12880 μS/cm, 20 mL sachets (25 pcs.) HI 70031P 1413 μS/cm, 20 mL sachets (25 pcs.) HI 70039P 5000 μS/cm, 20 mL sachets (25 pcs.) HI 7030M 12880 μS/cm, 230 mL bottle HI 7031M 1413 μS/cm, 230 mL bottle HI 7033M 84 μS/cm, 230 mL bottle HI 7030M… -
Page 90: Accessories
HI 2000WC Wall cradle HI 2000BC Bench cradle Ordering Information HI 2020-01 edge™ instrument with US plug HI 2020-02 edge™ instrument with EU plug HI 11310 Glass body, double junction, pH/temperature electrode Glass body, double junction, pH/temperature electrode with enhanced…
-
Page 91: Warranty
Technical Service department and then send it with shipping costs prepaid. When shipping any instrument, make sure it is properly packed for complete protection. Hanna Instruments reserves the right to modify the design, construction or appearance of its products without advance notice. Warranty…
-
Page 92
Notes Warranty… -
Page 93
Notes Warranty… -
Page 94
Notes Warranty… -
Page 95
Notes Warranty… -
Page 96
World Hanna Instruments Inc. Highland Industrial Park Headquarters 584 Park East Drive Woonsocket, RI 02895 www.Hannainst.com Local Office Hanna Instruments USA 270 George Washington Highway Smithfield, RI 02917 Phone: 800.426.6287 Fax: 401.765.7575 e-mail: tech@Hannainst.com…