Руководство пользователя наушников HAYLOU GT1 Pro TWS
Обзор

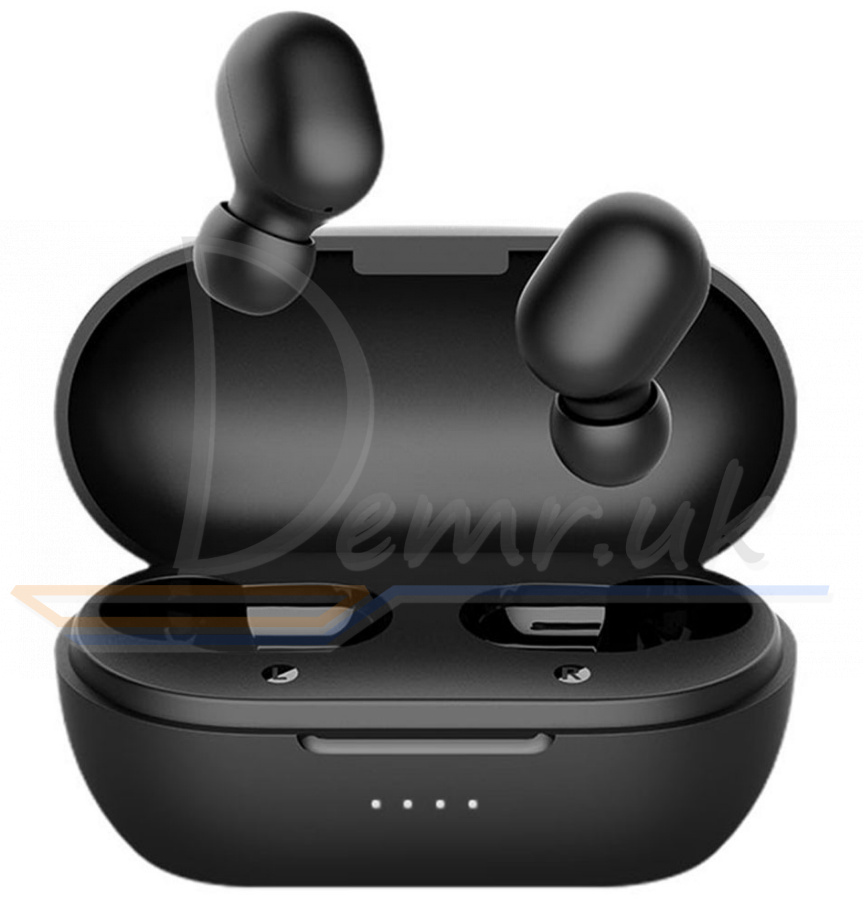
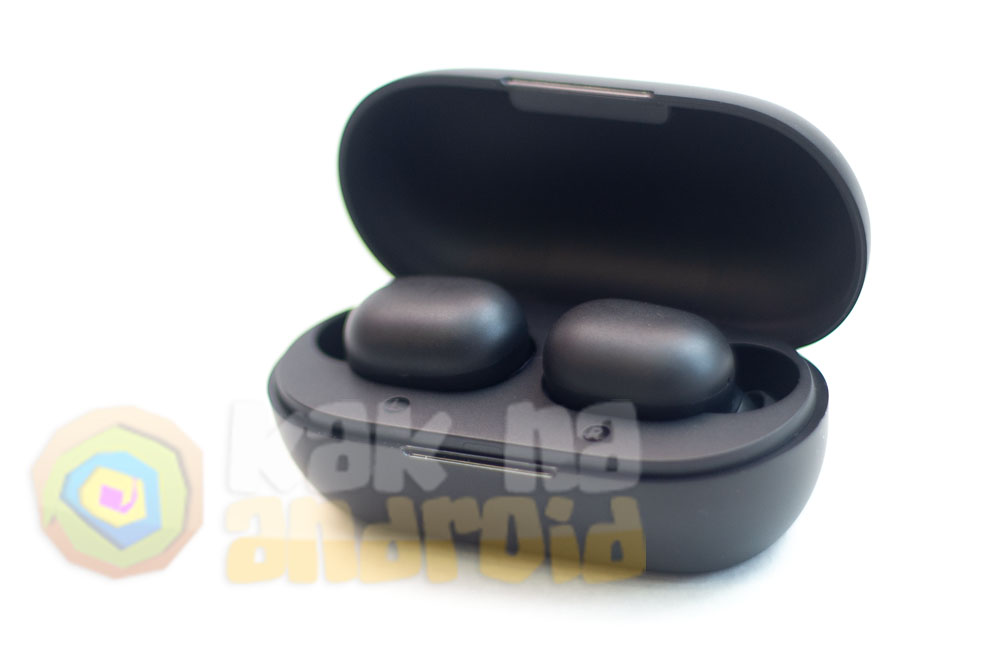
Что в коробке
- Наушники x 3 пары
- Bluetooth наушники
- Зарядный чехол
- зарядный кабель
- Руководство.
Основные параметры
- Рабочий диапазон: 10 м (без препятствий)
- Емкость батареи: 43 мАч (один наушник)
- Время зарядки: ок. 1.5hr
- Время звонка: ок. 3.5hr
- В режиме ожидания: ок. 150hr
- Входной параметр: 5V
 100mA
100mA - Тип батареи: литий-ионная
- Версия Bluetooth: 5.0
Зарядное устройство
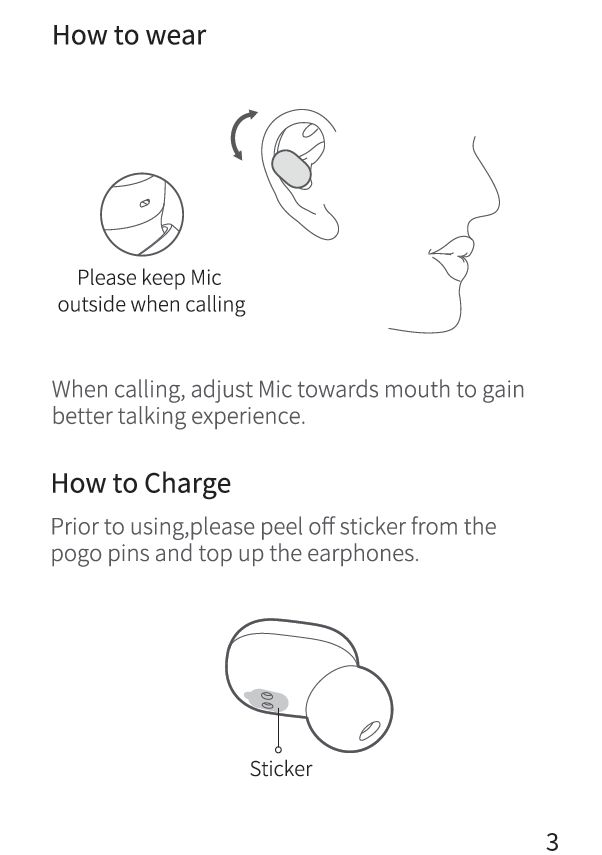
Как носить

При звонке поверните микрофон ко рту, чтобы лучше разговаривать.
Как зарядить
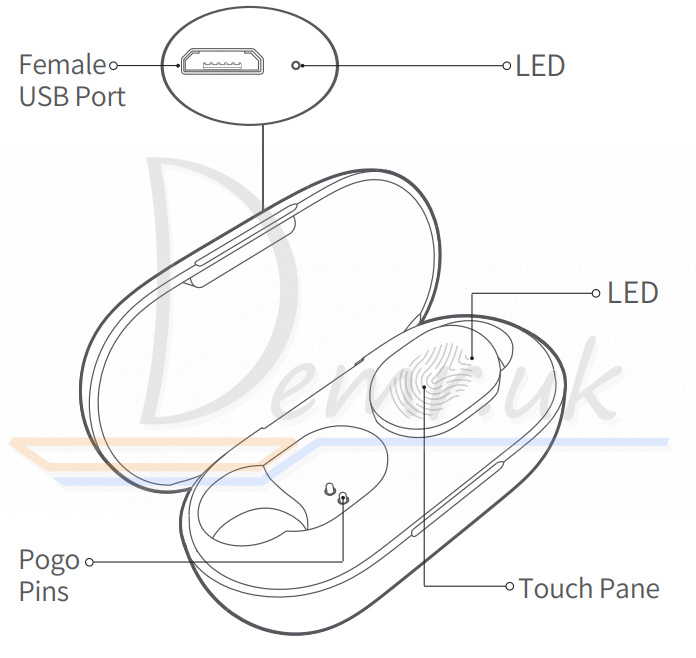
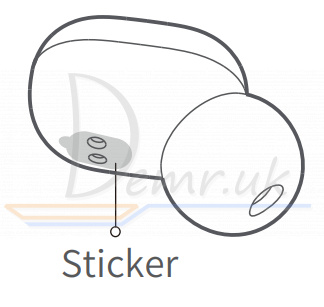
Перед использованием снимите наклейку с пого-булавки и зарядите наушники.

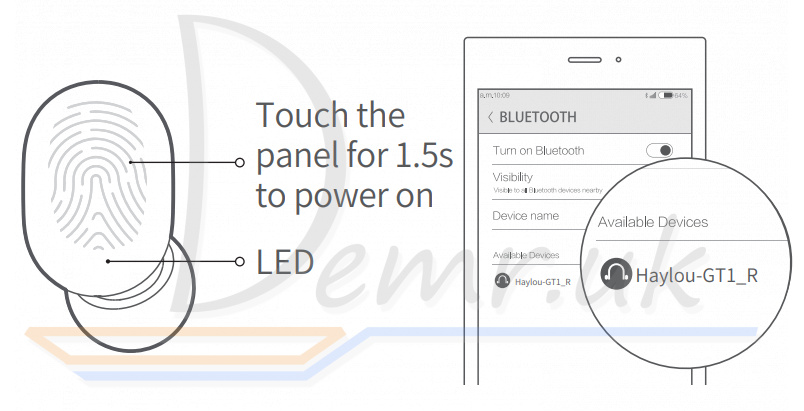
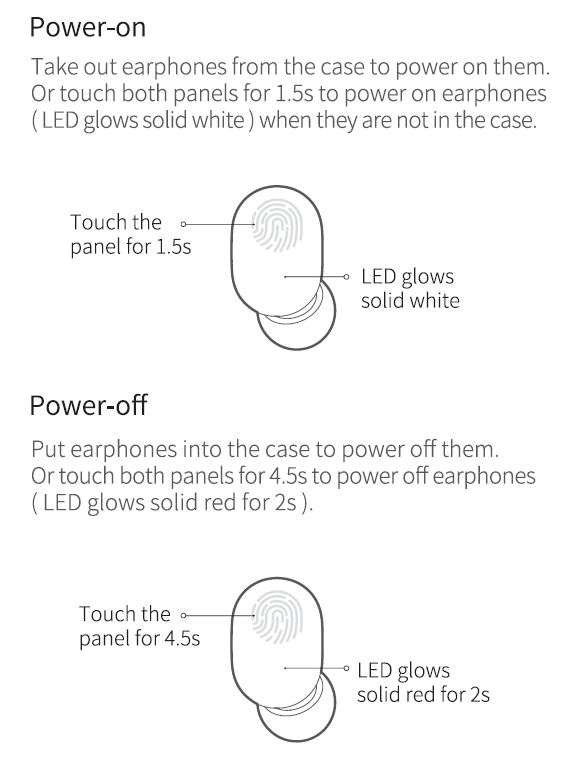
Включить
Выньте наушники из кейса, чтобы включить их. Или прикоснитесь к обеим панелям в течение 1.5 с, чтобы включить наушники (светодиодный индикатор горит белым светом), когда они не в футляре.

Выключить
Поместите наушники в чехол, чтобы выключить их. Или прикоснитесь к обеим панелям в течение 4.5 с, чтобы выключить наушники (светодиод горит красным в течение 2 с).

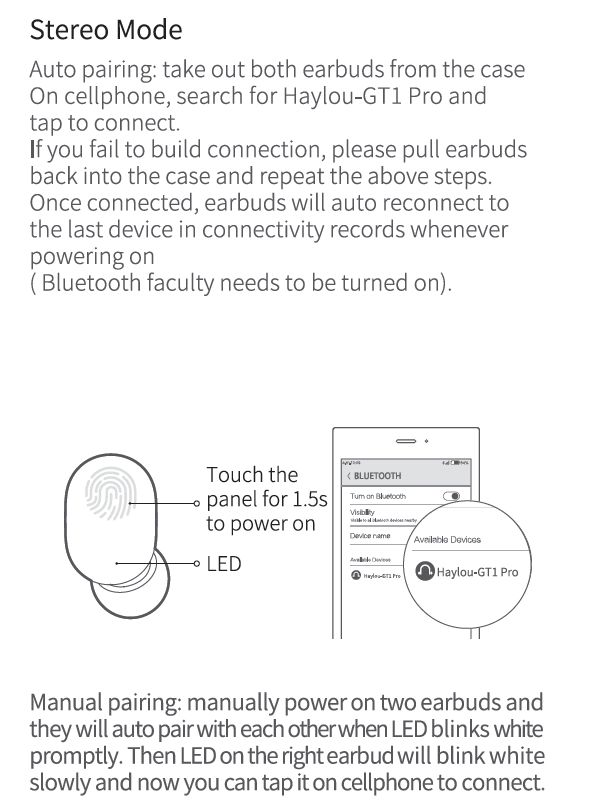
Стерео режим
Автоматическое сопряжение: выньте оба наушника из футляра. На мобильном телефоне найдите Haylou GT1 Pro и нажмите, чтобы подключиться.
Если не удается установить соединение, вставьте наушники обратно в футляр и повторите описанные выше действия.
После подключения наушники будут автоматически переподключаться к последнему устройству в записях о подключении при каждом включении.
(Bluetooth-факультет должен быть включен).

Сопряжение вручную: вручную включите два наушника, и они автоматически подключатся друг к другу, когда светодиодный индикатор будет быстро мигать белым. Затем светодиод на правом наушнике будет медленно мигать белым, и теперь вы можете нажать на него на мобильном телефоне для подключения.
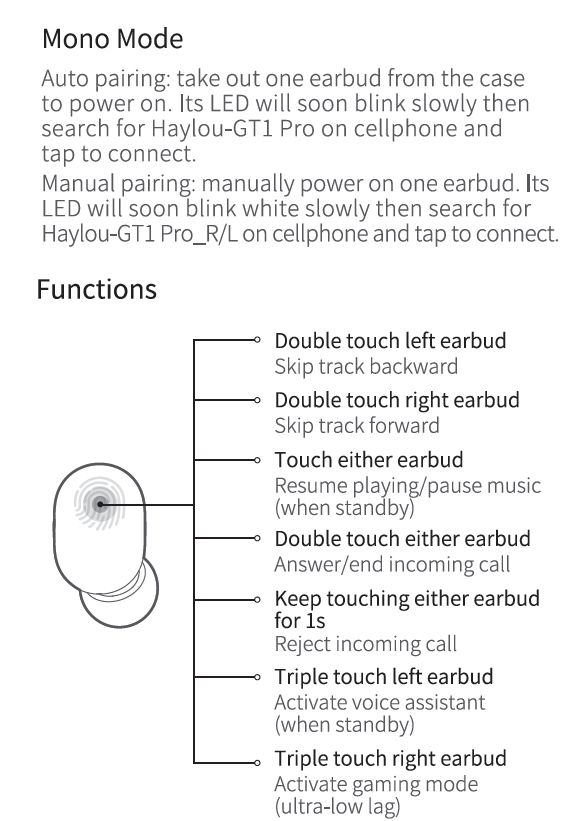
Моно режим
Автоматическое сопряжение: выньте один наушник из футляра, чтобы включить его. Его светодиод вскоре начнет медленно мигать, затем найдите Haylou-GT1 Pro на мобильном телефоне и нажмите, чтобы подключиться.
Сопряжение вручную: вручную включите один наушник. Его светодиод вскоре начнет медленно мигать белым, затем найдите Haylou-GT1 Pro_R / L на мобильном телефоне и нажмите, чтобы подключиться.
функции

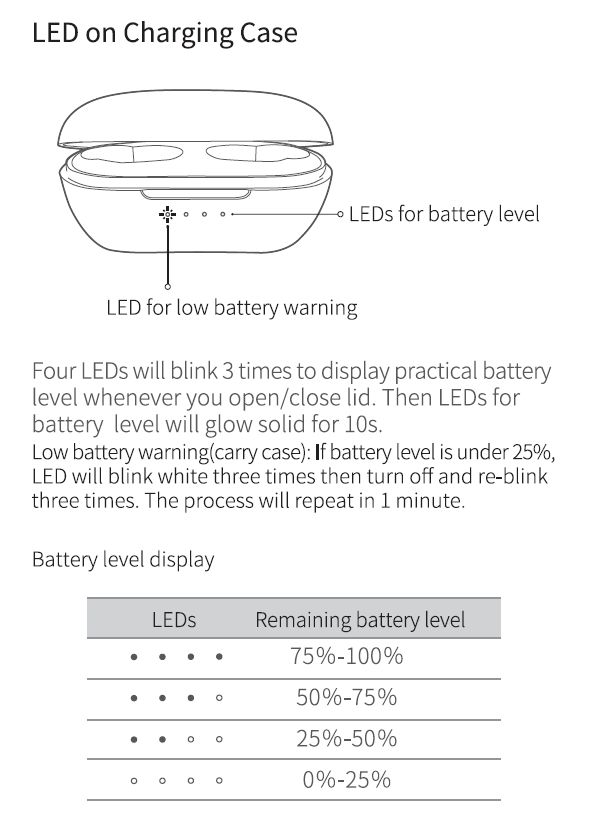
Светодиод на зарядном футляре

Каждый раз, когда вы открываете / закрываете крышку, четыре светодиода мигнут 3 раза, чтобы отобразить практический уровень заряда батареи. Затем светодиоды уровня заряда батареи будут гореть непрерывно в течение 10 секунд.
Предупреждение о низком заряде батареи (чемодан для переноски): если уровень заряда батареи ниже 25%, светодиодный индикатор трижды мигнет белым, затем погаснет и снова мигнет три раза. Процесс повторится через 1 минуту.
Индикатор уровня заряда батареи

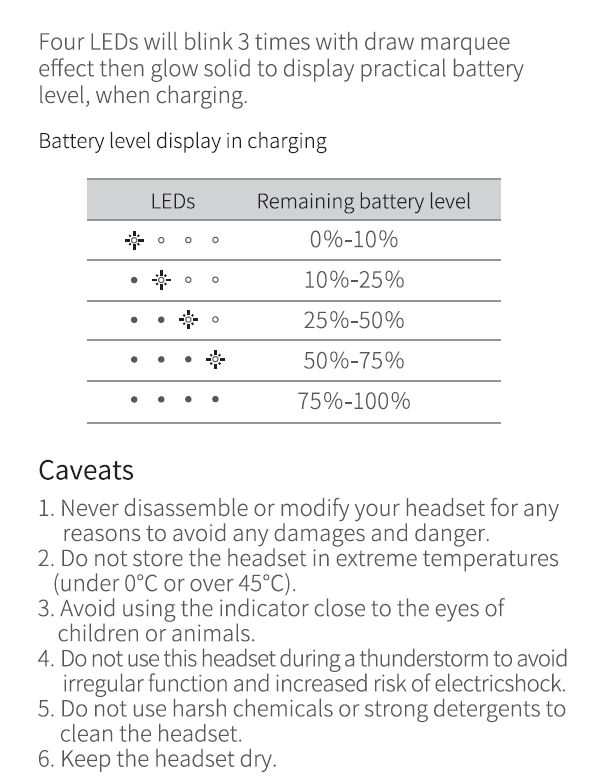
Четыре светодиода мигнут 3 раза с эффектом вытягивания, а затем горят непрерывно, показывая практический уровень заряда батареи во время зарядки.
Индикация уровня заряда батареи при зарядке

Предостережения
- Ни в коем случае не разбирайте и не модифицируйте гарнитуру, чтобы избежать повреждений и опасности.
- Не храните гарнитуру при экстремальных температурах (ниже 0 ° C или выше 45 ° C).
- Избегайте использования индикатора рядом с глазами детей или животных.
- Не используйте эту гарнитуру во время грозы, чтобы избежать сбоев в работе и повысить риск поражения электрическим током.
- Не используйте для чистки гарнитуры агрессивные химикаты или сильные моющие средства.
- Держите гарнитуру сухой.
Заводские настройки
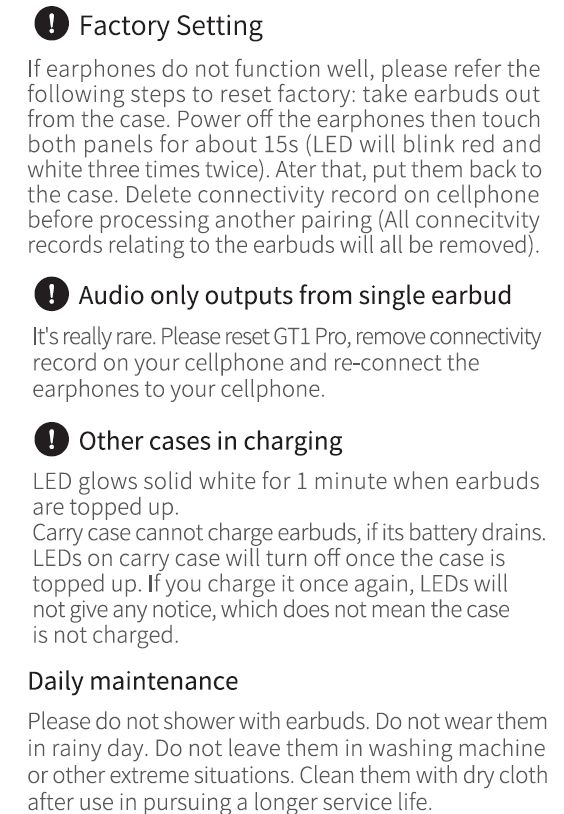
Если наушники не работают должным образом, выполните следующие действия для восстановления заводских настроек: выньте наушники из футляра. Выключите наушники, затем прикоснитесь к обеим панелям примерно на 15 секунд (светодиод дважды мигнет красным и белым трижды). После этого положите их обратно в футляр. Удалите запись о подключении на мобильном телефоне перед обработкой другого сопряжения (все записи о подключении, относящиеся к наушникам, будут удалены).
Аудио выводится только через один наушник
Это действительно редко. Сбросьте настройки GT1 Pro, удалите запись о подключении на мобильном телефоне и повторно подключите наушники к мобильному телефону.
Другие случаи в зарядке
Индикатор светится белым в течение 1 минуты, когда вкладыши наполнены.
Чехол для переноски не может заряжать наушники, если его аккумулятор разряжен. Светодиоды на футляре для переноски погаснут, когда он будет наполнен. Если вы зарядите его еще раз, светодиоды не выдадут никаких уведомлений, что не означает, что чехол не заряжен.
суточная потребность
Пожалуйста, не принимайте душ с наушниками. Не носите их в дождливый день. Не оставляйте их в стиральной машине или в других экстремальных ситуациях. После использования очищайте их сухой тканью, чтобы продлить срок службы.
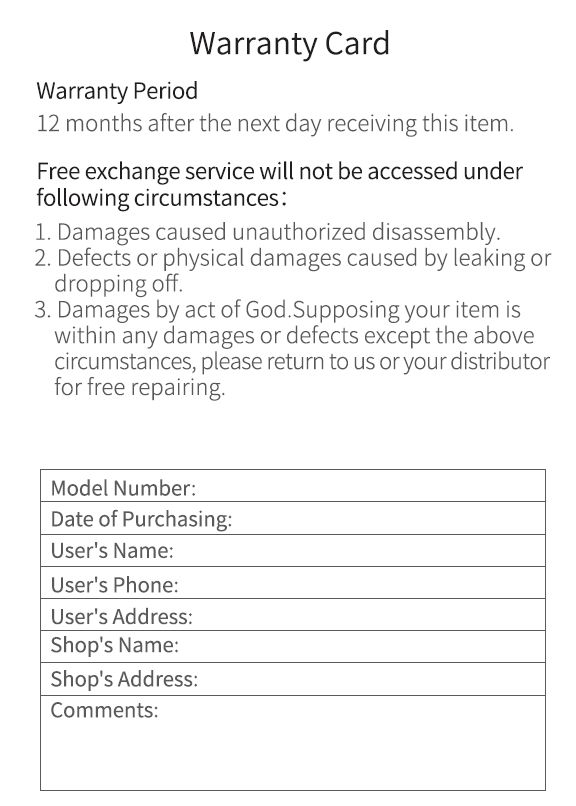
Гарантийный талон
Гарантийный срок
12 месяцев после получения этого товара на следующий день.
Услуга бесплатного обмена не будет доступна при следующих обстоятельствах:
- Повреждения вызваны самовольной разборкой.
- Дефекты или физические повреждения, вызванные утечкой или падением.
- Повреждения в результате стихийных бедствий. Если ваш товар находится в пределах любых повреждений или дефектов, за исключением вышеуказанных обстоятельств, пожалуйста, верните нам или вашему дистрибьютору для бесплатного ремонта.
| Номер модели: |
| Дата покупки: |
| Имя пользователя: |
| Телефон пользователя: |
| Адрес пользователя |
| Название магазина: |
| Адрес магазина: |
| Комментарии: |
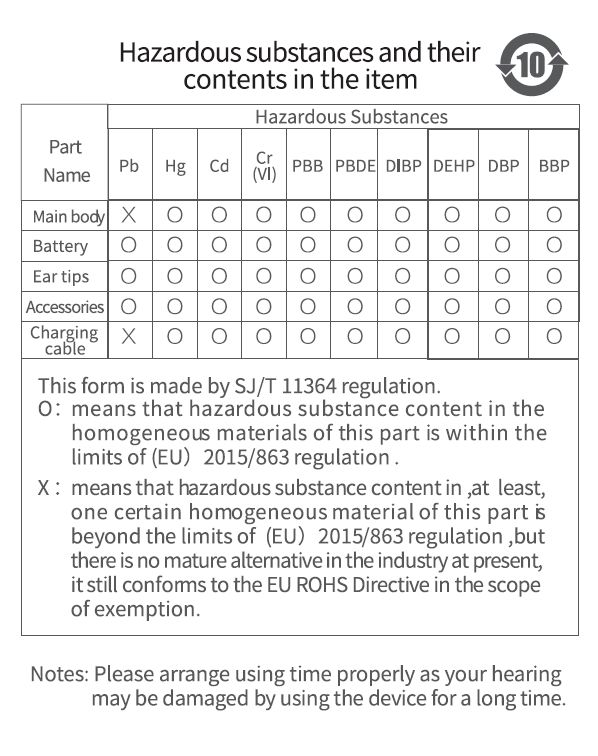
Опасные вещества и их содержание в предмете

| Наименование | Опасные вещества | |||||||||
| Pb | Hg | Cd | Cr Нет |
РВВ | ПББЭ | DIBP | ДЕГФ | DBP | BBP | |
| Основной корпус | X | 0 | 0 | 0 | 0 | 0 | 0 | 0 | 0 | 0 |
| Батарея | 0 | 0 | 0 | 0 | 0 | 0 | 0 | 0 | 0 | 0 |
| Насадки для ушей | 0 | 0 | 0 | 0 | 0 | 0 | 0 | 0 | 0 | 0 |
| Аксессуары | 0 | 0 | 0 | 0 | 0 | 0 | 0 | 0 | 0 | 0 |
| Зарядка кабель | X | 0 | 0 | 0 | 0 | 0 | 0 | 0 | 0 | 0 |
| Эта форма сделана в соответствии с правилами SJ / T 11364. 0: означает, что содержание опасных веществ в однородных материалах этой части находится в пределах нормы (ЕС) 2015/863. X: означает, что содержание опасных веществ, по крайней мере, в одном определенном однородном материале этой детали выходит за пределы регламента (ЕС) 2015/863, но в настоящее время в отрасли нет зрелой альтернативы, он по-прежнему соответствует Директиве ЕС ROHS в рамках исключения. |
Ноты: Используйте время правильно, так как ваш слух может быть поврежден из-за длительного использования устройства.
Заявление FCC
Это оборудование было протестировано и признано соответствующим ограничениям для цифровых устройств класса B в соответствии с частью 15 правил FCC. Эти ограничения разработаны для обеспечения разумной защиты от вредных помех при установке в жилых помещениях. Это оборудование генерирует, использует и может излучать радиочастотную энергию и, если оно установлено и используется не в соответствии с инструкциями, может создавать вредные помехи для радиосвязи. Однако нет гарантии, что помехи не возникнут при конкретной установке. Если это оборудование действительно создает недопустимые помехи для приема радио или телевидения, что можно определить путем включения и выключения оборудования, пользователю рекомендуется попытаться устранить помехи одним или несколькими из следующих способов:
- Изменить ориентацию или местоположение приемной антенны.
- Увеличьте расстояние между оборудованием и приемником.
- Подключить оборудование к розетке в цепи, отличной от той, к которой подключен приемник.
- Обратитесь за помощью к дилеру или опытному радио / телевизионному технику.
Это устройство соответствует требованиям части 15 правил FCC. Эксплуатация возможна при соблюдении следующих двух условий:
- Это устройство не должно вызывать вредных помех, и
- это устройство должно принимать любые помехи, включая помехи, которые могут вызвать сбои в работе.
Изменения или модификации, прямо не одобренные стороной, ответственной за соответствие, могут лишить пользователя права на эксплуатацию оборудования.
Tips
- Перед использованием гарнитуры внимательно прочтите руководство и сохраните его для использования в будущем.
- Перед первым использованием гарнитуру необходимо полностью зарядить.
- Если гарнитура не используется более двух недель, периодически заряжайте ее.
- Используйте зарядные устройства квалифицированного производителя.
- Если телефон не обнаруживает гарнитуру, проверьте, находится ли она в режиме сопряжения; если гарнитура оставалась неподключенной в течение длительного времени, она выйдет из режима сопряжения, повторно войдите в режим; если в вашем телефоне возникла процедурная ошибка, перезагрузите его; при возникновении процедурной ошибки гарнитуры перезагрузите или сбросьте настройки.
Адрес: Suite 1303, 1305 и 1306, 13 / F, проектная фраза 2 технологической башни Гаошэн, технологический парк Гаошэн, улица Лунси № 5, община Чжоуси, район Наньчэн, город Дунгуань, провинция Гуандун, Китай.
Производитель: Компания Dongguan Liesheng Electronic Co., Ltd.
Web: www.haylou.com
Сделано в Китае


Документы / Ресурсы
Download
Table of Contents
Add to my manuals
Share
URL of this page:
HTML Link:
Bookmark this page
Manual will be automatically added to «My Manuals»
Print this page
- Manuals
- Brands
- Haylou Manuals
- Wireless Headphones
- GT1 Pro
- User manual
Tws earphones
Hide thumbs
1
2
3
4
5
6
7
8
9
10
11
12
13
14
Table Of Contents
15
-
page
of
15/
15 -
Contents
-
Table of Contents
-
Bookmarks
Table of Contents
-
What’s in the Box
-
Basic Parameters
-
How to Wear
-
How to Charge
-
Stereo Mode
-
Mono Mode
-
Factory Setting
-
Daily Maintenance
-
Warranty Card
-
FCC Statement
Advertisement
Quick Links
Download this manual
HAY LOU
Haylou-GTl Pro
lWS Earphones
User Manual
Table of Contents
Previous Page
Next Page
- 1
- 2
- 3
- 4
- 5
Advertisement
Table of Contents
Related Manuals for Haylou GT1 Pro
-

Wireless Headphones Haylou GT5 Faq
(2 pages)
-
Wireless Headphones Haylou GT3 Pro Manual
(32 pages)
Summary of Contents for Haylou GT1 Pro
-
Page 14
Click Here To Read More… Haylou GT1 Pro TWS Earphones User Manual…
Table of Contents
![]()
![]()
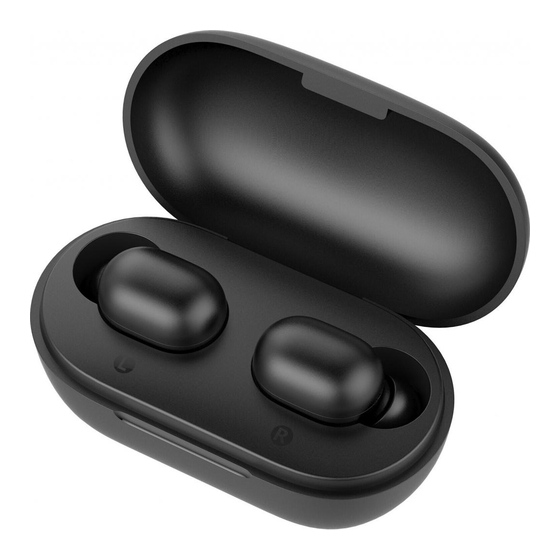
Haylou GT1 Pro TWS Earbuds — Manual
Overview — Xiaomi Haylou GT1 Pro TWS Bluetooth Earbuds
Charging Case
What’s in the Box
BT earphones, Charging case, EarTips × 2 pairs, Manual, Charging cable.
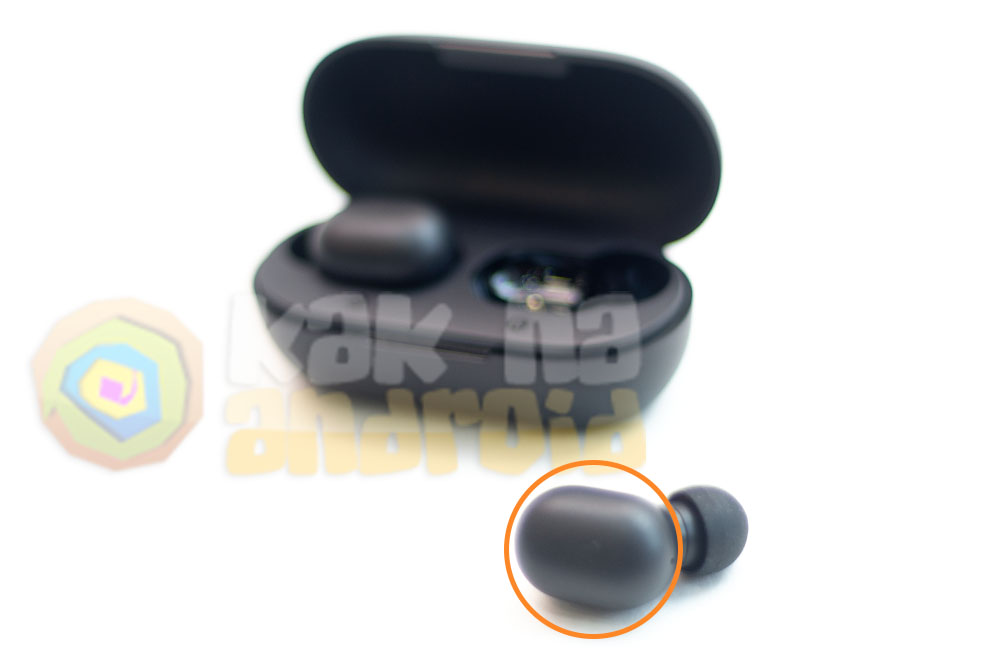
Earphones

Medium EarTips have been assembled in advance. However, you may try large or small ones, if the medium ones do not fit you well.
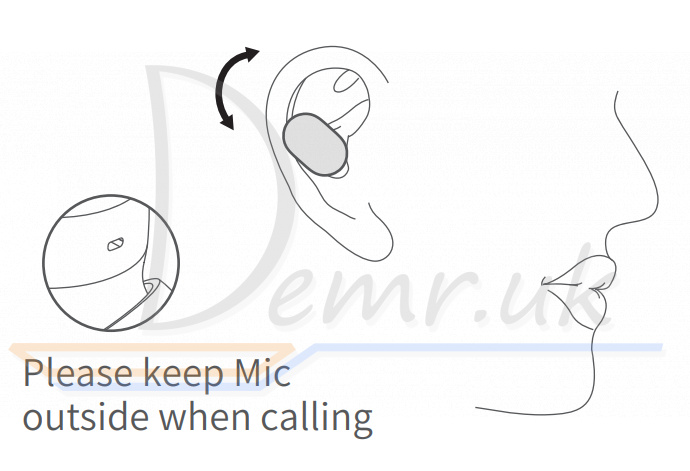
When calling, adjust Mic towards mouth to gain clear calling.
Power-on — Haylou GT1 Pro
Take out Xiaomi Haylou GT1 Pro earphones from the case to power on them. Or touch both panels for 1.5s to power on earphones (LED glows solid white) when they are not in the case.

Power-of
Put earphones into the case to power off them. Or touch both panels for 4.5s to power off earphones. (LED glows solid red for 2s).

Pairing with a phone — Haylou GT1 Pro Earbuds
Stereo Mode
Auto pairing: take out both Haylou GT1 Pro EarBuds from the case and they will auto pair with each other in 2 or 3s. Earphones will be connectable to cellphone when white slowly. On cellphone, LED on right EarBud blinks search for «Haylou-GT1_R» and tap to connect. If earphones fail to be connected to cellphone, please put EarBuds back to the case and repeat the above steps. Earphones will auto reconnect to the last device in connectivity records, if any.
Note: earphones have been setted to factory when shipping out.
Manual pairing: manually power on two EarBuds and they will auto pair with each other when LED blinks white promptly. Then LED on the right EarBud will blink white slowly and now you can tap it on cellphone to connect.
Mono Mode
Auto pairing: take out one EarBud from the case to power on it. Its LED will soon blink slowly then search for Haylou-GT1 R/L on cellphone and tap to connect. EarBud will auto reconnect to last device in connectivity records, if any.
Note: it may take more times for the left EarBud to reconnect.
Manual pairing: manually power on one EarBud. Its LED will soon blink white slowly then search for it on cellphone and tap to connect.
How to Charge — Haylou GT1 Pro
Prior to using, please peel off sticker on the pogo pins and top up the earphones.
How to use Xiaomi Haylou GT1 Pro TWS Wireless Earbuds
Ignore Call
Touch the panel for 1s to ignore incoming call.

Play/pause
When standby, touch the panel to pause/play music.
Note: media player should run in background.
Voice Assistant — Haylou GT1 Pro TWS
When standby, triple touch the panel to activate voice assistant.
Note: device needs to support voice assistant and fast awakening be turned on.

Answer/End Call
Double touch the panel to answer incoming call and double touch the panel again to end it.
Skip Track Forward/backward
Touch the panel on right earbud twice to skip track forward.
Touch the panel on left earbud twice to skip track backward.
Three-way Calling & Switch
Touch the panel twice to answer incoming call from phone. if another call is coming in sync , touch the panel to put the first call on hold while activating the second one. Double touch the panel to switch between active call and held call.
Switch Audio Output
When calling, touch the panel for 1s to switch audio output between earphones and cellphone.
Restoring factory settings — Xiaomi Haylou GT1 Pro TWS
If earphones do not function well, please refer the following steps to reset factory: take EarBuds out from the case. Power off the earphones then toch both panels for about 15s ( LED will blink red and white three times twice). After that, put them back to the case. Delete connectivity record on cellphone before processing another pairing. (All connectivity records relating to the EarBuds will all be removed)
Basic Parameters
Operation range: 10m(with no obstacle)
Battery capacity: 43mAh(single EarBud)
Changing time: approx. 1.5hr
Calling time: approx. 3.5hr
Standby time: approx. 150hr
Input parameter: 5V 100mA
Battery type: li-ion
Wireless connection: BT 5.0
Charging case
Input parameter:5V 500mA
Output parameter:5V 150mA
Charging time: approx. 2hr
Standby time: approx. 4 months
Battery capacity: 310mAh
Battery type: li-ion
Caveats
1. Never disassemble or modify your headset for any reasons to avoid any damages and danger.
2. Do not store the headset in extreme temperatures (under 0℃ or over 45℃).
3. Avoid using the indicator close to the eyes of children or animals.
4. Do not use this headset during a thunderstorm to avoid irregular function and increased risk of electricshock.
5. Do not use harsh chemicals or strong detergents to clean the headset.
6. Keep the headset dry.
Haylou GT1 Pro Manual
Re-Checking Earbuds Features and Specs: Haylou GT1 PRO
Haylou Earbuds Reset
Haylou GT1 PRO Reset
Haylou GT1 Pro Factory Reset
How to Reset Haylou GT1 Pro Earbuds?
- Turn off Earbuds first before reset Haylou GT1 PRO: Please press 2 earbuds control pads for 4 seconds (2 seconds for red light lighting) then the two Haylou GT1 Pro Earbuds will turn off
- Please again press 2 Haylou GT1 PRO earbuds control pads for 10 seconds, the red and white lights flash 3 times, then release your finger, the 2 earbuds reset completely and it will turn off automatically.
- Please delete the Bluetooth history on your device, Haylou GT1 PRO reset completely!
- Please do the pairing steps again! These steps will help resolve many problems!
Also resolve the problems:
How do I reset my Haylou GT1 PRO?
How to Factory Reset Haylou GT1 Pro Earbuds?
Haylou GT1 Pro How to Reset?
How do I fix my Haylou GT1 PRO?
Haylou Earbuds Pairing
Haylou GT1 Pro Pairing
How do you pair Haylou GT1 Pro left and right?
Stereo Mode Auto pairing:
- Take out both earbuds from the case, two Haylou GT1 Pro earbuds will auto pairing each other
- Then pick up your cellphone, search for Haylou-GT1 Pro and tap to connect.
- If you fail to build connection, please pull your earbuds
back into the case and repeat the above steps. - Once connected, earbuds will auto reconnect to the last device in connectivity records whenever
- If Haylou GT1 Pro connecting success, Haylou GT1 Pro pairing complete!
Also resolve problems:
How do I pair Haylou GT1 PRO?
How do I set up my Haylou GT1 PRO?
How do I connect my gt1 PRO?
Haylou GT1 Pro How to Pair?
Gaylou GT1 not Pairing Together
Haylou-GT1 Pro TWS Earphones User Manual
Haylou GT1 Pro Earbuds has been famous all over the world for many years,with help of xiaomi company’s help, Haylou GT1 Pro Earbuds spread more faster,with powerful distrubutor,people could get the haylou earbuds easy on earth,especially online sales.
Though Haylou GT1 Pro Earbuds come with user manual in package,there are many our customers asking the Haylou GT1 Pro Instructions User Manual for that can’t find the user manual at that time,the most frequence asking is Haylou GT1 Pro Manual English,Haylou Earbuds Manual,Haylou Earbuds Pairing,Haylou Earbuds Reset,Haylou GT1 Pro Instruction and so on. Heylou company make a decision to convert Haylou GT1 Pro Manual pdf to an article online to help Haylou customer checking Haylou GT1 Pro Earbuds manual anytime.
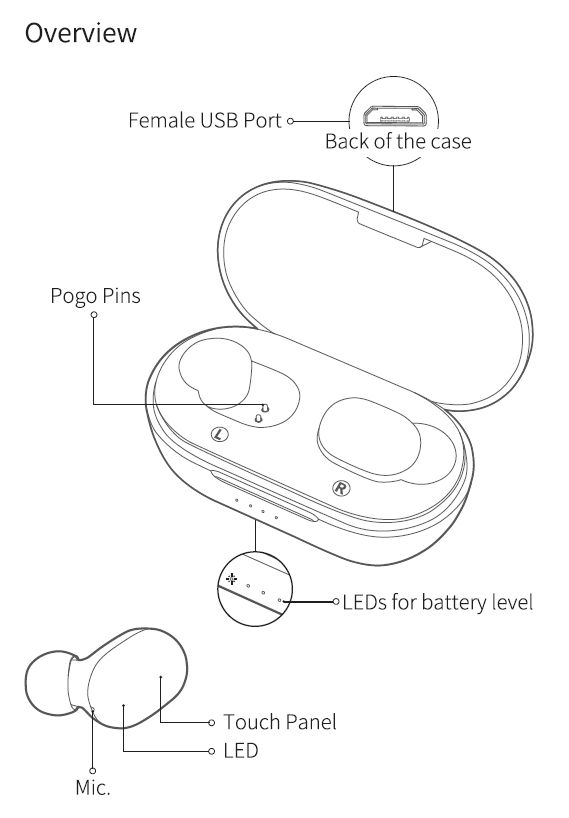
Haylou GT1 Pro Overview
- Female USB Port
- Back of the case
- Pogo Pins
- LEDs for battery level
- Touch Panel
- LED
- MiC
Does Haylou GT1 PRO have microphone? –
- Haylou gt1 Pro microphone location!
Haylou GT1 Pro microphone not working?
Please try turn off other media output or connect the earbuds again!
What’s in the Haylou GT1 Pro Box
- Eartips 3 pairs, Bluetooth earphones,
- Haylou GT1 Pro charging case, charging cable, manual.
Haylou GT1 Pro Basic Parameters
- Operation range: 10m(with no obstacle)
- Battery capacity: 43mAh(single earbud)
How long does it take to charge Haylou GT1 Pro?
- Charging time: approx. 1.5hr
- Calling time: approx. 3.5hr
- Standby time: approx. 150hr
- Input parameter: 5V =100mA
- Battery type: li-ion
- Bluetooth version: 5.0
Haylou GT1 Pro Charging Case
- Input parameter: 5V =500mA
- Output parameter: 5V=150mA
How long does it take to charge Haylou GT1 Pro charging box?
- Charging time: approx. 3.5hr
- Standby time: approx. 4 months
- Battery capacity: 800mAh
- Battery type: li-ion
How do you wear a Haylou GT1 PRO?
How to Wear Haylou GT1 Pro
- How to wear
- Please keep Mic outside when calling
- When calling, adjust Mic towards mouth to gain better talking experience.
Haylou GT1 Pro How to Charge
- Prior to using, please peel off sticker from the pogo pins and top up the earphones.
- Sticker
Haylou GT1 PRO Power-on
- Take out earphones from the case to power on them.
- Or touch both panels for 1.5s to power on earphones (LED glows solid white) when they are not in the case
- Touch the panel for 1.5s
- LED glows solid white
Haylou GT1 PRO Power-off
- Put earphones into the case to power off them.
- Or touch both panels for 4.5s to power off earphones
- (LED glows solid red for 2s).
- Touch the panel for 4.5s
- LED glows solid red for 2s
Haylou GT1 PRO powering on
Bluetooth faculty needs to be turned on).
Touch the panel for 1.5s Tuman Bluetooth to power on
Manual pairing: manually power on two earbuds and
they will auto pair with each other when LED blinks white
promptly. Then LED on the right earbud will blink white
slowly and now you can tap it on cellphone to connect
Haylou GT1 PRO Mono Mode
Auto pairing: take out one earbud from the case to power on. Its LED will soon blink slowly then search for Haylou-GT1 Pro on cellphone and
tap to connect.
Manual pairing: manually power on one earbud. Its LED will soon blink white slowly then search for Haylou-GT1 Pro R/L on cellphone and tap to connect.
Haylou GT1 Pro Controls
- Skip track backward: Double touch left earbud
- Skip track forward: Double touch right earbud
- Resume playing/pause music (when standby) : Touch either earbud
- Answer/end incoming call: Double touch either earbud
- Reject incoming call: Keep touching either earbud for 1s
- Activate voice assistant (when standby): Triple touch left earbud
How do you turn on game mode on Haylou GT1 PRO?
- Haylou GT1 Pro Gaming Mode turn on:
- Triple touch right earbud Activate gaming mode (ultra-low lag)
3 times tap – Haylou GT1 Pro gaming mode
Haylou GT1 Pro Manual volume control
Haylou GT1 Pro volume control
- Haylou GT1 Pro can’t control volume on earbuds ,but you could Adjust control the volume on your phone!
Haylou GT1 Pro volume low
LED on Charging Case
LEDs for battery level
LED for low battery warning
Four LEDs will blink 3 times to display practical battery level whenever you open/close lid. Then LEDs for battery level will glow solid for 10s.
Low battery warning(carry case): If battery level is under 25%, LED will blink white three times then turn off and re-blink three times. The process will repeat in 1 minute.
Haylou GT1 Pro Light Indicator
- Battery level display LEDS Remaining battery level
- ●● ●● 75%-100%
- ●● ● 50%-75%
- ●● 25%-50%
- ● 0%-25%
Haylou GT1 Pro charging
How do I charge my Haylou GT1 PRO?
Haylou GT1 Pro charging instruction
- Four LEDs will blink 3 times with draw marquee effect then glow solid to display practical battery level, when charging.
- Battery level display in charging
- LEDs Remaining battery level
- 0%-10%
- 10%-25%
- 25%-50%
- 50%-75%
- 75%-100%
Haylou GT1 PRO Caveats
- Never disassemble or modify your headset for any
reasons to avoid any damages and danger. - Do not store the headset in extreme temperatures
(under 0C or over 45C). - Avoid using the indicator close to the eyes of
children or animals. - Do not use this headset during a thunderstorm to avoid
irregular function and increased risk of electricshock. - Do not use harsh chemicals or strong detergents to
clean the headset. - Keep the headset dry.
Haylou GT1 PRO Factory Setting
If earphones do not function well, please refer the following steps to reset factory: take earbuds out from the case. Power off the earphones then touch
both panels for about 15s (LED will blink red and white three times twice). Ater that, put them back to the case. Delete connectivity record on cellphone before processing another pairing(All connecitvity records relating to the earbuds will all be removed).
Why is my Haylou earbuds not working?
- Audio only outputs from single earbud
- It’s really rare. Please reset GT1 Pro, remove connectivity record on your cellphone and re-connect the earphones to your cellphone.
Other cases in charging
LED glows solid white for 1 minute when earbuds are topped up.
Carry case cannot charge earbuds, if its battery drains.
LEDs on carry case will turn off once the case is topped up. If you charge it once again, LEDs will not give any notice, which does not mean the case
is not charged.
How do you know if Haylou GT1 Pro is fully charged?
- The Haylou GT1 Pro earbuds indicator will lighting white light for about 60 seconds if fully charged,then it will turn off Completely.
- The charging boxing indicator will lighting red light when charging and it will turn off automatically when fully charged.
- So,check the earbuds and charging box totally turn off is a good way!
Haylou GT1 pro charging box not turning on?
Haylou GT1 pro left earbud not charging?
Haylou GT1 pro left earbud not turning on?
Haylou GT1 pro not turning on?
- You should make sure the Haylou GT1 pro earbuds fully charged, when you pick up the earbuds from charging box, it will automatically turn on!
- DO the following reset steps!
Haylou GT1 Pro Right Earbud not Working
Haylou GT1 Pro Left not Working
Haylou GT1 Pro one Earbud not Charging
Gaylou GT1 Pro only one ear working
Haylou GT1 PRO Daily maintenance
- Please do not shower with earbuds. Do not wear them in rainy day. Do not leave them in washing machine or other extreme situations. Clean them with dry cloth after use in pursuing a longer service life.
Haylou GT1 PRO Warranty Card
- Warranty Period
- 12 months after the next day receiving this item.
Free exchange service will not be accessed under
following circumstances:
- Damages caused unauthorized disassembly.
- Defects or physical damages caused by leaking or
dropping off. - Damages by act of God. Supposing your item is
within any damages or defects except the above
circumstances, please return to us or your distributor
for free repairing
Model Number:
Date of Purchasing:
User’s Name:
User’s Phone:
User’s Address:
Shop’s Name:
Shop’s Address:
Comments:
Haylou GT1 PRO Hazardous substances and their contents in the item
This form is made by SJ/T 11364 regulation.
0: means that hazardous substance content in the homogeneous materials of this part is within the limits of (EU)2015/863 regulation.
X: means that hazardous substance content in ,at least one certain homogeneous material of this part is beyond the limits of (EU)2015/863 regulation, but there is no mature alternative in the industry at present,
it still conforms to the EU ROHS Directive in the scope of exemption.
Notes: Please arrange using time properly as your hearing may be damaged by using the device for a long time.
Haylou GT1 PRO FCC Statement
This equipment has been tested and found to comply with the limits for a Class B digital device, pursuant to Part 15 of the FCC Rules. These limits are designed to provide reasonable protection against harmful interference in a residential installation.
This equipment generates uses and can radiate radio frequency energy and, if not installed and used in accordance with the instructions, may cause harmful interference to radio communications
However, there is no guarantee that interference will not occur in a particular installation. If this equipment does cause harmful interference to radio or television reception, which can be determined by turning the equipment off and on, the user is encouraged to try to correct the interference by one or more of the following measures:
–Reorient or relocate the receiving antenna.
— Increase the separation between the equipment and receiver.
–Connect the equipment into an outlet on circuit different from that to which the receiver is connected.
-Consult the dealeroran experienced radio/TVtechnician for help.
This device complies with part 15 of the FCC Rules. Operation
is subject to the following two conditions:
(1)This device may not cause harmful interference, and (2)
this device must accept any interference received, including
interference that may cause undesired operation.
Changes or modifications not expressly approved by the party
responsible for compliance could void the user’s authority to
operate the equipment.
Haylou GT1 PRO Tips
- Before using the headset, please read the manual carefully and keep it for future references.
- The headset need to be fully charged prior to first-time use.
- If the headset is left unused for over two weeks, please recharge it periodically.
- Please use the chargers made by qualified manufacturer.
- If the headset cannot be found by your phone, please check whether it is in pairing mode; if left unconnected for a long while, the headset will exit pairing mode, please re-enter the mode; if a procedure error of your phone occurs, reboot it; if procedure error of the headset occurs, reboot or reset it.
Address: Suite 1303, 1305 and 1306, 13/F, Project Phrase
2 of Gaosheng Tech Tower, Gaosheng Tech Park,
No. 5 Longxi Road, Zhouxi Community, Nancheng
District, Dongguan City, Guangdong, China.
Manufacturer: Dongguan Liesheng Electronic
Co., Ltd.
Haylou gt1 pro windows 10 driver
Haylou GT1 Pro App
- Haylou GT1 Pro using bluetooth to connect,no need using Haylou GT1 Pro App! no need download app from ios or android apk,no need windows driver,no need macos driver.
This is not Haylou GT1 pro manual pdf ,you can learn by text and more clearly
How do I connect my Haylou GT1 to my computer?
How to connect haylou gt1 to pc
- The same steps with connect with your mobile phone!
Source: https://www.haylouearbudsgt.com/haylou-gt1-pro-manual-english/
Не смотря на то, что Haylou GT1 являются довольно простыми, не претендующими на какую-то оригинальность, беспроводными наушниками, тем не менее, у новичков увидевших их впервые может возникнуть резонный вопрос: почему на них нет ни одной кнопки? Можно ли переключать музыку, отвечать на звонки, увеличивать уровень громкости и выполнять прочие действия без каких-либо клавиш? Как пользоваться Haylou GT1 для достижения максимального уровня комфорта?
Прежде чем приступить, хочется сказать пару слов о том, что следует сделать до того, как начать пользоваться наушниками, а именно: зарядить их и подключить к своему мобильному устройству.
Информацию об этом можно узнать из материалов:
Как зарядить Haylou GT1
Как подключить наушники Haylou GT1 к телефону
Инструкция
После того, как TWS-наушники заряжены и готовы к использованию, достаем их из кейса и возле каждого из них видим буквенные обозначения:
- L – левый наушник
- R – правый наушник
Информация о стороне установки наушников также написана на внутренней стороне каждого из них.
После того, как наушники подключены и установлены в уши, можно начинать взаимодействовать через них со своим смартфоном.
Так, например, чтобы принять входящий звонок, необходимо просто прикоснуться к сенсорной панели занимающей всю внешнюю сторону корпуса каждого наушника. Стоит отметить, что в каждом из них установлен микрофон, а значит пользоваться в качестве Bluetooth-гарнитуры можно как левым, так и правым наушником.
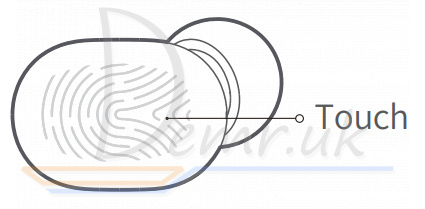
Что же касается прослушивания музыки, то одинарное прикосновение к любому из наушников останавливает проигрывание, а повторное – вновь запускает его.
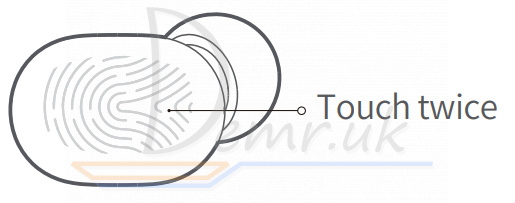
Навигация по плейлисту своего плеера также возможна. Двойное касание к правому наушнику – переход на одну композицию вперед, а для отката на один трек назад необходимо дважды быстро коснуться к панели левого наушника.
Если в смартфоне установлен голосовой ассистент (например, Google Assistant), вызвать его можно с помощью трехкратного касания к панели любого из наушников.
К сожалению, регулировать уровень громкости с помощью Haylou GT1 не получится и делать это придется кнопками смартфона.
Также имеются и несколько основных функций сенсорной панели касающихся включения наушников: длинное нажатие при включенном наушнике отключает его, а при отключенном – включает. Если держать палец на сенсорной панели отключенного наушника дольше обычного, то он включится и перейдет в режим поиска нового Bluetooth устройства.
Вам помогло? Оцените статью:
![]() Loading…
Loading…