![]()
Инструкция по началу работы

Руководство пользователя
Введение
Комплектация
| HeadRush MX5 USB-кабель (2) 1/8 дюйма (3.5 мм) для MIDI-адаптеров Адаптер питания |
Карта загрузки программного обеспечения Инструкция по началу работы Руководство по безопасности и гарантии |
важно: Войти headrushfx.com чтобы загрузить полное руководство пользователя.
Поддержка
Для получения последней информации об этом продукте (документация, технические характеристики, системные требования, информация о совместимости и т. Д.) И регистрации продукта посетите headrushfx.com.
Для получения дополнительной поддержки по продукту посетите headrushfx.com/support.
Особенности
Верхняя панель

- Дисплей: Этот полноцветный мультисенсорный дисплей отображает информацию, относящуюся к текущей работе HeadRush MX5. Коснитесь дисплея (и используйте элементы управления оборудованием) для управления интерфейсом. Видеть Основная операция узнайте, как это работает.
- Основная громкость: поверните эту ручку, чтобы отрегулировать уровень громкости выходов.
- Энкодер: поверните этот энкодер для прокрутки доступных опций меню или настройки значений параметров в выбранном поле на дисплее. Нажмите энкодер, чтобы подтвердить свой выбор.
- Индикаторы ножных переключателей: эти индикаторы показывают, включен ли педаль, установка или сцена, назначенные каждому ножному переключателю (ярко светится) или выключено (светится тускло).
- Ножные переключатели: нажмите эти педальные переключатели, чтобы активировать или деактивировать назначенную модель или сцену или загрузить назначенный риг.
- Педаль экспрессии: используйте эту педаль для регулировки назначенного параметра / параметров. Видеть Основные операции> Назначение оборудования> Педаль экспрессии чтобы получить больше информации.
Задняя панель

- Гитарный вход (1/4 дюйма / 6.35 мм, моно): подключите гитару к этому входу с помощью стандартного инструментального кабеля.
- Вход для педали экспрессии (1/4 дюйма / 6.35 мм, TRS): Подключите дополнительную педаль экспрессии к этому входу с помощью стандартного кабеля TRS 1/4 дюйма (6.35 мм).
- Выход FX Send (1/4 дюйма / 6.35 мм, стерео): Подключите этот выход ко входу другого модуля эффектов, педали эффекта или возврата петли эффектов ampпожизненнее.
- Вход FX Return (1/4 дюйма / 6.35 мм, стерео): Подключите этот вход к выходу другого модуля эффектов, педали эффекта или посыл петли эффектов ampпожизненнее.
Примечание: Вы можете настроить вход FX Return Input на прием сигнала на уровне рэка или педали (по умолчанию) в меню Global Settings. - Выходы (1/4 дюйма / 6.35 мм, симметричные): Подключите эти выходы ко входам вашего amplifier, аудиоинтерфейс и т. д. Если вам нужно использовать только один выход, используйте тот, который обозначен как Left / Mono.
Примечание: Вы можете настроить эти выходы для отправки сигналов на amp уровень или линейный уровень (по умолчанию) в Меню глобальных настроек. - Выход на наушники (1/8 дюйма / 3.5 мм, стерео): Подключите к этому выходу стандартные стереонаушники 1/8 дюйма (3.5 мм).
- Вход Aux (1/8 дюйма / 3.5 мм, стерео): Подключите дополнительный источник звука (например, смартфон, планшет и т. Д.) К этому входу с помощью стереокабеля 1/8 дюйма / 3.5 мм.
- MIDI-выход (1/8 дюйма / 3.5 мм): Используйте прилагаемый адаптер 1/8 ″ -to-MIDI и стандартный MIDI-кабель (не входит в комплект) для подключения этого выхода к MIDI-входу дополнительного внешнего MIDI-устройства.
- MIDI-вход (1/8 дюйма / 3.5 мм): Используйте прилагаемый адаптер 1/8 ″ -to-MIDI и стандартный MIDI-кабель (не входит в комплект) для подключения этого входа к MIDI-выходу дополнительного внешнего MIDI-устройства.
важно: Не подключайте аудиоустройства (например, наушники, мониторы и т. Д.) К MIDI-выход или MIDI-вход. Используйте прилагаемые переходники с 1/8 дюйма на 5 контактов только для подключения MIDI-устройств. - USB-порт: Подключите этот порт USB к компьютеру с помощью стандартного кабеля USB. Это соединение позволяет HeadRush MX5 отправлять и получать цифровой аудиосигнал на ваш компьютер и с него. Вы также можете использовать это соединение для импорта или экспорта буровых установок, списков предустановок модели и импульсных характеристик.
- Входная мощность: Подключите этот вход к розетке с помощью прилагаемого адаптера питания.
- Выключатель: Нажмите эту кнопку, чтобы включить HeadRush MX5. Нажмите и удерживайте эту кнопку, чтобы выключить HeadRush MX5.
- Вентиляция: Убедитесь, что это вентиляционное отверстие не закрыто при использовании HeadRush MX5.
Установка
Пункты, не указанные в Введение> Содержимое коробки продаются отдельно.
ВАЖНО! В меню Global Settings убедитесь, что вы установили выходы для отправки сигнала на amp уровень, если вы используете традиционную гитару ampболее продолжительный или линейный (по умолчанию), если вы используете полнодиапазонный плоский отклик ampлифтер, микшер, громкоговоритель или аудиоинтерфейс.

Основная операция
В этой главе описаны некоторые из основных функций HeadRush MX5. Вы можете посетить headrushfx.com чтобы загрузить полное руководство пользователя для получения дополнительной информации.
Главный Экран

важно: Последовательность моделей в вашей сигнальной цепи не обязательно отражается на педальных переключателях. Вы можете свободно назначать модели доступным педальным переключателям, вообще не меняя сигнальную цепочку — и наоборот. Видеть Назначение оборудования узнайте об этом.
Назначить модель (amp, cab, импульсная характеристика или эффект) в пустой слот, коснитесь его (+) а затем воспользуйтесь появившимся списком. Видеть Буровые установки> Создание Новая установка чтобы узнать об этом.

Чтобы переставить модели в вашей сигнальной цепочке, коснитесь и перетащите модель в другой слот или между двумя другими моделями (модели после этого положения будут
сдвинуть на один слот дальше вниз по сигнальной цепочке).
Чтобы активировать или деактивировать модель, нажмите ножной переключатель назначенный ему, или коснитесь модели, а затем коснитесь Вкл Выкл кнопка, которая появляется вверху
правый угол.
 Чтобы показать экран настроек модели, дважды коснитесь его.
Чтобы загрузить другую установку (предустановка):
к view другие варианты, нажмите • • • в правом верхнем углу, а затем коснитесь нужного параметра.
Режимы педального переключателя
 Три педальных переключателя можно использовать для активации или обхода моделей (amps, кабинеты, импульсные характеристики или эффекты), а также выберите сцены, установки или сетлисты. Эти ножные переключатели всегда находятся в одном из четырех режимов: Stomp,
Риг, Гибрид или Сетлист.
Чтобы изменить режим, удерживайте педаль 1, затем:
- Чтобы выбрать режим Stomp, нажмите педаль 1
- Чтобы выбрать режим буровой установки, нажмите педаль 2
- Чтобы выбрать гибридный режим, нажмите педаль 3
- Чтобы выбрать режим Setlist, удерживайте педаль 2
Топот Режим

Педальные переключатели 1-3 соответствуют моделям (amps, кабины или эффекты) в вашей сигнальной цепи. Нажмите педаль, чтобы активировать или деактивировать ее модель.
Чтобы загрузить следующую установку, нажмите педальные переключатели 1 и 2 (![]() ) одновременно.
) одновременно.
Чтобы загрузить предыдущую установку, нажмите педальные переключатели 2 и 3 (![]() ) одновременно.
) одновременно.
Режим буровой установки
 Педальные переключатели 1-3 соответствуют ранее сохраненным ригам. Нажмите педаль, чтобы загрузить его установку.
Чтобы показать следующий банк из трех установок, нажмите педальные переключатели 1 и 2 (![]() ) одновременно.
) одновременно.
Чтобы показать предыдущий банк из трех установок, нажмите педальные переключатели 2 и 3 (![]() ) одновременно.
) одновременно.
Гибридный режим
 Первый педальный переключатель может быть назначен для активации / деактивации модели или выбора сцены в текущей выбранной установке.
Чтобы переключиться на предыдущую установку, нажмите педаль 2.
Чтобы переключиться на следующую установку, нажмите педаль 3.
Сетлист режим
 Чтобы войти в текущий показанный сетлист, нажмите педаль 1.
Чтобы показать предыдущий сетлист, нажмите педаль 2.
Чтобы показать следующий сетлист, нажмите педаль 3.
Чтобы войти в сетлист All Rigs, нажмите и удерживайте педаль 1.
Буровые установки
При использовании HeadRush MX5 установка предустановка: комбинация назначенных Модели-The amps, cabs, импульсные характеристики и эффекты — а также настройки каждого из них. Вы можете создавать, редактировать, сохранять и загружать риги, что позволяет легко вспомнить идеальный звук для каждой части вашего
производительность.
Каждая буровая установка имеет 11 слоты, каждая из которых может иметь одну модель (amp, cab или эффект).
Назначенные слоты будут отображать графические представления моделей, а пустые слоты покажут + символ.
Создание новой буровой установки

Чтобы создать новую установку, нажмите • • • в правом верхнем углу экрана и коснитесь Новинки Rig.
Назначить модель (amp, cab или эффект) в пустой слот:
- Нажмите на пустой слот †
- В появившемся списке коснитесь типа модели, которую хотите назначить: Amp, Кабина, ИК (импульсная характеристика), или эффект (искажение, динамика / эквалайзер, модуляция, Реверберация / задержка, петля эффектов или экспрессия).
- В появившемся списке коснитесь модели, которую хотите назначить.
- В следующем появившемся списке коснитесь предустановки, которую хотите загрузить для этой модели.
Если вы загрузите amp или cab в слот с пустым соседним слотом, соответствующий amp или cab будет автоматически загружен в другой слот. После этого вы можете
настраивать их независимо: вы можете разделить их в цепочке сигналов, вы можете изменить тип amp или cab, и вы можете удалить каждую модель отдельно.
Оптимизация вашей сигнальной цепи
Наблюдения и советы этой статьи мы подготовили на основании опыта команды сигнальная цепь это путь, по которому аудиосигнал идет от вашей гитары через выбранные вами модели и заканчивается на выходах HeadRush MX5. Вы можете использовать сенсорный экран, чтобы расположить выбранные модели в любой последовательности, но вы можете обнаружить, что некоторые конфигурации будут звучать лучше, чем другие.
Вот несколько общих предложений по размещению моделей для создания тонов с помощью HeadRush MX5:
- Динамика (например, компрессоры), фильтры (например, вау, питч-шифтеры), и объем педали обычно располагаются в начале сигнальной цепи. В качестве альтернативы вы можете разместить педали громкости в конце сигнальной цепи, чтобы обеспечить небольшое отклонение в функциональности.
- Эффекты, основанные на усилении (например, овердрайв / дисторшн, фузз) обычно идут дальше.
- Выравнивание (EQ) часто используется для формирования тональных характеристик эффектов овердрайва / дисторшна и фузза, поэтому ставьте после них эквалайзер. Как вариант, поместите его перед ними, чтобы сформировать общий тон гитары — вырезать нежелательные частоты — перед педалями усиления.
- Эффекты модуляции, такие как фленджеры, фазеры и хорус обычно помещаются рядом.
- Эффекты, зависящие от времени, такие как задержки и реверберация обычно размещаются ближе к концу сигнальной цепи.
- An amp и еще один кабина (или amp и импульсная характеристика) часто помещают в самый конец сигнальной цепочки, хотя вы можете разместить их где угодно.
Спасение буровой установки
Если вы вообще меняли установку после ее загрузки, вы увидите звездочку (*) рядом с его названием вверху экрана. Вы можете сохранить эти изменения в этой установке, сохранить эти изменения как другую установку или полностью отменить их.

Чтобы спасти буровую, нажмите Save. в правом верхнем углу.
Чтобы сохранить изменения в текущем буровая установка, кран Сохранить.
Чтобы сохранить изменения как новую установку, нажмите Сохранить новую установку, используйте появившуюся клавиатуру, чтобы ввести имя, а затем нажмите «Сохранить».
Чтобы вернуться к предыдущему экрану без сохранения, нажмите Отмена в любое время.
Чтобы отменить любые изменения, которые вы внесли в установку, нажмите • • • в правом верхнем углу и коснитесь Отменить изменения.
Регулировка настроек
Чтобы изменить настройки модели в вашей установке, дважды коснитесь его, чтобы открыть экран настроек.

Сохранение предустановки
 Чтобы сохранить предустановку, нажмите Save. в правом верхнем углу.
Чтобы сохранить изменения в текущем пресете, нажмите Сохранить.
Чтобы сохранить изменения как новую предустановку, коснитесь «Сохранить новую предустановку»., используйте появившуюся клавиатуру для ввода имени, а затем коснитесь Сохранить.
Чтобы вернуться к предыдущему экрану без сохранения, нажмите «Отмена». в любое время.
Назначение оборудования
Экран Hardware Assign позволяет вам настроить, как ножные переключатели HeadRush MX5 и педаль экспрессии управляют каждой установкой.
 Чтобы открыть экран назначения оборудования, нажмите ••• в правом верхнем углу главного экрана, а затем нажмите Назначение оборудования.
Чтобы вернуться на главный экран, нажмите кнопку в![]() в левом верхнем углу.
в левом верхнем углу.
важно: Все настройки назначения оборудования являются частью общей установки, поэтому не забудьте сохранить изменения, которые вы хотите сохранить.
Чтобы установить цвет, связанный с буровой установкой, коснитесь его в верхней левой части экрана. Этот цвет появится рядом с названием буровой установки, когда вы view список всех доступных ригов или когда вы view и создавать сетлисты. Он также будет цветом соответствующего индикатора педального переключателя, когда HeadRush
MX5 находится в режиме буровой установки.
Для установки темпа зависящих от времени эффектов буровой установки (задержки, модуляция и т. д.), нажмите кнопку под Время , чтобы выбрать Текущий or Исправлена.
- Текущий: Риг будет использовать темп, который использовался последним или установленный Время ножной переключатель.
Чтобы установить темп, нажмите Время нажмите педаль в желаемом темпе 3–8 раз, чтобы установить новый темп в ударах в минуту. (ударов в минуту). - Исправлена: Риг будет использовать темп, который вы здесь задали.
Чтобы установить темп, поверните энкодер, чтобы установить желаемый темп в ударах в минуту.
(BPM). Вы можете установить темп только на этом экране Hardware Assign.
Для загрузки установки при получении изменения программы MIDI от дополнительного внешнего MIDI-устройства или для отправки сообщения изменения программы MIDI при загрузке установки,
нажмите кнопку под MIDI, а затем поверните кодировщик, чтобы выбрать MIDI номер изменения программы. Вы можете настроить MIDI изменения программы принимаются и / или отправляются в Глобальные настройки меню.
Примечание: Если установка использует номер, этот номер будет недоступен и не может быть назначен другой установке. Кроме того, при сохранении буровой установки с новым именем она будет сохранена, но без номера изменения программы, чтобы не дать установкам использовать один и тот же номер.
Ножные переключатели
Три прямоугольника в нижнем левом углу представляют три ножных переключателя HeadRush MX3. Вы можете назначить любые параметры на основе переключателей (имеющие только два состояния) на любой из ножных переключателей — независимо от их положения в сигнальной цепи.
Чтобы назначить параметр педальному переключателю:

- Коснитесь поля. + указывает на пустое поле.
- В появившемся списке коснитесь модели с параметром, который вы хотите назначить.
- В появившемся списке коснитесь параметра, который хотите назначить. Обычно параметр просто включен (для включения или выключения).
Нажмите Неназначенный × чтобы отменить назначение этого педального переключателя.
Чтобы поменять местами два назначения, коснитесь и перетащите один из них на другой, а затем отпустите.
Сцены
Наблюдения и советы этой статьи мы подготовили на основании опыта команды сцены Функция позволяет вам включать или выключать несколько моделей на каждой установке, а также выбирать различные предустановки для изменения модели. Когда вы нажимаете педальный переключатель, назначенный для этой сцены, все модели, включенные в эту сцену, включаются или выключаются или изменяются на другой пресет, в зависимости от того, как вы их назначаете. Это отличный способ создать несколько тонов в одной установке. Например, вы можете захотеть, чтобы определенная модель реверберации была включена в любое время, когда также включена конкретная модель искажения.
В качестве альтернативы вы можете захотеть выключить одну модель задержки при включении другой. Сцены позволяют сделать это одним нажатием педали.
Чтобы создать и отредактировать сцену:

- На Экран назначения оборудования, коснитесь Переключить / Сцена для желаемого педального переключателя, чтобы просмотреть доступные варианты, и выберите Сцена.
- На этой модели коснитесь Изменить. Появится редактор сцены, в котором будут показаны все модели вашей установки.
- Для каждой модели в установке коснитесь первой строки текста, чтобы просмотреть доступные параметры:
• On: Эта модель включится, когда вы включите сцену.
• Off: Эта модель выключится, когда вы включите сцену.
• Без изменений: Эта модель останется неизменной при включении сцены. - Для каждой модели в установке коснитесь второй строки текста, чтобы настроить предустановку модели, которая будет загружаться при активации сцены.
- Коснитесь цвета в верхней части сенсорного экрана, чтобы выбрать цвет для сцены.
- Нажмите
 в верхнем левом углу, чтобы вернуться к экрану назначения оборудования.
Чтобы переименовать сцену (который отображается на индикаторах педального переключателя), коснитесь текста в поле ниже
Редактировать на модели используйте появившуюся виртуальную клавиатуру, чтобы ввести имя, а затем коснитесь любого места, кроме текстового поля.
Педаль экспрессии
Педаль экспрессии может управлять двумя параметрами (в классическом режиме) или двумя наборами параметров (в классическом режиме).
Расширенный режим). Для переключения между ними используйте подносочный переключатель — педаль экспрессии A или B.
Чтобы активировать переключатель на носке, переместите «носок» педали экспрессии так, чтобы она коснулась MX5, а затем нажмите.
Примечание: Когда вы сохраняете установку, текущее выбранное состояние педали экспрессии (A или B) будет сохранено, а затем будет вызвано при повторной загрузке установки.
Столбец из четырех прямоугольников представляет настройки педали экспрессии. Вы можете назначить педали экспрессии один или несколько непрерывно регулируемых параметров (с диапазоном значений).
Чтобы установить режим педали экспрессии, нажмите кнопку над диапазоном в правом верхнем углу, чтобы выбрать Классический or Расширенный поиск.

- Classic: Вы можете назначить по одному параметру на каждую педаль экспрессии (A и B). Использование подносочного переключателя позволяет выбрать другую педаль экспрессии и деактивировать (обойти) текущий параметр педали экспрессии. Например, если вы назначите педаль вау на педаль экспрессии A, а педаль громкости — на
Педаль экспрессии B, только одна из них будет активна в любой момент; когда вы управляете педалью вау, громкость педали будет отключена, и наоборот.
- Дополнительно: Каждой педали экспрессии можно назначить до четырех параметров (A и B). При перемещении педали одновременно регулируются все назначенные ей параметры.
Использование подносочного переключателя выберет другую педаль экспрессии и оставит текущие параметры педали активными и на их максимальных значениях.
Чтобы назначить параметр педали экспрессии:
- Если же линия индикатора Назначать кнопка не включена, нажмите ее.
- Коснитесь поля под Назначать кнопку. + указывает на пустое поле.
- В появившемся списке коснитесь модели с параметром, который вы хотите назначить.
- В появившемся списке коснитесь параметра, который хотите назначить.
Нажмите Неназначенный × чтобы отменить назначение этого поля.
Чтобы поменять местами два назначения (в расширенном режиме) коснитесь и перетащите один из них поверх другого, а затем отпустите.
Чтобы установить диапазон назначенного параметра:

- Если же линия индикатора Диапазон кнопка не включена, нажмите ее.
- Коснитесь значения под Диапазон кнопку.
- Поверните кодер установить желаемое значение в процентахtage всего диапазона параметра. Нажмите энкодер или коснитесь в другом месте, чтобы подтвердить значение.
Сетлисты
Вы можете использовать сетлисты для организации ваших буровых установок. Сетлист — это сохраненная коллекция ригов, которую вы можете сохранить и вызвать позже. Это полезно, например, если вам нужны только некоторые из ваших ригов для работы; Вы можете сохранить сет-лист только этих установок, чтобы вам не приходилось тратить время на перебор всех ваших установок перед воспроизведением следующей песни.
к view ваши сетлисты, нажмите кнопку ≡ в верхнем левом углу главного экрана. в Сетлисты, появится экран.
Чтобы вернуться на главный экран, нажмите ![]() в верхнем левом углу.
в верхнем левом углу.
Чтобы создать сетлист:
 Нажмите Новинки в правом верхнем углу.
- На появившемся экране левая половина — это список всех доступных ригов, а правая половина — это список ригов в сетлисте.
Чтобы добавить риг в сетлист, коснитесь его, чтобы добавить в конец списка. Либо нажмите и удерживайте его, а затем перетащите в нужное место в списке.
Вы можете добавить одну и ту же установку в сетлист несколько раз. [Пусто +] rig в нижнем левом углу — это слот, который можно использовать в качестве заполнителя, чтобы упростить перестановку сет-листа; он не будет доступен в качестве выбираемой установки при перемещении между установками в сетлисте.
Чтобы изменить сет-лист, нажмите и удерживайте буровую установку в списке справа, а затем перетащите ее в нужное место в списке.
Чтобы удалить риг из сет-листа, нажмите × на его правом краю.
Чтобы сохранить сетлист, нажмите Save. в правом верхнем углу.
 Чтобы сохранить изменения в текущем сетлисте, нажмите Сохранить.
Чтобы сохранить изменения в виде нового сет-листа, коснитесь «Сохранить новый сет-лист», используйте появившуюся клавиатуру для ввода имени, а затем коснитесь Сохранить.
(В любое время) Чтобы вернуться к предыдущему экрану без сохранения, нажмите Отмена.
Чтобы отменить любые изменения, внесенные вами в сетлист, нажмите ![]() в верхнем левом углу и нажмите «Отменить изменения».
в верхнем левом углу и нажмите «Отменить изменения».
Чтобы загрузить сетлист:
 В то время как viewНа главном экране нажмите кнопку ≡ в верхнем левом углу, чтобы view что собой представляет Сетлисты экран. В каждом сет-листе будет указано количество ригов.
в скобках (включая несколько экземпляров одной и той же установки).- Коснитесь желаемого сет-листа. Первая установка из этого сет-листа загрузится немедленно. Нажмите Все буровые установки в view все риги вместо определенного сет-листа.
Чтобы отредактировать сетлист, нажмите •••на левой стороне, а затем коснитесь значка карандаша. Вы увидите тот же экран, который вы использовали для создания сет-листа, где вы можете редактировать и сохранять его.
Чтобы удалить сетлист, нажмите ••• на левой стороне, а затем коснитесь значка корзины. Нажмите Да для подтверждения удаления или Отмена чтобы вернуться к экрану Setlists, не удаляя его.
Режим громкой связи
Режим громкой связи позволяет вам изменять любые настройки ваших моделей, используя только ножные переключатели и педаль экспрессии.
Чтобы войти в режим громкой связи, нажмите и удерживайте ножной переключатель 1 для перехода на страницу выбора режима, а затем нажмите и удерживайте ножной переключатель 1 снова.
Чтобы увеличить или уменьшить отображаемое значение, перемести епедаль xpression.
Чтобы уменьшить значение, отображаемое маленьким приращения, нажмите fвыключатель 1 и 2 (![]() ) одновременно.
) одновременно.
Чтобы увеличить значение, отображаемое маленьким приращения, нажмите педальные переключатели 2 и 3 (![]() ) одновременно.
) одновременно.
Чтобы отредактировать следующую модель в вашей установке, нажмите ножной переключатель 1.
Чтобы отредактировать предыдущую модель в вашей установке, держать ножной переключатель 1.
Чтобы показать следующий параметр для показанного модели, нажмите ножной переключатель 2.
Чтобы показать предыдущий параметр для показанного модели, держать ножной переключатель 2.
Чтобы выйти из режима громкой связи, нажмите ножной переключатель 3.
Тюнер / Темп
 Вы можете использовать страницу Tuner / Tempo, чтобы настроить гитару и установить темп для временных эффектов.
Чтобы войти в режим тюнера / темпа, нажмите и удерживайте педаль 3 более одной секунды. В режиме тюнера / темпа отображается экран справа.
Чтобы изменить опорную высоту тюнера, коснитесь параметра, а затем поверните энкодер.
Чтобы включить звук во время настройки, нажмите педальный переключатель 1.
Ввод темпа нажатием педали, нажмите ножной переключатель 2 в желаемом темпе 3–8 раз, чтобы установить темп в ударах в минуту (BPM).
Чтобы выйти из этой страницы, нажмите ножной переключатель 3.
Наконечник: Вы также можете назначить Tap Tempo на педальный переключатель в установке на странице Hardware Assign.
Looper
HeadRush MX5 имеет встроенный лупер, который можно использовать для наложения композиций. Хотя работа лупера отображается на дисплее, вы можете удобно управлять большей частью с помощью ножных переключателей.
Петлитель вмещает до 20 минут звука за раз не более 50 слоя. Первый слой вашей петли может быть до 5 минут долго.

Чтобы записать первый слой петли, нажмите Запись ножной переключатель. Запись начнется немедленно, и индикатор ножного переключателя загорится. красный цвет. Нажмите Запись снова нажмите педаль, чтобы остановить запись и начать воспроизведение петли. Теперь ножной переключатель называется Наложить и индикатор педального переключателя желтый.
Для записи дополнительных слоев на петлю (наложение), нажмите Наложить ножной переключатель.
Наложение начнется немедленно, и индикатор ножного переключателя загорится. красный цвет. Нажмите Наложить снова нажмите педаль, чтобы остановить наложение и продолжить воспроизведение.
Чтобы стереть самый верхний (последний добавленный) слой петли, нажмите и удерживайте Кожура ножной переключатель. Самый верхний слой петли будут немедленно удалены. Этот процесс деструктивен, поэтому вы не сможете повторно добавить его позже.
Чтобы очистить полный цикл, нажмите и удерживайте Очистить ножной переключатель.
Этот процесс остановит воспроизведение и является разрушительным, поэтому вы не сможете повторно добавить его позже.
Чтобы сократить или удвоить длину петли, нажмите кнопку рядом с полем Длина, а затем поверните
кодировщик. Процесс деления вдвое является неразрушающим, поэтому вы можете восстановить исходный цикл и его содержимое, удвоив длину цикла.
Чтобы уменьшить или удвоить скорость петлителя, нажмите кнопку рядом с Скорость поле, а затем
повернуть кодировщик.
Наконечник: Используйте это для создания низких басовых линий или ультравысоких гитарных партий, которые вы обычно не могли бы сыграть.
Для обратного воспроизведения лупера нажмите кнопку рядом с полем «Воспроизведение», а затем поверните кодировщик.
Совет: создавайте жуткие эффекты, записывая слои в обратном порядке, а затем возвращаясь к нормальному воспроизведению.
Чтобы установить местоположение петлителя, нажмите кнопку рядом с полем «Воспроизведение», а затем поверните кодировщик, чтобы поместить его перед (Pre) или после (Post) цепочки сигналов. Перемещение лупера в препозицию позволяет редактировать установку без необходимости повторять один и тот же рифф снова и снова.
Чтобы выйти из лупера и вернуться к основному экрану, нажмите педальный переключатель Exit. Если лупер играет, воспроизведение продолжится.
Чтобы снова войти в лупер, снова нажмите и удерживайте ножной переключатель лупера.
Совет: используйте эту функцию для создания различных конфигураций эффектов (настройки параметров, активации / деактивации моделей и т. Д.) Для каждого слоя, создавая многотекстурное исполнение. Вы также можете переключать оснастку при использовании петлителя и использовать различную оснастку для каждого слоя.
Глобальные настройки
Используйте глобальные настройки для настройки общей работы HeadRush MX5.
Чтобы отобразить глобальные настройки, нажмите кнопку • • • в правом верхнем углу экрана и нажмите «Глобальные настройки».
Чтобы выбрать каждую страницу глобальных настроек, коснитесь числа в правом верхнем углу экрана.

Яркость ЖК-дисплея: этот параметр определяет яркость основного дисплея. Коснитесь этого поля, поверните энкодер, чтобы выбрать от 1 (тусклый) до 5 (яркий), а затем нажмите энкодер.
Аудио конфигурация:
Вход буровой установки: Этот параметр определяет, будет ли входной сигнал каждой установки взят из Guitar Input (Guitar) или левого (L) Return Input (FX Ret L). Когда установлено значение Per Rig, источник определяется настройкой Rig Input для каждой установки в блоке Input. Когда установлено FX Ret L или Per Rig, настройка FX-Loop Stereo Return будет отключена; сигнал будет монофоническим.
Уровень основного выхода: Эта настройка определяет уровень сигнала, отправляемого на основные выходы (1/4 дюйма / 6.35 мм, TRS). Когда установлено значение Line, выходной уровень будет +18 дБн. Используйте эту настройку, если вы подключаете HeadRush MX5 к полнодиапазонному, плоскому отклику. ampлифтер, динамик PA, микшер или аудиоинтерфейс. При установке на Amp, выходной уровень будет +6 дБн. Используйте эту настройку, если вы подключаете HeadRush MX5 к традиционной гитаре. ampпожизненнее.
Уровень возврата FX: Эта настройка определяет уровень сигнала, принимаемого входом FX Return (1/4 дюйма / 6.35 мм, TRS). При установке на стойку выходной уровень будет линейным, +18 дБн. Используйте эту настройку, если вы подключаете рэковый процессор эффектов к FXLoop HeadRush MX5. При установке на Stomp выходной уровень будет +6 дБн. Используйте эту настройку, если вы подключаете к FX-Loop традиционную гитарную педаль («стомпбокс»).
Стерео петли эффектов: Эти настройки определяют, будет ли входящий и исходящий сигнал в петле эффектов стерео или моно. Нажмите «Отправить», чтобы включить или отключить стереосигнал для выходов отправки. Нажмите «Return», чтобы включить или отключить стереосигнал для возвратных входов.
Настройки звука USB:
Внимание: Загрузите полное руководство пользователя HeadRush MX5 с сайта headrushfx.com, чтобы узнать больше о настройке DAW.
Важное примечание для пользователей Windows: перед подключением Headrush MX5 к компьютеру загрузите и установите необходимые драйверы с headrushfx.com/support.
Sample Rate: этот параметр определяетampСкорость аудиосигнала USB: 44.1 кГц, 48.0 кГц или 96.0 кГц. Не забудьте выбрать те же sample rate как в вашей DAW. Кроме того, установите его перед открытием DAW.
USB Audio: этот параметр определяет, отправляет ли HeadRush MX5 аудиосигнал USB через соединение USB. Коснитесь Вкл., Чтобы включить отправку аудиосигнала USB с выбранным Sample Rate. Нажмите «Выкл.», Чтобы отключить аудиосигнал USB. (Чтобы изменить Sample Rate, сначала установите USB Audio на Off, выберите правильнуюampскорости, снова включите USB Audio и перезапустите DAW.)
Режим USB: этот параметр определяет, как HeadRush MX5 отправляет аудиосигнал через USB-соединение и как при этом работают его выходы:
- Live: аудиосигнал будет отправлен на ваш компьютер, а также на выходы HeadRush MX5.
- DAW: аудиосигнал будет отправлен только на ваш компьютер. Выходы HeadRush MX5 будут отключены, чтобы предотвратить задержку во время мониторинга.
- Reamp: Ваш компьютер отправит аудиосигнал в HeadRush MX5, который обработает его через текущую установку и отправит обратно на ваш компьютер. Выходы HeadRush MX5 будут отключены, чтобы предотвратить задержку во время мониторинга.
Конфигурация педали:
External Pedal: этот параметр определяет, используете ли вы внешнюю педаль экспрессии с HeadRush MX5.
- Коснитесь Вкл., Чтобы использовать встроенную педаль экспрессии для управления параметрами / параметрами банка A, в то время как внешняя педаль экспрессии управляет параметрами / параметрами банка B. (Если вы используете классический режим педали экспрессии, нажатие переключателя на носке активирует или отключите параметр. Если вы используете расширенный режим, выключатель будет полностью отключен.)
- Коснитесь Off, чтобы отключить вход педали экспрессии и использовать только встроенную педаль экспрессии.
Напоминания:
Подтвердить несохранение: Этот параметр определяет, будете ли вы видеть подтверждающее сообщение, если вы меняете буровую установку, в то время как в текущей есть несохраненные изменения. Нажмите «Вкл», чтобы включить эти сообщения, или «Выкл.», Чтобы отключить их.
Либо коснитесь Больше не показывать это диалоговое окно в самом сообщении, чтобы отключить их.

Настройки MIDI: Эти настройки определяют, как HeadRush MX5 отправляет и принимает MIDI-информацию на внешние устройства и от них. Эти настройки влияют только на MIDI-вход или MIDI-выход HeadRush MX5.
 MIDI через: Нажмите «Вкл.», Чтобы использовать выход MIDI в качестве пропускной способности MIDI; любая MIDI-информация, отправляемая на MIDI-вход HeadRush MX5, будет отправлена непосредственно на MIDI-выход. Нажмите Off, чтобы нормально использовать MIDI-выход HeadRush MX5; HeadRush MX5 сможет посылать собственную MIDI-информацию из MIDI-выхода.
Прием MIDI часов: Нажмите «Вкл.», Чтобы включить HeadRush MX5 для получения информации синхронизации MIDI. Нажмите Off, чтобы использовать собственные внутренние MIDI-часы HeadRush MX5 (которые не будут отправляться).
Изменение программы: Нажмите «Отправить», чтобы включить или отключить передачу HeadRush MX5 сообщений об изменении программы MIDI при загрузке оборудования. Нажмите Recv, чтобы включить или отключить прием сообщений изменения программы MIDI от внешнего MIDI-устройства HeadRush MX5.
MIDI-канал: Этот параметр определяет MIDI-канал (-ы), который HeadRush MX5 будет отправлять и получать MIDI-сообщения. Коснитесь этого поля, поверните кодировщик, чтобы выбрать все каналы (Omni) или 1–16, а затем нажмите кодировщик.
Назначение:
Автоматическое назначение: Этот параметр определяет, как модели назначаются переключателям. Нажмите «Вкл.», Если вы хотите, чтобы модели автоматически назначались следующему доступному переключателю при их загрузке. Нажмите «Выкл.», Если хотите, чтобы модели загружались без назначения переключателя; вам придется назначить их вручную на экране «Назначение оборудования».
Цветовой мод:
Если у вас возникли проблемы с различением определенных цветов на дисплее вашего MX5 или если вы просто хотите дополнительно настроить цветовую схему, вы можете использовать параметры цветовой модификации, чтобы изменить их настройки по умолчанию. Пока экспериментирую с настройками, так какampВаши настройки будут отображаться в режиме реального времени. Если вы хотите вернуться к цветовой схеме по умолчанию, настройки по умолчанию следующие:
| Глубина: 0% | Цвет: 36 градусов | Размах: 180 градусов |
Внимание: Функция Color Mod отключена, когда включена функция блокировки экрана.
Глобальный эквалайзер:
Эти настройки на странице 2 определяют, применяется ли / как эквализация для ваших выходов. Этот эквалайзер представляет собой четырехполосный параметрический эквалайзер.
Совет: эти настройки особенно полезны, когда место проведения, репетиционное пространство и т. Д. Имеет акустические характеристики, отличные от помещения, в котором вы изначально создали свои пресеты (например, место проведения может казаться более громоздким, или репетиционное пространство со звукоизоляцией может ослабить некоторые из высокие концы). Эта страница позволяет вам быстро применить некоторую дополнительную коррекцию ко всем вашим пресетам без их постоянного сохранения.

Эквалайзер включен: Этот параметр определяет, включена ли коррекция (Вкл.) Или отключена (Выкл.) Для выходов.
Уровень: этот параметр определяет, будет ли / насколько усилен или уменьшен уровень выходного аудиосигнала. Это значение применяет уровень, установленный ручкой Master.
Полоса низких и высоких частот: Эти настройки определяют, какой тип коррекции применяется к полосе самых низких частот (полоса низких частот) и полосе самых высоких частот (полоса высоких частот): полка или обрезка.
Низкий, низкий средний, высокий и высокий средний: Три настройки для каждой из этих четырех частотных полос определяют форму эквализации:
Первая настройка (Гц) определяет центральную частоту диапазона низких частот, диапазона низких-средних частот, диапазона высоких частот или диапазона высоких-средних частот. Вторая настройка (дБ) определяет, насколько эквалайзер усиливает или ослабляет сигнал в соответствующей полосе частот.
Третья настройка (Q) определяет ширину полосы частот. Чем выше настройка, тем шире будет полоса вокруг центральной частоты (первая настройка). Этот параметр применяется независимо от того, установлен ли диапазон низких или высоких частот на полку или обрезку.
Передающий Files & Настройки
Через USB-соединение вы можете передавать установку, сетлист, предустановку модели, петлю и / или импульсную характеристику (IR). files между вашим компьютером и HeadRush MX5.
Мы рекомендуем создать резервную копию вашего files на свой компьютер, прежде чем вносить какие-либо изменения.
важно:
Не отключайте и не выключайте HeadRush MX5 во время процесса.
Любые неподдерживаемые files будут проигнорированы.
Вы не можете передать папку или папку .zip / архив в / из HeadRush MX5. Вместо этого перенесите все поддерживаемые fileнапрямую.
Рекомендуем организовать file структура ваших ригов, сетлистов, пресетов моделей и / или импульсной характеристики files на вашем компьютере, чтобы он был идентичен file структура, как показано на «диске» HeadRush MX5.

Перевести files между HeadRush MX5 и вашим компьютером:
- Подключите компьютер к USB-порту HeadRush MX5 с помощью стандартного USB-кабеля.
- Включите компьютер и включите HeadRush MX5 с помощью выключателя питания.
- Нажмите кнопку • • • в правом верхнем углу экрана, а затем нажмите «Глобальные настройки».
- На экране «Глобальные настройки» нажмите кнопку • • • в правом верхнем углу экрана и нажмите «Передача по USB». На вашем компьютере HeadRush MX5 появится как запоминающее устройство под названием HeadRush. Пользователи Windows: если вы впервые подключаете его к этому компьютеру, возможно, вам придется подождать минуту, пока он установит драйверы, соответствующие классу.
- Откройте диск HeadRush. Теперь вы можете свободно щелкать и перетаскивать содержимое между HeadRush и вашим компьютером. Обратите внимание, что любые изменения, которые вы вносите в содержимое HeadRush, вносятся немедленно и не могут быть отменены.
- ВАЖНО: Когда вы закончите перенос содержимого, вы должны отключить / извлечь диск HeadRush из вашего компьютера. File повреждение может произойти, если диск не будет должным образом извлечен перед продолжением.
- После извлечения диска нажмите «Синхронизация» на HeadRush MX5, чтобы «зафиксировать» любые изменения, внесенные вами в содержимое диска HeadRush. Появится дополнительная подсказка, подтверждающая, что вы извлекли диск. Нажмите «Продолжить», чтобы продолжить, или «Отмена», чтобы продолжить доступ. files на вашем компьютере.
Поскольку HeadRush MX5 анализирует и импортирует files, индикатор на дисплее покажет его ход. По завершении процесса снова появится обычный экран глобальных настроек. Не отключайте и не выключайте HeadRush MX5 во время процесса синхронизации.

Инструкции по обновлению прошивки
- Подключите USB-порт на устройстве HeadRush к компьютеру и убедитесь, что устройство HeadRush и ваш компьютер включены.
- На устройстве HeadRush коснитесь значка ••• в правом верхнем углу и коснитесь «Глобальные настройки».
- На экране «Глобальные настройки» снова коснитесь значка ••• в правом верхнем углу и коснитесь «Обновление прошивки». На появившемся экране нажмите OK, чтобы продолжить. После перезапуска в нижней части экрана отобразится «Обновление».
- Откройте приложение HeadRush Updater для своей операционной системы — Windows или macOS. (Вы можете загрузить последнюю версию приложения для обновления с сайта headrushfx.com)
- Когда появится окно программы обновления, нажмите «Обновить HeadRush». Не отключайте и не выключайте устройство HeadRush или компьютер до завершения обновления.
- Когда обновление будет завершено, в окне программы обновления отобразится «Готово», и ваше устройство HeadRush перезагрузится. Щелкните Готово, чтобы закрыть окно программы обновления.
- Убедитесь, что на вашем устройстве Headrush установлена последняя версия микропрограммы: нажмите значок ••• в правом верхнем углу и нажмите «Глобальные настройки». Версия прошивки появится внизу экрана.
Приложение
Технические спецификации
| Ножные переключатели | (3) педальные переключатели с цветными светодиодами |
| Knobs | (1) регулятор общей громкости на 300 ° (1) 360 ° навигация / кодировщик данных |
| Монитор | (1) полноцветный дисплей со светодиодной подсветкой и сенсорным интерфейсом 4 мм (по диагонали) |
| Соединители | (1) моно вход 1/4 дюйма (6.35 мм) (гитара) (1) вход TRS 1/4 дюйма (6.35 мм) (педаль экспрессии) (1) стереовыход 1/4 дюйма (6.35 мм) (отправка) (1) стереовход 1/4 дюйма (6.35 мм) (возврат) (2) 1/4 ″ (6.35 мм) симметричный выход (основной) (1) 1/8 ″ (3.5 мм) стереовыход (наушники) (1) стереовход 1/8 ″ (3.5 мм) (вспомогательное устройство) ( 1) выход MIDI 1/8 дюйма (3.5 мм) (1) вход MIDI 1/8 дюйма (3.5 мм) (1) порт USB типа B (1) Вход адаптера питания постоянного тока |
| Питания | Подключение Вход адаптера питания постоянного тока |
| Vol входtage 12 В постоянного тока, 3.0 А, центрально-положительный | |
| Размеры (ширина x глубина x высота) |
2.75 ″ x 11.6 ″ x 7.6 ″ 70 x 295 x 195 мм |
| Вес | 3.46 фунтов. 1.57 кг |
Торговые марки и лицензии
HeadRush — товарный знак inMusic Brands, Inc., зарегистрированный в США и других странах. Avid и Eleven являются зарегистрированными товарными знаками Avid Technology, Inc. в США и других странах. Все другие названия продуктов, названия компаний, товарные знаки или торговые наименования являются собственностью их соответствующих владельцев.
headrushfx.com
Версия руководства 1.4
Документы / Ресурсы
Рекомендации
HEADRUSH MX5 Manual

Introduction
Box Contents
HeadRush MX5
USB Cable
(2) 1/8″ (3.5mm) to MIDI Adapters
Power Adapter
Software Download Card
Quickstart Guide
Safety & Warranty Manual
Support
For the latest information about this product (documentation, technical specifications, system requirements, compatibility information, etc.) and product registration, visit headrushfx.com.
For additional product support, visit headrushfx.com/support.
Features
Top Panel

- Display: This full-color multi-touch display shows information relevant to HeadRush MX5’s current operation. Touch the display (and use the hardware controls) to control the interface. See Operation to learn how it works.
- Main Volume: Turn this knob to adjust the volume level of the outputs.
- Encoder: Turn this encoder to scroll through the available menu options or adjust the parameter values of the selected field in the display. Push the encoder to confirm your selection.
- Footswitch Indicators: These lights indicate whether the stomp, rig, or scene assigned to each footswitch is on (brightly lit) or off (dimly lit).
- Footswitches: Press these footswitches to activate or deactivate the assigned model or scene, or to load the assigned rig.
- Expression Pedal: Use this pedal to adjust the assigned parameter/parameters. See Operation >Hardware Assign > Expression Pedal for more information.
Rear Panel

- Guitar Input (1/4″/6.35 mm, mono): Connect your guitar to this input using a standard instrument cable.
- Expression Pedal Input (1/4″/6.35 mm, TRS): Connect an optional additional expression pedal to this input using a standard 1/4″ (6.35 mm) TRS cable.
- FX Send Output (1/4″/6.35 mm, stereo): Connect this output to the input of another effects module, an effect pedal, or the effects loop return of an amplifier.
- FX Return Input (1/4″/6.35 mm, stereo): Connect this input to the output of another effects module, an effect pedal, or the effects loop send of an amplifier.
Note: You can set the FX Return Input to receive signal at rack level or stomp level (default) in the Global Settings Menu. - Outputs (1/4″/6.35 mm, balanced): Connect these outputs to the inputs of your amplifier, audio interface, etc. If you only need to use one output, use the one labeled Left/Mono.
Note: You can set these outputs to send signal at amp level or line level (default) in the Global Settings Menu. - Phones Output (1/8″/3.5 mm, stereo): Connect standard 1/8″ (3.5 mm) stereo headphones to this output.
- Aux Input (1/8″/3.5 mm, stereo): Connect an optional audio source (e.g., smartphone, tablet, etc.) to this input using an 1/8″/3.5 mm stereo cable.
- MIDI Output (1/8″/3.5 mm): Use the included 1/8″-to-MIDI adapter and a standard MIDI cable (not included) to connect this output to the MIDI input of an optional external MIDI device.
- MIDI Input (1/8″/3.5 mm): Use the included 1/8″-to-MIDI adapter and a standard MIDI cable (not included) to connect this input to the MIDI output of an optional external MIDI device.
Do not connect audio devices (e.g., headphones, monitors, etc.) to the MIDI Output or MIDI Input. Use the included 1/8″-to-5-pin adapters to connect MIDI devices only. - USB Port: Connect this USB port to a computer using a standard USB cable. This connection allows HeadRush MX5 to send and receive the digital audio signal to and from your computer. You can also use this connection to import or export rigs, model presets, setlists and impulse responses.
- Power Input: Connect this input to a power outlet using the included power adapter.
- Power Switch: Press this button to turn HeadRush MX5’s power on. Press and hold this button to turn HeadRush MX5’s power off.
- Vent: Make sure this vent is unobstructed while using HeadRush MX5.
Setup
Items not listed under Introduction > Box Contents are sold separately.
In the Global Settings Menu, make sure you set the Outputs to send signal at amp level if you are using a traditional guitar amplifier, or line level (default) if you are using a full-range flat-response amplifier, mixer, PA speaker or audio interface.

Operation
This chapter describes some of HeadRush MX5’s basic functions.
Main Screen
Overview

- Turn encoder to move through selectable items onscreen or to adjust parameters. Press encoder as an Enter command.
- Tap to view setlists.
- Rig name.
- Tap and drag this bar downward to view list of rigs.
- Tap to save rig.
- This button toggles between the different routing options for a rig.
- This button enables or disables reverb and delay tails when switching to another rig.
- These three blocks show the current function of the three footswitches.
- Tap its footswitch to activate or deactivate it.
- Double-tap a model, In, or Out to show its parameters.
Basic Operations
The sequence of models in your signal chain is not necessarily reflected in the footswitches. You can freely assign models to available footswitches without changing your signal chain at all—and vice versa. See Hardware Assign to learn about this.
To assign a model (amp, cab, impulse response, or effect) to an empty slot, tap it (+) and then use the list that appears. See Rigs > Creating a New Rig to learn about this. 
To rearrange the models in your signal chain, tap and drag a model to another slot or between two other models (the ones after that position will shift one slot further down the signal chain).
To activate or deactivate a model, press the footswitch assigned to it, or tap the model and then tap the On/Off button that appears in the top right corner.

To switch an amp and/or cab between a dual and single configuration, tap the model and then tap the X 2 button that appears in the top right corner.
To show a model’s settings screen, double-tap it.
To load another rig (preset):
- Tap the name of the rig on the screen and then turn the encoder.
- Press footswitches 1 and 2 (s), or footswitches 2 and 3 (r) simultaneously when MX5 is in Stomp Mode.
- Press a footswitch assigned to a preset when MX5 is in Rig Mode.
- Press a footswitch assigned to Prev Rig or Next Rig when MX5 is in Hybrid Mode.
To create a new rig, tap the ••• button in the upper-right corner, and then tap New Rig.
To rename the current rig, double tap the rig name, or tap the ••• button in the upper-right corner, and then tap Edit Rig Name.
To delete the current rig, tap the ••• button in the upper-right corner, and then tap Delete Rig, and then tap Yes to continue or No to cancel.
To show a list of available rigs on your HeadRush MX5, tap the rig name and drag downward. On this list you can tap a rig’s name to load it. 
To hide this list, tap the current rig name and drag upward.
Note: If you have not selected a setlist, all rigs on your HeadRush will be shown on this rig list. If you have selected a setlist, only the rigs from that setlist will appear on this rig list.
To search for a rig on your HeadRush, tap the magnifyingglass icon in the upper-left corner and use the virtual keyboard that appears to enter a search term (e.g., part of the rig name). The results will appear below. Tap a result to load that rig. 
Reverb/Delay Tail Spillover
The MX5 features two types of Reverb/Delay Tail Spillover:
- If you have reverb and/or delay effect(s) active on your rig and then switch to a different rig, the effect(s) will continue to decay after switching to the second rig.
- If you have a reverb or delay effect active on your rig and then bypass this effect, it will continue to decay after it is bypassed.
To enable or disable this feature for the current rig, tap Tail on the Main Screen. 
Note: This feature will not work if you are using the FX Loop or USB Audio features.
To enable or disable Reverb/Delay Tail Spillover for an individual effect, first double tap the effect on the Main Screen. Then, use the Tails parameter to toggle the feature On or Off. 
Note: Adjusting this parameter will not impact the Reverb/Delay Tail Spillover setting for the whole rig.
Signal Path
You can easily reconfigure the path of your signal chain to split, which will create more complex routings.
To reconfigure the signal path, tap  toward the top right of the main screen. The icon will change to match one three possible signal paths (as shown below).

 This straight signal path is the default and the most common.

 This signal path splits in the middle and rejoins near the end. This configuration is useful if you want to use two types of effects (or chains of effects) but want to keep their signals separate.
See Adjusting Settings> Parameters > Mix to learn how to mix the split paths together.

 This signal path splits immediately from the source and rejoins near the end. Like the second configuration, this one is useful for using two types of effects (or chains of effects independently, but it allows for more models in the split paths and the rejoined one).
See Adjusting Settings> Parameters > Mix to learn how to mix the split paths together.
Stereo vs. Mono
The outgoing signal from the HeadRush MX5 can be mono or stereo, depending on the models in your rig, the signal path, and which outputs you are using. An indicator near the end of the signal path indicates the current configuration.
The signal will be stereo if you do any one of the following:
- Use any stereo effect model in your signal chain. Even if you have placed mono effect models after it. (This is possible because the mono effect is simply applied identically to both channels and not summed).
- Use a split signal path, even if the split paths rejoin before the output.
- Use a double-amp and/or double-cab configuration (i.e., if 2X is on).
The signal will be mono if you do all of the following:
- Use no stereo effect models in your signal chain.
- Use the linear (not split) signal path.
- Use only single-amp and single-cab configurations, if you use an amp or cab model at all.
Alternatively, the signal will be mono if you do any one of the following:
- Use only the L/Mono output (of a stereo pair) on the rear panel.
- Reduce the Rig Width output setting to 0%.
To adjust the width of the stereo field, tap the Out icon at the end of your signal path, and turn the third parameter knob to adjust the Rig Width output setting. This affects stereo signals only, not mono signals. 100% uses the full stereo field, while 0% produces a mono signal.
Footswitch Modes
The three footswitches can be used to activate or bypass models (amps, cabs, impulse responses, or effects) as well as select scenes, rigs, or setlists. These footswitches are always in one of four modes: Stomp, Rig, Hybrid, or Setlist. 
To change the mode, hold footswitch 1, then:
- To select Stomp mode, press footswitch 1
- To select Rig mode, press footswitch 2
- To select Hybrid mode, press footswitch 3
- To select Setlist mode, hold footswitch 2
Stomp Mode
Footswitches 1-3 correspond to models (amps, cabs, or effects) in your signal chain. Press a footswitch to activate or deactivate its model.
To load the next rig, press footswitches 1 and 2 (s) simultaneously.
To load the previous rig, press footswitches 2 and 3 (r) simultaneously.
Rig Mode
Footswitches 1-3 correspond to rigs you have previously saved. Press a footswitch to load its rig.
To show the next bank of three rigs, press footswitches 1 and 2 (s) simultaneously.
To show the previous bank of three rigs, press footswitches 2 and 3 (r) simultaneously.
Hybrid Mode
The first footswitch can be assigned to activate/deactivate a model or to select a scene in the currently selected rig.
To switch to the previous rig, press footswitch 2.
To switch to the next rig, press footswitch 3.
Setlist Mode

To enter the currently shown setlist, press footswitch 1.
To show the previous setlist, press footswitch 2.
To show the next setlist, press footswitch 3.
To enter the All Rigs setlist, press and hold footswitch 1.
Rigs
While using HeadRush MX5, a rig is a preset: the combination of assigned models—the amps, cabs, impulse responses, and effects—and the parameter settings of each of them. You can create, edit, save, and load rigs, making it easy to recall the perfect sound for each part of your performance.
Each rig has 11 slots, each of which can have one model (amp, cab, or effect) assigned to it. Assigned slots will show graphical representations of the models, and empty slots will show a + symbol.
Creating a New Rig
To create a new rig, tap the ••• button in the upper-right corner of the screen, and tap New Rig.
To assign a model (amp, cab, or effect) to an empty slot:
- Tap the empty slot (+).
- In the list that appears, tap the type of model you want to assign: Amp, Cab, IR (impulse response), or effect (Distortion, Dynamics/EQ, Modulation, Reverb/Delay, FXLoop, or Expression).
- In the list that appears, tap the model you want to assign.

- In the next list that appears, tap the preset you want to load for that model.
If you load an amp or cab to a slot with an empty adjacent slot, a matching amp or cab will be loaded automatically to the other slot. After that, you can configure them independently: you can separate them in the signal chain, you can change the type of the amp or cab, and you can delete each model separately.
Optimizing Your Signal Chain
The signal chain is the path that the audio signal follows from your guitar through your selected models and ends at the outputs of HeadRush MX5. You can use the touchscreen to arrange your selected models in any sequence, but you may find that some configurations will sound better than others.
Here are some common model placement suggestions for creating tones with HeadRush MX5:
- Dynamics (e.g., compressors), filters (e.g., wah, pitch shifters), and volume pedals generally are placed at the beginning of the signal chain. Alternatively, you can place volume pedals at the end of the signal chain to provide a slight variance in functionality.
- Gain-based effects (e.g., overdrive/distortion, fuzz) usually come next.
- Equalization (EQ) is often used to shape the tonal characteristics of overdrive/distortion and fuzz effects, so put an EQ after them. Alternatively, place it before them to shape the guitar’s general tone—cutting unwanted frequencies—before the gain pedals.
- Modulation effects like flangers, phasers, and chorus are typically placed next.
- Time-based effects like delays and reverbs are generally placed near the end of the signal chain.
- An amp and a cab (or an amp and impulse response) are often placed at the very end of the signal chain, although you can place it wherever you want.
Saving a Rig

If you have made certain changes to the rig at all since loading it, you will see an asterisk ( ) next to its name at the top of the screen. You will see an asterisk if you have done any of the following:
- Assigned a model to the rig
- Deleted a model from the rig
- Moved a model in the signal chain
- Changed a model’s preset (see Adjusting Settings to learn more)
- Made any change in the Hardware Assign screen (see Hardware Assign to learn more)
Activating or deactivating a model or using the expression pedal on any screen will not cause the asterisk to appear.
You can save these changes to this rig, save these changes as another rig, or discard them altogether.
To save a rig, tap Save in the upper-right corner. The prompt shown left will appear.
To save your changes to the current rig, tap Save.
To save your changes as a new rig, tap Save New Rig, use the keyboard that appears to enter a name, and then tap Save.
To return to the previous screen without saving, tap Cancel at any time.
To discard any changes you’ve made to the rig, tap the ••• button in the upper-right corner, and tap Discard Changes.
If the asterisk is shown and you try to load a different rig, you will be asked to select one of these options:
- Cancel: This option returns to the previous screen without saving the current rig or loading a new rig.
- Save as a New Rig: This option lets you save the current rig as a new rig. In the screen that appears, use the keyboard that appears to enter a name, and then tap Save. That rig will be saved, and the new rig will load.
- Save: This option saves any changes you made to the rig and then loads the new rig.
- Discard Changes: This option loads a new rig without saving any changes to the previous rig.
Deleting a Rig
To delete the current rig, tap the ••• button in the upperright corner, tap Delete Rig, and then tap Yes to continue or No to cancel. 
Note: Select Do not show this dialog again in the message to disable these confirmation messages. You can re-enable them in the Global Settings screen.
Adjusting Settings
To adjust the settings of an item in your rig, double-tap it to open its settings screen. You can adjust the settings of any model (amp, cab, or effect), the input (the In/Lock icon), the output (the Out icon), or mix (the Mix icon).
Overview

- Turn encoder to move through selectable items onscreen or to adjust parameters. Press encoder as an Enter command.
- Tap
 to return to retain your changes and return to the main screen.
 - Tap the Preset menu to select a preset.
- See Saving a Block Preset.
- Tap this button and tap Discard Changes to discard any changes you’ve made since opening this screen.
- Tap an Off/On parameter button to change the parameter’s setting accordingly.
- Tap and drag a slider left and right to adjust the parameter’s settings. Alternatively, tap the slider and use the encoder for fine adjustments.
- Tap Cancel to return to discard your changes and return to the main screen.
- Tap a color to assign it to this model. That color will be shown on the main screen, in the Hardware Assign screen, and in the footswitch indicator for this model.
- Tap Delete to unassign the model from the slot.
- Tap the model name to assign a different model to this slot.
Parameters
These are some of the parameters that you can adjust for each type of rig item. The types include amps, cabs, effects, input settings, output settings, and mix settings (if you are using a split signal path). See Saving a Block Preset to learn how to save your preset after adjusting its parameters.
Amp
The Amp category is a list of popular guitar amplifiers.
Preset: This is the current amp preset, which includes the model, all its settings, and its color assignment.
Model: This is the amp model.
Amp Settings: These are the settings for the selected amp model (different models may have more or fewer settings).
Cab Link: This setting determines whether a specific cab and microphone are associated with the amp. When set to Off, any cab and microphone used in the current rig will be completely independent of the amp you select. When set to On, a specific cab and microphone combination will be used if you change the amp’s Preset setting or if you load a new amp to the rig. You can still change the cab and microphone manually afterward by adjusting the parameters of the cab model.
Color: This is the assigned color, which will appear in the Hardware Assign screen and the switch indicator if the amp is assigned to a switch.
Cab
The Cab category is a list of popular amp cabinets, which contain the speakers. The HeadRush MX5 recreates not only the sound of the cabinet but also the type of microphone recording it.
Preset: This is the current cab preset, which includes the model, all its settings, and its color assignment.
Cab Type: This is the cab type. Numbers notated as _X__ indicate the number of speakers it has and the size of each speaker (e.g., 2X12 denotes a cab with two 12-inch speakers, 4X10 denotes a cab with four 10-inch speakers). Numbers notated as __W indicate the emulated wattage (output power) of the speaker.
Mic Type: This is the type of microphone being used on the cab. You can select different models of dynamic (Dyn), condenser (Cond), or ribbon (Ribbon) microphones.
Mic Settings: These are the settings for the microphone:
Break Up: This determines the amount of speaker «breakup»—the natural distortion that occurs when the audio signal overdrives the speaker.
On-Axis: This determines the microphone position relative to the cab. On-axis placement (On) positions the microphone at the center of the speaker, usually resulting in a brighter sound with more definition. Offaxis placement (Off) is slightly offset at and angle from the center of the speaker and often sounds darker in tone.
Out Gain: This is the cab’s output gain level.
Color: This is the assigned color, which will appear in the Hardware Assign screen and the switch indicator if the cab is assigned to a switch.
IR
The IR category contains factory-loaded and user-loaded impulse response files. The HeadRush MX5 supports all. WAV format impulse response files with sample rates up to 192 kHz, bit depths up to 32-bit, and sample lengths up to 2,048 samples. 
Preset: This is the current IR preset, which includes the impulse response, all its settings, and its color assignment.
Folder: This is the folder containing your IR files. IRs can be organized into folders by creating a folder on your Mac or PC while using the USB Transfer Mode. IRs generally have a very small file size, so the MX5 can store thousands of IRs at once.
IR File: Once you have selected a folder above, you can select a specific IR file here.
Gain: Adjusts the overall volume level of the IR.
HiCut and LoCut: These settings adjust the high-end and low-end of the IR tone, respectively.
Mix: This setting adjusts the mix of between the incoming signal and the IR.
Note: While using the model selector to add a block, you can load a full 2,048 sample impulse response by selecting IR, or a truncated 1,024 sample IR by selecting IR 1024. For the highest quality sound, use the 2,048 sample IR type. To save DSP power for adding more effects to your rig, use the 1,024 sample IR type.
Effects
There are several types of available effects. Their adjustable settings depend on the type of effect.
In
These input settings control the signal into the models of your rig:
Preset: This is the current input preset, which includes its settings on the right edge of the display and its locked/ unlocked state.
Parameters: This menu determines whether these input settings are locked or unlocked.
When unlocked, the settings will change to the new rig’s input settings each time you load a new rig. The lock icon on the main screen will be grey.
When locked, the settings will be retained as «global» input settings, regardless of the rig. The lock icon on the main screen will be red.
Rig Input: This setting determines whether the rig’s input signal is taken from the guitar input (Guitar) or the left (L) return input (FX Ret L). This menu is shown only when Rig Input is set to Per Rig in the global settings (see Global Settings to learn about this).
Input Level Meter: This level meter indicates the current level of your input signal before the input controls shown on this screen.
Gain: This setting controls the gain level of the signal sent from your guitar into your rig. The available range is -60.0 to 12.0 dB.
Gate Thrsh (Threshold): This setting controls the signal level required to open the noise gate, enabling the guitar signal to be sent to the rig. The available range is -120.0 to 0.0 dB. The threshold is represented by a white line on the input level meter.
Gate Rel (Release): This setting controls the amount of time it will take for the noise gate to close once the incoming guitar signal stops. The available range is 1–3000 ms.
USB Level: This setting controls the level of the audio signal sent from your computer to the HeadRush MX5 over a USB connection. The available range is -60.0 to 12.0 dB.
Out
These output settings control the signal sent to the HeadRush MX5 outputs:
Preset: This is the current output preset, which includes its settings on the right edge of the display.
Rig Output: This level meter indicates the current level of your output signal after the output controls shown on this screen. You can set which outputs will send this signal in the Global Settings screen.
Alternate Output: This level meter indicates the current level of your output signal. You can set which outputs will send this signal in the Global Settings screen. The To Amp Gain settings controls the level of this signal unless the Alternate Output source is set to Rig Input.
Rig Vol (Volume): This setting controls the level of the audio signal sent from the outputs. The available range is -60.0 to 36.0 dB.
To Amp Gain: This setting controls the gain level of the signal for the Alternate Output, unless the Alternate Output source is set to Rig Input. See Global Settings to learn about this. The available range is -60.0 to 12.0 dB.
Rig Width: This setting controls how much of the stereo field the output signal uses. 100% uses the full stereo field, while 0% produces a mono signal. This affects stereo signals only, not mono signals. See Main Screen > Stereo vs. Mono to learn how the HeadRush MX5 handles stereo and mono signals.
Mix
These settings control mix of a split signal path. This is available only for rigs with split signal paths (see Main Screen > Signal Path to learn more):
Preset: This is the current mix preset, which includes its settings on the right edge of the display.
A Lev / B Lev (Level): These settings control the volume levels the upper (A) and lower (B) branches of the signal path. The range is -60.0 dB to +12.0 dB.
A Pan / B Pan: These settings control the panning (position in the stereo field) the upper (A) and lower (B) branches of the signal path. The range is -100% to +100%.
A/B Delay: This setting controls a timing offset between the upper (A) and lower (B) branches of the signal path. The range is -30000μs to +30000μs. If the value is negative (—), the A branch is delayed. If the value is positive (+), the B branch is delayed.
Saving a Block Preset
To save a block preset, tap Save in the upper-right corner.
To save your changes to the current block preset, tap Save.
To save your changes as a new preset, tap Save New Preset, use the keyboard that appears to enter a name, and then tap Save.
To return to the previous screen without saving, tap Cancel at any time.
Hardware Assign
The Hardware Assign screen enables you to customize how HeadRush MX5’s footswitches and an expression pedal control each rig.
To open the Hardware Assign screen, tap the ••• button in the upper-right corner of the main screen, and then tap Hardware Assign.
To return to the main screen, tap the button in the upper-left corner.
The Hardware Assign settings are all part of the overall rig, so remember to save your changes you want to keep.
To set the color associated with the rig, tap it in the upper-left part of the screen. This color will appear next to the rig name when you view a list of all available rigs or when you view and create setlists. It will also be the color of the corresponding footswitch indicator when the HeadRush MX5 is in Rig Mode.
To set the tempo of the rig’s time-based effects (delays, modulation, etc.), tap the button under Tempo to select Current or Fixed.
Current: The rig will use the last-used tempo or the one set by the Tempo footswitch.
To set the tempo, press the Tempo footswitch at the desired tempo 3–8 times to set the new tempo in beats per minute (BPM).
Fixed: The rig will use a tempo that you set here.
To set the tempo, turn the encoder to set the desired tempo in beats per minute (BPM). You can set the tempo only in this Hardware Assign screen.
To load a rig when a MIDI program change is received from an optional external MIDI device, or to send a MIDI program change message when a rig is loaded, tap the button under MIDI, and then turn the encoder to select a MIDI program change number. You can adjust whether MIDI program changes are received and/or sent in the Global Settings menu.
Note: If a rig is using a number, that number will be unavailable and cannot be assigned to another rig. Additionally, saving a rig with a new name will save the rig but without the program change number to prevent rigs from sharing the same number.
Footswitches
The 3 boxes in the lower-left corner represent the 3 footswitches of HeadRush MX5. You can assign any switchbased parameters (ones with only two states) to any of the footswitches—regardless of their location in the signal chain.
To assign a parameter to a footswitch:

- Tap a box. + indicates an empty box.
- In the list that appears, tap the model with the parameter you want to assign.
- In the list that appears, tap the parameter you want to assign. Usually, the parameter will simply be On (to activate or deactivate it).
Tap Unassigned x to unassign that footswitch.
To swap two assignments, tap and drag one of them over the other, and then release it.
Scenes
The Scene feature allows you to turn multiple models on or off in each rig, as well as select different change model presets. When you press the footswitch assigned to that scene, all models included in that scene will turn on or off, or change to a different preset, depending on how you assign them. This is a great way to create multiple tones in the same rig. For instance, you may want a particular reverb model to be on anytime a particular distortion model is also on. Alternatively, you may want to turn one delay model off when you turn another one on. Scenes enable you to do this with only one footswitch press.
To create and edit a scene:

- On the Hardware Assign screen, tap Toggle/Scene for the desired footswitch to cycle through the available options, and select Scene.
- On that model, tap Edit. The Scene Editor will appear, which shows all models in your rig.
- For each model in the rig, tap the first line of text to cycle through the available options:
- On: This model will turn on when you turn the scene on.
- Off: This model will turn off when you turn the scene on.
- No Change: This model will remain unaffected when you turn the scene on.
- For each model in the rig, tap the second line of text to configure a model preset to be loaded when the scene is activated.
- Tap a color at the top of the touchscreen to select a color for the scene.
- Tap the button in the upper-left corner to return to the Hardware Assign screen.
To rename a scene (which appears in the footswitch indicators), tap the text in the box below Edit on the model, use the virtual keyboard that appears to enter a name, and then tap anywhere other than the text field.
Expression Pedal
The expression pedal can control two parameters (in Classic Mode) or two sets of parameters (in Advanced Mode). Use the toe switch to switch between them—Expression Pedal A or B.
To activate the toe switch, move the «toe end» of the expression pedal so it touches the MX5, and then press down.
Note: When you save your rig, the current selected Expression Pedal state (A or B) will be saved and then recalled when you load the rig again.
The column of four boxes represents the expression pedal settings. You can assign one or more continuously adjustable parameters (ones with a range of values) to the expression pedal.
To set the expression pedal mode, tap the button above Range in the upper-right corner to select Classic or Advanced.
- Classic: You can assign one parameter to each expressional pedal (A and B). Using the toe switch will select the other expression pedal and deactivate (bypass) the current expression pedal’s parameter. For instance, if you assign a wah pedal to Expression Pedal A and a volume pedal to Expression Pedal B, only one of them will be active at any time; when you are controlling the wah pedal, the volume pedal will be bypassed, and vice versa.
- Advanced: You can assign up to four parameters to each expression pedal (A and B). Moving the pedal will adjust all of its assigned parameters simultaneously. Using the toe switch will select the other expression pedal and leave the current pedal’s parameters active and at their maximum values.
To assign a parameter to the expression pedal:

- If the Assign button is not on, tap it.
- Tap a box under the Assign button. + indicates an empty box.
- In the list that appears, tap the model with the parameter you want to assign.
- In the list that appears, tap the parameter you want to assign.
Tap Unassigned x to unassign that box.
To swap two assignments (while in Advanced Mode), tap and drag one of them over the other, and then release it.
To set the range of an assigned parameter:

- If the Range button is not on, tap it.
- Tap a value under the Range button.
- Turn the encoder to set the desired value as a percentage of the parameter’s entire range. Press the encoder or tap elsewhere to confirm the value.
Setlists
You can use setlists to organize your rigs. A setlist is a saved collection of rigs, which you can save and recall at a later time. This is useful, for instance, if you only need some of your rigs for a performance; you can save a setlist of just those rigs so you don’t have to spend time searching through all of your rigs before playing the next song.
To view your setlists, tap the  button in the upper-left corner of the main screen. The Setlists screen will appear.
To return to the main screen, tap the button in the upper-left corner.
To create a setlist:

- Tap New in the upper-right corner.
- In the screen that appears, the left half is a list of all available rigs, and the right half is the list of rigs in the setlist.
To add a rig to the setlist, tap it to add it to the end of the list. Alternatively, tap and hold it, and then drag it to the desired location in the list. You can add the same rig to a setlist more than once. The [Empty +] rig in the lower-left corner is a slot to use as a placeholder to make rearranging the setlist easier; it will not be available as a selectable rig when moving through rigs in the setlist.
To rearrange the setlist, tap and hold a rig in the list on the right half, and then drag it to the desired location in the list.
To remove a rig from the setlist, tap the x on its right edge.
To save a setlist, tap Save in the upper-right corner.
To save your changes to the current setlist, tap Save.
To save your changes as a new setlist, tap Save New Setlist, use the keyboard that appears to enter a name, and then tap Save.
(At any time) To return to the previous screen without saving, tap Cancel.
To discard any changes you’ve made to the setlist, tap the button in the upper-left corner, and tap Discard Changes.
To load a setlist:

- While viewing the main screen, tap the ≡ button in the upper-left corner to view the Setlists screen. Each setlist will show the number of rigs in parentheses (including multiple instances of the same rig).
- Optional: Tap the magnifying-glass icon in the upper-left corner, and use the virtual keyboard that appears to enter a search term (e.g., part of the setlist name). The results will appear below.
- Tap the desired setlist. The first rig of that setlist will load immediately. Tap All Rigs to view all rigs instead of a specific setlist.
To edit a setlist, tap the ••• button on its left side, and then tap the pencil icon. You will see the same screen you used to create the setlist, where you can edit and save it.
To delete a setlist, tap the ••• button on its left side, and then tap the trash can icon. Tap Yes to confirm the deletion or Cancel to return to the Setlists screen without deleting it.
Hands-Free Mode
Hands-Free Mode enables you to adjust any of the settings on your models by using just the footswitches and expression pedal.

To enter Hands-Free Mode, press and hold footswitch 1 to enter the mode select page, and then press and hold footswitch 1 again.
To increase or decrease the value shown, move the expression pedal.
To decrease the value shown in small increments, press footswitch 1 and 2 ( ) simultaneously.
To increase the value shown in small increments, press footswitch 2 and 3 ( ) simultaneously.
To edit the next model in your rig, press footswitch 1.
To edit the previous model in your rig, hold footswitch 1.
To show the next parameter for the shown model, press footswitch 2.
To show the previous parameter for the shown model, hold footswitch 2.
To exit Hands-Free Mode, press footswitch 3.
Tuner/Tempo
You can use the Tuner/Tempo page to tune your guitar and set a tempo for time-based effects. 
To enter Tuner/Tempo mode, press and hold footswitch 3 for over one second. While in Tuner/Tempo Mode, the screen to the right is shown.
To change the tuner reference pitch, tap the parameter and then turn the encoder.
To unmute your signal while tuning, press footswitch 1.
To enter a tempo via tapping a footswitch, press footswitch 2 at the desired tempo 3–8 times to set the tempo in beats per minute (BPM).
To exit this page, press footswitch 3.
Tip: You can also assign Tap Tempo to a footswitch within a rig on the Hardware Assign page.
Looper
The HeadRush MX5 has a built-in looper that you can use to layer your performances. While the looper’s operation is shown in the display, you can control most of it conveniently with the footswitches.
The looper can hold up to 20 minutes of audio at a time across a maximum of 50 layers. The first layer of your loop can be up to 5 minutes long.
- This meter indicates your current location in the loop during recording or playback.
- Rig name.
- Loop file name.
- Tap here to save, load, rename and delete loops.
- This controls how much of the looper’s signal you hear in the outputs.
- This controls how much of the looper’s signal is routed back through it when recording another layer.
- This indicates whether the looper is located before (Pre) or after (Post) your signal chain. Moving the looper to the Pre position enables you to edit your rig without having to play the same riff over and over again.
- This indicates the direction of playback.
- This indicates the length of the current loop.
- This indicates the current speed of the loop as a multiple or fraction of the original.
- This indicates how many layers are playing in the current loop, including the original.
To record the first layer of a loop, press the Record footswitch. Recording will begin immediately and the footswitch indicator will light red. Press the Record footswitch again to stop recording and start loop playback. The footswitch is now called Overdub and the footswitch indicator is yellow.
To record additional layers onto the loop (overdub), press the Overdub footswitch. Overdubbing will begin immediately and the footswitch indicator will light red. Press the Overdub footswitch again to stop overdubbing and continue playback.
To erase the top-most (last-added) layer of the loop, press and hold the Peel footswitch. The top-most layer of the loop will be erased immediately. This process is destructive, so you can’t re-add it later.
To clear the full loop, press and hold the Clear footswitch. This process will stop playback and is destructive, so you can’t re-add it later.
To halve or double the length of the loop, tap the button next to the Length field and then turn the encoder. The halving process is non-destructive, so you can restore your original loop and its content by doubling the length of the loop.
To halve or double the speed of the looper, tap the button next to the Speed field and then turn the encoder.
Tip: Use this to create low bass lines or ultra-high guitar parts that you couldn’t ordinarily play.
To reverse looper playback, tap the button next to the Playback field and then turn the encoder.
Tip: Create eerie effects by recording layers in reverse then switching back to normal playback.
To set the looper’s location, tap the button next to the Playback field and then turn the encoder to place it before (Pre) or after (Post) the signal chain. Moving the looper to the Pre position enables you to edit your rig without having to play the same riff over and over again.
To create a new loop, tap the ••• button in the top right corner, and then tap New Loop. Tap Yes to clear the looper and create a new loop, or tap No to return to the Looper screen without creating a new loop.
To save a loop, tap the ••• button in the top right corner, and then tap Save Loop. Tap Yes to confirm the save, or tap Cancel to return to the Looper screen without saving it.
To load a loop, tap the ••• button in the top right corner, and then tap Load Loop. Use the file browser that appears to select the loop to load, and then tap Import to load the loop, or tap Cancel to return to the Looper screen without deleting it.
Tip: You can import.WAV and .MP3 audio files and load them into the looper by placing the files in the /LOOPS/ directory of the HeadRush MX5 while using the USB Transfer feature.
To edit a loop’s name, tap the ••• button in the top right corner, and then tap Edit Loop Name. Use the keyboard to type a new name, and then tap OK to confirm the new name, or tap Cancel to return to the Looper screen without renaming the loop.
To delete a loop, tap the ••• button in the top right corner, and then tap Delete Loop. Tap Yes to confirm the deletion, or tap No to return to the Looper screen without deleting it.
To exit the looper and return to the main screen, press the Exit footswitch. If the looper is playing, playback will continue.
To re-enter the looper, press the Looper footswitch again.
Tip: Use this feature to create different effect configurations (adjust parameters, activate/deactivate models, etc.) for each layer, creating a multi-textured performance. You can also switch rigs while using the looper and use a different rig for each layer.
External MIDI Control
The HeadRush MX5 can be controlled by incoming MIDI CC (control change) messages from external MIDI gear. These MIDI messages can be received from hardware connected to 1/8″ (3.5 mm) MIDI Input only.
The chart below lists the available parameters that can be controlled by external MIDI hardware:
| CC# | Action |
| 50 | Footswitch 1 |
| 51 | Footswitch 2 |
| 52 | Footswitch 3 |
| 64 | Tap Tempo |
| 65 | Looper: 1/2 Speed |
| 66 | Looper: 2X Speed |
| 67 | Looper: 1/2 Loop |
| 68 | Looper: 2X Loop |
| 69 | Looper Start/Stop |
| 70 | Looper Record |
| 71 | Looper Insert |
| 72 | Looper Peel |
| 73 | Looper Mute |
| 74 | Looper Reverse |
| 75 | Block 1 Toggle On/Off |
| 76 | Block 2 Toggle On/Off |
| 77 | Block 3 Toggle On/Off |
| 78 | Block 4 Toggle On/Off |
| 79 | Block 5 Toggle On/Off |
| 80 | Block 6 Toggle On/Off |
| 81 | Block 7 Toggle On/Off |
| 82 | Block 8 Toggle On/Off |
| 83 | Block 9 Toggle On/Off |
| 84 | Block 10 Toggle On/Off |
| 85 | Block 11 Toggle On/Off |
Global Settings
Use the global settings to configure the HeadRush MX5’s overall operation.
To show the global settings, tap the ••• button in the upper-right corner of the screen, and tap Global Settings.
To select each page of the global settings, tap the number at the upper-right corner of the screen.
LCD Brightness: This setting determines the brightness of the main display. Tap this field, turn the encoder to select 1 (dim) through 5 (bright), and then press the encoder.
Audio Configuration:
Rig Input: This setting determines whether each rig’s input signal is taken from the Guitar Input (Guitar) or the left (L) Return Input (FX Ret L). When set to Per Rig, the source is determined by the Rig Input setting of each rig in the Input block. When set to FX Ret L or Per Rig, the FX-Loop Stereo Return setting will be disabled; however, you can still use a mono FX loop for external pedals by using the right side of the FX Return input. You can access individual sides of the FX return input by using a standard 1/4″ (6.35 mm) stereo to (2) 1/4″ (6.35 mm) mono Y adapter (sold separately).
Main Out Level: This setting determines the signal level sent to the main Outputs (1/4″/6.35 mm, TRS). When set to Line, the output level will be +18 dBu. Use this setting if you are connecting the HeadRush MX5 to a full-range, flat-response amplifier, PA speaker, mixer, or audio interface. When set to Amp, the output level will be +6 dBu. Use this setting if you are connecting the HeadRush MX5 to a traditional guitar amplifier.
FX Return Level: This setting determines the signal level received by the FX Return Input (1/4″/6.35 mm, TRS). When set to Rack, the output level will be line level, +18 dBu. Use this setting if you are connecting a rack effects processor in the HeadRush MX5’s FX-Loop. When set to Stomp, the output level will be +6 dBu. Use this setting if you are connecting a traditional guitar pedal («stompbox») in the FX-Loop.
FX-Loop Stereo: These settings determine whether the incoming and outgoing signal in the effects loop is stereo or mono. Tap Send to enable or disable the stereo signal for the Send Outputs. Tap Return to enable or disable the stereo signal for the Return Inputs.
USB Audio Settings:
Important note for Windows users: Before connecting the Headrush MX5 to your computer, download and install the necessary drivers from headrushfx.com/support.
Sample Rate: This setting determines the sample rate of the USB audio signal: 44.1 kHz, 48.0 kHz or 96.0 kHz. Remember to select the same sample rate as the one in your DAW. Also, set it before opening your DAW.
USB Audio: This setting determines whether or not HeadRush MX5 is sending a USB audio signal over a USB connection. Tap On to enable sending of the USB audio signal with the selected Sample Rate. Tap Off to disable the USB audio signal. (To change the Sample Rate, set USB Audio to Off first, select the correct sample rate, set USB Audio to On again, and restart your DAW.)
USB Mode: This setting determines how the HeadRush MX5 sends its audio signal over the USB connection and how its outputs function while doing so:
- Live: The audio signal will be sent to your computer as well as to the HeadRush MX5’s outputs.
- DAW: The audio signal will be sent to your computer only. The HeadRush MX5’s outputs will be disabled to prevent any latency while monitoring.
- Reamp: Your computer will send an audio signal to the HeadRush MX5, which will process it through the current rig and send it back to your computer. The HeadRush MX5’s outputs will be disabled to prevent any latency while monitoring.
Pedal Configuration:
External Pedal: This setting determines whether or not you are using an external expression pedal with the HeadRush MX5.
- Tap On to use the built-in expression pedal to control the parameter/parameters of Bank A while your external expression pedal controls the parameter/parameters of Bank B. (If you are using the expression pedal’s Classic Mode, pressing the toe switch will activate or deactivate the parameter. If you are using Advanced Mode, the toe switch will be disabled entirely.)
- Tap Off to disable the expression pedal input and use the built-in expression pedal only.
Reminders:
Confirm Unsaved: This setting determines whether or not you will see a confirmation message if you change the rig while there are unsaved changes on the current one. Tap On to enable these messages or Off to disable them.
Alternatively, tap Do not show this dialog again in the message itself to disable them.
MIDI Settings: These settings determine how the HeadRush MX5 sends and receives MIDI information to and from external devices. These settings affect only the HeadRush MX5’s MIDI input or MIDI output.
MIDI Thru: Tap On to use the MIDI output as a MIDI throughput; any MIDI information sent to the HeadRush MX5’s MIDI input will be sent directly to the MIDI output. Tap Off to use the HeadRush MX5’s MIDI output normally; the HeadRush MX5 will be able to send its own MIDI information out of the MIDI output.
Recv MIDI Clock: Tap On to enable the HeadRush MX5 to receive MIDI clock information. Tap Off to use the HeadRush MX5’s own internal MIDI clock (which will not be sent out).
Prog Change: Tap Send to enable or disable the HeadRush MX5’s transmission of MIDI program change messages when you load a rig. Tap Recv to enable or disable the HeadRush MX5’s reception of MIDI program change messages from an external MIDI device.
MIDI Channel: This setting determines the MIDI channel(s) that the HeadRush MX5 will send and receive MIDI messages. Tap this field, turn the encoder to select all channels (Omni), or 1–16, and then press the encoder.
Assignments:
Auto Assign: This setting determines how models are assigned to the switches. Tap On if you want models to be automatically assigned to the next available switch when you load them. Tap Off if you want models to load without being assigned to a switch; you will have to assign them manually in the Hardware Assign screen.
Color Mod:
If you have trouble distinguishing certain colors on your MX5’s display or if you just want to further customize the color scheme, you can use the color mod parameters to adjust their default settings. While experimenting with the settings, a sample of your adjustments will be shown in real time. If you want to return to the default color scheme, the default settings are as follows:
Depth: 0%
Color: 36 DEG
Spread: 180 DEG
Note: The Color Mod feature is disabled when the Screen Lock feature is enabled.
Global EQ:
These settings on Page 2 determine if/how equalization is applied for your outputs. This equalizer is a four-band parametric equalizer.
Tip: These settings are especially useful when a venue, rehearsal space, etc. has different acoustic characteristics than the room where you originally created your presets (e.g., the venue may sound «boomier,» or a rehearsal space with soundproofing may deaden some of the high end). This page lets you quickly apply some additional equalization to all of your presets without permanently saving them.
EQ On: This setting determines whether equalization is enabled (On) or disabled (Off) for the outputs.
Level: This setting determines if/how much the outputs’ audio signal level is boosted or cut. This value is applied the level set by the Master knob.
Low Band & High Band: These settings determine what type of equalization is applied to the lowestfrequency band (Low Band) and to the highest-frequency band (High Band): Shelf or Cut.
Low, Low Mid, High & High Mid: The three settings for each of these four frequency bands determine the shape of the equalization:
The first setting (Hz) determines the center frequency of the low-frequency band, low-mid-frequency band, high-frequency band, or high-mid-frequency band.
The second setting (dB) determines how much the equalizer boosts or cuts the signal at the corresponding frequency band.
The third setting (Q) determines the width of the frequency band. The higher the setting, the wider the band will be around the center frequency (the first setting). This setting is applied whether Low Band or High Band is set to Shelf or Cut.
USB
You can use the HeadRush MX5’s USB connection to your computer for Recording (to a digital audio workstation [DAW]), Reamping, or Transferring Files & Settings (e.g., rigs, setlists, presets, etc.).
Important Note for Windows Users: Before connecting the HeadRush MX5 to your computer, download the necessary drivers from headrushfx.com/support and install them.
Recording
When the HeadRush MX5’s USB port is connected to your computer, you can select and use the HeadRush MX5 as a 24-bit audio interface, enabling you to play audio through it or to send its audio signal to the computer. It can use sample rates of 48 kHz or 96 kHz.
To use the HeadRush MX5 as an audio interface with your computer, open your computer’s Control Panel (Windows®) or System Preferences (macOS®), open its sound/audio settings, and select HeadRush MX5 as the device for recording/input and/or for playback/output.
The HeadRush MX5 can send four separate audio signal channels to your computer. Before recording the HeadRush MX5’s audio signal into your digital audio workstation (DAW), select the channel/channels you want to record:
1: the left channel of the master outputs with all active effects applied.
2: the right channel of the master outputs with all active effects applied.
3: a mono channel of the guitar input with no effects applied.
4: identical audio signal to 3.
The HeadRush MX5 can receive four separate audio signal channels from your computer. The channels are named and routed as follows:
1: the left channel of your computer’s output audio signal, which will be sent directly out of the HeadRush MX5’s master outputs and phones output.
2: the right channel of your computer’s output audio signal, which will be sent directly out of the HeadRush MX5’s master outputs and phones output.
3: a mono channel of your computer’s audio signal, which will be sent back through the HeadRush MX5 (see Reamping below).
4: not used in this scenario.
Remember to set your DAW’s master outputs to be sent to 1/2.
Reamping
Reamping is a process that adds the tone coloration of an amp to a pre-recorded audio signal—in this case, sending audio from your DAW through the HeadRush MX5 and then recording it back into your DAW. This is useful for saving time because you can change the sound of an already-recorded guitar track without having to manually play the same part again.
To use the HeadRush MX5 to reamp an audio signal:
- In your DAW, make sure HeadRush MX5 is selected as your audio interface for both recording/input and playback/output.
- Assign the output of the desired track to 3.
- On the HeadRush MX5, tap the ••• button in the upper-right corner of the screen, and tap Global Settings.
- In the Global Settings screen, tap Reamp next to USB Mode.
Also, make sure the Sample Rate is set to the same sample rate as the one in your DAW. To change the Sample Rate, set USB Audio to Off first, select the correct sample rate, set USB Audio to On again, and restart your DAW. - In your DAW again, create a new audio track and assign its input. For a stereo input signal, select 1/2. For a mono input signal, select 1.
- Locate the point in your track where you want to start reamping.
- On the HeadRush MX5, select the rig, models, or other parameters to achieve the sound you want.
- In your DAW, start audio recording. The track you want to reamp will be sent through the HeadRush MX5 and recorded into the audio track you created earlier.
Transferring Files & Settings
Over a USB connection, you can transfer rig, setlist, model preset, loop, and/or impulse response (IR) files between your computer and the HeadRush MX5.
We recommend creating a backup copy of your files to your computer before you make any changes.
Do not disconnect or power off the HeadRush MX5 during the process.
Any unsupported files will be ignored.
You cannot transfer a folder or.zip/archive folder to/from HeadRush MX5. Instead, transfer any supported files directly.
We recommend organizing the file structure of your rigs, setlists, model presets, and/or impulse response files on your computer so that it’s identical to the file structure as shown on the HeadRush MX5 «drive.»
To transfer files between the HeadRush MX5 and your computer:
- Connect your computer to the HeadRush MX5’s USB port using a standard USB cable.
- With your computer powered on, power on the HeadRush MX5 using the power switch.
- Tap the ••• button in the upper-right corner of the screen and then tap Global Settings.
- In the Global Settings screen, tap the ••• button in the upper-right corner of the screen, and tap USB Transfer. On your computer, the HeadRush MX5 will appear as a mass-storage device called HeadRush.
Windows users: If this is the first time you’ve connected it to this computer, you may need to wait a minute while it installs the class-compliant drivers. - Open the HeadRush drive. You can now freely click and drag contents between HeadRush and your computer. Note that any changes you make to the contents of your HeadRush are immediate and cannot be cancelled.
When you are finished transferring contents, you must unmount/eject the HeadRush drive from your computer. File corruption may occur if the drive is not properly ejected before continuing.- After the drive has been ejected, tap Sync on your HeadRush MX5 to «commit» any changes you made to the contents of the HeadRush drive. An additional prompt will appear to confirm you have ejected the drive. Tap Proceed to continue or Cancel to continue accessing files on your computer.

As the HeadRush MX5 analyzes and imports the files, a meter on the display will indicate its progress. The normal Global Settings screen will reappear when the process is finished. Do not disconnect or power off HeadRush MX5 during the sync process.
Screen Lock
The Screen Lock feature disables the touchscreen and gives you a simple interface that shows your current rig name, setlist name, and a customizable image.
To activate the screen lock feature, tap the ••• button in the upper-right corner of the main page, and then tap Lock Screen.
To deactivate the screen lock feature, tap the unlock icon.
To customize the Screen Lock image:
- Connect your computer to the HeadRush MX5’s USB port using a standard USB cable.
- With your computer powered on, power on the HeadRush MX5 using the power switch.
- Tap the ••• button in the upper-right corner of the screen and then tap Global Settings.
- In the Global Settings screen, tap the ••• button in the upper-right corner of the screen, and tap USB Transfer. On your computer, the HeadRush MX5 will appear as a mass-storage device called HeadRush.
Windows users: If this is the first time you have connected the HeadRush MX5 to your computer, you may need to wait a minute while the class-compliant drivers are installed. - Open the HeadRush drive.
- Place a .png, .bmp, .jpg, or .jpeg file named LockScreenLogo in the root directory of the HeadRush drive. We recommend using an 800×400-pixel image (it will be automatically scaled to this size after transferring it). Note that any changes you make to the contents of your HeadRush are immediate and cannot be cancelled.
When you are finished transferring contents, you must unmount/eject the HeadRush drive from your computer. File corruption may occur if the drive is not properly ejected before continuing.- After the drive has been ejected, tap Sync on your HeadRush MX5 to «commit» any changes you made to the contents of the HeadRush drive. An additional prompt will appear to confirm you have ejected the drive. Tap Proceed to continue or Cancel to continue accessing files on your computer.
As the HeadRush MX5 analyzes and imports the files, a meter on the display will indicate its progress. The normal Global Settings screen will reappear when the process is finished. Do not disconnect or power off HeadRush MX5 during the sync process.
Firmware Update Instructions
- Connect the USB port on your HeadRush MX5 to your computer and ensure HeadRush MX5 and your computer are powered on.
- On your HeadRush MX5, tap the ••• icon in the upper-right corner, and tap Global Settings.
- In the Global Settings screen, tap the ••• icon in the upper-right corner again, and tap Firmware Update. In the screen that appears, tap OK to continue. After restarting, the screen will show Update at the bottom edge.
- Open the HeadRush Updater application for your operating system—Windows or macOS. (You can download the latest updater application from headrushfx.com)
- When the updater window appears, click Update HeadRush. Do not disconnect or power off the HeadRush MX5 or your computer until the update is completed.
- When the update is completed, the updater window will display Done, and your HeadRush MX5 will restart. Click Done to close the updater window.
- Confirm your Headrush MX5 is using the latest firmware—tap the ••• icon in the upper-right corner, and tap Global Settings. The firmware version will appear at the bottom of the screen.
Technical Specifications
| Footswitches | (3) footswitches with color LEDs |
| Knobs | (1) 300° master volume knob (1) 360° navigation/data encoder |
| Display | (1) full-color LED-backlit display with touch interface 4″ / 102 mm (diagonal) |
| Connectors | (1) 1/4″ (6.35 mm) mono input (guitar) (1) 1/4″ (6.35 mm) TRS input (expression pedal) (1) 1/4″ (6.35 mm) stereo output (send) (1) 1/4″ (6.35 mm) stereo input (return) (2) 1/4″ (6.35 mm) balanced output (main) (1) 1/8″ (3.5 mm) stereo output (headphones) (1) 1/8″ (3.5 mm) stereo input (auxiliary device) (1) 1/8″ (3.5 mm) MIDI output (1) 1/8″ (3.5 mm) MIDI input (1) USB Type-B port (1) DC power adapter input |
| Power | Connection: DC power adapter input |
| Input Voltage: 12 VDC, 3.0 A, center-positive | |
| Dimensions (width x depth x height) |
11.6″ x 5.9″ x 2.75″ 295 x 150 x 70 mm |
| Weight | 3.46 lbs. 1.57 kg |
Specifications are subject to change without notice.
Trademarks & Licenses
HeadRush is a trademark of inMusic Brands, Inc., registered in the U.S. and other countries.
Windows is a registered trademark of Microsoft Corporation in the United States and other countries.
macOS is a trademark of Apple Inc., registered in the U.S. and other countries.
All other product names, company names, trademarks, or trade names are those of their respective owners.

headrushfx.com
Videos
Headrush MX5 | an Inside and Out Review Video
Documents / Resources
References
Download manual
Here you can download full pdf version of manual, it may contain additional safety instructions, warranty information, FCC rules, etc.
Download HEADRUSH MX5 Manual
![]()
Инструкция по началу работы
Руководство пользователя
Введение
Комплектация
| HeadRush MX5 USB-кабель (2) 1/8 дюйма (3.5 мм) для MIDI-адаптеров Адаптер питания |
Карта загрузки программного обеспечения Инструкция по началу работы Руководство по безопасности и гарантии |
важно: Войти headrushfx.com чтобы загрузить полное руководство пользователя.
Поддержка
Для получения последней информации об этом продукте (документация, технические характеристики, системные требования, информация о совместимости и т. Д.) И регистрации продукта посетите headrushfx.com.
Для получения дополнительной поддержки по продукту посетите headrushfx.com/support.
Особенности
Верхняя панель
- Дисплей: Этот полноцветный мультисенсорный дисплей отображает информацию, относящуюся к текущей работе HeadRush MX5. Коснитесь дисплея (и используйте элементы управления оборудованием) для управления интерфейсом. Видеть Основная операция узнайте, как это работает.
- Основная громкость: поверните эту ручку, чтобы отрегулировать уровень громкости выходов.
- Энкодер: поверните этот энкодер для прокрутки доступных опций меню или настройки значений параметров в выбранном поле на дисплее. Нажмите энкодер, чтобы подтвердить свой выбор.
- Индикаторы ножных переключателей: эти индикаторы показывают, включен ли педаль, установка или сцена, назначенные каждому ножному переключателю (ярко светится) или выключено (светится тускло).
- Ножные переключатели: нажмите эти педальные переключатели, чтобы активировать или деактивировать назначенную модель или сцену или загрузить назначенный риг.
- Педаль экспрессии: используйте эту педаль для регулировки назначенного параметра / параметров. Видеть Основные операции> Назначение оборудования> Педаль экспрессии чтобы получить больше информации.
Задняя панель
- Гитарный вход (1/4 дюйма / 6.35 мм, моно): подключите гитару к этому входу с помощью стандартного инструментального кабеля.
- Вход для педали экспрессии (1/4 дюйма / 6.35 мм, TRS): Подключите дополнительную педаль экспрессии к этому входу с помощью стандартного кабеля TRS 1/4 дюйма (6.35 мм).
- Выход FX Send (1/4 дюйма / 6.35 мм, стерео): Подключите этот выход ко входу другого модуля эффектов, педали эффекта или возврата петли эффектов ampпожизненнее.
- Вход FX Return (1/4 дюйма / 6.35 мм, стерео): Подключите этот вход к выходу другого модуля эффектов, педали эффекта или посыл петли эффектов ampпожизненнее.
Примечание: Вы можете настроить вход FX Return Input на прием сигнала на уровне рэка или педали (по умолчанию) в меню Global Settings. - Выходы (1/4 дюйма / 6.35 мм, симметричные): Подключите эти выходы ко входам вашего amplifier, аудиоинтерфейс и т. д. Если вам нужно использовать только один выход, используйте тот, который обозначен как Left / Mono.
Примечание: Вы можете настроить эти выходы для отправки сигналов на amp уровень или линейный уровень (по умолчанию) в Меню глобальных настроек. - Выход на наушники (1/8 дюйма / 3.5 мм, стерео): Подключите к этому выходу стандартные стереонаушники 1/8 дюйма (3.5 мм).
- Вход Aux (1/8 дюйма / 3.5 мм, стерео): Подключите дополнительный источник звука (например, смартфон, планшет и т. Д.) К этому входу с помощью стереокабеля 1/8 дюйма / 3.5 мм.
- MIDI-выход (1/8 дюйма / 3.5 мм): Используйте прилагаемый адаптер 1/8 ″ -to-MIDI и стандартный MIDI-кабель (не входит в комплект) для подключения этого выхода к MIDI-входу дополнительного внешнего MIDI-устройства.
- MIDI-вход (1/8 дюйма / 3.5 мм): Используйте прилагаемый адаптер 1/8 ″ -to-MIDI и стандартный MIDI-кабель (не входит в комплект) для подключения этого входа к MIDI-выходу дополнительного внешнего MIDI-устройства.
важно: Не подключайте аудиоустройства (например, наушники, мониторы и т. Д.) К MIDI-выход или MIDI-вход. Используйте прилагаемые переходники с 1/8 дюйма на 5 контактов только для подключения MIDI-устройств. - USB-порт: Подключите этот порт USB к компьютеру с помощью стандартного кабеля USB. Это соединение позволяет HeadRush MX5 отправлять и получать цифровой аудиосигнал на ваш компьютер и с него. Вы также можете использовать это соединение для импорта или экспорта буровых установок, списков предустановок модели и импульсных характеристик.
- Входная мощность: Подключите этот вход к розетке с помощью прилагаемого адаптера питания.
- Выключатель: Нажмите эту кнопку, чтобы включить HeadRush MX5. Нажмите и удерживайте эту кнопку, чтобы выключить HeadRush MX5.
- Вентиляция: Убедитесь, что это вентиляционное отверстие не закрыто при использовании HeadRush MX5.
Установка
Пункты, не указанные в Введение> Содержимое коробки продаются отдельно.
ВАЖНО! В меню Global Settings убедитесь, что вы установили выходы для отправки сигнала на amp уровень, если вы используете традиционную гитару ampболее продолжительный или линейный (по умолчанию), если вы используете полнодиапазонный плоский отклик ampлифтер, микшер, громкоговоритель или аудиоинтерфейс.
Основная операция
В этой главе описаны некоторые из основных функций HeadRush MX5. Вы можете посетить headrushfx.com чтобы загрузить полное руководство пользователя для получения дополнительной информации.
Главный Экран
важно: Последовательность моделей в вашей сигнальной цепи не обязательно отражается на педальных переключателях. Вы можете свободно назначать модели доступным педальным переключателям, вообще не меняя сигнальную цепочку — и наоборот. Видеть Назначение оборудования узнайте об этом.
Назначить модель (amp, cab, импульсная характеристика или эффект) в пустой слот, коснитесь его (+) а затем воспользуйтесь появившимся списком. Видеть Буровые установки> Создание Новая установка чтобы узнать об этом.
Чтобы переставить модели в вашей сигнальной цепочке, коснитесь и перетащите модель в другой слот или между двумя другими моделями (модели после этого положения будут
сдвинуть на один слот дальше вниз по сигнальной цепочке).
Чтобы активировать или деактивировать модель, нажмите ножной переключатель назначенный ему, или коснитесь модели, а затем коснитесь Вкл Выкл кнопка, которая появляется вверху
правый угол.
Чтобы показать экран настроек модели, дважды коснитесь его.
Чтобы загрузить другую установку (предустановка):
к view другие варианты, нажмите • • • в правом верхнем углу, а затем коснитесь нужного параметра.
Режимы педального переключателя
Три педальных переключателя можно использовать для активации или обхода моделей (amps, кабинеты, импульсные характеристики или эффекты), а также выберите сцены, установки или сетлисты. Эти ножные переключатели всегда находятся в одном из четырех режимов: Stomp,
Риг, Гибрид или Сетлист.
Чтобы изменить режим, удерживайте педаль 1, затем:
- Чтобы выбрать режим Stomp, нажмите педаль 1
- Чтобы выбрать режим буровой установки, нажмите педаль 2
- Чтобы выбрать гибридный режим, нажмите педаль 3
- Чтобы выбрать режим Setlist, удерживайте педаль 2
Топот Режим
Педальные переключатели 1-3 соответствуют моделям (amps, кабины или эффекты) в вашей сигнальной цепи. Нажмите педаль, чтобы активировать или деактивировать ее модель.
Чтобы загрузить следующую установку, нажмите педальные переключатели 1 и 2 (![]() ) одновременно.
) одновременно.
Чтобы загрузить предыдущую установку, нажмите педальные переключатели 2 и 3 (![]() ) одновременно.
) одновременно.
Режим буровой установки
Педальные переключатели 1-3 соответствуют ранее сохраненным ригам. Нажмите педаль, чтобы загрузить его установку.
Чтобы показать следующий банк из трех установок, нажмите педальные переключатели 1 и 2 (![]() ) одновременно.
) одновременно.
Чтобы показать предыдущий банк из трех установок, нажмите педальные переключатели 2 и 3 (![]() ) одновременно.
) одновременно.
Гибридный режим
Первый педальный переключатель может быть назначен для активации / деактивации модели или выбора сцены в текущей выбранной установке.
Чтобы переключиться на предыдущую установку, нажмите педаль 2.
Чтобы переключиться на следующую установку, нажмите педаль 3.
Сетлист режим
Чтобы войти в текущий показанный сетлист, нажмите педаль 1.
Чтобы показать предыдущий сетлист, нажмите педаль 2.
Чтобы показать следующий сетлист, нажмите педаль 3.
Чтобы войти в сетлист All Rigs, нажмите и удерживайте педаль 1.
Буровые установки
При использовании HeadRush MX5 установка предустановка: комбинация назначенных Модели-The amps, cabs, импульсные характеристики и эффекты — а также настройки каждого из них. Вы можете создавать, редактировать, сохранять и загружать риги, что позволяет легко вспомнить идеальный звук для каждой части вашего
производительность.
Каждая буровая установка имеет 11 слоты, каждая из которых может иметь одну модель (amp, cab или эффект).
Назначенные слоты будут отображать графические представления моделей, а пустые слоты покажут + символ.
Создание новой буровой установки
Чтобы создать новую установку, нажмите • • • в правом верхнем углу экрана и коснитесь Новинки Rig.
Назначить модель (amp, cab или эффект) в пустой слот:
- Нажмите на пустой слот †
- В появившемся списке коснитесь типа модели, которую хотите назначить: Amp, Кабина, ИК (импульсная характеристика), или эффект (искажение, динамика / эквалайзер, модуляция, Реверберация / задержка, петля эффектов или экспрессия).
- В появившемся списке коснитесь модели, которую хотите назначить.
- В следующем появившемся списке коснитесь предустановки, которую хотите загрузить для этой модели.
Если вы загрузите amp или cab в слот с пустым соседним слотом, соответствующий amp или cab будет автоматически загружен в другой слот. После этого вы можете
настраивать их независимо: вы можете разделить их в цепочке сигналов, вы можете изменить тип amp или cab, и вы можете удалить каждую модель отдельно.
Оптимизация вашей сигнальной цепи
Наблюдения и советы этой статьи мы подготовили на основании опыта команды сигнальная цепь это путь, по которому аудиосигнал идет от вашей гитары через выбранные вами модели и заканчивается на выходах HeadRush MX5. Вы можете использовать сенсорный экран, чтобы расположить выбранные модели в любой последовательности, но вы можете обнаружить, что некоторые конфигурации будут звучать лучше, чем другие.
Вот несколько общих предложений по размещению моделей для создания тонов с помощью HeadRush MX5:
- Динамика (например, компрессоры), фильтры (например, вау, питч-шифтеры), и объем педали обычно располагаются в начале сигнальной цепи. В качестве альтернативы вы можете разместить педали громкости в конце сигнальной цепи, чтобы обеспечить небольшое отклонение в функциональности.
- Эффекты, основанные на усилении (например, овердрайв / дисторшн, фузз) обычно идут дальше.
- Выравнивание (EQ) часто используется для формирования тональных характеристик эффектов овердрайва / дисторшна и фузза, поэтому ставьте после них эквалайзер. Как вариант, поместите его перед ними, чтобы сформировать общий тон гитары — вырезать нежелательные частоты — перед педалями усиления.
- Эффекты модуляции, такие как фленджеры, фазеры и хорус обычно помещаются рядом.
- Эффекты, зависящие от времени, такие как задержки и реверберация обычно размещаются ближе к концу сигнальной цепи.
- An amp и еще один кабина (или amp и импульсная характеристика) часто помещают в самый конец сигнальной цепочки, хотя вы можете разместить их где угодно.
Спасение буровой установки
Если вы вообще меняли установку после ее загрузки, вы увидите звездочку (*) рядом с его названием вверху экрана. Вы можете сохранить эти изменения в этой установке, сохранить эти изменения как другую установку или полностью отменить их.
Чтобы спасти буровую, нажмите Save. в правом верхнем углу.
Чтобы сохранить изменения в текущем буровая установка, кран Сохранить.
Чтобы сохранить изменения как новую установку, нажмите Сохранить новую установку, используйте появившуюся клавиатуру, чтобы ввести имя, а затем нажмите «Сохранить».
Чтобы вернуться к предыдущему экрану без сохранения, нажмите Отмена в любое время.
Чтобы отменить любые изменения, которые вы внесли в установку, нажмите • • • в правом верхнем углу и коснитесь Отменить изменения.
Регулировка настроек
Чтобы изменить настройки модели в вашей установке, дважды коснитесь его, чтобы открыть экран настроек.
Сохранение предустановки
Чтобы сохранить предустановку, нажмите Save. в правом верхнем углу.
Чтобы сохранить изменения в текущем пресете, нажмите Сохранить.
Чтобы сохранить изменения как новую предустановку, коснитесь «Сохранить новую предустановку»., используйте появившуюся клавиатуру для ввода имени, а затем коснитесь Сохранить.
Чтобы вернуться к предыдущему экрану без сохранения, нажмите «Отмена». в любое время.
Назначение оборудования
Экран Hardware Assign позволяет вам настроить, как ножные переключатели HeadRush MX5 и педаль экспрессии управляют каждой установкой.
Чтобы открыть экран назначения оборудования, нажмите ••• в правом верхнем углу главного экрана, а затем нажмите Назначение оборудования.
Чтобы вернуться на главный экран, нажмите кнопку в![]() в левом верхнем углу.
в левом верхнем углу.
важно: Все настройки назначения оборудования являются частью общей установки, поэтому не забудьте сохранить изменения, которые вы хотите сохранить.
Чтобы установить цвет, связанный с буровой установкой, коснитесь его в верхней левой части экрана. Этот цвет появится рядом с названием буровой установки, когда вы view список всех доступных ригов или когда вы view и создавать сетлисты. Он также будет цветом соответствующего индикатора педального переключателя, когда HeadRush
MX5 находится в режиме буровой установки.
Для установки темпа зависящих от времени эффектов буровой установки (задержки, модуляция и т. д.), нажмите кнопку под Время , чтобы выбрать Текущий or Исправлена.
- Текущий: Риг будет использовать темп, который использовался последним или установленный Время ножной переключатель.
Чтобы установить темп, нажмите Время нажмите педаль в желаемом темпе 3–8 раз, чтобы установить новый темп в ударах в минуту. (ударов в минуту). - Исправлена: Риг будет использовать темп, который вы здесь задали.
Чтобы установить темп, поверните энкодер, чтобы установить желаемый темп в ударах в минуту.
(BPM). Вы можете установить темп только на этом экране Hardware Assign.
Для загрузки установки при получении изменения программы MIDI от дополнительного внешнего MIDI-устройства или для отправки сообщения изменения программы MIDI при загрузке установки,
нажмите кнопку под MIDI, а затем поверните кодировщик, чтобы выбрать MIDI номер изменения программы. Вы можете настроить MIDI изменения программы принимаются и / или отправляются в Глобальные настройки меню.
Примечание: Если установка использует номер, этот номер будет недоступен и не может быть назначен другой установке. Кроме того, при сохранении буровой установки с новым именем она будет сохранена, но без номера изменения программы, чтобы не дать установкам использовать один и тот же номер.
Ножные переключатели
Три прямоугольника в нижнем левом углу представляют три ножных переключателя HeadRush MX3. Вы можете назначить любые параметры на основе переключателей (имеющие только два состояния) на любой из ножных переключателей — независимо от их положения в сигнальной цепи.
Чтобы назначить параметр педальному переключателю:
- Коснитесь поля. + указывает на пустое поле.
- В появившемся списке коснитесь модели с параметром, который вы хотите назначить.
- В появившемся списке коснитесь параметра, который хотите назначить. Обычно параметр просто включен (для включения или выключения).
Нажмите Неназначенный × чтобы отменить назначение этого педального переключателя.
Чтобы поменять местами два назначения, коснитесь и перетащите один из них на другой, а затем отпустите.
Сцены
Наблюдения и советы этой статьи мы подготовили на основании опыта команды сцены Функция позволяет вам включать или выключать несколько моделей на каждой установке, а также выбирать различные предустановки для изменения модели. Когда вы нажимаете педальный переключатель, назначенный для этой сцены, все модели, включенные в эту сцену, включаются или выключаются или изменяются на другой пресет, в зависимости от того, как вы их назначаете. Это отличный способ создать несколько тонов в одной установке. Например, вы можете захотеть, чтобы определенная модель реверберации была включена в любое время, когда также включена конкретная модель искажения.
В качестве альтернативы вы можете захотеть выключить одну модель задержки при включении другой. Сцены позволяют сделать это одним нажатием педали.
Чтобы создать и отредактировать сцену:
- На Экран назначения оборудования, коснитесь Переключить / Сцена для желаемого педального переключателя, чтобы просмотреть доступные варианты, и выберите Сцена.
- На этой модели коснитесь Изменить. Появится редактор сцены, в котором будут показаны все модели вашей установки.
- Для каждой модели в установке коснитесь первой строки текста, чтобы просмотреть доступные параметры:
• On: Эта модель включится, когда вы включите сцену.
• Off: Эта модель выключится, когда вы включите сцену.
• Без изменений: Эта модель останется неизменной при включении сцены. - Для каждой модели в установке коснитесь второй строки текста, чтобы настроить предустановку модели, которая будет загружаться при активации сцены.
- Коснитесь цвета в верхней части сенсорного экрана, чтобы выбрать цвет для сцены.
- Нажмите в верхнем левом углу, чтобы вернуться к экрану назначения оборудования.
Чтобы переименовать сцену (который отображается на индикаторах педального переключателя), коснитесь текста в поле ниже
Редактировать на модели используйте появившуюся виртуальную клавиатуру, чтобы ввести имя, а затем коснитесь любого места, кроме текстового поля.
Педаль экспрессии
Педаль экспрессии может управлять двумя параметрами (в классическом режиме) или двумя наборами параметров (в классическом режиме).
Расширенный режим). Для переключения между ними используйте подносочный переключатель — педаль экспрессии A или B.
Чтобы активировать переключатель на носке, переместите «носок» педали экспрессии так, чтобы она коснулась MX5, а затем нажмите.
Примечание: Когда вы сохраняете установку, текущее выбранное состояние педали экспрессии (A или B) будет сохранено, а затем будет вызвано при повторной загрузке установки.
Столбец из четырех прямоугольников представляет настройки педали экспрессии. Вы можете назначить педали экспрессии один или несколько непрерывно регулируемых параметров (с диапазоном значений).
Чтобы установить режим педали экспрессии, нажмите кнопку над диапазоном в правом верхнем углу, чтобы выбрать Классический or Расширенный поиск.
- Classic: Вы можете назначить по одному параметру на каждую педаль экспрессии (A и B). Использование подносочного переключателя позволяет выбрать другую педаль экспрессии и деактивировать (обойти) текущий параметр педали экспрессии. Например, если вы назначите педаль вау на педаль экспрессии A, а педаль громкости — на
Педаль экспрессии B, только одна из них будет активна в любой момент; когда вы управляете педалью вау, громкость педали будет отключена, и наоборот. - Дополнительно: Каждой педали экспрессии можно назначить до четырех параметров (A и B). При перемещении педали одновременно регулируются все назначенные ей параметры.
Использование подносочного переключателя выберет другую педаль экспрессии и оставит текущие параметры педали активными и на их максимальных значениях.
Чтобы назначить параметр педали экспрессии:
- Если же линия индикатора Назначать кнопка не включена, нажмите ее.
- Коснитесь поля под Назначать кнопку. + указывает на пустое поле.
- В появившемся списке коснитесь модели с параметром, который вы хотите назначить.
- В появившемся списке коснитесь параметра, который хотите назначить.
Нажмите Неназначенный × чтобы отменить назначение этого поля.
Чтобы поменять местами два назначения (в расширенном режиме) коснитесь и перетащите один из них поверх другого, а затем отпустите.
Чтобы установить диапазон назначенного параметра:
- Если же линия индикатора Диапазон кнопка не включена, нажмите ее.
- Коснитесь значения под Диапазон кнопку.
- Поверните кодер установить желаемое значение в процентахtage всего диапазона параметра. Нажмите энкодер или коснитесь в другом месте, чтобы подтвердить значение.
Сетлисты
Вы можете использовать сетлисты для организации ваших буровых установок. Сетлист — это сохраненная коллекция ригов, которую вы можете сохранить и вызвать позже. Это полезно, например, если вам нужны только некоторые из ваших ригов для работы; Вы можете сохранить сет-лист только этих установок, чтобы вам не приходилось тратить время на перебор всех ваших установок перед воспроизведением следующей песни.
к view ваши сетлисты, нажмите кнопку ≡ в верхнем левом углу главного экрана. в Сетлисты, появится экран.
Чтобы вернуться на главный экран, нажмите ![]() в верхнем левом углу.
в верхнем левом углу.
Чтобы создать сетлист:
- Нажмите Новинки в правом верхнем углу.
- На появившемся экране левая половина — это список всех доступных ригов, а правая половина — это список ригов в сетлисте.
Чтобы добавить риг в сетлист, коснитесь его, чтобы добавить в конец списка. Либо нажмите и удерживайте его, а затем перетащите в нужное место в списке.
Вы можете добавить одну и ту же установку в сетлист несколько раз. [Пусто +] rig в нижнем левом углу — это слот, который можно использовать в качестве заполнителя, чтобы упростить перестановку сет-листа; он не будет доступен в качестве выбираемой установки при перемещении между установками в сетлисте.
Чтобы изменить сет-лист, нажмите и удерживайте буровую установку в списке справа, а затем перетащите ее в нужное место в списке.
Чтобы удалить риг из сет-листа, нажмите × на его правом краю.
Чтобы сохранить сетлист, нажмите Save. в правом верхнем углу.
Чтобы сохранить изменения в текущем сетлисте, нажмите Сохранить.
Чтобы сохранить изменения в виде нового сет-листа, коснитесь «Сохранить новый сет-лист», используйте появившуюся клавиатуру для ввода имени, а затем коснитесь Сохранить.
(В любое время) Чтобы вернуться к предыдущему экрану без сохранения, нажмите Отмена.
Чтобы отменить любые изменения, внесенные вами в сетлист, нажмите ![]() в верхнем левом углу и нажмите «Отменить изменения».
в верхнем левом углу и нажмите «Отменить изменения».
Чтобы загрузить сетлист:
- В то время как viewНа главном экране нажмите кнопку ≡ в верхнем левом углу, чтобы view что собой представляет Сетлисты экран. В каждом сет-листе будет указано количество ригов.
в скобках (включая несколько экземпляров одной и той же установки). - Коснитесь желаемого сет-листа. Первая установка из этого сет-листа загрузится немедленно. Нажмите Все буровые установки в view все риги вместо определенного сет-листа.
Чтобы отредактировать сетлист, нажмите •••на левой стороне, а затем коснитесь значка карандаша. Вы увидите тот же экран, который вы использовали для создания сет-листа, где вы можете редактировать и сохранять его.
Чтобы удалить сетлист, нажмите ••• на левой стороне, а затем коснитесь значка корзины. Нажмите Да для подтверждения удаления или Отмена чтобы вернуться к экрану Setlists, не удаляя его.
Режим громкой связи
Режим громкой связи позволяет вам изменять любые настройки ваших моделей, используя только ножные переключатели и педаль экспрессии.
Чтобы войти в режим громкой связи, нажмите и удерживайте ножной переключатель 1 для перехода на страницу выбора режима, а затем нажмите и удерживайте ножной переключатель 1 снова.
Чтобы увеличить или уменьшить отображаемое значение, перемести епедаль xpression.
Чтобы уменьшить значение, отображаемое маленьким приращения, нажмите fвыключатель 1 и 2 (![]() ) одновременно.
) одновременно.
Чтобы увеличить значение, отображаемое маленьким приращения, нажмите педальные переключатели 2 и 3 (![]() ) одновременно.
) одновременно.
Чтобы отредактировать следующую модель в вашей установке, нажмите ножной переключатель 1.
Чтобы отредактировать предыдущую модель в вашей установке, держать ножной переключатель 1.
Чтобы показать следующий параметр для показанного модели, нажмите ножной переключатель 2.
Чтобы показать предыдущий параметр для показанного модели, держать ножной переключатель 2.
Чтобы выйти из режима громкой связи, нажмите ножной переключатель 3.
Тюнер / Темп
Вы можете использовать страницу Tuner / Tempo, чтобы настроить гитару и установить темп для временных эффектов.
Чтобы войти в режим тюнера / темпа, нажмите и удерживайте педаль 3 более одной секунды. В режиме тюнера / темпа отображается экран справа.
Чтобы изменить опорную высоту тюнера, коснитесь параметра, а затем поверните энкодер.
Чтобы включить звук во время настройки, нажмите педальный переключатель 1.
Ввод темпа нажатием педали, нажмите ножной переключатель 2 в желаемом темпе 3–8 раз, чтобы установить темп в ударах в минуту (BPM).
Чтобы выйти из этой страницы, нажмите ножной переключатель 3.
Наконечник: Вы также можете назначить Tap Tempo на педальный переключатель в установке на странице Hardware Assign.
Looper
HeadRush MX5 имеет встроенный лупер, который можно использовать для наложения композиций. Хотя работа лупера отображается на дисплее, вы можете удобно управлять большей частью с помощью ножных переключателей.
Петлитель вмещает до 20 минут звука за раз не более 50 слоя. Первый слой вашей петли может быть до 5 минут долго.
Чтобы записать первый слой петли, нажмите Запись ножной переключатель. Запись начнется немедленно, и индикатор ножного переключателя загорится. красный цвет. Нажмите Запись снова нажмите педаль, чтобы остановить запись и начать воспроизведение петли. Теперь ножной переключатель называется Наложить и индикатор педального переключателя желтый.
Для записи дополнительных слоев на петлю (наложение), нажмите Наложить ножной переключатель.
Наложение начнется немедленно, и индикатор ножного переключателя загорится. красный цвет. Нажмите Наложить снова нажмите педаль, чтобы остановить наложение и продолжить воспроизведение.
Чтобы стереть самый верхний (последний добавленный) слой петли, нажмите и удерживайте Кожура ножной переключатель. Самый верхний слой петли будут немедленно удалены. Этот процесс деструктивен, поэтому вы не сможете повторно добавить его позже.
Чтобы очистить полный цикл, нажмите и удерживайте Очистить ножной переключатель.
Этот процесс остановит воспроизведение и является разрушительным, поэтому вы не сможете повторно добавить его позже.
Чтобы сократить или удвоить длину петли, нажмите кнопку рядом с полем Длина, а затем поверните
кодировщик. Процесс деления вдвое является неразрушающим, поэтому вы можете восстановить исходный цикл и его содержимое, удвоив длину цикла.
Чтобы уменьшить или удвоить скорость петлителя, нажмите кнопку рядом с Скорость поле, а затем
повернуть кодировщик.
Наконечник: Используйте это для создания низких басовых линий или ультравысоких гитарных партий, которые вы обычно не могли бы сыграть.
Для обратного воспроизведения лупера нажмите кнопку рядом с полем «Воспроизведение», а затем поверните кодировщик.
Совет: создавайте жуткие эффекты, записывая слои в обратном порядке, а затем возвращаясь к нормальному воспроизведению.
Чтобы установить местоположение петлителя, нажмите кнопку рядом с полем «Воспроизведение», а затем поверните кодировщик, чтобы поместить его перед (Pre) или после (Post) цепочки сигналов. Перемещение лупера в препозицию позволяет редактировать установку без необходимости повторять один и тот же рифф снова и снова.
Чтобы выйти из лупера и вернуться к основному экрану, нажмите педальный переключатель Exit. Если лупер играет, воспроизведение продолжится.
Чтобы снова войти в лупер, снова нажмите и удерживайте ножной переключатель лупера.
Совет: используйте эту функцию для создания различных конфигураций эффектов (настройки параметров, активации / деактивации моделей и т. Д.) Для каждого слоя, создавая многотекстурное исполнение. Вы также можете переключать оснастку при использовании петлителя и использовать различную оснастку для каждого слоя.
Глобальные настройки
Используйте глобальные настройки для настройки общей работы HeadRush MX5.
Чтобы отобразить глобальные настройки, нажмите кнопку • • • в правом верхнем углу экрана и нажмите «Глобальные настройки».
Чтобы выбрать каждую страницу глобальных настроек, коснитесь числа в правом верхнем углу экрана.
Яркость ЖК-дисплея: этот параметр определяет яркость основного дисплея. Коснитесь этого поля, поверните энкодер, чтобы выбрать от 1 (тусклый) до 5 (яркий), а затем нажмите энкодер.
Аудио конфигурация:
Вход буровой установки: Этот параметр определяет, будет ли входной сигнал каждой установки взят из Guitar Input (Guitar) или левого (L) Return Input (FX Ret L). Когда установлено значение Per Rig, источник определяется настройкой Rig Input для каждой установки в блоке Input. Когда установлено FX Ret L или Per Rig, настройка FX-Loop Stereo Return будет отключена; сигнал будет монофоническим.
Уровень основного выхода: Эта настройка определяет уровень сигнала, отправляемого на основные выходы (1/4 дюйма / 6.35 мм, TRS). Когда установлено значение Line, выходной уровень будет +18 дБн. Используйте эту настройку, если вы подключаете HeadRush MX5 к полнодиапазонному, плоскому отклику. ampлифтер, динамик PA, микшер или аудиоинтерфейс. При установке на Amp, выходной уровень будет +6 дБн. Используйте эту настройку, если вы подключаете HeadRush MX5 к традиционной гитаре. ampпожизненнее.
Уровень возврата FX: Эта настройка определяет уровень сигнала, принимаемого входом FX Return (1/4 дюйма / 6.35 мм, TRS). При установке на стойку выходной уровень будет линейным, +18 дБн. Используйте эту настройку, если вы подключаете рэковый процессор эффектов к FXLoop HeadRush MX5. При установке на Stomp выходной уровень будет +6 дБн. Используйте эту настройку, если вы подключаете к FX-Loop традиционную гитарную педаль («стомпбокс»).
Стерео петли эффектов: Эти настройки определяют, будет ли входящий и исходящий сигнал в петле эффектов стерео или моно. Нажмите «Отправить», чтобы включить или отключить стереосигнал для выходов отправки. Нажмите «Return», чтобы включить или отключить стереосигнал для возвратных входов.
Настройки звука USB:
Внимание: Загрузите полное руководство пользователя HeadRush MX5 с сайта headrushfx.com, чтобы узнать больше о настройке DAW.
Важное примечание для пользователей Windows: перед подключением Headrush MX5 к компьютеру загрузите и установите необходимые драйверы с headrushfx.com/support.
Sample Rate: этот параметр определяетampСкорость аудиосигнала USB: 44.1 кГц, 48.0 кГц или 96.0 кГц. Не забудьте выбрать те же sample rate как в вашей DAW. Кроме того, установите его перед открытием DAW.
USB Audio: этот параметр определяет, отправляет ли HeadRush MX5 аудиосигнал USB через соединение USB. Коснитесь Вкл., Чтобы включить отправку аудиосигнала USB с выбранным Sample Rate. Нажмите «Выкл.», Чтобы отключить аудиосигнал USB. (Чтобы изменить Sample Rate, сначала установите USB Audio на Off, выберите правильнуюampскорости, снова включите USB Audio и перезапустите DAW.)
Режим USB: этот параметр определяет, как HeadRush MX5 отправляет аудиосигнал через USB-соединение и как при этом работают его выходы:
- Live: аудиосигнал будет отправлен на ваш компьютер, а также на выходы HeadRush MX5.
- DAW: аудиосигнал будет отправлен только на ваш компьютер. Выходы HeadRush MX5 будут отключены, чтобы предотвратить задержку во время мониторинга.
- Reamp: Ваш компьютер отправит аудиосигнал в HeadRush MX5, который обработает его через текущую установку и отправит обратно на ваш компьютер. Выходы HeadRush MX5 будут отключены, чтобы предотвратить задержку во время мониторинга.
Конфигурация педали:
External Pedal: этот параметр определяет, используете ли вы внешнюю педаль экспрессии с HeadRush MX5.
- Коснитесь Вкл., Чтобы использовать встроенную педаль экспрессии для управления параметрами / параметрами банка A, в то время как внешняя педаль экспрессии управляет параметрами / параметрами банка B. (Если вы используете классический режим педали экспрессии, нажатие переключателя на носке активирует или отключите параметр. Если вы используете расширенный режим, выключатель будет полностью отключен.)
- Коснитесь Off, чтобы отключить вход педали экспрессии и использовать только встроенную педаль экспрессии.
Напоминания:
Подтвердить несохранение: Этот параметр определяет, будете ли вы видеть подтверждающее сообщение, если вы меняете буровую установку, в то время как в текущей есть несохраненные изменения. Нажмите «Вкл», чтобы включить эти сообщения, или «Выкл.», Чтобы отключить их.
Либо коснитесь Больше не показывать это диалоговое окно в самом сообщении, чтобы отключить их.
Настройки MIDI: Эти настройки определяют, как HeadRush MX5 отправляет и принимает MIDI-информацию на внешние устройства и от них. Эти настройки влияют только на MIDI-вход или MIDI-выход HeadRush MX5.
MIDI через: Нажмите «Вкл.», Чтобы использовать выход MIDI в качестве пропускной способности MIDI; любая MIDI-информация, отправляемая на MIDI-вход HeadRush MX5, будет отправлена непосредственно на MIDI-выход. Нажмите Off, чтобы нормально использовать MIDI-выход HeadRush MX5; HeadRush MX5 сможет посылать собственную MIDI-информацию из MIDI-выхода.
Прием MIDI часов: Нажмите «Вкл.», Чтобы включить HeadRush MX5 для получения информации синхронизации MIDI. Нажмите Off, чтобы использовать собственные внутренние MIDI-часы HeadRush MX5 (которые не будут отправляться).
Изменение программы: Нажмите «Отправить», чтобы включить или отключить передачу HeadRush MX5 сообщений об изменении программы MIDI при загрузке оборудования. Нажмите Recv, чтобы включить или отключить прием сообщений изменения программы MIDI от внешнего MIDI-устройства HeadRush MX5.
MIDI-канал: Этот параметр определяет MIDI-канал (-ы), который HeadRush MX5 будет отправлять и получать MIDI-сообщения. Коснитесь этого поля, поверните кодировщик, чтобы выбрать все каналы (Omni) или 1–16, а затем нажмите кодировщик.
Назначение:
Автоматическое назначение: Этот параметр определяет, как модели назначаются переключателям. Нажмите «Вкл.», Если вы хотите, чтобы модели автоматически назначались следующему доступному переключателю при их загрузке. Нажмите «Выкл.», Если хотите, чтобы модели загружались без назначения переключателя; вам придется назначить их вручную на экране «Назначение оборудования».
Цветовой мод:
Если у вас возникли проблемы с различением определенных цветов на дисплее вашего MX5 или если вы просто хотите дополнительно настроить цветовую схему, вы можете использовать параметры цветовой модификации, чтобы изменить их настройки по умолчанию. Пока экспериментирую с настройками, так какampВаши настройки будут отображаться в режиме реального времени. Если вы хотите вернуться к цветовой схеме по умолчанию, настройки по умолчанию следующие:
| Глубина: 0% | Цвет: 36 градусов | Размах: 180 градусов |
Внимание: Функция Color Mod отключена, когда включена функция блокировки экрана.
Глобальный эквалайзер:
Эти настройки на странице 2 определяют, применяется ли / как эквализация для ваших выходов. Этот эквалайзер представляет собой четырехполосный параметрический эквалайзер.
Совет: эти настройки особенно полезны, когда место проведения, репетиционное пространство и т. Д. Имеет акустические характеристики, отличные от помещения, в котором вы изначально создали свои пресеты (например, место проведения может казаться более громоздким, или репетиционное пространство со звукоизоляцией может ослабить некоторые из высокие концы). Эта страница позволяет вам быстро применить некоторую дополнительную коррекцию ко всем вашим пресетам без их постоянного сохранения.
Эквалайзер включен: Этот параметр определяет, включена ли коррекция (Вкл.) Или отключена (Выкл.) Для выходов.
Уровень: этот параметр определяет, будет ли / насколько усилен или уменьшен уровень выходного аудиосигнала. Это значение применяет уровень, установленный ручкой Master.
Полоса низких и высоких частот: Эти настройки определяют, какой тип коррекции применяется к полосе самых низких частот (полоса низких частот) и полосе самых высоких частот (полоса высоких частот): полка или обрезка.
Низкий, низкий средний, высокий и высокий средний: Три настройки для каждой из этих четырех частотных полос определяют форму эквализации:
Первая настройка (Гц) определяет центральную частоту диапазона низких частот, диапазона низких-средних частот, диапазона высоких частот или диапазона высоких-средних частот. Вторая настройка (дБ) определяет, насколько эквалайзер усиливает или ослабляет сигнал в соответствующей полосе частот.
Третья настройка (Q) определяет ширину полосы частот. Чем выше настройка, тем шире будет полоса вокруг центральной частоты (первая настройка). Этот параметр применяется независимо от того, установлен ли диапазон низких или высоких частот на полку или обрезку.
Передающий Files & Настройки
Через USB-соединение вы можете передавать установку, сетлист, предустановку модели, петлю и / или импульсную характеристику (IR). files между вашим компьютером и HeadRush MX5.
Мы рекомендуем создать резервную копию вашего files на свой компьютер, прежде чем вносить какие-либо изменения.
важно:
Не отключайте и не выключайте HeadRush MX5 во время процесса.
Любые неподдерживаемые files будут проигнорированы.
Вы не можете передать папку или папку .zip / архив в / из HeadRush MX5. Вместо этого перенесите все поддерживаемые fileнапрямую.
Рекомендуем организовать file структура ваших ригов, сетлистов, пресетов моделей и / или импульсной характеристики files на вашем компьютере, чтобы он был идентичен file структура, как показано на «диске» HeadRush MX5.
Перевести files между HeadRush MX5 и вашим компьютером:
- Подключите компьютер к USB-порту HeadRush MX5 с помощью стандартного USB-кабеля.
- Включите компьютер и включите HeadRush MX5 с помощью выключателя питания.
- Нажмите кнопку • • • в правом верхнем углу экрана, а затем нажмите «Глобальные настройки».
- На экране «Глобальные настройки» нажмите кнопку • • • в правом верхнем углу экрана и нажмите «Передача по USB». На вашем компьютере HeadRush MX5 появится как запоминающее устройство под названием HeadRush. Пользователи Windows: если вы впервые подключаете его к этому компьютеру, возможно, вам придется подождать минуту, пока он установит драйверы, соответствующие классу.
- Откройте диск HeadRush. Теперь вы можете свободно щелкать и перетаскивать содержимое между HeadRush и вашим компьютером. Обратите внимание, что любые изменения, которые вы вносите в содержимое HeadRush, вносятся немедленно и не могут быть отменены.
- ВАЖНО: Когда вы закончите перенос содержимого, вы должны отключить / извлечь диск HeadRush из вашего компьютера. File повреждение может произойти, если диск не будет должным образом извлечен перед продолжением.
- После извлечения диска нажмите «Синхронизация» на HeadRush MX5, чтобы «зафиксировать» любые изменения, внесенные вами в содержимое диска HeadRush. Появится дополнительная подсказка, подтверждающая, что вы извлекли диск. Нажмите «Продолжить», чтобы продолжить, или «Отмена», чтобы продолжить доступ. files на вашем компьютере.
Поскольку HeadRush MX5 анализирует и импортирует files, индикатор на дисплее покажет его ход. По завершении процесса снова появится обычный экран глобальных настроек. Не отключайте и не выключайте HeadRush MX5 во время процесса синхронизации.
Инструкции по обновлению прошивки
- Подключите USB-порт на устройстве HeadRush к компьютеру и убедитесь, что устройство HeadRush и ваш компьютер включены.
- На устройстве HeadRush коснитесь значка ••• в правом верхнем углу и коснитесь «Глобальные настройки».
- На экране «Глобальные настройки» снова коснитесь значка ••• в правом верхнем углу и коснитесь «Обновление прошивки». На появившемся экране нажмите OK, чтобы продолжить. После перезапуска в нижней части экрана отобразится «Обновление».
- Откройте приложение HeadRush Updater для своей операционной системы — Windows или macOS. (Вы можете загрузить последнюю версию приложения для обновления с сайта headrushfx.com)
- Когда появится окно программы обновления, нажмите «Обновить HeadRush». Не отключайте и не выключайте устройство HeadRush или компьютер до завершения обновления.
- Когда обновление будет завершено, в окне программы обновления отобразится «Готово», и ваше устройство HeadRush перезагрузится. Щелкните Готово, чтобы закрыть окно программы обновления.
- Убедитесь, что на вашем устройстве Headrush установлена последняя версия микропрограммы: нажмите значок ••• в правом верхнем углу и нажмите «Глобальные настройки». Версия прошивки появится внизу экрана.
Приложение
Технические спецификации
| Ножные переключатели | (3) педальные переключатели с цветными светодиодами |
| Knobs | (1) регулятор общей громкости на 300 ° (1) 360 ° навигация / кодировщик данных |
| Монитор | (1) полноцветный дисплей со светодиодной подсветкой и сенсорным интерфейсом 4 мм (по диагонали) |
| Соединители | (1) моно вход 1/4 дюйма (6.35 мм) (гитара) (1) вход TRS 1/4 дюйма (6.35 мм) (педаль экспрессии) (1) стереовыход 1/4 дюйма (6.35 мм) (отправка) (1) стереовход 1/4 дюйма (6.35 мм) (возврат) (2) 1/4 ″ (6.35 мм) симметричный выход (основной) (1) 1/8 ″ (3.5 мм) стереовыход (наушники) (1) стереовход 1/8 ″ (3.5 мм) (вспомогательное устройство) ( 1) выход MIDI 1/8 дюйма (3.5 мм) (1) вход MIDI 1/8 дюйма (3.5 мм) (1) порт USB типа B (1) Вход адаптера питания постоянного тока |
| Питания | Подключение Вход адаптера питания постоянного тока |
| Vol входtage 12 В постоянного тока, 3.0 А, центрально-положительный | |
| Размеры (ширина x глубина x высота) |
2.75 ″ x 11.6 ″ x 7.6 ″ 70 x 295 x 195 мм |
| Вес | 3.46 фунтов. 1.57 кг |
Торговые марки и лицензии
HeadRush — товарный знак inMusic Brands, Inc., зарегистрированный в США и других странах. Avid и Eleven являются зарегистрированными товарными знаками Avid Technology, Inc. в США и других странах. Все другие названия продуктов, названия компаний, товарные знаки или торговые наименования являются собственностью их соответствующих владельцев.
headrushfx.com
Версия руководства 1.4
Документы / Ресурсы
Рекомендации
HEADRUSH MX5 Manual
Introduction
Box Contents
HeadRush MX5
USB Cable
(2) 1/8″ (3.5mm) to MIDI Adapters
Power Adapter
Software Download Card
Quickstart Guide
Safety & Warranty Manual
Support
For the latest information about this product (documentation, technical specifications, system requirements, compatibility information, etc.) and product registration, visit headrushfx.com.
For additional product support, visit headrushfx.com/support.
Features
Top Panel
- Display: This full-color multi-touch display shows information relevant to HeadRush MX5’s current operation. Touch the display (and use the hardware controls) to control the interface. See Operation to learn how it works.
- Main Volume: Turn this knob to adjust the volume level of the outputs.
- Encoder: Turn this encoder to scroll through the available menu options or adjust the parameter values of the selected field in the display. Push the encoder to confirm your selection.
- Footswitch Indicators: These lights indicate whether the stomp, rig, or scene assigned to each footswitch is on (brightly lit) or off (dimly lit).
- Footswitches: Press these footswitches to activate or deactivate the assigned model or scene, or to load the assigned rig.
- Expression Pedal: Use this pedal to adjust the assigned parameter/parameters. See Operation >Hardware Assign > Expression Pedal for more information.
Rear Panel
- Guitar Input (1/4″/6.35 mm, mono): Connect your guitar to this input using a standard instrument cable.
- Expression Pedal Input (1/4″/6.35 mm, TRS): Connect an optional additional expression pedal to this input using a standard 1/4″ (6.35 mm) TRS cable.
- FX Send Output (1/4″/6.35 mm, stereo): Connect this output to the input of another effects module, an effect pedal, or the effects loop return of an amplifier.
- FX Return Input (1/4″/6.35 mm, stereo): Connect this input to the output of another effects module, an effect pedal, or the effects loop send of an amplifier.
Note: You can set the FX Return Input to receive signal at rack level or stomp level (default) in the Global Settings Menu. - Outputs (1/4″/6.35 mm, balanced): Connect these outputs to the inputs of your amplifier, audio interface, etc. If you only need to use one output, use the one labeled Left/Mono.
Note: You can set these outputs to send signal at amp level or line level (default) in the Global Settings Menu. - Phones Output (1/8″/3.5 mm, stereo): Connect standard 1/8″ (3.5 mm) stereo headphones to this output.
- Aux Input (1/8″/3.5 mm, stereo): Connect an optional audio source (e.g., smartphone, tablet, etc.) to this input using an 1/8″/3.5 mm stereo cable.
- MIDI Output (1/8″/3.5 mm): Use the included 1/8″-to-MIDI adapter and a standard MIDI cable (not included) to connect this output to the MIDI input of an optional external MIDI device.
- MIDI Input (1/8″/3.5 mm): Use the included 1/8″-to-MIDI adapter and a standard MIDI cable (not included) to connect this input to the MIDI output of an optional external MIDI device.
Do not connect audio devices (e.g., headphones, monitors, etc.) to the MIDI Output or MIDI Input. Use the included 1/8″-to-5-pin adapters to connect MIDI devices only.
- USB Port: Connect this USB port to a computer using a standard USB cable. This connection allows HeadRush MX5 to send and receive the digital audio signal to and from your computer. You can also use this connection to import or export rigs, model presets, setlists and impulse responses.
- Power Input: Connect this input to a power outlet using the included power adapter.
- Power Switch: Press this button to turn HeadRush MX5’s power on. Press and hold this button to turn HeadRush MX5’s power off.
- Vent: Make sure this vent is unobstructed while using HeadRush MX5.
Setup
Items not listed under Introduction > Box Contents are sold separately.
In the Global Settings Menu, make sure you set the Outputs to send signal at amp level if you are using a traditional guitar amplifier, or line level (default) if you are using a full-range flat-response amplifier, mixer, PA speaker or audio interface.
Operation
This chapter describes some of HeadRush MX5’s basic functions.
Main Screen
Overview
- Turn encoder to move through selectable items onscreen or to adjust parameters. Press encoder as an Enter command.
- Tap to view setlists.
- Rig name.
- Tap and drag this bar downward to view list of rigs.
- Tap to save rig.
- This button toggles between the different routing options for a rig.
- This button enables or disables reverb and delay tails when switching to another rig.
- These three blocks show the current function of the three footswitches.
- Tap its footswitch to activate or deactivate it.
- Double-tap a model, In, or Out to show its parameters.
Basic Operations
The sequence of models in your signal chain is not necessarily reflected in the footswitches. You can freely assign models to available footswitches without changing your signal chain at all—and vice versa. See Hardware Assign to learn about this.
To assign a model (amp, cab, impulse response, or effect) to an empty slot, tap it (+) and then use the list that appears. See Rigs > Creating a New Rig to learn about this.
To rearrange the models in your signal chain, tap and drag a model to another slot or between two other models (the ones after that position will shift one slot further down the signal chain).
To activate or deactivate a model, press the footswitch assigned to it, or tap the model and then tap the On/Off button that appears in the top right corner.
To switch an amp and/or cab between a dual and single configuration, tap the model and then tap the X 2 button that appears in the top right corner.
To show a model’s settings screen, double-tap it.
To load another rig (preset):
- Tap the name of the rig on the screen and then turn the encoder.
- Press footswitches 1 and 2 (s), or footswitches 2 and 3 (r) simultaneously when MX5 is in Stomp Mode.
- Press a footswitch assigned to a preset when MX5 is in Rig Mode.
- Press a footswitch assigned to Prev Rig or Next Rig when MX5 is in Hybrid Mode.
To create a new rig, tap the ••• button in the upper-right corner, and then tap New Rig.
To rename the current rig, double tap the rig name, or tap the ••• button in the upper-right corner, and then tap Edit Rig Name.
To delete the current rig, tap the ••• button in the upper-right corner, and then tap Delete Rig, and then tap Yes to continue or No to cancel.
To show a list of available rigs on your HeadRush MX5, tap the rig name and drag downward. On this list you can tap a rig’s name to load it.
To hide this list, tap the current rig name and drag upward.
Note: If you have not selected a setlist, all rigs on your HeadRush will be shown on this rig list. If you have selected a setlist, only the rigs from that setlist will appear on this rig list.
To search for a rig on your HeadRush, tap the magnifyingglass icon in the upper-left corner and use the virtual keyboard that appears to enter a search term (e.g., part of the rig name). The results will appear below. Tap a result to load that rig.
Reverb/Delay Tail Spillover
The MX5 features two types of Reverb/Delay Tail Spillover:
- If you have reverb and/or delay effect(s) active on your rig and then switch to a different rig, the effect(s) will continue to decay after switching to the second rig.
- If you have a reverb or delay effect active on your rig and then bypass this effect, it will continue to decay after it is bypassed.
To enable or disable this feature for the current rig, tap Tail on the Main Screen.
Note: This feature will not work if you are using the FX Loop or USB Audio features.
To enable or disable Reverb/Delay Tail Spillover for an individual effect, first double tap the effect on the Main Screen. Then, use the Tails parameter to toggle the feature On or Off.
Note: Adjusting this parameter will not impact the Reverb/Delay Tail Spillover setting for the whole rig.
Signal Path
You can easily reconfigure the path of your signal chain to split, which will create more complex routings.
To reconfigure the signal path, tap toward the top right of the main screen. The icon will change to match one three possible signal paths (as shown below).
This straight signal path is the default and the most common.
This signal path splits in the middle and rejoins near the end. This configuration is useful if you want to use two types of effects (or chains of effects) but want to keep their signals separate.
See Adjusting Settings> Parameters > Mix to learn how to mix the split paths together.
This signal path splits immediately from the source and rejoins near the end. Like the second configuration, this one is useful for using two types of effects (or chains of effects independently, but it allows for more models in the split paths and the rejoined one).
See Adjusting Settings> Parameters > Mix to learn how to mix the split paths together.
Stereo vs. Mono
The outgoing signal from the HeadRush MX5 can be mono or stereo, depending on the models in your rig, the signal path, and which outputs you are using. An indicator near the end of the signal path indicates the current configuration.
The signal will be stereo if you do any one of the following:
- Use any stereo effect model in your signal chain. Even if you have placed mono effect models after it. (This is possible because the mono effect is simply applied identically to both channels and not summed).
- Use a split signal path, even if the split paths rejoin before the output.
- Use a double-amp and/or double-cab configuration (i.e., if 2X is on).
The signal will be mono if you do all of the following:
- Use no stereo effect models in your signal chain.
- Use the linear (not split) signal path.
- Use only single-amp and single-cab configurations, if you use an amp or cab model at all.
Alternatively, the signal will be mono if you do any one of the following:
- Use only the L/Mono output (of a stereo pair) on the rear panel.
- Reduce the Rig Width output setting to 0%.
To adjust the width of the stereo field, tap the Out icon at the end of your signal path, and turn the third parameter knob to adjust the Rig Width output setting. This affects stereo signals only, not mono signals. 100% uses the full stereo field, while 0% produces a mono signal.
Footswitch Modes
The three footswitches can be used to activate or bypass models (amps, cabs, impulse responses, or effects) as well as select scenes, rigs, or setlists. These footswitches are always in one of four modes: Stomp, Rig, Hybrid, or Setlist.
To change the mode, hold footswitch 1, then:
- To select Stomp mode, press footswitch 1
- To select Rig mode, press footswitch 2
- To select Hybrid mode, press footswitch 3
- To select Setlist mode, hold footswitch 2
Stomp Mode
Footswitches 1-3 correspond to models (amps, cabs, or effects) in your signal chain. Press a footswitch to activate or deactivate its model.
To load the next rig, press footswitches 1 and 2 (s) simultaneously.
To load the previous rig, press footswitches 2 and 3 (r) simultaneously.
Rig Mode
Footswitches 1-3 correspond to rigs you have previously saved. Press a footswitch to load its rig.
To show the next bank of three rigs, press footswitches 1 and 2 (s) simultaneously.
To show the previous bank of three rigs, press footswitches 2 and 3 (r) simultaneously.
Hybrid Mode
The first footswitch can be assigned to activate/deactivate a model or to select a scene in the currently selected rig.
To switch to the previous rig, press footswitch 2.
To switch to the next rig, press footswitch 3.
Setlist Mode
To enter the currently shown setlist, press footswitch 1.
To show the previous setlist, press footswitch 2.
To show the next setlist, press footswitch 3.
To enter the All Rigs setlist, press and hold footswitch 1.
Rigs
While using HeadRush MX5, a rig is a preset: the combination of assigned models—the amps, cabs, impulse responses, and effects—and the parameter settings of each of them. You can create, edit, save, and load rigs, making it easy to recall the perfect sound for each part of your performance.
Each rig has 11 slots, each of which can have one model (amp, cab, or effect) assigned to it. Assigned slots will show graphical representations of the models, and empty slots will show a + symbol.
Creating a New Rig
To create a new rig, tap the ••• button in the upper-right corner of the screen, and tap New Rig.
To assign a model (amp, cab, or effect) to an empty slot:
- Tap the empty slot (+).
- In the list that appears, tap the type of model you want to assign: Amp, Cab, IR (impulse response), or effect (Distortion, Dynamics/EQ, Modulation, Reverb/Delay, FXLoop, or Expression).
- In the list that appears, tap the model you want to assign.
- In the next list that appears, tap the preset you want to load for that model.
If you load an amp or cab to a slot with an empty adjacent slot, a matching amp or cab will be loaded automatically to the other slot. After that, you can configure them independently: you can separate them in the signal chain, you can change the type of the amp or cab, and you can delete each model separately.
Optimizing Your Signal Chain
The signal chain is the path that the audio signal follows from your guitar through your selected models and ends at the outputs of HeadRush MX5. You can use the touchscreen to arrange your selected models in any sequence, but you may find that some configurations will sound better than others.
Here are some common model placement suggestions for creating tones with HeadRush MX5:
- Dynamics (e.g., compressors), filters (e.g., wah, pitch shifters), and volume pedals generally are placed at the beginning of the signal chain. Alternatively, you can place volume pedals at the end of the signal chain to provide a slight variance in functionality.
- Gain-based effects (e.g., overdrive/distortion, fuzz) usually come next.
- Equalization (EQ) is often used to shape the tonal characteristics of overdrive/distortion and fuzz effects, so put an EQ after them. Alternatively, place it before them to shape the guitar’s general tone—cutting unwanted frequencies—before the gain pedals.
- Modulation effects like flangers, phasers, and chorus are typically placed next.
- Time-based effects like delays and reverbs are generally placed near the end of the signal chain.
- An amp and a cab (or an amp and impulse response) are often placed at the very end of the signal chain, although you can place it wherever you want.
Saving a Rig
If you have made certain changes to the rig at all since loading it, you will see an asterisk () next to its name at the top of the screen. You will see an asterisk if you have done any of the following:
- Assigned a model to the rig
- Deleted a model from the rig
- Moved a model in the signal chain
- Changed a model’s preset (see Adjusting Settings to learn more)
- Made any change in the Hardware Assign screen (see Hardware Assign to learn more)
Activating or deactivating a model or using the expression pedal on any screen will not cause the asterisk to appear.
You can save these changes to this rig, save these changes as another rig, or discard them altogether.
To save a rig, tap Save in the upper-right corner. The prompt shown left will appear.
To save your changes to the current rig, tap Save.
To save your changes as a new rig, tap Save New Rig, use the keyboard that appears to enter a name, and then tap Save.
To return to the previous screen without saving, tap Cancel at any time.
To discard any changes you’ve made to the rig, tap the ••• button in the upper-right corner, and tap Discard Changes.
If the asterisk is shown and you try to load a different rig, you will be asked to select one of these options:
- Cancel: This option returns to the previous screen without saving the current rig or loading a new rig.
- Save as a New Rig: This option lets you save the current rig as a new rig. In the screen that appears, use the keyboard that appears to enter a name, and then tap Save. That rig will be saved, and the new rig will load.
- Save: This option saves any changes you made to the rig and then loads the new rig.
- Discard Changes: This option loads a new rig without saving any changes to the previous rig.
Deleting a Rig
To delete the current rig, tap the ••• button in the upperright corner, tap Delete Rig, and then tap Yes to continue or No to cancel.
Note: Select Do not show this dialog again in the message to disable these confirmation messages. You can re-enable them in the Global Settings screen.
Adjusting Settings
To adjust the settings of an item in your rig, double-tap it to open its settings screen. You can adjust the settings of any model (amp, cab, or effect), the input (the In/Lock icon), the output (the Out icon), or mix (the Mix icon).
Overview
- Turn encoder to move through selectable items onscreen or to adjust parameters. Press encoder as an Enter command.
- Tap to return to retain your changes and return to the main screen.
- Tap the Preset menu to select a preset.
- See Saving a Block Preset.
- Tap this button and tap Discard Changes to discard any changes you’ve made since opening this screen.
- Tap an Off/On parameter button to change the parameter’s setting accordingly.
- Tap and drag a slider left and right to adjust the parameter’s settings. Alternatively, tap the slider and use the encoder for fine adjustments.
- Tap Cancel to return to discard your changes and return to the main screen.
- Tap a color to assign it to this model. That color will be shown on the main screen, in the Hardware Assign screen, and in the footswitch indicator for this model.
- Tap Delete to unassign the model from the slot.
- Tap the model name to assign a different model to this slot.
Parameters
These are some of the parameters that you can adjust for each type of rig item. The types include amps, cabs, effects, input settings, output settings, and mix settings (if you are using a split signal path). See Saving a Block Preset to learn how to save your preset after adjusting its parameters.
Amp
The Amp category is a list of popular guitar amplifiers.
Preset: This is the current amp preset, which includes the model, all its settings, and its color assignment.
Model: This is the amp model.
Amp Settings: These are the settings for the selected amp model (different models may have more or fewer settings).
Cab Link: This setting determines whether a specific cab and microphone are associated with the amp. When set to Off, any cab and microphone used in the current rig will be completely independent of the amp you select. When set to On, a specific cab and microphone combination will be used if you change the amp’s Preset setting or if you load a new amp to the rig. You can still change the cab and microphone manually afterward by adjusting the parameters of the cab model.
Color: This is the assigned color, which will appear in the Hardware Assign screen and the switch indicator if the amp is assigned to a switch.
Cab
The Cab category is a list of popular amp cabinets, which contain the speakers. The HeadRush MX5 recreates not only the sound of the cabinet but also the type of microphone recording it.
Preset: This is the current cab preset, which includes the model, all its settings, and its color assignment.
Cab Type: This is the cab type. Numbers notated as _X__ indicate the number of speakers it has and the size of each speaker (e.g., 2X12 denotes a cab with two 12-inch speakers, 4X10 denotes a cab with four 10-inch speakers). Numbers notated as __W indicate the emulated wattage (output power) of the speaker.
Mic Type: This is the type of microphone being used on the cab. You can select different models of dynamic (Dyn), condenser (Cond), or ribbon (Ribbon) microphones.
Mic Settings: These are the settings for the microphone:
Break Up: This determines the amount of speaker «breakup»—the natural distortion that occurs when the audio signal overdrives the speaker.
On-Axis: This determines the microphone position relative to the cab. On-axis placement (On) positions the microphone at the center of the speaker, usually resulting in a brighter sound with more definition. Offaxis placement (Off) is slightly offset at and angle from the center of the speaker and often sounds darker in tone.
Out Gain: This is the cab’s output gain level.
Color: This is the assigned color, which will appear in the Hardware Assign screen and the switch indicator if the cab is assigned to a switch.
IR
The IR category contains factory-loaded and user-loaded impulse response files. The HeadRush MX5 supports all. WAV format impulse response files with sample rates up to 192 kHz, bit depths up to 32-bit, and sample lengths up to 2,048 samples.
Preset: This is the current IR preset, which includes the impulse response, all its settings, and its color assignment.
Folder: This is the folder containing your IR files. IRs can be organized into folders by creating a folder on your Mac or PC while using the USB Transfer Mode. IRs generally have a very small file size, so the MX5 can store thousands of IRs at once.
IR File: Once you have selected a folder above, you can select a specific IR file here.
Gain: Adjusts the overall volume level of the IR.
HiCut and LoCut: These settings adjust the high-end and low-end of the IR tone, respectively.
Mix: This setting adjusts the mix of between the incoming signal and the IR.
Note: While using the model selector to add a block, you can load a full 2,048 sample impulse response by selecting IR, or a truncated 1,024 sample IR by selecting IR 1024. For the highest quality sound, use the 2,048 sample IR type. To save DSP power for adding more effects to your rig, use the 1,024 sample IR type.
Effects
There are several types of available effects. Their adjustable settings depend on the type of effect.
In
These input settings control the signal into the models of your rig:
Preset: This is the current input preset, which includes its settings on the right edge of the display and its locked/ unlocked state.
Parameters: This menu determines whether these input settings are locked or unlocked.
When unlocked, the settings will change to the new rig’s input settings each time you load a new rig. The lock icon on the main screen will be grey.
When locked, the settings will be retained as «global» input settings, regardless of the rig. The lock icon on the main screen will be red.
Rig Input: This setting determines whether the rig’s input signal is taken from the guitar input (Guitar) or the left (L) return input (FX Ret L). This menu is shown only when Rig Input is set to Per Rig in the global settings (see Global Settings to learn about this).
Input Level Meter: This level meter indicates the current level of your input signal before the input controls shown on this screen.
Gain: This setting controls the gain level of the signal sent from your guitar into your rig. The available range is -60.0 to 12.0 dB.
Gate Thrsh (Threshold): This setting controls the signal level required to open the noise gate, enabling the guitar signal to be sent to the rig. The available range is -120.0 to 0.0 dB. The threshold is represented by a white line on the input level meter.
Gate Rel (Release): This setting controls the amount of time it will take for the noise gate to close once the incoming guitar signal stops. The available range is 1–3000 ms.
USB Level: This setting controls the level of the audio signal sent from your computer to the HeadRush MX5 over a USB connection. The available range is -60.0 to 12.0 dB.
Out
These output settings control the signal sent to the HeadRush MX5 outputs:
Preset: This is the current output preset, which includes its settings on the right edge of the display.
Rig Output: This level meter indicates the current level of your output signal after the output controls shown on this screen. You can set which outputs will send this signal in the Global Settings screen.
Alternate Output: This level meter indicates the current level of your output signal. You can set which outputs will send this signal in the Global Settings screen. The To Amp Gain settings controls the level of this signal unless the Alternate Output source is set to Rig Input.
Rig Vol (Volume): This setting controls the level of the audio signal sent from the outputs. The available range is -60.0 to 36.0 dB.
To Amp Gain: This setting controls the gain level of the signal for the Alternate Output, unless the Alternate Output source is set to Rig Input. See Global Settings to learn about this. The available range is -60.0 to 12.0 dB.
Rig Width: This setting controls how much of the stereo field the output signal uses. 100% uses the full stereo field, while 0% produces a mono signal. This affects stereo signals only, not mono signals. See Main Screen > Stereo vs. Mono to learn how the HeadRush MX5 handles stereo and mono signals.
Mix
These settings control mix of a split signal path. This is available only for rigs with split signal paths (see Main Screen > Signal Path to learn more):
Preset: This is the current mix preset, which includes its settings on the right edge of the display.
A Lev / B Lev (Level): These settings control the volume levels the upper (A) and lower (B) branches of the signal path. The range is -60.0 dB to +12.0 dB.
A Pan / B Pan: These settings control the panning (position in the stereo field) the upper (A) and lower (B) branches of the signal path. The range is -100% to +100%.
A/B Delay: This setting controls a timing offset between the upper (A) and lower (B) branches of the signal path. The range is -30000μs to +30000μs. If the value is negative (—), the A branch is delayed. If the value is positive (+), the B branch is delayed.
Saving a Block Preset
To save a block preset, tap Save in the upper-right corner.
To save your changes to the current block preset, tap Save.
To save your changes as a new preset, tap Save New Preset, use the keyboard that appears to enter a name, and then tap Save.
To return to the previous screen without saving, tap Cancel at any time.
Hardware Assign
The Hardware Assign screen enables you to customize how HeadRush MX5’s footswitches and an expression pedal control each rig.
To open the Hardware Assign screen, tap the ••• button in the upper-right corner of the main screen, and then tap Hardware Assign.
To return to the main screen, tap the button in the upper-left corner.
The Hardware Assign settings are all part of the overall rig, so remember to save your changes you want to keep.
To set the color associated with the rig, tap it in the upper-left part of the screen. This color will appear next to the rig name when you view a list of all available rigs or when you view and create setlists. It will also be the color of the corresponding footswitch indicator when the HeadRush MX5 is in Rig Mode.
To set the tempo of the rig’s time-based effects (delays, modulation, etc.), tap the button under Tempo to select Current or Fixed.
Current: The rig will use the last-used tempo or the one set by the Tempo footswitch.
To set the tempo, press the Tempo footswitch at the desired tempo 3–8 times to set the new tempo in beats per minute (BPM).
Fixed: The rig will use a tempo that you set here.
To set the tempo, turn the encoder to set the desired tempo in beats per minute (BPM). You can set the tempo only in this Hardware Assign screen.
To load a rig when a MIDI program change is received from an optional external MIDI device, or to send a MIDI program change message when a rig is loaded, tap the button under MIDI, and then turn the encoder to select a MIDI program change number. You can adjust whether MIDI program changes are received and/or sent in the Global Settings menu.
Note: If a rig is using a number, that number will be unavailable and cannot be assigned to another rig. Additionally, saving a rig with a new name will save the rig but without the program change number to prevent rigs from sharing the same number.
Footswitches
The 3 boxes in the lower-left corner represent the 3 footswitches of HeadRush MX5. You can assign any switchbased parameters (ones with only two states) to any of the footswitches—regardless of their location in the signal chain.
To assign a parameter to a footswitch:
- Tap a box. + indicates an empty box.
- In the list that appears, tap the model with the parameter you want to assign.
- In the list that appears, tap the parameter you want to assign. Usually, the parameter will simply be On (to activate or deactivate it).
Tap Unassigned x to unassign that footswitch.
To swap two assignments, tap and drag one of them over the other, and then release it.
Scenes
The Scene feature allows you to turn multiple models on or off in each rig, as well as select different change model presets. When you press the footswitch assigned to that scene, all models included in that scene will turn on or off, or change to a different preset, depending on how you assign them. This is a great way to create multiple tones in the same rig. For instance, you may want a particular reverb model to be on anytime a particular distortion model is also on. Alternatively, you may want to turn one delay model off when you turn another one on. Scenes enable you to do this with only one footswitch press.
To create and edit a scene:
- On the Hardware Assign screen, tap Toggle/Scene for the desired footswitch to cycle through the available options, and select Scene.
- On that model, tap Edit. The Scene Editor will appear, which shows all models in your rig.
- For each model in the rig, tap the first line of text to cycle through the available options:
- On: This model will turn on when you turn the scene on.
- Off: This model will turn off when you turn the scene on.
- No Change: This model will remain unaffected when you turn the scene on.
- For each model in the rig, tap the second line of text to configure a model preset to be loaded when the scene is activated.
- Tap a color at the top of the touchscreen to select a color for the scene.
- Tap the button in the upper-left corner to return to the Hardware Assign screen.
To rename a scene (which appears in the footswitch indicators), tap the text in the box below Edit on the model, use the virtual keyboard that appears to enter a name, and then tap anywhere other than the text field.
Expression Pedal
The expression pedal can control two parameters (in Classic Mode) or two sets of parameters (in Advanced Mode). Use the toe switch to switch between them—Expression Pedal A or B.
To activate the toe switch, move the «toe end» of the expression pedal so it touches the MX5, and then press down.
Note: When you save your rig, the current selected Expression Pedal state (A or B) will be saved and then recalled when you load the rig again.
The column of four boxes represents the expression pedal settings. You can assign one or more continuously adjustable parameters (ones with a range of values) to the expression pedal.
To set the expression pedal mode, tap the button above Range in the upper-right corner to select Classic or Advanced.
- Classic: You can assign one parameter to each expressional pedal (A and B). Using the toe switch will select the other expression pedal and deactivate (bypass) the current expression pedal’s parameter. For instance, if you assign a wah pedal to Expression Pedal A and a volume pedal to Expression Pedal B, only one of them will be active at any time; when you are controlling the wah pedal, the volume pedal will be bypassed, and vice versa.
- Advanced: You can assign up to four parameters to each expression pedal (A and B). Moving the pedal will adjust all of its assigned parameters simultaneously. Using the toe switch will select the other expression pedal and leave the current pedal’s parameters active and at their maximum values.
To assign a parameter to the expression pedal:
- If the Assign button is not on, tap it.
- Tap a box under the Assign button. + indicates an empty box.
- In the list that appears, tap the model with the parameter you want to assign.
- In the list that appears, tap the parameter you want to assign.
Tap Unassigned x to unassign that box.
To swap two assignments (while in Advanced Mode), tap and drag one of them over the other, and then release it.
To set the range of an assigned parameter:
- If the Range button is not on, tap it.
- Tap a value under the Range button.
- Turn the encoder to set the desired value as a percentage of the parameter’s entire range. Press the encoder or tap elsewhere to confirm the value.
Setlists
You can use setlists to organize your rigs. A setlist is a saved collection of rigs, which you can save and recall at a later time. This is useful, for instance, if you only need some of your rigs for a performance; you can save a setlist of just those rigs so you don’t have to spend time searching through all of your rigs before playing the next song.
To view your setlists, tap the button in the upper-left corner of the main screen. The Setlists screen will appear.
To return to the main screen, tap the button in the upper-left corner.
To create a setlist:
- Tap New in the upper-right corner.
- In the screen that appears, the left half is a list of all available rigs, and the right half is the list of rigs in the setlist.
To add a rig to the setlist, tap it to add it to the end of the list. Alternatively, tap and hold it, and then drag it to the desired location in the list. You can add the same rig to a setlist more than once. The [Empty +] rig in the lower-left corner is a slot to use as a placeholder to make rearranging the setlist easier; it will not be available as a selectable rig when moving through rigs in the setlist.
To rearrange the setlist, tap and hold a rig in the list on the right half, and then drag it to the desired location in the list.
To remove a rig from the setlist, tap the x on its right edge.
To save a setlist, tap Save in the upper-right corner.
To save your changes to the current setlist, tap Save.
To save your changes as a new setlist, tap Save New Setlist, use the keyboard that appears to enter a name, and then tap Save.
(At any time) To return to the previous screen without saving, tap Cancel.
To discard any changes you’ve made to the setlist, tap the button in the upper-left corner, and tap Discard Changes.
To load a setlist:
- While viewing the main screen, tap the ≡ button in the upper-left corner to view the Setlists screen. Each setlist will show the number of rigs in parentheses (including multiple instances of the same rig).
- Optional: Tap the magnifying-glass icon in the upper-left corner, and use the virtual keyboard that appears to enter a search term (e.g., part of the setlist name). The results will appear below.
- Tap the desired setlist. The first rig of that setlist will load immediately. Tap All Rigs to view all rigs instead of a specific setlist.
To edit a setlist, tap the ••• button on its left side, and then tap the pencil icon. You will see the same screen you used to create the setlist, where you can edit and save it.
To delete a setlist, tap the ••• button on its left side, and then tap the trash can icon. Tap Yes to confirm the deletion or Cancel to return to the Setlists screen without deleting it.
Hands-Free Mode
Hands-Free Mode enables you to adjust any of the settings on your models by using just the footswitches and expression pedal.
To enter Hands-Free Mode, press and hold footswitch 1 to enter the mode select page, and then press and hold footswitch 1 again.
To increase or decrease the value shown, move the expression pedal.
To decrease the value shown in small increments, press footswitch 1 and 2 () simultaneously.
To increase the value shown in small increments, press footswitch 2 and 3 () simultaneously.
To edit the next model in your rig, press footswitch 1.
To edit the previous model in your rig, hold footswitch 1.
To show the next parameter for the shown model, press footswitch 2.
To show the previous parameter for the shown model, hold footswitch 2.
To exit Hands-Free Mode, press footswitch 3.
Tuner/Tempo
You can use the Tuner/Tempo page to tune your guitar and set a tempo for time-based effects.
To enter Tuner/Tempo mode, press and hold footswitch 3 for over one second. While in Tuner/Tempo Mode, the screen to the right is shown.
To change the tuner reference pitch, tap the parameter and then turn the encoder.
To unmute your signal while tuning, press footswitch 1.
To enter a tempo via tapping a footswitch, press footswitch 2 at the desired tempo 3–8 times to set the tempo in beats per minute (BPM).
To exit this page, press footswitch 3.
Tip: You can also assign Tap Tempo to a footswitch within a rig on the Hardware Assign page.
Looper
The HeadRush MX5 has a built-in looper that you can use to layer your performances. While the looper’s operation is shown in the display, you can control most of it conveniently with the footswitches.
The looper can hold up to 20 minutes of audio at a time across a maximum of 50 layers. The first layer of your loop can be up to 5 minutes long.
- This meter indicates your current location in the loop during recording or playback.
- Rig name.
- Loop file name.
- Tap here to save, load, rename and delete loops.
- This controls how much of the looper’s signal you hear in the outputs.
- This controls how much of the looper’s signal is routed back through it when recording another layer.
- This indicates whether the looper is located before (Pre) or after (Post) your signal chain. Moving the looper to the Pre position enables you to edit your rig without having to play the same riff over and over again.
- This indicates the direction of playback.
- This indicates the length of the current loop.
- This indicates the current speed of the loop as a multiple or fraction of the original.
- This indicates how many layers are playing in the current loop, including the original.
To record the first layer of a loop, press the Record footswitch. Recording will begin immediately and the footswitch indicator will light red. Press the Record footswitch again to stop recording and start loop playback. The footswitch is now called Overdub and the footswitch indicator is yellow.
To record additional layers onto the loop (overdub), press the Overdub footswitch. Overdubbing will begin immediately and the footswitch indicator will light red. Press the Overdub footswitch again to stop overdubbing and continue playback.
To erase the top-most (last-added) layer of the loop, press and hold the Peel footswitch. The top-most layer of the loop will be erased immediately. This process is destructive, so you can’t re-add it later.
To clear the full loop, press and hold the Clear footswitch. This process will stop playback and is destructive, so you can’t re-add it later.
To halve or double the length of the loop, tap the button next to the Length field and then turn the encoder. The halving process is non-destructive, so you can restore your original loop and its content by doubling the length of the loop.
To halve or double the speed of the looper, tap the button next to the Speed field and then turn the encoder.
Tip: Use this to create low bass lines or ultra-high guitar parts that you couldn’t ordinarily play.
To reverse looper playback, tap the button next to the Playback field and then turn the encoder.
Tip: Create eerie effects by recording layers in reverse then switching back to normal playback.
To set the looper’s location, tap the button next to the Playback field and then turn the encoder to place it before (Pre) or after (Post) the signal chain. Moving the looper to the Pre position enables you to edit your rig without having to play the same riff over and over again.
To create a new loop, tap the ••• button in the top right corner, and then tap New Loop. Tap Yes to clear the looper and create a new loop, or tap No to return to the Looper screen without creating a new loop.
To save a loop, tap the ••• button in the top right corner, and then tap Save Loop. Tap Yes to confirm the save, or tap Cancel to return to the Looper screen without saving it.
To load a loop, tap the ••• button in the top right corner, and then tap Load Loop. Use the file browser that appears to select the loop to load, and then tap Import to load the loop, or tap Cancel to return to the Looper screen without deleting it.
Tip: You can import.WAV and .MP3 audio files and load them into the looper by placing the files in the /LOOPS/ directory of the HeadRush MX5 while using the USB Transfer feature.
To edit a loop’s name, tap the ••• button in the top right corner, and then tap Edit Loop Name. Use the keyboard to type a new name, and then tap OK to confirm the new name, or tap Cancel to return to the Looper screen without renaming the loop.
To delete a loop, tap the ••• button in the top right corner, and then tap Delete Loop. Tap Yes to confirm the deletion, or tap No to return to the Looper screen without deleting it.
To exit the looper and return to the main screen, press the Exit footswitch. If the looper is playing, playback will continue.
To re-enter the looper, press the Looper footswitch again.
Tip: Use this feature to create different effect configurations (adjust parameters, activate/deactivate models, etc.) for each layer, creating a multi-textured performance. You can also switch rigs while using the looper and use a different rig for each layer.
External MIDI Control
The HeadRush MX5 can be controlled by incoming MIDI CC (control change) messages from external MIDI gear. These MIDI messages can be received from hardware connected to 1/8″ (3.5 mm) MIDI Input only.
The chart below lists the available parameters that can be controlled by external MIDI hardware:
| CC# | Action |
| 50 | Footswitch 1 |
| 51 | Footswitch 2 |
| 52 | Footswitch 3 |
| 64 | Tap Tempo |
| 65 | Looper: 1/2 Speed |
| 66 | Looper: 2X Speed |
| 67 | Looper: 1/2 Loop |
| 68 | Looper: 2X Loop |
| 69 | Looper Start/Stop |
| 70 | Looper Record |
| 71 | Looper Insert |
| 72 | Looper Peel |
| 73 | Looper Mute |
| 74 | Looper Reverse |
| 75 | Block 1 Toggle On/Off |
| 76 | Block 2 Toggle On/Off |
| 77 | Block 3 Toggle On/Off |
| 78 | Block 4 Toggle On/Off |
| 79 | Block 5 Toggle On/Off |
| 80 | Block 6 Toggle On/Off |
| 81 | Block 7 Toggle On/Off |
| 82 | Block 8 Toggle On/Off |
| 83 | Block 9 Toggle On/Off |
| 84 | Block 10 Toggle On/Off |
| 85 | Block 11 Toggle On/Off |
Global Settings
Use the global settings to configure the HeadRush MX5’s overall operation.
To show the global settings, tap the ••• button in the upper-right corner of the screen, and tap Global Settings.
To select each page of the global settings, tap the number at the upper-right corner of the screen.
LCD Brightness: This setting determines the brightness of the main display. Tap this field, turn the encoder to select 1 (dim) through 5 (bright), and then press the encoder.
Audio Configuration:
Rig Input: This setting determines whether each rig’s input signal is taken from the Guitar Input (Guitar) or the left (L) Return Input (FX Ret L). When set to Per Rig, the source is determined by the Rig Input setting of each rig in the Input block. When set to FX Ret L or Per Rig, the FX-Loop Stereo Return setting will be disabled; however, you can still use a mono FX loop for external pedals by using the right side of the FX Return input. You can access individual sides of the FX return input by using a standard 1/4″ (6.35 mm) stereo to (2) 1/4″ (6.35 mm) mono Y adapter (sold separately).
Main Out Level: This setting determines the signal level sent to the main Outputs (1/4″/6.35 mm, TRS). When set to Line, the output level will be +18 dBu. Use this setting if you are connecting the HeadRush MX5 to a full-range, flat-response amplifier, PA speaker, mixer, or audio interface. When set to Amp, the output level will be +6 dBu. Use this setting if you are connecting the HeadRush MX5 to a traditional guitar amplifier.
FX Return Level: This setting determines the signal level received by the FX Return Input (1/4″/6.35 mm, TRS). When set to Rack, the output level will be line level, +18 dBu. Use this setting if you are connecting a rack effects processor in the HeadRush MX5’s FX-Loop. When set to Stomp, the output level will be +6 dBu. Use this setting if you are connecting a traditional guitar pedal («stompbox») in the FX-Loop.
FX-Loop Stereo: These settings determine whether the incoming and outgoing signal in the effects loop is stereo or mono. Tap Send to enable or disable the stereo signal for the Send Outputs. Tap Return to enable or disable the stereo signal for the Return Inputs.
USB Audio Settings:
Important note for Windows users: Before connecting the Headrush MX5 to your computer, download and install the necessary drivers from headrushfx.com/support.
Sample Rate: This setting determines the sample rate of the USB audio signal: 44.1 kHz, 48.0 kHz or 96.0 kHz. Remember to select the same sample rate as the one in your DAW. Also, set it before opening your DAW.
USB Audio: This setting determines whether or not HeadRush MX5 is sending a USB audio signal over a USB connection. Tap On to enable sending of the USB audio signal with the selected Sample Rate. Tap Off to disable the USB audio signal. (To change the Sample Rate, set USB Audio to Off first, select the correct sample rate, set USB Audio to On again, and restart your DAW.)
USB Mode: This setting determines how the HeadRush MX5 sends its audio signal over the USB connection and how its outputs function while doing so:
- Live: The audio signal will be sent to your computer as well as to the HeadRush MX5’s outputs.
- DAW: The audio signal will be sent to your computer only. The HeadRush MX5’s outputs will be disabled to prevent any latency while monitoring.
- Reamp: Your computer will send an audio signal to the HeadRush MX5, which will process it through the current rig and send it back to your computer. The HeadRush MX5’s outputs will be disabled to prevent any latency while monitoring.
Pedal Configuration:
External Pedal: This setting determines whether or not you are using an external expression pedal with the HeadRush MX5.
- Tap On to use the built-in expression pedal to control the parameter/parameters of Bank A while your external expression pedal controls the parameter/parameters of Bank B. (If you are using the expression pedal’s Classic Mode, pressing the toe switch will activate or deactivate the parameter. If you are using Advanced Mode, the toe switch will be disabled entirely.)
- Tap Off to disable the expression pedal input and use the built-in expression pedal only.
Reminders:
Confirm Unsaved: This setting determines whether or not you will see a confirmation message if you change the rig while there are unsaved changes on the current one. Tap On to enable these messages or Off to disable them.
Alternatively, tap Do not show this dialog again in the message itself to disable them.
MIDI Settings: These settings determine how the HeadRush MX5 sends and receives MIDI information to and from external devices. These settings affect only the HeadRush MX5’s MIDI input or MIDI output.
MIDI Thru: Tap On to use the MIDI output as a MIDI throughput; any MIDI information sent to the HeadRush MX5’s MIDI input will be sent directly to the MIDI output. Tap Off to use the HeadRush MX5’s MIDI output normally; the HeadRush MX5 will be able to send its own MIDI information out of the MIDI output.
Recv MIDI Clock: Tap On to enable the HeadRush MX5 to receive MIDI clock information. Tap Off to use the HeadRush MX5’s own internal MIDI clock (which will not be sent out).
Prog Change: Tap Send to enable or disable the HeadRush MX5’s transmission of MIDI program change messages when you load a rig. Tap Recv to enable or disable the HeadRush MX5’s reception of MIDI program change messages from an external MIDI device.
MIDI Channel: This setting determines the MIDI channel(s) that the HeadRush MX5 will send and receive MIDI messages. Tap this field, turn the encoder to select all channels (Omni), or 1–16, and then press the encoder.
Assignments:
Auto Assign: This setting determines how models are assigned to the switches. Tap On if you want models to be automatically assigned to the next available switch when you load them. Tap Off if you want models to load without being assigned to a switch; you will have to assign them manually in the Hardware Assign screen.
Color Mod:
If you have trouble distinguishing certain colors on your MX5’s display or if you just want to further customize the color scheme, you can use the color mod parameters to adjust their default settings. While experimenting with the settings, a sample of your adjustments will be shown in real time. If you want to return to the default color scheme, the default settings are as follows:
Depth: 0%
Color: 36 DEG
Spread: 180 DEG
Note: The Color Mod feature is disabled when the Screen Lock feature is enabled.
Global EQ:
These settings on Page 2 determine if/how equalization is applied for your outputs. This equalizer is a four-band parametric equalizer.
Tip: These settings are especially useful when a venue, rehearsal space, etc. has different acoustic characteristics than the room where you originally created your presets (e.g., the venue may sound «boomier,» or a rehearsal space with soundproofing may deaden some of the high end). This page lets you quickly apply some additional equalization to all of your presets without permanently saving them.
EQ On: This setting determines whether equalization is enabled (On) or disabled (Off) for the outputs.
Level: This setting determines if/how much the outputs’ audio signal level is boosted or cut. This value is applied the level set by the Master knob.
Low Band & High Band: These settings determine what type of equalization is applied to the lowestfrequency band (Low Band) and to the highest-frequency band (High Band): Shelf or Cut.
Low, Low Mid, High & High Mid: The three settings for each of these four frequency bands determine the shape of the equalization:
The first setting (Hz) determines the center frequency of the low-frequency band, low-mid-frequency band, high-frequency band, or high-mid-frequency band.
The second setting (dB) determines how much the equalizer boosts or cuts the signal at the corresponding frequency band.
The third setting (Q) determines the width of the frequency band. The higher the setting, the wider the band will be around the center frequency (the first setting). This setting is applied whether Low Band or High Band is set to Shelf or Cut.
USB
You can use the HeadRush MX5’s USB connection to your computer for Recording (to a digital audio workstation [DAW]), Reamping, or Transferring Files & Settings (e.g., rigs, setlists, presets, etc.).
Important Note for Windows Users: Before connecting the HeadRush MX5 to your computer, download the necessary drivers from headrushfx.com/support and install them.
Recording
When the HeadRush MX5’s USB port is connected to your computer, you can select and use the HeadRush MX5 as a 24-bit audio interface, enabling you to play audio through it or to send its audio signal to the computer. It can use sample rates of 48 kHz or 96 kHz.
To use the HeadRush MX5 as an audio interface with your computer, open your computer’s Control Panel (Windows®) or System Preferences (macOS®), open its sound/audio settings, and select HeadRush MX5 as the device for recording/input and/or for playback/output.
The HeadRush MX5 can send four separate audio signal channels to your computer. Before recording the HeadRush MX5’s audio signal into your digital audio workstation (DAW), select the channel/channels you want to record:
1: the left channel of the master outputs with all active effects applied.
2: the right channel of the master outputs with all active effects applied.
3: a mono channel of the guitar input with no effects applied.
4: identical audio signal to 3.
The HeadRush MX5 can receive four separate audio signal channels from your computer. The channels are named and routed as follows:
1: the left channel of your computer’s output audio signal, which will be sent directly out of the HeadRush MX5’s master outputs and phones output.
2: the right channel of your computer’s output audio signal, which will be sent directly out of the HeadRush MX5’s master outputs and phones output.
3: a mono channel of your computer’s audio signal, which will be sent back through the HeadRush MX5 (see Reamping below).
4: not used in this scenario.
Remember to set your DAW’s master outputs to be sent to 1/2.
Reamping
Reamping is a process that adds the tone coloration of an amp to a pre-recorded audio signal—in this case, sending audio from your DAW through the HeadRush MX5 and then recording it back into your DAW. This is useful for saving time because you can change the sound of an already-recorded guitar track without having to manually play the same part again.
To use the HeadRush MX5 to reamp an audio signal:
- In your DAW, make sure HeadRush MX5 is selected as your audio interface for both recording/input and playback/output.
- Assign the output of the desired track to 3.
- On the HeadRush MX5, tap the ••• button in the upper-right corner of the screen, and tap Global Settings.
- In the Global Settings screen, tap Reamp next to USB Mode.
Also, make sure the Sample Rate is set to the same sample rate as the one in your DAW. To change the Sample Rate, set USB Audio to Off first, select the correct sample rate, set USB Audio to On again, and restart your DAW. - In your DAW again, create a new audio track and assign its input. For a stereo input signal, select 1/2. For a mono input signal, select 1.
- Locate the point in your track where you want to start reamping.
- On the HeadRush MX5, select the rig, models, or other parameters to achieve the sound you want.
- In your DAW, start audio recording. The track you want to reamp will be sent through the HeadRush MX5 and recorded into the audio track you created earlier.
Transferring Files & Settings
Over a USB connection, you can transfer rig, setlist, model preset, loop, and/or impulse response (IR) files between your computer and the HeadRush MX5.
We recommend creating a backup copy of your files to your computer before you make any changes.
Do not disconnect or power off the HeadRush MX5 during the process.
Any unsupported files will be ignored.
You cannot transfer a folder or.zip/archive folder to/from HeadRush MX5. Instead, transfer any supported files directly.
We recommend organizing the file structure of your rigs, setlists, model presets, and/or impulse response files on your computer so that it’s identical to the file structure as shown on the HeadRush MX5 «drive.»
To transfer files between the HeadRush MX5 and your computer:
- Connect your computer to the HeadRush MX5’s USB port using a standard USB cable.
- With your computer powered on, power on the HeadRush MX5 using the power switch.
- Tap the ••• button in the upper-right corner of the screen and then tap Global Settings.
- In the Global Settings screen, tap the ••• button in the upper-right corner of the screen, and tap USB Transfer. On your computer, the HeadRush MX5 will appear as a mass-storage device called HeadRush.
Windows users: If this is the first time you’ve connected it to this computer, you may need to wait a minute while it installs the class-compliant drivers. - Open the HeadRush drive. You can now freely click and drag contents between HeadRush and your computer. Note that any changes you make to the contents of your HeadRush are immediate and cannot be cancelled.
- When you are finished transferring contents, you must unmount/eject the HeadRush drive from your computer. File corruption may occur if the drive is not properly ejected before continuing.
- After the drive has been ejected, tap Sync on your HeadRush MX5 to «commit» any changes you made to the contents of the HeadRush drive. An additional prompt will appear to confirm you have ejected the drive. Tap Proceed to continue or Cancel to continue accessing files on your computer.
As the HeadRush MX5 analyzes and imports the files, a meter on the display will indicate its progress. The normal Global Settings screen will reappear when the process is finished. Do not disconnect or power off HeadRush MX5 during the sync process.
Screen Lock
The Screen Lock feature disables the touchscreen and gives you a simple interface that shows your current rig name, setlist name, and a customizable image.
To activate the screen lock feature, tap the ••• button in the upper-right corner of the main page, and then tap Lock Screen.
To deactivate the screen lock feature, tap the unlock icon.
To customize the Screen Lock image:
- Connect your computer to the HeadRush MX5’s USB port using a standard USB cable.
- With your computer powered on, power on the HeadRush MX5 using the power switch.
- Tap the ••• button in the upper-right corner of the screen and then tap Global Settings.
- In the Global Settings screen, tap the ••• button in the upper-right corner of the screen, and tap USB Transfer. On your computer, the HeadRush MX5 will appear as a mass-storage device called HeadRush.
Windows users: If this is the first time you have connected the HeadRush MX5 to your computer, you may need to wait a minute while the class-compliant drivers are installed. - Open the HeadRush drive.
- Place a .png, .bmp, .jpg, or .jpeg file named LockScreenLogo in the root directory of the HeadRush drive. We recommend using an 800×400-pixel image (it will be automatically scaled to this size after transferring it). Note that any changes you make to the contents of your HeadRush are immediate and cannot be cancelled.
- When you are finished transferring contents, you must unmount/eject the HeadRush drive from your computer. File corruption may occur if the drive is not properly ejected before continuing.
- After the drive has been ejected, tap Sync on your HeadRush MX5 to «commit» any changes you made to the contents of the HeadRush drive. An additional prompt will appear to confirm you have ejected the drive. Tap Proceed to continue or Cancel to continue accessing files on your computer.
As the HeadRush MX5 analyzes and imports the files, a meter on the display will indicate its progress. The normal Global Settings screen will reappear when the process is finished. Do not disconnect or power off HeadRush MX5 during the sync process.
Firmware Update Instructions
- Connect the USB port on your HeadRush MX5 to your computer and ensure HeadRush MX5 and your computer are powered on.
- On your HeadRush MX5, tap the ••• icon in the upper-right corner, and tap Global Settings.
- In the Global Settings screen, tap the ••• icon in the upper-right corner again, and tap Firmware Update. In the screen that appears, tap OK to continue. After restarting, the screen will show Update at the bottom edge.
- Open the HeadRush Updater application for your operating system—Windows or macOS. (You can download the latest updater application from headrushfx.com)
- When the updater window appears, click Update HeadRush. Do not disconnect or power off the HeadRush MX5 or your computer until the update is completed.
- When the update is completed, the updater window will display Done, and your HeadRush MX5 will restart. Click Done to close the updater window.
- Confirm your Headrush MX5 is using the latest firmware—tap the ••• icon in the upper-right corner, and tap Global Settings. The firmware version will appear at the bottom of the screen.
Technical Specifications
| Footswitches | (3) footswitches with color LEDs |
| Knobs | (1) 300° master volume knob (1) 360° navigation/data encoder |
| Display | (1) full-color LED-backlit display with touch interface 4″ / 102 mm (diagonal) |
| Connectors | (1) 1/4″ (6.35 mm) mono input (guitar) (1) 1/4″ (6.35 mm) TRS input (expression pedal) (1) 1/4″ (6.35 mm) stereo output (send) (1) 1/4″ (6.35 mm) stereo input (return) (2) 1/4″ (6.35 mm) balanced output (main) (1) 1/8″ (3.5 mm) stereo output (headphones) (1) 1/8″ (3.5 mm) stereo input (auxiliary device) (1) 1/8″ (3.5 mm) MIDI output (1) 1/8″ (3.5 mm) MIDI input (1) USB Type-B port (1) DC power adapter input |
| Power | Connection: DC power adapter input |
| Input Voltage: 12 VDC, 3.0 A, center-positive | |
| Dimensions (width x depth x height) |
11.6″ x 5.9″ x 2.75″ 295 x 150 x 70 mm |
| Weight | 3.46 lbs. 1.57 kg |
Specifications are subject to change without notice.
Trademarks & Licenses
HeadRush is a trademark of inMusic Brands, Inc., registered in the U.S. and other countries.
Windows is a registered trademark of Microsoft Corporation in the United States and other countries.
macOS is a trademark of Apple Inc., registered in the U.S. and other countries.
All other product names, company names, trademarks, or trade names are those of their respective owners.
headrushfx.com
Documents / Resources
References
Download manual
Here you can download full pdf version of manual, it may contain additional safety instructions, warranty information, FCC rules, etc.
Download HEADRUSH MX5 Manual
HeadRush претендует на корону компактного моделирования усилителей.
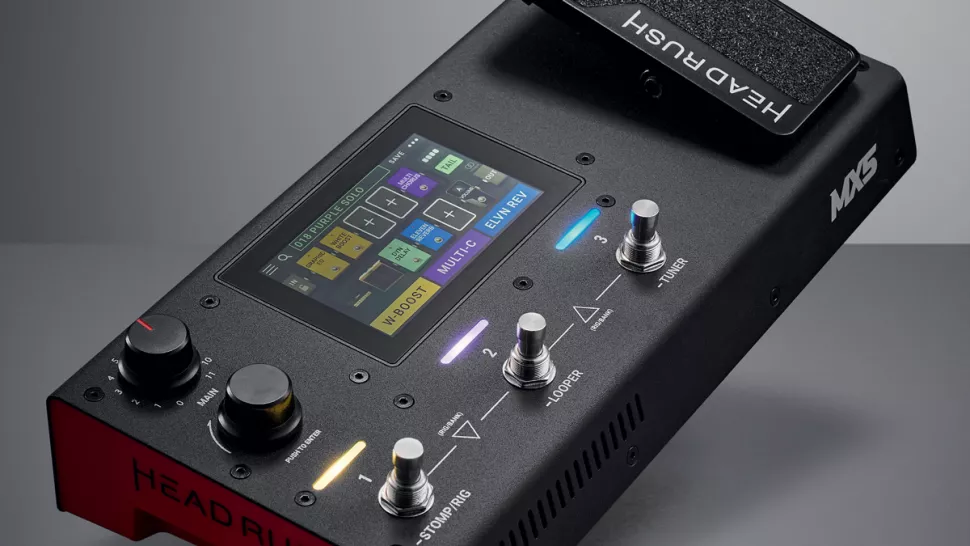
Вердикт
MX5 ощущается как более мощный зверь, чем полноразмерный флоуборд в его первоначальном выпуске. Он имеет конкурентоспособную цену и может заменить несколько педалей на компактном ‘борде.
Плюсы
- 4″ сенсорный экран позволяет легко редактировать цепи.
- Педаль экспрессии можно назначать на каждый патч.
- Возможность использования в качестве интерфейса записи и блока повторного усиления через USB.
- Компактность.
Минусы
- С помощью футсвитчей можно управлять только тремя эффектами в более сложной цепи.
В 2017 году флагманский педалборд HeadRush установил новую планку для реалистичного моделирования усилителей по доступной цене.
MX5 обещает взять все наработки педалборда и свести их к компактному и доступному ядру. Так ли это?
Наш обычный критерий — можем ли мы получить достойный патч без использования руководства. Это оказалось легко, благодаря сенсорному экрану, и мы быстро запустили отличную эмуляцию Klon в задержку со сдвигом высоты тона.
Уроки предыдущих продуктов компании и обновления прошивки за прошедшие годы выявили значительно улучшенный пользовательский интерфейс, который молниеносно осваивается и быстро редактируется. Сложные цепи создаются без труда, а удобные советы по сборке моно или стерео ригов помогают пользователю.
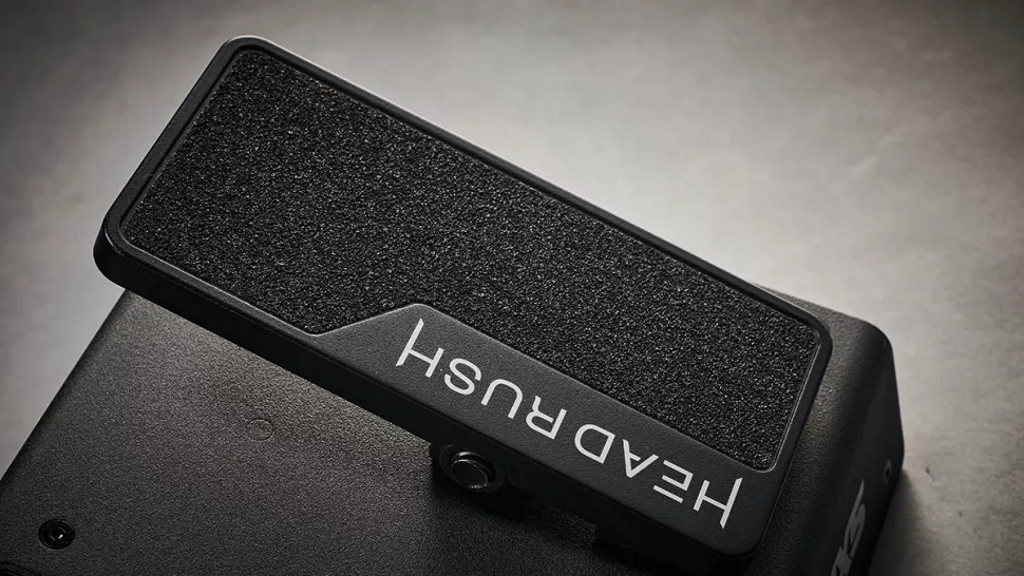
После того, как мы нашли нужный уровень выходного сигнала, мы обнаружили, что педаль так же реалистична, как и большая HeadRush, как в референсных мониторах, так и при записи в DAW.
Отключив эмулируемые усилители, мы подключили педаль к маломощному ламповому усилителю EL84 и обнаружили, что педаль без проблем выводит усилитель на насыщение с помощью моделей овердрайва и буста. Как и флагманский HeadRush, усилители и кабины безупречны, а гибкость моделей микрофонов является приятным бонусом.
Однако прибор страдает от той же проблемы, что и более крупная напольная доска, поскольку не все его эффекты нас так вдохновляют, как эффекты конкурирующих приборов от Boss или Line 6.
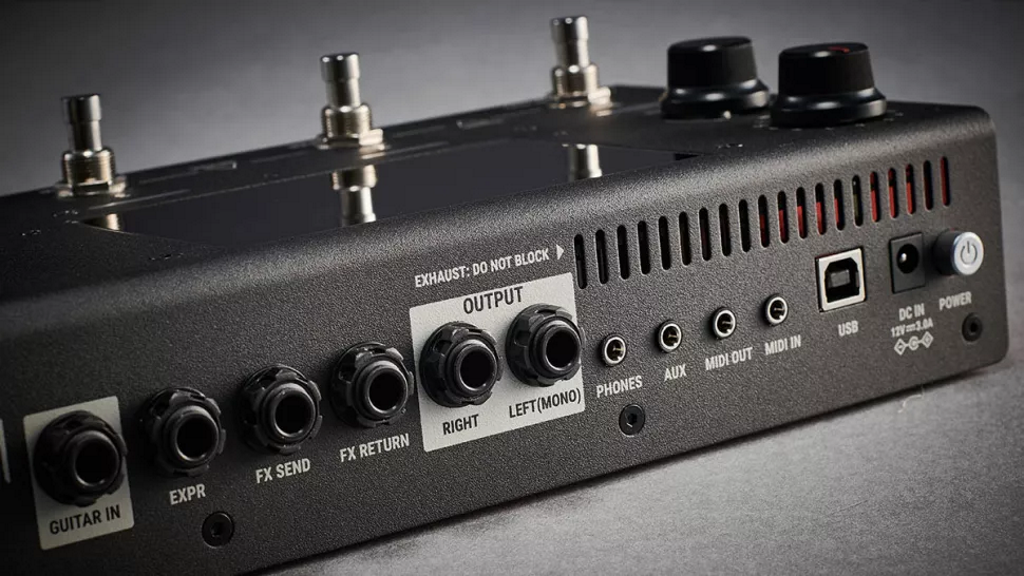
Многофункциональные педальные переключатели являются назначаемыми, что позволяет легко включать и выключать эффекты в собранной вами цепочке. Однако именно здесь кроется и самый большой недостаток MX5. Вы можете собирать цепочки практически произвольной сложности, но, в отличие от больших напольных плат, вы можете управлять только тремя эффектами в более сложной цепочке.
В MX5 вы можете использовать петлю посыла/возврата, чтобы подключить дополнительные автономные топталки, которыми вы владеете. Таким образом, на более компактной «доске» MX5 можно использовать в качестве цифрового симулятора эффектов, усилителей и кабины в конце цепи.
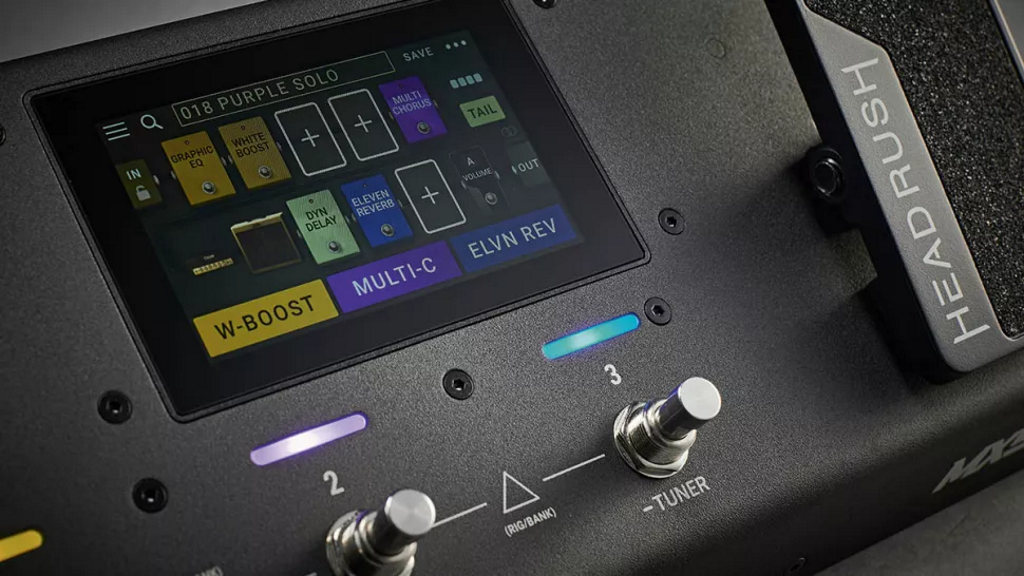
Вы можете использовать MX5 для замены Whammy, задержки, реверберации и модуляции, с контролем над всеми четырьмя эффектами. Вы можете установить отдельный дисторшн или буст в петлю эффектов, а затем использовать MX5 в качестве виртуального усилителя и кабины для прямого подключения к PA.
В заключение хочу сказать, что MX5 ощущается как более мощный зверь, чем полноразмерная напольная доска, которая была выпущена изначально. Он имеет конкурентоспособную цену и может заменить несколько педалей на компактном ‘борде. Для игроков, собирающих сложные, но статичные цепи, он может даже заменить целый педалборд.
Технические характеристики
- ТИП: Устройство моделирования усилителя и мультиэффектов
- ЭКРАН: 4-дюймовый сенсорный экран
- ФУТСВИТЧИ: 3
- ОСОБЕННОСТИ: Педаль экспрессии, лупер, 50 моделей усилителей, 15 моделей кабины, 10 виртуальных микрофонов, 300 ИК, 65 эффектов
Процессоры и педали эффектов
Артикул: A123645
Гарантия: 1 год
Нет в наличии
Товара нет в наличии в сети Музторг
Профессиональный напольный процессор эффектов
HEADRUSH MX5 – один из самых мощных и легких процессоров для моделирования гитарных усилителей и эффектов. Благодаря 4-дюймовому цветному сенсорному дисплею, прочному корпусу с множеством входов и выходов, педалью экспрессии, а также мощному многоядерному процессору, MX5 обеспечивает поразительно реалистичное моделирование усилителей и гитарных эффектов премиум-класса и обеспечивает удобство использования в различных условиях. Процессор имеет возможность загрузки практически неограниченного количества файлов пользовательских импульсов (IR). MX5 также имеет лупер с функцией сохранения и загрузки, USB-аудиоинтерфейс студийного качества для записи и реампинга, а также встроенную педаль экспрессии с интуитивно понятным режимом редактирования без помощи рук.
ВАШ ИДЕАЛЬНЫЙ ЗВУК ПРОСТО ПО КАСАНИЮ
Сердцем нового HeadRush MX5 является 4-дюймовый сенсорный дисплей, позволяющий гитаристам с помощью простого касания создавать и редактировать свои тембры сверхбыстрым и интуитивно понятным способом. Большой дисплей обеспечивает сверхчеткую обратную связь при выступлении вживую; особенно при использовании встроенного лупера или изменении тембра в «режиме управления без рук» при помощи встроенной педали экспрессии.
ПОЛНАЯ БИБЛИОТЕКА КЛАССИЧЕСКИХ, СОВЕРЕМЕННЫХ И БУТИКОВЫХ ГИТАРНЫХ ЗВУКОВ
В независимости от того, какой-звук ищет гитарист: классический винтажный, широкие обволакивающие стерео-текстуры с дилеем, синтезаторными обертонами и бесконечными хвостами или самые тяжелые хайгейн, HeadRush MX5 способен на все это. MX5 содержит невероятно разнообразную библиотеку из 50 моделей гитарных и басовых усилителей, 15 моделей кабинетов с 10 микрофонами, 300 ячеек под пользовательские испульсы и 66 моделей эффектов премиум-класса. MX5 — это безупречное моделирование самого востребованного гитарного оборудования с непревзойденной точностью и аутентичным динамическим откликом. Библиотека HeadRush будет и дальше расширяться за счет регулярных обновлений, в которые добавляются новые модели и функции на основе запросов и отзывов пользователей.
БЕСКОМПРОМИССНАЯ МОЩНОСТЬ
MX5, обладающий всей мощностью флагманских продуктов HeadRush, дает гитаристам огромную гибкость для создания звука своей мечты. Музыканты могут легко создавать собственные пресеты, включающие 9 отдельных эффектов, 2 модели усилителей и 2 модели кабинета в одном пресете. Кроме того, MX5 также имеет переключение пресетов без прерывания сигнала, сохраняя хвосты реверберации и задержки, поэтому гитаристы могут переключаться между чистым и лидовым звуками без каких-либо прерываний звука во время выступления.
ВСЕ НЕОБХОДИМЫЕ СОЕДИНЕНИЯ, КОТОРЫЕ ВАМ НУЖНЫ
Прочная и компактная конструкция MX5 может похвастаться 3 футсвитчами, оснащенными отдельными светодиодами RGB, педалью экспрессии (с регулируемым натяжением и встроенным переключателем на носке) и большим количеством входов и выходов на задней панели. В этот список входят: 1/4-дюймовый гитарный вход, стереопара 1/4-дюймовых симметричных выходов, 1/8-дюймовый вход AUX, 1/8-дюймовый выход для наушников, MIDI In/Out и 1/4-дюймовая стереофоническая петля эффектов. Стерео петлю можно использовать для интеграции внешних педалей и размещения их в любом месте сигнальной цепи MX5, а также для подключения MX5 к традиционным гитарным и басовым усилителям с помощью четырехкабельного метода. Также имеется порт USB, который можно использовать для записи или реампинга в студийном качестве (до 24 бит 96 кГц), передачи пресетов и лупов на комьютер, а также для простого обновления функций MX5, когда HeadRush выпускает обновления функций и библиотеки приборов.
Основные характеристики:
- Многоядерный процессор с мощной технологией FX-моделирования.
- 4-дюймовый сенсорный дисплей с высоким разрешением b ориентированным на гитариста интерфейсом
- Универсальная библиотека реалистичных моделей усилителей, кабинетов, микрофонов и эффектов.
- Объем памяти для загрузки практически неограниченного количество файлов IR-импульсов
- Плавное переключение пресетов с сохранением хвостов эффектов реверберации/задержки
- Режим редактирования без помощи рук для быстрого редактирования в реальном времени
- Лупер с функциями сохранения и загрузки.
- Встроенная педаль экспрессии с регулируемым натяжением и переключателем на носке.
- Стерео петля эффектов для подключения внешних приборов или 4-кабельного метода для подключения гитарных/басовых усилителей.
- Встроенный USB-аудиоинтерфейс студийного качества для записи и реампинга
Нашел в описании ошибку? Выдели неточный текст и нажми Ctrl+Enter.
Центральный склад г. Москва
Наличие:
нет в наличии
Музторг на Таганской
Краснохолмская наб., д.3
понедельник — суббота 10:00 — 21:00
воскресенье 10:00 — 20:00
Наличие:
нет в наличии
Музторг на Савеловской
ул. Вятская, д.1
понедельник — суббота 10:00 — 21:00
воскресенье 10:00 — 20:00
Наличие:
нет в наличии
Музторг на Кузнецком Мосту
ул. Неглинная, д.6/2
понедельник — суббота 10:00 — 20:00
воскресенье 10:00 — 18:00
Наличие:
нет в наличии

ДОСТАВКА И ОПЛАТА
Ваш город г. Москва
Доставка по Москве
Бесплатная доставка заказов от 5 000 р.
Доставка в день заказа
Заказы, оформленные до 12:00 доставим в этот же день, все товары в заказе должны быть в наличии в городе доставки.
Доставка в день заказа (по Москве в пределах МКАД):
- от 5 000 р. – бесплатно
- до 5 000 р. – 390 р.
Доставка осуществляется в интервале с 18:00 до 22:00 часов.
Доставка на следующий день и позже
Доставка на следующий день (по Москве):
— от 5 000 р. – бесплатно
— до 5 000 р. – 290р.
Доставка ко времени — выбирайте удобные интервалы
- 9:00-13:00
- 13:00-17:00
- 17:00-21:00
Мы поможем поднять до дверей крупногабаритный товар, а также собрать цифровое пианино. Услуги по подъему и сборке оплачиваются отдельно.
Сборка цифрового пианино – 600 рублей.
Стоимость подъема на этаж
При отсутствии грузового лифта:
- до 50 кг 300 р./за каждый этаж
- от 50 до 100 кг 750 р./за каждый этаж
- от 100 до 150 кг 1200 р./за каждый этаж
При наличии грузового лифта:
- до 50 кг 300 р.
- от 50 до 100 кг 750 р.
- от 100 до 150 кг 1200 р.
- от 150 кг (при наличии грузового лифта либо без него) 3200 р.
ДОСТАВКА по Московской области
Бесплатная доставка заказов от 5 000 р.
При доставке заказа на сумму более 5 000 р., но при наличии акционного товара, товара со скидкой, товара, приобретенного в рассрочку стоимость доставки 500 р.
Доставка на следующий день
Доставка на следующий день по Московской области:
- от 5 000 р. – бесплатно
- сумма заказа до 5 000 р. – стоимость доставки 500 р.
При доставке заказа на сумму более 5 000 р., но при наличии акционного товара, товара со скидкой, товара, приобретенного в рассрочку стоимость доставки 500 р.
Доставка осуществляется в интервале 09:00-21:00 часа.
Доставка на последующие даты
Доставка по Московской области:
- от 5 000 р. – бесплатно
- до 5 000 р. – стоимость доставки 500 р.
При доставке заказа на сумму более 5 000 р., но при наличии акционного товара, товара со скидкой, товара, приобретенного в рассрочку стоимость доставки 500 р.
Доставка осуществляется в течение дня.
Мы поможем поднять до дверей крупногабаритный товар, а также собрать цифровое пианино. Услуги по подъему и сборке оплачиваются отдельно.
Сборка цифрового пианино – 600 рублей.
Стоимость подъема на этаж
При отсутствии грузового лифта:
- до 50 кг 300 р./за каждый этаж
- от 50 до 100 кг 750 р./за каждый этаж
- от 100 до 150 кг 1200 р./за каждый этаж
При наличии грузового лифта:
- до 50 кг 300 р.
- от 50 до 100 кг 750 р.
- от 100 до 150 кг 1200 р.
- от 150 кг (при наличии грузового лифта либо без него) 3200 р.
Доставка и оплата по России и СНГ
- Надежные транспортные компании
- Банковской картой через интернет
- Банковский перевод
- Наличными при получении
(кроме СНГ)
Преимущества доставки
Оформление
заказа
- В разделе «Корзина» на сайте
- По номеру 8 800 555-00-75 или запросив обратный звонок
через сайт - Для юридических лиц — обратная связь.
Оплата
- Наличными или банковской картой в магазине
- Наличными или банковской картой курьеру
- Банковской картой на сайте
- В ближайшем банке
- Оформив кредит
- Безналичным переводом для юридических лиц
- Наложенным платежом
Получение
- В ближайшем магазине «Музторг»
- Курьерской доставкой
- В терминале транспортной компании
- Почтой России (EMS)
Почему выбирают «Музторг»
гарантируем подлинность, качество,
сервис. На большинство товаров срок гарантии 12 месяцев.
Надёжность
сеть магазинов в 47 городах России,
более 1000 сотрудников, более 1 миллиона посетителей ежегодно.
в соответствии с законом о защите
прав потребителей.
Кредит и рассрочка в Музторге
![]()
Простая подача заявки
![]()
Подтверждение за минуту
![]()
Одобрение 95% заявок
![]()
Четыре банка — партнера
Выбирайте подходящие программы сроком до 24 месяцев
| Зафиксируйте цену | Кредит |
|---|---|
| Первый взнос | 0% |
| Сумма | от 1 500 до 300 000 |
| Сроки выплат |
3—24 месяцев
* Минимальная сумма кредитной программы на 24 месяца — 30 000 рублей. |
| Особенности | Действует на все товары, включая акционные |
* Не распространяется на акционные товары и покупки со скидками, в т.ч. по Клубной карте.
Как оформить
В розничном магазине
В магазинах Музторг специалисты всегда помогут вам оформить рассрочку за несколько минут и сразу забрать
покупку.
В интернет-магазине
Вы можете оформить онлайн-рассрочку или кредит и при этом выбрать любой способ получения заказа.
Самовывоз из магазина Музторг
1
Выберите товар в каталоге, перейдите в корзину
и оформите заказ
2
Заполните заявку на кредит или рассрочку
3
Подпишите договор и получите
товар в магазине Музторг.
После одобрения онлайн-заявки посетите магазин для
получения товара и оформления документов.
Курьерская доставка или пункт самовывоза
1
Выберите товар в каталоге, перейдите в корзину
и оформите заказ
2
Заполните заявку на кредит или рассрочку
3
Подпишите договор
После одобрения онлайн-заявки сотрудник банка или курьер приедет к вам в удобное время для
заключения договора. Некоторые банки подписывают договоры через СМС (если вы уже являетесь
клиентом банка).
4
Получите товар
После подписания договора Музторг передаст заказ в службу доставки.

Предложение для клиентов СберБанка
«Рассрочка и кредит от СберБанка»
Оформление в СберБанк онлайн без документов
![]()
Переплата 0%
Без документов
![]()
3 000 — 300 000 рублей **
![]()
6, 12
месяцев
![]()
Оформление в СберБанк Онлайн
Подробнее с условиями кредитования можно ознакомиться
здесь
.
** Лимит суммарного остатка задоженности по данному продукту не должен превышать 300 000 рублей.
Как оформить рассрочку или кредит в СберБанке
1
Выберите товар в каталоге, перейдите в корзину и оформите
заказ
2
Подтвердите заказ
Вам не надо заполнять никаких данных (все данные есть у банка), только подтвердите сумму покупки
и список товарных позиций.
3
Решение от банка в течение 3-5 минут
В течение 3-5 минут получите итоговое решение и подтвердите данные кредита/рассрочки.
Никаких документов. Всё оформление и подтверждение через СберБанк Онлайн.
4
Получите товар
Как только вы подтвердите данные кредита, мы передадим товар в службу доставки или лично вам,
если вы находитесь в магазине Музторг.
Кредит предоставлен АО «ОТП Банк» Генеральная лицензия Банка России на осуществление банковских операций № 2766 от 27.11.2014 года. Организатор акции предоставляет скидку на товар, в итоге сумма, подлежащая выплате банку, не превышает первоначальной стоимости товара при условии, что дополнительные услуги банка не приобретаются. Полное досрочное погашение осуществляется в соответствии с «Общими условиями договора потребительского кредита по программе «Потребительский кредит». Более подробную информацию об условиях потребительского кредита АО «ОТП Банк» можно узнать на сайте www.otpbank.ru. АО «ОТП Банк» Юридический адрес: 125171, г. Москва, Ленинградское шоссе, д. 16А, стр. 2. Единый многоканальный справочный телефон: +7 (495) 775-4-775, 8 800 100-55-55
Кредит предоставлен ПАО «МТС-Банк». Лицензия Банка России №2268 от 17.12.2014 г. Организатор акции предоставляет скидку на товар, в итоге сумма, подлежащая выплате банку, не превышает первоначальной стоимости товара при условии, что дополнительные услуги банка не приобретаются. Полное досрочное погашение осуществляется в соответствии с «Общими условиями комплексного банковского обслуживания физических лиц в ПАО «МТС-Банк». Более подробную информацию об условиях потребительского кредита ПАО «МТС-Банк» можно узнать на сайте https://www.mtsbank.ru/ ПАО «МТС-Банк» оставляет за собой право отказать в предоставлении кредита без объяснения причин.
Кредит предоставляется КБ “РЕНЕССАНС КРЕДИТ” (ООО), лицензия Банка России № 3354 ОТ «26» апреля 2013 г. (далее – «Банк»). Банк предоставляет покупателю кредит, а продавец предоставляет покупателю скидку от стоимости товара, приобретаемого в кредит у продавца, предоставляемый банком, в размере процентов за пользование кредитом, в результате чего переплаты за товар не возникает, и фактически выплаченная сумма за товар не превышает его первоначальной стоимости. Решение о выдаче кредита принимается Банком по своему усмотрению на основании представленных документов клиентом. Подробную информацию можно получить на сайте https://www.rencredit.ru или по телефону 8-800-200-09-81.
Подробнее
- Все процессоры эффектов для гитар HEADRUSH
- Все
товары HEADRUSH
