
Отказ от ответственности
Благодарим вас за покупку регулятора EZRUN MAX8 G2 от Hobbywing! Пожалуйста, внимательно прочтите следующее заявление перед использованием, и его использование считается принятием всего содержания. Пожалуйста, строго соблюдайте и придерживайтесь ручной установки с этим продуктом. Несанкционированная модификация может привести к травмам и повреждению продукта. Мы оставляем за собой право обновлять дизайн и характеристики Продукта без предварительного уведомления. Доступны разные языки. Китайский язык будет доступен для материкового Китая, а английский язык будет доступен для остального мира.
Предупреждения
- Перед использованием этого продукта внимательно прочитайте инструкцию по эксплуатации. Убедитесь, что оборудование используется надлежащим образом, чтобы не повредить ESC. Неправильное использование приведет к перегреву и повреждению электроники.
- Важно убедиться, что все припаянные провода надежно закреплены, чтобы избежать короткого замыкания. Для такой работы рекомендуется хорошая паяльная станция во избежание перегрева печатной платы.
а также для обеспечения правильной сварки соединений. - Несмотря на то, что продукт имеет соответствующие защитные меры, всегда используйте его безопасным образом в соответствии с условиями эксплуатации, указанными в руководстве (например, томtagе, ток, температура и т. д.).
- Всегда не забывайте отключать аккумулятор каждый раз после его использования. Невыполнение этого требования приведет к полной разрядке аккумулятора, что может привести к непредсказуемой опасности.
Особенности
- В ESC используется специальный процесс в сочетании с инновационной водонепроницаемой конструкцией для повышения водонепроницаемости и пыленепроницаемости в различных климатических условиях. Легко справиться с суровыми условиями
содержащие осадок, лед и снег, скопление воды. - Встроенный сверхмощный режим переключения BEC с непрерывным током 6 А, мгновенным током 15 А и поддержкой переключения 6 В / 7.4 В / 8.4 В, поддерживающий широкий спектр мощных и высоковольтныхtagе сервоприводы.
- Оснащен самыми передовыми и безопасными электронными переключателями. Традиционный механический переключатель защищает и предотвращает попадание пыли, влаги и других суровых условий, контактную ржавчину и сильные удары (такие как
посадка на летящем склоне), вызванная автоматическим замыканием механических переключателей и другими проблемами. - Поддержите настройку времени турбонаддува на 32 градуса. При использовании с соответствующим двигателем (например, EZRUN 4278SD) максимальные обороты могут быть увеличены примерно на 25%, что позволяет легко победить соперника.
- Несколько функций защиты: низкий уровень заряда батареиtagэлектронная защита, ESC и защита двигателя от перегрева, защита от потери сигнала, защита по току.
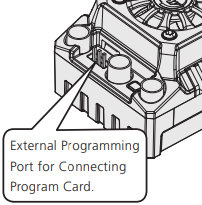
- Поддержка светодиодной программной карты, программной коробки LCD G2, программатора OTA (Примечание: необязательно) для установки параметров ESC.
- Регистрация данных в режиме реального времени в view различные рабочие данные в приложении HW LINK с использованием модуля OTA Bluetooth.
- Поддержите обновление прошивки ESC (для покупки потребуется многофункциональная программа LCD G2 или OTA Programmer), вы сможете пользоваться новейшими функциями.
Характеристики
| МОДЕЛЬ | ЭЗРУН МАКС8 G2 |
| продолжение / Пиковый ток | 160A / 1050A |
| Тип двигателя | Сенсорный и бессенсорный бесщеточный двигатель |
| Приложения | 1/8 Дорожный, Шорт-курс, Монстр-трак |
|
Ограничение двигателя |
С 4S Lipo: KV≤3000;
С 6S Lipo: двигатель KV≤2400 4278 |
| Липо-клетки | 3-6S Lipo |
| Выход BEC | 6 В / 7.4 В / 8.4 В регулируемый, непрерывный ток 6А (режим переключения) |
| Вентилятор | Стабильное 6В или 7.4В или 8.4В от встроенного БЭК |
| Размер / Вес | 60 x 48 x 40.5mm / 192g |
| Порт программирования | Совместно с фан-интерфейсами |
Коммутация
См. инструкции по подключению и схему подключения:
- Подключение двигателя:
- Существует разница между подключением бесщеточного двигателя с датчиком и бесщеточного двигателя без датчика:
- A. При подключении к бесщеточному двигателю с датчиком:
- Существуют строгие требования к последовательности проводов для подключения ESC к двигателю, три провода A/B/C ESC должны подключаться к трем проводам двигателя A/B/C соответственно. Затем подключите кабель датчика esc и двигателя в соответствии со стрелкой на разъеме датчика. Если вы не подключите кабель датчика, ваш ESC все равно будет работать в режиме без датчика, даже если вы используете двигатель с датчиком.
- Примечание. Если направление вращения двигателя изменено на противоположное, измените параметр в пункте 4 «Направление вращения двигателя», чтобы добиться правильной настройки.
- B. При подключении к бесщеточному двигателю без датчика: при использовании бесщеточного двигателя без датчика не требуется последовательности проводов, вы можете поменять местами два провода, если двигатель работает в обратном направлении.
Подключение ресивера:
- Подсоедините трос дроссельной заслонки ESC к каналу дроссельной заслонки на приемнике. Поскольку красная линия на тросе дроссельной заслонки выдает 6 В/7.4 В/8.4 В vol.tage к ресиверу и сервоприводу, пожалуйста, не подавайте дополнительное питание на ресивер, иначе esc может быть поврежден. Если требуется дополнительная мощность, отсоедините красную линию на тросе дроссельной заслонки.
- Подключение аккумулятора:
Убедитесь, что полюс (+) регулятора скорости подключен к полюсу (+) аккумулятора, а (-) к полюсу (-). Если соединение будет изменено, ESC будет поврежден и не будет покрываться гарантийным обслуживанием.
Настройка ESC
Установите диапазон дроссельной заслонки
- При первом использовании ESC или передатчика изменяет настройку «TRIM», D/R, EPA и другие параметры, необходимо сбросить диапазон дроссельной заслонки. Мы настоятельно рекомендуем открыть функцию отказоустойчивости передатчика, установить защиту канала дроссельной заслонки от отсутствия сигнала («F/S»), чтобы закрыть выход, или установить значение защиты в нейтральное положение дроссельной заслонки. Таким образом, двигатель может остановиться, если приемник не может принять сигнал передатчика. Этапы калибровки дроссельной заслонки следующие:

- Включите передатчик, убедитесь, что все параметры (D / R, EPA, ATL) на канале дроссельной заслонки установлены по умолчанию (100%). Для передатчика без ЖК-дисплея поверните ручку на максимум, а дроссельную заслонку «TRIM» на 0. (Если передатчик без ЖК-дисплея, поверните ручку в среднюю точку).
- Начните с включения передатчика с выключенным ESC, но подключенным к батарее. Удерживая кнопку «SET», затем нажмите кнопку «ON/OFF», КРАСНЫЙ светодиод на ESC начнет мигать (одновременно подается звуковой сигнал), а затем немедленно отпустите кнопку «SET».
- Примечание. Звуковой сигнал двигателя иногда может быть слабым, и вместо этого вы можете проверить состояние светодиода.
- Включите передатчик, убедитесь, что все параметры (D / R, EPA, ATL) на канале дроссельной заслонки установлены по умолчанию (100%). Для передатчика без ЖК-дисплея поверните ручку на максимум, а дроссельную заслонку «TRIM» на 0. (Если передатчик без ЖК-дисплея, поверните ручку в среднюю точку).
- Начните с включения передатчика с выключенным ESC, но подключенным к батарее. Удерживая кнопку «SET», затем нажмите кнопку «ON/OFF», КРАСНЫЙ светодиод на ESC начнет мигать (одновременно подается звуковой сигнал), а затем немедленно отпустите кнопку «SET». Примечание. Иногда звуковые сигналы двигателя могут быть низкими, вместо этого вы можете проверить состояние светодиода.

Установите нейтральную точку, конечную точку полного открытия дроссельной заслонки и конечную точку полного торможения.
- Оставьте передатчик в нейтральном положении, нажмите кнопку «SET», КРАСНЫЙ светодиод погаснет, а ЗЕЛЕНЫЙ светодиод мигнет 1 раз, а двигатель издаст 1 звуковой сигнал, подтверждая нейтральное положение.
- Потяните курок дроссельной заслонки в положение полного открытия дроссельной заслонки, нажмите кнопку «SET», ЗЕЛЕНЫЙ светодиод мигнет 2 раза, а двигатель издаст 2 звуковых сигнала, чтобы принять конечную точку полного открытия дроссельной заслонки.
- Нажмите курок дроссельной заслонки в положение полного торможения, нажмите кнопку «SET», ЗЕЛЕНЫЙ светодиод мигнет 3 раза, а двигатель издаст 3 звуковых сигнала, чтобы принять конечную точку полного торможения.
Примечание:
- Конечное положение вперед: потяните курок до максимального положения дроссельной заслонки, если это пистолетный передатчик. Нажмите на дроссель вверх, если это передатчик в виде платы.
- Конечное положение назад: нажмите спусковой крючок в положение максимального тормоза, если это пистолетный передатчик. Если это передатчик в виде платы, потяните дроссель вниз.
Двигатель можно запустить после завершения калибровки ESC/Radio.
Инструкции по включению/выключению и звуковому сигналу
Инструкции по переключению: короткое нажатие на кнопку ВКЛ/ВЫКЛ для включения питания, длительное нажатие на кнопку ВКЛ/ВЫКЛ для выключения. Описание звукового сигнала при включении питания: В нормальных условиях ESC издает несколько звуковых сигналов, чтобы указать количество литиевых элементов. Для бывшегоample: «бип-бип-бип» означает 3 ячейки, «бип-бип-бип-бип» означает 4 ячейки.
Примечание. Двигатель одновременно издает звуковой сигнал, синхронно мигает индикатор ESC.
Инструкция для программируемых элементов
Столбец белых слов на черном фоне в следующей таблице представляет собой значения по умолчанию для программируемых элементов.
|
1 |
Товары
Режим бега |
Вариант 1
Вперед с тормозом |
Вариант 2
вперед / Обратный тормоз |
Вариант 3
Вперед с реверсом |
Вариант 4 | Вариант 5 | Вариант 6 | Вариант 7 | Вариант 8 | Вариант 9 |
| 2 | Липо-клетки | Автомобили | 2S | 3S | 4S | 5S | 6S | |||
| 3 | Объем отсечкиtage | Отключена | Авто (низкий) | Автомобили (средний) | Авто (высокий) | |||||
| 4 | Вращение двигателя | CCW | CW | |||||||
| 5 | БЭК Томtage | 6.0V | 7.4V | 8.4V | ||||||
| 6 | Максимальное тормозное усилие | 12.50% | 25% | 37.50% | 50% | 62.50% | 75% | 87.50% | 100% | Отключена |
| 7 | Макс. Обратное усилие | 25% | 50% | 75% | 100% | |||||
| 8 | Панч | Level 1 | Level 2 | Level 3 | Level 4 | уровень 5 | Level 6 | Level 7 | Level 8 | Level 9 |
| 9 | Тормозное усилие сопротивления (светодиодная коробка) | 0% | 5% | 10% | 20% | 40% | 60% | 80% | 100% | |
| 9 | Тормозное усилие сопротивления (ЖК-бокс / OTA) | 0-100% (шаг настройки 1%), по умолчанию 0%. | ||||||||
| 10 | Начальное усилие дроссельной заслонки | 0.5% | 1% | 2% | 3% | 4% | 5% | 6% | 7% | 8% |
| 11 | Турбо тайминги | 0° | 4° | 8° | 12° | 16° | 20° | 24° | 28° | 32° |
| 12 | Турбо задержка | Мгновенное | 0.05s | 0.1s | 0.15s | 0.2s | 0.3s | 0.5s | 0.7s | 1.0s |
- Режим работы:
- Вариант 1: Вперед с тормозом
Транспортное средство может двигаться только вперед и имеет функцию торможения. Это также обычно приемлемо на гонках. - Вариант 2: вперед/назад и тормоз
Этот вариант известен как «тренировочный» режим с функцией «Вперед/Назад с торможением». Автомобиль тормозит только в первый раз, когда вы нажимаете курок газа в зону заднего хода/тормоза. Если двигатель останавливается, когда курок дроссельной заслонки возвращается в нейтральную зону, а затем повторно нажимает курок в зону заднего хода, автомобиль будет двигаться задним ходом, если двигатель не остановится полностью, ваш автомобиль не будет двигаться задним ходом, но все еще будет тормозить, вам нужно чтобы вернуть курок газа в нейтральную зону и снова нажать его в зону реверса. Этот метод предназначен для предотвращения случайного движения автомобиля задним ходом. - Вариант 3: Вперед и назад Когда курок газа переводится из нейтрального положения в положение заднего хода, двигатель реверсируется. Этот режим обычно используется в специальных транспортных средствах.
- Вариант 1: Вперед с тормозом
- Липо клетки:
- Установите правильное значение в соответствии с фактическим количеством используемых аккумуляторов Lipo. Значение по умолчанию рассчитывается автоматически, и опция «Авто» не распознает 5S, чтобы избежать неправильных расчетов во время фактического использования, например.ampле, 5S Lipo без питания могут быть неправильно рассчитаны как полностью заряженные 4S Lipo. Поэтому значение этого параметра необходимо установить вручную при использовании 5S Lipo.
- Примечание. Вариант «2S» здесь зарезервирован только в таблице параметров, из-за характеристик схемы и подходящего применения этого регулятора 2S Lipo не рекомендуется.
- Низкая громкостьtage Отсечка:
- Эта функция в основном предназначена для предотвращения чрезмерного разряда литиевых батарей, вызывающего их повреждение. ESC контролирует уровень заряда батареи.tagе во все времена, и как только объемtage падает ниже установленного порога, выходная мощность снижается, а выходная мощность полностью отключается через несколько секунд. Когда объемtagПри срабатывании защиты красный светодиод мигает в «-, -, -». Три уровня низкого, среднего и высокого уровня соответствуют 2.8 В/ячейка, 3.1 В/ячейка и 3.4 В/ячейка соответственно. Для NiMH аккумуляторов рекомендуется установить для этого параметра значение «Отключено».
- Вращение двигателя:
- Настройка вращения двигателя. Из-за некоторых различий в трансмиссии на разных автомобильных комплектах возможно, что автомобиль будет двигаться в противоположном направлении при полном газе. В том случае, если это произойдет, вы можете установить «направление вращения двигателя» на противоположное направление; «по часовой стрелке» или «против часовой стрелки».
- БЭК Томtage:
- БЭК об.tagе поддержка 6 В/7.4 В/8.4 В. Как правило, 6.0 В подходит для стандартных сервоприводов, а 7.4/8.4 В — для высоковольтных.tagе сервоприводы. Пожалуйста, установите в соответствии со спецификациями сервопривода. ПРЕДУПРЕЖДЕНИЕ! Не устанавливайте BEC vol.tage выше максимального рабочего объемаtage сервопривода, так как это может привести к повреждению сервопривода или даже ESC.
- Максимум. Тормозное усилие:
- Этот ESC обеспечивает функцию пропорционального торможения; эффект торможения определяется положением курка дроссельной заслонки. Он устанавливает процентыtage доступной мощности торможения при полном торможении. Большое количество сократит время торможения, но может повредить шестерню и цилиндрическую шестерню.
- Максимум. Обратная сила:
- Относится к скорости заднего хода. Выбор разных значений параметров может привести к разной скорости реверса. Рекомендуется использовать меньшую скорость реверса, чтобы избежать ошибок, вызванных слишком быстрым реверсом.
- Ударить кулаком:
- Установить в 1-9 сtagе, чем выше установленное значение, тем быстрее ускорение. Пожалуйста, примите во внимание в зависимости от места, характеристик сцепления шин, конфигурации автомобиля и т. д. Агрессивная настройка может привести к проскальзыванию шины, слишком большому пусковому току и неблагоприятному воздействию на работу электроники.
- Тормозная сила при перетаскивании
- Относится к тормозному усилию, создаваемому двигателем, когда курок газа возвращается в нейтральное положение. Выберите подходящее значение в соответствии с типом транспортного средства, конфигурацией, сайтом и т. д.
- Из-за разных устройств для установки этого esc, есть два разных содержимого дисплея, а именно:
- Когда используется светодиодный программный блок, есть 8 опций для силы торможения, которые можно отрегулировать, см. строку «Drag Brake Force (LED Box)» в приведенной выше таблице.
- При использовании программного блока с ЖК-дисплеем или модуля OTA Bluetooth тормозное усилие перетаскивания регулируется в диапазоне 0-100%, а шаг регулировки составляет 1%, см. строку «Тормозное усилие перетаскивания (ЖК-бокс / OTA)» в приведенной выше таблице.
- Начальное усилие дроссельной заслонки
- Это также называется минимальным усилием дроссельной заслонки. Вы можете установить его в соответствии с колесной шиной и сцеплением. Если земля скользкая, установите небольшое усилие дроссельной заслонки.
- Турбо тайминги
- Синхронизация Turbo может дополнительно увеличить обороты двигателя. Она срабатывает при полной нагрузке. Обычно используется на длинной прямой дороге для высвобождения максимальной мощности мотора. Чем выше это значение, тем больше будут увеличиваться обороты двигателя, и чем больше будет рабочий ток, тем выше будет температура двигателя и регулятора. Поэтому, пожалуйста, устанавливайте это значение разумно.
- Турбо задержка
- Когда «TURBO DELAY» установлен на «INSTANT», режим Turbo Timing будет активирован сразу после того, как курок газа переместится в положение полного газа. Когда применяется другое значение (я), вам нужно будет удерживать курок дроссельной заслонки в положении полного открытия дроссельной заслонки (как вы установили) до тех пор, пока не сработает режим Turbo Timing.
Метод программирования
- Программная карта светодиодов используется для установки параметров:
- Подключите программную карту к ESC и включите питание. С помощью кнопок «ПУНКТ» и «ЗНАЧЕНИЕ» на карточке программы можно быстро выбрать и изменить значения. Нажмите «ОК», чтобы сохранить параметры.
- Окно программы LCD G2 используется для установки параметров:
- Этот ESC позволяет блоку программирования LCD G2 устанавливать параметры или блоку программирования LCD G2 подключаться к компьютеру для установки параметров и с двумя штекерными разъемами JR и программным обеспечением HOBBYWING USB LINK). Перед программированием вам необходимо соединить ESC и программный блок LCD G2 кабелем с двумя штекерными разъемами JR и включить ESC; экран загрузки появится на ЖК-дисплее G2. Нажмите любую кнопку на программном блоке, чтобы инициировать связь между вашим ESC и программным блоком. Через несколько секунд отобразится сообщение «CONNECTING ESC», указывающее следующие параметры. Вы можете отрегулировать настройку с помощью кнопок «ITEM» и «VALUE» и нажать кнопку «OK (R/P)», чтобы сохранить новые настройки в вашем ESC.
- Модуль OTA Bluetooth используется для установки параметров:
- Подключите модуль Bluetooth OTA к ESC и установите приложение HOBBYWING HW LINK на свой телефон для настройки параметров.
- View данные ESC после запуска:
- После подключения модуля OTA Bluetooth к esc и установления связи Вы можете view текущие данные в режиме реального времени в меню [Журнал данных] в приложении HW link.

- После подключения модуля OTA Bluetooth к esc и установления связи Вы можете view текущие данные в режиме реального времени в меню [Журнал данных] в приложении HW link.
сброс к заводским настройкам
Ниже приведены несколько способов восстановления заводских параметров:
- Кнопка НАСТРОЙКА:
- Когда курок дроссельной заслонки находится в нейтральном положении, нажмите и удерживайте кнопку SET непрерывно в течение примерно 8 секунд, красный и зеленый индикаторы будут мигать одновременно, указывая на то, что сброс к заводским настройкам выполнен успешно и перед этим необходимо повторно включить питание. можно запустить.
- Светодиодная программная карта:
- Как только светодиодная программная карта подключена к ESC, нажмите кнопку «СБРОС», а затем нажмите «ОК», чтобы сохранить, чтобы восстановить заводские настройки.
- Программный блок LCD G2:
- Как только программный блок LCD G2 подключен к ESC, пункт «Restore Default» выбирается опцией ITEM и сохраняется нажатием кнопки OK (R/P) для восстановления заводских настроек.
- Bluetooth-модуль ОТА:
- После подключения модуля OTA перейдите в «Настройки параметров» и нажмите кнопку «Сброс», чтобы восстановить заводские настройки.
Пояснение к статусу светодиода
- Индикация состояния запуска:
- Курок дроссельной заслонки находится в нейтральной точке, а светодиоды не горят.
- При движении вперед постоянно горит красная лампочка, а при полном газе горит зеленая лампочка.
- При движении задним ходом постоянно горит красная лампочка; Если реверсивное усилие установлено на 100%, зеленый индикатор также загорается, когда дроссельная заслонка находится в максимальном положении реверса.
- Что означает светодиод при срабатывании соответствующей функции защиты:
- Мигает красный свет (одиночная вспышка, «☆, ☆, ☆»): входит в режим низкой громкости.tage состояние защиты.
- Зеленый свет мигает (одинарная вспышка, «☆, ☆, ☆»): входит в состояние защиты от перегрева esc.
- Зеленый свет мигает (двойная вспышка, «☆☆, ☆☆, ☆☆»): входит в состояние защиты двигателя от перегрева.
- Примечание. Защита двигателя от перегрева эффективна только при использовании поддерживающего двигателя Hobbywing (например, EZRUN-4278SD). При использовании двигателя, не поддерживающего Hobbywing, функция защиты двигателя от перегрева не действует.
- Зеленый свет мигает (три вспышки, «☆☆☆, ☆☆☆, ☆☆☆»): входит в текущее состояние защиты.
- Зеленый свет мигает (пять миганий, «☆☆☆☆☆, ☆☆☆☆☆, ☆☆☆☆☆»): входит в состояние защиты от перегрева конденсатора.
Поиск неисправностей
| Неприятности | Возможные причины | Решения |
| Свет не включается после подачи питания, двигатель не запускается, вентилятор не работает. | 1. Объем аккумулятораtage не выводится на ESC;
2. Переключатель поврежден. |
1. Проверьте батарею, и хорошо ли соединение между батареей и esc и хорошо ли припаяна вилка;
2. Заменить выключатель. |
| Двигатель не запускается после подачи питания, с предупреждающим сигналом «бип-бип-, бип-бип-», сопровождаемым миганием красного индикатора (примерно 0.5 секунды для каждого набора двухтональных интервалов). | Объем аккумуляторной батареиtage не входит в диапазон поддержки. |
Проверьте уровень заряда аккумулятораtage или заменить батарею для проверки. |
|
После включения красный индикатор быстро мигает. |
1. ESC не обнаруживает сигнал дроссельной заслонки;
2. Нейтральная точка ESC откалибрована неправильно. |
1. Проверьте, правильно ли подключен провод дроссельной заслонки. Проверьте, включен ли ваш передатчик. Проверьте, исправен ли приемник.
2. Повторно откалибруйте ход дроссельной заслонки. |
| Автомобиль движется в обратном направлении, когда применяется передний дроссель. |
Трансмиссия на автокомплекте другая |
Установите элемент параметра «Вращение двигателя» на противоположное направление. |
|
Двигатель внезапно остановился или значительно снизил мощность при работе. |
1. Возможные помехи; 2. ESC входит в режим низкой громкостиtagсостояние защиты; 3. ESC входит в состояние защиты от перегрева. |
1. Проверьте причину помех в приемнике и проверьте уровень заряда батареи передатчика;
2. Замените батарею, если красный индикатор продолжает мигать;
3. Зеленый свет продолжает мигать для защиты от перегрева, пожалуйста, продолжайте использовать после снижения температуры ESC или двигателя (рекомендуется уменьшить нагрузку на автомобиль). |
|
Мотор заглох и не смог завестись. |
1. Двигатель подключен неправильно;
2. Неисправность ESC (сгорел частичный силовой канал MOSFET). |
1. Проверьте разъемы и точки пайки, а также правильность последовательности проводов A, B и C.;
2. Свяжитесь с дилером для выполнения ремонта. |
|
Идет нормально вперед, но не назад. |
1. Нейтральная точка канала дроссельной заслонки дистанционного управления отклоняется от тормозной зоны;
2. Пункт параметра «Режим работы» установлен неправильно; 3. ESC поврежден. |
1. Повторно откалибруйте esc, когда курок газа находится в нейтральной точке, индикаторы esc не горят;
2. Пункт параметра «Режим работы» установлен неправильно; 3. Свяжитесь с дистрибьютором для выполнения ремонта. |
| Светодиод постоянно отображает три крайние горизонтальные линии — — — при подключении светодиодной программной карты; Или отображает «Подключение ESC» при подключении программной коробки с ЖК-дисплеем. |
Программный блок неправильно подключен к ESC. |
Подключите программный блок с правильным интерфейсом, который к порту вентилятора. |
|
Настройка хода дроссельной заслонки не может быть завершена. |
ESC не получил правильный сигнал газа. |
1. Проверьте правильность подключения троса газа к ресиверу.
2. Если сервопривод работает нормально, вы можете подключить трос дроссельной заслонки esc к рулевому управлению. |
| канал, чтобы провести тест, или изменить систему передатчика/приемника для тестирования напрямую. |
Документы / Ресурсы
Рекомендации
Hobbywing EZRUN MAX8 V3 — Brushless Electronic Speed Controller Manual
Warnings
- Ensure all wires and connections are well insulated before connecting the ESC to related devices, as short circuit will damage your ESC.
- Ensure all devices are well connected, in order to prevent poor connections that may cause your vehicle to lose control or other unpredictable issues such as damage to the device.
- Read through the manuals of all power devices and chassis and ensure the power configuration is rational before using this unit.
- Please use a soldering iron with the power of at least 60W to solder all input/output wires and connectors.
- Do not hold the vehicle in the air and rev it up to full throttle, as rubber tires can «expand» to extreme size or even crack to cause serious injury.
- Stop using the ESC when its casing temperature exceeds 90℃/194℉; otherwise your ESC will get destroyed and may also get your motor damaged. We recommend setting the «ESC Thermal Protection» to 105℃/221℉ (this refers to the internal temperature of the ESC).
- We recommend removing the cooling fan from ESC before exposing vehicle to liquids, and fully drying it right after use.
- Always disconnect the batteries after use, as the ESC will continue to consume current if it is still connected to batteries (even if the ESC is turned off). Long-time contact will cause batteries to completely discharge and result in damage to batteries or ESC. This WILL NOT be covered under warranty.
Features
- ESC is compatible with sensorless brushless motors and sensored brushless motors (only in sensorless mode).
- Fully waterproof design for all weather conditions.
- Super internal switch-mode BEC with switchable voltage of 6V/7.4V and a cont./peak current of 6A/15A for easily driving big torque servos and high voltage servos.
- Highly reliable electronic switch avoids troubles which may happen to traditional mechanical switch due to dirt, water, dash and etc.
- Separate programming port to easily connect the LED program card or the LCD program box to the ESC.
- Proportional brake with 9 levels of maximum brake force and 9 levels of drag brake force.
- 5 levels of acceleration/punch from soft to aggressive for different vehicles, tires and tracks.
- Capacitor Protection: Innovative Capacitor Protection effectively protects capacitors from exploding and causing irreversible damage to the ESC because of overload.
- Multiple protections: motor lock-up protection, low-voltage cutoff protection, thermal protection, overload protection, and fail safe (throttle signal loss protection).
- Advanced programming via portable LED program card or multifunction LCD program box.
- Firmware upgrade via HOBBYWING multifunction LCD program box (item sold separately).
Specifications
| Model | EZRUN-MAX8-V3 |
| Cont./Peak Current | 150A / 950A |
| Motor Type | Sensored / Sensorless Brushless Motor (only in sensorless mode) |
| Applications | 1/8th Touring Car, Buggy, Truggy and Monster Truck |
| Motor Limit | Brushless Motor Limit with 4S LiPo/12 cells NiMH: KV≤3000 (4274 size motor) Brushless Motor Limit with 6S LiPo/18 cells NiMH:KV≤2400 (4274 size motor) |
| LiPo /NiMH Cells | 3-6S LiPo/9-18S NiMH |
| BEC Output | 6V/7.4V Switchable, Continuous Current of 6A (Switch-mode BEC) |
| Cooling Fan | Powered by the stable BEC voltage of 6V/7.4V |
| Connectors | Input End: T-plug Male Connectors / Traxxas Male Connectors. Output End: Female 6.5mm Gold Connectors (pre-soldered onto the PCB of the speed controller). |
| Size/Weight | 59.8(L)*48(W)*36.8(H)/173.5g |
| Programming Port | FAN/PRG Port |
Connections

This is an extremely powerful brushless motor system. For your safety and the safety of those around you, we strongly recommend removing the pinion before performing calibration and programming functions with this system, and keeping wheels in the air when you turn on the ESC.
Motor Wiring
There is no polarity on the A/B/C wires between ESC and motor, so do not worry about how you connect them initially. You may find it necessary to swap two wires if the motor runs in reverse.
Receiver Wiring
Plug the throttle control cable (also called Rx cable) on the ESC into the throttle (TH) channel on receiver. The red wire in the throttle control cable will output the BEC voltage of 6V/7.4V to the receiver and servo, so please do not connect any additional battery to the receiver. Otherwise, your ESC may be damaged.
External Capacitor Module (also called Cappack) Wiring (Optional)
When using a 6S, if the capacitor temperature often goes above 85℃, you need to connect an external cappack (item sold separately) to the ESC, otherwise, the insufficient capability of the on-board/built-in cappack may cause capacitors to swell or even explode and the ESC to work abnormally or even get damaged. Based on our test results, an external cappack is needed by the following two types of vehicles.
External Cappack Wiring Diagram (as shown above). Connect a cappack to the ESC input end and ensure red/positive (+) to red/positive (+), black/negative (-) to black/negative (-).
- The vehicle weighs really heavy, the total weight (battery, ESC, motor, steering servo and etc. included) exceeds 7KG, for example, CEG-GST.
- The vehicle weighs not heavy, but the chassis is specially designed for running a super-high speed (over 100KM/H) like Traxxas XO-1.
Note 2: For the above two kinds of vehicles, we strongly recommend using our EZRUN MAX6 instead, because the MAX 6 has greater power output than MAX8.
Battery Wiring
Proper polarity is essential here! Make absolutely sure positive (+) of ESC connects to positive (+) of battery, and negative (-) of ESC connects to negative (-) of battery when you plug in your battery! If reverse polarity is applied to your ESC from the battery, it will damage the ESC. This will not be covered under warranty!
ESC Setup
Set the Throttle Range
In order to make the ESC match the throttle range, you must calibrate it when you begin to use a new ESC, or a new transmitter, or after you change the settings such as the TRIM, D/R, EPA and other parameters of throttle channel on your transmitter, otherwise the ESC will not work properly. We strongly recommend activating the «Fail Save» function of the radio system and set it (F/S) to «Output OFF» or set its value to the «Neutral Position» to ensure the motor can be stopped when there is no signal received from the transmitter. About setting the throttle range, let’s take FutabaTM transmitter as an example.
- Turn on the transmitter, set parameters on the throttle channel like «D/R», «EPA» and «ATL» to 100% (for transmitter without LCD, please turn the knob to the maximum) and the throttle «TRIM» to 0 (for transmitter without LCD, please turn the corresponding knob to the neutral position). For FutabaTM radio transmitter, the direction of throttle channel shall be set to «REV», while other radio systems shall be set to «NOR». Please ensure the «ABS braking function» of your transmitter must be DISABLED.
- Start with transmitter on and the ESC turned off but connected to a battery. Holding the SET button and press the ON/OFF button to turn on the ESC, the RED LED on the ESC starts to flash (Note 1 the motor beeps at the same time), and then release the SET button immediately. (The ESC will enter the programming mode if the SET button is not released in 3 seconds, then you need to restart from step 1.)

(Press and hold the SET button)
(Press the ON/OFF button)
(Release the SET button once the LED flashes.)
Note 1: Beeps from the motor may be low sometimes, and you can check the LED status instead.
- Set the neutral point, the full throttle endpoint and the full brake endpoint.
- The motor can be started 3 seconds after the ESC/Radio calibration is complete.
Power ON-OFF Warning
- Power ON/OFF:
(Start with the ESC turned off), press the ON/OFF button to turn on the ESC;
(Start with the ESC turned on), press and hold the ON/OFF button to turn off the ESC. - Warning Tones: Turn on the ESC in the normal way (that is to turn it on without holding the SET button); the motor will beep the number of LiPo cells you have plugged in. For example, 4 beeps indicate a 4S LiPo, and 6 beeps indicate a 6S LiPo.
Programmable Items
(Options in italics are the factory default settings)
| Programmable Items | Parameter Values | ||||||||
| Basic Setting | Option 1 | Option 2 | Option 3 | Option 4 | Option 5 | Option 6 | Option 7 | Option 8 | Option 9 |
|
Fwd/Br | Fwd/Rev/Br | |||||||
|
Auto Calculation |
2S | 3S | 4S | 6S | ||||
|
Disabled | Auto (Low) | Auto (Intermediate) |
Auto (High) | |||||
|
105℃/221°F | 125℃/257°F | |||||||
|
Disabled | ||||||||
|
CCW | CW | |||||||
|
6.0V | 7.4V | |||||||
|
12.5% | 25% | 37.5% | 50.0% | 62.5% | 75.0% | 87.5% | 100.0% | Disabled |
|
25% | 50% | |||||||
|
Level 1 | Level 2 | Level 3 | Level 4 | Level 5 | ||||
| Advanced Setting | |||||||||
|
0% | 2% | 4% | 6% | 8% | 10% | 12% | 14% | 16% |
- Running Mode
Option 1: Forward with Brake
The vehicle can go forward and brake but cannot reverse in this mode. This mode is usually for racing.
Option 2: Forward / Reverse with Brake
This mode provides the braking function, so it’s usually for training. «Forward/ Reverse with Brake» mode adopted the «DOUBLE-CLICK» method, that is your vehicle only brakes (won’t reverse) when the 1st time you push the throttle trigger forward (away from you) (1st push). If the motor stops when you quickly release the throttle trigger and then re-push the trigger quickly (2nd push), the vehicle will reverse. If the motor does not stop, then your vehicle won’t reverse but brake, and you need to push the throttle trigger one more time. The vehicle only reverses after the motor stops. This method is for preventing vehicle from being accidentally reversed. - LiPo Cells
We strongly recommend setting this item manually instead of using the default setting «Auto Calc. (which means calculating the LiPo cells automatically)». The ESC can only identify 3S, 4S and 6S LiPo packs when setting this item to «Auto Calc.». After you power on the ESC, if the battery voltage is below 13.6V, it will be identified as a 3S, if the voltage is from 13.6V to 17.6V, it will be identified as a 4S, if the voltage is above 17.6V, it will be identified as a 6S.
Note 2:
- This ESC is not intended for 2S operation. Even if you can set the «LiPo Cells» to 2S, it still does not work.
- You need to set «LiPo Cells» to «Auto Calc.» and «Cutoff Voltage» to «Disabled» if you use a NiMH pack or a 5S LiPo.
- Low-Voltage Cutoff
Sets the voltage at which the ESC lowers or removes power to the motor in order to either keep the battery at a safe minimum voltage (for Lipo batteries). The ESC will monitor the battery voltage all the time, it will immediately reduce the power to 50% and cut off the output 10 seconds later when the voltage goes below the cutoff threshold. The RED LED will flash a short, single flash that repeats ( ☆, ☆, ☆ ) to indicate the low-voltage cutoff protection is activated. If you use a NiMH pack, then please set the «Cutoff Voltage» to «Disabled».
Option 1: Disabled
The ESC won’t cut off the power due to low voltage after you select this option. We do not recommend using this option when you use any LiPo pack (5S LiPo is an exception), otherwise you will irreversibly damage it. However, for avoiding losing power in racing due to low voltage, we recommend using this option (this still may cause damage to your battery). You need to select this option when you use a NiMH pack.
Option 2: Auto (Low)
Low cutoff voltage, not very easy to get the LVC Protection activated, is applicable to batteries with poor discharge capability.
Option 3: Auto (Intermediate)
Medium cutoff voltage, prone to getting the LVC Protection activated, is applicable to batteries with ordinary discharge capability.
Option 4: Auto (High)
High cutoff voltage, very prone to getting the LVC Protection activated, is applicable to packs with great discharge capability.
If you set the Cutoff Voltage to Disabled when you use a LiPo pack, then please pay attention to the power change of your vehicle. In general, the battery voltage gets pretty low when your vehicle is severely losing power, then you should stop using that pack.
- ESC Thermal (Shutdown) Protection/Overheat Protection
The ESC will automatically cut off the output and the GREEN LED will flash a short, single flash that repeats ( ☆, ☆, ☆ ) when the temperature gets up to the value you preset and activates the ESC thermal protection. The output won’t resume until the temperature gets down. - Motor Thermal (Shutdown) Protection/Overheat Protection
This item has been permanently set to «Disabled» by manufacturer. - Motor Rotation
Pull the throttle trigger with the motor shaft faces you, the motor spins counter clockwise if this item is set to CCW; the motor spins clockwise if set to CW. The (A/B/C) wiring order of motors from different manufacturers may vary, so the direction of the motor rotation may be opposite to what you expect. You can adjust the «Motor Rotation» or swap any two (ESC-to-motor) wires if the motor runs in reverse. - BEC Voltage:
Option 1:6.0V
It’s applicable to ordinary servos. Do not use this option with high voltage servos; otherwise your servos may not function normally due to insufficient voltage.
Option 2:7.4V
It’s applicable to high voltage servos. Do not use this option with ordinary servos; otherwise your servos may be burnt due to high voltage. - Brake Force
This ESC provides the proportional braking function; the braking effect is decided by the position of the throttle trigger. It sets what percentage of available braking power is applied with full brake. Large amount will shorten the braking time but it may damage your pinion and spur. Please select the most suitable brake amount as per your car condition and your preference. - Reverse Force
Different reverse amount will bring different reversing speed. For the safety of your vehicle, we recommend using a low amount. - Start Mode (Punch)
You can choose the punch from level 1 (very soft) to level 5 (very aggressive) as per the track, tires, grip, your preference and etc. This feature is very useful for preventing tires from slipping during the starting-up process. In addition, «level 4» and «level 5» have strict requirement on battery’s discharge capability. It may affect the starting-up if the battery discharges poorly and cannot provide large current in a short time. The car stutters or suddenly loses power in the starting-up process indicating the battery’s discharge capability is not good, then you need to reduce the punch or increase the FDR (Final Drive Ratio). - Drag Brake
Drag brake is the braking power produced when releasing the throttle trigger to neutral zone. This is to simulate the slight braking effect of a neutral brushed motor while coasting.
(Attention! Drag brake will consume much power, so apply it cautiously.)
ESC Programming
Programming your ESC with the SET button

After entering the corresponding item, the red LED starts to blink, the times it blinks represents the current option number.
Click the SET button to choose the option, the times the red LED blinks indicates the option number you are going to select.
Program your ESC with a LED program card
The portable program card is an optional accessory applicable for field use. Its friendly interface makes the ESC programming easy and quick.
Before the programming, you need to connect your ESC and the program card via a cable with two JR male connectors, and then turn on the ESC, all programmable items will show up a few seconds later. You can select the item you want to program and the setting you want to choose via «ITEM» & «VALUE» buttons on the program card, and then press the «OK» button to save all new settings to your ESC.
Program your ESC with a multifunction LCD program box
You can program this EZRUN MAX8 ESC through a multifunction LCD program box or through a multifunction LCD program box & a PC (HOBBYWING USB LINK software needs to be installed on the PC). Before the programming, you need to connect your ESC and the LCD program box through a cable with two JR male connectors and turn on the ESC, then the boot screen will show up on the LCD, press any button on the program box to initiate the communication between your ESC and the program box. The «CONNECTING ESC» will be displayed, a few seconds later, the program box will display the current mode like «Profile 1» and then the 1st programmable item like «Running Mode». You can adjust the setting by using the «ITEM» & «VALUE» buttons, and then press the «OK» button to save new settings to your ESC.
The programming port of this ESC is also the fan port, so you need to unplug the fan first and then plug the programming cable within the fan port and program card/box in. Please don’t use the throttle control cable (also called Rx cable) on the ESC to connect the program card/box, otherwise the program card/box won’t function.
Factory Reset
- Restore the default values with the SET button
Press and hold the SET button for over 3 seconds anytime when the throttle trigger is at the neutral position (except during the ESC calibration and programming) can factory reset your ESC. RED & GREEN LEDs flash simultaneously indicating you have successfully restored all the default values within your ESC. Once you power the ESC off, and then back on your settings will be back in the default mode. - Restore the default values with a LED program card.
After connecting the program card to the ESC, press the «RESET» button and the «OK» button to factory reset your ESC. - Restore the default values with a multifunction LCD program box.
After connecting the program box to the ESC, continuously press the «ITEM» button on the program box until you see the «RESTORE DEFAULT» item, and then press «OK» to factory reset your ESC.
Explanation for LED Status
During the Starting-up Process
- The RED LED keeps flashing rapidly indicating the ESC doesn’t detect any throttle signal or the neutral throttle value stored on your ESC may be different from the current value stored on the transmitter.
- The GREEN LED flashes «Number» times indicating the number of LiPo cells you have connected to the ESC.
In Operation
- RED & GREEN LEDs die out when the throttle trigger is in throttle neutral zone.
- The RED LED turns on solid when your vehicle runs forward. The GREEN LED will also come on when pulling the throttle trigger to the full (100%) throttle endpoint.
- The RED LED turns on solid when you brake the vehicle, the GREEN LED will also come on when pushing the throttle trigger to the full brake endpoint and setting the «brake amount/maximum brake force» to 100%.
- The RED LED turns on solid when you reverse your vehicle.
When Some Protection is Activated
- The RED LED flashes a short, single flash that repeats ( ☆, ☆, ☆ ) indicating the low voltage cutoff protection is activated.
- The GREEN LED flashes a short, single flash that repeats ( ☆, ☆, ☆ ) indicating the ESC thermal (over heat) protection is activated.
Trouble Shooting
| Trouble(s) | Possible Causes | Solution(s) |
| The ESC was unable to start the status LED, the motor, and the cooling fan after it was powered on. |
|
|
| The ESC was unable to start the motor after it was powered on, but the motor emitted a short, double beep (BB, BB, BB…) that repeats with GREEN LED on the ESC blinked. (The interval between two beeps was 1 second.) | The battery voltage was beyond the normal operating voltage range of the ESC. | Check the battery voltage. |
| After the ESC was powered on and finished LiPo cells detection (the GREEN LED flashed N times), and then the RED LED flashed rapidly. |
|
|
| The vehicle ran backward when you pulled the throttle trigger towards you. |
|
Swap any two (ESC-to-motor) wires. |
| The motor suddenly stopped or significantly reduced the output in operation. |
|
|
| The motor stuttered but couldn’t start. |
|
|
| The vehicle could run forward (and brake), but could not reverse. |
|
|
| The car ran forward/backward slowly when the throttle trigger was at the neutral position. |
|
|
|
The programming card/box was connected to the ESC via the throttle control cable (Rx cable). | It is wrong to use the Rx cable to connect programming card/box. The programming port of this ESC is also the fan port, so please connect the ESC and programming card/box by plugging the programming cable into the fan port. |
| When pressing the SET button to set the throttle neutral position, the GREEN LED didn’t flash and no beep was emitted, or you were unable to set the full throttle endpoint and the full brake endpoint after the neutral position was accepted. |
|
|

Documents / Resources
Download manual
Here you can download full pdf version of manual, it may contain additional safety instructions, warranty information, FCC rules, etc.
Download Hobbywing EZRUN MAX8 V3 — Brushless Electronic Speed Controller Manual
Артикул: HW-38010402
ID: 52252


Внимание!
Внешний вид товара, комплектация и характеристики могут изменяться производителем
без предварительных уведомлений. Данный интернет-сайт носит исключительно информационный характер и ни при каких условиях не является публичной офертой, определяемой положениями
Статьи 437 (2) Гражданского кодекса Российской Федерации.
16 890
Скидка 3 900 руб. i
от 4 330 i/месяц

В наличии
Остались вопросы?

Эксперт компании Хобби Центр
проконсультирует Вас по любому вопросу.
+7 495 411-90-19
Ежедневно с 09:00 до 18:00
- Описание
- Характеристики
- Подходит к моделям
В этом разделе для вас представлена бесколлекторная система HobbyWing Ezrun Max8. Данное приспособление можно применять для ряда автомоделей, выполненных в размере один к восьми или один к десяти. Среди них – багги, монстры, шорт-корс, трагги, как с полным приводом, так и без.
Ezrun Max8 поддерживает множество видов моторов без сенсора и без коллектора. Для его питания необходимо три-шесть банок LiPo или шесть-восемнадцать банок NiMh. Регулятор можно применять даже на трассах с водой или запыленных дорогах. Ezrun Combo Max8 имеет два режима работы и два шага регулировки мощности заднего хода.
Характеристики:
- Максимальный постоянный ток регулятора — 150А
- Максимальный кратковременный ток регулятора (в рывке) — 950А
- Питание: 6-18 банок NiMh, 3-6 банки LiPo
- BEC: 6V/7.2V / 3A Импульсный
- Тип моторов — бессенсорные бесколлекторные моторы
- Поддерживаемые моторы:
- Brushless Motor Limit with 4S LiPo/12 cells NiMH: KV≤3000 (4274 size motor)
- Brushless Motor Limit with 6S LiPo/18 cells NiMH: KV≤2400 (4274 size motor)
- Подходит для моделей: 1/10 полноприводные авто, 1/8 2WD, 4WD Short-course truck, buggy, Monster, Traggy (в том числе TRAXXAS 1/10 SCT)
- Размеры: 59.8(L)*48(W)*36.8(H)
- Вес: 173.5г
Особенности:
- Регулятор защищен от влаги и пыли и подходит для использования на трассах с малым количеством воды
- Подходит для любых бессенсорных бесколлекторных моторов масштаба 1/8
- Используются высококачественные компоненты для повышения токотдачи и долговечности регулятора
- 2 режима работы: Гоночный (только вперед), Вперед/назад.
- 2 шага регулировки мощности заднего хода.
- Пропорциональная система торможения с 8 шагами регулировки максимального тормозного усилия, 9 шагами регулировки тормоза в нейтральном положении, а так же с возможностью выключения тормоза
- 5 режимов старта от «Soft» до «Very aggressive» для настройки под разные покрытия и трассы.
- Несколько типов защиты: Отсечка для LiPo / Защита от перегрева / Failsafe по газу / Защита при блокировке мотора / Защита от пыли и грязи.
- Легко программируется с помощью карточки программирования.
- Регулятор поддерживает обновление прошивки через USB с помощью Advanced LCD Program Box (приобретается отдельно)
Мотор:
- Модель EzRun 4274 Black Бессенсорный
- Kv — 2200 оборотов на вольт
- Диаметр — 42 мм
- Длина — 74 мм (без оси ротора)
- Диаметр оси ротора — 5 мм
- Длина оси ротора — 18.5 мм
- Разъемы — типа банан
- Масса 371 г.
- Размерность мотора 4274
Регулятор
Ezrun Max8 V3 – это бесколлекторный регулятор, популярный во всем мире среди любителей моделирования и профессионалов. Данное устройство, доступное для покупки, защищено от загрязнений и попадания влаги. Даже если на трассе есть немного воды, вы можете не бояться за Ezrun Max8. Такая модель из высококлассных деталей не боится перегрева и пыли. При блокировке мотора автоматически включается защита. Система торможения пропорциональна. Устройство обладает двумя шагами регулировки силы заднего хода. Режимов работы в изделии также два.
Характеристики:
- Максимальный постоянный ток регулятора — 150А
- Максимальный кратковременный ток регулятора (в рывке) — 950А
- Питание: 6-18 банок NiMh, 3-6 банки LiPo
- BEC: 6V/7.2V / 3A Импульсный
- Тип моторов — бессенсорные бесколлекторные моторы
- Поддерживаемые моторы:
- Brushless Motor Limit with 4S LiPo/12 cells NiMH: KV≤3000 (4274 size motor)
- Brushless Motor Limit with 6S LiPo/18 cells NiMH: KV≤2400 (4274 size motor)
- Подходит для моделей: 1/10 полноприводные авто, 1/8 2WD, 4WD Short-course truck, buggy, Monster, Traggy (в том числе TRAXXAS 1/10 SCT)
- Размеры: 59.8(L)*48(W)*36.8(H)
- Вес: 173.5г
Карточка:
- Удобная настройка регулятора без использования кнопки SET
- Позволяет настраивать практически любые регуляторы производства HobbyWing
- Компактный размер
- Размеры 88мм х 58мм х 14мм
- Вес нетто: 40г.
- ЭЛЕКТРОДВИГАТЕЛИ, РЕГУЛЯТОРЫ, ШЕСТЕРНИ И АКСЕССУАРЫ
- Регуляторы скорости
- Бесколлекторные регуляторы для автомоделей
- Для моделей масштаба 1/8
- Бесколлекторный бессенсорный влагозащищенный регулятор EZRUN MAX8 V3 XT90 для шот-корс, багги, монстров масштаба 1:8 артикул HW-EZRUN-MAX8-V3-XT90
Бесколлекторный бессенсорный влагозащищенный регулятор EZRUN MAX8 V3 XT90 для шот-корс, багги, монстров масштаба 1:8 артикул HW-EZRUN-MAX8-V3-XT90
Ezrun Max8 V3 – это бесколлекторный регулятор, популярный во всем мире среди любителей моделирования и профессионалов. Данное устройство, доступное для покупки, защищено от загрязнений и попадания влаги. Даже если на трассе есть немного воды, вы можете не бояться за Ezrun Max8. Такая модель из высококлассных деталей не боится перегрева и пыли. При блокировке мотора автоматически включается защита. Система торможения пропорциональна. Устройство обладает двумя шагами регулировки силы заднего хода.
Если вы решили купить HobbyWing Ezrun, то вы можете добавить модель в Корзину и заказать товар с доставкой на дом. Возможен и самовывоз.
Характеристики:
- Максимальный постоянный ток регулятора — 150А
- Максимальный кратковременный ток регулятора (в рывке) — 950А
- Питание: 6-18 банок NiMh, 3-6 банки LiPo
- BEC: 6V/7.2V / 3A Импульсный
- Тип моторов — бессенсорные бесколлекторные моторы
- Поддерживаемые моторы:
- Brushless Motor Limit with 4S LiPo/12 cells NiMH: KV≤3000 (4274 size motor)
- Brushless Motor Limit with 6S LiPo/18 cells NiMH: KV≤2400 (4274 size motor)
- Подходит для моделей: 1/10 полноприводные авто, 1/8 2WD, 4WD Short-course truck, buggy, Monster, Traggy (в том числе TRAXXAS 1/10 SCT)
- Размеры: 59.8(L)*48(W)*36.8(H)
- Вес: 173.5г
Особенности:
- Регулятор защищен от влаги и пыли и подходит для использования на трассах с малым количеством воды
- Подходит для любых бессенсорных бесколлекторных моторов масштаба 1/8
- Используются высококачественные компоненты для повышения токотдачи и долговечности регулятора
- 3 режима работы: Гоночный (только вперед), Вперед/Назад, Вперед/Тормоз/Назад
- 2 шага регулировки мощности заднего хода.
- Пропорциональная система торможения с 8 шагами регулировки максимального тормозного усилия, 9 шагами регулировки тормоза в нейтральном положении, а так же с возможностью выключения тормоза
- 5 режимов старта от «Soft» до «Very aggressive» для настройки под разные покрытия и трассы.
- Несколько типов защиты: Отсечка для LiPo / Защита от перегрева / Failsafe по газу / Защита при блокировке мотора / Защита от пыли и грязи.
- Легко программируется с помощью карточки программирования.
- Регулятор поддерживает обновление прошивки через USB с помощью Advanced LCD Program Box (приобретается отдельно)
В комплект входит:
- Регулятор Ezrun MAX8-V3 с разъемами XT90
Теги:
Hobbywing
Внимание!
Внешний вид товара, комплектация и характеристики могут изменяться производителем
без предварительных уведомлений. Данный интернет-сайт носит исключительно информационный характер и ни при каких условиях не является публичной офертой, определяемой положениями
Статьи 437 (2) Гражданского кодекса Российской Федерации.
Бесколлекторный бессенсорный влагозащищенный регулятор EZRUN MAX8 V3 XT90 для шот-корс, багги, монстров масштаба 1:8 артикул HW-EZRUN-MAX8-V3-XT90 отзывы
Оставьте отзыв об этом товаре первым!
Рекомендуем посмотреть
 артикул TRA5290")
 для Savage-X 21 & 25 длина 165mm артикул T7014SILVER")
 артикул EXA76801RRBL")


 артикул HSP-94211")
 аккумулятор Ni-Mh, 4WD, 2.4G, RTR комплект артикул RH1031-BLUE")
 аккумулятор Ni-Mh, 4WD, 2.4G, RTR комплект артикул RH1031-RED")
 артикул SK-400001-05")
 артикул HSP-94201")

 (2) артикул TRA6852R")
Hobbywing EZRUN MAX8 V3 — Brushless Electronic Speed Controller Manual
Warnings
- Ensure all wires and connections are well insulated before connecting the ESC to related devices, as short circuit will damage your ESC.
- Ensure all devices are well connected, in order to prevent poor connections that may cause your vehicle to lose control or other unpredictable issues such as damage to the device.
- Read through the manuals of all power devices and chassis and ensure the power configuration is rational before using this unit.
- Please use a soldering iron with the power of at least 60W to solder all input/output wires and connectors.
- Do not hold the vehicle in the air and rev it up to full throttle, as rubber tires can «expand» to extreme size or even crack to cause serious injury.
- Stop using the ESC when its casing temperature exceeds 90℃/194℉; otherwise your ESC will get destroyed and may also get your motor damaged. We recommend setting the «ESC Thermal Protection» to 105℃/221℉ (this refers to the internal temperature of the ESC).
- We recommend removing the cooling fan from ESC before exposing vehicle to liquids, and fully drying it right after use.
- Always disconnect the batteries after use, as the ESC will continue to consume current if it is still connected to batteries (even if the ESC is turned off). Long-time contact will cause batteries to completely discharge and result in damage to batteries or ESC. This WILL NOT be covered under warranty.
Features
- ESC is compatible with sensorless brushless motors and sensored brushless motors (only in sensorless mode).
- Fully waterproof design for all weather conditions.
- Super internal switch-mode BEC with switchable voltage of 6V/7.4V and a cont./peak current of 6A/15A for easily driving big torque servos and high voltage servos.
- Highly reliable electronic switch avoids troubles which may happen to traditional mechanical switch due to dirt, water, dash and etc.
- Separate programming port to easily connect the LED program card or the LCD program box to the ESC.
- Proportional brake with 9 levels of maximum brake force and 9 levels of drag brake force.
- 5 levels of acceleration/punch from soft to aggressive for different vehicles, tires and tracks.
- Capacitor Protection: Innovative Capacitor Protection effectively protects capacitors from exploding and causing irreversible damage to the ESC because of overload.
- Multiple protections: motor lock-up protection, low-voltage cutoff protection, thermal protection, overload protection, and fail safe (throttle signal loss protection).
- Advanced programming via portable LED program card or multifunction LCD program box.
- Firmware upgrade via HOBBYWING multifunction LCD program box (item sold separately).
Specifications
| Model | EZRUN-MAX8-V3 |
| Cont./Peak Current | 150A / 950A |
| Motor Type | Sensored / Sensorless Brushless Motor (only in sensorless mode) |
| Applications | 1/8th Touring Car, Buggy, Truggy and Monster Truck |
| Motor Limit | Brushless Motor Limit with 4S LiPo/12 cells NiMH: KV≤3000 (4274 size motor) Brushless Motor Limit with 6S LiPo/18 cells NiMH:KV≤2400 (4274 size motor) |
| LiPo /NiMH Cells | 3-6S LiPo/9-18S NiMH |
| BEC Output | 6V/7.4V Switchable, Continuous Current of 6A (Switch-mode BEC) |
| Cooling Fan | Powered by the stable BEC voltage of 6V/7.4V |
| Connectors | Input End: T-plug Male Connectors / Traxxas Male Connectors. Output End: Female 6.5mm Gold Connectors (pre-soldered onto the PCB of the speed controller). |
| Size/Weight | 59.8(L)*48(W)*36.8(H)/173.5g |
| Programming Port | FAN/PRG Port |
Connections
This is an extremely powerful brushless motor system. For your safety and the safety of those around you, we strongly recommend removing the pinion before performing calibration and programming functions with this system, and keeping wheels in the air when you turn on the ESC.
Motor Wiring
There is no polarity on the A/B/C wires between ESC and motor, so do not worry about how you connect them initially. You may find it necessary to swap two wires if the motor runs in reverse.
Receiver Wiring
Plug the throttle control cable (also called Rx cable) on the ESC into the throttle (TH) channel on receiver. The red wire in the throttle control cable will output the BEC voltage of 6V/7.4V to the receiver and servo, so please do not connect any additional battery to the receiver. Otherwise, your ESC may be damaged.
External Capacitor Module (also called Cappack) Wiring (Optional)
When using a 6S, if the capacitor temperature often goes above 85℃, you need to connect an external cappack (item sold separately) to the ESC, otherwise, the insufficient capability of the on-board/built-in cappack may cause capacitors to swell or even explode and the ESC to work abnormally or even get damaged. Based on our test results, an external cappack is needed by the following two types of vehicles.
External Cappack Wiring Diagram (as shown above). Connect a cappack to the ESC input end and ensure red/positive (+) to red/positive (+), black/negative (-) to black/negative (-).
- The vehicle weighs really heavy, the total weight (battery, ESC, motor, steering servo and etc. included) exceeds 7KG, for example, CEG-GST.
- The vehicle weighs not heavy, but the chassis is specially designed for running a super-high speed (over 100KM/H) like Traxxas XO-1.
Note 2: For the above two kinds of vehicles, we strongly recommend using our EZRUN MAX6 instead, because the MAX 6 has greater power output than MAX8.
Battery Wiring
Proper polarity is essential here! Make absolutely sure positive (+) of ESC connects to positive (+) of battery, and negative (-) of ESC connects to negative (-) of battery when you plug in your battery! If reverse polarity is applied to your ESC from the battery, it will damage the ESC. This will not be covered under warranty!
ESC Setup
Set the Throttle Range
In order to make the ESC match the throttle range, you must calibrate it when you begin to use a new ESC, or a new transmitter, or after you change the settings such as the TRIM, D/R, EPA and other parameters of throttle channel on your transmitter, otherwise the ESC will not work properly. We strongly recommend activating the «Fail Save» function of the radio system and set it (F/S) to «Output OFF» or set its value to the «Neutral Position» to ensure the motor can be stopped when there is no signal received from the transmitter. About setting the throttle range, let’s take FutabaTM transmitter as an example.
- Turn on the transmitter, set parameters on the throttle channel like «D/R», «EPA» and «ATL» to 100% (for transmitter without LCD, please turn the knob to the maximum) and the throttle «TRIM» to 0 (for transmitter without LCD, please turn the corresponding knob to the neutral position). For FutabaTM radio transmitter, the direction of throttle channel shall be set to «REV», while other radio systems shall be set to «NOR». Please ensure the «ABS braking function» of your transmitter must be DISABLED.
- Start with transmitter on and the ESC turned off but connected to a battery. Holding the SET button and press the ON/OFF button to turn on the ESC, the RED LED on the ESC starts to flash (Note 1 the motor beeps at the same time), and then release the SET button immediately. (The ESC will enter the programming mode if the SET button is not released in 3 seconds, then you need to restart from step 1.)
(Press and hold the SET button)
(Press the ON/OFF button)
(Release the SET button once the LED flashes.)
Note 1: Beeps from the motor may be low sometimes, and you can check the LED status instead.
- Set the neutral point, the full throttle endpoint and the full brake endpoint.
- The motor can be started 3 seconds after the ESC/Radio calibration is complete.
Power ON-OFF Warning
- Power ON/OFF:
(Start with the ESC turned off), press the ON/OFF button to turn on the ESC;
(Start with the ESC turned on), press and hold the ON/OFF button to turn off the ESC. - Warning Tones: Turn on the ESC in the normal way (that is to turn it on without holding the SET button); the motor will beep the number of LiPo cells you have plugged in. For example, 4 beeps indicate a 4S LiPo, and 6 beeps indicate a 6S LiPo.
Programmable Items
(Options in italics are the factory default settings)
| Programmable Items | Parameter Values | ||||||||
| Basic Setting | Option 1 | Option 2 | Option 3 | Option 4 | Option 5 | Option 6 | Option 7 | Option 8 | Option 9 |
|
Fwd/Br | Fwd/Rev/Br | |||||||
|
Auto Calculation |
2S | 3S | 4S | 6S | ||||
|
Disabled | Auto (Low) | Auto (Intermediate) |
Auto (High) | |||||
|
105℃/221°F | 125℃/257°F | |||||||
|
Disabled | ||||||||
|
CCW | CW | |||||||
|
6.0V | 7.4V | |||||||
|
12.5% | 25% | 37.5% | 50.0% | 62.5% | 75.0% | 87.5% | 100.0% | Disabled |
|
25% | 50% | |||||||
|
Level 1 | Level 2 | Level 3 | Level 4 | Level 5 | ||||
| Advanced Setting | |||||||||
|
0% | 2% | 4% | 6% | 8% | 10% | 12% | 14% | 16% |
- Running Mode
Option 1: Forward with Brake
The vehicle can go forward and brake but cannot reverse in this mode. This mode is usually for racing.
Option 2: Forward / Reverse with Brake
This mode provides the braking function, so it’s usually for training. «Forward/ Reverse with Brake» mode adopted the «DOUBLE-CLICK» method, that is your vehicle only brakes (won’t reverse) when the 1st time you push the throttle trigger forward (away from you) (1st push). If the motor stops when you quickly release the throttle trigger and then re-push the trigger quickly (2nd push), the vehicle will reverse. If the motor does not stop, then your vehicle won’t reverse but brake, and you need to push the throttle trigger one more time. The vehicle only reverses after the motor stops. This method is for preventing vehicle from being accidentally reversed. - LiPo Cells
We strongly recommend setting this item manually instead of using the default setting «Auto Calc. (which means calculating the LiPo cells automatically)». The ESC can only identify 3S, 4S and 6S LiPo packs when setting this item to «Auto Calc.». After you power on the ESC, if the battery voltage is below 13.6V, it will be identified as a 3S, if the voltage is from 13.6V to 17.6V, it will be identified as a 4S, if the voltage is above 17.6V, it will be identified as a 6S.
Note 2:
- This ESC is not intended for 2S operation. Even if you can set the «LiPo Cells» to 2S, it still does not work.
- You need to set «LiPo Cells» to «Auto Calc.» and «Cutoff Voltage» to «Disabled» if you use a NiMH pack or a 5S LiPo.
- Low-Voltage Cutoff
Sets the voltage at which the ESC lowers or removes power to the motor in order to either keep the battery at a safe minimum voltage (for Lipo batteries). The ESC will monitor the battery voltage all the time, it will immediately reduce the power to 50% and cut off the output 10 seconds later when the voltage goes below the cutoff threshold. The RED LED will flash a short, single flash that repeats ( ☆, ☆, ☆ ) to indicate the low-voltage cutoff protection is activated. If you use a NiMH pack, then please set the «Cutoff Voltage» to «Disabled».
Option 1: Disabled
The ESC won’t cut off the power due to low voltage after you select this option. We do not recommend using this option when you use any LiPo pack (5S LiPo is an exception), otherwise you will irreversibly damage it. However, for avoiding losing power in racing due to low voltage, we recommend using this option (this still may cause damage to your battery). You need to select this option when you use a NiMH pack.
Option 2: Auto (Low)
Low cutoff voltage, not very easy to get the LVC Protection activated, is applicable to batteries with poor discharge capability.
Option 3: Auto (Intermediate)
Medium cutoff voltage, prone to getting the LVC Protection activated, is applicable to batteries with ordinary discharge capability.
Option 4: Auto (High)
High cutoff voltage, very prone to getting the LVC Protection activated, is applicable to packs with great discharge capability.
If you set the Cutoff Voltage to Disabled when you use a LiPo pack, then please pay attention to the power change of your vehicle. In general, the battery voltage gets pretty low when your vehicle is severely losing power, then you should stop using that pack.
- ESC Thermal (Shutdown) Protection/Overheat Protection
The ESC will automatically cut off the output and the GREEN LED will flash a short, single flash that repeats ( ☆, ☆, ☆ ) when the temperature gets up to the value you preset and activates the ESC thermal protection. The output won’t resume until the temperature gets down. - Motor Thermal (Shutdown) Protection/Overheat Protection
This item has been permanently set to «Disabled» by manufacturer. - Motor Rotation
Pull the throttle trigger with the motor shaft faces you, the motor spins counter clockwise if this item is set to CCW; the motor spins clockwise if set to CW. The (A/B/C) wiring order of motors from different manufacturers may vary, so the direction of the motor rotation may be opposite to what you expect. You can adjust the «Motor Rotation» or swap any two (ESC-to-motor) wires if the motor runs in reverse. - BEC Voltage:
Option 1:6.0V
It’s applicable to ordinary servos. Do not use this option with high voltage servos; otherwise your servos may not function normally due to insufficient voltage.
Option 2:7.4V
It’s applicable to high voltage servos. Do not use this option with ordinary servos; otherwise your servos may be burnt due to high voltage. - Brake Force
This ESC provides the proportional braking function; the braking effect is decided by the position of the throttle trigger. It sets what percentage of available braking power is applied with full brake. Large amount will shorten the braking time but it may damage your pinion and spur. Please select the most suitable brake amount as per your car condition and your preference. - Reverse Force
Different reverse amount will bring different reversing speed. For the safety of your vehicle, we recommend using a low amount. - Start Mode (Punch)
You can choose the punch from level 1 (very soft) to level 5 (very aggressive) as per the track, tires, grip, your preference and etc. This feature is very useful for preventing tires from slipping during the starting-up process. In addition, «level 4» and «level 5» have strict requirement on battery’s discharge capability. It may affect the starting-up if the battery discharges poorly and cannot provide large current in a short time. The car stutters or suddenly loses power in the starting-up process indicating the battery’s discharge capability is not good, then you need to reduce the punch or increase the FDR (Final Drive Ratio). - Drag Brake
Drag brake is the braking power produced when releasing the throttle trigger to neutral zone. This is to simulate the slight braking effect of a neutral brushed motor while coasting.
(Attention! Drag brake will consume much power, so apply it cautiously.)
ESC Programming
Programming your ESC with the SET button
After entering the corresponding item, the red LED starts to blink, the times it blinks represents the current option number.
Click the SET button to choose the option, the times the red LED blinks indicates the option number you are going to select.
Program your ESC with a LED program card
The portable program card is an optional accessory applicable for field use. Its friendly interface makes the ESC programming easy and quick.
Before the programming, you need to connect your ESC and the program card via a cable with two JR male connectors, and then turn on the ESC, all programmable items will show up a few seconds later. You can select the item you want to program and the setting you want to choose via «ITEM» & «VALUE» buttons on the program card, and then press the «OK» button to save all new settings to your ESC.
Program your ESC with a multifunction LCD program box
You can program this EZRUN MAX8 ESC through a multifunction LCD program box or through a multifunction LCD program box & a PC (HOBBYWING USB LINK software needs to be installed on the PC). Before the programming, you need to connect your ESC and the LCD program box through a cable with two JR male connectors and turn on the ESC, then the boot screen will show up on the LCD, press any button on the program box to initiate the communication between your ESC and the program box. The «CONNECTING ESC» will be displayed, a few seconds later, the program box will display the current mode like «Profile 1» and then the 1st programmable item like «Running Mode». You can adjust the setting by using the «ITEM» & «VALUE» buttons, and then press the «OK» button to save new settings to your ESC.
The programming port of this ESC is also the fan port, so you need to unplug the fan first and then plug the programming cable within the fan port and program card/box in. Please don’t use the throttle control cable (also called Rx cable) on the ESC to connect the program card/box, otherwise the program card/box won’t function.
Factory Reset
- Restore the default values with the SET button
Press and hold the SET button for over 3 seconds anytime when the throttle trigger is at the neutral position (except during the ESC calibration and programming) can factory reset your ESC. RED & GREEN LEDs flash simultaneously indicating you have successfully restored all the default values within your ESC. Once you power the ESC off, and then back on your settings will be back in the default mode. - Restore the default values with a LED program card.
After connecting the program card to the ESC, press the «RESET» button and the «OK» button to factory reset your ESC. - Restore the default values with a multifunction LCD program box.
After connecting the program box to the ESC, continuously press the «ITEM» button on the program box until you see the «RESTORE DEFAULT» item, and then press «OK» to factory reset your ESC.
Explanation for LED Status
During the Starting-up Process
- The RED LED keeps flashing rapidly indicating the ESC doesn’t detect any throttle signal or the neutral throttle value stored on your ESC may be different from the current value stored on the transmitter.
- The GREEN LED flashes «Number» times indicating the number of LiPo cells you have connected to the ESC.
In Operation
- RED & GREEN LEDs die out when the throttle trigger is in throttle neutral zone.
- The RED LED turns on solid when your vehicle runs forward. The GREEN LED will also come on when pulling the throttle trigger to the full (100%) throttle endpoint.
- The RED LED turns on solid when you brake the vehicle, the GREEN LED will also come on when pushing the throttle trigger to the full brake endpoint and setting the «brake amount/maximum brake force» to 100%.
- The RED LED turns on solid when you reverse your vehicle.
When Some Protection is Activated
- The RED LED flashes a short, single flash that repeats ( ☆, ☆, ☆ ) indicating the low voltage cutoff protection is activated.
- The GREEN LED flashes a short, single flash that repeats ( ☆, ☆, ☆ ) indicating the ESC thermal (over heat) protection is activated.
Trouble Shooting
| Trouble(s) | Possible Causes | Solution(s) |
| The ESC was unable to start the status LED, the motor, and the cooling fan after it was powered on. |
|
|
| The ESC was unable to start the motor after it was powered on, but the motor emitted a short, double beep (BB, BB, BB…) that repeats with GREEN LED on the ESC blinked. (The interval between two beeps was 1 second.) | The battery voltage was beyond the normal operating voltage range of the ESC. | Check the battery voltage. |
| After the ESC was powered on and finished LiPo cells detection (the GREEN LED flashed N times), and then the RED LED flashed rapidly. |
|
|
| The vehicle ran backward when you pulled the throttle trigger towards you. |
|
Swap any two (ESC-to-motor) wires. |
| The motor suddenly stopped or significantly reduced the output in operation. |
|
|
| The motor stuttered but couldn’t start. |
|
|
| The vehicle could run forward (and brake), but could not reverse. |
|
|
| The car ran forward/backward slowly when the throttle trigger was at the neutral position. |
|
|
|
The programming card/box was connected to the ESC via the throttle control cable (Rx cable). | It is wrong to use the Rx cable to connect programming card/box. The programming port of this ESC is also the fan port, so please connect the ESC and programming card/box by plugging the programming cable into the fan port. |
| When pressing the SET button to set the throttle neutral position, the GREEN LED didn’t flash and no beep was emitted, or you were unable to set the full throttle endpoint and the full brake endpoint after the neutral position was accepted. |
|
|
Documents / Resources
Download manual
Here you can download full pdf version of manual, it may contain additional safety instructions, warranty information, FCC rules, etc.
Download Hobbywing EZRUN MAX8 V3 — Brushless Electronic Speed Controller Manual
Instructions for Brushed- and Brushless motors and ESC
Important safety advices:
• Before you start using the product, please make sure that you’ve read this safety
advices! Robitronic is not liable for any warrantee claims or damages that occur
from a nonobservance of these safety advices.
• Electronic products and accessories are not suitable for children under 14 years!
They’re not toys and children should be carefully advised.
• Keep things that can become entangled in the propeller away from the propeller.
Be especially careful that clothing, tools, as well as hands, face and other body
parts does not get too close to the propeller!
• Ensure your batteries (both transmitter and vehicle) have been properly charged
for use with your model.
• Never operate your model near traffic, bystanders, parking areas, or any other
area that could result in injury to people or damage to property.
• Never, under any circumstances, operate a model in traffic.
• Fly your model always with enough space away from obstacles, persons,
vehicles, buildings, etc.
• Never operate your model during a thunderstorm.
• Moisture can damage electronic components. Avoid water exposure to all
components.
• Always power on your transmitter before turning your vehicle on.
• The product should be regularly checked for damages, especially damages on
the mains cable. In case of damage, the product must not be used until it is
repaired by a qualified person. (See our contact details at the end of this manual
for further advice)
• The product must be protected from dust, direct sunlight, heat and rain.
• Observe the hazards emanating from a powered motor or propeller.
• Remove the propeller from the motor when you make adjustments or repairs to
an aircraft and the motor is powered.
• Observe the respective regulations valid in your country!
First Person View (FPV) regulations for Austria:
Operation is permitted if the «FPV-Pilot» which controls the model aircraft with
the aid of video glasses etc., is supportet at the same time by an «observer» with
clear sight between tot he model aircraft without the use of technical aids, giving
the FPV-Pilot in exigent circumstances instructions or in an emergency can take
over command of the flight model. Responsible and liable «(= liability insurance)
for third-party damage», is the «FPV-Pilot»!
• Disconnect the flight battery when the aircraft is not being used.
• The entire product must not be altered or modified!
• Operation under adverse conditions is not permitted, include:
— High humidity
— Wet conditions
— Dust or combustible gases, vapors, solvents or benzene
— High temperature (> approx. +40°C)
— Heavy vibrations
• If you may assume, that the product cannot be used safely any more, you must
immediately stop using it and secure it against unintended operation. Such an
assumption can be made if:
— is apparently damaged.
— malfunctions
— is stored in an adverse environment for prolonged periods of time.
Connection
The ESC can be connected to the motor via high-quality gold contacts or directly
via a soldering connection. The controllers are manufactured exclusively for the
operation of Brushless or Brushed motors as they are used in the hobby area.
They recognize AC motors on their 3 connection cables. Connect these to the three
connection cables of the controller.
They recognize DC motors on their 2 connection cables. Connect these to the two
connection cables of the controller.
When soldering, be careful not to overheat the motor and ESC and insulate open
cables with a shrink tube / insulation sleeve.
The maximum length of the battery cable should not exceed 15 cm.
• Solder / connect the ESC to the motor.
• Solder the required plug to the battery cable.
• Insulate all soldering joints with shrink / insulation tubing.
• Connect the «JR» connector to the «throttle» channel of the receiver.
• Connect the battery pack to the corresponding socket on the battery and make
sure the polarity is correct.
• If the motor rotates in the wrong direction, replace two motor cables in the case
of sensorless motors.
Warranty
With the purchase of this product you purchased at the same time a two-year
warranty from date of purchase. The guarantee applies only to the already existing
material defects on the purchase of the product and / or functional defects.
Excluded from the guarantee are:
• Damage caused by incorrect use
• Damage caused by neglect of duty of care
• Damage caused by improper handling and maintenance errors
• Liquid damage
For warranty claims, please contact your local dealer.
Should it be necessary to send the product, you must enclose a copy of the invoice
and a repair order. You can download it at www.robitronic.com. With direct sending
to the service department must be consulted beforehand (held by telephone or e-
mail). The postage costs borne by the consignor. Paid packages are not accepted.
Everyone sent in warranty case is first examined by our service department on
admissibility. For reject warranty claims will be charged back to a control and
processing fee before we return the product. Repairs not covered under warranty,
before the start of the repair must be paid.
LiPo Battery Warnings and Usage Guidelines
• You must charge the LiPo battery in a safe area away from flammable
materials.Never charge the LiPo battery unattended at any time. When charging
the battery you should always remain in constant observation to monitor the
charging process and react immediately to any potential problems that may
occur.
• After discharging the battery you must allow it to cool to ambient/room
temperature before recharging. Also, it is NOT necessary or recommended to
discharge the battery ‘fully’ before charging (LiPo batteries have no ‘memory’
and it’s safe to charge partially discharged batteries when using an appropriate
charger).
• To charge the battery you must use only a special LiPo battery charger. Failure
to do so may result in a fire causing property damage and/or personal injury. DO
NOT use a NiCd or NiMH charger.
• If at any time during the charge or discharge process the battery begins to
balloon or swell, discontinue charging or discharging immediately. Quickly and
safely disconnect the battery from the charger, then place the battery in a safe,
open area away from flammable materials to observe it for at least 15 minutes.
Continuing to charge or discharge a battery that has begun to balloon or swell
can result in a fire. A battery that has ballooned or swollen even a small amount
must be removed from service completely.
• Store the battery partially charged (approximately 50% charged/3.85V per cell),
at room temperature (approximately 25° C and in a dry area for best results.
• When transporting or temporarily storing the battery, the temperature range
should be from approximately 5°C-40°C. Do not store the battery or model in a
hot garage, car or direct sunlight whenever possible. If stored in a hot garage or
car the battery can be damaged or even catch fire.
• Do not over-discharge the LiPo battery. Discharging the LiPo battery to a voltage
that is too low can cause damage to the battery resulting in reduced power,
duration or failure of the battery entirely. LiPo cells should not be discharged to
below 3.2V each under load.
Disclaimer
As compliance with the instructions, the operations and conditions when using the
product at no time can be monitored by the manufacturer; the manufacturer
assumes no liability for damages, costs and / or losses arising from incorrect use
and / or incorrect operation or in any way connected.
Declaration of Conformity (DOC)
Hereby, the manufacturer declares that this product is in compliance with the
essential requirements and other relevant provisions of EU Directives.
The declaration of conformity may be consulted at www.robitronic.com
Disposal of Electronic Waste
Electronic waste is a commodity and must be disposed through special
electronic waste sites. Please inform yourself about adequate facilities in
your community area. Disposal of this product through domestic waste is
illegal.
Batteries / Accumulators
As a consumer you are legally obliged to return all empty / defective
batteries (Battery ordinance). Disposal in the household garbage is
prohibited! Contaminated batteries / accumulators are labeled with
symbols that indicate the prohibition of disposal in domestic waste. The
designations for the respective heavy metals are:
Cd = cadmium, Hg = mercury, Pb = lead.
Your empty / defective batteries / rechargeable batteries you can bring free of
charge to the community collection or wherever batteries / accumulators are sold.
Technical specifications, features and design are subject to change.
Importeur / Imported by:
Robitronic Electronic GmbH
Brunhildengasse 1/1, 1150 Wien, Österreich
Tel.:+43 (0)1-982 09 20 I Fax.: +43 (0)1-98 209 21
www.robitronic.com
Hersteller / Manufactured by:
Shenzhen Hobbywing Technology Co,.Ltd
Bldg 4,Yasen Hi-tech Industrial Park, 8 Chengxin Rd.,Baolong Town, Longgang
Dist., Shenzhen.China
Tel: (0086)-755-89507122-837 Fax: (0086)-755-25509626
www.hobbywing.com