В настоящий момент товары недоступны для заказа на samsung.com/ru
В настоящий момент товары недоступны для заказа на samsung.com/ru
Выберите свое местоположение и язык.

-
Установка
Как установить холодильник SamsungЧасто задаваемые вопросы о бытовой технике Samsung. Подробную информацию об установке холодильника Samsung Вы можете узнать в службе поддержки Samsung.
-
Температура
Что делать, если холодильник Samsung не охлаждаетЧасто задаваемые вопросы о бытовой технике Samsung. Узнайте подробнее о ‘Что делать, если холодильник Samsung не охлаждает’ с помощью службы поддержки Samsung.
-
Дверца
Как поменять направление открывания дверцы холодильника SamsungЧасто задаваемые вопросы о бытовой технике Samsung. Подробную информацию о том, как поменять направление открывания дверцы холодильника Samsung, вы можете узнать в службе поддержки Samsung.
-
Повреждения
Что делать, если намерзает лед в холодильнике SamsungЧасто задаваемые вопросы о технике Холодильники Samsung. Узнайте подробнее о ‘Что делать, если намерзает лед в холодильнике Samsung’ с помощью службы поддержки Samsung.
-
Шум и вибрация
Почему мой холодильник Samsung шумитЧасто задаваемые вопросы о бытовой технике Samsung. Узнайте подробнее о ‘Почему мой холодильник Samsung шумит’ с помощью службы поддержки Samsung.
-
Лед / Вода
Почему в моем холодильнике или морозильнике вода или конденсатЧасто задаваемые вопросы о бытовой технике Samsung. Узнайте подробнее о ‘Почему в моем холодильнике или морозильнике вода или конденсат’ с помощью службы поддержки Samsung.
-
Сообщение об ошибке
Коды ошибок холодильников SamsungОшибка на дисплее холодильника Samsung? Рекомендации от производителя в этой статье.
-
Температура
На холодильнике Samsung мигает индикатор температурыЧасто задаваемые вопросы о технике Холодильник Samsung. Узнайте подробнее о ‘Что делать, если на холодильнике Samsung мигает индикатор температуры’ с помощью службы поддержки Samsung
-
Лед / Вода
Как заменить фильтр для очистки воды в моем холодильнике?Часто задаваемые вопросы о бытовой технике Samsung. Больше информации о том, как заменить фильтр для очистки воды в холодильнике, в службе поддержки Samsung.
-
Температура
Что делать, если не охлаждает морозильная камера в холодильнике SamsungЧасто задаваемые вопросы о Бытовой технике Samsung. Узнайте подробнее о ‘Что делать, если не охлаждает морозильная камера в холодильнике Samsung’ с помощью службы поддержки Samsung.
-
Спецификации
Почему нагреваются боковые стенки холодильника SamsungЧасто задаваемые вопросы о технике Холодильники Samsung. Узнайте подробнее о ‘Почему нагреваются боковые стенки холодильника Samsung’ с помощью службы поддержки Samsung.
-
Использование
Как включить функцию быстрой заморозки в холодильнике SamsungЧасто задаваемые вопросы о бытовой технике Samsung. Узнайте подробнее о ‘Как включить функцию быстрой заморозки в холодильнике Samsung’ с помощью службы поддержки Samsung.
-
Питание
Что делать, если холодильник Samsung не включаетсяЧасто задаваемые вопросы о технике Холодильники Samsung. Узнайте подробнее о ‘Что делать, если холодильник Samsung не включается’ с помощью службы поддержки Samsung.
-
REF_Прочее
Холодильник Samsung не охлаждаетЧасто задаваемые вопросы о бытовой технике Samsung. Узнайте подробнее о ‘Холодильник Samsung не охлаждает’ с помощью службы поддержки Samsung.
-
Температура
Что делать, если холодильник Samsung перемораживает продуктыЧасто задаваемые вопросы о бытовой технике Samsung. Больше информации о том, что делать, если холодильник Samsung перемораживает продукты в службе поддержки Samsung.
-
Спецификации
Класс энергетической эффективности бытовой техникиЧасто задаваемые вопросы о технике Техника для кухни Samsung. Узнайте подробнее о ‘Класс энергетической эффективности бытовой техники’ с помощью службы поддержки Samsung.
-
Запах
Как устранить неприятный запах в холодильнике SamsungЧасто задаваемые вопросы о технике Холодильники Samsung. Узнайте подробнее о ‘Как устранить неприятный запах в холодильнике Samsung’ с помощью службы поддержки Samsung.
-
Шум и вибрация
Что делать, если скрипят дверцы холодильника SamsungЧасто задаваемые вопросы о технике Холодильники Samsung. Узнайте подробнее о ‘Что делать, если скрипят дверцы холодильника Samsung’ с помощью службы поддержки Samsung.
-
WM_Прочее
Что делать, если деталь техники Samsung из закаленного стекла разбиласьЧасто задаваемые вопросы о бытовой технике Samsung. Узнайте подробнее о ‘Что делать, если деталь техники Samsung из закаленного стекла разбилась’ с помощью службы поддержки Samsung.
-
Дверца
Дверь холодильника Samsung открывается из-за другой двериЧасто задаваемые вопросы о технике Холодильники Samsung. Узнайте подробнее о ‘Дверь холодильника Samsung колеблется из-за другой двери’ с помощью службы поддержки Samsung.
-
{{file.description}}
- Версия {{file.fileVersion}}
- {{file.fileSize}} MB
- {{file.fileModifiedDate}}
- {{file.osNames}}
ДОПОЛНИТЕЛЬНАЯ ИНФОРМАЦИЯ
Информация о гарантии
Узнайте, что входит в гарантийные обязательства


Индивидуальная поддержка
Получите помощь от официальных центров поддержки


Новости и уведомления
Обьявления о важных продуктах и услугах


Раздел: Бытовая, кухонная техника, электроника и оборудование
Тип: Холодильник
Характеристики, спецификации
Звук.сиг. повышения темп.:
Да
Отделений в мороз. камере:
3
Материал изготовления полок:
стекло
Полок в холодильной камере:
4
Количество компрессоров:
1
Тип компрессора:
стандартный
Габаритные размеры (В*Ш*Г):
178*60*60 см
Разм. мороз. камеры:
автомат.(No Frost)
Разм. холод. камеры:
автомат.(No Frost)
Инд. темп. в мороз. к-ре:
Да
Инд. темп. в холод. к-ре:
Да
Тип управления:
электронный
Тип освещения:
лампа накаливания
Расположение мороз.камеры:
нижнее
Объем холодильной камеры:
200 л
Объем морозильной камеры:
90 л
Режим суперохлаждения:
автоматический
Режим суперзамораживания:
автоматический
Инструкция к Холодильнику Samsung RL33EBMS
RUSSIAN
RL33SBSW RL33SBMS
RL33EBSW RL33EBMS
RL33EASW RL33EAMS
B68566
RL33SBSW RL33SBMS
RL33EBSW RL33EBMS
RL33EASW RL33EAMS
20. 03. 10~
RUSSIA
8-800-200-0400
www.samsung.ru
DA68-01339Q(5)
Samsung
www.samsung.com/global/register
RL33SBSW RL33SBMS
RL33EASW
RL33EBSW RL33EBMS
RL33EAMS
ST
I
290
200
90
220V-240V~/50Hz
100
10
300
20
0.87
12
R-600a,60g
75
595 658 1774
595 689 1774
M
M
S
3
1
M
C
2
t
1~
M
P.T.C
16
1
C C
RL33SBSW
RL33EBSW
RL33EASW
RL33SBMS
RL33EBMS
RL33EAMS
3
3
3
1
1
1
1
1
1
2
2
2
1
1
1
1
1
1
2
2
2
1
1
1
1
1
1
1
1
1
1
1
1
1 1 1
2
15
14
3
4
13
12
5
(RL33EA*,RL33EB*)
C C
—
—
—
C C
—
—
—
—
—
—
—
6
11
(RL33EA*,RL33EB*)
10
7
(RL33SB*)(RL33EA*,RL33EB*)
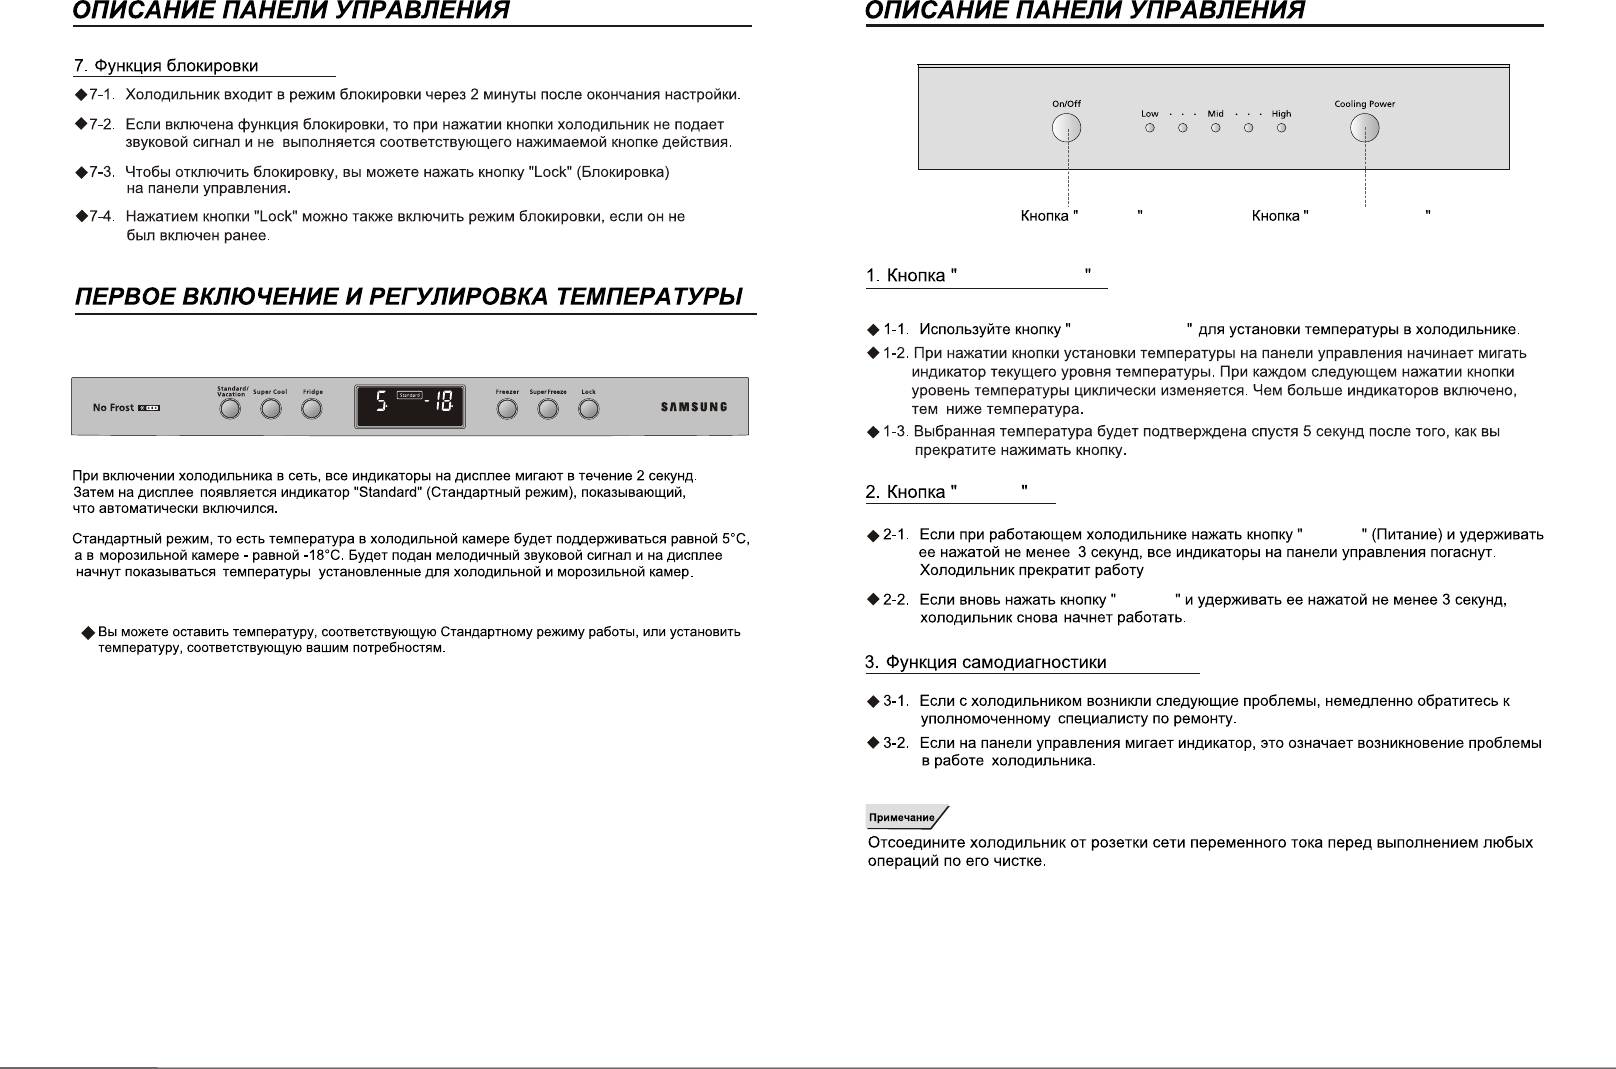
On/Off
Cooling Power
Cooling Power
Cooling Power
C C
On/Off
On/Off
On/Off
8
9
Аннотация для Холодильника Samsung RL33EBMS в формате PDF
Топ 10 инструкций
Другие инструкции
-
Contents
-
Table of Contents
-
Bookmarks
Quick Links
SERVICE
SERVICE
Electric Refrigerator
C
C
MANUAL
MANUAL
CONTENTS
ELECTRIC & COOLING PART SPEC. & CRITERION
FUNCTIONAL & OPERATIONAL INSTRUCTIONS
TROUBLE ANALYSIS & REPAIR SOLUTIONS
PART BREAKDOWN AND LIST
DISASSEMBLY & ASSEMBLY
MODEL:
RL33EBMS
2
3
4
5
10
15
19
24
33
39
Related Manuals for Samsung RL33EBMS
Summary of Contents for Samsung RL33EBMS
-
Page 1
MODEL: RL33EBMS SERVICE SERVICE MANUAL MANUAL Electric Refrigerator CONTENTS PREVENTIVE ACTIONS PRODUCT SPECIFICATIONS ELECTRIC & COOLING PART SPEC. & CRITERION FUNCTIONAL & OPERATIONAL INSTRUCTIONS FUNCTIONS CIRCUIT DETAILS TROUBLE ANALYSIS & REPAIR SOLUTIONS PART BREAKDOWN AND LIST DISASSEMBLY & ASSEMBLY CIRCUIT DISGRAM… -
Page 2
1. PREVENTIVE ACTIONS 1-1 Safety Precautions Only qualified technicians who have full command and knowledge of the cooling system and safety inspection are allowed to deliver the maintenance service as specified on the manual. Please be sure to keep the work place ventilated and safe as this product adopts the combustible and explosive R600a refrigerant. -
Page 3
1-3.Warning 1-3-1 Pay attention to the safety during maintenance as R600a refrigerant is combustible and explosive. 1-3-2 Keep the work place well ventilated without fire source and combustible and explosive objects arround during the maintenance of R600a refrigerator. 1-3-3 Make sure to lay the R600a clean during CYCLE maintenance (ensure the system unblocked by inflating nitrogen under HV and LV state.) 1-3-4 Fire soldering is not allowed until the work place is ventilative without R600a left in the CYCLE. -
Page 4
1-5 Maintenance Method 1.Maintenance Environment 1-1 Pay attention to the safety during maintenance as R600a refrigerant is combustible and explosive. 1-2 Keep the work place well ventilated without sparks and hot resource around when repairing the refrigerator’s cooling system. Soldering or heating are not recommended. -
Page 5
3.Vacuumizing 3-1 After all the refrigerants are out, repair the leaking points and replace the driers and process pipes. The compactor must be fitted with the special liquid process pipes (see below figure) Special liquid process pipe fire soldering 3-2 Close the process pipe on the dry filter and connect the compactor’s special liquid process pipe to a vacuum pump for vacuumizing. -
Page 6
2. PRODUCT SPECIFICATION Rl33EBMS Model Total volume Freeze compartment N.V. (L) Volume (ISO) Refrigerating compartment Width (mm) Size Deepth(mm) 1768 Height(mm) N.W. (Kg) Compartment cooling Cooling mode Electronic Temp control type Control & display Temp display type Digital Fast refrigeration… -
Page 7
3. SPEC. AND CRITERION OF ELECTRIC & COOLING PARTS Item SPEC Model Rl33EBMS Power 230V/50Hz Model JIA XIPERA ZBS1115CY RSCR Compressor Start mode HC-10 Oil type Evaporator Finned Natural convection Condenser Molecular sieve XH-9 Drying filter ID 0.72L2800mm Capillary 502AT… -
Page 8
4. FUNCTIONAL & OPERATIONAL INSTRUCTIONS 4-1 Product size Unit:mm Code Model 764.5 42.5 1768 1725 38.2 1161 RL33****… -
Page 9
4-2 Part Discription & Disassembly Take out the foods Pull out the shelf in the and pull it out in the arrow direction to arrow direction disassembly it. Ice box Fruit& vege. Tray/salad box Freeze compartment drawer… -
Page 10
4-3Cooling System Cycle Diagram condensing pipe dew proof pipe liquid barrel Evaporator loop pipe dry filter discharge pipe Compressor silver welding rod soldering silver welding rod soldering… -
Page 11
4-4Circuit Diagram » Ò É « Î Â ¶ È ´ « ¸ Ð Æ ÷ ° × É « º ì É « · Û º ì Ì ì À ¶ · Û º ì Ñ ¹ Ë õ » ú Ì… -
Page 12
4-5 Cold Air Cycle loop air fan leaf fan motor Evaporator air out loop air… -
Page 13
5. FUNCTIONS 5-1 Display Part Functions Display the actual temparature. It will display the default temperature when the refrigerating temperature falls into the setting range (+5,-3) Initializing and when the freeze temperature falls into the setting range (+3,-3). When the actual temperature is within the setting range (+5,-3), it will display the default temperature. -
Page 14
B.Refrigerating Temperature Control 1) You may control the refrigerating temperature from 9 to 1 by pressing refrigerating temerature key at 1 interval. 2) If pressing the temperature control button, the temperature will display in the following sequence: 5 ,4 ,3 ,2 ,1 ,9 ,8 ,7 ,6 ,5 . 3) The refrigerating temperature is initialized as 5 . -
Page 15
E.Standard Run 1) You may press the function key to select or give up this funciton. 2) If you select the Standard Run function, the freeze and refrigerating temperatures will be controlled at -18 and 5 respectively. F. Refrigeration Off 1) You may press the function key to select or give up this funciton. -
Page 16
5-4 Test Function Test function is to check the product, PCB, process control and maintenance. After the product function determined by selecting the test switch, you must re-electrify the appliance to run the self-diagonisis function. A.Forced Function 1) If you press the Refrigerating Temperature key and the Freeze Temperature key up to 5 minutes at the same time, the compactor will start running with the display board highlighting FF . -
Page 17
Self-diagnosis Trouble Sheet ITEM DISPLAY TROUBLE COMMENTS Open circuit Test temp. lower than -50 Refrigerating sensor short circuit Test temp. higher than +85 Open circuit Test temp. lower than -50 Main evaporator sensor short circuit Test temp. higher than +85 Open circuit Test temp. -
Page 18
6. CIRCUIT DETAILS 6-1 Power Supply Part C802 C105 C105 C101 C801 D101-104 1000uF In4007 Applied circuit Power supply Vcc (DC 5V) Chip peripheral circuit and sensor Vcc (DC 12V) Control voltage of the display and relay The AC input voltage will be stepped down by the transformer and be converted into the DC voltage by the rectifying circuit (D101-104). -
Page 19
6-3 Crystal Viberation Part Crystal Viberation 4MHz This circuit is used for the geneation of the resonant clock by receiving and sending the logic element information within the core chip. The time on the clock will play the role of time base. The resonance circuit must apply the rated criteria of each element as specification deviation will change the core chip time and disable the running. -
Page 20
6-5 Operation Part +12V Ic05 RY71 Defrost Heater Compressor RY72 Fan motor RY74 Inside lamp Rc71 Rc72 CON71 RY74 Gear motor Rc73 If outputing the relevant work circuit signals into the core chip port, the driving chip (ULN2003) will be activated. The DC 12V voltage will set the relay terminals to the position of On due to relay coils reaction to activate the circuit. -
Page 21
6-7 Functions Core chip D601 D610 D604 D607 D611 D602 D605 D608 D612 D603 D606 D609 R601-603 10K -J*3 The output signals such as GRID waves after initializing will be received by the diode and function confirmed by the metrix. The #32,#24 and #25 interfaces of the core chip only generate the same GRID waves output at the initializing stage. -
Page 22
7. TROUBLE DIAGNOSIS & REPAIR SOLUTIONS Mainboard inspection method At the self-diagnosis stage, you must cut off and reconnect to the power for inspection. The self-diagnosis codes are listed below self-diagnosis codes: ITEM DISPLAY TROUBLE COMMENTS Open circuit Test temp. lower than -50 Refrigerating sensor short circuit Test temp. -
Page 23
Primary Inspection r socket is electrified and the connecting power 1. Prior to trouble settlement, check if the powe supply spec. is normal. 2. Check if the power botton on display is pressed or not. 3. If other troubles are found, please refer to the remarks on the next page to make an inspection. -
Page 24
7-2 When troubles are found by self-diagnosis A. When the freeze sensor breaks down Start Is the freeze temperature sensor ok? Change the temp.sensor Is the mainboard connector plug-in ok? Plug in the connector again for bad contact. Are the mainboard sensor connectors linked properly? Disconnect sensors Is the input voltage on the core… -
Page 25
C. When the refrigerating sensor breaks down Start Is the refrigerating temperature sensor ok? Change the temp.sensor Is the mainboard connector plug-in ok? Plug in the connector again for bad contact. Are the main board sensor connectors linked properly? Disconnect sensors Is the input voltage on the core chip leg 26# ok? Check for miss or vold… -
Page 26
E. When the door switch breaks down Start Is the door switch plug-in ok? Plug in the connector again for bad contact. Is the door switch ok? Change the door switch Are the door switch connectors well linked? Disconnect the wire between the door switch connectors Is the input voltage on the core chip leg 28# ok? -
Page 27
8. PART BREAKDOWN & LIST 8-1 Door… -
Page 28
No Part number Description Q’ty Spec Remark… -
Page 29
8-2 Freeze Compartment… -
Page 30
No Part number Description Q’ty Spec Remark 9-10 9-11 9-12 9-13 9-14 9-15… -
Page 31
8-3 Refrigerating Compartment… -
Page 32
No Part number Description Q’ty Spec Remark 12-1 12-2 12-3… -
Page 33
8-4 General Assembly… -
Page 34
No Part number Description Q’ty Spec Remark 18-1 18-2 18-3 18-4 18-5 18-6 18-7 18-8 18-9… -
Page 35
No Part number Description Q’ty Spec Remark… -
Page 36
9. DISASSEMBLE & ASSEMBLY 9-1 Change The Refrigerating Compartment Lamp Alert When changing the refrigerating compartment lamp, disconnect the power to avoid an electric shock. 1.Remove the screw from the lampshade and unclench two latches at one-side with a 1-shaped screwdriver to take off the lampshade. 2.Turn off the lamp. -
Page 37
3. Pull out ice box subassembly framework. 4.Remove the four screws from the air-duct front cover that shall be drawn out in the direction of the arrow. 5.Hold down the terminal hook and draw out the terminal in the direction of the arrow. 6.Remove the two screws from the air-duct subassembly back cover. -
Page 38
7.Take apart the air-duct subassembly in the direction of arrow and take down the plug-ins, such as sensors etc. Assembly of The Freeze Air-duct Subassembly Evaporator framework Keep 9 (refrigerant and noise down) Temperature fuse Evaporator Main evaporator sensor… -
Page 39
9-3 Assembly of The Compressor and The Terminal Box 1.Remove the screws from the compressor cover. 2.The Compressor Assembly Alert Prior to repairing the refrigeration system, make sure that no refrigerant remains are found and that the workplace is ventilated. Alert : Prior to repairing the refrigeration system, make sure that no refrigerant remains are found and that the workplace is ventilated and safe. -
Page 40
9-4 Terminal Box Assembly Alert Remove the plug from the power socket when replacing electric elements. 1.Disconnect the power supply. 2.Take off the terminal box cover with a screwdriver. 3.Terminal box assembly Relay Capacitor Protector D/C transformer… -
Page 41
9-5 Top Front Cover Disassembly Open the door and remove the screw with a cross-head screwdriver. Unclench the top front cover with a 1-shaped screwdriver. Repair and replace the electric parts inside the top front cover. Set up the top front cover by pressing it into the hook (the sound Kaca will be heard as it reaches the right position). -
Page 42
10. CIRCUIT DIAGRAM 10-1 Luxury Type…