Код: 129904
154 400
рублей
Бесплатная доставка
по Красноярску
?
в наличии
в Красноярске
Новости интернет-магазина «Лаукар»:
Дополнительная информация в категории МФУ:
В интернет-магазине бытовой техники «Лаукар» Вы можете скачать инструкцию к товару МФУ HP LaserJet Pro M443nda совершенно бесплатно.
Все инструкции, представленные на сайте интернет-магазина бытовой техники «Лаукар», предоставляются производителем товара.
Перед началом использования товара рекомендуем Вам ознакомиться с инструкцией по применению.
Для того чтобы скачать инструкцию, Вам необходимо нажать на ссылку «скачать инструкцию», расположенную ниже, а в случае, если ссылки нет,
Вы можете попробовать обратиться к данной странице позднее,
возможно специалисты интернет-магазина бытовой техники «Лаукар» еще не успели загрузить для скачивания инструкцию к товару:
МФУ HP LaserJet Pro M443nda.

Фирма-производитель оставляет за собой право на внесение изменений в конструкцию, дизайн и комплектацию товара: МФУ HP LaserJet Pro M443nda. Пожалуйста, сверяйте информацию о товаре с информацией на
официальном сайте компании производителя.
-
Драйверы
20
-
Инструкции по эксплуатации
1

HP LaserJet MFP M443nda инструкция по эксплуатации
(160 страниц)
- Языки:Французский
-
Тип:
PDF -
Размер:
7.98 MB
Просмотр
На NoDevice можно скачать инструкцию по эксплуатации для HP LaserJet MFP M443nda. Руководство пользователя необходимо для ознакомления с правилами установки и эксплуатации HP LaserJet MFP M443nda. Инструкции по использованию помогут правильно настроить HP LaserJet MFP M443nda, исправить ошибки и выявить неполадки.

HP LaserJet MFP M433a, M436n, M436dn,
M436nda
Руководство пользователя

Авторские права и лицензия
© Copyright 2018 HP Development Company,
L.P.
Копирование, адаптация или перевод без
предварительного письменного разрешения
запрещены, за исключением случаев,
разрешенных законом об авторских правах.
Информация, содержащаяся в этом
документе, может быть изменена без
предварительного уведомления.
Гарантии на изделия и услуги HP
устанавливаются в специальных гарантийных
положениях, прилагаемых к таким изделиям и
услугам. Ничто из сказанного в настоящем
документе не должно истолковываться как
дополнительная гарантия. HP не несет
ответственности за технические или
редакторские ошибки или упущения,
содержащиеся в настоящем документе.
Edition 5, 4/2018
Информация о товарных знаках
Adobe
®
, Adobe Photoshop
®
, Acrobat
®
и
PostScript
®
являются зарегистрированными
товарными знаками Adobe Systems
Incorporated.
Microsoft®, Windows®, Windows XP® и Windows
Vista® являются зарегистрированными в США
товарными знаками Microsoft Corporation.

Содержание
1 Введение …………………………………………………………………………………………………………………………………………………………………………… 1
Функции по моделям …………………………………………………………………………………………………………………………………………. 2
О руководство пользователя …………………………………………………………………………………………………………………………….. 4
Сведения о безопасности ………………………………………………………………………………………………………………………………….. 5
Обзор устройства ……………………………………………………………………………………………………………………………………………….. 9
Компоненты ……………………………………………………………………………………………………………………………………… 9
Вид спереди …………………………………………………………………………………………………………………………………… 10
Вид сзади ……………………………………………………………………………………………………………………………………….. 11
Обзор панели управления ……………………………………………………………………………………………………………………………….. 12
2 Обзор меню …………………………………………………………………………………………………………………………………………………………………….. 15
Доступ к меню ………………………………………………………………………………………………………………………………………………….. 16
Обзор меню ………………………………………………………………………………………………………………………………………………………. 17
Меню функции копирования ………………………………………………………………………………………………………… 17
Меню «Настройка копирования» …………………………………………………………………………………………………… 18
Меню «Параметры печати» ……………………………………………………………………………………………………………. 19
Меню «Настройка системы» …………………………………………………………………………………………………………… 20
Меню «Сеть» ……………………………………………………………………………………………………………………………………. 23
Меню сканирования ………………………………………………………………………………………………………………………. 23
3 Материалы для печати и лотки ……………………………………………………………………………………………………………………………………… 25
Обзор лотков ……………………………………………………………………………………………………………………………………………………. 26
Загрузка бумаги в лоток …………………………………………………………………………………………………………………………………… 27
Введение ………………………………………………………………………………………………………………………………………… 27
Подготовка бумаги …………………………………………………………………………………………………………………………. 27
Лоток 2 / опциональный лоток …………………………………………………………………………………………………….. 28
Многоцелевой лоток 1 …………………………………………………………………………………………………………………… 30
Печать на специальных материалах ………………………………………………………………………………………………………………. 32
Стопка карточек/Бумага нестандартного размера ………………………………………………………………………. 32
Подготовленная бумага ………………………………………………………………………………………………………………… 32
Задание формата и типа бумаги ……………………………………………………………………………………………………………………… 34
RUWW iii

Загрузка оригинала ………………………………………………………………………………………………………………………………………….. 35
Введение ………………………………………………………………………………………………………………………………………… 35
Подготовка оригиналов ………………………………………………………………………………………………………………… 35
Загрузка оригиналов ……………………………………………………………………………………………………………………… 35
На стекле сканирования ……………………………………………………………………………………………… 35
В устройстве подачи документов ……………………………………………………………………………….. 37
Характеристики материала для печати ………………………………………………………………………………………………………….. 39
4 Установка принтера ………………………………………………………………………………………………………………………………………………………… 41
Аппаратная настройка принтера и установка ПО ………………………………………………………………………………………….. 42
Инструкции по установке программного обеспечения ………………………………………………………………………………….. 43
5 Печать ……………………………………………………………………………………………………………………………………………………………………………… 45
Настройка печати на панели управления ………………………………………………………………………………………………………. 46
6 Копирование …………………………………………………………………………………………………………………………………………………………………… 47
Функции копирования на панели управления ………………………………………………………………………………………………. 48
Функции копирования …………………………………………………………………………………………………………………… 48
Настройка копирования ………………………………………………………………………………………………………………… 50
Простое копирование ………………………………………………………………………………………………………………………………………. 52
Изменение настроек для каждой копии …………………………………………………………………………………………………………. 53
Плотность ………………………………………………………………………………………………………………………………………. 53
Тип оригинала ……………………………………………………………………………………………………………………………….. 53
Уменьшение или увеличение размера копии ………………………………………………………………………………. 54
Копирование удостоверений личности ………………………………………………………………………………………………………….. 55
7 Сканирование …………………………………………………………………………………………………………………………………………………………………. 57
Сканирование с устройства …………………………………………………………………………………………………………………………….. 58
Введение ………………………………………………………………………………………………………………………………………… 58
Функция сканирования …………………………………………………………………………………………………………………. 58
Простое сканирование ………………………………………………………………………………………………………………….. 59
Сканирование с компьютера …………………………………………………………………………………………………………………………… 60
Введение ………………………………………………………………………………………………………………………………………… 60
Сканирование на ПК ………………………………………………………………………………………………………………………. 60
Сканирование с помощью программы HP Scan …………………………………………………………………………… 61
Сканирование из программы редактирования изображений …………………………………………………….. 61
Сканирование с помощью драйвера WIA …………………………………………………………………………………….. 62
Сканирование с помощью WSD ……………………………………………………………………………………………………. 62
Установка драйвера принтера WSD ……………………………………………………………………………. 63
Сканирование с помощью функции WSD ………………………………………………………………….. 63
iv RUWW

8 Системные и другие параметры …………………………………………………………………………………………………………………………………….. 65
Настройка устройства ……………………………………………………………………………………………………………………………………… 66
Настройка бумаги …………………………………………………………………………………………………………………………………………….. 68
Отчет …………………………………………………………………………………………………………………………………………………………………. 69
Обслуживание ………………………………………………………………………………………………………………………………………………….. 70
Настройка сети …………………………………………………………………………………………………………………………………………………. 71
Доступ к настройкам через встроенный веб-сервер (EWS) …………………………………………………………………………… 72
9 Обслуживание ………………………………………………………………………………………………………………………………………………………………… 73
Заказ расходных материалов и дополнительных принадлежностей …………………………………………………………… 74
Доступные расходные материалы ………………………………………………………………………………………………………………….. 75
Доступные дополнительные принадлежности ……………………………………………………………………………………………… 76
Доступные запасные части для ремонта ………………………………………………………………………………………………………… 77
Хранение расходных материалов …………………………………………………………………………………………………………………… 78
Инструкции по обращению с узлом формирования изображения …………………………………………….. 78
Использование тонер-картриджа ………………………………………………………………………………………………… 78
Приблизительный ресурс тонер-картриджа ……………………………………………………………………………….. 79
Перераспределение тонера ……………………………………………………………………………………………………………………………. 80
Установка тонер-картриджа ……………………………………………………………………………………………………………………………. 83
Установка узла формирования изображения …………………………………………………………………………………………………. 86
Отслеживание срока службы ………………………………………………………………………………………………………………………….. 93
Настройка предупреждений о низком уровне тонера …………………………………………………………………………………… 94
Очистка устройства ………………………………………………………………………………………………………………………………………….. 95
Очистка с внешней стороны …………………………………………………………………………………………………………. 95
Очистка с внутренней стороны …………………………………………………………………………………………………….. 95
Очистка ролика ……………………………………………………………………………………………………………………………… 95
Очистка стекла узла сканера ………………………………………………………………………………………………………… 98
Обновление микропрограммы ……………………………………………………………………………………………………………………… 100
Шаг 1. Загрузите микропрограмму с сайта HP.com ……………………………………………………………………. 100
Шаг 2. Обновление микропрограммы ………………………………………………………………………………………… 100
10 Полезные настройки ………………………………………………………………………………………………………………………………………………….. 105
Основные параметры устройства …………………………………………………………………………………………………………………. 106
Высотная коррекция ……………………………………………………………………………………………………………………………………… 107
11 Устранение неполадок ………………………………………………………………………………………………………………………………………………. 109
Проблемы с подачей бумаги …………………………………………………………………………………………………………………………. 110
Устранение замятий ……………………………………………………………………………………………………………………………………….. 111
Введение ……………………………………………………………………………………………………………………………………… 111
Лоток 2 …………………………………………………………………………………………………………………………………………. 111
RUWW v

В опциональном лотке 3 …………………………………………………………………………………………………………….. 112
В многоцелевом лотке 1 ……………………………………………………………………………………………………………… 115
Внутри принтера ………………………………………………………………………………………………………………………….. 115
В области вывода ………………………………………………………………………………………………………………………… 116
В области двусторонней печати …………………………………………………………………………………………………. 118
Устранение замятий оригиналов ………………………………………………………………………………………………… 120
Замятие оригинала в передней части сканера ……………………………………………………….. 120
Замятие оригинала внутри сканера …………………………………………………………………………. 121
Замятие оригинала в области вывода сканера ……………………………………………………….. 124
Замятие оригинала в тракте двусторонней печати сканера …………………………………… 125
Объяснение состояний индикатора ………………………………………………………………………………………………………………. 127
Объяснение отображаемых сообщений ………………………………………………………………………………………………………. 129
Сообщения, связанных с замятием бумаги ………………………………………………………………………………… 129
Сообщения, связанные с тонером ………………………………………………………………………………………………. 129
Сообщения, связанные с лотком ………………………………………………………………………………………………… 131
Сообщения, связанные с сетью ………………………………………………………………………………………………….. 132
Прочие сообщения ……………………………………………………………………………………………………………………… 132
Проблемы с питанием и подключением кабеля ………………………………………………………………………………………….. 134
Проблемы печати …………………………………………………………………………………………………………………………………………… 135
Проблемы качества печати …………………………………………………………………………………………………………………………… 138
Проблемы копирования ………………………………………………………………………………………………………………………………… 143
Проблемы сканирования ………………………………………………………………………………………………………………………………. 144
Проблемы ОС …………………………………………………………………………………………………………………………………………………. 145
Приложение А Приложение ……………………………………………………………………………………………………………………………………………. 147
Характеристики ……………………………………………………………………………………………………………………………………………… 148
Общие технические характеристики …………………………………………………………………………………………. 148
Системные требования ……………………………………………………………………………………………………………….. 148
Сетевая среда ………………………………………………………………………………………………………………………………. 149
Ограниченная гарантия HP ……………………………………………………………………………………………………………………………. 151
Великобритания, Ирландия и Мальта ………………………………………………………………………………………… 153
Австрия, Бельгия, Германия и Люксембург ………………………………………………………………………………… 153
Бельгия, Франция и Люксембург ………………………………………………………………………………………………… 154
Италия ………………………………………………………………………………………………………………………………………….. 155
Испания ………………………………………………………………………………………………………………………………………… 155
Дания ……………………………………………………………………………………………………………………………………………. 156
Норвегия ………………………………………………………………………………………………………………………………………. 156
Швеция ………………………………………………………………………………………………………………………………………… 156
Португалия …………………………………………………………………………………………………………………………………… 156
Греция и Кипр ………………………………………………………………………………………………………………………………. 157
Венгрия ………………………………………………………………………………………………………………………………………… 157
vi RUWW

Чехия ……………………………………………………………………………………………………………………………………………. 157
Словакия ………………………………………………………………………………………………………………………………………. 158
Польша ………………………………………………………………………………………………………………………………………… 158
Болгария ………………………………………………………………………………………………………………………………………. 158
Румыния ……………………………………………………………………………………………………………………………………….. 159
Бельгия и Нидерланды ……………………………………………………………………………………………………………….. 159
Финляндия …………………………………………………………………………………………………………………………………… 159
Словения ……………………………………………………………………………………………………………………………………… 160
Хорватия ………………………………………………………………………………………………………………………………………. 160
Латвия ………………………………………………………………………………………………………………………………………….. 160
Литва ……………………………………………………………………………………………………………………………………………. 160
Эстония …………………………………………………………………………………………………………………………………………. 161
Россия …………………………………………………………………………………………………………………………………………… 161
Лицензионное соглашение с конечным пользователем ……………………………………………………………………………… 162
Premium Protection Warranty HP: Обязательство ограниченной гарантии на картридж с тонером
LaserJet …………………………………………………………………………………………………………………………………………………………… 167
Политика фирмы HP относительно расходных материалов других производителей ………………………………. 168
Веб-сайт HP по вопросам защиты от подделок …………………………………………………………………………………………… 169
Данные, сохраняемые в картридже с тонером …………………………………………………………………………………………….. 170
Гарантийные обязательства на расходные материалы с длительным ресурсом и на ремонтный
комплект (комплект для обслуживания) ……………………………………………………………………………………………………… 171
Поддержка клиентов …………………………………………………………………………………………………………………………………….. 172
Декларация о соответствии ………………………………………………………………………………………………………………………….. 173
Программа контроля за воздействием изделия на окружающую среду ……………………………………………………. 175
Защита окружающей среды ………………………………………………………………………………………………………. 175
Утилизация оборудования, отслужившего свой срок, силами пользователя (ЕС и Индия) …….. 175
Переработка электронного оборудования ………………………………………………………………………………… 175
Заявление об ограничении по опасным веществам (Индия) ……………………………………………………. 175
Информация для пользователей об экологической маркировке SEPA (Китай) ……………………….. 175
Регулирование внедрения маркировки об энергоэффективности принтеров, факсов и
копиров для Китая ………………………………………………………………………………………………………………………. 176
Таблица веществ (Китай) ……………………………………………………………………………………………………………. 176
Ограничения по материалам ………………………………………………………………………………………………………. 176
Информация о батареях ……………………………………………………………………………………………………………… 177
Таблица веществ (Тайвань) ………………………………………………………………………………………………………… 178
Таблица безопасности материалов (MSDS) ………………………………………………………………………………… 179
Дополнительная информация ……………………………………………………………………………………………………. 179
Нормативная информация …………………………………………………………………………………………………………………………….. 180
Предупреждение …………………………………………………………………………………………………………………………. 180
Евразийское соответствие (Республика Беларусь, Казахстан, Россия) …………………………………….. 181
Заявление о безопасности лазерного оборудования ……………………………………………………………….. 181
RUWW vii

Нормы электромагнитной совместимости (Китай) …………………………………………………………………….. 182
Обязательства для Скандинавии (Дания, Финляндия, Норвегия, Швеция) …………………………….. 182
Заявление о лазерной безопасности (Финляндия) …………………………………………………………………… 182
Глоссарий ………………………………………………………………………………………………………………………………………………………………………….. 185
viii RUWW

1 Введение
В данной главе представлены сведения, которые необходимо знать перед работой с устройством.
●
Функции по моделям
●
О руководство пользователя
●
Сведения о безопасности
●
Обзор устройства
●
Обзор панели управления
RUWW 1

Функции по моделям
ПРИМЕЧАНИЕ. Некоторые функции и опциональные принадлежности могут быть недоступны в
зависимости от модели и страны/региона. Некоторые модели могут быть недоступны в зависимости от
страны/региона.
Таблица 1-1 Функции
Функции M436n
W7U01A
M436dn
2KY38A
M436nda
W7U02A
M433a
1VR14A
Высокоскоростное
подключение USB 2.0
Сетевой интерфейс
Ethernet 10/100 Base TX
проводной локальной
сети
Печать в режиме Eco
Двусторонняя (дуплекс)
печать (автоматическая)
Двусторонняя (дуплекс)
печать (в ручном
режиме)
a
Многоцелевой лоток 1
(МЦ лоток 1)
Лоток 2
Опциональное второе
устройство подачи с
кассетой (лоток 3)
Устройство
автоматической подачи
документов (АПД)
(опционально для
M436n/M436dn)
Сканирование
Копирование
a
Доступно только для ОС Windows и Linux.
Таблица
1-2 Программное обеспечение
Программное обеспечение Windows XP, Vista, Server 2003
M436n/dn/nda, M433a
Windows 7, 8, 8.1, 10
M436n/dn/nda, M433a
Драйвер принтера PCL6
Printer Manager
Приложение сканирования
Средство установки/удаления ПО
Windows
2 Глава 1 Введение RUWW

Таблица 1-2 Программное обеспечение (продолжение)
Программное обеспечение Windows XP, Vista, Server 2003
M436n/dn/nda, M433a
Windows 7, 8, 8.1, 10
M436n/dn/nda, M433a
Монитор состояния
ПО сканирования
Настройка сканирования на ПК
a
ПО можно загрузить и установить с веб-сайта: (www.hp.com/support/ljM436MFP, www.hp.com/support/ljM433MFP > драйверы, ПО
и микропрограммы). Перед установкой следует проверить, есть ли поддержка ПО для вашей ОС.
RUWW Функции по моделям 3

О руководство пользователя
В данном руководстве пользователя представлены основные сведения о компьютере, а также пошаговые
инструкции по работе с устройством.
● Перед использованием устройства следует ознакомиться с информацией по безопасности.
● Если при работе с устройством возникают проблемы, см. главу об устранении неполадок.
● Используемые в руководстве пользователя термины объяснены в главе глоссария.
●
Иллюстрации в руководстве пользователя могут немного отличаться от реального устройства, в
зависимости от дополнительных принадлежностей или приобретенной модели.
● Снимки экрана в руководстве пользователя могут отличаться от вашего устройства, в зависимости от
версии микропрограммного обеспечения/драйверов на компьютере.
● Процедуры, описанные в данном руководстве пользователя, в основном рассчитаны на
ОС Windows 7.
● Документ – это то же, что и исходный документ.
● Бумага – это то же, что и материал для печати или носитель.
4 Глава 1 Введение RUWW
Сведения о безопасности
Предостережения и меры предосторожности приводятся для предотвращения травм пользователей и
потенциальных повреждений устройства. Следует ознакомиться и понять все инструкции перед работой с
устройством. После ознакомления с данным разделом, его следует заложить для обращения в
дальнейшем.
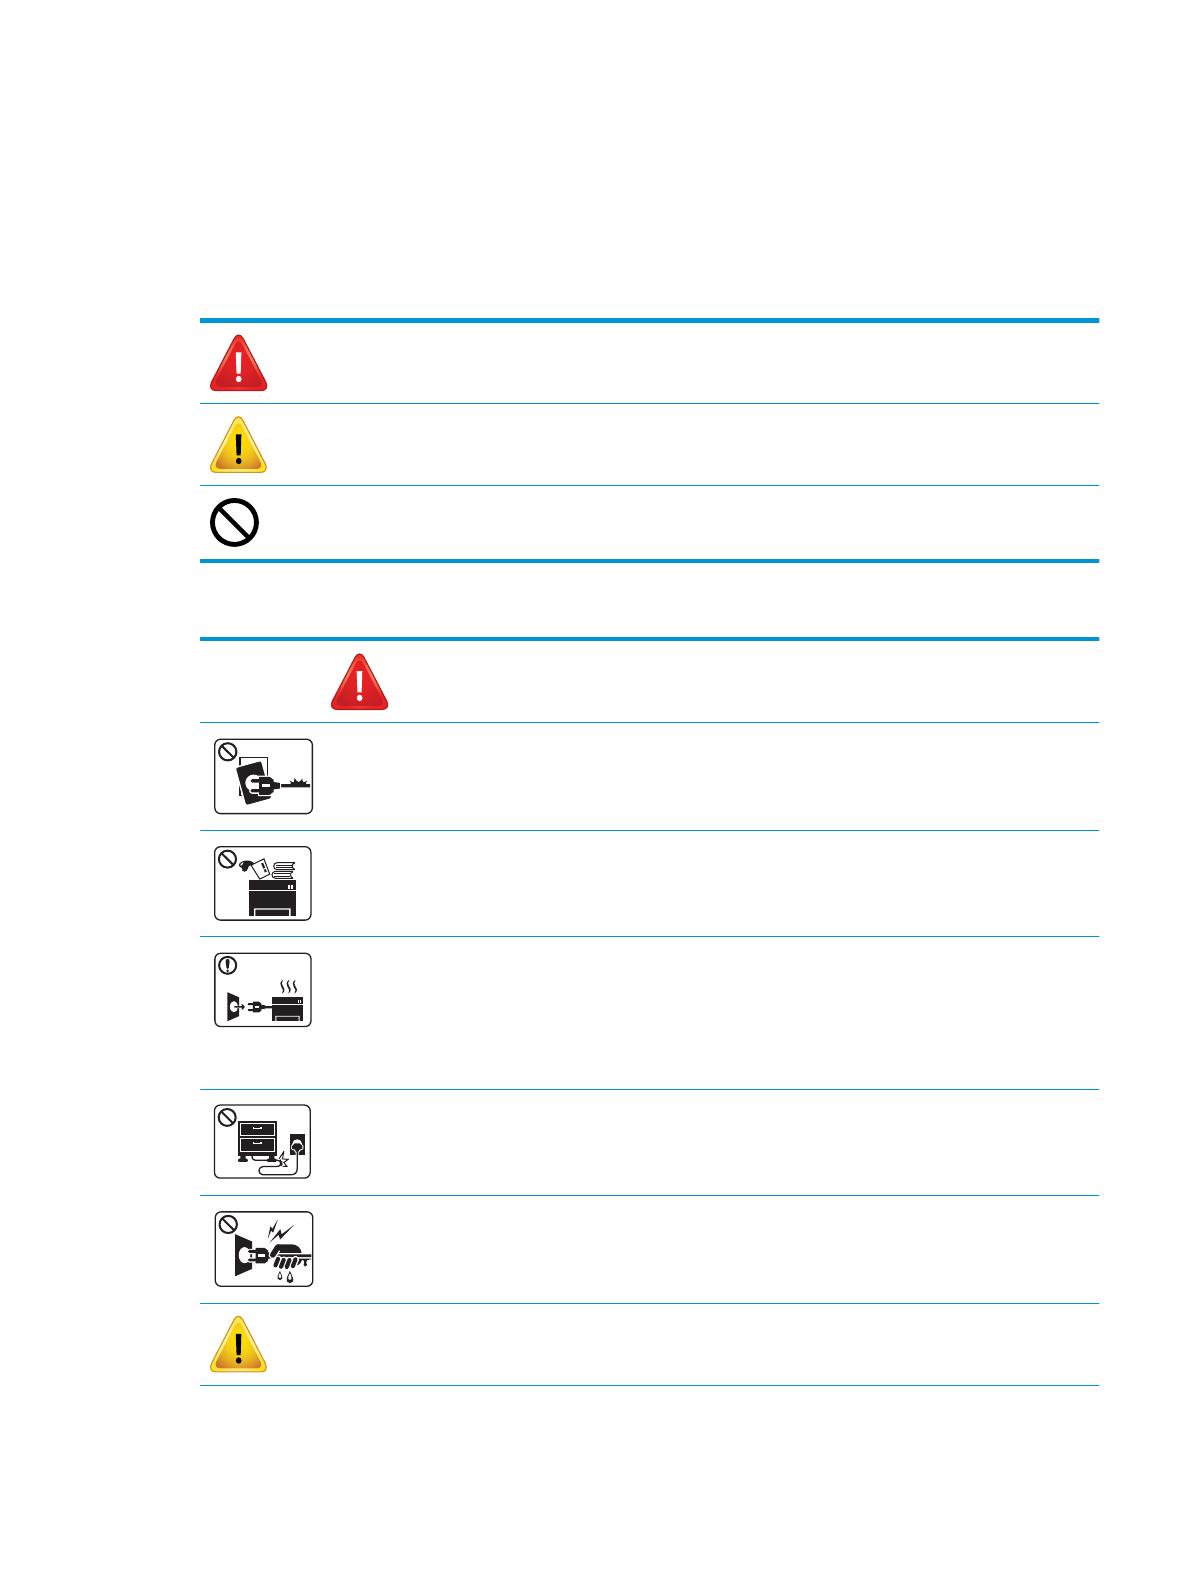
Таблица 1-3 Важные символы по безопасности
Предупреждение Рискованные или небезопасные действия, которые
могут повлечь серьезные травмы или
представляющие смертельную угрозу.
Внимание! Рискованные или небезопасные действия, которые
могут повлечь легкие травмы или повреждения
имущества.
Не предпринимать попыток.
Таблица 1-4 Рабочие условия
Предупреждение
Не допускается использование при повреждении кабеля питания или с незаземленной розеткой.
Оборудование может быть повреждено.
Не следует ничего располагать на устройстве (емкости с водой, небольшие металлические или тяжелые
предметы, свечи, зажженные сигареты и т.д.).
Оборудование может быть повреждено.
● При перегреве устройства может происходить задымление, появляться странный шум или запах: следует
немедленно выключить питание и отключить устройство от электророзетки.
● Должен оставаться свободный доступ к электророзетке для экстренных случаев, когда может
потребоваться отключение устройства от розетки.
Оборудование может быть повреждено.
Не сгибайте, не наступайте и не ставьте тяжелые предметы на кабель питания.
Такие действия могут повредить оборудование.
Не отключайте вилку из розетки, держась только за кабель; не трогайте вилку мокрыми руками.
Оборудование может быть повреждено.
Внимание!
RUWW Сведения о безопасности 5
Таблица 1-4 Рабочие условия (продолжение)
Осторожно, область вывода бумаги может быть горячей.
При падении устройства или повреждении корпуса, следует отключить все интерфейсные соединения и
запросить помощь квалифицированного обслуживающего персонала.
Если устройство не работает должным образом после выполнения данных инструкций, следует отключить все
интерфейсные соединения и запросить помощь квалифицированного обслуживающего персонала.
Если вилку не удается без усилия подключить к розетке, не прикладывайте большого усилия.
Следует вызвать электрика для замены электророзетки.
Таблица 1-5 Метод эксплуатации
Внимание!
Не вытягивайте бумагу с усилием при печати.
Оборудование может быть повреждено.
При извлечении замятой бумаги не используйте пинцет или острые металлические предметы.
Оборудование может быть повреждено.
Не допускайте большого скопления бумаги в выходном лотке.
Это может привести к замятию бумаги.
Не закрывайте и не заталкивайте предметы в вентиляционные отверстия.
Оборудование может быть повреждено.
Чтобы отключить питание, отключите вилку из розетки.
Таблица 1-6 Установка / перемещение
Предупреждение
Устройство следует размещать в помещениях с температурой и влажностью в соответствии со
спецификацией.
Внимание!
6 Глава 1 Введение RUWW
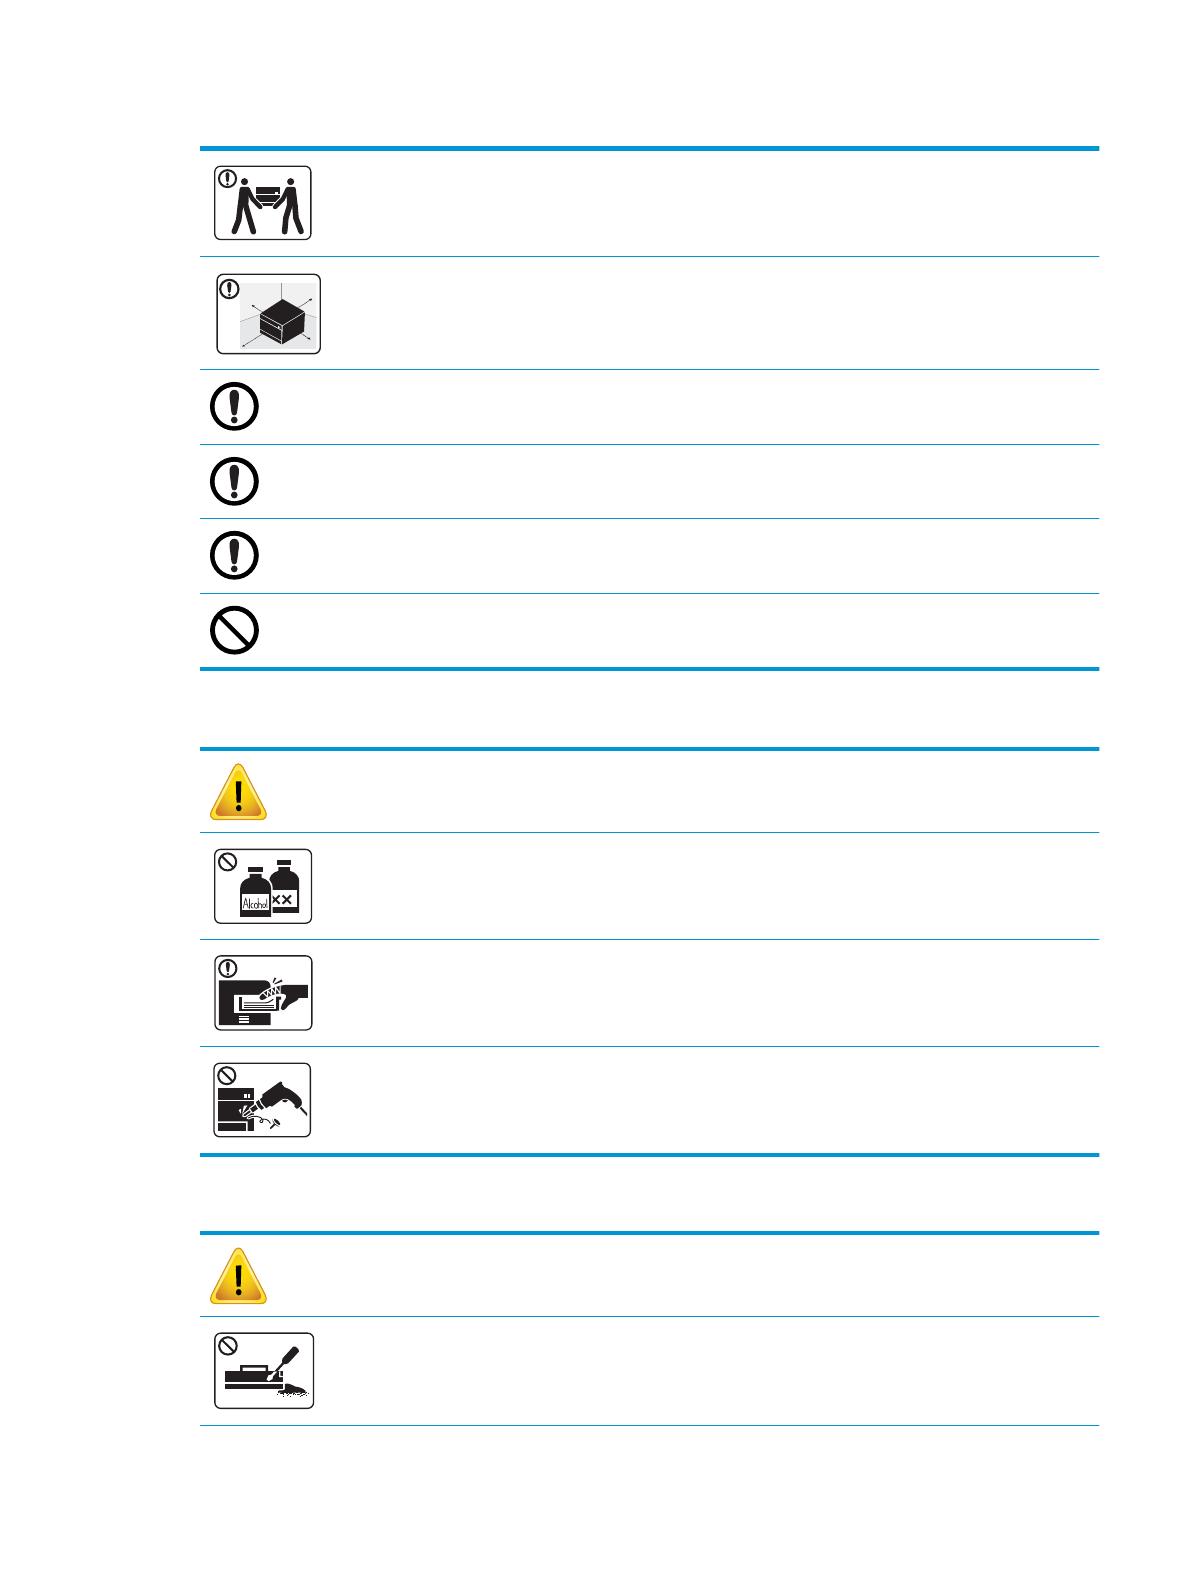
Таблица 1-6 Установка / перемещение (продолжение)
Перед перемещением устройства следует выключить питание и отсоединить все кабели. Если по
медицинским предписаниям вам противопоказан подъем тяжестей, не поднимайте устройство. Попросите
кого-нибудь помочь, всегда задействуйте достаточное количество людей для безопасного подъема
устройства.
Для размещения устройства выберите ровную поверхность и достаточное пространство для вентиляции.
Также следует учесть необходимое свободное пространство для открытия крышки и лотков.
Не следует размещать устройство на неустойчивых поверхностях.
Падение устройства может стать причиной травм и повреждения устройства.
Не забудьте подключить кабель питания к заземленной электрической розетке.
В целях безопасности следует использовать кабель питания из комплекта поставки устройства.
Подключайте кабель питания напрямую к электророзетке. Не используйте удлинители или разветвители.
Не следует накрывать устройство или размещать его в закрытых помещениях, таких как кладовые комнаты.
Таблица 1-7 Обслуживание / проверка
Внимание!
Перед очисткой внутренней области устройства следует отключать его от розетки. Не следует очищать
устройства с использованием бензола, растворителей или спиртосодержащих средств; не распыляйте воду
непосредственно на устройство.
При открывании устройства для замены расходных материалов или очистки не включайте устройство.
Не разбирайте устройство, не выполняйте мелкий или крупный ремонт самостоятельно.
При этом можно повредить устройство. Для ремонта устройства следует обращаться к сертифицированным
специалистам.
Таблица 1-8 Использование расходных материалов
Внимание!
Не разбирайте тонер-картридж.
RUWW Сведения о безопасности 7

Таблица 1-8 Использование расходных материалов (продолжение)
При использовании восстановленных расходных материалов, таких как тонер, можно повредить устройство.
Если тонер попал на одежду, не смывайте его горячей водой.
Используйте холодную воду.
8 Глава 1 Введение RUWW

Обзор устройства
Иллюстрации могут немного отличаться от устройства, в зависимости от модели. Существуют различные
типы устройств.
Некоторые функции и опциональные принадлежности могут быть недоступны в зависимости от модели и
страны/региона.
Компоненты
Устройство Модуль формирования изображения
Тонер-картридж
a
Кабель питания; Краткое руководство по установке
Компакт-диски с ПО
b
Прочие дополнительные
принадлежности
a
a
Различные дополнительные принадлежности из комплекта поставки устройства могут различаться, в зависимости от страны/
региона приобретения и конкретной модели.
b
В зависимости от модели принтера может быть более одного компакт-диска с ПО.
RUWW Обзор устройства 9
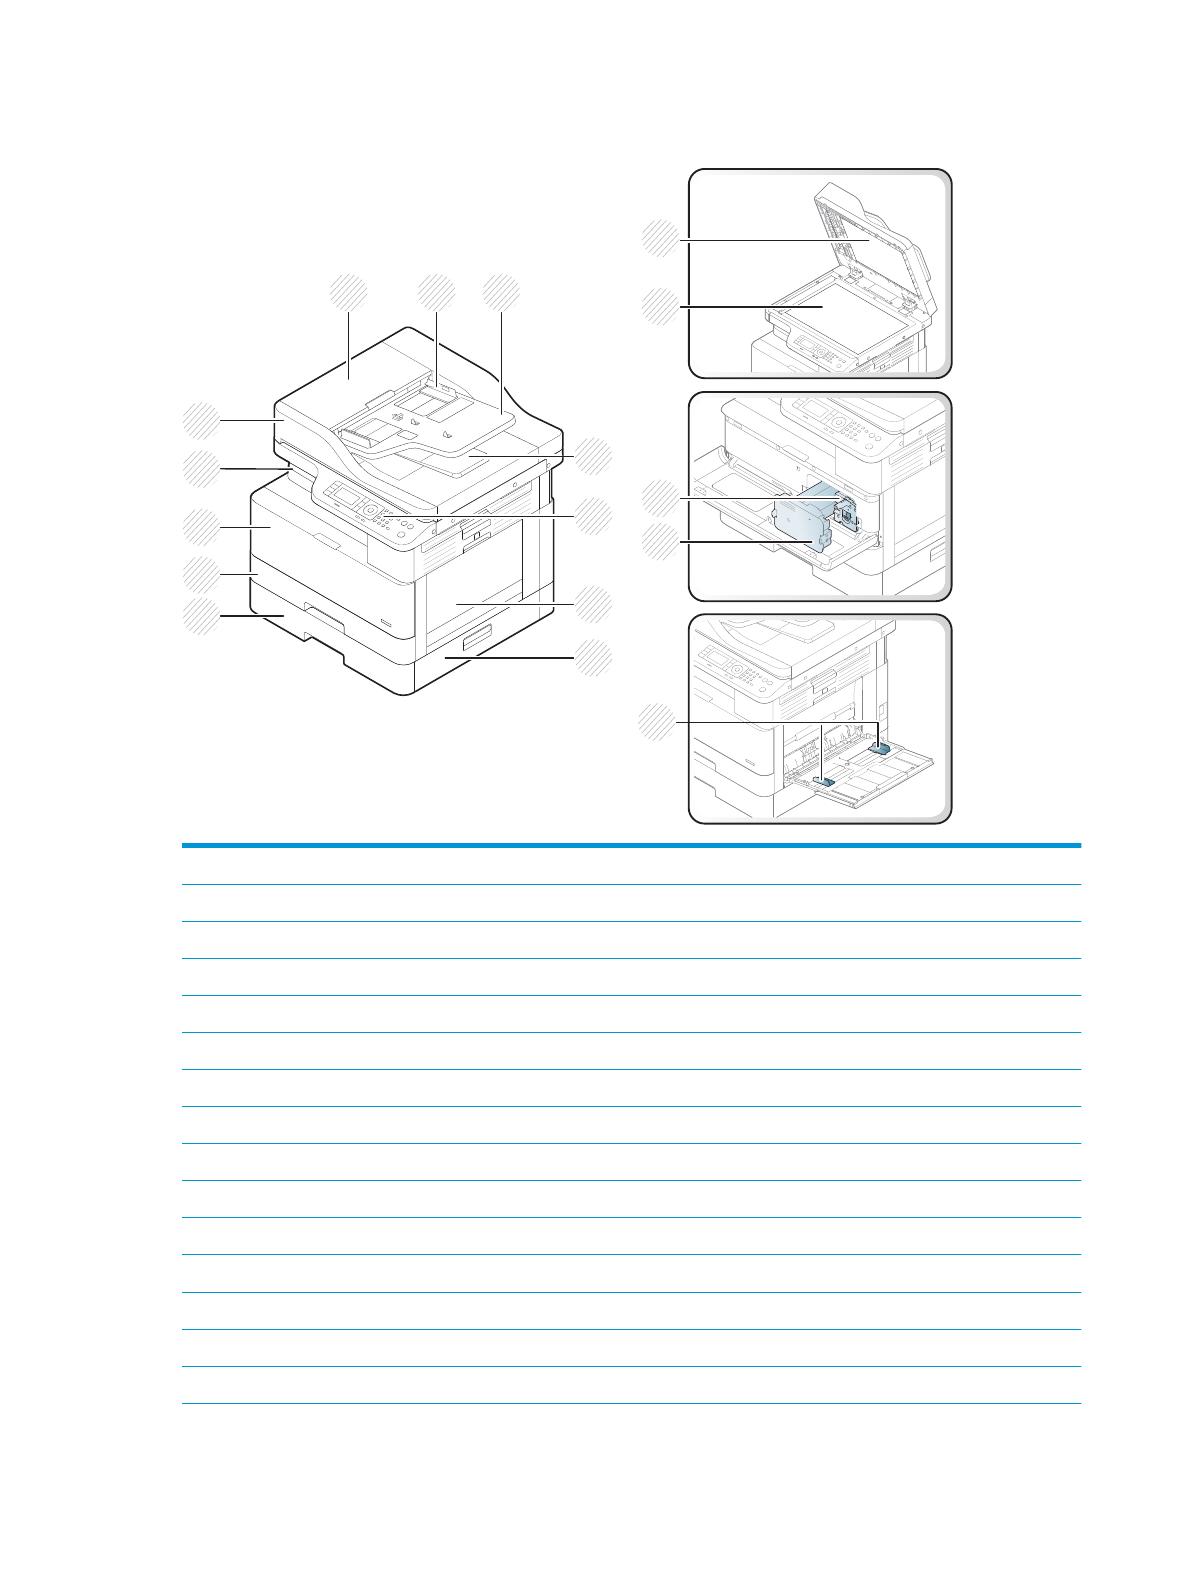
Вид спереди
1
15
16
2 3
5
6
4
7
8
12
9
10
11
17
14
13
1
Крышка устройства автоматической подачи документов
a
2
Направляющая ширины устройства автоматической подачи документов
a
3
Подающий лоток устройства автоматической подачи документов
a
4
Приемный лоток устройства автоматической подачи документов
a
5 Панель управления
6 Многоцелевой лоток
7
Крышка лотка 3 для устранения замятий
a
8
Второе устройство подачи с кассетой (лоток 3)
a
9 Лоток 2
10 Передняя крышка
11 Выходной лоток
12
Устройство автоматической подачи документов
a
13 Крышка сканера
14 Стекло сканера
15 Модуль формирования изображения
10 Глава 1 Введение RUWW
16 Тонер-картридж
17 Направляющие ширины бумаги в многоцелевом лотке
a
Это опциональная функция.
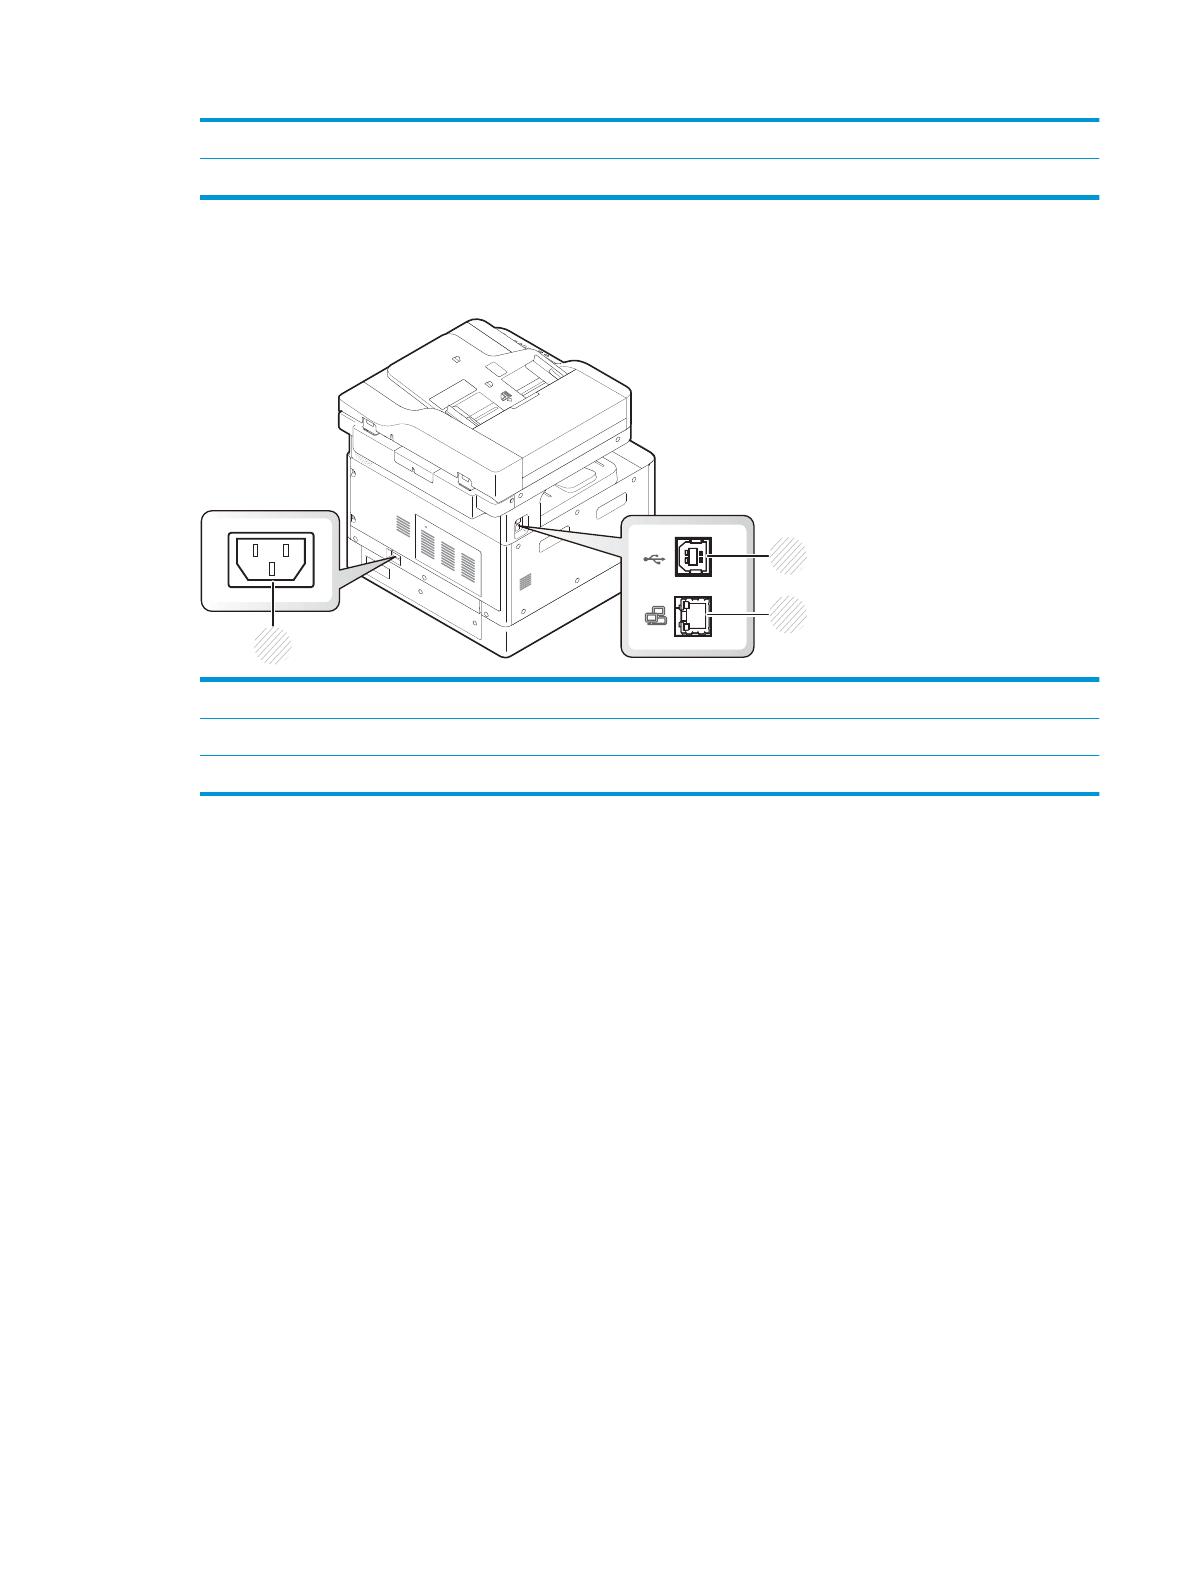
Вид сзади
1 Разъем шнура питания
2 Порт USB 2.0 Type-B
3 Сетевой порт (недоступен на модели M433a)
RUWW Обзор устройства 11
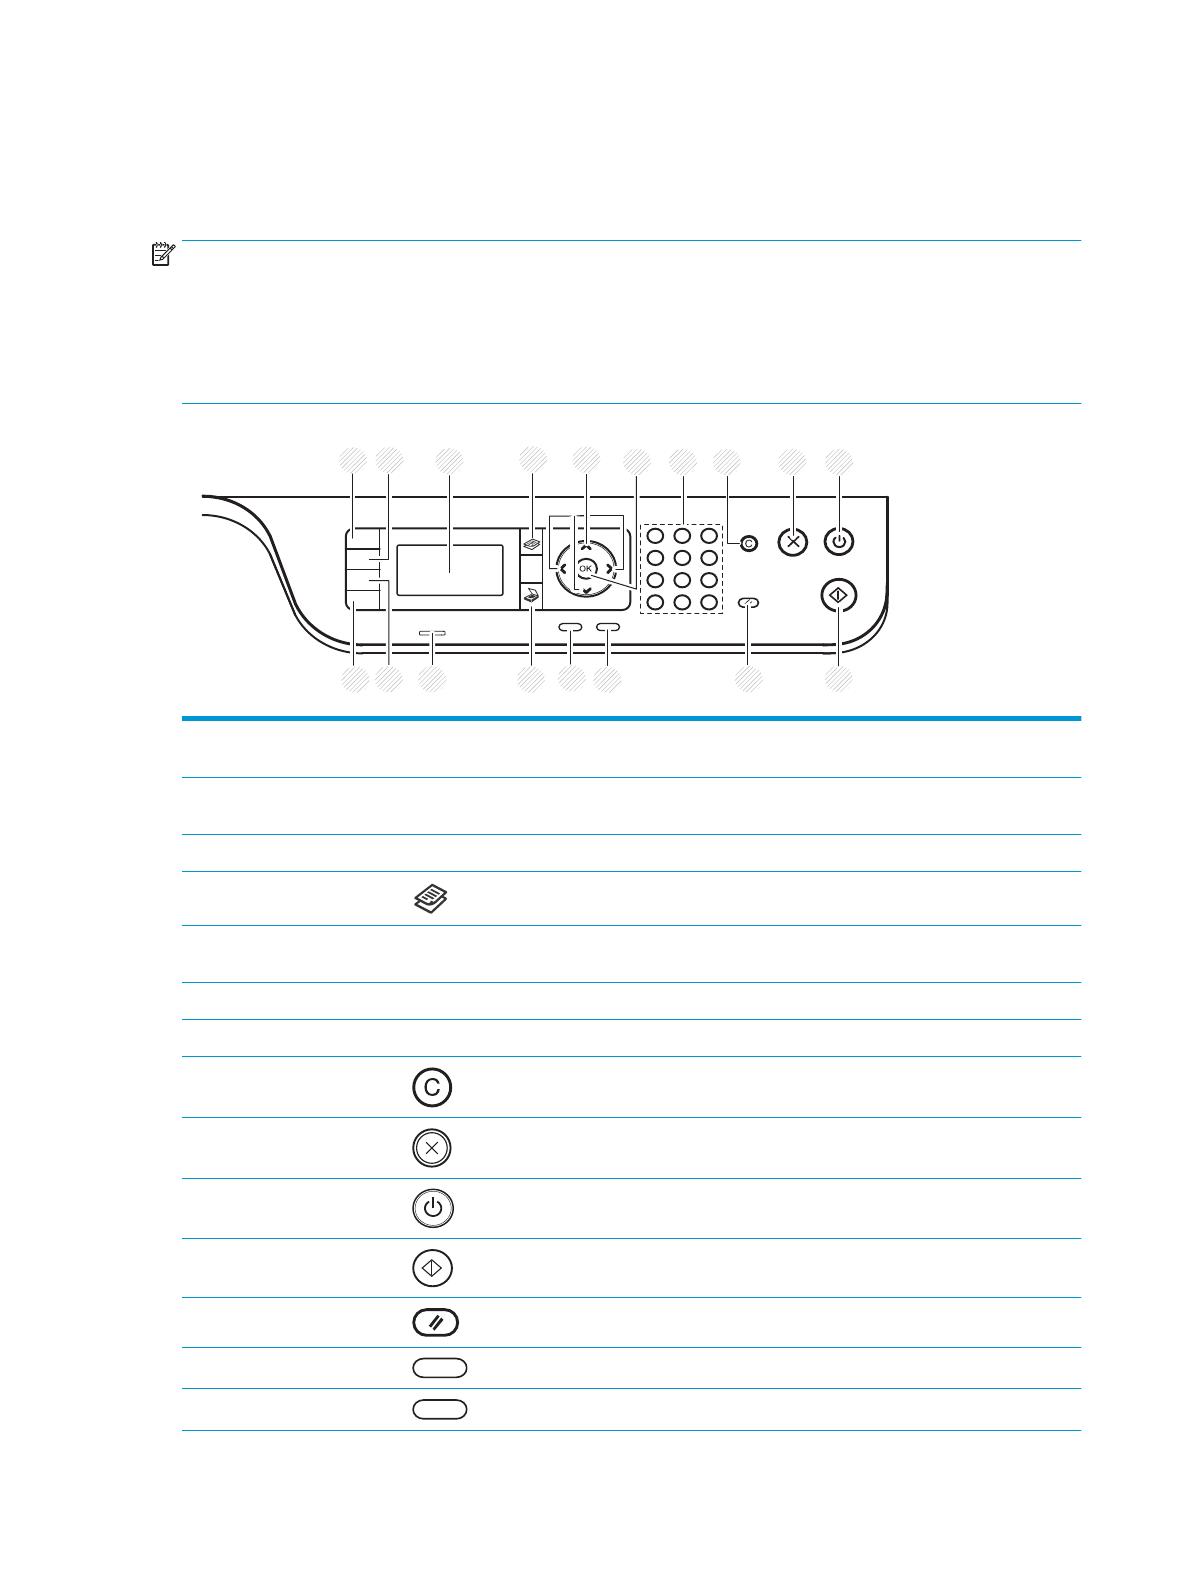
Обзор панели управления
На следующем рисунке показано расположение, а в таблице приводится краткое описание элементов
панели управления.
ПРИМЕЧАНИЕ. Панель управления может отличаться от вашей, в зависимости от модели. Существуют
различные типы панелей управления.
Некоторые функции и опциональные принадлежности могут быть недоступны в зависимости от модели и
страны/региона.
Некоторые кнопки могут не работать, в зависимости от режима (копирование или сканирование).
8 9 1076
2
1
3 5
12 11
18
17
16 15
14
13
4
1 Копирование удостоверений Позволяет копировать обе стороны удостоверений личности (например, водительские
удостоверения) на одной стороне бумаги.
2 Уменьшить/Увеличить Можно изменять масштабирование от 25% до 400% при копировании оригиналов со
стекла сканера.
3 Экран Отображается текущее состояние и подсказки при работе.
4 Копирование Переключение в режим копирования.
5 Стрелки Перемещение по пунктам выбранного меню, а также увеличение или уменьшение
значений.
6 ОК Подтверждение выбора на экране.
7 Цифровая клавиатура Ввод количества копий.
8 Очистить Сброс количества копий.
9 Остановить Остановка текущей операции.
10 Питание / выход из
режима ожидания
Включение или выключение питания, или выход из энергосберегающего режима. Если
требуется выключить устройство, нажмите и удерживайте кнопку более трех секунд.
11 Пуск Запускается задание копирования.
12 Сброс Сброс параметров копирования до значений по умолчанию.
13 Назад Возврат в меню верхнего уровня.
14 Меню Переход в режим меню, а также перемещение по доступным меню.
12 Глава 1 Введение RUWW
/
HP LaserJet MFP M433a, M436n, M436dn,
M436nda
Руководство пользователя
Авторские права и лицензия
© Copyright 2018 HP Development Company,
L.P.
Копирование, адаптация или перевод без
предварительного письменного разрешения
запрещены, за исключением случаев,
разрешенных законом об авторских правах.
Информация, содержащаяся в этом
документе, может быть изменена без
предварительного уведомления.
Гарантии на изделия и услуги HP
устанавливаются в специальных гарантийных
положениях, прилагаемых к таким изделиям и
услугам. Ничто из сказанного в настоящем
документе не должно истолковываться как
дополнительная гарантия. HP не несет
ответственности за технические или
редакторские ошибки или упущения,
содержащиеся в настоящем документе.
Edition 5, 4/2018
Информация о товарных знаках
Adobe
®
, Adobe Photoshop
®
, Acrobat
®
и
PostScript
®
являются зарегистрированными
товарными знаками Adobe Systems
Incorporated.
Microsoft®, Windows®, Windows XP® и Windows
Vista® являются зарегистрированными в США
товарными знаками Microsoft Corporation.
Содержание
1 Введение …………………………………………………………………………………………………………………………………………………………………………… 1
Функции по моделям …………………………………………………………………………………………………………………………………………. 2
О руководство пользователя …………………………………………………………………………………………………………………………….. 4
Сведения о безопасности ………………………………………………………………………………………………………………………………….. 5
Обзор устройства ……………………………………………………………………………………………………………………………………………….. 9
Компоненты ……………………………………………………………………………………………………………………………………… 9
Вид спереди …………………………………………………………………………………………………………………………………… 10
Вид сзади ……………………………………………………………………………………………………………………………………….. 11
Обзор панели управления ……………………………………………………………………………………………………………………………….. 12
2 Обзор меню …………………………………………………………………………………………………………………………………………………………………….. 15
Доступ к меню ………………………………………………………………………………………………………………………………………………….. 16
Обзор меню ………………………………………………………………………………………………………………………………………………………. 17
Меню функции копирования ………………………………………………………………………………………………………… 17
Меню «Настройка копирования» …………………………………………………………………………………………………… 18
Меню «Параметры печати» ……………………………………………………………………………………………………………. 19
Меню «Настройка системы» …………………………………………………………………………………………………………… 20
Меню «Сеть» ……………………………………………………………………………………………………………………………………. 23
Меню сканирования ………………………………………………………………………………………………………………………. 23
3 Материалы для печати и лотки ……………………………………………………………………………………………………………………………………… 25
Обзор лотков ……………………………………………………………………………………………………………………………………………………. 26
Загрузка бумаги в лоток …………………………………………………………………………………………………………………………………… 27
Введение ………………………………………………………………………………………………………………………………………… 27
Подготовка бумаги …………………………………………………………………………………………………………………………. 27
Лоток 2 / опциональный лоток …………………………………………………………………………………………………….. 28
Многоцелевой лоток 1 …………………………………………………………………………………………………………………… 30
Печать на специальных материалах ………………………………………………………………………………………………………………. 32
Стопка карточек/Бумага нестандартного размера ………………………………………………………………………. 32
Подготовленная бумага ………………………………………………………………………………………………………………… 32
Задание формата и типа бумаги ……………………………………………………………………………………………………………………… 34
RUWW iii
Загрузка оригинала ………………………………………………………………………………………………………………………………………….. 35
Введение ………………………………………………………………………………………………………………………………………… 35
Подготовка оригиналов ………………………………………………………………………………………………………………… 35
Загрузка оригиналов ……………………………………………………………………………………………………………………… 35
На стекле сканирования ……………………………………………………………………………………………… 35
В устройстве подачи документов ……………………………………………………………………………….. 37
Характеристики материала для печати ………………………………………………………………………………………………………….. 39
4 Установка принтера ………………………………………………………………………………………………………………………………………………………… 41
Аппаратная настройка принтера и установка ПО ………………………………………………………………………………………….. 42
Инструкции по установке программного обеспечения ………………………………………………………………………………….. 43
5 Печать ……………………………………………………………………………………………………………………………………………………………………………… 45
Настройка печати на панели управления ………………………………………………………………………………………………………. 46
6 Копирование …………………………………………………………………………………………………………………………………………………………………… 47
Функции копирования на панели управления ………………………………………………………………………………………………. 48
Функции копирования …………………………………………………………………………………………………………………… 48
Настройка копирования ………………………………………………………………………………………………………………… 50
Простое копирование ………………………………………………………………………………………………………………………………………. 52
Изменение настроек для каждой копии …………………………………………………………………………………………………………. 53
Плотность ………………………………………………………………………………………………………………………………………. 53
Тип оригинала ……………………………………………………………………………………………………………………………….. 53
Уменьшение или увеличение размера копии ………………………………………………………………………………. 54
Копирование удостоверений личности ………………………………………………………………………………………………………….. 55
7 Сканирование …………………………………………………………………………………………………………………………………………………………………. 57
Сканирование с устройства …………………………………………………………………………………………………………………………….. 58
Введение ………………………………………………………………………………………………………………………………………… 58
Функция сканирования …………………………………………………………………………………………………………………. 58
Простое сканирование ………………………………………………………………………………………………………………….. 59
Сканирование с компьютера …………………………………………………………………………………………………………………………… 60
Введение ………………………………………………………………………………………………………………………………………… 60
Сканирование на ПК ………………………………………………………………………………………………………………………. 60
Сканирование с помощью программы HP Scan …………………………………………………………………………… 61
Сканирование из программы редактирования изображений …………………………………………………….. 61
Сканирование с помощью драйвера WIA …………………………………………………………………………………….. 62
Сканирование с помощью WSD ……………………………………………………………………………………………………. 62
Установка драйвера принтера WSD ……………………………………………………………………………. 63
Сканирование с помощью функции WSD ………………………………………………………………….. 63
iv RUWW
8 Системные и другие параметры …………………………………………………………………………………………………………………………………….. 65
Настройка устройства ……………………………………………………………………………………………………………………………………… 66
Настройка бумаги …………………………………………………………………………………………………………………………………………….. 68
Отчет …………………………………………………………………………………………………………………………………………………………………. 69
Обслуживание ………………………………………………………………………………………………………………………………………………….. 70
Настройка сети …………………………………………………………………………………………………………………………………………………. 71
Доступ к настройкам через встроенный веб-сервер (EWS) …………………………………………………………………………… 72
9 Обслуживание ………………………………………………………………………………………………………………………………………………………………… 73
Заказ расходных материалов и дополнительных принадлежностей …………………………………………………………… 74
Доступные расходные материалы ………………………………………………………………………………………………………………….. 75
Доступные дополнительные принадлежности ……………………………………………………………………………………………… 76
Доступные запасные части для ремонта ………………………………………………………………………………………………………… 77
Хранение расходных материалов …………………………………………………………………………………………………………………… 78
Инструкции по обращению с узлом формирования изображения …………………………………………….. 78
Использование тонер-картриджа ………………………………………………………………………………………………… 78
Приблизительный ресурс тонер-картриджа ……………………………………………………………………………….. 79
Перераспределение тонера ……………………………………………………………………………………………………………………………. 80
Установка тонер-картриджа ……………………………………………………………………………………………………………………………. 83
Установка узла формирования изображения …………………………………………………………………………………………………. 86
Отслеживание срока службы ………………………………………………………………………………………………………………………….. 93
Настройка предупреждений о низком уровне тонера …………………………………………………………………………………… 94
Очистка устройства ………………………………………………………………………………………………………………………………………….. 95
Очистка с внешней стороны …………………………………………………………………………………………………………. 95
Очистка с внутренней стороны …………………………………………………………………………………………………….. 95
Очистка ролика ……………………………………………………………………………………………………………………………… 95
Очистка стекла узла сканера ………………………………………………………………………………………………………… 98
Обновление микропрограммы ……………………………………………………………………………………………………………………… 100
Шаг 1. Загрузите микропрограмму с сайта HP.com ……………………………………………………………………. 100
Шаг 2. Обновление микропрограммы ………………………………………………………………………………………… 100
10 Полезные настройки ………………………………………………………………………………………………………………………………………………….. 105
Основные параметры устройства …………………………………………………………………………………………………………………. 106
Высотная коррекция ……………………………………………………………………………………………………………………………………… 107
11 Устранение неполадок ………………………………………………………………………………………………………………………………………………. 109
Проблемы с подачей бумаги …………………………………………………………………………………………………………………………. 110
Устранение замятий ……………………………………………………………………………………………………………………………………….. 111
Введение ……………………………………………………………………………………………………………………………………… 111
Лоток 2 …………………………………………………………………………………………………………………………………………. 111
RUWW v
В опциональном лотке 3 …………………………………………………………………………………………………………….. 112
В многоцелевом лотке 1 ……………………………………………………………………………………………………………… 115
Внутри принтера ………………………………………………………………………………………………………………………….. 115
В области вывода ………………………………………………………………………………………………………………………… 116
В области двусторонней печати …………………………………………………………………………………………………. 118
Устранение замятий оригиналов ………………………………………………………………………………………………… 120
Замятие оригинала в передней части сканера ……………………………………………………….. 120
Замятие оригинала внутри сканера …………………………………………………………………………. 121
Замятие оригинала в области вывода сканера ……………………………………………………….. 124
Замятие оригинала в тракте двусторонней печати сканера …………………………………… 125
Объяснение состояний индикатора ………………………………………………………………………………………………………………. 127
Объяснение отображаемых сообщений ………………………………………………………………………………………………………. 129
Сообщения, связанных с замятием бумаги ………………………………………………………………………………… 129
Сообщения, связанные с тонером ………………………………………………………………………………………………. 129
Сообщения, связанные с лотком ………………………………………………………………………………………………… 131
Сообщения, связанные с сетью ………………………………………………………………………………………………….. 132
Прочие сообщения ……………………………………………………………………………………………………………………… 132
Проблемы с питанием и подключением кабеля ………………………………………………………………………………………….. 134
Проблемы печати …………………………………………………………………………………………………………………………………………… 135
Проблемы качества печати …………………………………………………………………………………………………………………………… 138
Проблемы копирования ………………………………………………………………………………………………………………………………… 143
Проблемы сканирования ………………………………………………………………………………………………………………………………. 144
Проблемы ОС …………………………………………………………………………………………………………………………………………………. 145
Приложение А Приложение ……………………………………………………………………………………………………………………………………………. 147
Характеристики ……………………………………………………………………………………………………………………………………………… 148
Общие технические характеристики …………………………………………………………………………………………. 148
Системные требования ……………………………………………………………………………………………………………….. 148
Сетевая среда ………………………………………………………………………………………………………………………………. 149
Ограниченная гарантия HP ……………………………………………………………………………………………………………………………. 151
Великобритания, Ирландия и Мальта ………………………………………………………………………………………… 153
Австрия, Бельгия, Германия и Люксембург ………………………………………………………………………………… 153
Бельгия, Франция и Люксембург ………………………………………………………………………………………………… 154
Италия ………………………………………………………………………………………………………………………………………….. 155
Испания ………………………………………………………………………………………………………………………………………… 155
Дания ……………………………………………………………………………………………………………………………………………. 156
Норвегия ………………………………………………………………………………………………………………………………………. 156
Швеция ………………………………………………………………………………………………………………………………………… 156
Португалия …………………………………………………………………………………………………………………………………… 156
Греция и Кипр ………………………………………………………………………………………………………………………………. 157
Венгрия ………………………………………………………………………………………………………………………………………… 157
vi RUWW
Чехия ……………………………………………………………………………………………………………………………………………. 157
Словакия ………………………………………………………………………………………………………………………………………. 158
Польша ………………………………………………………………………………………………………………………………………… 158
Болгария ………………………………………………………………………………………………………………………………………. 158
Румыния ……………………………………………………………………………………………………………………………………….. 159
Бельгия и Нидерланды ……………………………………………………………………………………………………………….. 159
Финляндия …………………………………………………………………………………………………………………………………… 159
Словения ……………………………………………………………………………………………………………………………………… 160
Хорватия ………………………………………………………………………………………………………………………………………. 160
Латвия ………………………………………………………………………………………………………………………………………….. 160
Литва ……………………………………………………………………………………………………………………………………………. 160
Эстония …………………………………………………………………………………………………………………………………………. 161
Россия …………………………………………………………………………………………………………………………………………… 161
Лицензионное соглашение с конечным пользователем ……………………………………………………………………………… 162
Premium Protection Warranty HP: Обязательство ограниченной гарантии на картридж с тонером
LaserJet …………………………………………………………………………………………………………………………………………………………… 167
Политика фирмы HP относительно расходных материалов других производителей ………………………………. 168
Веб-сайт HP по вопросам защиты от подделок …………………………………………………………………………………………… 169
Данные, сохраняемые в картридже с тонером …………………………………………………………………………………………….. 170
Гарантийные обязательства на расходные материалы с длительным ресурсом и на ремонтный
комплект (комплект для обслуживания) ……………………………………………………………………………………………………… 171
Поддержка клиентов …………………………………………………………………………………………………………………………………….. 172
Декларация о соответствии ………………………………………………………………………………………………………………………….. 173
Программа контроля за воздействием изделия на окружающую среду ……………………………………………………. 175
Защита окружающей среды ………………………………………………………………………………………………………. 175
Утилизация оборудования, отслужившего свой срок, силами пользователя (ЕС и Индия) …….. 175
Переработка электронного оборудования ………………………………………………………………………………… 175
Заявление об ограничении по опасным веществам (Индия) ……………………………………………………. 175
Информация для пользователей об экологической маркировке SEPA (Китай) ……………………….. 175
Регулирование внедрения маркировки об энергоэффективности принтеров, факсов и
копиров для Китая ………………………………………………………………………………………………………………………. 176
Таблица веществ (Китай) ……………………………………………………………………………………………………………. 176
Ограничения по материалам ………………………………………………………………………………………………………. 176
Информация о батареях ……………………………………………………………………………………………………………… 177
Таблица веществ (Тайвань) ………………………………………………………………………………………………………… 178
Таблица безопасности материалов (MSDS) ………………………………………………………………………………… 179
Дополнительная информация ……………………………………………………………………………………………………. 179
Нормативная информация …………………………………………………………………………………………………………………………….. 180
Предупреждение …………………………………………………………………………………………………………………………. 180
Евразийское соответствие (Республика Беларусь, Казахстан, Россия) …………………………………….. 181
Заявление о безопасности лазерного оборудования ……………………………………………………………….. 181
RUWW vii
Нормы электромагнитной совместимости (Китай) …………………………………………………………………….. 182
Обязательства для Скандинавии (Дания, Финляндия, Норвегия, Швеция) …………………………….. 182
Заявление о лазерной безопасности (Финляндия) …………………………………………………………………… 182
Глоссарий ………………………………………………………………………………………………………………………………………………………………………….. 185
viii RUWW
1 Введение
В данной главе представлены сведения, которые необходимо знать перед работой с устройством.
●
Функции по моделям
●
О руководство пользователя
●
Сведения о безопасности
●
Обзор устройства
●
Обзор панели управления
RUWW 1
Функции по моделям
ПРИМЕЧАНИЕ. Некоторые функции и опциональные принадлежности могут быть недоступны в
зависимости от модели и страны/региона. Некоторые модели могут быть недоступны в зависимости от
страны/региона.
Таблица 1-1 Функции
Функции M436n
W7U01A
M436dn
2KY38A
M436nda
W7U02A
M433a
1VR14A
Высокоскоростное
подключение USB 2.0
Сетевой интерфейс
Ethernet 10/100 Base TX
проводной локальной
сети
Печать в режиме Eco
Двусторонняя (дуплекс)
печать (автоматическая)
Двусторонняя (дуплекс)
печать (в ручном
режиме)
a
Многоцелевой лоток 1
(МЦ лоток 1)
Лоток 2
Опциональное второе
устройство подачи с
кассетой (лоток 3)
Устройство
автоматической подачи
документов (АПД)
(опционально для
M436n/M436dn)
Сканирование
Копирование
a
Доступно только для ОС Windows и Linux.
Таблица
1-2 Программное обеспечение
Программное обеспечение Windows XP, Vista, Server 2003
M436n/dn/nda, M433a
Windows 7, 8, 8.1, 10
M436n/dn/nda, M433a
Драйвер принтера PCL6
Printer Manager
Приложение сканирования
Средство установки/удаления ПО
Windows
2 Глава 1 Введение RUWW
Таблица 1-2 Программное обеспечение (продолжение)
Программное обеспечение Windows XP, Vista, Server 2003
M436n/dn/nda, M433a
Windows 7, 8, 8.1, 10
M436n/dn/nda, M433a
Монитор состояния
ПО сканирования
Настройка сканирования на ПК
a
ПО можно загрузить и установить с веб-сайта: (www.hp.com/support/ljM436MFP, www.hp.com/support/ljM433MFP > драйверы, ПО
и микропрограммы). Перед установкой следует проверить, есть ли поддержка ПО для вашей ОС.
RUWW Функции по моделям 3
О руководство пользователя
В данном руководстве пользователя представлены основные сведения о компьютере, а также пошаговые
инструкции по работе с устройством.
● Перед использованием устройства следует ознакомиться с информацией по безопасности.
● Если при работе с устройством возникают проблемы, см. главу об устранении неполадок.
● Используемые в руководстве пользователя термины объяснены в главе глоссария.
●
Иллюстрации в руководстве пользователя могут немного отличаться от реального устройства, в
зависимости от дополнительных принадлежностей или приобретенной модели.
● Снимки экрана в руководстве пользователя могут отличаться от вашего устройства, в зависимости от
версии микропрограммного обеспечения/драйверов на компьютере.
● Процедуры, описанные в данном руководстве пользователя, в основном рассчитаны на
ОС Windows 7.
● Документ – это то же, что и исходный документ.
● Бумага – это то же, что и материал для печати или носитель.
4 Глава 1 Введение RUWW
Сведения о безопасности
Предостережения и меры предосторожности приводятся для предотвращения травм пользователей и
потенциальных повреждений устройства. Следует ознакомиться и понять все инструкции перед работой с
устройством. После ознакомления с данным разделом, его следует заложить для обращения в
дальнейшем.
Таблица 1-3 Важные символы по безопасности
Предупреждение Рискованные или небезопасные действия, которые
могут повлечь серьезные травмы или
представляющие смертельную угрозу.
Внимание! Рискованные или небезопасные действия, которые
могут повлечь легкие травмы или повреждения
имущества.
Не предпринимать попыток.
Таблица 1-4 Рабочие условия
Предупреждение
Не допускается использование при повреждении кабеля питания или с незаземленной розеткой.
Оборудование может быть повреждено.
Не следует ничего располагать на устройстве (емкости с водой, небольшие металлические или тяжелые
предметы, свечи, зажженные сигареты и т.д.).
Оборудование может быть повреждено.
● При перегреве устройства может происходить задымление, появляться странный шум или запах: следует
немедленно выключить питание и отключить устройство от электророзетки.
● Должен оставаться свободный доступ к электророзетке для экстренных случаев, когда может
потребоваться отключение устройства от розетки.
Оборудование может быть повреждено.
Не сгибайте, не наступайте и не ставьте тяжелые предметы на кабель питания.
Такие действия могут повредить оборудование.
Не отключайте вилку из розетки, держась только за кабель; не трогайте вилку мокрыми руками.
Оборудование может быть повреждено.
Внимание!
RUWW Сведения о безопасности 5
Таблица 1-4 Рабочие условия (продолжение)
Осторожно, область вывода бумаги может быть горячей.
При падении устройства или повреждении корпуса, следует отключить все интерфейсные соединения и
запросить помощь квалифицированного обслуживающего персонала.
Если устройство не работает должным образом после выполнения данных инструкций, следует отключить все
интерфейсные соединения и запросить помощь квалифицированного обслуживающего персонала.
Если вилку не удается без усилия подключить к розетке, не прикладывайте большого усилия.
Следует вызвать электрика для замены электророзетки.
Таблица 1-5 Метод эксплуатации
Внимание!
Не вытягивайте бумагу с усилием при печати.
Оборудование может быть повреждено.
При извлечении замятой бумаги не используйте пинцет или острые металлические предметы.
Оборудование может быть повреждено.
Не допускайте большого скопления бумаги в выходном лотке.
Это может привести к замятию бумаги.
Не закрывайте и не заталкивайте предметы в вентиляционные отверстия.
Оборудование может быть повреждено.
Чтобы отключить питание, отключите вилку из розетки.
Таблица 1-6 Установка / перемещение
Предупреждение
Устройство следует размещать в помещениях с температурой и влажностью в соответствии со
спецификацией.
Внимание!
6 Глава 1 Введение RUWW
Таблица 1-6 Установка / перемещение (продолжение)
Перед перемещением устройства следует выключить питание и отсоединить все кабели. Если по
медицинским предписаниям вам противопоказан подъем тяжестей, не поднимайте устройство. Попросите
кого-нибудь помочь, всегда задействуйте достаточное количество людей для безопасного подъема
устройства.
Для размещения устройства выберите ровную поверхность и достаточное пространство для вентиляции.
Также следует учесть необходимое свободное пространство для открытия крышки и лотков.
Не следует размещать устройство на неустойчивых поверхностях.
Падение устройства может стать причиной травм и повреждения устройства.
Не забудьте подключить кабель питания к заземленной электрической розетке.
В целях безопасности следует использовать кабель питания из комплекта поставки устройства.
Подключайте кабель питания напрямую к электророзетке. Не используйте удлинители или разветвители.
Не следует накрывать устройство или размещать его в закрытых помещениях, таких как кладовые комнаты.
Таблица 1-7 Обслуживание / проверка
Внимание!
Перед очисткой внутренней области устройства следует отключать его от розетки. Не следует очищать
устройства с использованием бензола, растворителей или спиртосодержащих средств; не распыляйте воду
непосредственно на устройство.
При открывании устройства для замены расходных материалов или очистки не включайте устройство.
Не разбирайте устройство, не выполняйте мелкий или крупный ремонт самостоятельно.
При этом можно повредить устройство. Для ремонта устройства следует обращаться к сертифицированным
специалистам.
Таблица 1-8 Использование расходных материалов
Внимание!
Не разбирайте тонер-картридж.
RUWW Сведения о безопасности 7
Таблица 1-8 Использование расходных материалов (продолжение)
При использовании восстановленных расходных материалов, таких как тонер, можно повредить устройство.
Если тонер попал на одежду, не смывайте его горячей водой.
Используйте холодную воду.
8 Глава 1 Введение RUWW
Обзор устройства
Иллюстрации могут немного отличаться от устройства, в зависимости от модели. Существуют различные
типы устройств.
Некоторые функции и опциональные принадлежности могут быть недоступны в зависимости от модели и
страны/региона.
Компоненты
Устройство Модуль формирования изображения
Тонер-картридж
a
Кабель питания; Краткое руководство по установке
Компакт-диски с ПО
b
Прочие дополнительные
принадлежности
a
a
Различные дополнительные принадлежности из комплекта поставки устройства могут различаться, в зависимости от страны/
региона приобретения и конкретной модели.
b
В зависимости от модели принтера может быть более одного компакт-диска с ПО.
RUWW Обзор устройства 9
Вид спереди
1
15
16
2 3
5
6
4
7
8
12
9
10
11
17
14
13
1
Крышка устройства автоматической подачи документов
a
2
Направляющая ширины устройства автоматической подачи документов
a
3
Подающий лоток устройства автоматической подачи документов
a
4
Приемный лоток устройства автоматической подачи документов
a
5 Панель управления
6 Многоцелевой лоток
7
Крышка лотка 3 для устранения замятий
a
8
Второе устройство подачи с кассетой (лоток 3)
a
9 Лоток 2
10 Передняя крышка
11 Выходной лоток
12
Устройство автоматической подачи документов
a
13 Крышка сканера
14 Стекло сканера
15 Модуль формирования изображения
10 Глава 1 Введение RUWW
16 Тонер-картридж
17 Направляющие ширины бумаги в многоцелевом лотке
a
Это опциональная функция.
Вид сзади
1 Разъем шнура питания
2 Порт USB 2.0 Type-B
3 Сетевой порт (недоступен на модели M433a)
RUWW Обзор устройства 11
Обзор панели управления
На следующем рисунке показано расположение, а в таблице приводится краткое описание элементов
панели управления.
ПРИМЕЧАНИЕ. Панель управления может отличаться от вашей, в зависимости от модели. Существуют
различные типы панелей управления.
Некоторые функции и опциональные принадлежности могут быть недоступны в зависимости от модели и
страны/региона.
Некоторые кнопки могут не работать, в зависимости от режима (копирование или сканирование).
8 9 1076
2
1
3 5
12 11
18
17
16 15
14
13
4
1 Копирование удостоверений Позволяет копировать обе стороны удостоверений личности (например, водительские
удостоверения) на одной стороне бумаги.
2 Уменьшить/Увеличить Можно изменять масштабирование от 25% до 400% при копировании оригиналов со
стекла сканера.
3 Экран Отображается текущее состояние и подсказки при работе.
4 Копирование Переключение в режим копирования.
5 Стрелки Перемещение по пунктам выбранного меню, а также увеличение или уменьшение
значений.
6 ОК Подтверждение выбора на экране.
7 Цифровая клавиатура Ввод количества копий.
8 Очистить Сброс количества копий.
9 Остановить Остановка текущей операции.
10 Питание / выход из
режима ожидания
Включение или выключение питания, или выход из энергосберегающего режима. Если
требуется выключить устройство, нажмите и удерживайте кнопку более трех секунд.
11 Пуск Запускается задание копирования.
12 Сброс Сброс параметров копирования до значений по умолчанию.
13 Назад Возврат в меню верхнего уровня.
14 Меню Переход в режим меню, а также перемещение по доступным меню.
12 Глава 1 Введение RUWW

HP LaserJet MFP M438
HP LaserJet MFP M440
HP LaserJet MFP M442
HP LaserJet MFP M443
User Guide
www.hp.com/videos/laserjet
www.hp.com/support/ljM438MFP
www.hp.com/support/ljM440MFP
www.hp.com/support/ljM442MFP
www.hp.com/support/ljM443MFP
HP LaserJet MFP M438, M440, M442, M443
Copyright and License
Trademark Credits
© Copyright 2019 HP Development Company,
L.P.
Adobe®, Adobe Photoshop®, Acrobat®, and
PostScript® are trademarks of Adobe Systems
Incorporated.
Reproduction, adaptation, or translation without
prior written permission is prohibited, except as
allowed under the copyright laws.
The information contained herein is subject to
change without notice.
The only warranties for HP products and
services are set forth in the express warranty
statements accompanying such products and
services. Nothing herein should be construed as
constituting an additional warranty. HP shall not
be liable for technical or editorial errors or
omissions contained herein.
Edition 1, 2/2020
Microsoft®, Windows®, Windows® XP, and
Windows Vista® are U.S. registered trademarks
of Microsoft Corporation.
Table of contents
1 Introduction ............................................................................................................................................................................................... 1
Features by model .................................................................................................................................................................... 2
About this user’s guide ............................................................................................................................................................ 4
Safety information ................................................................................................................................................................... 5
Machine overview ..................................................................................................................................................................... 9
Components ......................................................................................................................................................... 9
Front view ........................................................................................................................................................... 10
Rear view ............................................................................................................................................................ 11
Control panel overview ......................................................................................................................................................... 12
2 Menu Overview ....................................................................................................................................................................................... 15
Accessing the menus ............................................................................................................................................................. 16
Menu overview ........................................................................................................................................................................ 17
Copy feature menu ............................................................................................................................................ 17
Copy Setup Menu ............................................................................................................................................... 18
Print Setup Menu ............................................................................................................................................... 19
System Setup Menu .......................................................................................................................................... 20
Network Menu .................................................................................................................................................... 23
Secured Job Menu ............................................................................................................................................. 23
Scan Menu .......................................................................................................................................................... 23
3 Media and Tray ........................................................................................................................................................................................ 25
Tray overview ......................................................................................................................................................................... 26
Loading paper in the tray ...................................................................................................................................................... 27
Introduction ........................................................................................................................................................ 27
Preparing paper ................................................................................................................................................. 27
Tray 2 / optional tray ........................................................................................................................................ 27
Multi-purpose Tray 1 ........................................................................................................................................ 30
Printing on special media ...................................................................................................................................................... 32
Card stock/Custom-sized paper ...................................................................................................................... 32
Preprinted paper ................................................................................................................................................ 33
ENWW
iii
Setting the paper size and type ........................................................................................................................................... 34
Loading the original ............................................................................................................................................................... 35
Introduction ........................................................................................................................................................ 35
Preparing originals ............................................................................................................................................ 35
Loading originals ............................................................................................................................................... 36
On the scanner glass .................................................................................................................... 36
In the document feeder ............................................................................................................... 38
Print media specifications ..................................................................................................................................................... 39
4 Printer installation .................................................................................................................................................................................. 41
Printer hardware setup and software installation ............................................................................................................ 42
Software installation instructions ....................................................................................................................................... 43
5 Printing ..................................................................................................................................................................................................... 45
Print setup on the control panel .......................................................................................................................................... 46
Overview of print jobs when using a Universal Print Driver (UPD) and Discrete Host Printer Driver ........................ 47
Print secure documents from the control panel ............................................................................................................... 48
6 Copying ..................................................................................................................................................................................................... 49
Copy features on the control panel ..................................................................................................................................... 50
Copy feature ....................................................................................................................................................... 50
Copy Setup .......................................................................................................................................................... 53
Basic copying .......................................................................................................................................................................... 53
Changing the settings for each copy ................................................................................................................................... 54
Darkness ............................................................................................................................................................. 54
Original Type ....................................................................................................................................................... 54
Reduced or enlarged copy ................................................................................................................................ 55
ID card copying ....................................................................................................................................................................... 56
7 Scanning .................................................................................................................................................................................................. 59
Scanning from the machine ................................................................................................................................................. 60
Introduction ........................................................................................................................................................ 60
Scan feature ....................................................................................................................................................... 60
Scanning from a computer ................................................................................................................................................... 62
Introduction ........................................................................................................................................................ 62
Scan to PC ........................................................................................................................................................... 62
Scanning from the HP Scan Software ............................................................................................................ 63
Scanning from image editing program .......................................................................................................... 63
Scanning using the WIA driver ......................................................................................................................... 64
Scanning via WSD .............................................................................................................................................. 64
iv
ENWW
Installing a WSD Printer Driver .................................................................................................... 64
Scanning using the WSD feature ................................................................................................ 65
Sending scanned images to different destinations .......................................................................................................... 66
Setting up an email account ............................................................................................................................ 66
Scanning and sending an email ...................................................................................................................... 66
Setting up an FTP/SMB server ......................................................................................................................... 66
Scanning and sending to FTP/SMB server ..................................................................................................... 67
8 System and Other Settings ................................................................................................................................................................... 69
Machine setup ......................................................................................................................................................................... 70
Paper setup ............................................................................................................................................................................. 72
Report ...................................................................................................................................................................................... 72
Maintenance ............................................................................................................................................................................ 73
Network setup ........................................................................................................................................................................ 74
Accessing settings using the Embedded Web Server (EWS) ........................................................................................... 75
9 Maintenance ............................................................................................................................................................................................ 79
Ordering supplies and accessories ...................................................................................................................................... 80
Available consumables .......................................................................................................................................................... 80
Available accessories ............................................................................................................................................................. 81
Available maintenance parts ................................................................................................................................................ 81
Storing the consumables ...................................................................................................................................................... 82
Imaging unit handling instructions ................................................................................................................. 82
Toner cartridge usage ....................................................................................................................................... 82
Estimated toner cartridge life .......................................................................................................................... 83
Redistributing toner ............................................................................................................................................................... 83
Toner cartridge installation ................................................................................................................................................... 86
Imaging unit installation ....................................................................................................................................................... 89
Monitoring the supplies life .................................................................................................................................................. 96
Setting the toner low alert .................................................................................................................................................... 96
Cleaning the machine ............................................................................................................................................................ 97
Cleaning the outside ......................................................................................................................................... 97
Cleaning the inside ............................................................................................................................................ 97
Cleaning the roller ............................................................................................................................................. 98
Cleaning the scan unit .................................................................................................................................... 102
Update the firmware ........................................................................................................................................................... 103
Step one: Download the firmware from HP.com ....................................................................................... 103
Step two: Update the firmware ..................................................................................................................... 103
ENWW
v
10 Useful Settings ................................................................................................................................................................................... 107
Machine’s initial set up ........................................................................................................................................................ 108
Machine’s basic settings ..................................................................................................................................................... 109
Altitude adjustment ............................................................................................................................................................. 110
11 Troubleshooting ................................................................................................................................................................................. 111
Paper feeding problems ..................................................................................................................................................... 112
Clearing jams ........................................................................................................................................................................ 113
Introduction ...................................................................................................................................................... 113
Tray 2 ................................................................................................................................................................ 113
In Multi-purpose Tray 1 .................................................................................................................................. 115
Inside the printer ............................................................................................................................................. 116
In the exit area ................................................................................................................................................. 118
In the duplex unit area .................................................................................................................................... 120
Clearing original document jams .................................................................................................................. 122
Original paper jam in front of scanner .................................................................................... 122
Original paper jam inside of scanner ....................................................................................... 124
Original paper jam in exit area of scanner .............................................................................. 127
Original paper jam in scanner duplex path ............................................................................. 129
Understanding the status LED ........................................................................................................................................... 131
Understanding display messages ..................................................................................................................................... 132
Paper Jam-related messages ....................................................................................................................... 132
Toner-related messages ................................................................................................................................ 133
Tray-related messages .................................................................................................................................. 134
Network-related messages ........................................................................................................................... 134
Misc. messages ................................................................................................................................................ 135
Power and cable connecting problems ............................................................................................................................ 136
Printing problems ................................................................................................................................................................ 137
Printing quality problems ................................................................................................................................................... 139
Copying problems ................................................................................................................................................................ 144
Scanning problems .............................................................................................................................................................. 145
Operating system problems .............................................................................................................................................. 146
vi
ENWW
1
Introduction
This chapter provides information you need to know before using the machine.
ENWW
●
Features by model
●
About this user’s guide
●
Safety information
●
Machine overview
●
Control panel overview
1
Features by model
NOTE: Some features and optional goods may not be available depending on model or country/region. Some
models may not be available depending on the country/region.
Table 1-1 Variety features
Features
M438n
M438dn
M438nda
M440n
M440dn
M440nda
M442dn
M443nda
8AF43A
8AF44A
8AF45A
8AF46A
8AF47A
8AF48A
8AF71A
8AF72A
Hi-Speed
USB 2.0
Network
Interface
Ethernet
10/100 Base
TX wired LAN
Eco printing
Duplex (2sided)
printing
(automatic)
Duplex (2sided)
printing
(manual) a
Multipurpose Tray
1 (MP Tray 1)
Tray 2
Reverse
Automatic
Document
Feeder
(RADF)
Optional
Second
Cassette
Feeder Tray
Scan
Scan to Local
PC
Scan To
Network PC
ScanTo Email
(with
address
book)
2
Chapter 1 Introduction
ENWW
Table 1-1 Variety features (continued)
Features
M438n
M438dn
M438nda
M440n
M440dn
M440nda
M442dn
M443nda
8AF43A
8AF44A
8AF45A
8AF46A
8AF47A
8AF48A
8AF71A
8AF72A
Scan to SMB
(with
address
book)
Scan to FTP
(with
address
book)
PIN Printing
(Confidential
Printing by
RAM disk)
Job
Accounting
Copy
a
Available for Windows OS and Linux OS only.
Table 1-2 Software
Software
Windows XP, Vista, Server 2003
Windows 7, 8, 8.1, 10
PS (Postscript)
PCL6 printer driver
Printer Manager
Scan application
Windows Software Installer/Uninstaller
Status Monitor
Scanning Software
Scan to PC Setup
a
ENWW
You can download the software from the website and install it: (www.hp.com/support/ljM438MFP, www.hp.com/support/ljM440MFP,
www.hp.com/support/ljM442MFP, www.hp.com/support/ljM443MFP drivers, software & firmware). Before installing, check whether your
computer’s OS supports the software.
Features by model
3
About this user’s guide
This user's guide provides information for your basic understanding of the machine as well as detailed steps to
explain machine usage.
4
●
Read the safety information before using the machine.
●
If you have a problem using the machine, refer to the troubleshooting chapter.
●
All illustrations in this user’s guide may differ from your machine depending on its options or model you
purchased.
●
The screenshots in this user’s guide may differ from your machine depending on the machine’s firmware/
driver version.
●
The procedures in this user’s guide are mainly based on Windows 10.
●
Document is synonymous with original.
●
Paper is synonymous with media, or print media.
Chapter 1 Introduction
ENWW
Safety information
These warnings and precautions are included to prevent injury to you and others, and to prevent any potential
damage to your machine. Be sure to read and understand all of these instructions before using the machine.
After reading this section, keep it in a safe place for future reference.
Table 1-3 Important safety symbols
Warning
Hazards or unsafe practices that may result in personal
injury.
Caution
Hazards or unsafe practices that may result in minor
personal injury or property damage.
Do not attempt.
Table 1-4 Operating environment
Warning
Do not use if the power cord is damaged or if the electrical outlet is not grounded.
Equipment damage could occur.
Do not place anything on top of the machine (water, small metal or heavy objects, candles, lit cigarettes, etc.).
Equipment damage could occur.
●
If the machine gets overheated, it releases smoke, makes strange noises, or generates an odd odor,
immediately turn off the power and unplug the machine.
●
The user should be able to access the power outlet in case of emergencies that might require the user to pull
the plug out.
Equipment damage could occur.
Do not bend, step on, or place heavy objects on the power cord.
Stepping on or allowing the power cord to be crushed by a heavy object could result in equipment damage.
Do not remove the plug by pulling on the cord; do not handle the plug with wet hands.
Equipment damage could occur.
Caution
Be careful, the paper output area may be hot.
ENWW
Safety information
5
Table 1-4 Operating environment (continued)
If the machine has been dropped, or if the cabinet appears damaged, unplug the machine from all interface
connections and request assistance from qualified service personnel.
If the machine does not operate properly after these instructions have been followed, unplug the machine from all
interface connections and request assistance from qualified service personnel.
If the plug does not easily enter the electrical outlet, do not attempt to force it in.
Call an electrician to change the electrical outlet.
Table 1-5 Operating method
Caution
Do not forcefully pull the paper out during printing.
Equipment damage could occur.
When removing jammed paper, do not use tweezers or sharp metal objects.
Equipment damage could occur.
Do not allow too many papers to stack up in the paper output tray.
This may cause paper jams.
Do not block or push objects into the ventilation opening.
Equipment damage could occur.
To switch off the power supply, remove the power cord from the electrical outlet.
Table 1-6 Installation/Moving
Warning
Place the machine in the environment where it meets the operating temperature and humidity specification.
Temperature: 15° to 27° C (59° to 80.6° F)
Relative Humidity: 30% to 70% relative humidity (RH)
Caution
6
Chapter 1 Introduction
ENWW
Table 1-6 Installation/Moving (continued)
Before moving the machine, turn the power off and disconnect all cords. If you have a medical condition that
prevents you from lifting, do not lift the machine. Ask for help, and always use the appropriate amount of people to
lift the device safely.
Choose a flat surface with enough space for ventilation to place the machine. Also consider the space required to
open the cover and trays.
Do not place the machine on an unstable surface.
The machine could fall, causing injury or machine damage.
Make sure you plug the power cord into a grounded electrical outlet.
Use the power cord supplied with your machine for safe operation.
Connect the power cord directly to the power outlet. Do not use extension cords or power strips.
Do not put a cover over the machine or place it in an airtight location, such as a closet.
Table 1-7 Maintenance / Checking
Caution
Unplug this product from the wall outlet before cleaning the inside of the machine. Do not clean the machine with
benzene, paint thinner or alcohol; do not spray water directly into the machine.
When you are working inside the machine replacing consumables or cleaning the inside, do not operate the machine.
Do not disassemble, repair or rebuild the machine by yourself.
Call a certified technician when the machine needs repairing.
Table 1-8 Supply usage
Caution
Do not disassemble the toner cartridge.
ENWW
Safety information
7
Table 1-8 Supply usage (continued)
Using recycled consumables, such as toner, can cause damage to the machine.
When toner gets on your clothing, do not use hot water to wash it.
Use cold water.
8
Chapter 1 Introduction
ENWW
Machine overview
This illustration may differ from your machine depending on your model. There are various types of machines.
Some features and optional goods may not be available depending on model or country/region.
Components
Machine
Imaging unit
Power cord
Quick installation guide
Toner cartridgea
Misc. accessoriesa
a
ENWW
Miscellaneous accessories included with your machine may vary by country/region of purchase and specific model.
Machine overview
9
Front view
11
1
2
3
10
12
4
9
5
8
7
13
14
6
15
10
1
Automatic document feeder cover (M438nda /M440nda /M443nda)
2
Automatic document feeder width guide (M438nda /M440nda /M443nda)
3
Automatic document feeder input tray (M438nda /M440nda /M443nda)
4
Automatic document feeder output tray (M438nda /M440nda /M443nda)
5
Control panel
6
Multi-purpose tray
7
Tray 2
8
Front cover
9
Output tray
10
Automatic document feeder (M438nda /M440nda /M443nda)
11
Scanner lid
12
Scanner glass
13
Imaging unit
14
Toner cartridge
15
Paper width guides on a multipurpose tray
Chapter 1 Introduction
ENWW
Rear view
2
3
1
ENWW
1
Power receptacle
2
USB 2.0, Type B port
3
Network port
Machine overview
11
Control panel overview
The following figure and table describe the location and provide a brief description of the control panel elements.
NOTE: This control panel may differ from your machine depending on its model. There are various types of
control panels.
Some features and optional goods may not be available depending on model or country/region.
Some buttons may not work depending on the mode (copy or scan).
12
1
2
3
4
18
17
16
15
5
14
6
7
8
9
12
13
10
11
1
ID Copy
Allows you to copy both sides of an ID card like a driver’s license on a
single side of paper.
2
Reduce/Enlarge
You can reduce or enlarge the size of a copied image from 25% to
400% when you copy original documents from the scanner glass.
3
Display screen
4
Copy
5
Arrows
Scroll through the options available in the selected menu, and increase or decrease values.
6
OK
Confirms the selection on the screen.
7
Numeric keypad
Enter the number of copies.
8
Address book
Allows you to store a list of email addresses.
9
Stop/Clear
Stops and clears current operation.
10
Power / Wake Up
Turns the power on or off, or wakes up the machine from the power
save mode. If you need to turn the machine off, press this button for
more than three seconds.
11
Start
Begins a copying job.
12
Reset
Reset the copy settings to default values.
13
Back
Sends you back to the upper menu level.
14
Menu
Enters Menu mode and scrolls through the available menus.
15
Scan
Switches to Scan mode.
Chapter 1 Introduction
Shows the current status and prompts during an operation.
Switches to Copy mode.
ENWW
ENWW
16
Status LED
Indicates the status of your machine.
17
Paper Select
Select the tray you want from the display screen.
18
Darkness
Adjusts the brightness level to make a copy for easier reading, when
the original contains faint markings and dark images.
Control panel overview
13
14
Chapter 1 Introduction
ENWW
2
Menu Overview
This chapter provides information about the overall menu structure.
ENWW
●
Accessing the menus
●
Menu overview
15
Accessing the menus
Some menus may not appear on the display depending on the options selected, the product model, or your
country/region of residence. If so, it is not applicable to your machine.
1.
Select the Copy
or Scan
button on the control panel depending on the feature to be used.
2.
Select the Menu
3.
Press the arrows until the needed menu item appears and press OK.
4.
If the setting item has sub menus, repeat step 3.
5.
Press OK to save the selection.
6.
Select the Back
7.
Press the Stop/Clear
button on the left to enter Menu mode.
button to return to the previous menu item.
button to return to the ready mode.
Menu features are also accessible remotely from the Embedded Web Server (EWS) on network-connected
printers. For more information about the EWS, go to http://support.hp.com.
16
Chapter 2 Menu Overview
ENWW
Menu overview
Copy feature menu
Some menus may not appear on the display depending on the options selected, the product model, or your
country/region of residence. If so, it is not applicable to your machine.
Table 2-1 Copy Feature
Menu
Sub-menu
Reduce/Enlargea
25%
NOTE: The most commonly used
reductions/enlargements are:
50% (A3 -> A5)
●
70% (A3 -> A4)
●
141% (A4 -> A3)
61% (A3 -> B5)
70% (A3 -> A4), B4(JIS) -> B5, A4 -> A5)
81% (B4(JIS) -> A4, B5-A5)
86% (A3-B4(JIS), A4 -> B5)
100%
AutoFit
115% (B4(JIS) -> A3)
122% (A4 -> B4(JIS))
141% (A4 -> A3), A5 -> A4)
150%
200 (A5 -> A3)
400%
Custom (25 – 400%)
Duplexb
1->1 Sided
1->2 Sided, Book
1->2 Sided, Calendar
2->1 Sided, Book
2->1 Sided, Calendar
2->2 Sided, Book->Book
2->2 Sided, Calendar->Calendar
2->2 Sided, Book->Calendar
2->2 Sided, Calendar->Book
Darkness
-5 -> +5
Original Type
Text
Text/Photo
Photo
ENWW
Menu overview
17
Table 2-1 Copy Feature (continued)
Menu
Sub-menu
Map
Image Rotationb
On/Off
Collation
On/Off
Layout
Normal
ID Copy
N-Up
Book Copy
Adjust Background
Off
Auto
Enhance Lev.1
Enhance Lev.2
Erase Lev.1- Erase Lev.4
a
b
Reduce/Enlarge means specifically to print a specific paper size onto another specific paper size. The % and specific sizes listed are based
on the default paper size.
Some menus may not appear on the display depending on options or models. If so, it is not applicable to your machine.
Table 2-2 Reduce/Enlarge percentages for other media sizes
Media
Reduce/enlarge setting percentage
A3->A5
50%
A3->B5
61%
A3->A4
70%
B4->B5/A5
70%
B4->A4/B5/A5
81%
A3/B4/A4->B5
86%
A5->A3
200%
B4->A3
115%
A4->B4
122%
A4->A3
141%
A5->A4
141%
A5->A3
200%
Copy Setup Menu
Some menus may not appear on the display depending on the options selected, the product model, or your
country/region of residence. If so, it is not applicable to your machine.
18
Chapter 2 Menu Overview
ENWW
Table 2-3 Copy Setup Menu
a
Menu
Sub-menu
Change Defaulta
Copies
Auto Tray
On/Off
This menu selection allows you to change the default copy selections for the Copy Feature menu, except for Layout and Background.
Print Setup Menu
Some menus may not appear on the display depending on the options selected, the product model, or your
country/region of residence. If so, it is not applicable to your machine.
Table 2-4 Print Setup
Menu
Sub-menu
Orientation
Portrait
Sub-menu
Landscape
Duplex
Off
Long Edge
Short Edge
Copies
1-999
Resolution
Standard
High Resolution
Clear Text
Off
Minimum
Normal
Maximum
Auto CR
LF
LF+CR
Skip Blank Pages
On/Off
Emulation
Setup
PCL
Typeface
PCL 1 - 58
Symbol Set
Lines
5 - 128
Pitch
0.44 - 99.99
Wide A4
On/Off
Courier
Regular
Dark
PostScript
ENWW
Print PS Error
Menu overview
19
System Setup Menu
Some menus may not appear on the display depending on the options selected, the product model, or your
country/region of residence. If so, it is not applicable to your machine.
Table 2-5 System Setup
Menu
Sub-menu
Machine Setup
Date & Time
Clock Mode
Sub-menu
Sub-menu
Sub-menu
12 hours
24 hours
Language
English
French
Italian
Polish
Russian
Turkish
Chinese
Spanish
Power Save
1 - 60 minute(s)
Wakeup Event
On/Off
Auto Power Off
Off
On (5 - 240) minutes
System Timeout
Off
On (10 - 600)
seconds
Job Timeout
Off
On (15 - 300)
seconds
Altitude Adjustment
Normal
High 1 - 4
Humidity
Normal
High 1 - 3
OPC Cleaning
Off
Execute Now
Cleaning Time
(1– 5) minutesa
Automatic
Start Time
(HH):(MM) AM/PMb
20
Chapter 2 Menu Overview
ENWW
Table 2-5 System Setup (continued)
Menu
Sub-menu
Sub-menu
Sub-menu
Sub-menu
Cleaning Time
(1– 5) minutesa
Auto Continue
Off
After 0 sec
After 30 sec
Auto Tray Switch
On/Off
Paper Substitution
On/Off
Tray Protection
Tray 1
Off
On
Tray 2
Off
On
Eco Settings
Default Mode
On/Off
Select Template
Default Eco
Custom Eco
Paper Setup
Paper Size
MP Tray 1
Tray 2
Default Paper Size
A4
Letter
Paper Type
MP Tray 1
Tray 2
Paper Select
Copy
Tray 1
Tray 2
Print
Auto
Tray 1
Tray 2
Margin
Common Margin
Simplex Margin
Top Margin
-20 - +20 mm
Left Margin
Duplex Margin
Tray Confirmation
Tray 1
Side 1 Top Margin
-20 - +20 mm
Side 1 Left Margin
-20 - +20 mm
Side 2 Top Margin
-20 - +20 mm
Side 2 Left Margin
-20 - +20 mm
Off
On
ENWW
Menu overview
21
Table 2-5 System Setup (continued)
Menu
Sub-menu
Sub-menu
Sub-menu
Tray 2
Off
Sub-menu
On
Report
Configuration
Demo Page
Network
Configuration
Email Sent
Supplies Information
Usage Counter
Job Accounting
PCL Font
PS Font
Maintenance
Supplies Life
Supplies Information
Total
ADF Scan
Platen Scan
Developer
Fuser
Transfer Roller
Tray 1 Roller
Tray 1 Friction Pad
Tray 2 Roller
Tray 2 Friction Pad
ADF Roller
ADF Rubber Pad
Image Mgr.
Custom Color
Toner Low Alert
On/Off
OPC Unit Low Alert
On/Off
Default
Reset?
Print Density
-10 - +10
Serial Number
Paper Stacking
a
b
c
22
On/Off
OPC cleaning time: Start this operation right now after finishing current job, default: 5 minutes.
OPC automatic start time: Start this operation based on exceeding page count, default time: 12:00:00 AM.
Some menus may not appear on the display depending on options or models. If so, it is not applicable to your machine.
Chapter 2 Menu Overview
ENWW
Network Menu
Some menus may not appear on the display depending on the options selected, the product model, or your
country/region of residence. If so, it is not applicable to your machine.
Table 2-6 Network
Menu
Sub-menu
TCP/IP (IPv4)
DHCP
BOOTP
Static
TCP/IP (IPv6)
IPv6 Protocol
DHCPv6 Config
Ethernet
Ethernet Port
Ethernet Speed
Protocol Management
HTTP
WINS
SNMPv1/v2
UPnP(SSDP)
mDNS
Network Configuration
Clear Settings
Secured Job Menu
Some menus may not appear on the display depending on the options selected, the product model, or your
country/region of residence. If so, it is not applicable to your machine.
Table 2-7 Secured Job Menu
Menu
Sub-menu
Sub-menu
User Name List a
Password
Print
Delete
a
If a user sends multiple confidential jobs, the user name is only listed one time on the printer. The maximum number of confidential print
jobs is 100. If the machine has 100 jobs stored in the printer, a new job will be stored after removing the oldest print job.
Scan Menu
Some menus may not appear on the display depending on the options selected, the product model, or your
country/region of residence. If so, it is not applicable to your machine.
Select Scan
ENWW
> Scan To PC on the control panel.
Menu overview
23
Table 2-8 Scan Menu
Menu
Sub-menu
Scan to PC
Network PC
Original Size
Original Type
Resolution
Color Mode
File Format
Duplex
Darkness
Adjust Background
Scan to Email
Original Size
Original Type
Resolution
Color Mode
File Format
Duplex
Darkness
Email Confirmation
Scan to SMB
Original Size
Original Type
Resolution
Color Mode
File Format
Duplex
Darkness
Server Confirmation
Scan to FTP
Original Size
Original Type
Resolution
Color Mode
File Format
Duplex
Darkness
ServerConfirmation
24
Chapter 2 Menu Overview
ENWW
3
Media and Tray
This chapter provides information on how to load print media into your machine.
ENWW
●
Tray overview
●
Loading paper in the tray
●
Printing on special media
●
Setting the paper size and type
●
Loading the original
●
Print media specifications
25
Tray overview
To change the size, you need to adjust the paper guides.
1
2
3
4
26
1
Paper length guide
2
Paper width guide
3
Paper bottom plate
4
Tray extend lever
Chapter 3 Media and Tray
ENWW
Loading paper in the tray
Introduction
The following topics describe how to prepare and load paper in Tray 2, optional Tray 3, and Multi-purpose Tray 1.
●
Preparing paper
●
Tray 2 / optional tray
●
Multi-purpose Tray 1
Preparing paper
●
Use only print media that meets the specifications required by the machine.
●
If you use print media that does not meet the specifications outlined in this user guide, the following
problems may occur:
–
Low printing quality, paper jams, excessive wear on the machine.
●
The weight, material, surface condition, and moisture content of the print media may affect the
performance and printing quality of the machine.
●
Some print media may not produce the desired result even if it meets the specifications outlined in this user
guide.
This may occur due to mishandling of the print media, unsuitable temperature or humidity, or other
uncontrollable factors.
●
Using print media that does not meet the specifications outlined in this user guide may result in machine
malfunctions that require repairs.
Such repairs are not covered by the warranty agreement.
●
Do not use inkjet photo print media with this machine. Doing so may damage the machine.
●
Do not use creased, torn, or damp print media.
WARNING! The use of inflammable media or foreign materials left in the printer may lead to overheating of the
unit and, in rare cases may cause a fire.
Tray 2 / optional tray
NOTE: For models using an optional tray, CarePack installation is required and may vary depending on country/
region of purchase or specific model.
ENWW
Loading paper in the tray
27
1.
Pull out the paper tray.
2.
Squeeze and slide the paper width guide and paper
length lever to locate them in the correct paper
size slot marked at the bottom of the tray to adjust
to the size.
2
3
1
3.
28
Flex or fan the edge of the paper stack to separate
the pages before loading papers.
Chapter 3 Media and Tray
ENWW
4.
After inserting paper into the tray, squeeze and
slide the paper width guides and paper length
guide.
●
Do not push the paper width guide too far
causing the media to warp.
●
If you do not adjust the paper width guide, it
may cause paper jams.
3
2
1
●
Do not use a paper with a leading-edge curl, it
may cause a paper jam or the paper can be
wrinkled.
5.
Insert the tray back into the machine.
6.
When you print a document, set the paper type
and size for Tray 2/optional tray.
CAUTION: To avoid paper jams, always press
down the Tray 2/optional tray feed plate when
reloading paper.
ENWW
Loading paper in the tray
29
Multi-purpose Tray 1
The multi-purpose tray can hold special sizes and types of print material, such as postcards and note cards.
30
1.
Hold the handle of multi-purpose tray and pull it
down to open and pull out the multi-purpose tray
paper extension.
2.
Load the paper.
Chapter 3 Media and Tray
ENWW
3.
Squeeze the multi-purpose tray paper width
guides and adjust them to the width of the paper.
Do not force them too much, or the paper will bent
resulting in a paper jam or skew.
4.
When you print a document, set the paper type
and size for the multipurpose tray.
CAUTION: To avoid paper jams, always press
down the Tray 1 feed plate when reloading paper.
ENWW
Loading paper in the tray
31
Printing on special media
The paper setting in the machine and driver should match to print without a paper mismatch error.
Or if your machine supports a display screen, you can set it using the Menu
button on the control panel.
Then, set the paper type from the Printing preferences window > Paper tab > Paper Type.
NOTE:
●
When using special media, we recommend you feed one sheet at a time.
●
Illustrations on this user’s guide may differ from your machine depending on its options or models. Check
your machine type.
Card stock/Custom-sized paper
In the software application, set the margins to at least 6.4 mm (0.25 inches) away from the edges of the
material.
32
Chapter 3 Media and Tray
ENWW
Preprinted paper
When loading preprinted paper, the printed side should be facing up with an uncurled edge at the front. If you
experience problems with paper feeding, turn the paper around. Note that print quality is not guaranteed.
ENWW
●
Must be printed with heat-resistant ink that will not melt, vaporize, or release hazardous emissions when
subjected to the machine’s fusing temperature for 0.1 second (about 170°C (338°F)).
●
Preprinted paper ink must be non-flammable and should not adversely affect machine rollers.
●
Before you load preprinted paper, verify that the ink on the paper is dry. During the fusing process, wet ink
can come off preprinted paper, reducing print quality.
Printing on special media
33
Setting the paper size and type
The paper setting in the machine and driver should match to print without a paper mismatch error.
From the print driver or application, set the paper type from the Print Options window > Properties > Paper tab >
Type.
NOTE: It may be necessary to press OK to navigate to lower-level menus for some models.
After loading paper in the paper tray, set the paper size and type using the control panel buttons.
1.
Select Menu
> System Setup > Paper Setup > Paper Size or Paper Type on the control panel.
2.
Select the tray and the option you want.
3.
Press OK to save the selection.
4.
Click the Back
button to the right of the Menu
button to return to the Paper Setup screen. Then
select the paper type if desired.
5.
Press the Stop/Clear
button to return to ready mode.
NOTE: If you want to use special-sized paper such as billing paper, select the Paper tab > Size > Edit... and set
Custom Paper Size Settings in the Printing Preferences.
34
Chapter 3 Media and Tray
ENWW
Loading the original
Introduction
The following topics describe how to prepare originals for copying and how to load originals on the scanner glass
or in the document feeder.
●
Preparing originals
●
Loading originals
Preparing originals
ENWW
●
Do not load documents that are smaller than 125 x 101.6mm (4.92 x 4 inches) or larger than 297 x 914
mm (11.6 x 36 inches).
●
Do not load documents printed on the following types of paper to avoid paper jams, low printing quality,
and machine malfunctions:
–
Carbon-paper or carbon-backed paper
–
Coated paper
–
Tracing paper or thin paper
–
Wrinkled or creased paper
–
Curled or rolled paper
–
Torn paper
●
Remove all staples and paper clips from the document before loading it.
●
Make sure that any glue, ink, or correction fluid on the document is completely dry before loading it.
●
Do not load original documents that include different sizes or weights of paper.
●
Do not load booklets, pamphlets, transparencies, or documents with other unusual characteristics.
Loading the original
35
Loading originals
You can use the scanner glass or the document feeder to load an original for copying and scanning.
NOTE: Illustrations on this user’s guide may differ from your machine depending on its options or models.
Check your machine type.
On the scanner glass
Using the scanner glass, you can copy or scan originals. You can get the best scan quality, especially for colored
or gray-scaled images. Make sure that no originals are in the document feeder. If an original is detected in the
document feeder, the machine gives it priority over the original on the scanner glass.
1.
36
Lift and open the scanner lid.
Chapter 3 Media and Tray
ENWW
2.
Place the original face down on the scanner glass.
Align it with the registration guide at the top left
corner of the glass.
3.
Close the scanner lid.
NOTE:
●
Leaving the scanner lid open while copying
may affect copy quality and toner
consumption.
●
Dust on the scanner glass may cause black
spots on the printout. Always keep it clean.
●
If you are copying a page from a book or
magazine, lift the scanner lid until its hinges
are caught by the stopper and then close the
lid. If the book or magazine is thicker than 30
mm, start copying with the scanner lid open.
CAUTION:
●
Be careful not to break the scanner glass. You
may get hurt.
●
Do not look into the light from inside of the
scanner while copying or scanning. It is
harmful to the eyes.
ENWW
Loading the original
37
In the document feeder
Using the automatic document feeder (ADF), you can load up to 100 sheets of paper (80 g/m2, 21 lbs bond) for
one job.
1.
Flex or fan the edge of the paper stack to separate
the pages before loading originals.
2.
Load the original face up into the document feeder
input tray. Make sure that the bottom of the
original stack matches the paper size marked on
the document input tray.
3.
Adjust the document feeder width guides to the
paper size.
NOTE: Dust on the document feeder glass may cause black lines on the printout. Always keep the glass clean.
38
Chapter 3 Media and Tray
ENWW
Print media specifications
The following table describes the attributes of the print media supported by the printer. Attributes include media
type, size, dimensions, weight, and tray capacity for the specified media.
Type
Plain paper
ENWW
Size
Dimensions
Print media weight/Capacitya
Tray 2 / Tray 3
Multi-purpose Tray 1
71 to 85 g/m2 (19 to 22.5
lbs bond)
Letter
216 x 279 mm (8.5 x 11
inches)
71 to 85 g/m2 (19 to 22.5
lbs bond)
11 x 17
279 x 432 mm (11 x 17
inches)
●
Legal
216 x 356 mm (8.5 x 14
inches)
Oficio
216 x 330 mm (8.5 x 13
inches)
Oficio 216x340
216 x 340 mm (8.5 x
13.39 inches)
B4
257 x 364 mm (10.1 x
14.3 inches)
B5
182 x 257 mm (7.16 x
10.11 inches)
Executive
184 x 267 mm (7.25 x
10.5 inches)
8K
270 x 390 mm (10.75 x
15.5 inches)
16K
195 x 270 mm (7.76 x
10.75 inches)
A3
297 x 420 mm (11.7 x
16.5 inches)
A4
210 x 297 mm (8.26 x
11.69 inches)
A5
148 x 210 mm (5.82 x
8.26 inches)
Statement
140 x 216 mm (5.5 x 8.5
inches)
Not available in Tray 2/
Tray 3.
PostCard
152 x 102 mm (6 x 4
inches)
Not available in Tray 2/
Tray 3.
Mid-weight 96-110g
Refer to the Plain paper
section
Refer to the Plain paper
section
96 to 110 g/m2 (26 to 29
lbs bond)
96 to 110 g/m2 (26 to 29
lbs bond)
Heavy 110 to 130gb
Refer to the Plain paper
section
Refer to the Plain paper
section
Not available in Tray 2/
Tray 3.
111 to 163 g/m2 (30 to
43.5 lbs bond)
Light 60-74g
Refer to the Plain paper
section
Refer to the Plain paper
section
60 to 74 g/m2 (16 to 20
lbs bond)
60 to 74 g/m2 (16 to 20
lbs bond)
250 sheets of 80
g/m2 (21 lbs bond)
●
100 sheets of 80
g/m2 (21 lbs bond)
Print media specifications
39
Type
Size
c
d
40
Tray 2 / Tray 3
Multi-purpose Tray 1
Refer to the Plain paper
section
Refer to the Plain paper
section
75 to 90 g/m2 (20 to
24lbs bond)
75 to 90 g/m2 (20 to
24lbs bond)
Recycled paper
Refer to the Plain paper
section
Refer to the Plain paper
section
60 to 90 g/m2 (16 to
24lbs bond)
60 to 90 g/m2 (16 to
24lbs bond)
Bond paperb
Refer to the Plain paper
section
Refer to the Plain paper
section
Not available in Tray 2/
Tray 3.
105 to 120 g/m2 (28 to
32lbs bond)
Intermediate 85-95g
Refer to the Plain paper
section
Refer to the Plain paper
section
85 to 95 g/m2 (23 to
26lbs bond)
85 to 95 g/m2 (23 to
26lbs bond)
Card stockb
Refer to the Plain paper
section
Refer to the Plain paper
section
Not available in Tray 2/
Tray 3.
105 to 163 g/m2 (28 to
43 lbs bond)
Minimum size (custom)c, d
●
Maximum size (custom)
a
Print media weight/Capacitya
HP LaserJet 90g, Colored
paper, Pre-Printed paper,
LetterHead paper, PrePunched paper
●
b
Dimensions
Multi-purpose Tray
1: 125 x 101.6 mm
(4.92 x 4 inches)
●
Multi-purpose Tray 1: 60 to 163 g/m2 (16 to 43.5 lbs bond)
●
Tray 2/ Tray 3: 60 to 110 g/m2 (16 to 29.3 lbs bond)
Tray 2/ Tray 3: 148
x 182 mm (5.83 x
7.17 inches)
297 x 914 mm (11.6 x 36
inches)
Maximum capacity may differ depending on media weight, thickness, and environmental conditions.
The printer does not support duplexing for Heavy weight paper, Bond paper, and Card stock paper types.
The paper types available in Multi-purpose Tray 1: Plain, Mid-weight 96-110g, heavy 110 to 130g, light 60-74g, HP Laser Jet 90g,
Colored, Preprinted, Recycled, Bond, Intermediate 85-95g, LetterHead, Prepunched, Cardstock
The paper types available in Tray 2: Plain, Mid-weight 96-110g, light 60-74g, HP Laser Jet 90g, Colored, Preprinted, Recycled,
Intermediate 85-95g, LetterHead, Prepunched
Chapter 3 Media and Tray
ENWW
4
ENWW
Printer installation
●
Printer hardware setup and software installation
●
Software installation instructions
41
Printer hardware setup and software installation
For basic setup instructions, see the Quick Installation Guide that came with the printer. For additional
instructions, go to HP support on the Web.
Go to www.hp.com/support/ljM438MFP, www.hp.com/support/ljM440MFP, www.hp.com/support/ljM442MFP,
www.hp.com/support/ljM443MFP for HP's all-inclusive help for the printer. Find the following support:
42
●
Install and configure
●
Learn and use
●
Solve problems
●
Download software and firmware updates
●
Join support forums
●
Find warranty and regulatory information
Chapter 4 Printer installation
ENWW
Software installation instructions
The full software install is available for the following operating systems:
●
Windows XP 32–bit and 64–bit
●
Windows Vista 32–bit and 64–bit
●
Windows 7 32–bit and 64–bit
●
Windows 8 32–bit and 64–bit
●
Windows 8.1 32–bit and 64–bit
●
Windows 10 32–bit and 64–bit
Server operating system platforms support the installation of the HP LaserJet MFP M438, M440, M442, M443
print driver only using the Add Printer Wizard.
Other supported HP LaserJet MFP M438, M440, M442, M443 print drivers available for download on hp.com:
●
HP UPD PCL6
●
HP UPD PostScript driver
Install the software
ENWW
1.
Download the HP LaserJet MFP M438, M440, M442, M443 full software solution from www.hp.com/
support/ljM438MFP, www.hp.com/support/ljM440MFP, www.hp.com/support/ljM442MFP, www.hp.com/
support/ljM443MFP..
2.
Follow the on-screen instructions to install and configure the product software.
Software installation instructions
43
44
Chapter 4 Printer installation
ENWW
5
Printing
This chapter explains common printing tasks.
●
Print setup on the control panel
●
Overview of print jobs when using a Universal Print Driver (UPD) and Discrete Host Printer Driver
●
Print secure documents from the control panel
NOTE:
Supported optional devices and features may differ according to your model.
For additional print driver information, go to www.hp.com/support/ljM438MFP, www.hp.com/support/
ljM440MFP, www.hp.com/support/ljM442MFP, www.hp.com/support/ljM443MFP
ENWW
45
Print setup on the control panel
The following information describes the printer setup functions available from the control panel. These functions
control the appearance of the printed pages.
NOTE: Some menus may not appear in the display depending on options or models. If so, it is not applicable to
your machine.
To change the menu options:
Press Menu
> Print Setup on the control panel.
Item
Description
Orientation
Selects the direction in which information is printed on a page.
Duplex
●
Portrait
●
Landscape
You can set the machine to print on both sides of paper.
NOTE:
46
Depending on model, this may be manual or automatic duplexing.
Copies
You can enter the number of prints using the number keypad.
Resolution
Sets the resolution option. The higher the setting, the sharper printed characters and graphics.
Clear Text
Prints text darker than on a normal document.
Auto CR
Allows you to append the required carriage return to each line feed, which is useful for DOS users.
Skip Blank Pages
The printer detects the printing data from computer whether a page is empty or not. You can set to print or
skip the blank page.
Emulation
Set up font information to be used when sending PCL5 directly to the device.
Chapter 5 Printing
ENWW
Overview of print jobs when using a Universal Print Driver (UPD) and
Discrete Host Printer Driver
The below table provides a brief description of the print jobs when using an HP UPD and the discrete printer
driver.
Table 5-1 Selection of print jobs for normal and confidential printing
Universal Print Driver (UPD)
Discrete printer driver
Normal print jobs tasks are performed in the following conditions:
User can select normal or confidential print jobs These pint modes
are based on the RAM disk on the printer.
●
●
When the user selects any of the following Job Storage Mode
options in the HP UPD:
●
Proof and Hold
●
Quick Copy
●
Stored Job
This driver does not support the “Proof” print mode.
When the user selects the Personal Job option in the HP UPD
without a password.
User can set up confidential jobs when using a Personal Job with a
password (PIN).
ENWW
NOTE:
User can set print jobs as confidential.
Overview of print jobs when using a Universal Print Driver (UPD) and Discrete Host Printer Driver
47
Print secure documents from the control panel
PIN printing (Confidential printing by RAM disk) is a simple method of safeguarding print jobs at the printer until
the end user enters the proper PIN to retrieve the private job. This method works with the Job Storage feature
enabled in the printer driver and the private print jobs are stored in the RAM disk. Each print job is given a job
name, user name, and a PIN number. An end user needs to have this information before being able to print the
job to an output tray.
1.
Make sure that the machine is connected to your computer and powered on.
2.
On the HP UPD, select the Personal Job mode, and then enter a PIN and User name.
a.
Select your printer from your Windows operating system, click the Printing Preferences menu, and
then select the Job Storage tab.
b.
Make sure to select PIN to print from the Make Job Private/Secure drop-down list to enter a PIN, and
then select the User name.
The printer saves this job in the RAM disk.
NOTE:
If the RAM disk is full, the control panel will display the following message “Memory Full.”
The maximum number of confidential print jobs is 100. If the machine has 100 jobs stored in the
printer, a new job will be stored after removing the oldest print job.
c.
3.
Click the Apply button.
Select Secured Job menu on the control panel.
The control panel will display a list of secure print jobs.
NOTE:
48
If a user sends multiple confidential jobs, the user name is only listed one time on the printer.
4.
Select the document to print.
5.
Enter the PIN that you set for the printer driver.
6.
Print or delete the document.
Chapter 5 Printing
ENWW
6
Copying
This chapter explains common copying tasks.
ENWW
●
Copy features on the control panel
●
Basic copying
●
Changing the settings for each copy
●
ID card copying
49
Copy features on the control panel
Copy feature
The following topics describe how to use the Copy and Copy Setup features on the control panel. These features
control the appearance of the generated copies.
NOTE: Some menus may not appear in the display depending on options or models. If so, it is not applicable to
your machine.
To change the menu options:
Press Copy
Or Menu
> Menu
> Copy Feature on the control panel.
> Copy Feature on the control panel.
Table 6-1 Copy feature
Item
Description
Reduce/Enlarge
Reduces or enlarges the size of a copied image.
NOTE:
50
Chapter 6 Copying
If the machine is set to Eco mode, reduce and enlarge features are not available.
ENWW
Table 6-1 Copy feature (continued)
ENWW
Item
Description
Duplex
You can set the machine to print copies on both sides of paper.
NOTE: Available only on
models equipped with an
automatic duplexer.
●
1 ->1 Sided: Scans one side of an original and prints it on one side of the paper.
●
1->2 Sided, Book
●
1->2 Sided, Calendar
●
2->1 Sided, Book
●
2->1 Sided, Calendar
●
2->2 Sided, Book ->Book
●
2->2 Sided, Calendar->Calendar
●
2->2 Sided, Book->Calendar
●
2->2 Sided, Calendar->Book
Copy features on the control panel
51
Table 6-1 Copy feature (continued)
52
Item
Description
Darkness
Adjusts the brightness level to make a copy that is easier to read, when the original contains faint markings
and dark images.
Original Type
Improves the copy quality by selecting the document type for the current copy job.
Image Rotation
Allows you to rotate the image in the originals.
Collation
Set the machine to sort the copy job. For example, if you make 2 copies of a 3 page original, one complete 3
page document will print followed by a second complete document.
●
On: Prints output in sets to match the sequence of originals.
●
Off: Prints output sorted into stacks of individual pages.
Layout
Adjusts the layout format such as ID Copy, N-Up, etc.
Adjust Background
Prints an image without its background. This copy feature removes the background color and can be helpful
when copying an original containing color in the background, such as a newspaper or a catalog.
Chapter 6 Copying
●
Off: Does not use this feature.
●
Auto: Optimizes the background.
●
Enhance Lev.1~2: The higher the number is, the more vivid the background is.
●
Erase Lev.1~4: The higher the number is, the lighter the background is.
ENWW
Copy Setup
NOTE: Some menus may not appear in the display depending on options or models. If so, it is not applicable to
your machine.
To change the menu options:
Press Copy
Or Menu
> Menu
> Copy Setup on the control panel.
> Copy Setup on the control panel.
Table 6-2 Copy Setup
Item
Description
Change Default
The copy options can be set to those most frequently used.
Auto Tray
This is the option to set if the machine is to continue printing or not when any tray becomes empty.
Basic copying
1.
Select Copy
> Menu
Or select Menu
> Copy Feature on the control panel.
> Copy Feature on the control panel.
2.
Place a single document face down on the document glass, or load the documents face up into the
document feeder.
3.
If you want to customize the copy settings including Reduce/Enlarge, Darkness, Original Type and more by
using the control panel buttons.
4.
Enter the number of copies using the arrow or number keypad, if necessary.
5.
Press Start
.
NOTE: If you need to cancel the copying job during the operation, press the Stop/Clear
button and the
copying will stop.
ENWW
Basic copying
53
Changing the settings for each copy
Your machine provides default settings for copying so that you can quickly and easily make a copy.
NOTE:
●
If you press the Stop/Clear
button twice while setting the copy options, all of the options you have set
for the current copy job will be canceled and returned to their default status. Or, they will automatically
return to their default status after the machine completes the copy in progress.
●
Accessing menus may differ from model to model.
●
It may be necessary to press OK to navigate to lower-level menus for some models.
Darkness
If you have an original containing faint marking and dark images, you can adjust the brightness to make a copy
that is easier to read.
1.
Select Copy
> Menu
Or press Darkness
2.
> Copy Feature > Darkness on the control panel.
on the control panel.
Select the option you want and press OK.
For example, the +5 being the lightest, and the -5 being the darkest.
3.
Press the Stop/Clear
button to return to ready mode.
Original Type
The original setting is used to improve the copy quality by selecting the document for the current copy job.
1.
Select Copy
> Menu
Or select Menu
2.
54
> Copy Feature >Original Type on the control panel.
Select the option you want and press OK.
●
Text: Use for originals containing mostly text.
●
Text/Photo: Use for originals with mixed text and photographs.
NOTE:
3.
> Copy Feature > Original Type on the control panel.
If texts in the printout is blurry, select Text to get the clear texts.
●
Photo: Use when the originals are photographs.
●
Map: Use when the originals are map.
Press the Stop/Clear
Chapter 6 Copying
button to return to ready mode.
ENWW
Reduced or enlarged copy
You can reduce or enlarge the size of a copied image from 25% to 400% from the document feeder or scanner
glass.
NOTE:
●
This feature may not be available depending on model or optional goods.
●
If the machine set to Eco mode, reduce and enlarge features are not available.
To select from the predefined copy sizes
1.
Select Copy
> Menu
Or select Menu
> Copy Feature > Reduce/Enlarge on the control panel.
> Copy Feature > Reduce/Enlarge
2.
Select the option you want and press OK.
3.
Press the Stop/Clear
button on the control panel.
button to return to ready mode.
To scale the copy by directly entering the scale rate
1.
Select Copy
> Menu >
Or select Menu
> Copy Feature > Reduce/Enlarge > Custom on the control panel.
2.
Enter the copy size you want using the numeric keypad.
3.
Press OK to save the selection.
4.
Press the Stop/Clear
NOTE:
ENWW
> Copy Feature > Reduce/Enlarge > Custom on the control panel.
button to return to ready mode.
When you make a reduced copy, black lines may appear at the bottom of your copy.
Changing the settings for each copy
55
ID card copying
Your machine can print 2-sided originals on one sheet.
The machine prints one side of the original on the upper half of the paper and the other side on the lower half
without reducing the size of the original. This feature is helpful for copying a small-sized item such as business
card.
NOTE:
●
The original must be placed on the scanner glass to use this feature.
●
If the machine set to Eco mode, this feature is not available.
Depending on the model, the operating procedure may differ.
1.
Press ID Copy
on the control panel.
Or select (Menu) > Copy Feature > Layout > ID Copy on the control panel.
2.
Place the front side of an original facing down on the scanner glass where arrows indicate as shown. Then,
close the scanner lid.
NOTE:
To get a better image, close the scanner lid and lightly press the scanner lid.
3.
Place Front Side Press [Start] appears on the display.
4.
Press Start
.
Your machine begins scanning the front side and shows Place Rear Side Press [Start].
56
Chapter 6 Copying
ENWW
5.
Turn the original over and place it on the scanner glass where arrows indicate as shown. Then, close the
scanner lid.
6.
Press the Start
button.
Figure 6-1 Front and back of the ID card
NOTE:
ENWW
●
If you do not press the Start
button, only the front side will be copied.
●
If the original is larger than the printable area, some portions may not be printed.
ID card copying
57
58
Chapter 6 Copying
ENWW
7
Scanning
This chapter explains the normal and usual procedure for scanning originals.
NOTE:
ENWW
A scan job cannot run concurrently with a print job.
●
Scanning from the machine
●
Scanning from a computer
●
Sending scanned images to different destinations
59
Scanning from the machine
Introduction
The following topics describe how to set up the Scan menu options from the control panel and then scan a
document.
Scan feature
NOTE: Some menus may not appear in the display depending on options or models. If so, it is not applicable to
your machine.
NOTE: In order for the Scan To button to function, you must install the HP Scan Software on the PC.
To change the menu options:
Press Scan
> Scan To PC on the control panel.
Item
Description
Scan to PC
Selects the scan destination to a local or network-connected computer that has the scan software installed
and the Scan To feature configured.
Scan to Email
Sets scan destination to an email.
Scan to FTP
Sets scan destination to a FTP server.
Scan to SMB
Sets scan destination to a SMB server.
File Format
Sets the file format in which the image is to be saved. If you select JPEG, TIFF or PDF, you can select to scan
multiple pages. Depending on the selected scan type, this option may not appear.
●
Multi-Page PDF: Scans originals in PDF, but several originals are scanned as one file.
●
Single-Page PDF: Scans the originals in PDF, and several originals are scanned as an each individual
PDF file.
●
Multi-Page TIFF: Scans originals in TIFF (Tagged Image File Format), but several originals are scanned
as one file.
●
Single-Page TIFF: Scans the originals in TIFF (Tagged Image File Format), and several originals are
scanned as an each individual TIFF file.
●
JPEG: Scans original in JPEG format.
NOTE: The file format JPEG cannot be selected in the File Format option, if Mono has been selected for
Color Mode.
Color Mode
60
You can select the color options of scan outputs.
●
Color: Uses color to display an image. 24 bits per pixel, 8 bits for each RGB, is used for 1 pixel.
●
Gray: Uses the black gradation to display an image. 8 bits per pixel.
●
Mono: Displays an image in black and white 1 bit per pixel.
Darkness
Adjusts the brightness level to scan.
Resolution
Sets the image resolution.
Original Size
Sets the image size.
Original Type
Sets the original document’s type.
Chapter 7 Scanning
ENWW
Item
Description
Duplex
Selects if the machine scans one side of the paper (1 Sided), both sides of the paper (2 Sided), or both sides
of the paper (2 Sided Rotated).
●
1 Sided: For originals that are printed on one side only.
●
2 Sided, Book: For originals that are printed on both sides.
●
2 Sided, Calendar: For originals that are printed on both sides, but the back is rotated 180 degrees.
NOTE: If an original is placed on the scanner glass, the machine shows the window asking to place another
page. Load another original and press Yes. When you finish, select No for this option.
Email Confirmation
Sets up the machine to print email confirmation result report.
NOTE: If you select the On–Error option, the machine prints a report only when the transmission is not
successful.
Server Confirmation
Sets up the machine to print server confirmation result report.
NOTE: If you select the On–Error option, the machine prints a report only when the transmission is not
successful.
If a report contains characters or fonts that the machine does not support, Unknown could be printed instead
of the characters/ fonts in the report.
ENWW
Scanning from the machine
61
Scanning from a computer
Introduction
The following topics describe several methods for scanning a document from the scanner to a computer.
NOTE: The maximum resolution that can be achieved depends upon various factors, including computer speed,
available disk space, memory, the size of the image being scanned, and bit depth settings. Thus, depending on
your system and what you are scanning, you may not be able to scan at certain resolutions, especially using
enhanced dpi.
●
Scan to PC
●
Scanning from the HP Scan Software
●
Scanning from image editing program
●
Scanning using the WIA driver
●
Scanning via WSD
Scan to PC
The HP LaserJet MFP M438, M440, M442, M443 full software installation includes the HP Scan Application. The
HP Scan Application enables the Scan To button on the printer's control panel.
The HP Scan Application includes the Scan to PC Setup utility for configuring the scan settings used when
scanning is done using the Scan To button on the printer's control panel.
Configure scan settings using the Scan to PC Setup utility
1.
2.
Open the Scan to PC Setup utility:
a.
Select the Windows icon in the left-bottom corner of the screen.
b.
Select All Programs.
c.
Select the HP or HP LaserJet Printers folder.
d.
Select the HP MFP Scan to PC Setup application.
Select your printer from the list in the Scan to PC Setup utility, and then click the Properties button. The
following settings are available:
●
Profile Name–This is the name that displays on the printer's control panel to identify and select the
profile.
●
Scan Settings
Color Mode
Resolution
Original Size
Duplex
●
62
Save Settings
Chapter 7 Scanning
ENWW
Save Location
File Format
Action After Saving
3.
Click the OK button to save the settings.
1.
Place a single document face down on the document glass, or load the documents face up into the
document feeder.
2.
Touch Scan to PC on the control panel.
3.
Select your registered computer ID, and enter the Password if necessary.
4.
Select the option you want and then touch OK.
5.
Scanning begins.
Scan to PC
NOTE: Scanned images are saved in C:Usersusers nameMy Documents. The saved folder
may differ, depending on your operating system or the application you are using.
Scanning from the HP Scan Software
The full software solution available at hp.com, includes a TWAIN compliant scan application.
1.
2.
Open the HP Scan Application:
a.
Click the Start button.
b.
Click All Programs.
c.
Click HP or HP LaserJet Printers.
d.
Click HP MFP Scan.
Use the Quick Scan, Advanced Scan or Configuration features to scan documents or to adjust scan settings.
Scanning from image editing program
You can scan and import documents in the image editing software such as Adobe Photoshop, if the software is
TWAIN-compliant. Follow the steps below to scan with TWAIN-compliant software:
ENWW
1.
Make sure that the machine is connected to your computer and powered on.
2.
Place a single document face down on the document glass, or load the documents face up into the
document feeder.
3.
Open an application, such as Adobe Photoshop.
4.
Click File > Import, and select the scanner device.
5.
Set the scan options.
6.
Scan and save your scanned image.
Scanning from a computer
63
Scanning using the WIA driver
Your machine supports the Windows Image Acquisition (WIA) driver for scanning images. WIA is one of the
standard components provided by Microsoft Windows and works with digital cameras and scanners. Unlike the
TWAIN driver, the WIA driver allows you to scan and easily adjust images without using additional software:
1.
Make sure that the machine is connected to your computer and powered on.
2.
Place a single document face down on the document glass, or load the documents face up into the
document feeder.
3.
Open a WIA-compliant application, for example Microsoft Paint, and then do the following:
4.
a.
Select File
b.
Select From Scanner or Camera.
c.
Select M438/M440/M442/M443 Scan.
From the WIA Scan screen select Flatbed or Document Feeder as the Paper Source.
NOTE: When using the document feeder as the paper source the File Type and Page Size must be
configured in the Settings menu.
5.
Click the Scan button.
Scanning via WSD
Scans the originals and saves the scanned data on a connected computer if the computer supports the WSD
(Web Service for Device) feature. To use the WSD feature, you need to install the WSD printer driver on your
computer. For Windows, you can install the WSD driver by Control Panel > Devices and Printers > Add a printer.
Click Add a network printer from the wizard.
IMPORTANT:
enabled.
To use the WSD feature the computer must have Network Discovery and File and Print Sharing
NOTE:
●
Device Discovery and File and Print Sharing must be enabled on the computer for WSD to work.
●
The machine that does not support the network interface, it will not be able to use this feature.
●
The WSD feature works only with Windows Vista® or later version that are the WSD-compliant computer.
●
The following installation steps are based on a Windows computer.
Installing a WSD Printer Driver
64
1.
Select Start > Control Panel > Devices and Printers > Add a printer.
2.
Click Add a network, wireless or Bluetooth printer from the wizard.
3.
In the printers list, select the one you want to use, and then click Next.
Chapter 7 Scanning
ENWW
NOTE:
4.
●
The IP address for WSD printer is http://IP address/ws/ (example: http:// 111.111.111.111/ws/).
●
If no WSD printer is displayed in the list, click The printer that I want isn't listed > Add a printer using a
TCP/IP address or hostname and select Web Services Device from Device type. Then enter the
printer's IP address.
Follow the instructions in the installation window.
Scanning using the WSD feature
1.
Make sure that the machine is connected to your computer and powered on.
2.
Place a single document face down on the document glass, or load the documents face up into the
document feeder.
3.
Select Scan
> Scan To WSD on the control panel.
NOTE: If you see Not Available message, check the port connection. Or check the printer driver for WSD is
correctly installed.
ENWW
4.
Select your computer name from Destination List.
5.
Select the option you want and press OK.
6.
Scanning begins.
Scanning from a computer
65
Sending scanned images to different destinations
The following topics provide information to set up and send scanned images using email or an FTP/SMB server.
NOTE: M438n does not support the scan to email or FTP/SMB server features. The machine will display the
following message Feature is not supported when a user presses the Address book button.
●
Setting up an email account
●
Scanning and sending an email
●
Setting up an FTP/SMB server
●
Scanning and sending to FTP/SMB server
Setting up an email account
1.
Open a web browser and type in your printer’s IP address in the browser window to access the Embedded
Web Server (EWS). For instructions, see Accessing settings using the Embedded Web Server (EWS)
on page 75.
2.
Set up the network parameters, SMTP and email settings in the network settings. For instructions, see Set
up an email account on page 76.
Scanning and sending an email
NOTE: To scan and send an image as an email attachment, make sure to configure the network settings in the
EWS.
Make sure a network cable is connected to the machine.
1.
Place a single document face down on the document glass, or load the documents face up into the
document feeder.
2.
Select Scan
3.
Select the desired scan options and press OK.
4.
Enter the sender’s and recipient’s email address.
5.
Enter an email subject and press OK.
6.
Press Start
7.
The machine begins scanning and then sends the email.
> Scan To Email on the control panel.
.
Setting up an FTP/SMB server
NOTE: To scan and send an image to a server destination, make sure to configure the network settings in the
EWS.
Make sure a network cable is connected to the machine.
66
Chapter 7 Scanning
ENWW
1.
Open a web browser and type in your printer’s IP address in the browser window to access the Embedded
Web Server (EWS). For instructions, see Accessing settings using the Embedded Web Server (EWS)
on page 75.
2.
Set up the network parameters in the network settings. For instructions, see Set up a server destination
on page 76.
Scanning and sending to FTP/SMB server
ENWW
1.
Make sure your machine is connected to a network.
2.
Place a single document face down on the document glass, or load the documents face up into the
document feeder.
3.
Select Scan
4.
Select a server, the desired scan settings, and press OK.
5.
Press Start
6.
The machine begins scanning and then sends the scanned image to the specified server.
> Scan To FTP or Scan To SMB on the control panel.
.
Sending scanned images to different destinations
67
68
Chapter 7 Scanning
ENWW
8
ENWW
System and Other Settings
●
Machine setup
●
Paper setup
●
Report
●
Maintenance
●
Network setup
●
Accessing settings using the Embedded Web Server (EWS)
69
Machine setup
NOTE: Some menus may not appear in the display depending on options or models. If so, it is not applicable to
your machine.
To change the menu options:
Press Menu
> System Setup > Machine Setup on the control panel.
Item
Description
Date & Time
Sets the date and time.
Clock Mode
Selects the format for displaying time between 12 hr. and 24 hr.
Language
Sets the language of the text that appears on the control panel display.
Power Save
Sets how long the machine waits before going to power save mode.
When the machine does not receive data for an extended period of time, power consumption is
automatically lowered.
Wakeup Event
Auto Power Off
When this option is "On", you can wake up the machine from the power saving mode with the following
actions:
●
Loading paper in a tray.
●
Opening or closing the front cover.
●
Pulling a tray out or pushing a tray in.
Turns power off automatically when the machine has been in power save mode for the length of time set in
Auto Power Off > On > Timeout.
NOTE:
●
To turn the machine on again, Press the (Power / Wake Up) button on the control panel.
●
If you run the printer driver or HP Scan Application, the time automatically extends.
●
While the machine is connected to the network or working on a print job, Auto Power Off feature
doesn't work.
System Timeout
Sets the time that the machine remembers previously used copy settings. After the timeout, the machine
restores the default copy settings.
Job Timeout
Sets the length of time the printer waits before printing the last page of a print job that does not end with a
command to print the page.
Altitude Adjustment
Optimize print quality according to the machine’s altitude.
Humidity
Optimizes print quality according to the humidity in the environment.
OPC Cleaning
Use the OPC mode when the output has light or faded printing using Century paper, usually 297mm.
●
Automatic: Use this option to perform OPC Cleaning for every 1,000 pages at a designated "Start
Time.
●
Off: This is the default option.
NOTE: This feature cannot be selected if there is no paper in the tray or when an error occurs in the
machine.
70
Chapter 8 System and Other Settings
ENWW
Item
Description
Auto Continue
Determine whether or not the machine continues printing when it detects the paper does not match the
paper settings.
Auto Tray Switch
●
0 Sec: This option allows you to continue printing when the paper size you have set is mismatched
with the paper in the tray.
●
30 Sec: If a paper mismatch occurs, an error message will display. The machine waits for about 30
second, then automatically clears the message and continue printing.
●
Off: If a paper mismatch occurs, the machine waits until you insert the correct paper.
Determine whether or not the machine continues printing when it detects the paper does not match. For
example, if Tray 2 is filled with the same size paper, the machine automatically prints from Tray 2 after Tray
1 runs out of paper.
NOTE:
This option does not appear if you selected Auto for Paper Source from printer driver.
Paper Substitution
Automatically substitutes the printer driver’s paper size to prevent the paper mismatch between Letter and
A4. For example, if you have A4 paper in the tray but you set the paper size to Letter in the printer driver,
the machine prints on A4 paper and vice versa.
Tray Protection
Decides to use or not use the Auto Tray Switch feature.
If you set Tray 2 to On, for example, then Tray 2 is excluded during tray switching.
NOTE:
Eco Settings
ENWW
This setting works for copy or print jobs.
Allows you to save print resources and enables ecofriendly printing.
●
Default Mode: Select whether to turn the Eco mode on or off.
●
Select Template: Selects the eco template set from the EWS.
Machine setup
71
Paper setup
NOTE: Some menus may not appear in the display depending on options or models. If so, it is not applicable to
your machine.
To change the menu options:
Press Menu
> System Setup > Paper Setup on the control panel.
Item
Description
Paper Size
Choose the paper size for each tray. It must match the size of paper that is in the tray.
Paper Type
Choose the type of the paper for each tray.
Paper Select
Select the default paper tray for Copy and Print.
Margin
Sets the default margins for all printing.
Tray Confirmation
If tray confirmation is set, the confirmation message appears automatically when you load paper into an
empty tray. The machine detects some paper sizes and types automatically. You can confirm or change the
detected size/type from the confirmation window.
Report
NOTE: Some menus may not appear in the display depending on options or models. If so, it is not applicable to
your machine.
To change the menu options:
Press Menu
72
> System Setup > Report on the control panel.
Item
Description
Configuration
Prints a report on the machine's overall configuration.
Demo Page
Prints the demo page to check whether your machine is printing properly or not.
Network Configuration
Prints information on your machine’s network connection and configuration.
Supplies Information
Prints supplies’ information.
Usage Counter
Prints a usage page. The usage page contains the total number of pages printed.
Account
Prints a report of a user using the machine.
PCL Font
Prints the PCL font list.
PS Font
Prints the PS font list.
Chapter 8 System and Other Settings
ENWW
Maintenance
NOTE: Some menus may not appear in the display depending on options or models. If so, it is not applicable to
your machine.
To change the menu options:
Press Menu
ENWW
> System Setup > Maintenance on the control panel.
Item
Description
Supplies Life
Shows the supply life indicators.
Image Mar.
Allows you to adjust the color setting such as color registration, color density, etc.
Toner Low Alert
Turn on/off Toner Low Alert.
OPC Unit Low Alert
Turn on/off OPC Unit Low Alert.
Serial Number
Shows the machine’s serial number. When you call for service or register as a user on the website, you can
find this.
Paper Stacking
If you use a machine in a humid area, or you are using the damp print media caused by a high humidity, the
printouts on the output tray may be curled and may not be stacked properly. In this case, you can set the
machine to use this function to let printouts stack firmly. But, using this function will make the print speed
slow.
Maintenance
73
Network setup
NOTE: Some menus may not appear in the display depending on options or models. If so, it is not applicable to
your machine.
To change the menu options:
Press Menu
> Network on the control panel.
Option
Description
TCP/IP (IPv4)
Selects the appropriate protocol and configure parameters to use the network
environment.
NOTE: There are lots of parameters to be set. If you are not sure, leave as is, or consult
the network administrator.
TCP/IP (IPv6)
Selects this option to use the network environment through IPv6.
Ethernet
Configure the network transmission speed or port.
NOTE:
Protocol Management
HTTP
You can set whether to use Web Service or not.
NOTE:
Turn the power off and on after you change this option to Off.
WINS
You can configure the WINS server. WINS (Windows Internet Name Service) is used in the
Windows operating system.
SNMP V1/V2
You can set SNMP (Simple Network Management Protocol). Administrator’s can use SNMP
to monitor and manage machines on the network.
UPnP(SSDP)
You can set UPNP protocol.
NOTE:
MDNS
Turn the power off and on after you change this option to Off.
You can set mDNS (Multicast Domain Name System) settings.
Network Configuration
This list shows information on your machine’s network connection and configuration.
Clear Settings
Reverts the network settings to the default values.
NOTE:
74
Turn the power off and on after you change this option.
Chapter 8 System and Other Settings
Turn the power off and on after you change this option.
ENWW
Accessing settings using the Embedded Web Server (EWS)
Network-connected MFPs have an Embedded Web Server available to view and modify printer settings.
For more information about the EWS, go to http://support.hp.com.
Access the EWS
Use the following steps to open the EWS:
1.
Print a configuration page to obtain your printer's IP address or host name.
2.
Open a Web browser, and in the address line, type the IP address or host name exactly as it displays on the
configuration page. Press the Enter key on the computer keyboard. The EWS opens.
If the Web browser displays a There is a problem with this website’s security certificate message when
attempting to open the EWS, click Continue to this website (not recommended).
NOTE: Choosing Continue to this website (not recommended) will not harm the computer while
navigating within the EWS for the HP printer.
Modify settings in the EWS
The EWS displays printer settings in a “Read-only” view by default. Users must log in to the EWS to change any
settings. Use the following steps to log into the EWS:
1.
Click the Sign In button in the upper-right of the EWS page.
2.
Type admin for both the ID and Password.
NOTE: It is recommended that the administrator initially set up the ID and Password and users should
enter the correct ID and Password to log into the EWS.
Set up and manage accounts in the EWS
The Job Accounting feature is enabled in the EWS. You can manage accounts and allow users to log in by entering
an ID and password.
NOTE: Scan to WSD does not support the Job Accounting feature when this feature is enabled because
Windows does not support the Job Accounting ID/ Password for these jobs.
The UPD driver jobs are cancelled in the machine when the Standard Accounting option is selected or the account
mode is set to “On” in the machine.
Follow these steps to enable the Job Accounting option:
ENWW
1.
Access the EWS, and then click the Sign In button in the upper-right of the EWS page.
2.
Type in the correct ID and Password to log into the EWS.
3.
In the EWS, click the Security tab.
4.
In the left navigation pane, select Accounting and then click the Accounting Methods option.
Accessing settings using the Embedded Web Server (EWS)
75
5.
Select the Standard Accounting option.
There are two options for Job Accounting:
6.
●
No Accounting: When this option is selected, the Job Accounting feature is disabled.
●
Standard Accounting: When this option is selected, the user can select either the “ID/ Password” mode
or “ID only” mode.
Click the Add button to add a user Account ID.
NOTE:
The Standard Accounting feature supports up to 200 users.
Set up an email account
NOTE: Make sure the network is connected to the printer.
You can set up an Address Book in the EWS and manage 200 individual contacts and 200 groups in the address
book.
Follow these steps to set up an email account:
1.
Access the EWS, and then click the Sign In button in the upper-right of the EWS page.
2.
Type in the correct ID and Password to log into the EWS.
3.
Click the Settings tab, and then select Network Settings > SMTP.
4.
Enter the IP address in dotted decimal notation or as a host name.
5.
Enter the server port number, from 1 to 65535.
6.
Select the check box next to SMTP Requires Authentication to require authentication.
7.
Enter the SMTP server login name and password.
8.
Click the Apply button.
Set up a server destination
NOTE: Make sure the network is connected to the printer.
Follow these steps to set up an email account:
76
1.
Access the EWS, and then click the Sign In button in the upper-right of the EWS page.
2.
Type in the correct ID and Password to log into the EWS.
3.
Click the Address Book tab, and then select Individual > Add.
4.
Select the check box next to Add FTP or Add SMB .
5.
Enter the IP address in dotted decimal notation or as a host name.
6.
Enter the server port number, from 1 to 65535.
7.
Select the check box next to Anonymous, to enable the server permit access of unauthorized people.
8.
Enter the login name and password.
Chapter 8 System and Other Settings
ENWW
9.
Enter the domain name if your server is joined to the certain domain, otherwise just enter your computer
name which is registered to the SMB.
10. Enter the path for saving the scanned image.
NOTE:
The folder to save the scanned image must be on the root.
The folder properties need to be setup as a share.
Your user name should have the rights to read and write the folder.
11. Click the Apply button.
ENWW
Accessing settings using the Embedded Web Server (EWS)
77
78
Chapter 8 System and Other Settings
ENWW
9
Maintenance
This chapter provides information about purchasing supplies, accessories, and maintenance parts available for
your machine.
ENWW
●
Ordering supplies and accessories
●
Available consumables
●
Available accessories
●
Available maintenance parts
●
Storing the consumables
●
Redistributing toner
●
Toner cartridge installation
●
Imaging unit installation
●
Monitoring the supplies life
●
Setting the toner low alert
●
Cleaning the machine
●
Update the firmware
79
Ordering supplies and accessories
NOTE: Available accessories may differ from country/region to country/region. Contact your sales
representatives to obtain the list of available supplies and maintenance parts.
Available consumables
When supplies reach the end of their life span, you can order the following supplies for your machine:
Type
Description
Part number
Toner cartridge
Standard-capacity replacement black toner cartridge
W1335A
High-capacity replacement black toner cartridge
W1335X
Replacement imaging drum
CF257A
Imaging unit
NOTE: Depending on the options, percentage of image area and job mode used, the toner cartridge’s lifespan
may differ.
WARNING! When purchasing new toner cartridges or other supplies, these must be purchased in the same
country/region as the machine you are using. Otherwise, new toner cartridges or other supplies will be
incompatible with your machine due to different configurations of toner cartridges and other supplies according
to the specific country/region conditions.
CAUTION: HP does not recommend using non-genuine HP toner cartridge such as refilled or remanufactured
toner. HP cannot guarantee non-genuine HP toner cartridge's quality. Service or repair required as a result of
using non-genuine HP toner cartridges will not be covered under the machine’s warranty.
80
Chapter 9 Maintenance
ENWW
Available accessories
You can purchase accessories to enhance your machine's performance and capacity. These accessories must be
installed by a qualified HP authorized service provider, dealer, or the retailer where you bought the machine.
Contact an HP authorized service or support provider to order an accessory.
NOTE:
a
b
Some features and optional goods may not be available depending on model or country/region.
Accessory
Function
Optional tray
If you are experiencing frequent paper supply problems, you can attach an additional 250a sheet tray.
Optional RADFb
Reverse Automatic Document Feeder.
Plain paper 80 g/m2 (20 lbs bond).
For models where RADF is optional, CarePack installation is required and may vary depending on country/region of purchase or specific
model.
Available maintenance parts
To purchase maintenance parts, contact the source where you bought the machine. Replacing maintenance parts
can be performed only by an authorized service provider, dealer, or the retailer where you bought the machine.
The warranty does not cover the replacement of any maintenance parts once it has reached its “Average yield”.
Maintenance parts are replaced at specific intervals to avoid print quality and paper feed problems resulting from
worn parts, see table below. The purpose of which is to maintain your machine in top working condition. The
maintenance parts below should be replaced when the life span of each item has been met.
a
ENWW
Parts
Average yielda
Transfer roller
Approx. 100,000 pages
Fuser unit
Approx. 100,000 pages
MP Tray 1 pick up roller
Approx. 100,000 pages
Tray 2 pick up roller
Approx. 100,000 pages
MP Tray 1 Friction Pad
Approx. 50,000 pages
Tray 2 friction pad
Approx. 50,000 pages
Document feeder (ADF) Roller
Approx. 100,000 pages
Document feeder (ADF) Rubber
Approx. 50,000 pages
It will be affected by the operating system used, computing performance, application software, connecting method, media, media size,
and job complexity.
Available accessories
81
Storing the consumables
Consumables contain components that are sensitive to light, temperature, and humidity. HP suggests users
follow these recommendations to ensure optimal performance, highest quality, and longest life from your new
HP consumables.
Store the consumables in the same environment in which the printer will be used. This should be in controlled
temperature and humidity conditions. The consumables should remain in their original and unopened package
until installation.
If the consumables are removed from the printer, follow the instructions below to store the imaging unit
properly.
●
Store the cartridge inside the protective bag from the original package.
●
Store lying flat (not standing on end) with the same side facing up as if it were installed in the machine.
●
Do not store consumables in any of the following conditions:
–
Temperature greater than 40°C (104°F).
–
Humidity range less than 20% or greater than 80%.
–
An environment with extreme changes in humidity or temperature.
–
Direct sunlight or room light.
–
Dusty places.
–
A car for a long period of time.
–
An environment where corrosive gases are present.
–
An environment with salty air.
Imaging unit handling instructions
●
Opening the imaging unit package prior to use dramatically shortens its useful shelf and operating life. Do
not store on the floor.
●
If original packaging is not available, cover the top opening of the imaging unit with paper and store in a
dark cabinet.
●
Do not touch the surface of the photoconductive drum in the imaging unit.
●
Do not expose the imaging unit to unnecessary vibrations or shock.
●
Never manually rotate the drum, especially in the reverse direction; this can cause internal damage and
toner spillage.
Toner cartridge usage
HP cannot recommend the use of non-HP toner cartridges, either new or remanufactured.
NOTE: For HP printer products, the use of a non-HP toner cartridge or a refilled toner cartridge does not affect
either the warranty to the customer or any HP support contract with the customer. However, if product failure or
damage is attributable to the use of a non-HP toner cartridge or refilled toner cartridge, HP will charge its
standard time and materials charges to service the product for the particular failure or damage.
82
Chapter 9 Maintenance
ENWW
Estimated toner cartridge life
Print cartridge life is approximate, based on average A4 /Letter-size page count with ISO coverage. Declared
cartridge yield value in accordance with ISO/IEC 19798. Actual yields vary considerably based on images printed
and other factors. For more information, go to http://www.hp.com/go/learnaboutsupplies.
Redistributing toner
When the toner cartridge is near the end of its life:
●
White streaks or light printing occurs and/or density varies from side to side.
●
The Status LED blinks red. The toner-related message saying that the toner is low may appear on the
display.
●
The computer’s Printing Status program window appears on the computer telling you which cartridge is low
on toner.
If this happens, you can temporarily improve print quality by redistributing the remaining toner in the cartridge. In
some cases, white streaks or light printing will still occur even after you have redistributed the toner.
NOTE: Illustrations on this user’s guide may differ from your machine depending on its options or models.
Check your machine type.
CAUTION: If toner gets on your clothing, wipe it off with a dry cloth and wash clothing in cold water. Hot water
sets toner into fabric.
1.
ENWW
Redistributing toner
83
2.
3.
4.
84
Chapter 9 Maintenance
ENWW
5.
ENWW
Redistributing toner
85
Toner cartridge installation
1.
Remove toner cartridge from shipping bag.
TIP:
2.
86
Keep the orange plug in place. It is required for toner cartridge replacement.
Hold the toner cartridge as shown and rotate the toner cartridge end to end to redistribute toner in
cartridge.
Chapter 9 Maintenance
ENWW
3.
ENWW
Pull the red or orange pull tab and remove it completely.
Toner cartridge installation
87
88
4.
Align toner cartridge with the opening and push until toner cartridge locks into place. An audible click will
indicate the cartridge is locked into place.
5.
Close front door and right door.
Chapter 9 Maintenance
ENWW
Imaging unit installation
CAUTION:
ENWW
Leave front and right door open until all installation steps are complete.
1.
Remove imaging unit from shipping bag and place it on a clean flat surface.
2.
Loosen shipping tape from the bottom and both sides.
Imaging unit installation
89
3.
90
Remove orange shipping locks from imaging unit.
Chapter 9 Maintenance
ENWW
4.
Remove remaining shipping tape and pull protective sheet from imaging unit.
CAUTION:
NOTE:
ENWW
Do not touch exposed drum roller surface.
Do not expose the imaging unit to light for more than a few minutes.
Imaging unit installation
91
5.
Remove orange plug on back of imaging unit
CAUTION: Once the plug is removed, the imaging unit must remain level. Contents may spill out if the
imaging unit is tipped.
6.
With right and front doors fully open, carefully lift imaging unit into position, so the bottom of imaging unit
aligns with the raised alignment rails inside printer cabinet as shown.
CAUTION:
92
Chapter 9 Maintenance
Do not touch exposed drum roller surface.
ENWW
7.
Install imaging unit and ensure it is fully seated.
NOTE: If imaging unit binds or does not slide easily into cabinet, verify the right door is fully open, realign
imaging unit, and install.
ENWW
Imaging unit installation
93
8.
Connect the electrical cable as shown and route cable into holder as shown.
CAUTION:
94
Chapter 9 Maintenance
Make sure the connector is fully seated in the socket.
ENWW
9.
Install two screws as shown.
10. Ensure electrical connector is plugged in and fully seated. Ensure the two screws are securely installed.
ENWW
Imaging unit installation
95
Monitoring the supplies life
If you experience frequent paper jams or printing problems, check the number of pages the machine has printed
or scanned. Replace the corresponding parts, if necessary.
NOTE:
●
Some menus may not appear in the display depending on options or models. If so, it is not applicable to
your machine.
●
It may be necessary to press OK to navigate to lower-level menus for some models.
1.
Select Menu
2.
Select the option you want and press OK.
3.
Press the Stop/Clear
> System Setup > Maintenance > Supplies Life on the control panel.
button to return to ready mode.
Setting the toner low alert
If the amount of toner in the cartridge is low, a message or LED informing the user to change the toner cartridge
appears. You can set the option for whether or not this message or LED appears.
NOTE: It may be necessary to press OK to navigate to lower-level menus for some models.
96
1.
Select Menu
2.
Select the option you want.
3.
Press OK to save the selection.
Chapter 9 Maintenance
> System Setup > Maintenance > Toner Low Alert on the control panel.
ENWW
Cleaning the machine
If printing quality problems occur or if you use your machine in a dusty environment, you need to clean your
machine regularly to keep it in the best printing condition and use your machine longer.
CAUTION:
●
Cleaning the cabinet of the machine with cleaning materials containing large amounts of alcohol, solvents,
or other strong substances can discolor or distort the cabinet.
●
If your machine or the surrounding area is contaminated with toner, we recommend you use a cloth or
tissue dampened with water to clean it. If you use a vacuum cleaner, toner blows in the air and might be
harmful to you.
Cleaning the outside
Clean the machine cabinet with a soft, lint-free cloth. Dampen the cloth slightly with water, but be careful not to
let any water drip onto or into the machine.
Cleaning the inside
During the printing process, paper, toner, and dust particles can accumulate inside the machine. This buildup can
cause print quality problems, such as toner specks or smearing. Cleaning the inside of the machine clears and
reduces these problems.
CAUTION:
●
To prevent damage to the toner cartridge, do not expose it to light for more than a few minutes. Cover it
with a piece of paper, if necessary.
●
Do not touch the green area of the toner cartridge. Use the handle on the cartridge to avoid touching this
area.
●
Use a dry lint free cloth when cleaning the inside of the machine, be careful not to damage the transfer
roller or any other inside parts. Do not use solvents such as benzene or thinner. Printing quality problems
can occur and cause damage to the machine.
NOTE:
ENWW
●
Use a dry lint-free cloth to clean the machine.
●
Turn the machine off and unplug the power cord. Wait for the machine to cool down.
●
Illustrations on this user’s guide may differ from your machine depending on its options or models. Check
your machine type.
Cleaning the machine
97
Cleaning the roller
NOTE:
●
Turn the machine off and unplug the power cord. Wait for the machine to cool down.
●
Illustrations on this user’s guide may differ from your machine depending on its options or models. Check
your machine type.
1.
2.
98
Chapter 9 Maintenance
ENWW
3.
4.
5.
M438nda, M440nda, M443nda models only
1.
ENWW
Cleaning the machine
99
2.
3.
100 Chapter 9 Maintenance
ENWW
4.
ENWW
Cleaning the machine 101
Cleaning the scan unit
Keeping the scan unit clean helps ensure the best possible copies. We suggest that you clean the scan unit at the
start of each day and during the day as needed.
NOTE:
●
Turn the machine off and unplug the power cord. Wait for the machine to cool down.
●
Illustrations on this user’s guide may differ from your machine depending on its options or models. Check
your machine type
1.
Slightly dampen a soft, lint-free cloth or paper towel with water.
2.
Lift and open the scanner lid.
3.
Wipe the surface of the scanner until it is clean and dry.
4.
1
Scanner lid
2
Scanner glass
3
Document feeder glass
4
White bar
Close the scanner lid.
102 Chapter 9 Maintenance
ENWW
Update the firmware
The following steps explain how to download and update the firmware on the printer.
Step one: Download the firmware from HP.com
1.
Go to www.hp.com/support, select Software and Drivers, type the printer name in the search field, click
Find, and then select the model from the list of search results.
2.
If it is not automatically detected, select or change the operating system.
3.
Under the Firmware or Firmware-system section, locate the Firmware Update Utility file.
4.
Click Download and save the file to a location such as your Desktop or Downloads folder.
5.
Open the location where the firmware file was saved, right-click the .zip file, and then extract the files.
Step two: Update the firmware
Follow the appropriate steps for either a USB cable connection or a wired network connection.
Method one: Update the firmware for a USB-connected printer (Windows XP/Vista/7/8/8.1/10)
Use this method to update the firmware if the printer is connected to the computer via a USB cable.
NOTE:
In order to use this method, you must have a driver or full software solution installed.
1.
Make sure the printer is connected to the computer via a USB cable and can successfully copy or print.
2.
Turn the printer off.
3.
Press and hold the Stop/Clear
4.
Turn the printer on, keeping the Stop/Clear
button on the device control panel.
button pressed in until the control panel displays the
following message: Download mode, press stop or cancel key.
5.
Press the Stop/Clear
button again to enter Emergency Mode. A Wait Image messages displays on the
control panel.
6.
On your computer, navigate to the folder containing the files downloaded from HP.com.
7.
Select the *.hd firmware file and drag and drop it onto the usblist2.exe file. The firmware update will start
automatically on the printer.
8.
Once completed, the firmware update will reboot the printer automatically.
9.
Print a configuration page to verify the installed firmware version after the update process.
Method two: Update the firmware for a network-connected printer
Use this method to update the firmware if the printer is connected to the computer via a wired network.
NOTE: In order to use this method, you must use a computer browser to open the Embedded Web Server
(EWS).
1.
ENWW
Print a configuration page to obtain your printer's IP address or host name.
Update the firmware 103
2.
Open a Web browser, and in the address line, type the IP address or host name exactly as it displays on the
configuration page. Press the Enter key on the computer keyboard. The EWS opens.
If the Web browser displays a There is a problem with this website’s security certificate message when
attempting to open the EWS, click Continue to this website (not recommended).
NOTE: Choosing Continue to this website (not recommended) will not harm the computer while
navigating within the EWS for the HP printer.
3.
Select Sign In in the upper-right corner of the EWS page
Figure 9-1 EWS page
4.
Enter your Username and Password.
NOTE: If you have not yet created a password for the EWS, enter the default credentials of admin for
both the Username and the Password.
5.
Select the Maintenance tab.
6.
Select the Upgrade Wizard button.
NOTE:
7.
If you did not sign in to the EWS, this button will not be available.
Select Browse and browse to the location where you extracted the files.
104 Chapter 9 Maintenance
ENWW
8.
Select the firmware file and click Open.
9.
Select Next and then wait for the wizard to verify the firmware.
10. When prompted, check the firmware version, select Next, and then wait for the firmware to upload to the
printer.
11. Wait for the firmware programming process to complete and for the printer to restart.
NOTE: This process will take several minutes. Do not close the browser window or interrupt
communication until the HP Embedded Web Server (EWS) displays the confirmation page.
12. Follow any remaining on-screen instructions to complete the installation.
13. Print a configuration page to verify the installed firmware version after the update process.
ENWW
Update the firmware 105
106 Chapter 9 Maintenance
ENWW
10 Useful Settings
This chapter explains how to browse the current status of your machine, and the method of setting for advanced
machine setup.
ENWW
●
Machine’s initial set up
●
Machine’s basic settings
●
Altitude adjustment
107
Machine’s initial set up
After setting up the printer and connecting the printer to a power cable, follow these steps to set up a password:
1.
Select your country from the list of countries.
NOTE:
2.
Depending on the country selected, the system will select the language.
Enter an eight-digit numerical pin code as a password, and then type the password again to confirm the
password.
NOTE: If a password is not valid, “Invalid input” error message will display on the screen. Press the OK
button.
108 Chapter 10 Useful Settings
ENWW
Machine’s basic settings
To change the machine’s default settings, follow these steps:
NOTE:
It may be necessary to press OK to navigate to lower-level menus for some models.
1.
Select Menu
2.
Select the option you want, then press OK.
NOTE:
> System Setup > Machine Setup on the control panel.
When you press the Power/Wake Up
button or start printing, the product will wake up from
the power saving mode.
3.
Select the option you want, then press OK.
4.
Press OK to save the selection.
5.
Press the Stop/Clear
button to return to ready mode.
The printer's settings are also available for viewing/modifying in the EWS.
ENWW
Machine’s basic settings 109
Altitude adjustment
Print quality is affected by atmospheric pressure, which is determined by the height of the machine above sea
level. The following information will guide you on how to set your machine for the best print quality.
Before you set the altitude value, determine the altitude where you are.
5,000 m
(16,404 ft)
1
4,000 m
(13,123 ft)
2
3,000 m
(9,842 ft)
3
2,000 m
(6,561 ft)
4
1,000 m
(3,280 ft)
5
0
1
High 4
2
High 3
3
High 2
4
High 1
5
Normal
You can set the altitude in System Setup option on the machine’s display.
110 Chapter 10 Useful Settings
ENWW
11 Troubleshooting
This chapter gives helpful information for what to do if you encounter an error.
ENWW
●
Paper feeding problems
●
Clearing jams
●
Understanding the status LED
●
Understanding display messages
●
Power and cable connecting problems
●
Printing problems
●
Printing quality problems
●
Copying problems
●
Scanning problems
●
Operating system problems
111
Paper feeding problems
The following table describes common paper feeding problems and suggested solutions for each one.
Condition
Suggested solutions
Paper sticks together.
●
Check the maximum paper capacity of the tray.
●
Make sure that you are using the correct type of paper.
●
Remove paper from the tray and flex the paper.
●
Humid conditions may cause some paper to stick together.
Multiple sheets of paper do
not feed.
Different types of paper may be stacked in the tray. Load paper of only one type, size, and weight.
Paper does not feed into the
machine.
●
Paper trays are not properly reset prior to loading paper.
●
Remove any obstructions from inside the machine.
●
Paper has not been loaded correctly. Remove paper from the tray and reload it correctly.
●
There is too much paper in the tray. Remove excess paper from the tray.
●
The paper is too thick. Use only paper that meets the specifications required by the machine.
●
Paper trays are not properly reset prior to loading paper.
●
There is too much paper in the tray. Remove excess paper from the tray. If you are printing on
special materials, use the manual feeding in tray.
●
An incorrect type of paper is being used. Use only paper that meets the specifications required by
the machine.
●
There may be debris inside the machine. Open the front cover and remove any debris.
The paper keeps jamming.
IMPORTANT:
Pushing down on the lift plate is necessary when adding paper to an empty tray.
112 Chapter 11 Troubleshooting
ENWW
Clearing jams
Introduction
The following topics describe how to clear paper jams in several locations inside the printer and the scanner.
NOTE:
To avoid tearing the paper, pull the jammed paper out slowly and gently.
Illustrations on this user’s guide may differ from your printer depending on its model or optional goods.
●
Tray 2
●
In Multi-purpose Tray 1
●
Inside the printer
●
In the exit area
●
In the duplex unit area
●
Clearing original document jams
1.
Pull out the tray.
Tray 2
ENWW
Clearing jams 113
2.
Remove the jammed paper by gently pulling it straight out.
3.
Insert the tray back into the printer until it snaps into place.
114 Chapter 11 Troubleshooting
ENWW
In Multi-purpose Tray 1
▲
ENWW
Remove the jammed paper by gently pulling it straight out.
Clearing jams 115
Inside the printer
1.
Open the side cover.
2.
Open the jam guide and remove the jammed paper.
1
2
3.
Open the fuser jam cover and remove the jammed paper.
1
2
116 Chapter 11 Troubleshooting
ENWW
4.
ENWW
Close the side cover.
Clearing jams 117
In the exit area
CAUTION:
1.
The fuser area is hot. Take care when removing paper from the printer.
Remove the jammed paper by gently pulling it straight out.
If you do not see the paper in this area, stop and go to next step:
2.
Open the side cover.
118 Chapter 11 Troubleshooting
ENWW
ENWW
3.
Remove the jammed paper from the exit unit or fuser unit.
4.
Close the side cover.
Clearing jams 119
In the duplex unit area
1.
Open the side cover.
2.
Remove the jammed paper from the transfer roller assembly.
120 Chapter 11 Troubleshooting
ENWW
3.
Release the transfer roller assembly and remove the jammed paper.
1
2
4.
ENWW
Close the side cover.
Clearing jams 121
Clearing original document jams
NOTE: To prevent document jams, use the scanner glass for thick, thin or mixed paper originals.
CAUTION:
To avoid tearing the document, remove the jammed document slowly and carefully.
Original paper jam in front of scanner
1.
Open the document feeder cover.
2.
Gently remove the original carefully from the document feeder.
122 Chapter 11 Troubleshooting
ENWW
3.
ENWW
Close the document feeder cover.
Clearing jams 123
Original paper jam inside of scanner
1.
Open the document feeder cover.
2.
Gently remove the original carefully from the document feeder.
If you do not see the paper in this area, stop and go to next step:
124 Chapter 11 Troubleshooting
ENWW
ENWW
3.
Open the scanner lid.
4.
Grasp the misfeed original, and remove the paper from the feed area by carefully pulling it.
Clearing jams 125
5.
Close the scanner lid.
6.
Close the document feeder cover.
126 Chapter 11 Troubleshooting
ENWW
Original paper jam in exit area of scanner
1.
Open the Cover-Open and lift up the stacker.
1
2
2.
ENWW
Gently remove the original carefully from the document feeder.
Clearing jams 127
3.
Close the Cover-Open and pull down the stacker.
2
1
128 Chapter 11 Troubleshooting
ENWW
Original paper jam in scanner duplex path
1.
Open the document feeder cover.
2.
Open the duplex jam cover. Pull the original document gently out of the document feeder.
1
2
ENWW
Clearing jams 129
3.
Close the duplex jam cover and document feeder cover.
130 Chapter 11 Troubleshooting
ENWW
Understanding the status LED
The color of the LED indicates the machine's current status.
NOTE:
●
Some LEDs may not be available depending on model or country/region.
●
To resolve the error, look at the error message and its instructions from the troubleshooting part.
●
You also can resolve the error with the guideline from the computer’s Printing Status window.
●
If the problem persists, call a service representative.
LED
Status
Description
Status
Off
●
The machine is off-line.
●
The machine is in power save mode.
Green
Red
Blinking
When the backlight blinks, the machine is receiving or printing data.
On
●
The machine is on-line and can be used.
Blinking
●
A minor error has occurred and the machine is waiting for the
error to be cleared. Check the display message. When the problem
is cleared, the machine resumes.
●
Small amount of toner is left in the cartridge. The estimated
cartridge lifea of toner is close. Prepare a new cartridge for
replacement. You may temporarily increase the printing quality by
redistributing the toner.b
●
A toner cartridge has almost reached its estimated cartridge lifea.
It is recommended to replace the toner cartridge.
●
The cover is opened. Close the cover.
●
There is no paper in the tray. Load paper in the tray.
●
The machine has stopped due to a major error. Check the display
message.
●
A paper jam has occurred.
●
An imaging unit has almost reached its estimated cartridge lifec. It
is recommended to replace the toner cartridge
On
Power / Wake Up
a
b
c
ENWW
White
On
The machine is in power save mode.
Off
The machine is in ready mode or machine’s power is off.
Print cartridge life is approximate, based on average A4 /Letter-size page count with ISO coverage. Declared cartridge yield value in
accordance with ISO/IEC 19798. Actual yields vary considerably based on images printed and other factors. For more information, go to
http://www.hp.com/go/learnaboutsupplies. Some amount of toner may remain in the cartridge even when the red LED is on and the
printer stops printing.
Some LEDs may not be available depending on model or country/region.
When the imaging unit has reached its end of life, the machine will stop printing. In this case, you can choose to stop or continue printing
from the Web Service (Settings > Machine Settings > System > Setup > Supplies Management> Imaging Unit Stop). Turning off this option
and continuing to print may damage the device’s system.
Understanding the status LED 131
Understanding display messages
Messages appear on the control panel display to indicate the machine’s status or errors. Refer to the tables
below to understand the messages and their meaning, and correct the problem, if necessary.
NOTE:
●
You can resolve the error with the guideline from the computer’s Printing Status program window.
●
If a message is not in the table, reboot the power and try the printing job again. If the problem persists, call
a service representative.
●
When you call for service, provide the service representative with the contents of display message.
●
Some messages may not appear on the display depending on the model or optional goods.
●
[error number] indicates the error number.
●
[tray type] indicates the tray number.
●
[media type] indicates the media type.
●
[media size] indicates the media size.
●
[unit type] indicates the unit type.
Paper Jam-related messages
Message
Meaning
Suggested solutions
Original paper jam
The loaded original document has jammed in document
feeder.
Clear the jam.
Paper Jam in Tray 2
Paper has jammed in the tray.
Clear the jam.
Paper Jam in Tray 1
Paper has jammed in the multipurpose tray.
Clear the jam.
Jam inside of duplex
Paper has jammed inside the duplex.
Clear the jam.
Jam in exit area
Paper has jammed in the paper exit area.
Clear the jam.
132 Chapter 11 Troubleshooting
ENWW
Toner-related messages
Message
●
Meaning
Suggested solutions
Error [error number]
A toner cartridge is not installed.
Reinstall the toner cartridge.
Toner Cart Failure [error
number]
A toner cartridge is not being detected.
Reinstall the toner cartridge two or
three times to confirm it is seated
properly. If the problem persists,
contact the service representatives.
Protective film is not removed from toner.
Remove the protective film from the
toner cartridge.
The imaging unit you have installed is not for your machine.
Install a HP genuine imaging unit,
designed for your machine.
The imaging unit is not installed.
Reinstall the imaging unit two or
three times. If the problem persists,
call for service.
The estimated imaging unit life is close.
Prepare a new imaging unit for
replacement.
The indicated imaging unit has almost reached its
estimated imaging unit life.
●
You can choose Stop or
Continue as shown on the
control panel. If you select
Stop, the printer stops printing
and you cannot print any more
without changing the imaging
unit. If you select Continue, the
printer keeps printing but the
printing quality cannot be
guaranteed. Replace the
imaging unit for the best print
quality when this message
appears. Using a imaging unit
beyond this stage can result in
printing quality issues.
●
If the machine stops printing,
replace the imaging unit.
Call for service
●
Toner not installed
Toner cartridge is not installed.
Install it.
●
IMG. Not Compatible
Imaging unit is not compatible.
Check guide
●
IMG. Not Installed
Imaging unit is not installed.
Install the unit.
●
Prepare IMG. unit
Prepare new imaging unit
●
Replace IMG. unit
Replace with new imaging unit
●
Toner Not compatible
Toner cartridge is not
compatible. Check guide
●
Prepare new toner
Prepare new toner cartridge
●
Replace new toner
Replace with new toner
cartridge
ENWW
The indicated toner cartridge is not suitable for your
machine.
Replace the indicated toner cartridge
with an HP cartridge.
Small amount of toner is left in the indicated cartridge. The
estimated cartridge lifea of toner is close.
Prepare a new cartridge for a
replacement. You may temporarily
increase the printing quality by
redistributing the toner.
The indicated toner cartridge has almost reached its
estimated cartridge life.
●
You can choose Stop or
Continue as shown on the
control panel. If you select
Stop, the printer stops printing.
If you select Continue, the
printer keeps printing but the
Understanding display messages 133
Message
Meaning
Suggested solutions
printing quality cannot be
guaranteed.
●
The indicated toner cartridge has reached its estimated
cartridge life
Replace the toner cartridge for
the best print quality when this
message appears. Using a
cartridge beyond this stage can
result in printing quality issues.
Replace the toner cartridge.
The printer indicates when the cartridge level is low. Actual cartridge life remaining may vary. Consider having a replacement available to
install when print quality is no longer acceptable. The cartridge does not need to be replaced now unless the print quality is no longer
acceptable.
a
CAUTION: For HP printer products, the use of a non-HP toner cartridge or a refilled toner cartridge does not
affect either the warranty to the customer or any HP support contract with the customer. However, if product
failure or damage is attributable to the use of a non-HP toner cartridge or refilled toner cartridge, HP will charge
its standard time and materials charges to service the product for the particular failure or damage.
Tray-related messages
Message
Meaning
Suggested solutions
There is no paper in all tray.
Load paper in tray.
There is no paper in tray.
Load paper in tray.
There is no paper in the multi-purpose tray.
Load paper in the multi-purpose tray.
Message
Meaning
Suggested solutions
IP Conflict
The network IP address you have set is
being used by someone else.
Check the IP address and reset it if
necessary.
●
All Tray Empty
Paper is empty in all tray. Load paper
●
Paper Empty in Tray 2 Paper is empty
in Tray 2. Load paper
●
Paper Empty in Tray 3 Paper is empty
in Tray 3. Load paper
●
Paper Empty in Tray 1
Paper is empty in Tray 1. Load paper
Network-related messages
This IP address conflicts with that of other
system
134 Chapter 11 Troubleshooting
ENWW
Misc. messages
Message
●
Tray 2 door is open. Close it
●
Front door is open. Close it
●
Right door is open. Close it
●
Scanner door open
Door of scanner is open. Close the
door
●
Not Proper room temp
Not Proper room temperature. Change
room temperature
●
Prepare TR Roller/Prepare with new
transfer roller
●
Error: C9–2220/TR failure: #C92220.
Meaning
Suggested solutions
The Tray 2 door, front door or right door is
not securely latched.
Close the door until it locks into place.
The document feeder cover is not securely
latched.
Close the cover until it locks into place.
The machine is in a room with improper
room temperature.
Move the machine to a room with proper
room temperature
The life of the tray reverse roller has
expired.
Replace the tray reverse roller with a new
one. Contact the service representatives.
The scanner is locked.
Reboot the power. If the problem persists,
please call for service.
The document feeder cover is not securely
latched.
Close the cover until it locks into place.
There is a problem in the fuser unit.
Reboot the power. If the problem persists,
please call for service.
There is a problem in the Motor system.
Reboot the power. If the problem persists,
please call for service.
There is a problem in the LSU.
Reboot the power. If the problem persists,
please call for service.
There is a problem in a Tray.
Check the Tray connection.
Install transfer roller again
●
Scanner Locked
Scanner is locked. Press Stop/Clear
button.
●
Scanner door open
Door of scanner is open. Close the
door
●
Error: [error number]
Fuser Unit Failure: [error number]
Turn off then on. Call for service if the
problem persists
●
Error: [error number]
Motor Failure: [error number]
Turn off then on. Call for service if the
problem persists
●
Error: [error number]
LSU Failure: [error number]
Turn off then on. Call for service if the
problem persists
●
Error: [error number]
Input System Failure: [error number]
Check the Tray connection
ENWW
Understanding display messages 135
Power and cable connecting problems
Condition
Suggested solutions
The machine is not receiving power, or the connection cable
between the computer and the machine is not connected properly.
●
Connect the machine to the electricity supply first. If the
machine has a Power / Wake Up
button on the control,
press it.
●
136 Chapter 11 Troubleshooting
Disconnect the machine’s cable and reconnect it.
ENWW
Printing problems
The following table describes common printing problems, the possible causes, and suggested solutions.
Condition
Possible cause
Suggested solutions
The machine does not
print.
The machine is not receiving power.
Connect the machine to the electricity supply first. If
the machine has a Power / Wake Up
button on
the control, press it.
The machine is not selected as the default machine.
Select your machine as your default machine in
Windows.
Check the machine for the following:
●
The cover is not closed. Close the cover.
●
Paper is jammed. Clear the paper jam.
●
No paper is loaded. Load paper.
●
The toner cartridge is not installed. Install the toner cartridge.
●
Make sure the protective cover and sheets are removed from the toner cartridge.
If a system error occurs, contact your service representative.
ENWW
The connection cable between the computer and the
machine is not connected properly.
Disconnect the machine cable and reconnect it.
The connection cable between the computer and the
machine is defective.
If possible, attach the cable to another computer that
is working properly and print a job. You can also try
using a different machine cable.
The port setting is incorrect.
Check the Windows printer settings to make sure
that the print job is sent to the correct port. If the
computer has more than one port, make sure that
the machine is attached to the correct one.
The machine may be configured incorrectly.
Check the Printing Preferences to ensure that all of
the print settings are correct.
The printer driver may be incorrectly installed.
Uninstall and reinstall the machine’s driver.
The machine is malfunctioning.
Check the display message on the control panel to
see if the machine is indicating a system error.
Contact a service representative.
The document size is so big that the hard disk space
of the computer is insufficient to access the print job.
Get more hard disk space and print the document
again.
The output tray is full.
Once the paper is removed from the output tray, the
machine resumes printing.
The machine selects print
materials from the wrong
paper source.
The paper option that was selected in the Printing
Preferences may be incorrect.
For many software applications, the paper source
selection is found under the Paper tab within the
Printing Preferences. Select the correct paper source.
See the printer driver help screen.
A print job is extremely
slow.
The job may be very complex.
Reduce the complexity of the page or try adjusting
the print quality settings.
Half the page is blank.
The page orientation setting may be incorrect.
Change the page orientation in your application.
Printing problems 137
Condition
Possible cause
Suggested solutions
The paper size and the paper size settings do not
match.
Ensure that the paper size in the printer driver
settings matches the paper in the tray. Or, ensure
that the paper size in the printer driver settings
matches the paper selection in the software
application settings you use.
The machine cable is loose or defective.
Disconnect the machine cable and reconnect. Try a
print job that you have already printed successfully. If
possible, attach the cable and the machine to
another computer that you know works and try a
print job. Finally, try a new machine cable.
The wrong printer driver was selected.
Check the application’s printer selection menu to
ensure that your machine is selected.
The software application is malfunctioning.
Try printing a job from another application.
The operating system is malfunctioning.
Exit Windows and reboot the computer. Turn the
machine off and back on again.
The toner cartridge is defective or out of toner.
Redistribute the toner, if necessary. If necessary,
replace the toner cartridge.
The file may have blank pages.
Check the file to ensure that it does not contain blank
pages.
Some parts, such as the controller or the board, may
be defective.
Contact a service representative.
The machine does not
print PDF files correctly.
Some parts of graphics,
text, or illustrations are
missing.
Incompatibility between the PDF file and the Acrobat
products.
Printing the PDF file as an image may enable the file
to print. Turn on Print As Image from the Acrobat
printing options.
The print quality of photos
is not good. Images are
not clear.
The resolution of the photo is very low.
Reduce the photo size. If you increase the photo size
in the software application, the resolution will be
reduced.
Before printing, the
machine emits vapor near
the output tray.
Using damp/wet paper can cause vapor [white
smoke] during printing.
This is not a problem, just keep printing. If you are
bothered by the smoke [vapor], then replace the
paper with fresh paper from an unopened ream.
The machine does not
print special-sized paper,
such as billing paper.
Paper size and paper size setting do not match.
Set the correct paper size in the Custom in Paper tab
in Printing Preferences.
The printed billing paper is
curled.
The paper type setting does not match.
Change the printer option and try again. Go to
Printing Preferences, click Paper tab, and set type to
Thin.
The machine prints, but
the text is wrong, garbled,
or incomplete.
Pages print, but they are
blank.
138 Chapter 11 Troubleshooting
NOTE: It will take longer to print when you print a
PDF file as an image.
ENWW
Printing quality problems
The following table describes common printing quality problems, shows examples of each one, and lists
suggested solutions.
Condition
Example
Light or faded print
The top half of the paper is
printed lighter than the rest of
the paper
Toner specks
Dropouts
Suggested solutions
●
If a vertical white streak or faded area appears on the page,
the toner supply is low. Install a new toner cartridge.
●
The paper may not meet paper specifications; for example,
the paper may be too moist or rough.
●
If the entire page is light, the print resolution setting is too low
or the toner save mode is on. Adjust the print resolution and
turn the toner save mode off. See the help screen of the
printer driver.
●
A combination of faded or smeared defects may indicate that
the toner cartridge needs cleaning. Clean the inside of your
machine.
●
The surface of the LSU part inside the machine may be dirty.
Clean the inside of your machine. If cleaning does not correct
the problem, contact a service representative.
The toner might not adhere properly to this type of paper.
A aB bC c
A aB bC c
A aB bC c
A aB bC c
A aB bC c
A aBb C
A aBb C
A aBb C
A aBb C
A aBb C
●
Change the printer option and try again. Go to Printing
Preferences, click the Paper tab, and set the paper type to
Recycled.
●
The paper may not meet specifications; for example, the
paper may be too moist or rough.
●
The transfer roller may be dirty. Clean the inside of your
machine.
●
The paper path may need cleaning. If these steps do not
correct the problem, contact a service representative.
If faded areas, generally rounded, occur randomly on the page:
●
A single sheet of paper may be defective. Try reprinting the
job.
●
The moisture content of the paper is uneven or the paper has
moist spots on its surface. Try a different brand of paper.
●
The paper lot is bad. The manufacturing processes can cause
some areas to reject toner. Try a different kind or brand of
paper.
●
Change the printer option and try again. Go to Printing
Preferences, click the Paper, and set type to Thick.
If these steps do not correct the problem, contact a service
representative.
ENWW
Printing quality problems 139
Condition
White Spots
Example
Suggested solutions
If white spots appear on the page:
●
The paper is too rough and a lot of dirt from paper falls to the
inner components within the machine, so the transfer roller
may be dirty. Clean the inside of your machine.
●
The paper path may need cleaning. Clean the inside of your
machine.
If these steps do not correct the problem, contact a service
representative.
Vertical lines
If black vertical streaks appear on the page:
●
The surface (drum part) of the cartridge inside the machine
has probably been scratched. Remove the cartridge and install
a new one.
If white vertical streaks appear on the page:
Black or color background
Toner smear
Vertical repetitive defects
140 Chapter 11 Troubleshooting
●
The surface of the LSU part inside the machine may be dirty.
Clean the inside of your machine. If cleaning does not correct
the problem, contact a service representative.
●
Change to a lighter weight paper.
●
Check the environmental conditions: very dry conditions or a
high level of humidity (higher than 80% RH) can increase the
amount of background shading.
●
Remove the old toner cartridge and install a new one.
●
Thoroughly redistribute the toner.
●
Clean the inside of the machine.
●
Check the paper type and quality.
●
Remove the toner cartridge and install a new one.
If marks repeatedly appear on the printed side of the page at even
intervals:
●
The toner cartridge may be damaged. If you still have the
same problem, remove the toner cartridge and, install a new
one .
●
Parts of the machine may have toner on them. If the defects
occur on the back of the page, the problem will likely correct
itself after a few more pages.
●
The fusing assembly may be damaged. Contact a service
representative.
ENWW
Condition
Example
Background scatter
A
Toner particles are around bold
characters or pictures
Curl or wave
ENWW
Background scatter results from bits of toner randomly distributed
on the printed page.
●
The paper may be too damp. Try printing with a different
batch of paper. Do not open packages of paper until
necessary so that the paper does not absorb too much
moisture.
●
If background scatter covers the entire surface area of a
printed page, adjust the print resolution through your
software application or in Printing Preferences. Ensure the
correct paper type is selected. For example: If Thicker Paper is
selected, but Plain Paper actually used, an overcharging can
occur causing this copy quality problem.
●
If you are using a new toner cartridge, redistribute the toner
first.
The toner might not adhere properly to this type of paper.
Misformed characters
Page skew
Suggested solutions
A aBb
A aBb C
A aBb C
A aBb C
A aBb C
Cc
●
Change the printer option and try again. Go to Printing
Preferences, click the Paper tab, and set the paper type to
Recycled.
●
Ensure the correct paper type is selected. For example: If
Thicker Paper is selected, but Plain Paper actually used, an
overcharging can occur causing this copy quality problem.
●
If characters are improperly formed and producing hollow
images, the paper stock may be too slick. Try different paper.
●
Ensure that the paper is loaded properly.
●
Check the paper type and quality.
●
Ensure that the guides are not too tight or too loose against
the paper stack.
●
Ensure that the paper is loaded properly.
●
Check the paper type and quality. Both high temperature and
humidity can cause paper curl.
●
Turn the stack of paper over in the tray. Also try rotating the
paper 180° in the tray.
Printing quality problems 141
Condition
Example
Wrinkles or creases
Suggested solutions
●
Ensure that the paper is loaded properly.
●
Check the paper type and quality.
●
Turn the stack of paper over in the tray. Also try rotating the
paper 180° in the tray.
Back of printouts are dirty
●
Check for leaking toner. Clean the inside of the machine.
Solid color or black pages
●
The toner cartridge may not be installed properly. Remove the
cartridge and reinsert it.
●
The toner cartridge may be defective. Remove the toner
cartridge and install a new one.
●
The machine may require repairing. Contact a service
representative.
●
Clean the inside of the machine.
●
Check the paper type, thickness, and quality.
●
Remove the toner cartridge and install a new one.
A
Loose toner
If the problem persists, the machine may require repair. Contact a
service representative.
Character voids
A
142 Chapter 11 Troubleshooting
Character voids are white areas within parts of characters that
should be solid black:
●
You may be printing on the wrong surface of the paper.
Remove the paper and turn it around.
●
The paper may not meet paper specifications.
ENWW
Condition
Horizontal stripes
Example
Suggested solutions
If horizontally aligned black streaks or smears appear:
●
The toner cartridge may be installed improperly. Remove the
cartridge and reinsert it.
●
The toner cartridge may be defective. Remove the toner
cartridge and install a new one. Remove the toner cartridge
and install a new one.
If the problem persists, the machine may require repairing. Contact
a service representative.
Curl
If the printed paper is curled or paper does not feed into the
machine:
●
An unknown image
repetitively appears on a
few sheets
●
Loose toner
●
Light print or
contamination occurs
●
Turn the stack of paper over in the tray. Also try rotating the
paper 180° in the tray.
●
Change the printer’s paper option and try again. Go to Printing
Preferences, click the Paper tab, and set type to Thin.
Your machine is probably being used at an altitude of 1,000 m
(3,281 ft) or above. The high altitude may affect the print quality,
such as loose toner or light imaging.
Vertical Streaks
Use the control panel to initiate Cleaning the OPC Mode.
When using Century Star media,
it may contaminate the OPC
surface. This will cause light
vertical streaks during printing.
1.
On the control panel, press Menu
Machine Setup > OPC Cleaning.
2.
Select Automatic to initiate a cleaning every 1,000 pages.
> System Setup >
NOTE: The OPC cleaning takes approximately 5 minutes to
complete.
ENWW
Printing quality problems 143
Copying problems
The following table describes common copying problems and suggested solutions.
Condition
Suggested solutions
Copies are too light or too
dark.
Adjust the darkness in copy feature to lighten or darken the backgrounds of copies.
Smears, lines, marks, or spots
appear on copies.
●
If the defects are on the original, adjust darkness in copy feature to lighten the background of your
copies.
●
If there are no defects on the original, clean the scan unit.
●
Ensure that the original is aligned with the registration guide.
●
The transfer roller may be dirty. Clean the inside of your machine.
Copy image is skewed.
Blank copies print out.
Ensure that the original is face down on the scanner glass or face up in the document feeder.
If these steps do not correct the problem, contact a service representative.
Image rubs off the copy easily.
Frequent copy paper jams
occur.
144 Chapter 11 Troubleshooting
●
Replace the paper in the tray with paper from a new package.
●
In high humidity areas, do not leave paper in the machine for extended periods of time.
●
Fan the paper, then turn it over in the tray. Replace the paper in the tray with a fresh supply. Check/
adjust the paper guides, if necessary.
●
Ensure that the paper is the proper type and weight.
●
Check for copy paper or pieces of copy paper remaining in the machine after a paper jam has been
cleared.
●
Your originals may contain pictures, solids, or heavy lines. For example, your originals may be
forms, newsletters, books, or other documents that use more toner.
●
The scanner lid may be left open while copies are being made.
●
Turn the machine off and back on.
ENWW
Scanning problems
The following table describes common scanning problems and suggested solutions.
Condition
Suggested solutions
The scanner does not work.
●
Make sure that you place the original to be scanned face down on the scanner glass, or face up in
the document feeder.
●
There may not be enough available memory to hold the document you want to scan. Try the
Prescan function to see if that works. Try lowering the scan resolution rate.
●
Check that the machine printer cable is connected properly.
●
Make sure that the machine printer cable is not defective. Switch the printer cable with a known
good cable. If necessary, replace the printer cable.
●
Check that the scanner is configured correctly. Check scan setting in the application you want to use
to make certain that the scanner job is being sent to the correct port (for example, USB001).
●
Check if the machine is printing received data. If so, scan the document after the received data has
been printed.
●
Graphics are scanned more slowly than text.
●
There may be a copying or printing job in progress. Try your job again when that job is finished.
●
The selected port is currently being used. Restart your computer and try again.
●
The machine printer cable may be improperly connected or the power may be off.
●
The scanner driver is not installed or the operating environment is not set up properly.
●
Ensure that the machine is properly connected and the power is on, then restart your computer.
●
The USB cable may be improperly connected or the power may be off.
The unit scans very slowly.
Message appears on your
computer screen:
●
ENWW
Device can’t be set to
the H/W mode you want.
●
Port is being used by
another program.
●
Port is disabled.
●
Scanner is busy
receiving or printing
data. When the current
job is completed, try
again.
●
Invalid handle.
●
Scanning has failed.
Scanning problems 145
Operating system problems
Condition
Suggested solutions
“File in Use” message
appears during
installation.
Exit all software applications. Remove all software from the startup group, then restart Windows. Reinstall
the printer driver.
“General Protection Fault”,
“Exception OE”, “Spool
32”, or “Illegal Operation”
messages appear.
Close all other applications, reboot Windows and try printing again.
“Fail To Print”, “A printer
timeout error occurred”
message appear.
These messages may appear during printing. Just keep waiting until the machine finishes printing. If the
message appears in ready mode or after printing has completed, check the connection and/or whether an
error has occurred.
Machine information is
not displayed when you
click the device in the
Devices and Printers.
Check the Printer properties. Click the Ports tab.
(Control Panel > Devices and Printers > Right-click on your printer icon and select Printer properties)
If the port is set to File or LPT, uncheck them and select TCP/IP, USB, or WSD.
NOTE: Refer to the Microsoft Windows User’s Guide that came with your computer for further information on
Windows error messages.
146 Chapter 11 Troubleshooting
ENWW