Вопросы и ответы

Результаты, отвечающие критериям поиска, не найдены.
Советы по поиску и устранению неисправностей не найдены.
Введите минимум два символа.
Результаты, отвечающие критериям поиска, не найдены.
Не можете найти нужную информацию? Читайте раздел Вопросы и ответы.

- Manuals
- Brands
- Huawei Manuals
- Cell Phone
- P40 Lite
- User manual
-
Contents
-
Table of Contents
-
Bookmarks
Quick Links
Related Manuals for Huawei P40 lite
Summary of Contents for Huawei P40 lite
-
Page 1
User Guide… -
Page 2: Table Of Contents
Notification and Status Icons Control Panel Enter Text Multi-Window Smart Features AI Voice AI Lens AI Touch Huawei Print Multi-Device Collaboration Media Controller Camera and Gallery Take Photos Shoot in Portrait, Night, and Wide Aperture Modes AI Camera AR Lens…
-
Page 3: Basic Gestures
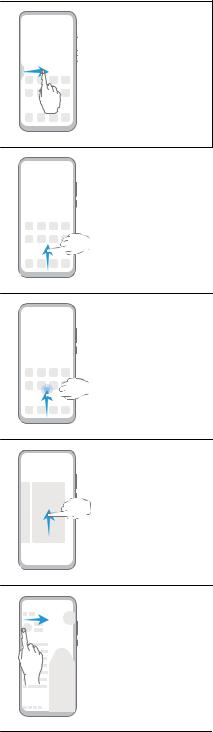
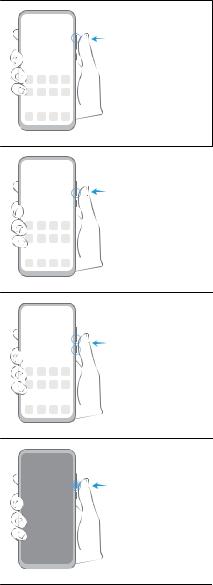
Essentials Basic Gestures Basic Gestures and Shortcuts System Navigation Gestures Go to Settings > System & updates > System navigation and make sure that Gestures is selected. Return to the previous screen Swipe in from the left or right edges to return to the previous screen. Back to home screen Swipe up from the bottom to go to the home screen.
-
Page 4
Essentials Switch between apps Slide across the bottom edge of the screen to switch between apps. • Before using this gesture, touch Settings on the System navigation screen, and ensure that Slide across bottom to switch apps is enabled. Swipe across the bottom of the screen in an arc to switch between apps. •… -
Page 5: Lock And Unlock Your Screen
Essentials Turn on a shortcut switch Swipe down from the upper right edge of the screen to display Control Panel and touch to expand the shortcut switches panel (depending on your device model). Button Shortcuts Power off and restart Press and hold the Power button until your device displays the Power off and Restart menu.
-
Page 6: Get Familiar With The Home Screen
Essentials On the home screen, pinch two fingers together to enter screen editing mode. Touch • Widgets, then drag the Screen Lock icon to the home screen. You can now touch the Screen Lock icon to lock the screen. Set the Screen Timeout Period Go to Settings >…
-
Page 7: Notification And Status Icons
Essentials Operations in a Large Folder You can perform the following operations in large folders: Open apps: In a large folder, touch an icon to access the app directly. • Enter and exit folders: Touch the lower right corner of a large folder to enter it. Touch a •…
-
Page 8: Control Panel
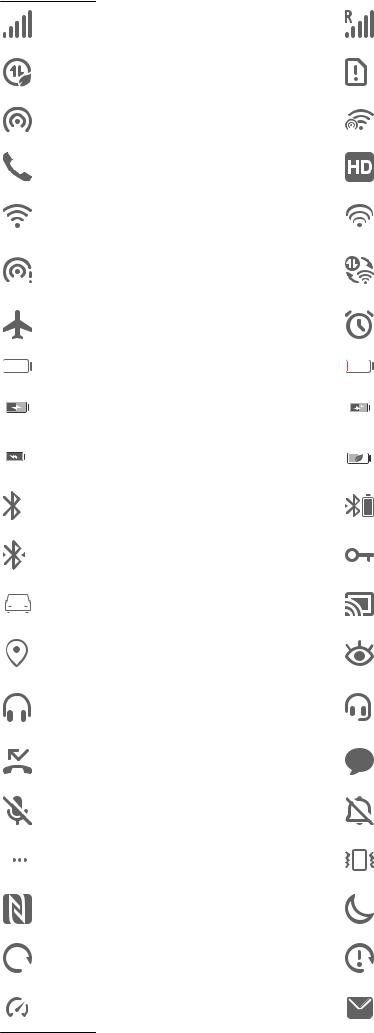
Essentials Airplane mode is ON Alarm set Battery empty Low battery power Charging Quick charging Super charging Wireless super charging Wireless fast charging Regular wireless charging Power Saving mode on Digital Balance enabled Bluetooth enabled Bluetooth device battery Bluetooth device connected VPN connected Driving mode Projection device connected…
-
Page 9
(such as Visions and Bluetooth headsets). Shortcut controls: To enable, disable, or set frequently used features. • Device+: Automatically discovers nearby devices logged in to the same HUAWEI ID and • allows you to link them so they work together as one. -
Page 10
Essentials Turn on a Shortcut Switch Swipe down from the upper right edge of the screen to display Control Panel and touch to expand the shortcut switches panel(depending on your device model). The figures are for reference only. Touch a shortcut switch to enable or disable the corresponding feature. •… -
Page 11
Connect your device to an audio device via Bluetooth or other methods. After a Vision product is connected to your device via Bluetooth, you can also connect it to the same Wi-Fi network and log in to the same HUAWEI ID as your device to perform more operations. -
Page 12: Enter Text
Bluetooth and Wi-Fi and log in to your HUAWEI ID on your phone. For other devices, perform the following settings: Vision: Ensure that it is connected to the same LAN and logged in to the same HUAWEI ID •…
-
Page 13
Essentials Text Input Keyboard input Celia Keyboard comes with a 26-key layout by default. As you type on the keyboard, a box will be displayed for you to select predicted words. Press and hold a letter key and then swipe up to enter a number, or swipe left or right to enter the letter. -
Page 14: Multi-Window
Essentials On the input keyboard, go to > Sound & vibration and adjust the Keypress volume • and Vibration intensity. You can also touch Sound on keypress and select your desired audio effects. Set the mechanical keyboard On the input keyboard, go to >…
-
Page 15
Essentials Touch and hold in the middle of the split screen line and drag it until either pane disappears. Support for split-screen mode varies by app. Drag and Drop Between Apps with Multi-Window Use the Multi-Window feature to easily drag and drop images, text, and documents between apps. -
Page 16
Essentials Relocate the floating window: Drag the bar at the top of the floating window to move the window to the desired position. Resize the floating window: Drag the bottom edge, two sides, or bottom corners of the floating window to resize it. Display in full screen: Touch at the top of the floating window to display it in full screen. -
Page 17: Smart Features
Wake up AI Voice You can press and hold the Power button for 1 second to wake up AI Voice: Go to Settings > HUAWEI Assistant > AI Voice > Wake with Power button, and enable Wake with Power button.
-
Page 18
This feature is only available in some countries and regions. Play Videos with Voice Commands Wake up AI Voice and give voice commands such as «Play video», «Play Friends in HUAWEI Video», «Show me a funny video», or «Play a Coldplay video». -
Page 19
Smart Features Speech Translation AI Voice allows you to translate your voice or text input so you can communicate with foreign friends easily. This feature is only available in some countries and regions. • Please make sure your device has been updated to the latest system version. •… -
Page 20
When you see content you are interested in on the screen, wake up AI Touch with AI Voice to identify onscreen objects and obtain more relevant information. Go to Settings > HUAWEI Assistant > AI Touch and enable AI Touch. This feature is only available in some countries and regions. -
Page 21: Ai Lens
Smart Features Shop with AI Voice Go to Settings > HUAWEI Assistant > AI Touch and enable AI Touch. When you see an item you wish to buy on your device, wake up AI Voice and ask questions or give commands such as «How much is the cosmetics in the screen», «I want to buy the electric fan in the screen», or «Help me find the same style skirt on the screen».
-
Page 22: Ai Touch
When you see any content that you are interested in on your device, touch and hold the screen with two fingers spread slightly apart to bring up AI Touch to learn more. Go to Settings > HUAWEI Assistant > AI Touch and enable AI Touch. Shop with AI Touch…
-
Page 23: Huawei Print
Bluetooth and Wi-Fi and log in to your HUAWEI ID on your phone. For other devices, perform the following settings: Vision: Ensure that it is connected to the same LAN and logged in to the same HUAWEI ID •…
-
Page 24: Media Controller
Transfer MeeTime Calls and Audio or Video Being Streamed to Other Devices When you are making MeeTime calls on your device, watching videos (such as in HUAWEI Video, Youku, or other video streaming apps), or listening to music, you can transfer any of these ongoing tasks to another device via Device+ and pick up from where you left off on the new device.
-
Page 25
Connect your device to an audio device via Bluetooth or other methods. After a Vision product is connected to your device via Bluetooth, you can also connect it to the same Wi-Fi network and log in to the same HUAWEI ID as your device to perform more operations. -
Page 26: Camera And Gallery
Camera and Gallery Take Photos Take Photos The figures are for reference only. Open Camera. You can then: Focus: Touch the location you want to focus on. •…
-
Page 27
Camera and Gallery To adjust focus and metering separately, touch and hold the viewfinder and drag the respective frame or ring to the desired location. Adjust brightness: Touch the viewfinder. When the symbol appears next to the • focus frame, drag it up or down. Zoom in or out: On the viewfinder, pinch in or out, or drag the zoom slider. -
Page 28: Shoot In Portrait, Night, And Wide Aperture Modes
Camera and Gallery When shooting, you’ll see a number in the viewfinder, which indicates how many photos you’ve taken so far. Release your finger to stop shooting. Select the Burst Photos You Want to Keep Open Gallery. Touch a burst photo (which is tagged with ), then touch Swipe through the burst photos, select the ones you want to keep, then touch follow the onscreen instructions.
-
Page 29
Camera and Gallery Use the Front Camera to Take Night Portraits To take a selfie at night or when there is not sufficient light around you, you can use the front camera in Night mode. In a dim environment, you can turn on the flash to get an illuminated photo of your face. Go to Camera or go to Camera >… -
Page 30: Ai Camera
Camera and Gallery Shoot Wide Aperture Videos Wide aperture mode allows you to shoot photos and videos with a blurred background while your subject remains in sharp focus. Open Camera or go to Camera > More(depending on your device model) and select Aperture mode.
-
Page 31: Moving Pictures
Camera and Gallery Touch and hold to start recording. After the recording is complete, add text or directly save the emoji. The emoji will be saved to Gallery in GIF format. Use 3D CuteMoji to Record Videos Open Camera or go to Camera > More(depending on your device model), select AR lens mode, and touch 3D CuteMoji.
-
Page 32: Pro Mode
, then select Save as video or Save as GIF. Share Moving Pictures You can share moving pictures with Huawei or Honor devices using various methods, such as Wi-Fi Direct, Bluetooth, or Huawei Share. Go to Gallery > Albums > Camera, touch and hold to select the moving pictures you want to share, then touch to share them.
-
Page 33
Camera and Gallery The figures are for reference only. Open Camera or go to Camera > More (depending on your device model), and select Pro mode. From there, you can: Adjust the metring mode: Touch M and select a metring mode. •… -
Page 34
Camera and Gallery Metring mode Overview Focuses on light from a specific region, such as a subject’s eyes. Spot Adjust the ISO sensitivity: Touch ISO and drag the slider. • In low-light settings, you’ll generally want to increase the ISO sensitivity. In well-lit settings, you’ll want to reduce it to avoid image noise. -
Page 35: Record Videos
Camera and Gallery Metring Description Mode Measures the light in the whole frame. Applicable when shooting Matrix natural landscapes. Concentrates on the light at the centre of the screen. Applicable when Centre shooting portraits. Concentrates on the light in a small area of the screen, such as the Spot subject’s eyes.
-
Page 36: Slow-Mo Recording
Camera and Gallery Capture Video Open Camera and select Video mode. Adjust the following settings: Zoom in or out: Pinch in or out on the viewfinder, or drag the zoom slider. • Focus: Touch the location you want to focus on. Touch and hold the viewfinder to lock •…
-
Page 37: Time-Lapse Photography
Camera and Gallery Shoot Slow-Mo Videos Use Slow-mo mode to capture fleeting moments in detail. Adjust the slow motion speed based on how slow you want your footage to appear. With a higher speed you’ll get slower playback. The available slow motion speeds vary by device. 256x: suitable for recording shooting, explosion, or other extreme fast-paced action scenes.
-
Page 38: Adjust Camera Settings
Camera and Gallery Use Time-Lapse to Create a Short Video You can use Time-lapse to capture images slowly over several minutes or even hours, then condense them into a short video. This allows you to capture the beauty of change – blooming flowers, drifting clouds, and more.
-
Page 39
Camera and Gallery Enable Assistive grid. Grid lines will then appear in the viewfinder. Place the subject of your photo at one of the intersecting points, then touch the shutter button. Use Mirror Reflection When using the front camera, touch , then enable or disable Mirror reflection. -
Page 40: Manage Gallery
Camera and Gallery Manage Gallery View Photos and Videos In Gallery, you can view, edit, and share your photos and videos, as well as browse the clips automatically generated from them. The figures are for reference only. View by Shooting Time Open Gallery.
-
Page 41
Multi-Device Collaboration in Settings. If neither of the two switches can be found on your device, it indicates that this feature is not supported. Enable Wi-Fi and Bluetooth and log in to the same HUAWEI ID on your device and the device you want to connect to. -
Page 42
Camera and Gallery If your device cannot connect to the target device, connect them to the same router or personal hotspot, log in to the same HUAWEI ID, and enable Bluetooth on both devices. Touch the Other devices tab to view connected devices. If the device you want to browse from is not connected, touch the device name and initiate a connection as prompted. -
Page 43
Camera and Gallery Basic Editing Open Gallery, touch the photo you want to edit, and then touch . You can then: Crop and rotate: Touch Crop, select a frame, then drag the grid or its corners to select • which part you want to keep. You can drag the photo in the frame, or use two fingers to zoom in or out to adjust the displayed part of the photo. -
Page 44
Camera and Gallery Collage You can use the collage feature in Gallery to quickly combine multiple photos into one for easier sharing. You can access the collage feature in the following ways (depending on your device model): On the Discover tab, touch Create collage, select some photos, then touch Create. •… -
Page 45
Camera and Gallery Change Album Covers Go to Gallery > Albums and touch the album you want to set. Go to > Change album cover and select the image you want to set as the album cover. Move Photos and Videos Open an album, then touch and hold to select the photos and videos you want to move. -
Page 46: Highlights
Camera and Gallery Highlights Introduction to Highlights Gallery automatically creates Highlights albums from your best photos and videos based on time, location, and theme information, and even generates a short video clip so you can walk down memory lane and instantly relive the good times. To start using Highlights, go to Camera >…
-
Page 47
Camera and Gallery Go to > Delete and then touch Delete. After you delete a Highlights album, it cannot be restored, and the photos and videos in the Highlights album will remain in Gallery. -
Page 48: Apps
MeeTime Use MeeTime to Make Calls Use MeeTime to make high-quality video or voice calls with contacts who have Huawei devices (such as phones and tablets), and share your screen during calls. Thanks to the GPU Turbo technology, the video call resolution will be optimised automatically when the network signal is weak.
-
Page 49
Apps Touch to mute MeeTime. • Touch to use the speaker. • Touch to switch to a voice call. • Touch to share the screen. • To view or manage your call logs, touch Calls. Share Your Device Screen During a MeeTime Call During a MeeTime video call, you can share your screen with the other party and doodle on the screen. -
Page 50: Notepad
Apps Touch to add another phone number if only one phone number has been linked. • Touch to delete any numbers or add new ones if multiple phone numbers have • been linked. In the list of Outgoing number (this device), select one of the added phone numbers •…
-
Page 51
Apps Open Notepad and go to Notes > > > Add card. Point the camera to the certificate or bank card you want to scan, and touch to scan it one by one or consecutively. Touch to preview the scanned copies. (Optional) If you manually unskew the scanned copies, touch to preview them again. -
Page 52
Apps Enter your to-do item. Touch , set a reminder time, then touch OK. Touch to mark the to-do item as important. Touch Save to save your settings. Set Repeated Reminders for a To-do Item If you specify a time for a to-do item, you can select a repeat mode for it (for example, Never, Every day, Every week, Every month, or Every year), and your device will repeatedly prompt you to complete the to-do item at the specified time. -
Page 53
Apps Touch and hold a note or to-do item, select the ones you want to classify under the same • category, then touch to move them to the target category. Items in an Exchange account cannot be moved. Sync Notepad Items Sync Exchange email data: You can sync the data in your Exchange account to Notepad to record important events anytime and anywhere. -
Page 54
Apps To restore a deleted Notepad item, touch All notes or All to-dos, select the item you want to restore in Recently deleted, then touch… -
Page 55: Settings
Settings Biometrics & Password Set Fingerprints You can enrol a fingerprint and then use it to unlock the screen and access your Safe, App lock, and more. Enrol a Fingerprint Go to Settings > Biometrics & password > Fingerprint ID or Settings > Biometrics & password >…
-
Page 56
Settings Please make sure your device has been updated to the latest system version. Use Your Fingerprint to Access a Locked App Go to Settings > Biometrics & password > Fingerprint ID or Settings > Biometrics & password > Fingerprint ID > Fingerprint management(depending on your device model) and enter the lock screen password. -
Page 57: About Phone
Disable facial data for certain features: Disable Unlock device, or Access App Lock as • required. This will not delete your facial data. Delete facial data: Touch Delete facial data and follow the onscreen instructions to delete • your facial data. About Phone Legal Notice Copyright © Huawei 2022. All rights reserved.
-
Page 58
All statements, information, and recommendations in this guide do not constitute a warranty of any kind, express or implied. Please visit https://consumer.huawei.com/en/support/hotline for up to date support hotline and email address information for your country or region. Model: JNY-LX1…
This manual is also suitable for:
Jny-lx1
![]()
User Guide
Contents
Essentials
|
Basic Gestures |
1 |
||
|
System Navigation |
3 |
||
|
Phone Clone |
4 |
||
|
Lock and Unlock Your Screen |
5 |
||
|
Get Familiar with the Home Screen |
6 |
||
|
N fi |
n and Status Icons |
7 |
|
|
Shortcut Switches |
9 |
||
|
Home Screen Widgets |
9 |
||
|
Set Your Wallpaper |
9 |
||
|
Screenshots & Screen Recording |
10 |
||
|
View and Clear N fi |
n |
12 |
|
|
Adjust Sound Settings |
12 |
||
|
Enter Text |
13 |
||
|
Split-screen Mode & Floating Window |
13 |
||
|
Power On and ff or Restart Your Device |
15 |
||
|
Charging |
15 |
Smart Features
|
AI Lens |
18 |
|
HiTouch |
18 |
|
Easy Projection |
18 |
|
Huawei Share |
19 |
Camera and Gallery
|
Launch Camera |
22 |
|
Take Photos |
22 |
|
Shoot in Portrait, Night, and Wide Aperture Modes |
24 |
|
Master AI |
26 |
|
Zoom to Take Photos |
26 |
|
Super Macro |
27 |
|
Take Panoramic Photos |
27 |
|
AR Lens |
28 |
|
Light Painting |
28 |
|
Take HDR Photos |
30 |
|
Moving Pictures |
30 |
|
Add Stickers to Photos |
31 |
|
Documents Mode |
31 |
|
Pro Mode |
32 |
|
Record Videos |
33 |
|
Slow-Mo Recording |
33 |
i
|
Contents |
|
|
Time-Lapse Photography |
34 |
|
Filters |
35 |
|
Edit Camera Modes |
35 |
|
Adjust Camera Settings |
35 |
|
Manage Gallery |
36 |
|
Gallery Smart Categorization |
41 |
|
Huawei Vlog Editor |
41 |
|
Huawei Vlogs |
42 |
|
Highlights |
43 |
Apps
|
Apps |
45 |
|
Contacts |
46 |
|
Phone |
49 |
|
Messaging |
55 |
|
Calendar |
57 |
|
Clock |
58 |
|
Notepad |
60 |
|
Recorder |
61 |
|
|
62 |
|
Calculator |
66 |
|
Flashlight |
67 |
|
Compass |
67 |
|
Mirror |
67 |
|
App Twin |
68 |
|
Quickly Access Frequently Used App Features |
68 |
|
Optimizer |
68 |
|
Phone Clone |
71 |
|
HiSuite |
72 |
|
Tips |
74 |
Settings
|
Search for Items in Settings |
75 |
|
|
Wi-Fi |
75 |
|
|
Bluetooth |
76 |
|
|
Mobile Data |
77 |
|
|
More Connections |
81 |
|
|
Home Screen & Wallpaper |
86 |
|
|
Display & Brightness |
87 |
|
|
Sounds & Vibration |
91 |
|
|
N fi |
n |
93 |
|
Biometrics & Password |
95 |
|
|
Apps |
97 |
|
|
Battery |
98 |
ii
|
Contents |
|
|
Storage |
99 |
|
Security |
100 |
|
Privacy |
102 |
|
Digital Balance |
104 |
|
Accessibility Features |
105 |
|
Users & Accounts |
107 |
|
System & Updates |
108 |
|
About Phone |
111 |
iii
Essentials
Basic Gestures
Basic Gestures
System Navigation Gestures
Go to  Settings > System & updates > System navigation and ensure that Gestures is selected.
Back
Swipe inward from the left or right edge to return to the previous screen.
Back to the home screen
Swipe up from the bottom to go to the home screen.
View recent tasks
Swipe up from the bottom of the screen and hold to view recent tasks.
Close an app
On the recent tasks screen, swipe up on an app preview to close the app.
Access in-app menus
In applicable third-party apps, swipe inward from the left or right edge near the top of the screen.
1

Essentials
More Gestures
Split the screen
Swipe up on the screen with three fin
Access Home screen editing mode
|
Pinch two fin |
together on the home screen. |
Display the shortcut panel on the lock screen
Swipe up from the bottom of the lock screen.
Display the search bar
Swipe down on the home screen.
Swipe down from the status bar.
Button Shortcuts
Power ff and restart
Press and hold the Power button until the Power ff and
Restart options appear.
2
Essentials
Increase the volume
Press the Volume up button.
Decrease the volume
Press the Volume down button.
Take a screenshot
Press the Volume down and Power buttons simultaneously.
Ultra snapshot
Double-press the Volume down button when the screen is ff or locked to take a photo.
System Navigation
Change the Navigation Mode
Go to  Settings > System & updates > System navigation to select a navigation mode according to your preferences.
Navigate with Gestures
Go to  Settings > System & updates > System navigation and enable or disable Gestures.
After enabling Gestures, you can:
•Go back to the previous screen: Swipe inward from the left or right edge.
•Return to the home screen: Swipe up from the bottom of the screen.
•Access the recent tasks screen: Swipe up from the bottom of the screen and hold.
•Close an app from the recent tasks screen: Swipe up on an app preview.
3

Essentials
•Access in-app menus: In applicable third-party apps, swipe inward from the left or right edge near the top of the screen.
Three-Key Navigation
Go to  Settings > System & updates > System navigation, and select Three-key navigation.
Touch Settings to select the navigation key combination you prefer. The icons on the navigation bar are as follows:
• : Back key to return to the previous screen, exit an app, or close the onscreen keyboard.
• : Home key to return to the home screen.
• : Recents key to display the recent tasks screen. Touch and hold it to access Split-screen
mode.
|
• |
: N fi |
n key to open the n fi |
n panel. |
Customize the Navigation Key Combination
Go to Three-key navigation > Settings. You can:
•Select a navigation key combination.
•Enable Hide navigation keys to allow you to hide the navigation bar when not in use.
Navigation Dock
Go to  Settings > System & updates > System navigation > Navigation dock, and enable Navigation dock.
After the Navigation dock button appears, you can:
•Drag the button to your desired position.
•Touch the button to go back.
•Double-touch the button to go back two steps.
•Touch and hold the button, then release it to go back to the home screen.
•Touch and hold the button, then swipe left or right to view recent tasks.
Phone Clone
Phone Clone
Phone Clone lets you quickly and seamlessly move all the basic data (including contacts, calendar, images, and videos) from your old phone to your new phone.
4
Essentials
Clone Data from an Android Device
1 On your new phone, open  Phone Clone (in the Tools folder by default). Alternatively,
go to  Settings > System & updates > Phone Clone, touch This is the new phone, then touch Huawei or Other Android.
2 Follow the onscreen instructions to download and install Phone Clone on your old device.
3On your old device, open  Phone Clone and touch This is the old phone. Follow the onscreen instructions to connect your old device with your new phone by scanning a code or connecting manually.
4On your old device, select the data you want to clone, then touch Transfer to start cloning.
 Phone Clone is only available on phones running Android 4.4 or later.
Clone Data from an iPhone or iPad
On your new phone, open  Phone Clone (in the Tools folder by default). Alternatively,
go to  Settings > System & updates > Phone Clone, touch This is the new phone, then touch iPhone/iPad.
Follow the onscreen instructions to download and install Phone Clone on your old device.
3On your old device, open  Phone Clone and touch This is the old phone. Follow the onscreen instructions to connect your old device with your new phone by scanning a code or connecting manually.
4On your old device, select the data you want to clone, then follow the onscreen instructions to complete the data cloning.
 Phone Clone is only available on phones running iOS 8.0 or later.
Lock and Unlock Your Screen
Lock and Unlock Your Screen
Lock the Screen
If your phone remains inactive for a period of time, it will automatically lock the screen and enter sleep mode to save power.
Alternative, you can manually lock the screen in either of the following ways:
|
• |
Press the Power button. |
|
|
• |
On the home screen, pinch together two fin |
to enter screen editing mode. Touch |
|
Widgets, then drag the Screen Lock icon to the home screen. You can now touch the |
||
|
Screen Lock icon to lock the screen. |
5
Essentials
Set the Screen Timeout Period
Go to  Settings > Display & brightness > Sleep and select a screen timeout period.
Wake Screen
You can turn on the screen in either of the following ways:
•Press the Power button.
•Go to  Settings > Accessibility features > Shortcuts & gestures > Wake screen and enable Raise to wake.
Enter the Password to Unlock the Screen
Once the screen is turned on, swipe from any position on the screen to display the password input panel. Then enter your lock screen password.
Use Face Unlock
Turn on the screen and align it with your face. Your phone will unlock once your face is recognized.
Unlock Your Phone with Your Fingerprint
|
Press an enrolled fin |
against the fin |
n sensor to unlock your phone. |
Change the Lock Screen Display
Go to  Settings > Home screen & wallpaper, touch Lock screen signature, then type text to display on the lock screen.
To remove the signature, touch Lock screen signature and delete the text.
Access Apps from the Lock Screen
You can access commonly used apps such as Camera, Recorder, and Calculator from the lock screen.
•On the lock screen, swipe up on the  icon to open Camera.
•On the lock screen, swipe up from the bottom of the lock screen to open the shortcut panel. Shortcuts for Recorder, Flashlight, Calculator, and Timer will be available for you to choose from.
Get Familiar with the Home Screen
Get Familiar with the Home Screen
|
From the home screen, you can: |
|
|
• Check the status of your phone and n fi |
n from the status bar at the top of the |
|
screen. |
6

Essentials
• Swipe left or right to view apps and widgets displayed on the home screen.
|
N |
fi |
and Status Icons |
|
N |
fi |
and Status Icons |
 Network status icons may vary according to your region or network service provider. Supported functions vary according to the device model. Some of the following icons may not be applicable to your phone.
|
5G network connected |
4G network connected |
|
3G network connected |
2G network connected |
7
Essentials
|
Full signal strength |
Roaming |
|||||
|
Data saver enabled |
SIM card not found |
|||||
|
Hotspot enabled |
Hotspot connected |
|||||
|
Calling |
VoLTE enabled |
|||||
|
Wi-Fi network connected |
SkyTone in use |
|||||
|
Hotspot disconnected |
Network being switched by Wi-Fi |
|||||
|
+ |
||||||
|
Airplane mode enabled |
Alarms set |
|||||
|
Battery empty |
Battery low |
|||||
|
Charging |
Quick charging |
|||||
|
Super charging |
Power saving mode enabled |
|||||
|
Bluetooth enabled |
Bluetooth device battery |
|||||
|
Bluetooth device connected |
VPN connected |
|||||
|
Driving mode |
Projection device connected |
|||||
|
Location service enabled |
Eye comfort mode enabled |
|||||
|
Headset connected |
Headset with a microphone |
|||||
|
connected |
||||||
|
Missed call |
Unread SMS |
|||||
|
Microphone disabled |
Muted |
|||||
|
More n fi |
n |
Vibrate only |
||||
|
NFC enabled |
Do Not Disturb mode enabled |
|||||
|
Data syncing |
Data sync failed |
|||||
|
Performance mode enabled |
New emails |
8

|
Essentials |
||
|
Event reminders |
Digital balance enabled |
|
Shortcut Switches
Shortcut Switches
Turn on a Shortcut Switch
Swipe down from the status bar to open the n fi n panel, then swipe down on it again to show all shortcuts.
•Touch a shortcut switch to enable or disable the corresponding feature.
•Touch and hold a shortcut switch to enter the settings screen for that feature.
•Touch  to open Settings.
Customize Shortcut Switches
Touch  , touch and hold an icon, then drag it to the desired position.
Home Screen Widgets
Home Screen Widgets
You can add, move, or delete home screen widgets, such as Screen lock, Weather, Notepad, Clock, Contacts, and Calendar, according to your personal requirements.
Add a Widget to the Home Screen
|
Pinch together two fin |
on the home screen to access the Home screen editor. |
Touch Widgets, then swipe left to view all widgets.
3Some widgets, like Weather, come in various formats. Touch the widget to view all formats, then swipe right to return.
|
4 Touch a widget to add it to the home screen. |
If there is no room on the current screen |
|
page, touch and hold it, then drag it to a ff |
n screen page. |
Move or Delete a Widget
Touch and hold a widget on your home screen until your phone vibrates, then drag it to the desired position or touch Remove.
Set Your Wallpaper
9

Essentials
Set Your Wallpaper
Use a Preset Wallpaper
|
1 |
Go to |
Settings > Home screen & wallpaper > Wallpaper. |
|
|
2 |
Touch an image you want to set as the wallpaper. |
||
|
3 |
Set the following according to your preferences: |
||
|
• Blur: applies a blur ff |
which can be adjusted by dragging the slider. |
•Scrollable: enables the wallpaper to be scrollable on the home screen.
4Touch  , then determine whether you’d like to set it as the wallpaper for the Lock screen, Home screen, or Both.
Set an Image from Gallery as Your Wallpaper
1 Open  Gallery, and open the image you want to set as your wallpaper.
|
2 Go to |
> Set as > Wallpaper, then follow the onscreen instructions. |
Screenshots & Screen Recording
Take a Screenshot
Use a Key Combination to Take a Screenshot
Press and hold the Power and Volume down buttons simultaneously to take a screenshot.
Use a Shortcut to Take a Screenshot |
||
|
Swipe down from the status bar to open the n fi |
n panel, then swipe down on it again |
|
|
to show all shortcuts. Touch |
to take a screenshot. |
Share and Edit a Screenshot, or Switch to Scrollshot
10
Essentials
After you take a screenshot, a thumbnail will display in the lower left corner of the screen. Then you can:
•Swipe down on the thumbnail to take a scrolling screenshot.
•Swipe up on the thumbnail to select a sharing mode and share the screenshot with your friends.
•Touch the thumbnail to edit or delete it.
Screenshots are saved to Gallery by default.
Record the Screen
Record your screen activities in sharable videos to compose a tutorial, show ff your awesome gaming skills, and a lot more.
Use a Key Combination to Start Screen Recording
Press and hold the Power and Volume up buttons simultaneously to start screen recording. To stop recording, press and hold both buttons again.
Use a Shortcut to Start Screen Recording |
||
|
1 |
Swipe down from the status bar to open the n fi |
n panel, then swipe down on it |
|
again to show all shortcuts. |
||
|
2 |
Touch Screen Recorder to start screen recording. |
11

Essentials
To stop the recording, touch the timer at the top of the screen. The recording will be saved to Gallery.
Record Your Voice During Screen Recording
You can enable the microphone to record your voice while recording the screen.
Once you have started a screen recording, touch the microphone icon and ensure that it is
displayed as  . Your voice can then also be recorded.
If the microphone is disabled (i.e. if it is displayed as  ), you will only be able to record system sounds (such as gameplay sounds). If you want the screen to be recorded in silence, mute your phone and turn ff the music and any other media sound before starting the screen recording.
View and Clear N fi
View and Clear N fi
View N fi
When there is a n fi status bar to open the n
n reminder, you can turn on the screen and swipe down from the fi n panel and view the n fi n
|
Clear N |
fi |
||||||
|
• |
Swipe right on a n |
fi |
n reminder to clear the n fi |
n |
|||
|
• |
Touch |
at the bottom of the n fi |
n panel to clear all n fi |
n |
|||
|
Block, Silence, or Delay N |
fi |
||||||
|
Swipe left on a n fi |
n |
then touch |
to block, silence, or delay n |
fi |
n from that |
||
|
source. |
|||||||
|
Some system n |
fi |
n can’t be blocked, cleared, or delayed. |
Adjust Sound Settings
Adjust Sound Settings
Press a Volume Button to Adjust the Volume
Press the Volume up or down button to adjust the volume.
Press the Power Button to Mute Your Device When It Rings
When your phone rings for an incoming call or alarm, you can press the Power button to mute it.
12

Essentials
Flip to Mute or Raise to Reduce the Ringtone Volume
When there is an incoming call, you can fl your phone to mute it, or raise it up to reduce the ringtone volume.
For the features to take ff go to  Settings > Accessibility features > Shortcuts & gestures > Mute ringtone/Reduce volume and make sure that Flip to mute ringtone and Raise to lower volume are enabled.
Set the Default Volume
Go to  Settings > Sounds & vibration, then you can set the volume for the following items:
•Media (video, games, music, and more)
•Ringtone
•Alarms
•Calls
Use a Shortcut to Switch Between Ring, Vibrating, or Mute Mode
|
1 |
Swipe down from the status bar to open the n fi |
n panel, then swipe down on it |
|||
|
again to show all shortcuts. |
|||||
|
2 |
Touch the |
Sound, |
Silent, or |
Vibration icon to switch between ff n |
|
|
modes. |
Enter Text
Edit Text
You can select text displayed on your screen, copy or cut it to the clipboard, then paste it somewhere else. You can also share it in multiple ways.
Touch and hold the text until 
 appears.
Drag  and
and  to select the text you need, or touch Select all to select all the text. Touch Copy or Cut according to your requirement.
Touch the point where you want to paste the text, then touch Paste.
Split-screen Mode & Floating Window
Split-screen Mode
You can split the screen of your phone to use two apps simultaneously.
13

Essentials
Enable Split-screen Mode
1 Open an app.
2Enable split-screen mode using any of the following methods:
•Swipe up from the middle of the screen with three fin
•When using gesture navigation, swipe up from the bottom of the screen and hold to enter the Recent tasks screen. Then touch  .
.
•When using three-key navigation, touch and hold the  key.
key.
3 Open the other app to start multitasking.
Adjust the Size of the Split-screen Panes
Drag  in the middle of the split screen line to the desired position on the screen.
  This feature can only be used when your phone is in the portrait orientation.
Switch the Split-screen Panes
 If the home screen is displayed in either of the split-screen panes, you won’t be able to switch the panes.
Touch  in the middle of the split screen line, then touch
  .
.
Disable Split-screen Mode
Touch  in the middle of the split screen line, then touch
  .
.
Floating Window
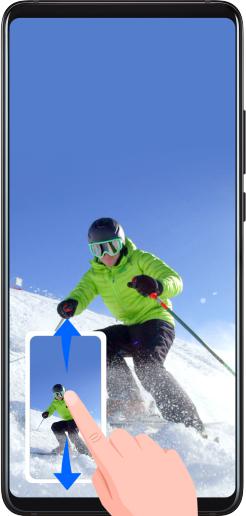
While watching videos or playing games in Full-screen mode, you can view and reply to incoming messages in a fl n window without having to stop what you’re doing.
Display the Floating Window
Support for the fl n window feature may vary depending on the app.
1Before using this feature, make sure your phone is not in Simple mode, Ultra power saving mode, or One-handed mode.
|
2 |
When using your phone in Full-screen mode, touch |
in the n fi |
n banner for new |
|||
|
message alerts to be displayed in a fl |
n |
window. |
||||
|
3 |
You can reply to messages directly in the fl |
n window. |
14

Essentials
Resize the Floating Window
Touch and hold the edge of the fl n window, then drag it inwards or outwards to expand or reduce the window size.
Close the Floating Window
Touch  on the fl n window to close it.
|
Power On and |
ff or Restart Your Device |
|
Power On and ff or Restart Your Device |
|
|
Power Your Device On and |
ff |
To power ff your device, press and hold the Power button for a few seconds, touch Power ff and Touch to power ff.
To power on your device, press and hold the Power button for a few seconds until your device vibrates and displays the logo.
Restart Your Device
Restart your device on a regular basis to clear the cache and keep the device in an optimal state. A restart can sometimes resolve the issue when your device encounters a problem. Just press and hold the Power button for a few seconds, then touch Restart and Touch to restart.
Force Restart Your Device
If your device isn’t working or won’t turn ff normally, you can force restart it. Just press and hold the Power button for 10 seconds or longer.
Charging
15

Essentials
Charge Your Phone
Your phone will alert you when it is running out of power. Please make sure to charge your phone in time to prevent it from turning ff automatically when the power runs out.
Precautions for Charging
•Charge your phone using the standard adapter and USB cable that came with your device. Using other chargers or USB cables may cause repeated restarts, slow charging,
overheating, or other undesirable ff
•Your phone will automatically run a safety check when a charger or other device is connected to the USB port. If moisture is detected in the USB port, your phone will automatically activate safety measures and stop charging. Disconnect your phone from the USB port and wait until the USB port is dry.
•The time required to fully charge the battery depends on the ambient temperature and age of the battery.
•Batteries have a limited number of charge cycles. When the battery life becomes noticeably shorter, go to an authorized Huawei Customer Service Center to replace the battery.
•Do not cover your phone or charger during charging.
•Your phone may heat up when you have been using it for an extended period of time, especially in high temperatures. In this case, stop charging, disable some features, and move your phone to a cool place.
•Please do not use your phone while it is charging.
•If your phone does not respond after you press and hold the Power button, the battery may have run out. Charge for 10 minutes and then power it on.
Using the Charger that Came with Your Device
Use the USB cable that came with your phone to connect your phone and the adapter. Plug the adapter into a power socket.
Charging Your Phone with a PC
1 Connect your phone to a PC or other device using a USB cable.
2When the Use USB to dialog box is displayed on your phone, touch Charge only.
If another option has been set previously, the dialog box will not pop up. Swipe down
|
from the status bar to open the n fi |
n panel, touch Settings, then select Charge |
|
only. |
Overview of Battery Icons
You can check the battery level from the battery icon on the phone screen.
|
Battery Icon |
Battery Level |
|
Less than 4% battery remaining. |
|
16
![]()
Essentials
|
Battery Icon |
Battery Level |
|
Charging, less than 10% battery remaining. |
|
|
Charging, 10% to 90% battery remaining. |
|
|
Charging, at least 90% battery remaining. |
|
|
If 100% is displayed next to the battery icon, or a charging complete |
|
|
message is displayed on the lock screen, the battery is fully charged. |
|
Reverse Charging with an OTG Cable
On-The-Go (OTG) is a USB transmitting technology that allows a phone to directly access fi on a USB fl drive or digital camera, or connect to an external device such as a keyboard or mouse, with the help of an OTG cable.
You can use your phone to charge other devices using an OTG cable.
1 Connect your phone with the device to be charged using an OTG cable.
2When the Use USB to dialog box is displayed on your phone, touch Reverse charge. If another option has been set previously, the dialog box will not pop up. Swipe down
|
from the status bar to open the n fi |
n panel, touch Settings, and then select |
|
Reverse charge. |
3 Follow the onscreen instructions on the device to be charged to start charging.
17
Smart Features
AI Lens
Scan Codes
HiVision can read various QR codes and instantly direct you to the corresponding app screen.
Open the camera, touch  , then touch
  .
.
Place the QR code within the scan frame and wait for it to be recognized.
Scan to Shop
The Shopping feature of HiVision lets you scan goods to get purchase recommendations for similar items online.
Open the camera, touch  , then touch
  .
.
|
Frame the target object in the v wfin |
You will be given purchase recommendations |
once the object has been recognized. You can also touch  to take a photo, which will be recognized automatically.
HiTouch
Convenient Shopping
When you see an item you wish to buy on your phone screen, touch and hold it with two fin to search for it online, and touch the displayed links to view more details.
Go to  Settings > Accessibility features > HiTouch, then enable HiTouch.
|
Touch and hold the item you wish to purchase with two fin |
spread slightly apart. |
||
|
After the subject is |
n fi |
links to the item on ff n |
shopping platforms will then |
|
display. |
|
4 You can also adjust the position and size of the |
n fi |
n box to select other items |
|
you’re interested in. |
5 Touch the links to view product details and make a purchase.
Easy Projection
Wireless Projection
You can connect your phone to an external display (for example, a TV) wirelessly.
1 Based on the model and functions of your external display, do the following:
18

Smart Features
•If the external display supports Miracast, enable wireless projection on it.
•If not, use a wireless HDMI adapter to connect your phone and external display. Ensure that the wireless HDMI adapter is connected to a power supply.
To check whether your external display supports Miracast and how to enable wireless projection on it, consult the user guide or customer service of the external display manufacturer.
|
2 |
Swipe down from the status bar to open the n fi |
n panel, then touch |
to turn on |
|
|
Wi-Fi. |
||||
|
3 |
Swipe down further on the n fi |
n panel to enable Wireless Projection. Your phone |
will now search for the external display or the wireless HDMI adapter.
Alternatively, go to  Settings > More connections > Easy Projection and enable Wireless projection.
4Touch the name of the external display or the wireless HDMI adapter on the search result list to start projecting.
Huawei Share
Huawei Share
Huawei Share is a wireless sharing technology that allows you to quickly transfer images, videos, documents, and other types of fi between devices. This technology relies on Bluetooth to discover nearby devices, and uses Wi-Fi Direct to transfer fi without using mobile data.
Enable or Disable Huawei Share
You can enable or disable Huawei Share in either of the following ways:
• Swipe down from the status bar to open the n fi n panel, then touch  to enable or disable Huawei Share. Touch and hold the switch to enter the Huawei Share settings screen.
• Go to  Settings > More connections > Huawei Share, enable or disable Huawei Share. Enabling Huawei Share automatically turns on Wi-Fi and Bluetooth.
Quickly Share Files Between Your Phones Using Huawei Share
You can use Huawei Share to quickly share fi between Huawei phones. The recipient can preview the fi before they are sent, then view the full content of the fi once they have been received. For example, the recipient can view received pictures or videos in Gallery.
On the recipient device, enable Huawei Share.
On the sending device, touch and hold a fi select the fi you want to share, then touch
 . Touch Huawei Share, then touch the icon of the recipient device to send the fi
19
Smart Features
 Operations may vary if you are sharing fi from apps directly.
3 On the recipient device, touch Accept to accept the transfer.
To view the fi received, go to Files, then go to Internal storage > Huawei Share on the
Categories tab.
Received pictures or videos can also be found in  Gallery > Albums > Huawei Share.
Share Files Between Your Phone and Computer
You can use Huawei Share to quickly and easily share fi wirelessly between your phone and a computer (Windows PC or Apple Mac).
1 Make sure your phone and computer are connected to the same Wi-Fi network.
2On your phone, enter the Huawei Share settings and enable Huawei Share and
Computer share.
3 Make a note of what’s shown next to the Name shown on computers and the user name and password under fi on computers.
4On your computer, go to:
•Windows: This PC (Computer) > Network.
•macOS: Finder > Go > Network.
 Currently, this feature is only available on Macs running macOS 10.8 to 10.14.
5On your computer, double-click the name of your phone and enter the user name and password that you made a note of earlier.
6 Open a shared folder of your phone such as the Internal storage or Album folder, then view, edit, or copy fi to the computer, or copy fi from the computer to the shared folder to store them in your phone.
If you edit fi in the shared folder on your computer, the changes will be synced to your phone automatically. Similarly, if you edit any fi in the shared folder on your phone, the changes will be synced to your computer.
One-Touch Printing with Huawei Share
When a printer that supports Huawei Share is nearby, you can use Huawei Share to fin the printer and print out pictures or PDF fi from your phone.
1Depending on the type of printer, ensure the following:
•Wi-Fi capable printers: The printer must be powered on and connected to the same network as your phone.
•Wi-Fi Direct capable printers: The printer must be powered on and have Wi-Fi Direct enabled.
•Bluetooth capable printers: The printer must be powered on and discoverable.
2 On your phone, preview the fi to be printed, then go to Share > Huawei Share.
3Once the printer has been discovered, touch its name on your phone, and adjust settings on the preview screen. Then touch PRINT to print.
20
Smart Features
If you are connecting a Bluetooth printer to your phone for the fi time, fin the printer on your phone, touch the printer name, then press and hold the Power button on the printer for about 1 second to nfi m the connection.
 For a list of supported printers, touch Learn more on the Huawei Share sharing screen, swipe left on the screen, then touch What printers are supported? to see the list.
21
Camera and Gallery
Launch Camera
Launch Camera
There are multiple ways to open the Camera app.
From the Home Screen
From the home screen, open  Camera.
From the Lock Screen
When the screen is locked, turn on the screen, then swipe up on the camera icon in the lower right corner to open the camera.
Using Ultra Snapshot
When enabled, simply double-press the Volume down button to open the camera when the screen is ff
Open  Camera.
Go to  > Ultra snapshot and select Open camera or Take a snapshot.
You can now open the camera or take a snapshot without unlocking your screen.
Take Photos
Take Photos
22

Camera and Gallery
|
1 |
Open |
Camera. |
|
|
2 |
You can then: |
||
|
• Focus: Touch where you want to focus. |
|||
|
To adjust focus and metering separately, touch and hold the v wfin |
and drag the |
||
|
individual frame or ring to the desired location. |
|
Adjust brightness: Touch the v |
wfin |
When the |
symbol appears next to the |
||
|
focus frame, drag it up or down. |
|||||
|
Zoom in or out: On the v wfin |
pinch in or out, or drag the zoom slider. |
||||
|
Turn the fl |
on or ff Touch |
and select |
(Auto), |
(On), |
( ff) or |
 (Always on).
Some features are only available when using the rear camera.
23
Camera and Gallery
3 Touch  to take a photo.
Take Burst Photos
Use Burst mode to take a sequence of photos in quick succession so you can choose the best one.
Burst shooting is only available when using the rear camera.
1 Open  Camera and select Photo mode.
2Touch and hold  or press and hold one of the Volume buttons to take a burst photo. When shooting, you’ll see a counter, which indicates how many photos you’ve taken so far.
|
3 Lift your fin |
to stop shooting. |
|
Once you have fin |
select photos you want to keep from the burst. |
Open  Gallery.
Touch a burst photo (which will be tagged with  ), then touch
  .
.
3Swipe through the burst photos, select the ones you want to keep, then touch  and follow the onscreen instructions.
4 To delete the whole burst photo, touch and hold to select the photo, then touch  .
.
Take Timed Photos
The camera timer allows you to set a time delay so you can get into position after you have touched the shutter button.
Open  Camera.
Go to  > Timer and select a delay option.
|
Return to the v wfin |
and touch the shutter button. Your phone will take a photo when |
|
the countdown ends. |
Use Voice Commands to Take Photos
You can use your voice to take photos without having to touch the shutter button.
Open  Camera.
Go to  > Audio control, enable Audio control, and select an audio control option.
|
Go back to the v wfin |
then say your command to take a photo. |
Shoot in Portrait, Night, and Wide Aperture Modes
24

Camera and Gallery
Shoot in Portrait, Night, and Wide Aperture Modes
Use Portrait Mode to Shoot Portraits |
|
|
Portrait mode lets you apply beauty, and blur ff |
to your photos to shoot stunning |
|
portraits. |
Open  Camera and select Portrait mode. Frame your subject in the v wfin
|
3 You can also: |
|||||||
|
• |
Enable beauty |
ff |
Touch |
and drag the slider to adjust beauty settings. A larger |
|||
|
value will produce a more distinct beauty |
ff |
To disable the beauty ff |
drag |
||||
|
each setting to its lowest value. |
|||||||
|
• |
Set blur ff |
Touch |
and select blur |
ff |
to your liking. |
4 Touch  to take a photo.
Take Night Shots
Night mode solves the issues caused by low light and night shooting to give your photos sharper details and brighter colors.
You can also use Night mode when shooting backlit subjects and scenes with fl w n water, such as waterfalls, to create a better contrast or a smooth, silky water ff
Open  Camera and select Night mode.
|
If you are using the rear camera, touch |
on the v wfin |
to adjust the ISO sensitivity |
|
or |
to adjust the shutter speed. |
3 Keep your phone steady and touch 

 .
.
4Your phone will adjust the exposure time based on the ambient brightness. Keep your phone steady.
|
Do not stop shooting before the countdown fin |
or your photos may come out blurry. |
Shoot Wide Aperture Photos and Videos
Wide aperture mode allows you to shoot photos and videos where the background is blurred while your subject remains in sharp focus.
1 Open  Camera > More and select Aperture mode.
2Touch where you want to focus. For best results, your phone needs to be within 2 meters (about 7 ft.) of your subject.
25

|
Camera and Gallery |
||
|
3 Touch |
in the v wfin |
and drag the slider to adjust aperture settings. A smaller |
aperture value will create a more blurred background.
4Touch the shutter button to shoot a photo or video. When recording, touch the v wfin to adjust the focus.
Edit Background Blur in Wide Aperture Photos
You can adjust the focus and background blur after you’ve taken a wide aperture photo.
Go to  Gallery > Albums > Camera.
Touch a photo tagged with  , then touch
  at the top of the photo.
3Follow the instructions to touch the photo to re-focus. Drag the slider at the bottom to adjust the aperture.
4 Touch  to save the settings.
Master AI
AI Camera
AI camera is a pre-installed camera feature that helps you take better photos by intelligently identifying objects and scenes and optimizing the camera settings accordingly.
AI camera is able to identify a variety of scenes, such as stages, beaches, blue skies, greenery, and text.
Open  Camera and select Photo mode.
Touch  to ensure that AI camera is enabled.
Frame the subject in the v wfin Once AI camera n fi what you are shooting, it will automatically recommend a mode (such as portrait, greenery, or text).
4To disable the recommended mode, touch  next to the mode text or touch
  to disable AI camera.
Zoom to Take Photos
Zoom to Take Photos
The zoom capabilities of your device’s camera allow you to capture more of a scene, or distant vistas.
Take Wide-Angle Photos
1 Open  Camera and select Photo mode.
26
![]()
Camera and Gallery
2 Touch  to ensure that AI camera is enabled.
3Aim the camera at the object you want to take a photo of. The camera will automatically recommend Wide mode if it detects a building. Touch Wide to have a wider angle of view.
You can also drag the zoom slider in the v wfin or pinch in or out to adjust the zoom level. A smaller value will result in a wider angle of view.
4 Touch  to take a photo.
 You will not be able to adjust the zoom when the resolution is set to the maximum value. The camera will automatically switch the resolution.
Take Photos from Far Away
1 Open  Camera and select Photo mode.
2Aim the camera at the distant object you want to take a photo of. Drag the zoom slider, or pinch in or out to adjust the zoom level.
You will not be able to adjust the zoom when the resolution is set to the maximum value. The camera will automatically switch the resolution.
|
3 In the v wfin |
touch where you want to focus. When the camera is in focus, touch |
. |
Super Macro
Super Macro
Super macro mode makes it easier to shoot close-ups of small objects, such as dew drops and leaves, as well as other everyday objects, to bring out details easily missed by the naked eye.
Go to  Camera > More and select Super macro mode. Touch
  to take a photo.
Take Panoramic Photos
Take Panoramic Photos
Add breadth to your landscape or group photos with the Panorama feature. The camera takes multiple photos of objects within your fi of view and stitches them together into a single panoramic photo.
Use the Rear Camera to Take Panoramic Photos
1 Go to  Camera > More and select Panorama mode.
27

Camera and Gallery
|
Touch |
at the bottom of the v wfin |
to set the pan direction. |
Point the camera at your starting point, then touch  to start shooting.
4Slowly move the camera in the direction of the arrow displayed on the screen. Keep your phone steady and the arrow on the center line the entire time.
5 Touch  when you are fin
AR Lens
AR Lens
Use AR lens to make your photos fun and stand out.
Use 3D Qmoji to Create Your Own Qmojis
1 Go to  Camera and select AR lens.
2Touch 3D Qmoji and select an animated Qmoji. The Qmoji will then mimic and act out your facial expressions accordingly.
Touch  to enable or disable the background.
Turn on  , then look straight at the front camera. Touch and hold
  to record a Qmoji.
6After the recording is complete, add text or directly save the Qmoji. The Qmoji will be saved to Gallery in GIF format.
Use 3D Qmoji to Record Videos
1Touch 3D Qmoji and select an animated Qmoji. The Qmoji will then mimic and act out your facial expressions accordingly.
Touch  to enable or disable the background.
Touch  to disable Qmoji, then look straight at the front camera. Touch
  to start recording
Light Painting
Light Painting
Light painting helps you capture light trails by allowing the shutter to stay open for a longer time. No manual aperture and shutter adjustment is involved.
28

Camera and Gallery
Just choose from the available options depending on the subjects and light conditions. To reduce camera shake, a tripod is recommended to steady your phone.
Capture Car Light Trails in ffi Trails Mode
ffi trails mode lets you create artistic photos of car tail lights at night.
|
1 Go to |
Camera > More > Light painting > |
ffi trails. |
2Find a spot where you’ll see the light trails created by cars from a distance. Ensure that car headlights do not point directly at the camera, as this can overexpose the image.
|
3 |
Touch |
to start shooting. Observe the shot in the v |
wfin |
When the exposure is just |
||
|
right, touch |
to fin shooting. |
|||||
|
Capture Light Drawings in Light |
ffi Mode |
|||||
|
Light |
ffi mode lets you create patterns or write words by moving a light source in front |
|||||
|
of the camera. |
||||||
|
1 |
Go to |
Camera > More > Light painting > Light |
ffi . |
2In a dark environment without distracting light sources, move a suitably bright light source of an appropriate color, such as a small torch or glow stick, in front of the camera.
|
Avoid exaggerated body movement as this may ff |
the shooting results. |
|||
|
3 Touch |
to start shooting. Observe the shot in the v |
wfin |
When the exposure is just |
|
|
right, touch |
to fin shooting. |
Capture Rivers and Waterfalls in Silky Water Mode
Silky water mode lets you capture silky smooth photographs of waterfalls and rivers.
|
1 |
Go to |
Camera > More > Light painting > Silky water. |
||
|
2 |
This feature works best when taking photos of a stream or waterfall where the water is |
|||
|
fl w n |
heavily. |
|||
|
3 |
Touch |
to start shooting. Observe the shot in the v wfin |
When the exposure is just |
|
|
right, touch |
to fin shooting. |
Capture the Beauty of the Stars in Star Trails Mode
Star trails mode lets you use your camera to capture the movement of the stars in the night sky.
1 Go to  Camera > More > Light painting > Star trails.
2For best results, choose a clear night in a location free of light pollution and with an unobstructed view of the sky.
29

|
Camera and Gallery |
|||
|
3 Touch |
to start shooting. Observe the shot in the v wfin |
When the exposure is just |
|
|
right, touch |
to fin shooting. |
Take HDR Photos
Take HDR Photos
When shooting photos with backlighting or a high light contrast, High Dynamic Range (HDR) mode can help you improve light and shadow ff in your photos, giving your photos sharper details.
Use HDR with the Rear Camera
Go to  Camera > More and select HDR.
Steady your phone, with the help of a tripod if necessary. Touch  to take a photo.
Moving Pictures
Moving Pictures
Moving pictures capture a second of movement and sound before and after you touch the shutter button.
Take Moving Pictures
Go to  Camera > More > Moving picture and touch
  to take a photo.
Play Moving Pictures
Moving pictures are saved in JPG format in Gallery.
Go to  Gallery > Albums > Camera, touch a moving picture, then touch
  at the top of the picture to view it.
The moving picture will automatically stop after a complete playback. You can also touch the screen to stop the playback.
Share Moving Pictures
You can share moving pictures with Huawei or Honor devices using various methods, such as Wi-Fi Direct, Bluetooth, or Huawei Share.
Go to  Gallery > Albums > Camera, touch and hold to select the moving pictures you want to share, then touch
  to share them.
30

Camera and Gallery
If you share moving pictures to third-party apps or incompatible devices, moving pictures will be displayed as static images.
Add Stickers to Photos
Add Stickers to Photos
Add a sticker, such as time, location, weather, or mood, to spice up your photos.
Go to  Camera > More > Stickers.
If this mode is not there, touch  and then download Stickers.
Touch  and select a sticker. The selected sticker will be displayed in the v wfin
Drag the sticker to change its position. You can also edit the text of some types of stickers. Touch  to take a photo.
Documents Mode
Documents Mode
Images shot at an angle always ff from the problem of perspective. If you aren’t able to take a perfectly straight photo of a document, use Documents mode.
The camera will automatically adjust skewed images shot in Documents mode.
Shoot Photos in Documents Mode
1Go to  Camera > More > Documents. If this mode is not there, touch
  and then download Documents.
|
2 Frame the document you want to shoot in the v wfin |
such as a presentation slide on |
a projector or a street poster. Then touch  .
.
3 The camera then automatically n fi the text area within the v wfin and unskews the image.
Adjust the Text Area
If you fin the skew correction provided by Documents mode unsatisfactory, you can also manually adjust the text area.
This is only available for photos taken in Documents mode.
Go to  Gallery > Albums > Camera, then touch the photo you wish to adjust. Touch
  above the photo.
Drag the four corners to customize the correction area. Then touch  .
.
31
 Loading…
Руководство пользователя смартфона HUAWEI P40 Lite
 Loading…
Руководство пользователя смартфона HUAWEI P40 Lite
Знай свое устройство
Перед использованием устройства ознакомьтесь с его основными функциями.
- Чтобы включить устройство, нажмите и удерживайте кнопку питания, пока экран не включится.
- Чтобы выключить устройство, нажмите и удерживайте кнопку питания, а затем нажмите.
- Чтобы перезагрузить устройство, нажмите и удерживайте кнопку питания, а затем нажмите.
- Нажмите и удерживайте кнопку питания в течение 10 или более секунд, чтобы принудительно перезагрузить устройство.

1 Кнопка громкости 2 Кнопка питания / датчик отпечатков пальцев 3 Разъем для гарнитуры 4 Порт USB Type-C 5 Слот для карт памяти - Пожалуйста, держите область NFC рядом с другими устройствами или объектами при использовании функции NFC.
- Ознакомьтесь с предустановленной
Tips app и освоите все замечательные функции своего устройства.
Первые шаги
- Будьте осторожны, чтобы не поцарапать устройство и не пораниться при использовании штифта для извлечения.
- Храните выталкивающий штифт в недоступном для детей месте, чтобы предотвратить случайное проглатывание или травму.
- Не используйте с устройством обрезанные или модифицированные SIM- или NM-карты (нано-карты памяти), так как они могут быть не распознаны и могут повредить лоток (слот) для карты.
- Если ваша SIM-карта не соответствует вашему устройству, обратитесь к оператору связи.
Следуйте инструкциям на следующих рисунках, чтобы настроить устройство. Используйте прилагаемый штифт для извлечения. Убедитесь, что карта правильно выровнена и лоток для карт выровнен, когда вы вставляете ее в устройство.

Управление двумя SIM-картами
Ваше устройство поддерживает двойной режим ожидания с двумя SIM-картами. При необходимости выберите карту мобильной передачи данных и телефонную карту по умолчанию. Для получения дополнительных сведений ознакомьтесь с предустановленным приложением «Советы».
- Услуги 4G и 5G зависят от поддержки вашего сетевого оператора и развертывания соответствующих услуг. Обратитесь к своему оператору связи, чтобы активировать услугу 4G или 5G.
- Если вы вставили две SIM-карты, только карта мобильной передачи данных по умолчанию может поддерживать службу 5G.
- Услуги 4G и 5G могут быть недоступны в некоторых регионах из-за помех сети.
- Если это руководство не соответствует описанию на официальном сайте webсайт, последнее преобладает. 2 Дополнительные сведения Если у вас возникнут какие-либо проблемы при использовании устройства, вы можете получить помощь из следующих ресурсов.
- Войти https://consumer.huawei.com/en в view информация об устройстве, часто задаваемые вопросы и другая информация.
- Войти https://consumer.huawei.com/en/support для получения самой последней контактной информации для вашей страны или региона.
- Перейдите в Настройки и введите следующие ключевые слова в поле поиска, чтобы view соответствующая информация. Например Юридическая информация, аутентификационная информация, сертификационные логотипы, информация по безопасности.
Информация по технике безопасности
- Пожалуйста, внимательно прочтите всю информацию о безопасности перед использованием вашего устройства, чтобы обеспечить его безопасную и правильную работу и узнать, как правильно утилизировать ваше устройство.
Эксплуатация и безопасность
 Чтобы предотвратить возможное повреждение слуха, не слушайте музыку на большой громкости в течение длительного времени.
- Использование не одобренного или несовместимого адаптера питания, зарядного устройства или аккумулятора может повредить ваше устройство, сократить срок его службы или вызвать пожар, взрыв или другие опасности.
- Идеальная рабочая температура составляет от 0 ° C до 35 ° C. Идеальная температура хранения от -20 ° C до +45 ° C.
- Производители кардиостимуляторов рекомендуют соблюдать минимальное расстояние 15 см между кардиостимулятором и беспроводным устройством, чтобы предотвратить возможные помехи для кардиостимулятора. При использовании кардиостимулятора держите устройство на стороне, противоположной кардиостимулятору, и не носите устройство в переднем кармане.
- Держите устройство и аккумулятор вдали от огня, чрезмерного тепла и прямых солнечных лучей. Не размещайте их на нагревательных приборах или в них, например, в микроволновых печах, водонагревателях, плитах или батареях отопления.
- При использовании устройства соблюдайте местные законы и правила. Чтобы снизить риск несчастных случаев, не используйте беспроводное устройство во время вождения. Если вы ошиблись или ответили на звонок, сначала остановите автомобиль в безопасном месте.
- Во время полета в самолете или непосредственно перед посадкой на борт убедитесь, что вы используете устройство в соответствии с предоставленными инструкциями. Использование беспроводного устройства в самолете может нарушить работу беспроводных сетей, создать опасность для полетов самолета или быть незаконным в соответствии с законом.
- Во избежание повреждения внутренней схемы устройства или зарядного устройства не используйте устройство в пыльном, damp, или в грязном месте, или рядом с магнитным полем.
- При зарядке устройства убедитесь, что адаптер питания вставлен в розетку рядом с устройствами и легкодоступен.
- Отключайте зарядное устройство от розетки и от устройства, когда оно не используется.
- Do не использовать, хранить или транспортировать устройство там, где хранятся легковоспламеняющиеся или взрывчатые вещества (например, на заправочной станции, нефтебазе или химическом заводе). Использование вашего устройства в таких средах увеличивает риск взрыва или пожара.
- Держите аккумулятор вдали от огня, не разбирайте, не модифицируйте, не бросайте и не сжимайте его. Не вставляйте в него посторонние предметы, погружайте его в воду или другие жидкости или подвергайте его воздействию внешней силы или давления, так как это может привести к протечке, перегреву, возгоранию или даже взрыву аккумулятора.
- Утилизируйте это устройство, аккумулятор и аксессуары в соответствии с местными правилами. Их нельзя выбрасывать вместе с обычными бытовыми отходами. Неправильное использование батареи может привести к возгоранию, взрыву или другим опасностям.
- Проконсультируйтесь со своим врачом и производителем устройства, чтобы определить, может ли работа вашего устройства помешать работе вашего медицинского устройства.
- Соблюдайте все правила и нормы, установленные больницами и медицинскими учреждениями.
- Это устройство содержит встроенный аккумулятор. Не попробуйте заменить аккумулятор самостоятельно. В противном случае устройство может не работать должным образом или может повредить аккумулятор. Для вашей личной безопасности и обеспечения правильной работы вашего устройства настоятельно рекомендуется обратиться в авторизованный сервисный центр Huawei для замены.
Потенциально взрывоопасная атмосфера
Выключайте устройство в любом месте с потенциально взрывоопасной атмосферой и соблюдайте все знаки и инструкции. Области, в которых может быть потенциально взрывоопасная атмосфера, включают области, в которых вам обычно советуют выключить двигатель автомобиля.
Возникновение искр в таких местах может вызвать взрыв или пожар, что приведет к телесным повреждениям или даже смерти. Не включайте устройство на заправочных станциях, например, на станциях технического обслуживания. Соблюдайте ограничения на использование радиооборудования на складах, в местах хранения и распределения топлива, а также на химических заводах. Кроме того, соблюдайте ограничения на участках, где ведутся взрывные работы.
Перед использованием устройства обратите внимание на зоны с потенциально взрывоопасной атмосферой, которые часто, но не всегда, четко обозначены. К таким местам относятся зоны под палубой на лодках, объекты для перевозки или хранения химикатов, а также зоны, где в воздухе содержатся химические вещества или частицы. например, зерно, пыль или металлический порошок. Спросите производителей автомобилей, использующих сжиженный нефтяной газ (например, пропан или бутан), можно ли безопасно использовать это устройство в непосредственной близости от них.
Информация об утилизации и переработке
Символ на продукте, батарее, документации или упаковке означает, что продукты и батареи следует сдать в отдельные пункты сбора отходов, указанные местными властями, по окончании срока службы. Это гарантирует, что EEE отходы перерабатываются и обрабатываются таким образом, чтобы сохранить ценные материалы и защитить здоровье человека и окружающую среду.
Для получения дополнительной информации обратитесь к местным властям, продавцу или в службу утилизации бытовых отходов или посетите webсайт https://consumer.huawei.com/en/.
Уменьшение вредных веществ
Это устройство и его электрические аксессуары соответствуют местным применимым правилам по ограничению использования определенных опасных веществ в электрическом и электронном оборудовании, таким как регламент ЕС REACH, директива RoHS и батареи (если они есть).
Чтобы ознакомиться с декларациями о соответствии REACH и RoHS, посетите webсайт https://consumer.huawei.com/certification.
Информация о радиочастотном воздействии
Всемирная организация здравоохранения заявила, что воздействие можно уменьшить, ограничив использование или просто используя комплект громкой связи, чтобы держать устройство подальше от головы и тела. Убедитесь, что аксессуары устройства, такие как футляр для устройства и кобура, не состоят из металлических компонентов. Держите устройство подальше от тела, чтобы соблюсти необходимое расстояние.
Для стран, принявших ограничение SAR 2.0 Вт / кг на 10 грамм ткани.
Устройство соответствует требованиям RF при использовании рядом с ухом или на расстоянии 0.50 см от вашего тела. Наивысшее зарегистрированное значение SAR: SAR для головы: 0.81 Вт / кг; SAR для тела: 1.10 Вт / кг.
Соответствие нормам ЕС
Соответствие нормам ЕС
Настоящим Huawei Technologies Co., Ltd. заявляет, что это устройство CDY-NX9A соответствует следующей директиве: RED 2014/53 / EU, RoHS 2011/65 / EU, ErP 2009/125 / EC.
Полный текст декларации соответствия ЕС, подробная информация об ErP и самая последняя информация об аксессуарах и программном обеспечении доступны по следующему адресу в Интернете: https://consumer.huawei.com/certification. Это устройство может эксплуатироваться во всех странах-членах ЕС. Соблюдайте национальные и местные правила использования устройства.
Использование этого устройства может быть ограничено в зависимости от локальной сети.
Ограничения в диапазоне 5 ГГц
Диапазон частот от 5150 до 5350 МГц ограничен для использования внутри помещений в следующих странах: AT, BE, BG, CH, CY, CZ, DE, DK, EE, EL, ES, FI, FR, HR, HU, IE, IS, IT. , LI, LT, LU, LV, MT, NL, NO, PL, PT, RO, SE, SI, SK, TR, UK.
Полосы частот и мощность
Полосы частот и номинальные пределы мощности передачи (излучаемой и / или кондуктивной), применимые к данному радиооборудованию, следующие:
| CDYNX9A | Диапазон 5G NR NSA: n1 / n3 / n28 (703-733 МГц) / n38 / n41 / n77 / n78: 26 дБм, GSM 900: 35.5 дБм, GSM 1800: 32.5 дБм, WCDMA 900/2100: 25.7 дБм, диапазон LTE 1 /3/7/8/20/28/34/38/40:25.7 дБм, Wi-Fi 2.4 ГГц: 20 дБм, Bluetooth: 13 дБм, Wi-Fi 5G: 5150–5350 МГц: 23 дБм, 5470–5725 МГц: 23 дБм, 5725 -5850 МГц: 14 дБм, NFC: 42 дБуА / м на 10 м |
Правовое уведомление
Товарные знаки и разрешения
Android является товарным знаком Google LLC.
LTE — торговая марка ETSI.
Словесный знак и логотипы Bluetooth® являются зарегистрированными товарными знаками, принадлежащими Bluetooth SIG, Inc., и любое использование этих знаков компанией Huawei Technologies Co., Ltd. осуществляется по лицензии. Huawei Device Co., Ltd. является аффилированным лицом Huawei Technologies Co., Ltd.
Wi-Fi®, логотип Wi-Fi CERTIFIED и логотип Wi-Fi являются товарными знаками Wi-Fi Alliance.
© Huawei, 2020 Все права защищены.
ВСЕ ИЗОБРАЖЕНИЯ И ИЛЛЮСТРАЦИИ В ДАННОМ РУКОВОДСТВЕ, ВКЛЮЧАЯ ЦВЕТ, РАЗМЕР И СОДЕРЖАНИЕ ДИСПЛЕЯ УСТРОЙСТВА, НО НЕ ОГРАНИЧИВАЯСЬ, ИСПОЛЬЗУЮТСЯ ТОЛЬКО ДЛЯ ВАШЕЙ СПРАВКИ. ФАКТИЧЕСКОЕ УСТРОЙСТВО МОЖЕТ РАЗЛИЧАТЬСЯ. НИЧТО В ДАННОМ РУКОВОДСТВЕ НЕ ЯВЛЯЕТСЯ КАКИМ-ЛИБО ГАРАНТИЕЙ, ЯВНОЙ ИЛИ ПОДРАЗУМЕВАЕМЫЙ.
Политика конфиденциальности Чтобы лучше понять, как мы защищаем вашу личную информацию, ознакомьтесь с политикой конфиденциальности по адресу
https://consumer.huawei.com/privacy-policy.

Документы / Ресурсы
Рекомендации
(Ocr-Read Summary of Contents of some pages of the Huawei P40 Lite Document (Main Content), UPD: 07 April 2023)
-
56, Please make sure your device has been updated to the latest system version. Use Your Fingerprint to Access a Locked App 1 Go to Settings > Biometrics & password > Fingerprint ID or Settings > Biometrics & password > Fingerprint ID > Fingerprint management(depending on your device model) and enter the lock screen password. 2 Turn on the Access App Lock switch and follow the onscreen instructi…
-
16, Relocate the oating window: Drag the bar at the top of the oating window to move the window to the desired position. Resize the oating window: Drag the bottom edge, two sides, or bottom corners of the oating window to resize it. Display in full screen: Touch at the top of the oating window to display it in full screen. Minimise the oating window: Touch at the top of the oating window to minimise and shrink it into a oating bubble. Close the oating window: Touch …
-
7, Operations in a Large Folder You can perform the following operations in large folders: • Open apps: In a large folder, touch an icon to access the app directly. • Enter and exit folders: Touch the lower right corner of a large folder to enter it. Touch a blank area in the folder to exit it. When there are more than nine apps within a large folder, a stacked icon will appear in the lower right co…
-
58, This guide is for your reference only. The actual product, including but not limited to the colour, size, and screen layout, may vary. All statements, information, and recommendations in this guide do not constitute a warranty of any kind, express or implied. Please visit https://consumer.huawei.com/en/support/hotline for up to date support hotline and email address information for your country or region. Model: JNY-LX1 EMUI12.0_01
… -
39, Huawei P40 Lite 1 Enable Assistive grid. Grid lines will then appear in the viewnder. 2 Place the subject of your photo at one of the intersecting points, then touch the shutter button. Use Mirror Reection When using the front camera, touch , then enable or disable Mirror reection. When Mirror reection is enabled, the image will appear as you see yourself in the viewnder, instead of ipped. When Mirror reection is disabled, the image …
-
24, Huawei P40 Lite • Device+ does not support collaboration between phones. • If Device+ is hidden, access Control Panel and go to > Show Device+. Transfer MeeTime Calls and Audio or Video Being Streamed to Other Devices When you are making MeeTime calls on your device, watching videos (such as in HUAWEI Video, Youku, or other video streaming apps), or listening to music, you can transfer any of these ongoing tasks to another device…
-
42, If your device cannot connect to the target device, connect them to the same router or personal hotspot, log in to the same HUAWEI ID, and enable Bluetooth on both devices. 3 Touch the Other devices tab to view connected devices. If the device you want to browse from is not connected, touch the device name and initiate a connection as prompted. You can then: • Browse images or videos: Touch a connected device to view the albums stored on that device. • Search for images: On th…
-
10, Turn on a Shortcut Switch Swipe down from the upper right edge of the screen to display Control Panel and touch to expand the shortcut switches panel(depending on your device model). The gures are for reference only. • Touch a shortcut switch to enable or disable the corresponding feature. • Touch and hold a shortcut switch to access the settings screen of the corresponding feature (supported by some features). • Touch to access the system settings screen. Essent…
-
12, Huawei P40 Lite Set Device+ Currently, Device+ supports linking phones with the following types of devices. To use this feature, make sure that devices to be connected support Device+. Before you get started, enable Bluetooth and Wi-Fi and log in to your HUAWEI ID on your phone. For other devices, perform the following settings: • Vision: Ensure that it is connected to the same LAN and logged in to the same HUAWEI ID as your device. • Bluetooth device: Some Bluetooth devices (such as Bluet…
-
49, • Touch to mute MeeTime. • Touch to use the speaker. • Touch to switch to a voice call. • Touch to share the screen. To view or manage your call logs, touch Calls. Share Your Device Screen During a MeeTime Call During a MeeTime video call, you can share your screen with the other party and doodle on the screen. The other party will then be able to view your screen and your doodles on…
-
22, Scan to Translate Using Camera 1 Go to Camera > Photo, touch , and then touch or (depending on your device model). 2 Select the source and target languages from the language list. 3 Position the text you want to translate within the viewnder, and wait for it to be translated. Scan to Learn More AI Lens allows you to learn more about artworks or landmarks you see by scanning the objects with your camera. Scan to Learn More Using Camera 1 Go to …
-
40, Manage Gallery View Photos and Videos In Gallery, you can view, edit, and share your photos and videos, as well as browse the clips automatically generated from them. The gures are for reference only. View by Shooting Time Open Gallery. On the Photos tab, pinch in on the screen to switch to the monthly view and pinch out to switch to the daily view. Camera and Gallery 38
… -
6, • On the home screen, pinch two ngers together to enter screen editing mode. Touch Widgets, then drag the Screen Lock icon to the home screen. You can now touch the Screen Lock icon to lock the screen. Set the Screen Timeout Period Go to Settings > Display & brightness > Sleep and select a screen timeout period. Turn On the Screen You can turn on the screen in any of the following ways: • Press the Power button. �…
-
31, 4 Touch and hold to start recording. 5 After the recording is complete, add text or directly save the emoji. The emoji will be saved to Gallery in GIF format. Use 3D CuteMoji to Record Videos 1 Open Camera or go to Camera > More(depending on your device model), select AR lens mode, and touch 3D CuteMoji. 2 Select your preferred CuteMoji for it to track and imitate your facial expressions and movements. 3 If the icon is displayed at the top of the screen, touch to…
-
32, Save a Moving Picture as a GIF File or Video To save a moving picture as a GIF le or video, touch the moving picture in the album, touch , then select Save as video or Save as GIF. Share Moving Pictures You can share moving pictures with Huawei or Honor devices using various methods, such as Wi-Fi Direct, Bluetooth, or Huawei Share. Go to Gallery > Albums > Camera, touch and hold to select the moving pictures you want to s…
-
34, Metring mode Overview Spot Focuses on light from a specic region, such as a subject’s eyes. • Adjust the ISO sensitivity: Touch ISO and drag the slider. In low-light settings, you’ll generally want to increase the ISO sensitivity. In well-lit settings, you’ll want to reduce it to avoid image noise. • Adjust the shutter speed: Touch S and drag the slider. The shutter speed determines the amount of light that is …