More Dishwasher Device Models:
-
Maytag
MDB7709AWQ2
DOOR AND PANEL PARTS1For Models: MDB7709AWB2, MDB7709AWW2, MDB7709AWQ2, MDB7709AWS2(Black) (White) (Biscuit) (Stainless)12−09 Litho In U.S.A. (cre) (eeb)Part No. W10308304 Rev. AUNDERCOUNTERDISHWASHERIllus. PartNo. No. DESCRIPTION1 Literature PartsW10199707Instr …
MDB7709AWQ2 Dishwasher, 14
-
Asko
D3152
ASKO D3152Use & Care Guide SAVE THESE INSTRUCTIONS FOR FUTURE REFERENCEIMPORTANT!To get the best performance from your dishwasher, read all operating instructions before using it for the first time. …
D3152 Dishwasher, 28
-
Bosch
Ascenta SHE4AM12U
AAASSSCCCEEENNNTTTAAA DDDWWW RRREEEPPPAAAIIIRRR IIINNNSSSTTTRRRUUUCCCTTTIIIOOONNN 1 SAFETY ………………………………………….. 3 4.7 Water inlet / condensation system………………………14 4.8 Door spring………………………………………………………..15 1.1 General h …
Ascenta SHE4AM12U Dishwasher, 50
-
Kenmore
58717242100
Installation InstructionsFor the 18″Built-In Dishwasher and Front Color PanelsSEARSSears, Roebuck and Co. Sears Canada, Inc. 154399201Hoffman Estates, IL 60179 U.S.A. Toronto, Ontario, Canada M5B 2B8 …
58717242100 Dishwasher, 14
Recommended Documentation:
![]()
IDE 44
Dishwasher
Installation and use
Safety Is a Good Habit to Get Into
NOTICE
Carefully read the instructions contained in this manual, as they provide important information which is essential to safe and proper installation, use and maintenance of the appliance.
This appliance complies with the following EEC directives: — 73/23/EEC of 19/02/73 (Low Voltage) and subsequent
modifications;
— 89/336/EEC of 03/05/89 (Electromagnetic Compatibility) and subsequent modifications.
— 97/17/EEC Labelling
-2002/96/EC (Waste Electrical and Electronic Equipment) 1.Carefully dispose of the packing material.
2.After removing the packing, check to make sure that the appliance is not damaged. If in doubt, contact a qualified professional. 3.The dishwasher must only be used by adults for the washing of household dishes and cooking utensils.
4.Fundamental rules to follow when using the appliance:
—Never touch the dishwasher when barefoot or with wet hands or feet;
—We discourage the use of extension cords and multiple sockets;
—During installation, the power supply cord must not be excessively or dangerously bent or flattened;
—If the appliance is not operating properly or maintenance must be performed, disconnect the appliance from the power supply.
5.Keep detergents out of the reach of children, who must also be kept away from the dishwasher when it is open.
6.This appliance cannot be installed outdoors, not even if the area in which it is installed is covered by a roof; it is also very dangerous to leave it exposed to the rain and elements.
7.Do not touch the heating element during or after a wash cycle. 8.Do not lean or sit on the door when it is open, as this could overturn the dishwasher.
9.If the appliance malfunctions, turn off water supply to the appliance and disconnect the plug from the wall socket. Then, consult the section entitled, «Troubleshooting.» If you cannot resolve the problem, contact a service centre.
10.Appliances which are no longer being used must be made inoperable by cutting the power supply cord and removing the door lock.
To maintain the EFFICIENCY and SAFETY of this appliance, we recommend:
λcall only the Service Centers authorized by the manufacturer
λalways use original Spare Parts
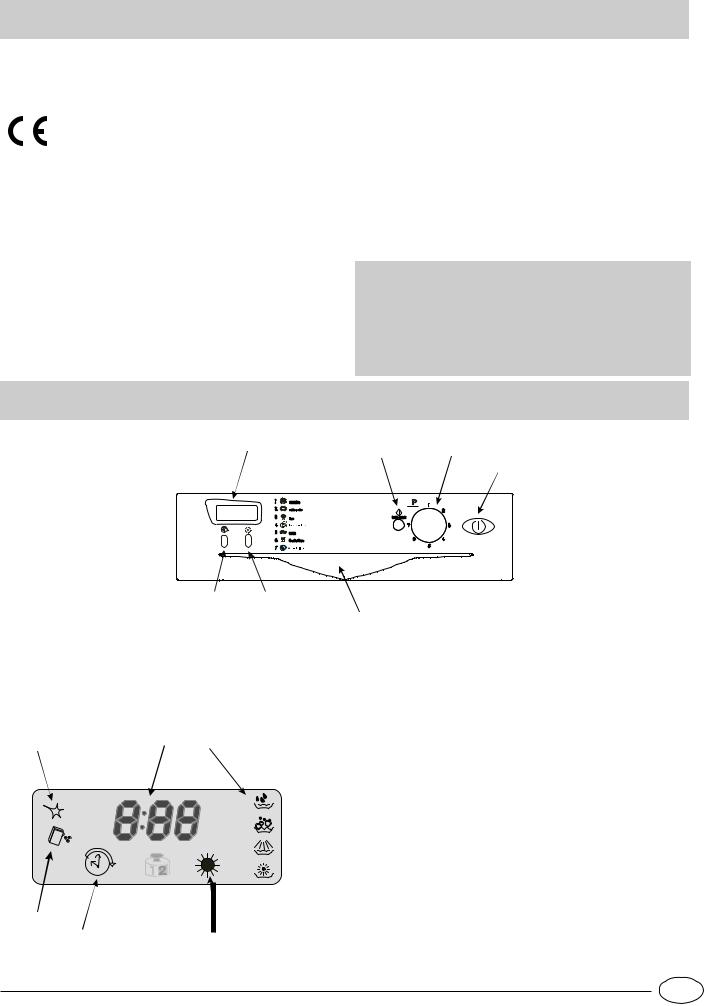
Close-up View (control panel)
H
R D
A
|
P |
E |
||
|
C |
|||
|
A: ON-OFF button |
H: Display |
||
|
C: Door handle |
E: «Extra drying» button |
||
|
D: Cycle selection Knob |
P: Delayed start select button |
||
|
R: Start/Reset Button |
|||
|
T |
L |
H |
|
|
G: «Extra drying» indicator light |
|||
|
H: Cycle phase indicator lights |
|||
|
L: Alphanumeric indicator |
|||
|
S: Low salt indicator light |
|||
|
T: Low rinse aid indicator light |
|||
|
I: Delayed start indicator light |
|||
|
S |
|||
|
I |
G |

Close-up View (Interior)
E
G
F
J  H
H
 K
K
I
L
|
Upper Rack |
Bottom Sprayer Arm |
|||
|
Top Sprayer Arm |
Salt Container Cap |
|||
|
Rack Height Adjustor |
Washing Filter |
|||
|
Lower Rack |
Detergent and Rinse Aid Dispenser |
|||
|
Technical characteristics |
||||
|
Width |
cm. 45 |
|||
|
Depth |
cm. |
60 |
||
|
Height |
cm. |
85 |
||
|
Capacity |
9 standard place settings |
|||
|
Mains water pressure |
4,3 psi — 145 psi 30KPa÷ 1MPa (0,3 ÷10 bar) |
|||
|
Power voltage |
See data plate |
|||
|
Total absorber power |
See data plate |
|||
|
Fuse |
See data plate |
|||
Salt ……
Salt
The hardness of the water varies from place to place. If hard water is used in the dishwasher, deposits will form on the dishes and utensils.
The appliance is equipped with a special softener that uses a salt specifically designed to eliminate lime and minerals from the water.
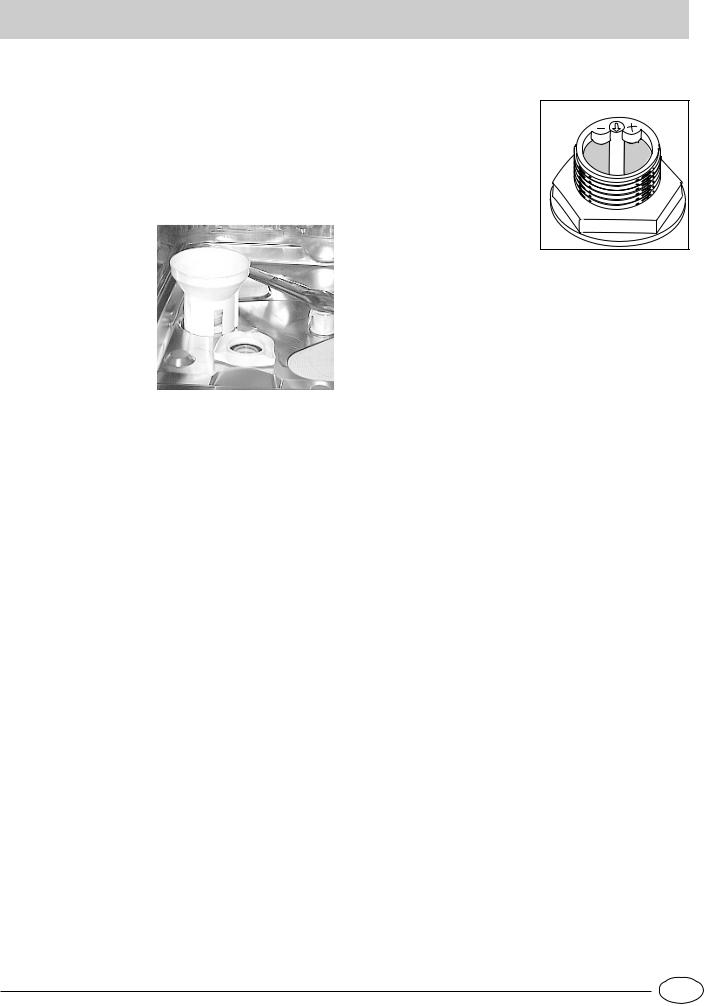
Loading the Salt into the Softener
Always use salt intended for use with dishwashers. The salt container is located beneath the lower rack and should be filled as follows:
1.Remove the lower rack and then unscrew and remove the cap from the salt container;
2.If you are filling the container for the first time, fill it with water;
3.Place the end of the funnel (supplied) into the hole and introduce about 2 kg of salt. It is normal for a small amount of water to come out of the salt container.
4.Carefully screw the cap back on.
The salt container should be filled up when the low salt indicator light «S» flashes.
Once you have loaded the salt for the first time, it is normal that the low salt indicator light stays on or flashes for about 5 consecutive cycles.
Warning: To prevent rust from forming, we advise you to load the salt before starting a wash cycle.
Adjusting Salt Consumption
The dishwasher is designed to allow for adjusting the amount of salt consumed based
on the harness of the water
used. This is intended to optimize and customize the
level of salt consumption so that it remains at a minimum.
Your Local Water Board can supply the degree of hardness
of the water in your area.
To adjust salt consumption, proceed as follows:
1)Unscrew the cap from the salt container.
2)There is a ring on the container with an arrow on it (see figure to the side), if necessary, rotate the ring in the anticlockwise direction from the «_» setting towards the «+» sign, based on the hardness of the water being used.
It is recommended that adjustments be made in accordance with the following schema:
|
Water Hardness |
||||||
|
Salt |
Autono- |
|||||
|
consu- |
||||||
|
Clarke |
Selector |
my |
||||
|
°fH |
mmol/l |
mption |
||||
|
degrees |
position |
(cycles2- |
||||
|
(grams/- |
||||||
|
kg) |
||||||
|
cycle) |
||||||
|
0 — 14 |
0 — 17 |
0 -1,7 |
/ |
0 |
/ |
|
|
14 — 36 |
18 — 44 |
1,8 — 4,4 |
«-« |
20 |
60 |
|
|
36 — 71 |
45 — 89 |
4,5 — 8,9 |
MED |
40 |
40 |
|
|
>71 |
> 89 |
> 8,9 |
«+» |
60 |
25 |
|
 Loading…
-
Инструкции по эксплуатации
1

INDESIT IDE 44 EU инструкция по эксплуатации
(80 страниц)
- Языки:Английский
-
Тип:
PDF -
Размер:
2.68 MB -
Описание:
Посудомоечная машина
Просмотр
На NoDevice можно скачать инструкцию по эксплуатации для INDESIT IDE 44 EU. Руководство пользователя необходимо для ознакомления с правилами установки и эксплуатации INDESIT IDE 44 EU. Инструкции по использованию помогут правильно настроить INDESIT IDE 44 EU, исправить ошибки и выявить неполадки.
Краткое содержание страницы № 1
IDE 44
Dishwasher
Installation and use
Краткое содержание страницы № 2
Краткое содержание страницы № 3
Safety Is a Good Habit to Get Into NOTICE 5.Keep detergents out of the reach of children, who must also be Carefully read the instructions contained in this manual, as they kept away from the dishwasher when it is open. provide important information which is essential to safe and proper 6.This appliance cannot be installed outdoors, not even if the area in installation, use and maintenance of the appliance. which it is installed is covered by a roof; it is also very dangerous to leave it exposed
Краткое содержание страницы № 4
Close-up View (Interior) E G F J H K I L Upper Rack Bottom Sprayer Arm Top Sprayer Arm Salt Container Cap Rack Height Adjustor Washing Filter Lower Rack Detergent and Rinse Aid Dispenser Technical characteristics Width cm. 45 Depth cm. 60 Height cm. 85 Capacity 9 standard place settings Mains water pressure 4 ,3 psi — 14 5 psi 30 KPa÷ 1MPa (0,3 ÷10 bar) Power voltage See data plate Total absorber power See data plate Fuse See data plate EN 2
Краткое содержание страницы № 5
Salt …… Salt Adjusting Salt Consumption The hardness of the water varies from place to place. If The dishwasher is designed to allow for adjusting the hard water is used in the dishwasher, deposits will form on amount of salt consumed based the dishes and utensils. on the harness of the water The appliance is equipped with a special softener that uses used. This is intended to a salt specifically designed to eliminate lime and minerals optimize and customize the from the water. level of sal
Краткое содержание страницы № 6
Detergent and Rinse Aid …. Rinse Aid Detergent This product makes dishes sparkle more as it improves their Detergent specifically intended for use with dishwashers drying. The rinse aid container is situated on the inside of must be used. The dispenser must be refilled before the the appliance door; you should refill it when the low rinse start of each wash cycle following the instructions provided aid indicator light «T» flashes. in the «Wash Cycle Table.» The detergent dispenser is located o
Краткое содержание страницы № 7
Loading the Dishwasher Before placing the dishes in the racks, remove the largest Load examples scraps of food left over on your plates, you will thus avoid blocking the filter, which would reduce the efficacy of the wash. upper rack lower rack If the saucepans and frying pans are very dirty, allow them to soak before being washed. You will thus avoid having to wash them again. To make it easier to load your dishes, pull the racks out fully. How to use the lower rack We recommend you place the m
Краткое содержание страницы № 8
Turning on the Appliance First of all You’ve left out a dish? Insert the plug into the electricity socket to power the You can interrupt a wash cycle by pressing the «ON-OFF» dishwasher. Turn on the water tap completely and press ON- button, then place the forgotten dishes into the appliance, OFF button «A»; the display lights up and the wash cycle which will start up, after approximately 10 seconds, from time selected on the knob will flash. where it was interrupted when you turn it back on. Se
Краткое содержание страницы № 9
Setting a delayed start How to set a delayed start Have you changed your mind? • If you change your mind, you can set a shorter time delay: When you have loaded the dishes, you can choose when to press button «P» to select it. You need not reset the wash start your dishwasher before setting the wash cycle desired. cycle. • Press button «P» repeatedly to postpone the start of the wash cycle from 1 hour to 24h. • If you have changed your mind and wish to start the wash • If you press the button
Краткое содержание страницы № 10
Wash Cycle Table Dishwasher washing guarantees your dishes will be cleaned in a hygienic setting for safer, cleaner results. :DVKFFOH GXUDWLRQ ‘HWHUJHQW &FOHVHOHFWLRQ IRUSUH &FOH &FOHGHVFULSWLRQ 5LQVH$LG PDUJLQ LQVWUXFWLRQV ZDVK ZLWKRXW ZDVK H[WUD GULQJ Pre-wash with hot water at 40°C Very dirty dishes and Wash at 65°C pans (not to be used 2 cold rinses JU
for delicate items) Hot rinse at 65°C Drying. ,QWHQVLYH Normally dirty pans Wash at 60°C. and dishes. Sta
Краткое содержание страницы № 11
Energy Saving Tips — Use the right amount of detergent: if you use too much — It is important to try and run the dishwasher when it is detergent, the result will not be cleaner dishes, but, rather, fully loaded in order to save on energy. In order to prevent a greater negative impact on the environment. odors from forming and food from caking onto the dishes, you can run the hold cycle. — There is no utility in rinsing dishes, cookware and utensils before placing them in the dishwasher. — Choose
Краткое содержание страницы № 12
Cleaning and Special Maintenance The filter assembly The dishwasher is not to be used without filters. Improper If you want consistent good results from your dishwasher, replacement of the filters may reduce the efficiency of the you need to clean the filter assembly; this way the food wash and even damage your dishwasher. particles are removed from the wash water, allowing it to be recirculated during the cycle, filtered perfectly. For this reason, Cleaning the Sprayer Arms it is a good idea to
Краткое содержание страницы № 13
Installation Positioning the Appliance Drain Hose Connection Position the appliance in the desired location. The back Fit the drain pipe into a drain A should rest against the wall behind it, and the sides, along line with a minimum diameter the adjacent cabinets or wall. The dishwasher is equipped of 4 cm or place it over the with water supply and drain hoses that can be positioned sink. Avoid restricting or to the right or the left to facilitate proper installation. bending it. Use the special
Краткое содержание страницы № 14
Electrical Connection Electrical Connection As the colours of the wires in the mains lead may not If your appliance is supplied with a 13 amp. fused plug it correspond with the coloured markings identifying the can be plugged into a 13 amp socket for immediate use. terminal in your plug, proceed as follows: Before using the appliance please read the instruction below. connect Green & Yellow wire to terminal market “E” or coloured Green or Green & Yellow. WARNING: THIS APPLIANCE MUST BE EARTHED.
Краткое содержание страницы № 15
Краткое содержание страницы № 16
Viale Aristide Merloni 47 60044 Fabriano (AN) Italy Tel +39 0732 6611 www.indesit.com P08/2005 — 195043341.02 — Xerox Business Services — DocuTech