-
Contents
-
Table of Contents
-
Troubleshooting
-
Bookmarks
Quick Links
AGILIA SP MC WIFI CA
Syringe Infusion Pump
Applicable to software version 2.2
Instructions For Use
For Use in Healthcare Facilities
(Disponible en Français sur demande)
Related Manuals for Fresenius Kabi AGILIA SP MC WIFI CA
Summary of Contents for Fresenius Kabi AGILIA SP MC WIFI CA
-
Page 1
AGILIA SP MC WIFI CA Syringe Infusion Pump Applicable to software version 2.2 Instructions For Use For Use in Healthcare Facilities (Disponible en Français sur demande) -
Page 2
Symbol Descriptions Warning Name and address of the (Refer to the Instructions for Use) manufacturer / Date of manufacture Name and address of the Refer to the Instructions for Use manufacturing facility Protection against electric shock: Product reference / part number class II Non-ionizing electromagnetic Product serial number… -
Page 3: Table Of Contents
Table of Contents INTRODUCTION ………………..9 COPE ………………9 NTENDED …………..9 RINCIPLES OF PERATION …………10 NTENDED RODUCTS TO BE NFUSED ………………10 NTENDED SERS …………….11 NTENDED ATIENTS …………….12 ONTRAINDICATIONS …………….12 NVIRONMENT DESCRIPTION ………………13 RONT ) ……..13 OTTOM EVICE DENTIFICATION ABEL ……………….14 ………………..15 EYPAD ……………..17 ISPLAY AND YMBOLS…
-
Page 4
INSTALLATION …………..23 YPES OF NSTALLATIONS …………24 SING THE OTATING LAMP ) …………..25 TTACHING THE PUMP 4.3.1 Attaching to a Pole …………….25 4.3.2 Attaching to a Rail …………….25 4.3.3 Using on a Flat Table …………….. 26 4.3.4 Attaching Two Pumps Together …………26 GETTING STARTED ………………27 LOWCHART… -
Page 5
6.10.2 Volume/Time & Dose/Time …………..49 6.10.3 Volume Limit………………50 6.11 …………….51 THER UNCTIONS 6.11.1 Priming the Syringe and the Extension Set……..51 6.11.2 Pre-programming the Pump …………… 53 MENUS ………………..54 VERVIEW ………………..55 ROFILE ……………..56 CCLUSION RESSURE …………….58 EYPAD TATUS ………………60 ATTERY …………61… -
Page 6
DATA COMMUNICATION ………………..78 VERVIEW ………….78 OMMUNICATION VIA GILIA ABLES …………..79 OMMUNICATION VIA …………….79 PLOAD 10 USER TEST 11 ALARMS AND SAFETY FEATURES 11.1 ………………81 NTRODUCTION 11.2 …………….81 LARM ESCRIPTIONS 11.3 …………….82 ENERAL EMARKS 11.4 ……………….82 IST OF LARMS 12 SYRINGES 12.1 ………………87 YRINGE… -
Page 7
14.8 …………..94 RESSURE ANAGEMENT 14.9 ……………….95 CCURACY 14.10 U …………97 NITS AND ONVERSION ULES 15 CLEANING AND DISINFECTING 15.1 ……….99 HEN TO LEAN AND ISINFECT THE 15.2 ……….99 ECOMMENDED AND ROHIBITED GENTS 15.3 ……..100 NSTRUCTIONS FOR LEANING AND ISINFECTING 16 POWER MANAGEMENT 16.1 AC P …………103… -
Page 8
19 TROUBLESHOOTING 20 RECYCLING 21 WARRANTY 21.1 …………114 ENERAL ARRANTY ONDITIONS 21.2 …………….114 IMITED ARRANTY 21.3 ……..114 ARRANTY ONDITIONS FOR CCESSORIES 22 GUIDANCE AND MANUFACTURER’S DECLARATION ON EMC 22.1 …………115 LECTROMAGNETIC OMPATIBILITY 22.2 (ESD) .115 LECTROSTATIC ISCHARGE RECAUTIONS AKEN 22.3 ……….116 SSENTIAL ERFORMANCE… -
Page 9: Introduction
Introduction Scope These Instructions for Use (IFU) are applicable to the Agilia SP MC WiFi. This device is referred to throughout this manual as the «Agilia SP MC» or «Agilia pump». The user must adhere to the instructions specified in this IFU. Failure to adhere to these instructions may result in damage to the equipment, injury to patients or injury to users.
-
Page 10: Intended Products To Be Infused
(primary users), physicians, nurse practitioners and physician assistants. Typical initial training duration: 1 hour. It is recommended that users attend a refresher training session of about 20 minutes every year. For training, contact your Fresenius Kabi sales representative.
-
Page 11: Intended Patients
Intended Patients Agilia SP MC is intended to be used according to healthcare facilities protocols on patients with the following characteristics: Patient Characteristics Male Female Neonates Pediatrics Adults (including elderly) Weight 0.25 kg to 350 kg Body Surface Area 0.05 m² to 4.5 m² Note: 1 kg = 2.2 lb When using the pump with specific patients easily affected by light and noise like neonates, make sure to:…
-
Page 12: Contraindications
Up to 9842.52 ft (3000 m) above sea-level Warning The functionality of the pump can be affected by pressure variations, mechanical shocks, heat ignition sources, and so on. Information For more information on using the device in specific conditions, contact your Fresenius Kabi sales representative.
-
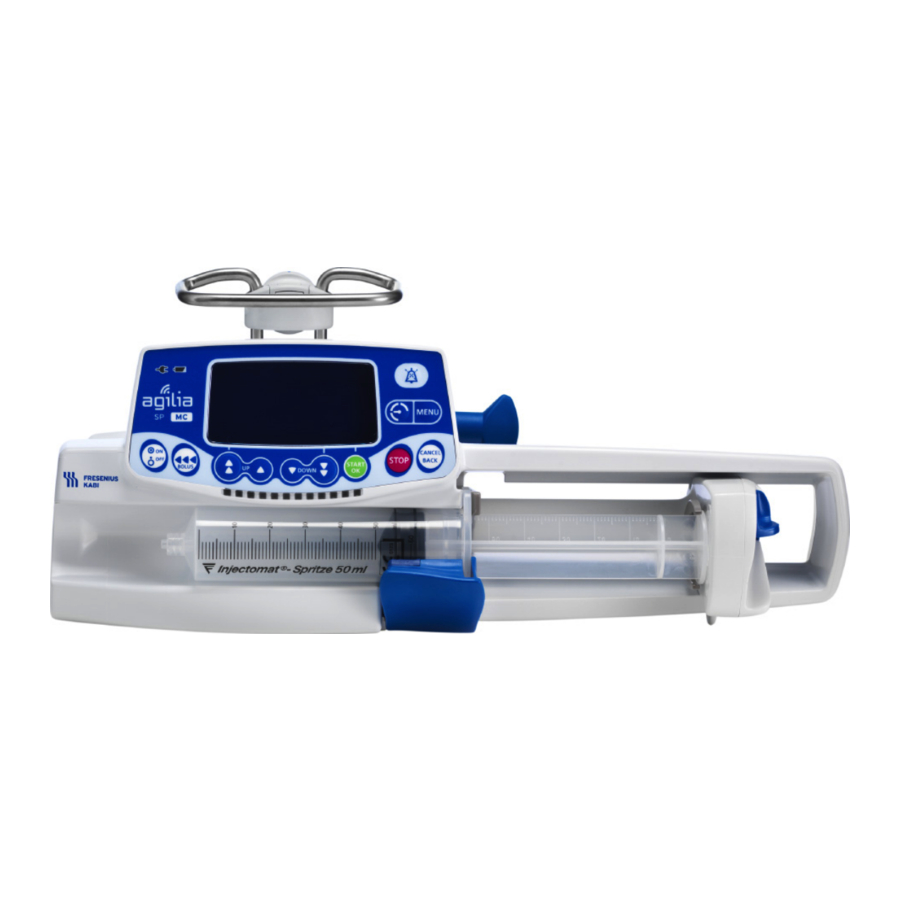
Page 13: Description
Description Front View Figure 2.1: Front View Legend Handle Plunger Driver Syringe Barrel Clasp Disengagement Lever Syringe Flange Cradle Syringe Guard Bottom View (Device Identification Label) The UDI (Unique Device Identifier) is represented in AIDC (Automatic Identification and Data Capture) and readable text: …
-
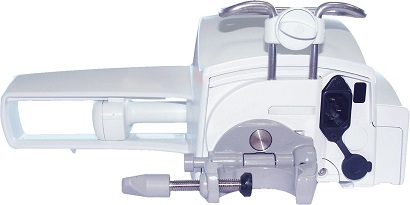
Page 14: Back View
Back View Figure 2.2: Back View Legend Release Button Power Cord Inlet Rotating Pole Clamp Infrared Cell RS232 Communication Port Attachment Lock Knob Symbol Location Description Warning See section 17, page 105. Near Power Cord Inlet Warning Near RS232 Communication Port See section 9, page 78.
-
Page 15: Keypad
Keypad 2.4.1 Keypad Description Figure 2.3: Keypad Legend Screen 3 7 10 Decrement Battery Charge Status Indicator 3 11 Fast Decrement Power Supply Indicator 3 12 Confirm Value / Move to Next Field Wi-Fi Symbol 3 13 Stop On / Off Cancel Value / Move Back to Previous 3 14 Field…
-
Page 16
2.4.2 Keypad Details 2.4.2.1 Selection Keys Description Arrow Keys Keys for selecting volume, time, flow rate and other values. Fast Access to Maximum Value or Top of a List Fast Access to Minimum Value or Bottom of a List Note: … -
Page 17: Display And Symbols
Display and Symbols 2.5.1 Infusion Status Symbol Description Infusion in Progress (Basic Profile) Symbols for infusion in progress. Infusion in Progress (Custom Profiles) This symbol is displayed when the pump is infusing a drug customized with infusion limits customized with a compatible DERS. Infusion Stopped STOP remains in the center of the screen until the user starts the infusion again.
-
Page 18: Alarms And Safety Features
Symbol Description exit Exit Function Change Selection prog Program Function Select / Unselect See More Information Zoom in / Zoom out Move the Event Marker to the Left / Right 2.5.4 Alarms and Safety Features Symbol Description Power Disconnection Alarm Silenced Pressure Increase Drop in Pressure Note: For more information on alarms, see section 11, page 81.
-
Page 19: Packaging
Packaging weight: Approximately 1.16 lb (530 g). Packaging consists of: Recycled cardboard, expanded foam. Information It is the healthcare facility’s responsibility to check the pump integrity upon receipt. If the packaging contents are incomplete or damaged, contact your Fresenius Kabi sales representative.
-
Page 20: Fundamentals
Fundamentals Profiles A profile defines the device configuration and drug library used for a group of patients in a given healthcare environment. By default, factory settings include only 1 profile (Basic Profile). Custom profiles can be created and loaded to the pump using a compatible DERS. Custom profiles feature a specific pump configuration and a drug library.
-
Page 21: Drug Libraries
Information We recommend using a custom profile when infusing critical drugs. We recommend that you create and upload profiles in order to limit usage errors, and to better adapt the use of the pump to the local practices of the different care units. For example, make sure to limit flow rates for sensitive populations.
-
Page 22: Hard Limits And Soft Limits
3.3.3 Hard Limits and Soft Limits Programming limits can be set for each drug in a drug library. Two types of limits can be set: Hard limits: limits that cannot be overridden when programming an infusion. Soft limits: limits that can be overridden within an authorized range when programming an infusion.
-
Page 23: Installation
Installation Types of Installations A pump can be installed on any of the following: Location Comments See section 4.3.1, page 25. On a Pole Pole specifications: Diameter: from 0.6 to 1.6 in (15 to 40 mm) See section 4.3.2, page 25. On a Rail Rail specifications: …
-
Page 24: Using The Rotating Pole Clamp
Warning The pump must be used in a horizontal and stable position to function properly. Use recommended Agilia accessories to ensure stability and prevent the pump from falling. Do not stack the pump with equipment other than those recommended. Using the Rotating Pole Clamp The rotating pole clamp is located at the back of the pump.
-
Page 25: Attaching The Pump(S)
4.2.2.2 Folding the Clamp Up (inward toward the pump) You can fold the clamp up as follows: 1. Push the release button. 2. Fold the pole clamp inward toward the pump. 4.2.2.3 Rotating the Clamp You can rotate the clamp as follows: 1.
-
Page 26: Using On A Flat Table
4.3.3 Using on a Flat Table 1. Fold the pole clamp up: see section 4.2.2.2, page 25. 2. Place the pump far enough from the table’s edges to prevent it from accidentally being pushed off. 4.3.4 Attaching Two Pumps Together You can attach two pumps together either for transport, or before fixing them to a pole.
-
Page 27: Getting Started
Getting Started Flowchart Once the pump is installed at the bedside, you must follow the steps below in order to install a syringe and power on the pump. Preparing and priming the syringe and the extension set Section 12.2, page 87. Powering on Section 5.3, page 28.
-
Page 28: Using The Pump For The First Time
Using the Pump for the First Time 1. Make sure the pump is correctly installed at the bedside. See section 4, page 23. 2. Plug the pump into the AC power supply. See section 16.1, page 103. 3. Before starting the pump for the first time, you must charge the battery for approximately 6 hours.
-
Page 29
Screen After Powering on Description Startup screen: the following information is displayed: Product name / Ward name Wi-Fi module status Date & time The pump is operating on battery. The symbol shows three different charge levels: <… -
Page 30: Installing A Syringe
Screen After Powering on Description Data Set information (optional) Installing a Syringe Warning This must only be done when the patient is not connected. 1. Open the syringe barrel clasp [A]. 2. Push the disengagement lever [B] down and move the plunger driver to the right.
-
Page 31: Pump Height
Pump Height Warning Ideally, the syringe pump should be level with the distal tip of the catheter (e.g., the site of fluid delivery; if accessing a central line the syringe pump should be at the level of the patient’s heart). If the pump height is raised relative to the distal tip of the catheter (e.g., during patient transport), the increase in height of the syringe pump can result in a temporary increase in fluid delivery or bolus until the flow rate…
-
Page 32: Operation
Operation Flowchart Selecting a Profile Section 6.2, page 33. Custom Profile Basic Profile Section 3.1.2, page 20. Section 3.1.1, page 20. Selecting a Syringe Section 6.3, page 33. Selecting a Drug Section 6.4, page 34. Flow Rate Dose Rate Programming Programming Section 6.5.1, page 35.
-
Page 33: Selecting A Profile
Selecting a Profile You can only select a profile if more than one profile is loaded in the pump. 1. Press to power on the pump. 2. Press the arrow keys to select a profile that corresponds to the target group of patients.
-
Page 34: Selecting A Drug
2. If you have chosen to select another syringe, press the arrow keys to select a new syringe. 3. Press OK to confirm the new syringe. A clinical advisory message may appear, if one is configured for the selected syringe. 4.
-
Page 35: Programming An Infusion
2. Press the arrow keys to scroll to the drug’s name, and press OK. A clinical advisory message may appear, if one is configured for the selected drug. 3. Press OK to acknowledge the clinical advisory message and continue programming, or C to change the drug. Programming an Infusion …
-
Page 36
Authorized Concentration Range Authorized Finite Concentrations Legend Unauthorized Range Hard Limits Authorized Range Default Value Finite Values Selecting the Drug Concentration Range Finite values 1. Press the arrow keys to select the concentration. 2. Press OK to confirm. 6.5.2.2 Selecting the Patient’s Characteristics Weight Body Surface Area 1. -
Page 37
Information The weight entry screen only appears if the selected drug uses weight for dose rate calculations. The body surface area entry screen only appears if the selected drug uses body surface area for dose rate calculations. A pre-populated default weight or body surface area may have been previously configured with a compatible DERS. -
Page 38
Programming a Loading Dose 1. Press the arrow keys to enter a value for the dose, and press OK to confirm. 2. Press the arrow keys to program the loading dose duration (_h_min_s), and press OK to confirm each time segment. The VTBI and the flow rate are automatically calculated based on dose and duration settings. -
Page 39: Programming Beyond Soft Limits
Interrupting a Loading Dose 1. To pause the loading dose, press The screen displays Continue? 2. Choose one of the following options: Press no or to stop the loading dose and proceed to the programmed infusion. Press start to continue with the loading dose. 6.5.3 Programming Beyond Soft Limits You can override soft limits, and adjust flow rate and dose rate within the…
-
Page 40
Overriding a Soft Limit 1. If you reach a soft limit when programming an infusion, the pump displays a message at the top of the screen: = the upper soft limit is exceeded Upper soft max = the lower soft limit is exceeded Lower soft min Flow rate Dose Rate… -
Page 41: Starting An Infusion
Starting an Infusion Flow rate Dose Rate 1. Check the delivery path integrity, (syringe and access device). 2. Check that there is no air in the syringe or in the extension set. 3. Confirm that the syringe is correctly installed in the pump. 4.
-
Page 42: Monitoring An Infusion
Monitoring an Infusion 6.7.1 Monitoring an Infusion when Programmed by Flow Rate Legend Drug Name (Custom profiles only) Infusion Flow Rate (mL/h) To change the flow rate during an infusion, see section 6.8.2, page 44. The flow rate is displayed with the largest font size. Infusion Duration At the current rate, the remaining infusion time in hours and minutes.
-
Page 43
6.7.2 Monitoring an Infusion when Programmed by Dose Rate Legend Drug Name (Custom profiles only) Dose Rate To change the dose rate during an infusion, see section 6.8.2, page 44. Dose rate is displayed with the largest font size. Drug Concentration Infusion Flow Rate Syringe Name / Ward Name (configurable) Patient Characteristics… -
Page 44: Functions During Infusion
Functions During Infusion 6.8.1 Stop Flow rate Dose Rate To stop the infusion, press After 2 minutes, an alarm is generated as a reminder that the infusion is stopped. To restart the infusion, first confirm or modify the programming settings, then start the infusion.
-
Page 45
Information The bolus volume is added to the Volume Infused (VI). key is not active when the menu screen is displayed. 6.8.3.1 Direct Bolus Note: This feature can be activated or deactivated with a compatible DERS (custom profiles) or in the pump options (Basic profile). 1. -
Page 46
Programming a Bolus 1. Press the arrow keys to program the bolus volume or dose, and press OK. 2. Press the arrow keys to program the bolus duration (_h_min_s), and press OK. The flow rate is calculated automatically. Flow rate Dose Rate 3. -
Page 47: Completing An Infusion
Completing an Infusion 6.9.1 Near End of Infusion Alert Prior to the end of an infusion, a near end of infusion alert is automatically triggered. The following happens: An audible alarm is triggered. An alarm message appears on the pump screen. …
-
Page 48: End Of Infusion
6.9.2 End of Infusion When the infusion is complete, the following happens: An audible alarm is triggered. An alarm message appears on the pump screen. The infusion indicator lights flash red. End of infusion settings are configurable with a compatible DERS (custom profiles), or in the pump options (Basic Profile).
-
Page 49: Volume/Time & Dose/Time
6.10.2 Volume/Time & Dose/Time You can use this infusion mode to program a volume to be infused (VTBI) over a programmed period of time. When the VTBI is reached, an alarm is triggered. 1. For information on how to access the Volume/Time or Dose/Time menu, see section 7.11, page 65.
-
Page 50: Volume Limit
6.10.3 Volume Limit You can use this infusion mode to set a limit to the volume infused. When the limit is reached, an alarm is triggered. 1. Access the Volume Limit menu, see section 7.12, page 66. Flow rate Dose Rate 2.
-
Page 51: Other Functions
6.11 Other Functions 6.11.1 Priming the Syringe and the Extension Set Note: The prime function can be configured with a compatible DERS (custom profiles) or in the pump options (Basic profile): Mandatory: A message is displayed and the user is required to prime the line with the pump prime function before infusion.
-
Page 52
Warning Electronically prime the syringe pump system before starting an infusion, or after replacing a near-empty syringe with a replacement syringe. Verify the fluid flow to the patient is OFF, and if available, use the prime function on the syringe pump to remove any mechanical slack in the system. -
Page 53: Pre-Programming The Pump
Warning If the prime function is set as «Not displayed», and if the quick-start is triggered, an undesired bolus may occur in some cases. Always select the automatic prime function for life-sustaining drugs. 6.11.2 Pre-programming the Pump You can program the pump before installing the syringe. 1.
-
Page 54: Menus
Menus Overview 7.1.1 Commands Operation Access menu or exit menu Select Confirm (corresponds to enter on the screen) Select / Deselect 7.1.2 Menu Description Stop Menu Symbol Infusion Associated Procedure Required Profile Displaying active profile information, page 55. …
-
Page 55: Profile
Stop Menu Symbol Infusion Associated Procedure Required Syringe Displaying on-pump syringe information, page 70. View event log Viewing the event log, page 70. Date / Time Setting up the date and time, page 71. Maintenance Displaying maintenance information, page 72. …
-
Page 56: Occlusion Pressure
Occlusion Pressure Symbol Procedure Modifying the pressure threshold The pump pressure threshold is pre-defined in the Agilia compatible DERS or in the pump options in one of the following modes: 3 levels (low , medium , high The pressure threshold is adjustable according to 3 pre-set values. …
-
Page 57
4. Press the arrow keys to increase or decrease the pressure threshold. 5. Press OK to validate. 6. Press to enable or disable the DPS function (optional). 7. Press OK to confirm. Warning To avoid the presence of air and to minimize the amount of time it takes the pump to recognize an occlusion and generate an alarm while infusing at low rates (e.g., less than 5 mL per hour, and especially flow rates less than 0.5 mL per hour):… -
Page 58: Keypad Lock Status
Information The Dynamic Pressure System (DPS) informs the user of any sudden rise or drop in pressure before the pressure threshold is reached. If variable pressure mode is enabled, a pre alarm is triggered when the pressure reaches 50 mmHg below maximum pressure (25 mmHg when maximum pressure is 50 mmHg).
-
Page 59
4. Lock the keypad as follows: Press to lock the keypad. The keypad is locked and the screen displays Press to activate the automatic lock. The keypad will lock automatically at infusion start. If the keypad is unlocked during the infusion, it will lock again automatically after a time- out. -
Page 60: Battery Life
Information keys remain functional when the keypad is locked. During keypad lock, the key is functional when the infusion is stopped. During keypad lock, the key is functional when an alarm occurs, or at the end of infusion. …
-
Page 61: Volume Infused / Dose Infused
Volume Infused / Dose Infused Symbol Procedure Viewing and clearing the volume or dose infused Flow rate Dose Rate You can view and clear the volume or dose infused as follows: 1. Press 2. Press the arrow keys to select The total volume, or total dose, infused includes the programmed infusion, loading doses and boluses.
-
Page 62: Programmed Bolus
You can program a pause as follows: 1. Press to stop the infusion. 2. Press 3. Press the arrow keys to select 4. Press enter. 5. Press the arrow keys to program the pause duration in hours and minutes, and press OK. 6.
-
Page 63: Patient
Patient Symbol Procedure Changing a patient’s weight or body surface area Information If the selected dose rate unit is weight-based (kg), the screen displays the patient’s weight. If the selected dose rate unit is body surface area-based (m²), the screen displays the patient’s body surface area.
-
Page 64
Switching from Day Mode to Night Mode You can switch to night mode as follows: 1. Press 2. Press the arrow keys to select 3. Press enter. 4. Press to activate night mode. The screen displays 5. Press OK to confirm. Switching from Night Mode to Day Mode You can switch to day mode as follows: 1. -
Page 65: Volume/Time & Dose/Time
4. Press to activate day mode. The screen displays 5. Press OK to confirm. 7.11 Volume/Time & Dose/Time Symbols Procedure Programming a Volume/Time or Dose/Time infusion Volume/Time Dose/Time 1. Press 2. Press the arrow keys to select 3. Press enter. For more information on how to program a Volume/Time or Dose/Time infusion, see section 6.10.2, page 49.
-
Page 66: Volume Limit
7.12 Volume Limit Symbol Procedure Programming a Volume Limit infusion Flow rate Dose Rate 1. Press 2. Press the arrow keys to select 3. Press enter. For more information on how to program a Volume Limit infusion, see section 6.10.3, page 50. 7.13 Alarm Volume Symbol…
-
Page 67: Volume-Dose History
7.14 Volume-Dose History Symbol Procedure Viewing the infusion history This function allows the user to view the infusion history on the pump. You can view the infusion history as follows: 1. Press 2. Press the arrow keys to select 3. Press enter. 4.
-
Page 68: View Flow Rate History
7.15 View Flow Rate History Symbol Procedure Viewing flow rate history This function allows the user to check the current infusion’s history information in order to verify the dose administered. You can view flow rate history as follows: 1. Press 2.
-
Page 69: View Pressure History
7.16 View Pressure History Symbol Procedure Viewing pressure history This function allows the user to check the current infusion’s history information in order to verify changes in pressure. You can view pressure history as follows: 1. Press 2. Press the arrow keys to select 3.
-
Page 70: Syringe
7.17 Syringe Symbol Procedure Displaying on-pump syringe information You can display on-pump syringe information as follows: 1. Press 2. Use the arrow keys to select 3. Press enter. The following information is displayed: — Syringe capacity — Syringe brand / name 7.18 View Event Log Symbol…
-
Page 71: Date / Time
4. Press the arrow keys to select the desired event. 5. Press enter. The details of the event are displayed. 6. Press exit to return to the previous screen. 7.19 Date / Time Symbol Procedure Setting up the date and time You can set the date and time as follows: 1.
-
Page 72: Maintenance
7.20 Maintenance Symbol Procedure Displaying maintenance information You can display maintenance information as follows: 1. Press 2. Press the arrow keys to select 3. Press enter. 4. Press the arrow keys to scroll through the maintenance information. The following information is displayed: …
-
Page 73: Library Information
7.21 Library Information Symbol Procedure Displaying drug library information You can display drug library information as follows: 1. Press 2. Press the arrow keys to select The number of drugs contained in the drug library is displayed. 3. Press enter. All the drugs contained in the drug library are displayed.
-
Page 74: Clinical Information
7.22 Clinical Information Symbol Procedure Viewing remaining time before clinical information display If configured for the selected drug with a compatible DERS, a protocol message will be displayed on the pump screen after a pre-defined period of time. You can view the remaining time before clinical information display as follows: 1.
-
Page 75: Data Set
7.23 Data Set Symbol Procedure Displaying active data set information You can display active data set information as follows: 1. Press 2. Press the arrow keys to select 3. Press enter. The active data set information is displayed.
-
Page 76: Options
Options Commands Operation Options access Option selection Confirm (corresponds to enter on the screen) Select / Deselect Selected current values are stored when the device is powered off after programming. To return to the normal menus, power off then power on again. Option Descriptions Four different option groups are available on the pump.
-
Page 77: Pump Settings
Pump Settings The following options have different functions that you can select or deselect to customize your Agilia SP MC. Default Function Choice Pump Setting Maintenance: display or hide maintenance Disabled [User 2]: Menu items Date/Time: display or hide date/time menu Disabled …
-
Page 78: Data Communication
Pump history retrieval Information Ensure that all hospital information systems have been approved by Fresenius Kabi. For more information, contact your technical services representative. Before connecting the pump to a hospital information system, ask your IT or biomedical department to configure the device.
-
Page 79: Data Set Upload
Information Do not disconnect communication cables while data is being transferred. Communication via Wi-Fi The Wi-Fi option allows the pump to connect to a hospital information system without cables. To activate or deactivate the Wi-Fi module, see section 8.3, page 77. For more information on the Wi-Fi module, refer to the technical manual.
-
Page 80: User Test
User Test The following protocol provides the user with a quick integrity check guide to ensure that the pump system is functional. Perform this user test before each use of the pump. 1. Check the external appearance of the pump for the absence of cracks or other visible damage.
-
Page 81: Alarms And Safety Features
Alarms and Safety Features 11.1 Introduction Agilia SP MC has a continuous monitoring system that begins when the pump is started. When an alarm is triggered, a message is displayed on the pump screen. We recommend that the user stand in front of the pump to read the message before acknowledgment.
-
Page 82: General Remarks
11.3 General Remarks When two alarms occur at the same time, the higher priority alarm is displayed. When two alarms with the same priority level are triggered at the same time, the pump software assigns them a priority. …
-
Page 83
Stops Message Priority Problem / Resolution Infusion? The time remaining is less than the defined time duration (adjustable between 1 and Near end of volume Medium (!!) 30 minutes), and the remaining VTBI until the limit !! volume limit has dropped to less than 10% of the syringe capacity. -
Page 84
Stops Message Priority Problem / Resolution Infusion? Information The upper soft limit is exceeded, according to Upper soft max signal the drug settings defined in the drug library. Information The lower soft limit is exceeded, according to Lower soft min signal the drug settings defined in the drug library. -
Page 85
11.4.9 Technical Error Alarms Stops Message Priority Problem / Resolution Infusion? Technical alarm. High (!!!) Erxx(yyyy) !!! Contact your qualified technician or your Fresenius Kabi sales representative. Temperature increase. High internal Low (!) temperature ! Check device environment. -
Page 86
If the alarm persists when the pump is powered on again, do not use the device on a patient, and contact qualified biomedical engineering staff in your healthcare facility or your Fresenius Kabi sales representative. 11.4.10 Audio-only Information Signals Stops… -
Page 87: Syringes
Warning Fresenius Kabi cannot accept responsibility for any flow rate errors that are due to changes to syringe specifications introduced by the manufacturer. Ensure syringe sizes and models are compatible with the syringe pump, see Section 24.4, page 120.
-
Page 88
Information The fluid in the syringe and the syringe must be within normal operating temperature conditions: 64.4 °/ 86 °F (+18 °/+30 °C). It is recommended to prime the set immediately before starting the infusion. Do not use in conjunction with positive pressure infusion devices that could generate back pressure higher than 2000 hPa (1500 mmHg): doing so will damage the administration set and the pump. -
Page 89: Operations Fors
12.3 Operations for Syringes 12.3.1 Removing a Syringe 1. Press to stop the infusion. 2. Disconnect the patient. 3. Open the syringe barrel clasp. 4. Press to silence the audible signal for 2 minutes. 5. Push the disengagement lever down and remove the syringe from its cradle. 6.
-
Page 90: Gravity Infusion In
Figure 12.1: Gravity Infusion (in parallel with a pump) Information Fresenius Kabi recommends the use of a back check valve or positive pressure infusion device when an infusion on the pump is connected to a gravity line. This will prevent the back-up of IV fluid or medication into the gravity line.
-
Page 91: Device Storage
Device Storage 13.1 Precautions for Storage Handle the device with care during storage. Store the device in a cool, dry place. The storage area must be clean and organized. Clean and disinfect the device prior to storage. Warning If the device is not used for an extended period (longer than 2 months), it is recommended that the battery be removed from the device and put…
-
Page 92: Specifications
Specifications Information The range of settings and default values described in this section corresponds to the factory configuration. Range of settings and default values may be adjusted in the pump options (Basic Profile) or a compatible DERS (custom profiles). Increment rules may be modified with a compatible DERS (custom profiles).
-
Page 93: Volume T O B Ei
14.3 Volume To Be Infused (VTBI) Default Minimum Format Range of Settings Value Increment (0.1 99.9) Volume Limit (100 999) Volume/Time 99.9 Direct Bolus Programmed Bolus 99.9 Applicable for all syringe sizes (50/60 mL, 30 mL, 20 mL, 10 mL, 5 mL) 14.4 Dose To Be Infused (DTBI) Default…
-
Page 94: Concentration
14.6 Concentration Default Minimum Format Range of Settings Value Increment 0.01 (0.01 9.99) Concentration Unit 0.01 70000 0.01 (10.0 99.9) (100 70000) Volume of Diluent 2000 Applicable for all syringe sizes (50/60 mL, 30 mL, 20 mL, 10 mL, 5 mL) 14.7 Patient Data Default…
-
Page 95: Accuracy
Default Minimum Format Range of Settings Value Increment mmHg Medium mmHg High mmHg (50 250) Full Range mmHg (250 900) Maximum mmHg Limit Raise mmHg Threshold Drop mmHg Threshold Note: 1 bar = 750 mmHg = 100 kPa = 14.5 PSI. 14.9 Accuracy Warning…
-
Page 96
14.9.3 Occlusion Alarm Accuracy Accuracy Occlusion Alarm Threshold Syringe** Rate 50 mmHg 900 mmHg Occlusion Alarm Response 0.1 mL/h < 5 hours < 28 hours Time* 50 mL 1 mL/h < 30 minutes < 3 hours 5 mL/h < 7 minutes <… -
Page 97: Units And Conversion Rules
14.10 Units and Conversion Rules 14.10.1 Concentration Units Units Suffix nanog, mcg, mg, g mmol Concentration mUnit, Unit /mL, /—mL Units cal, kcal 14.10.2 Dose Rate Units Units nanog/h, nanog/kg/min, nanog/kg/h mcg/min, mcg/h, mcg/kg/min, mcg/kg/h mg/min, mg/h, mg/24h, mg/kg/min, mg/kg/h, mg/kg/24h, mg/m²/h, mg/m²/24h g/h, g/kg/min, g/kg/h, g/kg/24h mmol/h, mmol/kg/h, mmol/kg/24h…
-
Page 98
14.10.3 Conversion Rules 1 mc unit = 1000 nano unit 1 m unit = 1000 mc unit 1 k unit = 1000 unit 1 unit/h = 24 unit/24 h 1 unit/min = 60 unit/h Conversion of a dose unit/kg/h (dose) × kg (weight) mL/h = including the unit/kg into unit/mL (concentration) -
Page 99: Cleaning And Disinfecting
Cleaning and Disinfecting To avoid the risks of infection and microbial transmission, make sure to adequately clean and disinfect the equipment. Warning The disinfecting procedure must be done immediately after cleaning. Disinfecting the pump without prior cleaning is not effective. …
-
Page 100: Instructions For Cleaning And Disinfecting
15.2.2 Prohibited Agents The following cleaning and disinfecting agents are prohibited: Trichloroethylene Abrasive detergents Undiluted alcohol These aggressive agents may damage the plastic parts of the pump and cause it to malfunction. 15.3 Instructions for Cleaning and Disinfecting Follow the instructions provided to ensure effective cleaning and disinfecting of the equipment.
-
Page 101
15.3.1 Cleaning Instructions Prerequisites The pump is powered off. The power cord and all other cables are unplugged. The air is at room temperature (68 to 77 °F, or 20 to 25 °C). The operator is wearing suitable protective equipment. Protocol 1. -
Page 102
15.3.2 Disinfecting Instructions Prerequisites The cleaning protocol has been performed. The pump is powered off. The power cord and all other cables are unplugged. The air is at room temperature (68 to 77 °F, or 20 to 25 °C). … -
Page 103: Power Management
Warning The pump and its accessories can only be connected to the AC power supply with the power cord supplied by Fresenius Kabi, or with a power supply accessory from the Agilia product range. Do not use an extension cord when connecting the pump to the AC power supply.
-
Page 104: Battery Operating Mode
16.3 Battery Operating Mode The device is provided with an internal battery that automatically provides power to the device in case of power failure or disconnection from the AC power supply. The battery charges when the pump is connected to AC power supply. Before starting for the first time, charge the battery for approximately 6 hours by plugging in the power supply cord with the pump powered off.
-
Page 105: Technical Characteristics
Technical Characteristics 17.1 Power Supply It is mandatory to use an Agilia power cord compliant with North American standards and with the IEC 60227 standard. The power cord conductor must have a cross section of at least 0.75 mm 100 V — 240 V ~ / 50 / 60 Hz with functional Power supply earth AC Power…
-
Page 106: Infrared Communication
17.5 Infrared Communication The pump is equipped with an infrared cell located at the back of the device. Mode Wireless optical communication using infrared light Asynchronous Serial Infrared (SIR) physical layer irPHY 1.0, baseband no Compatibility carrier Transport Protocol Proprietary Speed 115.2 kb/s max Wavelength…
-
Page 107: Compliance
17.7 Compliance Compliant with the following Index of protection against ElectroMedical standards: IP22 ingress of water or particulate Equipment Safety IEC 60601-1 matter IEC 60601-1-8 Compliant with the following Protection against leakage (ElectroMagnetic standard: current: Defibrillation-proof IEC 60601-1-2 type CF applied part* Compatibility) Protection against electric…
-
Page 108
17.9.1 Flow rate: 0.1 mL/h Legend Instantaneous flow rate Set flow rate Sampling time: 120 s 1080 1200 Time (minutes) Figure 17.1: Start-up and instantaneous flow rate (0.1 mL/h over first 20 hours on 96 hours) Legend Measured variance from flow rate Error 21,7… -
Page 109
Legend Measured variance from flow rate Error Flow rate Sampling time: 10 s -1,6 -1,9 -4,4 -6,5 -8,6 Time (minutes) Figure 17.4: Trumpet curves for 2, 5, 11, 19, 31 minutes observation windows (1 mL/h over first 2 hours on 96 hours) 17.9.3 Flow rate: 5 mL/h Legend… -
Page 110: Wi-Fi
Warning Agilia Wi-Fi pumps must be configured by qualified and appropriately trained staff. Information If communication with the wireless network is interrupted, the pump can be used as intended. For more information, contact your Fresenius Kabi sales representative…
-
Page 111
Data that is pending is stored and re-transmitted when the connection becomes available. Data integrity and quality of service are inherent in the design. The system should be ensured and maintained by a qualified and trained technical user, or a Fresenius Kabi sales representative. -
Page 112: Troubleshooting
The pump is damaged, or you notice Remove the power cord. something abnormal (unusual noise, Contact your biomedical department or your Fresenius Kabi abnormal heat or smoke). sales representative immediately. The pump has been dropped or was Do not use the pump.
-
Page 113: Recycling
They must be collected separately and disposed of according to local regulations. Information For more information on waste processing regulations, contact your Fresenius Kabi sales representative or the local distributor. For more information on dismantling the device, refer to the technical manual. …
-
Page 114: Warranty
Warranty 21.1 General Warranty Conditions Fresenius Kabi guarantees that this product is free from defects in material and workmanship during the period defined by the accepted sales conditions, except for the batteries and the accessories. 21.2 Limited Warranty To benefit from the materials and workmanship guarantee from our…
-
Page 115: Guidance And Manufacturer’s Declaration On Emc
Guidance and Manufacturer’s Declaration on EMC 22.1 Electromagnetic Compatibility Warning The Agilia pump and its accessories are intended to be used in the electromagnetic environments specified in the technical manual. The customer or the user of the Agilia pump should ensure that it is used in such environments.
-
Page 116: Emc And Essential
The following environmental conditions related to electrostatic sensitive components (ESD standards) must be observed: Floors coated with wood, tiles or concrete Relative humidity of at least 30% If it is not possible to guarantee this environment, the following additional precautions must be taken: …
-
Page 117
Warning Use of the Agilia pump adjacent to or stacked with other equipment should be avoided because it could result in improper operation. If such use is necessary, this equipment and the other equipment should be observed to verify that they are operating normally. -
Page 118: Servicing
3. Pack the device in the provided packaging. 4. Ship the device to Fresenius Kabi. Information Fresenius Kabi is not liable for loss or damage to the device during transport. For more information on servicing, contact your Fresenius Kabi sales representative.
-
Page 119: Agilia Connect Infusion System Compatibility
The items listed below are compatible with the pump.These products are regulated as medical devices in most of the countries. Please refer to your competent Health Authority or local Fresenius Kabi sales representative to check availability on your market. Agilia Connect Infusion Devices detailed intended use are available on request.
-
Page 120: Racks Anda
24.3 Racks and Accessories Agilia Link 4 4-slot rack for power centralization Agilia Link 6 6-slot rack for power centralization Agilia Link 8 8-slot rack for power centralization Agilia Duo 2 channels accessory for power supply centralization 24.4 Syringes Information The flow rate accuracy of an infusion made with the Agilia SP MC and any of the syringes listed below is ±…
-
Page 121
Occlusion Rate (mL/h) Release Syringe Reference Volume (mL) Average Monoject Soft 12 mL 1181200777 0.20 Monoject Soft 6 mL 11800600777 0.13 Injectomat Spr. 50 mL 9000711 1200 0.33 SCHOTT TopPac 50 mL M087566/00PT 1200 0.04 SCHOTT TopPac 20 mL 0.04 SCHOTT TopPac 10 mL 0.17 Terumo 60 mL… -
Page 122: Glossary Of Terms
Glossary of Terms Term Description Amperes Alternating Current Ampere-hours Automatic Identification and Data Capture AIDC Amplitude Modulation Amperes per meter BPSK Binary Phase Shift Keying Body Surface Area Calorie Complementary Code Keying Centers for Disease Control CISPR Special International Committee on Radio Interference CT Scan Computed Tomography Decibels…
-
Page 123
Term Description Instructions for Use Inches Information Technology Intravenous Kilograms Keep Vein Open lb(s) Pound(s) Light Emitting Diode Milliamperes Milliequivalents Milliliters per hour mL/h mmHg Millimeters of Mercury mmol Millimole Metal Oxyde Semiconductor Magnetic Resonance Imaging Milliwatts per steradian mW/sr Not Applicable Nuclear Magnetic Resonance Occlusivity Check System… -
Page 124
Appendix: Factory Configuration Feature Availability Feature Availability Profile Simple Rate Pressure Infusion Volume/Time management Modes Keypad lock Volume Limit status Battery life Direct Bolus Programmed Volume infused Bolus Pause Loading Dose Infusion… -
Page 125
Index Event Log 70 Accessories 119 Agilia USB Cable 79 Factory Configuration 124 Alarm First Use 28 Adjust Volume 66 Flow Rate 21, 35, 42 List 82 Priority 16, 81 Sound Level 106 Glossary 122 Arrow Keys 16 Graphics Flow Rate History 68 Pressure History 69 Battery Characteristics 105… -
Page 126
Release Notes 127 Rotating Pole Clamp 24 Maintenance 118 Display Information 72 Reminder Message 29 Screen Requirements 118 Contrast 77 Menu Display and Symbols 17 Customization 77 Selection Keys 16 List 54 Servicing 118 Monitoring Simple Rate 48 Dose Rate 43 Soft Limit 22 Flow Rate (ml/h) 42 Override 39… -
Page 127
This document may not be reproduced in whole or in part without the written consent of Fresenius Kabi. ® ®… -
Page 128
For service and maintenance information, please contact your distributor: Fresenius Kabi AG Fresenius Vial S.A.S 61346 Bad Homburg Le Grand Chemin Germany 38590 Brézins — France…
Насос инфузионный шприцевой Agilia SP, с принадлежностями
варианты исполнения:
I. Насос инфузионный шприцевой Agilia SP, в составе:
1. Кабель сетевой — 1 шт.
2. Держатель — 1 шт.
3. Инструкция по применению — 1 шт.
4. Инструкция по эксплуатации: Инфузионная система Agilia Connect. Системные компоненты — 1 шт.
II. Насос инфузионный шприцевой Agilia SP MC, в составе:
1. Кабель сетевой — 1 шт.
2. Держатель — 1 шт.
3. Инструкция по применению — 1 шт.
4. Инструкция по эксплуатации: Инфузионная система Agilia Connect. Системные компоненты — 1 шт.
III. Насос инфузионный шприцевой Agilia SP TIVA, в составе:
1. Кабель сетевой — 1 шт.
2. Держатель — 1 шт.
3. Инструкция по применению — 1 шт.
4. Инструкция по эксплуатации: Инфузионная система Agilia Connect. Системные компоненты — 1 шт.
Принадлежности:
1. Держатель Agilia Holder Ambulance для крепления инфузионных насосов серии Agilia в автомобилях скорой помощи — 1 шт., в составе:
— держатель Agilia Holder Ambulance;
— ключ для одного насоса Agilia — 2 шт;
— ключ гаечный номер 13 — 1 шт;
— ключ шестигранный — 1 шт;
— инструкция по монтажу и эксплуатации — 1 шт.
2. Кабель для подключения насоса Agilia к компьютеру через USB-порт — 1 шт.
3. Кабель для подключения насоса Agilia к компьютеру через СОМ-порт — 1 шт.
4. Кабель для подключения насоса Agilia к системе вызова медсестры — 1 шт.
5. Программное обеспечение Agilia Vigilant Drug’Lib — 1 шт.
6. Программное обеспечение Agilia Partner — 1 шт.
7. Программное обеспечение Centerium — 1 шт.
Купить Насос инфузионный шприцевой Agilia SP, с принадлежностями, лучшая цена, доставка по России. Для заказа у нас на сайте вы можете заполнить заявку в свободной форме на почту sales@medtehural.ru или же позвонив по телефону 8 (343) 361-44-98
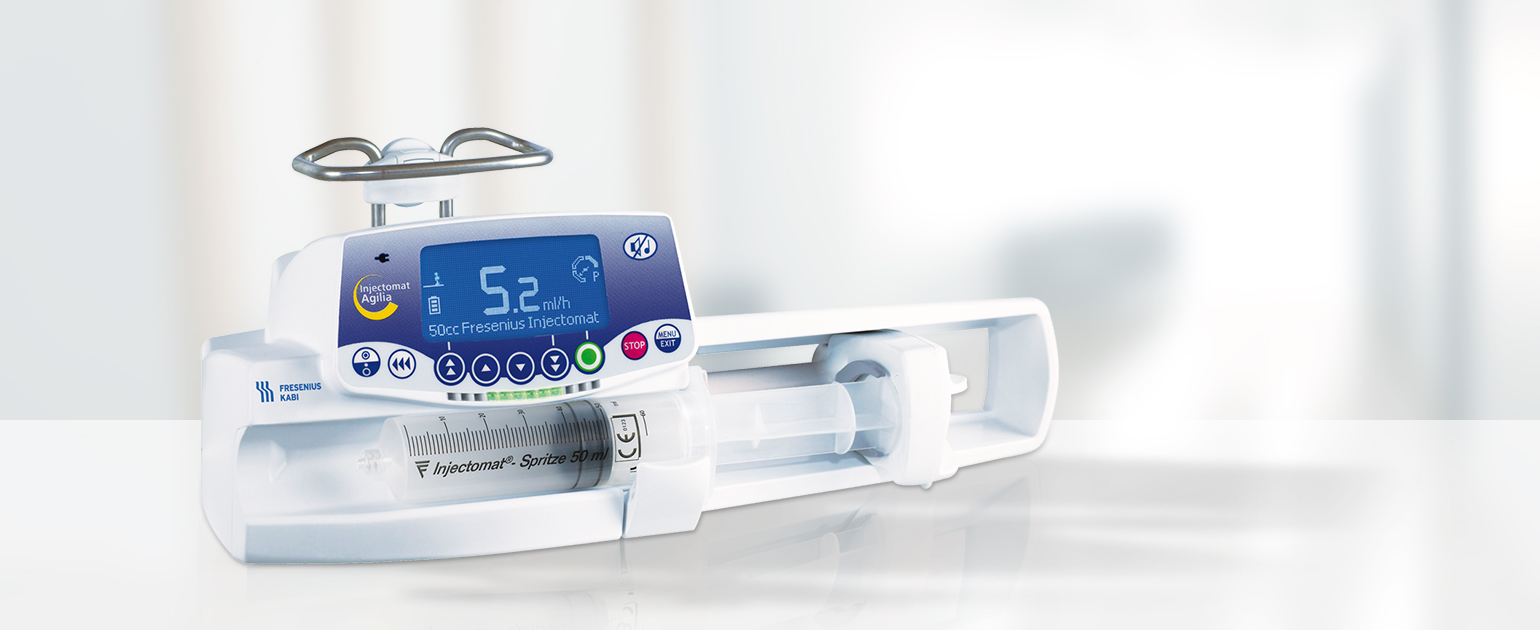
Injectomat Agilia является базовой моделью в линейке шприцевых насосов Agilia.
- Варианты программирования инфузии:
- программирование скорости в мл/ч
- программирование объема и продолжительности инфузии
- программирование объема и скорости инфузии
- Диапазон скорости введения — от 0,1 до 1200 мл/ч (зависит от объема шприца)
- Диапазон скорости введения болюса — от 50 до 1200 мл/ч
- Варианты объемов шприцев: 5, 10, 20, 30/35, 50/60 мл
- В память загружены характеристики 50 моделей шприцев разных производителей, что позволяет учесть их особенности и обеспечить высокую точность при проведении инфузии
- При установке шприца в насос перемещение толкателя и фиксация поршня осуществляется вручную – нет задержек времени
- Защита поршня — защитная рамка предотвращает непреднамеренное введение болюса при случайном ударе по толкателю поршня, например при падении насоса или при транспортировке
- Программируемая пауза — от 1 мин до 24 ч
- Большой информативный экран – достаточно беглого взгляда, чтобы быстро оценить состояние инфузии
- Возможность установки библиотеки лекарственных препаратов Vigilant® Drug Lib. В ней для каждого препарата программируется ряд параметров: название, мягкие пределы (наиболее высокая используемая скорость введения), жесткие пределы (максимально допустимая скорость введения), допустимые режимы инфузии, что значительно повышает безопасность при проведении инфузии
- Режим поддержания вены открытой (ПВО) — после завершения инфузии насос автоматически продолжит вводить раствор с небольшой скоростью (от 1 до 5 мл/ч) с целью поддержания проходимости венозного доступа
- Динамическая система контроля давления – реагирует на стабильное изменение уровня давления в системе (до достижения заданного предела), позволяет быстро обнаружить окклюзию или отсоединение системы и своевременно принять необходимые меры
- Журнал, в котором сохраняется до 1500 событий
- Поворачиваемый зажим позволяет крепить насос в необходимом положении
- Возможность объединения насосов друг с другом
- Ночной режим – сниженная яркость, выключение звука кнопок; автоматический переход в ночной режим в заданное время
- Встроенная батарея (NiMH); время работы от батареи — 12 часов при скорости инфузии 5 мл/ч
- Размеры (ШхВхГ)/вес: 345 мм х 135 мм х 170 мм / 2,15 кг
- Сервисное обслуживание – один раз в три года
| Наименование | Артикул |
|
INJECTOMAT AGILIA RUS/ Насос шприцевой, исполнения: Injectomat AGILIA |
Z018056 |
Требуется подтверждение
Данный раздел сайта содержит информацию о рецептурных лекарственных препаратах, предназначенную исключительно для медицинских и фармацевтических работников (Специалистов здравоохранения). Информация о рецептурных лекарственных препаратах, размещенная в данном разделе, не может быть использована иными лицами, в том числе для замены консультации со Специалистом здравоохранения и для принятия решения о применении данных препаратов.
Нажимая «Подтверждаю», Вы подтверждаете, что являетесь Специалистом здравоохранения.
Подтверждаю
Не подтверждаю
Agilia SP является базовой моделью в линейке шприцевых насосов Agilia.
Обеспечивает точное и управляемое проведение инфузии растворов лекарственных препаратов.
Варианты программирования инфузии:
- программирование скорости инфузии (в мл/ч)
- программирование введения определенного объема за определенный промежуток времени
- программирование введения определенного объема с определенной скоростью
ПРЕИМУЩЕСТВА:
- Быстрая подготовка к инфузии — установка шприца в насос осуществляется вручную.
- Большой информативный экран, хорошо читаемый с расстояния более 3м.
- Защита поршня и толкателя – защитная рамка предотвращает непреднамеренное введение болюса и/или повреждение толкателя поршня при случайном ударе по нему.
- Возможность установки библиотеки лекарственных препаратов Vigilant® Drug Lib. В ней для каждого препарата программируется ряд параметров: название, пределы, допустимые режимы инфузии, что повышает безопасность при проведении инфузии и ускоряет подготовку к инфузии.
- Динамическая система контроля давления позволяет быстро обнаружить окклюзию или отсоединение системы и своевременно принять необходимые меры
- Ночной режим – сниженная яркость, выключение звука кнопок; автоматический переход в ночной режим и выход из него в заданное время
- Встроенная ручка для удобства транспортировки
Диапазон скорости введения
от 0,1 до 1200 мл/ч (зависит от объема шприца)
Диапазон скорости введения болюса
от 50 до 1200 мл/ч
Варианты объемов шприцев
5, 10, 20, 30, 50/60 мл
Программируемая пауза
от 1 мин до 24 ч
Поворачиваемый винтовой зажим
возможность крепления насоса в необходимом положении
Размеры (ВхШхГ)/
135мм х 345мм х 170мм
Время работы от батареи
13 часов при скорости инфузии 5 мл/ч
Symbol Descriptions
Warning
(Refer to the Instructions for Use)
Refer to the Instructions for Use
Product reference / part number
Product serial number
IN: Input terminal — connector
OUT: Output terminal — connector
Electrical fuses
Alternating Current (AC)
Direct Current (DC)
Index of protection against solid
IP22
foreign objects (> 12.5 mm) and
dripping liquids
Not for use in residential areas
Part included in a recycling process
Protection against leakage current;
defibrillation-proof type CF applied
part
CSA
C
US
Warning of a potential hazard that
could result in serious personal
injury and/or product damage if the
written instructions are not followed.
mark
Name and address of the
manufacturer / Date of manufacture
Name and address of the
manufacturing facility
Protection against electric shock:
class II
Non-ionizing electromagnetic
radiation
Fragile, handle with care
This way up
Keep away from rain
Temperature limitation
Humidity limitation
Atmospheric pressure limitation
General symbol for recyclable
material
Eco packaging symbol
Caution: Federal law restricts this
device to sale by or on the order of a
physician
(See 21 CFR 801.109(b)(1))
Recommendations to be followed.
14209-2_master_ifu_agilia_sp_mc_eng_CA