B4403-5
Èíñòðóêöèÿ ïî
Âñòðîåííûé
ýêñïëóàòàöèè
ýëåêòðè÷åñêèé
äóõîâîé øêàô

Ñîäåðæàíèå2
Áëàãîäàðèì âàñ çà òî, ÷òî âûáðàëè îäíî èç íàøèõ âûñîêîêà÷åñòâåííûõ
èçäåëèé.
×òîáû îáåñïå÷èòü îïòèìàëüíóþ è áåñïåðåáîéíóþ ðàáîòó ïðèáîðà,
âíèìàòåëüíî ïðî÷èòàéòå íàñòîÿùåå Ðóêîâîäñòâî. Ýòî ïîçâîëèò âûïîëíÿòü
âñå îïåðàöèè íàèáîëåå ïðàâèëüíûì è ýôôåêòèâíûì îáðàçîì. Äëÿ òîãî
÷òîáû â íóæíûé ìîìåíò âñåãäà ìîæíî áûëî ñâåðèòüñÿ ñ íàñòîÿùèì
Ðóêîâîäñòâîì, ðåêîìåíäóåì õðàíèòü åãî â íàäåæíîì ìåñòå. Ïðîñèì òàêæå
ïåðåäàòü åãî íîâîìó âëàäåëüöó ïðèáîðà â ñëó÷àå ïðîäàæè èëè óñòóïêè.
Íàäååìñÿ, ÷òî íîâûé ïðèáîð äîñòàâèò âàì ìíîãî ðàäîñòè.
Ñîäåðæàíèå
Èíñòðóêöèÿ ïî ýêñïëóàòàöèè 3
Èíñòðóêöèè, òàáëèöû è ñîâåòû 17
Ïðèãîòîâëåíèå âûïå÷íûõ èçäåëèé 17
Ïðàâèëà òåõíèêè áåçîïàñíîñòè 3
Æàðêà 25
Îïèñàíèå ïðèáîðà 5
Ïëîñêîñòíîå ãðèëèðîâàíèå 28
Ðàçìîðàæèâàíèå 29
Îáùèé âèä 5
Ïîäñóøèâàíèå 30
Ðåãóëèðîâî÷íàÿ ïàíåëü 6
Êîíñåðâèðîâàíèå 30
Îñíîâíîå îñíàùåíèå äóõîâîãî øêàôà 6
Ïðèíàäëåæíîñòè äóõîâîãî øêàôà 7
Ìûòüå è óõîä 31
Ïåðåä ïåðâûì èñïîëüçîâàíèåì 8
Ïðèáîð ñíàðóæè 32
Êàìåðà äóõîâîãî øêàôà 32
Óñòàíîâêà è èçìåíåíèå âðåìåíè ñóòîê 8
Îñíàùåíèå 32
Ïåðâîå ìûòüå 8
Æèðîâîé ôèëüòð 32
Óïðàâëåíèå äóõîâûì øêàôîì 9
Îïîðíûå áîêîâûå ðåøåòêè 32
Âêëþ÷åíèå è âûêëþ÷åíèå äóõîâîãî
Ïîäñâåòêà äóõîâîãî øêàôà 33
øêàôà 9
Ìûòüå äóõîâîãî øêàôà 34
Ôóíêöèè äóõîâîãî øêàôà 10
Äâåðü äóõîâêè 35
Óñòàíîâêà ðåøåòêè, îáû÷íîãî è
Ñòåêëî äâåðè äóõîâêè 37
ãëóáîêîãî ïðîòèâíÿ 11
×òî äåëàòü, åñëè … 41
Óñòàíîâêà è ñíÿòèå æèðîâîãî
ôèëüòðà 12
Óòèëèçàöèÿ 42
Äîïîëíèòåëüíûå ôóíêöèè 13
Ñåðâèñíàÿ ïîääåðæêà 43
Ìåõàíè÷åñêàÿ áëîêèðîâêà äâåðöû 16
 äàííîì ðóêîâîäñòâå ïî ýêñïëóàòàöèè èñïîëüçóþòñÿ ñëåäóþùèå ñèìâîëû:
1
Âàæíàÿ èíôîðìàöèÿ ïî îáåñïå÷åíèþ ëè÷íîé áåçîïàñíîñòè è
ïðåäîòâðàùåíèþ ïîâðåæäåíèé ïðèáîðà.
3 Îáùàÿ èíôîðìàöèÿ è ðåêîìåíäàöèè
2 Èíôîðìàöèÿ ïî çàùèòå îêðóæàþùåé ñðåäû

3Èíñòðóêöèÿ ïî ýêñïëóàòàöèè
Èíñòðóêöèÿ ïî ýêñïëóàòàöèè
1 Ïðàâèëà òåõíèêè áåçîïàñíîñòè
Ýëåêòðîáåçîïàñíîñòü
• Ïîäêëþ÷åíèåì ïðèáîðà ìîæåò çàíèìàòüñÿ òîëüêî êâàëèôèöèðîâàííûé
ñïåöèàëèñò.
•  ñëó÷àå âîçíèêíîâåíèÿ íåïîëàäîê è ïîâðåæäåíèé ïðèáîðà âûâåðíèòå
èëè îòêëþ÷èòå ïðåäîõðàíèòåëè.
• Ðåìîíò ïðèáîðà èìåþò ïðàâî âûïîëíÿòü òîëüêî ñïåöèàëèñòû.
Íåïðîôåññèîíàëüíûé ðåìîíò ìîæåò èìåòü âåñüìà îïàñíûå ïîñëåäñòâèÿ.
Ïðè íåîáõîäèìîñòè ïðîèçâåñòè ðåìîíò îáðàùàéòåñü â íàø ñåðâèñíûé
öåíòð.
Ìåðû ïî îáåñïå÷åíèþ áåçîïàñíîñòè äåòåé
• Íèêîãäà íå îñòàâëÿéòå äåòåé áåç ïðèñìîòðà âî âðåìÿ ðàáîòû ïðèáîðà.
Òåõíèêà áåçîïàñíîñòè ïðè ýêñïëóàòàöèè
• Ëèöà (â òîì ÷èñëå è äåòè), êîòîðûå ïî ïðè÷èíå ôèçè÷åñêèõ, ñåíñîðíûõ èëè
ïñèõè÷åñêèõ îãðàíè÷åíèé èëè ñâîåé íåîïûòíîñòè èëè íåïîäãîòîâëåííîñòè
íå ìîãóò áåçîïàñíî èñïîëüçîâàòü äàííûé ïðèáîð, íå äîëæíû
èñïîëüçîâàòü åãî áåç íàäçîðà èëè ðóêîâîäîñòâà ñî ñòîðîíû
îòâåòñòâåííîãî ëèöà.
• Íàñòîÿùèé ïðèáîð ïðåäíàçíà÷åí òîëüêî äëÿ èñïîëüçîâàíèÿ â äîìàøíåì
õîçÿéñòâå, ò.å. æàðêè, âàðêè è âûïå÷êè ïèùåâûõ ïðîäóêòîâ.
• Ñîáëþäàéòå îñòîðîæíîñòü ïðè ïîäêëþ÷åíèè ýëåêòðîïðèáî-ðîâ ê
ýëåêòðîñåòè ÷åðåç íàõîäÿùèåñÿ ïîáëèçîñòè îò ïðèáîðà ýëåêòðîðîçåòêè.
Ïðîâîäà ïîäêëþ÷åíèÿ íè â êîåì ñëó÷àå íå äîëæíû ñîïðèêàñàòüñÿ èëè
áûòü çàæàòûìè ãîðÿ÷åé äâåðöåé äóõîâîãî øêàôà.
• Ïðåäóïðåæäåíèå: Îïàñíîñòü îæîãà! Âî âðåìÿ ðàáîòû òåìïåðàòóðà âî
âíóòðåííåé êàìåðå äóõîâîãî øêàôà î÷åíü âûñîêàÿ.
• Åñëè â ðåöåïò áëþäà, êîòîðîå Âû ãîòîâèòå â äóõîâîì øêàôó, âõîäèò
àëêîãîëü, ýòî ìîæåò ïðèâåñòè ê îáðàçîâàíèþ ëåãêî âîñïëàìåíÿåìîé
ñïèðòî-âîçäóøíîé ñìåñè.  ýòîì ñëó÷àå ñîáëþäàéòå îñòîðîæíîñòü ïðè
îòêðûâàíèè äâåðöû äóõîâîãî øêàôà. Ïðîñëåäèòå, ÷òîáû ïîáëèçîñòè íå
áûëî íèêàêèõ èñòî÷íèêîâ âîñïëàìåíåíèÿ, èñêð èëè îãíÿ.
3 Çàìå÷àíèå êàñàòåëüíî àêðèëàìèäà
Ñîãëàñíî ðåçóëüòàòàì íîâåéøèõ íàó÷íûõ èññëåäîâàíèé èíòåíñèâíàÿ
òåïëîâàÿ îáðàáîòêà ïèùåâûõ ïðîäóêòîâ ñ öåëüþ ïîëó÷åíèÿ ðóìÿíîé
êîðè÷íåâîé êîðî÷êè îïàñíà äëÿ çäîðîâüÿ ÷åëîâåêà èç-çà âðåäíîãî
âîçäåéñòâèÿ àêðèëàìèäà. Â îñîáåííîñòè ýòî îòíîñèòñÿ ê ïðîäóêòàì, â
êîòîðûõ ñîäåðæèòñÿ êðàõìàë. Ïîýòîìó ìû ðåêîìåíäóåì ãîòîâèòü ïèùó ïðè
âîçìîæíî áîëåå íèçêîé òåìïåðàòóðå è íå çàðóìÿíèâàòü ïðîäóêòû ñëèøêîì
ñèëüíî.

Ïðàâèëà òåõíèêè áåçîïàñíîñòè4
Êàê èçáåæàòü ïîâðåæäåíèé ïðèáîðà.
• Íå âûñòèëàéòå äóõîâîé øêàô àëþìèíèåâîé ôîëüãîé, íå ñòàâüòå íà äíî
ïðîòèâíè, êàñòðþëè è ò.ï., òàê êàê ïðîòèâíîì ñëó÷àå ýìàëåâîå ïîêðûòèå
äóõîâîãî øêàôà áóäåò ïîâðåæäåíî èç-çà âûñîêîé êîíöåíòðàöèè òåïëà â
ýòèõ ìåñòàõ.
• Êàïàþùèå ñ ïðîòèâíåé ôðóêòîâûå ñîêè îñòàâëÿþò ïÿòíà, íå ïîääàþùèåñÿ
óäàëåíèþ. Äëÿ ïðèãîòîâëåíèÿ ïèðîãîâ ñ áîëüøèì ñîäåðæàíèåì âëàãè
ïîëüçóéòåñü ãëóáîêèì ïðîòèâíåì.
• Íå îòÿãîùàéòå îòêðûòóþ äâåðöó äóõîâîãî øêàôà íèêàêèìè ãðóçàìè.
• Íèêîãäà íå ëåéòå âîäó ïðÿìî â ãîðÿ÷èé äóõîâîé øêàô. Ýòî ìîæåò
ïðèâåñòè ê ïîâðåæäåíèþ ýìàëè è ÷àñòè÷íîìó èçìåíåíèþ öâåòà
ïîâåðõíîñòåé äóõîâîãî øêàôà.
• Ïðè ôèçè÷åñêîì âîçäåéñòâèè, â îñîáåííîñòè íà êðàÿ ïåðåäíåãî ñòåêëà
äóõîâîãî øêàôà, ýòî ñòåêëî ìîæåò ëîïíóòü.
• Íå õðàíèòå â äóõîâîì øêàôó íèêàêèõ ãîðþ÷èõ ïðåäìåòîâ. Ïðè
âêëþ÷åíèèè ïðèáîðà îíè ìîãóò âîñïëàìåíèòüñÿ.
• Íå õðàíèòå â äóõîâîì øêàôó íèêàêèõ âëàæíûõ ïðîäóêòîâ ïèòàíèÿ. Ýòî
ìîæåò ïîâðåäèòü ýìàëü.
• Ïîñëå îòêëþ÷åíèÿ îõëàæäàþùåãî âåíòèëÿòîðà íå äåðæèòå â äóõîâîì
øêàôå îòêðûòûå áëþäà. Â äóõîâîì øêàôå èëè íà ñòåêëàõ äâåðè ìîæåò
îñàæäàòüñÿ êîíäåíñàò, êîòîðûé ìîæåò òàêæå ïîïàñòü è íà ìåáåëü.
3 Çàìå÷àíèå îá ýìàëåâîì ïîêðûòèè äóõîâîãî øêàôà
Èçìåíåíèÿ öâåòà ýìàëåâîãî ïîêðûòèÿ äóõîâîãî øêàôà, âîçíèêøèå â
ïðîöåññå ýêñïëóàòàöèè, íå ñíèæàþò ïðèãîäíîñòü ïðèáîðà äëÿ îáû÷íîãî èëè
äîãîâîðíîãî èñïîëüçîâàíèÿ. Ïîýòîìó îíè íå ÿâëÿþòñÿ äåôåêòîì, íà
êîòîðûé ðàñïðîñòðàíÿåòñÿ ãàðàíòèÿ.
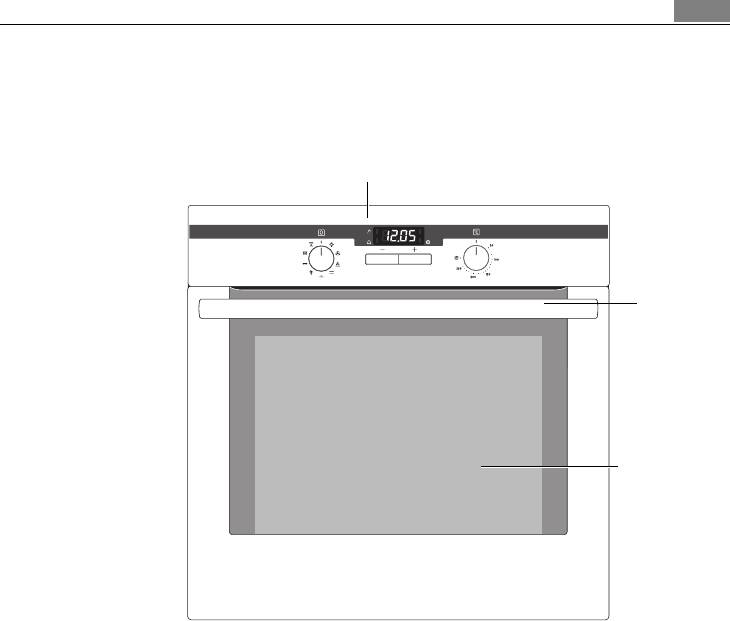
5Îïèñàíèå ïðèáîðà
Îïèñàíèå ïðèáîðà
Îáùèé âèä
Ïàíåëü óïðàâëåíèÿ
Ðó÷êà
äâåðöû
Ñòåêëÿííàÿ
äâåðöà
Îïèñàíèå ïðèáîðà6
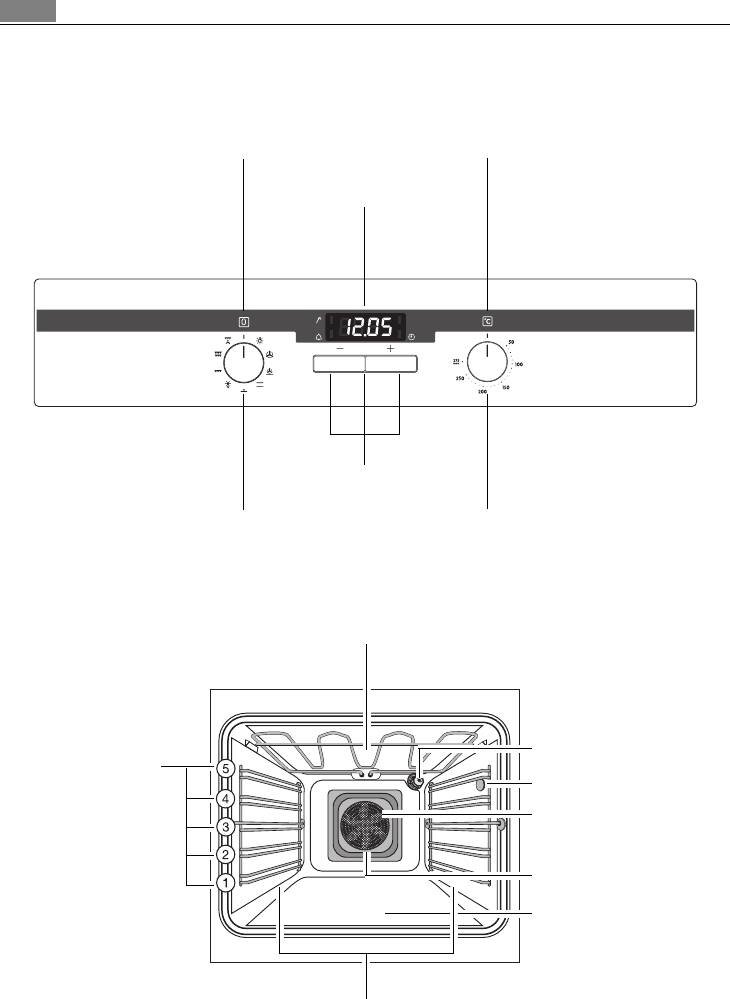
Ðåãóëèðîâî÷íàÿ ïàíåëü
Êîíòðîëüíûé èíäèêàòîð
Êîíòðîëüíûé èíäèêàòîð
ðàáî÷åãî ðåæèìà
òåìïåðàòóðû
Èíäèêàöèÿ âðåìåíè
Êíîïêè ôóíêöèé ÷àñîâ
Ôóíêöèè äóõîâîãî øêàôà
Âûáîð òåìïåðàòóðû
Îñíîâíîå îñíàùåíèå äóõîâîãî øêàôà
Íàãðåâ ñâåðõó è íàãðåâàòåëüíûé ýëåìåíò ãðèëÿ
Ïîäñâåòêà äóõîâîãî
øêàôà
Óðîâíè äóõîâîãî
øêàôà
Ãíåçäî äëÿ òåðìîùóïà
Æèðîâîé ôèëüòð
Íàãðåâàòåëüíûé ýëå-
ìåíò íà çàäíåé ñòåíêå
Íàãðåâ ñíèçó
Áîêîâûå îïîðíûå ðåøåòêè, ñúåìíûå
7Îïèñàíèå ïðèáîðà
Âíóòðåííÿÿ ñòîðîíà äâåðöû
Íà âíóòðåííåé ñòîðîíå äâåðöû äóõîâîãî
øêàôà èçîáðàæåíà ñõåìà ñ íóìåðàöèåé
óðîâíåé äóõîâîãî øêàôà.
Êðîìå òîãî, òàì ïðèâîäèòñÿ êðàòêàÿ
èíôîðìàöèÿ î ôóíêöèÿõ äóõîâîãî øêàôà,
ðåêîìåíäóåìûõ óðîâíÿõ âñòàâêè
ïðèíàäëåæíîñòåé, à òàêæå òåìïåðàòóðàõ,
èñïîëüçóåìûõ äëÿ ïðèãîòîâëåíèÿ
íàèáîëåå ïîïóëÿðíûõ êóëèíàðíûõ áëþä.
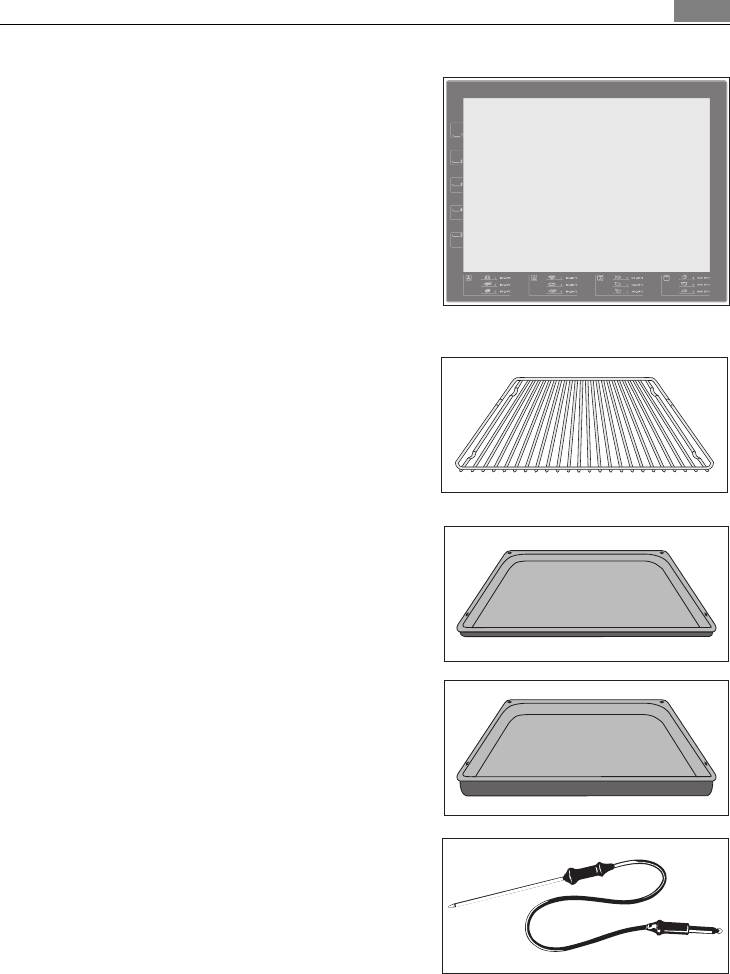
Ïðèíàäëåæíîñòè äóõîâîãî øêàôà
Ðåøåòêà
Äëÿ óñòàíîâêè ïîñóäû, âûïå÷íûõ ôîðì,
æàðêè è ãðèëåâàíèÿ êóñêîâ ìÿñà.
Ïðîòèâåíü
äëÿ ïèðîãîâ è ïå÷åíüÿ.
Ãëóáîêèé ïðîòèâåíü
Èñïîëüçóåòñÿ äëÿ âûïå÷êè, æàðêè è â
êà÷åñòâå ïîääîíà äëÿ ñáîðà æèðà.
Òåðìîùóï äëÿ ìÿñà
Äëÿ òî÷íîãî îïðåäåëåíèÿ ñîñòîÿíèÿ
ãîòîâíîñòè ìÿñà â äóõîâîì øêàôó.
B4403-5
|
User manual |
Built-In Electric Oven |

2 Contents
Thank you for choosing one of our high-quality products.
To ensure optimal and regular performance of your appliance please read this instruction manual carefully. It will enable you to navigate all processes perfectly and most efficiently.
To refer to this manual any time you need to, we recommend you to keep it in a safe place. And please pass it to any future owner of the appliance.
We wish you much joy with your new appliance.
Contents
|
Operating Instructions |
3 |
|
Safety instructions |
3 |
|
Description of the Appliance |
4 |
|
General Overview |
4 |
|
Control Panel |
5 |
|
Oven Features |
5 |
|
Oven accessories |
6 |
|
Before Using for the first time |
7 |
|
Setting and changing the time |
7 |
|
Initial Cleaning |
7 |
|
Using the Oven |
8 |
|
Switching the Oven On and Off |
8 |
|
Oven Functions |
9 |
|
Inserting the Oven Shelf, Baking Tray |
|
|
and Roasting Pan |
9 |
|
Inserting/Removing the Fat Filter |
10 |
|
Additional functions |
11 |
|
Mechanical Door Lock |
14 |
|
Uses, Tables and Tips |
15 |
|
Baking |
15 |
|
Roasting |
21 |
|
Grill sizes |
24 |
|
Defrosting |
24 |
|
Drying |
25 |
|
Making preserves |
26 |
|
Cleaning and Care |
27 |
|
Outside of the appliance |
27 |
|
Oven interior |
27 |
|
Accessories |
27 |
|
Fat Filter |
27 |
|
Shelf Support Rails |
28 |
|
Oven lighting |
29 |
|
Oven Ceiling |
29 |
|
Oven door |
30 |
|
Oven door glass |
32 |
|
What to do if … |
36 |
|
Disposal |
37 |
|
Service |
38 |
The following symbols are used in this user manual:
1Important information concerning your personal safety and information on how to avoid damaging the appliance.
3General information and tips
2Environmental information
Operating Instructions
1Safety instructions
Electrical safety
•This appliance must be only connected by a registered electrician.
•In the event of a fault or damage to the appliance: Take the fuses out or switch off.
•Repairs to the appliance must only be carried out by qualified service engineers. Considerable danger may result from improper repairs. If repairs become necessary, please contact our Customer Services or your dealer.
Child Safety
• Never leave children unsupervised when the appliance is in use.
Safety whilst using
•People (including children) who, because of their physical, sensory or mental capabilities or their inexperience or ignorance are not able to use the device safely, should not use this device without supervision or instruction by a responsible person.
•This appliance is intended to be used for cooking, roasting and baking food in the home.
•Take care when connecting electric appliances to sockets nearby. Do not allow connecting leads to come into contact with or to catch beneath the hot oven door.
•Warning: Risk of burns! The interior of the oven becomes hot during use.
•Using ingredients containing alcohol in the oven may create an alcohol-air mixture that is easily ignited. In this case, open the door carefully. Do not have embers, sparks or naked flames in the vicinity when opening the door.
3Information on acrylamides
According to the latest scientific knowledge, intensive browning of food, especially in products containing starch, can constitute a health risk due to acrylamides. Therefore we recommend cooking at the lowest possible temperatures and not browning foods too much.
How to avoid damage to the appliance
•Do not line the oven with aluminium foil and do not place baking trays, pots, etc. on the oven floor, as the heat that builds up will damage the oven enamel.
•Fruit juices dripping from the baking tray will leave stains, which you will not be able to remove. For very moist cakes, use a deep tray.
•Do not put any strain on the oven door when open.
•Never pour water directly into the oven when it is hot. This could cause damage to or discolouration of the enamel.
•Rough handling, especially around the edges of the front panel, can cause the glass to break.
•Do not store any flammable materials inside the oven. These could ignite when the oven is switched on.

4Description of the Appliance
•Do not store any moist foods inside the oven. This could damage the oven enamel.
•After switching off the cooling fan, do not keep uncovered dishes in the oven. Moisture may condense in the oven interior or on the glass doors and may get into the units.
3Note on enamel coating
Changes in the colour of the oven’s enamel coating as a result of use do not affect the appliance’s suitability for normal and correct use. They therefore do not constitute a defect in the sense of the warranty law.
Description of the Appliance
General Overview
Control panel
Door handle
Full glass door

|
Description of the Appliance |
|
|
5 |
|
Control Panel
|
Oven Power Indicator |
Temperature Pilot Light |
Time display
Clock function buttons
Oven Functions Temperature selector
Oven Features
Top heat and heating elements
Oven lighting
Shelf positions
Meat probe socket
Fat Filter
Fan heating element
Fan
Bottom Heat
Oven shelf runners, removable
6Description of the Appliance
Inside of door
On the inside of the oven door you will find the numbers of the different oven shelves.
You will also find some brief information about the oven’s functions, recommended shelves and temperatures for cooking the most popular dishes.
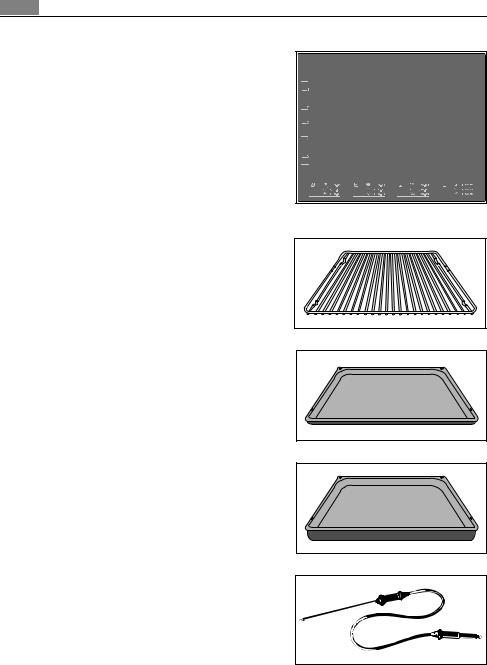
Oven accessories
Oven shelf
For cookware, cake tins, roasts and grilled foods.
Baking tray
For cakes and biscuits.
Roasting Pan
For baking and roasting or as a pan for collecting fat.
Meat probe
For determining exactly how far joints of meat are cooked.

|
Before Using for the first time |
|
|
7 |
|
Before Using for the first time
Setting and changing the time
After the appliance has been connected to the electrical supply or when there has been a power cut, the function indicator Time of day  flashes automatically.
1.To change a time that has already been set,
press the  button and the
  button at the same time, until the function light Time of day
  flashes.
2.Using the or
or  button, set the current time. 3 Always press the desired button in the middle.
After about 5 seconds, the flashing stops and the clock displays the time of day set.
The appliance is now ready to use.
3The Time of day Minute Minder
 can only be changed, if no is set.
Initial Cleaning
Before using the oven for the first time you should clean it thoroughly.
1Caution: Do not use any caustic, abrasive cleaners! The surface could be damaged.
3To clean metal fronts use commercially available cleaning agents.
1.Turn the oven function switch to oven lighting 
2.Remove all accessories and the shelf support rails and wash them with warm water and washing up liquid.
3.Then wash out the oven with warm water and washing-up liquid, and dry.
4.Wipe the front of the appliance with a damp cloth.

8 Using the Oven
Using the Oven
3The oven is equipped with retractable buttons for “Oven functions” and “Temperature selection”. To use, press the relevant button. The button then sticks out.
Switching the Oven On and Off
|
Temperature / Time Display |
|
|
Oven Power Indicator |
Temperature Pilot Light |
Meat probe indicator
|
Oven function selection |
Temperature selector |
1.Turn the oven functions dial to the desired function.
2.Turn the temperature selector to the desired temperature. The power indicator is lit as long as the oven is in operation.
The temperature pilot light is lit as long as the oven is heating up.
3.To turn the oven off, turn the oven functions dial and the temperature selector to the Off position.
3Cooling fan
The fan switches on automatically in order to keep the appliance’s surfaces cool. When the oven is switched off, the fan continues to run to cool the appliance down, then switches itself off automatically.

Oven Functions
The oven has the following functions:
|
Oven function |
Application |
|
Light |
Using this function you can light up the oven interior, e.g. for |
|
cleaning. |
|
|
True fan |
For baking on up to three oven levels at the same time. |
|
Set the oven temperatures 20-40 °C lower than when using |
|
|
Conventional. |
|
|
Fan baking |
For baking on one oven level dishes that require more inten- |
|
sive browning and a crispy base. |
|
|
Set the oven temperatures 20-40 °C lower than when using |
|
|
Conventional. |
|
|
Conventional |
For baking and roasting on one oven level. |
|
Base heat |
For baking cakes with crispy or crusty bases. |
|
Defrost |
For defrosting e. g. flans and gateaux, butter, bread, fruit or |
|
other frozen foods. |
|
|
Single grill |
For grilling flat food items placed in the middle of the grill |
|
and for toasting. |
|
|
Dual grill |
For grilling flat food items in large quantities and for toast- |
|
ing. |
|
|
Rotitherm |
For roasting larger joints of meat or poultry on one level. |
|
The function is also suitable for gratinating and browning. |
|
Inserting the Oven Shelf, Baking Tray and Roasting Pan
3Shelf runner safety and anti-tip device
As a shelf runner safety device, all insertable components have a small curved indentation at the bottom on the right and left-hand edge.
Always insert insertable components so that this indentation is at the back of the oven interior. This indentation is also important for preventing the insertable components from tipping.
Inserting the baking tray or roasting pan
Push the baking tray or roasting pan between the guide bars of the selected oven level.

10Using the Oven
Inserting the oven shelf:
Insert the oven shelf so that the feet point downwards.
Push the oven shelf between the guide bars of the selected oven level.
3The high rim around the oven shelf is an additional device to prevent cookware from slipping.
Inserting the oven shelf and roasting pan together
Lay the oven shelf on the roasting pan.
Push the roasting pan between the guide bars of the selected oven level.
Inserting/Removing the Fat Filter
Only use the fat filter when roasting to protect the rear heating elements from fat splashes.
Inserting the fat filter
Hold the fat filter by the grip and insert the two mounts downwards into the opening on the rear wall of the oven (fan opening).
Taking out the fat filter
Hold the fat filter by the grip and unhook it.
![]()
Additional functions
|
Either Minute Minder or Meatprobe can be |
||
|
Time or temperature display |
||
|
set. |
||
Minute Minder
To set a countdown.
Meatprobe
To set a core temperature.
Selector buttons
2Switching off the time display
You can save energy by switching off the time display.
To switch off the time display
Press the  button and the
  button at the same time until the display goes out.
To switch on the time display
Press any button until the time appears in the display again.
3The display can only be switched off if no clock function or core temperature  is entered.
3General Hints
•After a function has been selected, the display flashes for about 5 seconds. While it flashes, the desired time can be set using the  or
or  buttons.
•When the desired time has been set, the display flashes for another 5 seconds. The set time begins to run.
•Press any of the buttons to stop the signal.
•The desired oven function and temperature can be selected before or after setting the clock functions.
•When cooking is finished, turn the oven and temperature selectors back to zero.

12 Using the Oven
Minute Minder 
3This function has no effect on the operation of the oven.
1.Press any button.
“0.00” flashes in the display.
2.Within 5 seconds set the desired countdown
using the  or
or  buttons (max. 2 hours 30 minutes).
After 5 seconds the display shows the time remaining.
When the time has elapsed, “0.00” is displayed and an audible signal sounds for 2 minutes.
3.The signal can be stopped by pressing any button.
 Loading…
Инструкцию для AEG B 4403 5M на русском языке, в формате pdf можно скачать с нашего сайта. Наш каталог предоставляем Вам инструкцию производителя фирмы AEG, которая была взята из открытых источников. Ознакомившись с руководством по эксплуатации от AEG, Вы на все 100% и правильно сможете воспользоваться всеми функциями устройства.
Для сохранения инструкции «Электрический духовой шкаф AEG B 4403 5M» на русском языке на вашем компьютере либо телефоне, нажмите кнопку «Скачать инструкцию». Если активна кнопка «Инструкция онлайн», то Вы можете просмотреть документ (manual), в своём браузере онлайн.
Если у Вас нет возможности скачать инструкцию по эксплуатации либо просмотреть её, Вы можете поделиться ссылкой на эту страницу в социальных сетях и при удобном моменте скачать инструкцию. Либо добавьте эту страницу в закладки Вашего браузера, нажав кнопку «Добавить страницу в закладки браузера».
Главная
»
Инструкции
»
AEG
»
Встраиваемые плиты и духовые шкафы
»
AEG B 4403-5-M
На этой странице представлен список инструкций, включающий в себя руководство пользователя, сервисную инструкцию, инструкцию по установке, а также по эксплуатации и ремонту для AEG B 4403-5-M на различных языках. Выберите нужный тип инструкции и язык, на котором Вам удобнее будет ее читать и нажимайте кнопку «Скачать инструкцию».
Руководство пользователя AEG B 4403-5-M
 |
Руководство пользователя AEG B 4403-5-M
Языки: Русский
|
