Дополнительная информация
-
Руководство пользователя PDF
файл,
2.9 MB
20 апреля 2022 г. -
Руководство пользователя PDF
файл,
2.9 MB
15 апреля 2022 г. -
Руководство пользователя PDF
файл,
5.3 MB
15 апреля 2022 г. -
Руководство пользователя PDF
файл,
2.9 MB
15 апреля 2022 г. -
Руководство пользователя PDF
файл,
2.9 MB
15 апреля 2022 г. -
Руководство пользователя PDF
файл,
2.9 MB
14 апреля 2022 г. -
Руководство пользователя PDF
файл,
2.8 MB
15 апреля 2022 г. -
Руководство пользователя PDF
файл,
2.9 MB
15 апреля 2022 г. -
Руководство пользователя PDF
файл,
2.9 MB
15 апреля 2022 г. -
Руководство пользователя PDF
файл,
2.9 MB
20 апреля 2022 г. -
Руководство пользователя PDF
файл,
2.9 MB
15 апреля 2022 г. -
Руководство пользователя PDF
файл,
2.9 MB
15 апреля 2022 г. -
Руководство пользователя PDF
файл,
2.9 MB
14 апреля 2022 г. -
Руководство пользователя PDF
файл,
2.9 MB
15 апреля 2022 г. -
Руководство пользователя PDF
файл,
2.9 MB
16 апреля 2022 г. -
Руководство пользователя PDF
файл,
2.9 MB
20 апреля 2022 г. -
Руководство пользователя PDF
файл,
3.0 MB
18 апреля 2022 г. -
Руководство пользователя PDF
файл,
2.9 MB
15 апреля 2022 г. -
Руководство пользователя PDF
файл,
2.9 MB
14 апреля 2022 г. -
Руководство пользователя PDF
файл,
2.9 MB
14 апреля 2022 г. -
Руководство пользователя PDF
файл,
2.9 MB
16 апреля 2022 г. -
Руководство пользователя PDF
файл,
2.9 MB
1 мая 2022 г. -
Руководство пользователя PDF
файл,
2.9 MB
15 апреля 2022 г. -
Руководство пользователя PDF
файл,
2.9 MB
14 апреля 2022 г. -
Руководство пользователя PDF
файл,
2.9 MB
20 апреля 2022 г. -
Руководство пользователя PDF
файл,
2.9 MB
18 апреля 2022 г. -
Руководство пользователя PDF
файл,
2.9 MB
20 апреля 2022 г. -
Руководство пользователя PDF
файл,
2.9 MB
14 апреля 2022 г. -
Руководство пользователя PDF
файл,
2.9 MB
13 апреля 2022 г. -
Руководство пользователя PDF
файл,
2.9 MB
16 апреля 2022 г. -
Руководство пользователя PDF
файл,
2.9 MB
14 апреля 2022 г. -
Руководство пользователя PDF
файл,
2.9 MB
20 апреля 2022 г. -
Руководство пользователя PDF
файл,
2.9 MB
18 апреля 2022 г. -
Руководство пользователя PDF
файл,
2.9 MB
16 апреля 2022 г. -
Руководство пользователя PDF
файл,
2.9 MB
14 апреля 2022 г. -
Руководство пользователя PDF
файл,
2.9 MB
15 апреля 2022 г. -
Руководство пользователя PDF
файл,
2.9 MB
20 апреля 2022 г. -
Руководство пользователя PDF
файл,
2.8 MB
20 апреля 2022 г. -
Руководство пользователя PDF
файл,
3.1 MB
19 апреля 2022 г. -
Руководство пользователя PDF
файл,
2.9 MB
13 апреля 2022 г. -
Руководство пользователя PDF
файл,
2.9 MB
15 апреля 2022 г. -
Руководство пользователя PDF
файл,
2.9 MB
20 апреля 2022 г. -
Краткое руководство PDF
файл,
2.5 MB
19 апреля 2022 г. -
Краткое руководство PDF
файл,
2.5 MB
19 апреля 2022 г. -
Краткое руководство PDF
файл,
2.5 MB
19 апреля 2022 г. -
Краткое руководство PDF
файл,
2.5 MB
19 апреля 2022 г. -
Краткое руководство PDF
файл,
2.5 MB
19 апреля 2022 г. -
Краткое руководство PDF
файл,
2.5 MB
19 апреля 2022 г. -
Краткое руководство PDF
файл,
2.5 MB
19 апреля 2022 г. -
Краткое руководство PDF
файл,
2.5 MB
19 апреля 2022 г. -
Краткое руководство PDF
файл,
2.5 MB
19 апреля 2022 г. -
Краткое руководство PDF
файл,
2.5 MB
19 апреля 2022 г. -
Краткое руководство PDF
файл,
2.5 MB
19 апреля 2022 г. -
Краткое руководство PDF
файл,
2.5 MB
19 апреля 2022 г. -
Краткое руководство PDF
файл,
2.5 MB
19 апреля 2022 г. -
Краткое руководство PDF
файл,
2.5 MB
19 апреля 2022 г. -
Краткое руководство PDF
файл,
2.5 MB
19 апреля 2022 г. -
Краткое руководство PDF
файл,
2.5 MB
19 апреля 2022 г. -
Краткое руководство PDF
файл,
2.5 MB
19 апреля 2022 г. -
Краткое руководство PDF
файл,
2.5 MB
19 апреля 2022 г. -
Краткое руководство PDF
файл,
2.5 MB
19 апреля 2022 г. -
Краткое руководство PDF
файл,
2.5 MB
19 апреля 2022 г. -
Краткое руководство PDF
файл,
2.5 MB
19 апреля 2022 г. -
Краткое руководство PDF
файл,
2.5 MB
19 апреля 2022 г. -
Краткое руководство PDF
файл,
2.5 MB
19 апреля 2022 г. -
Краткое руководство PDF
файл,
2.5 MB
19 апреля 2022 г. -
Краткое руководство PDF
файл,
2.5 MB
19 апреля 2022 г. -
Краткое руководство PDF
файл,
2.5 MB
19 апреля 2022 г. -
Краткое руководство PDF
файл,
2.5 MB
19 апреля 2022 г. -
Краткое руководство PDF
файл,
2.5 MB
19 апреля 2022 г. -
Краткое руководство PDF
файл,
2.5 MB
19 апреля 2022 г. -
Краткое руководство PDF
файл,
2.5 MB
19 апреля 2022 г. -
Краткое руководство PDF
файл,
2.5 MB
19 апреля 2022 г. -
Краткое руководство PDF
файл,
2.5 MB
19 апреля 2022 г. -
Краткое руководство PDF
файл,
2.5 MB
19 апреля 2022 г. -
Краткое руководство PDF
файл,
2.5 MB
19 апреля 2022 г. -
Краткое руководство PDF
файл,
2.5 MB
19 апреля 2022 г. -
Краткое руководство PDF
файл,
2.5 MB
19 апреля 2022 г. -
Краткое руководство PDF
файл,
2.5 MB
19 апреля 2022 г. -
Краткое руководство PDF
файл,
2.5 MB
19 апреля 2022 г. -
Краткое руководство PDF
файл,
2.5 MB
19 апреля 2022 г. -
Краткое руководство PDF
файл,
2.5 MB
19 апреля 2022 г. -
Краткое руководство PDF
файл,
2.5 MB
19 апреля 2022 г. -
Краткое руководство PDF
файл,
2.5 MB
19 апреля 2022 г. -
Краткое руководство PDF
файл,
2.5 MB
19 апреля 2022 г. -
Краткое руководство PDF
файл,
2.5 MB
19 апреля 2022 г. -
Краткое руководство PDF
файл,
2.5 MB
19 апреля 2022 г. -
Краткое руководство PDF
файл,
2.5 MB
19 апреля 2022 г. -
Руководство с важными сведениями PDF
файл,
1.2 MB
15 апреля 2022 г. -
Руководство с важными сведениями PDF
файл,
1.2 MB
15 апреля 2022 г. -
Руководство с важными сведениями PDF
файл,
1.2 MB
15 апреля 2022 г. -
Руководство с важными сведениями PDF
файл,
1.2 MB
15 апреля 2022 г. -
Руководство с важными сведениями PDF
файл,
1.2 MB
15 апреля 2022 г. -
Руководство с важными сведениями PDF
файл,
1.2 MB
15 апреля 2022 г. -
Руководство с важными сведениями PDF
файл,
1.2 MB
15 апреля 2022 г. -
Руководство с важными сведениями PDF
файл,
1.2 MB
15 апреля 2022 г. -
Руководство с важными сведениями PDF
файл,
1.2 MB
15 апреля 2022 г. -
Руководство с важными сведениями PDF
файл,
1.2 MB
15 апреля 2022 г. -
Руководство с важными сведениями PDF
файл,
1.2 MB
15 апреля 2022 г. -
Руководство с важными сведениями PDF
файл,
1.2 MB
15 апреля 2022 г. -
Руководство с важными сведениями PDF
файл,
1.2 MB
15 апреля 2022 г. -
Руководство с важными сведениями PDF
файл,
1.2 MB
15 апреля 2022 г. -
Руководство с важными сведениями PDF
файл,
1.2 MB
15 апреля 2022 г. -
Руководство с важными сведениями PDF
файл,
1.2 MB
15 апреля 2022 г. -
Руководство с важными сведениями PDF
файл,
1.2 MB
15 апреля 2022 г. -
Руководство с важными сведениями PDF
файл,
925.9 kB
16 апреля 2022 г. -
Руководство с важными сведениями PDF
файл,
1.5 MB
20 апреля 2022 г. -
Руководство с важными сведениями PDF
файл,
1.5 MB
20 апреля 2022 г. -
Руководство с важными сведениями PDF
файл,
1.5 MB
20 апреля 2022 г. -
Руководство с важными сведениями PDF
файл,
1.5 MB
20 апреля 2022 г. -
Руководство с важными сведениями PDF
файл,
1.5 MB
20 апреля 2022 г. -
Руководство с важными сведениями PDF
файл,
1.5 MB
20 апреля 2022 г. -
Руководство с важными сведениями PDF
файл,
1.5 MB
20 апреля 2022 г. -
Руководство с важными сведениями PDF
файл,
1.5 MB
20 апреля 2022 г. -
Руководство с важными сведениями PDF
файл,
1.5 MB
20 апреля 2022 г. -
Руководство с важными сведениями PDF
файл,
1.5 MB
20 апреля 2022 г. -
Руководство с важными сведениями PDF
файл,
1.2 MB
15 апреля 2022 г. -
Руководство с важными сведениями PDF
файл,
1.2 MB
15 апреля 2022 г. -
Руководство с важными сведениями PDF
файл,
1.2 MB
15 апреля 2022 г. -
Руководство с важными сведениями PDF
файл,
1.2 MB
15 апреля 2022 г. -
Руководство с важными сведениями PDF
файл,
1.2 MB
15 апреля 2022 г. -
Руководство с важными сведениями PDF
файл,
1.2 MB
15 апреля 2022 г. -
Руководство с важными сведениями PDF
файл,
1.2 MB
15 апреля 2022 г. -
Руководство с важными сведениями PDF
файл,
1.2 MB
15 апреля 2022 г. -
Руководство с важными сведениями PDF
файл,
1.2 MB
15 апреля 2022 г. -
Руководство с важными сведениями PDF
файл,
1.2 MB
15 апреля 2022 г. -
Руководство с важными сведениями PDF
файл,
1.2 MB
15 апреля 2022 г. -
Руководство с важными сведениями PDF
файл,
1.2 MB
15 апреля 2022 г. -
Руководство с важными сведениями PDF
файл,
1.2 MB
15 апреля 2022 г. -
Руководство с важными сведениями PDF
файл,
1.2 MB
15 апреля 2022 г. -
UK Declaration of conformity PDF
файл,
44.5 kB
19 августа 2023 г. -
Локализованная торговая брошюра PDF
файл,
818.5 kB
6 июня 2022 г.
Зарегистрируйте продукт и получите
- Электронную гарантию
- Информацию о скидках и акциях
- Простой доступ к поддержке продуктов
Обращение в компанию Philips
Мы всегда рады помочь вам
Предлагаемые продукты

- Manuals
- Brands
- Philips Manuals
- Electric Shaver
- S7000 series
- Manual
-
Contents
-
Table of Contents
-
Troubleshooting
-
Bookmarks
Quick Links
Related Manuals for Philips S7000 Series
Summary of Contents for Philips S7000 Series
-
Page 1
S7000 series… -
Page 3: Table Of Contents
How do I replace the shaving heads?____________________________ Ordering accessories_____________________________________________ Troubleshooting__________________________________________________ Introduction Congratulations on your purchase and welcome to Philips! To fully benefit from the support that Philips offers, register your product at www.philips.com/welcome or via the app. General description Pop-up trimmer…
-
Page 4: What Do The Icons On My Appliance Handle Mean
English 15 Cleaning brush 16 Length settings 17 Click-on beard styler attachment 18 Comb for beard styler attachment 19 Attachment holder 20 Click-on cleansing brush attachment 21 Click-on nose trimmer attachment Note: The accessories supplied may vary for different products. The box shows the accessories that have been supplied with your appliance.
-
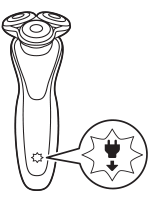
Page 5
English Icon Behavior Meaning Flashing quickly The cleaning program was stopped. If you when you wish to continue, you need to restart the remove the cleaning cycle by putting the shaver into shaver from the the Quick Clean Pod and pressing the Quick Clean Pod on/off button. -
Page 6: What Does The Icon On My Quick Clean Pod Mean
English Icon Behavior Meaning Bottom light The battery is almost empty (see ‘How do flashing orange I charge my appliance?’). Lights flashing in The appliance is charging. sequence Lights up The appliance is fully charged. continuously What does the icon on my Quick Clean Pod mean? Icon Behavior…
-
Page 7
English 2 Insert the small plug into the appliance and put the supply unit in the wall socket. — While the appliance is in quick charge mode, the lights of the battery status indicator light up one after the other. After approximately 5 minutes, the bottom light of the battery status indicator flashes. -
Page 8: How Do I Use My Appliance And The Attachments
English — As the appliance continues to charge, the light ring becomes brighter and rotates slower. — When the appliance is fully charged, the light ring lights up fully and stops rotating. 4 After charging, remove the supply unit from the wall socket and pull the small plug out of the charging stand.
-
Page 9
English start with the guided shave to enhance your shaving experience. — Correct handling of your appliance will contribute to the best shaving result. — Follow the advice obtained from the synchronized shaves and the personalized programs. Shaving You can use this appliance either wet or dry, or even under the shower. -
Page 10
English 3 Use the narrow sides of the shaving unit to shave in hard-to-reach areas such as along your jawline and under your nose. 4 Switch off and clean the appliance after each use. Note: Make sure you rinse all foam or shaving gel off the appliance. -
Page 11
English — Clean the appliance and attachments after each use to prevent clogging and damage (see ‘How do I clean my appliance and the attachments?’). — Clean the shaving heads thoroughly once a month or when the appliance does not shave as well as it used to (see ‘Thorough cleaning’). -
Page 12
English 4 You can also use the trimmer under your nose. 5 Switch off the appliance and clean the trimmer after each use to prevent clogging and damage (see ‘How do I clean my appliance and the attachments?’). 6 Close the trimmer. Using the click-on attachments Note: The accessories supplied may vary for different products. -
Page 13
English 3 Press the length selector and then push it to the left or right to select the desired hair length setting. 4 Switch on the appliance. 5 Move the appliance upwards while you exert gentle pressure. Make sure the front of the comb is in full contact with the skin. -
Page 14
English Using the nose/ear trimmer attachment You can use the nose/ear trimmer attachment to trim your nose and/or ear hair. Trimming nose hair Make sure both the nose/ear trimmer attachment and nasal passages are clean before trimming. 1 Twist the shaving head or other attachment to remove it from the handle and press the nose/ear hair trimmer onto the handle. -
Page 15
English Do not insert the trimming head more than 0.5 cm into your ear channel, as this could damage the eardrum. 4 Slowly turn the trimming head around to remove all unwanted hairs from your outer ear channel. 5 Switch off the appliance and clean the attachment after use. -
Page 16
— Store the appliance in the pouch (if supplied). — Alternatively, store the appliance on the charging stand (if supplied) or in the Philips Quick Clean Pod (if supplied). Travel lock You can lock the shaver when you are going to travel to prevent it from switching on accidentally. -
Page 17: How Do I Clean My Appliance And The Attachments
English Press the on/off button for 3 seconds to use the travel lock mode. When the travel lock is activated, the travel lock 3 sec. symbol flashes. Note: Bluetooth is switched off when the travel lock is activated. Deactivating the travel lock Press the on/off button for 3 seconds.
-
Page 18
English 3 Switch off the shaver. Press the release button to open the shaving unit. 4 Rinse the hair chamber under a warm tap. 5 Rinse the shaving head holder under a warm tap. 6 Carefully shake off excess water and let the shaving head holder air-dry completely. -
Page 19
English 2 Press the release buttons on the shaving unit and pull the shaving head holder off the shaving unit. 3 Rinse the hair chamber and shaving head holder under the tap. 4 Remove the shaving heads. For detailed instructions, see ‘How do I replace the shaving heads?.’ Note: Do not clean more than one cutter and guard at a time, since they are all matching sets. -
Page 20
English 1 Make sure that the appliance is switched off and disconnected from the wall socket. 2 Push the trimmer release slide down to open the pop-up trimmer. 3 Switch on the appliance and rinse the pop-up trimmer with warm water. 4 After cleaning, switch off the appliance. -
Page 21: How Do I Use The Quick Clean Pod
English 3 Clean the parts thoroughly with warm water. Use soap only on the cleansing brush attachment. Tip: If rinsing the nose/ear trimmer attachment under the tap is not sufficient, press the attachment onto handle and immerse the trimming head in a glass with warm water for a few minutes.
-
Page 22
English 3 Lift the tab on the seal and pull it by the corner to remove the seal from the Quick Clean Pod Cartridge. 4 Press the small circular piece on the handle of the Quick Clean Pod Cartridge to break the snap hook on the handle. -
Page 23
English Clean Pod (see ‘How do I clean my appliance and the attachments?’). Always shake excess water off the shaver before you place it in the Quick Clean Pod. 1 Place the shaver upside down into the Quick Clean Pod. The shaver automatically detects that it is in the Quick Clean Pod. -
Page 24: How Do I Connect My Shaver And Smartphone
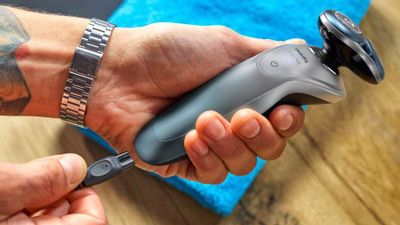
4 Place a new Quick Clean Pod Cartridge into the Quick Clean Pod (see ‘Preparing the Quick Clean Pod for use’). Scan the QR code to the left or visit www.philips.com/cleaning-cartridge to order replacement Quick Clean Pod Cartridges. How do I connect my shaver and smartphone? Note: Make sure your smartphone is equipped with Bluetooth®…
-
Page 25
The app is compatible with a wide range of iPhone and Android™ smartphones. More information is available at www.philips.com. 1 Download the app. 2 Make sure Bluetooth on you smartphone is switched on. -
Page 26
If you need further support, visit www.philips.com/support. Unpair the shaver and smartphone You can pair your shaver with only one smartphone at a time. To unpair your shaver from your smartphone (e.g. -
Page 27: How Do I Replace The Shaving Heads
Replace damaged shaving heads immediately. Always replace the shaving heads with original Philips shaving heads (see ‘Ordering accessories’). Replacing the shaving heads 1 Switch off the shaver. 2 Press the release buttons on the shaving unit and pull the shaving head holder off the shaving unit.
-
Page 28: Ordering Accessories
Ordering accessories To buy accessories or spare parts, visit www.philips.com/parts-and-accessories or go to your Philips dealer. You can also contact the Philips Consumer Care Center in your country (see the international warranty leaflet for contact details). The following accessories and spare parts are…
-
Page 29: Troubleshooting
English — CC12 Philips Quick Clean Pod Cartridge 2-pack — CC13 Philips Quick Clean Pod Cartridge 3-pack — CC16 Philips Quick Clean Pod Cartridge 6-pack Note: The availability of the accessories may differ by country. Troubleshooting This chapter summarizes the most common problems you could encounter with the appliance.
-
Page 30
English Problem Possible cause Solution Make sure that your smartphone is within one meter of your shaver to enable a Bluetooth connection. Make sure your shaver is charged. I want to use You do not have to connect the shaver your shaver with your without the smartphone before each app. -
Page 31
Philips Quick Clean Pod Problem Possible cause Solution My shaver isn’t clean You removed the Leave the shaver in… -
Page 32
Pod after rinsing the the shaving heads shaver but not each time before shaking off excess putting the shaver water. into the Philips Quick Clean Pod. You shaved with Rinse the shaving shaving gel or foam heads thoroughly and did not rinse the… -
Page 33
© 2020 Koninklijke Philips N.V. All rights reserved 3000.057.1983.1 (14/8/2020) >75 % recycled paper >75 % papier recyclé…
Посмотреть инструкция для Philips Series 7000 S7783 бесплатно. Руководство относится к категории бритвы, 6 человек(а) дали ему среднюю оценку 8.6. Руководство доступно на следующих языках: русский. У вас есть вопрос о Philips Series 7000 S7783 или вам нужна помощь? Задайте свой вопрос здесь
Не можете найти ответ на свой вопрос в руководстве? Вы можете найти ответ на свой вопрос ниже, в разделе часто задаваемых вопросов о Philips Series 7000 S7783.
Инструкция Philips Series 7000 S7783 доступно в русский?
Да, руководствоPhilips Series 7000 S7783 доступно врусский .
Не нашли свой вопрос? Задайте свой вопрос здесь

A shave as unique as your skin
Shave the way that feels right by discovering your shaver’s most important features and accessing content about achieving your best shave. Browse the page for tips to take care of your shaver, register your product and find support if you need it – all from one place.
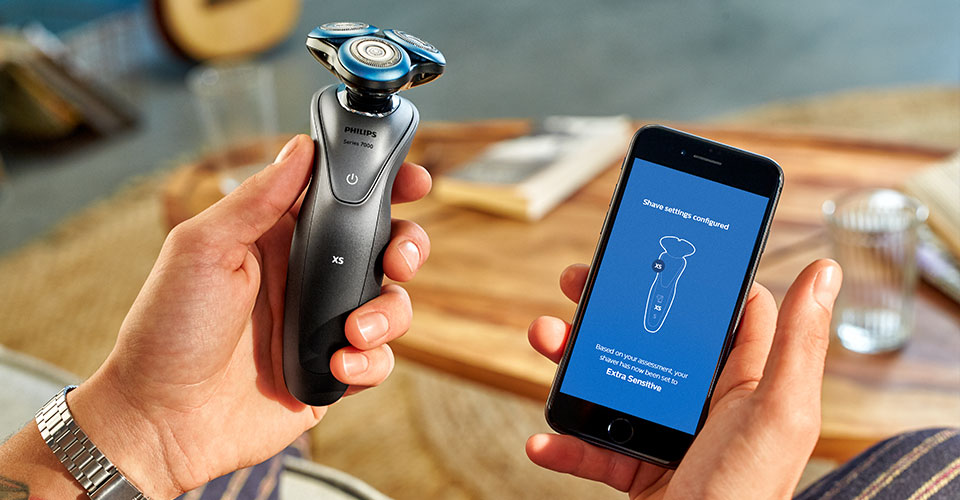
Create your personal shave plan
Get adaptive advice to tackle your specific skin issues, whether redness, razor burn or in-grown hairs. Download and pair the GroomTribe app for iOS and Android to get started.
Download. Pair. Shave.
It couldn’t be easier to get going. Simply download the GroomTribe app from your smartphone’s app store.
Turn on your shaver and with your smartphone’s Bluetooth switched on, open the app and follow the instructions to start pairing. From now on, the shaver and GroomTribe app will connect every time you open the app.
Keep your phone and shaver near each other to stay connected and synchronize. And once you have selected your sensitive shave setting, you’re ready to shave!
Shaving just got personal
Series 7000 is the world’s first personalized shaving solution for sensitive skin. The shaver and the connected GroomTribe app are packed with features to help you shave the way that feels right. Because every skin is different.
-

Personal Shave Plan
Co-developed with dermatologists, the personal shave plan provides adaptive advice to tackle your specific skin issues. It gives advice on your shaving routine and technique via the connected GroomTribe app, tracking your progress and adjusting its advice.
-

BeardAdapt Sensor
The shaver senses your beard density and automatically adjusts the power as needed. With variable power you can shave off even dense beard areas efficiently, helping reduce the chance your skin becoming irritated by repetitive passes.
-

Sensitive Shave Settings
Shave with the recommended speed setting customized to your skin, or choose your own via the GroomTribe app. The default setting is sensitive, but once the app has enough information it will automatically select normal, sensitive or extra sensitive for you.
-

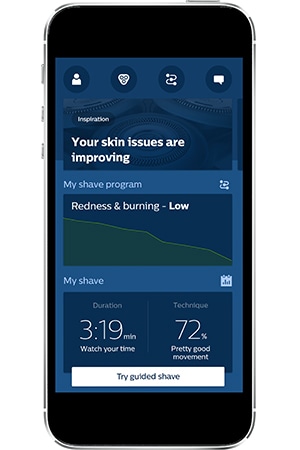
Guided shave
Perfect your shave with the guided shave feature, which provides real-time feedback on your shaving technique at a glance. You won’t always need your phone in the bathroom, it just helps you get your technique working for you at the start of your shave plan.
-
Shave analysis and history
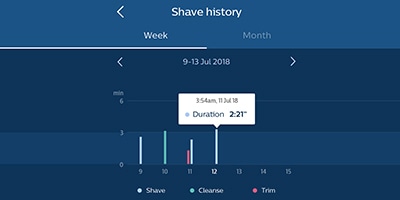
Want to see how you’ve been doing? Your shave analysis and history enable you to review your skin’s progress and shaving technique over time. From your first to most recent shave.
The display
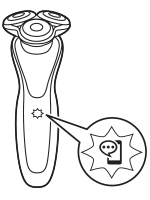
Get the most from your shaver with the intuitive indicators showing in-app notifications, remaining battery, cleaning reminders and more.
-
Notification symbol
The notification symbol lights up when there is an important message for you in the app.
-
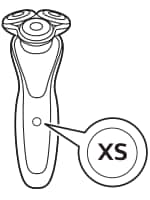
Sensitive shave settings
Your shaver will show XS (extra sensitive), S (sensitive) or N (normal) depending on the shave setting selected within the GroomTribe app.
-
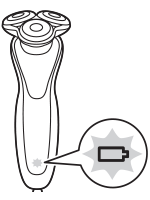
Battery low
The battery charge indicator flashes orange, telling you there is enough energy left for one shave.
-

Quick charge
The battery indicator flashes quickly during a 5-minute quick charge. Once the indicator begins flashing slowly, you have enough charge for one full shave.
-
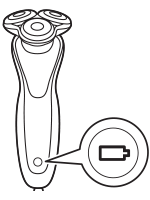
Fully charged
When the battery is full, the charge indicator lights up white continuously for 30 minutes.
-
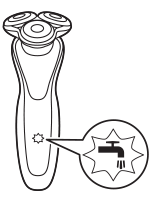
Cleaning reminder
The tap icon flashes reminding you to clean the shaver after every use.
-
‘Unplug for use’ reminder
Flashes to remind you to disconnect the shaver from the wall socket before you can switch it on.
-
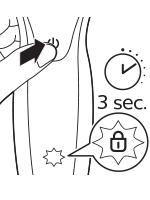
Travel lock
To activate and deactivate the travel lock, press the on/off button for 3 seconds. When the lock is activated the padlock icon will flash.

Achieve the perfect clean shave in three steps
The clean-shaven look can pose challenges, especially for men with sensitive skin who are prone to redness, burning or the ever-present threat of ingrown hairs. Yet – done properly – a close shave with Series 7000 doesn’t have to aggravate your skin.
What does clean-shaven mean?
Before we start, the goal. A clean shave means no beard, and no stubble: a smooth, close shave that lets your good looks do the talking. Ready? Here’s how to have a clean shave in minutes.
Wet or dry?
With a shaver, dry shaving is more skin-friendly, and less likely to generate nicks and cuts. Wet shaving is refreshing and smooth, as long as you remember the shaving foam. Doing what’s right can feel very uncertain at first – especially if you have sensitive skin – but luckily there’s some help at hand.
Shaving advice
The GroomTribe app’s personal shaving plan contains tailormade advice about getting your best shave. Its guided shave strengthens your shave game in real time. Whilst synchronized shaving uses your longer-term shaving data to adjust the advice it creates for you.
Step 1. Be cool
Wash and rinse your face so that it’s really clean before you reach for your shaver. But don’t have a hot shower first, otherwise your skin will be hot, puffy, sweating and difficult to shave. Make sure your skin is dry before moving on to the next step.
Step 2. Be firm but fair
Your Series 7000 can shave up to a three-day beard. If you have any facial hair longer than that, trim it first. For a wet clean shave (including in the shower), smooth on some shaving foam or gel and start shaving using circular movements.
On your first pass, shave in the direction your facial hair is growing in, then go against the grain afterwards for a closer shave. If your skin is particularly sensitive, stay with the grain.
Gently pull your skin tight with your free hand to make shaving easier, just don’t overstretch it. You don’t need a lot of pressure for a close shave, so try not to press the shaver too hard against your skin.
The shaver does its bit too, sensing your beard density and automatically adjusting power to shave off dense beard areas more efficiently. You don’t need to go over and over the same areas, so it helps reduce the chance of your skin becoming irritated.
If you’re shaving wet, rinse off the shaver head every 10 to 15 seconds to clean off the build-up of foam or gel, and dead skin, hair and dirt that can get in the way.
Step 3. Be good
Now for the post-shave recovery. Splash your face with warm water, gently pat it dry and apply some aftershave or moisturizer as needed. Rinse off the wet shaver head and leave it to air dry.
That’s it. Follow these steps, and you can step out of the house with the cleanest shave there is. And on days when the routine doesn’t appeal, you can always go for the perfect five o’clock shadow.
Don’t have your personal shave plan yet?
Get adaptive advice on how to tackle your specific skin issues, whether redness, razor burn or in-grown hairs. Shave-by-shave, the connected app, co-developed with dermatologists, tracks your shave technique and skin progress.
Download and pair the GroomTribe app for iOS and Android to get started.
Download on the App Store
Get it on Google Play
1. Wet or dry?
With a shaver, dry shaving is more skin-friendly, and less likely to generate nicks and cuts. Wet shaving is refreshing and smooth, as long as you remember the shaving foam. Doing what’s right can feel very uncertain at first – especially if you have sensitive skin – but luckily there’s some help at hand.
Click here to read moreClick here to read less

Shave wet or shave dry? Here’s how to do both
A personal shave plan is the best way to be sure if foam or dry shaving is best for your unique skin. But however you learn what’s best for you, here are our tips on a getting a close shave – wet or dry – without compromising on skin comfort.
1. Pre-trim
With a shaver, dry shaving is more skin-friendly, and less likely to generate nicks and cuts. Wet shaving is refreshing and smooth, as long as you remember the shaving foam. Doing what’s right can feel very uncertain at first – especially if you have sensitive skin – but luckily there’s some help at hand.
2. Prepare your skin
If you’re shaving without cream, it is important to have properly dry skin before you start, because moist skin can hamper the smooth movement of the shaver on the face. If you have a shower or wash your face, wait at least 5 minutes to dry off completely.
If you’re shaving wet, it’s still best to start with clean skin, but be careful not to have a hot shower, it will make your skin hot, puffy and sweaty – and difficult to shave. Just smooth on some shaving foam or gel before you start shaving.
3. Shave the comfortable way
Wet or dry, the Series 7000 BeardAdapt Sensor will check your beard density and automatically select the best comfort setting for you. You can manually select a setting if you want to, but your shaver and connected GroomTribe app are designed to care of it.
4. Shave with circular motions
Applying only light pressure (pressing too hard will give you more friction, which can then equal more irritation), shave in small, circular movements. Slow down and take your time with sensitive areas.
5. Final pass
Now that you’ve gone over your entire face once, it’s time to go closer. Make your final pass now, using a little more pressure and moving against the grain. As before, you’ll want to treat sensitive areas with a little extra care and caution.
6. Difficult hairs
Shaving without cream means it’s easier to spot those rogue hairs that have escaped your shaver. But if you are shaving with cream, you can still tackle stubborn hairs and tough-to-reach areas. Gently pull your skin a little tauter to lift the hairs.
7. Sideburns
The length and style of your sideburns is up to you, but now is definitely the time to take care of them with your Series 7000 trimmer or styler attachment.
8. Aftershave
Now for some after-care. Get that fresh-shave feeling by finishing up with aftershave or a shaving balm. That’s it: you’re ready to face the day.
Remember: A regular shaving routine can help keep your skin used to the electric shaver, meaning you get better results. And don’t forget that all-important post-shave hygiene. Rinse your shaver with plenty of lukewarm water, shake it off, and lay it out open.
Don’t have your personal shave plan yet?
Get adaptive advice on how to tackle your specific skin issues, whether redness, razor burn or in-grown hairs. Shave-by-shave, the connected app, co-developed with dermatologists, tracks your shave technique and skin progress.
Download and pair the GroomTribe app for iOS and Android to get started.
Download on the App Store
Get it on Google Play
Click here to read moreClick here to read less
More than just a shaver
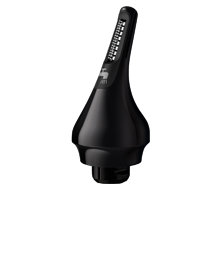
Easily turn your shaver into a beard styler, a precision trimmer or a cleansing brush with the SmartClick attachment system.
-

SmartClick beard styler
Change your look with the SmartClick Beard Styler. Choose from 5 length settings to create anything from a perfect stubble to a neatly-trimmed short beard.
-

SmartClick cleansing brush
Click on cleansing brush to cleanse more deeply than you can by hand. The brush removes dead skin cells and increases micro-circulation, leaving your skin feeling fresh and radiant.
-

SmartClick precision trimmer
Finish your look with the skin-friendly SmartClick precision trimmer. It is ideal for maintaining your mustache and trimming your sideburns.
-
SmartClick nose trimmer
Click-on trimmer for nose & ear hair. Both the ProtecTrim technology and the specially-designed angle of the trimmer ensure an easy and comfortable trim.
Keep your shaver like new
Take care of your shaver and accessories to keep your shaver performing as well as on day one.

Cleaning your shaver
Clean your shaver after use for optimal performance and hygiene.
- Switch on the shaver and rinse the shaving unit under a warm tap.
- Switch it off, pull the shaving head holder off the bottom part of the shaving unit and rinse both parts under the tap.
- Carefully shake off excess water and let the shaving head holder air-dry before re-attaching the shaving head.

How to replace the shaving head
For maximum performance, replace the shaving heads every two years.
- Switch off the shaver. Pull the click-on shaving
unit from the handle. - Discard the old click-on shaving unit and attach
the new click-on shaving unit to the handle.
(‘click’). - After replacing the click-on shaving unit, you can reset the replacement reminder in the app. If you do not reset the replacement reminder,
FAQ
-
Do I always need to bring the phone in the bathroom?
-
No. It is useful to do so at the beginning to receive real-time feedback how to shave in the most skin friendly way. Once you get the hang of it, you can simply synchronize your shave information with the app and receive your personal feedback and guidance. The shaver and app will synchronize automatically whenever they come into close proximity to each other.
The shaver can store up to 20 shaves, so make sure you synchronize the shaver at least once every 2-3 weeks via Bluetooth connection. To synchronize your shaves — 1 Open the app and make sure you are close to the shaver. 2 The app will connect automatically and synchronizes your last shaves.
-
How do I download the app?
-
You can download the GroomTribe app via the App Store or Play Store or Scan the QR code on your shaver pack.
In China, for Android store support, please visit www.mylife.philips.com.cn/appdownload/.
-
Which phones is the app compatible with?
-
iPhone compatibility:
· iPhone 6S and above
· iOS 11 and above
Android compatibility:
· Only Phones, size >4.5 inches
· OS version > 6.0, BLE Version > 4.1
-
How do I connect my Philips GroomTribe app with the App?
-
· Download the GroomTribe app from the App store.
· Make sure Bluetooth on the smartphone is switched on.
· Open the app on the smartphone.
· Follow the instructions in the app to establish the connection.
Note: Make sure you have a good Bluetooth and Internet connection to fully benefit from the app.
-
What do when I have connection issues?
-
There may be several reasons why you can’t connect your phone with your Philips Series 7000 shaver. Below are the most common causes and their solutions.
· Using incorrect Bluetooth version
The Philips Series 7000 shaver uses Bluetooth version 4.1 or higher. Make sure your phone supports this version (or higher) in order to connect to your shaver. Also, make sure that you turn on the Bluetooth function on your phone before pairing it with your shaver.· Phone is incompatible
Please check that your mobile phone is compatible with the GroomTribe app before downloading it. The App only works on iPhone 5S (or higher) using the software iOS10 or higher.For Android users, the App only works with Android 6 (Marshmallow) or higher version. And with Only Phones, size > 4.5 inches
· Phone is too far from shaver
Your phone needs to be in close proximity to be paired up with your Philips Series 7000 shaver. Make sure your phone is not further than 3 meters away from the shaver.· Reset the connection between the shaver and the app
If you followed the advice above, but can still not connect the App to your phone, then you can try resetting the connection by following the steps below: 1. Unpair shaver: Long-press the ON/OFF button on your shaver for 10 seconds to disconnect it from the app. Notification symbol in the UI starts to blink slowly. 2. Un-pair phone: Go to ‘settings’ on your phone and select Bluetooth. Then select the Shaver S79XX and press ‘forget’ or ‘unpair’.Note: These instructions may differ per smartphone. Please check your phone manual for more information. If you have tried the advice above, but are still unable to solve this problem, then please contact consumer care center in your country for further support.
-
The notification symbol on my Philips Series 7000 is blinking. What should I do?
-
When the notification symbol flashes on your shaver handle, open the app as there will be an update/notification for you.
-
Can I change the sensitive shave settings without the app?
-
No, the sensitive shave settings are personalized to your needs, which are determined by the app. The default shaver setting is S.
-
What are the symbols in the UI?
-
The symbols in the shavers display are:
· Notification symbol
· Sensitive shave setting — XS
· Sensitive shave setting — S
· Cleaning reminder
· Travel lock symbol
· Unplug for use reminder
· Battery charge indicator
-
How long do I need to charge the first time?
-
We recommend fully charging the shaver before first use. Charging will take about an hour and will provide a shaving time of up to 50 minutes.
-
What is the benefit of electric shaving?
-
With electric shaving you don’t have to compromise: You get both, closeness and skin comfort. Also, electric shavers are convenient to use: many shavers can be used wet and dry and also under the shower.
-
What is the benefit of rotary shaving?
-
Rotary shaving heads are known for their flexibility. As a result, you get a smooth shave also in difficult to reach areas. You can complete your shave with fewer passes and less pressure. The result is a close shave and high skin comfort.
-
Can I use the shaver under the shower?
-
The Series 7000 shavers are waterproof. You decide what kind of shave you like: dry, with gel or foam and even under the shower.
Support
* Apple, the Apple logo, iPad, and iPhone are trademarks of Apple Inc., registered in the U.S. and other countries. App Store is a service mark of Apple Inc.
* Android is a trademark of Google Inc.
* Google Play and the Google Play logo are trademarks of Google Inc.
* The Bluetooth® word mark and logos are registered trademarks owned by the Bluetooth SIG, Inc. and any use of such marks by Koninklijke Philips N.V. is under licence.
By clicking on the link, you will be leaving the official Royal Philips («Philips») website. Any links to third-party websites that may appear on this site are provided only for your convenience and in no way represent any affiliation or endorsement of the information provided on those linked websites. Philips makes no representations or warranties of any kind with regard to any third-party websites or the information contained therein.
I understand
You are about to visit a Philips global content page
Continue
+7 (863) 210-11-44
Покупай как юр. лицо
ЖурналАкцииКонфигураторДоставкаМагазиныОбратная связь
Каталог товаров
Войти
Избранное
Сравнение
Корзина
Красота и здоровье
Бритвы и эпиляторы
Электробритвы
PHILIPS
Код товара: 1133299


Электробритва Philips Series 7000 S7910/16, серый и голубой
Код товара: 1133299
Нет в наличии
Последний раз товар был 5 марта
Введите ваш e-mail *
- Тип бритвы: роторная;
- Бритвенных головок: 3 шт;
- Питание: от аккумулятора;
- Время автономной работы: 50 мин;
- Время полного заряда: 1 ч;
- Особенности: влажное бритье,
Появились вопросы о товаре?

- Тип бритвы: роторная;
- Бритвенных головок: 3 шт;
- Питание: от аккумулятора;
- Время автономной работы: 50 мин;
- Время полного заряда: 1 ч;
- Особенности: влажное бритье,
Появились вопросы о товаре?
Нет в наличии
Последний раз товар был 5 марта
Введите ваш e-mail *
Нет в наличии
Последний раз товар был 5 марта
Введите ваш e-mail *
Хочу быть в курсе акций и новинок
Контакты
Адреса магазинов
+7 (863) 210-11-44
- Журнал
- Акции
- Покупателям
- Информация
- Доставка
- Гарантия
- Кредит и рассрочка
- Сервисные центры
- Услуги
- Корпоративным клиентам
- Аренда помещений
- Партнёрская программа
- Обзоры
- Форум
- Клуб Ситилинк
- Конфигуратор
- Подбор расходных материалов
- Ситилинк
- Новости
- Вакансии
- Документы
© Ситилинк, 2008 – 2023
Политика обработки персональных данных
Мы используем файлы cookie. Подробнее
Мы используем файлы cookie для вашего удобства пользования сайтом и повышения качества рекомендаций. Подробнее
Главная
Каталог
Корзина
Избранное
Сравнение
Войти