
-
Contents
-
Table of Contents
-
Bookmarks
Quick Links
Related Manuals for D-Link DCS-2130
Summary of Contents for D-Link DCS-2130
-
Page 2: Table Of Contents
Wireless Setup ……….21 Appendix …………..51 Dynamic DNS ……….23 DI/DO Input Specifications ……..51 Image Setup ………… 24 Technical Specifications ……..52 Audio and Video ……….26 Preset ………….. 28 Motion Detection ……….30 D-Link DCS-2130 User Manual…
-
Page 3: Manual Revisions
Preface D-Link reserves the right to revise this publication and to make changes in the contents hereof without obligation to notify any person or organization of such revisions or changes. Manual Revisions Revision Date Description June 14, 2011 DCS-2130 Revision A1 with firmware version 1.00…
-
Page 4: Product Overview
Product Overview Product Overview Package Contents ƒ DCS-2130 Network Camera ƒ CAT5 Ethernet cable ƒ Power adapter ƒ Camera stand ƒ CD-ROM with User Manual and software ƒ Quick Installation Guide If any of the above items are missing, please contact your reseller.
-
Page 5: Hardware Overview
Hardware Overview Hardware Overview Hardware Overview Front Camera Lens Records video of the surrounding area Status LED Indicates the camera’s current status Microphone Records audio from the surrounding area D-Link DCS-2130 User Manual…
-
Page 6: Rear
Base Holes Can be used with cable ties to attach camera to a surface Reset Press and hold this button for 10 seconds to reset the camera D-Link DCS-2130 User Manual…
-
Page 7: Side
Hardware Overview Side MicroSD Slot Accepts MicroSD flash memory cards for recording snapshots Audio Out Port Connects to an external speaker (optional) D-Link DCS-2130 User Manual…
-
Page 8: Installation
Insert the Installation CD-ROM into your computer’s optical drive to start the autorun program. The CD-ROM will open the Camera Setup Wizard. Simply click the Start button to go through the Setup Wizard, which will guide you through the setup process from connecting your hardware to configuring your camera. D-Link DCS-2130 User Manual…
-
Page 9: Connecting Wirelessly Using Wps
WPS feature. If you are not sure where the WPS button is on your router, please refer to your router’s User Manual. The DCS-2130 will automatically create a wireless connection to your router. While connecting, the green LED will flash and your camera will reboot.
-
Page 10: Configuration
After completing the Camera Setup Wizard, you are ready to use your camera. The camera’s built-in Web configuration utility is designed to allow you to easily access and configure your DCS-2130. At the end of the wizard, click the Go To Camera button, or enter the IP address of your camera into a web browser, such as Internet Explorer.
-
Page 11: Live Video
Recording a Video Clip Set a Storage Folder This control pad can be used to pan, tilt, and zoom Listen/Stop Listening Control Pad within the camera’s predefined view area, if one Talk/Stop Talking has been defined. Start/Stop Digital Output D-Link DCS-2130 User Manual…
-
Page 12
The Language: You may select the interface language using this menu. ROI will pan from back and forth within the Stop Stops the camera ePTZ motion Preset Path Starts the camera’s motion along the predefined path D-Link DCS-2130 User Manual… -
Page 13: Setup
Internet Connection Setup Wizard This wizard will guide you through a step-by-step process to configure your new D-Link Camera and connect the camera to the internet. Click Next to continue. Note: Select DHCP if you are unsure of which settings to choose.
-
Page 14
If you have a Dynamic DNS account and would like the camera to update your IP address automatically, Select Enable DDNS and enter your host information. Click Next to continue. Enter a name for your camera and click Next to continue. D-Link DCS-2130 User Manual… -
Page 15
If you have selected DHCP, you will see a summary of your settings, including the camera’s IP address. Please write down all of this information as you will need it in order to access your camera. Click Apply to save your settings. D-Link DCS-2130 User Manual… -
Page 16: Motion Detection Setup Wizard
Please see the Motion Detection section on page 27 for information about how to configure motion detection. Step 2 This step allows you to enable motion detection based on a customized schedule. Specify the day and hours. You may also choose to always record motion. D-Link DCS-2130 User Manual…
-
Page 17
Click Next to continue. Step 4 You have completed the Motion Detection Wizard. Please verify your settings and click Apply to save them. Please wait a few moments while the camera saves your settings and restarts. D-Link DCS-2130 User Manual… -
Page 18: Network Setup
Invalid gateway settings may cause the failure of transmissions to a different subnet. Primary DNS: The primary domain name server translates names to IP addresses. Secondary DNS: The secondary DNS acts as a backup to the primary DNS. D-Link DCS-2130 User Manual…
-
Page 19
PDAs. The default port number is 554. You may specify the address of a particular stream. For instance, live1. sdp can be accessed at rtsp://x.x.x.x/video1.sdp where the x.x.x.x represents the ip address of your camera. D-Link DCS-2130 User Manual… -
Page 20
Entering a value of ‘0’ indicates that the camera should not monitor bandwidth. Specifying other values will limit the camera’s transfer speed to the specified number of kilobytes per second. D-Link DCS-2130 User Manual… -
Page 21: Wireless Setup
— Open, Shared, WPA-PSK, or WPA2-PSK. Encryption: If you use WPA-PSK or WPA2-PSK authentication, you will need to specify whether your wireless network uses TKIP or AES encryption. If you use Open or Shared authentication, WEP encryption should be setting. D-Link DCS-2130 User Manual…
-
Page 22
Configuration Key: If you use WEP, WPA-PSK, or WPA2-PSK authentication, enter the Key (also known as password) used for your wireless network. D-Link DCS-2130 User Manual… -
Page 23: Dynamic Dns
DDNS account. Password: Enter the password used to connect to your DDNS server account. Timeout: Enter the DNS Timeout values you wish to use. Status: Indicates the connection status, which is automatically determined by the system. D-Link DCS-2130 User Manual…
-
Page 24: Image Setup
Select the frequency used by your power lines to avoid interference or distortion. White Balance: Use the dropdown box to change white balance settings to help balance colors for different environments. You can choose from Auto, Outdoor, Indoor, Fluorescent, and Push Hold. D-Link DCS-2130 User Manual…
-
Page 25
This setting controls the amount of coloration, from grayscale to fully saturated. Sharpness: Specify a value from 0 to 8 to specify how much sharpening to apply to the image. Reset Default: Click this button to reset the image to factory default settings. D-Link DCS-2130 User Manual… -
Page 26: Audio And Video
Frame size, you will not be able to use the ePTZ function. Maximum frame rate: A higher frame rate provides smoother motion for videos, and requires more bandwidth. Lower frame rates will result in stuttering motion, and requires less bandwidth. D-Link DCS-2130 User Manual…
-
Page 27
This setting controls the amount of gain applied to incoming audio to increase its volume. Audio out off: Ticking this checkbox will mute outgoing audio. Audio out volume level: This setting controls the amount of gain applied to outgoing audio to increase its volume. D-Link DCS-2130 User Manual… -
Page 28: Preset
Click this dropdown box to see a list of all the presets that have been created. You can select one, then click the GoTo button to change the displayed camera view to the preset. Clicking the Remove button will delete the currently selected preset. D-Link DCS-2130 User Manual…
-
Page 29
Clicking the trash can button will remove the currently selected preset from the sequence. If you want to change the dwell time for a preset, select it from the list, enter a new dwell time, then click the Update button. D-Link DCS-2130 User Manual… -
Page 30: Motion Detection
Right clicking on the camera image brings up the following menu options: Select All: Draws a motion detection area over the entire screen. Clear All: Clears any motion detection areas that have been drawn. Restore: Restores the previously specified motion detection areas. D-Link DCS-2130 User Manual…
-
Page 31: Time And Date
NTP server. NTP Server: Network Time Protocol (NTP) synchronizes the DCS-2130 with an Internet time server. Choose the one that is closest to your location. Set the Date and Time This option allows you to set the time and date Manually: manually.
-
Page 32: Event Setup
2. To delete the selected item from the pull-down menu of event, server or media, click Delete. 3. Click on the item name to pop up a window for modifying. Note: You can add up to four events, five servers, and five media fields. D-Link DCS-2130 User Manual…
-
Page 33: Application
Application In a typical application, when motion is detected, the DCS-2130 Network Camera sends images to a FTP server or via e-mail as notifications. As shown in the illustration below, an event can be triggered by many sources, such as motion detection or external digital input devices.
-
Page 34: Add Server
Enter the configuration for the target e-mail server account. FTP: Enter the configuration for the target FTP server account. Network Storage: Specify a network storage device. Only one network storage device is supported. SD Card: Use the camera’s onboard SD card storage. D-Link DCS-2130 User Manual…
-
Page 35: Add Media
You can set up to 7 post-event images to be taken. File name prefix: The prefix name will be added on the file name. Add date and time suffix to file Check it to add timing information as file name suffix. name: D-Link DCS-2130 User Manual…
-
Page 36
This is the prefix that will be added to the filename of saved video clips. System log: Select this option to set the media type to system logs. This will save the event to the camera system log, but will not record any snapshots or video. D-Link DCS-2130 User Manual… -
Page 37: Add Event
Digital input: The external trigger input to the camera. System Boot: Triggers an event when the system boots up. Network Lost: Triggers an event when if the network connection is lost. D-Link DCS-2130 User Manual…
-
Page 38
Select Always or enter the time interval. Trigger D/O: Select to trigger the digital output for a specific number of seconds when an event occurs. Server: Specify the location where the event information should be saved to. D-Link DCS-2130 User Manual… -
Page 39: Add Recording
Please note that if the free HDD space is not enough, the recording will stop. Before you set up this option please make sure your HDD has enough space, and it is better to not save other files in the same folder as recording files. D-Link DCS-2130 User Manual…
-
Page 40
Size of each file for recording: File size for each recording file. You may input the value in the range of 200-5000. File Name Prefix: The prefix name will be added on the file name of the recording file(s). D-Link DCS-2130 User Manual… -
Page 41: Sd Card
Playback Recorded Video: If video files are stored on the SD card, click on the video folder and choose the video file you would like to view. Refresh: Reloads the file and folder information from the SD card. D-Link DCS-2130 User Manual…
-
Page 42: Advanced
N.O. stands for Normally Open. This means that the normal state of the circuit is open. Therefore events are triggered when the device status changes to «Closed.» LED: You may specify whether or not to illuminate the LED on the side of the camera. D-Link DCS-2130 User Manual…
-
Page 43: Https
Create a certificate request and install Status: Displays the status of the certificate. Note: The certificate cannot be removed while the HTTPS is still enabled. To remove the certificate, you must first uncheck Enable HTTPS secure connection. D-Link DCS-2130 User Manual…
-
Page 44: Access List
Configuration Access List Here you can set access permissions for users to view your DCS-2130. Allow list: The list of IP addresses that have the access right to the camera. Start IP address: The starting IP Address of the devices (such as a computer) that have permission to access the video of the camera.
-
Page 45: Maintenance
Enable OSD: Select this option to enable the On-Screen Display feature for your camera. Label: Enter a label for the camera. Show Time: Select this option to enable the time-stamp display on the video screen. D-Link DCS-2130 User Manual…
-
Page 46: Backup And Restore
Browse and then restore the pre-defined settings to your camera by clicking Load Configuration. Restore to Factory Default: You may reset your camera and restore the factory settings by clicking Restore Factory Defaults. Reboot Device: This will restart your camera. D-Link DCS-2130 User Manual…
-
Page 47: Firmware Upgrade
Configuration Firmware Upgrade The camera’s current firmware version will be displayed on this screen. You may visit the D-Link Support Website to check for the latest available firmware version. To upgrade the firmware on your DCS-2130, please download and save the latest firmware version from the D-Link Support Page to your local hard drive.
-
Page 48: Status
Configuration Status Device Info This page displays detailed information about your device and network connection. D-Link DCS-2130 User Manual…
-
Page 49: Logs
Configuration Logs This page displays the log information of your camera. You may download the information by clicking Download. You may also click Clear to delete the saved log information. D-Link DCS-2130 User Manual…
-
Page 50: Help
Configuration Help This page provides helpful information regarding camera operation. D-Link DCS-2130 User Manual…
-
Page 51: Appendix
DC 5 V Output / Max. 100 mA Internal 5V Power External 3~12V Power DC Power 5V DC Power 5V DC Power 3V~12V N.C / N.O N.C / N.O Reed switch Reed switch Diode Diode 100 mA 100 mA ALARM ALARM D-Link DCS-2130 User Manual…
-
Page 52: Technical Specifications
Interface ƒ Micro SD card slot ƒ 3.5mm audio output jack IPv4, TCP/IP, UDP, ICMP, DHCP Client, NTP Client (D-Link), DNS Client, DDNS Client (D-Link), SMTP Client, FTP Client, HTTP / HTTPS, Network Network Protocols Samba Client, PPPoE, UPnP Port Forwarding, RTP / RTSP/ RTCP, IP filtering, 3GPP, IGMP, ONVIF Compliant ƒ…
-
Page 53
* This device complies with part 15 of the FCC Rules. Operation is subject to the following two conditions: (1) This device may not cause harmful interference. (2) This device must accept any interference received, including interference that may cause undesired operation. D-Link DCS-2130 User Manual… -
Page 54
Appendix Dimensions D-Link DCS-2130 User Manual…
This manual is also suitable for:
Dcs-2103

QUICK
INSTALLATION
GUIDE
HD Wireless N Cube NetWork Camera
DCs-2130
Руководство по быстРой установке
Современные IP видеокамеры это уже не просто средство наблюдения, это мини- компьютеры, которые способны на многое (следить за движением и пересылать снимки на почтовый ящик, способны включаться в определенное время и т.д.). Если камеры снабжена Wi-Fi адаптером то ее установка возможно практически в любом месте квартиры или офиса, видео IP камеры можно без труда просматривать из любой точки Земли. В этой статье я хотел бы описать некоторые возможность IP видеокамеры Dlink DCS-2103/ 2130.
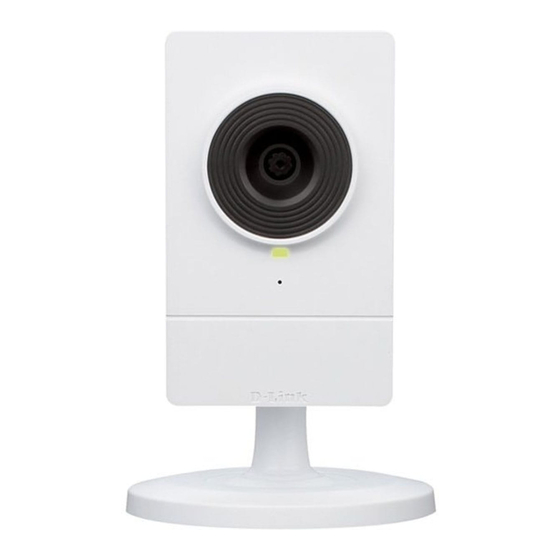
Внешний вид IP камеры Dlink DCS-2103/2130.
Предлагаю начать с внешнего вида IP камеры.
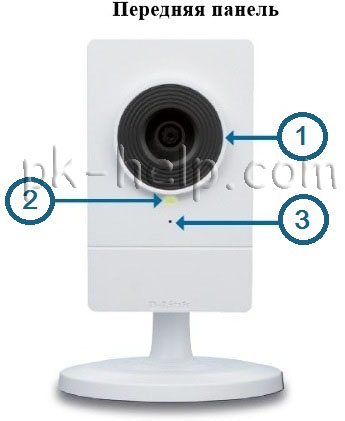
1. Объектив камеры
2. Индикатор состояния
3. Микрофон
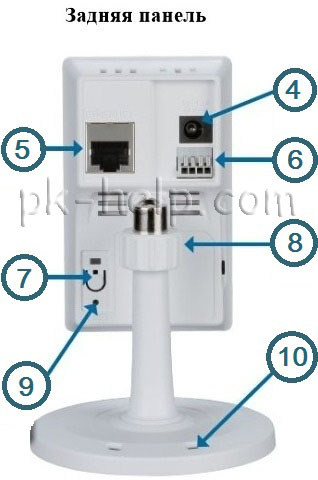
4. Разъем питания
5. Разъем Ethernet
6. Разъем I/O. Для подключения внешних устройств.
7. Кнопка WPS и индикатор. Используется для автоматической установки беспроводной связи с роутером (имеется на модели D-link DCS2130).
8. Фиксирующее кольцо. Настройте положение камеры и затяните кольцо для сохранения положения.
9. Кнопка Reset. Используется для сброса настроек до заводских. Для этого необходимо нажать кнопку и удерживать 10 сек. до перезагрузки камеры.
10. Отверстия в подставке. Используется для прокладки кабелей.
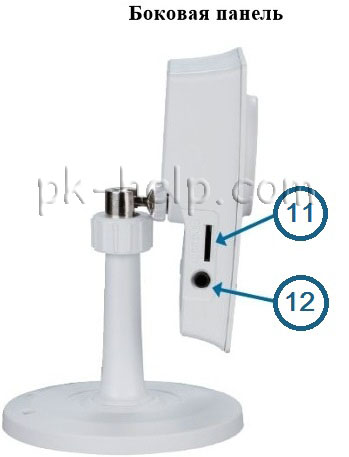
11. Слот для Micro SD карты.
12. Аудио- порт. Используется для подключения внешних динамиков.
Подключение к веб интерфейсу IP камеры.
Теперь перейдем к ее веб интерфейсу. По умолчанию у IP камеры используется IP адрес 192.168.0.20, т.е. если вы подключите камеру напрямую в компьютер/ ноутбук, то вам на нем необходимо прописать адрес 192.168.0.1 маска 255.255.255.0. После этого в адресной строке браузера ввести IP адрес камеры и попасть на веб интерфейс.
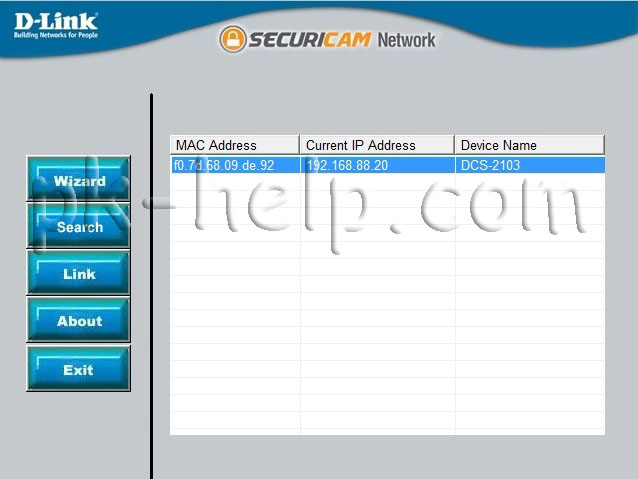
Если вы подключаете Dlink DCS-2103/2130 через роутер/ маршрутизатор в таком случае, вам необходимо определить какой IP адрес получила ваша камера, для этого вы можете зайти на веб интерфейс роутера/ маршрутизатора и в подключенных устройствах найти IP камеру. Второй способ это воспользоваться утилитой SetupWizard. Для этого скачайте утилиту с официального сайта Dlink. Установите на компьютер/ ноутбук, запустите, после непродолжительного поиска ваша камера будет обнаружена и будет указан ее IP адрес. В данном случае 192.168.88.20.
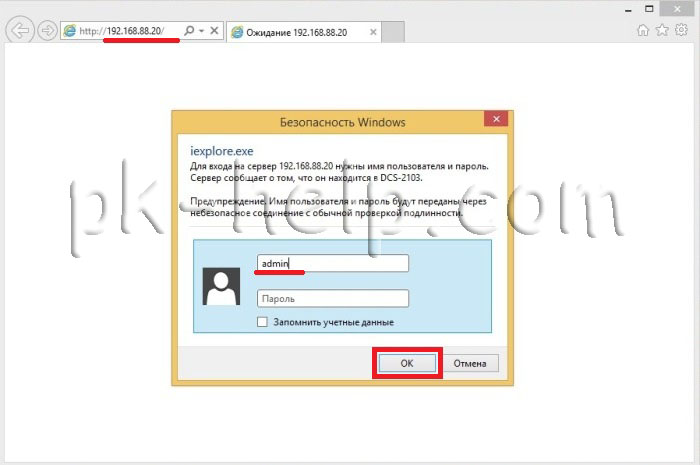
После этого откройте любой браузер (IE, Firefox, Opera, Chrome) в адресной строке введите IP адрес камеры, в поле логин введите- admin, пароль пустой.
Обновление прошивки Dlink DCS-2103/2130.
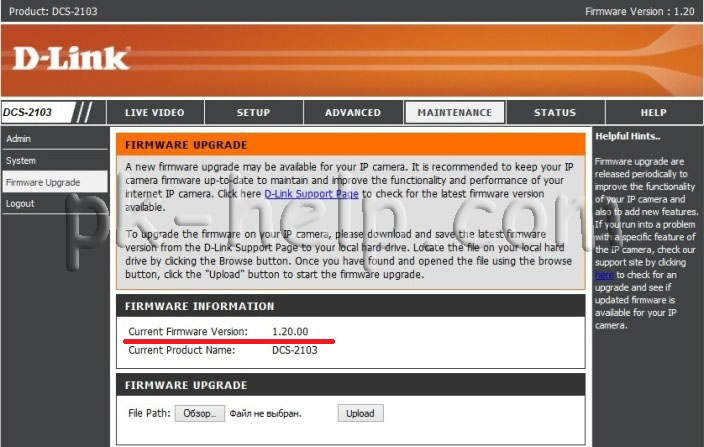
Первое что необходимо сделать — обновить прошивку D-link DCS2130/ 2103. Для этого перейдите в меню «Maintenance» — «Firmware Upgrade». Вы увидите установленную версию прошивки (в данном случае 1.00).
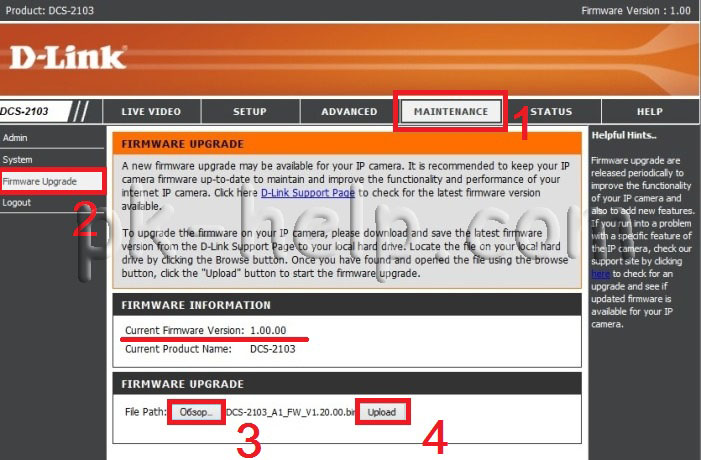
Теперь вам необходимо зайти на сайт Dlink и скачать более свежую прошивку Dlink DCS-2103/2130. Разархивируйте скаченный архив, затем на веб интерфейсе камеры нажмите «Обзор», после этого укажите путь к разархивированному файла с прошивкой и нажмите кнопку «Upload». После чего начнется обновление прошивки. Спустя 2-3 мин. прошивка IP камеры будет обновлена.
Изменение пароля на IP камере.
Для повышения безопасности, рекомендую установить пароль для подключения к IP камере. Для этого перейдите «Maintenance» — «Admin».
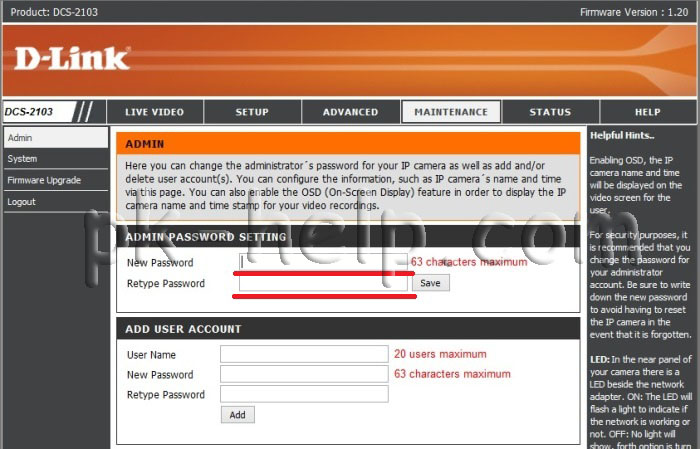
В поле «New Password» введите пароль. Желательно использовать сложный пароль, состоящий из цифр, заглавных и прописных букв, спец знаков (@#$%). Далее повторите пароль в поле «Reture Password». Нажмите кнопку «Save».
В поле «Add user account» вы можете создать еще пользователей.
Подключение к IP камере через Интернет.
Общий принцип получения доступа к камере через Интернет я описывал в этой статье. Из не вы узнаете, что необходимо иметь «белый» IP адрес, что доступ через роутер к камере можно получить если прокинуть порты на роутере. В случае если у вас будет использоваться несколько камер, необходимо поменять стандартный порт, для этого перейдите в меню «Setup» — «Network Setup» в поле «HTTP» измените порт.

После этого необходимо прокинуть порты на роутере, более подробно об этом в статье Проброс портов на роутерах Asus, D-Link, TP-Link, Zyxel.
Сохранение видео на компьютере с D-link DCS2130/ 2103.
Как сохранить видео с IP камеры на компьютер, задача вроде очевидная, но тут есть ряд нюансов в настройке. Итак, для того что бы сохранять не события, а все снимаемое видео необходимо в меню камеры перейти в меню «Setup» — «Event Setup».
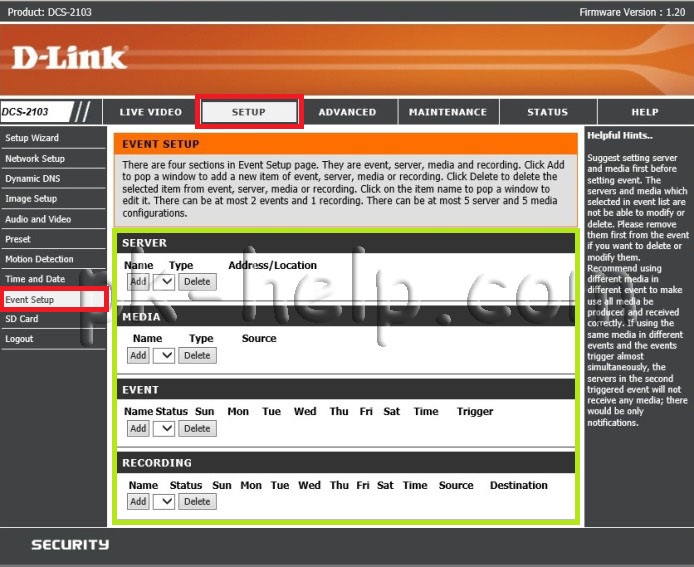
Справа вы увидите различные поля, которые отвечают, за то куда будет сохраняться видео и какие события сохранять.
Event (Событие)
Server (Сервер)
Media (Данные)
Recording (Запись)
Внимание: Можно создать не более 2 событий, не более 5 серверов и не более 5 полей для данных.
Нас интересует запись всего процесса записи видео на компьютер. Для этого первым делом необходимо расшарить папку на компьютере, более подробно как это сделать описано в статье Как сделать сетевую папку (папку общего доступа) на Windows XP/ Windows 7/ Windows 8. После этого на веб интерфейсе камеры в поле «Server» нажмите «Add». Далее по порядку заполняем поля.
Server Name- впишите уникальное имя.
Выбираете «Network Storage», далее все настройки будут касаться того компьютера на который вы хотите сохранять видео:
Network Storage Location- укжите путь до расшаренной папки. Замечу, что лучше не использовать имя компьютера, а заменить его на IP адрес, как в примере. Более подробно как узнать IP адрес компьютера прочитайте в статье Способы узнать свой IP.
Workgroup — необходимо указать рабочую группу компьютера.
User Name — имя учетной записи на компьютере.
Password — пароль от учетной записи, если используется.
После этого нажмите кнопку «Test», в случае правильной настройки тест пройдет успешно, об этом будет свидетельствовать надпись «Test OK». Затем сохраните настройки, нажмите кнопку «Save Settings».

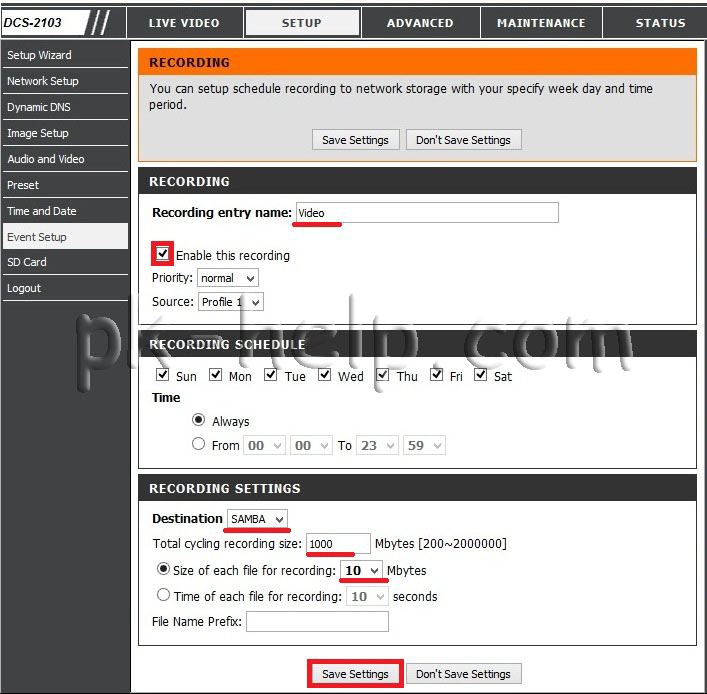
Далее необходимо указать параметры записи, для этого перейдите в поле «Recording» и нажмите кнопку «Add». В поле:
«Recording entry name» укажите уникльное имя.
поставьте галочку напротив «Enable this recording»
В поле «Recording Shedule» можете указать дни недели и время в которое производить запись.
В поле «Recording Settings» в строке «Distination» выберите «Samba».
В строке «Total cycling recording size» укажите максимально возможное выделяемое место под видео, если размер файлов будет превышать указанный размер, старые файлы будут удаляться для записи новых.
Ниже можете выбрать, по каким параметрам записывать файлы с видео, определенного размера или определенной длины (по времени).
После этого сохраните настройки «Save Settings».
В итоге в расшаренной папки будут появляться ролики с вашей IP камеры D-link DCS2130/ 2103.
Я очень надеюсь, моя статья помогла Вам! Просьба поделиться ссылкой с друзьями:
-
Contents
-
Table of Contents
-
Troubleshooting
-
Bookmarks
Quick Links
HD Wireless N Cube NetWork Camera
DCs-2130
QUICK
INSTALLATION
GUIDE
Руководство по быстРой установке
Guía de InstalacIón RápIda
GuIa de Instalação RápIda
快速安裝指南
petunjuk pemasanGan cepat
Related Manuals for D-Link dcs-2130
Summary of Contents for D-Link dcs-2130
-
Page 1: Quick Installation
HD Wireless N Cube NetWork Camera DCs-2130 QUICK INSTALLATION GUIDE Руководство по быстРой установке Guía de InstalacIón RápIda GuIa de Instalação RápIda 快速安裝指南 petunjuk pemasanGan cepat…
-
Page 2: Contents Of Packaging
PACKAGING CoNteNts INSTALLATION CD Includes set-up WIZaRd & tecHnIcal manuals HD WIrELESS N CUbE NETWOrK CAmErA dcs-2130 POWEr ADAPTEr adapteR ETHErNET CAbLE (CAT5 UTP) connect tHe cameRa to YouR RouteR duRInG set-up If any of these items are missing from your packaging contact…
-
Page 3: Product Setup
Ip of address of type 192.168.0.x. then connect the power cable on the dcs-2130. the dcs-2130 power light will display as solid red first, then shortly turn to green.
-
Page 4: Troubleshooting
— If you have changed the password and can not remember it, you will need to reset the dcs- 2130 to set the password back to blank (leave the field blank). If the dcs-2130 cannot find a dHcp server, the default Ip address is http://192.168.0.20.
-
Page 5: Technical Support
You can find software updates and user documentation on the d-link website. Tech Support for customers in Australia: D-Link middle East — Dubai, U.A.E. tel: 1300-766-868 plot no. s31102, 24/7 technical support jebel ali Free Zone south, Web: http://www.dlink.com.au p.o.Box 18224, dubai, u.a.e.
-
Page 6
+ 965 22453939 / +965 22453949 Türkiye merkez İrtibat Ofisi ayazağa maslak yolu erdebil cevahir İş merkezi no: 5/a ayazağa / maslak İstanbul tel: +90 212 2895659 Ücretsiz müşteri destek Hattı: 0 800 211 00 65 Web:www.dlink.com.tr teknik destek: support.tr@dlink.com.tr DCs-2130… -
Page 7: Комплект Поставки
КОМПЛЕКТ ПОСТАВКИ содеРЖИМое УСТАНОВОЧНЫЙ CD-ДИСК ВКЛЮЧАЕТ МАСТЕР УСТАНОВКИ И РУКОВОДСТВО поЛЬЗоватеЛЯ HD WIrELESS N CUbE NETWOrK CAmErA dcs-2130 АДАПТЕР ПИТАНИЯ адаптеР КАБЕЛЬ ETHERNET (UTP 5 КАТ.) дЛЯ подкЛЮЧенИЯ каМеРы к МаРШРутИЗатоРу если что-либо из перечисленного отсутствует, пожалуйста, обратитесь к поставщику.
-
Page 8
компьютера с помощью ethernet-кабеля. убедитесь, что компьютеру назначен статический Ip-адрес вида 192.168.0.x. Затем подключите кабель питания к dcs-2130. Индикатор питания на dcs-2130 сначала загорится постоянным красным светом, затем, а вскоре поменяется на зеленый. Затем откройте окно браузера и введите Ip-адрес в поле адреса: Ip-адРес: http://192.168.0.20… -
Page 9: Поиск И Устранение Неисправностей
— установите и запустите утилиту setup Wizard se. — Имя пользователя по умолчанию ‘admin’. пароль по умолчанию отсутствует. — если пароль был изменен и забыт, то необходимо сбросить настройки камеры dcs-2130, чтобы вернуть пароль по умолчанию (оставьте это поле незаполненным). если dcs-2130 не…
-
Page 10: Техническая Поддержка
технИЧескаЯ поддеРЖка обновления программного обеспечения и документация доступны на Интернет-сайте d-link. d-link предоставляет бесплатную поддержку для клиентов в течение гарантийного срока. клиенты могут обратиться в группу технической поддержки d-link по телефону или через Интернет. Техническая поддержка D-Link: +7(495) 744-00-99 Техническая поддержка через Интернет…
-
Page 11: Contenido Del Empaque
EmPAQUE CoNteNiDo CD DE INSTALACIÓN IncluYe asIstente de InstalacIón Y manuales técnIcos HD WIrELESS N CUbE NETWOrK CAmErA dcs-2130 ADAPTADOr DE ENErGÍA adapteR CAbLE ETHErNET (CAT5 UTP) conecte la cámaRa a su RouteR duRante la InstalacIón si uno de los elementos no se encuentra en el empaque, por favor contáctese con su vendedor.
-
Page 12: Instalación Del Producto
Ip estática de tipo 192.168.0.x. luego conecte el cable de energía en la cámara. la luz de energía de la cámara dcs-2130 será de color rojo, luego se tornará de color verde.
-
Page 13: Solución De Problemas
— el nombre de usuario por defecto es “admin”. la contraseña por defecto es en blanco. — si ha cambiado la contraseña y no la recuerda, necesitará resetear la cámara dcs-2130 para restablecer la contraseña en blanco (dejar el campo vacío). si la cámara no logra encontrar un servidor dHcp, la dirección Ip por defecto es http://192.168.0.20.
-
Page 14: Soporte Técnico
SOPOrTE TÉCNICO PArA USUArIOS EN LATINO AmErICA soporte técnico a través de los siguientes teléfonos de d-link PAIS NUMERO Argentina…
-
Page 15: Conteúdo Da Embalagem
EmbALAGEm CoNteúDo CD DE INSTALAÇÃO IncluI um assIstente de conFIGuRação e manuaIs técnIcos HD WIrELESS N CUbE NETWOrK CAmErA dcs-2130 FONTE DE ALImENTAÇÃO adaptadoR CAbO ETHErNET (CAT5 UTP) conecte a câmeRa a seu RoteadoR duRante a Instalação se qualquer um desses itens estiver faltando contate com o seu revendedor.
-
Page 16
CoNFiGurações aVaNçaDas (aCesso Via eNDereço iP) para configurar a câmera dcs-2130 usando um Ip estático, ligue a dcs-2130 diretamente à porta ethernet do seu computador através do cabo ethernet fornecido. Verifique se o computador também tem um endereço Ip estático do tipo 192.168.0.x. -
Page 17
2. COmO FAÇO PArA CONFIGUrAr A CâmErA DCS-2130 SEm O CD? — conecte seu pc ao roteador usando um cabo ethernet. — entre no site de suporte d-link http://support.dlink.com.tw. Baixe o utilitário setup Wizard se da dcs-2130. — Instale e execute o utilitário assistente de configuração se. -
Page 18: Suporte Técnico
DCs-2130…
-
Page 19
包裝清單 內容物 安裝光碟 內含產品操作手冊與設定精靈軟體 HD WIrELESS N CUbE NETWOrK CAmErA dcs-2130 電源供應器 供應設備電源 中 乙太網路線(CAT 5 UTP) 連結攝影機至您的寬頻路由器使用 文 假如有缺少任何配件敬請於您購買的的經銷商聯繫。 DCs-2130… -
Page 20
產品設定 設定精靈光碟 設定精靈光碟 光碟內含DCS-2130相關軟體與操作手冊。 放入光碟 將光碟放入您電腦的光碟機中。設定精靈軟體將會自動執行。請 確認您的網際網路連線是正常的。(請先不要將DCS-2130連接至 網路)。 設定精靈 從選擇清單中選擇安裝的語言,透過導引進行DCS-2130的安裝設 定。 中 文 進階設定(透過IP位址存取) 透過固定的IP位址進行DCS-2130的組態設定,直接將DCS-2130透過網路線連接至您電腦的網路卡。請確 認您的電腦也同樣設定一組與DCS-2130相同網段的IP位址例如:192.168.0.x。然後將DCS-2130連接上電 源供應器。DCS-2130狀態指示燈號將會顯示紅色然後轉為綠色。 開啟您電腦的網頁瀏覽器然後再網址的欄位輸入IP位址。 Ip 位址: http://192.168.0.20 使用者名稱: admin 密碼: DCs-2130… -
Page 21
故障排除 設定與安裝問題 1. 我要如何將DCS-2130恢復原廠預設值? — 首先確認DCS-2130電源是開啟的。 — 使用圖釘或迴紋針按壓設備的重置按鍵約10秒鐘,然後釋放。網路攝影機將會恢復原廠預設值。 2. 我要如何設定網路攝影機而不透過光碟? — 將您的電腦連接至對外連線的寬頻路由器。 — 至D-Link技術支援網站http://support.dlink.com.tw下載DCS-2130設定精靈軟體。 — 安裝並執行設定精靈軟體 — 預設的管理者帳號為”admin”。預設的密碼為空白不需輸入。 — 假如您曾經更改過設備的登入密碼但您以忘記,你必須將DCS-2130恢復原廠預設值。假如DCS- 2130所安裝的網路環境不具備DHCP伺服器,預設的IP位址為http://192.168.0.20。 3. 假如我的DCS-2130無法正確的運作我該如何修復? — 請嘗試重新執行光碟內的設定精靈軟體。 — 請確認您的硬體已正確安裝,並確認以下幾點: •設備前面板的燈號是顯示綠色 •您的網際網路連線是正常的 •確認您寬頻路由器的網路連線是正常的 •確認您的寬頻路由器是否支援UPnP功能 •確認您的攝影機與電腦市在相同的區域網路環境 •確認您的電腦與網路攝影機皆可以正常的連線網際網路 — 假如您的網路攝影機仍然無法正常運作,請確認你的寬頻路由器與網路攝影機已升級到最新的韌體。 中 4. 假如我沒有寬頻路由器。我要如何安裝DCS-2130? — 直接將網路攝影機透過網路線連接至您的電腦網路卡。… -
Page 22
友訊科技 台灣分公司 技術支援資訊 如果您還有任何本使用手冊無法協助您解決的產品相關問題,台灣地區用戶可以透過我 們的網站、電子郵件或電話等方式與d-link台灣地區技術支援工程師聯絡。 D-Link 免付費技術諮詢專線 0800-002-615 服務時間:週一至週五,早上9:00到晚上9:00 (不含周六、日及國定假日) 網 站:http://www.dlink.com.tw 電子郵件:dssqa_service@dlink.com.tw 如果您是台灣地區以外的用戶,請參考D-Link網站,全球各地分公司 的聯絡資訊以取得相關支援服務。 產品保固期限、台灣區維修據點查詢,請參考以下網頁說明: http://www.dlink.com.tw 產品維修: 使用者可直接送至全省聯強直營維修站或請洽您的原購買經銷商。 中 文 DCs-2130… -
Page 23: Isi Paket
ISI PAKET CD PEmASANGAN teRmasuk Bantuan pemasanGan dan petunjuk teknIs penGGunaan HD WIrELESS N CUbE NETWOrK CAmErA dcs-2130 POWEr ADAPTEr adapteR KAbEL ETHErNET (CAT 5 UTP) HuBunGkan kameRa denGan RouteR anda pada saat memasanG jika ada item-item tersebut yang hilang, silahkan hubungi penjualsilahkan hubungi penjual.
-
Page 24
Ip-nya dari blok 192.168.0.x. kemudian hubungkan kabel power ke dcs-2130. pertama kali, lampu power dcs-2130 akan nyala merah terang, kemudian berubah menjadi hijau setelah beberapa saat. -
Page 25
— jika anda sudah mengganti password dan tidak dapat mengingatnya, anda butuh untuk mereset dcs-2130 agar passwordnya kembali ke kosong (biarkan kotak dalam kondisi kosong). jika dcs-2130 tidak dapat menemukan sebuah server dHcp, alamat Ip bawaannya adalah http://192.168.0.20. 3. APA yANG DAPAT SAyA LAKUKAN jIKA DCS-2130 SAyA TIDAK bEKErjA DENGAN bENAr? — coba gunakan bantuan yang ada dalam cd. -
Page 26
DukuNGaN tekNis update perangkat lunak dan dokumentasi pengguna dapat diperoleh pada situs web d-link. dukungan teknis untuk pelanggan: Dukungan Teknis D-Link melalui telepon: tel: +62-21-5731610 Dukungan Teknis D-Link melalui Internet: email : support@dlink.co.id Website : http://support.dlink.co.id DCs-2130… -
Page 27
DCs-2130… -
Page 28
Wireless NetWork remiNDer Wireless Network Name (ssiD) Wireless Network Password Ver. 1.01(Di) 2012/04/19 rmN0100657…
Посмотреть инструкция для D-Link DCS-2130 бесплатно. Руководство относится к категории камеры видеонаблюдения, 1 человек(а) дали ему среднюю оценку 8.3. Руководство доступно на следующих языках: английский. У вас есть вопрос о D-Link DCS-2130 или вам нужна помощь? Задайте свой вопрос здесь
Не можете найти ответ на свой вопрос в руководстве? Вы можете найти ответ на свой вопрос ниже, в разделе часто задаваемых вопросов о D-Link DCS-2130.
Что такое мегапиксель?
Количество мегапикселей обозначает количество пикселей в датчике. 1 мегапиксель равен 1 миллиону пикселей. Чем больше пикселей, тем выше потенциальное качество изображения.
Что означает аббревиатура MП?
МП обозначает «мегапиксели».
Инструкция D-Link DCS-2130 доступно в русский?
К сожалению, у нас нет руководства для D-Link DCS-2130, доступного в русский. Это руководство доступно в английский.
Не нашли свой вопрос? Задайте свой вопрос здесь