
Casio SGW-500 / линейка Collection / модуль 5269 / год 2012
Инструкция к модулю Casio 5269
- Смотреть онлайн → (без скачивания, удобно на мобильных и планшетах);
- Скачать русскую инструкцию → (типичная “как у всех”, не всегда понятные картинки);
- Скачать английскую инструкцию → (детальная, много фото, более понятная).
Сложно настроить? Спрашивай на форуме Casio →
Читайте новости о любимых часах SGW-500 на блоге
[display-posts tag=”SGW-500″ posts_per_page=”4″]
Все новости о SGW-500 →
Побывайте на заводе Casio, изучайте последние новинки часов на Casioblog.RU


Настройка часов Casio SGW-500H может показаться сложной задачей, особенно для новичков. Однако, с помощью подробной инструкции вы сможете легко и быстро установить правильное время и настроить все функции этих спортивных часов.
Перед тем как начать настройку, нажмите и удерживайте кнопку «A» на боковой панели часов, чтобы войти в режим настроек. Затем, используя кнопки «B» и «D», выберите язык, который вы предпочитаете для отображения на дисплее.
Как только язык выбран, снова нажмите кнопку «A», чтобы перейти к настройке времени. Выберите формат времени: 12-часовой или 24-часовой, используя кнопки «B» и «D». Затем, с помощью тех же кнопок, установите текущее время.
Далее, вам будет предложено настроить дату и день недели. В данном случае дату можно настроить только в формате «день-месяц», поэтому обратите внимание на это при настройке.
Продолжайте нажимать кнопку «A» и использовать кнопки «B» и «D» для настройки остальных функций, таких как будильник, таймер, хронометр и подсветка. Не забывайте сохранять текущие настройки, переводя указатель на пункт меню «Save» (Сохранить) и нажимая кнопку «C».
Вот и все! Теперь вы знакомы с подробной инструкцией по настройке часов Casio SGW-500H. Следуя этим простым шагам, вы сможете быстро и легко установить правильное время и настроить все функции этих удобных и стильных спортивных часов.
Содержание
- Как настроить Casio SGW-500H: подготовка к настройке
- Установка батареи:
- Выбор языка и формата времени:
- Как настроить часы Casio SGW-500H: настройка даты и времени
Как настроить Casio SGW-500H: подготовка к настройке
Перед началом настройки Casio SGW-500H необходимо выполнить несколько шагов, чтобы убедиться в правильной работе часов и точности настройки.
1. Установка даты и времени
Перед началом настройки убедитесь, что дата и время на часах установлены правильно. Проверьте текущие настройки и в случае необходимости, выполните коррекцию.
2. Прочтите инструкцию
Перед тем, как приступить к настройке часов, важно ознакомиться с инструкцией, которая поставляется вместе с Casio SGW-500H. В инструкции вы найдете подробную информацию о функциях и возможностях часов.
3. Разберитесь с функциями
Проанализируйте доступные функции и определитесь с тем, какие именно настройки вам необходимы. Вы можете отключить ненужные функции, чтобы упростить процесс настройки.
4. Подготовьте необходимые инструменты
Для настройки Casio SGW-500H вам может понадобиться небольшой инструмент, например, ножик или игла, чтобы аккуратно выставить определенные параметры. Убедитесь, что вы обладаете всеми необходимыми инструментами перед началом настройки.
Следуя этим рекомендациям, вы уверенно приступите к настройке Casio SGW-500H и сможете исправно пользоваться всеми его функциями и возможностями.
Установка батареи:
Для установки батареи в часы Casio SGW-500H следуйте инструкции:
- Снимите заднюю крышку с помощью отвертки или монеты.
- Вставьте батарею в отсек, обратив внимание на правильную полярность.
- Закройте заднюю крышку, убедившись, что она надежно зафиксирована.
После установки батареи рекомендуется проверить работу часов и их функциональность.
Выбор языка и формата времени:
Перед настройкой часов Casio SGW-500H необходимо выбрать язык и формат времени. Для этого выполните следующие шаги:
- Нажмите кнопку «C» для переключения в режим настроек.
- Удерживайте кнопку «A» до тех пор, пока не появится индикация выбора языка.
- Используйте кнопки «B» и «D» для выбора языка.
- Подтвердите выбор языка, удерживая кнопку «A».
- Часы автоматически перейдут в режим настройки формата времени.
- Используйте кнопку «B» и «D» для выбора формата времени (12-часовой или 24-часовой).
- Подтвердите выбор формата времени, удерживая кнопку «A».
После завершения этих шагов, часы будут настроены на выбранный вами язык и формат времени.
Как настроить часы Casio SGW-500H: настройка даты и времени
Для начала, убедитесь, что вашим часам Casio SGW-500H требуется настройка даты и времени. Если на экране отображаются неправильные значения или если часы показывают некорректную дату, вам необходимо произвести настройку.
Вот подробная инструкция по настройке даты и времени на часах Casio SGW-500H:
- Нажмите на кнопку «Mode» (режим) на часах, чтобы переключиться в режим настройки.
- Используйте кнопку «Adjust» (настройка) для выбора значения, которое вам необходимо настроить (например, дату или время).
- После выбора значения используйте кнопки «Mode» и «Adjust» для изменения этого значения. Например, если вы хотите настроить дату, используйте кнопку «Mode» для выбора месяца, дня и года, а затем кнопку «Adjust» для изменения каждого значения по отдельности.
- Убедитесь, что вы выбрали правильное значение, и нажмите кнопку «Mode» для перехода к следующему значению, которое требуется настроить.
- Повторяйте шаги 3-4, пока вы не настроите все необходимые значения.
- Когда вы закончите настройку, нажмите кнопку «Adjust» для сохранения ваших изменений.
- Часы Casio SGW-500H автоматически выйдут из режима настройки и вы сможете использовать их с настроенной датой и временем.
Теперь, после выполнения этих шагов, вы сможете наслаждаться правильным отображением даты и времени на своих часах Casio SGW-500H.
CASIO
SGW-500
Модуль 5269
Руководство пользователя
Прежде всего прочтите эту важную информацию
Батарея
При первых признаках недостаточности питания (нечеткость изображения или
отсутствие подсветки) необходимо заменить батарею у ближайшего дилера или
дистрибьютора фирмы «CASIO». В приобретенных вами часах, содержится
батарея, установленная изготовителем для тестовых испытаний, поэтому срок
службы этой батареи по сравнению со стандартным, вероятно, будет сокращен
Защита от воды
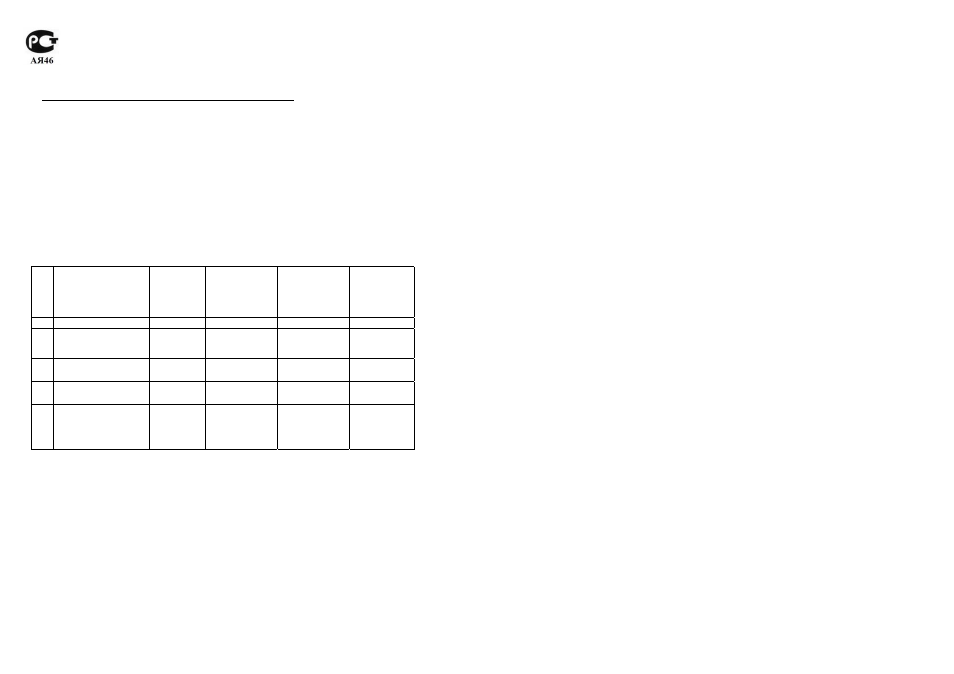
Часы классифицируются по разрядам (с I по V разряд) в соответствии со
степенью их защищенности от воды. Уточните разряд ваших часов с помощью
приведенной ниже таблицы, чтобы определить правила их использования.
Маркировка
на корпусе
Брызги,
дождь и
т.п.
Плавание,
мытье
машины и
т.п.
Подводное
плавание,
ныряние и
т.п.
Ныряние с
аквалангом
I
—
Нет
Нет
Нет
Нет
II
WATER
RESISTANT
Да
Нет
Нет
Нет
III
50M WATER
RESISTANT
Да
Да
Нет
Нет
IV 100M WATER
RESISTANT
Да
Да
Да
Нет
V
200M WATER
RESISTANT
300M WATER
RESISTANT
Да
Да
Да
Да
Примечания для соответствующих разделов.
I. Часы не защищены от воды. Избегайте попадания любой влаги.
III. Если часы подверглись воздействию соленой воды, то тщательно промойте
их и вытрите насухо.
IV. Если часы подверглись воздействию соленой воды, то тщательно промойте
их и вытрите насухо.
V. Часы могут использоваться при погружении с аквалангом (за исключением
таких глубин, при которых требуется гелиево-кислородная смесь).
ВНИМАНИЕ!!!
Для всех категорий часов запрещается:
нажимать кнопки под водой
переводить стрелки под водой
отвинчивать переводную головку под водой
ВАЖНО!!!
Особенностью некоторых защищенных от воды часов является наличие у
них кожаных ремешков. Не надевайте эти часы во время плавания или
какой-либо другой деятельности, при которой ремешок погружается в воду.
Уход за вашими часами
Замена резиновой прокладки, защищающей часы от попадания воды и пыли,
должна осуществляться через каждые 2-3 года.
Если внутрь часов попадет влага, то немедленно проверьте их у ближайшего
к вам дилера или дистрибьютора фирмы CASIO.
Не подвергайте часы воздействию слишком высоких или низких температур.
Хотя часы рассчитаны на использование их в обычных условиях, тем не
менее, вы должны избегать грубого обращения с ними и не допускать их
падения.
Не застегивайте ремешок слишком туго. Между вашим запястьем и
ремешком должен проходить палец.
Для очистки часов и ремешка используйте сухую мягкую ткань, либо мягкую
ткань, смоченную в водном растворе мягкого нейтрального моющего
средства. Никогда не используйте легко испаряющимися средствами
(например, такими, как бензин, растворители, распыляющиеся чистящие
средства и т.п.).
Когда вы не пользуетесь вашими часами, храните их в сухом месте.
Избегайте попадания на часы бензина, чистящих растворителей, аэрозолей из
распылителей, клеящих веществ, краски и т.п. Химические реакции,
вызываемые этими материалами, приводят к повреждению прокладок,
корпуса и полировки часов.
Особенностью некоторых моделей часов является наличие на их ремешке
изображений, выполненных шелкографией. Будьте осторожны при чистке
таких ремешков, чтобы не испортить эти рисунки.
Для часов с полимерными ремешками…
Вы можете обнаружить белесое порошкообразное вещество на ремешке.
Это вещество не вредно для вашей кожи или одежды и может быть легко
удалено путем протирания мягкой тканью.
Попадание на полимерный ремешок пота или влаги, а также хранение его в
условиях высокой влажности может привести к повреждению, разрыву или
растрескиванию ремешка. Для того чтобы обеспечить длительный срок
службы полимерного ремешка, как можно чаще протирайте его от грязи и
воды мягкой тканью.
Для часов с флуоресцентными корпусами и ремешками…
Длительное облучение прямым солнечным светом может привести к
постепенному исчезновению флуоресцентной окраски.
Длительный контакт с влагой может вызвать постепенное исчезновение
флуоресцентной окраски. В случае попадания на поверхность часов любой
Перед вами файл pdf, где представлена инструкция (руководство) на русском для PRO TREK SGW-500H-1B. Вы можете скачать ее либо изучить в онлайн режиме.
Подробные сведения об инструкции:
Устройство из раздела: наручные часы
Бренд-производитель: CASIO
Наименование модели: PRO TREK SGW-500H-1B
Язык: Руководство на русском языке
Файл: pdf
Размер файла: 291,33 kB

Скачать инструкцию к HARPER HDT2-1110
ЗАГРУЗИТЬ
Просмотр инструкции онлайн
![]()
MO1208-EA © 2012 CASIO COMPUTER CO., LTD.
Operation Guide 5269
ENGLISH
Congratulations upon your selection of this CASIO watch.
Warning!
• The measurement functions built into this watch are not intended for taking measurements that require professional or industrial precision. Values produced by this watch should be considered as reasonable representations only.
• Note that CASIO COMPUTER CO., LTD. assumes no responsibility for any damage or loss suffered by you or any third party arising through the use of this product or its malfunction.
E-1
•To ensure correct direction readings by this watch, be sure to perform bidirectional calibration before using it. The watch may produce incorrect direction readings if you do not perform bidirectional calibration. For more information, see “To perform bidirectional calibration” (page E-36).
•Keep the watch away from audio speakers, magnetic necklace, cell phone, and other devices that generate strong magnetism. Exposure to strong magnetism can magnetize the watch and cause incorrect direction readings. If incorrect readings continue even after you perform bidirectional calibration, it could mean that your watch has been magnetized. If this happens, contact your original retailer or an authorized CASIO Service Center.
E-2
About This Manual
• Depending on the model of your watch, digital display text appears either as dark figures on a light background, or light figures on a dark background. All sample displays in this manual are shown using dark figures on a light background.
• Button operations are indicated using the letters shown in the illustration.
• Note that the product illustrations in this manual are intended for reference only, and so the actual product may appear somewhat different than depicted by an illustration.
E-3
|
Things to check before using the watch |
3. Set the current time. |
|||
|
See “Configuring Current Time and Date Settings” (page E-22). |
||||
|
1. Check the Home City and the daylight saving time (DST) setting. |
||||
Use the procedure under “Configuring Home City Settings” (page E-17) to configure your Home City and daylight saving time settings.
Important!
Proper World Time Mode, Sunrise/Sunset Mode, and Moon Age Mode data depend on correct Home City, time, and date settings in the Timekeeping Mode. Make sure you configure these settings correctly.
2. Configure latitude and longitude settings for your current location.
See “To select a Home City by configuring latitude and longitude settings” (page E-20).
The watch is now ready for use.
E-4 E-5
|
Contents |
E-26 Hand Home Position Adjustment |
||
|
E-26 To adjust home positions |
|||
E-3 About This Manual
E-4 Things to check before using the watch
E-11 Mode Reference Guide
E-16 Timekeeping
E-17 Configuring Home City Settings
E-17 To configure Home City settings
E-19 To change the Daylight Saving Time (summer time) setting
E-20 Configuring Latitude and Longitude Settings for Your Current Location
E-20 To select a Home City by configuring latitude and longitude settings
E-22 Configuring Current Time and Date Settings
E-22 To change the current time and date settings
E-6
E-29 Taking Direction Readings
E-30 To take a direction reading
E-36 To perform bidirectional calibration
E-38 To perform magnetic declination correction
E-43 Thermometer
E-43 To enter and exit the Thermometer Mode
E-45 To correct the temperature value
E-47 Specifying Temperature Unit
E-47 To specify the temperature unit
E-49 Looking up Sunrise and Sunset Times
E-49 To look up the sunrise and sunset times on a specific date E-50 To toggle between sunrise time and sunset time
E-51 To view the sunrise/sunset time for a particular date
E-7
|
E-52 |
Using Moon Data |
E-60 Using the Countdown Timer |
|
|
E-52 To look up the Moon age on a specific date |
E-60 |
To enter the Countdown Timer Mode |
|
|
E-54 |
Using the Alarm |
E-60 |
To specify the countdown start time |
E-54 To enter the Alarm Mode E-55 To set an alarm time E-56 To test the alarm
E-57 To turn an alarm and the Hourly Time Signal on and off E-57 To stop the alarm
E-58 Using the Stopwatch
E-58 To enter the Stopwatch Mode
E-58 To perform an elapsed time operation E-58 To pause at a split time
E-61 To perform a countdown timer operation
E-62 To stop the alarm
E-63 Checking the Current Time in a Different Time Zone
E-63 To enter the World Time Mode
E-64 To view the time in another time zone
E-64 To specify standard time or daylight saving time (DST) for a city
E-65 Illumination
E-65 To turn on illumination
E-66 To change the illumination duration
E-68 Button Operation Tone
E-68 To turn the button operation tone on and off

Operation Guide 5269
|
E-70 Troubleshooting |
Mode Reference Guide |
||||
|
E-75 Specifications |
Your watch has 9 “modes”. The mode you should select depends on what you want to do. |
||||
|
To do this: |
Enter this mode: |
See: |
|||
|
• View the current time and date in the Home City |
|||||
|
• Configure Home City and daylight saving time (DST) settings |
Timekeeping Mode |
E-16 |
|||
|
• Configure current location latitude and longitude settings |
|||||
|
• Configure time and date settings |
|||||
|
• Determine your current bearing or the direction from your current |
Digital Compass |
||||
|
location to a destination as a direction indicator and angle value |
E-29 |
||||
|
Mode |
|||||
|
• Determine your current location using the watch and a map |
|||||
|
Determine the temperature at your current location |
Thermometer Mode |
E-43 |
|||
|
View the sunrise and sunset times for a specific date |
Sunrise/Sunset Mode |
E-49 |
|||
|
Determine a Moon age value |
Moon Age Mode |
E-52 |
|||
|
Set an alarm time |
Alarm Mode |
E-54 |
|||
|
Use the stopwatch to measure elapsed time |
Stopwatch Mode |
E-58 |
|||
|
Use the countdown timer |
Countdown Timer Mode |
E-60 |
|||
|
View the current time in one of 48 cities (31 time zones) around the globe |
World Time Mode |
E-63 |
|||
|
E-10 |
E-11 |
||||
Selecting a Mode
•The illustration below shows which buttons you need to press to navigate between modes.
•To return to the Timekeeping Mode from any other mode, hold down C for about two seconds.
•In any mode, press L to illuminate the display.
|
Alarm Mode |
Moon Age Mode |
|
Stopwatch Mode |
Countdown Timer Mode |
|
Sunrise/Sunset Mode |
Timekeeping Mode |
Digital Compass Mode |
|||||||||
World Time Mode
Thermometer Mode
General Functions (All Modes)
The functions and operations described in this section can be used in all of the modes.
Auto Return Features
• If you do not perform any operation for a certain amount of time in certain modes as shown in the table below, the watch will automatically return to the Timekeeping Mode.
|
Mode |
No operation time |
|
Digital Compass, Thermometer |
1 to 2 minutes |
|
Sunrise/Sunset, Moon Age, Alarm |
2 to 3 minutes |
• If you leave a setting screen (one with flashing digits) on the digital display for two or three minutes without performing any operation, the watch exits the setting screen automatically.
Initial Screens
When you enter the Sunrise/Sunset Mode, Digital Compass Mode, Alarm Mode, or World Time Mode, the data you were viewing when you last exited the mode will appear first.
Scrolling
The B and D buttons are used on the setting screen to scroll through available settings on the digital display. In most cases, holding down these buttons during a scroll operation scrolls through the data at high speed.
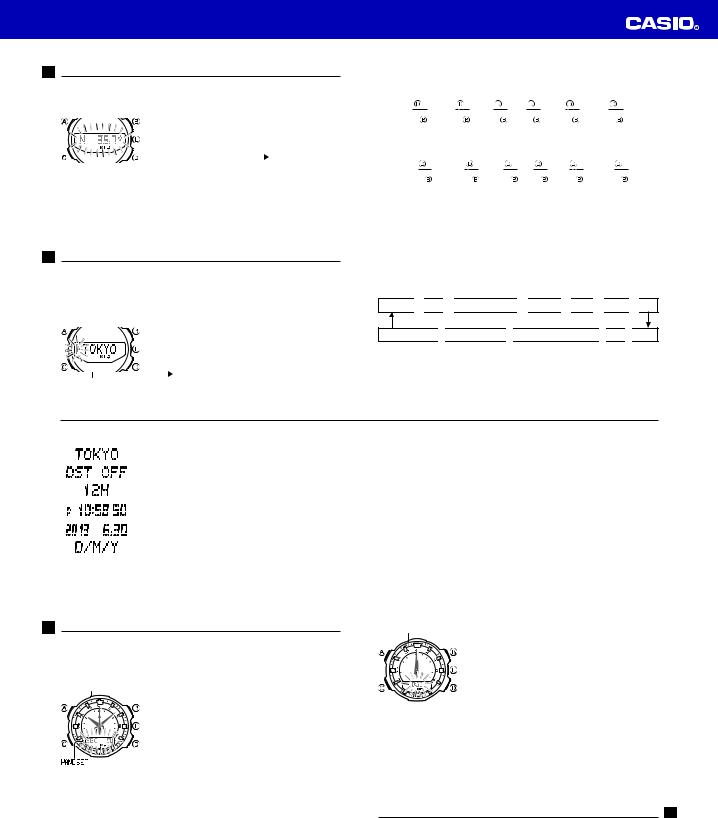
Timekeeping
Use the Timekeeping Mode to set and view the current time and date.
•Each press of A in the Timekeeping Mode toggles the digital display between the current date and the current time.
•You can select one of the two following Date Screen display formats: SUN 6.30 or SUN 30.6. For information about how to select the format, see “Date Display Format” under “To change the current time and date settings” (page E-22).
|
Date screen |
Regular timekeeping screen |
|
|
Day of week |
Month Day |
Hour : Minutes Seconds |
Configuring Home City Settings
There are two Home City settings: actually selecting the Home City and selecting either standard time or daylight saving time (DST).
To configure Home City settings
1. In the Timekeeping Mode, hold down A for at least two
City Name seconds until ADJUST appears on the digital display. This is the setting mode. Release A after ADJUST appears.
• The city name of the currently selected Home City
data will appear on the digital display with an arrow ( ) flashing to the left.
•The watch will exit the setting mode automatically if you do not perform any operation for about two or three minutes.
•For details about city data, see the “City Data Table” at the back of this manual.
2.Press D (East) and B (West) to scroll through city names until the one you want to use as your Home City data is displayed.
3.Press C to display the DST setting screen.
4.Press D to toggle between Daylight Saving Time (DST ON) and Standard Time (DST OFF).
5.When the setting is the way you want, press A twice to
|
return to the Timekeeping Mode. |
|
|
• The DST indicator appears to indicate that Daylight |
|
|
Saving Time is turned on. |
|
|
Note |
|
|
• After you specify city data, the watch will use UTC* |
|
|
Setting |
offsets to calculate the current time for other time |
|
zones based on the current time in your Home City. |
|
|
DST indicator |
* Coordinated Universal Time, the world-wide |
|
scientific standard of timekeeping. |
|
|
The reference point for UTC is Greenwich, England. |
To change the Daylight Saving Time (summer time) setting
1.In the Timekeeping Mode, hold down A for at least two
seconds until ADJUST appears on the digital display. Release A after ADJUST appears.
•The name of the city currently selected as your Home City will appear on the digital display with an arrow ( ) flashing to the left.
2.Press C to display the DST setting screen.
3.Press D to toggle between Daylight Saving Time (DST ON) and Standard Time (DST OFF).
4.When the setting is the way you want, press A twice to return to the Timekeeping Mode.
•The DST indicator appears to indicate that Daylight Saving Time is turned on.
Operation Guide 5269
Configuring Latitude and Longitude Settings for Your Current Location
You can ensure correct display of sunrise and sunset time settings, and of moon ages by configuring latitude and longitude settings for your current location.
To select a Home City by configuring latitude and longitude settings
1.In the Timekeeping Mode, hold down A for at least two
seconds until ADJUST appears on the digital display. This is the setting mode. Release A after ADJUST
appears.
• Your current Home City data will appear on the digital display with an arrow ( ) flashing to the left.
2.Press A to display the latitude setting screen with the current latitude setting flashing.
Configuring Current Time and Date Settings
You can use the procedure below to adjust the current time and date settings if they are not correct.
Changing the digital Home City data should cause the analog time setting to change accordingly. If the analog time does not indicate the digital time, check the home positions of the hands and make adjustments if necessary (page E-26).
To change the current time and date settings
1.In the Timekeeping Mode, hold down A for at least two seconds until ADJUST appears on the digital display.
This is the setting mode. Release A after ADJUST
appears.
• The name of the city currently selected as your Home City will appear on the digital display with an arrow
( ) flashing to the left.
City name
E-22
|
Screen |
To do this: |
Do this: |
|
Change the city name |
Use D (East) and |
|
|
B (West). |
||
|
Toggle between Daylight Saving Time |
Press D. |
|
|
(DST ON) and Standard Time (DST OFF). |
||
|
Toggle between 12-hour (12H) and 24-hour |
Press D. |
|
|
(24H) timekeeping. |
||
|
Reset the seconds to 00 |
Press D. |
|
|
Change the hour or minute |
Use D (+) and |
|
|
Change the year, month, or day |
B (–). |
|
|
Select the date display format (DMY, YMD, |
Press D. |
|
|
MDY) |
||
Note
•For information about selecting a Home City and configuring the DST setting, see “Configuring Home City Settings” (page E-17).
•The watch’s built-in full automatic calendar makes allowances for different month lengths and leap years. Once you set the date, there should be no reason to change it except after you have the watch’s battery replaced.
•Changing your Home City setting will initialize the latitude and longitude settings to the location of the Home City.
5.When the settings are the way you want, press A twice to return to the Timekeeping Mode.
Hand Home Position Adjustment
The hour, minute, and second hands of this watch can be put out of position by strong magnetism or strong impact. When this happens, you can use the procedure below to adjust the hand positions.
|
To adjust home positions |
|
|
Second hand |
1. In the Timekeeping Mode, hold down A for at least |
|
four seconds until HAND SET appears on the digital |
|
|
display. This is the setting mode. Release A after |
|
|
HAND SET appears. |
|
|
• This will cause SEC 00 to flash on the digital |
|
|
display, indicating the second hand adjustment |
|
|
mode. |
Hour and minute hands
Correct hour and minute hand positions
2.Check the position of the second hand.
•If the second hand is pointing to 12 o’clock, it is in the correct home position. If it isn’t, use D (forward) and B (back) to adjust the second hand position so it points to 12 o’clock.
•Holding down either button will cause the second hand to move at high speed.
3.Press C. This will cause 0:00 to flash on the digital display, indicating the hour and minute adjustment mode.
4.Check the positions of the hour and minute hands.
•The hands are in the correct home positions if they are pointing to 12 o’clock. If they aren’t, use D (forward) and B (back) to adjust their positions.
•Holding down either button will cause the hour and minute hands to move at high speed.
5.Press A to exit the setting screen.
•This will cause the hour and minute hands to move to the current Timekeeping Mode time.
Taking Direction Readings
The watch has a magnetic sensor that makes it possible to take digital compass readings. You can use the digital compass to find the direction to a specific objective and to determine your current position.
•See “Magnetic North and True North” (page E-40) for information about the two types of north. For information about maximizing digital compass accuracy, see “Calibrating Direction Readings” (page E-34) and “Digital Compass Precautions” (page E-40).
 Loading…
You can only view or download manuals with
Sign Up and get 5 for free
Upload your files to the site. You get 1 for each file you add
Get 1 for every time someone downloads your manual
Buy as many as you need